
Are you trying to fix the 400 bad request error on WordPress? You are in the right place!
In this article, I’ll show you how to troubleshoot this common WordPress error.
Without further ado, let’s get started!
Table of contents
- What is a 400 Bad Request Error?
- Main causes of 400 Bad Request Errors on WordPress
- Uploading a too big file
- Sending a request to an invalid URL
- Expired/wrong cookie
- Elementor
- Uploading a too big file
- Troubleshooting the 400 Bad Request Error Code on WordPress
- Check the Solicited URL
- Clear your Web Browser Cache and Cookies
- Log Out of your WordPress Account and Log In Again
- Diminish the size of the file you tried to upload
- Clear your cache in WordPress
- Remove the last plugins you installed
- Downgrade your WordPress version
- Check the Solicited URL
- Final thoughts on the 400 bad request error code on WordPress
What is a 400 Bad Request Error?
The 400 Bad Request Error indicates that the server was unable to process the request due to invalid syntax. It falls into the Client Error category. So, the 400 Bad Request error happens before it is even processed by the server.
In this article, I’ll show you how to quickly fix this common WordPress error.
Let’s get started!
Main causes of 400 Bad Request Errors on WordPress
Errors 400 can have a multitude of reasons, but here are the most common ones:
Uploading a too big file
To protect bandwidth, many web servers (almost all of them) limit by default the size of the files your visitors can upload. When such an upload occurs, the server returns a 400 Bad Request error. Anyway, it’s best for security not to allow your user to upload heavy files on WordPress websites.
Sending a request to an invalid URL
Sending a request to an invalid URL (ie: with erroneous characters, malformed syntax, or illegal characters) can return a 400 Bad Request Error. This can happen so easily if you don’t encode your URL correctly.
Expired/wrong cookie
Sometimes your browser can store invalid or expired cookies. The server may perceive this cookie as dangerous and return the 400 Bad Request Error code.
Elementor
Sometimes Elementor users encounter the 400 error. Don’t worry, the solutions we propose in this article also work for Elementor users.
Troubleshooting the 400 Bad Request Error Code on WordPress
Nota bene: Before trying to fix any HTTP error on WordPress, you should ALWAYS make a backup of your WordPress Website (FTP + Database).
Although it’s categorized as a client error, the 400 bad request error code is often at a crossroad between, the client, the server, and/or a web application. Determining the cause and fixing the 400 bad request error code on WordPress can thus be challenging.
This being said, the 400 bad request error designates that the request sent by the client was invalid for some reason, so here is what you should do first if you are using WordPress: Make a backup!!! 🙂
Check the Solicited URL
Wrong URL strings are the most common reasons for a 400 Bad Request error. Check that there are no unwanted or illegal characters in the URL you typed in your browser. You also need to make sure they’re separated with adequate slashes.
Sometimes, the URL has special characters such as %%%, which can lead to the 400 error. If this happens, you have to check that your WordPress website is encoded properly.
If you struggle with this, check out this amazing free URL Encoder & Decoder Tool for WordPress. When you think that you have a good URL structure, try to refresh the page. If it doesn’t work, go to the next step!
Clear your Web Browser Cache and Cookies
You may be surprised, but most 400 errors in WordPress can be fixed by clearing your browser’s cache and cookies.
Browser caches temporarily store images, scripts, and other parts of websites you visit to speed up your browsing experience. Some of the data stored can be expired and thus responsible for the 400 Bad Request Error. Clearing your browser cache and cookies might troubleshoot the 400 HTTP error code.
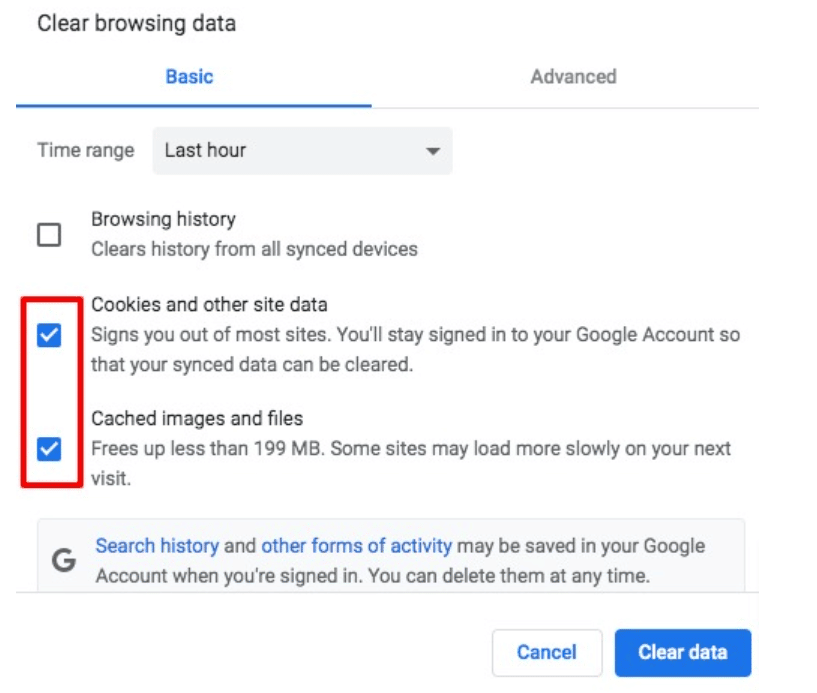
Clear Cache & Cookies Chrome
In Chrome, enter this address in your browser’s URL field: chrome://settings/clearBrowserData
You will directly access the clear browsing data dashboard.
Here, make sure that the “cached images and files“, and “cookies” boxes are ticked. Then click on the Clear data button. Refresh your page, if it doesn’t work, go to the next step!
Nota bene: On a Mac, you can refresh a web page and automatically clear its cache with the shortcut: SHIFT+CMD+R
Clear Cache & Cookies Mozilla
Click the menu button  and select “Preferences” > Privacy & Security panel. You will lend here:

Tick the “Cookies and Site Data” and “Cached Web Content” boxes and click “clear data”
If you are not using Google Chrome or Firefox, check out these guides (I don’t have IE, Edge or Safari on my laptop):
- For Internet Explorer
- For Microsoft Edge
- For Safari
Log Out of your WordPress Account and Log In Again
If you have emptied your browser cache and cookies, you have automatically been logged out of WordPress. Try to log in again.
By doing so, you will refresh your credential and maybe get rid of the 400 Bad Request Error Code. If it doesn’t work, let’s go to the next step!
Diminish the size of the file you tried to upload
Many servers limit the size of files for security reasons. If you’re facing the bad request error while uploading a file, try again with a much smaller file to see if this resolves the 400 error.
How to reduce file size?
- To reduce the image size, you can use a compression plugin like ShortPixel or a third-party application like CompressJPEG.
- To reduce video size on WordPress, check out this great guide from Digi Effects.
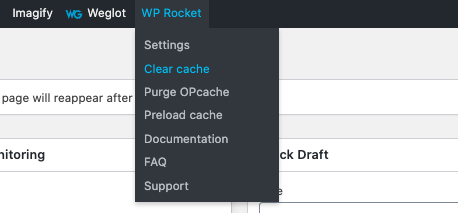
Clear your cache in WordPress
It’s highly unlikely, but the 400 Bad Request Error can also be triggered by your cache plugin. You might want to purge your cache to troubleshoot this error.
To clear the cache on WP Rocket you need to click here:
To purge the cache on WP Super Cache you need to click there:
Remove the last plugins you installed
Plugins and themes can enhance your WordPress website functionalities, but they can also generate PHP errors and trigger the 400 Bad Request Error Code.
Monitoring WordPress PHP error logs is a good way to detect the plugins that can slow and jeopardize your website. Removing one by one the last plugins you installed, might be a good way to fix the 400 bad request error.
If you want to see which plugins generate PHP errors look at WP Umbrella.
Downgrade your WordPress version
If you have updated WordPress just before the 400 bad request error showed up – and if none of the solutions we suggested you before worked – you may want to consider rolling back to the previous WordPress version you had installed when things were working just fine.
If you don’t know how to downgrade your WebPress website, check out this article from Kinsta!
Final thoughts on the 400 bad request error code on WordPress
In most cases, the 400 Bad Request error is coming from the client side and is thus easy to fix. However, from time to time, this error can shed light on more problematic generic server issues.
If none of our tips and fixes worked, you should suspect the bad request error to be a server side issue. In such a situation, you have to contact your web host provider.
You may also want to see my article on how to fix the 500 internal server error on WordPress.
How to fix the 400 Bad Request Error in WordPress
Refresh the Page
Usually, the first thing we do when a website fails to load is hit refresh. A forced refresh tells your browser to bypass any cached copies of the page and request a new copy from the server.
Clearing your cache can often fix many common issues, including 400 Bad Request errors.
You can try one of these commands depending on your browser:
- Chrome on Windows: Ctrl + F5
- Chrome on Mac: Command + Shift + R
- Firefox on Windows: Ctrl + F5
- Firefox on Mac: Command + Shift + R
- Safari: Command + Option + R
- Microsoft Edge: Ctrl + F5
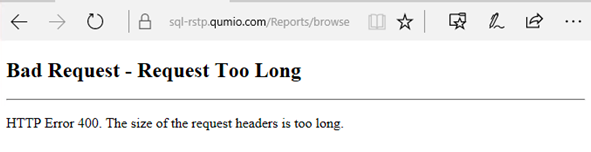
Check the URL
When typing a URL into the browser, it is easy to mistakenly add extra characters.
In this example, a % symbol has been mistakenly typed, causing the 400 error screen to appear:
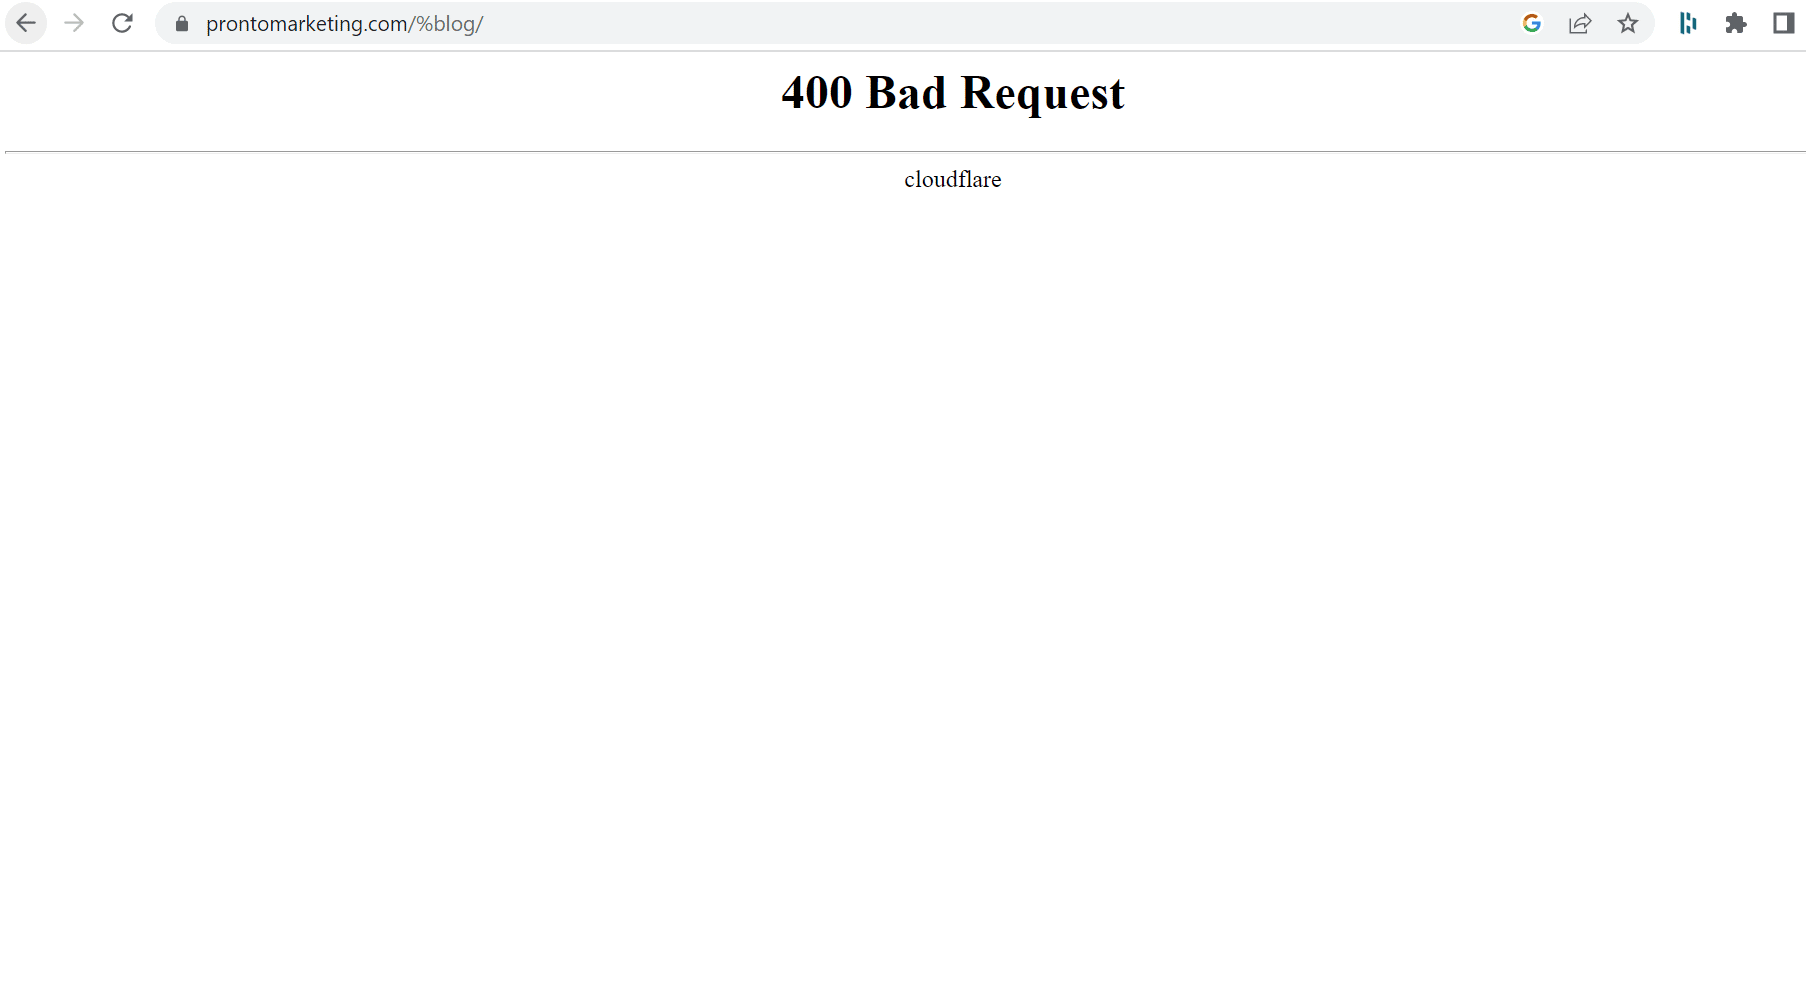
The domain name and page you’re trying to access might be misspelled, so check for errors. They should also be separated by forward slashes. If the particular URL includes special characters, double-check that they’ve been encoded correctly and are legal URL characters.
If you have long URLs, an online URL encoder/decoder will make your life much easier. These types of utilities can also automatically detect illegal characters in the URL.
With the correct characters used in the browser URL, your page ideally loads correctly:

If the URL is still not working and you get the same error, then you need to clear your browser’s cache.
Clear Browser Cache and Cookies
If the files stored on your computer for a particular website have become corrupted, it can cause a 400 Bad Request error.
To fix this, you need to go to your browser’s history and delete all cookies and cache. Different browsers have different ways of doing this, but you need to make sure that the entire history is removed – otherwise, data stored from other websites may have corrupted files too.
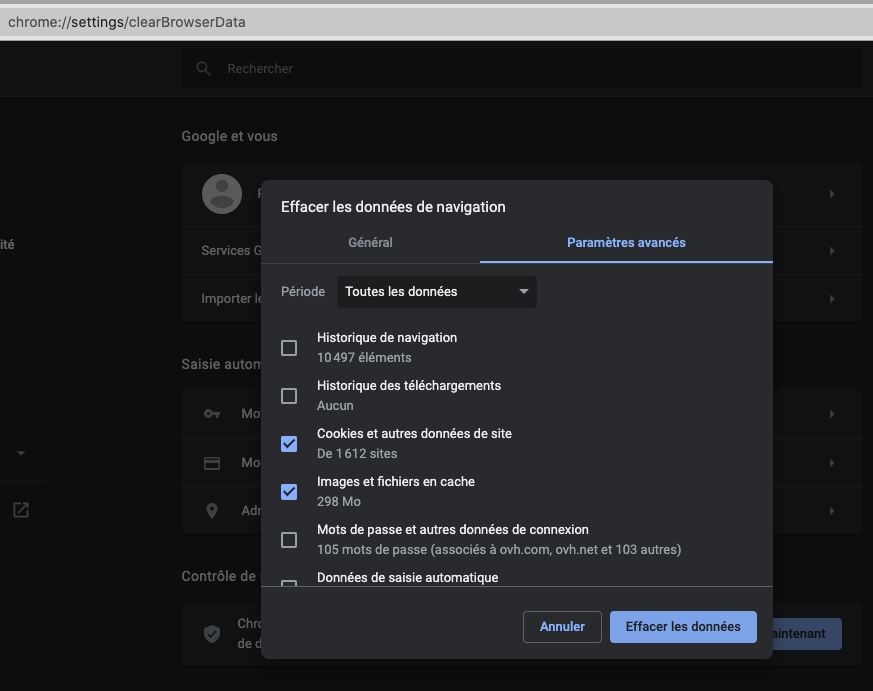
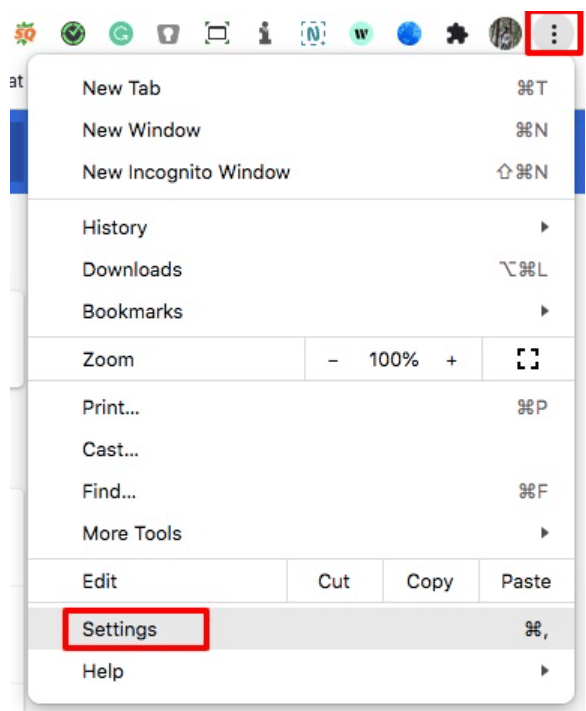
You must clear your cache and cookies regularly to ensure optimal performance for your browser. The process differs between browsers, but here we will show you how to do it for Google Chrome. With the settings option open, click on the three dots icon from the top right corner of your screen:
To do this, open the Google Chrome settings page and go to the Privacy and Security tab. There, you will find the Clear Browser Data button:
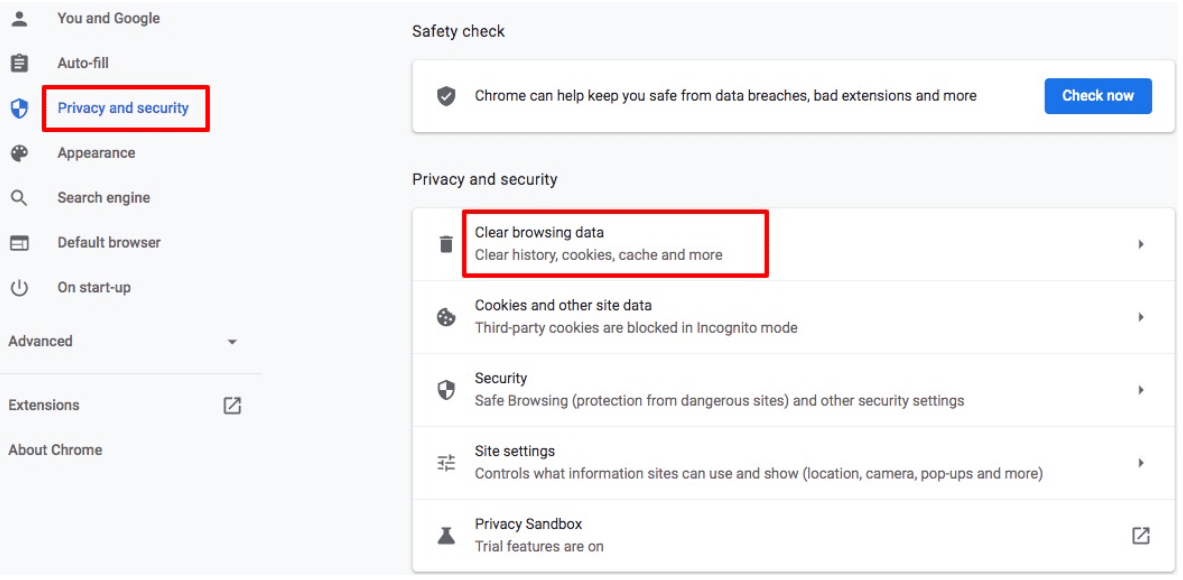
Click on the “Clear Browser Data” option. A window will pop up. Select the “Cookies and other site data” and “Cached images and files” options. Click on the “Clear data” button to delete your website cache and cookies:
You could remove all the browser cookies at a different time, but it’s more efficient to do it now. However, this will also delete other saved data that provides a better internet browsing experience.
If the 400 Bad Request error is no longer present after completing one or both of these steps, then the problem has been solved. If the error persists, continue with troubleshooting.
Clear DNS Cache
Although both DNS cache and browser cache improve website loading speeds by saving relevant data, they are not the same thing. Your system saves DNS cache, while the browser saves browser cache.
If you can’t fix the http 400 server in WordPress by clearing your browser cache, try flushing the local DNS cache instead.
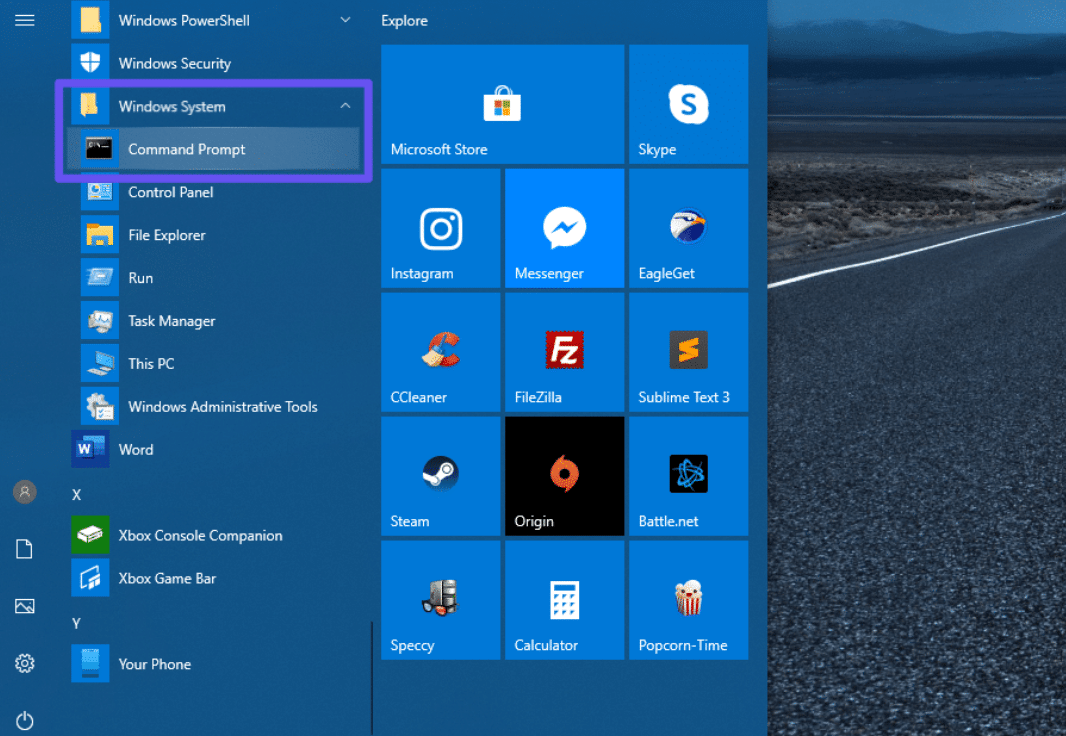
You can clear your DNS cache on a Windows OS by opening Command Prompt and navigating to Windows Systems > Command Prompt:
Enter the following line into the command line interface:
ipconfig /flushdns
After you run this command, it should return a confirmation that the DNS cache has been successfully flushed.
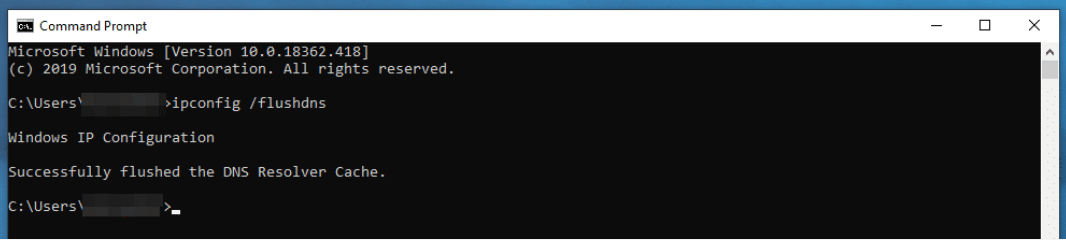
You can then close the Command Prompt window.
Deactivate Browser Extensions
The 400 Bad Request error on your browser could be caused by newly installed extensions. It might also be due to a plugin or theme interrupting your service requests. To see if the issue gets resolved, disable or deactivate these tools from your browser or server.
Reduce Uploaded File Size
If you’re receiving an HTTP 400 bad request error when uploading a file to a website or server, this fix is likely relevant for you. The reason being is that the file you’re trying to upload is too large. There’s usually a set limit on individual file size when it comes to WordPress websites and servers.
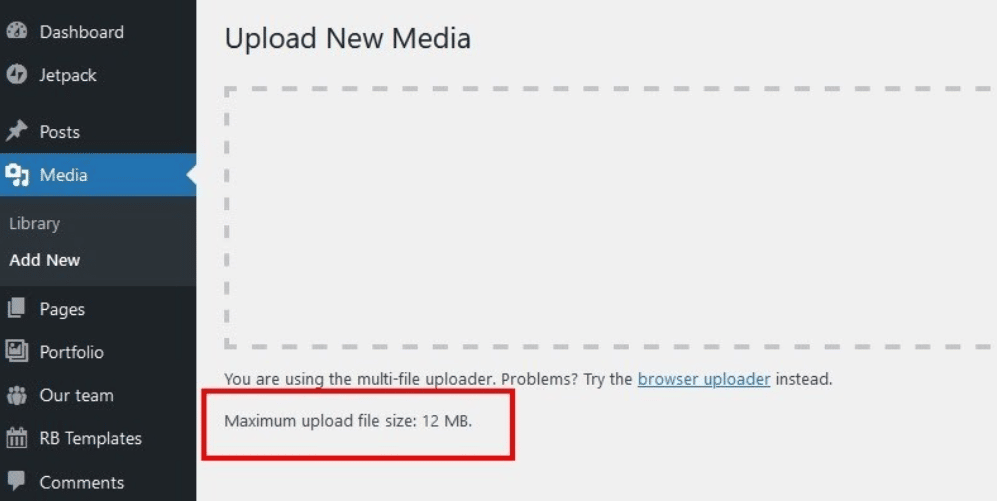
If you’re uploading excessively large images, audio or video files to a website, it’ll likely exceed the file size limit. If you’re hosting your own website, your web host probably has set a file size limit.
The way to test this is easy. Take a smaller file and attempt to upload in the same manner onto the website.
If successful, then you’re more than likely reaching the maximum limit for filesize and receiving HTTP error 400.
If you are using WordPress, you might have come across the 400 bad request error. This is a common error that you might have come across. Here is where we will see how to fix 400 bad request error in WordPress.
We will first see why this error occurs and then we will move on to the ways to fix it.
Why 400 Bad Request Occurs?
Bad Request simply means that there is something wrong with the client (in most cases). If the server can’t determine the error type, it falls into the 400 error. Generally, it is caused when the client makes the mistake.
It is not specific to any browser or OS. In simpler words, it might occur in Google Chrome or Mozilla Firefox too. There is no specific browser. One thing is that the same error might not be occurring for all the websites.
So, there are good chances that it client’s mistake and not the servers.
Now that you know about the error and why it is caused, let’s jump into the ways to fix it.
There are various reasons why this error might occur. We can’t name it specifically that this is the reason for the error. To solve it, we will have to try all the methods one by one. One of them will surely work and will give you the solution to the problem.
Therefore, you will have to try all of them to see which one is for you.
Check the URL
This is the most common mistake that people make which causes this error. The easiest way to fix 400 bad request errors in WordPress is to check the URL that you are visiting.
URL is the biggest mistake that you might see here. This happens especially when you are running any campaign which includes signs.
So, you need to make sure that the URL is correct. There could be small URL errors such as an unwanted sign or you might have added space in between or some sign that is not allowed in the URL.
This happens a lot when you have clicked a link trough a third-party refers. You need to add “?” before you start writing the campaign and the reference details. Such small mistakes can change the request.
Therefore, you can try by removing the extra slug and just typing in the URL. If the main domain name works and a particular URL doesn’t work, it might be URL’s mistake and not the server’s mistake.
Cookies and Cache
One of the reasons why this error occurs might be your computer’s fault. You can simply check out the cookies and cache of your computer.
The simplest way will be to open the website or the URL in incognito mode. If the webpage works fine in the incognito mode, it is the cookies or cache memory that is giving the problem. You can simply remove the cookies and cache memory from your browser. You can also try using it in a different browser.
Alternatively, you can “click ctrl + shift + f5” altogether to see if it is working fine. This will reload the page without any cache memory. So, you don’t have to open incognito mode to see the changes.
If this is not the issue, the next reason will be the server-side cache. If you are using one of the cache plugins on your website, then this might occur.
All you can do is purge all the cache on your website and see if the error occurs again or not. In most cases, it will be gone and you will be able to open the URL. It is that simple.
Even if this doesn’t work, you can try disabling or deactivating the cache plugin for a while to see if the problem is fixed or not. You can surely activate it again if it doesn’t solve the problem.
Cache memory is usually the primary cause of such problems assuming it has nothing to do with your browser.
So, we saw that it could either be your browser’s cache memory that is giving issues or it might be the server’s cache memory. You can try it both to see if it works or not.
File too Large
If you are uploading a file and you see this error than the simple reason for the error could be the file size. If the file you are uploading is too large, WordPress will show you 400 error.
Therefore, you can either try uploading a small file or you can increase the memory of WordPress. It might sound like a big deal but it surely isn’t. You can do it with ease.
You will have to head over to your cPanel to do this. It can’t be directly done through the WordPress dashboard.
So, open your file manager and look for the wp-config.php file. It will be in your WordPress directory. You won’t have to open any folder to find it.
Once you are there in the file, open the file and add the following code inside it.
define(‘WP_MEMORY_LIMIT’, ’256M’);
You can either right-click on the file and select “code edit” to edit the file or you can download the file, open it in Notepad++ or any editor, edit the file and then upload it again on the server. Either way, you just have to add the above given one line inside it.
This code will simply increase the default memory to 256 MB which will allow huge files to execute. Please note that there might be some limit set by your host if you are not using standard hosting. However, most of them allow 256 MB. Therefore, you can add the code and try to reload the page again to see if the error is solved or not.
If not, it is because the file is corrupted (only applies if you are getting this error while uploading a file).
Recreate the Permalinks
Sometimes the .htaccess file might be corrupted which might be giving this issue. To solve it, you will need to recreate the permalinks on your WordPress website. It will be impossible to create all the links. So, we will use a simple trick to regenerate all the links.
All we will do is fix the .htaccess file. For that, we will first have to head over to the WordPress dashboard and go to Settings > Permalinks.
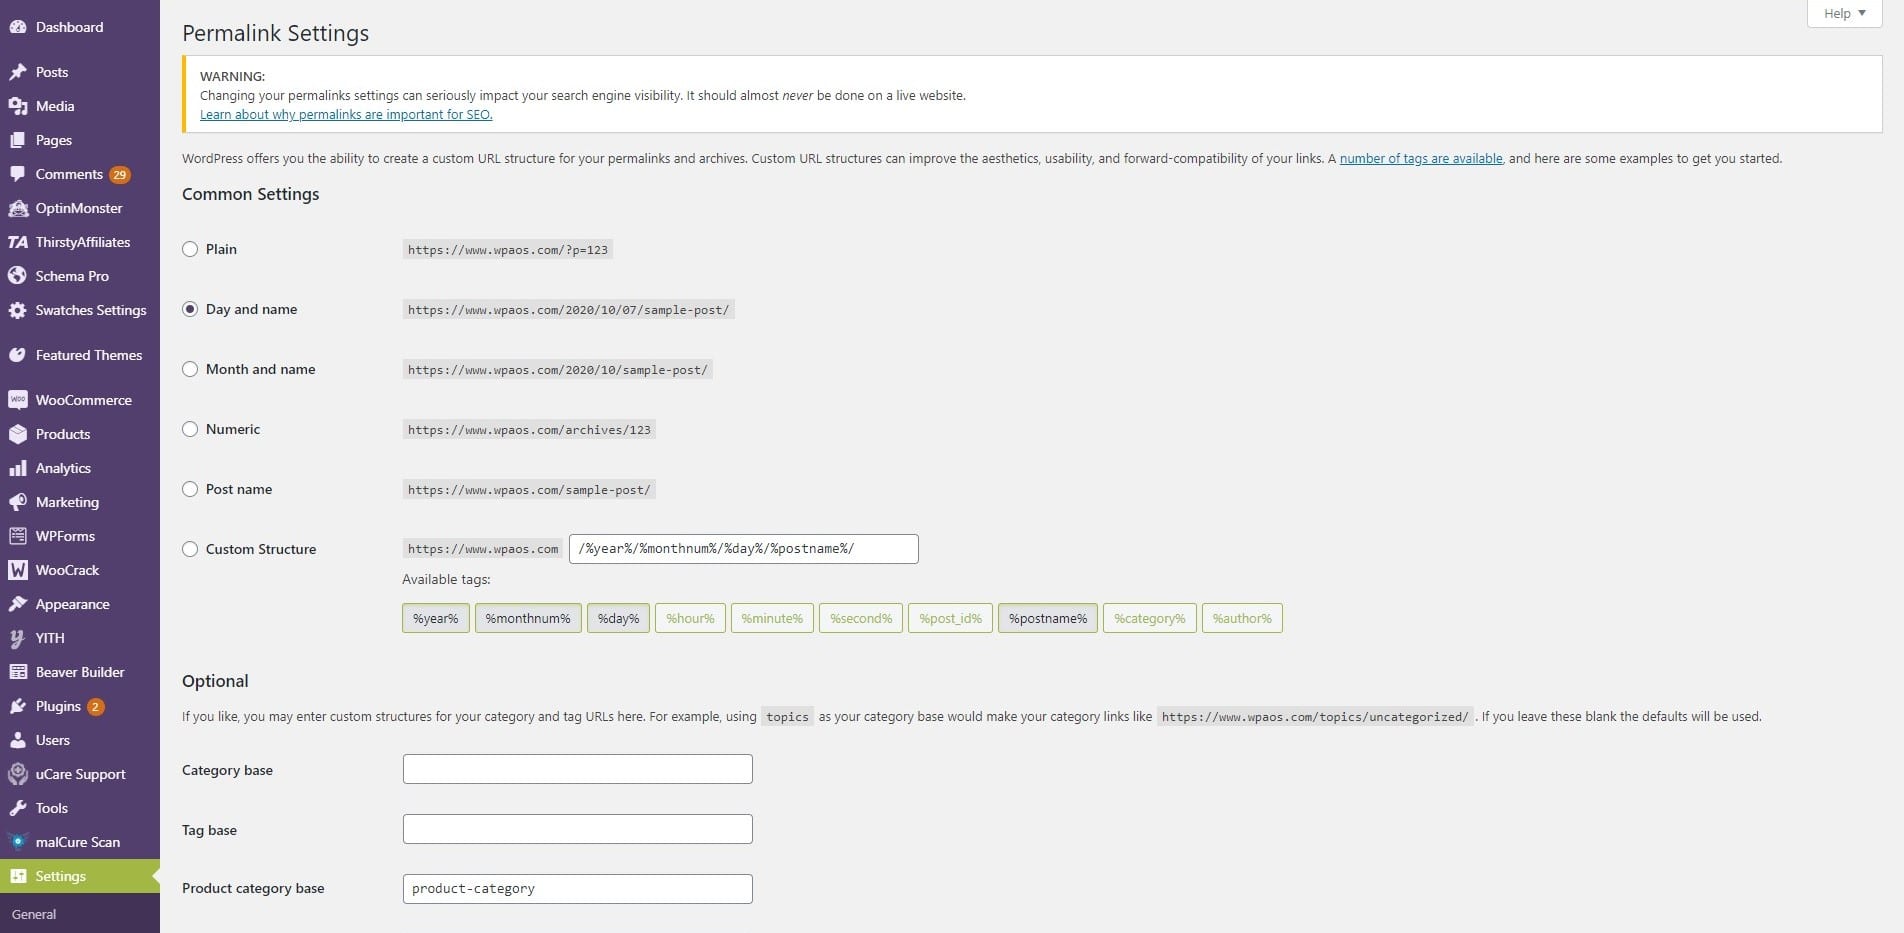
Once you open it, don’t do anything and just hit the save button without making any change. This will recreate all the links and you are done.
Thereafter, you can open the URL again and see if it is still showing the same thing or not. If you’re not able to open the homepage, you can simply enter the admin panel and it will open the admin page. Usually, this error is for a particular page and not for the entire website. So, don’t worry, and directly open one of the admin panels. It will work like charm.
However, if this method doesn’t work, we have got one more method for you that will surely work. This is for the people who can’t even open the admin panel.
IS YOUR WEBSITE BROKEN?
WordPress Emergency Service
Stop wasting your time we will fix your website today!
Rollback the Changes
If you recently changed any plugin or code, this might be the issue. For example, if you recently installed any plugin in your system, this might be giving the issue.
You can try deactivating the plugin or you can rollback the entire change that you made. This could be anything from activating a plugin to change a theme.
Most people even suggest you deactivate all the plugin and activate them again. However, you won’t have to necessarily do that here.
Just rolling back the changes will be enough procedure that you can do to see if it is causing the issue. However, if nothing works, you can surely try deactivating all the plugins. This will surely work.
You can also try renaming the plugin folder in WordPress directly. It will automatically deactivate all the plugins. You can then name it back again if it starts working. The same applies to the theme. Instead of changing the folder name of the theme, you can change the theme name itself. Thereafter, if it starts working, you can start using the same theme again.
Not to mention, you can also delete the plugin if you want.

Final Words
To conclude, these are some of the best ways you can try to fix 400 bad request error in WordPress. For most people, it will be either the cache memory or the memory limit. You can try all of the methods in sequence as given here. We have made sure that we tell you the most common method first and then go to the advanced method. There will be very few people who will have to go to the last method. Most of you will get the error solved just by trying 2 or 3 methods from here. Don’t forget to check the website again to see if it is working or not.
You are probably familiar with the HTTP 404 error. It’s when the page or document you’ve requested can’t be found. But what about when you get an HTTP error 400, where you’re given the bad request message? That one is a bit trickier, but not anything to worry about. We want to go through some of the most common reason a 400 error occurs, ways to fix it when it does, and steps you can take to prevent it from happening.
Subscribe To Our Youtube Channel
-
1
What is the HTTP Error 400? -
2
Browser Cache and Cookie Issues -
3
Check Your URLs -
4
Check Browser Add-ons and Extensions -
5
File Size is Too Large -
6
Flush Your DNS Cache -
7
Wrapping Up with the HTTP Error 400
What is the HTTP Error 400?
Of all the HTTP errors that people get, this is one of the more common errors that happens on the user’s end. That’s not to say that server admins don’t have to worry about it. They do. But in many cases, the request is bad from the beginning, and the website can’t make sense of it. So instead of even trying to fulfill it, it just gives you a 400.
Luckily, there are some things you can do to push the request on through to the server processes and get it carried out. Let’s look at some of the causes, then, and how you can fix them.
Browser Cache and Cookie Issues
We’ve said it before, and we will say it again. Clearing your browser cache is the “turn it off, then back on” of HTTP errors. Or really, most internet errors. Unfortunately, doing this will absolutely not fix everything. However, if there’s been a corruption somewhere, an expired cookie, or just something locked up and unable to parse, clearing your browser cache might be able to clear it up.
Many times, a 400 error gets returned on form submission or login. If you are sending secured and encrypted packets, something might go wrong during the process. Sometimes a simple refresh can do it, but other times a full cache urge can clear it up.
Additionally, you can try to bypass the cache when receiving an HTTP error 400 by pressing CTRL/CMD – Shift – R on the error screen. That might help push your request through. If not, then you move on to the other fixes.
Check Your URLs
One of the primary causes of the HTTP error 400 is actually an error in the URL. Not like a typo that generally results in a 404, but an illegal character that isn’t part of the server’s expected syntax.
Let’s go with a simple example. When you’re working with a UTM campaign, you can use %20 and similar codes to insert characters (%20 inserts a space). Like this:
www.elegantthemes.com/divi?utm_campaign=viral%20campaign&utm_medium=Blog%20post&utm_source=TikTok
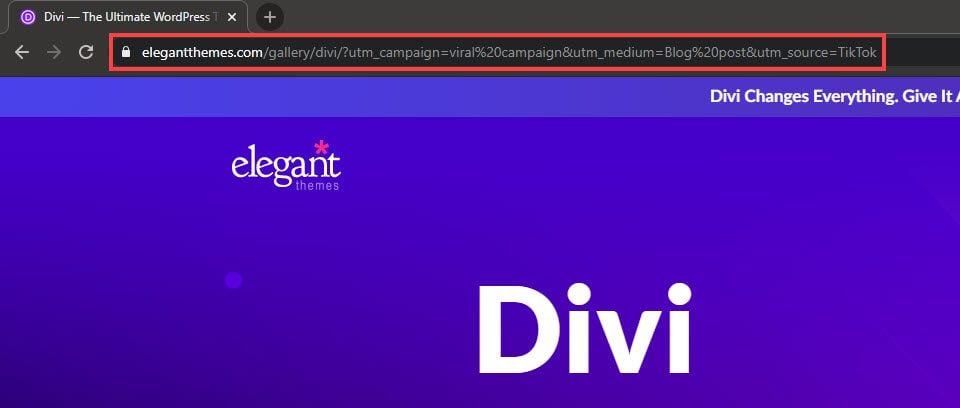
You can put that URL in our browser right now, and it would work. However, if you put a % or %20 in the main part of the URL (the part before the ? that indicates query strings in a URL), the server just has no idea what you’re asking for.
www.elegantthemes.com/%divi will give you this:
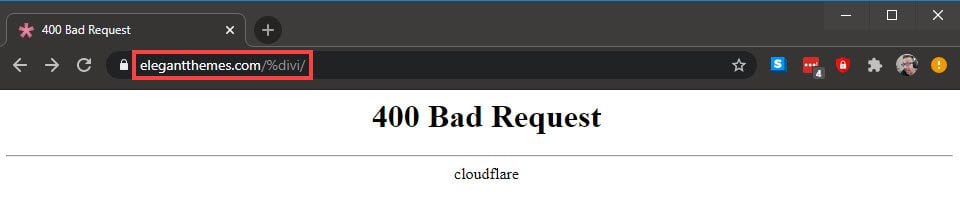
Because standard URL structure doesn’t accept that character. Make sure that when you get an HTTP error 400 that you have not malformed the URL in any way. That the URL you’re trying to reach has been correctly typed in. This most likely will happen on URLs that you click, so if you follow a link that gives you a 400 Bad Request screen, check the primary URL for any strange characters that shouldn’t be there.
Check Browser Add-ons and Extensions
Much like WordPress debugging, you want to make sure that third-party software isn’t causing the issue. If you run any browser extensions or add-ons, it’s a very good idea to disable them individually to see if one of them is causing the error to pop up.
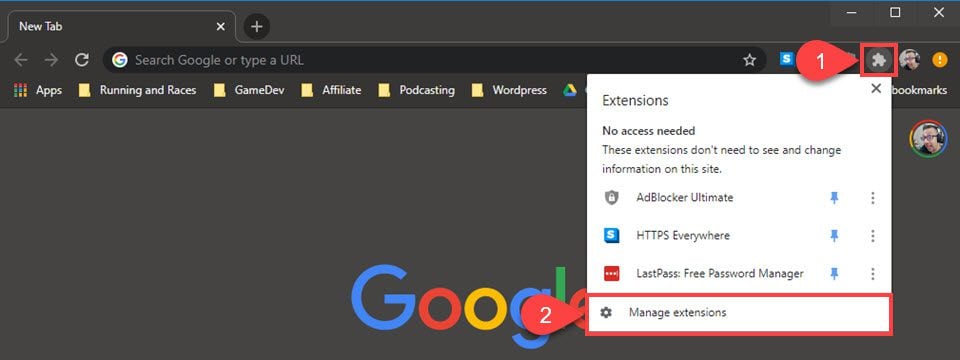
You can do it all at once, but then you don’t know who the culprit is. So check them individually. And if you can reload the page and not get a 400 error, then either learn to live without that add-on for a while or check the extensions marketplace to ensure that it’s updated to the most recent version.
File Size is Too Large
This is a huge issue in WordPress. WP users have invariably come across an HTTP error when trying to upload a file. This doesn’t just happen with WordPress, either. But with WP, it’s a very simple fix. However, just to make sure that the 400 that you’re setting is based on file size, upload a smaller file to the server. If it goes through, then there’s a higher chance the file size limit needs to be increased. Also, we’ve had luck with logging out and back in to fix a 400 error based on uploads.
In your wp-config.php file, you should find a line that looks something like this: define(‘WP_MEMORY_LIMIT’, ’64M’);
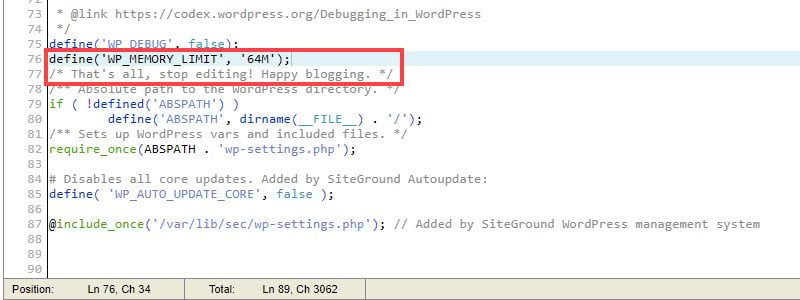
If you do not find it, you can copy/paste this one in directly above the line that reads /* That’s all, stop editing! Happy blogging. */. Then adjust the 64M to 128M or 256M. Doing so will change the maximum file upload size (in megabyes) for your WordPress site.
You can also change the max file size via your .htaccess file and the functions.php file inside your theme’s directory. If you’d prefer to go that route, we have some great documentation to walk you through the steps.
Flush Your DNS Cache
Flushing your DNS cache can help in much the same way that clearing your browser’s cache and deleting cookies helps. (They’re completely separate, by the way.) The concept is the same, though. Your computer is saving DNS information for sites you’ve been to in order to load them faster upon revisiting them. But…sometimes that old info conflicts with the site’s most recent version. And you get a 400 error.
It’s a pretty easy fix, though. In Windows, you just need to open up the command prompt.

Just enter cmd in the search, and when you get to the prompt, just type in ipconfig /flushdns (with the space). And that might have fixed your HTTP error 400.
If you’re on Mac, it’s very similar. You search for terminal and enter sudo killall -HUP mDNSResponder. If that doesn’t work, try sudo discoveryutil udnsflushcaches.
For other operating systems and a full rundown of DNS caching as a whole, you can check out Kinsta’s excellent guide.
Wrapping Up with the HTTP Error 400
If you still get a 400 after trying all of these solutions, it’s time to contact the web host. If you’re a visitor and know how to contact the website via Twitter or other means, do that. And if you’re the administrator and have to deal with the problem, your best bet is likely the support at whichever host you use. Many HTTP errors like the 400 can be fixed by following simple and easy solutions like the ones we mention here. However, not all can. That’s when the host should be involved. They have a lot more information and access than you do.
How have you dealt with HTTP Error 400 in the past?
Article featured image by Leremy / shutterstock.com
This all began with a “Server Error 400” when updating a page in Elementor. So, naturally I searched for “Server Error 400 Elementor”.
I searched the whole day in forums for a solution to this. I tried everything that all the code experts suggested, that apparently helped others. None of them worked for me. In the end, when I ran out of solutions in the forums, and was at the point of tearing my hair out and dangerously close to chucking my laptop out of the window, I decided to try something actually quite simple. But first things first. Let me take you through the process because one of these might just be the solution for you.
What is Server Error 400?
So, what exactly is “Server Error 400”? A 400 Bad Request Error indicates that the server (remote computer) is unable to process the request sent by the client (web browser), due to an issue that is perceived by the server to be a client problem. Well, I certainly knew I had a communication problem here.
The first thing I checked was to see if this was happening to my other sites so that I could pinpoint the source of the issue. My other sites were okay. I also eliminated the browser as being the source of the problem by opening WordPress and Elementor on other browsers. Still the same problem.
Some forums also suggested an http/https issue. I considered this possibility as I had already had some problems with Mixed Content not too long ago which I had already solved. See my blog post on “SSL Certificate displaying Mixed Content“. Others claimed it was a Windows issue.
Flush your local DNS cache
The first thing I tried was to flush my local DNS cache. Flushing the DNS resolver cache can help resolve DNS related problems in Microsoft Windows. Issues would include web site not found errors or not being able to view certain web pages that have changed. It was worth a shot. This is how you do it:
For Windows 10:
Click on Start (Windows Logo). In the Search field type in “cmd”. The Command Prompt will reveal itself. On the right choose Run as Administrator.

Type ipconfig /flushdns then press “Enter“. (make sure there is a space before the slash)
You should now see the following confirmation message: “Successfully flushed the DNS Resolver Cache.”

This did not work for me, but it could be a solution for you.
File Permissions
I then decided to try and install W3 Total Cache as this was a possible solution. To my dismay and horror, WordPress presented me with an error window “Update Failed: The package could not be installed. PCLZIP_ERR_MISSING_FILE”.
When installing or updating a plugin, theme or WordPress core, WordPress needs to create a temporary folder to put the files in when downloading during the installation process. It will do this in C:WINDOWSTEMP. If WordPress detects that it cannot write files to this temp directory, then you get the error message like “The package could not be installed. PCLZIP_ERR_MISSING_FILE: Missing archive file ‘C:WINDOWSTEMP/akismet.tmp ”, or this error message “Installation failed: Destination directory for file streaming does not exist or is not writable.”
Quickly check to see if the file permissions are correctly set to 755 in your wp-content file. You can do this by FTP access in FileZilla (or if your hosting provides a File Manager utility, use that). Open FileZilla and find your wp-content file (It should be in the root folder). Right-click and choose “File Attributes”. A window will open allowing you to check and edit the file permissions.

Define the absolute path
If that hasn’t fixed your problem, you will need to define the absolute path of the temp folder in your WordPress by adding a snippet of code to the wp-config.php file .
- Open FileZilla (or C-Panel). Connect to your website files. You need to find the wp-config.php file which is in the root folder. The code you need to change is in this file. You can do this in 2 ways:
- You can either download the wp-config.php file, or
- you can edit the php file within FileZilla. I prefer to download just in case I botch it up. In which case, I still have the original unchanged file as a safety net.
- Download the wp-config.php file (just drag and drop within the FileZilla screen from the server files to your local download folder). Make a copy of it and rename both files so that the “copy” (the one you are about to edit) now has the name “wp-config.php”.
- Open this in any program that can read PHP files. Notepad in Windows is one example of a PHP file opener, but syntax highlighting is so helpful when coding in PHP that a more dedicated PHP editor is usually preferred. Here is a handy link on PHP with some tips on which program to use when editing code. https://www.lifewire.com/php-file-4138559
- In the PHP file, search for (CTRL-F) the following code.
if ( !defined('ABSPATH') )
    define('ABSPATH', dirname(__FILE__) . '/');
- Now add the following line of code after that:
/*Set WordPress temporary directory */ define('WP_TEMP_DIR', ABSPATH . 'wp-content/temp');
- When you are ready to close your edited file, save it and upload it back into your server files. Overwrite if FileZilla prompts you.
- Create a temp folder within wp-content simply called “temp”.
More options:
The code that you add after this varies depending on which forum thread you read, and any one of them could work for you so I will list them here:
/* Setup a temporary folder for uploading and updating */
define( ‘WP_TEMP_DIR’, ABSPATH . ‘wp-content/tmp/’) ;
You may have to create a “tmp” folder within wp-content for this to work
or:
/* Setup a temporary folder for uploading and updating */
define( ‘WP_TEMP_DIR’, ABSPATH . ‘wp-content/uploads/’) ;
You should not have to create an uploads folder.
This is the one that worked for me:
The “temp” did not work for me. I did all of the above but to no avail. So I decided to try this:
 if ( !defined('ABSPATH') )
     define('ABSPATH', dirname(FILE) . '/');
 /*Set WordPress temporary directory */
 define('WP_TEMP_DIR', ABSPATH . 'wp-content/');
Note that if the temp directory is defined otherwise further down in the wp-config.php file, the later definition must either be changed to the above, or deleted. The later definition will override the earlier one.
This solved both the plugin download issue and updating in Elementor.