
Languages:
English •
Creating an Error 404 Page 日本語
(Add your language)
While you work hard to make sure that every link actually goes to a specific web page on your site, there is always a chance that a link clicked will slam dunk and become a famous 404 ERROR PAGE NOT FOUND.
All is not lost. If your visitors encounter an error, why not be a helpful WordPress site administrator and present them with a message more useful than «NOT FOUND».
This lesson will teach you how to edit your «error» and «page not found» messages so they are more helpful to your visitors. We’ll also show how to ensure your web server displays your helpful custom messages. Finally, we’ll go over how to create a custom error page consistent with your Theme’s style.
Contents
- 1 An Ounce of Prevention
- 2 Understanding Web Error Handling
- 3 Editing an Error 404 Page
- 4 Creating an Error 404 Page
- 5 Tips for Error Pages
- 5.1 Writing Friendly Messages
- 5.2 Add Useful Links
- 6 Testing 404 Error Messages
- 7 Help Your Server Find the 404 Page
- 8 Questions About Error Files
An Ounce of Prevention
Some errors are avoidable, you should regularly check and double check all your links. Also, if you are deleting a popular but out-of-date post, consider deleting the body of the post, and replacing it with a link referring visitors to the new page.
Understanding Web Error Handling
Visitors encounter errors at even the best websites. As site administrator, you may delete out-of-date posts, but another website may have a link to your inside page for that post.
When a user clicks on a link to a missing page, the web server will send the user an error message such as 404 Not Found. Unless your webmaster has already written custom error messages, the standard message will be in plain text and that leaves the users feeling a bit lost.
Most users are quite capable of hitting the back key, but then you’ve lost a visitor who may not care to waste their time hunting for the information. So as not to lose that visitor, at the very least, you’ll want your custom message to provide a link to your home page.
The friendly way to handle errors is to acknowledge the error and help them find their way. This involves creating a custom Error Page or editing the one that came with your WordPress Theme.
Editing an Error 404 Page
Every theme that is shipped with WordPress has a 404.php file, but not all Themes have their own custom 404 error template file. If they do, it will be named 404.php. WordPress will automatically use that page if a Page Not Found error occurs.
The normal 404.php page shipped with your Theme will work, but does it say what you want it to say, and does it offer the kind of help you want it to offer? If the answer is no, you will want to customize the message in the template file.
To edit your Theme’s 404 error template file, open it in your favorite text editor and edit the message text to say what you want it to say. Then save your changes and upload it to the theme directory of your WordPress install.
While you are examining and editing your 404 template file, take a look at the simple structure of the 404.php file that is shipped with Twenty Thirteen. It basically features tags that display the header, sidebar, and footer, and also an area for your message:
<?php
/**
 * The template for displaying 404 pages (Not Found)
 *
 * @package WordPress
 * @subpackage Twenty_Thirteen
 * @since Twenty Thirteen 1.0
 */

get_header(); ?>

	<div id="primary" class="content-area">
		<div id="content" class="site-content" role="main">

			<header class="page-header">
				<h1 class="page-title"><?php _e( 'Not Found', 'twentythirteen' ); ?></h1>
			</header>

			<div class="page-wrapper">
				<div class="page-content">
					<h2><?php _e( 'This is somewhat embarrassing, isn’t it?', 'twentythirteen' ); ?></h2>
					<p><?php _e( 'It looks like nothing was found at this location. Maybe try a search?', 'twentythirteen' ); ?></p>

					<?php get_search_form(); ?>
				</div><!-- .page-content -->
			</div><!-- .page-wrapper -->

		</div><!-- #content -->
	</div><!-- #primary -->

<?php get_footer(); ?>
So, to change the error message your visitor sees, revise the text within the h1 heading and within the page-content class; if necessary, add more paragraphs below that.
Creating an Error 404 Page
If your WordPress Theme does not include a template file named 404.php, you can create your own.
Because every theme is different, there is no guarantee that copying over the 404.php template file found in the Twenty Thirteen Theme will work, but it’s a good place to start. The error page you copy from the Twenty Thirteen Theme will adopt the style of the current theme because it actually calls the header and footer of the current theme. That’s less work for you, and you may only have to edit the message to suit your particular needs.
To use the 404.php template file from the WordPress Twenty Thirteen Theme:
- Copy the file /wp-content/themes/twentythirteen/404.php into the directory of your current theme.
- Then, as described in the previous section, edit the error message to present your desired error message.
If copying the default 404.php into your theme directory does not work well with your theme, you can also:
- Change the Default Theme’s 404.php template file’s header, sidebar, footer, and other codes to match the rest of the Theme’s layout.
Or
- Copy the index.php file of your current theme to a file called 404.php.
- Open that file and delete all sections dealing with posts or comments, see The Loop.
- Then, edit your 404 error message.
Tips for Error Pages
There are various improvements you can make to your 404 Error web pages so let’s look at some of your options.
Writing Friendly Messages
When an error message is displayed, you can say many things to help a visitor feel reassured they’ve only encountered a minor glitch, and you’re doing the best you can to help them find the information they want. You can say something clever like:
"Oops, I screwed up and you discovered my fatal flaw.
Well, we're not all perfect, but we try.  Can you try this
again or maybe visit our <a
title="Our Site" href="http://example.com/index.php">Home
Page</a> to start fresh.  We'll do better next time."
You should also attempt to show the user what they want. Check out the AskApache Google 404 Plugin to add google search results to your 404.php
Or, say something shorter and sweeter. Almost anything you say is better than 404 Error Page Not Found. You can find more information about writing 404 Error pages on the Internet, like List Apart’s Perfect 404.
As an implementation of the Perfect 404 page, this solution will tell the user it’s not their fault and email the site admin.
Helpful 404 page
When a visitor gets a 404 error page, it can be intimidating, and unhelpful. Using WordPress, you can take the edge off a 404 and make it helpful to users, and yourself, too, by emailing whenever the user clicks a link to a non-existent page.
<p>You
<?php
#some variables for the script to use
#if you have some reason to change these, do.  but wordpress can handle it
$adminemail = get_option('admin_email'); #the administrator email address, according to wordpress
$website = get_bloginfo('url'); #gets your blog's url from wordpress
$websitename = get_bloginfo('name'); #sets the blog's name, according to wordpress

  if (!isset($_SERVER['HTTP_REFERER'])) {
    #politely blames the user for all the problems they caused
        echo "tried going to "; #starts assembling an output paragraph
	$casemessage = "All is not lost!";
  } elseif (isset($_SERVER['HTTP_REFERER'])) {
    #this will help the user find what they want, and email me of a bad link
	echo "clicked a link to"; #now the message says You clicked a link to...
        #setup a message to be sent to me
	$failuremess = "A user tried to go to $website"
        .$_SERVER['REQUEST_URI']." and received a 404 (page not found) error. ";
	$failuremess .= "It wasn't their fault, so try fixing it.
        They came from ".$_SERVER['HTTP_REFERER'];
	mail($adminemail, "Bad Link To ".$_SERVER['REQUEST_URI'],
        $failuremess, "From: $websitename <noreply@$website>"); #email you about problem
	$casemessage = "An administrator has been emailed
        about this problem, too.";#set a friendly message
  }
  echo " ".$website.$_SERVER['REQUEST_URI']; ?>
and it doesn't exist. <?php echo $casemessage; ?>  You can click back
and try again or search for what you're looking for:
  <?php include(TEMPLATEPATH . "/searchform.php"); ?>
</p>
Add Useful Links
If you encounter a «page not found» situation on the WordPress site, it is filled with helpful links to direct you to the various categories and areas of information within the WordPress site. Check it out at http://wordpress.org/brokenlink.php.
To add similar useful links to your 404 page, create a list, or a paragraph, so the visitor can easily determine which section might be useful to visit. Information of that nature is much better than having the user just reach a dead-end. To help you understand how to link to documents within your site, especially to Pages and Categories, see Linking_Posts_Pages_and_Categories.
Testing 404 Error Messages
To test your custom 404 page and message, just type a URL address into your browser for your website that doesn’t exist. Make one up or use something like:
http://example.com/fred.php
This is sure to result in an error unless you actually have a php file called fred. If your error page doesn’t look «right», you can go back and edit it so it works correctly and matches your Theme’s look and feel.
Help Your Server Find the 404 Page
By default, if WordPress cannot find a particular page it will look for the 404.php web page. However, there may be cases where the web server encounters a problem before WordPress is aware of it. In that case, you can still guarantee that your web server sends the visitor to your 404.php template file by configuring your web server for custom 404 error handling.
To tell your web server to use your custom error files, you’ll need to edit the .htaccess file in the main directory (where main index.php file resides) of your WordPress installation. If you don’t have an .htaccess file, see Editing Rewrite Rules (.htaccess) on how to create an .htaccess file.
To ensure the server finds your 404 page, add the following line to your .htaccess file:
ErrorDocument 404 /index.php?error=404
The url /index.php is root-relative, which means that the forward slash begins with the root folder of your site. If WordPress is in a subfolder or subdirectory of your site’s root folder named ‘wordpress’, the line you add to your .htaccess file might be:
ErrorDocument 404 /wordpress/index.php?error=404
Questions About Error Files
- Why not just hard code the path all the way to the 404.php file?
- By allowing index.php to call the error file, you ensure that the 404.php file used will change automatically as you change your theme.
- What happens if I switch to a theme that does not have a 404.php file?
- Visitors clicking on a broken link will just see a copy of the home page of your WordPress site (index.php), but the URL they see will be the URL of the broken link. That can confuse them, especially since there is no acknowledgement of the error. But this is still better than a getting a «NOT FOUND» message without any links or information that could help them find what they seek.
You’ve likely seen the “Page Not Found” error before. Unfortunately, if you operate a website of any sort (WordPress or not), the day will probably come when you see the message on one of your own pages.
Fortunately, like many common WordPress errors, 404s are relatively easy to troubleshoot and fix. The solution usually involves restoring your site’s permalink structure — something you can do in just a few minutes.
In this article, we’ll explain just what a 404 error is and what can cause one on your site. Then we’ll walk you through how to fix it in four simple steps. Let’s get started!
Get Content Delivered Straight to Your Inbox
Subscribe to our blog and receive great content just like this delivered straight to your inbox.
An Overview of the WordPress 404 Error
A 404 error, also known as a “Page Not Found” error, indicates that your browser can’t locate the page you’re trying to access. The exact message can look a bit different depending on the browser you’re using, but it will generally always contain either the “404” code or a “page not found” message of some kind.
404 Error
A 404 error is an HTTP status code that indicates that the page a user is trying to access does not exist. 404 errors can occur for a wide variety of reasons, but they almost always lead to a poor User Experience (UX).
Read More
Websites can also create their own custom 404 pages.
Seeing this notification (or any other error message) when you’re trying to access your site can be frustrating. While there is a chance that your post has actually gone missing, the vast majority of the time, there’s a more benign cause.
Some common reasons that WordPress posts might return 404 errors include:
- A mistyped URL. It could simply be attributed to a typo in the URL. This is the most common cause.
- An issue with your Domain Name System (DNS) settings. If you’ve recently updated any of your DNS information and you’re seeing this error, it could be because the changes haven’t propagated fully. It can take up to 48 hours for this process to complete.
- Problems with the permalink structure of your site. Permalink problems can be caused by a missing, broken, or corrupted .htaccess file. Compatibility issues with WordPress components such as plugins and themes could also be the culprit.
Regardless of the cause, this error prevents access to your site, so it needs to be resolved as quickly as possible. We’ll look at troubleshooting and resolving the problem shortly.
Skip the Stress
Avoid troubleshooting when you sign up for DreamPress. Our friendly WordPress experts are available 24/7 to help solve website problems — big or small.
Why 404 Errors Matter
404 errors pose several problems for a website, beyond simply preventing you from accessing pages. First, they create a poor User Experience (UX).
If there are many of these errors on your site, and they aren’t resolved quickly, they could eventually turn users away. In the worst-case scenario, those visitors could land on a competing website instead, costing you business.
404 errors can also hurt your Search Engine Optimization (SEO). Search engine crawlers won’t index a page that returns a 404 because they think it doesn’t exist.
What to Do Before Troubleshooting the WordPress 404 Error
Before changing your permalink settings or .htaccess file, it’s a smart idea to create a backup of your website and database. This way, if you accidentally make something worse, you can easily restore your site to a functioning state.
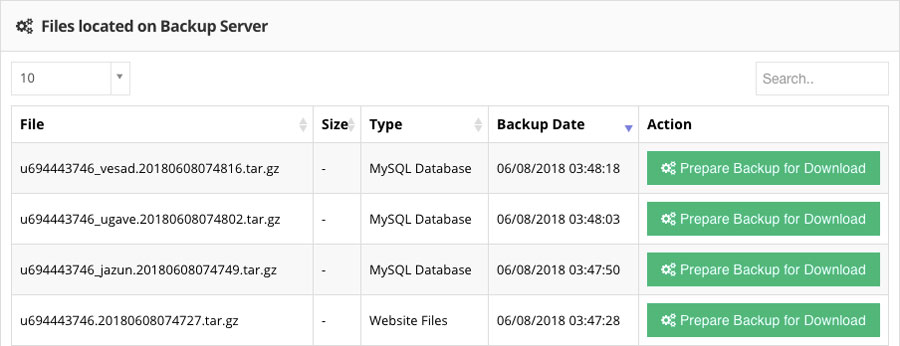
If your website is hosted with DreamPress, backups couldn’t be easier. DreamPress automatically backs up your entire site every day, so you always have a fresh copy to access. You can also create a manual backup with just a few clicks.
How to Fix WordPress Posts Returning 404 Error (In 4 Steps)
With a fresh backup of your site in hand, it’s time to get to work. You’ll want to follow these steps in order and check if the error has been resolved after each one.
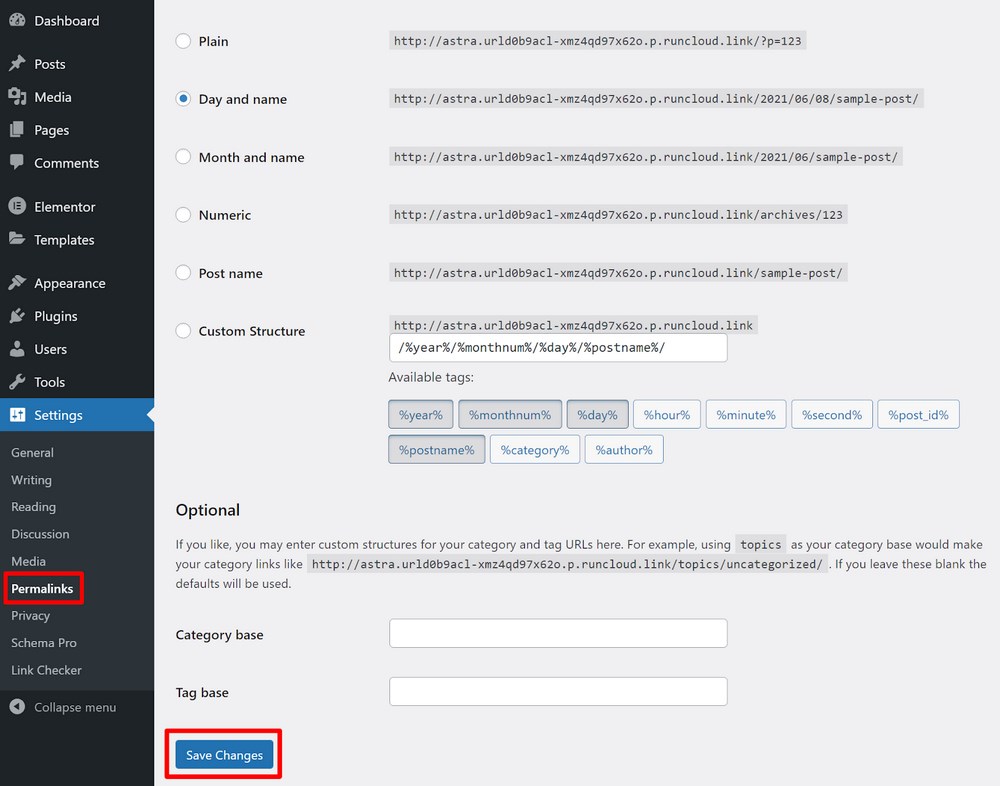
Step 1: Reset Your WordPress Permalinks
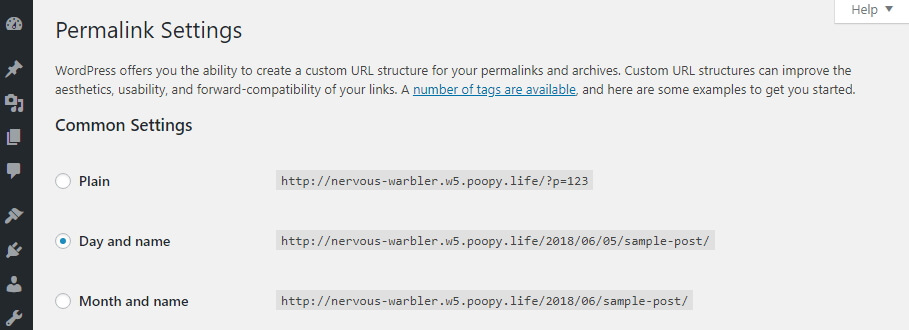
The first step to try is resetting your permalinks. Head to your WordPress dashboard and navigate to Settings > Permalinks.
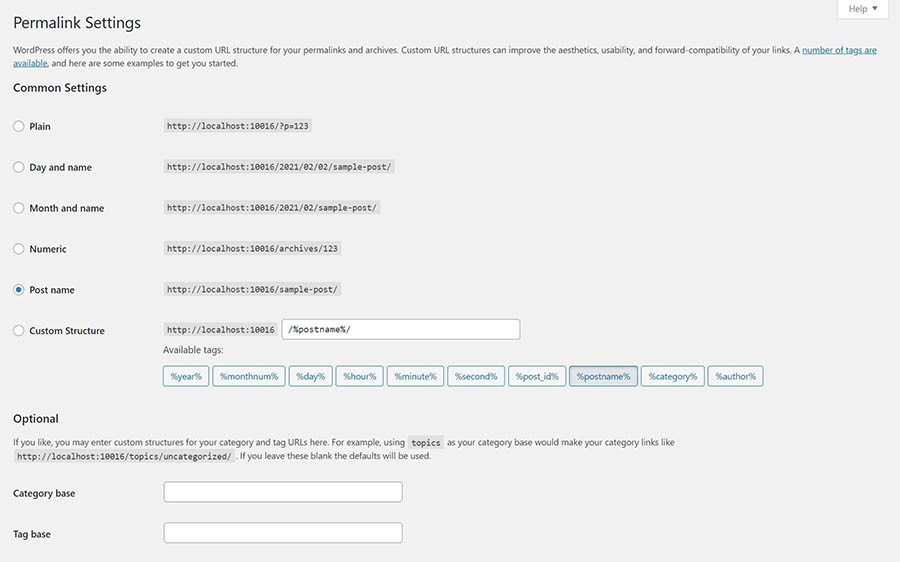
From here, just click on Save Changes. That’s right — you don’t actually need to edit anything. Clicking that button will update the permalink settings even if you don’t make any changes. This is important because it also refreshes the rewrite rules used for “pretty permalinks.”
With this done, go ahead and reload the pages you were trying to access. If everything works, you’re all done. If you still get a 404 error, head to the next step.
Step 2: Restore Your .htaccess File
If resetting your permalinks didn’t work, the next strategy is restoring your .htaccess file. This controls how WordPress interacts with the server and how it generates permalinks for your pages. Restoring it to the default settings can fix sudden 404 errors.
To restore the .htaccess file, you’ll first need a way to access it. If you’re using DreamPress hosting, you can use the built-in file manager found in the DreamHost control panel. Most other web hosts offer a similar feature, or you can use a Secure File Transfer Protocol (SFTP) client such as FileZilla. We have detailed instructions for connecting via SFTP if you need help.
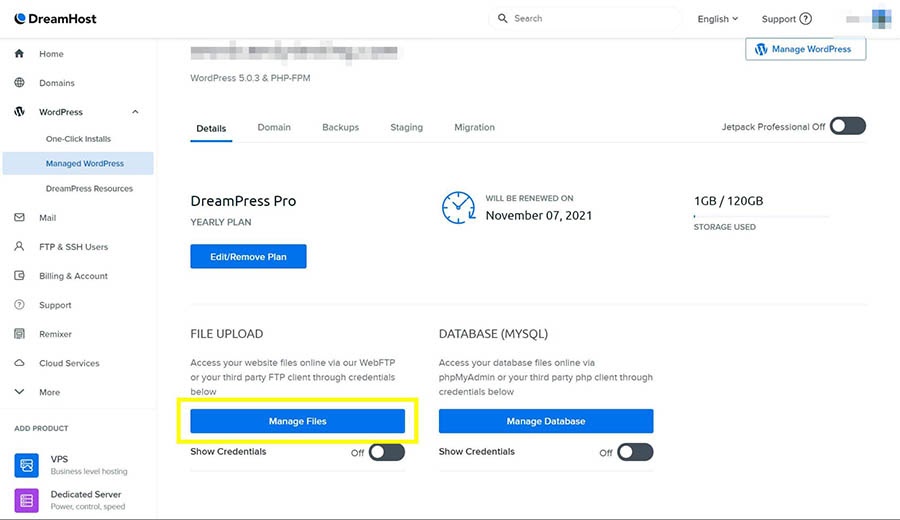
For this example, we’ll use the DreamHost file manager. Head to your DreamHost panel and navigate to WordPress > Managed WordPress in the sidebar.
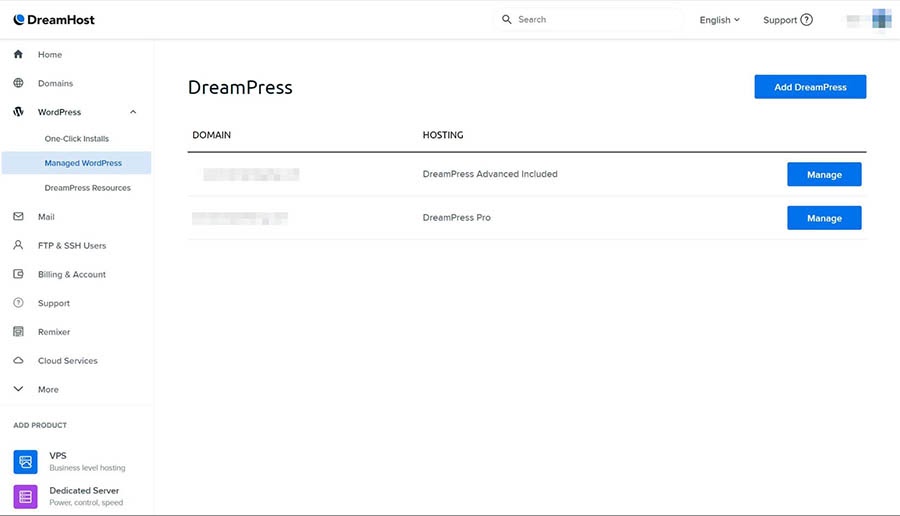
Find the domain you’re having trouble with and click on the blue Manage button. On the next page, make sure the Details tab is selected at the top, and then click on Manage Files.
This will open the file manager in a new tab. Locate and click on the folder that corresponds to your domain name. You’ll find the .htaccess file in this directory (it’s the same one that contains items such as wp-content).
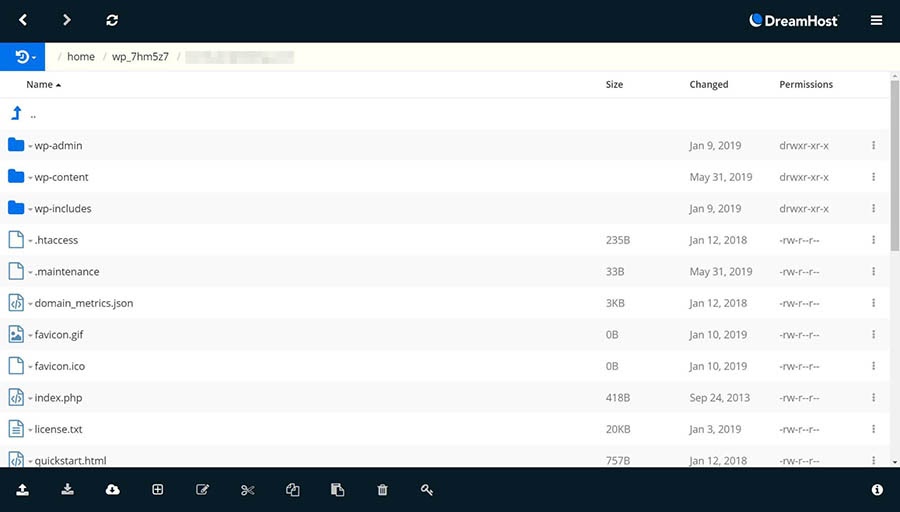
Next, click on the file name and select Edit from the list of options. You can copy the current contents of the file and paste them somewhere for safekeeping. For now, you’ll want to replace the contents with the following:
# BEGIN WordPress

<IfModule mod_rewrite.c>

RewriteEngine On

RewriteBase /

RewriteRule ^index.php$ - [L]

RewriteCond %{REQUEST_FILENAME} !-f

RewriteCond %{REQUEST_FILENAME} !-d

RewriteRule . /index.php [L]

</IfModule>

# END WordPress
This is the default .htaccess file for WordPress. When you’ve pasted this in, go ahead and save the file.
Restoring this file will also reset the permalink settings for your WordPress site. Therefore, if you’re using a custom permalink structure (or have changed it at all from the default), you’ll need to restore that setting too.
To do so, head back to your WordPress dashboard and navigate to Settings > Permalinks (just like Step 1 above). You can change it to whatever you were using before and then save it.
Finally, refresh your website and attempt to load the pages that were returning 404 errors. If everything works now, congratulations! If not, proceed to the next step.
Step 3: Disable All of Your WordPress Plugins and Theme
If you’ve reset your permalinks and .htaccess file, but you’re still seeing 404 errors on your site, the next step is to check your plugins and theme. Plugins, in particular, can sometimes have bugs or compatibility issues that prevent a site from loading.
Let’s start there. The basic idea is to disable them one by one and then check your website. If the error persists, turn it back on and move to the next one.
To get started, head to your WordPress dashboard and navigate to Plugins > Installed Plugins.

Locate and click on the Deactivate button below the first plugin. You can see that active plugins are shaded blue, while those that are off are white (as you can see with Akismet in the screenshot above). Now, refresh your site and see if the 404 error is still occurring.
If you get the error message, head back to the plugins screen, re-activate the plugin you just tried, and move to the next one in the list. If you find one that resolves the issue, you can check for updates that may resolve the problem or find an alternative with similar functionality.
If none of the plugins prove to be the issue, it’s time to try changing your theme. Head to Appearance > Themes.
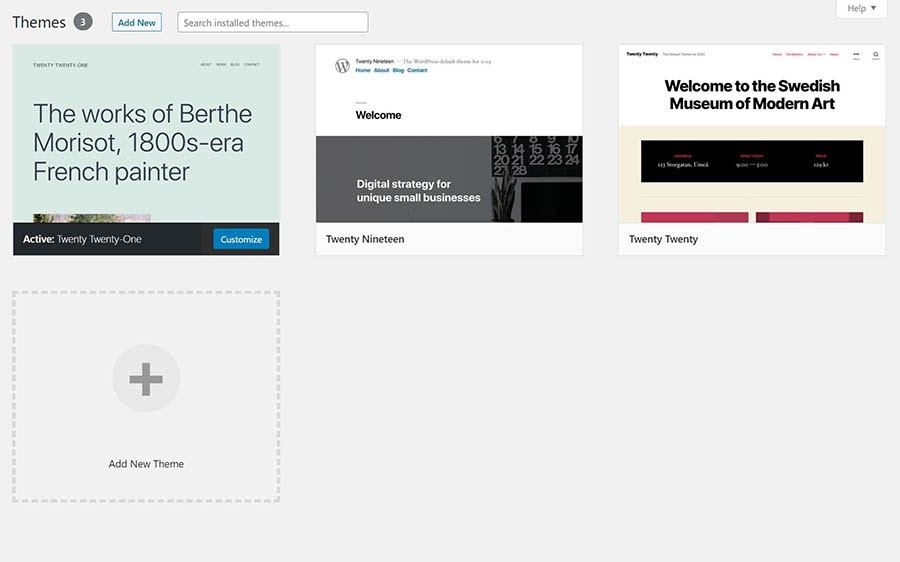
Your currently-active theme is marked as such. Hover over one of the others and click on Activate. Then refresh your site and try to access the problematic page again.
Note that changing your theme can alter your site significantly. So if you find that your theme is the issue, you may need to spend some time finding one that provides a similar look and features.
Step 4: Set Up a 301 Redirect for Moved or Renamed Content
This one is a bit of a bonus step. If you do actually have content that’s been moved or renamed and thus doesn’t exist anymore at the URL you were using previously, you’ll want to set up some 301 redirects to point that old URL to the new one.
The easiest way to do this is with a WordPress plugin such as Redirection.

This tool will enable you to quickly set up the redirects you need. Plus, it’s free and user-friendly.
How to Create Your Own “Error 404 Not Found” Page
If you want to set up your own custom 404 error page, you can do so relatively easily. The process involves adding one line to the .htaccess file to point the error to a specific page and then creating that page. We have full instructions for setting up a custom error page to walk you through the process.
Tools to Help You Monitor 404 Errors Moving Forward
Finally, if you want to keep an eye out for 404 errors in the future, you can use a few handy tools. The Google Search Console will show you crawl errors that the Google bots have come across as they index your site. This is a simple way to see all the issues Google is encountering.
You can also enter your URL into a specialized tool such as the Broken Link Checker, which will scan your entire site for broken links and let you know if it finds a 404 page.
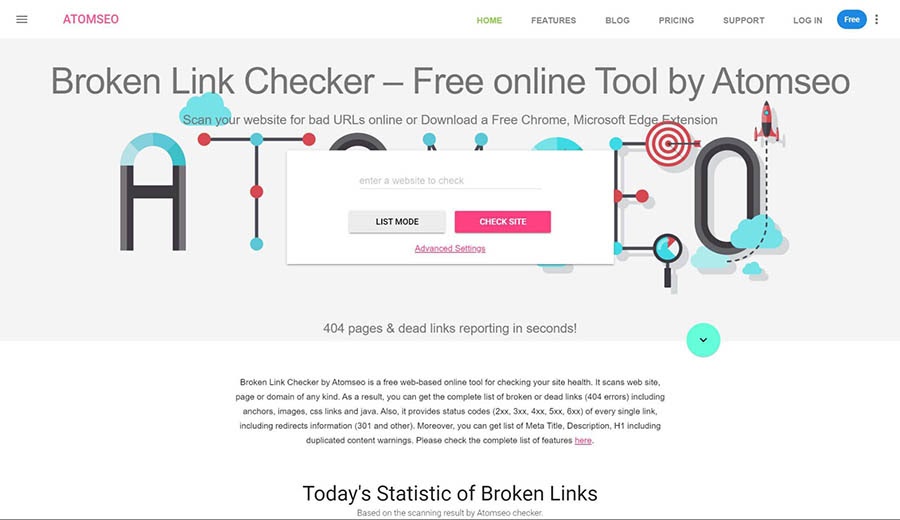
It’s free and easy to use. You can simply input your domain and then click on Check Site.
More WordPress Error Tutorials
Want to learn how to fix other common WordPress errors? We’ve created a series of guides to help!
- How to Fix the 500 Internal Server Error in WordPress
- How to Fix Syntax Errors in WordPress
- How to Fix the WordPress Not Sending Email Issue
- How to Fix the Error Establishing Database Connection in WordPress
- How to Fix the Sidebar Below Content Error in WordPress (In 3 Steps)
Ready to Find That Missing WordPress Post?
A 404 error can be frustrating — especially when it happens on your own site. These messages cause problems with SEO and ruin your site’s UX. Fortunately, they’re not too difficult to resolve.
Fixing 404 pages generally involves restoring your site’s permalink structure and setting up redirects for any posts that are actually gone. You can then use tools such as Google Search Console to monitor your site for future 404s.
If you want to spend less time dealing with errors, consider switching to DreamPress, our managed WordPress hosting service. We’ll take care of all the troubleshooting for you, so you can focus on what matters!
It is common that you come across the WordPress 404 or “WordPress site permalinks not working” error on your website if it is not appropriately maintained. But there are times when your website is under maintenance, and your visitors will be automatically directed to a 404 error page.
Are you facing a WordPress 404 error or a “WordPress page not found” error? Don’t freak out! We have a solution for you.
- What is a WordPress 404 Error?
- How to Fix 404 Error on WordPress (8 Solutions)
- Clear the Browsing Cache and Cookies
- Set Your Permalinks
- Restore Your .htaccess file
- Set Up a 301 Redirect
- Disabling Plugins/Themes
- Change and Update WordPress URL in Database
- Fix WordPress 404 Error on Local Servers
- Alternative Method
- Conclusion
What is a WordPress 404 Error?
The 404 error is an HTTP response code that occurs when the server cannot find the file or page requested by the user. In response, the web hosting server automatically sends the user an error message, “404 Not Found“.
The WordPress 404 error commonly occurs when:
- You’ve newly migrated your site to a new host.
- You have changed your URL’s permalink structure and haven’t redirected the old URL.
- You don’t have file permissions.
- You have opened an incorrect URL.
- Poorly coded plugin/theme.
Many WordPress themes offer creative layouts & content options to display the 404 error page. Cloudways’ 404 error has a custom design and layout too:

Managed WordPress Hosting Starting from $10/month
Enjoy hassle-free hosting on a cloud platform with guaranteed performance boosts.
How to Fix 404 Error on WordPress (8 Troubleshooting Solutions)
This tutorial will show you how to quickly fix the 404 Not Found status code. So let’s get started!
1. Clear Browser History & Cookies
The first troubleshooting method you should try is clearing the browser cache and cookies. Or you can try to visit your site in incognito mode.
2. Set Up Your Permalink
If apart from your homepage, your other WordPress website pages give you a 404 page not found error, you can update your permalink settings by following the steps below:
- Log in to your WordPress Dashboard.
- Go to Settings → Permalinks.
- Select the Default settings.
- Click the Save Changes button.
- Change the settings to the previous configuration (the one you selected before Default). Put the custom structure back if you had one.
- Click Save Settings.
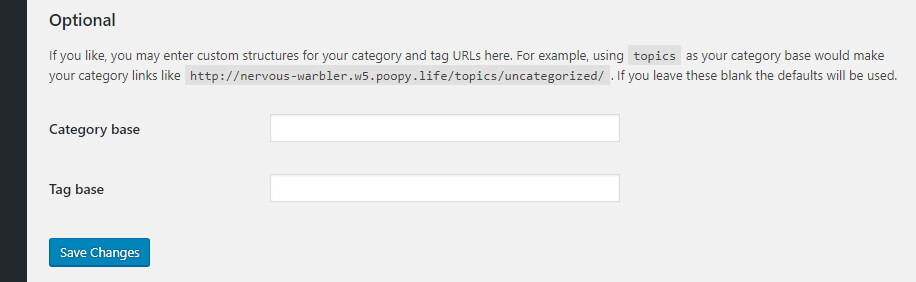
Note: If you use a custom structure, copy/paste it into the Custom Base section.

This solution could fix the WordPress 404 not found or “WordPress permalinks not working” error.
If it doesn’t work, you’ll need to edit the .htaccess file in the main directory of your WordPress installation (where the main index.php file resides). 404 errors are also usually due to misconfigured .htaccess files or file permission-related issues.
3. Restore Your .httaccess File
Since .htaccess is a hidden file, you must set all files as visible in your FTP.
Note: It’s always recommended to backup your site before editing any files or pages.
Follow the steps below:
- Log in to your server using an FTP client.
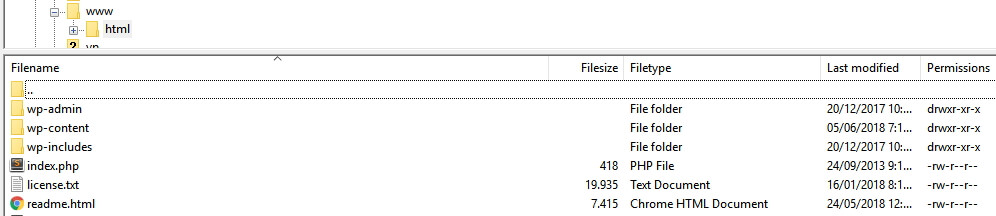
- Download the .htaccess file which is located in the same location as folders like /wp-content/ wp-admin /wp-includes/.
- Open the downloaded file in any text editor.
- Visit the WordPress .htaccess support page and copy/paste the version of the code that is most suitable for your website.
- Save the .htaccess file and upload it to the live server.

For example, if you have Basic WP, use the code below.
# BEGIN WordPress

RewriteEngine On

RewriteRule .* - [E=HTTP_AUTHORIZATION:%{HTTP:Authorization}]

RewriteBase /

RewriteRule ^index.php$ - [L]

RewriteCond %{REQUEST_FILENAME} !-f

RewriteCond %{REQUEST_FILENAME} !-d

RewriteRule . /index.php [L]

# END WordPress
4. Setup a 301 Redirect
If you have changed the URL of any specific page and haven’t redirected it yet, it’s time to redirect the old URL to your new URL. You may redirect your old post/page via a plugin or a .htaccess file.
If you are comfortable working with .htaccess, add the following code to your .htaccess file. Don’t forget to replace the URLs with your own website.
Redirect 301 /oldpage.html https://www.mywebsite.com/newpage.html
If you prefer the easy way, you may use a plugin to set up a 301 redirect. Follow the steps below:
- Install the Redirection Plugin.
- Go to the WordPress Dashboard.
- Click Tools > Redirection.
- Complete the setup and Add new redirection.

5. Disabling Plugins/Theme
An outdated or poorly coded plugin may be causing the 404 error on your WordPress site. To check this, you must deactivate all your plugins and change your current theme.
Note: All WordPress themes have 404.php files but don’t necessarily have a custom 404 error template file. WordPress automatically uses the 404.php page if the 404 error occurs.
You may access your WordPress files using an FTP like FileZilla. Go to public_html > wp-content and change the plugins folder name to something like myplugins.

Now go back to your browser to check whether the website is working. If the error has been resolved, then any of your plugins could be the culprit.
Note: If it’s not resolved, simply change the myplugins folder name to plugins and move to the next troubleshooting method.
Error-Free Plugin/Theme Automated Updates with SafeUpdates
Cloudways SafeUpdates automatically backs up and tests all your plugins and themes for errors before any updates.
Learn More

If it’s resolved, change the myplugins folder name to plugins and follow the steps below to check which of your plugin(s) is causing the error.
- Go to your WordPress dashboard.
- Go to Plugins > Installed Plugins.
- Activate each plugin one by one and check if your website is working.
- When you encounter the 404 error, you’d know which plugin caused it.
- Update the plugin or remove it to get rid of the error.

6. Change and Update WordPress URL in Database
You might encounter the following error message on your WordPress website.
“The requested URL was not found on this server. If you entered the URL manually, please check your spelling and try again.”
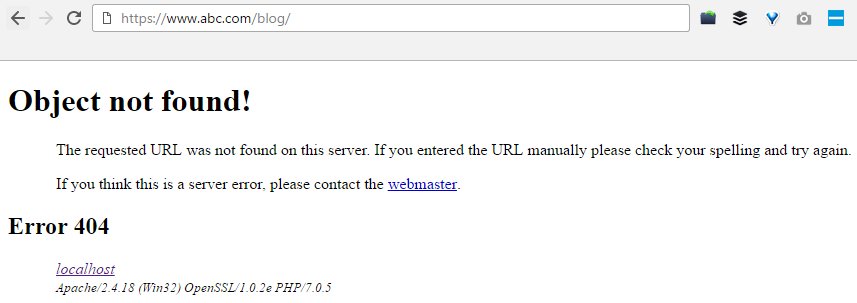
Fix the error by following the steps below:
- Go to your PHPMyAdmin.
- Navigate to your database name, and select wp-option. For example, blog > wp-option.

- Change the URL, for example, from https://www.abc.com/blog/ to http://localhost/blog.

7. Fix WordPress 404 Error on Local Servers
Many designers and developers install WordPress on their desktops and laptops using a local server for staging purposes. A common problem with local server installations of WordPress is the inability to get permalink rewrite rules to work.
You may try to change the permalinks for posts and pages, but eventually, the website shows the WordPress “404 Not Found” error.
Fixing Errors is Easier With Cloudways
Get rid of WordPress errors with a cloud hosting built to deliver a hassle-free experience with incredible speeds.
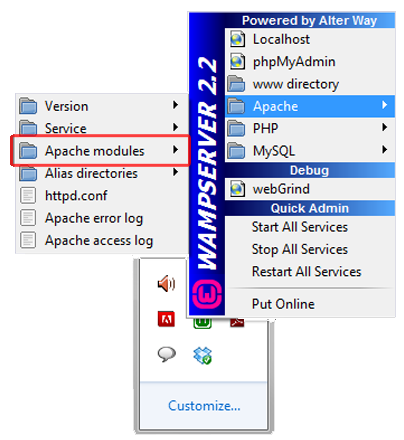
In this situation, turn on the rewrite module in your WAMP, XAMPP, or MAMP installation. I am using WAMP in this tutorial. Navigate to the taskbar and find the WAMP icon. After that, navigate to Apache → Apache modules.
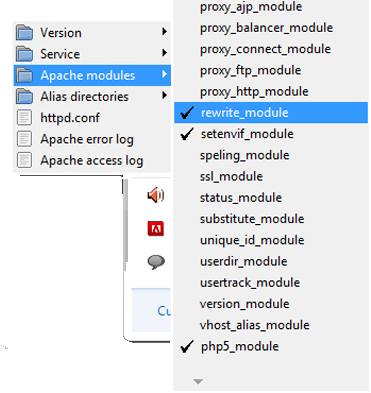
It will enable a long list of modules that you can toggle on and off. Find the one called “rewrite_module” and click it, so it is checked.
Then check whether your permalinks are working or not.
8. Alternative Method
If none of the above solutions work, you may try the alternative method to fix the 404 error.
- Navigate to the local server.
- Find the Apache folder, then go to the “conf” folder.
- Navigate to the httpd.conf file.
- Search for a line that looks like:
#LoadModule rewrite_module modules/mod_rewrite.so
- Remove the “#” sign so it looks like this:
LoadModule rewrite_module modules/mod_rewrite.so
Additional tip: PHP workers are used while executing your WordPress site’s code. An ecommerce site that gets 50,000 visitors per month needs a lot more resources than a simple blog with the same amount of traffic.
Conclusion
I hope this guide helped you solve the “WordPress 404 page error” or “WordPress permalinks not working” problem. Have you figured out any other ways to get rid of this problem? Please share your solutions with us in the comment section below.
Also, if you are a WordPress user and want to boost your site, you must try Cloudways WordPress hosting solutions and take advantage of its 3-day free trial.
Frequently Asked Questions
Q. Why am I getting a 404 error?
WordPress 404 errors usually occur when you have removed certain pages from your website and haven’t redirected them to your live pages. Sometimes, these errors may also occur when you have changed a URL of a specific page.
Q. How do I test a 404 error?
You can use multiple tools to test WordPress 404 errors, like Deadlinkchecker. Or you may access Google Analytics to find out which blogs are giving you a 404 error.
Q. How do I fix error 404 on WordPress?
You can fix the error 404 on WordPress by implementing the following solutions:
- Clear the browser cache and cookies
- Set your permalinks
- Make a default .htaccess file
- Set up a 301 redirect
- Disable plugins and themes
- Change and update the WordPress URL in the database
- Fix the error on local servers
Q. How to redirect WordPress 404 pages?
Follow the steps below to redirect WordPress 404 pages:
- Go to your WordPress dashboard.
- Navigate to Tools > Redirection.
- Apply redirection by pasting the broken URL in the source box and the new URL in the Target box.
Q. How to edit a WordPress 404 page?
You may edit a WordPress 404 page by following the steps below:
- Visit your WordPress dashboard.
- Navigate to Appearance > Theme Editor.
- Find the file named “404.php file” and edit the file yourself or with the help of a WordPress developer.
Дек 10, 2020
Anna
7хв. читання
Ошибка 404 в WordPress является одной из наиболее распространённых ошибок, с которой вы будете сталкиваться в интернете. Однако это не делает её менее раздражающей или неприятной, когда она появляется на вашем собственном веб-сайте. Хорошей новостью является то, что её исправление относительно простое, и процесс хорошо расписан для сайтов на WordPress.
В этой статье мы рассмотрим три способа исправления ошибки 404 в WordPress:
- Сброс настроек постоянных ссылок в WordPress (англ).
- Восстановление файла .htaccess (англ).
- Отключение тем и плагинов.
Однако, прежде чем закатывать рукава, мы поговорим о том, как работает ошибка 404 и какие причины её возникновения. Давайте перейдём непосредственно к этому!
Что такое ошибка 404 в WordPress (и что её вызывает)
Ошибка 404 это сообщение, которое появляется, когда вы пытаетесь получить доступ к странице, которую браузер не может найти. В зависимости от того, какой браузер вы используете, сообщение может незначительно отличаться. Например, Firefox отображает такой текст: «404 Not Found», а Chrome показывает сообщение — «404. That’s an error»:
Эти сообщения об ошибках по умолчанию могут быть довольно неопределёнными, и любой веб-сайт может настроить собственную страницу ошибок 404 (англ). Это не является необходимым, но это позволяет объяснять посетителям, что сайт работает, и единственная проблема заключается в конкретной странице, которую они пытаются найти.
Независимо от того, как оно выглядит, существует много вещей, которые могут вызвать в WordPress сообщение: 404 ошибка. К ним относятся:
- Неверный URL. В некоторых случаях ошибка может быть в дополнительной букве, набранной в URL страницы.
- Проблемы с кэшированием. Иногда браузер может кэшировать страницу, к которой вы пытаетесь получить доступ, и пока она не найдена, вы будете видеть ошибку 404, даже если сайт работает для всех остальных.
- Проблема с настройками сервера доменных имен (DNS). Возможно, информация о вашем домене ещё не обновилась в DNS, поэтому вы видите ошибку при попытке получить доступ к одной из страниц вашего сайта.
- Проблемы с совместимостью в WordPress. В некоторых случаях проблемы с плагином или темой могут повлиять на то, как WordPress создаёт URL-адреса и постоянные ссылки для вашего сайта. Затем, если кто-либо попытается получить доступ к URL-адресу, который больше не работает, возникает ошибка 404 в WordPress.
Важно понимать, что ошибка 404 не уникальна только для WordPress. Она может возникать независимо от того, на какой платформе находится ваш сайт. Однако, если вы используете WordPress, у вас есть преимущество, так как существует множество способов решить эту проблему. Давайте поговорим о том, что делать, если вы столкнулись с ошибкой 404 в WordPress.
Что делать перед устранением ошибки 404 в WordPress
В следующих разделах вы будете редактировать некоторые файлы на бэкэнд WordPress. Мы проведем вас через весь процесс, и всё будет в порядке. Однако, когда вы решите редактировать конфиденциальные файлы в WordPress, лучше заранее создать резервную копию вашего сайта — на всякий случай.
Если у вас нет доступа к панели управления WordPress прямо сейчас, не волнуйтесь. В Hostinger существует несколько способов получить резервную копию вашего веб-сайта с панели управления хостингом.
После этого вам нужно будет загрузить и настроить FTP-клиент. Мы рекомендуем FileZilla (англ), так как он бесплатный и предлагает все функции, которые могут вам понадобиться. Если вы раньше не использовали FTP, вы можете ознакомиться с нашим подробным руководством о том, как получить доступ к сайту Hostinger напрямую. Затем, когда вы будете готовы, вы сможете приступить к исправлению ошибок WordPress 404.
Как исправить ошибку 404 в WordPress (3 метода)
В некоторых случаях ненайденные страницы в WordPress вскоре исчезают сами по себе. Обычно это происходит, если они вызваны ошибкой с вашим хостинг-провайдером. Прежде чем приступать к серьёзному устранению неполадок, мы рекомендуем вам попробовать обновить сайт, предоставив ему пять или десять минут, чтобы всё уладить.
Если ошибка сохраняется и дальше, значит на вашем сайте существует проблема. В этом случае давайте рассмотрим три потенциальных решения одно за другим.
1. Сбросьте настройки своих постоянных ссылок (пермалинков) в WordPress
Одной из наиболее распространённых причин ошибки WordPress 404 является проблема с тем, как WordPress генерирует ваши постоянные ссылки (англ). Как вы, возможно, знаете, WordPress предоставляет вам несколько вариантов форматирования ссылок ваших записей и страниц. Например, вы можете настроить платформу для использования простых числовых ссылок или указать название каждой записи в качестве URL-адреса:
В любом случае первое, что вам нужно сделать, когда вы столкнётесь с ошибкой 404 в WordPress, это сбросить настройки ваших постоянных ссылок. Есть два способа сделать это: один через панель управления (Консоль), а другой через FTP. Если у вас есть доступ к панели управления, следуйте инструкциям в этом разделе. Еслм нет – вам следует перейти к методу номер два.
Если вы можете войти в свою панель инструментов, начните с перехода во вкладку Настройки> Постоянные ссылки. Обратите внимание на структуру, которую использует ваш сайт на данный момент. Вам нужно будет временно изменить её, чтобы сбросить настройки постоянных ссылок в WordPress, но вы измените её всего на мгновение.
Выберите параметр Простой в разделе Общие настройки и нажмите кнопку Сохранить в нижней части страницы:
Страница перезагрузится. Затем вы можете продолжить и выбрать свой предыдущий тип постоянных ссылок и сохранить изменения ещё раз. Это всё, что требуется для сброса структуры ссылок на WordPress.
Теперь попробуйте просмотреть свой веб-сайт как обычно. Проверьте страницы, которые ранее выдавали ошибку 404. Если ошибка ушла, вы молодец – вам понадобилось минимум времени, чтобы её исправить!
2. Восстановите файл .htaccess в WordPress.
Когда вы вносите изменения в структуру постоянной ссылки в WordPress, они сохраняются в файл под названием .htaccess (англ). Этот файл определяет, как WordPress будет взаимодействовать со своим сервером, а также способ создания URL-адресов для страниц.
Если у вас нет доступа к панели управления, вам нужно будет вручную отредактировать .htaccess, чтобы переустановить постоянные ссылки. Чтобы начать работу, зайдите на свой сайт через FTP и перейдите в корневую папку WordPress. Это каталог, который содержит установку WordPress и обычно находится в папке public_html или www или назван в честь вашего сайта:
Откройте эту папку и найдите файл .htaccess. Если вы используете FileZilla, вам нужно щёлкнуть правой кнопкой мыши по файлу .htaccess и выбрать параметр Просмотреть / Изменить. Это означает, что вы загружаете копию файла на свой компьютер и открываете его с помощью локального текстового редактора по умолчанию. Теперь вы сможете внести любые изменения, которые вам нужны.
Если вы не понимаете, для чего нужен весь код в этом файле, не беспокойтесь. Вы не должны вносить в него никаких изменений, если вы не уверены в них на 100 %. Однако, что вы можете сделать, так это использовать код WordPress .htaccess, который выглядит следующим образом:
# BEGIN WordPress
<IfModule mod_rewrite.c>
RewriteEngine On
RewriteBase /
RewriteRule ^index.php$ - [L]
RewriteCond %{REQUEST_FILENAME} !-f
RewriteCond %{REQUEST_FILENAME} !-d
RewriteRule . /index.php [L]
</IfModule>
# END WordPress
Это чистый файл .htaccess без каких-либо изменений. Он удалит любые изменения, внесённые в вашу структуру постоянной ссылки. Идём дальше и создаём резервную копию содержимого старого файла .htaccess и заменяем его фрагментом кода, указанного выше.
После этого сохраните изменения в файле .htaccess с помощью текстового редактора и закройте его. FileZilla спросит, хотите ли вы заменить существующий файл .htaccess копией, которую вы только что отредактировали. Согласитесь на это действие, и всё! Вы просто переустанавливаете свои постоянные ссылки WordPress вручную, не нарушая ничего в этом процессе.
На этом этапе попробуйте снова вернуться на ваш сайт. Ошибка 404 должна исчезнуть, что уже является отличной новостью. Тем не менее, вы по-прежнему можете вернуть предыдущую структуру постоянных ссылок, если вам не нравятся числовые URL-адреса.
Помните, что вы можете изменить способ просмотра ваших постоянных ссылок, перейдя в панель управления и во вкладку Настройки> Постоянные ссылки. Выберите структуру, которую использовал ваш сайт до ошибки 404, и сохраните изменения. Тогда всё должно вернуться к нормальному функционированию.
3. Отключите темы и плагины в WordPress.
Как уже упоминалось ранее, иногда ваши плагины и темы могут влиять на структуру вашего WordPress, в зависимости от их настроек. Если вы попробовали один или оба предыдущих метода и ошибка 404 по-прежнему сохраняется, отключите свои темы и плагины.
Есть два способа сделать это, в зависимости от того, имеете ли вы доступ к панели управления или нет. Если у вас есть доступ, перейдите во вкладку Плагины> Все плагины и выполните этот процесс для каждого из ваших плагинов:
- Нажмите кнопку Деактивировать под именем плагина.
- Проверьте свой сайт, чтобы узнать, сохраняется ли ошибка 404.
- Если ошибка всё ещё существует, повторно активируйте отключённый плагин.
- Перейдите к следующему плагину в списке и повторите процесс.
Ваша цель – отключать каждый плагин один за другим. Вы можете отключить их всех сразу, но в большинстве случаев всего один плагин вызывает проблемы. Если отключение одного из ваших плагинов устраняет проблему, у вас есть три варианта. Вы можете проверить, есть ли доступное обновление, и временно отключить плагин до тех пор, пока оно не появится, или вы не замените плагин на альтернативный.
Если вы проверили все свои плагины, и ни один из них не оказался причиной проблемы, вам также придётся убедиться, что ваша активная тема не приводит к ошибке 404. Этот процесс намного быстрее, так как вам нужно проверить всего одну тему. Перейдите на вкладку Темы и переключите свою активную тему на какую-нибудь другую:

Теперь проверьте, не исчезла ли ошибка 404. Если да, то вам снова нужно выбирать между поиском обновления или поиском новой темы. Переключение тем в WordPress может быть немного хлопотным, но в конечном итоге это необходимо, раз уж ваша текущая тема приводит к ошибкам.
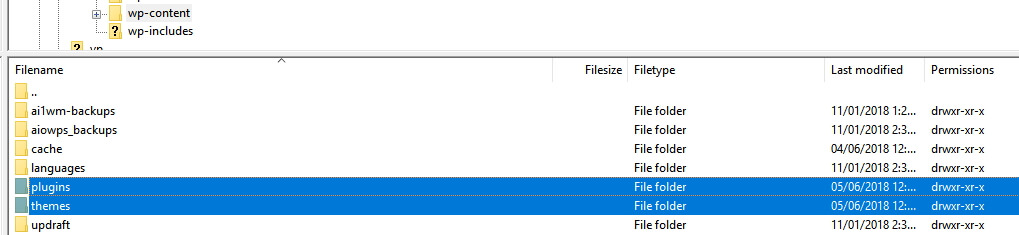
Если у вас нет доступа к панели управления, вы можете отключить тему и плагины вручную через FTP. Чтобы сделать это, зайдите на свой сайт с помощью FileZilla, затем перейдите в каталог public_html / wp-content. Здесь вы найдёте несколько папок, две из которых называются plugins и themes соответственно:
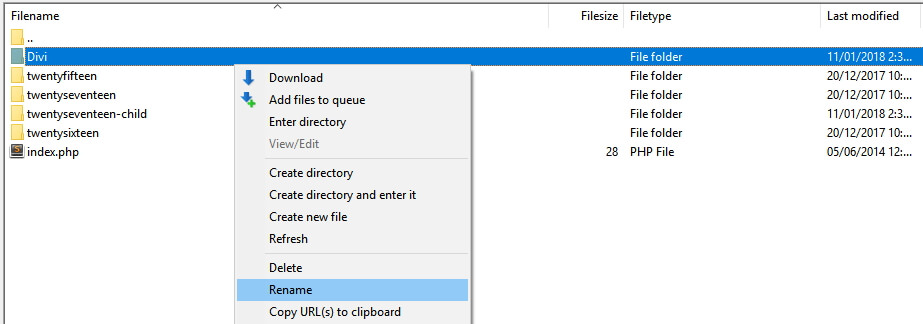
Сначала зайдите в каталог плагинов. Вы заметите, что для каждого плагина есть своя папка. Выберите одну из этих папок, щёлкнув по ней правой кнопкой мыши и выберите опцию Переименовать:

Измените название папки на что-то вроде akismet.disabled, так чтобы вы смогли легко её идентифицировать. Простого изменения названия папки плагина достаточно для того, чтобы WordPress его отключил. Теперь проверьте, не исчезла ли ошибка 404. Если нет, верните этой папке прежнее название и повторите этот процесс для каждого следующего плагина в папке.
Если один из ваших плагинов стал причиной ошибки, вы знаете, как с этим справиться. Однако, если окажется, что ошибка 404 возникает не из-за них, вы можете перейти в каталог тем wp-content> themes. Найдите папку с активной темой и переименуйте её так же, как и плагины:
Поскольку WordPress всегда нуждается в активной теме, отключение вашей приведет к тому, что платформа будет использовать один из готовых вариантов по умолчанию. Это может повлиять на внешний вид вашего веб-сайта, но не беспокойтесь, это временно.
Если ошибка исчезла, вам может потребоваться подобрать новую тему. Однако, если это не так, восстановите предыдущее название папки своей темы, чтобы WordPress снова её распознал.
Дополнительная информация
Ошибка 404 это не единственная проблема, которая может возникнуть с веб-сайтом в WordPress. Вот список наиболее популярных ошибок в WordPress с углублённой информацией о том, как их исправлять:
- Как исправить ошибку 403 Forbide Error в WordPress
- Как исправить ошибку 500 Internal Server Error в WordPress
- Ошибка 502 Bad Gateway в WordPress – причины и как исправить
- Как отладить и исправить ошибку 503 Service Unavailable в WordPress
- Ошибка 504 Gateway Time-out и как её исправить в WordPress
- Как исправить ошибку HTTP при загрузке изображений в WordPress
- Как исправить ошибку «Извините, вы не можете получить доступ к этой странице» в WordPress
Вывод
Ошибка 404 может показаться простой, но она может нанести большой урон. Если ваши посетители не могут найти нужные им страницы, они могут начать искать в другом месте, а зачем вам это? Это означает потерянный трафик и, возможно, снижение конверсий.
К счастью, есть много способов решить эту проблему в WordPress, включая отключение тем и плагинов, восстановление вашего файла .htaccess и сброс ваших постоянных ссылок.
Если у вас возникли какие-либо вопросы, советы или рекомендации по работе с ошибкой WordPress 404 – давайте поговорим о них в разделе комментариев!

Анна долгое время работала в сфере социальных сетей и меседжеров, но сейчас активно увлеклась созданием и сопровождением сайтов. Она любит узнавать что-то новое и постоянно находится в поиске новинок и обновлений, чтобы делиться ими с миром. Ещё Анна увлекается изучением иностранных языков. Сейчас её увлёк язык программирования!
Если вы знакомы с Интернетом, вы должны знать об ошибках 404. Эти страницы раздражают, когда вы ищите контент в Интернете. Вы увидите слова: «Страница не может быть найдена. Страница, которую вы ищете, могла быть удалена, изменила ее название или временно доступна ». Обычно это происходит, когда нет URL-адреса для доставки.
На всякий случай, если вы никогда не видели такое сообщение или хотите увидеть страницу 404 на своем собственном веб-сайте, введите URL-адрес страницы, которую вы ищете, а затем введите строку тарабарщины. Вы увидите, о чем я говорю. Это происходит из-за сбоя во взаимодействии клиент-сервер, который может произойти по многим причинам:
- Страница, которую вы ищете, может больше не существовать.
- Ссылка на страницу, которую вы ищете, может быть неработающей.
- Возможно, вы просто ввели неправильный URL.
Активный веб-сайт не может полностью избежать этих ошибок, но можно сделать многое, чтобы свести их к минимуму.
Ошибки 404 и влияние на SEO
Страница 404 вредна для вашего SEO. Посетитель теряется, потому что ссылки на вашем сайте не поддерживаются должным образом. Одна или две неработающие ссылки, которые иногда появляются в поисковых системах, не имеют большого значения. Но у вас есть более серьезная проблема, если поисковая система часто сталкивается с этими ошибками на вашем сайте. Повышенный показатель отказов окажет негативное влияние на ваше SEO, и вашему сайту может потребоваться время, чтобы оправиться от этого.
Если вы используете плагин Google Analytics, вы можете легко увидеть ошибки, поскольку они помечены. Но поисковые системы также сталкиваются с ошибкой 404, которой никогда не делают обычные посетители, потому что они сканируют что угодно на вашем сайте. Таким образом, даже скрытые ссылки являются источником 404 ошибок для поисковых систем. Xenu или Screaming Frog могут помочь найти эти ошибки и исправить их.
Вы также должны искать битые изображения или битые вставки видео. Их сложно найти с помощью инструментов для веб-мастеров или Google Analytics, но Xenu и Screaming Frog также могут вам помочь. Вы также можете выполнить поиск в журналах сервера, выполнив поиск 404 плюс «.jpg» и «.png». Они не причинят большого вреда, но это не очень хорошее впечатление для посетителей.
Исправление ошибок 404
Есть много способов перенаправления и исправления ошибок 404, и вы можете попробовать эти шаги последовательно:
- Вы можете вручную проверить неработающие ссылки и исправить перенаправления, выполнив поиск в конфигурации вашего .htaccess или NGINX сервера, но это требует от вас некоторых технических навыков. Или несколько настроек в файле 404.php могут помочь. Это лучший способ исправить ошибку 404, но если вам неудобно работать с кодом, вы должны пропустить этот шаг.
- Если URL-адрес изменен, перейдите на правильный URL-адрес. Если файл статический, проверьте, существует ли файл, открыв FTP и проверив.
- Если он существует, но его появление в браузере является проблемой, то это проблема сервера или WordPress. Для этого создайте 2 отдельных файла – файл HTML и файл PHP и загрузите их. Если у вас есть доступ к этим файлам, значит, проблема с сервером, а проблема в WordPress.
- WordPress использует массив перезаписи, который управляет постоянными ссылками. Нестандартные плагины, изменения в каталоге или пользовательские типы сообщений могут нарушить постоянные ссылки, вызывая ошибку 404. Чтобы установить это правильно, просто перейдите в раздел «Постоянные ссылки» и снова сохраните структуру постоянных ссылок в папке wp.admin. Откройте «Постоянные ссылки» в разделе «Настройки» и «Сохраните изменения». Постоянные ссылки будут обновлены. Это исправление в основном сделает всю работу.
- Если у вас установлены плагины или любой плагин, который создает постоянные ссылки, отключите их и проверьте.
- Проверьте массив перезаписи WP с помощью плагина Debug This. После активации этот плагин покажет правила перезаписи, а также фактическую перезаписываемую строку PHP.
- Отключите плагины один за другим и определите плагин, который вызывает ошибки.
- Нет необходимости полностью удалять старый контент. Вместо этого вы можете создать настраиваемую страницу по этому URL-адресу и направлять посетителей на другие похожие страницы или сообщения на вашем веб-сайте.
Существует множество плагинов, которые помогают находить, отслеживать и перенаправлять неработающие ссылки. Я перечислил здесь несколько популярных из них, которые достаточно хорошо справляются со своей задачей.
Проверка неработающих ссылок
Broken Link Checker – это бесплатный плагин из репозитория WordPress. Это один из первых плагинов, который приходит на ум, когда вы хотите избавиться от этих надоедливых страниц.
После установки он просканирует ваш сайт на предмет любых ссылок, которые не работают. В зависимости от размера вашего сайта это может занять время. Вы можете выбрать получение уведомления о неработающих ссылках на свою электронную почту или в виджете проверки неработающих ссылок на панели инструментов. Вы также можете запретить поисковым системам переходить по этим неработающим ссылкам.

Вы можете увидеть в действии средство проверки неработающих ссылок, открыв средство проверки ссылок в разделе «Настройки». Параметр «Создать настраиваемый фильтр» можно использовать, чтобы сделать видимыми только некоторые ссылки, например, ссылки для определенной категории сообщений. Что вы решите делать со ссылкой, можно решить с помощью опций, которые открываются при наведении курсора на каждую ссылку.
Вы можете изменить URL-адрес, и все экземпляры этого URL-адреса будут исправлены. Вы можете удалить ссылку, при этом текст останется без изменений. Если ссылка в порядке, но отображается как неработающая, вы можете изменить ее вручную. Опция “Закрыть” оставит ссылку неизменной до следующего изменения статуса. Вы можете отключать плагин после каждого использования и повторно активировать его для периодического сканирования, если это необходимо.
Страница 404 от SeedProd
Какой бы ни была тема вашего веб-сайта, вы можете использовать страницу 404 от SeedProd для разработки и настройки своей пользовательской страницы 404. Вы можете полностью заменить страницу 404 своей темы и полностью настроить новую страницу 404. При необходимости вы даже можете использовать HTML5 и CSS3 для настройки.
Фоновое изображение может быть растянуто на весь браузер, а плагин поддерживает несколько сайтов, а также BuddyPress.

В премиум-версии вы можете собирать потенциальных клиентов, нажав на информацию электронной почты. Информация может храниться в вашей базе данных WordPress и быть экспортирована любому поставщику услуг электронной почты. MailChimp, Aweber, Get Response, Constant Contact и Campaign Monitor интегрированы, а также шрифты Google и Typekit.
Встраивайте видео, просто набрав URL, включите Gravity Forms и собирайте информацию о посетителях с помощью этого плагина. Посетители могут продолжить поиск страницы, которую они искали, на вашем веб-сайте.
Стоимость лицензий колеблется от 29 долларов за использование на одном сайте в течение одного года до 199 долларов за неограниченное количество сайтов в течение всей жизни. Покупка сопровождается гарантией возврата денег.
Все 404 перенаправляют на домашнюю страницу
Все 404 Redirect to Homepage будут перенаправлять все ссылки с ошибкой 404 на домашнюю страницу с использованием перенаправления SEO 301 – это перенаправление сообщает посетителю, что страница была перемещена навсегда. Вы также можете перенаправить его на любую настроенную страницу.
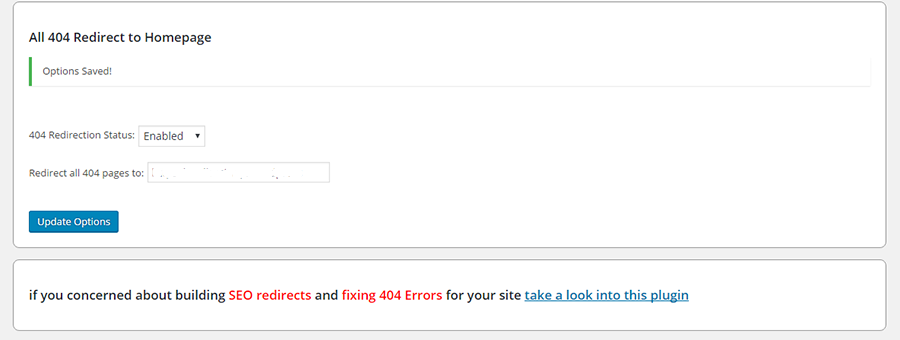
Это простой плагин, в котором вы должны включить статус перенаправления, заполнить URL-адрес страницы, на которую должен быть перенаправлен 404. И как только вы нажмете кнопку обновления, настройки будут сохранены в базе данных.
404–301
С 404 по 301 работает почти так же, как и предыдущий плагин, перенаправляя все ошибки 404 на любую страницу, которую вы установили с помощью перенаправления 301, 304 или 307. Эти числа указывают, была ли страница перемещена временно или навсегда. После установки этого плагина вы обнаружите, что панель инструментов вашего веб-мастера почти всегда будет сообщать об ошибках Nil.

Вы можете выбрать мониторинг ошибок, а также включить уведомления по электронной почте об ошибках 404. Если вы просто хотите отслеживать или вести журнал, вы можете отключить параметр «Перенаправление». Плагин легкий, готов к переводу и совершенно бесплатный, с пожизненными обновлениями. Разработчики и другие пользователи могут получить доступ к плагину на GitHub.
Пользовательский 404 Pro
Вы можете использовать Custom 404 Pro, чтобы заменить стандартную страницу ошибки 404 на настраиваемую страницу, которую вы можете создать в разделе Pages вашей панели администратора. Или вы можете просто указать полный URL-адрес для перенаправления 404.
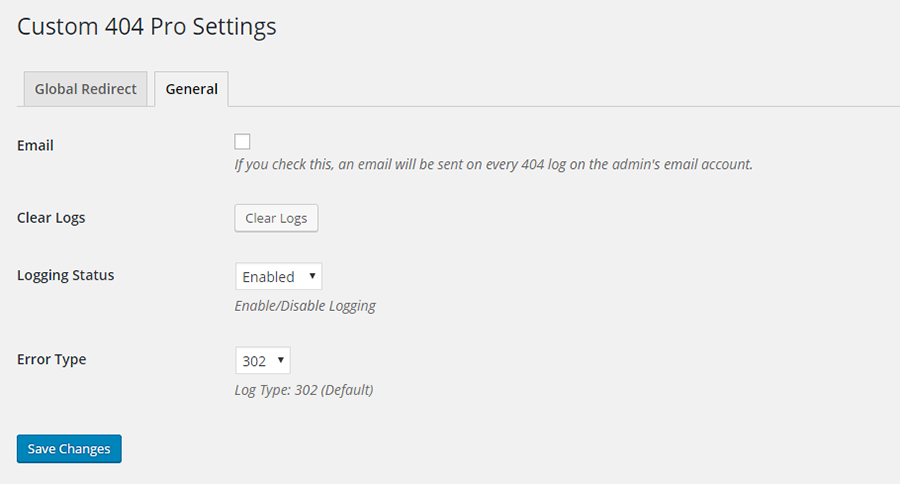
Могут быть записаны данные 404, а также ключевые слова, по которым посетитель попал на страницу 404. Поддержка этого плагина доступна на GitHub.
Регистратор ошибок 404
404 Error Logger – это простой и эффективный плагин, который регистрирует все ошибки, возникающие на вашем сайте WordPress. Имея всю эту информацию, вы можете определить неработающие ссылки и недостающий контент. При желании вы также можете записывать дополнительную информацию, такую как IP-адрес, пользовательские агенты и источники перехода. И вы можете заблокировать IP-адреса, если хотите.
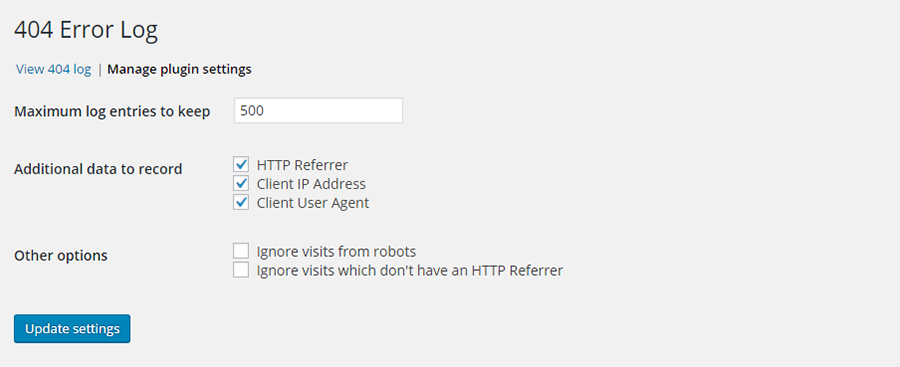
Этот плагин не будет работать, если вы используете плагин кеширования, который кэширует все ошибки 404.
Перенаправление
Перенаправление помогает отслеживать ошибки 404 с помощью перенаправления 301. Это популярный плагин в репозитории WordPress, с более чем 500 000 активных установок. Вы можете перенаправить все URL-адреса, а не только страницы с ошибками. Это особенно полезно, если вы перемещаете свой веб-сайт или меняете каталог, в котором установлен WordPress.
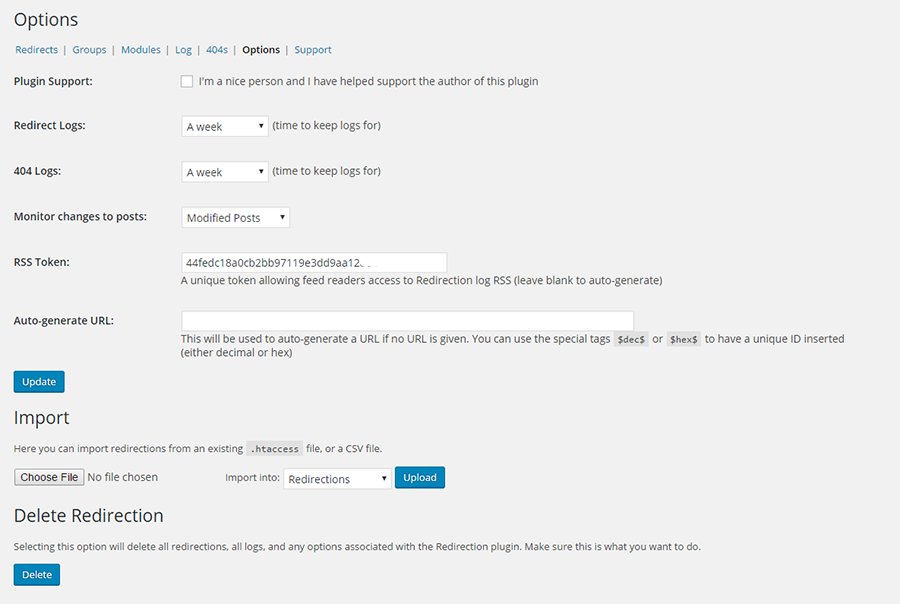
Плагин отслеживает 404 ошибки и ведет полные журналы. Вы также можете настроить его так, чтобы некоторые URL-адреса могли переходить на другую страницу, файл или веб-сайт. Вы можете настроить разные перенаправления в зависимости от статуса входа, перенаправления на случайные страницы или на основе источников перехода.
Плагин автоматически добавит 301 редирект при изменении URL-адреса публикации. Это также можно сделать вручную. Он полностью работает внутри вашего сайта WordPress, и .htaccess не требуется. Из журнала вы можете проверить, кто пытался войти в систему и сколько попыток входа было сделано.
Плагин WordPress Ultimate 404
Плагин WordPress Ultimate 404 дает вам полный контроль над вашими 404 страницами. Он предлагает 4 готовых шаблона, которые вы можете выбрать для отображения в качестве страницы с ошибкой. Шаблоны можно настроить. Также поддерживается стандартный шаблон 404 темы WordPress.

Плагин ведет запись всех событий с ошибкой 404, поэтому вы знаете, какая страница является наиболее посещаемой. При необходимости вы можете добавить URL-адрес перенаправления. Ключевое слово, используемое посетителем для поиска, записывается, давая вам ценную информацию о SEO.
Вы можете приобрести этот плагин на CodeCanyon за 19 долларов. Он поставляется с будущими обновлениями и 6-месячной поддержкой. Поддержка может быть продлена до 12 месяцев за дополнительные 5,70 долларов США.
Google 404
Google 404 – это не совсем плагин WordPress. Это просто расширенный скрипт страницы 404 от Google.
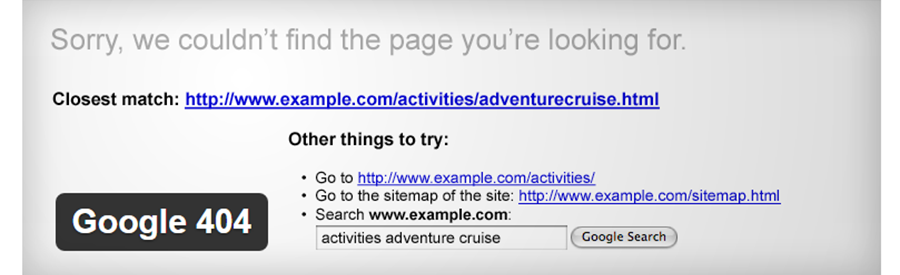
Он встраивает окно поиска на вашу страницу 404, поэтому посетителю предлагается продолжить поиск на вашем веб-сайте. Здесь может быть размещена полезная информация, относящаяся к поисковому слову, используемому посетителем. Или вы можете помочь посетителю найти информацию, которую он ищет.
Чтобы плагин был полностью эффективным, Google требует, чтобы вы отправили XML-карту вашего сайта WordPress и создали учетную запись веб-мастера Google.
404 Стр.
Вы не должны изо всех сил отказываться от страницы 404. Создайте страницу 404 на своем сайте WordPress так же, как вы обычно создаете страницы в WordPress. После этого откройте Настройки на панели инструментов WordPress. Щелкните страницу ошибки 404 и выберите страницу, которую вы только что создали, в качестве страницы ошибки 404. Вот и все.

Плагин не создает редирект. При перенаправлении URL остается в поисковом индексе, и это может повлиять на SEO. Этот плагин обеспечивает доставку правильного кода 404 в поисковые системы. Плагин сильно отличается от других. На сервер запросы не отправляются. Вместо этого используются собственные ресурсы WordPress.
404, чтобы начать
404 to Start обнаруживает ошибку 404 даже раньше, чем это делают поисковые системы. Вы можете установить перенаправление на 301 (постоянно), что является настройкой по умолчанию. Или вы можете установить его на 302, что является временным перенаправлением.
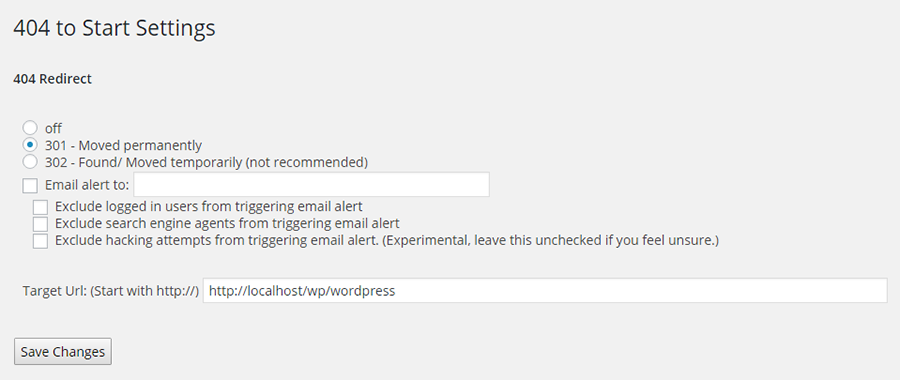
Он перенаправляет все 404 веб-страницы на стартовую страницу или на любую другую страницу, которую вы хотите. Вы можете выбрать вариант получения уведомления по электронной почте. Всякий раз, когда пользователя перенаправляют, вы будете знать, какой браузер он использует и URL-адрес, к которому он пытается получить доступ. Вы можете выбирать из настроек, которые позволяют направлять страницы 404 на любой URL-адрес, который вы выберете – домашнюю страницу или любую другую страницу вашего сайта.
Внутренние ссылки RB
RB Internal Links – полезный плагин для владельцев блогов. С помощью этого плагина они могут ссылаться на сообщения и страницы на своем сайте WordPress с помощью шорткода. Нет необходимости вводить длинный URL-адрес.
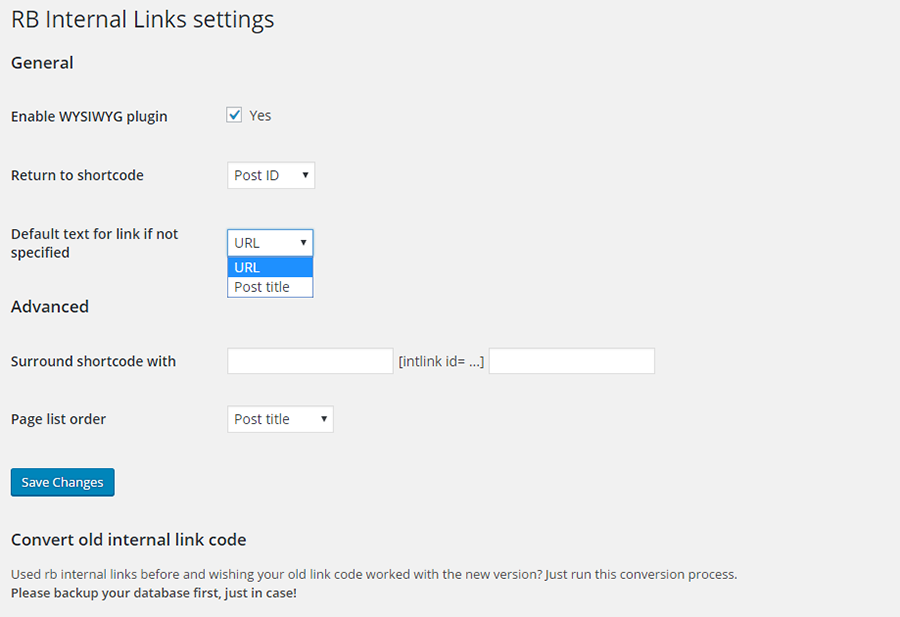
Структура постоянных ссылок на сайте не нарушается, и для создания ссылки для публикации используется шорткод. Затем этот тег вставляется вручную или с помощью плагина wysiwyg. Этот плагин упрощает переход от одной ссылки к другой на веб-сайте. Это также позволит искать сообщения по категориям.
Плагин быстрого перенаправления сообщений на страницу
Плагин Quick Page Post Redirect выполняет свою работу по двум направлениям. Один из них – это метод быстрого перенаправления, при котором вам просто нужно ввести URL-адрес запроса и URL-адрес назначения. Затем плагин будет перенаправлять в соответствии с указанными вами URL-адресами.
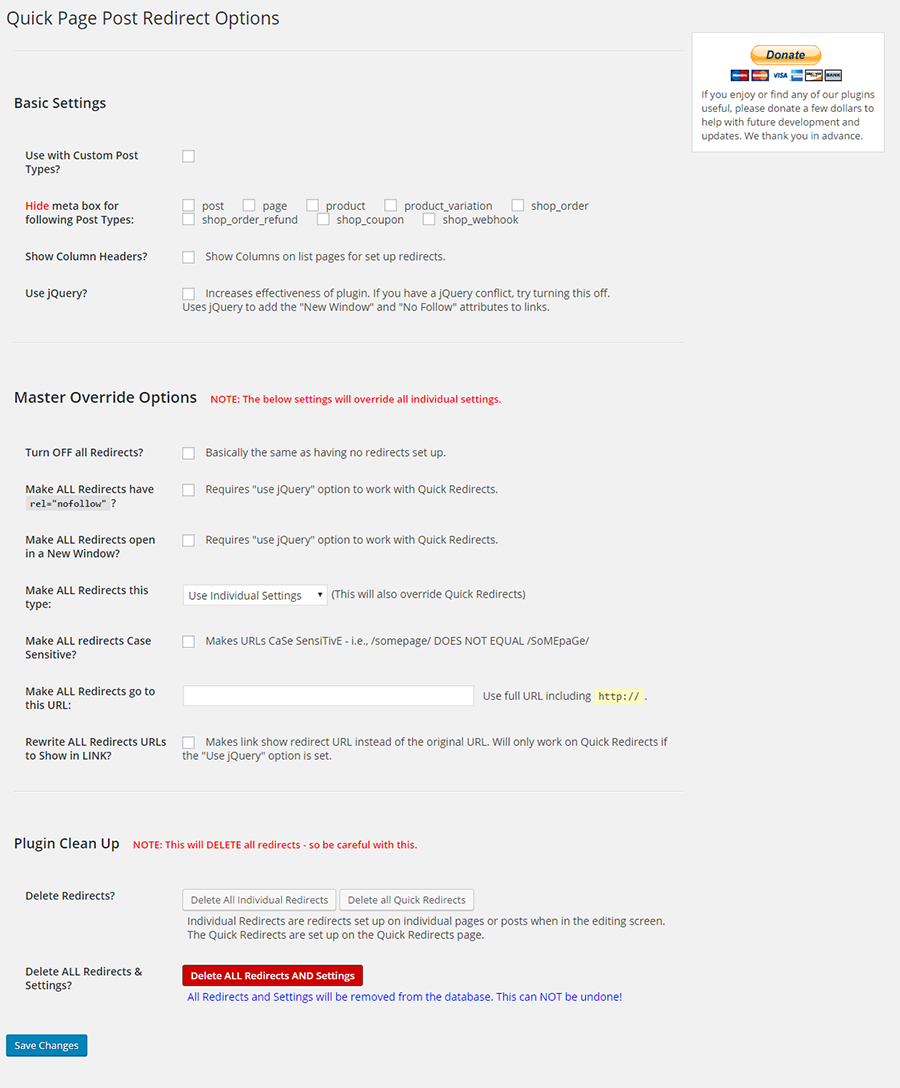
Ни создавать страницу, ни иметь существующую страницу не требуется. Этот плагин очень пригодится, когда вам нужно исправить опечатки, которые произошли при создании страницы, или когда вы хотите перенаправить старые URL-адреса на новые URL-адреса. Вы также найдете это отличным помощником при перемещении веб-сайта.
Для существующей страницы или сообщений на экран редактирования добавляется мета-поле опций, где вы можете ввести новый URL-адрес. Это хорошо работает для пунктов меню и повторяющихся сообщений. Также лучше всего работать в структуре постоянных ссылок WordPress.
Плагин перенаправления SEO
При построении SEO Перенаправление плагин, авторы сосредоточились на сохранении его простым для пользователей всех уровней, и вы можете увидеть это в том, как плагин работает. Расширенная панель управления поможет вам контролировать все, что может делать плагин.
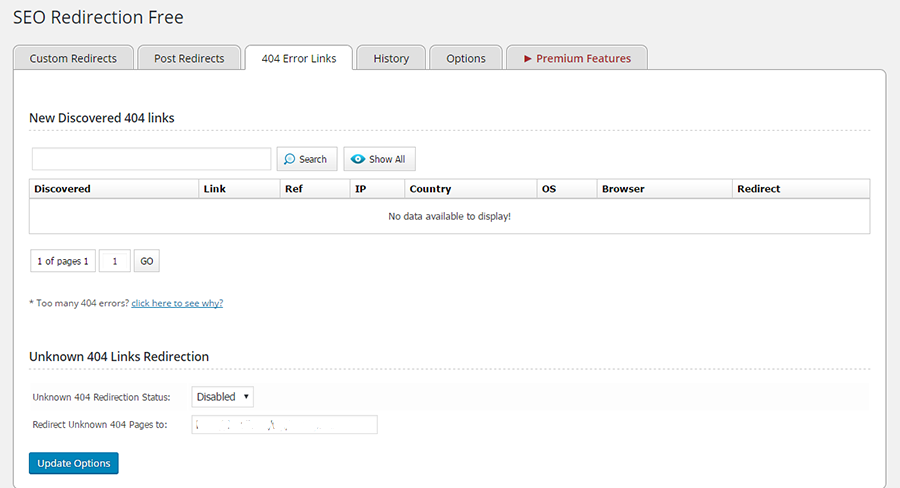
Вы можете отслеживать страницы с ошибками 404 и перенаправлять их все одним щелчком мыши. Возможно перенаправление 301, 302 или 307, равно как и перенаправление по шаблону. Все содержимое папки можно перенаправить, изменив настройки папки на вкладке перенаправления. Можно вести историю перенаправлений.
Чтобы перенаправить любое сообщение, вы можете заполнить полный URL-адрес и папку назначения и нажать «Добавить». Или вы можете отредактировать целевой URL в публикации или на странице редактирования и нажать «Сохранить». Плагин также пригодится при смене доменного имени или перемещении сайта. Обратите внимание, что этот плагин не поддерживает установку с несколькими сайтами.
Менеджер безопасного перенаправления
Safe Redirect Manager – эффективный плагин для обработки ошибок 404 при установке с несколькими сайтами. Вы можете перенаправить на новые URL-адреса, используя коды состояния HTTP, которые вы создаете.
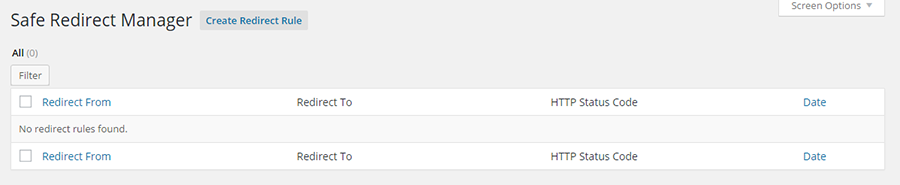
Он позволяет перенаправление только на хосты из белого списка с помощью функции wp_safe_redirect.
в заключение
Важно проявлять инициативу и, насколько это возможно, уберечь свой сайт от ошибок 404. В вашем списке дел по обслуживанию WordPress вы можете:
- Запланируйте проверку журналов статистики вашего сайта, чтобы найти отчеты об ошибках 404.
- Регулярно проверяйте внутренние и внешние ссылки. Небольшие сайты могут проводить проверку один раз в месяц, большие – раз в неделю.
- Частота проверки будет зависеть от содержания веб-сайта, а не посетителей. Сайты с тяжелым содержанием должны проверять чаще.
С таким количеством доступных качественных плагинов у вас нет причин не поддерживать свои ссылки в отличном состоянии. Попробуйте их и держите свой веб-сайт в отличном состоянии.
Источник записи: https://www.wpexplorer.com
For a very big CMS platform like WordPress. it’s best for a user who is not familiar with coding. in this WordPress, it’s possible to get 404 Errors. “404 Not Found” error is a common issue faced by WordPress users. It occurs when a user tries to access a page or post on a website that can’t be found. This error can be frustrating for visitors to your website and may lead to a decrease in traffic. A server is software that receives your request to access a web page. It runs only a couple of security checks on your HTTP request and takes you to the web page.

But sometimes you face a message showing on your screen “WordPress PAGE NOT FOUND” or “WordPress The requested URL was not found on this Server” while using the site.
Now if you get any 404 error message then you don’t have to get stressed as it is a very common problem that users face while using WordPress. In this article, we will provide you with all the essential information about how to fix the error 404 page not found WordPress. So keep reading!!!
Ways How to Fix WordPress 404 Error
This type of error may occur due to the .htaccess file or something wrong that happened to the rewrite rules. You just have to update the permalink settings and modify the .htaccess file. Where .htaccess (hypertext Access file) is the configuration file of a website.
This configuring file is used to run Apache Web Server software. Any alteration in this file can cause an error.
Here are the steps of how to remove 404 error WordPress.
Reset Permalink
Now the question arises What are permalinks? Permalinks are the permanent URLs to your individual pages and blog posts. The URL to each post should be permanent and never change to be known as the permalink.
To fix the URL with a WordPress 404 error have to update your permalinks settings and change rewrite rules. There are two methods through which you can reset these permalinks.
1st method
- Login to your account and go to the admin dashboard.
- Go to settings and Click on permalinks.
- Select the plain radio button option.
- Scroll down and click on Save Changes.
Now your permalinks have been reset and you won’t find any 404 error message and you can check your posts, pages, and images.
If this method doesn’t work then you can try another method in which you can do these changes manually given below.
2nd Method: Do it manually
If you need to reset permalinks manually then you have to access and edit your .htaccess file which is located at the root of your site. You can access your .htaccess file through SSH, command line, FTP, or cPanel.
As FTP stands for File Transfer Protocol. It is a “means of transport” i.e. it is used to transfer files from one local computer to a remote website, such as a WordPress blog.
Also, cPanel is also known as a control panel which is basically a web hosting panel based on a Linux system and provided by many hosting providers.
It provides a website with all the automation tools to simplify the process of hosting a website.
There are two ways through which you can edit your .htaccess file in WordPress manually:
- The first way is to download a copy of your .htaccess file and then modify it in a text editor which is compatible. Here as an editor, users have the authority to edit, write, publish, and delete posts. This includes posts that are written by other users. Then re-upload it on your site by replacing the original .htaccess file.
- The second way is to use SSH or FTP clients such as Filezilla to modify your .htaccess file directly on your server and then click on Save Changes.
# BEGIN WordPress
RewriteEngine On

RewriteBase /

RewriteRule ^index.php$ - [L]

RewriteCond %{REQUEST_FILENAME} !-f

RewriteCond %{REQUEST_FILENAME} !-d

RewriteRule . /index.php [L]
# END WordPress
Fix Custom Post Types
In this, you have to check if your custom post types have unique titles and slugs. If any two or more posts have the same title then they need to be altered.
Just a single post/page can contain the same slug or URL. So make sure to change the WordPress permalink not Working. Otherwise, it will show a 404 error message on the screen.
Still, WordPress Posts Returning 404 Errors?
If you tried the above methods and still you are getting an error message then you need to troubleshoot the issue further. This error may occur due to your theme. So To resolve this error just try another theme to install and activate it. To get resolve your 404 Error follow the steps:
- Activate the WordPress twenty-seven theme.
- Go to the Appearance tab and click on themes.
- Click on activate when you find the WordPress default theme.
- Now if you don’t find any 404 error message on your screen then your theme was creating this 404 error problem.
- And If you still find the error then switch to your previous theme and deactivate all the plugins. This might help you to remove the 404 error.
Change and update WordPress URL in the database
If you encounter any 404 error message saying that “WordPress URL not found. If you entered the URL manually, please check your spelling and try again.”, then follow the steps given below:
- Go to your database name and Choose wp-option.
- Now change the URL like your website URL is https://www.xyz.com/blog replace it with http://localhost/blog
WordPress Page Not Found After Changing URL
If you didn’t want your 404 Error page you can also redirect the 404 error page to the homepage in WordPress To do this you have to install some plugins like Redirection, 404page or you can also do it manually by adding some line of code in you 404.php file. Follow the steps to redirect the 404 error post or page to the homepage:
- open your 404.php file in your theme’s folder.
- If it is not found then create a blank PHP file.
- Now paste this code on that file.
<?php
header(“HTTP/1.1 301 Moved Permanently”);
header(“Location: “.get_bloginfo(‘url’));
exit();
?>
And now it’s done. if any user opens this URL it will be redirected to the homepage.
Get in touch with our support team
If the above methods are not at all useful and you are still having trouble resolving the 404 errors then don’t panic.
Our support team is just one call away to help you. You can contact our professional experts and they will listen to you and will try to provide effective solutions to your problem.
For any Technical help and support Dial, WordPress customer service number +1-855-945-3219.
Also Read:
11 essential tips to ensure your WordPress Security
4 Simple Ways to Backup Your WordPress Site
WordPress Maintenance – An Advance Guide
8 Signs Indicating Your WordPress site Hacked
Struggling with how to fix the 404 Not Found error on WordPress posts and pages?
This error might appear sometimes when you, or a visitor, try to access a certain page on your site. Instead of seeing the content that you expected, you see something like an “Error 404 Not Found” message instead.
Thankfully, this error message is usually localized to the specific page in question. That is, it shouldn’t affect any other parts of your site (though it can in rare cases).
However, that doesn’t mean it’s not frustrating, and you’ll definitely want to do your best to prevent and fix 404 errors on your site.
In this post, we’ll cover everything that you need to know about 404 errors including:
- What the 404 Not Found error is and what causes it
- Fixing sitewide 404 errors on WordPress
- Fixing individual 404 errors on WordPress
- Monitoring your site for 404 errors
- Creating a custom 404 page for your site (this will make more sense after you’ve read the other sections!)
Table Of Contents
- What Is Error 404 Not Found?
- How to Fix Sitewide 404 Not Found Errors in WordPress
- How to Fix Individual 404 Errors on WordPress
- How to Monitor Your WordPress Site for 404 Errors
- How to Create a Custom 404 Error Page
- Fix the WordPress 404 Not Found Error Today
What Is Error 404 Not Found?
The Error 404 Not Found message appears when you, or one of your visitors, tries to visit a page on your site that doesn’t exist.
That could be either because the page never existed, the page was removed (deleted), or the page’s URL was changed to a different URL.
For example, let’s say you have a blog post at yoursite.com/2020-guide. If you update the post for 2021 and change the URL to yoursite.com/2021-guide, then anyone who tried to visit the original 2020-guide URL would see a 404 error because that page no longer exists at that URL (unless you set up a redirect – more on that later!).
Most of the time, the error only appears when a person tries to visit a nonexistent URL on your site. That is, the error won’t affect any content that does exist.
In rare situations, however, a corrupted .htaccess file can cause the 404 error to appear on your entire site.
404 Error Variations
The 404 Error Not Found message can appear in several different variations depending on what web hosting/web server you’re using, the browser that a visitor is using, and how your site is configured.
Here are some common variations:
- “Error 404”
- “404 Not Found”
- “Not Found”
- “Page Not Found”
- “The requested URL was not found on this server.”
- “HTTP Error 404”
- “We can’t find the page you’re looking for.”
- “The page cannot be found”
To add some further complexity, it’s actually possible to create your own custom 404 message that will appear whenever there’s a 404 error on your site.
We’ll cover this topic in more depth later on, but this lets you create a more user-friendly error message and help redirect users to the right spot.
For example, on the Astra website, we have a custom 404 page that includes a search box to help users find the content that they’re looking for:

This is actually the default 404 error page for all sites using the Astra theme, though Astra makes it easy to create your own custom design – more on that later too.
Some websites even use their 404 pages as a way to show some creativity, like this 404 page from Ready to Go Survival:


Hello! My name is Sujay and I’m CEO of Astra.
We’re on a mission to help small businesses grow online with affordable software products and the education you need to succeed.
Leave a comment below if you want to join the conversation, or click here if you would like personal help or to engage with our team privately.
What Causes Error 404 Not Found?
There are two types of 404 errors that you might be experiencing and the likely cause depends on which type of error it is.
We’ll include fixes for both types of problems below.
If you see a sitewide 404 Not Found error no matter what page you try to visit, the issue is likely with your WordPress site’s permalink structure or .htaccess file.
Something got corrupted somewhere which is causing your site’s server to think your site’s URLs don’t exist. It sounds serious, but this one is usually pretty easy to fix so don’t worry.
On the other hand, if you only see the 404 Not Found error on specific URLs (but the rest of your site works), then there are several potential problems:
- Broken links – Someone might be linking to a page on your site that doesn’t exist. This could be an external link on someone else’s site or an internal link on your own site. When people click the link, it takes them to a page that doesn’t exist and triggers the 404 error.
- Changed URLs – If you change the URL of a piece of content, you might have people still trying to visit the old URL which will trigger a 404 error (unless you set up a redirect).
- Typos – Someone might have accidentally mistyped the URL that they’re trying to visit.
It’s impossible to fix all of these causes because you can’t prevent someone from making a typo.
But you can fix broken links and changed URLs, and you can create a custom 404 page to create a more user-friendly experience for users who make typos.
Why You Need to Fix Error 404 Not Found?
The 404 error can be problematic for a couple of reasons.
The biggest reason is that it’s just plain frustrating for your visitors. They’re trying to access a certain piece of content. Instead of seeing the content they expected, they’re seeing a 404 error instead.
For this reason alone, you should always try to fix 404 errors on your site.
Beyond creating a poor user experience, 404 errors can also be an indirect drag on search engine optimization (SEO). If the 404 error is a result of a broken internal or external link, you might be wasting link equity.
Basically, Google ranks a page in part on how many links point to it. So if a link points to a missing page instead of the actual URL, you’re essentially missing out on the benefit of that link.
Some SEO experts also claim that 404 errors can make it harder for Google to crawl your site, though Google says this isn’t an issue.
How to Fix Sitewide 404 Not Found Errors in WordPress
If you’re seeing the Error 404 Not Found message across your entire WordPress site, you should be able to fix the problem by regenerating your site’s .htaccess file or permalinks.
If you can still access your WordPress dashboard, you can do this directly from your dashboard. Otherwise, you might need to connect to your server using FTP.
Assuming you still have dashboard access, all you need to do is go to Settings → Permalinks in your dashboard.
Then, just click the Save Changes button.
There’s no need to make any other changes – just clicking Save Changes will force WordPress to generate a new .htaccess file, which should fix the problem:
If you can’t access your WordPress dashboard, you’ll first need to connect to your site’s server using FTP with a tool like FileZilla (tutorial here).
Then, delete the existing .htaccess file. We recommend downloading a copy of the file first so that you have a backup just in case.
Once you delete the .htaccess file, you should be able to access your WordPress dashboard and you can generate a new .htaccess file by going to Settings → Permalinks and clicking Save Changes.
How to Fix Individual 404 Errors on WordPress
If you’re experiencing 404 errors on specific pieces of content, you’ll need a more targeted approach to fix the problem.
There are two tactics that you can try:
- Fix any broken links on your site to make sure you’re not accidentally sending visitors to content that doesn’t exist.
- For remaining errors, you can set up redirects to automatically send people to the correct URL(s) instead of showing a 404 error.
How to Find and Fix Broken Links
The first step in stopping 404 errors is to make sure you don’t have any broken links on your site that send users to a 404 error.
To quickly scan your site for broken links, you can use the free Broken Link Checker plugin.
Once you install and activate the plugin, go to Tools → Broken Links to view a report.
If the plugin detects a broken link, you can fix it directly from the plugin’s interface:
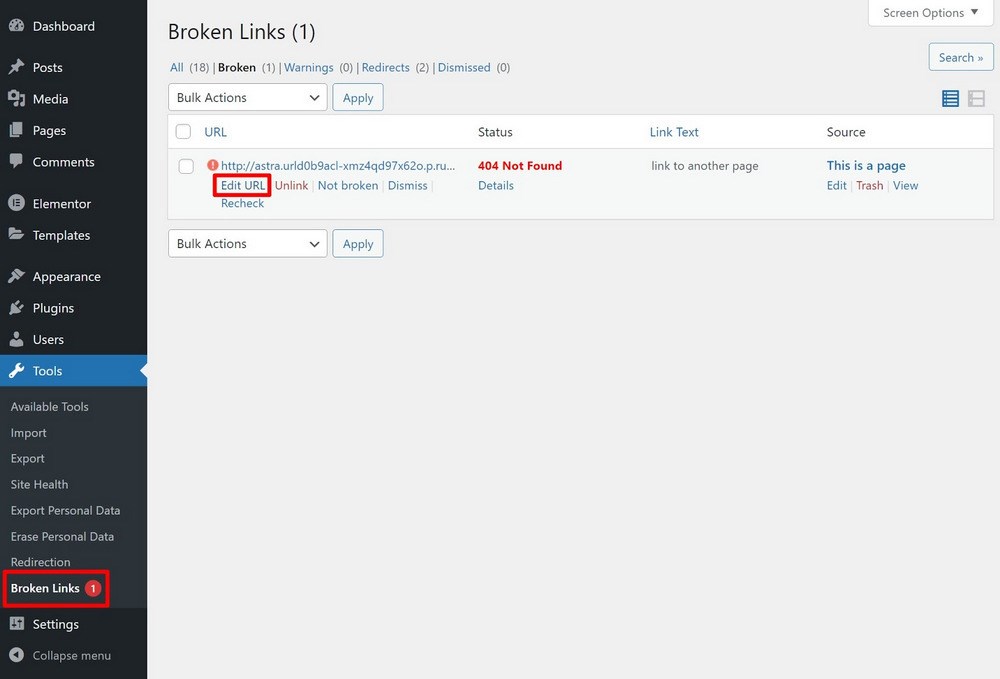
Note – while this plugin is useful, we recommend deactivating it once you’re finished to reduce any performance impact from the plugin’s scanning.
How to Set Up Redirects
For any remaining 404 errors, you can fix the problem by manually setting up a redirect to send users to the correct page.
Let’s go back to that example from before where you had a blog post published at yoursite.com/2020-guide and then you updated it for 2021 and changed the URL to yoursite.com/2021-guide.
To prevent people from seeing a 404 error when they visit yoursite.com/2020-guide, you can set up a redirect that automatically redirects the people who visit yoursite.com/2020-guide to yoursite.com/2021-guide.
There are several plugins that make it easy to set up redirects on WordPress, but we recommend the popular and free Redirection plugin.
All you do is enter the original URL and the new destination URL and the plugin will handle everything else for you:
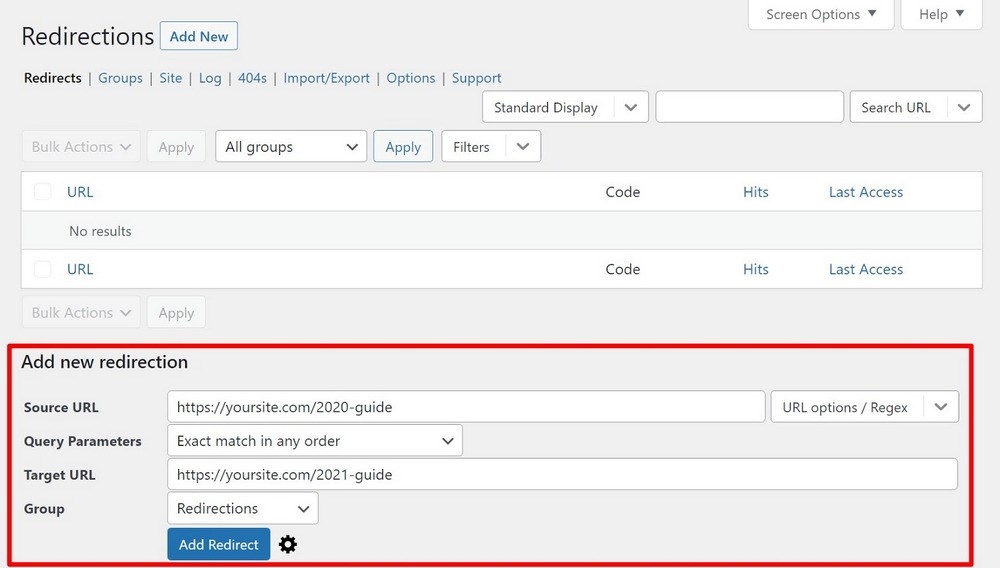
To learn more about what redirects are and how to use them, we have a complete guide on WordPress redirects, Or you can check this video to fix 404 errors using redirection.
How to Monitor Your WordPress Site for 404 Errors
If you want to proactively prevent 404 errors on your site, it can be useful to monitor which URLs are triggering them. Then, if you see that a particular URL is causing problems, you can step in and set up a redirect to send users to the proper spot.
There are a few ways that you can track the URLs that are triggering 404 errors:
- Google Analytics
- Google Search Console
- The Redirection plugin
Google Analytics
If you’re using Google Analytics, you can use its built-in reporting to check for URLs that caused 404 errors.
To get started, go to Behavior → Site Content → All Pages and then search for “Page Not Found” with Page Title as the primary dimension:
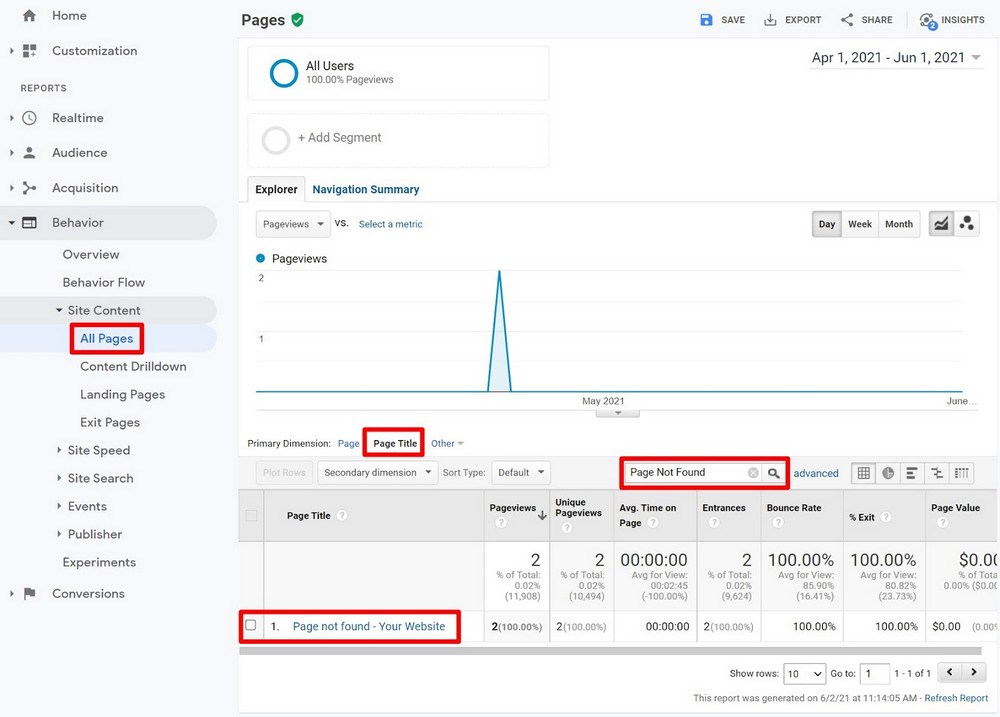
You can then click on the result to see the specific URLs that caused the error:
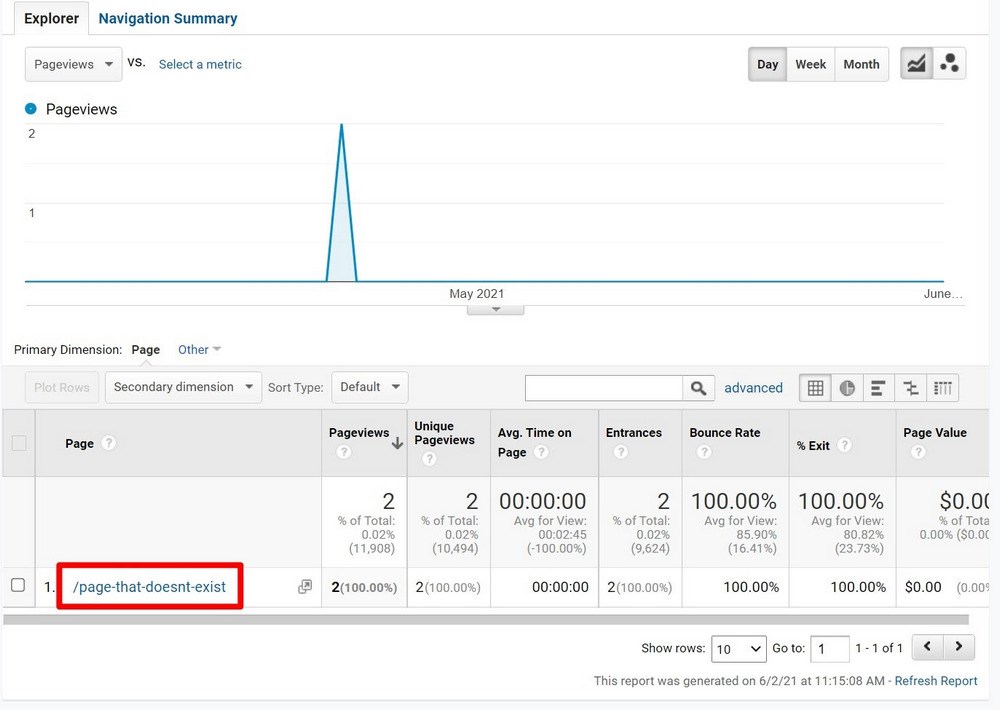
In this example, you can see that yoursite.com/page-that-doesnt-exist was the URL that triggered the 404 error. You can use this information to set up a redirect.
If you’re not using Google Analytics yet, you can follow our guide to add Google Analytics to WordPress or browse the best Google Analytics plugins.
Google Search Console
Google Search Console is another useful way to track 404 errors. Unlike Google Analytics, which tracks the 404 errors that your human visitors encounter, Google Search Console will show the 404 errors that Google’s web crawler bot encounters.
Typically, these errors are the result of broken links, either on your own site or someone else’s site. Or, it could be an issue with your sitemap including content that doesn’t exist.
To look for 404 errors, go to the Coverage report and check for 404 errors in the Type column:

Redirection Plugin
For a native WordPress solution to track 404 errors, you can use the free Redirection plugin that we mentioned above. It helps you both track 404 errors and then easily set up redirects for any problems that it finds.
In the setup wizard, make sure to enable the 404 logging feature. Beyond that, there’s nothing else to configure.
You can view a log of 404 errors by going to Tools → Redirection → 404s. If you hover over an error, the plugin will give you an option to set up a redirect right away:
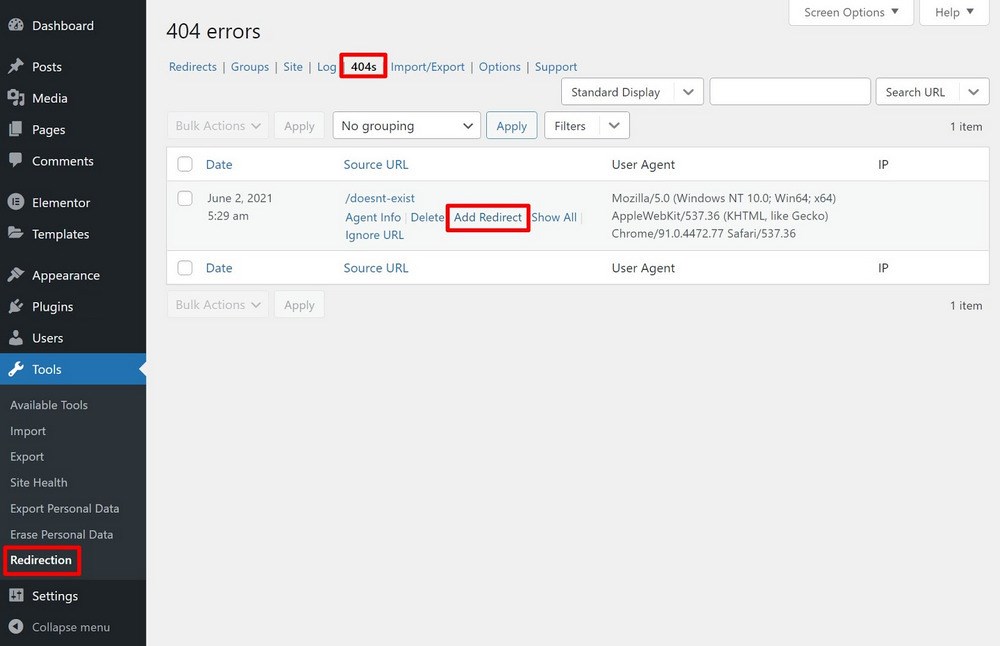
How to Create a Custom 404 Error Page
As we mentioned earlier, another way to lessen the impact of 404 errors is to create your own custom 404 page. You can use your custom 404 page to…
- Explain the error and why the visitor isn’t seeing the content that they expected to find.
- Include a search box.
- Offer some relevant links to your most popular content/features.
There are lots of different ways that you can create a custom 404 page on WordPress – we’ll share three code-free methods.
Astra Theme
If you’re using the Astra theme, you can use Astra’s built-in Custom Layouts feature, which is available in Astra Pro.
Once you activate the Custom Layouts module, you can go to Appearance → Astra Options → Custom Layouts.
Make sure to set the layout as the 404 page and then you can use the native WordPress editor or your favorite page builder to design the 404 page:
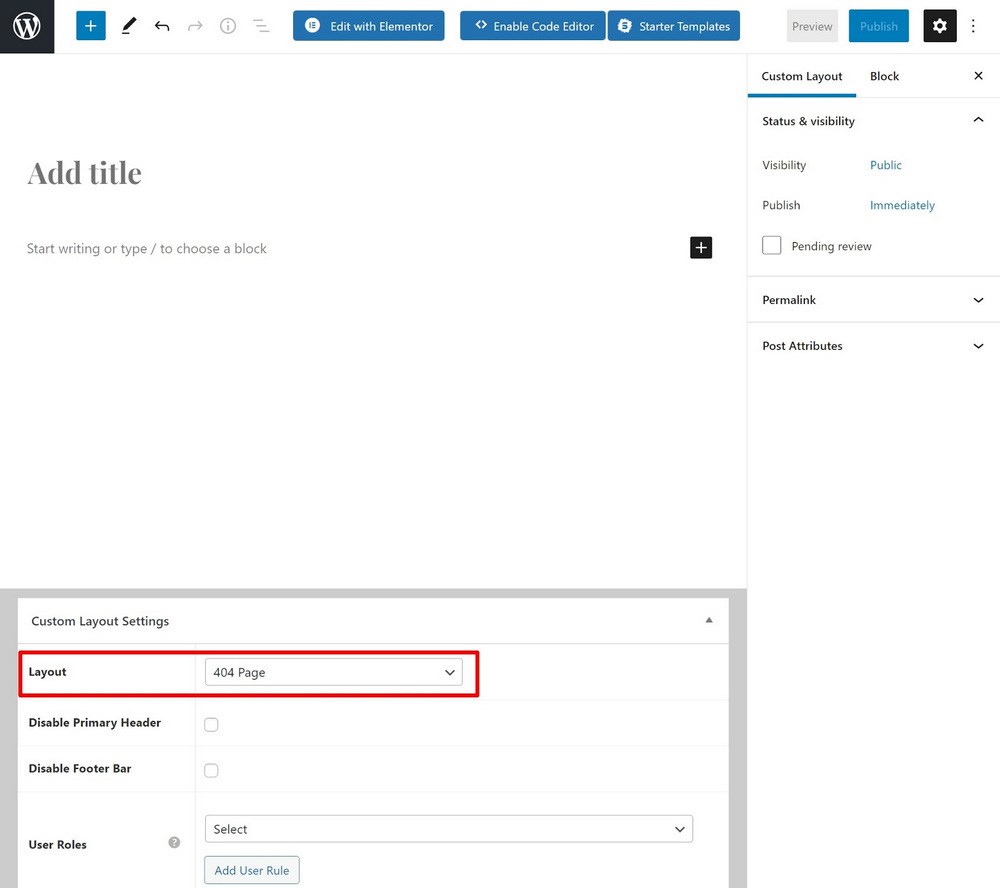
For a more detailed look, you can follow our guide on how to create a custom 404 page with Astra Custom Layouts.
Elementor Pro
If you’re using Elementor Pro (our review), you can use Elementor Theme Builder to design a custom 404 page template:
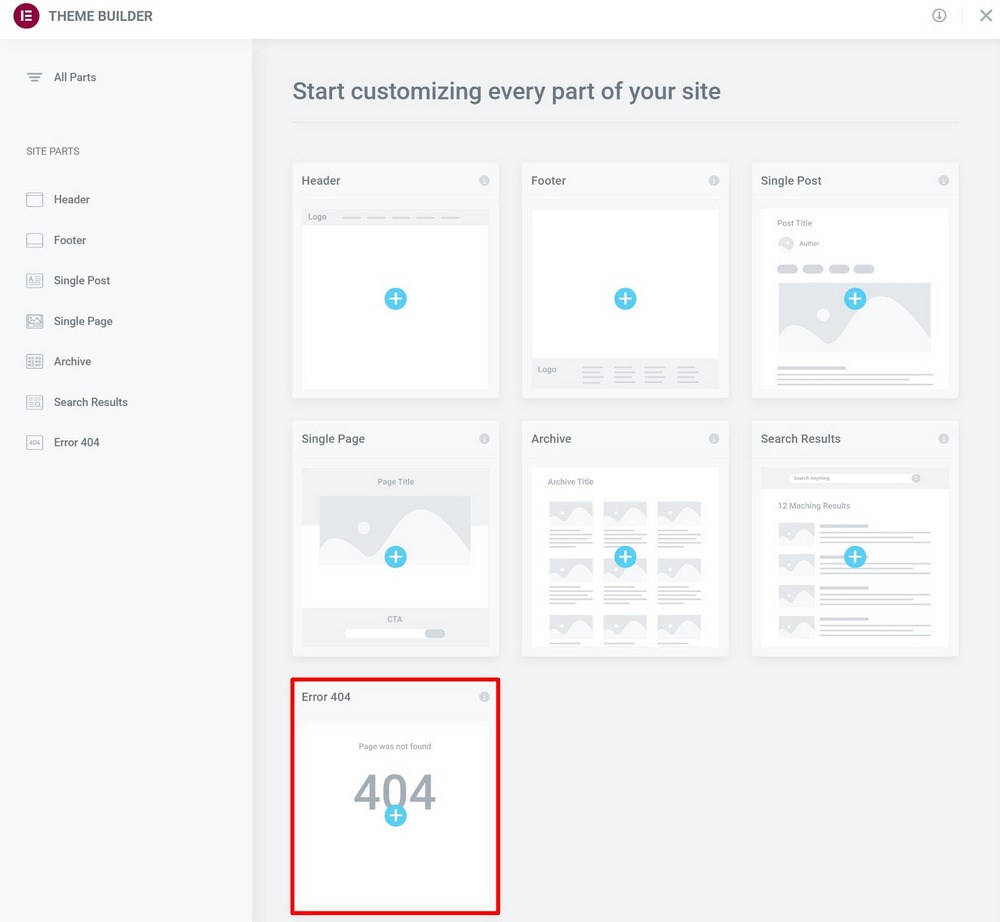
To learn how to use the Elementor interface, you can follow our Elementor tutorial.
404page
For a free option to create a custom 404 page, you can use the 404page plugin.
To get started, create the design that you want to use for your 404 page using a regular WordPress page (Pages → Add New). You can use the regular WordPress editor or your favorite page builder.
Once you’ve done that, go to Appearance → 404 Error Page and use the drop-down to select the page that you just created:
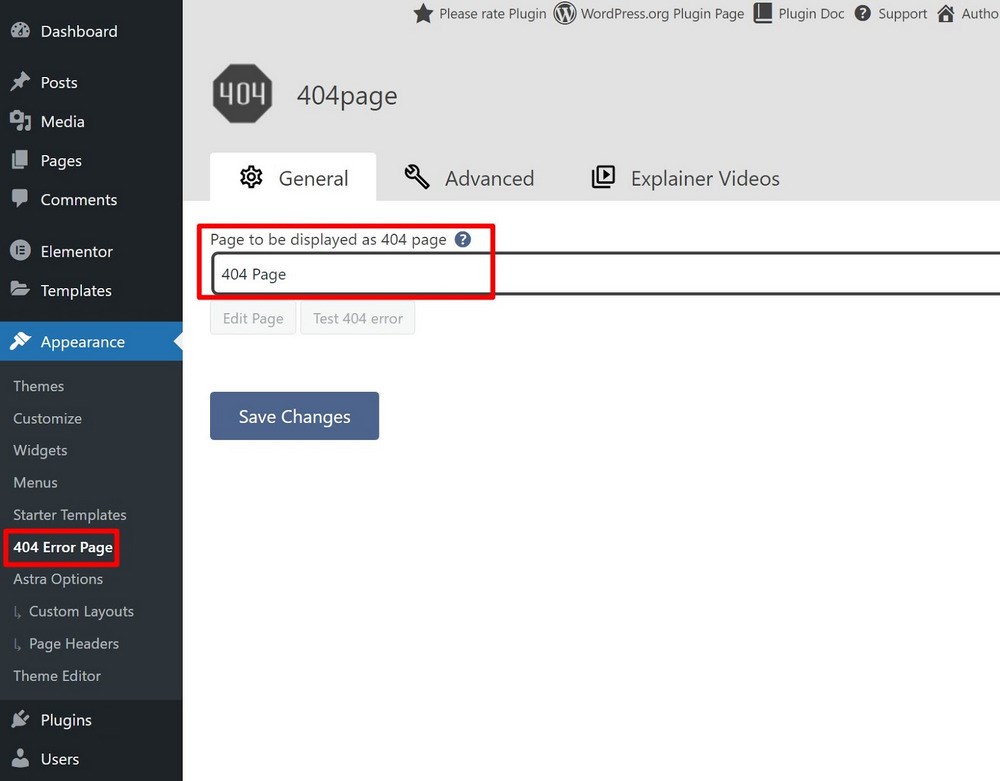
That’s it! People who experience a 404 error will now see that page.
Fix the WordPress 404 Not Found Error Today
The Error 404 Not Found message can be frustrating for WordPress users. But with the tactics in this post, you can easily fix your site’s 404 errors and prevent 404 errors in the future.
Beyond that, you can also create your own custom 404 error page that lessens the impact of errors by providing an explanation of what’s going wrong and helping visitors find the content that they’re looking for.
Recommended Articles:
- How to fix err_connection_refused error
Do you still have any questions about the Error 404 Not Found message on WordPress? Let us know in the comments!
Are your WordPress posts returning a 404 error on your website?
This error happens when you can access your WordPress admin area and blog, but when you try to open a post, you will see “404 Not Found”.
In this article, we will show you how to fix the WordPress posts returning 404 error.

What Causes the WordPress Posts Returning 404 Error?
WordPress is a powerful content management system (CMS), but a slight change can sometimes make your WordPress website inaccessible.
In some cases, you may not be able to access your WordPress admin area or the website itself, like with the internal server error or error establishing a database connection.
By contrast, when your WordPress posts are returning 404 errors, you will still be able to get into your admin area and see your WordPress website on the front end. Then, when you click on a blog post, you will see a message saying “404 Not Found”.
Although this error message can be scary, it doesn’t mean you have lost your WordPress posts. Instead, your .htaccess file has probably been deleted, or something went wrong with the rewrite rules on your blog.
That being said, let’s look at how to fix the WordPress posts returning 404 error. You can use the links below to jump straight to different solutions.
- Video Tutorial
- Fix Your Permalink Settings
- Update the WordPress .htaccess File
- Contact Your Hosting Provider
- Fix for Local Servers
Video Tutorial
Subscribe to WPBeginner
If you’d prefer written instructions, then just continue reading.
Fix Your Permalink Settings
WordPress posts can return 404 errors because of problems with rewrite rules in your .htaccess file. In most cases, you can fix the problem by updating your permalink settings.
Simply go to Settings » Permalinks in your WordPress admin, and click on the ‘Save Changes’ button.

This will update your permalink settings and flush the rewrite rules.
In most cases, this solution fixes the WordPress posts 404 error. However, if it does not work for you, then you probably need to update your .htaccess file manually.
Update the WordPress .htaccess File
First, you will need to connect to your server using an FTP client or the File Manager app in your WordPress hosting dashboard.
Next, you will need to find and edit the .htaccess file, which is located in the same location as folders like /wp-content/ and /wp-includes/.
Simply right-click on the file and select ‘File permissions’.

You can make the file writeable by changing its permissions to 666.
Simply enter ‘666’ into the ‘Numeric value’ box and then click on ‘OK’.

Then, you need to repeat the steps in the Fix the Permalinks Settings section of our tutorial. Once you have done this, don’t forget to change the permissions back to 660.
You can also edit the file and add code to it.

Once you have opened the .htaccess file with a text editor, simply insert this code.
# BEGIN WordPress
<IfModule mod_rewrite.c>
RewriteEngine On
RewriteBase /
RewriteRule ^index.php$ - [L]
RewriteCond %{REQUEST_FILENAME} !-f
RewriteCond %{REQUEST_FILENAME} !-d
RewriteRule . /index.php [L]
</IfModule>
# END WordPress
Contact Your Hosting Provider
If neither of the solutions above has fixed the WordPress posts returning 404 error, then we recommend contacting your WordPress hosting provider. There may be an error on their end, or they might be able to help you troubleshoot the problem.
Please also see our guide on how to properly ask for WordPress support and get it.
Fix for Local Servers
If you are using a local server for testing purposes, then you will need to enable the rewrite_module in the Apache configuration of your MAMP, WAMP, or XXAMP site.
We hope this article helped you resolve the posts returning 404 error in WordPress. You may also want to see our guide to the most common WordPress errors and how to fix them, along with our expert picks for the best WordPress plugins to grow your site.
If you liked this article, then please subscribe to our YouTube Channel for WordPress video tutorials. You can also find us on Twitter and Facebook.
Disclosure: Our content is reader-supported. This means if you click on some of our links, then we may earn a commission. See how WPBeginner is funded, why it matters, and how you can support us.
Editorial Staff at WPBeginner is a team of WordPress experts led by Syed Balkhi with over 16 years of experience building WordPress websites. We have been creating WordPress tutorials since 2009, and WPBeginner has become the largest free WordPress resource site in the industry.

От автора: приветствую, вас, уважаемые читатели. 404 ошибка WordPress: что это? зачем? и почему? Из этой статьи вы узнаете ответы на эти вопросы, а именно: что такое 404 ошибка WordPress, как исправить ошибку 404 в WordPress и как, благодаря ошибке 404, подсказать пользователю, что он набрал неверный адрес.
Что же такое ошибка 404?
Начнем, пожалуй, с определения того, что же такое ошибка 404. Ошибка 404 — это стандартный код ответа сервера на ошибочный запрос. Этот код означает, что по данному адресу ничего нет: Not Found (не найдено). Прежде всего этот код необходим для поисковых роботов, чтобы сообщить им, что по данному URL ничего нет.
А нужна ли ошибка 404?
Здесь можно было бы ограничиться одним словом — нужна. Но давайте попробуем понять, зачем именно она нужна. На самом деле есть подход, применяющийся порой веб-мастерами, который состоит в следующем: при обращении к несуществующему адресу идет перенаправление на главную страницу сайта. Этот подход не очень хорош, поскольку так выходит, что на одну страницу — главную — ведут несколько ссылок. На эту ситуацию уже не очень хорошо могут отреагировать поисковые системы.
Вот для того, чтобы избежать возможных неприятностей, и существует ошибка 404, которая должна отправляться в ответ на ошибочный запрос. В этом случае мы говорим поисковому роботу, что такой страницы нет, и он должен удалить ошибочный адрес из поискового индекса.
Настройка страницы 404 в WordPress
Итак, мы выяснили, что страница 404 — нужна. Как же настроить в WordPress эту страницу и в чем заключается настройка 404 страницы? Собственно, зачастую нам не придется делать ничего особенного, поскольку в WordPress все уже сделано за нас. Все, что вам необходимо сделать — создать в папке активной темы новый шаблон (если его там еще нет), который так и называется — 404.php.
Далее этот шаблон мы можем оформить по собственному вкусу. Это может быть как шаблон в общем стиле сайта, так и кардинально отличающийся от общей стилистики. Вообще, оформление страницы 404 — довольно интересный и иногда даже занимательный вопрос. Многие сайты стараются выделиться, создавая страницы 404 с юмором, с т.н. «пасхальными яйцами», вставляя на эту страницу всевозможные занимательные картинки.

Профессия PHP-разработчик с нуля до PRO
Готовим PHP-разработчиков с нуля
Вы с нуля научитесь программировать сайты и веб-приложения на PHP, освоите фреймворк
Laravel, напишете облачное хранилище и поработаете над интернет-магазином в команде.
Сможете устроиться на позицию Junior-разработчика.
Узнать подробнее
Командная стажировка под руководством тимлида
90 000 рублей средняя зарплата PHP-разработчика
3 проекта в портфолио для старта карьеры
Это может быть как относительно простая, но со вкусом оформленная страница ошибки 404, например, как на Гитхабе:

Так и довольно сложная, великолепная и оригинальная страница студии дизайна Bluedaniel — www.bluedaniel.com/404:

Ради интереса вы можете обратиться к поиску по картинкам Google, набрав простой поисковый запрос — 404. В ответ Вы найдете массу интересных и креативных картинок, которые используются для оформления страницы 404.
WordPress — 404 не работает…
Иногда вы можете столкнуться с такой ситуацией, что шаблон 404.php есть, но он почему-то не срабатывает, т.е. WordPress при возникновении ошибки 404 просто не подключает этот шаблон. Такое иногда случается и связано с настройками сервера.
Как же исправить эту ситуацию? Очень просто. Найдите в корне вашего сайта (рядом с папкой wp-content) файл .htaccess и добавьте в этот файл следующую строку:
|
ErrorDocument 404 /index.php?error=404 |
Эта строка заставит сервер при возникновении ошибки 404 обращаться по нужному адресу. Ну а WordPress уже подключит страницу 404. Если вдруг вы не найдете в корне сайта файл .htaccess, тогда создайте его самостоятельно. Сделать это можно через любой редактор кода (например, Notepad++).
Ошибка 404 — что делать?
До этого мы с Вами рассматривали оформление страницы 404 в WordPress. Но что делать, если на вашем сайте только и присутствует страница 404? Т.е. работает только главная, а при попытке перейти на любую другую страницу вы получаете в ответ ошибку 404 в WordPress? Да, такое тоже иногда бывает. Но не спешите кричать «Караул!» и переустанавливать WordPress. Можно попытаться решить проблему своими силами.
Вполне возможно, что почему-то произошла ошибка с настройками постоянных ссылок в WordPress. Попробуйте зайти в меню Параметры — Постоянные ссылки и просто нажмите кнопку Сохранить изменения. В большинстве случаев это поможет решить проблему с постоянной ошибкой 404 в WordPress.
Если первая рекомендация не помогла, тогда проверьте наличие в корне сайта упомянутого ранее файла .htaccess. Откройте этот файл и проверьте, присутствуют ли в нем вот эти строки:
|
# BEGIN WordPress <IfModule mod_rewrite.c> RewriteEngine On RewriteBase / RewriteRule ^index.php$ — [L] RewriteCond %{REQUEST_FILENAME} !—f RewriteCond %{REQUEST_FILENAME} !—d RewriteRule . /index.php [L] </IfModule> # END WordPress |
Если вдруг этих строк там не окажется, тогда добавьте их. Этот способ также должен помочь решить проблему постоянной ошибки 404 в WordPress.
Профессия PHP-разработчик с нуля до PRO
Готовим PHP-разработчиков с нуля
Вы с нуля научитесь программировать сайты и веб-приложения на PHP, освоите фреймворк
Laravel, напишете облачное хранилище и поработаете над интернет-магазином в команде.
Сможете устроиться на позицию Junior-разработчика.
Узнать подробнее
Командная стажировка под руководством тимлида
90 000 рублей средняя зарплата PHP-разработчика
3 проекта в портфолио для старта карьеры
Друзья, надеюсь, ознакомившись со статьей вы исправили ошибку 404 в WordPress и смогли настроить страницу 404. Если у вас возникли какие-либо вопросы — не стесняйтесь их задавать, мы попробуем ответить на них.

Let’s start with the beginning: what does a 404-error page mean, after all?
A 404-error page means a broken link. It means that the content users searched for on that page doesn’t exist or it does no longer exist.
404 is the status code a web server displays when the requested page cannot be found.
State of 404 error pages
Every website provides a 404 page when the requested content doesn’t exist. Every website delivers a 404 page, even if there’s no customization in place. It’s important, however, to give users alternative options as to how they can continue navigation within the website.
There’s a difference between browser-based 404 and page error 404.
Browser-based 404:
This type of error page implies that the website itself doesn’t exist. It’s highly frustrating for users. It implies that there’s no other variant to find helpful information at the respective address.

Page error 404:
In a customized 404 error page, on the contrary, you get a chance to keep readers hooked and guide them through the website, to the information they need. A 404 error-page implies there’s no content on the required page, but users can return to a different page and reinitiate their search.

Such a page needs to be customized accordingly, to be user-friendly, and invite readers to stay on site. But how the error page can be customized?
Landing on an error page can be frustrating. Such a page needs to be customized to make it user-friendly and invite readers to stay on the site. To better the user’s experience, you can create an interactive game. This will redirect your reader’s attention away from the error, thus turning a mistake into an opportunity to create a positive brand impression. Remember, a well-designed 404 page can reduce your bounce rate and increase your conversions.
To be customized, you need to first find the 404 error page into the WordPress website.
Where do I find the 404 error page in my WordPress?
The theme in use for your website can have a 404-error template file. To find it, login to your WordPress Admin dashboard. In the left-hand menu, go to Appearance -> Theme Editor. On the right side of the screen, you should find a 404 template (404.php file) you have to customize as you want.

Important Note! For some themes, there’s no 404.php file available in Theme Editor. That doesn’t need to upset you, because there’s a better solution to customize your 404-error page. Keep reading on.
To start the process of customizing a 404-error page, you also need to be aware of its usefulness for the readers. You need to be fully aware of its importance in that:
- A customized 404 error-page is user-friendly, and it encourages navigation within the rest of the website, increasing time on site (when there’s a risk for users to leave the website)
- Custom 404 pages serve to increase branding. As long as they borrow the color scheme of the website, and the layout integrates well in the overall website presentation, typography is in line with that of other pages, customized 404 pages have their contribution to the brand personality in the online medium.
- A 404-page acts like a soft-sell landing page: it helps retain people on the website and it can serve to better clarify the decision-making process for users that’ll relaunch their search.
The actual customization of a 404 error-page
To bring specific elements to a 404 page and customize it to its best, there are 3 options available:
- You have to modify the 404.php file. To do so, you have to adjust code for the error page customization. Some CSS & PHP knowledge is required.
Moreover, to be sure everything else stays in place in the website, you should ensure you have a backup of the website before proceeding to the actual changes in the 404.php file.
- Another option is to take the 404-page template from Twenty Thirteen theme and apply it to your theme. Not very complicated, it also requires some coding knowledge to make the code transfer appropriately and have it work.
3. A third option is to use plugins for 404 pages. Pay attention, though, that you cannot use any plugin that’s available for your WordPress website (That’s why it’s best to make a custom 4040 page with complete control over the page, and no reliance on a plugin).
And we’ll explain you why:
When a user lands on a broken link, he/she is redirected to a custom 404 page. The same goes for search engine bots. Bots are redirected to a custom 404 page, once they identify a broken link. Plugins that make this redirection are not SEO-friendly, and they are to be avoided.
However, there’s a plugin that you can safely use without affecting your SEO: it’s 404Page. It doesn’t make that redirection, and it’s super easy to use. With 404Page, you can customize the page just like any other page in the website. There are some limitations, but for additional customizations, you’ll need a custom 404 page and coding knowledge to make the changes.
In terms of basic customizations, and even more than basic, you can rely on 404Page.

Download the plugin
Let’s see how you can use the 404Page in your WordPress, and make it simple:
404Page plugin for customizing 404-error pages in WordPress
- Login to your WordPress Admin dashboard.
- In the left-hand menu, go to Plugins -> Add New.
- In the search bar placed on the right side of the dashboard, type in 404Page (the name of the plugin).

- Click Install, then Activate plugin.
- Next, create a page that’ll be representative as your 404 error-page in the website.
Note that, for this doing, you have to go to Pages -> Add New -> create your own page.
The new page can be customized like any other page in the website, either in the WordPress Editor, or directly in the Customizer (as is the case for the Mesmerize theme).
How you can customize a 404-error page:
Add a specific title that explains that this is a 404 page.
You can add 1 or 2 blocks of content, if needed, for further indications or to embellish the page.
You might customize the background of the page. So it will perfectly integrate into the overall website design and, implicitly, its branding.
Elements to consider as potentially helpful in such a page:
- A search box – it might help users directly search for the information they need, right in the error page
- A link to the homepage – this is useful for orienting visitors in the navigation process, in case they landed on an error page
- A funny message – the text in a 404-error page might be friendly, so users be inclined to dwell longer on the website and relaunch their search for the needed information; such a message sets up a connection with users
- An explanatory message for the 404-error page display – if not funny, at least clear and explanatory, the text in the error page should help users. This text is bound to tell users why the error page is displayed at this step of their search process, and how to restart their browsing session
- Additional links to where users can restart their browsing session – in line with the above text element, links that help users navigate through important pages with useful information are more than welcome in 404-error pages
- The main menu – as we’ve mentioned useful links, the main menu cannot miss from the list. It includes the most important links for visitors to follow, so consider including the menu in the 404-error page, as well.
- Some clues as to how users can get oriented into the website – this element is more generic, but we thought it might be useful to include it on the list, as incorporates several distinct elements (at your choice) that serve for orienting users within the website, and out of the error page.
- You can choose to display popular posts, so visitors of the blog can restart their navigation from a widely appreciated post of yours
- One might choose to display most commented posts, so users will restart their navigation within the blog from some posts presenting topics of high interest
- You can choose to insert an archives widget into the error page, so visitors can browse through older posts, in search of topics they are interested in.
- After the page you want to use is ready and customized, you have on more step to follow:
Check the results
In the left-hand menu of the WordPress Admin Dashboard, go to Appearance -> 404 Error Page.
Select the page you have just customized as your 404 page and set it as 404-error page that’ll be displayedappear by default, when users land on a broken link:

Click Save Changes and that’s it. You have finished setting up a customized 404-error page for your website or blog.
Now, re-enter your website address into the browser, and type just anything after the address/justanything. Here’s how the page might look like:

This is an example of 404-error page that we’ve customized with the 404Page plugin, for the Mesmerize Theme.
You have complete freedom as to how you can customize your page (as it is as just another page of your website). The above example is a simple suggestion: we wanted to show you 404-error pages can look greater than the default error pages.
Quick solution: is it really a solution to redirect all 404 pages to the homepage?
It’s become common practice to redirect 404 pages to the homepage. The idea is to help users reinitialize their search within the website, without bothering with a 404-page error. But is this really a recommendable solution?
The answer is: no. Redirect 404 pages to homepage only if you have a great number of broken links and you want to solve the issue quickly. Otherwise, it’s better to redirect pages individually, one by one and to the correct new pages.
We hope this article helps you customize your own 404-error page. You can put enough style into it as to make it more of a pleasant halt into the search process. Also, we hope you proceed to the 404-error page customization as soon as possible. You shouldn’t neglect this aspect that might make you lose precious traffic on site.
[sibwp_form id=1]
