
There seems to be a thread with a lot of good info on this subject here:
https://h30434.www3.hp.com/t5/Inkjet-Printing/HP-4525-59-F0-Error/td-p/5084375
Otherwise your choices are:
— Obtain a Service Manual for this printer model
— Modify an existing guide such as the following:
http://www.printertechs.com/printer-troubleshooting/479-59-f0-error-itb-contact-alienation-error-hp-…
— Scrap the printer
Experts are not HP Employees. Experts are advanced users, administrators, technicians, engineers or business partners who volunteer their time to answer community questions.
Please mark anything that is helpful with a Kudo.
When you are done troubleshooting, please mark one of the responses as the Solution.
This feedback enhances the community by helping future readers choose between multiple similar responses.
Hello,
<UPDATES IN RED TEXT BELOW>
The purpose of this post is to inform the community of one of the causes of and suggestions on how to resolve the 59.F0 error issue for the CP4025, CP4525 and CM4540.
<ITB Primary Transfer Roller Alienation- Sensor Flag Sticking in Up Position>
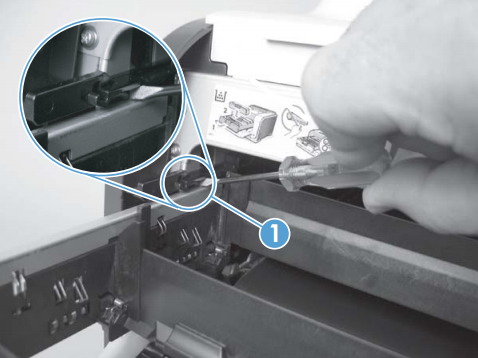
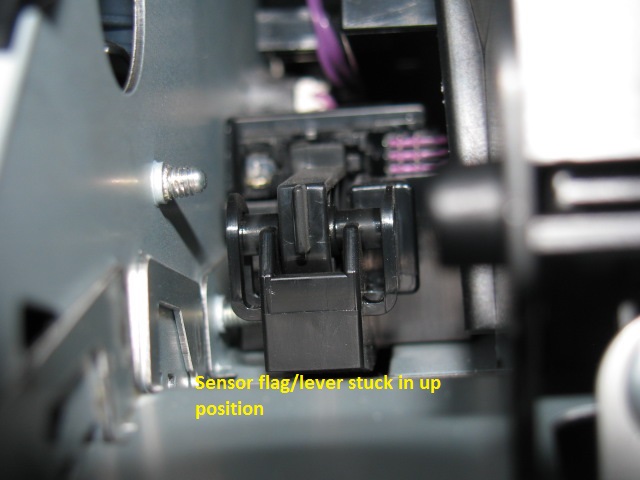
The ITB (Intermediate Transfer Belt, aka. Transfer Kit) has a feature that removes the contact of primary transfer rollers (one for each color under the belt surface) when the printer is not running to prevent sets, etc. The printer knows the location of the transfer rollers by cycling the system and getting a response from the sensor: (K on Manual Sensor Test for 4025/4525 and SR9 on CM4540). The ITB has a white plastic pusher (in image #3 below) that moves the sensor flag lever (POSITION DETECT ASSY) on the printer (can be seen on left side with ITB removed hanging down from sheet metal cutout- Image #3). The flag passes through the photo interrupter of the sensor. The sensor flag/lever is returned to the home postion (down-image #2) by gravity. In some cases, the sensor flag/lever can become stuck in the up position (see image #1 and #3 below). When the flag/lever sticks or returns slowly the result can be a 59.F0 error.
Below is a recommended suggestion to resolve this problem:
- Upgrade the FW (http://h20564.www2.hp.com/hpsc/swd/public/readIndex?sp4ts.oid=3965807&swLangOid=8&swEnvOid=4062)
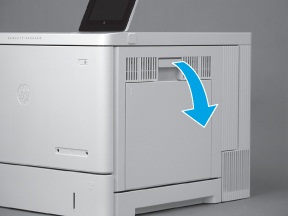
- If the error persisits, remove the ITB
- Remove the fuser and on the left side (front of printer side) you can see the sensor flag holder (image #1 and #2 below)
- If the sensor flag/lever is stuck in the up position then reach in and carefully release the part with your fingers. The images below show the sensor flag/lever stuck in the up position. Actuate the flag/lever a few times to make sure it is loosened up.
- Re-install the ITB
- Re-install the fuser
- Reboot to see if the error clears
If the issue returns in a short period of time, then the flag/lever is likely dragging and returning slowly or getting stuck again. If this occurs, then it is recommended to:
- Use the attached document «59.F0_Error_Position Detect Assy Cleaning(CP4025_CP4525) to clean the POSITION DETECT ASSY to resolve the sticking flag.
NOTE: The ITB is typically not the cause of this issue.
I hope this helps.
Regards,
DaveK.
I work for HP
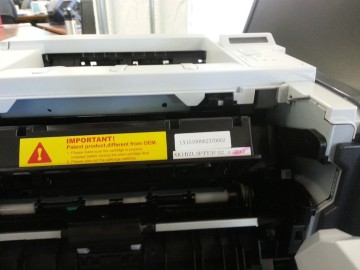
<Image #1>
Just below is an image looking in with the fuser removed at the sensor flag/lever in the holder with the photo interrupter located on the left side (front of printer). The sensor flag/lever is stuck in the up position which causes the 59.F0 error:

<Image #2>
Just below is an image looking in with the fuser removed at the sensor flag/lever in the holder with the photo interrupter located on the left side (front of printer). The sensor flag/lever is in the down position

<Image #3>
Just below is an image of the ITB Primary Transfer Roller Alienation Pusher (white plastic part) and Sensor Flag/Lever (black plastic part stuck in the up position in the sheet metal cutout) as seen looking at the left side (front of printer) from the right side of the printer with the right door open and ITB still installed.

59.FO error is a Transfer Alienation Failure. If you have warranty on this printer then call it into HP for servicing. If not then contact a local PCRepair shop and ask for a quote.
Here is the error information from the Service Manual.
59.XX Error, Turn off then on
The product has experienced an error with one of the internal motors.
● 59.30 = Fuser motor startup error
● 59.40 = Fuser motor rotation error
● 59.70 = Black developer motor startup error
● 59.71 = Cyan developer motor startup error
● 59.72 = Magenta developer motor startup error
● 59.73 = Yellow developer motor startup error
● 59.80 = Black developer motor rotation error
● 59.81 = Cyan developer motor rotation error
● 59.82 = Magenta developer motor rotation error
● 59.83 = Yellow developer motor rotation error
● 59.90 = ITB motor start error
● 59.A0 = ITB motor rotation error
● 59.C0 = Developer motor rotation error
● 59.F0 = Transfer alienation failure
Recommended action
1. Reset the printer:
a. Turn off the power by using the power switch, and then wait at least 30 seconds.
b. Turn on the power and wait for the product to initialize.
2. If you are using a surge protector:
a. Power off the printer.
b. Remove the surge protector.
c. Plug the product directly into the wall socket and turn the product power on.
3. If the error persists, replace the appropriate motor:
Error Code Motor Description HP Part #
59.30, 59.40 Fuser Motor Assembly RM2–7348–000CN
59.70, 59.71, 59.72, 59.73, 59.80, 59.80, 59.82, 59.83 59.C0 Developing Motor Assembly RM2–7344–000CN
59.90, 59.A0, 59.FO Drum Motor Assembly RM2–7342–000CN
Experts are not HP Employees. Experts are advanced users, administrators, technicians, engineers or business partners who volunteer their time to answer community questions.
Please mark anything that is helpful with a Kudo.
When you are done troubleshooting, please mark one of the responses as the Solution.
This feedback enhances the community by helping future readers choose between multiple similar responses.
Принтер или МФУ HP CLJ Pro M377 / M452 / M477 и другие модели выдают ошибку 59.F0 или 59.C0 выкл. и вкл. Устройство. Давайте разберемся в проблеме. Данная ошибка возникает после определенного пробега устройства. Ошибки в датчиках или по другому в концевиках. Ошибка 59.F0 означает что неисправна лента переноса, но если лента не прошла свой ресурс заявленным производителем, то какой смысл ее менять, да и к тому же это не дешевое удовольствие.
Разберем в чем неисправность ошибки, в ленте переноса изображения есть микрик, в котором со временем окисляется контакт и мозги устройства сигнализируют ошибку, не дающую дальнейшей работы на оборудовании.
Что можно сделать в данной ситуации, самое простое заменить ленту, второе очистка микрика от окислов. Чтобы до него добраться сначала надо разобрать принтер и извлечь ленту переноса. Далее становится труднее, так как повредив перенос изображения, вы автоматически попадаете на замену ее. Сам датчик не разбирается легко, концевик можно извлечь с помощью иголок не повредив его крепление. Контакты нужно очистить и привезти в порядок. Мультиметр должен показывать сопротивление не больше одного ома. Чтоб сэкономить время и деньги вы всегда можете обратиться к нам по ремонту принтеров.
Замена ленты переноса или профилактика аппарата

При разборке узла переноса нужно быть очень внимательным, так как повредив узел уже нельзя будет добиться идеальной печати документов. По работе мастер извлекает ленту переноса, разбирает ее полностью, проводит профилактику, затем добирается до виновника ошибки. Так как к нам очень много заходит аппаратов с этими ошибками, у нас есть инструмент который легко извлекает ножку микрика из датчика.
Провести ремонт в нашем сервисе довольно просто, создав заявку или обратившись по другим контактам. Занимает по времени от одного до двух дней в зависимости от загруженности инженеров. Насколько долго это прослужит, прослужит до конца ресурса ленты переноса.
How to fix the 59.F0 Error
59.F0 Error Description:
This 59.F0 (that is F-zero, not F-oh) error is primarily caused by a transfer alienation failure in which the ITB is stuck and unable to rotate, the SR9 sensor (the primary transfer roller disengagement sensor) has gone bad or the fuser drive assembly has failed.
The 59.F0 error is a common error on the CP and CM, and M version HP Color LaserJet products. Printers such as the HP Color LaserJet CP3525, CP4025, CP4525, M651, M680 and CM4540 encounter the dreaded 59.F0 error often.

59.F0 Error Code
Even the newer LaserJets M477 and M452 encounter the 59.F0 error. However, in the case of these models, the cause is a timing issue which can be resolved by updating the DC Controller firmware (contact Metrofuser for further information regarding this fix). Either way, diagnosing the 59.F0 error issue could be time consuming and costly.

59.F0 error, the usual culprit is a failing Fuser Drive Assembly
For a 59.F0 error, the usual culprit is a failing Fuser Drive Assembly; this assembly drives the fuser and also turns a flag on your transfer belt assembly.

HP 59.F0 Error Found on The HP Color laserJet CP3525 CM3530 CP4525 & CM4540
Solution to the 59.F0 Error
When troubleshooting the 59.f0 error, we recommend starting with the transfer belt itself. Remove the belt from the printer. On the right-hand side there is a white round protrusion that engages the belt with the drive assembly. You can rotate this clockwise (2) to rotate the belt and if all goes well, unlock the sensor flag into position (1).
-
How To Replace The HP CP4025 CP4525 CM4540 CP3525 CM3530 Transfer Kit Belt
-
How to Clean and Maintain The HP Color LaserJet Transfer Belt ITB ETB Assemblies
-
CP3525 CM3530 and CP4025 Fuser Drive Duplex Simplex Conversion RM1-5001 RM1-4974 Service Note
If the flag fails to engage downwards or spin, then replace the belt. This is a common issue on the CP3525, CP4025, CP4525 and CM4540 series products.
If replacement of the transfer belt does not resolve the 59.F0 error, then it could either be the Fuser Drive Gear assembly or the solenoid located on the assembly. Gaining access to this assembly is time consuming and could take up to four hours. Due to the amount of assemblies required just to gain access to the Drive Assembly, plan on at least two hours to obtain access to the solenoid itself.

59.F0 error repair and the HP Color laserJet CP3525 CM3530 CP4525 & CM4540 motor

59.F0 error repair and the HP Color laserJet CP3525 CM3530 CP4525 & CM4540 59.F0 solenoid
Much like the solenoids that release to engage the Tray 2 pickup drive, the Fuser Drive Assembly solenoid may also be sticking due to the wear of the noise dampening sponge, which can expose the glue causing the timing of the Fuser Drive Gear to slip.
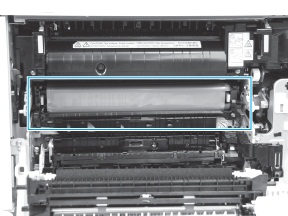
The picture above shows the Fuser Drive Assembly removed from the machine. The highlighted screws are required to be removed in order to access the solenoid.
The next picture shows the access point of the screws on the assembly still located inside the printer. These screws are accessible by removing the back cover, DC Controller, Low Voltage Power Supply and High Voltage Power Supply (both upper and lower).
The Main Drive Assembly (MDA) is not required to be removed to gain access to
the solenoid. After removal of the solenoid, denatured or 99% alcohol can be used to remove the glue from it. Remove the spring and armature from the solenoid. Thoroughly clean any residual adhesive left by the old solenoid pad. Be sure to also clean the underside of the armature before reassembling the solenoid.
Three or four layers of electrical tape can be applied in order to act as a replacement noise dampener. It is also recommended as to eliminate the magnetic charge that could build up when the solenoid arm strikes the base.

The solenoid is not always the issue. If the sponge is intact, and it does not stick, the Fuser Drive Assembly may very well be the issue. The part number for the Fuser Drive Assembly solenoid is RK2-0950.
If the transfer belt and Fuser Drive Assembly solenoid are good, the gears on Fuser Drive Assembly may be out of alignment. The three gears at the backside of the solenoid are keyed to keep them properly synchronized. Often, these gears will skip a tooth and then be out of sync, causing a 59.F0 error. Once the Fuser Drive Assembly is removed from the printer, you can easily remove two of these three gears and realign them so that the keyed gaps and teeth are in the right spots.
The Fuser Drive Assembly part numbers are as follows:
-
HP Color LaserJet CP3525 Simplex RM1-5001
-
HP Color LaserJet CM3530 CP3525 Duplex RM1-4974
-
HP Color LaserJet CM4540 Duplex RM1-5656
-
HP Color LaserJet CP4520 CP4525 Duplex RM1-5656
-
HP Color LaserJet CP4520 CP4525 Simplex RM1-6702
59.F0 Error Repair Difficulty Level
The 59.F0 level of repair is a 9 out of 10. Depending on the level of technical expertise, this procedure should take approximately four to five hours from start to finish if replacing the Fuser Drive Assembly.
For technical assistance or to schedule a training module please contact us at 908-245-2100.
Other Helpful Resources
-
Paper Jam Solutions For Laserjet Printers
-
Printer Service And Parts Glossary
-
Printer Service Error Codes
-
Developing a Critical HP Printer Parts Stocking Strategy
Metrofuser is a leading global innovator, manufacturer of printer parts, equipment, diagnostics, repair information and systems solutions for professional users performing critical tasks. Products and services include hp printer parts, printers and printer repair training. Parts include hp printer parts such as printer fusers, printer maintenance kits and other hp printer replacement parts.
The company’s, customers include office equipment dealerships, online retailers, repair centers and MPS service providers nationwide. Metrofuser has been named to Inc. Magazine’s fastest growing companies five consecutive years. Contact us at 908-245-2100, Dial 0 for sales.
HP laser colour jet printer is showing 59 F0 Error, and not printing papers properly? Are you too facing the same issue? So the solution to this scenario is provided in a detailed manner and step to step solution to the HP 59 F0 Error.
There are many errors faced by the HP printer like 59.30- motor startup error, 59.40-motor rotation error, 59.90- ITB motor error, 59.F0, etc.
Methods to Solve Error 59.F0 on HP m452nw
The answer to this will be, it is a primarily caused by transfer alienation failure in which ITB is stuck and unable to rotate and the roller disarrangement sensor has gone bad or failed. Usually, for 59.F0, it is recommended to try resetting the toner and the fuser assembly. It is basically the solution to improve HP M452Nw 59 F0 Error:
Solution 1:
- Reset the printer using the power switch, turn off the printer for a few minutes.
- Turn on the printer and wait for the HP colour jet printer to revitalise.
- If there’s any surge protector remove it.
- If the problem continues then replaces the motor.
Solution 2:
- Verify the ITB installed adequately or not.
- Reconnect the primary transfer disengagement sensor.
- Run the sensor test in the sensor monitor mode to verify that the primary transfer disengagement is functioning correctly, if not replace it.
- Perform the alienation drive.
Examine the fuser motor, if not working properly, replace it
Solution 3:
- Reset the printer; turn off the power by using power switch and wait for some time.
- Remove the surge protector (if the user is using).
- If the problem is still there, then the PCA Assembly needs to be replaced.
- If still it’s troubling after replacing the PCA Assembly, then you might have to replace the product.
Steps To Perform ITB Alienation Test:
- Remove the transfer belt assembly.
- Open the toner access door and remove the cyan cartridge.
- Insert a flat blade screwdriver in the slot; let it stay there until the test is performed. The inserted screwdriver stimulates the toner access.
- Once done take it out, assemble it and switch it on.
- During the test, the gear needs to spin if it doesn’t spin or it tends to miss the spin then the fuser assembly is damaged. The only solution will be to repair it or replace it.
Steps to Solve 59.F0 Error on HP Printer:
- Check the ITB alienation sensor by doing manual sensor test in the troubleshooting menu.
- Reconnect the connectors of ITB.
- Perform ITB alienation test in the troubleshooting menu.
- Reconnect the connectors of primary roller disengagement motor. If it works then its recovered if not then it must be replaced.
- Hence this will hopefully solve the issue of 59.F0 Error M452Nw.
Thus, these are the few ways to check on the issues faced by the HP colour jet printer m452nw. Hopefully, these will fetch a solution to the users facing such issues.
venmartin Changed status to publish July 16, 2020
Do you have an HP color laserjet printer and are experiencing the 59.f0 error? If so, don’t worry – you’re not alone! This is a common error that can occur on many different models of HP printers, especially for HP Color LaserJet M452Nw, M277, and M477dw.
In this guide, we will discuss what causes the HP 59.f0 error and how to fix it. We will also provide some tips to help prevent this error from happening in the future.
Basic Printer Checkup
Before you start troubleshooting the 59.f0 error, it’s a good idea to do a basic printer checkup on your HP printer. This can help identify any potential problems that may be causing your HP laserjet printer to malfunction. Here are a few things you can do to get started with the basic printer checkup.
- Turn on your HP laserjet printer.
- Check your printer screen, it should not have any display or button issue.
- Now, place any document on your scanner glass, then click on the copy button. It does not matter if you copy in black or copy in color. You may select either one of them.
If you can copy successfully, you can proceed to the more advanced troubleshooting steps below.
If you cannot copy from your printer, then you have a much bigger problem and you might need to investigate further.
How To Fix 59.f0 Error On My Printer
Now that you’ve done a basic checkup of your printer, it’s time to start troubleshooting the 59.f0 error. There are a few different things you can try to fix this error.
Restart Your Printer
One simplest and most effective way to fix many printer errors is to simply turn off your printer. We highly recommend doing a hard reset.
To do this, you just unplug the power source at the back of your HP printer and wait a couple of minutes before you insert back the plug into your printer and turn it back on.
Check Your Toner Cartridges
If you’ve recently replaced your toner cartridges or installed a new one, this could be the root cause of your 59.f0 error. We recommend checking to see if the toner cartridge is properly seated in its slot and that there are no loose wires or connections.
You should also check the expiration date on your toner cartridge. If it’s been more than six months since you last replaced it, the toner might be dried out and causing the error. In this case, you’ll need to replace the toner cartridge. To ensure that you are only using HP genuine toners, check these items out.
No products found.
Update Your Printer Firmware
If you’re still experiencing the HP 59.f0 error after restarting your printer and checking your toner cartridges, it’s time to try updating your printer firmware. Firmware is the software that controls your printer and tells it how to function.
Sometimes, there are bugs in the firmware that can cause your printer to display errors or behave erratically. By updating your printer firmware, you can often fix these issues.
To update your printer firmware, you’ll need to go to the HP website and download the latest version of the firmware for your printer model. Once you’ve downloaded the firmware, follow the instructions on how to install it on your printer.
If you’re still having trouble with the 59.f0 error after trying all of these troubleshooting steps, we recommend doing our expert fix for the 59.f0 error code.
Advanced Troubleshooting Steps To Fix 59.f0 Error On HP Printer
If you’ve tried the steps above and you’re still getting the 59.f0 error on your HP Color LaserJet M452Nw, M477dw, or M277, you can try resetting the Intermediate Transfer Belt or the ITB. This is a process that will require you to open up your printer and access the main board.
We recommend doing this only if you’re comfortable opening up your printer and working with electronic components. If you’re not comfortable, we recommend taking your printer to a professional for service.
To fix the HP printer error 59.f0, check all of its internal connections such as those on ITB and sensor. Make sure they’re tight too! If everything looks good then try resetting it by following these steps:
Total time to fix 59.f0 error: 30 minutes
Access the inside of your HP printer.
Open the access door on the right of your HP printer.
Locate the intermediate transfer belt.
Hold the blue lever inside and carefully pull it on both ends of this transfer belt assembly. You’ll need to pull it towards you for easy access so make sure you’re doing it correctly!
Look for two large handles.
Once you’ve pulled out enough of the transfer belt, two large handles should pop free.
Remove the transfer belt
Hold both large handles on the transfer belt and pull until it is completely free from its connection.
Installing the new ITB
The new transfer belt should be installed in reverse order. Be careful not to touch the surface of your transfer belt while installing it. This can cause some serious damage to your HP printer.
Setting up the newly installed ITB

Go to the “Control Panel” of your HP printer and press the “Home” button, so you can start resetting the New Transfer Kit Setting. At the “Administration” menu, click on “Manage Supplies”.
Make sure the New Transfer Kit is detected
Click on the “Rest Supplies” option and then choose “New Transfer Kit.” Click on Yes and OK, respectively.
Do a printer calibration
After you have replaced the transfer belt to fix the 59.f0 error, you need to perform a full calibration of your HP printer. Calibration ensures that your printer’s colors are accurate, consistent, and of the highest quality.
Testing The ITB To Ensure HP 59.f0 Error Fix Works
There are a few ways to test your Intermediate Transfer Belt. One way is by rotating the gears and checking for any fluctuations in the flag when you turn the white gear, if there’s an issue with it then replace it with a new ITB.
If the ITB is not damaged after checking, proceed with examining the Sensor SR9. The location of Sensor SR9 in your HP printer is inside the ITB Cavity. On your printer’s control panel, proceed to click on the home button and look for the Diagnostics menu. Look for Manual Sensor Test and click the “OK” button.
Once you release the SR9 flag from inside of the ITB cavity, check to see if your sensor responds by pressing down on it. If not then sensor replacement may be needed or something else might have happened that caused this problem on your HP printer. If you’re still having trouble, we recommend taking your printer to an HP service center near you.
Last update on 2023-04-15 / Includes affiliate links / Images from Amazon.com
Принтер или МФУ HP CLJ Pro M377 / M452 / M477 и другие модели выдают ошибку 59.F0 или 59.C0 выкл. и вкл. Устройство. Давайте разберемся в проблеме. Данная ошибка возникает после определенного пробега устройства. Ошибки в датчиках или по другому в концевиках. Ошибка 59.F0 означает что неисправна лента переноса, но если лента не прошла свой ресурс заявленным производителем, то какой смысл ее менять, да и к тому же это не дешевое удовольствие.
Что делать с ошибкой 59.C0 и 59.F0
Разберем в чем неисправность ошибки, в ленте переноса изображения есть микрик, в котором со временем окисляется контакт и мозги устройства сигнализируют ошибку, не дающую дальнейшей работы на оборудовании.
Что можно сделать в данной ситуации, самое простое заменить ленту, второе очистка микрика от окислов. Чтобы до него добраться сначала надо разобрать принтер и извлечь ленту переноса. Далее становится труднее, так как повредив перенос изображения, вы автоматически попадаете на замену ее. Сам датчик не разбирается легко, концевик можно извлечь с помощью иголок не повредив его крепление. Контакты нужно очистить и привезти в порядок. Мультиметр должен показывать сопротивление не больше одного ома. Чтоб сэкономить время и деньги вы всегда можете обратиться к нам по ремонту принтеров.
Замена ленты переноса или профилактика аппарата
При разборке узла переноса нужно быть очень внимательным, так как повредив узел уже нельзя будет добиться идеальной печати документов. По работе мастер извлекает ленту переноса, разбирает ее полностью, проводит профилактику, затем добирается до виновника ошибки. Так как к нам очень много заходит аппаратов с этими ошибками, у нас есть инструмент который легко извлекает ножку микрика из датчика.
Провести ремонт в нашем сервисе довольно просто, создав заявку или обратившись по другим контактам. Занимает по времени от одного до двух дней в зависимости от загруженности инженеров. Насколько долго это прослужит, прослужит до конца ресурса ленты переноса.