Найдена следующая информация по ошибке B1491 для автомобиля MITSUBISHI ASX (2010-2017):
На русском языке:
Неисправность цепи датчика зажигания
На английском языке:
Ignition Cylinder Sensor Circuit Failure
Вы можете задать вопрос или поделиться опытом устранения ошибки B1491 на автомобиле MITSUBISHI с другими пользователями.
Возможную причину возникновения и советы по устранению можно найти в каталоге причин и советов:
Найти причину >>>
Ошибки (коды ошибок) полученные от прибора, сканера требуют правильной интерпретации информации, дабы не тратить время и деньги на замену работающих элементов автомобиля.
Проблема зачастую кроется намного глубже чем кажется на первый взгляд. Это& вызвано теми обстоятельствами, что информационные сообщения содержат, как было выше сказано, косвенную информацию о нарушении работы системы.
Может быть полезным для решения вопроса по устранению неисправности у Mitsubishi ASX:
Возможные симптомы — Подсветка двигателя включена (или предупреждающая лампа обслуживания двигателя).
Неисправность цепи датчика зажигания является общим описанием для кода B1491, но у производителя может быть другое описание. В настоящее время у нас нет дополнительной информации о коде B1491 OBDII.
Каталог руководств по обслуживанию и ремонту автомобилей самых популярных марок


© 2022 manuals4car.ru Все права защищены.
При упоминании использовании материалов активная ссылка на manuals4car.ru обязательна.
Причины возникновения ошибки B1491 на MITSUBISHI
Найдено значений ошибки: 1
Обрыв проводки питания подушки безопасности, установленной спереди. Причина появления ошибки может быть связана с замыканием электролинии
Если при диагностике обнаружено несколько ошибок, то их следует устранять в порядке обнаружения сканером. После устранения причины воникновения ошибки произведите их чистку и выполните тест-драйв автомобиля.
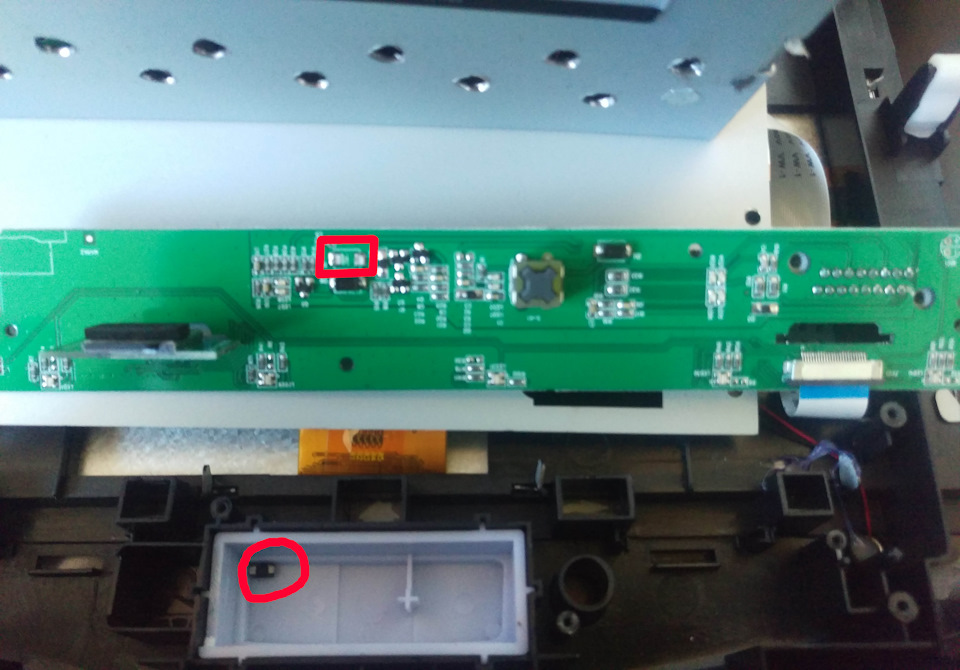
Плата аварийки или как я победил ошибку подушки безопасности

Полный размер
После установки китайской магнитолы выскочила ошибка «беременный мужик». Я об этом писал в записи «Активация доп.функций» www.drive2.ru/l/469512631732929318/, но сейчас подробнее об этом!
Активировал все функции, и попытался скинуть ошибку подушки безопасности b1489 через ЕД. Ошибку видит, но снять не получается, она появляется вновь. Раз 10 пробовал — результат тот же… Подумал — проблема в китайской плате может быть… Родную магнитолу с рамкой продал увы, так что поставить нечего проверить.
Вынул опять мафон, принес домой, разобрал часть где плата аварийки! И что вы думаете? Смотрю, валяется диод отпаянный в корыте кнопки аварийки. Беру его, припаял на место и все заработало! Подключил ЕД и ошибку стер с первого раза! Китайцы мля… 
Пробег: 30 000 км
Войдите или зарегистрируйтесь, чтобы писать комментарии, задавать вопросы и участвовать в обсуждении.
| caution |
|
OPERATION |
| Only when the frontal impact exceeding the threshold is simultaneously detected (turned ON) by the front impact sensor as well as by the analogue G-sensor and safing G-sensor in SRS-ECU, the electric current is supplied from SRS-ECU to the passenger’s (front) air bag module (squib). |
TROUBLE JUDGEMENT |
| The code is set when the open circuit occurs to the SRS-ECU passenger’s (front) air bag module (squib) circuit. |
PROBABLE CAUSES |
|
DIAGNOSIS PROCEDURE |
STEP 1. M.U.T.-III CAN bus diagnostics. |
| Use M.U.T.-III to diagnose the CAN bus lines. |
Q.
|
 Go to Step 2. Go to Step 2. |
|
STEP 2. M.U.T.-III diagnosis code. |
| (1)Connect the negative battery terminal. |
| (2)After erasing the diagnosis code memory, check the diagnosis code again. |
| (3)Disconnect the negative battery terminal. |
Q.
|
 Go to Step 3. Go to Step 3. |
|
STEP 3. Diagnosis check by dummy resistor connection. |
| (1)Check that the negative battery terminal is disconnected. If the negative battery terminal is connected, disconnect it. |
 |
(2)Slide the outer housing of harness side connector in the arrow direction shown, and disconnect the C-114 harness side connector. |
 |
(3)Connect special tool dummy resistor (MB991865) to special tool resistor harness (MB991866). (4)
Insert the resistor harness probe from the back of C-114 harness side connector terminals
After erasing the diagnosis code memory, check the diagnosis code again. Q.
|
STEP 4. Resistance measurement at the C-126 SRS-ECU connector and
|
| (1)Check that the negative battery terminal is disconnected. If the negative battery terminal is connected, disconnect it. |
 |
(2)While pushing the part «A» indicated in the figure of the harness side connector, turn the lock lever to the direction of the arrow to release the lock lever, and disconnect the C-126 SRS-ECU connector. |
 |
(3)
Slide the outer housing of harness side connector in the arrow direction shown, and disconnect |
  |
(4)
Insert an insulator (width: 3 mm, thickness: 0.5 mm) such as cable tie between the terminals
Take the measurements below at the C-126 and C-114 harness side connectors.
OK: Continuity (less than 2 Ω) Q.
|
STEP 5. Check whether the diagnosis code is reset. |
Q.
|


 Replace the passenger’s (front) air bag module (Refer to
  ).
).