
Указания по использованию

Внимание:
Эту сводку допустимо использовать только, если
к автомобилю применимы указанные в ней опции,
блоки управления и записи регистратора событий.
Данные по а/м
A3 8V mit PR-Nr 1X1 Allradantrieb
Варианты комплектации
| Коды комплектаций |
|---|
| with 1X1 |
Q3 8U mit PR-Nr. 1X1 Allradantrieb
Варианты комплектации
| Коды комплектаций |
|---|
| with 1X1 |
A1 8X mit PR-Nr. 1X1 Allradantrieb
Варианты комплектации
| Коды комплектаций |
|---|
| with 1X1 |
Описание неисправности
Описание неисправности клиентом:
Не работает полный привод
и/или
Горит лампа электронной системы поддержания курсовой устойчивости ЕSC.
Заключение станции:
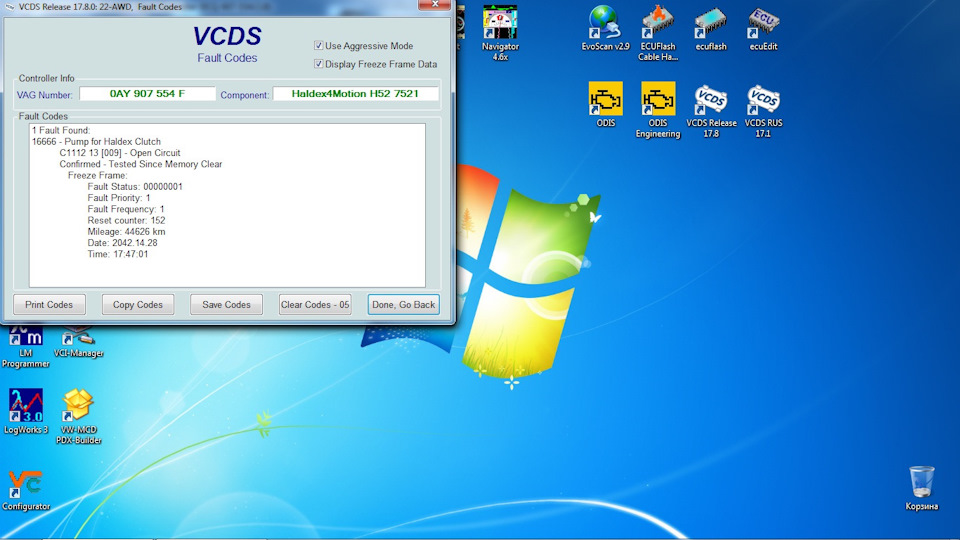
Запись в регистраторе событий по муфте Haldex по адресу 22: C111204 – Неисправность муфты.
В сетке нагнетательного насоса муфты Haldex может находиться чёрно-серая масса.
Решение в условиях сервиса
Необходимо проверить рекламацию клиента (в соответствии с описанием клиента/заключением станции), чтобы однозначно отнести её к настоящей сводке TPI. Описанные ниже ремонтные работы выполнять только при полном совпадении всех критериев (модель, VIN, буквенные обозначения двигателя и КП, код(ы) комплектации, номера деталей, версия ПО, кодировка и т. д.). В противном случае это решение в условиях сервиса не приведёт к устранению неисправности и может потребоваться повторный ремонт. В этом случае мы оставляем за собой право отказать в оплате по гарантии выполненных работ и заменённых деталей.
| 1. |
Заменить нагнетательный насос согласно руководству по ремонту. |
| 2. |
Заменить масло для тяжёлых условий работы для муфты Haldex согласно руководству по ремонту. |
Внимание!
Главная передача и муфта Haldex имеют раздельные масляные контуры.
|
• |
Муфта Haldex заправляется специальным маслом для тяжёлых условий работы. |
|
• |
Главная передача заправляется трансмиссионным маслом. |
Если в сетке нагнетательного насоса муфты Haldex находится чёрно-серая масса, это нормально.
Как здесь найти нужную информацию?
Расшифровка заводской комплектации автомобиля (англ.)
Расшифровка заводской комплектации VAG на русском!
Диагностика Фольксваген, Ауди, Шкода, Сеат, коды ошибок.
Если вы не нашли информацию по своему автомобилю — посмотрите ее на автомобили построенные на платформе вашего авто.
С большой долей вероятности информация по ремонту и обслуживанию подойдет и для Вашего авто.


-
#801
Cucelo, 0CQ598549 — это 5 халдекс. 0AY598549A — 4 халдекс
Добавлено через 1 минуту
Cucelo,Помоему я Вам подбирал насос?
Последнее редактирование: 25 Янв 2016
-
#802
Да
отправлено из снегов Ямала
-
#803
Сегодня ездил к официалам.
Как итог-поменяли насос. Пробег 24т. 5-ый Халдекс. К моему удивлению,без лишних разговоров(Руслан на Ленинском). Теперь esp не мигает,прет как танк.
-
#804
Сегодня ездил к официалам.
Как итог-поменяли насос. Пробег 24т. 5-ый Халдекс. К моему удивлению,без лишних разговоров(Руслан на Ленинском). Теперь esp не мигает,прет как танк.
мда уж
-
#805
На пятый халдекс есть TPI на замену насоса,там типа по номеру модификации насоса
приговор,ну и условия сгорает предохранитель и ошибка по насосу
-
#806
Единственное,что не понравилось по началу-это очень редкий случай,может вам кажется,что не работает полный привод,он же у вас интелэктуальный
-
#807
На пятый халдекс есть TPI на замену насоса,там типа по номеру модификации насоса
приговор,ну и условия сгорает предохранитель и ошибка по насосу
TPI в студию!
-
#809
Учётный №: 2041327/3
Трансмиссия: задний привод/муфта Haldex не работает, событие C111204
Дата разрешения публикации: 08.12.2015
Описание неисправности клиентом/Заключение станции
Описание неисправности клиентом:
•
Не работает полный привод.
и/или
•
Передние колёса пробуксовывают при трогании на скользком покрытии.
Заключение станции:
•
Одно или оба описанных клиентом явления удаётся воспроизвести.
В блоке управления муфты Haldex появилось следующее событие:
•
C111204, насос муфты Haldex имеет неисправность
Техническое обоснование
Аппаратно-зависимый сбой насоса муфты Haldex.
Решение в условиях производства
Введение усовершенствованного насоса муфты Haldex.
•
Начиная с номера конструктивной версии: 02000931 (см. пример номера конструктивной версии на рис. 1, красный овал).
Решение в условиях сервиса
Замена насоса муфты Haldex
•
Установить ремкомплект для подкачивающего насоса (насоса муфты Haldex) в соответствии с ⇒ Руководством по ремонту/каталогом оригинальных деталей.
-
#810
Трансмиссия: задний привод/муфта Haldex не работает, событие C111204
в коллекцию ошибок по полному приводу:
— С 111307 — механическая неисправность полного привода;
При такой ошибке меняют всю муфту в сборе.
-
#811
С 111307 — механическая неисправность полного привода;
а где вы на муфте видели датчики, — отвечающие за механнику? и вся муфта, и все сразу на ней физически не может отказать.
замена муфты целиком, — это позиция дилера, — чтоб вам впарить всю муфту целиком
-
#812
71miha71, впаривали бесплатно, наблюдал лично!")
Ваши комменты по данной ошибке?
-
#813
71miha71, впаривали бесплатно, наблюдал лично!
Ваши комменты по данной ошибке?
Это просто блок ругается на отсутствие задних колёс. Если подумать, отсутствие ошибок или наличие таких ничем не отличается
а причина может быть и в блоке, и в клапане, или в насосе
Или масло забыли залить. Или хотели в муфту, попали в редуктор
-
#814
Или масло забыли залить. Или хотели в муфту, попали в редуктор
масло в муфте было по уровню и с редуктором не путали.
-
#815
Народ , замена предохранителя полного привода 10А на 7,5А маст хев или нет ? Все меняют ?
-
#817
Проскакивала инфа, что пред на 10 А не спасает в случае чего блок управления , который стоит Овер 80 тыс рупий. По крайней мере, как я понимаю , на форд куга ( где стоит 15А) народ меняет массово.
-
#819
Добавил в закладки ценную инфу.
-
#820
Ребята кто-нибудь делал этот моторчик?????????? Два года назад у меня помер, ожил от постукиваний по нему, потом сняли промыли все цело…..поездил этой зимой снова снимал, так как стал отказывать морозы -44 были….так же все в масле, снова промыли просушили, щетки как новые…снова катаюсь на полном уже 100 тыр с момента покупки, барахлить стал на 60 тыр…Там по моему какая то резинка пропускает масло…мнения есть у кого…такую найти не можем….а этот как новый, зачем еще один на 60 тыр брать…масло и фильтр теперь меняю там каждые 30 тыр…и сейчас уже темное, буду менять с фильтром…а тогда не знал 60 от катал, фильтр забит был, вот и давить стало…машина 2009 года…или теперь каждую зиму снимать и промывать((((
Последнее редактирование: 12 Фев 2016
Не объездил я 10т.км как появилась вот такая штука (Первые поломки):
Полный размер
Запчасти на фото: 178171
Которая говорит что неисправен насос Haltex 5, т.е. полного привода нет, едет только морда.
При резком старте чувствуется пробуксовка передней оси, и появлении на приборки значка пьяной дороги.
По этому поводу у VW есть TPI — 2041327/3
Учётный №: 2041327/3
Трансмиссия: задний привод/муфта Haldex не работает, событие C111204
Дата разрешения публикации: 08.12.2015
Описание неисправности клиентом/Заключение станции
Описание неисправности клиентом:
•
Не работает полный привод.
и/или
•
Передние колёса пробуксовывают при трогании на скользком покрытии.
Заключение станции:
•
Одно или оба описанных клиентом явления удаётся воспроизвести.
В блоке управления муфты Haldex появилось следующее событие:
•
C111204, насос муфты Haldex имеет неисправность
Техническое обоснование
Аппаратно-зависимый сбой насоса муфты Haldex.
Решение в условиях производства
Введение усовершенствованного насоса муфты Haldex.
•
Начиная с номера конструктивной версии: 02000931 (см. пример номера конструктивной версии на рис. 1, красный овал).
Решение в условиях сервиса
Замена насоса муфты Haldex
•
Установить ремкомплект для подкачивающего насоса (насоса муфты Haldex) в соответствии с ⇒ Руководством по ремонту/каталогом оригинальных деталей.
Благо машина находится на продленной гарантии у дилера (работы по гарантии бесплатно, запчасти с 30% скидкой). Я сразу записался к дилеру на диагностику.
Мозги чуть по выносили, мол у тебя ПО в Haldex старое, мы тебе обновим и может полегчает…обновили, покатался денек, все тоже самое.
На следующий день опять записался на диагностику, в этот раз диагноз подтвердили — замена насоса.
Цена вопроса насос последней ревизии + масло (VAG G06 017 5A2) + пробка = 13 т.р.
После замены, старый насос заберу, посмотрим что там внутри…
Насос заменил у ОД, по продленной гарантии (т.е. работы по замене бесплатно, 30% скидка на ЗП, итого получилось около 13т.р. за замену насоса и масла).
Post by cluxford on Jan 14, 2022 2:47:07 GMTBrand new to Tiguan. My daughter just bought one as her first car. 2014 4Motion. I got the OBD11 and ran a scan and getting a C111204 error on the Haldex. 1. I do not have a windows machine in the house, can I do a pump relearn / reset through OBD11 basic settings and have it actually work? It seems some say yes, some say no from reserach I’ve done 2. The code itself, from what I can read I am reading I need new pump AND new ECU all the way to I just need to clean the pump screen and do a reset. Thoughts? |
|
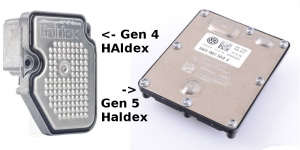 This list is not definitive, and be cautious on the dates as cars around the change over date may have ether Gen 4 or Gen 5, please check by comparing the picture to the right of the Gen 4 v’s Gen 5 control unit to see which system is fitted to the vehicle. Mixing up repair information is common and leads to misdiagnosis, and incorrect parts orders. So check and be sure which you have! Generation 5 Haldex is fitted to the following VAG group 4wd vehicles (and also some of their 2wd vehicles but will be discussed elsewhere!):-
 Audi A1 2015 onwards
- Audi A3 S3 RS3 / Sportback 2013 onwards
- Audi A3 Cabriolet 2014 onwards
- Audi Q3 2012 onwards
- Audi TT / TTS / TTRS Coupe/Roadster 2014 onwards
- Volkswagen Golf / Golf R / 4Motion 2013 onwards
- Volkswagen Passat / 4Motion / Santana 2015 onwards
- Volkswagen Sharan / syncro / 4Motion 2012 ownards
- Volkswagen Tiguan 2013 onwards
- Seat Alhambra 2012 onwards
- Seat Leon / Leon 4 2013 onwards
- Seat Altea Freetrack 2014 onwards
- Skoda Octavia / Scout 2013 onwards
- Skoda Yeti 2013 onwards
 Audi A1 2015 onwards
Generation 5 Haldex is the most simplified and cut back Haldex system to date, it has less components than ever before and is the lightest generation so far. A cynic might say the most “cost effective” system to manufacture! We are being inundated with customers contacting us with low mileage vehicles, around 15k to 30k miles and only 3 to 5 years old, where the 4wd system no longer works. Often they have been given astronomical quotes from main dealerships or aftermarket garages for potential repair quotes, usually in the region of £1500 to £3000 is common depending on what parts the garage is guessing at replacing!
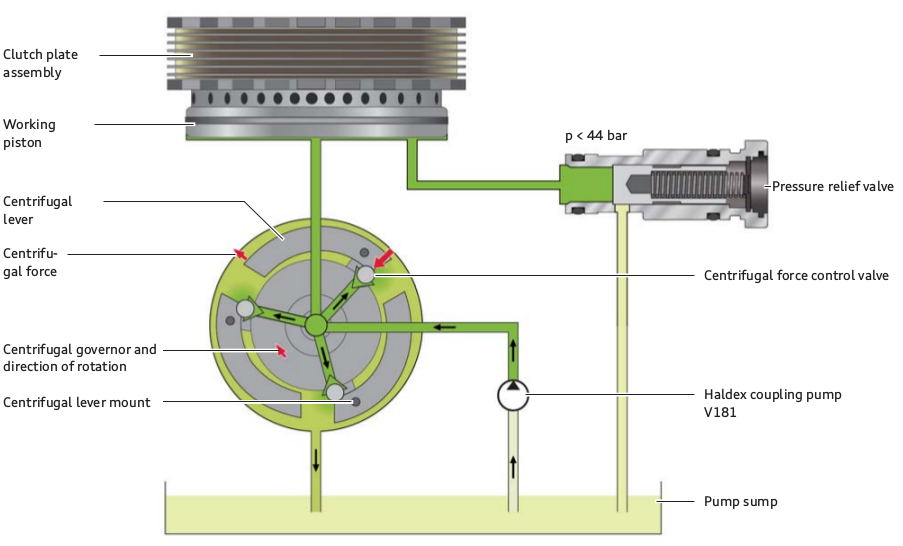
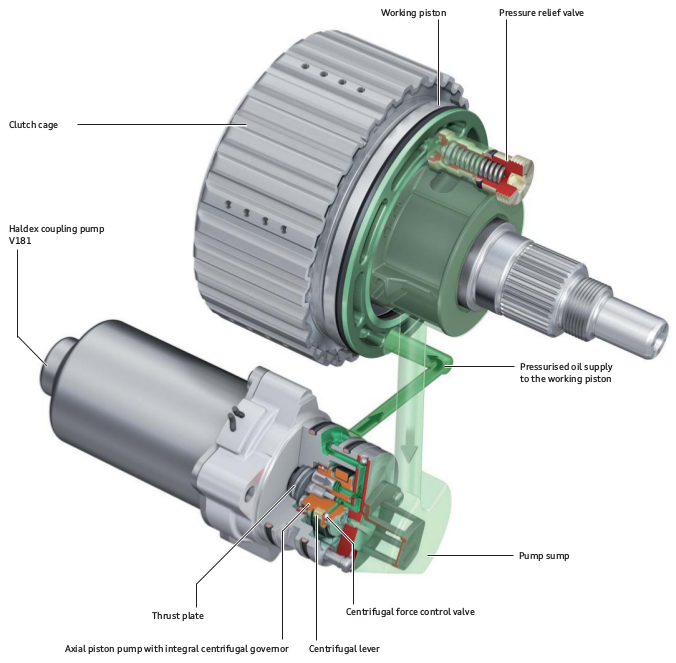
The system really only has a few components, as seen on the diagram. There is control unit which powers a pump – which is fitted with a strainer gauze, when pressure is made the piston applies force to the clutch pack which engages the 4wd. There is a pressure relief/blowoff valve which vents any excess oil pressure. And that is about all there is! There is no fine particle filter cartridge like the previous systems, which we suspect is the main cause of early failure. There is no “n373 Valve for Controlling Clutch Operating Angle”, nor any pressure sensors. Any pressure values shown on the diagnostic equipment measuring blocks like VCDS is purely estimated and calculated, thus they are purely fictitious.
Common Problems and Fault Codes
Often customers complain about no drive to the rear wheels, and typically there are no warning lights or error messages shown on the dashboard to illustrate the system is faulty, thus owners are unaware of the issue. Buyers of second hand cars often purchase these cars not working, so then never know any different. Only when it comes to winter time where they get stuck somewhere they then realise the rear wheels are not turning. With the more performance orientated cars such as Golf R, RS3, S3, TTS or TTRS, the lack of 4wd is more apparent as brisk acceleration usually causes the traction light to flash and power be limited – accompanied by lots of wheel spin, especially on wet roads or slippy surfaces.
When scanning the vehicle for fault codes, it is important to use some decent scanning system which can actually communicate with the Haldex control module which is “22 AWD”, otherwise you will find there is no fault codes stored! People often fall into this trap with cheap OBD2 code readers or phone apps. Fault codes which often occur are:-
- 131599 – All Wheel Drive Clutch – U0114 00 [009] – No Communication (typically ECU fault)
- 131599 – Control Module for All Wheel Drive Clutch – C1113 07 Intermittent error (typically ECU fault)
- 16670 – All-Wheel Drive – C1113 07 [008] – Mechanical Failure (typically pump type fault OR/AND transfer box)
- 16671 – Pump for Haldex Clutch – C1112 04 [008] Internal System Fault (faulty pump AND ecu needs repair)
- 16671 – Haldex clutch pump Faulty – C1112 04 passive/sporadic (faulty pump AND ecu needs repair)
- 16668 – Pump for Haldex Clutch C1112 07 [008] – Mechanical Failure Intermittent (typically Pump fault)
- 16666 – Pump for Haldex Clutch C1112 13 [008] – Open Circuit(typically pump type fault)
- C111307 – Mechanincal Malfunction – Passive / Sporadic (typically blocked pump, clean out and relearn or transfer box)
Typical Solutions
When the fault code 131599 is triggered it is often caused by damage or corrosion to the control unit, we can test and often repair these, they are easy to open by the 8 torx screws on the front and check for obvious signs of water ingress or blown/burnt components.
16671 – Pump for Haldex Clutch – C1112 04 [008] Internal System Fault OR ” C111204 Haldex Clutch Pump, Defective “
The ISF (internal system fault) is caused when the pump is defective, but even when fitting a new pump you often find the 16671 code will come back every time you clear it. This is a software fault in the Gen 5 control unit. Most of the time no amount of doing the “Pump Learn” will fix this, some will clear after the learn but most will not. There is an internal system table that is used by the firmware to calibrate the controller current/voltage sensing system. When this data is outside of certain values the ISF fault is triggered. A defective pump causes this problem. The solution is to either replace the controller, or send us the controller where we can carry out this data repair manually by removing the chip that stores the data, read it, manually change it, write it back, then solder it back on and re-assemble the controller. We do this under our fixed rate Haldex ECU repair service.
PUMP LEARN FUNCTION
It is common for owners to have a new pump fitted by a garage or main dealer and still the problem persists. When fitting a pump, or even just after a clean out and service it is essential to carry out the “pump learn” function in the “basic settings” of the Haldex control unit, VCDS/VAGCOM can do this and so can the main dealer ODIS system. Customers are often told there is “no adaption” or programming required to fit a new pump, this is incorrect!
The control unit learns how much power is required to run the pump until the pressure hits a certain threshold, it does this by monitoring how much current is consumed by the pump, when the pump is blocked, or faulty, the control unit learns/adapts some very low values which means when the Haldex controller tried to engage the pump, it does not supply enough power to make it engage. By carrying out the learn function when fitting a new pump, it will learn the correct power values and thus engage the system correctly.
Literally multiple times a week we get customers calling who have had new pumps fitted, often by main VW, Audi, or Skoda dealership, yet the system still does not work and they will not perform the pump learn process. Instead they then quote the customers on a brand new ECU/Haldex Controller, or they quote them on a complete new coupling/rear diff, plus labour. There is no documentation we know of in the “VAG Self Study Guides” / VAG workshop manuals that have any reference to the Pump Calibration / Learn function.
Very very rarely, the pressure relief blow off valve will stick open, this will cause the coupling to not engage 4wd as there is no oil pressure there to clamp the clutch plates together. We have brand new valves in stock, they are easy to replace and not very expensive.
Essentially what the learn function does, and you can listen to the pump run while it does it; the function ramps up the power to the pump slowly until the pressure hits the 44 bar blow off valve where is senses the drop in current. It does it a few times so the pump knows how much current and voltage it takes to achieve 44 bar. It then saves this value in the calibration values, and after a short drive it then calculates/estimates the 1 bar and 15 bar from the last measured 44 bar value.
AFTER THE LEARN HAS “COMPLETED SUCCESS”, THE VALUES USUALLY SAY “0” UNTIL THE VEHICLE IS TAKEN FOR A SHORT DRIVE, THIS IS DUE TO IT ESTIMATING THE 1 & 15 BAR VALUES FROM USE.
Here are some photos of how to carry out the pump learn function using VCDS VAGCOM
MAKE SURE YOU HAVE THE ENGINE RUNNING TO SUCCESSFULLY CARRY OUT THE PUMP LEARN FUNCTION!
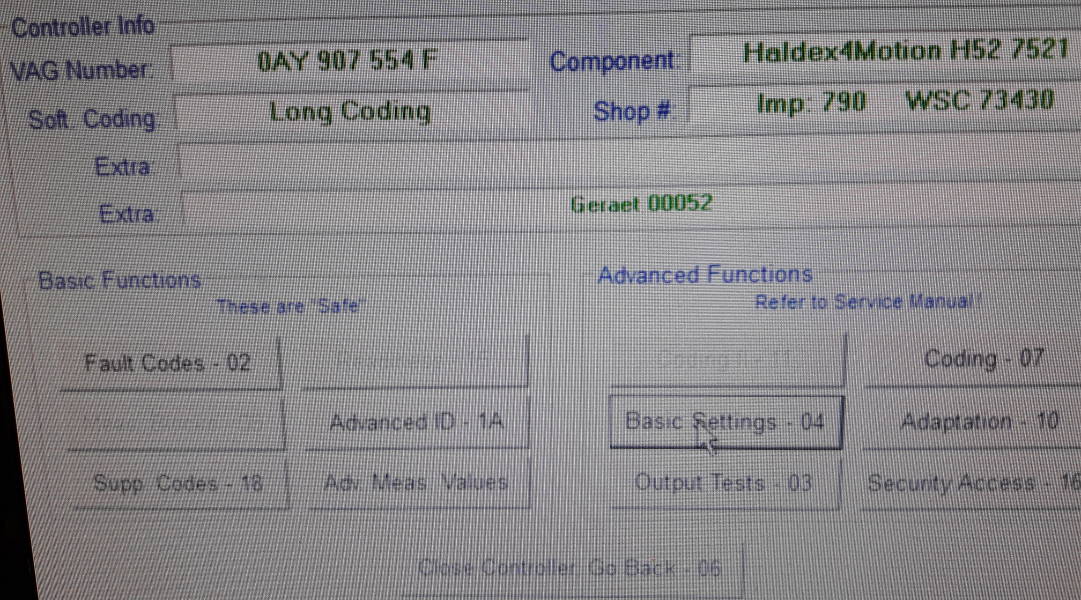
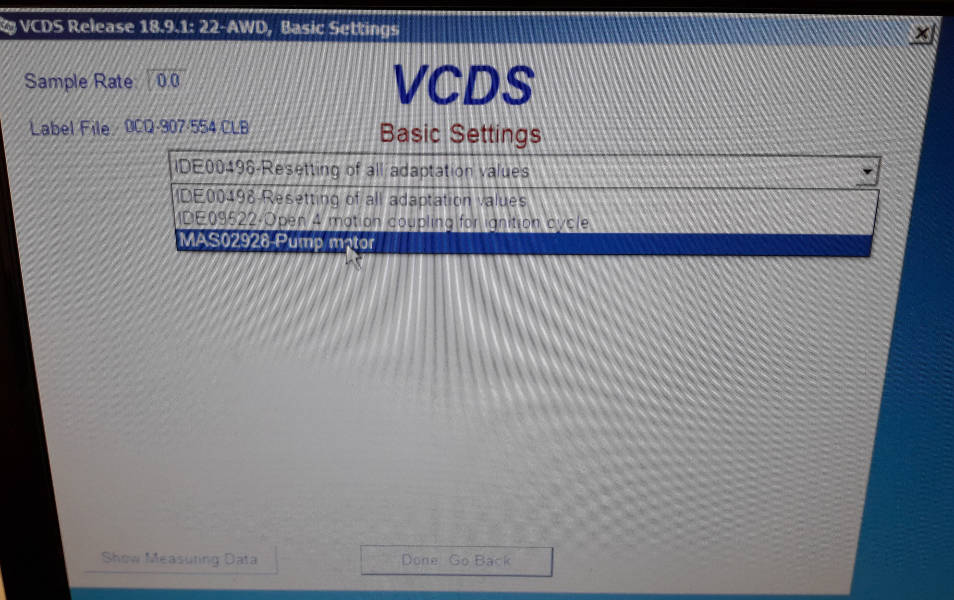
MAKE SURE YOU HAVE THE ENGINE RUNNING TO SUCCESSFULLY CARRY OUT THE PUMP LEARN FUNCTION!
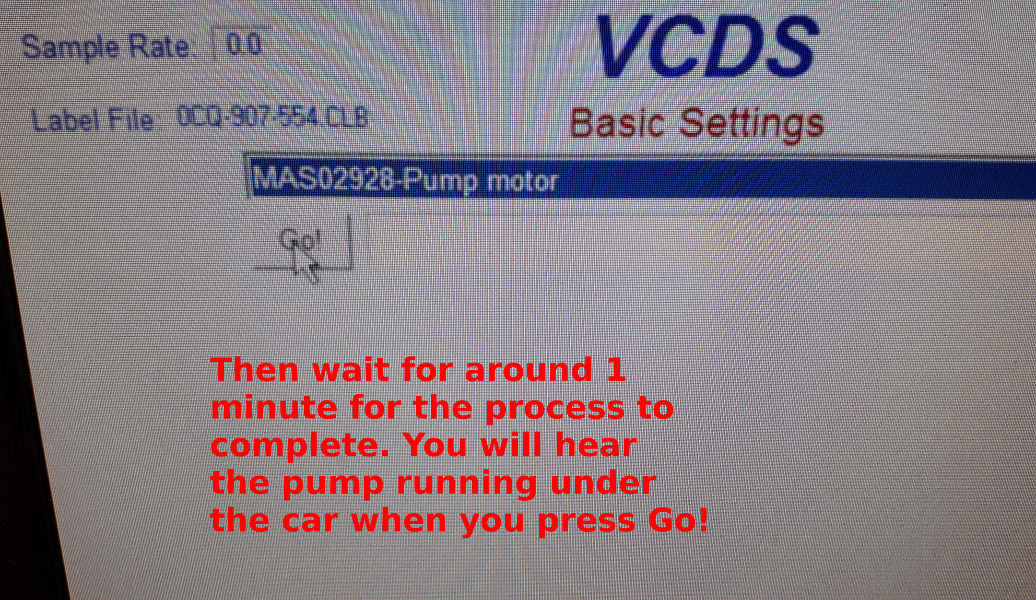
MAKE SURE YOU HAVE THE ENGINE RUNNING TO SUCCESSFULLY CARRY OUT THE PUMP LEARN FUNCTION!!!
BEWARE SOME DIAGNOSTIC TOOLS DO NOT COMPLETE THE LEARN FUNCTION CORRECTLY.
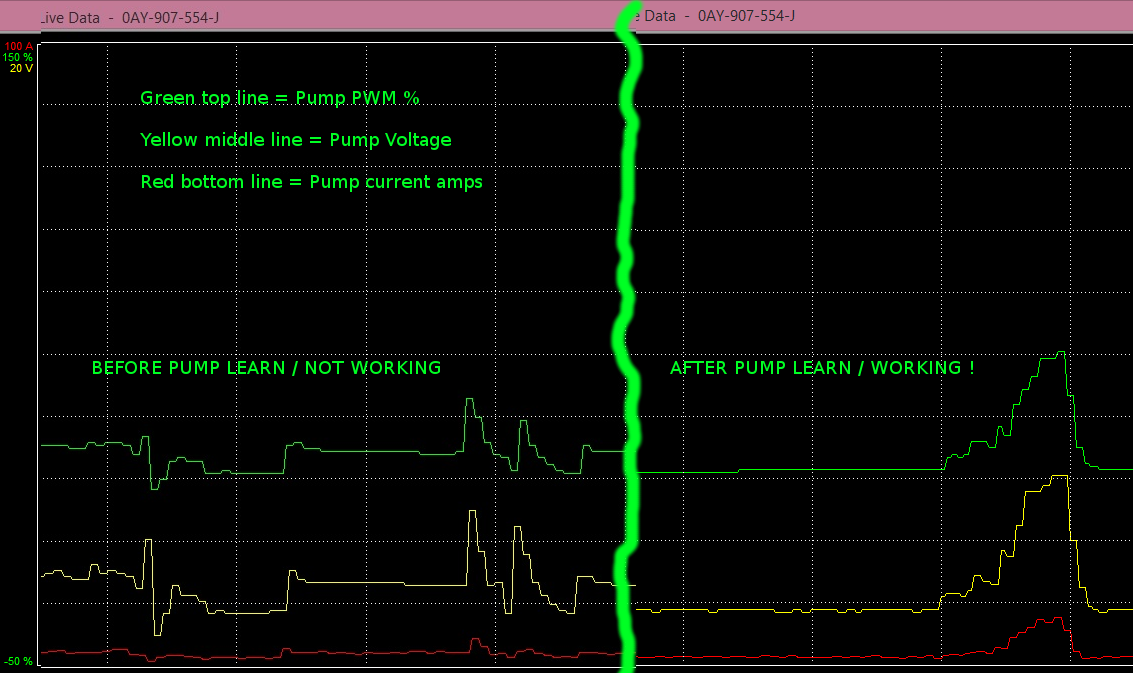
These are good typical learn values below, which can be found in the “advanced measuring values” on VCDS and other tools like Vag-CAN Pro etc. If the values are wildly different then more than likely the pump is no good. This is an indicator of a defective pump.
This image shows good known Pump Calibration Learn Values, and Bad learn values. Also there is average values, and minimum/maximum values which have been taken from a large sample of good working vehicles. Bad learn values are a good indicator for a failed pump, but good values do not guarantee a healthy pump although is a rough tool to use for fault finding.
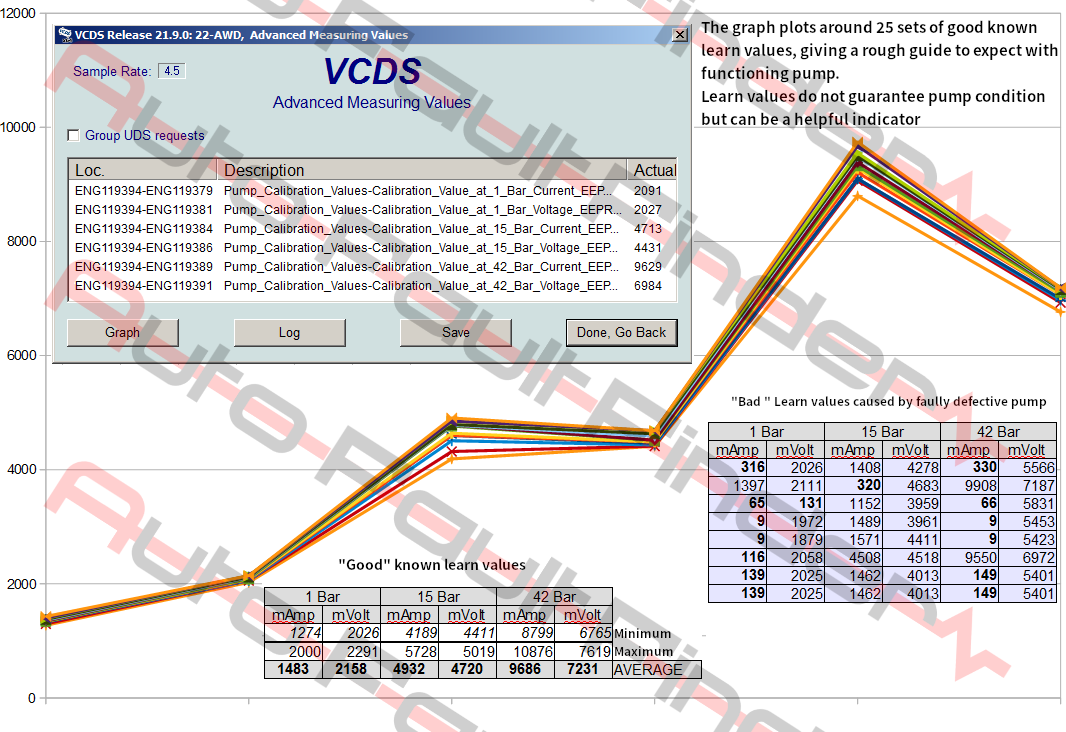
If you have system that is not working, a good starting point is to data log some of the measuring blocks for the pump control, these are the Pump PWM %, Pump current and Pump Voltage. Take the car somewhere that it can be launched to hopefully cause wheel spin somewhere safely and legal while data logging these values. This image is of a system before and after the pump learn function, as you can see there is almost twice the voltage and current being measured at the pump, and the PWM % green trace line shows the control unit is driving the pump harder thus the larger Voltage and Current values.
Oil Change guide
These Generation 5 Haldex systems have never been serviced correctly, many aftermarket VAG specialists are offering far better servicing where the pump is removed and cleaned which puts them in a far better position but still trouble often persists. Servicing is often not the solution to problems, it is more preventative maintenance. If the car is getting the 16671 or 16668 fault codes then often a new pump is required, but if the vehicle is just getting the 16670 fault code then often cleaning them out, and fresh oil will solve them but the “pump learn” function must be carried out.
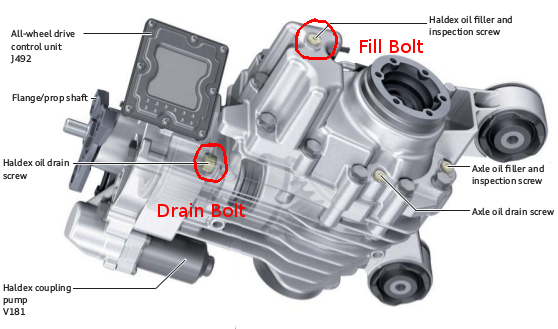
- When doing an oil change, remove the pump, remove the fill bolt and drain bolt.
- Wash out sludge out of the coupling by blowing compressed air into the fill plug with the drain undone.
- Add a little clean oil to wash out the last of the sludge and blow out again.
- Blow the pump gauze clean with compressed air, refit the pump with new oil seal O rings with a little oil, refit the drain bolt.
- Fill will haldex fluid via the fill bolt until oil over spills. Refit the fill plug and clean up any mess.

Transfer Box Test
Make sure you are capable of doing this in a safe manor.
You are in control of your own safety. We are not liable for any damage or harm you may cause yourself, your workshop, other people, or your car. This test is only for automotive repair professional use only.
Lift the car so ONLY the front wheels are off the ground.
Get somebody or a camera to watch the propshaft.
Someone else to sit in the car, starts up the engine.
Apply foot brake, remove handbrake, put vehicle into drive gear.
Then very gently lift your foot off the brake so the front weeks start to turn.
Prop shaft is stationary = transfer box is faulty.
Prop shaft rotates = a Haldex issue.
Transfer Box Failure generally only effects modified vehicles, almost every example has been a remapped car. Very common with Golf R, S3, RS3, TTS, TTRS etc. These transfer boxes are not designed to be robust, this is a really good youtube video showing how they fail inside https://www.youtube.com/watch?v=nt33-EgQ4gk