Дата публикации 11.08.2020
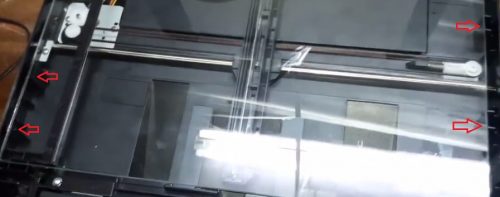
Одной из часто возникающих ошибок при работе с МФУ серии Canon MF 4410/4430. Как оказалось проблема в разметочной планке,которая находится на стекле сканера. Для устранения ошибки Е202-0002 необходимо:
- снять планку
- протереть стекло сканера
- наклеить планку назад
Данная ошибка возникает при смещении разметочной планки. Также, с другой ее стороны идет беспрерывная черная линия, её нарушение или повреждение опять же может провоцировать возникновение ошибки. Если планка повреждена, можно на обычном белом листе сделать черную сплошную линию и наклеить её вместо планки.
Предыдущая
РемонтКак поменять матрицу ноутбука на примере Samsung R40, в картинках с инструкцией
Следующая
РемонтКак исправить CMOS Checksum Invalid — RUN SCU
Помогла статья? Оцените её
Загрузка…

Порывшись тут, здесь, и здесь, и тут (для справки) на форуме, а ещё на просторах тырнета и насмотревшись видосиков, приступил к диагностике сего аппарата. Путем подмены с донора определил, что неисправна сканирующая линейка планка CIS. Клиент согласился заменить на донорскую. При сравнении работы исправного MF4410 и ремонтируемого MF4550 заметил следующую закономерность. При попытке найти home position и откалиброваться на рабочем аппарате подсветка изменяет цвет «красный»-«зеленый»-«синий». На неисправном отсутствует «синий», аппарат светит ещё раз «зелёным» меняя яркость и падает в ошибку.
Поскольку клиента уговорили на донорскую линейку, терять было нечего и я решил пропаять выводы светодиодов на линейке. На фото выделено красным.
И вуаля! Все цвета подсветки работают, аппарат выходит в готовность. Скорее всего дело было в окислении заводской пайки. После тестов в течение раб.дня многократных вкл/выкл, копирования, сканирования, отдан клиенту.
проблема с МФУ Canon i-SENSYS MF4410
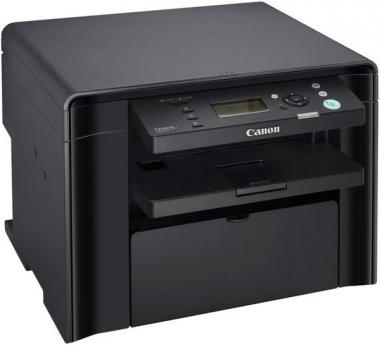
Постоянно выдает ошибку Е202-0002 включено осн.питание.Не печатает и не копирует, достал уже((
Люди с такой же проблемой (49)
Скажите пожалуйста, МФУ CANON MF 231 W, ошибка Е 202-0002 устраняется так же ? окигэло 25 августа 2022
> Сбоку линейка отклеилась и перевёрнута была. я её на место приклеил
Она клеится только в одном направлении, там пазы сверху и снизу разные. Что значит перевернута? ыбибюсу 30 марта 2021
юсюня 11 февраля 2021
Здравствуйте
у меня проблема такой же пожалуйста помочь вам урикюч 7 июня 2019
Принтер работал всё нормально, после переезда внезапно начал писать ошибку e202-0002 . Поднял верхнюю крышку для сканирования. Сбоку линейка отклеилась и перевёрнута была. я её на место приклеил, перезапустил принтер и ошибка исчезла жацухил 24 июня 2018
oshibka e 202 — 0002
mi delili chto pokazana v interneti vse
pojaluyta pomogite ispravit etot oshibka raq550 15 июня 2017
Как исправить ошибку E202-0002 на принтерах серии Canon MF 4410-4430 ыфытаж 9 марта 2016
разобрал принтер менял пленку, собрал и он выдал ошибку е2020002 штекера все наместе, что делать 19780604 26 ноября 2014
удит при включении, при этом не печатает, не копирует и не сканирует. Загорается красная лампочка и на дисплее появляется надпись: «ВКЛ. основное питание. Tariyel 15 июля 2013
проверил а что дальше то делать, ползунок двигается до этой планки и останавливается на одном месте . qwerty435 4 июня 2013
принтер canon mf 4410 ошибка на экране вкл, основное питание e202-0002 vaevoda 8 октября 2012
у меня проблема не печатает принтер выдал ошибку е202-0002 планка на месте что нужно конкретно сделать по действиям чтоб мфу заработало serg240980 8 августа 2012
Видео с YouTube на эту тему
Знаете, как решить эту проблему?
Поделитесь своим знанием!
Ваш способ решения:
Наиболее похожие проблемы из этого раздела
c ноутбука печатает, но не копирует и не сканирует. Выдает пустые листы, сканирует пустой лист, не видит картинку. Что с ним такое?
до этого норм …
не сканирует и не печатает, горит красный индикатор, дисплей пишет отключить питание, пробовал не помогает выдаёт ошибку е202 0002 кто знает как …
МФУ canon после копирования 1 листа пишет ошибка E736-0000, ВКЛ. основное питание. Проблема осталась свяжитесь с сервисным центром. При подключении …
После обновления Windows 10, пропал принтер, скачала официальные драйвера с сайта, установила, стал сканировать и всё, как сканер определяется как …
Ошибка печати: Принтеру не удалось распечатать А4.
То печатает нормально, то до середины дойдет и выдает ошибку, но продолжает печатать, следующий …
Отзывы об МФУ Canon i-SENSYS MF4410
Вы рекомендуете этот продукт?
Этот продукт рекомендуют
70 из 113 участников
Добавьте свою проблему с МФУ Canon i-SENSYS MF4410
– и наши эксперты помогут вам найти её решение
добавить
5 проблем
добавлено за сутки
12 экспертов
были на сайте за сутки
Не можете починить?
do.fixim.ru
доска объявлений сломанной
техники и запчастей
Лучшие эксперты по принтерам и МФУ
гуру
240 решений
мастер
123 решения
Сервисные центры,
Предложения ремонта
Москва, Костикова ул., д.7
Москва, Журавлева пл., д.10
Москва, Багратионовский пр-д, 7к3 (ТЦ Горбушкин …
ремонт МФУ Canon в Москве
Canon brand is known for their reliable performance, but just like any other machine, Canon printers occasionally experience problems. One such error that bothers users is E202 Error which shows “Turn the main power ON E202 0002” message on the display screen.
In order to fix this issue, it requires the user to perform some hardware maintenance steps, there are many users who prefer visiting the Canon service engineer. However, if you know the exact maintenance steps and perform them carefully, then the error E202 0002 can be fixed in just a few minutes. In this guide, you will learn how to fix error E202 0002 on Canon printers.
Index:
- Meaning of E202 0002 Error
- Required Tools and precautions to fix it
- How to fix E202 0002 Error
What is the Meaning of Error E202 0002
According to the service manual of Canon MF4770n printer the error E202 0002 is displayed when the CIS (Contact Image Sensor) unit didn’t move to HP. Therefore, the possible causes of this error according to the Canon service manual can be:
- Error in Reader Motor
- Error in HP Sensor
- Error in CIS Unit
Although it may seem that the solution to the causes listed above may need you to replace the reader motor, HP sensor or the CIS unit, these are the causes mentioned in the service manual. There are some simpler solutions, which doesn’t require any hardware replacement, but only some minor maintenance process.
Sometimes, this Canon error is caused when there is a connection problem between the Flat Cable and the Main Controller Board in your Canon image class printer. This problem in the connection adversely affects the functioning of the Contact Sensor, which can cause the error E202 0002 on Canon printers. The simplest solution is to clean the Flat Cable and re-attach it to the Main Controller Board of your Canon printer.
Possible causes behind e202 error
Almost every Canon all-in-one can display E202 error. This error doesn’t allow the users to access the printing, scanning and copying features of their Canon multifunction device. The cause of this error can differ based on the printer model, but one common malfunction that causes this error is the improper functioning of scanner.
Commonly, it’s noticed that when scanner is not able to go back to its start position, which is the left side of the glass flatbed, your Canon MFP will display E202 error. This happens when either CCD unit of your scanner is faulty or the cable that connects the CCD unit to your all-in-one has some fault. Therefore, the surest way to fix this error is to replace your CCD unit or its cable with a new one.
Since you will be performing hardware maintenance for your Canon IR 5055 and other Canon printers, you will require some tools.
- Philips Screwdriver: You will need a Philips screwdriver to open the screws on the back of your printer. Make sure that the screwdriver you choose is capable of opening those screws, which means it matches the size of the screws, is long enough to reach the screws and can be used easily without losing your grip.
- Flat-Head Screwdriver: You will require a flat-head screwdriver to open the side cover of your printer. Using this screwdriver will allow you to open the side cover without applying any excessive force.
- Clean Cloth: You may need a clean cloth to wipe dust off of some of the places on your printer.
Also, you will have to take certain precautions so that while performing the maintenance you can avoid damaging your Canon MF232w printer.
- Avoid Excess Force: When working with the printer hardware component, you should not use any excess force. When applying pressure be gentle, but firm. If at any stage you feel that you are unable to perform some steps, then re-read the steps in our guide, most probably you are doing something wrong.
- Read the Guide Carefully: Before starting the printer maintenance process, you must read all the steps carefully multiple times so that you know exactly what needs to be done.
- Don’t Rush Through Steps: Since the complete maintenance process can be completed in just a few minutes, you shouldn’t rush through these steps. Trying to rush through the steps can cause damage to the components of your printer or you may skip some steps in a hurry.
Arrange all the tools mentioned above and follow all the precautions. At any stage during the printer maintenance, if you are confused about what to do, then either re-read our maintenance guide to clear your doubts or simply stop the printer maintenance process.
Example 1 to Fix Error 202 (E202)
When you see the message “Turn the main power ON E202 0002” on your Canon MF733cdw printer display screen, then you should follow the steps given below before contacting the service engineer. Please study this Canon printer maintenance guide carefully and follow its steps in the correct order. The below mentioned maintenance process can be followed for the Canon D530 printer, the Canon MF229 or any other Canon printer as well.
Before starting the maintenance process, switch-off your printer and disconnect the power cable from the printer.
- Use the Philips screwdriver to open the screw on the back left-side of your Canon printer so that you can open the left-side cover.
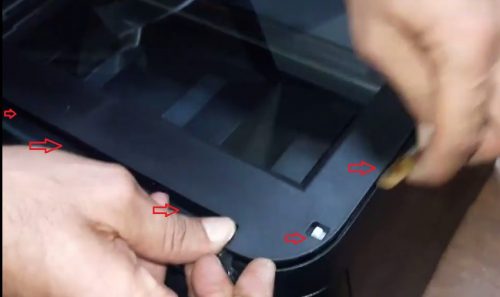
- Use the flat-head screwdriver to unlock the cover as shown in the image below.
- Lift the top-lid cover of your printer from the front.
- Now unlock the left-cover so that it’s completely detached from the printer.
- If you need, then you can use the flat-head screwdriver to ease the detachment of the left-side cover.
- Now you can see the Main Controller Board of your printer. In the board, you can see two cables connecting with the board as shown in the image below.
- One by one, pull-out these cables and clean them carefully, then reattach the cables into their back to the original positions. (Most important step)
- After cleaning and reattaching the cables you should replace the left-side cover as it was placed originally and tighten the screws.
- Now, reconnect the power cable to your printer and switch-on your printer to check whether the Canon error E202 0002 has been fixed or not.
That’s it, you have successfully cleaned the Flat Cable connected to the Main Controller Board of your printer. This should solve error E202 0002 on Canon printer.
Example 2 to Fix Error 202 (E202)
We are taking an example of Canon MF 231 printer, but the same steps can be followed for all Canon MFP printers. The outer design of the MFP’s may be different, but inside the scanner all the Canon all-in-ones will have the same design.
- Open the two screws on the top of your scanner.
- Then, open the screws on the downside of your scanner.
- Now, slowly unlatch the plastic panel which holds the scanner glass top. You can use a blunt plastic strip for assistance.
- Once the plastic panel is removed, the scanner glass will be free for removal. Remove it.
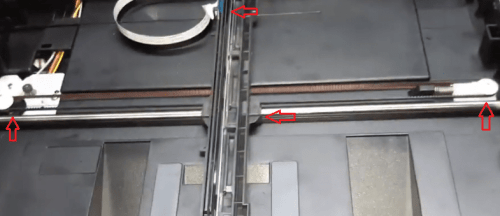
- Information: This will expose the CCD unit which is placed on a metal rail, attached to a ribbon and a rubber strip. The rubber strip is running on two rollers and one of the rollers has a spring attached to it.
- Move CCD unit to the middle and remove the rubber strip from the roller wheel which doesn’t have spring attached to it.
- Now remove the rubber strip from the other roller and gently detach ribbon from the CCD unit.
- Next, gently detach rubber strip from the CCD unit.
Now, your old CCD unit free to be removed from your printer. Take the new CCD unit and follow the steps given below. - Take the new CCD unit and gently reattach the rubber strip and ribbon. Then, place the CCD unit on the metal rail.
- Next, place the rubber strip around the roller with spring and then stretch it to place on the other roller.
- Once new CCD unit is properly placed, before moving to the next step make sure that CCD unit is moving freely over the metal rail without any obstruction. A properly attached CCD unit should look like this.
- Put the scanner glass to cover the CCD unit. Make sure that scanner glass is stable on the slots made for it and is not moving.
- Reattach the plastic panel to hold the scanner glass. Then, tighten the screws on the top side and downside of the scanner. Now you can restart your printer and it will print, scan, and copy properly.
That’s it.
The steps given above should be followed exactly in the order they have been mentioned. Just remember that all the components of your scanner are sensitive to damage, therefore, when you are working with them you should apply the least force possible and try to do everything gently. By following the steps given in this guide you will be able to fix error 202 in your Canon MFP printer.
Now you know how to fix error E202 0002 on Canon printers. However, if the above solution didn’t work for you, then you should contact the Canon service center because your printer may require some hardware replacement.
Advertisement
-
Catalog
-
Sign In
-
Contacts
-
Forum
-
Eng
- Error Codes
- Canon
- MF4450
- Code E202-0002
- Code: E202-0002
- Description: Contact Sensor HP error, Failure in return
- Remedy: When the same error repeatedly occurs after several times of turning the power OFF/ON, execute the following remedies.
(1) Check the connection of Flat Cable between Main Controller Board (J5) and Contact Sensor.
(2) Replace the Flat Cable between Main Controller Board (J5) and Contact Sensor.
(3) Replace the Contact Sensor.
(4) Replace the Main Controller Board.


