
-
Что такое nginx
-
Как используется и работает nginx
-
Как проверить, установлен ли NGINX
-
Как установить NGINX
-
Где расположен nginx
-
Как правильно составить правила nginx.conf
-
NGINX WordPress Multisite
-
Как заблокировать по IP в NGINX
-
Как в NGINX указать размер и время
-
Настройка отладки в NGINX
-
Добавление модулей NGINX в Linux (Debian/CentOS/Ubuntu)
-
Основные ошибки nginx и их устранение
-
502 Bad Gateway
-
504 Gateway Time-out
-
Upstream timed out (110: Connection timed out) while reading response header from upstream
-
413 Request Entity Too Large
-
304 Not Modified не устанавливается
-
Client intended to send too large body
-
Как перезагрузить nginx
-
В чём разница между reload и restart
-
Как вместо 404 ошибки делать 301 редирект на главную
-
Как в NGINX сделать редирект на мобильную версию сайта
-
Как в NGINX включить поддержку WebP
-
Полезные материалы и ссылки
-
Настройка NGINX под WP Super Cache
-
Конвертер правил .htaccess (Apache) в NGINX
NGINX — программное обеспечение, написанное для UNIX-систем. Основное назначение — самостоятельный HTTP-сервер, или, как его используют чаще, фронтенд для высоконагруженных проектов. Возможно использование NGINX как почтового SMTP/IMAP/POP3-сервера, а также обратного TCP прокси-сервера.
Как используется и работает nginx
NGINX является широко используемым продуктом в мире IT, по популярности уступая лишь Apache.
Как правило, его используют либо как самостоятельный HTTP-сервер, используя в бекенде PHP-FPM, либо в связке с Apache, где NGINX используется во фронтэнде как кеширующий сервер, принимая на себя основную нагрузку, отдавая статику из кеша, обрабатывая и отфильтровывая входящие запросы от клиента и отправляя их дальше к Apache. Apache работает в бекэнде, работая уже с динамической составляющей проекта, собирая страницу для передачи её в кеш NGINX и запрашивающему её клиенту. Это если в общих чертах, чтобы понимать суть работы, так-то внутри всё сложнее.
Как проверить, установлен ли NGINX
Пишете в консоль SSH следующую команду, она покажет версию NGINX
nginx -v
Если видите что-то навроде
nginx version: nginx/1.10.3
Значит, всё в порядке, установлен NGINX версии 1.10.3. Если нет, установим его.
Как установить NGINX
Если вы сидите не под
root, предваряйте командыapt-getпрефиксомsudo, напримерsudo apt-get install nginx
- Обновляем порты (не обязательно)
apt-get update && apt-get upgrade
- Установка NGINX
apt-get install nginx
- Проверим, установлен ли NGINX
nginx -v
Команда должна показать версию сервера, что-то подобное:
nginx version: nginx/1.10.3
Где расположен nginx
Во FreeBSD NGINX располагается в /usr/local/etc/nginx.
В Ubuntu, Debian NGINX располагается тут: /etc/nginx. В ней располагается конфигурационный файл nginx.conf — основной конфигурационный файл nginx.
Чтобы добраться до него, выполняем команду в консоли
nano /etc/nginx/nginx.conf
По умолчанию, файлы конфигураций конкретных сайтов располагаются в /etc/nginx/sites-enabled/
cd /etc/nginx/sites-enabled/
или в /etc/nginx/vhosts/
cd /etc/nginx/vhosts/
Как правильно составить правила nginx.conf
Идём изучать мануалы на официальный сайт.
Пример рабочей конфигурации NGINX в роли кеширующего проксирующего сервера с Apache в бекенде
 # Определяем пользователя, под которым работает nginx
user www-data;

 # Определяем количество рабочих процессов автоматически
 # Параметр auto поддерживается только начиная с версий 1.3.8 и 1.2.5.
worker_processes auto;


 # Определяем, куда писать лог ошибок и уровень логирования
error_log  /var/log/nginx/error.log warn;

 # Задаём файл, в котором будет храниться номер (PID) основного процесса
pid /var/run/nginx.pid;


events {
    # Устанавливает максимальное количество соединений одного рабочего процесса. Следует выбирать значения от 1024 до 4096.
    # Как правило, число устанавливают в зависимости от числа ядер процессора по принципу n * 1024. Например, 2 ядра дадут worker_connections 2048.
    worker_connections  1024;

    # Метод обработки соединений. Наличие того или иного метода определяется платформой.
    # Как правило, NGINX сам умеет определять оптимальный метод, однако, его можно указать явно.
    # use epoll - используется в Linux 2.6+
    # use kqueue - FreeBSD 4.1+, OpenBSD 2.9+, NetBSD 2.0 и Mac OS X
    use epoll;


    # Будет принимать максимально возможное количество соединений
    multi_accept on;
}


http {

    include       /etc/nginx/mime.types;
    default_type  application/octet-stream;

    log_format  main  '$remote_addr - $remote_user [$time_local] "$request" '
                      '$status $body_bytes_sent "$http_referer" '
                      '"$http_user_agent" "$http_x_forwarded_for"';

    # Куда писать лог доступа и уровень логирования
    access_log  /var/log/nginx/access.log  main;

    # Для нормального ответа 304 Not Modified;
    if_modified_since before;

    # Включаем поддержку WebP
    map $http_accept $webp_ext {
        default "";
        "~*webp" ".webp";
    }

    ##
    # Basic Settings
    ##

    # Используется, если количество имен серверов большое
    #server_names_hash_max_size 1200;
    #server_names_hash_bucket_size 64;


    ### Обработка запросов ###

    # Метод отправки данных sendfile более эффективен, чем стандартный метод read+write
    sendfile on;
    # Будет отправлять заголовки и и начало файла в одном пакете
    tcp_nopush on;
    tcp_nodelay on;


    ### Информация о файлах ###

    # Максимальное количество файлов, информация о которых будет содержаться в кеше
    open_file_cache max=200000 inactive=20s;
    # Через какое время информация будет удалена из кеша
    open_file_cache_valid 30s;
    # Кеширование информации о тех файлах, которые были использованы хотя бы 2 раза
    open_file_cache_min_uses 2;
    # Кеширование информации об отсутствующих файлах
    open_file_cache_errors on;


    # Удаляем информацию об nginx в headers
    server_tokens off;

    # Будет ждать 30 секунд перед закрытием keepalive соединения
    keepalive_timeout 30s;
    ## Максимальное количество keepalive запросов от одного клиента
    keepalive_requests 100;

    # Разрешает или запрещает сброс соединений по таймауту
    reset_timedout_connection on;
    # Будет ждать 30 секунд тело запроса от клиента, после чего сбросит соединение
    client_body_timeout 30s;
    # В этом случае сервер не будет принимать запросы размером более 200Мб
    client_max_body_size 200m;
    # Если клиент прекратит чтение ответа, Nginx подождет 30 секунд и сбросит соединение
    send_timeout 30s;

    # Proxy #
    # Задаёт таймаут для установления соединения с проксированным сервером.
    # Необходимо иметь в виду, что этот таймаут обычно не может превышать 75 секунд.
    proxy_connect_timeout 30s;
    # Задаёт таймаут при передаче запроса проксированному серверу.
    # Таймаут устанавливается не на всю передачу запроса, а только между двумя операциями записи.
    # Если по истечении этого времени проксируемый сервер не примет новых данных, соединение закрывается.
    proxy_send_timeout 30s;
    # Задаёт таймаут при чтении ответа проксированного сервера.
    # Таймаут устанавливается не на всю передачу ответа, а только между двумя операциями чтения.
    # Если по истечении этого времени проксируемый сервер ничего не передаст, соединение закрывается.
    proxy_read_timeout 30s;


    ##
    # Gzip Settings
    ##

    # Включаем сжатие gzip
    gzip on;
    # Для IE6 отключить
    gzip_disable "msie6";
     # Добавляет Vary: Accept-Encoding в Headers
     gzip_vary on;
     # Cжатие для всех проксированных запросов (для работы NGINX+Apache)
     gzip_proxied any;
     # Устанавливает степень сжатия ответа методом gzip. Допустимые значения находятся в диапазоне от 1 до 9
     gzip_comp_level 6;
     # Задаёт число и размер буферов, в которые будет сжиматься ответ
     gzip_buffers 16 8k;
     # Устанавливает минимальную HTTP-версию запроса, необходимую для сжатия ответа. Значение по умолчанию
     gzip_http_version 1.1;
     # MIME-типы файлов в дополнение к text/html, которые нужно сжимать
     gzip_types text/plain text/css application/json application/x-javascript text/xml application/xml application/xml+rss text/javascript application/javascript image/svg+xml;
     # Минимальная длина файла, которую нужно сжимать
     gzip_min_length 10;

  # Подключаем конфиги конкретных сайтов
  include /etc/nginx/conf.d/*.conf;
  include /etc/nginx/vhosts/*/*;

  ### Далее определяем localhost
  ### Сюда отправляются запросы, для которых не был найден свой конкретный блок server в /vhosts/
  server {
     server_name localhost; # Тут можно ввести IP сервера
     disable_symlinks if_not_owner;
     listen 80 default_server; # Указываем, что это сервер по умолчанию на порту 80

     ### Возможно, понадобится чётко указать IP сервера
     # listen      192.168.1.1:80 default_server;

     ### Можно сбрасывать соединения с сервером по умолчанию, а не отправлять запросы в бекенд
     #return      444;

    include /etc/nginx/vhosts-includes/*.conf;
    location @fallback {
       error_log /dev/null crit;
       proxy_pass http://127.0.0.1:8080;
       proxy_redirect http://127.0.0.1:8080 /;
       proxy_set_header Host $host;
       proxy_set_header X-Forwarded-For $proxy_add_x_forwarded_for;
       proxy_set_header X-Forwarded-Proto $scheme;
       access_log off ;
    }
  }
}
Строка include /etc/nginx/vhosts/*; указывает на поддиректорию vhosts, в которой содержатся файлы конфигураций конкретно под каждый домен.
Пример того, что может содержаться там — example.com.conf
Ниже пример для Apache в бекенде:
server {
  # Домен сайта и его алиасы через пробел
  server_name example.com www.example.com;
  # Кодировка сайта. Содержимое заголовка "Content-Type". off отключает этот заголовок. Можно указать стандартные uft-8, windows-1251, koi8-r, либо же использовать свою.
  charset off;
  disable_symlinks if_not_owner from=$root_path;
  index index.html;
  root $root_path;
  set $root_path /var/www/example/data/www/example.com;
  access_log /var/www/httpd-logs/example.com.access.log ;
  error_log /var/www/httpd-logs/example.com.error.log notice;
  #IP:Port сервера NGINX
  listen 192.168.1.1:80;
  include /etc/nginx/vhosts-includes/*.conf;
  location / {
    location ~ [^/].ph(pd*|tml)$ {
      try_files /does_not_exists @fallback;
    }
    # WebP
    location ~* ^.+.(png|jpe?g)$ {
      expires 365d;
      add_header Vary Accept;
      try_files $uri$webp_ext $uri =404;
    }
    location ~* ^.+.(gif|svg|js|css|mp3|ogg|mpe?g|avi|zip|gz|bz2?|rar|swf)$ {
      expires 365d;
      try_files $uri =404;
    }
    location / {
      try_files /does_not_exists @fallback;
    }
  }
  location @fallback {
    proxy_pass http://127.0.0.1:8080;
    proxy_redirect http://127.0.0.1:8080 /;
    proxy_set_header Host $host;
    proxy_set_header X-Forwarded-For $proxy_add_x_forwarded_for;
    proxy_set_header X-Forwarded-Proto $scheme;
    access_log off ;
  }
}
А вот вариант для PHP-FPM:
server {
  # Домен сайта и его алиасы через пробел
  server_name example.com www.example.com;
  # Кодировка сайта. Содержимое заголовка "Content-Type". off отключает этот заголовок. Можно указать стандартные uft-8, windows-1251, koi8-r, либо же использовать свою.
  charset off;
  disable_symlinks if_not_owner from=$root_path;
  index index.html;
  root $root_path;
  set $root_path /var/www/example/data/www/example.com;
  access_log /var/www/httpd-logs/example.com.access.log ;
  error_log /var/www/httpd-logs/example.com.error.log notice;
  #IP:Port сервера NGINX
  listen 192.168.1.1:80;
  include /etc/nginx/vhosts-includes/*.conf;
  location / {
    location ~ [^/].ph(pd*|tml)$ {
      try_files /does_not_exists @php;
    }
    # WebP
    location ~* ^.+.(png|jpe?g)$ {
      expires 365d;
      add_header Vary Accept;
      try_files $uri$webp_ext $uri =404;
    }
    location ~* ^.+.(gif|svg|js|css|mp3|ogg|mpe?g|avi|zip|gz|bz2?|rar|swf)$ {
      expires 365d;
      try_files $uri =404;
    }
    location / {
      try_files $uri $uri/ @php;
    }
  }
  location @php {
    try_files $uri =404;
    include fastcgi_params;
    fastcgi_index index.php;
    fastcgi_param PHP_ADMIN_VALUE "sendmail_path = /usr/sbin/sendmail -t -i -f [email protected]";
    # Путь к сокету php-fpm сайта
    fastcgi_pass unix:/var/www/php-fpm/example.sock;
    fastcgi_split_path_info ^((?U).+.ph(?:pd*|tml))(/?.+)$;
  }
}
NGINX WordPress Multisite
Ниже конфигурация под WordPress Multisite с сайтами в поддиректориях:
#user 'example' virtual host 'example.com' configuration file
server {
  server_name example.com www.example.com;
  charset off;
  disable_symlinks if_not_owner from=$root_path;
  index index.html index.php;
  root $root_path;
  set $root_path /var/www/example/data/www/example.com;
  access_log /var/www/httpd-logs/example.com.access.log ;
  error_log /var/www/httpd-logs/example.com.error.log notice;
  listen 1.2.3.4:80;
  include /etc/nginx/vhosts-includes/*.conf;

  # А вот тут блок специально для MU subdirectories
  if (!-e $request_filename) {
      rewrite /wp-admin$ $scheme://$host$uri/ permanent;
      rewrite ^(/[^/]+)?(/wp-.*) $2 last;
      rewrite ^(/[^/]+)?(/.*.php) $2 last;
  }

  location / {
      try_files $uri $uri/ /index.php?$args ;
  }

  location ~ .php {
    try_files $uri =404;
    include fastcgi_params;
    fastcgi_index index.php;
    fastcgi_param PHP_ADMIN_VALUE "sendmail_path = /usr/sbin/sendmail -t -i -f [email protected]";
    fastcgi_pass unix:/var/www/php-fpm/example.sock;
    fastcgi_split_path_info ^((?U).+.ph(?:pd*|tml))(/?.+)$;
  }
}
Как заблокировать по IP в NGINX
Блокировать можно с помощью директив allow и deny.
Правила обработки таковы, что поиск идёт сверху вниз. Если IP совпадает с одним из правил, поиск прекращается.
Таким образом, вы можете как забанить все IP, кроме своих, так и заблокировать определённый IP:
  deny 1.2.3.4 ; # Здесь мы вводим IP нарушителя
  deny 192.168.1.1/23 ; # А это пример того, как можно добавить подсеть в бан
  deny 2001:0db8::/32 ; # Пример заблокированного IPv6
  allow all ; # Всем остальным разрешаем доступ
Приведу пример конфигурации, как можно закрыть доступ к панели администратора WordPress по IP:
### https://sheensay.ru/?p=408
################################

location = /wp-admin/admin-ajax.php { # Открываем доступ к admin-ajax.php. Это нужно, чтобы проходили ajax запросы в WordPress
  try_files $uri/ @php ;
}

location = /adminer.php { # Закрываем Adminer, если он есть
  try_files /does_not_exists @deny ;
}

location = /wp-login.php { # Закрываем /wp-login.php
  try_files /does_not_exists @deny ;
}

location ~* /wp-admin/.+.php$ { # Закрываем каталог /wp-admin/
  try_files /does_not_exists @deny ;
}


location @deny { # В этом location мы определяем правила, какие IP пропускать, а какие забанить

  allow 1.2.3.4 ; # Здесь мы вводим свой IP из белого списка
  allow 192.168.1.1/23 ; # А это пример того, как можно добавить подсеть IP
  allow 2001:0db8::/32 ; # Пример IPv6

  deny all ; # Закрываем доступ всем, кто не попал в белый список

  try_files /does_not_exists @php; # Отправляем на обработку php в бекенд
}

location ~ .php$ { ### Файлы PHP обрабатываем в location @php
    try_files /does_not_exist @php;
}

location @php{
    ### Обработчик php, PHP-FPM или Apache
}
Ещё один неплохой вариант. Правда, по умолчанию определяются только статичные IP. А чтобы разрешить подсеть, придётся использовать дополнительный модуль GEO:
### Задаём таблицу соответсткий
map $remote_addr $allowed_ip {

   ### Перечисляете разрешённые IP
   1.2.3.4 1; ### 1.2.3.4 - это разрешённый IP
   4.3.2.1 1; ### 4.3.2.1 - это ещё один разрешённый IP

   default 0; ### По умолчанию, запрещаем доступ
}

server {

   ### Объявляем переменную, по которой будем проводить проверку доступа
   set $check '';

   ### Если IP не входит в список разрешённых, отмечаем это
   if ( $allowed_ip = 0  ) {
      set $check "A";
   }

   ### Если доступ идёт к wp-login.php, отмечаем это
   if ( $request_uri ~ ^/wp-login.php ) {
      set $check "${check}B";
   }

   ### Если совпали правила запрета доступа - отправляем соответствующий заголовок ответа
   if ( $check = "AB" ) {
      return 444; ### Вместо 444 можно использовать стандартный 403 Forbidden, чтобы отслеживать попытки доступа в логах

   ### Остальные правила server ####
}
Как в NGINX указать размер и время
Размеры:
- Байты указываются без суффикса. Пример:
directio_alignment 512;
- Килобайты указываются с суффиксом
kилиK. Пример:client_header_buffer_size 1k;
- Мегабайты указываются с суффиксом
mилиM. Пример:client_max_body_size 100M;
- Гигабайты указываются с суффиксом
gилиG. Пример:client_max_body_size 1G;
Время задаётся в следующих суффиксах:
ms— миллисекундыs— секундыm— минутыh— часыd— дниw— неделиM— месяцы, 30 днейY— годы, 365 дней
В одном значении можно комбинировать различные единицы, указывая их в порядке от более к менее значащим, и по желанию отделяя их пробелами. Например, 1h 30m задаёт то же время, что и 90m или 5400s. Значение без суффикса задаёт секунды.
Рекомендуется всегда указывать суффикс
Некоторые интервалы времени можно задать лишь с точностью до секунд.
Настройка отладки в NGINX
В целях отладки настройки NGINX вы можете писать данные в логи, но я советую воспользоваться директивой add_header. С её помощью вы можете выводить различные данные в http headers.
Пример, как можно определить, в каком location обрабатывается правило:
  location ~ [^/].ph(pd*|tml)$ {
    try_files /does_not_exists @fallback;
    add_header X-debug-message "This is php" always;
  }

  location ~* ^.+.(jpe?g|gif|png|svg|js|css|mp3|ogg|mpe?g|avi|zip|gz|bz2?|rar|swf)$ {
    expires 365d; log_not_found off; access_log off;
    try_files $uri $uri/ @fallback;
    add_header X-debug-message "This is static file" always;
  }
Теперь, если проверить, какие заголовки отдаёт статичный файл, например https://sheensay.ru/wp-content/uploads/2015/06/nginx.png, то вы увидите среди них и наш X-debug-message
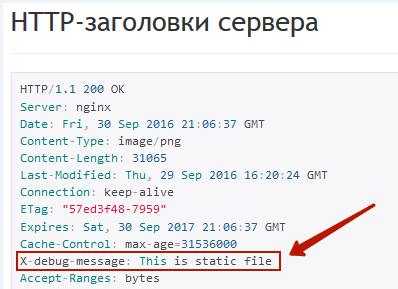
Отладочная информация NGINX в заголовках HTTP headers
Вместо статичной строки можно выводить данные различных переменных, что очень удобно для правильной настройки сервера и поиска узких мест.
Добавление модулей NGINX в Linux (Debian/CentOS/Ubuntu)
Функционал NGINX возможно расширить с помощью модулей. С их списком и возможным функционалом можно ознакомиться на официальном сайте http://nginx.org/ru/docs/. Также, существуют интересные сторонние модули, например, модуль NGINX для защиты от DDoS
Приведу пример установки модуля ngx_headers_more.
Все команды выполняются в консоли, используйте Putty или Far Manager с NetBox/WinSCP. Установка будет происходить под Debian
-
nginx -V
В результате увидите что-то навроде
nginx version: nginx/1.8.0
built by gcc 4.9.1 (Debian 4.9.1-19)
built with OpenSSL 1.0.1k 8 Jan 2015
TLS SNI support enabled
configure arguments: --prefix=/etc/nginx --sbin-path=/etc/nginx/sbin/nginx --conf-path=/etc/nginx/nginx.conf --error-log-path=/var/log/nginx/error.log --http-log-path=/var/log/ngin
x/access.log --pid-path=/var/run/nginx.pid --lock-path=/var/run/nginx.lock --http-client-body-temp-path=/var/cache/nginx/client_temp --http-proxy-temp-path=/var/cache/nginx/p
roxy_temp --http-fastcgi-temp-path=/var/cache/nginx/fastcgi_temp --http-uwsgi-temp-path=/var/cache/nginx/uwsgi_temp --http-scgi-temp-path=/var/cache/nginx/scgi_temp --user=ng
inx --group=nginx --with-http_ssl_module --with-http_realip_module --with-http_addition_module --with-http_sub_module --with-http_dav_module --with-http_flv_module --with-htt
p_mp4_module --with-http_gunzip_module --with-http_gzip_static_module --with-http_random_index_module --with-http_secure_link_module --with-http_stub_status_module --with-htt
p_auth_request_module --with-mail --with-mail_ssl_module --with-file-aio --with-http_spdy_module --with-cc-opt='-g -O2 -fstack-protector-strong -Wformat -Werror=format-securi
ty' --with-ld-opt=-Wl,-z,relro --with-ipv6
Результат запишем в блокнот, пригодится при компиляции
-
wget http://nginx.org/download/nginx-1.8.0.tar.gz
tar xvf nginx-1.8.0.tar.gz
rm -rf nginx-1.8.0.tar.gz
cd nginx-1.8.0
Тут мы скачиваем нужную версию NGINX.
-
wget https://github.com/openresty/headers-more-nginx-module/archive/v0.29.tar.gz
tar xvf v0.29.tar.gz
Скачиваем и распаковываем последнюю версию модуля из источника, в моём случае, с GitHub
-
aptitude install build-essential
Установим дополнительные пакеты.
Если выходит ошибкаaptitude: команда не найдена, нужно предварительно установить aptitude:apt-get install aptitude
- Теперь приступаем к конфигурированию NGINX с модулем
headers-more-nginx-module
Ещё раз запускаемnginx -Vи копируем, начиная с —prefix= и до первого —add-module= (все присутствующие в результате —add_module= нам не нужны). После чего пишем в консоли ./configure и вставляем скопированное из редактора:./configure --prefix=/etc/nginx --sbin-path=/etc/nginx/sbin/nginx --conf-path=/etc/nginx/nginx.conf --error-log-path=/var/log/nginx/error.log --http-log-path=/var/log/nginx/access.log --pid-path=/var/run/nginx.pid --lock-path=/var/run/nginx.lock --http-client-body-temp-path=/var/cache/nginx/client_temp --http-proxy-temp-path=/var/cache/nginx/proxy_temp --http-fastcgi-temp-path=/var/cache/nginx/fastcgi_temp --http-uwsgi-temp-path=/var/cache/nginx/uwsgi_temp --http-scgi-temp-path=/var/cache/nginx/scgi_temp --user=nginx --group=nginx --with-http_ssl_module --with-http_realip_module --with-http_addition_module --with-http_sub_module --with-http_dav_module --with-http_flv_module --with-http_mp4_module --with-http_gunzip_module --with-http_gzip_static_module --with-http_random_index_module --with-http_secure_link_module --with-http_stub_status_module --with-http_auth_request_module --with-mail --with-mail_ssl_module --with-file-aio --with-http_spdy_module --with-cc-opt='-g -O2 -fstack-protector-strong -Wformat -Werror=format-security' --with-ld-opt=-Wl,-z,relro --with-ipv6 --add-module=./headers-more-nginx-module-0.29
—add-module={Тут надо добавить путь до распакованного модуля, абсолютный или относительный}
- Во время конфигурирования могут возникнуть ошибки
- Ошибка
./configure: error: the HTTP rewrite module requires the PCRE library.
You can either disable the module by using --without-http_rewrite_module
option, or install the PCRE library into the system, or build the PCRE library
statically from the source with nginx by using --with-pcre=<path> option.
Эта проблема решается установкой
libpcre++-dev:aptitude install libpcre++-dev
- Ошибка
./configure: error: SSL modules require the OpenSSL library.
You can either do not enable the modules, or install the OpenSSL library
into the system, or build the OpenSSL library statically from the source
with nginx by using --with-openssl=<path> option.
Эта проблема решается так:
aptitude install libssl-dev
- Ошибка
- В случае успеха, вы увидите что-то навроде
Configuration summary
  + using system PCRE library
  + using system OpenSSL library
  + md5: using OpenSSL library
  + sha1: using OpenSSL library
  + using system zlib library

  nginx path prefix: "/etc/nginx"
  nginx binary file: "/etc/nginx/sbin/nginx"
  nginx configuration prefix: "/etc/nginx"
  nginx configuration file: "/etc/nginx/nginx.conf"
  nginx pid file: "/var/run/nginx.pid"
  nginx error log file: "/var/log/nginx/error.log"
  nginx http access log file: "/var/log/nginx/access.log"
  nginx http client request body temporary files: "/var/cache/nginx/client_temp"
  nginx http proxy temporary files: "/var/cache/nginx/proxy_temp"
  nginx http fastcgi temporary files: "/var/cache/nginx/fastcgi_temp"
  nginx http uwsgi temporary files: "/var/cache/nginx/uwsgi_temp"
  nginx http scgi temporary files: "/var/cache/nginx/scgi_temp"
- Пришло время собрать бинарный файл nginx
make install clean
- Теперь нужно проверить, собрался ли бинарник с нужным модулем.
/usr/sbin/nginx -V
В результате должны увидеть модуль на месте
nginx version: nginx/1.8.0
built by gcc 4.9.2 (Debian 4.9.2-10)
built with OpenSSL 1.0.1k 8 Jan 2015
TLS SNI support enabled
configure arguments: --prefix=/etc/nginx --sbin-path=/etc/nginx/sbin/nginx --conf-path=/etc/nginx/nginx.conf --error-log-path=/var/log/nginx/error.log --http-log-path=/var/log/nginx/access.log --pid-path=/var/run/nginx.pid --lock-path=/var/run/nginx.lock --http-client-body-temp-path=/var/cache/nginx/client_temp --http-proxy-temp-path=/var/cache/nginx/proxy_temp --http-fastcgi-temp-path=/var/cache/nginx/fastcgi_temp --http-uwsgi-temp-path=/var/cache/nginx/uwsgi_temp --http-scgi-temp-path=/var/cache/nginx/scgi_temp --user=nginx --group=nginx --with-http_ssl_module --with-http_realip_module --with-http_addition_module --with-http_sub_module --with-http_dav_module --with-http_flv_module --with-http_mp4_module --with-http_gunzip_module --with-http_gzip_static_module --with-http_random_index_module --with-http_secure_link_module --with-http_stub_status_module --with-http_auth_request_module --with-mail --with-mail_ssl_module --with-file-aio --with-http_spdy_module --with-cc-opt='-g -O2 -fstack-protector-strong -Wformat -Werror=format-security' --with-ld-opt=-Wl,-z,relro --with-ipv6 --add-module=./headers-more-nginx-module-0.29
- Останавливаем nginx
service nginx stop
- Сделаем бекап текущего бинарника nginx на всякий случай, чтобы откатить его назад при необходимости
mv /usr/sbin/nginx /usr/sbin/nginx_back
- Свежесобранный бинарник nginx ставим на место старого
mv /etc/nginx/sbin/nginx /usr/sbin/nginx
- Проверяем, что вышло в итоге, что ничего не перепутано, и нужные модули на месте
nginx -V
- Запускаем NGINX
service nginx start
- Подчищаем за собой
cd ../
rm -rf nginx-1.8.0
rm -rf /etc/nginx/sbin
Основные ошибки nginx и их устранение
502 Bad Gateway
Ошибка означает, что NGINX не может получить ответ от одного из сервисов на сервере. Довольно часто эта ошибка появляется, когда NGINX работает в связке с Apache, Varnish, Memcached или иным сервисом, а также обрабатывает запросы PHP-FPM.
Как правило, проблема возникает из-за отключенного сервиса (в этом случае нужно проверить состояние напарника и при необходимости перезапустить его) либо, если они находятся на разных серверах, проверить пинг между ними, так как, возможно, отсутствует связь между ними.
Также, для PHP-FPM нужно проверить права доступа к сокету.
Для этого убедитесь, что в /etc/php-fpm.d/www.conf прописаны правильные права
listen = /tmp/php5-fpm.sock
listen.group = www-data
listen.owner = www-data
504 Gateway Time-out
Ошибка означает, что nginx долгое время не может получить ответ от какого-то сервиса. Такое происходит, если Apache, с которым NGINX работает в связке, отдаёт ответ слишком медленно.
Проблему можно устранить с помощью увеличения времени таймаута.
При работе в связке NGINX+Apache в конфигурационный файл можно внести изменения:
server {
...
   send_timeout 800;
   proxy_send_timeout 800;
   proxy_connect_timeout 800;
   proxy_read_timeout 800;
...
}
Тут мы выставили ожидание таймаута в 800 секунд.
Upstream timed out (110: Connection timed out) while reading response header from upstream
Причиной может быть сложная и потому долгая обработка php в работе PHP-FPM.
Здесь тоже можно увеличить время ожидания таймаута
location ~ .php$ {
   include fastcgi_params;
   fastcgi_index index.php;
   fastcgi_param SCRIPT_FILENAME $document_root$fastcgi_script_name;
   fastcgi_pass unix:/tmp/php5-fpm.sock;
   fastcgi_read_timeout 800;
}
800 секунд на ожидание ответа от бекенда.
Это лишь временные меры, так как при увеличении нагрузки на сайт ошибка снова станет появляться. Устраните узкие места, оптимизируйте работу скриптов php
413 Request Entity Too Large
Ошибка означает, что вы пытались загрузить слишком большой файл. В настройках nginx по умолчанию стоит ограничение в 1Mb.
Для устранения ошибки в nginx.conf нужно найти строку
client_max_body_size 1m;
и заменить значение на нужное. Например, мы увеличим размер загружаемых файлов до 100Mb
client_max_body_size 100m;
Также, можно отключить проверку размера тела ответа полностью значением ноль:
client_max_body_size 0;
Следует помнить, зачем ввели это ограничение: если любой пользователь может загружать файлы на неподготовленный сайт, можно сравнительно легко провести DDOS-атаку на него, перегружая входной поток большими файлами.
После каждого внесённого изменения в конфигурационный файл необходимо перезагружать nginx
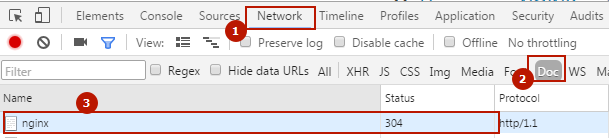
304 Not Modified не устанавливается
Если возникает проблема с правильным отображением ответного заголовка сервера 304 Not Modified, то проблема, скорее всего, в пунктах:
- В секции
serverконкретного сайта включенssi on(Подробнее в документации). По умолчанию, ssi отключен, но некоторые хостеры и ISPManager любят его прописывать в дефолтную конфигурацию сайта включенным. Его нужно обязательно отключить, закомментировав или удалив эту строку; - if_modified_since установить в
before, то есть на уровнеhttpили конкретногоserverпрописать:if_modified_since before;
Правильность ответа
304 Not Modifiedможно проверить с помощью:
- Консоли разработчика браузера (F12) в разделе
Network (Cеть)(не забываем перезагружать страницу);

- Или сторонних сервисов, например last-modified.com.
Client intended to send too large body
Решается с помощью увеличения параметра client_max_body_size
client_max_body_size 200m;
Как перезагрузить nginx
Для перезагрузки NGINX используйте restart или reload.
Команда в консоли:
service nginx reload
либо
/etc/init.d/nginx reload
либо
nginx -s reload
Эти команды остановят и перезапустят сервер NGINX.
Перезагрузить конфигурационный файл без перезагрузки NGINX можно так:
nginx -s reload
Проверить правильность конфигурации можно командой
nginx -t
В чём разница между reload и restart
Как происходит перезагрузка в NGINX:
- Команда посылается серверу
- Сервер анализирует конфигурационный файл
- Если конфигурация не содержит ошибок, новые процессы открываются с новой конфигурацией сервера, а старые плавно прекращают свою работу
- Если конфигурация содержит ошибки, то при использовании
restartпроцесс перезагрузки сервера прерывается, сервер не запускаетсяreloadсервер откатывается назад к старой конфигурации, работа продолжается
Короче говоря, restart обрывает работу резко, reload делает это плавно.
Restart рекомендуется использовать, только когда внесены глобальные изменения, например, заменено ядро сервера, либо нужно увидеть результат внесённых изменений прямо здесь и сейчас. В остальных случаях используйте reload.
Ещё лучше, если вы будете предварительно проверять правильность конфигурации командой nginx -t, например:
nginx -t && service nginx reload
или
nginx -t && nginx -s reload
Как вместо 404 ошибки делать 301 редирект на главную
error_page 404 = @gotomain;

location @gotomain {
  return 301 /;
}
Как в NGINX сделать редирект на мобильную версию сайта
Данный код вставляется на уровне server в самое начало файла (не обязательно в самое начало, но главное, чтобы перед определением обработчика скриптов php, иначе редирект может не сработать).
### Устанавливаем переменную в 0. В неё пишем 1, если обнаружили мобильную версию браузера
set $mobile_rewrite 0;

if ($http_user_agent ~* "(android|bbd+|meego).+mobile|avantgo|bada/|blackberry|blazer|compal|elaine|fennec|hiptop|iemobile|ip(hone|od)|iris|kindle|lge |maemo|midp|mmp|mobile.+firefox|netfront|opera m(ob|in)i|palm( os)?|phone|p(ixi|re)/|plucker|pocket|psp|series(4|6)0|symbian|treo|up.(browser|link)|vodafone|wap|windows ce|xda|xiino") {
  set $mobile_rewrite 1;
}

if ($http_user_agent ~* "^(1207|6310|6590|3gso|4thp|50[1-6]i|770s|802s|a wa|abac|ac(er|oo|s-)|ai(ko|rn)|al(av|ca|co)|amoi|an(ex|ny|yw)|aptu|ar(ch|go)|as(te|us)|attw|au(di|-m|r |s )|avan|be(ck|ll|nq)|bi(lb|rd)|bl(ac|az)|br(e|v)w|bumb|bw-(n|u)|c55/|capi|ccwa|cdm-|cell|chtm|cldc|cmd-|co(mp|nd)|craw|da(it|ll|ng)|dbte|dc-s|devi|dica|dmob|do(c|p)o|ds(12|-d)|el(49|ai)|em(l2|ul)|er(ic|k0)|esl8|ez([4-7]0|os|wa|ze)|fetc|fly(-|_)|g1 u|g560|gene|gf-5|g-mo|go(.w|od)|gr(ad|un)|haie|hcit|hd-(m|p|t)|hei-|hi(pt|ta)|hp( i|ip)|hs-c|ht(c(-| |_|a|g|p|s|t)|tp)|hu(aw|tc)|i-(20|go|ma)|i230|iac( |-|/)|ibro|idea|ig01|ikom|im1k|inno|ipaq|iris|ja(t|v)a|jbro|jemu|jigs|kddi|keji|kgt( |/)|klon|kpt |kwc-|kyo(c|k)|le(no|xi)|lg( g|/(k|l|u)|50|54|-[a-w])|libw|lynx|m1-w|m3ga|m50/|ma(te|ui|xo)|mc(01|21|ca)|m-cr|me(rc|ri)|mi(o8|oa|ts)|mmef|mo(01|02|bi|de|do|t(-| |o|v)|zz)|mt(50|p1|v )|mwbp|mywa|n10[0-2]|n20[2-3]|n30(0|2)|n50(0|2|5)|n7(0(0|1)|10)|ne((c|m)-|on|tf|wf|wg|wt)|nok(6|i)|nzph|o2im|op(ti|wv)|oran|owg1|p800|pan(a|d|t)|pdxg|pg(13|-([1-8]|c))|phil|pire|pl(ay|uc)|pn-2|po(ck|rt|se)|prox|psio|pt-g|qa-a|qc(07|12|21|32|60|-[2-7]|i-)|qtek|r380|r600|raks|rim9|ro(ve|zo)|s55/|sa(ge|ma|mm|ms|ny|va)|sc(01|h-|oo|p-)|sdk/|se(c(-|0|1)|47|mc|nd|ri)|sgh-|shar|sie(-|m)|sk-0|sl(45|id)|sm(al|ar|b3|it|t5)|so(ft|ny)|sp(01|h-|v-|v )|sy(01|mb)|t2(18|50)|t6(00|10|18)|ta(gt|lk)|tcl-|tdg-|tel(i|m)|tim-|t-mo|to(pl|sh)|ts(70|m-|m3|m5)|tx-9|up(.b|g1|si)|utst|v400|v750|veri|vi(rg|te)|vk(40|5[0-3]|-v)|vm40|voda|vulc|vx(52|53|60|61|70|80|81|83|85|98)|w3c(-| )|webc|whit|wi(g |nc|nw)|wmlb|wonu|x700|yas-|your|zeto|zte-)") {
  set $mobile_rewrite 1;
}
### Мобильный барузер обнаружен, редиректим на мобильный поддомен, в моём случае, m.example.com
if ($mobile_rewrite = 1) {
    rewrite ^ http://m.example.com/$request_uri redirect;
    break;
}
Как в NGINX включить поддержку WebP
Чтобы включить поддержку WebP, нужно прописать в секции http:
    # Прописываем маппинг для WebP, если он поддерживается браузером
    map $http_accept $webp_ext {
        default "";
        "~*webp" ".webp";
    }
Теперь, в секции server можно использовать:
location ~* ^.+.(png|jpe?g)$ {
    expires 365d; # Включаем браузерный кеш на год для изображений
    add_header Vary Accept; # Даём заголовок, что акцептируем запрос
    try_files $uri$webp_ext $uri =404; # Пробуем сначала искать версию изображения .webp
}
Полезные материалы и ссылки
Настройка NGINX под WP Super Cache
Конвертер правил .htaccess (Apache) в NGINX
Весьма полезный сервис, который поможет cконвертировать правила из .htaccess в NGINX. Результат, возможно, придётся донастроить вручную, но, в целом, он весьма удобен в применении.
Вот как описывают сервис сами авторы:
Сервис предназначен для перевода конфигурационного файла Apache .htaccess в инструкции конфигурационного файла nginx.
В первую очередь, сервис задумывался как переводчик инструкций mod_rewrite с htaccess на nginx. Однако, он позволяет переводить другие инструкции, которые можно и резонно перевести из Apache в nginx.
Инструкции, не относящиеся к настройке сервера (например, php_value), игнорируются.
Переводчик не проверяет правильность входящего конфига, в том числе регулярные выражения и логические ошибки.
Результат перевода следует обязательно проверить вручную, а затем разместить в секции server {} конфигурационного файла nginx.
Замечания и предложения по улучшению ждем, как обычно, на [email protected]


Перейти в конвертер из .htaccess Apache в NGINX
![]() Загрузка…
Загрузка…

Nginx — это веб-сервер, на котором работает треть всех сайтов в мире. Но если забыть или проигнорировать некоторые ошибки в настройках, можно стать отличной мишенью для злоумышленников. Detectify Crowdsource подготовил список наиболее часто встречающихся ошибок, делающих сайт уязвимым для атак.
Nginx — один из наиболее часто используемых веб-серверов в Интернете, поскольку он модульный, отзывчивый под нагрузкой и может масштабироваться на минимальном железе. Компания Detectify регулярно сканирует Nginx на предмет неправильных настроек и уязвимостей, из-за которых могут пострадать пользователи. Найденные уязвимости потом внедряются в качестве теста безопасности в сканер веб-приложений.
Мы проанализировали почти 50 000 уникальных файлов конфигурации Nginx, загруженных с GitHub с помощью Google BigQuery. С помощью собранных данных удалось выяснить, какие ошибки в конфигурациях встречаются чаще всего. Эта статья прольёт свет на следующие неправильные настройки Nginx:
-
Отсутствует корневой каталог
-
Небезопасное использование переменных
-
Чтение необработанного ответа сервера
-
merge_slashes отключены
Отсутствует корневой каталог
server {
        root /etc/nginx;

        location /hello.txt {
                try_files $uri $uri/ =404;
                proxy_pass http://127.0.0.1:8080/;
        }
}
Root-директива указывает корневую папку для Nginx. В приведённом выше примере корневая папка /etc/nginx, что означает, что мы можем получить доступ к файлам в этой папке. В приведенной выше конфигурации нет места для / (location / {...}), только для /hello.txt. Из-за этого root-директива будет установлена глобально, а это означает, что запросы к / перенаправят вас на локальный путь /etc/nginx.
Такой простой запрос, как GET /nginx.conf, откроет содержимое файла конфигурации Nginx, хранящегося в /etc/nginx/nginx.conf. Если корень установлен в /etc, запрос GET на /nginx/nginx.conf покажет файл конфигурации. В некоторых случаях можно получить доступ к другим файлам конфигурации, журналам доступа и даже зашифрованным учётным данным для базовой аутентификации HTTP.
Из почти 50 000 файлов конфигурации Nginx, которые мы проанализировали, наиболее распространёнными корневыми путями были следующие:

Потерявшийся слеш
server {
        listen 80 default_server;

        server_name _;
        location /static {
                alias /usr/share/nginx/static/;
        }
        location /api {
                proxy_pass http://apiserver/v1/;
        }
}
При неправильной настройке off-by-slash можно перейти на один шаг вверх по пути из-за отсутствующей косой черты. Orange Tsai поделился информацией об этом в своём выступлении на Blackhat «Нарушение логики парсера!». Он показал, как отсутствие завершающей косой черты в location директиве в сочетании с alias директивой позволяет читать исходный код веб-приложения. Менее известно то, что это также работает с другими директивами, такими как proxy_pass. Давайте разберёмся, что происходит и почему это работает.
location /api {
                proxy_pass http://apiserver/v1/;
        }
Если на Nginx запущена следующая конфигурация, доступная на сервере, можно предположить, что доступны только пути в http://apiserver/v1/.
http://server/api/user -> http://apiserver/v1//userКогда запрашивается http://server/api/user, Nginx сначала нормализует URL. Затем он проверяет, соответствует ли префикс /api URL-адресу, что он и делает в данном случае. Затем префикс удаляется из URL-адреса, поэтому остаётся путь /user. Затем этот путь добавляется к URL-адресу proxy_pass, в результате чего получается конечный URL-адрес http://apiserver/v1//user.
Обратите внимание, что в URL-адресе есть двойная косая черта, поскольку директива местоположения не заканчивается косой чертой, а путь URL-адреса proxy_pass заканчивается косой чертой. Большинство веб-серверов нормализуют http://apiserver/v1//user до http://apiserver/v1/user, что означает, что даже с этой неправильной конфигурацией всё будет работать так, как ожидалось, и это может остаться незамеченным.
Эта неправильная конфигурация может быть использована путём запроса http://server/api../, из-за чего Nginx запросит URL-адрес http://apiserver/v1/../, который нормализован до http://apiserver/. Уровень вреда от такой ошибки определяется тем, чего можно достичь, если использовать эту неправильную конфигурацию. Например, это может привести к тому, что статус сервера Apache будет отображаться с URL-адресом http://server/api../server-status, или он может сделать доступными пути, которые не должны быть общедоступными.
Одним из признаков того, что сервер Nginx имеет неправильную конфигурацию, является возврат сервером одинакового же ответа при удалении косой черты в URL-адресе. То есть, если http://server/api/user и http://server/apiuser возвращают один и тот же ответ, сервер может быть уязвимым. Он позволяет отправлять следующие запросы:
http://server/api/user -> http://apiserver/v1//user
http://server/apiuser -> http://apiserver/v1/user
Небезопасное использование переменных
Некоторые фреймворки, скрипты и конфигурации Nginx небезопасно используют переменные, хранящиеся в Nginx. Это может привести к таким проблемам, как XSS, обход HttpOnly-защиты, раскрытие информации и в некоторых случаях даже RCE.
SCRIPT_NAME
С такой конфигурацией, как эта:
        location ~ .php$ {
                include fastcgi_params;
                fastcgi_param SCRIPT_FILENAME $document_root$fastcgi_script_name;
                fastcgi_pass 127.0.0.1:9000;
        }
основная проблема будет заключаться в том, что Nginx отправит интерпретатору PHP любой URL-адрес, заканчивающийся на .php, даже если файл не существует на диске. Это распространённая ошибка во многих конфигурациях Nginx, и об этом говорится в документе «Ловушки и распространенные ошибки», созданном Nginx.
XSS возможен, если PHP-скрипт попытается определить базовый URL на основе SCRIPT_NAME;
<?php

if(basename($_SERVER['SCRIPT_NAME']) ==
basename($_SERVER['SCRIPT_FILENAME']))
   echo dirname($_SERVER['SCRIPT_NAME']);
?>
GET /index.php/<script>alert(1)</script>/index.php
SCRIPT_NAME  =  /index.php/<script>alert(1)</script>/index.php
Использование $uri может привести к CRLF-инъекции
Другая неправильная конфигурация, связанная с переменными Nginx, заключается в использовании $uri или $document_uri вместо $request_uri.
$uri и $document_uri содержат нормализованный URI, тогда как нормализация в Nginx включает URL-декодирование URI. В блоге Volema рассказывалось, что $uri обычно используется при создании перенаправлений в конфигурации Nginx, что приводит к внедрению CRLF.
Пример уязвимой конфигурации Nginx:
location / {
  return 302 https://example.com$uri;
}
Символами новой строки для HTTP-запросов являются r (возврат каретки) и n (перевод строки). URL-кодирование символов новой строки приводит к следующему представлению символов %0d%0a. Когда эти символы включены в запрос типа http://localhost/%0d%0aDetectify:%20clrf на сервер с неправильной конфигурацией, сервер ответит новым заголовком с именем Detectify, поскольку переменная $uri содержит новые URL-декодированные строчные символы.
HTTP/1.1 302 Moved Temporarily
Server: nginx/1.19.3
Content-Type: text/html
Content-Length: 145
Connection: keep-alive
Location: https://example.com/
Detectify: clrf
Произвольные переменные
В некоторых случаях данные, предоставленные пользователем, можно рассматривать как переменную Nginx. Непонятно, почему это происходит, но это встречается не так уж редко, а проверяется довольно-таки сложным путём, как видно из этого отчёта. Если мы поищем сообщение об ошибке, то увидим, что оно находится в модуле фильтра SSI, то есть это связано с SSI.
Одним из способов проверки является установка значения заголовка referer:
$ curl -H ‘Referer: bar’ http://localhost/foo$http_referer | grep ‘foobar’Мы просканировали эту неправильную конфигурацию и обнаружили несколько случаев, когда пользователь мог получить значение переменных Nginx. Количество обнаруженных уязвимых экземпляров уменьшилось, что может указывать на то, что уязвимость исправлена.
Чтение необработанного ответа сервера
С proxy_pass Nginx есть возможность перехватывать ошибки и заголовки HTTP, созданные бэкендом (серверной частью). Это очень полезно, если вы хотите скрыть внутренние сообщения об ошибках и заголовки, чтобы они обрабатывались Nginx. Nginx автоматически предоставит страницу пользовательской ошибки, если серверная часть ответит ей. А что происходит, когда Nginx не понимает, что это HTTP-ответ?
Если клиент отправляет недопустимый HTTP-запрос в Nginx, этот запрос будет перенаправлен на серверную часть как есть, и она ответит своим необработанным содержимым. Тогда Nginx не распознает недопустимый HTTP-ответ и просто отправит его клиенту. Представьте себе приложение uWSGI, подобное этому:
def application(environ, start_response):
   start_response('500 Error', [('Content-Type',
'text/html'),('Secret-Header','secret-info')])
   return [b"Secret info, should not be visible!"]
И со следующими директивами в Nginx:
http {
   error_page 500 /html/error.html;
   proxy_intercept_errors on;
   proxy_hide_header Secret-Header;
}
proxy_intercept_errors будет обслуживать пользовательский ответ, если бэкенд имеет код ответа больше 300. В нашем приложении uWSGI выше мы отправим ошибку 500, которая будет перехвачена Nginx.
proxy_hide_header почти не требует пояснений; он скроет любой указанный HTTP-заголовок от клиента.
Если мы отправим обычный GET-запрос, Nginx вернёт:
HTTP/1.1 500 Internal Server Error
Server: nginx/1.10.3
Content-Type: text/html
Content-Length: 34
Connection: close
Но если мы отправим неверный HTTP-запрос, например:
GET /? XTTP/1.1
Host: 127.0.0.1
Connection: close
То получим такой ответ:
XTTP/1.1 500 Error
Content-Type: text/html
Secret-Header: secret-info

Secret info, should not be visible!
merge_slashes отключены
Для директивы merge_slashes по умолчанию установлено значение «on», что является механизмом сжатия двух или более слешей в один, поэтому/// станет /. Если Nginx используется в качестве обратного прокси и проксируемое приложение уязвимо для включения локального файла, использование дополнительных слешей в запросе может оставить место для его использования. Об этом подробно рассказывают Дэнни Робинсон и Ротем Бар.
Мы нашли 33 Nginx-файла, в которых для параметра merge_slashes установлено значение «off».
Попробуйте сами
Мы создали репозиторий GitHub, где вы можете использовать Docker для настройки своего собственного уязвимого тестового сервера Nginx с некоторыми ошибками конфигурации, обсуждаемыми в этой статье, и попробуйте найти их самостоятельно!
Вывод
Nginx — это очень мощная платформа веб-серверов, и легко понять, почему она широко используется. Но с помощью гибкой настройки вы даёте возможность совершать ошибки, которые могут повлиять на безопасность. Не позволяйте злоумышленнику взломать ваш сайт слишком легко, не проверяя эти распространённые ошибки конфигурации.
Вторая часть будет позднее.
Что ещё интересного есть в блоге Cloud4Y
→ Пароль как крестраж: ещё один способ защитить свои учётные данные
→ Тим Бернерс-Ли предлагает хранить персональные данные в подах
→ Подготовка шаблона vApp тестовой среды VMware vCenter + ESXi
→ Создание группы доступности AlwaysON на основе кластера Failover
→ Как настроить SSH-Jump Server
Подписывайтесь на наш Telegram-канал, чтобы не пропустить очередную статью. Пишем не чаще двух раз в неделю и только по делу.
Nginx – очень популярный веб-сервер в наши дни.
В этой статье мы расскажем вам о некоторых распространенных ошибках при работе веб-сервера Nginx и возможных решениях.
Это не полный список.
Если вы все еще не можете устранить ошибку, попробовав предложенные решения, пожалуйста, проверьте логи сервера Nginx в каталоге /var/log/nginx/ и поищите в Google, чтобы отладить проблему.
Содержание
- Unable to connect/Refused to Connect
- The Connection Has Timed Out
- 404 Not Found
- 403 Forbidden
- 500 Internal Server Error
- Nginx показывает страницу по умолчанию
- 504 Gateway time-out
- Размер памяти исчерпан
- PR_END_OF_FILE_ERROR
- Resource temporarily unavailable
- Два файла виртуального хоста для одного и того же сайта
- PHP-FPM Connection reset by peer
- Утечки сокетов Nginx
- Заключение
Unable to connect/Refused to Connect
Если при попытке получить доступ к вашему сайту вы видите следующую ошибку:
Firefox can’t establish a connection to the server at www.example.com
или
www.example.com refused to connect
или
The site can't be reached, www.example.com unexpectedly closed the connection.
Это может быть потому, что:
- Nginx не запущен. Вы можете проверить состояние Nginx с помощью sudo systemctl status nginx. Запустите Nginx с помощью sudo systemctl start nginx. Если Nginx не удается запустить, запустите sudo nginx -t, чтобы выяснить, нет ли ошибок в вашем конфигурационном файле. И проверьте логи (sudo journalctl -eu nginx), чтобы выяснить, почему он не запускается.
- Брандмауэр блокирует порты 80 и 443. Если вы используете брандмауэр UFW на Debian/Ubuntu, выполните sudo ufw allow 80,443/tcp, чтобы открыть TCP порты 80 и 443. Если вы используете Firewalld на RHEL/CentOS/Rocky Linux/AlmaLinux, выполните sudo firewall-cmd –permanent –add-service={http,https}, затем sudo systemctl reload firewalld, чтобы открыть TCP порты 80 и 443.
- Fail2ban. Если ваш сервер использует fail2ban для блокировки вредоносных запросов, возможно, fail2ban запретил ваш IP-адрес. Выполните команду sudo journalctl -eu fail2ban, чтобы проверить, не заблокирован ли ваш IP-адрес. Вы можете добавить свой IP-адрес в список fail2ban ignoreip, чтобы он больше не был забанен.
- Nginx не прослушивает нужный сетевой интерфейс. Например, Nginx не прослушивает публичный IP-адрес сервера.
The Connection Has Timed Out

Это может означать, что ваш сервер находится в автономном режиме или Nginx работает неправильно.
Однажды у меня возникла проблема нехватки памяти, из-за чего Nginx не смог запустить рабочие процессы.
Если вы увидите следующее сообщение об ошибке в файле /var/log/nginx/error.log, вашему серверу не хватает памяти:
fork() failed while spawning "worker process" (12: Cannot allocate memory)
404 Not Found
404 not found означает, что Nginx не может найти ресурсы, которые запрашивает ваш веб-браузер.
🌐 Как создать пользовательскую страницу ошибки 404 в NGINX
Причина может быть следующей:
- Корневой каталог web не существует на вашем сервере. В Nginx корневой веб-каталог настраивается с помощью директивы root, например, так: root /usr/share/nginx/linuxbabe.com/;. Убедитесь, что файлы вашего сайта (HTML, CSS, JavaScript, PHP) хранятся в правильном каталоге.
- PHP-FPM не запущен. Вы можете проверить статус PHP-FPM с помощью sudo systemctl status php7.4-fpm (Debian/Ubuntu) или sudo systemctl status php-fpm.
- Вы забыли включить директиву try_files $uri /index.php$is_args$args; в конфигурационный файл сервера Nginx. Эта директива необходима для обработки PHP-кода.
- На вашем сервере нет свободного дискового пространства. Попробуйте освободить немного дискового пространства. Вы можете использовать утилиту ncdu (sudo apt install ncdu или sudo dnf install ncdu), чтобы узнать, какие каталоги занимают огромное количество дискового пространства.
403 Forbidden
Эта ошибка означает, что вам не разрешен доступ к ресурсам запроса.
Возможный сценарий включает:
- Администратор сайта блокирует публичный доступ к запрашиваемым ресурсам с помощью белого списка IP-адресов или других методов.
- На сайте может использоваться брандмауэр веб-приложения, например ModSecurity, который обнаружил атаку вторжения, поэтому заблокировал запрос.
Некоторые веб-приложения могут показывать другое сообщение об ошибке, когда происходит запрет 403. Оно может сказать вам, что “secure connection failed, хотя причина та же.
500 Internal Server Error
Это означает, что в веб-приложении произошла какая-то ошибка.
Это может быть следующее
- Сервер базы данных не работает. Проверьте состояние MySQL/MariaDB с помощью sudo systemctl status mysql. Запустите его с помощью sudo systemctl start mysql. Запустите sudo journalctl -eu mysql, чтобы выяснить, почему он не запускается. Процесс MySQL/MariaDB может быть завершен из-за проблем с нехваткой памяти.
- Вы не настроили Nginx на использование PHP-FPM, поэтому Nginx не знает, как выполнять PHP-код.
- Если ваше веб-приложение имеет встроенный кэш, вы можете попробовать очистить кэш приложения, чтобы исправить эту ошибку.
- Ваше веб-приложение может создавать свой собственный журнал ошибок. Проверьте этот файл журнала, чтобы отладить эту ошибку.
- Возможно, в вашем веб-приложении есть режим отладки. Включите его, и вы увидите более подробные сообщения об ошибках на веб-странице. Например, вы можете включить режим отладки в почтовом сервере хостинг-платформы Modoboa, установив DEBUG = True в файле /srv/modoboa/instance/instance/settings.py.
- PHP-FPM может быть перегружен. Проверьте журнал PHP-FPM (например, /var/log/php7.4-fpm.log). Если вы обнаружили предупреждение [pool www] seems busy (возможно, вам нужно увеличить pm.start_servers, или pm.min/max_spare_servers), вам нужно выделить больше ресурсов для PHP-FPM.
- Иногда перезагрузка PHP-FPM (sudo systemctl reload php7.4-fpm) может исправить ошибку.
Nginx показывает страницу по умолчанию
Если вы пытаетесь настроить виртуальный хост Nginx и при вводе доменного имени в веб-браузере отображается страница Nginx по умолчанию, это может быть следующее
- Вы не использовали реальное доменное имя для директивы server_name в виртуальном хосте Nginx.
- Вы забыли перезагрузить Nginx.
504 Gateway time-out
Это означает, что апстрим, такой как PHP-FPM/MySQL/MariaDB, не может обработать запрос достаточно быстро.
Вы можете попробовать перезапустить PHP-FPM, чтобы временно исправить ошибку, но лучше начать настраивать PHP-FPM/MySQL/MariaDB для более быстрой работы.
Вот конфигурация InnoDB в моем файле /etc/mysql/mariadb.conf.d/50-server.cnf.
Это очень простая настройка производительности.
innodb_buffer_pool_size = 1024M
innodb_buffer_pool_dump_at_shutdown = ON
innodb_buffer_pool_load_at_startup  = ON
innodb_log_file_size = 512M
innodb_log_buffer_size = 8M

#Improving disk I/O performance
innodb_file_per_table = 1
innodb_open_files = 400
innodb_io_capacity = 400
innodb_flush_method = O_DIRECT
innodb_read_io_threads = 64
innodb_write_io_threads = 64
innodb_buffer_pool_instances = 3
Где:
- InnoDB buffer pool size должен быть не менее половины вашей оперативной памяти. (Для VPS с небольшим объемом оперативной памяти я рекомендую установить размер буферного пула на меньшее значение, например 400M, иначе ваш VPS будет работать без оперативной памяти).
- InnoDB log file size должен составлять 25% от размера буферного пула.
- Установите потоки ввода-вывода для чтения и записи на максимум (64).
- Заставьте MariaDB использовать 3 экземпляра буферного пула InnoDB. Количество экземпляров должно соответствовать количеству ядер процессора в вашей системе.
- После сохранения изменений перезапустите MariaDB.
После сохранения изменений перезапустите MariaDB.
sudo systemctl restart mariadb
Вы также можете установить более длительное значение тайм-аута в Nginx, чтобы уменьшить вероятность тайм-аута шлюза.
Отредактируйте файл виртуального хоста Nginx и добавьте следующие строки в блок server {…}.
  proxy_connect_timeout       600;
  proxy_send_timeout          600;
  proxy_read_timeout          600;
  send_timeout                600;
Если вы используете Nginx с PHP-FPM, то установите для параметра fastcgi_read_timeout большее значение, например 300 секунд.
По умолчанию это 60 секунд.
 location ~ .php$ {
     try_files $uri /index.php$is_args$args;
     include snippets/fastcgi-php.conf;
     fastcgi_split_path_info ^(.+.php)(/.+)$;

     fastcgi_pass unix:/var/run/php/php7.4-fpm.sock;
     fastcgi_param SCRIPT_FILENAME $document_root$fastcgi_script_name;
     include fastcgi_params;
     fastcgi_read_timeout 300;
 }
Затем перезагрузите Nginx.
sudo systemctl reload nginx
PHP-FPM также имеет максимальное время выполнения для каждого скрипта.
Отредактируйте файл php.ini.
sudo nano /etc/php/7.4/fpm/php.ini
Вы можете увеличить это значение до 300 секунд.
max_execution_time = 300
Затем перезапустите PHP-FPM
sudo systemctl restart php7.4-fpm
Размер памяти исчерпан
Если вы видите следующую строку в журнале ошибок Nginx, это означает, что PHP достиг лимита памяти в 128 МБ.
PHP Fatal error: Allowed memory size of 134217728 bytes exhausted (tried to allocate 57134520 bytes)
Вы можете отредактировать файл php.ini (/etc/php/7.4/fpm/php.ini) и увеличить лимит памяти PHP.
memory_limit = 512M
Затем перезапустите PHP7.4-FPM.
sudo systemctl restart php7.4-fpm
Если ошибка все еще существует, скорее всего, в вашем веб-приложении плохой PHP-код, который потребляет много оперативной памяти.
PR_END_OF_FILE_ERROR
- Вы настроили Nginx на перенаправление HTTP-запросов на HTTPS, но в Nginx нет блока сервера, обслуживающего HTTPS-запросы.
- Может быть, Nginx не запущен?
- Иногда основной бинарник Nginx запущен, но рабочий процесс может не работать и завершиться по разным причинам. Для отладки проверьте логи ошибок Nginx (/var/log/nginx/error.log).
Resource temporarily unavailable
Некоторые пользователи могут найти следующую ошибку в файле логов ошибок Nginx (в разделе /var/log/nginx/).
connect() to unix:/run/php/php7.4-fpm.sock failed (11: Resource temporarily unavailable)
Обычно это означает, что на вашем сайте много посетителей и PHP-FPM не справляется с обработкой огромного количества запросов.
Вы можете изменить количество дочерних процессов PHP-FPM, чтобы он мог обрабатывать больше запросов.
Отредактируйте файл PHP-FPM www.conf.
(Путь к файлу зависит от дистрибутива Linux).
sudo /etc/php/7.4/fpm/pool.d/www.conf
По умолчанию конфигурация дочернего процесса выглядит следующим образом:
pm = dynamic
pm.max_children = 5
pm.start_servers = 2
pm.min_spare_servers = 1
pm.max_spare_servers = 3
Приведенная выше конфигурация означает.
- PHP-FPM динамически создает дочерние процессы. Нет фиксированного количества дочерних процессов.
- Создается не более 5 дочерних процессов.
- При запуске PHP-FPM запускаются 2 дочерних процесса.
- Есть как минимум 1 незанятый процесс.
- Максимум 3 неработающих процесса.
pm = dynamic
pm.max_children = 20
pm.start_servers = 8
pm.min_spare_servers = 4
pm.max_spare_servers = 12
Убедитесь, что у вас достаточно оперативной памяти для запуска дополнительных дочерних процессов.
Сохраните и закройте файл.
Затем перезапустите PHP-FPM. (Возможно, вам потребуется изменить номер версии).
sudo systemctl restart php7.4-fpm
Чтобы следить за состоянием PHP-FPM, вы можете включить страницу status .
Найдите следующую строку в файле PHP-FPM www.conf.
Обратите внимание, что
;pm.status_path = /status
Уберите точку с запятой, чтобы включить страницу состояния PHP-FPM.
Затем перезапустите PHP-FPM.
sudo systemctl restart php7.4-fpm
Затем отредактируйте файл виртуального хоста Nginx.
Добавьте следующие строки.
Директивы allow и deny используются для ограничения доступа.
Только IP-адреса из “белого списка” могут получить доступ к странице состояния.
location ~ ^/(status|ping)$ {
        allow 127.0.0.1;
        allow your_other_IP_Address;
        deny all;

        fastcgi_param SCRIPT_FILENAME $document_root$fastcgi_script_name;
        fastcgi_index index.php;
        include fastcgi_params;
        #fastcgi_pass 127.0.0.1:9000;
        fastcgi_pass   unix:/run/php/php7.4-fpm.sock;
}
Сохраните и закройте файл. Затем протестируйте конфигурацию Nginx.
sudo nginx -t
Если проверка прошла успешно, перезагрузите Nginx, чтобы изменения вступили в силу.
sudo systemctl reload nginx
В файле PHP-FPM www.conf дается хорошее объяснение того, что означает каждый параметр.
Если PHP-FPM очень занят и не может обслужить запрос немедленно, он поставит его в очередь.
По умолчанию может быть не более 511 ожидающих запросов, определяемых параметром listen.backlog.
listen.backlog = 511
Если вы видите следующее значение на странице состояния PHP-FPM, это означает, что в очереди еще не было ни одного запроса, т.е. ваш PHP-FPM может быстро обрабатывать запросы.
listen queue:         0
max listen queue:     0
Если в очереди 511 ожидающих запросов, это означает, что ваш PHP-FPM очень загружен, поэтому вам следует увеличить количество дочерних процессов.
Вам также может понадобиться изменить параметр ядра Linux net.core.somaxconn, который определяет максимальное количество соединений, разрешенных к файлу сокетов в Linux, например, к файлу сокетов PHP-FPM Unix.
По умолчанию его значение равно 128 до ядра 5.4 и 4096 начиная с ядра 5.4.
$ sysctl net.core.somaxconn
net.core.somaxconn = 128
Если у вас сайт с высокой посещаемостью, вы можете использовать большое значение.
Отредактируйте файл /etc/sysctl.conf.
sudo nano /etc/sysctl.cnf
Добавьте следующие две строки.
net.core.somaxconn = 20000
net.core.netdev_max_backlog = 65535
Сохраните и закройте файл. Затем примените настройки.
sudo sysctl -p
Примечание: Если ваш сервер имеет достаточно оперативной памяти, вы можете выделить фиксированное количество дочерних процессов для PHP-FPM, как показано ниже.
Два файла виртуального хоста для одного и того же сайта
Если вы запустите sudo nginx -t и увидите следующее предупреждение.
nginx: [warn] conflicting server name "example.com" on [::]:443, ignored
nginx: [warn] conflicting server name "example.com" on 0.0.0.0:443, ignored
Это означает, что есть два файла виртуальных хостов, содержащих одну и ту же конфигурацию server_name.
Не создавайте два файла виртуальных хостов для одного сайта.
PHP-FPM Connection reset by peer
В файле логов ошибок Nginx отображается следующее сообщение.
recv() failed (104: Connection reset by peer) while reading response header from upstream
Это может быть вызвано перезапуском PHP-FPM.
Если он перезапущен вручную самостоятельно, то вы можете игнорировать эту ошибку.
Утечки сокетов Nginx
Если вы обнаружили следующее сообщение об ошибке в файле /var/log/nginx/error.log, значит, у вашего Nginx проблема с утечкой сокетов.
2021/09/28 13:27:41 [alert] 321#321: *120606 open socket #16 left in connection 163
2021/09/28 13:27:41 [alert] 321#321: *120629 open socket #34 left in connection 188
2021/09/28 13:27:41 [alert] 321#321: *120622 open socket #9 left in connection 213
2021/09/28 13:27:41 [alert] 321#321: *120628 open socket #25 left in connection 217
2021/09/28 13:27:41 [alert] 321#321: *120605 open socket #15 left in connection 244
2021/09/28 13:27:41 [alert] 321#321: *120614 open socket #41 left in connection 245
2021/09/28 13:27:41 [alert] 321#321: *120631 open socket #24 left in connection 255
2021/09/28 13:27:41 [alert] 321#321: *120616 open socket #23 left in connection 258
2021/09/28 13:27:41 [alert] 321#321: *120615 open socket #42 left in connection 269
2021/09/28 13:27:41 [alert] 321#321: aborting
Вы можете перезапустить ОС, чтобы решить эту проблему.
Если это не помогает, вам нужно скомпилировать отладочную версию Nginx, которая покажет вам отладочную информацию в логах.
Заключение
Надеюсь, эта статья помогла вам исправить распространенные ошибки веб-сервера Nginx.
см. также:
- 🌐 Как контролировать доступ на основе IP-адреса клиента в NGINX
- 🐉 Настройка http-сервера Kali Linux
- 🌐 Как парсить логи доступа nginx
- 🌐 Ограничение скорости определенных URL-адресов с Nginx
- 🛡️ Как использовать обратный прокси Nginx для ограничения внешних вызовов внутри веб-браузера
- 🔏 Как настроить Nginx с Let’s Encrypt с помощью ACME на Ubuntu
- 🌐 Как собрать NGINX с ModSecurity на Ubuntu сервере
2 декабря, 2022 12:20 пп
56 views
| Комментариев нет
LEMP Stack
Nginx — это популярный веб-сервер, на котором размещаются многие крупные сайты. При настройке веб-сервера Nginx обычно создается domain block с деталями конфигурации, чтобы сайт мог обрабатывать входящие запросы. Часто при настройке Nginx в файле конфигурации допускают ошибки. Мы разберем самые распространенные синтаксические ошибки, а также подумаем, как их проверить и как исправить.
Примеры в этом мануале были протестированы на сервере Ubuntu, но они будут работать на большинстве установок Nginx, так как они в основном связаны со стандартным файлом конфигурации. Каталоги и пути могут немного отличаться.
В этом мануале мы рассмотрим самые распространенные ошибки и способы их устранения. Синтаксические ошибки нарушают структуру, которую Nginx распознает как допустимую. Часто одна ошибка переходит в другую и становится причиной более серьезной или отдельной проблемы. Поэтому конкретные обстоятельства и настройки в реальной среде могут отличаться от тех, что приведены в данном мануале.
Помните, что вы всегда можете обратиться к логу ошибок Nginx, чтобы просмотреть текущий список:
sudo cat /var/log/nginx/error.log
В этом мануале позже будет рассказано, как разобрать и понять сообщения об ошибках Nginx.
Проверка файла конфигурации на наличие ошибок
Давайте посмотрим на пример domain block в Nginx с разными ошибками в файле конфигурации. Эти ошибки сделаны намеренно, чтобы показать вам, как их можно исправить. Чтобы проверить, есть ли в настройке какие-либо синтаксические ошибки, запустите следующую команду:
sudo nginx -t
Если ошибок нет, вывод будет следующим:
nginx: the configuration file /etc/nginx/nginx.conf syntax is ok
nginx: configuration file /etc/nginx/nginx.conf test is successful
Если команда обнаружит ошибки, вы получите сообщение, в котором будет указан точный файл и строка кода, а также конкретная проблема с синтаксисом, которую нужно решить.
Выявление структурных синтаксических ошибок
Одна из распространенных ошибок при работе с Nginx – отсутствие необходимых символов или неправильная структура синтаксиса. Конфигурационный файл Nginx ориентирован на директивы, и эти директивы должны быть объявлены определенным образом. В противном случае конфигурационный файл будет структурно некорректным.
Директивы можно разделить на два типа, каждый из которых имеет свой синтаксис: простые директивы (которые содержат имя и параметры, заканчивающиеся точкой с запятой) и блочные директивы (разделяются фигурными скобками { } и могут содержать другие блоки внутри себя).
Если директива структурирована неправильно, Nginx не сможет распознать ее, что может привести к следующим ошибкам.
Ошибка Invalid parameter
Файл конфигурации Nginx очень требователен к структуре и синтаксису. Одна из самых частых проблем с синтаксисом связана с точкой с запятой. Например, рассмотрим такое сообщение об ошибке:
[emerg] invalid parameter "root" in /etc/nginx/sites-enabled/your_domain:5
nginx: configuration file /etc/nginx/nginx.conf test failed
Прежде чем решать эту проблему, нужно понять сообщение об ошибке Nginx. В нем есть подсказки, которые помогают определить причину ошибки. В этом случае [emerg] означает “emergency” — это связано с нестабильностью системы. Значит, Nginx столкнулся с проблемой, которая не позволяет ему работать.
Это сообщение об ошибке дополнительно указывает место, где обнаружена ошибка. Имейте в виду, что в настройках Nginx у вас будет свой файл конфигурации, связанный симликом с /etc/nginx/nginx.conf. Если вы следовали мануалу Установка Nginx в Ubuntu 20.04, то в пункте 5 вы видели, как это делается. Указана точная строка в конфигурационном файле с ошибкой: /etc/nginx/sites-enabled/your_domain:5. Также в этом файле есть invalid parameter “root”.
Теперь, когда у вас есть информация, где искать ошибку, вы можете открыть файл в любом текстовом редакторе. Мы будем работать с nano:
sudo nano /etc/nginx/sites-available/your_domain
Примечание: Все конфигурационные файлы можно найти в каталоге /etc/nginx/.
Внутри файла найдите строку 5, на которую ссылается сообщение об ошибке:
server {
        listen 80;
        listen [::]:80;

       root /var/www/your_domain/html
        index index.html index.htm index.nginx-debian.html;

        server_name your_domain www.your_domain;

        location / {
                try_files $uri $uri/ =404;
        }
}
Ошибка может быть не совсем очевидна. Напоминаем, из сообщения об ошибке следует, что проблема заключается в invalid parameter. Параметры — это аргументы, которые предоставляются директивам Nginx. В этом сценарии /var/www/your_domain/html – и есть это недействительный параметр. Он не работает потому, что в синтаксической структуре отсутствует символ, в данном случае – точка с запятой в конце строки.
Многие строки в этом файле также заканчиваются точкой с запятой. Точка с запятой должна стоять в конце каждой строки, которая содержит директиву. В этом примере у нас присутствует директива root, которая указывает на root каталог, который будет использоваться при поиске файла. Наличие root необходимо для того, чтобы Nginx мог найти определенный URL. Разберем важность директив в следующем разделе.
Если вкратце, исправить эту ошибку можно, добавив точку с запятой в конец этой строки, чтобы директива стала действительна. Это будет выглядеть следующим образом:
…

       root /var/www/your_domain/html;
        index index.html index.htm index.nginx-debian.html;

…
После исправления сохраните и закройте файл.
Чтобы убедиться, что синтаксическая ошибка исправлена, выполните команду sudo nginx -t.
Неправильно поставленные фигурные скобки
Еще одна распространенная ошибка, которая может возникнуть в синтаксической структуре Nginx, связана с фигурными скобками { }. В отличие от предыдущей ошибки, в которой не было указано, как исправить недопустимый параметр, это сообщение указывает на ее причину:
nginx: [emerg] unexpected "}" in /etc/nginx/sites-enabled/your_domain:15
nginx: configuration file /etc/nginx/nginx.conf test failed
Сообщение об ошибке указывает на строку 15, в которой содержится лишняя фигурная скобка в том же файле конфигурации, что и раньше. Откройте этот файл через текстовый редактор:
server {
        listen 80;
        listen [::]:80;

       root /var/www/your_domain/html;
        index index.html index.htm index.nginx-debian.html;

        server_name your_domain www.your_domain;

        location / {
                try_files $uri $uri/ =404;
       }
Внизу файла вы найдете фигурную скобку }. Сначала суть проблемы может быть непонятна, поскольку фигурная скобка вроде бы присутствует на своем месте. Однако при детальном разборе оказывается, что после этой фигурной скобки не хватает еще одной скобки. Правильное количество фигурных скобок в файле конфигурации Nginx очень важно, поскольку они указывают на открытие и закрытие определенного блока. Фигурная скобка в конце файла является закрывающей скобкой для следующего вложенного блока location:
…

 location / {
                try_files $uri $uri/ =404;
       }

…
Если просмотреть файл конфигурации еще дальше, то окажется, что в server block также отсутствует закрывающая фигурная скобка. Server block в Nginx важен, поскольку он предоставляет детали конфигурации, необходимые Nginx для определения того, какой виртуальный сервер будет обрабатывать получаемые запросы. Важно отметить, что location blocks вложены в server block, поскольку он имеет приоритет при обработке входящих запросов. Учитывая все это, для завершения server block в конце файла нужно добавить закрывающую фигурную скобку. Теперь содержимое этого файла будет выглядеть следующим образом:
server {
        listen 80;
        listen [::]:80;

        root /var/www/your_domain/html;
        index index.html index.htm index.nginx-debian.html;

        server_name your_domain www.your_domain;

        location / {
                try_files $uri $uri/ =404;
        }
}
После редактирования не забудьте сохранить и закрыть файл. Чтобы убедиться, что синтаксическая ошибка устранена, запустите sudo nginx -t.
Ошибка invalid host
Эта ошибка возникает из-за неверно сформированного параметра, заданного в директиве. Если завершение строк точкой с запятой и закрытие каждой фигурной скобки относится к общей структуре конфигурационного файла, то параметры – это пользовательские данные, которые могут варьироваться в зависимости от потребностей установки.
Отметим, что в этом сценарии действует директива host, но при недопустимых параметрах любая директива может быть подвержена этой ошибке. Соответственно, изменится и сообщение об ошибке:
[emerg] invalid host in "[::]80" of the "listen" directive in /etc/nginx/sites-enabled/your_domain:3
nginx: configuration file /etc/nginx/nginx.conf test failed
Сообщение объясняет, что установленная директива порта 80 недействительна. Сообщение об ошибке дополнительно указывает место обнаружения ошибки и точную строку в файле конфигурации: /etc/nginx/sites-enabled/your_domain:3. Обладая информацией о том, где найти ошибку, можно открыть файл в текстовом редакторе. Найдите строку 3, на которую ссылается сообщение:
server {
        listen 80;
        listen [::]80;

        root /var/www/your_domain/html;
        index index.html index.htm index.nginx-debian.html;

        server_name your_domain www.your_domain;

        location / {
                try_files $uri $uri/ =404;
        }
}
Два двоеточия в скобках представляют собой обозначение IPv6 или 0.0.0.0; без дополнительного двоеточия после скобки он не сможет привязаться к порту 80. В результате директива listen не будет работать, поскольку без двоеточия неясно, какой порт должен прослушивать сервер.
В общем, конкретная синтаксическая ошибка здесь заключается в том, что после скобки [::] не хватает двоеточия, а это делает параметр недействительным. После добавления пропущенного двоеточия, фрагмент кода в файле будет выглядеть следующим образом:
server {
        listen 80;
        listen [::]:80;
…
После обновления этой строки обязательно сохраните и закройте файл и убедитесь, что синтаксическая ошибка исправлена, выполнив команду sudo nginx -t.
В целом, при получении подобных синтаксических ошибок, связанных с параметрами, точками с запятой ; или фигурными скобками { }, рекомендуем обратить особое внимание на точное местоположение и детали в сообщении [emerg].
Выявление неправильных директив – ключевые слова в конфигурационном файле Nginx
Помимо предыдущих синтаксических ошибок, вы можете неправильно написать ключевые слова, связанные с директивой в конфигурационном файле. Мы кратко упоминали директивы в предыдущем разделе, но давайте вернемся к ним подробнее.
Ошибка unknown directive
Как упоминалось ранее, в основе файла конфигурации Nginx лежат директивы. У Nginx большой выбор директив, но есть несколько основных, необходимых практически в каждом в файле конфигурации. Однако существуют ошибки, которые могут возникнуть в самой директиве. Например, ключевое слово написано не совсем так, как должно быть. Вот пример такого сообщения об ошибке:
nginx: [emerg] unknown directive "serve_name" in /etc/nginx/sites-enabled/your_domain:8
nginx: configuration file /etc/nginx/nginx.conf test failed
Эта ошибка указывает на unknown directive “serve_name” в строке 8 файла конфигурации. Откройте файл с помощью текстового редактора:
server {
        listen 80;
        listen [::]:80;

        root /var/www/your_domain/html;
        index index.html index.htm index.nginx-debian.html;

        serve_name your_domain www.your_domain;

        location / {
                try_files $uri $uri/ =404;
        }
}
В данном примере ошибка — это неправильно написанное слово “server” в имени директивы server_name. В нем пропущена буква “r” и по этой причине директива не распознается. Это серьезная ошибка, поскольку в директиве server_name хранятся конкретные названия серверов, к которым будет обращаться server block при получении запроса. Без корректной работы этой директивы запрос не будет выполнен. Казалось бы, незначительная опечатка, но она нарушает синтаксис и вызывает ошибку. Обновите фрагмент кода в файле конфигурации следующим образом:
…

        server_name your_domain www.your_domain;

…
Сохраните и закройте файл. Проверьте его с помощью команды sudo nginx -t.
Ошибка directive is not allowed here
Теперь предположим, что возникла ошибка с той же директивой, но на этот раз сообщение выглядит так:
nginx: [emerg] "server" directive is not allowed here in /etc/nginx/sites-enabled/your_domain:8
nginx: configuration file /etc/nginx/nginx.conf test failed
Ошибка возникает в том же месте, что и предыдущая, причина проблемы подробно описана в этом сообщении. Поэтому важно понимать, на что указывает сообщение об ошибке. Эта ошибка указывает, что directive is not allowed here. Откройте файл конфигурации в текстовом редакторе:
server {
        listen 80;
        listen [::]:80;

        root /var/www/your_domain/html;
        index index.html index.htm index.nginx-debian.html;

        server name your_domain www.your_domain;

        location / {
                try_files $uri $uri/ =404;
        }
}
Здесь слово “server” написано правильно, но теперь тут отсутствует символ подчеркивания. Поэтому server воспринимается как дубликат, что недопустимо, о чем и говорит сообщение об ошибке. Это связано с различием между простыми и блочными директивами, о котором мы говорили ранее.
Эта ошибка связана с тем, что без подчеркивания server name читается просто как server и таким образом конфликтует с первой директивой server block в начале файла. Это сложная синтаксическая ошибка, которая может возникнуть из-за иерархической структуры Nginx в файле конфигурации среди блочных директив и вложенных простых директив. Исправить эту ошибку можно, добавив знак подчеркивания:
…

        server_name your_domain www.your_domain;

…
После внесения исправлений сохраните и закройте файл. Затем проверьте правильность синтаксиса с помощью команды sudo nginx -t. Если в файле конфигурации нет ошибок, должно появиться сообщение syntax is ok.
Примечание: В конфигурационных файлах Nginx есть определенная гибкость в отношении интервалов или разделения строк, что не приведет к возникновению ошибок. Однако все, что явно связано с директивами, приведет к ошибке, поскольку для правильной работы необходимы точная формулировка или синтаксическая структура.
Последнее, что нужно рассказать: если файл конфигурации содержит несколько ошибок, сообщения об ошибках будут появляться по одному в последовательном порядке. Это означает, что если вы получили сообщение об одной ошибке и исправили ее, а затем снова запустили команду проверки синтаксиса, то в выводе появится следующая ошибка (если таковая встречается в файле). Так будет продолжаться, пока все ошибки не будут исправлены.
Здесь вы узнали о самых распространенных синтаксических ошибках, которые могут возникнуть с определенными директивами в файле конфигурации веб-сервера. Важно отметить, что все эти примеры представлены в среде терминала. Вы также можете использовать редактор кода, например Visual Studio Code, который может проверять и выделять ошибки в коде, не отправляя многочисленных уведомлений, что позволит исправить их все сразу или даже избежать их на ранней стадии.
Читайте также: Установка командной строки Visual Studio Code
Подводим итоги
В этом мануале мы разобрали распространенные синтаксические ошибки Nginx и поговорили о том, как их исправить. Несмотря на то, что вы можете столкнуться с разными синтаксическими ошибками Nginx, эти примеры дают представление о решениях наиболее частых из них.
Читайте также: Структура и контексты конфигурационного файла Nginx
Tags: NGINX
When we help NGINX users who are having problems, we often see the same configuration mistakes we’ve seen over and over in other users’ configurations – sometimes even in configurations written by fellow NGINX engineers! In this blog we look at 10 of the most common errors, explaining what’s wrong and how to fix it.
- Not enough file descriptors per worker
- The
error_logoffdirective - Not enabling keepalive connections to upstream servers
- Forgetting how directive inheritance works
- The
proxy_bufferingoffdirective - Improper use of the
ifdirective - Excessive health checks
- Unsecured access to metrics
- Using
ip_hashwhen all traffic comes from the same /24 CIDR block - Not taking advantage of upstream groups
Mistake 1: Not Enough File Descriptors per Worker
The worker_connections directive sets the maximum number of simultaneous connections that a NGINX worker process can have open (the default is 512). All types of connections (for example, connections with proxied servers) count against the maximum, not just client connections. But it’s important to keep in mind that ultimately there is another limit on the number of simultaneous connections per worker: the operating system limit on the maximum number of file descriptors (FDs) allocated to each process. In modern UNIX distributions, the default limit is 1024.
For all but the smallest NGINX deployments, a limit of 512 connections per worker is probably too small. Indeed, the default nginx.conf file we distribute with NGINX Open Source binaries and NGINX Plus increases it to 1024.
The common configuration mistake is not increasing the limit on FDs to at least twice the value of worker_connections. The fix is to set that value with the worker_rlimit_nofile directive in the main configuration context.
Here’s why more FDs are needed: each connection from an NGINX worker process to a client or upstream server consumes an FD. When NGINX acts as a web server, it uses one FD for the client connection and one FD per served file, for a minimum of two FDs per client (but most web pages are built from many files). When it acts as a proxy server, NGINX uses one FD each for the connection to the client and upstream server, and potentially a third FD for the file used to store the server’s response temporarily. As a caching server, NGINX behaves like a web server for cached responses and like a proxy server if the cache is empty or expired.
NGINX also uses an FD per log file and a couple FDs to communicate with master process, but usually these numbers are small compared to the number of FDs used for connections and files.
UNIX offers several ways to set the number of FDs per process:
- The
ulimitcommand if you start NGINX from a shell - The
initscript orsystemdservice manifest variables if you start NGINX as a service - The /etc/security/limits.conf file
However, the method to use depends on how you start NGINX, whereas worker_rlimit_nofile works no matter how you start NGINX.
There is also a system‑wide limit on the number of FDs, which you can set with the OS’s sysctl fs.file-max command. It is usually large enough, but it is worth verifying that the maximum number of file descriptors all NGINX worker processes might use (worker_rlimit_nofile * worker_processes) is significantly less than fs.file‑max. If NGINX somehow uses all available FDs (for example, during a DoS attack), it becomes impossible even to log in to the machine to fix the issue.
Mistake 2: The error_log off Directive
The common mistake is thinking that the error_log off directive disables logging. In fact, unlike the access_log directive, error_log does not take an off parameter. If you include the error_log off directive in the configuration, NGINX creates an error log file named off in the default directory for NGINX configuration files (usually /etc/nginx).
We don’t recommend disabling the error log, because it is a vital source of information when debugging any problems with NGINX. However, if storage is so limited that it might be possible to log enough data to exhaust the available disk space, it might make sense to disable error logging. Include this directive in the main configuration context:
error_log /dev/null emerg;Note that this directive doesn’t apply until NGINX reads and validates the configuration. So each time NGINX starts up or the configuration is reloaded, it might log to the default error log location (usually /var/log/nginx/error.log) until the configuration is validated. To change the log directory, include the -e <error_log_location> parameter on the nginx command.
Mistake 3: Not Enabling Keepalive Connections to Upstream Servers
By default, NGINX opens a new connection to an upstream (backend) server for every new incoming request. This is safe but inefficient, because NGINX and the server must exchange three packets to establish a connection and three or four to terminate it.
At high traffic volumes, opening a new connection for every request can exhaust system resources and make it impossible to open connections at all. Here’s why: for each connection the 4-tuple of source address, source port, destination address, and destination port must be unique. For connections from NGINX to an upstream server, three of the elements (the first, third, and fourth) are fixed, leaving only the source port as a variable. When a connection is closed, the Linux socket sits in the TIME‑WAIT state for two minutes, which at high traffic volumes increases the possibility of exhausting the pool of available source ports. If that happens, NGINX cannot open new connections to upstream servers.
The fix is to enable keepalive connections between NGINX and upstream servers – instead of being closed when a request completes, the connection stays open to be used for additional requests. This both reduces the possibility of running out of source ports and improves performance.
To enable keepalive connections:
-
Include the
keepalivedirective in everyupstream{}block, to set the number of idle keepalive connections to upstream servers preserved in the cache of each worker process.Note that the
keepalivedirective does not limit the total number of connections to upstream servers that an NGINX worker process can open – this is a common misconception. So the parameter tokeepalivedoes not need to be as large as you might think.We recommend setting the parameter to twice the number of servers listed in the
upstream{}block. This is large enough for NGINX to maintain keepalive connections with all the servers, but small enough that upstream servers can process new incoming connections as well.Note also that when you specify a load‑balancing algorithm in the
upstream{}block – with thehash,ip_hash,least_conn,least_time, orrandomdirective – the directive must appear above thekeepalivedirective. This is one of the rare exceptions to the general rule that the order of directives in the NGINX configuration doesn’t matter. -
In the
location{}block that forwards requests to an upstream group, include the following directives along with theproxy_passdirective:proxy_http_version 1.1; proxy_set_header "Connection" "";By default NGINX uses HTTP/1.0 for connections to upstream servers and accordingly adds the
Connection:closeheader to the requests that it forwards to the servers. The result is that each connection gets closed when the request completes, despite the presence of thekeepalivedirective in theupstream{}block.The
proxy_http_versiondirective tells NGINX to use HTTP/1.1 instead, and theproxy_set_headerdirective removes theclosevalue from theConnectionheader.
Mistake 4: Forgetting How Directive Inheritance Works
NGINX directives are inherited downwards, or “outside‑in”: a child context – one nested within another context (its parent) – inherits the settings of directives included at the parent level. For example, all server{} and location{} blocks in the http{} context inherit the value of directives included at the http level, and a directive in a server{} block is inherited by all the child location{} blocks in it. However, when the same directive is included in both a parent context and its child context, the values are not added together – instead, the value in the child context overrides the parent value.
The mistake is to forget this “override rule” for array directives, which can be included not only in multiple contexts but also multiple times within a given context. Examples include proxy_set_header and add_header – having “add” in the name of second makes it particularly easy to forget about the override rule.
We can illustrate how inheritance works with this example for add_header:
http {
    add_header X-HTTP-LEVEL-HEADER 1;
    add_header X-ANOTHER-HTTP-LEVEL-HEADER 1;

    server {
        listen 8080;
        location / {
            return 200 "OK";
        }
    }

    server {
        listen 8081;
        add_header X-SERVER-LEVEL-HEADER 1;

        location / {
            return 200 "OK";
        }

        location /test {
            add_header X-LOCATION-LEVEL-HEADER 1;
            return 200 "OK";
        }

        location /correct {
            add_header X-HTTP-LEVEL-HEADER 1;
            add_header X-ANOTHER-HTTP-LEVEL-HEADER 1;

            add_header X-SERVER-LEVEL-HEADER 1;
            add_header X-LOCATION-LEVEL-HEADER 1;
            return 200 "OK";
        }
    }
}
For the server listening on port 8080, there are no add_header directives in either the server{} or location{} blocks. So inheritance is straightforward and we see the two headers defined in the http{} context:
% curl -is localhost:8080
HTTP/1.1 200 OK
Server: nginx/1.21.5
Date: Mon, 21 Feb 2022 10:12:15 GMT
Content-Type: text/plain
Content-Length: 2
Connection: keep-alive
X-HTTP-LEVEL-HEADER: 1
X-ANOTHER-HTTP-LEVEL-HEADER: 1
OK
For the server listening on port 8081, there is an add_header directive in the server{} block but not in its child location / block. The header defined in the server{} block overrides the two headers defined in the http{} context:
% curl -is localhost:8081
HTTP/1.1 200 OK
Server: nginx/1.21.5
Date: Mon, 21 Feb 2022 10:12:20 GMT
Content-Type: text/plain
Content-Length: 2
Connection: keep-alive
X-SERVER-LEVEL-HEADER: 1
OK
In the child location /test block, there is an add_header directive and it overrides both the header from its parent server{} block and the two headers from the http{} context:
% curl -is localhost:8081/test
HTTP/1.1 200 OK
Server: nginx/1.21.5
Date: Mon, 21 Feb 2022 10:12:25 GMT
Content-Type: text/plain
Content-Length: 2
Connection: keep-alive
X-LOCATION-LEVEL-HEADER: 1
OK
If we want a location{} block to preserve the headers defined in its parent contexts along with any headers defined locally, we must redefine the parent headers within the location{} block. That’s what we’ve done in the location /correct block:
% curl -is localhost:8081/correct
HTTP/1.1 200 OK
Server: nginx/1.21.5
Date: Mon, 21 Feb 2022 10:12:30 GMT
Content-Type: text/plain
Content-Length: 2
Connection: keep-alive
X-HTTP-LEVEL-HEADER: 1
X-ANOTHER-HTTP-LEVEL-HEADER: 1
X-SERVER-LEVEL-HEADER: 1
X-LOCATION-LEVEL-HEADER: 1
OK
Mistake 5: The proxy_buffering off Directive
Proxy buffering is enabled by default in NGINX (the proxy_buffering directive is set to on). Proxy buffering means that NGINX stores the response from a server in internal buffers as it comes in, and doesn’t start sending data to the client until the entire response is buffered. Buffering helps to optimize performance with slow clients – because NGINX buffers the response for as long as it takes for the client to retrieve all of it, the proxied server can return its response as quickly as possible and return to being available to serve other requests.
When proxy buffering is disabled, NGINX buffers only the first part of a server’s response before starting to send it to the client, in a buffer that by default is one memory page in size (4 KB or 8 KB depending on the operating system). This is usually just enough space for the response header. NGINX then sends the response to the client synchronously as it receives it, forcing the server to sit idle as it waits until NGINX can accept the next response segment.
So we’re surprised by how often we see proxy_buffering off in configurations. Perhaps it is intended to reduce the latency experienced by clients, but the effect is negligible while the side effects are numerous: with proxy buffering disabled, rate limiting and caching don’t work even if configured, performance suffers, and so on.
There are only a small number of use cases where disabling proxy buffering might make sense (such as long polling), so we strongly discourage changing the default. For more information, see the NGINX Plus Admin Guide.
Mistake 6: Improper Use of the if Directive
The if directive is tricky to use, especially in location{} blocks. It often doesn’t do what you expect and can even cause segfaults. In fact, it’s so tricky that there’s an article titled If is Evil in the NGINX Wiki, and we direct you there for a detailed discussion of the problems and how to avoid them.
In general, the only directives you can always use safely within an if{} block are return and rewrite. The following example uses if to detect requests that include the X‑Test header (but this can be any condition you want to test for). NGINX returns the 430 (Request Header Fields Too Large) error, intercepts it at the named location @error_430 and proxies the request to the upstream group named b.
location / {
    error_page 430 = @error_430;
    if ($http_x_test) {
        return 430;
    }

    proxy_pass http://a;
}

location @error_430 {
    proxy_pass b;
}
For this and many other uses of if, it’s often possible to avoid the directive altogether. In the following example, when the request includes the X‑Test header the map{} block sets the $upstream_name variable to b and the request is proxied to the upstream group with that name.
map $http_x_test $upstream_name {
    default "b";
    ""      "a";
}

# ...

location / {
    proxy_pass http://$upstream_name;
}
Mistake 7: Excessive Health Checks
It is quite common to configure multiple virtual servers to proxy requests to the same upstream group (in other words, to include the identical proxy_pass directive in multiple server{} blocks). The mistake in this situation is to include a health_check directive in every server{} block. This just creates more load on the upstream servers without yielding any additional information.
At the risk of being obvious, the fix is to define just one health check per upstream{} block. Here we define the health check for the upstream group named b in a special named location, complete with appropriate timeouts and header settings.
location / {
    proxy_set_header Host $host;
    proxy_set_header "Connection" "";
    proxy_http_version 1.1;
    proxy_pass http://b;
}

location @health_check {
    health_check;
    proxy_connect_timeout 2s;
    proxy_read_timeout 3s;
    proxy_set_header Host example.com;
    proxy_pass http://b;
}
In complex configurations, it can further simplify management to group all health‑check locations in a single virtual server along with the NGINX Plus API and dashboard, as in this example.
server {
	listen 8080;

	location / {
	    # …
 	}

	location @health_check_b {
	    health_check;
	    proxy_connect_timeout 2s;
	    proxy_read_timeout 3s;
	    proxy_set_header Host example.com;
	    proxy_pass http://b;
	}

	location @health_check_c {
	    health_check;
	    proxy_connect_timeout 2s;
	    proxy_read_timeout 3s;
	    proxy_set_header Host api.example.com;
	    proxy_pass http://c;
	}

	location /api {
	    api write=on;
	    # directives limiting access to the API (see 'Mistake 8' below)
	}

	location = /dashboard.html {
	    root   /usr/share/nginx/html;
	}
}
For more information about health checks for HTTP, TCP, UDP, and gRPC servers, see the NGINX Plus Admin Guide.
Mistake 8: Unsecured Access to Metrics
Basic metrics about NGINX operation are available from the Stub Status module. For NGINX Plus, you can also gather a much more extensive set of metrics with the NGINX Plus API. Enable metrics collection by including the stub_status or api directive, respectively, in a server{} or location{} block, which becomes the URL you then access to view the metrics. (For the NGINX Plus API, you also need to configure shared memory zones for the NGINX entities – virtual servers, upstream groups, caches, and so on – for which you want to collect metrics; see the instructions in the NGINX Plus Admin Guide.)
Some of the metrics are sensitive information that can be used to attack your website or the apps proxied by NGINX, and the mistake we sometimes see in user configurations is failure to restrict access to the corresponding URL. Here we look at some of the ways you can secure the metrics. We’ll use stub_status in the first examples.
With the following configuration, anyone on the Internet can access the metrics at http://example.com/basic_status.
server {
    listen 80;
    server_name example.com;

    location = /basic_status {
        stub_status;
    }
}
Protect Metrics with HTTP Basic Authentication
To password‑protect the metrics with HTTP Basic Authentication, include the auth_basic and auth_basic_user_file directives. The file (here, .htpasswd) lists the usernames and passwords of clients who can log in to see the metrics:
server {
    listen 80;
    server_name example.com;

    location = /basic_status {
        auth_basic “closed site”;
        auth_basic_user_file conf.d/.htpasswd;
        stub_status;
    }
}
Protect Metrics with the allow and deny Directives
If you don’t want authorized users to have to log in, and you know the IP addresses from which they will access the metrics, another option is the allow directive. You can specify individual IPv4 and IPv6 addresses and CIDR ranges. The deny all directive prevents access from any other addresses.
server {
    listen 80;
    server_name example.com;

    location = /basic_status {
        allow 192.168.1.0/24;
        allow 10.1.1.0/16;
        allow 2001:0db8::/32;
        allow 96.1.2.23/32;
        deny  all;
        stub_status;
    }
}
Combine the Two Methods
What if we want to combine both methods? We can allow clients to access the metrics from specific addresses without a password and still require login for clients coming from different addresses. For this we use the satisfy any directive. It tells NGINX to allow access to clients who either log in with HTTP Basic auth credentials or are using a preapproved IP address. For extra security, you can set satisfy to all to require even people who come from specific addresses to log in.
server {
    listen 80;
    server_name monitor.example.com;

    location = /basic_status {
        satisfy any;

        auth_basic “closed site”;
        auth_basic_user_file conf.d/.htpasswd;
        allow 192.168.1.0/24;
        allow 10.1.1.0/16;
        allow 2001:0db8::/32;
        allow 96.1.2.23/32;
        deny  all;
        stub_status;
    }
}
With NGINX Plus, you use the same techniques to limit access to the NGINX Plus API endpoint (http://monitor.example.com:8080/api/ in the following example) as well as the live activity monitoring dashboard at http://monitor.example.com/dashboard.html.
This configuration permits access without a password only to clients coming from the 96.1.2.23/32 network or localhost. Because the directives are defined at the server{} level, the same restrictions apply to both the API and the dashboard. As a side note, the write=on parameter to api means these clients can also use the API to make configuration changes.
For more information about configuring the API and dashboard, see the NGINX Plus Admin Guide.
server {
    listen 8080;
    server_name monitor.example.com;

    satisfy any;
    auth_basic “closed site”;
    auth_basic_user_file conf.d/.htpasswd;
    allow 127.0.0.1/32;
    allow 96.1.2.23/32;
    deny  all;

    location = /api/ {
        api write=on;
    }

    location = /dashboard.html {
        root /usr/share/nginx/html;
    }
}
Mistake 9: Using ip_hash When All Traffic Comes from the Same /24 CIDR Block
The ip_hash algorithm load balances traffic across the servers in an upstream{} block, based on a hash of the client IP address. The hashing key is the first three octets of an IPv4 address or the entire IPv6 address. The method establishes session persistence, which means that requests from a client are always passed to the same server except when the server is unavailable.
Suppose that we have deployed NGINX as a reverse proxy in a virtual private network configured for high availability. We put various firewalls, routers, Layer 4 load balancers, and gateways in front of NGINX to accept traffic from different sources (the internal network, partner networks, the Internet, and so on) and pass it to NGINX for reverse proxying to upstream servers. Here’s the initial NGINX configuration:
http {

    upstream {
        ip_hash;
        server 10.10.20.105:8080;
        server 10.10.20.106:8080;
        server 10.10.20.108:8080;
    }

    server {# …}
}
But it turns out there’s a problem: all of the “intercepting” devices are on the same 10.10.0.0/24 network, so to NGINX it looks like all traffic comes from addresses in that CIDR range. Remember that the ip_hash algorithm hashes the first three octets of an IPv4 address. In our deployment, the first three octets are the same – 10.10.0 – for every client, so the hash is the same for all of them and there’s no basis for distributing traffic to different servers.
The fix is to use the hash algorithm instead with the $binary_remote_addr variable as the hash key. That variable captures the complete client address, converting it into a binary representation that is 4 bytes for an IPv4 address and 16 bytes for an IPv6 address. Now the hash is different for each intercepting device and load balancing works as expected.
We also include the consistent parameter to use the ketama hashing method instead of the default. This greatly reduces the number of keys that get remapped to a different upstream server when the set of servers changes, which yields a higher cache hit ratio for caching servers.
http {
    upstream {
        hash $binary_remote_addr consistent;
        server 10.10.20.105:8080;
        server 10.10.20.106:8080;
        server 10.10.20.108:8080;
    }

    server {# …}
}
Mistake 10: Not Taking Advantage of Upstream Groups
Suppose you are employing NGINX for one of the simplest use cases, as a reverse proxy for a single NodeJS‑based backend application listening on port 3000. A common configuration might look like this:
http {

    server {
        listen 80;
        server_name example.com;

        location / {
            proxy_set_header Host $host;
            proxy_pass http://localhost:3000/;
        }
    }
}
Straightforward, right? The proxy_pass directive tells NGINX where to send requests from clients. All NGINX needs to do is resolve the hostname to an IPv4 or IPv6 address. Once the connection is established NGINX forwards requests to that server.
The mistake here is to assume that because there’s only one server – and thus no reason to configure load balancing – it’s pointless to create an upstream{} block. In fact, an upstream{} block unlocks several features that improve performance, as illustrated by this configuration:
http {

    upstream node_backend {
        zone upstreams 64K;
        server 127.0.0.1:3000 max_fails=1 fail_timeout=2s;
        keepalive 2;
    }

    server {
        listen 80;
        server_name example.com;

        location / {
            proxy_set_header Host $host;
            proxy_pass http://node_backend/;
            proxy_next_upstream error timeout http_500;

        }
    }
}
The zone directive establishes a shared memory zone where all NGINX worker processes on the host can access configuration and state information about the upstream servers. Several upstream groups can share the zone. With NGINX Plus, the zone also enables you to use the NGINX Plus API to change the servers in an upstream group and the settings for individual servers without restarting NGINX. For details, see the NGINX Plus Admin Guide.
The server directive has several parameters you can use to tune server behavior. In this example we have changed the conditions NGINX uses to determine that a server is unhealthy and thus ineligible to accept requests. Here it considers a server unhealthy if a communication attempt fails even once within each 2-second period (instead of the default of once in a 10-second period).
We’re combining this setting with the proxy_next_upstream directive to configure what NGINX considers a failed communication attempt, in which case it passes requests to the next server in the upstream group. To the default error and timeout conditions we add http_500 so that NGINX considers an HTTP 500 (Internal Server Error) code from an upstream server to represent a failed attempt.
The keepalive directive sets the number of idle keepalive connections to upstream servers preserved in the cache of each worker process. We already discussed the benefits in Mistake 3: Not Enabling Keepalive Connections to Upstream Servers.
With NGINX Plus you can configure additional features with upstream groups:
-
We mentioned above that NGINX Open Source resolves server hostnames to IP addresses only once, during startup. The
resolveparameter to the server directive enables NGINX Plus to monitor changes to the IP addresses that correspond to an upstream server’s domain name, and automatically modify the upstream configuration without the need to restart.The
serviceparameter further enables NGINX Plus to use DNSSRVrecords, which include information about port numbers, weights, and priorities. This is critical in microservices environments where the port numbers of services are often dynamically assigned.For more information about resolving server addresses, see Using DNS for Service Discovery with NGINX and NGINX Plus on our blog.
-
The
slow_startparameter to the server directive enables NGINX Plus to gradually increase the volume of requests it sends to a server that is newly considered healthy and available to accept requests. This prevents a sudden flood of requests that might overwhelm the server and cause it to fail again. -
The
queuedirective enables NGINX Plus to place requests in a queue when it’s not possible to select an upstream server to service the request, instead of returning an error to the client immediately.
Resources
- Creating NGINX Plus and NGINX Configuration Files in the NGINX Plus Admin Guide
- Gixy, an NGINX configuration analyzer on GitHub
- NGINX Amplify, which includes the Analyzer tool
To try NGINX Plus, start your free 30-day trial today or contact us to discuss your use cases.
-
Что такое nginx
-
Как используется и работает nginx
-
Как проверить, установлен ли NGINX
-
Как установить NGINX
-
Где расположен nginx
-
Как правильно составить правила nginx.conf
-
NGINX WordPress Multisite
-
Как заблокировать по IP в NGINX
-
Как в NGINX указать размер и время
-
Настройка отладки в NGINX
-
Добавление модулей NGINX в Linux (Debian/CentOS/Ubuntu)
-
Основные ошибки nginx и их устранение
-
502 Bad Gateway
-
504 Gateway Time-out
-
Upstream timed out (110: Connection timed out) while reading response header from upstream
-
413 Request Entity Too Large
-
304 Not Modified не устанавливается
-
Client intended to send too large body
-
Как перезагрузить nginx
-
В чём разница между reload и restart
-
Как вместо 404 ошибки делать 301 редирект на главную
-
Как в NGINX сделать редирект на мобильную версию сайта
-
Как в NGINX включить поддержку WebP
-
Полезные материалы и ссылки
-
Настройка NGINX под WP Super Cache
-
Конвертер правил .htaccess (Apache) в NGINX
NGINX — программное обеспечение, написанное для UNIX-систем. Основное назначение — самостоятельный HTTP-сервер, или, как его используют чаще, фронтенд для высоконагруженных проектов. Возможно использование NGINX как почтового SMTP/IMAP/POP3-сервера, а также обратного TCP прокси-сервера.
Как используется и работает nginx
NGINX является широко используемым продуктом в мире IT, по популярности уступая лишь Apache.
Как правило, его используют либо как самостоятельный HTTP-сервер, используя в бекенде PHP-FPM, либо в связке с Apache, где NGINX используется во фронтэнде как кеширующий сервер, принимая на себя основную нагрузку, отдавая статику из кеша, обрабатывая и отфильтровывая входящие запросы от клиента и отправляя их дальше к Apache. Apache работает в бекэнде, работая уже с динамической составляющей проекта, собирая страницу для передачи её в кеш NGINX и запрашивающему её клиенту. Это если в общих чертах, чтобы понимать суть работы, так-то внутри всё сложнее.
Как проверить, установлен ли NGINX
Пишете в консоль SSH следующую команду, она покажет версию NGINX
nginx -v
Если видите что-то навроде
nginx version: nginx/1.10.3
Значит, всё в порядке, установлен NGINX версии 1.10.3. Если нет, установим его.
Как установить NGINX
Если вы сидите не под
root, предваряйте командыapt-getпрефиксомsudo, напримерsudo apt-get install nginx
- Обновляем порты (не обязательно)
apt-get update && apt-get upgrade
- Установка NGINX
apt-get install nginx
- Проверим, установлен ли NGINX
nginx -v
Команда должна показать версию сервера, что-то подобное:
nginx version: nginx/1.10.3
Где расположен nginx
Во FreeBSD NGINX располагается в /usr/local/etc/nginx.
В Ubuntu, Debian NGINX располагается тут: /etc/nginx. В ней располагается конфигурационный файл nginx.conf — основной конфигурационный файл nginx.
Чтобы добраться до него, выполняем команду в консоли
nano /etc/nginx/nginx.conf
По умолчанию, файлы конфигураций конкретных сайтов располагаются в /etc/nginx/sites-enabled/
cd /etc/nginx/sites-enabled/
или в /etc/nginx/vhosts/
cd /etc/nginx/vhosts/
Как правильно составить правила nginx.conf
Идём изучать мануалы на официальный сайт.
Пример рабочей конфигурации NGINX в роли кеширующего проксирующего сервера с Apache в бекенде
 # Определяем пользователя, под которым работает nginx
user www-data;
# Определяем количество рабочих процессов автоматически
# Параметр auto поддерживается только начиная с версий 1.3.8 и 1.2.5.
worker_processes auto;
# Определяем, куда писать лог ошибок и уровень логирования
error_log  /var/log/nginx/error.log warn;
# Задаём файл, в котором будет храниться номер (PID) основного процесса
pid /var/run/nginx.pid;
events {
# Устанавливает максимальное количество соединений одного рабочего процесса. Следует выбирать значения от 1024 до 4096.
# Как правило, число устанавливают в зависимости от числа ядер процессора по принципу n * 1024. Например, 2 ядра дадут worker_connections 2048.
worker_connections  1024;
# Метод обработки соединений. Наличие того или иного метода определяется платформой.
# Как правило, NGINX сам умеет определять оптимальный метод, однако, его можно указать явно.
# use epoll - используется в Linux 2.6+
# use kqueue - FreeBSD 4.1+, OpenBSD 2.9+, NetBSD 2.0 и Mac OS X
use epoll;
# Будет принимать максимально возможное количество соединений
multi_accept on;
}
http {
include       /etc/nginx/mime.types;
default_type  application/octet-stream;
log_format  main  '$remote_addr - $remote_user [$time_local] "$request" '
'$status $body_bytes_sent "$http_referer" '
'"$http_user_agent" "$http_x_forwarded_for"';
# Куда писать лог доступа и уровень логирования
access_log  /var/log/nginx/access.log  main;
# Для нормального ответа 304 Not Modified;
if_modified_since before;
# Включаем поддержку WebP
map $http_accept $webp_ext {
default "";
"~*webp" ".webp";
}
##
# Basic Settings
##
# Используется, если количество имен серверов большое
#server_names_hash_max_size 1200;
#server_names_hash_bucket_size 64;
### Обработка запросов ###
# Метод отправки данных sendfile более эффективен, чем стандартный метод read+write
sendfile on;
# Будет отправлять заголовки и и начало файла в одном пакете
tcp_nopush on;
tcp_nodelay on;
### Информация о файлах ###
# Максимальное количество файлов, информация о которых будет содержаться в кеше
open_file_cache max=200000 inactive=20s;
# Через какое время информация будет удалена из кеша
open_file_cache_valid 30s;
# Кеширование информации о тех файлах, которые были использованы хотя бы 2 раза
open_file_cache_min_uses 2;
# Кеширование информации об отсутствующих файлах
open_file_cache_errors on;
# Удаляем информацию об nginx в headers
server_tokens off;
# Будет ждать 30 секунд перед закрытием keepalive соединения
keepalive_timeout 30s;
## Максимальное количество keepalive запросов от одного клиента
keepalive_requests 100;
# Разрешает или запрещает сброс соединений по таймауту
reset_timedout_connection on;
# Будет ждать 30 секунд тело запроса от клиента, после чего сбросит соединение
client_body_timeout 30s;
# В этом случае сервер не будет принимать запросы размером более 200Мб
client_max_body_size 200m;
# Если клиент прекратит чтение ответа, Nginx подождет 30 секунд и сбросит соединение
send_timeout 30s;
# Proxy #
# Задаёт таймаут для установления соединения с проксированным сервером.
# Необходимо иметь в виду, что этот таймаут обычно не может превышать 75 секунд.
proxy_connect_timeout 30s;
# Задаёт таймаут при передаче запроса проксированному серверу.
# Таймаут устанавливается не на всю передачу запроса, а только между двумя операциями записи.
# Если по истечении этого времени проксируемый сервер не примет новых данных, соединение закрывается.
proxy_send_timeout 30s;
# Задаёт таймаут при чтении ответа проксированного сервера.
# Таймаут устанавливается не на всю передачу ответа, а только между двумя операциями чтения.
# Если по истечении этого времени проксируемый сервер ничего не передаст, соединение закрывается.
proxy_read_timeout 30s;
##
# Gzip Settings
##
# Включаем сжатие gzip
gzip on;
# Для IE6 отключить
gzip_disable "msie6";
# Добавляет Vary: Accept-Encoding в Headers
gzip_vary on;
# Cжатие для всех проксированных запросов (для работы NGINX+Apache)
gzip_proxied any;
# Устанавливает степень сжатия ответа методом gzip. Допустимые значения находятся в диапазоне от 1 до 9
gzip_comp_level 6;
# Задаёт число и размер буферов, в которые будет сжиматься ответ
gzip_buffers 16 8k;
# Устанавливает минимальную HTTP-версию запроса, необходимую для сжатия ответа. Значение по умолчанию
gzip_http_version 1.1;
# MIME-типы файлов в дополнение к text/html, которые нужно сжимать
gzip_types text/plain text/css application/json application/x-javascript text/xml application/xml application/xml+rss text/javascript application/javascript image/svg+xml;
# Минимальная длина файла, которую нужно сжимать
gzip_min_length 10;
# Подключаем конфиги конкретных сайтов
include /etc/nginx/conf.d/*.conf;
include /etc/nginx/vhosts/*/*;
### Далее определяем localhost
### Сюда отправляются запросы, для которых не был найден свой конкретный блок server в /vhosts/
server {
server_name localhost; # Тут можно ввести IP сервера
disable_symlinks if_not_owner;
listen 80 default_server; # Указываем, что это сервер по умолчанию на порту 80
### Возможно, понадобится чётко указать IP сервера
# listen      192.168.1.1:80 default_server;
### Можно сбрасывать соединения с сервером по умолчанию, а не отправлять запросы в бекенд
#return      444;
include /etc/nginx/vhosts-includes/*.conf;
location @fallback {
error_log /dev/null crit;
proxy_pass http://127.0.0.1:8080;
proxy_redirect http://127.0.0.1:8080 /;
proxy_set_header Host $host;
proxy_set_header X-Forwarded-For $proxy_add_x_forwarded_for;
proxy_set_header X-Forwarded-Proto $scheme;
access_log off ;
}
}
}
Строка include /etc/nginx/vhosts/*; указывает на поддиректорию vhosts, в которой содержатся файлы конфигураций конкретно под каждый домен.
Пример того, что может содержаться там — example.com.conf
Ниже пример для Apache в бекенде:
server {
# Домен сайта и его алиасы через пробел
server_name example.com www.example.com;
# Кодировка сайта. Содержимое заголовка "Content-Type". off отключает этот заголовок. Можно указать стандартные uft-8, windows-1251, koi8-r, либо же использовать свою.
charset off;
disable_symlinks if_not_owner from=$root_path;
index index.html;
root $root_path;
set $root_path /var/www/example/data/www/example.com;
access_log /var/www/httpd-logs/example.com.access.log ;
error_log /var/www/httpd-logs/example.com.error.log notice;
#IP:Port сервера NGINX
listen 192.168.1.1:80;
include /etc/nginx/vhosts-includes/*.conf;
location / {
location ~ [^/].ph(pd*|tml)$ {
try_files /does_not_exists @fallback;
}
# WebP
location ~* ^.+.(png|jpe?g)$ {
expires 365d;
add_header Vary Accept;
try_files $uri$webp_ext $uri =404;
}
location ~* ^.+.(gif|svg|js|css|mp3|ogg|mpe?g|avi|zip|gz|bz2?|rar|swf)$ {
expires 365d;
try_files $uri =404;
}
location / {
try_files /does_not_exists @fallback;
}
}
location @fallback {
proxy_pass http://127.0.0.1:8080;
proxy_redirect http://127.0.0.1:8080 /;
proxy_set_header Host $host;
proxy_set_header X-Forwarded-For $proxy_add_x_forwarded_for;
proxy_set_header X-Forwarded-Proto $scheme;
access_log off ;
}
}
А вот вариант для PHP-FPM:
server {
# Домен сайта и его алиасы через пробел
server_name example.com www.example.com;
# Кодировка сайта. Содержимое заголовка "Content-Type". off отключает этот заголовок. Можно указать стандартные uft-8, windows-1251, koi8-r, либо же использовать свою.
charset off;
disable_symlinks if_not_owner from=$root_path;
index index.html;
root $root_path;
set $root_path /var/www/example/data/www/example.com;
access_log /var/www/httpd-logs/example.com.access.log ;
error_log /var/www/httpd-logs/example.com.error.log notice;
#IP:Port сервера NGINX
listen 192.168.1.1:80;
include /etc/nginx/vhosts-includes/*.conf;
location / {
location ~ [^/].ph(pd*|tml)$ {
try_files /does_not_exists @php;
}
# WebP
location ~* ^.+.(png|jpe?g)$ {
expires 365d;
add_header Vary Accept;
try_files $uri$webp_ext $uri =404;
}
location ~* ^.+.(gif|svg|js|css|mp3|ogg|mpe?g|avi|zip|gz|bz2?|rar|swf)$ {
expires 365d;
try_files $uri =404;
}
location / {
try_files $uri $uri/ @php;
}
}
location @php {
try_files $uri =404;
include fastcgi_params;
fastcgi_index index.php;
fastcgi_param PHP_ADMIN_VALUE "sendmail_path = /usr/sbin/sendmail -t -i -f [email protected]";
# Путь к сокету php-fpm сайта
fastcgi_pass unix:/var/www/php-fpm/example.sock;
fastcgi_split_path_info ^((?U).+.ph(?:pd*|tml))(/?.+)$;
}
}
NGINX WordPress Multisite
Ниже конфигурация под WordPress Multisite с сайтами в поддиректориях:
#user 'example' virtual host 'example.com' configuration file
server {
server_name example.com www.example.com;
charset off;
disable_symlinks if_not_owner from=$root_path;
index index.html index.php;
root $root_path;
set $root_path /var/www/example/data/www/example.com;
access_log /var/www/httpd-logs/example.com.access.log ;
error_log /var/www/httpd-logs/example.com.error.log notice;
listen 1.2.3.4:80;
include /etc/nginx/vhosts-includes/*.conf;
# А вот тут блок специально для MU subdirectories
if (!-e $request_filename) {
rewrite /wp-admin$ $scheme://$host$uri/ permanent;
rewrite ^(/[^/]+)?(/wp-.*) $2 last;
rewrite ^(/[^/]+)?(/.*.php) $2 last;
}
location / {
try_files $uri $uri/ /index.php?$args ;
}
location ~ .php {
try_files $uri =404;
include fastcgi_params;
fastcgi_index index.php;
fastcgi_param PHP_ADMIN_VALUE "sendmail_path = /usr/sbin/sendmail -t -i -f [email protected]";
fastcgi_pass unix:/var/www/php-fpm/example.sock;
fastcgi_split_path_info ^((?U).+.ph(?:pd*|tml))(/?.+)$;
}
}
Как заблокировать по IP в NGINX
Блокировать можно с помощью директив allow и deny.
Правила обработки таковы, что поиск идёт сверху вниз. Если IP совпадает с одним из правил, поиск прекращается.
Таким образом, вы можете как забанить все IP, кроме своих, так и заблокировать определённый IP:
  deny 1.2.3.4 ; # Здесь мы вводим IP нарушителя
deny 192.168.1.1/23 ; # А это пример того, как можно добавить подсеть в бан
deny 2001:0db8::/32 ; # Пример заблокированного IPv6
allow all ; # Всем остальным разрешаем доступ
Приведу пример конфигурации, как можно закрыть доступ к панели администратора WordPress по IP:
### https://sheensay.ru/?p=408
################################
location = /wp-admin/admin-ajax.php { # Открываем доступ к admin-ajax.php. Это нужно, чтобы проходили ajax запросы в WordPress
try_files $uri/ @php ;
}
location = /adminer.php { # Закрываем Adminer, если он есть
try_files /does_not_exists @deny ;
}
location = /wp-login.php { # Закрываем /wp-login.php
try_files /does_not_exists @deny ;
}
location ~* /wp-admin/.+.php$ { # Закрываем каталог /wp-admin/
try_files /does_not_exists @deny ;
}
location @deny { # В этом location мы определяем правила, какие IP пропускать, а какие забанить
allow 1.2.3.4 ; # Здесь мы вводим свой IP из белого списка
allow 192.168.1.1/23 ; # А это пример того, как можно добавить подсеть IP
allow 2001:0db8::/32 ; # Пример IPv6
deny all ; # Закрываем доступ всем, кто не попал в белый список
try_files /does_not_exists @php; # Отправляем на обработку php в бекенд
}
location ~ .php$ { ### Файлы PHP обрабатываем в location @php
try_files /does_not_exist @php;
}
location @php{
### Обработчик php, PHP-FPM или Apache
}
Ещё один неплохой вариант. Правда, по умолчанию определяются только статичные IP. А чтобы разрешить подсеть, придётся использовать дополнительный модуль GEO:
### Задаём таблицу соответсткий
map $remote_addr $allowed_ip {
### Перечисляете разрешённые IP
1.2.3.4 1; ### 1.2.3.4 - это разрешённый IP
4.3.2.1 1; ### 4.3.2.1 - это ещё один разрешённый IP
default 0; ### По умолчанию, запрещаем доступ
}
server {
### Объявляем переменную, по которой будем проводить проверку доступа
set $check '';
### Если IP не входит в список разрешённых, отмечаем это
if ( $allowed_ip = 0  ) {
set $check "A";
}
### Если доступ идёт к wp-login.php, отмечаем это
if ( $request_uri ~ ^/wp-login.php ) {
set $check "${check}B";
}
### Если совпали правила запрета доступа - отправляем соответствующий заголовок ответа
if ( $check = "AB" ) {
return 444; ### Вместо 444 можно использовать стандартный 403 Forbidden, чтобы отслеживать попытки доступа в логах
### Остальные правила server ####
}
Как в NGINX указать размер и время
Размеры:
- Байты указываются без суффикса. Пример:
directio_alignment 512;
- Килобайты указываются с суффиксом
kилиK. Пример:client_header_buffer_size 1k;
- Мегабайты указываются с суффиксом
mилиM. Пример:client_max_body_size 100M;
- Гигабайты указываются с суффиксом
gилиG. Пример:client_max_body_size 1G;
Время задаётся в следующих суффиксах:
ms— миллисекундыs— секундыm— минутыh— часыd— дниw— неделиM— месяцы, 30 днейY— годы, 365 дней
В одном значении можно комбинировать различные единицы, указывая их в порядке от более к менее значащим, и по желанию отделяя их пробелами. Например, 1h 30m задаёт то же время, что и 90m или 5400s. Значение без суффикса задаёт секунды.
Рекомендуется всегда указывать суффикс
Некоторые интервалы времени можно задать лишь с точностью до секунд.
Настройка отладки в NGINX
В целях отладки настройки NGINX вы можете писать данные в логи, но я советую воспользоваться директивой add_header. С её помощью вы можете выводить различные данные в http headers.
Пример, как можно определить, в каком location обрабатывается правило:
  location ~ [^/].ph(pd*|tml)$ {
try_files /does_not_exists @fallback;
add_header X-debug-message "This is php" always;
}
location ~* ^.+.(jpe?g|gif|png|svg|js|css|mp3|ogg|mpe?g|avi|zip|gz|bz2?|rar|swf)$ {
expires 365d; log_not_found off; access_log off;
try_files $uri $uri/ @fallback;
add_header X-debug-message "This is static file" always;
}
Теперь, если проверить, какие заголовки отдаёт статичный файл, например https://sheensay.ru/wp-content/uploads/2015/06/nginx.png, то вы увидите среди них и наш X-debug-message
Отладочная информация NGINX в заголовках HTTP headers
Вместо статичной строки можно выводить данные различных переменных, что очень удобно для правильной настройки сервера и поиска узких мест.
Добавление модулей NGINX в Linux (Debian/CentOS/Ubuntu)
Функционал NGINX возможно расширить с помощью модулей. С их списком и возможным функционалом можно ознакомиться на официальном сайте http://nginx.org/ru/docs/. Также, существуют интересные сторонние модули, например, модуль NGINX для защиты от DDoS
Приведу пример установки модуля ngx_headers_more.
Все команды выполняются в консоли, используйте Putty или Far Manager с NetBox/WinSCP. Установка будет происходить под Debian
-
nginx -V
В результате увидите что-то навроде
nginx version: nginx/1.8.0 built by gcc 4.9.1 (Debian 4.9.1-19) built with OpenSSL 1.0.1k 8 Jan 2015 TLS SNI support enabled configure arguments: --prefix=/etc/nginx --sbin-path=/etc/nginx/sbin/nginx --conf-path=/etc/nginx/nginx.conf --error-log-path=/var/log/nginx/error.log --http-log-path=/var/log/ngin x/access.log --pid-path=/var/run/nginx.pid --lock-path=/var/run/nginx.lock --http-client-body-temp-path=/var/cache/nginx/client_temp --http-proxy-temp-path=/var/cache/nginx/p roxy_temp --http-fastcgi-temp-path=/var/cache/nginx/fastcgi_temp --http-uwsgi-temp-path=/var/cache/nginx/uwsgi_temp --http-scgi-temp-path=/var/cache/nginx/scgi_temp --user=ng inx --group=nginx --with-http_ssl_module --with-http_realip_module --with-http_addition_module --with-http_sub_module --with-http_dav_module --with-http_flv_module --with-htt p_mp4_module --with-http_gunzip_module --with-http_gzip_static_module --with-http_random_index_module --with-http_secure_link_module --with-http_stub_status_module --with-htt p_auth_request_module --with-mail --with-mail_ssl_module --with-file-aio --with-http_spdy_module --with-cc-opt='-g -O2 -fstack-protector-strong -Wformat -Werror=format-securi ty' --with-ld-opt=-Wl,-z,relro --with-ipv6
Результат запишем в блокнот, пригодится при компиляции
-
wget http://nginx.org/download/nginx-1.8.0.tar.gz
tar xvf nginx-1.8.0.tar.gz
rm -rf nginx-1.8.0.tar.gz
cd nginx-1.8.0
Тут мы скачиваем нужную версию NGINX.
-
wget https://github.com/openresty/headers-more-nginx-module/archive/v0.29.tar.gz
tar xvf v0.29.tar.gz
Скачиваем и распаковываем последнюю версию модуля из источника, в моём случае, с GitHub
-
aptitude install build-essential
Установим дополнительные пакеты.
Если выходит ошибкаaptitude: команда не найдена, нужно предварительно установить aptitude:apt-get install aptitude
- Теперь приступаем к конфигурированию NGINX с модулем
headers-more-nginx-module
Ещё раз запускаемnginx -Vи копируем, начиная с —prefix= и до первого —add-module= (все присутствующие в результате —add_module= нам не нужны). После чего пишем в консоли ./configure и вставляем скопированное из редактора:./configure --prefix=/etc/nginx --sbin-path=/etc/nginx/sbin/nginx --conf-path=/etc/nginx/nginx.conf --error-log-path=/var/log/nginx/error.log --http-log-path=/var/log/nginx/access.log --pid-path=/var/run/nginx.pid --lock-path=/var/run/nginx.lock --http-client-body-temp-path=/var/cache/nginx/client_temp --http-proxy-temp-path=/var/cache/nginx/proxy_temp --http-fastcgi-temp-path=/var/cache/nginx/fastcgi_temp --http-uwsgi-temp-path=/var/cache/nginx/uwsgi_temp --http-scgi-temp-path=/var/cache/nginx/scgi_temp --user=nginx --group=nginx --with-http_ssl_module --with-http_realip_module --with-http_addition_module --with-http_sub_module --with-http_dav_module --with-http_flv_module --with-http_mp4_module --with-http_gunzip_module --with-http_gzip_static_module --with-http_random_index_module --with-http_secure_link_module --with-http_stub_status_module --with-http_auth_request_module --with-mail --with-mail_ssl_module --with-file-aio --with-http_spdy_module --with-cc-opt='-g -O2 -fstack-protector-strong -Wformat -Werror=format-security' --with-ld-opt=-Wl,-z,relro --with-ipv6 --add-module=./headers-more-nginx-module-0.29
—add-module={Тут надо добавить путь до распакованного модуля, абсолютный или относительный}
- Во время конфигурирования могут возникнуть ошибки
- Ошибка
./configure: error: the HTTP rewrite module requires the PCRE library. You can either disable the module by using --without-http_rewrite_module option, or install the PCRE library into the system, or build the PCRE library statically from the source with nginx by using --with-pcre=<path> option.
Эта проблема решается установкой
libpcre++-dev:aptitude install libpcre++-dev
- Ошибка
./configure: error: SSL modules require the OpenSSL library. You can either do not enable the modules, or install the OpenSSL library into the system, or build the OpenSSL library statically from the source with nginx by using --with-openssl=<path> option.
Эта проблема решается так:
aptitude install libssl-dev
- Ошибка
- В случае успеха, вы увидите что-то навроде
Configuration summary + using system PCRE library + using system OpenSSL library + md5: using OpenSSL library + sha1: using OpenSSL library + using system zlib library nginx path prefix: "/etc/nginx" nginx binary file: "/etc/nginx/sbin/nginx" nginx configuration prefix: "/etc/nginx" nginx configuration file: "/etc/nginx/nginx.conf" nginx pid file: "/var/run/nginx.pid" nginx error log file: "/var/log/nginx/error.log" nginx http access log file: "/var/log/nginx/access.log" nginx http client request body temporary files: "/var/cache/nginx/client_temp" nginx http proxy temporary files: "/var/cache/nginx/proxy_temp" nginx http fastcgi temporary files: "/var/cache/nginx/fastcgi_temp" nginx http uwsgi temporary files: "/var/cache/nginx/uwsgi_temp" nginx http scgi temporary files: "/var/cache/nginx/scgi_temp"
- Пришло время собрать бинарный файл nginx
make install clean
- Теперь нужно проверить, собрался ли бинарник с нужным модулем.
/usr/sbin/nginx -V
В результате должны увидеть модуль на месте
nginx version: nginx/1.8.0 built by gcc 4.9.2 (Debian 4.9.2-10) built with OpenSSL 1.0.1k 8 Jan 2015 TLS SNI support enabled configure arguments: --prefix=/etc/nginx --sbin-path=/etc/nginx/sbin/nginx --conf-path=/etc/nginx/nginx.conf --error-log-path=/var/log/nginx/error.log --http-log-path=/var/log/nginx/access.log --pid-path=/var/run/nginx.pid --lock-path=/var/run/nginx.lock --http-client-body-temp-path=/var/cache/nginx/client_temp --http-proxy-temp-path=/var/cache/nginx/proxy_temp --http-fastcgi-temp-path=/var/cache/nginx/fastcgi_temp --http-uwsgi-temp-path=/var/cache/nginx/uwsgi_temp --http-scgi-temp-path=/var/cache/nginx/scgi_temp --user=nginx --group=nginx --with-http_ssl_module --with-http_realip_module --with-http_addition_module --with-http_sub_module --with-http_dav_module --with-http_flv_module --with-http_mp4_module --with-http_gunzip_module --with-http_gzip_static_module --with-http_random_index_module --with-http_secure_link_module --with-http_stub_status_module --with-http_auth_request_module --with-mail --with-mail_ssl_module --with-file-aio --with-http_spdy_module --with-cc-opt='-g -O2 -fstack-protector-strong -Wformat -Werror=format-security' --with-ld-opt=-Wl,-z,relro --with-ipv6 --add-module=./headers-more-nginx-module-0.29
- Останавливаем nginx
service nginx stop
- Сделаем бекап текущего бинарника nginx на всякий случай, чтобы откатить его назад при необходимости
mv /usr/sbin/nginx /usr/sbin/nginx_back
- Свежесобранный бинарник nginx ставим на место старого
mv /etc/nginx/sbin/nginx /usr/sbin/nginx
- Проверяем, что вышло в итоге, что ничего не перепутано, и нужные модули на месте
nginx -V
- Запускаем NGINX
service nginx start
- Подчищаем за собой
cd ../
rm -rf nginx-1.8.0
rm -rf /etc/nginx/sbin
Основные ошибки nginx и их устранение
502 Bad Gateway
Ошибка означает, что NGINX не может получить ответ от одного из сервисов на сервере. Довольно часто эта ошибка появляется, когда NGINX работает в связке с Apache, Varnish, Memcached или иным сервисом, а также обрабатывает запросы PHP-FPM.
Как правило, проблема возникает из-за отключенного сервиса (в этом случае нужно проверить состояние напарника и при необходимости перезапустить его) либо, если они находятся на разных серверах, проверить пинг между ними, так как, возможно, отсутствует связь между ними.
Также, для PHP-FPM нужно проверить права доступа к сокету.
Для этого убедитесь, что в /etc/php-fpm.d/www.conf прописаны правильные права
listen = /tmp/php5-fpm.sock
listen.group = www-data
listen.owner = www-data
504 Gateway Time-out
Ошибка означает, что nginx долгое время не может получить ответ от какого-то сервиса. Такое происходит, если Apache, с которым NGINX работает в связке, отдаёт ответ слишком медленно.
Проблему можно устранить с помощью увеличения времени таймаута.
При работе в связке NGINX+Apache в конфигурационный файл можно внести изменения:
server {
...
send_timeout 800;
proxy_send_timeout 800;
proxy_connect_timeout 800;
proxy_read_timeout 800;
...
}
Тут мы выставили ожидание таймаута в 800 секунд.
Upstream timed out (110: Connection timed out) while reading response header from upstream
Причиной может быть сложная и потому долгая обработка php в работе PHP-FPM.
Здесь тоже можно увеличить время ожидания таймаута
location ~ .php$ {
include fastcgi_params;
fastcgi_index index.php;
fastcgi_param SCRIPT_FILENAME $document_root$fastcgi_script_name;
fastcgi_pass unix:/tmp/php5-fpm.sock;
fastcgi_read_timeout 800;
}
800 секунд на ожидание ответа от бекенда.
Это лишь временные меры, так как при увеличении нагрузки на сайт ошибка снова станет появляться. Устраните узкие места, оптимизируйте работу скриптов php
413 Request Entity Too Large
Ошибка означает, что вы пытались загрузить слишком большой файл. В настройках nginx по умолчанию стоит ограничение в 1Mb.
Для устранения ошибки в nginx.conf нужно найти строку
client_max_body_size 1m;
и заменить значение на нужное. Например, мы увеличим размер загружаемых файлов до 100Mb
client_max_body_size 100m;
Также, можно отключить проверку размера тела ответа полностью значением ноль:
client_max_body_size 0;
Следует помнить, зачем ввели это ограничение: если любой пользователь может загружать файлы на неподготовленный сайт, можно сравнительно легко провести DDOS-атаку на него, перегружая входной поток большими файлами.
После каждого внесённого изменения в конфигурационный файл необходимо перезагружать nginx
304 Not Modified не устанавливается
Если возникает проблема с правильным отображением ответного заголовка сервера 304 Not Modified, то проблема, скорее всего, в пунктах:
- В секции
serverконкретного сайта включенssi on(Подробнее в документации). По умолчанию, ssi отключен, но некоторые хостеры и ISPManager любят его прописывать в дефолтную конфигурацию сайта включенным. Его нужно обязательно отключить, закомментировав или удалив эту строку; - if_modified_since установить в
before, то есть на уровнеhttpили конкретногоserverпрописать:if_modified_since before;
Правильность ответа
304 Not Modifiedможно проверить с помощью:
- Консоли разработчика браузера (F12) в разделе
Network (Cеть)(не забываем перезагружать страницу);
- Или сторонних сервисов, например last-modified.com.
Client intended to send too large body
Решается с помощью увеличения параметра client_max_body_size
client_max_body_size 200m;
Как перезагрузить nginx
Для перезагрузки NGINX используйте restart или reload.
Команда в консоли:
service nginx reload
либо
/etc/init.d/nginx reload
либо
nginx -s reload
Эти команды остановят и перезапустят сервер NGINX.
Перезагрузить конфигурационный файл без перезагрузки NGINX можно так:
nginx -s reload
Проверить правильность конфигурации можно командой
nginx -t
В чём разница между reload и restart
Как происходит перезагрузка в NGINX:
- Команда посылается серверу
- Сервер анализирует конфигурационный файл
- Если конфигурация не содержит ошибок, новые процессы открываются с новой конфигурацией сервера, а старые плавно прекращают свою работу
- Если конфигурация содержит ошибки, то при использовании
restartпроцесс перезагрузки сервера прерывается, сервер не запускаетсяreloadсервер откатывается назад к старой конфигурации, работа продолжается
Короче говоря, restart обрывает работу резко, reload делает это плавно.
Restart рекомендуется использовать, только когда внесены глобальные изменения, например, заменено ядро сервера, либо нужно увидеть результат внесённых изменений прямо здесь и сейчас. В остальных случаях используйте reload.
Ещё лучше, если вы будете предварительно проверять правильность конфигурации командой nginx -t, например:
nginx -t && service nginx reload
или
nginx -t && nginx -s reload
Как вместо 404 ошибки делать 301 редирект на главную
error_page 404 = @gotomain;
location @gotomain {
return 301 /;
}
Как в NGINX сделать редирект на мобильную версию сайта
Данный код вставляется на уровне server в самое начало файла (не обязательно в самое начало, но главное, чтобы перед определением обработчика скриптов php, иначе редирект может не сработать).
### Устанавливаем переменную в 0. В неё пишем 1, если обнаружили мобильную версию браузера
set $mobile_rewrite 0;
if ($http_user_agent ~* "(android|bbd+|meego).+mobile|avantgo|bada/|blackberry|blazer|compal|elaine|fennec|hiptop|iemobile|ip(hone|od)|iris|kindle|lge |maemo|midp|mmp|mobile.+firefox|netfront|opera m(ob|in)i|palm( os)?|phone|p(ixi|re)/|plucker|pocket|psp|series(4|6)0|symbian|treo|up.(browser|link)|vodafone|wap|windows ce|xda|xiino") {
set $mobile_rewrite 1;
}
if ($http_user_agent ~* "^(1207|6310|6590|3gso|4thp|50[1-6]i|770s|802s|a wa|abac|ac(er|oo|s-)|ai(ko|rn)|al(av|ca|co)|amoi|an(ex|ny|yw)|aptu|ar(ch|go)|as(te|us)|attw|au(di|-m|r |s )|avan|be(ck|ll|nq)|bi(lb|rd)|bl(ac|az)|br(e|v)w|bumb|bw-(n|u)|c55/|capi|ccwa|cdm-|cell|chtm|cldc|cmd-|co(mp|nd)|craw|da(it|ll|ng)|dbte|dc-s|devi|dica|dmob|do(c|p)o|ds(12|-d)|el(49|ai)|em(l2|ul)|er(ic|k0)|esl8|ez([4-7]0|os|wa|ze)|fetc|fly(-|_)|g1 u|g560|gene|gf-5|g-mo|go(.w|od)|gr(ad|un)|haie|hcit|hd-(m|p|t)|hei-|hi(pt|ta)|hp( i|ip)|hs-c|ht(c(-| |_|a|g|p|s|t)|tp)|hu(aw|tc)|i-(20|go|ma)|i230|iac( |-|/)|ibro|idea|ig01|ikom|im1k|inno|ipaq|iris|ja(t|v)a|jbro|jemu|jigs|kddi|keji|kgt( |/)|klon|kpt |kwc-|kyo(c|k)|le(no|xi)|lg( g|/(k|l|u)|50|54|-[a-w])|libw|lynx|m1-w|m3ga|m50/|ma(te|ui|xo)|mc(01|21|ca)|m-cr|me(rc|ri)|mi(o8|oa|ts)|mmef|mo(01|02|bi|de|do|t(-| |o|v)|zz)|mt(50|p1|v )|mwbp|mywa|n10[0-2]|n20[2-3]|n30(0|2)|n50(0|2|5)|n7(0(0|1)|10)|ne((c|m)-|on|tf|wf|wg|wt)|nok(6|i)|nzph|o2im|op(ti|wv)|oran|owg1|p800|pan(a|d|t)|pdxg|pg(13|-([1-8]|c))|phil|pire|pl(ay|uc)|pn-2|po(ck|rt|se)|prox|psio|pt-g|qa-a|qc(07|12|21|32|60|-[2-7]|i-)|qtek|r380|r600|raks|rim9|ro(ve|zo)|s55/|sa(ge|ma|mm|ms|ny|va)|sc(01|h-|oo|p-)|sdk/|se(c(-|0|1)|47|mc|nd|ri)|sgh-|shar|sie(-|m)|sk-0|sl(45|id)|sm(al|ar|b3|it|t5)|so(ft|ny)|sp(01|h-|v-|v )|sy(01|mb)|t2(18|50)|t6(00|10|18)|ta(gt|lk)|tcl-|tdg-|tel(i|m)|tim-|t-mo|to(pl|sh)|ts(70|m-|m3|m5)|tx-9|up(.b|g1|si)|utst|v400|v750|veri|vi(rg|te)|vk(40|5[0-3]|-v)|vm40|voda|vulc|vx(52|53|60|61|70|80|81|83|85|98)|w3c(-| )|webc|whit|wi(g |nc|nw)|wmlb|wonu|x700|yas-|your|zeto|zte-)") {
set $mobile_rewrite 1;
}
### Мобильный барузер обнаружен, редиректим на мобильный поддомен, в моём случае, m.example.com
if ($mobile_rewrite = 1) {
rewrite ^ http://m.example.com/$request_uri redirect;
break;
}
Как в NGINX включить поддержку WebP
Чтобы включить поддержку WebP, нужно прописать в секции http:
    # Прописываем маппинг для WebP, если он поддерживается браузером
map $http_accept $webp_ext {
default "";
"~*webp" ".webp";
}
Теперь, в секции server можно использовать:
location ~* ^.+.(png|jpe?g)$ {
expires 365d; # Включаем браузерный кеш на год для изображений
add_header Vary Accept; # Даём заголовок, что акцептируем запрос
try_files $uri$webp_ext $uri =404; # Пробуем сначала искать версию изображения .webp
}
Полезные материалы и ссылки
Настройка NGINX под WP Super Cache
Конвертер правил .htaccess (Apache) в NGINX
Весьма полезный сервис, который поможет cконвертировать правила из .htaccess в NGINX. Результат, возможно, придётся донастроить вручную, но, в целом, он весьма удобен в применении.
Вот как описывают сервис сами авторы:
Сервис предназначен для перевода конфигурационного файла Apache .htaccess в инструкции конфигурационного файла nginx.
В первую очередь, сервис задумывался как переводчик инструкций mod_rewrite с htaccess на nginx. Однако, он позволяет переводить другие инструкции, которые можно и резонно перевести из Apache в nginx.
Инструкции, не относящиеся к настройке сервера (например, php_value), игнорируются.
Переводчик не проверяет правильность входящего конфига, в том числе регулярные выражения и логические ошибки.
Результат перевода следует обязательно проверить вручную, а затем разместить в секции server {} конфигурационного файла nginx.
Замечания и предложения по улучшению ждем, как обычно, на [email protected]
![;)]()
Перейти в конвертер из .htaccess Apache в NGINX
![]() Загрузка…
Загрузка…
Nginx is a very popular web server these days. This article will show you some common errors when running an Nginx web server and possible solutions. This is not a complete list. If you still can’t fix the error after trying the advised solutions, please check your Nginx server logs under /var/log/nginx/ directory and search on Google to debug the problem.
Unable to connect/Refused to Connect
If you see the following error when trying to access your website:
Firefox can’t establish a connection to the server at www.example.com
or
www.example.com refused to connect
or
The site can't be reached, www.example.com unexpectedly closed the connection.
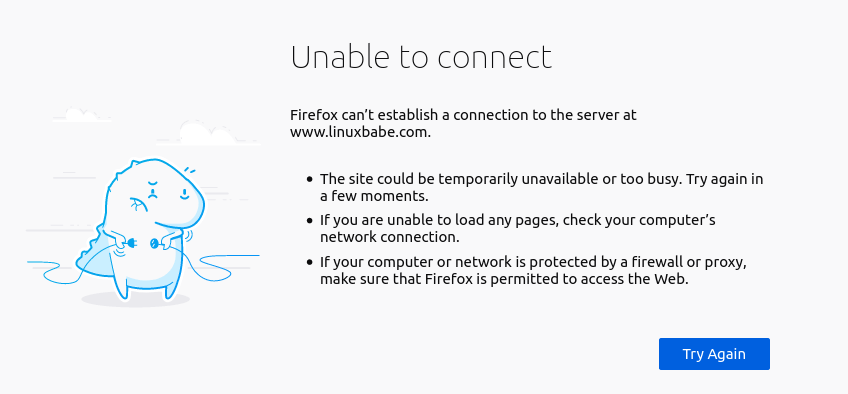
It could be that
- Nginx isn’t running. You can check Nginx status with
sudo systemctl status nginx. Start Nginx withsudo systemctl start nginx. If Nginx fails to start, runsudo nginx -tto find if there is anything wrong with your configuration file. And check the journal (sudo journalctl -eu nginx) to find out why it fails to start. - Firewall blocking ports 80 and 443. If you use the UFW firewall on Debian/Ubuntu, run
sudo ufw allow 80,443/tcpto open TCP ports 80 and 443. If you use Firewalld on RHEL/CentOS/Rocky Linux/AlmaLinux, runsudo firewall-cmd --permanent --add-service={http,https}, thensudo systemctl reload firewalldto open TCP ports 80 and 443. - Fail2ban. If your server uses fail2ban to block malicious requests, it could be that fail2ban banned your IP address. Run
sudo journalctl -eu fail2banto check if your IP address is banned. You can add your IP address to the fail2banignoreiplist, so it won’t be banned again. - Nginx isn’t listening on the right network interface. For example, Nginx isn’t listening on the server’s public IP address.
If systemctl status nginx shows Nginx is running, but sudo ss -lnpt | grep nginx shows Nginx is not listening on TCP port 80/443, it could be that you deleted the following lines in the /etc/nginx/nginx.conf file.
include /etc/nginx/conf.d/*;
So Nginx doesn’t use the virtual host files in /etc/nginx/conf.d/ directory. Add this line back.
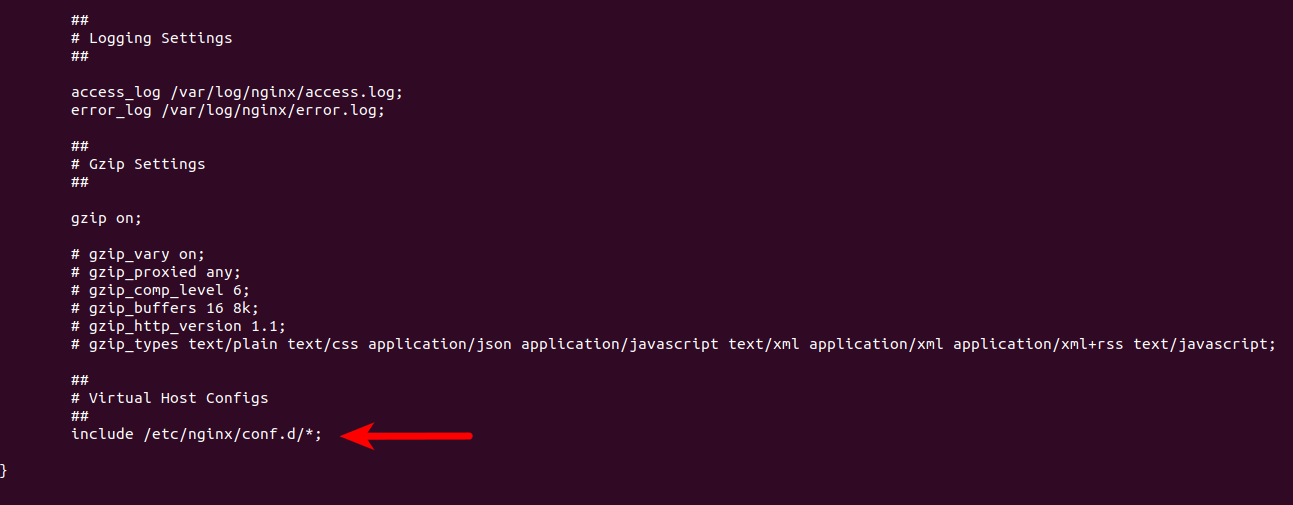
The Connection Has Timed Out
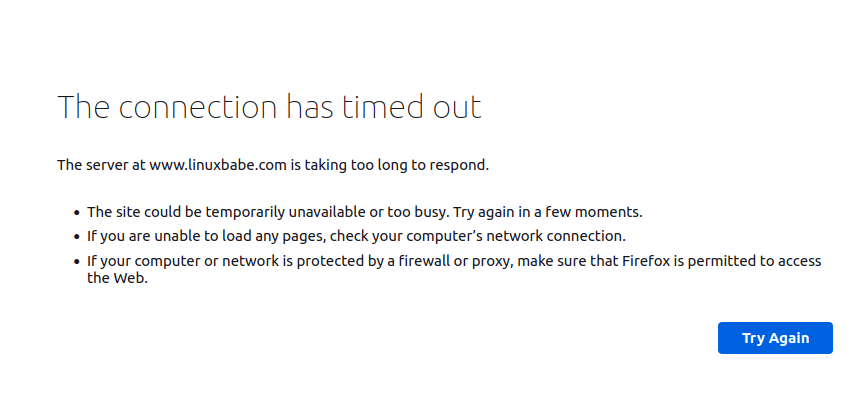
This could mean that your server is offline, or Nginx isn’t working properly. I once had an out-of-memory problem, which caused Nginx to fail to spawn the worker processes. If you can see the following error message in /var/log/nginx/error.log file, your server is short of memory.
fork() failed while spawning "worker process" (12: Cannot allocate memory)
404 Not Found
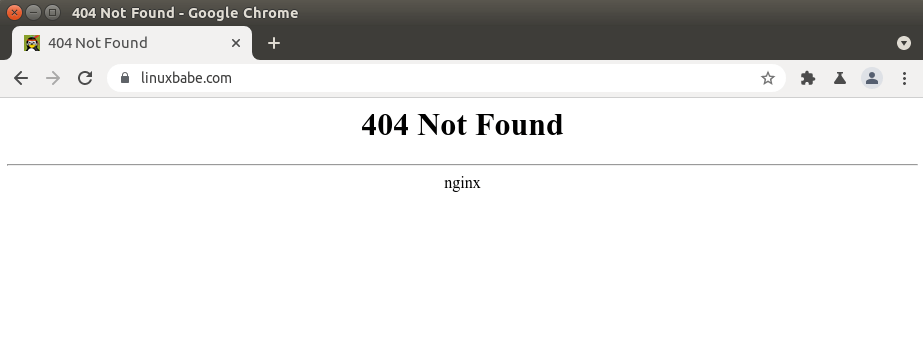
404 not found means Nginx can’t find the resources your web browser asks for. The reason could be:
- The web root directory doesn’t exist on your server. In Nginx, the web roor directory is configured using the
rootdirective, like this:root /usr/share/nginx/linuxbabe.com/;. Make sure your website files (HTML, CSS, JavaScript, PHP) are stored in the correct directory. - PHP-FPM isn’t running. You can check PHP-FPM status with
sudo systemctl status php7.4-fpm(Debian/Ubuntu) orsudo systemctl status php-fpm. - You forgot to include the
try_files $uri /index.php$is_args$args;directive in your Nginx server config file. This directive is needed to process PHP code. - Your server has no free disk space. Try to free up some disk space. You can use the
ncduutility (sudo apt install ncduorsudo dnf install ncdu) to find out which directories are taking up huge amount of disk space.
403 Forbidden
This error means that you are not allowed to access the request resources. Possible scenario includes:
- The website administrator blocks public access to the requested resources with an IP whitelist or other methods.
- The website could be using a web application firewall like ModSecurity, which detected an intrusion attack, so it blocked the request.
Some web applications may show a different error message when 403 forbidden happens. It might tell you that “secure connection failed”, while the cause is the same.
500 Internal Server Error
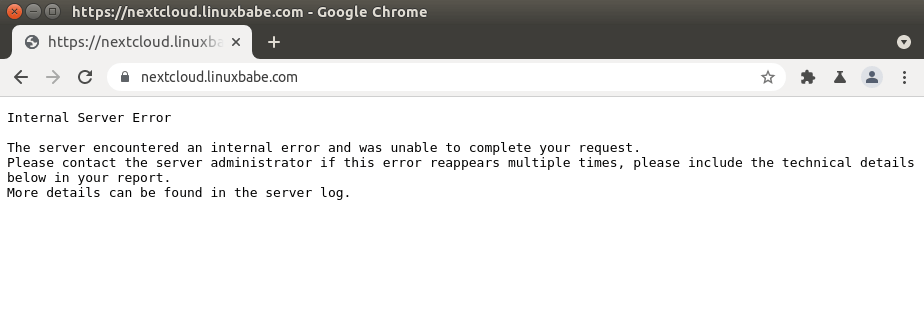
This means there is some error in the web application. It could be that
- The database server is down. Check MySQL/MariaDB status with
sudo systemctl status mysql. Start it withsudo systemctl start mysql. Runsudo journalctl -eu mysqlto find out why it fails to start. MySQL/MariaDB process could be killed due to out-of-memory issue. - You didn’t configure Nginx to use PHP-FPM, so Nginx doesn’t know how to execute PHP code.
- If your web application has a built-in cache, you can try flushing the app cache to fix this error.
- Your web application may produce its own error log. Check this log file to debug this error.
- Your web application may have a debugging mode. Turn it on and you will see more detailed error messages on the web page. For example, you can turn on debugging mode in the Modoboa mail server hosting platform by setting
DEBUG = Truein the/srv/modoboa/instance/instance/settings.pyfile. - PHP-FPM could be overloaded. Check your PHP-FPM log (such as
/var/log/php7.4-fpm.log). If you can find the[pool www] seems busy (you may need to increase pm.start_servers, or pm.min/max_spare_servers)warning message, you need to allocate more resources to PHP-FPM. - Sometimes reloading PHP-FPM (
sudo systemctl reload php7.4-fpm) can fix the error. - It also might be that you didn’t install the database module for PHP, so PHP can’t connect to the database. For MySQL/MariaDB, install it with
sudo apt install php7.4-mysql. For PostgreSQL, install it withsudo apt install php7.4-pgsql.
Nginx Shows the default page
If you try to set up an Nginx virtual host and when you type the domain name in your web browser, the default Nginx page shows up, it might be
- Your Nginx virtual host file doesn’t have the
server_namedirective. - You didn’t use a real domain name for the
server_namedirective in your Nginx virtual host. - You forgot to reload Nginx.
- You can try deleting the default virtual host file in Nginx (
sudo rm /etc/nginx/sites-enabled/default).
The page isn’t redirecting properly
Firefox displays this error as The page isn’t redirecting properly. Google Chrome shows this error as www.example.com redirected you too many times.

This means you have configured Nginx redirection too many times. For example, you may have added an unnecessary return 301 directive in the https server block to redirect HTTP to HTTPS connection.
If you have set up a page cache such as Nginx FastCGI cache, you need to clear your server page cache.
504 Gateway time-out
This means the upstream like PHP-FPM/MySQL/MariaDB isn’t able to process the request fast enough. You can try restarting PHP-FPM to fix the error temporarily, but it’s better to start tuning PHP-FPM/MySQL/MariaDB for faster performance.
Optimize MySQL/MariaDB Performance
Here is the InnoDB configuration in my /etc/mysql/mariadb.conf.d/50-server.cnf file. This is a very simple performance tunning.
innodb_buffer_pool_size = 1024M innodb_buffer_pool_dump_at_shutdown = ON innodb_buffer_pool_load_at_startup = ON innodb_log_file_size = 512M innodb_log_buffer_size = 8M #Improving disk I/O performance innodb_file_per_table = 1 innodb_open_files = 400 innodb_io_capacity = 400 innodb_flush_method = O_DIRECT innodb_read_io_threads = 64 innodb_write_io_threads = 64 innodb_buffer_pool_instances = 3
Where:
- The InnoDB buffer pool size needs to be at least half of your RAM. ( For VPS with small amount of RAM, I recommend setting the buffer pool size to a smaller value, like 400M, or your VPS would run out of RAM.)
- InnoDB log file size needs to be 25% of the buffer pool size.
- Set the read IO threads and write IO thread to the maximum (64) and
- Make MariaDB use 3 instances of InnoDB buffer pool. The number of instances needs to be the same number of CPU cores on your system.
After saving the changes, restart MariaDB.
sudo systemctl restart mariadb
Recommended reading: MySQL/MariaDB Database Performance Monitoring with Percona on Ubuntu Server
Find Out Which PHP Script Caused 504 Error
You can check the web server access log to see if there are any bad requests. For example, some folks might find the following lines in the Nextcloud access log file (/var/log/nginx/nextcloud.access).
"GET /apps/richdocumentscode/proxy.php?req=/hosting/capabilities HTTP/1.1" 499 0 "-" "Nextcloud Server Crawler" "GET /apps/richdocumentscode/proxy.php?req=/hosting/capabilities HTTP/1.1" 499 0 "-" "Nextcloud Server Crawler" "GET /apps/richdocumentscode/proxy.php?req=/hosting/capabilities HTTP/1.1" 499 0 "-" "Nextcloud Server Crawler"
Notice the HTTP status code 499, which means the HTTP client quit the connection before the server gives back an answer. Successful HTTP code should be 2xx or 3xx. If you can find HTTP code 4xx, it means there’s a problem with this HTTP request. In this example, the Nextcloud richdocumentscode app isn’t working.
Increase Timeout Settings
You can also set a longer timeout value in Nginx to reduce the chance of gateway timeout. Edit your Nginx virtual host file and add the following lines in the server {...} block.
proxy_connect_timeout 600; proxy_send_timeout 600; proxy_read_timeout 600; send_timeout 600;
If you use Nginx with PHP-FPM, then set the fastcgi_read_timeout to a bigger value like 300 seconds. Default is 60 seconds.
location ~ .php$ { try_files $uri /index.php$is_args$args; include snippets/fastcgi-php.conf; fastcgi_split_path_info ^(.+.php)(/.+)$; fastcgi_pass unix:/var/run/php/php7.4-fpm.sock; fastcgi_param SCRIPT_FILENAME $document_root$fastcgi_script_name; include fastcgi_params; fastcgi_read_timeout 300; }
Then reload Nginx.
sudo systemctl reload nginx
PHP-FPM also has a max execution time for each script. Edit the php.ini file.
sudo nano /etc/php/7.4/fpm/php.ini
You can increase the value to 300 seconds.
max_execution_time = 300
Then restart PHP-FPM
sudo systemctl restart php7.4-fpm
Memory Size Exhausted
If you see the following line in your Nginx error log, it means PHP reached the 128MB memory limit.
PHP Fatal error: Allowed memory size of 134217728 bytes exhausted (tried to allocate 57134520 bytes)
You can edit the php.ini file (/etc/php/7.4/fpm/php.ini) and increase the PHP memory limit.
memory_limit = 512M
Then restart PHP7.4-FPM.
sudo systemctl restart php7.4-fpm
If the error still exists, it’s likely there’s bad PHP code in your web application that eats lots of RAM.
PR_END_OF_FILE_ERROR
- You configured Nginx to rediect HTTP request to HTTPS, but there’s no server block in Nginx serving HTTPS request.
- Maybe Nginx isn’t running?
- Sometimes, the main Nginx binary is running, but a worker process can fail and exit due to various reasons. Check the Nginx error log (
/var/log/nginx/error.log) to debug.
PHP-FPM Upstream Time Out
Some folks can find the following error in Nginx error log file ( under /var/log/nginx/).
[error] 7553#7553: *2234677 upstream timed out (110: Connection timed out) while reading response header from upstream
Possible solutions:
- Restart PHP-FPM.
- Upgrade RAM.
- Optimize database performance. Because PHP-FPM needs to fetch data from the database, if the database is slow to process requests, PHP-FPM will time out.
502 Bad Gateway
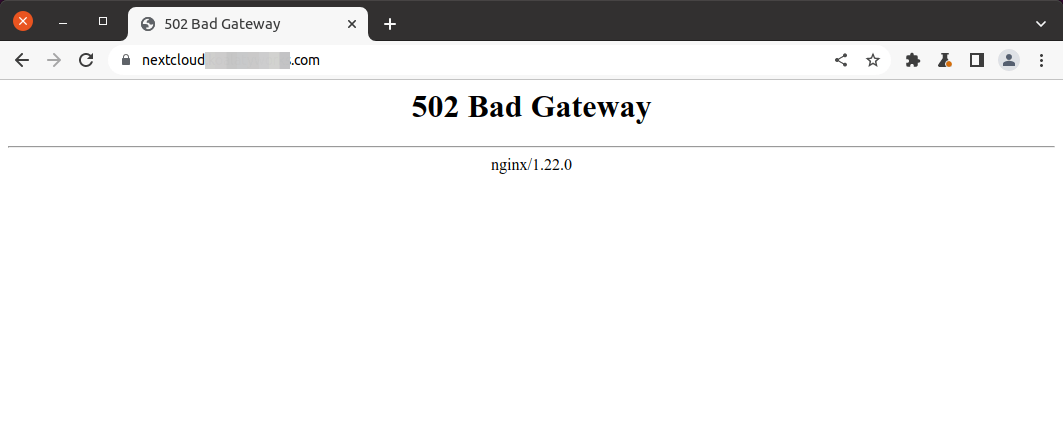
This error could be caused by:
- PHP-FPM isn’t running. Check its status:
sudo systemctl status php7.4-fpm. - PHP-FPM is running, but Nginx isn’t able to connect to PHP-FPM (Resource temporarily unavailable), see how to fix this error below.
- PHP-FPM is running, but Nginx doesn’t have permission to connect to PHP-FPM socket (Permission denied). It might be that Nginx is running as nginx user, but the socket file
/run/php/php7.4-fpm.sockis owned by thewww-datauser. You should configure Nginx to run as thewww-datauser.
Resource temporarily unavailable
Some folks can find the following error in Nginx error log file ( under /var/log/nginx/).
connect() to unix:/run/php/php7.4-fpm.sock failed (11: Resource temporarily unavailable)
This usually means your website has lots of visitors and PHP-FPM is unable to process the huge amounts of requests. You can adjust the number of PHP-FPM child process, so it can process more requests.
Edit your PHP-FPM www.conf file. (The file path varies depending on your Linux distribution.)
sudo nano /etc/php/7.4/fpm/pool.d/www.conf
The default child process config is as follows:
pm = dynamic pm.max_children = 5 pm.start_servers = 2 pm.min_spare_servers = 1 pm.max_spare_servers = 3
The above configuration means
- PHP-FPM dynamically create child processes. No fixed number of child processes.
- It creates at most 5 child processes.
- Start 2 child processes when PHP-FPM starts.
- There’s at least 1 idle process.
- There’s at most 3 idle processes.
The defaults are based on a server without much resources, like a server with only 1GB RAM. If you have a high traffic website, you probably want to increase the number of child processes, so it can serve more requests. (Make sure you have enough RAM to run more child processes.)
pm = dynamic pm.max_children = 20 pm.start_servers = 8 pm.min_spare_servers = 4 pm.max_spare_servers = 12
Save and close the file. Then we also increase the PHP memory limit.
sudo nano /etc/php/7.4/fpm/php.ini
Find the following line.
memory_limit = 128M
By default, a script can use at most 128M memory. It’s recommended to set this number to at lest 512M.
memory_limit = 512M
Save and close the file. Restart PHP-FPM. (You might need to change the version number.)
sudo systemctl restart php7.4-fpm
To monitor the health of PHP-FPM, you can enable the status page. Find the following line in the PHP-FPM www.conf file.
;pm.status_path = /status
Remove the semicolon to enable PHP-FPM status page. Then restart PHP-FPM.
sudo systemctl restart php7.4-fpm
Then edit your Nginx virtual host file. Add the following lines. The allow and deny directives are used to restrict access. Only the whitelisted IP addresses can access the status page.
location ~ ^/(status|ping)$ { allow 127.0.0.1; allow your_other_IP_Address; deny all; fastcgi_param SCRIPT_FILENAME $document_root$fastcgi_script_name; fastcgi_index index.php; include fastcgi_params; #fastcgi_pass 127.0.0.1:9000; fastcgi_pass unix:/run/php/php7.4-fpm.sock; }
Save and close the file. Then test Nginx configurations.
sudo nginx -t
If the test is successful, reload Nginx for the changes to take effect.
sudo systemctl reload nginx
Sample PHP-FPM status page.
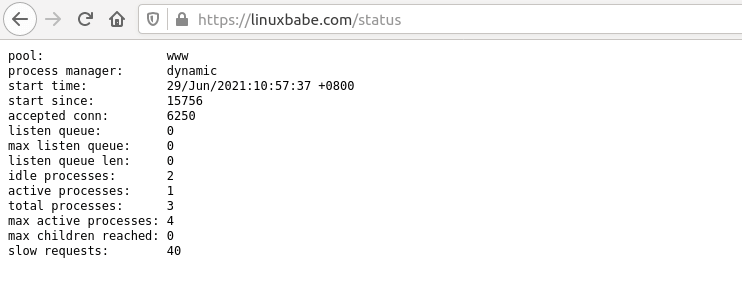
The PHP-FPM www.conf file gives you a good explanation of what each parameter means.
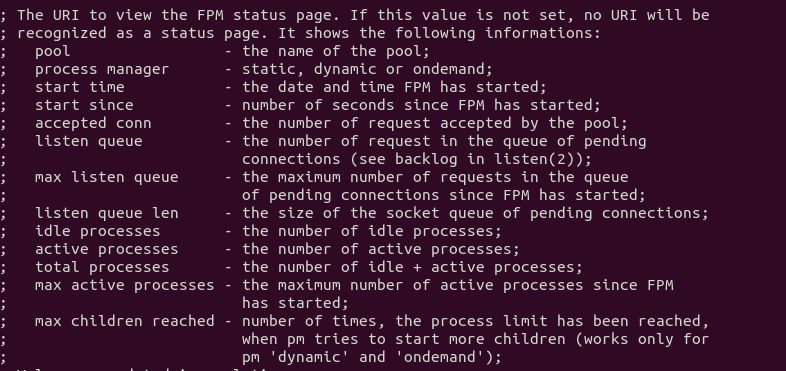
If PHP-FPM is very busy and unable to serve a request immediately, it will queue this request. By default, there can be at most 511 pending requests, determined by the listen.backlog parameter.
listen.backlog = 511
If you see the following value on the PHP-FPM status page, it means there has never been a request put in the queue, i.e. your PHP-FPM can process requests quickly.
listen queue: 0 max listen queue: 0
If there are 511 pending requests in the queue, it means your PHP-FPM is very busy, so you should increase the number of child processes.
You may also need to change the Linux kernel net.core.somaxconn setting, which defines max number of connections allowed to a socket file on Linux, such as the PHP-FPM Unix socket file. By default, its value is 128 before kernel 5.4 and 4096 starting with kernel 5.4.
[email protected]:~$ sysctl net.core.somaxconn net.core.somaxconn = 128
If you run a high traffic website, you can use a big value. Edit /etc/sysctl.conf file.
sudo nano /etc/sysctl.conf
Add the following two lines.
net.core.somaxconn = 20000 net.core.netdev_max_backlog = 65535
Save and close the file. Then apply the settings.
sudo sysctl -p
Note: If your server has enough RAM, you can allocate a fixed number of child processes for PHP-FPM like below. In my experience, this fixed the 500 internal error for a Joomla + Virtuemart website.
pm = static pm.max_children = 50
Two Virtual Host files For the Same Website
If you run sudo nginx -t and see the following warning.
nginx: [warn] conflicting server name "example.com" on [::]:443, ignored nginx: [warn] conflicting server name "example.com" on 0.0.0.0:443, ignored
It means there are two virtual host files that contain the same server_name configuration. Don’t create two virtual host files for one website.
PHP-FPM Connection reset by peer
Nginx error log file shows the following message.
recv() failed (104: Connection reset by peer) while reading response header from upstream
This may be caused by a restart of PHP-FPM. If it’s retarted manually by yourself, then you can ignore this error.
Nginx Socket Leaks
If you find the following error message in the /var/log/nginx/error.log file, your Nginx has a socket leaks problem.
2021/09/28 13:27:41 [alert] 321#321: *120606 open socket #16 left in connection 163 2021/09/28 13:27:41 [alert] 321#321: *120629 open socket #34 left in connection 188 2021/09/28 13:27:41 [alert] 321#321: *120622 open socket #9 left in connection 213 2021/09/28 13:27:41 [alert] 321#321: *120628 open socket #25 left in connection 217 2021/09/28 13:27:41 [alert] 321#321: *120605 open socket #15 left in connection 244 2021/09/28 13:27:41 [alert] 321#321: *120614 open socket #41 left in connection 245 2021/09/28 13:27:41 [alert] 321#321: *120631 open socket #24 left in connection 255 2021/09/28 13:27:41 [alert] 321#321: *120616 open socket #23 left in connection 258 2021/09/28 13:27:41 [alert] 321#321: *120615 open socket #42 left in connection 269 2021/09/28 13:27:41 [alert] 321#321: aborting
You can restart the OS to solve this problem. If it doesn’t work, you need to compile a debug version of Nginx, which will show you debug info in the log.
invalid PID number “” in “/run/nginx.pid”
You need to restart your web server.
sudo pkill nginx sudo systemctl restart nginx
Cloudflare Errors
Here are some common errors and solutions if your website runs behind Cloudflare CDN (Content Delivery Network).
521 Web Server is Down
- Nginx isn’t running.
- You didn’t open TCP ports 80 and 443 in the firewall.
- You changed the server IP address, but forgot to update DNS record in Cloudflare.
The page isn’t redirecting properly
If your SSL setting on the SSL/TLS app is set to Flexible, but your origin server is configured to redirect HTTP requests to HTTPS, Your Nginx server sends reponse back to Cloudflare in encrypted connection. Since Cloudflare is expecting HTTP traffic, it keeps resending the same request, resulting in a redirect loop. In this case, you need to use the Full (strict) SSL/TLS option in your Cloudflare settings.
Wrapping Up
I hope this article helped you to fix common Nginx web server errors. As always, if you found this post useful, then subscribe to our free newsletter to get more tips and tricks 🙂
You may want to check out:
- How to Fix Common Let’s Encrypt/Certbot Errors
«403 Forbidden» — наиболее распространенная ошибка при работе с NGINX. В этой статье мы расскажем о причинах возникновения 403 forbidden NGINX, а также о том, как найти ее причину и исправить основную проблему.
- Об ошибке
- Поиск файла конфигурации NGINX
- Некорректный индексный файл
- Автоиндекс
- Права доступа к файлам
- Идентификация пользователя NGINX
- Установите права собственности на файл
- Установите права доступа
«403 Forbidden» — это универсальная ошибка NGINX, которая указывает на то, что вы запросили что-то, а NGINX (по ряду причин) не может это предоставить. «403» является кодом состояния HTTP, который означает, что веб-сервер получил и понял ваш запрос, но не может предпринять никаких дальнейших действий.
По умолчанию файлы конфигурации NGINX находятся в папке /etc/nginx. Если вы просмотрите этот каталог, то найдете несколько конфигурационных файлов для различных модулей сервера.
Главный файл конфигурации — /etc/nginx/nginx.conf. Он содержит основные директивы для NGINX и является аналогом файла httpd.conf для Apache.
Чтобы отредактировать этот файл, используйте команду:
CentOS 7: sudo nano /etc/nginx/conf.d/test.example.com.conf Ubuntu 16.04: sudo nano /etc/nginx/sites-available/test.example.com.conf
Одна из наиболее распространенных причин ошибки 403 forbidden NGINX — некорректная настройка индексного файла.
nginx.conf указывает, какие индексные файлы должны загружаться, и в каком порядке. Например, приведенная ниже строка указывает NGINX искать index.html, затем index.htm, затем index.php:
index index.html index.htm index.php;
Если ни один из этих трех файлов не будет найден в каталоге, NGINX вернет ошибку «403 Forbidden».
Примечание. Имена файлов чувствительны к регистру. Если nginx.conf указывает index.html, а файл называется Index.html, это приведет к ошибке «403 Forbidden».
Если вы хотите использовать имя индексного файла, которое ваш веб-сервер NGINX не распознает, отредактируйте nginx.conf и добавьте имя файла в строку конфигурации индекса.
Например, чтобы добавить index.py в список распознаваемых индексных файлов, отредактируйте эту строку следующим образом:
index index.html index.htm index.php index.py;
Сохраните изменения, а затем перезапустите NGINX командой:
Альтернативным решением является разрешение индекса директории. Индекс директории означает, что если индексный файл не найден, сервер отобразит все содержимое директории.
По соображениям безопасности индекс директории в NGINX по умолчанию отключен.
При «403 forbidden NGINX», если вы хотите показать индекс директории в ситуациях, когда NGINX не может найти (идентифицировать) файл, отредактируйте nginx.conf, как описано выше, и добавьте в него две следующие директивы:
Autoindex on; Autoindex_exact_size off;
Эти директивы должны быть добавлены в блок location. Можно либо добавить их в существующий блок location/, либо добавить новый. Окончательный результат должен выглядеть так:
location / { [pre-existing configurations, if applicable] autoindex on; autoindex_exact_size off; }
Также можно активировать индексирование директории в определенной папке, если не хотите, чтобы она была доступна для всего сайта:
location /myfiles { autoindex on; autoindex_exact_size off; }
Сохраните изменения в файле, затем перезапустите NGINX командой:
Некорректные права доступа к файлам являются еще одной причиной ошибки «403 Forbidden NGINX». Для использования с NGINX рекомендуется стандартная настройка: для каталогов — 755 и для файлов — 644. Пользователь NGINX также должен быть владельцем файлов.
Для начала нужно определить, от имени какого пользователя запущен NGINX. Для этого используйте команду:
В этом примере рабочий процесс NGINX работает от имени пользователя nginx.
Перейдите на уровень выше корневой директории документа сайта. Например, если корневая директория вашего сайта /usr/share/nginx/example.com, перейдите в /usr/share/nginx с помощью команды:
Измените права собственности на все файлы в директориях нижних уровней на пользователя nginx с помощью команды:
sudo chown -R nginx:nginx *
403 forbidden NGINX — как исправить: установите права доступа для каждой директории на 755 с помощью команды:
sudo chmod 755 [имя директории]
Например, чтобы установить права доступа для директории example.com, используется команда:
sudo chmod 755 example.com
Затем перейдите в корневой каталог веб-документа:
sudo chmod 755 example.com
Измените права доступа для всех файлов в этой директории с помощью команды:
Содержание
could not allocate new session in ssl session shared cache le_nginx_ssl while ssl handshaking
https://trac.nginx.org/nginx/ticket/621
For now you may use smaller session timeouts and/or a larger shared memory zone. This way sessions will expire and will be removed from the cache before the cache will be overflowed, and no errors will happen.
т.е. ssl_session_cache и ssl_session_timeout
ssl_session_cache shared:le_nginx_SSL:64m; ssl_session_timeout 1800m;
Skipping acquire of configured file ‘nginx/binary-i386/Packages’
Ошибка
Skipping acquire of configured file 'nginx/binary-i386/Packages' as repository 'http://nginx.org/packages/ubuntu focal InRelease' doesn't support architecture 'i386'
Решение
Заменить
deb http://nginx.org/packages/ubuntu/ focal nginx deb-src http://nginx.org/packages/ubuntu/ focal nginx
На
deb [arch=amd64] http://nginx.org/packages/ubuntu/ focal nginx deb-src http://nginx.org/packages/ubuntu/ focal nginx
upstream timed out (110: Connection timed out) while reading response header from upstream
для apache
proxy_connect_timeout 300; proxy_send_timeout 300; proxy_read_timeout 300;
для fpm
fastcgi_connect_timeout 60; fastcgi_send_timeout 180; fastcgi_read_timeout 180;

sock failed (11: Resource temporarily unavailable) while connecting to upstream
Ошибка: connect() to unix:/var/www/php-fpm/www.sock failed (11: Resource temporarily unavailable) while connecting to upstream
Браузер возвращает 502 Bad Gateway.
nginx работает с php через сокеты. Проблема в дефолтных лимитах
-
net.core.somaxconn = 128 (ограничение на количество открытых соединений к файловым сокетам)
-
net.core.netdev_max_backlog = 200 (ограничение на количество ожидающих запросов открытия соединений к файловым сокетам)
Посмотреть текущие значения можно так
cat /proc/sys/net/core/somaxconn cat /proc/sys/net/core/netdev_max_backlog
Решение: добавить в sysctl.conf
net.core.somaxconn = 65535 net.core.netdev_max_backlog = 65535
Высокие значения указаны лишь для примера и лучше использовать подходящие под конкретную систему.
К сожалению это не помогло.
Понадобилась еще одна настройки в fpm пуле
listen.backlog = 65535
или установить unlimited
listen.backlog = -1
изучить дополнительно / технические детали на otus.ru
fastcgi_intercept_errors
nginx: [warn] 4096 worker_connections exceed open file resource limit: 1024
OKGOOGLE. Проверим текущие soft/hard лимиты файловых дескрипторов и открытых файлов для master процесса nginx
# cat /proc/$(cat /var/run/nginx.pid)/limits|grep open.files Max open files 1024 4096 files
Далее (подсмотрел на stackoverflow кажется) проверим для дочерних процессов (worker)
# ps --ppid $(cat /var/run/nginx.pid) -o %p|sed '1d'|xargs -I{} cat /proc/{}/limits|grep open.files Max open files 1024 4096 files Max open files 1024 4096 files Max open files 1024 4096 files Max open files 1024 4096 files
Добавить в /etc/security/limits.conf
16384
nginx soft nofile 16384 nginx hard nofile 16384
В nginx.conf установить
-
worker_processes 4;
-
worker_connections 4096;
-
worker_rlimit_nofile 16384;
for pid in `pidof nginx`; do echo "$(< /proc/$pid/cmdline)"; egrep 'files|Limit' /proc/$pid/limits; echo "Currently open files: $(ls -1 /proc/$pid/fd | wc -l)"; echo; done
upd
в centos7 /etc/systemd/system/nginx.service.d добавить conf
[Service] LimitNOFILE=16384
could not build the server_names_hash
server_names_hash_bucket_size
Ошибка
could not build the server_names_hash, you should increase server_names_hash_bucket_size: 32
Просто сделай больше 
http { ...snip... server_names_hash_bucket_size 64; ...snip... }
413 Request Entity Too Larget
Ошибка появляется при загрузке файлов больше 1 мегабайта. Одна из причин — это дефолтные настройки nginx, а точнее параметра client_max_body_size, который по умолчанию равен 1m
Директива client_max_body_size задаёт максимально допустимый размер тела запроса клиента, указываемый в строке «Content-Length» в заголовке запроса. Если размер больше заданного, то клиенту возвращается ошибка «Request Entity Too Large» (413). Следует иметь в виду, что браузеры не умеют корректно показывать эту ошибку.
Подробнее в документацииclient_max_body_size
Решение
Изменить размер client_max_body_size
upstream sent too big header while reading response header from upstream, client
Что такое proxy_buffer_size и proxy_buffers.
Исправляется добавлением двух последних строк в конфиг Nginx:
http { include /etc/nginx/mime.types; default_type application/octet-stream; proxy_buffers 8 16k; proxy_buffer_size 32k;
А если по-русски, то proxy_buffer_size предназначен для хранения, прочтенного с бэкэнда хидера:
proxy_buffer_size and fastgci_buffer_size set buffer to read the whole of response header from backend or fastcgi server.
То есть, если Вы уже выставили 32к, а ошибка все равно появляется, то нужно тюнить дальше.
Если же просто увеличить 32к до 64к, то можно получить вот такую ошибку:
Restarting nginx: [emerg]: "proxy_busy_buffers_size" must be less than the size of all "proxy_buffers" minus one buffer in /etc/nginx/nginx.conf:34017
Итого, если указанных в самом верху настроек мало, корректируем так:
proxy_buffers 8 32k; proxy_buffer_size 64k;
И еще. fastcgi paramaters that appear to be currently working
fastcgi_connect_timeout 60; fastcgi_send_timeout 180; fastcgi_read_timeout 180; fastcgi_buffer_size 128k; fastcgi_buffers 4 256k; fastcgi_busy_buffers_size 256k; fastcgi_temp_file_write_size 256k; fastcgi_intercept_errors on
Ошибки 404/403 apache+nginx HTTP/1.0 HTTP/1.1
Небольшая заметка на тему косяка в апаче (это всё-таки он игнорирует то, что ему передали HTTP/1.0, и отдаёт с HTTP/1.1)
В качестве обхода проблемы (особенно если используется не Apache) по идее также должна помочь установка nginx >= 1.1.4 или chunked_transfer_encoding off.
http://habrahabr.ru/blogs/nginx/135662/
414 Request URI Too Large
504 SSL_do_handshake() failed
via http://dragonflybsd.blogspot.com/2012/04/nginx-504-ssldohandshake-failed.html
При проксировании https даже без сертификатов (чисто прокси) при реальной работе ловили
SSL_do_handshake() failed (SSL: error:1408C095:SSL routines:SSL3_GET_FINISHED:digest check failed) while SSL handshaking to upstream
и 502 Bad Gateway.
Как ни странно, гугл дал всего 4 страницы, из которой только 1 была с решением:
proxy_ssl_session_reuse off;
Помогло. Непонятно, что это было и почему… Проверять можно было через openssl s_client -connect www.test.com:81 -state -ssl3 -no_ssl2 -no_tls1 в несколько потоков.
400 Bad Request Request Header Or Cookie Too Large
Самое просто решение — почистить куки. Если же сервер наш, можно подкрутить настройки серверов:
для nginx это
large_client_header_buffers 4 8k;
Можно выставить например 16к, но дальше будет ошибка
Your browser sent a request that this server could not understand. Size of a request header field exceeds server limit.
Потому что надо увеличить эти же значения и для apache
LimitRequestFieldSize 8190
Можно выставить
LimitRequestFieldSize 16380
via
could not build the server_names_hash, you should increase server_names_hash_bucket_size: 32
server_names_hash_bucket_size 64;
This website uses cookies. By using the website, you agree with storing cookies on your computer. Also you acknowledge that you have read and understand our Privacy Policy. If you do not agree leave the website.More information about cookies
When we help NGINX users who are having problems, we often see the same configuration mistakes we’ve seen over and over in other users’ configurations – sometimes even in configurations written by fellow NGINX engineers! In this blog we look at 10 of the most common errors, explaining what’s wrong and how to fix it.
- Not enough file descriptors per worker
- The
error_logoffdirective - Not enabling keepalive connections to upstream servers
- Forgetting how directive inheritance works
- The
proxy_bufferingoffdirective - Improper use of the
ifdirective - Excessive health checks
- Unsecured access to metrics
- Using
ip_hashwhen all traffic comes from the same /24 CIDR block - Not taking advantage of upstream groups
Mistake 1: Not Enough File Descriptors per Worker
The worker_connections directive sets the maximum number of simultaneous connections that a NGINX worker process can have open (the default is 512). All types of connections (for example, connections with proxied servers) count against the maximum, not just client connections. But it’s important to keep in mind that ultimately there is another limit on the number of simultaneous connections per worker: the operating system limit on the maximum number of file descriptors (FDs) allocated to each process. In modern UNIX distributions, the default limit is 1024.
For all but the smallest NGINX deployments, a limit of 512 connections per worker is probably too small. Indeed, the default nginx.conf file we distribute with NGINX Open Source binaries and NGINX Plus increases it to 1024.
The common configuration mistake is not increasing the limit on FDs to at least twice the value of worker_connections. The fix is to set that value with the worker_rlimit_nofile directive in the main configuration context.
Here’s why more FDs are needed: each connection from an NGINX worker process to a client or upstream server consumes an FD. When NGINX acts as a web server, it uses one FD for the client connection and one FD per served file, for a minimum of two FDs per client (but most web pages are built from many files). When it acts as a proxy server, NGINX uses one FD each for the connection to the client and upstream server, and potentially a third FD for the file used to store the server’s response temporarily. As a caching server, NGINX behaves like a web server for cached responses and like a proxy server if the cache is empty or expired.
NGINX also uses an FD per log file and a couple FDs to communicate with master process, but usually these numbers are small compared to the number of FDs used for connections and files.
UNIX offers several ways to set the number of FDs per process:
- The
ulimitcommand if you start NGINX from a shell - The
initscript orsystemdservice manifest variables if you start NGINX as a service - The /etc/security/limits.conf file
However, the method to use depends on how you start NGINX, whereas worker_rlimit_nofile works no matter how you start NGINX.
There is also a system‑wide limit on the number of FDs, which you can set with the OS’s sysctl fs.file-max command. It is usually large enough, but it is worth verifying that the maximum number of file descriptors all NGINX worker processes might use (worker_rlimit_nofile * worker_processes) is significantly less than fs.file‑max. If NGINX somehow uses all available FDs (for example, during a DoS attack), it becomes impossible even to log in to the machine to fix the issue.
Mistake 2: The error_log off Directive
The common mistake is thinking that the error_log off directive disables logging. In fact, unlike the access_log directive, error_log does not take an off parameter. If you include the error_log off directive in the configuration, NGINX creates an error log file named off in the default directory for NGINX configuration files (usually /etc/nginx).
We don’t recommend disabling the error log, because it is a vital source of information when debugging any problems with NGINX. However, if storage is so limited that it might be possible to log enough data to exhaust the available disk space, it might make sense to disable error logging. Include this directive in the main configuration context:
error_log /dev/null emerg;Note that this directive doesn’t apply until NGINX reads and validates the configuration. So each time NGINX starts up or the configuration is reloaded, it might log to the default error log location (usually /var/log/nginx/error.log) until the configuration is validated. To change the log directory, include the -e <error_log_location> parameter on the nginx command.
Mistake 3: Not Enabling Keepalive Connections to Upstream Servers
By default, NGINX opens a new connection to an upstream (backend) server for every new incoming request. This is safe but inefficient, because NGINX and the server must exchange three packets to establish a connection and three or four to terminate it.
At high traffic volumes, opening a new connection for every request can exhaust system resources and make it impossible to open connections at all. Here’s why: for each connection the 4-tuple of source address, source port, destination address, and destination port must be unique. For connections from NGINX to an upstream server, three of the elements (the first, third, and fourth) are fixed, leaving only the source port as a variable. When a connection is closed, the Linux socket sits in the TIME‑WAIT state for two minutes, which at high traffic volumes increases the possibility of exhausting the pool of available source ports. If that happens, NGINX cannot open new connections to upstream servers.
The fix is to enable keepalive connections between NGINX and upstream servers – instead of being closed when a request completes, the connection stays open to be used for additional requests. This both reduces the possibility of running out of source ports and improves performance.
To enable keepalive connections:
-
Include the
keepalivedirective in everyupstream{}block, to set the number of idle keepalive connections to upstream servers preserved in the cache of each worker process.Note that the
keepalivedirective does not limit the total number of connections to upstream servers that an NGINX worker process can open – this is a common misconception. So the parameter tokeepalivedoes not need to be as large as you might think.We recommend setting the parameter to twice the number of servers listed in the
upstream{}block. This is large enough for NGINX to maintain keepalive connections with all the servers, but small enough that upstream servers can process new incoming connections as well.Note also that when you specify a load‑balancing algorithm in the
upstream{}block – with thehash,ip_hash,least_conn,least_time, orrandomdirective – the directive must appear above thekeepalivedirective. This is one of the rare exceptions to the general rule that the order of directives in the NGINX configuration doesn’t matter. -
In the
location{}block that forwards requests to an upstream group, include the following directives along with theproxy_passdirective:proxy_http_version 1.1; proxy_set_header "Connection" "";By default NGINX uses HTTP/1.0 for connections to upstream servers and accordingly adds the
Connection:closeheader to the requests that it forwards to the servers. The result is that each connection gets closed when the request completes, despite the presence of thekeepalivedirective in theupstream{}block.The
proxy_http_versiondirective tells NGINX to use HTTP/1.1 instead, and theproxy_set_headerdirective removes theclosevalue from theConnectionheader.
Mistake 4: Forgetting How Directive Inheritance Works
NGINX directives are inherited downwards, or “outside‑in”: a child context – one nested within another context (its parent) – inherits the settings of directives included at the parent level. For example, all server{} and location{} blocks in the http{} context inherit the value of directives included at the http level, and a directive in a server{} block is inherited by all the child location{} blocks in it. However, when the same directive is included in both a parent context and its child context, the values are not added together – instead, the value in the child context overrides the parent value.
The mistake is to forget this “override rule” for array directives, which can be included not only in multiple contexts but also multiple times within a given context. Examples include proxy_set_header and add_header – having “add” in the name of second makes it particularly easy to forget about the override rule.
We can illustrate how inheritance works with this example for add_header:
http {
    add_header X-HTTP-LEVEL-HEADER 1;
    add_header X-ANOTHER-HTTP-LEVEL-HEADER 1;

    server {
        listen 8080;
        location / {
            return 200 "OK";
        }
    }

    server {
        listen 8081;
        add_header X-SERVER-LEVEL-HEADER 1;

        location / {
            return 200 "OK";
        }

        location /test {
            add_header X-LOCATION-LEVEL-HEADER 1;
            return 200 "OK";
        }

        location /correct {
            add_header X-HTTP-LEVEL-HEADER 1;
            add_header X-ANOTHER-HTTP-LEVEL-HEADER 1;

            add_header X-SERVER-LEVEL-HEADER 1;
            add_header X-LOCATION-LEVEL-HEADER 1;
            return 200 "OK";
        }
    }
}
For the server listening on port 8080, there are no add_header directives in either the server{} or location{} blocks. So inheritance is straightforward and we see the two headers defined in the http{} context:
% curl -is localhost:8080
HTTP/1.1 200 OK
Server: nginx/1.21.5
Date: Mon, 21 Feb 2022 10:12:15 GMT
Content-Type: text/plain
Content-Length: 2
Connection: keep-alive
X-HTTP-LEVEL-HEADER: 1
X-ANOTHER-HTTP-LEVEL-HEADER: 1
OK
For the server listening on port 8081, there is an add_header directive in the server{} block but not in its child location / block. The header defined in the server{} block overrides the two headers defined in the http{} context:
% curl -is localhost:8081
HTTP/1.1 200 OK
Server: nginx/1.21.5
Date: Mon, 21 Feb 2022 10:12:20 GMT
Content-Type: text/plain
Content-Length: 2
Connection: keep-alive
X-SERVER-LEVEL-HEADER: 1
OK
In the child location /test block, there is an add_header directive and it overrides both the header from its parent server{} block and the two headers from the http{} context:
% curl -is localhost:8081/test
HTTP/1.1 200 OK
Server: nginx/1.21.5
Date: Mon, 21 Feb 2022 10:12:25 GMT
Content-Type: text/plain
Content-Length: 2
Connection: keep-alive
X-LOCATION-LEVEL-HEADER: 1
OK
If we want a location{} block to preserve the headers defined in its parent contexts along with any headers defined locally, we must redefine the parent headers within the location{} block. That’s what we’ve done in the location /correct block:
% curl -is localhost:8081/correct
HTTP/1.1 200 OK
Server: nginx/1.21.5
Date: Mon, 21 Feb 2022 10:12:30 GMT
Content-Type: text/plain
Content-Length: 2
Connection: keep-alive
X-HTTP-LEVEL-HEADER: 1
X-ANOTHER-HTTP-LEVEL-HEADER: 1
X-SERVER-LEVEL-HEADER: 1
X-LOCATION-LEVEL-HEADER: 1
OK
Mistake 5: The proxy_buffering off Directive
Proxy buffering is enabled by default in NGINX (the proxy_buffering directive is set to on). Proxy buffering means that NGINX stores the response from a server in internal buffers as it comes in, and doesn’t start sending data to the client until the entire response is buffered. Buffering helps to optimize performance with slow clients – because NGINX buffers the response for as long as it takes for the client to retrieve all of it, the proxied server can return its response as quickly as possible and return to being available to serve other requests.
When proxy buffering is disabled, NGINX buffers only the first part of a server’s response before starting to send it to the client, in a buffer that by default is one memory page in size (4 KB or 8 KB depending on the operating system). This is usually just enough space for the response header. NGINX then sends the response to the client synchronously as it receives it, forcing the server to sit idle as it waits until NGINX can accept the next response segment.
So we’re surprised by how often we see proxy_buffering off in configurations. Perhaps it is intended to reduce the latency experienced by clients, but the effect is negligible while the side effects are numerous: with proxy buffering disabled, rate limiting and caching don’t work even if configured, performance suffers, and so on.
There are only a small number of use cases where disabling proxy buffering might make sense (such as long polling), so we strongly discourage changing the default. For more information, see the NGINX Plus Admin Guide.
Mistake 6: Improper Use of the if Directive
The if directive is tricky to use, especially in location{} blocks. It often doesn’t do what you expect and can even cause segfaults. In fact, it’s so tricky that there’s an article titled If is Evil in the NGINX Wiki, and we direct you there for a detailed discussion of the problems and how to avoid them.
In general, the only directives you can always use safely within an if{} block are return and rewrite. The following example uses if to detect requests that include the X‑Test header (but this can be any condition you want to test for). NGINX returns the 430 (Request Header Fields Too Large) error, intercepts it at the named location @error_430 and proxies the request to the upstream group named b.
location / {
    error_page 430 = @error_430;
    if ($http_x_test) {
        return 430;
    }

    proxy_pass http://a;
}

location @error_430 {
    proxy_pass b;
}
For this and many other uses of if, it’s often possible to avoid the directive altogether. In the following example, when the request includes the X‑Test header the map{} block sets the $upstream_name variable to b and the request is proxied to the upstream group with that name.
map $http_x_test $upstream_name {
    default "b";
    ""      "a";
}

# ...

location / {
    proxy_pass http://$upstream_name;
}
Mistake 7: Excessive Health Checks
It is quite common to configure multiple virtual servers to proxy requests to the same upstream group (in other words, to include the identical proxy_pass directive in multiple server{} blocks). The mistake in this situation is to include a health_check directive in every server{} block. This just creates more load on the upstream servers without yielding any additional information.
At the risk of being obvious, the fix is to define just one health check per upstream{} block. Here we define the health check for the upstream group named b in a special named location, complete with appropriate timeouts and header settings.
location / {
    proxy_set_header Host $host;
    proxy_set_header "Connection" "";
    proxy_http_version 1.1;
    proxy_pass http://b;
}

location @health_check {
    health_check;
    proxy_connect_timeout 2s;
    proxy_read_timeout 3s;
    proxy_set_header Host example.com;
    proxy_pass http://b;
}
In complex configurations, it can further simplify management to group all health‑check locations in a single virtual server along with the NGINX Plus API and dashboard, as in this example.
server {
	listen 8080;

	location / {
	    # …
 	}

	location @health_check_b {
	    health_check;
	    proxy_connect_timeout 2s;
	    proxy_read_timeout 3s;
	    proxy_set_header Host example.com;
	    proxy_pass http://b;
	}

	location @health_check_c {
	    health_check;
	    proxy_connect_timeout 2s;
	    proxy_read_timeout 3s;
	    proxy_set_header Host api.example.com;
	    proxy_pass http://c;
	}

	location /api {
	    api write=on;
	    # directives limiting access to the API (see 'Mistake 8' below)
	}

	location = /dashboard.html {
	    root   /usr/share/nginx/html;
	}
}
For more information about health checks for HTTP, TCP, UDP, and gRPC servers, see the NGINX Plus Admin Guide.
Mistake 8: Unsecured Access to Metrics
Basic metrics about NGINX operation are available from the Stub Status module. For NGINX Plus, you can also gather a much more extensive set of metrics with the NGINX Plus API. Enable metrics collection by including the stub_status or api directive, respectively, in a server{} or location{} block, which becomes the URL you then access to view the metrics. (For the NGINX Plus API, you also need to configure shared memory zones for the NGINX entities – virtual servers, upstream groups, caches, and so on – for which you want to collect metrics; see the instructions in the NGINX Plus Admin Guide.)
Some of the metrics are sensitive information that can be used to attack your website or the apps proxied by NGINX, and the mistake we sometimes see in user configurations is failure to restrict access to the corresponding URL. Here we look at some of the ways you can secure the metrics. We’ll use stub_status in the first examples.
With the following configuration, anyone on the Internet can access the metrics at http://example.com/basic_status.
server {
    listen 80;
    server_name example.com;

    location = /basic_status {
        stub_status;
    }
}
Protect Metrics with HTTP Basic Authentication
To password‑protect the metrics with HTTP Basic Authentication, include the auth_basic and auth_basic_user_file directives. The file (here, .htpasswd) lists the usernames and passwords of clients who can log in to see the metrics:
server {
    listen 80;
    server_name example.com;

    location = /basic_status {
        auth_basic “closed site”;
        auth_basic_user_file conf.d/.htpasswd;
        stub_status;
    }
}
Protect Metrics with the allow and deny Directives
If you don’t want authorized users to have to log in, and you know the IP addresses from which they will access the metrics, another option is the allow directive. You can specify individual IPv4 and IPv6 addresses and CIDR ranges. The deny all directive prevents access from any other addresses.
server {
    listen 80;
    server_name example.com;

    location = /basic_status {
        allow 192.168.1.0/24;
        allow 10.1.1.0/16;
        allow 2001:0db8::/32;
        allow 96.1.2.23/32;
        deny  all;
        stub_status;
    }
}
Combine the Two Methods
What if we want to combine both methods? We can allow clients to access the metrics from specific addresses without a password and still require login for clients coming from different addresses. For this we use the satisfy any directive. It tells NGINX to allow access to clients who either log in with HTTP Basic auth credentials or are using a preapproved IP address. For extra security, you can set satisfy to all to require even people who come from specific addresses to log in.
server {
    listen 80;
    server_name monitor.example.com;

    location = /basic_status {
        satisfy any;

        auth_basic “closed site”;
        auth_basic_user_file conf.d/.htpasswd;
        allow 192.168.1.0/24;
        allow 10.1.1.0/16;
        allow 2001:0db8::/32;
        allow 96.1.2.23/32;
        deny  all;
        stub_status;
    }
}
With NGINX Plus, you use the same techniques to limit access to the NGINX Plus API endpoint (http://monitor.example.com:8080/api/ in the following example) as well as the live activity monitoring dashboard at http://monitor.example.com/dashboard.html.
This configuration permits access without a password only to clients coming from the 96.1.2.23/32 network or localhost. Because the directives are defined at the server{} level, the same restrictions apply to both the API and the dashboard. As a side note, the write=on parameter to api means these clients can also use the API to make configuration changes.
For more information about configuring the API and dashboard, see the NGINX Plus Admin Guide.
server {
    listen 8080;
    server_name monitor.example.com;

    satisfy any;
    auth_basic “closed site”;
    auth_basic_user_file conf.d/.htpasswd;
    allow 127.0.0.1/32;
    allow 96.1.2.23/32;
    deny  all;

    location = /api/ {
        api write=on;
    }

    location = /dashboard.html {
        root /usr/share/nginx/html;
    }
}
Mistake 9: Using ip_hash When All Traffic Comes from the Same /24 CIDR Block
The ip_hash algorithm load balances traffic across the servers in an upstream{} block, based on a hash of the client IP address. The hashing key is the first three octets of an IPv4 address or the entire IPv6 address. The method establishes session persistence, which means that requests from a client are always passed to the same server except when the server is unavailable.
Suppose that we have deployed NGINX as a reverse proxy in a virtual private network configured for high availability. We put various firewalls, routers, Layer 4 load balancers, and gateways in front of NGINX to accept traffic from different sources (the internal network, partner networks, the Internet, and so on) and pass it to NGINX for reverse proxying to upstream servers. Here’s the initial NGINX configuration:
http {

    upstream {
        ip_hash;
        server 10.10.20.105:8080;
        server 10.10.20.106:8080;
        server 10.10.20.108:8080;
    }

    server {# …}
}
But it turns out there’s a problem: all of the “intercepting” devices are on the same 10.10.0.0/24 network, so to NGINX it looks like all traffic comes from addresses in that CIDR range. Remember that the ip_hash algorithm hashes the first three octets of an IPv4 address. In our deployment, the first three octets are the same – 10.10.0 – for every client, so the hash is the same for all of them and there’s no basis for distributing traffic to different servers.
The fix is to use the hash algorithm instead with the $binary_remote_addr variable as the hash key. That variable captures the complete client address, converting it into a binary representation that is 4 bytes for an IPv4 address and 16 bytes for an IPv6 address. Now the hash is different for each intercepting device and load balancing works as expected.
We also include the consistent parameter to use the ketama hashing method instead of the default. This greatly reduces the number of keys that get remapped to a different upstream server when the set of servers changes, which yields a higher cache hit ratio for caching servers.
http {
    upstream {
        hash $binary_remote_addr consistent;
        server 10.10.20.105:8080;
        server 10.10.20.106:8080;
        server 10.10.20.108:8080;
    }

    server {# …}
}
Mistake 10: Not Taking Advantage of Upstream Groups
Suppose you are employing NGINX for one of the simplest use cases, as a reverse proxy for a single NodeJS‑based backend application listening on port 3000. A common configuration might look like this:
http {

    server {
        listen 80;
        server_name example.com;

        location / {
            proxy_set_header Host $host;
            proxy_pass http://localhost:3000/;
        }
    }
}
Straightforward, right? The proxy_pass directive tells NGINX where to send requests from clients. All NGINX needs to do is resolve the hostname to an IPv4 or IPv6 address. Once the connection is established NGINX forwards requests to that server.
The mistake here is to assume that because there’s only one server – and thus no reason to configure load balancing – it’s pointless to create an upstream{} block. In fact, an upstream{} block unlocks several features that improve performance, as illustrated by this configuration:
http {

    upstream node_backend {
        zone upstreams 64K;
        server 127.0.0.1:3000 max_fails=1 fail_timeout=2s;
        keepalive 2;
    }

    server {
        listen 80;
        server_name example.com;

        location / {
            proxy_set_header Host $host;
            proxy_pass http://node_backend/;
            proxy_next_upstream error timeout http_500;

        }
    }
}
The zone directive establishes a shared memory zone where all NGINX worker processes on the host can access configuration and state information about the upstream servers. Several upstream groups can share the zone. With NGINX Plus, the zone also enables you to use the NGINX Plus API to change the servers in an upstream group and the settings for individual servers without restarting NGINX. For details, see the NGINX Plus Admin Guide.
The server directive has several parameters you can use to tune server behavior. In this example we have changed the conditions NGINX uses to determine that a server is unhealthy and thus ineligible to accept requests. Here it considers a server unhealthy if a communication attempt fails even once within each 2-second period (instead of the default of once in a 10-second period).
We’re combining this setting with the proxy_next_upstream directive to configure what NGINX considers a failed communication attempt, in which case it passes requests to the next server in the upstream group. To the default error and timeout conditions we add http_500 so that NGINX considers an HTTP 500 (Internal Server Error) code from an upstream server to represent a failed attempt.
The keepalive directive sets the number of idle keepalive connections to upstream servers preserved in the cache of each worker process. We already discussed the benefits in Mistake 3: Not Enabling Keepalive Connections to Upstream Servers.
With NGINX Plus you can configure additional features with upstream groups:
-
We mentioned above that NGINX Open Source resolves server hostnames to IP addresses only once, during startup. The
resolveparameter to the server directive enables NGINX Plus to monitor changes to the IP addresses that correspond to an upstream server’s domain name, and automatically modify the upstream configuration without the need to restart.The
serviceparameter further enables NGINX Plus to use DNSSRVrecords, which include information about port numbers, weights, and priorities. This is critical in microservices environments where the port numbers of services are often dynamically assigned.For more information about resolving server addresses, see Using DNS for Service Discovery with NGINX and NGINX Plus on our blog.
-
The
slow_startparameter to the server directive enables NGINX Plus to gradually increase the volume of requests it sends to a server that is newly considered healthy and available to accept requests. This prevents a sudden flood of requests that might overwhelm the server and cause it to fail again. -
The
queuedirective enables NGINX Plus to place requests in a queue when it’s not possible to select an upstream server to service the request, instead of returning an error to the client immediately.
Resources
- Creating NGINX Plus and NGINX Configuration Files in the NGINX Plus Admin Guide
- Gixy, an NGINX configuration analyzer on GitHub
- NGINX Amplify, which includes the Analyzer tool
To try NGINX Plus, start your free 30-day trial today or contact us to discuss your use cases.
Nginx – очень популярный веб-сервер в наши дни.
В этой статье мы расскажем вам о некоторых распространенных ошибках при работе веб-сервера Nginx и возможных решениях.
Это не полный список.
Если вы все еще не можете устранить ошибку, попробовав предложенные решения, пожалуйста, проверьте логи сервера Nginx в каталоге /var/log/nginx/ и поищите в Google, чтобы отладить проблему.
Содержание
- Unable to connect/Refused to Connect
- The Connection Has Timed Out
- 404 Not Found
- 403 Forbidden
- 500 Internal Server Error
- Nginx показывает страницу по умолчанию
- 504 Gateway time-out
- Размер памяти исчерпан
- PR_END_OF_FILE_ERROR
- Resource temporarily unavailable
- Два файла виртуального хоста для одного и того же сайта
- PHP-FPM Connection reset by peer
- Утечки сокетов Nginx
- Заключение
Unable to connect/Refused to Connect
Если при попытке получить доступ к вашему сайту вы видите следующую ошибку:
Firefox can’t establish a connection to the server at www.example.com
или
www.example.com refused to connect
или
The site can't be reached, www.example.com unexpectedly closed the connection.
Это может быть потому, что:
- Nginx не запущен. Вы можете проверить состояние Nginx с помощью sudo systemctl status nginx. Запустите Nginx с помощью sudo systemctl start nginx. Если Nginx не удается запустить, запустите sudo nginx -t, чтобы выяснить, нет ли ошибок в вашем конфигурационном файле. И проверьте логи (sudo journalctl -eu nginx), чтобы выяснить, почему он не запускается.
- Брандмауэр блокирует порты 80 и 443. Если вы используете брандмауэр UFW на Debian/Ubuntu, выполните sudo ufw allow 80,443/tcp, чтобы открыть TCP порты 80 и 443. Если вы используете Firewalld на RHEL/CentOS/Rocky Linux/AlmaLinux, выполните sudo firewall-cmd –permanent –add-service={http,https}, затем sudo systemctl reload firewalld, чтобы открыть TCP порты 80 и 443.
- Fail2ban. Если ваш сервер использует fail2ban для блокировки вредоносных запросов, возможно, fail2ban запретил ваш IP-адрес. Выполните команду sudo journalctl -eu fail2ban, чтобы проверить, не заблокирован ли ваш IP-адрес. Вы можете добавить свой IP-адрес в список fail2ban ignoreip, чтобы он больше не был забанен.
- Nginx не прослушивает нужный сетевой интерфейс. Например, Nginx не прослушивает публичный IP-адрес сервера.
The Connection Has Timed Out
Это может означать, что ваш сервер находится в автономном режиме или Nginx работает неправильно.
Однажды у меня возникла проблема нехватки памяти, из-за чего Nginx не смог запустить рабочие процессы.
Если вы увидите следующее сообщение об ошибке в файле /var/log/nginx/error.log, вашему серверу не хватает памяти:
fork() failed while spawning "worker process" (12: Cannot allocate memory)
404 Not Found
404 not found означает, что Nginx не может найти ресурсы, которые запрашивает ваш веб-браузер.
🌐 Как создать пользовательскую страницу ошибки 404 в NGINX
Причина может быть следующей:
- Корневой каталог web не существует на вашем сервере. В Nginx корневой веб-каталог настраивается с помощью директивы root, например, так: root /usr/share/nginx/linuxbabe.com/;. Убедитесь, что файлы вашего сайта (HTML, CSS, JavaScript, PHP) хранятся в правильном каталоге.
- PHP-FPM не запущен. Вы можете проверить статус PHP-FPM с помощью sudo systemctl status php7.4-fpm (Debian/Ubuntu) или sudo systemctl status php-fpm.
- Вы забыли включить директиву try_files $uri /index.php$is_args$args; в конфигурационный файл сервера Nginx. Эта директива необходима для обработки PHP-кода.
- На вашем сервере нет свободного дискового пространства. Попробуйте освободить немного дискового пространства. Вы можете использовать утилиту ncdu (sudo apt install ncdu или sudo dnf install ncdu), чтобы узнать, какие каталоги занимают огромное количество дискового пространства.
403 Forbidden
Эта ошибка означает, что вам не разрешен доступ к ресурсам запроса.
Возможный сценарий включает:
- Администратор сайта блокирует публичный доступ к запрашиваемым ресурсам с помощью белого списка IP-адресов или других методов.
- На сайте может использоваться брандмауэр веб-приложения, например ModSecurity, который обнаружил атаку вторжения, поэтому заблокировал запрос.
Некоторые веб-приложения могут показывать другое сообщение об ошибке, когда происходит запрет 403. Оно может сказать вам, что “secure connection failed, хотя причина та же.
500 Internal Server Error
Это означает, что в веб-приложении произошла какая-то ошибка.
Это может быть следующее
- Сервер базы данных не работает. Проверьте состояние MySQL/MariaDB с помощью sudo systemctl status mysql. Запустите его с помощью sudo systemctl start mysql. Запустите sudo journalctl -eu mysql, чтобы выяснить, почему он не запускается. Процесс MySQL/MariaDB может быть завершен из-за проблем с нехваткой памяти.
- Вы не настроили Nginx на использование PHP-FPM, поэтому Nginx не знает, как выполнять PHP-код.
- Если ваше веб-приложение имеет встроенный кэш, вы можете попробовать очистить кэш приложения, чтобы исправить эту ошибку.
- Ваше веб-приложение может создавать свой собственный журнал ошибок. Проверьте этот файл журнала, чтобы отладить эту ошибку.
- Возможно, в вашем веб-приложении есть режим отладки. Включите его, и вы увидите более подробные сообщения об ошибках на веб-странице. Например, вы можете включить режим отладки в почтовом сервере хостинг-платформы Modoboa, установив DEBUG = True в файле /srv/modoboa/instance/instance/settings.py.
- PHP-FPM может быть перегружен. Проверьте журнал PHP-FPM (например, /var/log/php7.4-fpm.log). Если вы обнаружили предупреждение [pool www] seems busy (возможно, вам нужно увеличить pm.start_servers, или pm.min/max_spare_servers), вам нужно выделить больше ресурсов для PHP-FPM.
- Иногда перезагрузка PHP-FPM (sudo systemctl reload php7.4-fpm) может исправить ошибку.
Nginx показывает страницу по умолчанию
Если вы пытаетесь настроить виртуальный хост Nginx и при вводе доменного имени в веб-браузере отображается страница Nginx по умолчанию, это может быть следующее
- Вы не использовали реальное доменное имя для директивы server_name в виртуальном хосте Nginx.
- Вы забыли перезагрузить Nginx.
504 Gateway time-out
Это означает, что апстрим, такой как PHP-FPM/MySQL/MariaDB, не может обработать запрос достаточно быстро.
Вы можете попробовать перезапустить PHP-FPM, чтобы временно исправить ошибку, но лучше начать настраивать PHP-FPM/MySQL/MariaDB для более быстрой работы.
Вот конфигурация InnoDB в моем файле /etc/mysql/mariadb.conf.d/50-server.cnf.
Это очень простая настройка производительности.
innodb_buffer_pool_size = 1024M
innodb_buffer_pool_dump_at_shutdown = ON
innodb_buffer_pool_load_at_startup  = ON
innodb_log_file_size = 512M
innodb_log_buffer_size = 8M

#Improving disk I/O performance
innodb_file_per_table = 1
innodb_open_files = 400
innodb_io_capacity = 400
innodb_flush_method = O_DIRECT
innodb_read_io_threads = 64
innodb_write_io_threads = 64
innodb_buffer_pool_instances = 3
Где:
- InnoDB buffer pool size должен быть не менее половины вашей оперативной памяти. (Для VPS с небольшим объемом оперативной памяти я рекомендую установить размер буферного пула на меньшее значение, например 400M, иначе ваш VPS будет работать без оперативной памяти).
- InnoDB log file size должен составлять 25% от размера буферного пула.
- Установите потоки ввода-вывода для чтения и записи на максимум (64).
- Заставьте MariaDB использовать 3 экземпляра буферного пула InnoDB. Количество экземпляров должно соответствовать количеству ядер процессора в вашей системе.
- После сохранения изменений перезапустите MariaDB.
После сохранения изменений перезапустите MariaDB.
sudo systemctl restart mariadb
Вы также можете установить более длительное значение тайм-аута в Nginx, чтобы уменьшить вероятность тайм-аута шлюза.
Отредактируйте файл виртуального хоста Nginx и добавьте следующие строки в блок server {…}.
  proxy_connect_timeout       600;
  proxy_send_timeout          600;
  proxy_read_timeout          600;
  send_timeout                600;
Если вы используете Nginx с PHP-FPM, то установите для параметра fastcgi_read_timeout большее значение, например 300 секунд.
По умолчанию это 60 секунд.
 location ~ .php$ {
     try_files $uri /index.php$is_args$args;
     include snippets/fastcgi-php.conf;
     fastcgi_split_path_info ^(.+.php)(/.+)$;

     fastcgi_pass unix:/var/run/php/php7.4-fpm.sock;
     fastcgi_param SCRIPT_FILENAME $document_root$fastcgi_script_name;
     include fastcgi_params;
     fastcgi_read_timeout 300;
 }
Затем перезагрузите Nginx.
sudo systemctl reload nginx
PHP-FPM также имеет максимальное время выполнения для каждого скрипта.
Отредактируйте файл php.ini.
sudo nano /etc/php/7.4/fpm/php.ini
Вы можете увеличить это значение до 300 секунд.
max_execution_time = 300
Затем перезапустите PHP-FPM
sudo systemctl restart php7.4-fpm
Размер памяти исчерпан
Если вы видите следующую строку в журнале ошибок Nginx, это означает, что PHP достиг лимита памяти в 128 МБ.
PHP Fatal error: Allowed memory size of 134217728 bytes exhausted (tried to allocate 57134520 bytes)
Вы можете отредактировать файл php.ini (/etc/php/7.4/fpm/php.ini) и увеличить лимит памяти PHP.
memory_limit = 512M
Затем перезапустите PHP7.4-FPM.
sudo systemctl restart php7.4-fpm
Если ошибка все еще существует, скорее всего, в вашем веб-приложении плохой PHP-код, который потребляет много оперативной памяти.
PR_END_OF_FILE_ERROR
- Вы настроили Nginx на перенаправление HTTP-запросов на HTTPS, но в Nginx нет блока сервера, обслуживающего HTTPS-запросы.
- Может быть, Nginx не запущен?
- Иногда основной бинарник Nginx запущен, но рабочий процесс может не работать и завершиться по разным причинам. Для отладки проверьте логи ошибок Nginx (/var/log/nginx/error.log).
Resource temporarily unavailable
Некоторые пользователи могут найти следующую ошибку в файле логов ошибок Nginx (в разделе /var/log/nginx/).
connect() to unix:/run/php/php7.4-fpm.sock failed (11: Resource temporarily unavailable)
Обычно это означает, что на вашем сайте много посетителей и PHP-FPM не справляется с обработкой огромного количества запросов.
Вы можете изменить количество дочерних процессов PHP-FPM, чтобы он мог обрабатывать больше запросов.
Отредактируйте файл PHP-FPM www.conf.
(Путь к файлу зависит от дистрибутива Linux).
sudo /etc/php/7.4/fpm/pool.d/www.conf
По умолчанию конфигурация дочернего процесса выглядит следующим образом:
pm = dynamic
pm.max_children = 5
pm.start_servers = 2
pm.min_spare_servers = 1
pm.max_spare_servers = 3
Приведенная выше конфигурация означает.
- PHP-FPM динамически создает дочерние процессы. Нет фиксированного количества дочерних процессов.
- Создается не более 5 дочерних процессов.
- При запуске PHP-FPM запускаются 2 дочерних процесса.
- Есть как минимум 1 незанятый процесс.
- Максимум 3 неработающих процесса.
pm = dynamic
pm.max_children = 20
pm.start_servers = 8
pm.min_spare_servers = 4
pm.max_spare_servers = 12
Убедитесь, что у вас достаточно оперативной памяти для запуска дополнительных дочерних процессов.
Сохраните и закройте файл.
Затем перезапустите PHP-FPM. (Возможно, вам потребуется изменить номер версии).
sudo systemctl restart php7.4-fpm
Чтобы следить за состоянием PHP-FPM, вы можете включить страницу status .
Найдите следующую строку в файле PHP-FPM www.conf.
Обратите внимание, что
;pm.status_path = /status
Уберите точку с запятой, чтобы включить страницу состояния PHP-FPM.
Затем перезапустите PHP-FPM.
sudo systemctl restart php7.4-fpm
Затем отредактируйте файл виртуального хоста Nginx.
Добавьте следующие строки.
Директивы allow и deny используются для ограничения доступа.
Только IP-адреса из “белого списка” могут получить доступ к странице состояния.
location ~ ^/(status|ping)$ {
        allow 127.0.0.1;
        allow your_other_IP_Address;
        deny all;

        fastcgi_param SCRIPT_FILENAME $document_root$fastcgi_script_name;
        fastcgi_index index.php;
        include fastcgi_params;
        #fastcgi_pass 127.0.0.1:9000;
        fastcgi_pass   unix:/run/php/php7.4-fpm.sock;
}
Сохраните и закройте файл. Затем протестируйте конфигурацию Nginx.
sudo nginx -t
Если проверка прошла успешно, перезагрузите Nginx, чтобы изменения вступили в силу.
sudo systemctl reload nginx
В файле PHP-FPM www.conf дается хорошее объяснение того, что означает каждый параметр.
Если PHP-FPM очень занят и не может обслужить запрос немедленно, он поставит его в очередь.
По умолчанию может быть не более 511 ожидающих запросов, определяемых параметром listen.backlog.
listen.backlog = 511
Если вы видите следующее значение на странице состояния PHP-FPM, это означает, что в очереди еще не было ни одного запроса, т.е. ваш PHP-FPM может быстро обрабатывать запросы.
listen queue:         0
max listen queue:     0
Если в очереди 511 ожидающих запросов, это означает, что ваш PHP-FPM очень загружен, поэтому вам следует увеличить количество дочерних процессов.
Вам также может понадобиться изменить параметр ядра Linux net.core.somaxconn, который определяет максимальное количество соединений, разрешенных к файлу сокетов в Linux, например, к файлу сокетов PHP-FPM Unix.
По умолчанию его значение равно 128 до ядра 5.4 и 4096 начиная с ядра 5.4.
$ sysctl net.core.somaxconn
net.core.somaxconn = 128
Если у вас сайт с высокой посещаемостью, вы можете использовать большое значение.
Отредактируйте файл /etc/sysctl.conf.
sudo nano /etc/sysctl.cnf
Добавьте следующие две строки.
net.core.somaxconn = 20000
net.core.netdev_max_backlog = 65535
Сохраните и закройте файл. Затем примените настройки.
sudo sysctl -p
Примечание: Если ваш сервер имеет достаточно оперативной памяти, вы можете выделить фиксированное количество дочерних процессов для PHP-FPM, как показано ниже.
Два файла виртуального хоста для одного и того же сайта
Если вы запустите sudo nginx -t и увидите следующее предупреждение.
nginx: [warn] conflicting server name "example.com" on [::]:443, ignored
nginx: [warn] conflicting server name "example.com" on 0.0.0.0:443, ignored
Это означает, что есть два файла виртуальных хостов, содержащих одну и ту же конфигурацию server_name.
Не создавайте два файла виртуальных хостов для одного сайта.
PHP-FPM Connection reset by peer
В файле логов ошибок Nginx отображается следующее сообщение.
recv() failed (104: Connection reset by peer) while reading response header from upstream
Это может быть вызвано перезапуском PHP-FPM.
Если он перезапущен вручную самостоятельно, то вы можете игнорировать эту ошибку.
Утечки сокетов Nginx
Если вы обнаружили следующее сообщение об ошибке в файле /var/log/nginx/error.log, значит, у вашего Nginx проблема с утечкой сокетов.
2021/09/28 13:27:41 [alert] 321#321: *120606 open socket #16 left in connection 163
2021/09/28 13:27:41 [alert] 321#321: *120629 open socket #34 left in connection 188
2021/09/28 13:27:41 [alert] 321#321: *120622 open socket #9 left in connection 213
2021/09/28 13:27:41 [alert] 321#321: *120628 open socket #25 left in connection 217
2021/09/28 13:27:41 [alert] 321#321: *120605 open socket #15 left in connection 244
2021/09/28 13:27:41 [alert] 321#321: *120614 open socket #41 left in connection 245
2021/09/28 13:27:41 [alert] 321#321: *120631 open socket #24 left in connection 255
2021/09/28 13:27:41 [alert] 321#321: *120616 open socket #23 left in connection 258
2021/09/28 13:27:41 [alert] 321#321: *120615 open socket #42 left in connection 269
2021/09/28 13:27:41 [alert] 321#321: aborting
Вы можете перезапустить ОС, чтобы решить эту проблему.
Если это не помогает, вам нужно скомпилировать отладочную версию Nginx, которая покажет вам отладочную информацию в логах.
Заключение
Надеюсь, эта статья помогла вам исправить распространенные ошибки веб-сервера Nginx.
см. также:
- 🌐 Как контролировать доступ на основе IP-адреса клиента в NGINX
- 🐉 Настройка http-сервера Kali Linux
- 🌐 Как парсить логи доступа nginx
- 🌐 Ограничение скорости определенных URL-адресов с Nginx
- 🛡️ Как использовать обратный прокси Nginx для ограничения внешних вызовов внутри веб-браузера
- 🔏 Как настроить Nginx с Let’s Encrypt с помощью ACME на Ubuntu
- 🌐 Как собрать NGINX с ModSecurity на Ubuntu сервере