
Call of Duty Warzone is hitting all the right accolades to be the most popular free-to-play Battle Royales. Infinity Ward put a lot of care this time around to craft a superb First-Person shooter experience. But like most multiplayer game titles, Warzone is filled with its fair share of bugs and glitches.
The error first started appearing after the controversial Dev Error-5476 had taken its toll on the game. Players reported seeing the error code instead of the usual Dev error message we mentioned beforehand. The issue mostly prevents players from connecting to the online server lobbies of the game.
The issue is commonly reported to occur on Playstation and PC. There are further reports where players can see the error occasionally pop up while matchmaking and downloading in-game updates.
So this problem might not be just on your end but for the entire player base of the game. Furthermore, the error code 6 or the Diver error is persistent on the Xbox version, too but in the format of Error Code 4 of Warzone.
Most of the time, it is a server-based issue or a network one most of the times. But there is no need to worry as now we are going to mention the causes of the Diver Error Code of the game in short detail.
Warzone might show Diver error code due to a few different reasons. But according to everything we can find in the communities and the Official Support Forums of the game, these reasons may even correlate with other potential errors of Warzone like the Dev Error-6065. The following are the core reasons for the diver error code:
- Network Issues: If your ISP is interfering with the network traffic or if the router settings are restricting Warzone’s permission to its online source data, then it may show an error Diver message.
- Interference from the System’s Security Application: Interference from your system’s security features like Windows Defender Firewall may block the much-needed linking of the main game directory to its important online resources, thus can cause the Diver error problem.
- The Corruption of Essential System Files: You may encounter Warzone error code Diver if the essential system files are corrupt. This corruption can happen via several factors, such as power outages and more. It can cause a malfunction of the vital files needed for the game’s proper operation, resulting in the issue.
- The Corrupt Installation of Modern Warfare: The game might show the error code Diver if its installation has gone corrupt. It will require you to reinstall the game, which we will cover later on in the guide. So the trouble might also be due to the removal of essential game files from the security software in your hardware.
8 Ways To Fix Code Diver in Warzone
We have gone ahead and managed to find 8 different ways to resolve this recurring problem of the game. It is all based on our research on multiple community platforms on Call of Duty and chatting with various players.
The following methods are carefully written to provide you with the best assistance possible. We encourage you to try all of these different mentioned methods and check which one works the best to alleviate this minor problem. So without further delay, here are the solutions to prevent the Error Code diver during Warzone.
Related to this: Error Code 47 in Warzone
Restarting Your System or Game Application
Often at times, games will face direct communication issues with their servers despite being in the clear. It will then result in the game prompting several error codes, which may disturb for no reason at all.
So basically, restarting the game or, even better, rebooting your system or console can be a simple way to get things running smoothly again. This is the oldest trick in the book to run classic or even newer games with ease.
Reset your Router Settings
In most scenarios, players will often go the extra mile of clearing the persistent error codes of the game. Most of the time, it is best to reset your modem or router to its Default Factory settings from its menu.
Call of Duty Warzone will constantly frustrate your gameplay with error codes such as the diver irritating you. These all can be fixed in a few minutes by navigating toward the main IP address of your modem. You will have to log in with the credentials provided on the back of the Router.
Alternatively, newer router models from ISPs come equipped with built-in reset buttons on the back of them. We suggest contacting your ISP provider support first for the exact instructions on how to reset the router. Make sure to reconfigure any custom settings back to their original form and check if the diver error code still exists.
Change Regional Servers in The Launcher
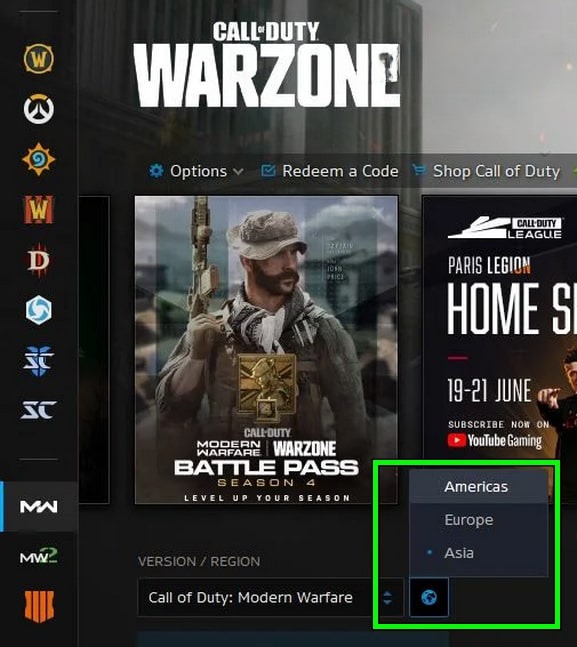
When it comes to an understanding of what kind of issue the diver error causes in Warzone. Players will more than likely want to check if the problem is consistent in other regions of the game.
Regional servers play a huge part in maintaining a stable connection for massive multiplayer titles. So it is generally a brilliant concept by Infinity Ward to have implemented dedicated region servers for players. You can swap to other regions and check if the error code is appearing in that specific region of the game.
The error code can be caused by a glitch in the different regional servers of the main game. So it is advised that you visit the Main Support Page of Activision as it details the status of servers in every region of the game. This will rule out any possibility that the diver error is being caused by server maintenance or downtime.
Making Sure the Game is Up-to-Date
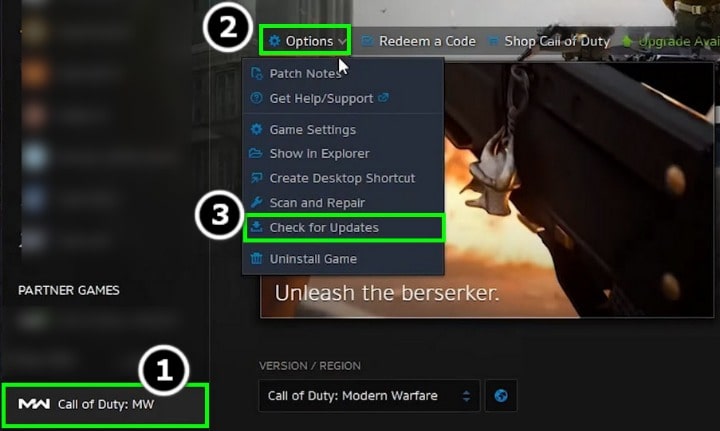
It is a universal rule at this point for online multiplayer games to be up-to-date so you can run them feasibly and with little to no issues. So with a game like Warzone, it will fail to work properly without the game itself not being updated to the latest build or patch. It will then cause incompatibility issues with its host servers.
- First of all, navigate to your library on the battle net and select the game. Make sure it is closed.
- Click on the Options drag-down menu at the top of the game page screen
- You should see an option that allows you to “Check for Updates.”
- If there are any updates available to download, make sure you accept them and wait for them to complete. Furthermore, if the problem persists, allow the game to compile shaders in the main menu and then launch it.
- Keeping the game up to date will prevent from future error codes randomly popping up.
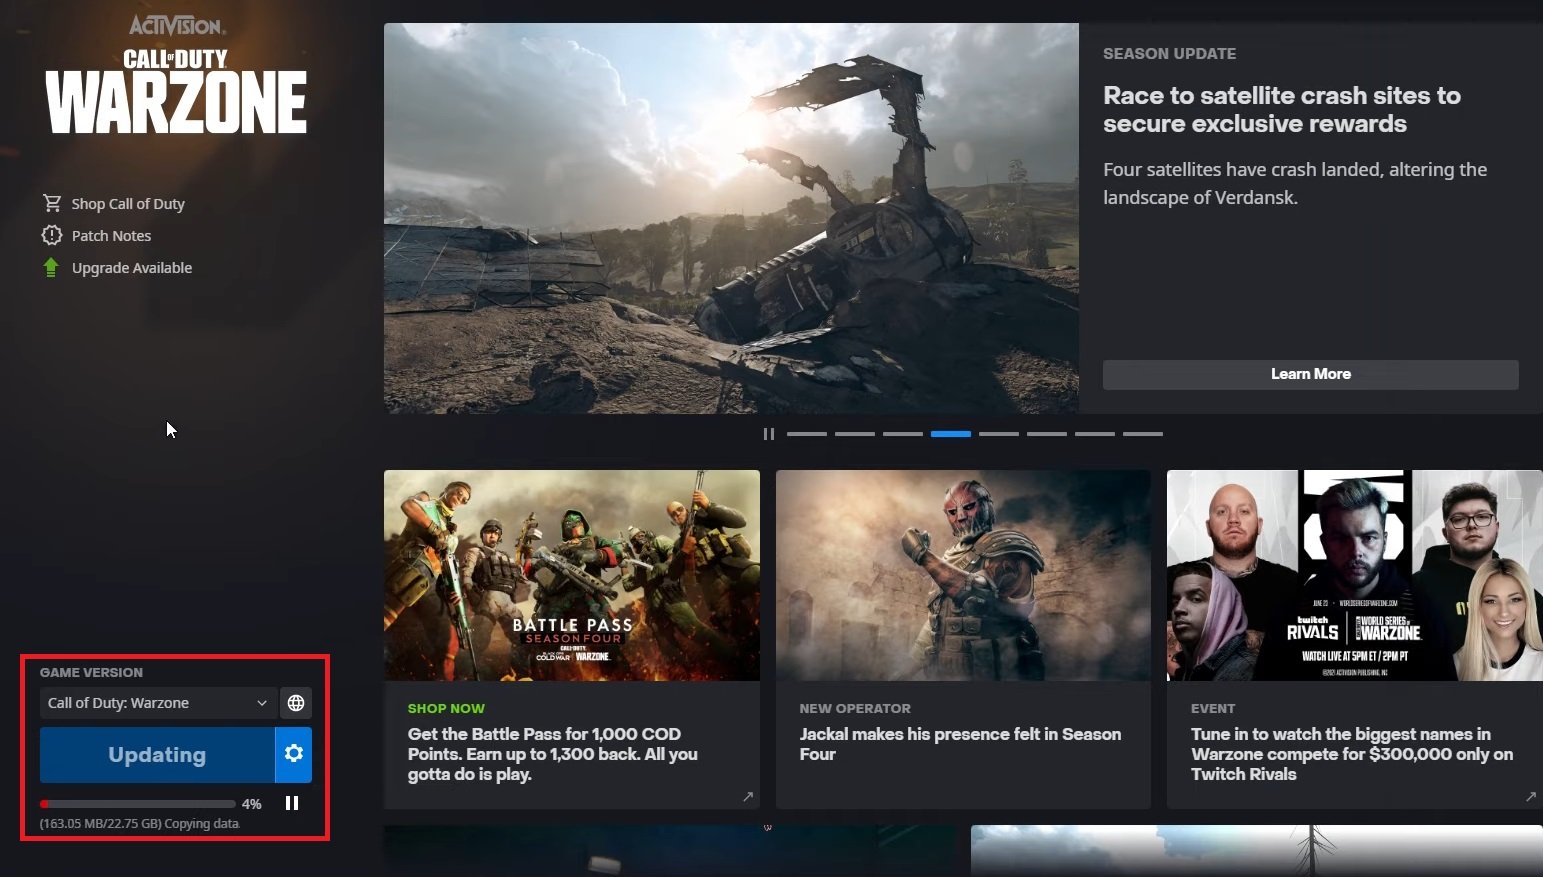
Scan & Repair the Game Files
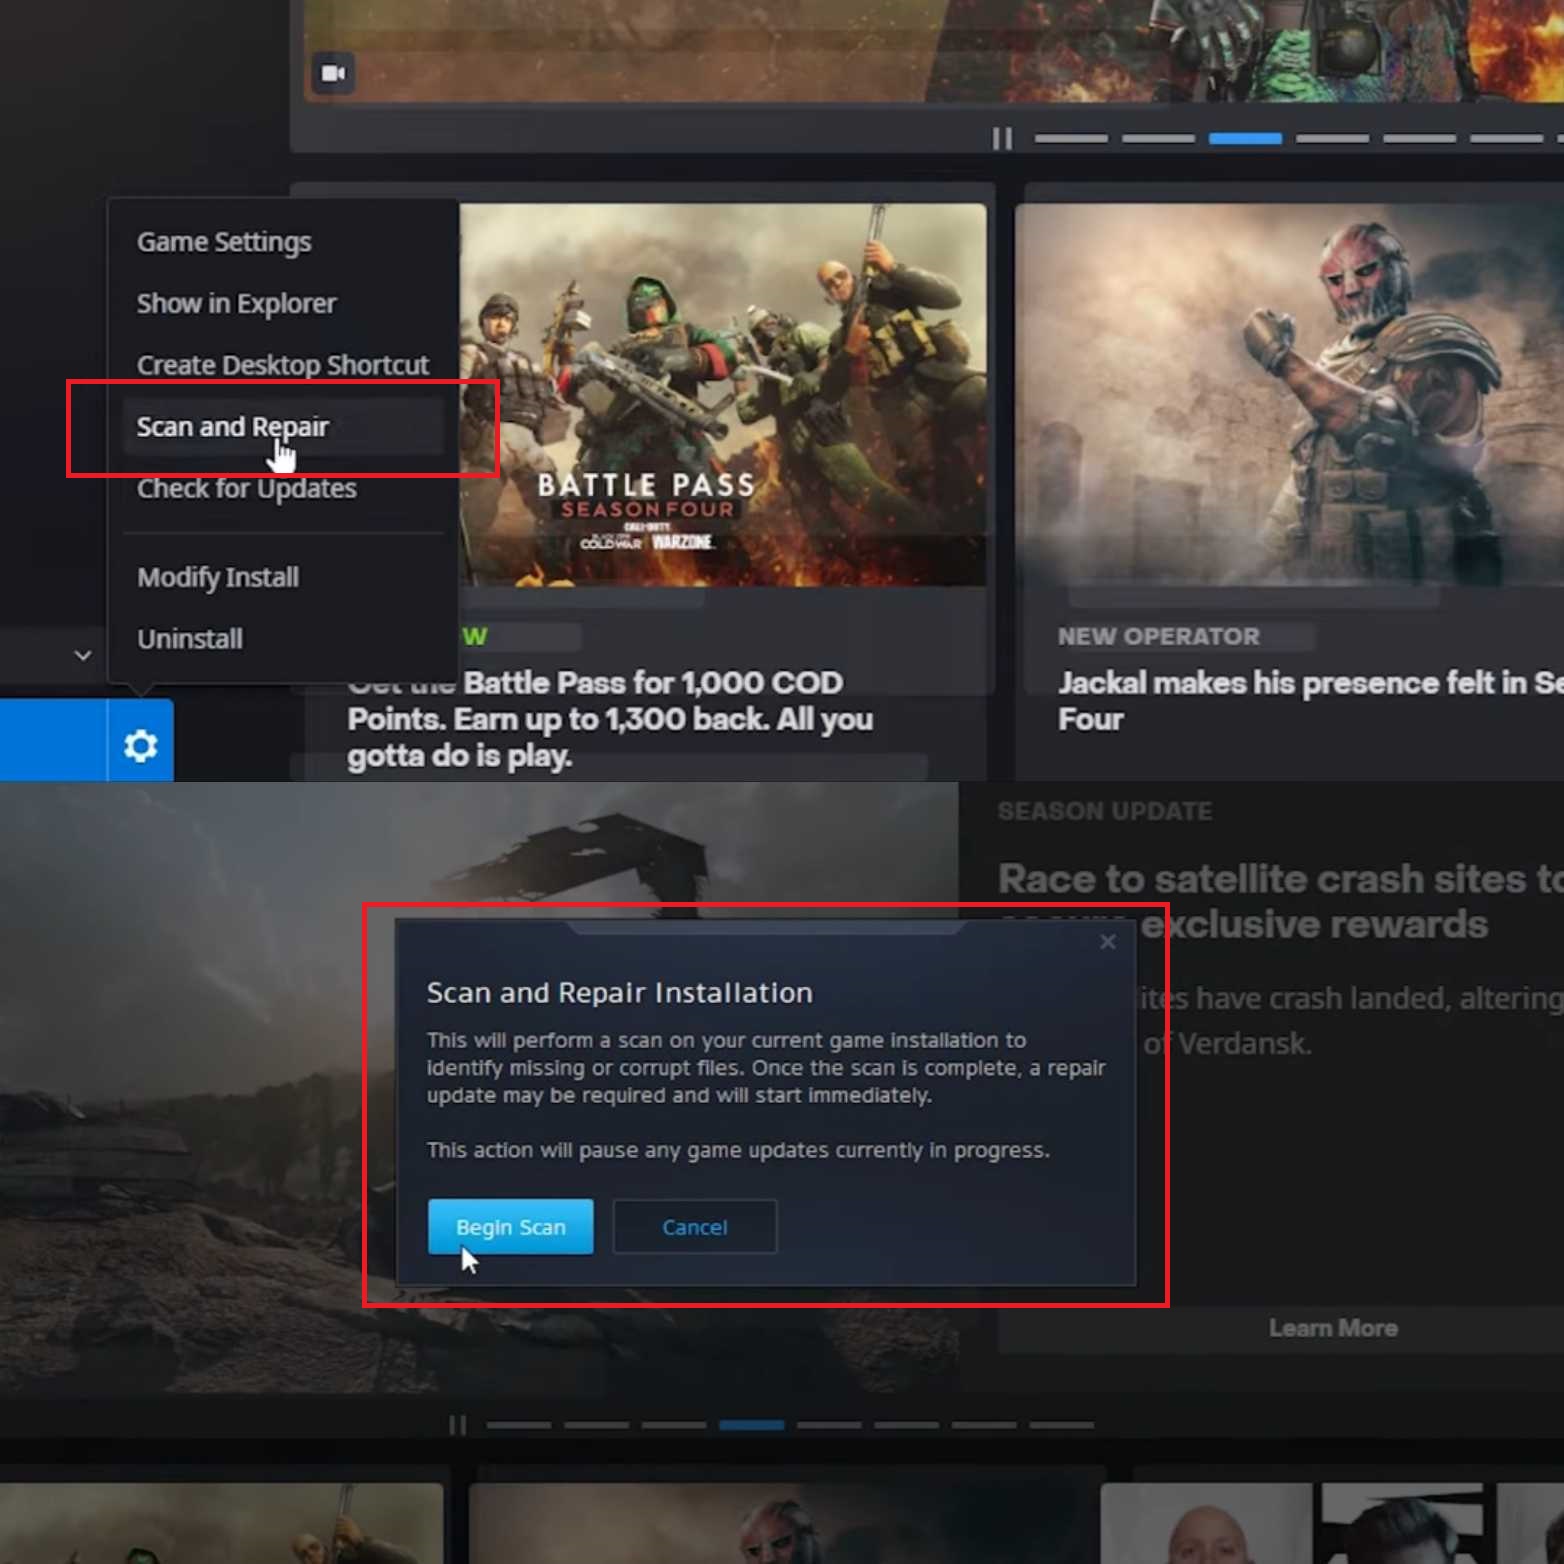
Contrary to popular belief, instead of checking for updates on the game or reinstalling it. You also have the option to Scan & Repair any missing or deleted files of the game. It is mandatory if you face some sort of power outage or the game shuts down abruptly in some way to ensure no files get corrupted.
These kinds of games need their respective data files to manage the system of the game. Of course, without them, COD: Warzone can not even function properly and will dish out random issues like the diver error code.
This is a relatively simple process. It is quite similar to the Steam Launcher’s File integrity Verification. Simply click on the game when it is not running. Open the drop-down menu as you would usually do to update the game but instead click on “Scan and Repair.” It will check the directory for any missing files of the game.
Update the System & Graphics Drivers
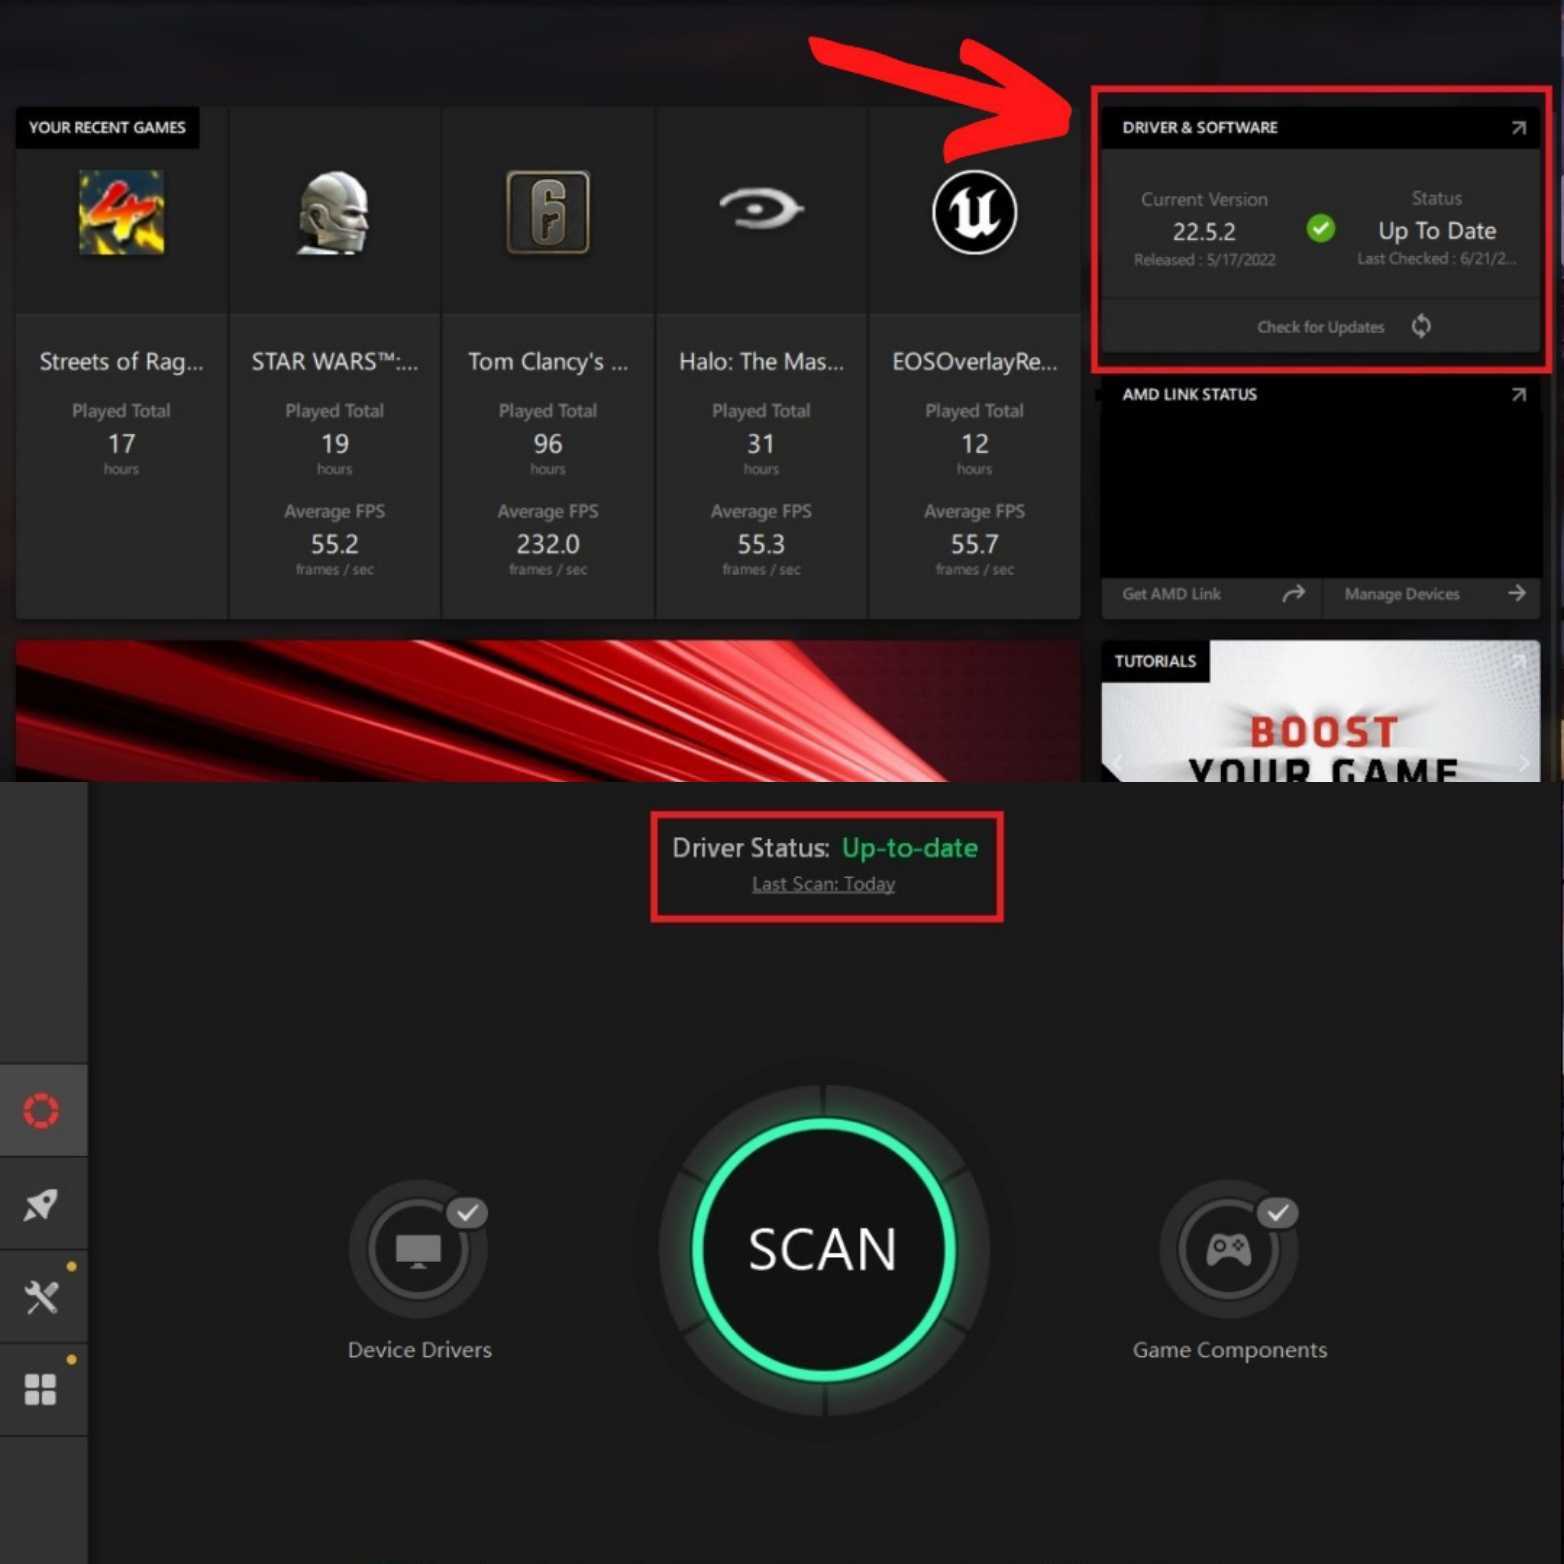
This section of the guide is especially important for the PC Playerbase of the game. The device drivers of your system are essential for its smooth functioning and operating system. It maintains a healthy and up-to-date program on all of your hardware components and software.
It is more than likely that the drivers installed on your computer sooner or later can become outdated or, rarely at times, incompatible with use. We highly advise avoiding that since it can cause error codes like in Warzone.
Preferably, you should always have your graphics card & System Drivers regularly updated at all times. The Driver Booster 7 is a fantastic software to download the latest drivers for all of your PC components. It scans your PC for driver updates and, within minutes, can update them to the latest version for you.
Just be sure to do a quick reboot of your PC to have the drivers’ updates take effect. There is no need to worry as it is a verified software to manage your drivers and have them updated accordingly without any trouble.
Disable Static IP in Your Router Settings
Most importantly, there are times when the data traffic from the Warzone servers may get blocked during transmission to and from your IP Address. It may potentially cause the diver error code.
Most of the time, restarting the router will refresh the status of your IP. However, if your router is confined to a static IP, you might face a little problem. You will have to change your Router settings to reconfigure it manually.
Disabling the Static IP can be a bit daunting, but it generally differs for everyone since every router is built with its custom settings. You will need to follow the basic guidelines from your ISP to be able not to take a risk.
Keep in mind disabling the static IP might cause other issues on the network system for other things. The basic gist is that you will need to enter the web portal written on the back of your router. Login to the router settings, and the option to change the static IP should be right under the UPnP or Dmz settings of most routers.
Enable Firewall Network Access to the Game
Moving on to the last bit of procedures you can perform to fix the diver error code in Warzone is by granting it access past your Windows Defender Firewall settings. We have briefly entailed a step-by-step guide to performing this task, so it should not be too difficult to follow it.
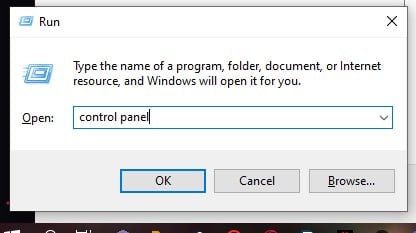
- Open up the windows 10 command box by typing the Windows Key + ‘R’ key
- You can look up the ‘Control Panel’ by typing it in the search box
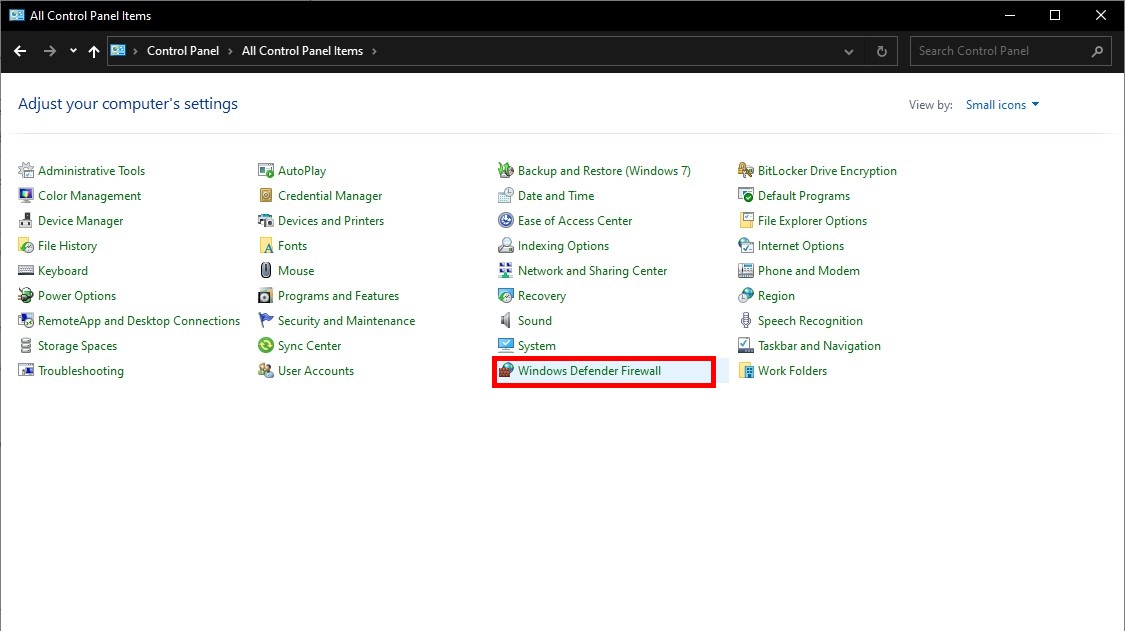
- In the control panel, change the “View By” to allow small icons
- The Windows Defender Firewall should now be visible, as shown in the above image.
- On the next menu, click on the “Allow an app or feature through Windows Firewall Defender” text.
- Browse through the list of Allowed apps and features to see if Warzone is checked here. If not, click Change Settings, and click “Allow another app…”. Proceed to follow the on-screen instructions to add Modern Warfare or its “.Exe” file to the allowed apps list.
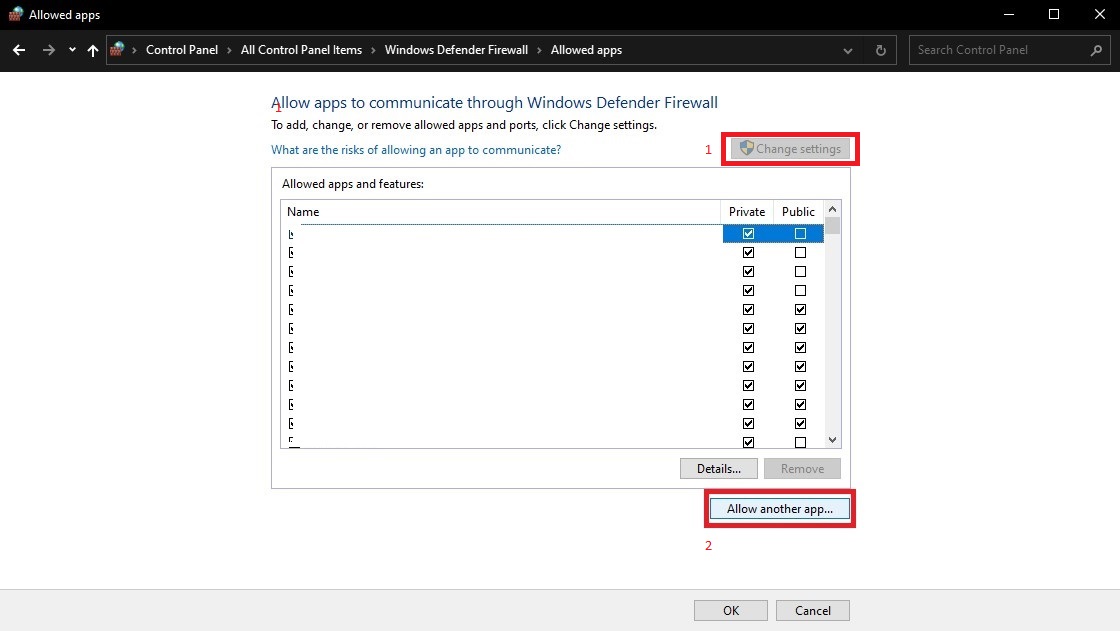
- Once you add the warzone .exe file or Modern Warfare app to it, you are good to go!
- Just make sure to checkmark both the Private and Public boxes to allow all network access to the game.
Let us know if this error fix helped you successfully log into the game without any worries! Be sure to let us know any other questions related to the error in the comments box below so we can provide further assistance on it.
Other Tips
There are multiple coding errors that pop up, like the Dev Error-6070 or even the Dev Error-6039 in the game. There is even a fatal error code that bans your Current Profile Access in Warzone.
Эти ошибки одинаковы, но называются по разному.
Возникает у юзеров после очередного обновления, после первой установки игры.
Фикс довольно прост.
Вручную выставите DNS Google:
Зайдите в «Центр управления сетями и общим доступом«, выбираете «Изменения параметров сетевого адаптера«. Далее зайдите в «сетевые подключения», нажмите ПКМ на активном подключении к интернету, выберите свойства. Здесь вы увидите список протоколов, выбираете «TCP/IPv4» и нажимаете «свойства». Во вкладке «общее» выставляете «Использовать следующие адреса DNS-серверов» и вписываете в поле «предпочитаемый» — 8.8.8.8, в поле «альтернативный» — 8.8.4.4.
После этих манипуляций перезайдите в игру, попутно перезапустив battle.net. Доп.файлы обновления должны будут подгрузиться и проблем в дальнейшем не должно быть.
Если же это не помогло — используйте VPN.
Перед тем, как его запустить выйдите из игры и закройте battle.net, чтобы у приложения не было активных сетевых подключений.
Вообще, практически любые проблемы, связанные с загрузкой файлов в MW 2019 исправляются с помощью VPN.
Далее по мере возникновения проблем в колде буду выкладывать рабочие способы их решения.
In this article, we will try to solve the «Download has failed. Error Code: Diver Error» problem that Call of Duty Warzone 2.0 players encounter after running the game.
Call of Duty Warzone 2.0 players encounter the error «Download has failed. Error Code: Diver Error» after running the game, and their access to the game is restricted. If you are facing suchaproblem, you can findasolution by following the suggestions below.
- What is Call of Duty Warzone 2.0 Diver Error?
- How To Fix Call of Duty Warzone 2.0 Diver Error
- Restart Your Device
- Check Your Link
- Restart Modem
- Connect to Wired Internet
- Verify Game File Integrity
- Create Private Port for Warzone 2.0
What is Call of Duty Warzone 2.0 Diver Error?
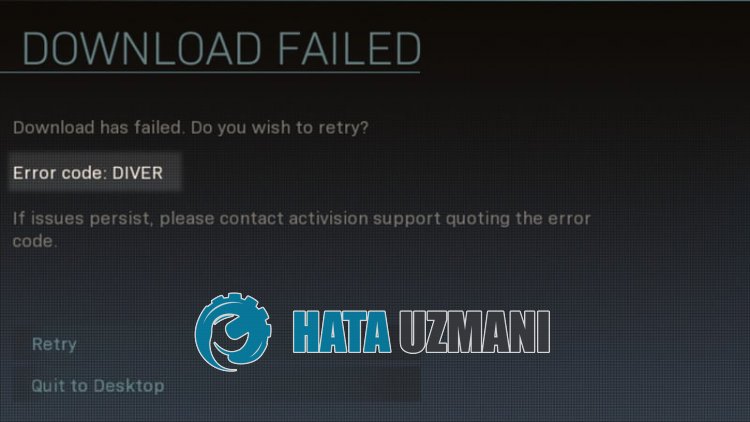
This error is usually caused by an unstable network connection.
Of course, you may encounter such an error not only because of this problem, but also because of many other problems.
For this, we will give you information on how to fix the problem by mentioningafew suggestions.
How To Fix Call of Duty Warzone 2.0 Diver Error
To fix this error, you can find the solution to the problem by following the suggestions below.
1-) Restart Your Device
Restarting the device will help clear damaged cache files saved in the background.
Therefore, you can check if the problem persists by restarting the device.
2-) Check Your Connection
The problem with the internet connection can cause many errors. If your internet connection is slowing down or disconnected, let’s giveafew suggestions to fix it.
- If your internet speed is slowing down, turn your modem off and then on again. This process will relieve your internet alittle bit.
- We can eliminate the problem by clearing the Internet cache.
Clear DNS Cache
- Type «cmd» in the start search screen and run it as administrator.
- Command prompt screen by typing the followinglines of code one after the other and press enter.
- ipconfig /flushdns
- netsh int ipv4 reset
- netsh int ipv6 reset
- netsh winhttp reset proxy
- netsh winsock reset
- ipconfig /registerdns
- After this operation, it will show that your dns cache and proxies have been cleared successfully.
After this process, you can open the game by restarting the computer. If the problem persists, let’s move on to another suggestion.
3-) Restart Modem
Restarting the modem may prevent you from experiencing unstable network connection.
For this, turn off the modem by pressing the power button on the back of the modem.
20 seconds after turning off the modem, turn it back on by pressing the power button on the back of the modem.
After the modem is fully active, you can start Call of Duty Warzone 2.0 to check if the problem persists.
4-) Connect to Wired Internet
If you have access to the Internet withaWi-Fi connection, you can try to access the Internet withacable.
This may be caused by the Wi-Fi signal strength not being transmitted properly.
Data loss in your internet access may cause you to encounter various errorslike this.
For this, you can check whether the problem persists by providing internet access withacable.
5-) Verify Game File Integrity
Damage to the game file can cause you to encounter various errorslike this. For this, we can eliminate the problem by verifying the game files.
- Open the Steam program.
- Open thelibrary menu.
- Right click on the «Warzone 2.0» game on the left and open the «Properties» tab.
- Open the «Local Files» menu on the left side of the screen that opens.
- Click on the «Verify integrity of game files» button in the Local Files menu we encountered.
After this process, the download will be performed by scanning the damaged game files. After the process is finished, try to open the game again.
6-) Create Private Port for Warzone 2.0
If none of the above suggestions work for you, we can fix the problem by setting the port configured for Warzone 2.0.
- In the start search screen, type «Windows Defender Firewall» and open it.
- Click on «Advanced Settings» on the left side of the screen that opens.
- Click on the «Inbound Rules» option on the left side of the window that opens and click on the «New Rule» option on the right.
- Choose the «Port» option in the new window that opens and click the «Next» button.
- After this process, select the «TCP» option and type the port we will leave below in the box and click the «Next» button.
- 3074, 4000, 6112-6119, 20500, 20510, 27014-27050, 28960
- Then select the «Allow Connection» option, press the «Next» button, set three options as selected and click the «Next» button .
- Then, give the name of the port where we performed the installation process and press the «Finish» button.
In this process, we have addedanew rule to the TCP port. In our next action, let’s end our process by connecting the UDP port.
- Then add the new rule again and select «Port» and click the «Next» button.
- After this process, select the «UDP» option and type the port we will leave below in the box and click the «Next» button.
- 3074, 3478, 4379-4380, 6112-6119, 20500, 20510, 27000-27031, 27036, 28960
- Then select the «Allow Connection» option, press the «Next» button, set three options as selected and click the «Next» button .
- Then, give the name of the port where we performed the installation process and press the «Finish» button.
After this, run Warzone 2.0 to see if the issue persists.
Yes, friends, we have solved our problem under this title. If your problem persists, you can ask about the errors you encounter by entering our FORUM platform that we have opened.
Вылазит какой-то код ошибки Diver, когда запускаю Warzone 2.0. Товарищи в сети чего только не насоветовали. И перезагрузка ПК, и переустановка игры, и переустановка всей Винды целиком. Первые два я попробовал, конечно. ОС перебивать не собирают и никому не советую, не ради игры.
Решение
Код ошибки Diver — это крайне распространенная ошибка среди игроков Call of Duty Modern Warfare 2 и Warzone 2.0. Как показывает практика, избавиться от ошибки помогают два метода:
- изменить адреса DNS-сервера в настройках сетевого подключения;
- запуск игры через VPN.
Чтобы изменить DNS для своего сетевого подключения, нужно сделать следующее:
- откройте классическую панель управления (WIN+R→control);
- перейдите в раздел «Центр управления сетями и общим доступом»;
- кликните на пункт «Изменение параметров адаптера»;
- дважды кликните на название своего сетевого подключения;
- нажмите «Свойства» и дважды кликните на компонент «IP версии 4 (TCP/IPv4)»;
- активируйте опцию «Использовать следующие адреса DNS-серверов»;
- выставьте следующие адреса (или любые другие публичные DNS):
- 4.2.2.1
- 4.2.2.2
- сохраните изменения.
Выбор VPN зависит сугубо от предпочтений самого пользователя. Платить или нет — тоже личный выбор. В сети можно найти неплохие бесплатные VPN, однако они дают крайне ограниченный объем трафика. Заручившись помощью проверенного VPN, код ошибки Diver гарантировано исчезнет из Modern Warfare 2 и Warzone 2.0.
Хотите узнать, как исправить Modern Warzone 2 Код ошибки DIVER ? Хотя Modern Warzone 2работала долго и упорно, это не спасло ее от участи любой другой игры в мире. Ведь какой бы хорошей ни была игра, так или иначе, рано или поздно в ней случаются ошибки. И хотя иногда проблема связана с игровыми серверами или недоработкой разработчиков, 99% проблем возникают по более простым причинам. Одна из наиболее распространенных ошибок, с которой сталкиваются игроки, — это код ошибки DIVER. Если вы видите такое уведомление, не волнуйтесь, вы не одиноки. Наше руководство поможет вам и расскажет, как исправить Modern Warzone 2 Error Code DIVER.
Как исправить Modern Warzone 2 Error Code DIVER

Хотя код ошибки DIVER возникает только тогда, когда игра не загружается, причин такого поведения игры может быть несколько. От поврежденных игровых файлов до устаревших обновлений или плохого интернет-соединения. Итак, мы представим некоторые из лучших решений для исправления Modern Warzone 2 Код ошибки DIVER ниже.
Проверить наличие обновлений
Одной из наиболее распространенных причин такой ошибки являются последние обновления. Игровые серверы автоматически обновляют вашу игру, но игроков слишком много. Автоматическое обновление происходит в порядке очереди, и если ваша очередь еще не подошла, вы можете увидеть код ошибки DIVER. В этом случае вам необходимо проверить наличие обновлений и при необходимости обновить игру самостоятельно:
- Консоль.Нажмите кнопку Пуск или кнопку Меню и выберите Проверить наличие обновлений.
- Battle.net . Нажмите на значок шестеренки Настройки и выберите Проверить наличие обновлений.
- Steam. У игроков Steam редко возникают проблемы с обновлениями. Но если они есть, щелкните правой кнопкой мыши название, выберите Свойства, а затем нажмите Обновления
По теме:
Как разблокировать BAS-P SMG в Warzone и Modern Warfare 2
Проверьте целостность файлов
Эта причина встречается реже, но все же не является исключением. Более того, если предыдущий способ не помог решить проблему, необходимо проверить и убедиться в целостности файлов. Для этого необходимо сделать то же, что мы описали в предыдущем способе, выбрав следующие пункты в зависимости от вашей платформы:
- Проверить целостность файлов игры< /li>
- Сканировать и восстановить
- Проверить и восстановить
Перезагрузить игру
Если ни один из вышеперечисленных способов не помог, вам следует переустановить игру. Не исключено, что какие-то игровые файлы повреждены гораздо сильнее, либо возникли другие проблемы. В этом случае полная переустановка игры — лучший вариант, чтобы вернуть все в исходное состояние.
Warzone 2.0 будетдоступна на PlayStation. 4, PlayStation 5, Xbox One, Xbox Series X|S и ПК.