Hi guys
I have 2 Xiaomi Redmi Note 8 Pro When I try to repair first phone success but the second phone give me that error.
I used latest version Modem meta
What should I do?
Both phones bootloader unlocked and I am using Engineer mode now.
Attached Files
aa.png Size: 34.47 KB Downloads: 29
X3non
Recognized Contributor
Posts: 22,062
Threads: 571
Joined: Jul 2014
Reputation:
332
(05-09-2020, 08:12 PM)mami Wrote: Hi guys
I have 2 Xiaomi Redmi Note 8 Pro When I try to repair first phone success but the second phone give me that error.
I used latest version Modem meta
What should I do?
Both phones bootloader unlocked and I am using Engineer mode now.
check if the first phone is still able to connect without issues
also check if the second phone gets detected properly just like the first one in device manager, if it doesn’t then update the driver
Posts: 2
Threads: 1
Joined: Sep 2020
Reputation:
0
(07-09-2020, 12:04 PM)X3non Wrote:
(05-09-2020, 08:12 PM)mami Wrote: Hi guys
I have 2 Xiaomi Redmi Note 8 Pro When I try to repair first phone success but the second phone give me that error.
I used latest version Modem meta
What should I do?
Both phones bootloader unlocked and I am using Engineer mode now.check if the first phone is still able to connect without issues
also check if the second phone gets detected properly just like the first one in device manager, if it doesn’t then update the driverI checked the phones first one ok but the second phone still same position. I was erase nvram and nvdata in fastboot . I was try to back to my backup whichs are nvram, nvdata I used these codes:
Code:
adb shellsu
ls -al /dev/block/platform/*/by-name
dd if=/sdcard/nvdata of=/dev/block/sdc8
dd if=/sdcard/nvram of=/dev/block/sdc18
But there are no imei numbers.
I can’t restore my nvram and nvdata files.
I can’t repair my imei numbers cause maui meta problems.
Any suggest ?
X3non
Recognized Contributor
Posts: 22,062
Threads: 571
Joined: Jul 2014
Reputation:
332
(07-09-2020, 01:10 PM)mami Wrote: I checked the phones first one ok but the second phone still same position. I was erase nvram and nvdata in fastboot . I was try to back to my backup whichs are nvram, nvdata I used these codes:
…
[/quote]
your commands are wrong
for backup, IF should be the mount point of the partition you wish to backup while OF should be where you want to save
for restoring, reverse of backup
sdc18 and sdc8 are nvram and nvdata? if no, then check the mount points using the guide @ https://www.hovatek.com/forum/thread-11203.html
if yes, then why not backup from phone 1 (you could use modem meta tool to write the imei of phone 2 into phone 1 before making the backup)
then restore both backups into phone 2
commands for backup
Code:
adb shell

su

dd if=/dev/block/sdc8 of=/sdcard/nvdata

dd if=/dev/block/sdc18 of=/sdcard/nvram
(This post was last modified: 07-09-2020, 08:28 PM by X3non.)
Posts: 49,469
Threads: 1,451
Joined: Oct 2013
Reputation:
432
(07-09-2020, 01:10 PM)mami Wrote: But there are no imei numbers.
I can’t restore my nvram and nvdata files.
I can’t repair my imei numbers cause maui meta problems.
Any suggest ?
You can also go the TWRP way i.e flash TWRP to both phones and backup nvram from the good one to restore to the bad one
Note!
We have a reply schedule for Free Support. Please upgrade to Private Support if you can’t wait.
Welcome to the GSM-Tutors Forum!
You are currently viewing our boards as a guest which gives you limited access to view most discussions and access our other features.
Only registered members may post questions, contact other members, search our boards or view our download links.
Registration is fast, simple and absolutely free so please —
Register
If you have any problems with the registration process or your account login, please read this forum.
How to Change iPhone Location | Spoof GPS Location on iPhone with Tenoshare iAnyGo (iOS 16 Supported)
- Emrekst42
- Registered User
- Posts:4
- Joined:Mon Feb 17, 2020 7:09 pm
- Location:Turkey
- Status:Offline
#1
Unread post
by Emrekst42 » Mon Feb 17, 2020 7:39 pm
The device I use is connecting to Casper via m1 (Wiko fever Rom) chipset mt6753 Maui meta v10 program and it gives error in connect md section
-
RomShillzz
- Administrator
- Posts:1301
- Joined:Fri Jun 15, 2018 12:00 pm
- Location:Nigeria
- Donate:
- Has thanked: 6 times
- Been thanked: 104 times
- Status:Offline
- Contact:
Re: Maui meta Fail
#2
Unread post
by RomShillzz » Tue Feb 18, 2020 8:08 am
Kindly provide a screenshot of the error.
Use Search Button to get Instant Results | Follow Forum Rules
Avoid Spams in the forum to prevent banning the offending account. | https://romshillzz.net
- Emrekst42
- Registered User
- Posts:4
- Joined:Mon Feb 17, 2020 7:09 pm
- Location:Turkey
- Status:Offline
Re: Maui meta Fail
#3
Unread post
by Emrekst42 » Tue Feb 18, 2020 8:32 pm
get kernel error in port section now
-
RomShillzz
- Administrator
- Posts:1301
- Joined:Fri Jun 15, 2018 12:00 pm
- Location:Nigeria
- Donate:
- Has thanked: 6 times
- Been thanked: 104 times
- Status:Offline
- Contact:
Re: Maui meta Fail
#4
Unread post
by RomShillzz » Tue Feb 18, 2020 8:57 pm
The image above shows that your device is not properly connecting.
Make sure you have installed Android VCOM Driver: viewtopic.php?f=59&t=631
Also, install Android CDC Driver: viewtopic.php?f=59&t=632
After installing the required drivers, restart your PC and try again (please note, your device should be powered off when connecting).
kindly check if the Baseband is okay. Post a screenshot of the «About phone»
Use Search Button to get Instant Results | Follow Forum Rules
Avoid Spams in the forum to prevent banning the offending account. | https://romshillzz.net
- Emrekst42
- Registered User
- Posts:4
- Joined:Mon Feb 17, 2020 7:09 pm
- Location:Turkey
- Status:Offline
Re: Maui meta Fail
#5
Unread post
by Emrekst42 » Wed Feb 19, 2020 9:09 pm
RomShillzz wrote: ↑
Tue Feb 18, 2020 8:57 pm
The image above shows that your device is not properly connecting.Make sure you have installed Android VCOM Driver: viewtopic.php?f=59&t=631
Also, install Android CDC Driver: viewtopic.php?f=59&t=632After installing the required drivers, restart your PC and try again (please note, your device should be powered off when connecting).
kindly check if the Baseband is okay. Post a screenshot of the «About phone»
Baseband version of the device is unknown
-
RomShillzz
- Administrator
- Posts:1301
- Joined:Fri Jun 15, 2018 12:00 pm
- Location:Nigeria
- Donate:
- Has thanked: 6 times
- Been thanked: 104 times
- Status:Offline
- Contact:
Re: Maui meta Fail
#6
Unread post
by RomShillzz » Wed Feb 19, 2020 10:15 pm
Emrekst42 wrote: ↑
Wed Feb 19, 2020 9:09 pm
Baseband version of the device is unknown
That is the problem!
You’ll need the fix the Unknown Baseband before you can be able to repair IMEI on your device. To fix this, kindly download the firmware and flash your device, or watch the video below (no need to download firmware):
Use Search Button to get Instant Results | Follow Forum Rules
Avoid Spams in the forum to prevent banning the offending account. | https://romshillzz.net
- Emrekst42
- Registered User
- Posts:4
- Joined:Mon Feb 17, 2020 7:09 pm
- Location:Turkey
- Status:Offline
Re: Maui meta Fail
#7
Unread post
by Emrekst42 » Wed Feb 19, 2020 11:07 pm
RomShillzz wrote: ↑
Wed Feb 19, 2020 10:15 pm
Emrekst42 wrote: ↑
Wed Feb 19, 2020 9:09 pm
Baseband version of the device is unknownThat is the problem!
You’ll need the fix the Unknown Baseband before you can be able to repair IMEI on your device. To fix this, kindly download the firmware and flash your device, or watch the video below (no need to download firmware):
thanks i will try this solution
- Babaji
- Registered User
- Posts:1
- Joined:Thu Feb 17, 2022 5:15 pm
- Location:India
- Status:Offline
Re: Maui meta Fail
#9
Unread post
by Babaji » Thu Feb 17, 2022 5:23 pm
My baseband version is okay but In Maui Meta it show md not connect.
What should I do any suggestions?
-
RomShillzz
- Administrator
- Posts:1301
- Joined:Fri Jun 15, 2018 12:00 pm
- Location:Nigeria
- Donate:
- Has thanked: 6 times
- Been thanked: 104 times
- Status:Offline
- Contact:
Re: Maui meta Fail
#10
Unread post
by RomShillzz » Thu Feb 17, 2022 8:19 pm
Babaji wrote: ↑
Thu Feb 17, 2022 5:23 pm
My baseband version is okay but In Maui Meta it show md not connect.
What should I do any suggestions?
Kindly tell us a little more about your device like the model number, android version and CPU (Chipset).
Use Search Button to get Instant Results | Follow Forum Rules
Avoid Spams in the forum to prevent banning the offending account. | https://romshillzz.net
-
- 0 Replies
- 4088 Views
-
Last post byRomShillzz
Sun Mar 17, 2019 5:45 am
-
- 1 Replies
- 1570 Views
-
Last post byExclusive
Fri Dec 20, 2019 10:12 am
-
- 1 Replies
- 717 Views
-
Last post byRomShillzz
Mon Apr 04, 2022 6:36 pm
Return to “Android based Phones / Tablets”
Jump to
- News Section
- ↳ Service Products News & Updates
- ↳ Remote Imei Unlock & Factory Code Service News
- ↳ unlockking.us server news
- ↳ TopCode.us IMEI & Server Unlocks News
- ↳ Tech News
- Premium Market place
- ↳ Premium Sales section
- GSM & CDMA Phones/Tablets Software & Hardware Area
- ↳ Android based Phones / Tablets
- ↳ Android Development and Modding
- ↳ Android Tablets
- ↳ LG Android based
- ↳ HTC Android based
- ↳ Motorola Android
- ↳ Samsung Android based
- ↳ Sony Android based
- ↳ Games and App for Android Devices
- ↳ iPhone, iPod & iPad (Apple Inc. Products)
- ↳ iPhone 2 / iPhone 3G / iPhone 3GS
- ↳ iPhone 4 / iPhone 4S
- ↳ iPhone 5 / iPhone 5S / iPhone 5C / iPhone SE
- ↳ iPhone 6 / iPhone 6 Plus / iPhone 6S / iPhone 6S Plus
- ↳ iPhone 7 / iPhone 7 Plus
- ↳ iPhone 8 / iPhone 8 Plus / iPhone X
- ↳ iPad , iPod , Apple TV
- ↳ iPhone, iPad, iPod — FAQ, Guide, How To, Tutorials , News
- ↳ iMac, Macbook Pro, Macbook Air
- ↳ iPhone, iPad, iPod Hardware Repair
- ↳ iOS Application, games & media area
- ↳ iWatch
- ↳ Alcatel
- ↳ Alcatel & TCL Old Models
- ↳ BF, BG, TH, BHx Series
- ↳ Alcatel TCL Phones and New Models
- ↳ Alcatel TCL Hardware Repair
- ↳ BlackBerry (RIM)
- ↳ BlackBerry Hardware Repair
- ↳ BlackBerry Android Based Devices
- ↳ Application, games & media area
- ↳ Blackberry CDMA
- ↳ Chinese Models & Cloned Phones
- ↳ Android based chinese phones
- ↳ Chinese Phones Hardware Repair
- ↳ Huawei
- ↳ Huawei Android based phones
- ↳ Huawei CDMA
- ↳ Huawei Hardware Repair
- ↳ HTC
- ↳ HTC Android based
- ↳ HTC & PDA WM (With Touchscreen)
- ↳ HTC & Smartphones (WM Without Touch)
- ↳ HTC CDMA
- ↳ HTC Hardware Repair
- ↳ Infinix
- ↳ Infinix Android based phones
- ↳ Infinix Feature phones
- ↳ Infinix Hardware Repair
- ↳ Itel
- ↳ Itel Android based phones
- ↳ Itel Feature phones
- ↳ Itel Hardware Repair
- ↳ Karbonn
- ↳ Karbonn Hardware Repair
- ↳ Lenovo
- ↳ Lenovo Hardware Repair
- ↳ LG
- ↳ LG Android based phones
- ↳ LG Hardware Repair
- ↳ LG CDMA
- ↳ Micromax
- ↳ Micromax Hardware Repair
- ↳ Motorola
- ↳ Motorola Android based
- ↳ Motorola CDMA
- ↳ Motorola MAGX
- ↳ Motorola ODM
- ↳ Motorola P2k
- ↳ Motorola Old Legacy (EMMI)
- ↳ Motorola Hardware Repair
- ↳ MotoACTV
- ↳ Nokia
- ↳ Nokia Base Band 5 (BB-5)
- ↳ Nokia CDMA
- ↳ Nokia X Android Based
- ↳ Nokia Digital Core Technology 4 (DCT-4)
- ↳ WD2 & APE (Symbian Phones)
- ↳ Nokia Legacy Phones (DCT-1, 2, 3, L)
- ↳ Nokia Windows & MeaMo/MeeGo based
- ↳ Nokia Multimedia
- ↳ Nokia Hardware & Hardware Repair
- ↳ Nokia Repair Guide and FAQ
- ↳ Sony Ericsson (Sony Xperia)
- ↳ Sony Android based phones
- ↳ Sony Ericsson Media, RingTones, Games
- ↳ Sony Ericsson
- ↳ Old Ericsson Phones & Sony Phones
- ↳ Sony
- ↳ Sony Ericsson Hardware Repair
- ↳ SmartWatch, SmartWatch 2 & LiveView
- ↳ Samsung
- ↳ 2G Latest Models
- ↳ Samsung Android based phones
- ↳ Bada Platform
- ↳ QUALCOMM Models (3G)
- ↳ SWIFT Platform
- ↳ SYSOL Platform
- ↳ Samsung Flashers, Software, Firmware
- ↳ Samsung Media, Games, Ringtones
- ↳ Samsung Hardware Repair
- ↳ Trident/AGERE Platform
- ↳ Samsung CDMA
- ↳ VLSI, Conexant, Skyworks and Old Models
- ↳ Galaxy Gear
- ↳ Tecno
- ↳ Tecno Android based phones
- ↳ Tecno Feature phones
- ↳ Tecno Hardware Repair
- ↳ Xiaomi
- ↳ Xiaomi Hardware Repair
- ↳ ZTE
- ↳ ZTE CDMA
- ↳ ZTE Hardware Repair
- ↳ Other Brands
- ↳ Acer
- ↳ ASUS
- ↳ Celkon
- ↳ Intex
- ↳ Gionee
- ↳ Lava
- ↳ Microsoft
- ↳ NEC
- ↳ OPPO
- ↳ PalmOS/HP and others
- ↳ Panasonic
- ↳ Philips
- ↳ Q-Mobile
- ↳ Sagem
- ↳ Infineon C16X M51 & ARM7 M52 BASED
- ↳ ARM9 BASED M62 / M62+
- ↳ Wallpaper, Applications, RingTones, etc
- ↳ Sagem Hardware Repair Area
- ↳ Sharp
- ↳ Siemens-Benq
- ↳ All Siemens and Benq Manufactured Phones
- ↳ x1x to x45/x50
- ↳ E-Gold Based Phones
- ↳ S-Gold Based Phones
- ↳ NON Siemens Brand (ODM Phones)
- ↳ Siemens-Benq Flash Patching
- ↳ x4x, x5x Flashpatching
- ↳ x6x and x7x Flashpatching
- ↳ Siemens-Benq RingTones and WallPapers
- ↳ Siemens Hardware Repair Area
- ↳ Spice
- ↳ Symphony
- ↳ Walton
- ↳ Xolo
- ↳ Vivo
- ↳ Various CDMA/TDMA Cell Phones
- GSM & CDMA Phones Hardware Repair Area
- ↳ Hardware Repair Item Wanted
- ↳ LCD Refurbish
- ↳ Hardware Equipments for GSM
- ↳ iPOWER X
- ↳ iREWORK Station
- ↳ RE-7500 Reworking System & iSolder
- ↳ Tornado Infra Station
- ↳ Hardware Repair by brands
- ↳ iPhone Hardware Repair (Apple Products)
- ↳ Alcatel TCL Hardware Repair
- ↳ BlackBerry Hardware Repair
- ↳ HTC Hardware Repair
- ↳ LG Hardware Repair
- ↳ Motorola Hardware Repair
- ↳ ZTE Hardware Repair
- ↳ Nokia Hardware Repair
- ↳ Samsung Hardware Repair
- ↳ Siemens Hardware Repair
- ↳ Micromax Hardware Repair
- ↳ Karbonn Hardware Repair
- ↳ Huawei Hardware Repair
- ↳ Sony Ericsson Hardware Repair
- Other Gsm/Mobile Related Forums
- ↳ GSM Mobile Links
- ↳ Freewebspace-Links
- ↳ GPS devices, Navigators & Maps
- ↳ GSM Programming & Reverse Engineering
- ↳ Java, iOS, Android, Symbian development
- ↳ GSM / HSDPA Modems and Routers
- ↳ CDMA Modems, Routers, Aircard
- ↳ Sim Cloning and Scaning
- ↳ Smart Watches
- ↳ Apple Watch
- ↳ ASUS ZenWatch
- ↳ i’M Watch
- ↳ LG Smart Watches
- ↳ Motorola Moto 360
- ↳ Pebble and Pebble Steel
- ↳ Qualcomm Toq
- ↳ Samsung Smart Watches
- ↳ Sony Smart Watches
- ↳ Universal GSM Software
- ↳ Unlocking Codes & log files Requests
- ↳ Phone Unlocking Codes & Maps
- ↳ Programs Keys & H/W finger prints
- ↳ All FRP Reset Section
- The Market Place
- ↳ Main Sales Section
- ↳ Sell your Old & Used Stuffs
- ↳ Job Opportunities / Vacancies
- ↳ Wanted Products
- ↳ Wanted Unlocking Codes / Service
- ↳ Exchange Section
- ↳ The Market Place Feedback
- ↳ Listed Fraudsters
- Product Support Sections
- ↳ Hard/Software Products (official support)
- ↳ 7ICE Team
- ↳ Mkey — Modem Unlock Key
- ↳ AVATOR BOX
- ↳ Avatorbox FlashFiles
- ↳ BMT TEAM
- ↳ Avengers Box
- ↳ BST Dongle
- ↳ Chimera Tool
- ↳ CS-Tool
- ↳ Easy draw-best hardware draw
- ↳ Easy Draw software
- ↳ Easy 56 Adapter
- ↳ DC Unlocker
- ↳ Eagle Eye
- ↳ Easy-Jtag
- ↳ Easy-Firmware Dongle
- ↳ EFT Dongle
- ↳ Falcon Box
- ↳ FuriousGold
- ↳ GCPro Key
- ↳ GRT Dongle
- ↳ GSMServer Products
- ↳ Medusa
- ↳ SigmaKey
- ↳ Smart-Clip 2
- ↳ HUA Team Products
- ↳ HSB Box
- ↳ HUA Box
- ↳ DE Tool
- ↳ Infinity-Box
- ↳ BB5 Easy Service Tool (BEST) Nokia Dongle
- ↳ IP-BOX (The SMART Tool)
- ↳ Martech Products
- ↳ MARTECH CARS Category
- ↳ MFC Team Products
- ↳ iBUS Tools For Apple Watch
- ↳ iPOWER X
- ↳ MFC Dongle
- ↳ iREWORK Station
- ↳ Micro-Box Team Products
- ↳ Activation Software Support (HTC, BLACKBERRY, ALCATEL, LG/ZTE, SAGEM/SE)
- ↳ Basic Micro-Box Software Support (SAMSUNG, HUAWEI, etc…)
- ↳ Miracle Box
- ↳ NCK Team products
- ↳ Avengers Box
- ↳ NCK Box
- ↳ NCK Dongle
- ↳ NTool by Setool Team
- ↳ Octopus/Octoplus
- ↳ Octoplus FRP Tool
- ↳ Octoplus Huawei Tool
- ↳ Octopus LG/Octoplus LG
- ↳ Octopus Samsung/Octoplus Samsung
- ↳ Octoplus JTAG
- ↳ Octopus/Octoplus Suite
- ↳ ORT JTAG
- ↳ RIFF Box Team
- ↳ RIFFBOX
- ↳ Saras Boxes
- ↳ UFST
- ↳ HWK
- ↳ Syscobox
- ↳ MRT — Mobile repair tool
- ↳ Ultimate Multi Tool Box
- ↳ Uni-Android Tool — UAT
- ↳ Volcano Box
- ↳ INFERNO
- ↳ ViTool
- ↳ Volcano Flash Files
- ↳ Volcano Flash Files
- ↳ xtc2cliP
- ↳ Z3X-Team Products
- ↳ Z3X-JTAG
- ↳ SIM Solution Products
- ↳ GF SIM
- ↳ R-SIM & SAM SIM
- ↳ R-SIM&RGKNSE Products Area
- ↳ Special Solutions / Services / WebShop
- ↳ EASY-FIRMWARE
- ↳ GSMFABRICA Products
- ↳ ORT-JTAG
- ↳ NAND-PRO
- ↳ HYDRA TOOL
- ↳ GPGIndustries Support section
- ↳ GPG Powered Devices
- ↳ MAGMA BOX
- ↳ Volcano Box
- ↳ Distributed Devices by GPG
- ↳ GCPro Key
- ↳ GPGORT
- ↳ GPGServer
- ↳ GPG-Setool3
- ↳ MultiUnlocker
- ↳ GPGShop.com — Official Support of GPGIndustries Online Shop
- ↳ Latest GPGIndustries News
- ↳ GPGIndustries Cables
- ↳ GPG FBUS Cables — Simply Best FBus cables in World
- ↳ GPGUFC — The best Universal Fbus Cables ever made
- ↳ GPGHardwares — World’s Finest Hardware ever made
- ↳ GPGInterfaces — www.gpginterface.com
- ↳ HWKBox — www.hwkbox.com
- ↳ Others
- ↳ GPGIndustries Dealers area — Dealers Advertise your services!
- ↳ GPG-India.com (Official GPG support for India users)
- ↳ GSM Library -Daily Updates- Rss feed
- ↳ GSM Library -Daily Updates- Rss feed
- ↳ GF WebShop
- ↳ GF SIM
- ↳ GF LCDs
- ↳ Other Parts
- ↳ HalaGSM WebShop
- ↳ Mobile Phone Spare Parts
- ↳ Miracle Team
- ↳ Miracle Box
- ↳ Eagle Eye
- ↳ Falcon Box by Miracle Team
- ↳ Smart-gsm team
- ↳ Dolphin Clip by SmartGSM Team
- ↳ WindyCitySDR
- ↳ Hard/Software Products (Non-Official Support)
- ↳ SETool2
- ↳ Third Party Hardware Products
- ↳ Venus Box
- Non GSM/Mobile Related Forums
- ↳ Off Topic Zone
- ↳ New Members Introduce Yourself
- ↳ Personal Topics and Birthday Greetings
- ↳ General Discussion
- ↳ Bluetooth
- ↳ Bluetooth-Hardware
- ↳ Bluetooth-Software
- ↳ CAR Electronics
- ↳ Dashboard
- ↳ Airbag
- ↳ ECU & IMMO
- ↳ Mobile Network Operators Info. & Browsing Tweaks
- ↳ MTN
- ↳ GLO
- ↳ Airtel
- ↳ 9mobile
- ↳ Spectranet
- ↳ Swift
- ↳ Smile
- ↳ Ntel
- ↳ Telkom
- ↳ Visafone
- ↳ Vodafone
- ↳ ZoomMobile
- ↳ Other Mobile Network Operators (MNO) / Carriers
- ↳ Notebooks & Personal Computers
- ↳ PC General Discussions
- ↳ PC Tutorials & Guidelines
- ↳ PC Registered Software’s
- ↳ PC Games
- ↳ Game Consoles & Mp3/4 , HD players
- ↳ Trash
- Downloads
- ↳ Apps
- ↳ Firmware
- ↳ Tecno Firmware
- ↳ Infinix Firmware
- ↳ Gionee Firmware
- ↳ Itel Firmware
- ↳ X-BO Firmware
- ↳ Xtouch Firmware
- ↳ Ulefone Firmware
- ↳ Oppo Firmware
- ↳ THL Firmware
- ↳ Opsson Firmware
- ↳ Gowin Firmware
- ↳ Lenovo Firmware
- ↳ Huawei Firmware
- ↳ BlackBerry Firmware
- ↳ Coolpad Firmware
- ↳ Sony Xperia Firmware
- ↳ LG Firmware
- ↳ HTC Firmware
- ↳ Huawei Firmware
- ↳ Samsung Firmware
- ↳ Samsung Clone Firmware
- ↳ Nokia Flash Files
- ↳ Other Brands Firmware
- ↳ FRP Files
- ↳ MediaTek (MTK) Secure Boot DA & Auth. Files
- ↳ Spreadtrum (SPD) Secure Boot Custom Loader Files
- ↳ Network Files / IMEI / NVRAM / QCN / DB Files
- ↳ Fix All Itel Invalid/Null IMEI & Network Issues
- ↳ Root Files
- ↳ Tecno Root Files
- ↳ Infinix Root Files
- ↳ Itel Root Files
- ↳ Samsung Root Files
- ↳ Tools & Drivers
- ↳ Windows ISO
- ↳ Request Section
- ↳ Firmware Request
- ↳ Network Files / IMEI / NVRAM / QCN / DB Files Request
- ↳ Secure Boot DA & Auth. Files Request
- ↳ Tools & Drivers Request
- ↳ Root Files Request
- VIP Section
- ↳ Factory, Premium & Exclusive Firmware
- ↳ Samsung Combination Files
- ↳ Samsung 4 Files (Repair) Firmware
- ↳ Exclusive Tools
- ↳ Other Exclusive Contents
- Success Stories & Tutorials
- ↳ Flashing Firmware
- ↳ Unlocking / Formatting / Hard Reset
- ↳ Code / Pattern Unlocking / Formatting
- ↳ Hard Reset
- ↳ Network / SIM Unlocking
- ↳ Factory Reset Protection (FRP) Bypass / Removal
- ↳ Rooting Android Devices
- ↳ IMEI / Baseband / WiFi / Bluetooth Address Repairs
- ↳ Other Success Stories
- Quick Questions
- ↳ Ask a Question
- Forum Announcements and Support
- ↳ Forum Announcements
- ↳ Board, Server, Registration and Login Issues/Support
- ↳ Sales Activation Requests
- ↳ Banned Users
- ↳ Feedback & Suggestions
After flashing ROMs or installing updates, it is possible that the phone will get an invalid IMEI or unknown baseband. Invalid IMEI would mean no mobile network connections.
This tutorial will help you restore / fix lost / missing IMEI and Serial Numbers for MT6582, MT6572, MT6592, MT6589, MT6595
One method of restoring/repairing an invalid IMEI or unknown baseband is outlined in this tutorial. If this method does not work, you may try using MTK Droid Tools to manually enter IMEI numbers.
If these methods fail, check to see if you have a valid Serial Number.
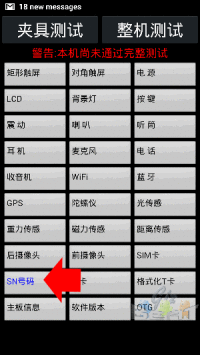
1. From your phone keypad, type in *#66#.
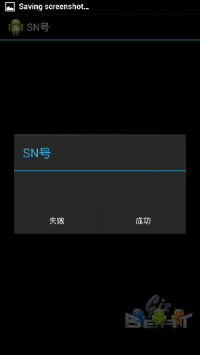
2. Tap on SN. If it shows a blank space, that means you would first have to restore your Serial Number before you can work on fixing the IMEI.
NOTE: This method assumes your Serial Number is also invalid or null. However, if you have a valid Serial Number and only need to restore IMEI, you can still use this guide. Just choose method B below and do the IMEI Download option.
Requirements:
- Maui META Tool
- MTK Drivers
- PC
- MTK Phone and Data Cable
- NVRAM Database file for current ROM [Few NVRAM Database BPLGU files]
- Baseband configuration (.ini) file from manufacturer OR Serial Number and IMEI Numbers shown on the sticker on your phone’s battery tray
Connect to Maui META
1. Extract and install Maui META Software. Do not launch the program yet.
2. Switch your phone on and connect it to your PC. Install MediaTek VCOM Drivers.
3. Disconnect your phone and turn it off.
4. Keeping Device Manager open and visible in the background, locate MauiMETA Program and Run as Administrator.
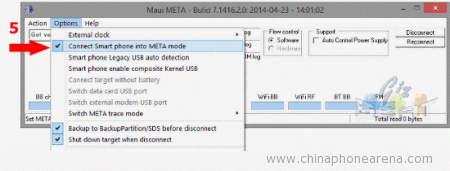
5. Click on Options in the menu bar, and select “Connect Smart phone into META mode”
6. Click on Reconnect. Maui META will now ask you to “Please connect cable to target and then power on”.
7. Connect your phone to the PC, but DO NOT turn it on. Maui META will trigger the power up sequence. You should hear about 2 connect-disconnect sequence sounds from your PC.
a. During the first connection to Maui META, your phone will boot partially while CDC VCOM Drivers are installed automatically. Wait for it to finish.
b. After successful installation, you should see “Gadget CDC VCOM Driver (COMxx)” in Device Manager.
c. Even if the installation was successful, Maui META may still be unable to connect to your phone. If this is the case, close Maui META and disconnect your phone. Shut your phone off manually.
d. Run Maui META as administrator again and repeat step 5 to 7 and proceed to step 8.
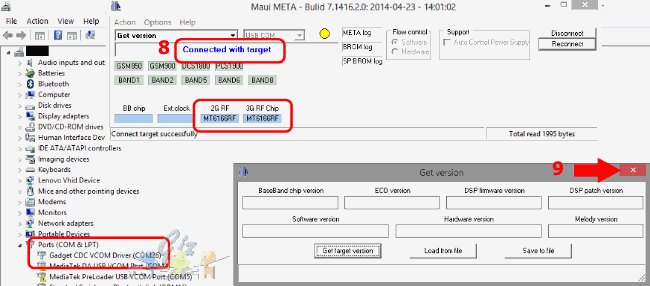
8. Check if the connection was successful.
It is successful if you see the following:
- Your phone will appear in Device Manager as a Gadget CDC VCOM Driver (COMxx)
- Maui META indicates “Connected with Target” and shows your RF chip versions
- Your phone shows a static boot logo
If the connection was successful, proceed to step 9. However, f your phone shows as a MediaTek Preloader in Device Manager, or if your phone starts charging via USB, follow the steps below.
a. Go to Device Manager, highlight your phone in the list and right-click on it. Choose to update drivers manually, then point to this folder: (D:…MTK_USB_ADB_UltimateAll MTK USB Driver 2014 Properties)
b. Disconnect your phone, and repeat steps 5 to 8.
c. If you are continuously returning to these sub-steps, try using a different USB port.
(note: If your phone is not showing in Device Manager at all, uninstall drivers. Download USBdeview software, Run as Administrator, then uninstall your phone’s Device IDs. Restart at step 2.)
9. Once your phone boots into META mode, a Get Version pop up window will appear. Ignore and close this window.
Restoring Values
From here, there are two possible methods to go through. If the Update Parameter does not work (i.e. no successful flash message), do method B.
A. Update Parameter
A.1. In the main Maui META window, click on the drop down menu and select Update Parameter.
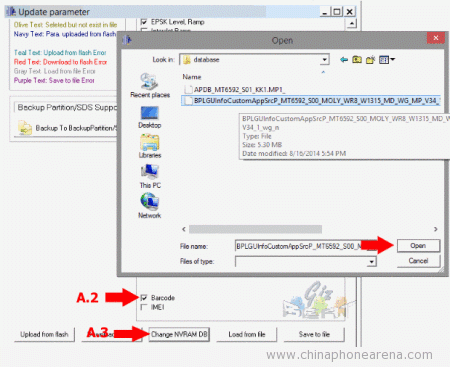
A.2. At the bottom of the pop up window, tick Barcode.
A.3. Click on “Change NVRAM Database” and select the NVRAM Database file that is suitable for your current ROM. Click Open.
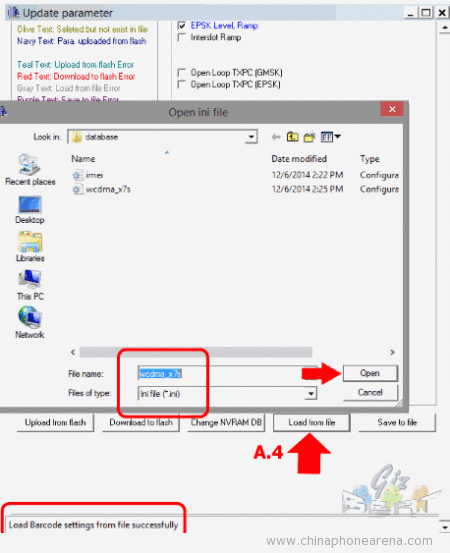
A.4. Click on “Load from File” and select the .ini file that is compatible with your phone.
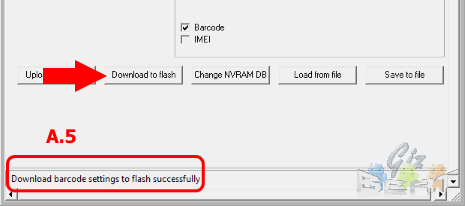
A.5. Click on Download to Flash and wait for this message: “Download Barcode Settings to flash successfully”.
B. Barcode Download + IMEI Download
B.1. Barcode Download
B.1.1. In the main Maui META window, click on the drop down menu and select Barcode Download.
B.1.2. Click on “Change NVRAM Database” and select the NVRAM Database file that is suitable for your current ROM. Click Open.
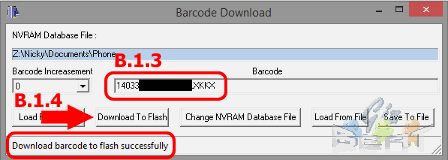
B.1.3. Type in the Serial Number you obtained from the back of the phone.
(If you are restoring a backup, click on “Load from File” and select the appropriate .ini file.)
B.1.4. Click on “Download to Flash”. Check the bottom of the window to see if the flash was successful.
B.1.5. Close the Barcode Download window.
B.2 IMEI Download
B.2.1. In the main Maui META window, click on the drop down menu and select IMEI Download.
B.2.2 Click on “Change NVRAM Database” and select the NVRAM Database file that is compatible with your current ROM version. Click Open.
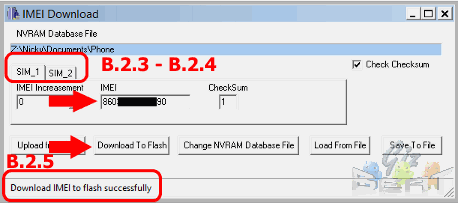
B.2.3. In the SIM1 tab, type in the IMEI for SIM1. (Note: the last number of the IMEI goes into the checksum box.)
B.2.4. Click on SIM2 tab, and enter the IMEI for SIM2.
(If you are restoring a backup, select “Load From File” and select the appropriate .ini file. You only need to load this once for both IMEI numbers.)
B.2.5. Click on “Download to Flash”. Check the bottom of the window to see if the flash was successful.
Exiting META Mode
1. Close all pop-up windows.
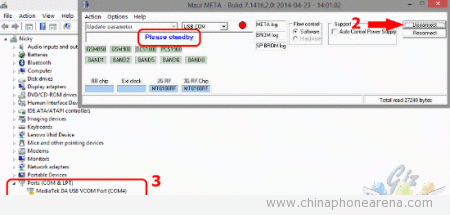
2. Click on Disconnect, you should see a message saying “Please Standby”
3. Wait for Gadget CDC VCOM Driver to disappear from Device Manager List.
4. Wait for your phone to shutdown and enter charging mode.
5. Close Maui META and disconnect your phone.
You may now reboot your phone and check via *#66# and *#06# if you now have a valid Serial Number and IMEI Numbers.
https://gizbeat.com/6058/how-to-restore-fix-lost-imei-and-serial-numbers-for-mtk6582-mtk6572-mtk6592-mtk6589-mtk6595/https://gizbeat.com/wp-content/uploads/2014/12/sn-12-450×215.gifhttps://gizbeat.com/wp-content/uploads/2014/12/sn-12-150×150.gif2016-11-07T13:44:37+07:00Nicky ArriolaHow ToMediaTekRecentTutorialsAfter flashing ROMs or installing updates, it is possible that the phone will get an invalid IMEI or unknown baseband. Invalid IMEI would mean no mobile network connections.
This tutorial will help you restore / fix lost / missing IMEI and Serial Numbers for MT6582, MT6572, MT6592, MT6589, MT6595
One method…Nicky ArriolaNicky
Arriolanicx.arriola@gmail.comEditorNicky is a full-time student and full-time lab worker. Her passion is anything to do with gadgets or tech and has high hopes to get all roads in the world paved with solar LED panels.GizBeat
How To Fix Null/Invalid Imei On MTK Android With MAUI META 3G
Before we begin i learn that some people don’t even know what is IMEI And the meaning of MTK.
IMEI: is short for International Mobile Equipment Identity and is a unique number given to every single mobile phone, typically found behind the battery. IMEI numbers of cellular phones connected to a GSM network are stored in a database.
The below method will only work out successfully with MTK devices with latest Android OS
Such As:
Infinix
Tecno
Gionee
Lenovo. e.t.c.
This Method Will Work On All MTK Devices With Latest Android OS 5.1, 6. Above, e.g
Infinix With XOS Cameron Interface.
Change or Fix null/invalid imei on mtk devices using Chamelephon
How to use MAUI META 3G to Fix Null/Invalid MTK Imei
Download MAUI META 3G
Download BPLG Of your Model
Download an install Android_Gadget_CDC Drivers
How to use MAUI META 3G to Restore IMEI for MTK Devices
Android_Gadget_CDC must completely installed before continued to the next step else MAUI META 3G will not detect your device.
Connect your device on your computer and copy BPLGUInfoCustomAppSrcP_MT67XX, from /system/etc/mddb/ on your device to your computer, this is a modemdb needed when change IMEI. you can also find BPLGUInfoCustomAppSrcP_MT67XX inside your Stock ROM/Firmware, Folder I am use Root Explorer as my Android windows explorer because it can navigate to /system without root access.
Disconnect your device and turn off, now install MAUI META 3G and run it. On MAUI META 3G select Options > Connect Smart phone into META mode make sure you check it, then click on Reconnect button. Signal light will be blinking red and green, and it will turn yellow when you successful connect your device
Now to get it done follow the prescriptions below:- Now connect your device (turn off condition), wait until charger battery disappear then press Power button and hold for 2 seconds then release it and your devices will on META mode and MAUI META 3G will recognize your device,
After successfully connect your devices, now select IMEI Download. it will open IMEI download windows where you can edit your IMEI here
On IMEI download windows, click on Change NVRAM Database File, and point it to BPLGUInfoCustomAppSrcP_MT67XX that you have already copied to your computer.
Then insert your IMEI on the IMEI text box for SIM 1 or SIM 2, must be valid 14 digit IMEI number. Then just click Download To Flash button, success message can be see on the bottom of MAUI META 3G
Share This :
Перейти к контенту
-
#1
сделал бекап nvram через flash tool, пробовал прошивать разными прошивками, но вот зачем то решил прошить с кнопкой format all, теперь слетела прошивка модемаб imei конечно же пуст. ну думаю, чего тут сложного, ведь с прошивкой в папке лежит database модема, начал пробовать восстановить через sn write tool, пишет разные ошибки, потом начал пробовать другие программы, последняя это maui meta ( перепробовал все версии с MauiMETA_3G_v7.1412.1 по MauiMETA_v9.1548.0(Official)) все они выдают одну и туже ошибку:
Код:
etstm task init

etstm task init ok

Fail to enable SWLA; SWLA cannot be enabled under Meta Mode
[@DHL2ELT] DHL ready
recv message from fta
recv message from fta
recv message from fta
recv message from fta
sw version: MOLY.LR9.W1423.MD.LWTG.CMCC.MP.V3.P11
project: LR9.W1423.MD.LWTG.CMCC.MP VANZO95_LWT_DS_KK_MD1(LTTG)
build time: 2015/02/12 16:13
[1] Assert fail: service/nvram/src/nvram_io.c 1211 0xfffffff7 0x3 0x8 - NVRAM
[1] Expression: KAL_FALSE
Memory dump is enabled!
You can do memory dump after re-dumping TST ring buffer is finished.
Caution: To re-dump DHL ring buffer!
etstm task init

etstm task init ok

Fail to enable SWLA; SWLA cannot be enabled under Meta Mode
[@DHL2ELT] DHL ready
recv message from fta
recv message from fta
recv message from fta
recv message from fta
[INFO] Please start to dump memory.
или просто окно:
Код:
Assert fail: service/nvram/src/nvram_io.c 1211 0xfffffff7 0x3 0x8 - NVRAMпробовал много разных BPDB для mt6595, результат один и тот же. :icq02:
-
80,2 КБ
Просмотры: 49 -
29,1 КБ
Просмотры: 28
-
04.02.2019, 13:37
Fish
- Регистрация:
- 17.08.2013
- Сообщений:
- 34,065
- Репутация:
13198
Инструкция по восстановлению imei на устройствах с процессором Mediatek (MTK)
Требования:
- установленная стоковая (заводская) прошивка на устройстве и её наличие для SP Flash Tool
- установленный USB VCOM драйвер
- отключенная проверка подписи у драйверов | инструкция для windows 8 | для Windows 10 |
Устанавливаем Maui META и CDC драйвер
1. Скачиваете и устанавливаете Maui META [скачать с MEGA | Google.Disk]. Установка дефолтная — запускаете exe-файл и жмёте «Далее».
2. Запускаете Maui META. Убеждаетесь что в поле «Platform Type» выбраны: «Smart Phone«, а в «COM Port»: «USB COM«.3. Нажимаете «Connect» в правом нижнем углу окна программы и сразу подключаете
выключенный телефон. В программе начнётся процесс инициализации устройства.
4. Если процесс завис на пункте «Get kernel port» -> устанавливаем CDC драйвер:
- Скачиваем архив Drivers for writing IMEI CDC Serial.zip (прикрепил к посту). Распаковываем на компьютере. Также можно воспользоваться альтернативными драйверами (Drivers_MTK.zip).
- Открываем диспетчер устройств. Делаем подсвеченным «ваш компьютер» нажав один раз по «Win-XXXXXXX». Нажимаем «Действие» и выбираем «Установить старое устройство».
- Жмём «Далее» -> в следующем окне выбираем «Установка оборудования, выбранного из списка вручную»
- Жмём «Далее» и в следующих окнах нажимаем на «Установить с диска»
- Далее нажимаем «Обзор» и в проводнике выбираем файл cdc-acm.ini из папки «Drivers for writing IMEI CDC Serial». Жмём «Открыть» и «OK».
- Выбираем один из предложенных драйверов и нажимаем «Далее» -> «Далее» — > «Готово» (если всё равно будет стопориться на «Get kernel port» в программе, тогда пробуем выбрать другой драйвер) . Если в процессе выскочит окошко с предупреждением «Не удалось проверить издателя этих драйверов» — нажимаете уверенно на «Всё равно установить» (проверку цифровой подписи у драйверов при этом должна быть отключена в системе, иначе ничего не установится!)
после установки драйвера смартфон планшет должен определиться в программе и иметь статус «Connected»
Редактируем IMEI
1. Нажимаем кнопку «Load DB» (2)
2. Во всплывшем окне выбираем «From file» (3)
3. Ищем в распакованной оригинальной прошивке для SP FlashTool файл, начинающийся на BPLGUInfo (4) и открываем его. Если прошивки нет, то можно попробовать достать файл с самого устройства. Искать в systemetcmddb.
4. Кликаем мышкой на поисковой строке (5) и выбираем «IMEI Download» (6)
5. Прописываем СВОИ IMEI (7), контрольная сумма пропишется сама. Свои IMEI можно посмотреть на коробке, на наклейке под АКБ или на задней крышке.
6. Нажимаем «Write» (8) и при успешном результате, радуемся надписи «Write IMEI to target successfully» (9).
7. Отключаем устройство от компьютера, включаем и проверяем imei введя в «звонилке» *#06#.p.s. Прикрепил к посту альтернативные драйвера. Источник 4pda.ru/forum/index.php?showtopic=678449.
Cкачать:
Drivers for writing IMEI CDC Serial.zip
Drivers_MTK.zip
-
12.08.2019, 19:37
77Dimon77
- Регистрация:
- 01.04.2019
- Сообщений:
- 71
- Репутация:
6
-
14.08.2019, 18:54
Fish
- Регистрация:
- 17.08.2013
- Сообщений:
- 34,065
- Репутация:
13198
Сообщение от 77Dimon77
BPLGUInfo не могу найти
в папке с прошивкой)
по постам в других темах вижу, что ты уже всё восстановил по этой инструкции
-
16.08.2019, 04:40
77Dimon77
- Регистрация:
- 01.04.2019
- Сообщений:
- 71
- Репутация:
6
-
16.10.2019, 16:20
alex7806
- Регистрация:
- 17.02.2015
- Сообщений:
- 36
- Репутация:
14
спасибо!!!! прописал
история в кратце: попал смарт Q437 после хардрезет, естественно привязка к гуглаккаунту, вощем получилось так что я форматнул всё, прошил и без задней мысли отдал хозяину, тот чуть позже грит сим не работают, я набрал *#06# а там пусто, думаю ну щас пропишу не проблема, оказалось проблема сегодня искал прошивку на Oysters T72H 3G и случайно наткнулся на запись Восстанавливаем IMEI ….. вобщем пробовал я это программой до прочтения и выкидывало на Get kernel port скачал дрова установил и всё прописалось!!! благодарен Вам!!!! -
16.10.2019, 17:16
Fish
- Регистрация:
- 17.08.2013
- Сообщений:
- 34,065
- Репутация:
13198
Сообщение от alex7806
история в кратце: попал смарт Q437 после хардрезет, естественно привязка к гуглаккаунту, вощем получилось так что я форматнул всё
зачем?
тебе блок только FRP нужно было форматнуть
тем более у тебя прошивка была, адрес легко бы глянул бы в scatter-файле
или ты не по осторожности?)
вот писал когда-то… там правда чуток дополнить нужно
-
16.10.2019, 18:17
alex7806
- Регистрация:
- 17.02.2015
- Сообщений:
- 36
- Репутация:
14
Сообщение от Fish
зачем?
тебе блок только FRP нужно было форматнуть
тем более у тебя прошивка была, адрес легко бы глянул бы в scatter-файле
или ты не по осторожности?)
вот писал когда-то… там правда чуток дополнить нужно
в торопях так получилось
благо щас аппарат оживлён полностью
но теперь другая проблема с другим прошивку не могу найти на устрицы -
16.10.2019, 18:30
Fish
- Регистрация:
- 17.08.2013
- Сообщений:
- 34,065
- Репутация:
13198
Сообщение от alex7806
но теперь другая проблема с другим прошивку не могу найти на устрицы
что за «устрицы»? что за модель?
-
17.10.2019, 10:14
alex7806
- Регистрация:
- 17.02.2015
- Сообщений:
- 36
- Репутация:
14
Сообщение от Fish
что за «устрицы»? что за модель?
Oysters T72H 3G
-
17.10.2019, 15:43
Fish
- Регистрация:
- 17.08.2013
- Сообщений:
- 34,065
- Репутация:
13198
Сообщение от alex7806
Oysters T72H 3G
на оф. сайте же есть http://oysters.ru/information/download/
-
18.10.2019, 12:06
alex7806
- Регистрация:
- 17.02.2015
- Сообщений:
- 36
- Репутация:
14
Сообщение от Fish
на оф. сайте же есть http://oysters.ru/information/download/
Вложение 102749
не качает по этой ссылке
-
18.10.2019, 17:28
Fish
- Регистрация:
- 17.08.2013
- Сообщений:
- 34,065
- Репутация:
13198
Сообщение от alex7806
не качает по этой ссылке
третий пост вот здесь (нужна регистрация)
-
25.11.2019, 17:10
Semeon
- Регистрация:
- 25.11.2019
- Сообщений:
- 1
- Репутация:
2
ZOJI Z7 Сильный нагрев с новья ,подбор прошивок Итог слетели IMEI .Единственная прога которая восстановила пункт 5. Через инженерку небыло даже поля «WRITE IMEI»СПАЧСИБО
-
21.01.2020, 14:08
Кирилл Драчёв
- Регистрация:
- 21.01.2020
- Сообщений:
- 1
- Репутация:
0
архивы не распаковываются, винрар пишет ошибку
-
21.01.2020, 21:05
Fish
- Регистрация:
- 17.08.2013
- Сообщений:
- 34,065
- Репутация:
13198
Сообщение от Кирилл Драчёв
архивы не распаковываются, винрар пишет ошибку
старая версия winrar у тебя
установи 7-zip с оф. сайта (полностью бесплатный)
-
06.04.2020, 22:30
kezoid
- Регистрация:
- 16.03.2020
- Сообщений:
- 1
- Репутация:
0
Установка CDC не помогает
-
30.07.2020, 19:04
segamar
- Регистрация:
- 30.07.2020
- Сообщений:
- 2
- Репутация:
0
-
30.07.2020, 19:07
segamar
- Регистрация:
- 30.07.2020
- Сообщений:
- 2
- Репутация:
0
[QUOTE=Fish;168237]в папке с прошивкой)
BPLGUInfo нету не где…
-
19.09.2020, 13:38
JohnyDM
- Регистрация:
- 18.09.2020
- Сообщений:
- 1
- Репутация:
0
добрый день, подскажите пж что я не делаю не так. тел с прогой соединился. но при загрузке файла bplgui… пишет ошибку, что его загрузить нельзя. файл копировал из телефона, т.к. в стоковой прошивке его не нашел. как из флэштулла его достать я вообще не понял. уже неделю долблюсь с этим телефоном tele2 maxi lte. решил восстановить для мелкого, выкидывать жалко.
-
11.12.2022, 00:29
d8e27ece15
- Регистрация:
- 11.12.2022
- Сообщений:
- 1
- Репутация:
0
Я вам так скажу kernel port 7 дней водит мне чем-то по губам.
Как восстановить nvram с помощью
Maui META 3G и SP META
Серия процессоров начиная с MT6589/82… и все MT67xx
Задать вопрос, поделится опытом можно в теме обсуждения, посмотреть другие статьи в оглавлении
Необходимые исходные условия.
- Удостоверится, что у вас действительно повреждён NVRAM (Признаки и методы проверки повреждённого NVRAM).
- Заряженнный смартфон. Рекомендую зарядить его полностью до 100%.
- Найденная и скачанная заводская прошивка под SP Flash Tool. Там обязательно должны быть базы APBD и MODEMDB (обычно они в одноименных папках, но редко бывает и в папке target_bin россыпью).

Создание базовой структуры настроек NVRAM и запись IMEI.
- Произвести очистку NVRAM или Форматирование телефона (рекомендуется).
- Извлечь и вновь вставить аккумулятор. Если это невозможно, то после выключения аппарата подождать 1 минуту.
-
Произвести прошивку аппарата полной заводской прошивкой в соответствие с инструкциями:
Прошивка смартфона/планшета на МТК прошивальщиком версии 3.х
Прошивка смартфона/планшета на МТК новым прошивальщиком версии 5.х - Отключить аппарат от зарядного устройства и компьютера.
- Установить драйверы режима METAMODE
- Запустить «Maui META 3G».
-
Переключить режим соединения на: USB COM.
-
В верхнем меню установить галочку на Options – Connect Smart Phone into META mode. На последних Maui Meta этой опции в меню нет. Она включена по-умолчанию.
-
В меню программы: Actions – Open NVRAM Database. Выбрать файл (обычно начинается на BPLGUInfoCustomAppSrcP…) из папки modemdb (файлы могут быть не в отдельной папке, а прямо в target_bin) заводской прошивки для SP Flash Tool. Например для A850+ файл с именем BPLGUInfoCustomAppSrcP_MT6592_S00_A850+_V1_1_wg_n и его размер 5,5МБ, для A606 файл с именем LWD3I15.1.6.1.3T21A0828_M015.src и его размер 7.3Мб. Главное чтобы этот файл был из комплекта прошивки, которая сейчас в телефоне. Это важно! На последних Maui Meta при выборе возникает ошибка: «Initialize database file». Ничего страшного, переходим к п.10. На п.14 при попытке записать параметры Maui Meta сама запросит базы. При этом ошибки уже не произойдет.
- Нажать Reconnect. Будет мигать кружок с красного на зелёный.
- Извлечь и вновь ставить аккумулятор. Если это невозможно, то после выключения аппарата подождать 1 минуту.
- Выключенный аппарат подключить к компьютеру стандартным «MicroUSB кабелем». При успешном подключении программы к телефону кружок сменит цвет на жёлтый и откроется окно выбранной опции**. До подключении программы выбор опции недоступен, поэтому если это будет не «Update parameter» то просто закройте появившееся окошко. При неудачном подключении вернутся к предыдущему пункту.
- В основном окне программы Maui META 3G выбрать опцию «Update parameter». В окне «Update parameter» нажать кнопку «Load from file» и выбрать ini-файл с калибровками. Базы для восстановления NVRAM по возможности будут пополнятся такими файлами. Если для вашего телефона нет ini-файла, то или просим совладельца сделать его или переходим к пункту 15!
-
Нажать кнопку Download to Flash. Дождаться пока все синие надписи станут серыми, закрыть окно «Update parameter».
- В основном окне программы Maui META 3G выбрать опцию «IMEI Download».
-
Ввести в поле часть IMEI без последней цифры (она будет подсчитана автоматически) и нажать «Download to flash». Перейти на вторую вкладку. Ввести в поле часть IMEI без последней цифры (она будет подсчитана автоматически) и нажать «Download to flash». Если не можете найти/вспомнить какой был IMEI, то прибавьте к предпоследней цифре 8, контрольная сумма будет вычислена автоматически.
- Закрыть окно «IMEI Download» и нажать кнопку Disconnect. Телефон выйдет из METAMODE и выключится.
Запись MAC–адресов Bluetooth и Wi–Fi, а также SN в NVRAM.
- Запустить SP_META (Внимание! Вторая программа из набора). Если предложенная версия программы не подключается к телефону, то пробуем подобрать другую версию.
- Выбрать опцию “AP NVRAM Editor”.
- Нажать Reconnect. Будет мигать кружок с красного на зелёный.
- Извлечь и вновь ставить аккумулятор. Если это невозможно, то после выключения аппарата подождать 1 минуту.
- Выключенный аппарат подключить к компьютеру стандартным «MicroUSB кабелем».
- При успешном подключении программы к телефону появится окно «AP Editor».
-
В окне «AP Editor» нажать “read from NVRAM”. Программа попросит указать APDB. Выбрать файл (обычно начинается на APDB_…) из папки apdb (файлы могут быть не в отдельной папке, а прямо в target_bin) заводской прошивки для SP Flash Tool. Например для A850+ файл с именем APDB_MT6592_S01_ALPS.JB9.MP_ и его размер 163Кб, для A606 файл с именем APDB_MT6582_S01_KK1.MP3_ и его размер 162Кб. Главное чтобы этот файл был из комплекта прошивки, которая сейчас в телефоне. Это важно!
Корректировка SN.
- В левой части окна открыть дерево: “Other LID –> AP_CFG_CUSTOM_FILE_CUSTOM_SN_LID –> 1” (Для некоторых аппаратов есть отличия, например для S660 пункт называется AP_CFG_CUSTOM_FILE_CUST_IN_SW_LID)
- Нажать “read from NVRAM”.
- В правой части окна открыть: “Barcode array[64]”.
-
Заполнить 8 или более групп элементов. каждый символ SN в HEX-формате,
Barcode array[1] – 0x03,
Barcode array[2] – 0x35,
Barcode array[3] – 0x01,
Barcode array[4] – 0x05,
Barcode array[5] – 0x06.
Barcode array[6] – 0x0f.
Barcode array[7] – 0x11.
Barcode array[8] – 0x14. - В левой части окна вновь выделить: “Other LID –> AP_CFG_CUSTOM_FILE_CUSTOM_SN_LID –> 1”
- Нажать кнопку “save to NVRAM”
-
Проконтролировать что в левой нижней части окна появилась надпись: “NVRAM write record successfully”, а в правой части окна красные поля Barcode array[0] — Barcode array[64] стали чёрными.
Если данная инструкция по корректировке серийного номера не приносит результаты, то почитайте опыт пользователей для P70A и S820. Где найти SN.
Корректировка MAC для Bluetooth.
- В левой части окна открыть дерево: “RDEB LID –> AP_CFG_RDEB_FILE_BT_ADDR_LID –> 1”
- Нажать “read from NVRAM”.
- В правой части окна открыть: “ap_nvram_btradio_mt6610_struct –> addr”.
-
Заполнить 6 групп элементов. Для примера, чтобы назначить MAC адрес: 98:FF:DD:A1:05:06 необходимо:
в addr[0] вписать 0x98 (первый символ ноль, затем латинский символ “икс”),
addr[1] – 0xff,
addr[2] – 0xdd,
addr[3] – 0xa1,
addr[4] – 0x05,
addr[5] – 0x06. - В левой части окна вновь выделить: “RDEB LID –> AP_CFG_RDEB_FILE_BT_ADDR_LID –> 1”
- Нажать кнопку “save to NVRAM”
- Проконтролировать что в левой нижней части окна появилась надпись: “NVRAM write record successfully”, а в правой части окна красные поля addr[0] — addr[6] стали чёрными.
-
Нажать кнопку “Clear”.
Корректировка MAC для Wi-Fi.
- В левой части окна открыть дерево: “RDEB LID –> AP_CFG_RDEB_FILE_WIFI_LID –> 1”
- Нажать “read from NVRAM”.
- В правой части окна открыть: “WIFI_CFG_PARAM_STRUCT –> aucMacAddress”.
-
Заполнить 6 групп элементов. Для примера, чтобы назначить MAC адрес: 98:FF:DD:A2:05:06 необходимо:
в aucMacAddress[0] вписать 0x98 (первый символ ноль, затем латинский символ “икс”),
aucMacAddress[1] – 0xff,
aucMacAddress[2] – 0xdd,
aucMacAddress[3] – 0xa2,
aucMacAddress[4] – 0x05,
aucMacAddress[5] – 0x06. - В левой части окна вновь выделить: “RDEB LID –> AP_CFG_RDEB_FILE_WIFI_LID –> 1”
- Нажать кнопку “save to NVRAM”
- Проконтролировать что в левой нижней части окна появилась надпись: “NVRAM write record successfully”, а в правой части окна красные поля aucMacAddress[0] — aucMacAddress[6] стали чёрными.
- Закрыть окно “AP Editor”.
-
В “SP Meta Tool” нажать “Disconnect” и закрыть программу.
- Закрыть окно «AP Editor» и нажать кнопку Disconnect. Телефон выйдет из METAMODE и выключится.
* Смартфон, планшет или другое устройство на MTK.
** Если телефон не подключился, хотя все драйверы установлены, то первым делом, перезагружаем компьютер, снимаем и вновь ставим аккумулятор телефона. И повторяем попытку подключения к программе.
19 пользователям понравился пост







 Drivers for writing IMEI CDC Serial.zip
 тебе блок только FRP нужно было форматнуть


