
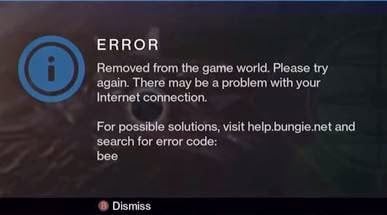
If you’ve been hit with error code Bee in Destiny 2, then you’re in the right place, as this guide will explain everything you need to know to get you back to grinding out the best Gear, taking on Raids with your friends, and just having an all-round good time with your Guardian.
What Is Error Code Bee?
The Bee error code, much like the Fly and Lion errors, is caused by “general disconnections between you and the various routes your traffic takes across the internet to get to Bungie,” according to the official FAQ provided by the developer. “This includes packet loss or disconnections between your home network and Bungie (such as ISP saturation or general internet congestion),” the explainer continues.
Essentially, it means that the information transfer between your console and their servers isn’t stable enough, and so a permanent, stable connection, which is required for live-service games like Destiny 2, Genshin Impact, and Fortnite, cannot be established.
How to Fix Destiny 2 Error Code Bee
The FAQ states that this can be caused by “bandwidth claimed by other devices and applications. It may be necessary to avoid file-sharing, video streaming, or other bandwidth-intensive tasks on any device connected to your network while playing Destiny…”
1. Disconnect Other Devices from Your Network
As such, the first thing you should do is try disconnecting as many devices from your network as possible to see if this resolves the issue. If it does, then happy days.
2. Restart Your Network Router
If you’re still getting hit with the Destiny 2 Bee error code, then the next step you’ll want to take is to try restarting your network router. Sometimes, routers can get random bugs and issues from updates pushed by your ISP, or just out of the blue for no good reason.
Resetting your router 9 times out of 10 will fix this issue, and allow you to carry on with grinding out the best gear for your Guardian.
3. Switch to a Wired Connection
Should that fail, then try and get your hands on an ethernet cable plugging it into your PC or console and your router. A wired connection is far more stable and resistant to data dropouts and packet losses, which is exactly what the Bee error code is caused by. With a bit of luck, you’ll have no further issues.
Finally, Bungie does note that the Destiny 2 error code Bee can be caused by ISP outages which can’t be helped on your side. In these cases, you’ll just have to wait for your service provider to fix the issue on their end, and then you’ll be able to hop back into action. In instances of ISP outages, your provider will often reach out via email or text to let you know of the issue and an estimated time that the problem will be fixed. If they don’t, you might need to reach out to them for a service update.
Just like that, you should be all error code Bee free! For more on Destiny 2, be sure to check out our wiki, or see more of our guides below.
About the author

Chris Jecks
Chris is the Managing Editor of Twinfinite. Chris has been with the site and covering the games media industry for eight years. He typically covers new releases, FIFA, Fortnite and any good shooters for the site, and loves nothing more than a good Pro Clubs session with the lads. Chris has a History degree from the University of Central Lancashire. He spends his days eagerly awaiting the release of BioShock 4.
More Stories by Chris Jecks
- Destiny 2 – How to kill Ecthar Shield of Savathun Guide – Ghosts of the Deep Dungeon Encounter 2
- Destiny 2 Cold Comfort Rocket Launcher – How to Get It and God Roll
- Destiny 2 – Into the Depths Quest Guide for Season of the Deep
- Best Solar Synthoceps Titan Hammer Build in Destiny 2 Season of the Deep
- How To Get the Arbor Warden Exotic Titan Armor in Destiny 2
Судьба 2 — отличная игра, но в последнее время в ней появляется много сообщений об ошибках. Самая распространенная ошибка, с которой сталкиваются пользователи Destiny 2, — это код ошибки Bee. Этот код ошибки возникает из-за неправильного соединения между вашим игровым контроллером и интернет-службами. Некоторые эксперты считают, что ошибка вызвана появлением новых игроков на их серверах, которые не выдерживают нагрузки. Независимо от того, в чем проблема, новый код ошибки Destiny 2 затрудняет игровой процесс для многих игроков Destiny. Сегодня мы поможем вам устранить эту ошибку, чтобы вы могли исправить ее немедленно.
У кого-нибудь еще возникают проблемы с отключением, код ошибки BEE даже при хорошем подключении к Интернету? от DestinyTechПоддержка
Новый код ошибки Bee из игры Destiny 2 также связан с дросселированием Wi-Fi или пропускной способности другими устройствами, подключенными к той же сети. Пользователям не рекомендуется играть в такие игры с высокой пропускной способностью через общее Wi-Fi-соединение. Но даже при хорошем интернет-соединении есть пользователи, которые сталкиваются с той же самой проблемой. Почему этот код ошибки появляется у игроков Destiny 2 и как его полностью исправить. Следуйте этому руководству, чтобы узнать больше.

Оглавление
- 1 Как исправить код ошибки Destiny 2 Bee
- 1.1 Переназначение порта для обхода ошибки пчелы
- 1.2 Изменение настроек сети, использование проводного подключения или обновление оборудования
- 1.3 Перезапуск консоли Xbox и удаление файлов кэша
- 1.4 Перезапуск PlayStation Console и удаление файлов кеша
- 2 Вывод
Destiny 2 — это многопользовательский шутер от первого лица от Bungie, разработанный для PlayStation 4 и Xbox. Игра бесплатна, в ней отличная графика и игровая механика. Однако в игре есть много ошибок, с которыми пользователи сталкиваются во время игры. Хотя есть много ошибок Destiny 2, о которых мы можем поговорить, мы собираемся обсудить код ошибки Bee. Есть несколько причин, по которым может возникнуть код ошибки Bee; некоторые из причин указаны ниже.
- Ошибка пчелы может возникнуть из-за плохого подключения вашего хоста к игровому серверу Destiny 2 Bungie. Это приведет к потере пакетов и разрыву соединения, что в основном вызвано перегрузкой интернета, насыщением IPS, неправильной настройкой Wi-Fi и т. Д.
- Ошибка может появиться из-за дросселирования полосы пропускания. Обычно это происходит, когда вы делитесь Интернетом с другими устройствами или из-за фоновых приложений, которые выполняют некоторые задачи в Интернете.
- Из-за сбоя системы IPS во многих географических регионах появляется код ошибки bee.
Не существует конкретного способа решить проблему одним методом. Поэтому вам нужно пройти через решения, упомянутые ниже, и попробовать их все, что я заказываю, чтобы посмотреть, какое из них работает.
Переназначение порта для обхода ошибки пчелы
Шаг 1) Идти к Иксокно Настройки> Сеть> Расширенные настройки, затем прокрутите вниз, перейдите в раздел со своим IP-адресом и запишите свой IP-адрес на бумаге или что-нибудь еще.
Только Шаг 1 для Xbox и PlayStation отличается; в остальном все остальные шаги такие же.
Для PlayStation перейдите в «Настройки PlayStation»> «Сеть»> «Просмотр состояния подключения» и найдите IP-адрес и MAC-адрес, запишите это.
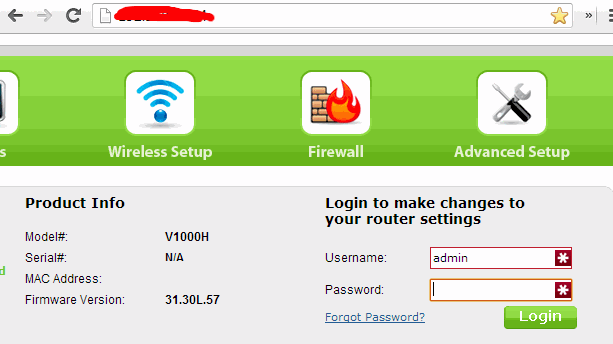
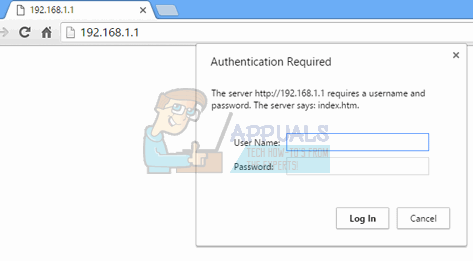
Шаг 2) Зайдите в свой веб-браузер и введите номер шлюза по умолчанию. Если вы не знаете, спросите своего провайдера — войдите в свою учетную запись с помощью имени пользователя и пароля.
Шаг 3) Нажми на Настройки и проверьте Включить назначение вручную возможность активировать его. Введите свой IP-адрес и MAC-адрес, затем нажмите добавлять кнопка.
Примечание: Убедитесь, что вы ввели свой MAC-адрес консоли.
Шаг 4) Перейти к переназначение портов или секция переадресации портов и введите следующие порты именно для Destiny 2. Будет здорово, если вы проведете небольшое исследование с названием вашего маршрутизатора и с вашими MAC, IP-адресами.
- 7500–17899 (TCP) Исходящий
- 30000–40399 (TCP) Исходящий
- 35000–35099 (UDP) Входящие и исходящие
Шаг 5) Нажмите включить или в порядке чтобы применить настройки консоли и перезапустить консоль. Теперь вы введете статический IP-адрес, который вы создали, запустите игру и проверьте, возникает ли ошибка.
Изменение настроек сети, использование проводного подключения или обновление оборудования
Если ни один из вышеперечисленных шагов вам не помог, то это последнее средство, которое вы можете сделать, чтобы исправить ошибку Bee.
Настройте все параметры Интернета по умолчанию; если вы не можете сделать это самостоятельно, позвоните своему интернет-провайдеру и попросите помощника. В основном ошибка на стороне пользователя, поэтому установите все настройки по умолчанию и запустите игру.
Если вы не хотите использовать какие-либо из этих сложных решений, просто используйте проводное соединение вместо беспроводного. От пользователей Wired, играющих в Destiny 2, поступает лишь несколько сообщений, потому что проводное соединение является безопасным и потери данных очень незначительны; также безупречно работают настройки по умолчанию.
Более того, есть сообщения от пользователей, что даже после смены оборудования код ошибки пчелы исчез. Это означает, что если вы смените маршрутизатор, ошибка может быть решена, но обновление оборудования — это отличное решение для одной игры.
Перезапуск консоли Xbox и удаление файлов кэша
Есть два способа удалить файлы кеша из Xbox; мы покажем, как удалить файлы кеша с помощью настроек. Выполните шаги, указанные ниже, чтобы удалить файлы кеша.
- Используя консоль, перейдите в Настройки Xbox затем нажмите на Сеть вариант. После этого перейдите в Расширенные настройки.
- Перейдите к Альтернативный Mac-адрес ярлык и нажмите на Очистить кэш вариант есть.
- Появится запрос с вопросом, хотите ли вы продолжить. Нажмите «Да», и ваш Xbox перезагрузится. Теперь запустите Destiny 2 и посмотрите, появляется ли ошибка.
Перезапуск PlayStation Console и удаление файлов кеша
- Выключите всю систему, вытащите шнур питания и убедитесь, что ваша PlayStation полностью выключена.
- Сядьте, наберитесь терпения и подождите, пока Playstation остынет.
- Включите PlayStation, вставьте шнур питания обратно в PlayStation, запустите ее в обычном режиме и запустите игру, посмотрите, появляется ли код ошибки Bee по-прежнему.
Вывод
Код ошибки: Bee — это один из самых раздражающих кодов ошибок, с которыми игроки Destiny 2 сталкиваются ежедневно. Надеюсь, вы устранили проблему, выполнив приведенное выше руководство по устранению неполадок. Если эта статья помогла вам подумать о том, чтобы поделиться статьей с другими друзьями, которые играют в игру Destiny 2. Возможно, они сталкиваются с той же проблемой и могут получить помощь после прочтения этого. Основной причиной появления кода ошибки BEE является неисправное внутреннее соединение, поэтому убедитесь, что вы поддерживаете устойчивое намеренное соединение, чтобы оно не мешало вашему игровому процессу.
Выбор редактора:
- Как исправить код ошибки GeForce Experience 0x0003
- Получите вой Луны в Destiny 2: боль и чувство вины
- Как исправить ошибку кода ошибки Destiny 2 Weasel?
- Где найти XUR в игре Destiny 2?
- Способы получить Astral Horizon в Destiny 2
Рахул изучает информатику и проявляет огромный интерес к темам в области технологий и криптовалюты. Большую часть времени он пишет, слушает музыку или путешествует по незнакомым местам. Он считает, что шоколад — это решение всех его проблем. Жизнь бывает, и кофе помогает.
Если вы являетесь игроком Destiny, то вы уже либо получили ошибку с кодом BEE или так или иначе получите. Эта ошибка не позволит вам полностью закончить игру, что совершенно непозволительно.
Большая часть игроков получают эту ошибку прямо во время игры. Не так давно игра все-таки получила обновление и количество игроков сталкивающихся с данной проблемой уменьшилось. Однако ошибка все еще всплывает у некоторых людей.
Причины появления ошибки BEE
- Интернет-соединение: Вы можете получать данную ошибку в Destiny из-за проблем с сетью.
Если у вас медленное соединение и вы используете различные сторонние приложения полагающееся на Интернет, то вы вполне можете испытывать подобную проблему. - Рассоединение: Если у вас есть потеря пакетов или вас отсоединило от официальных серверов, то вы также можете получить данную ошибку.
Решения ошибки BEE в Destiny
- Вам необходимо выполнить правильную настройку вашего сетевого подключения для стабильной игры.
- Избегайте использования WiFi. Данный вариант конечно наиболее удобный , но порой он бывает одним из самых нестабильных. Для игры в Destiny вам необходимо стабильное Интернет-соединение и, желательно, чтобы оно было проводным.
- Подождите немного для стабилизации соединения перед началом игры. Большую часть времени, ошибка BEE возникает из-за нестабильной сети.
- Выполните правильную настройку своей консоли.

Ошибка пчелы Destiny 2 — это код, когда игроки сталкиваются с проблемами сервера и общими отключениями. Вот полный список причин, по которым появляется код ошибки Destiny 2 Bee:
- Отключение от игры
- Общие отключения
- Потеря пакетов
- Интернет-провайдер насыщения
- Общая загруженность интернета
- Низкая пропускная способность
- Настройка Wi-Fi
- Неисправная домашняя проводка
Основываясь на приведенном выше списке, кажется, что код ошибки Bee может быть вызван многими проблемами, но большинство из них относятся к вашему интернет-соединению. Из-за этого большинство исправлений ошибки требуют перезагрузки вашего Интернета или маршрутизатора.
Связанный: Как исправить код ошибки Destiny 2 CAT
Чтобы исправить код ошибки Destiny 2 Bee, вам необходимо выполнить следующие шаги по устранению неполадок.
| Действия по устранению неполадок | Как сделать каждый шаг |
|---|---|
| Перезагрузите маршрутизатор | Чтобы перезапустить маршрутизатор, отсоедините провод сзади и оставьте его отключенным на несколько секунд. По истечении времени снова подключите провод к маршрутизатору. |
| Перезагрузите ПК/систему | Чтобы перезапустить систему, просто выключите питание или выберите параметр перезагрузки в настройках питания. |
| Закройте все программы, которые интенсивно используют пропускную способность. | Короче говоря, чтобы выполнить этот шаг, просто откройте диспетчер задач и найдите все программы, которые используют сеть, и закройте их. |
Чтобы узнать больше о Destiny 2, мы в Pro Game Guides расскажем вам!

Прошло несколько лет с момента выхода Destiny 2. Но время от времени игроки по-прежнему загружаются посреди игры из-за кода ошибки: пчела . Если вы ищете способ решить эту проблему раз и навсегда, вот несколько рабочих исправлений, которые вы можете попробовать.
Этот код ошибки Bee указывает на проблемы с сетью, поэтому сначала вы можете проверьте, не проблема ли это на сервере . Но обычно это, скорее всего, проблема с вашей локальной сетью.
Попробуйте эти исправления
Возможно, вам не нужно пробовать их все. Просто работайте вниз, пока не найдете тот, который принесет вам удачу.
- Перезагрузите свою сеть
- Закройте сетевые программы
- Обновите сетевой драйвер
- Попробуйте серверы в другом регионе
- Используйте VPN
Исправление 1: перезагрузите сеть
При устранении неполадок в сети сначала убедитесь, что ваше сетевое оборудование работает правильно . Или вы можете просто сделать перезагрузку. Это очистит кеш и даст вам новый IP-адрес, который может просто решить проблему.
- На задней панели модема и маршрутизатора отсоедините шнуры питания.

Модем
Маршрутизатор
- Подождите хотя бы 30 секунд , затем снова подключите шнуры. Убедитесь, что индикаторы вернулись в нормальное состояние.
- Откройте браузер и проверьте соединение.
Перезагрузка может быть только временным решением. Если вы используете старый маршрутизатор, рассмотрите возможность его обновления до лучший игровой Wi-Fi . Также не забудьте свой модем.
Если перезапуск сетевого оборудования не помогает, обратите внимание на следующее исправление ниже.
Исправление 2. Закройте программы, перегружающие полосу пропускания.
Вы можете столкнуться с задержкой или отключением, если у вас есть фоновые программы, использующие ваш трафик. Поэтому перед входом в игру нужно убедиться, что все нежелательные программы и службы отключены.
Вы можете использовать эти шаги для проверки пропускной способности:
- На клавиатуре нажмите CTRL+Shift+Esc в то же время, чтобы открыть диспетчер задач.
- Затем нажмите Сеть чтобы проверить, какая программа использует вашу пропускную способность. Выберите эту программу и нажмите Завершить задачу .
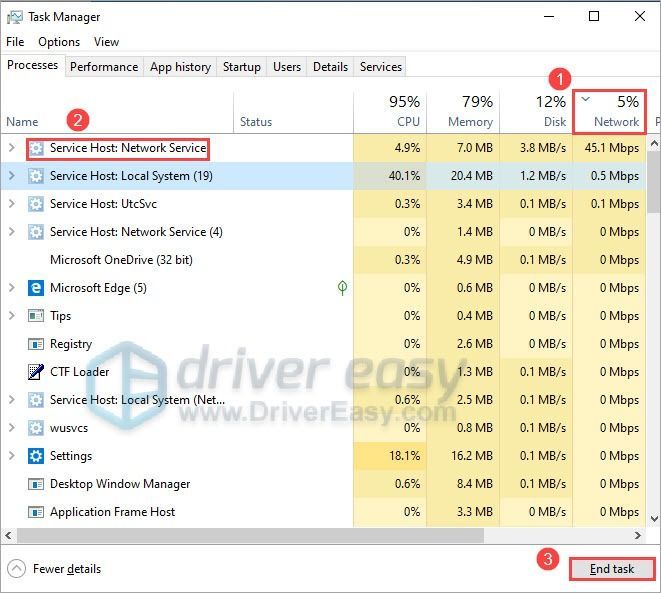
К обычным преступникам относятся Центр обновления Windows , Раздор и Хром . Вы можете перенести обновление системы и закрыть все фоновые приложения перед запуском Destiny 2.
Если вы уверены, что никакие программы не крадут ваш трафик, ознакомьтесь со следующим исправлением ниже.
Исправление 3: обновите сетевой драйвер
Если вы постоянно отключаетесь и перезагрузка роутера не помогает, вам нужно проверить, не используете ли вы к неисправный и устаревший сетевой драйвер . Мы всегда рекомендуем геймерам постоянно обновлять драйвер, чтобы избежать проблем с производительностью.
Вы можете обновить сетевой драйвер вручную, проверив производителя, посетив официальный сайт и найдя последнюю версию правильного установщика драйвера. Но если вам неудобно играть с драйверами устройств, вы можете выполнить автоматическое обновление с помощью Драйвер Легкий .
- Скачатьи установите драйвер Easy.
- Запустите Driver Easy и нажмите кнопку Сканировать сейчас кнопка. Затем Driver Easy просканирует ваш компьютер и обнаружит проблемные драйверы.
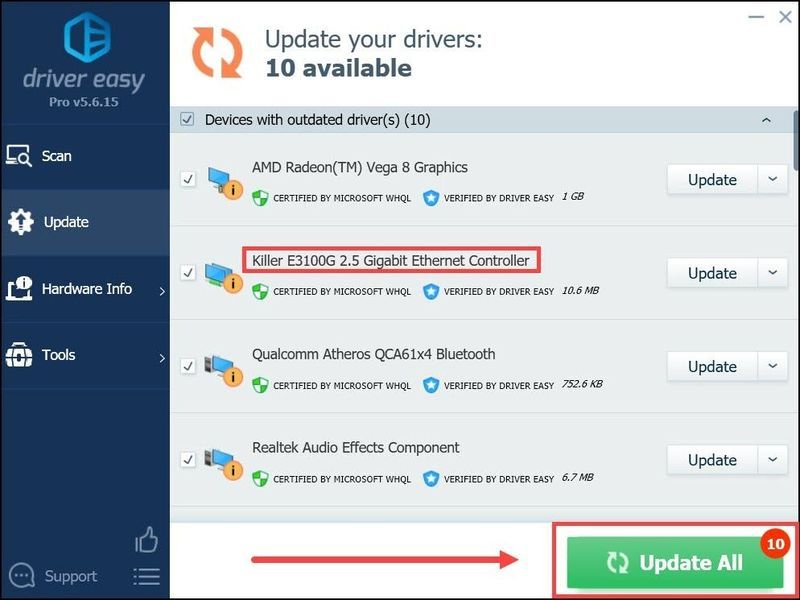
- Нажмите Обновить все для автоматической загрузки и установки правильной версии все драйверы, которые отсутствуют или устарели в вашей системе.
(Для этого требуется Про версия — вам будет предложено обновиться, когда вы нажмете «Обновить все». Если вы не хотите платить за Pro-версию, вы все равно можете загрузить и установить все необходимые драйверы в бесплатной версии; вам просто нужно загрузить их по одному и установить вручную, как обычно в Windows.)
Pro-версия Driver Easy приходит с полная техническая поддержка . Если вам нужна помощь, обращайтесь Служба поддержки Driver Easy в .
После обновления сетевого драйвера перезагрузите компьютер и проверьте, не отключается ли Destiny 2 снова.
Если последний сетевой драйвер не приносит вам удачи, просто перейдите к следующему исправлению.
Исправление 4: попробуйте серверы в другом регионе
Некоторые игроки сообщали, что переход на другие серверы может остановить отключение. Чтобы проверить, является ли это региональной проблемой, вы можете попробовать переключиться на другой регион и протестировать игровой процесс.
Обратите внимание, что в настоящее время вы не можете изменить свой сервер Destiny 2 в Steam . Если вы используете Steam, вы можете перейти к следующему исправлению ниже.
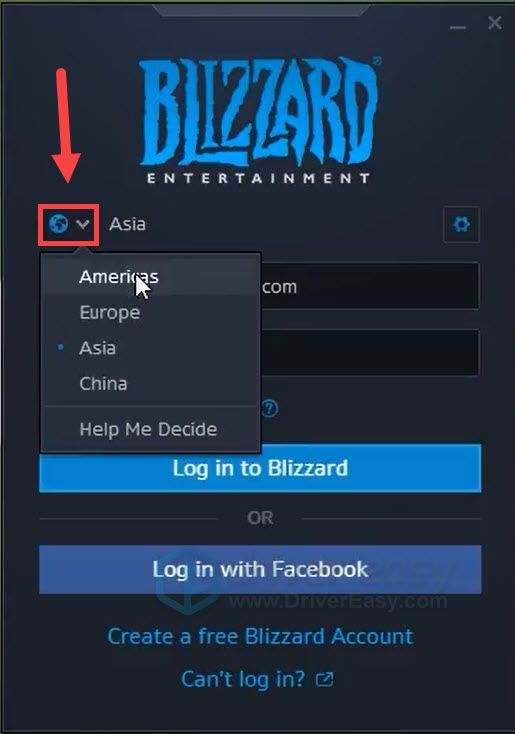
Вот как вы можете изменить свой сервер в клиенте Battle.net:
- Откройте клиент Battle.net и выйдите из системы.
- В окне входа нажмите кнопку значок глобуса изменить свой регион. Затем войдите в систему, как обычно.
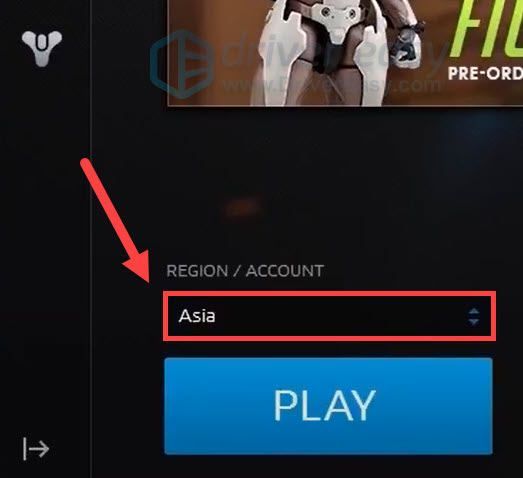
- В левом нижнем углу щелкните поле под РЕГИОН/АККАУНТ и измените свой регион.
Теперь вы можете запустить Destiny 2 и проверить соединение.
Если код ошибки появляется снова, вы можете попробовать следующее исправление.
Исправление 5: используйте VPN
Если ни одно из приведенных выше исправлений не может вам помочь, попробуйте VPN . VPN-серверы предлагают более стабильное соединение с игровыми серверами, и вам не нужно будет беспокоиться о канцелярских проблемах с типом NAT, переадресацией портов и настройками брандмауэра. Если использование VPN решает проблему, вы можете вернуться к устранению неполадок, когда захотите.
Имейте в виду, что нам не нравятся бесплатные VPN, поскольку они всегда чего-то добиваются. Иногда даже самые дешевые планы VPN дают вам доступ к серверам премиум-класса.
И вот некоторые VPN, которые мы рекомендуем:
- НордВПН
- Серфшарк VPN
- КиберГост VPN
Надеюсь, этот пост поможет вам решить проблему с подключением к Destiny 2. Если у вас есть какие-либо вопросы или предложения, не стесняйтесь оставлять комментарии ниже.
- Судьба 2
The bee error code corresponds specifically due to a network-related issue in your game. It can cause severe disruptions to your gameplay. Most of the time, players will end up encountering the problem while they are playing an important activity in the game like the Nightfalls. It will usually be followed up by the game booting them out of the activity, and back to the Orbit menu screen.
However, whatever the case may be, the problem has a slight chance to fix itself since the malfunction can be rarely originated due to the background scheme of things such as Bungie‘s backend servers getting disturbed. But if not, then more than likely, it is gonna be on your end and it will not resolve unit you administer a working fix to alleviate the problem.
According to the Official Bungie troubleshooter guide on the error code bee in Destiny 2, it states that the issue is generally caused by a disconnection in the traffic routes between your internet and the backend servers. It can even be caused by packet loss or the router and its wiring having disorganized implications. These can all be easily avoided by registering a few short fixes that can help you cure the error code as quickly as possible.
Key Highlights
- Bungie classifies their errors into codes such as Bee, which occurs due to traffic disruption between the player and the game servers.
- The error usually happens during gameplay and kicks the player out of any activity and back to the main Orbit screen.
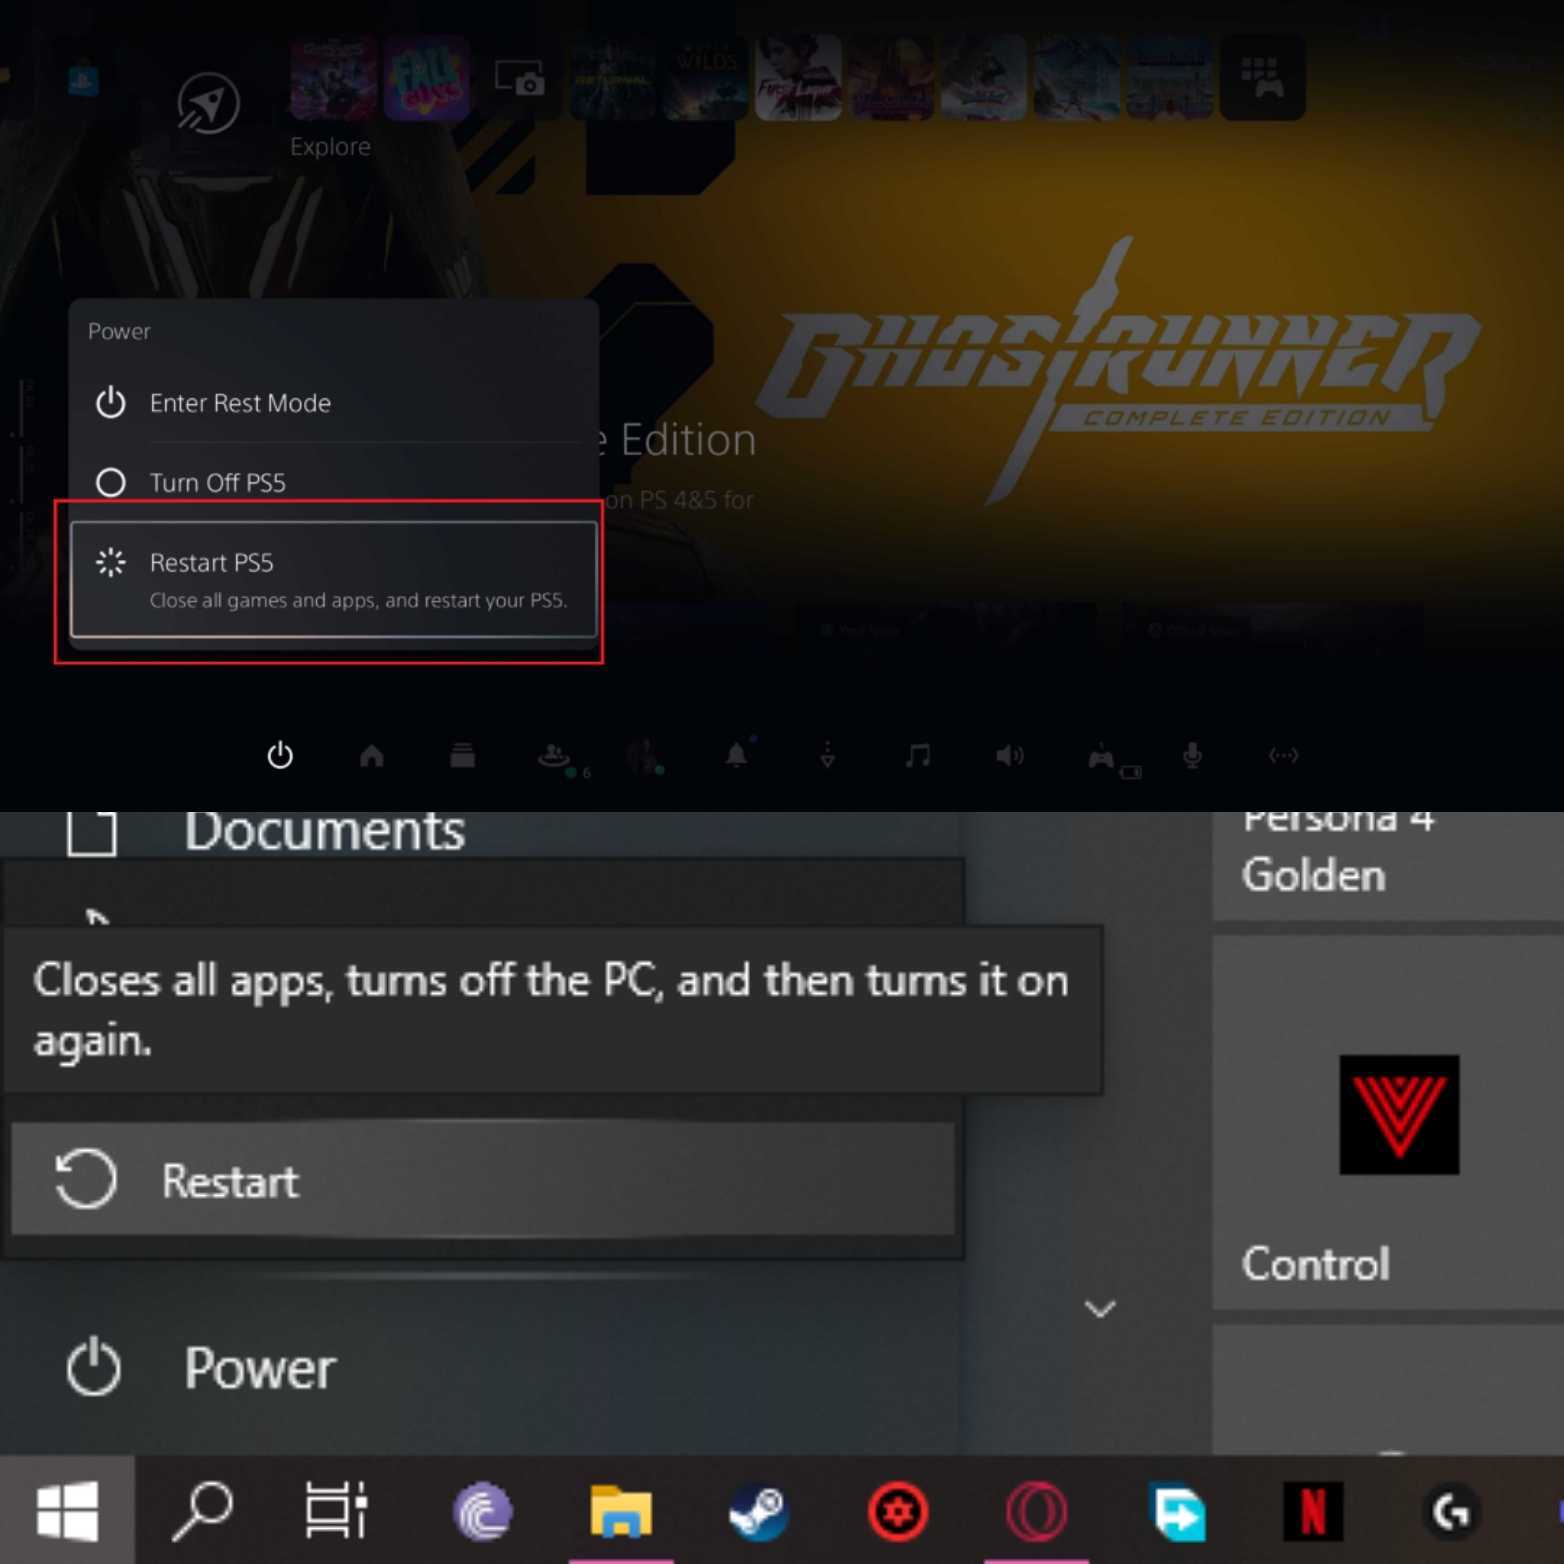
- Try restarting your game; if the problem continues, try restarting your PC or Console. You can also try Power Cycling by keeping your device unplugged for a few minutes.
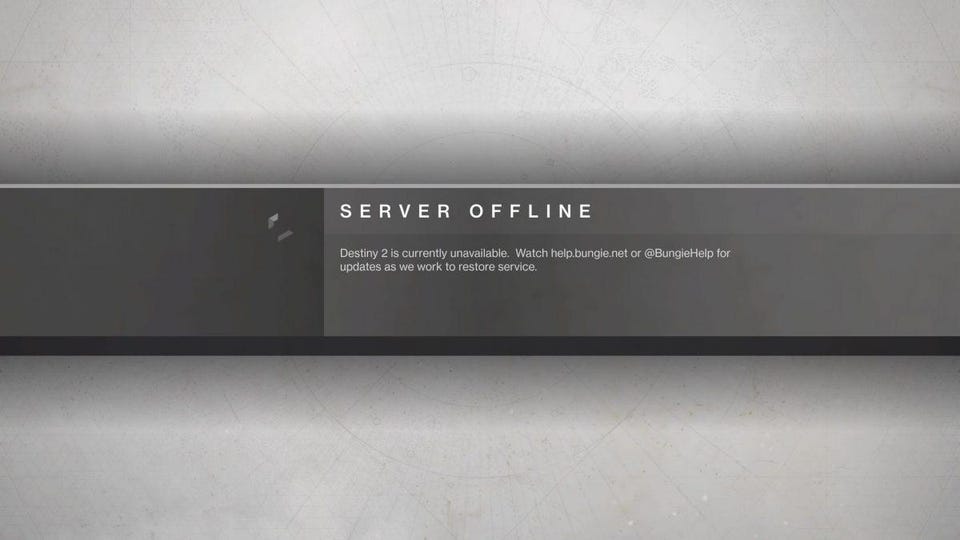
- Secondly, check if the game’s servers are under maintenance by checking Bungie’s Up-to-date Maintenance List, as the developers may take down the servers to fix bugs or release patches.
- Steam has a feature to check for corrupt game files. You can use it by going to the Local Files tab in the game’s Properties from your Steam Library and clicking “Verify integrity of game files”.
- As described in the guide, you can also set up a Static IP Address and Port Forward Destiny 2. This allows your device to have a more stable connection to the servers.
- You can also try to use a VPN to connect with the game’s servers, as it sometimes resolves the problem.
- Windows Firewall can also prevent the game from connecting to the servers. You can fix this by adding Destiny 2 to the list of apps allowed through Windows Defender Firewall.
- And lastly, you can upgrade your connection to ensure a smooth and stable connection. We also recommend using an ethernet cable instead of a WiFi connection.
- Before we Begin: Destiny 2 Error Code Centipede
How To Fix The Bungie Error Code Bee
Thankfully the error code bee isn’t something that will require you to perform rocket science levels of tasks in order to successfully resolve it. At the end of the day, Destiny 2 is a game where everything is constantly in motion, and your data is shared through a steady internet connection and the stability of its backend servers.
There have been numerous threads about the error code bee on the Official Forums of Bungie, as well as the multiple community platforms of Destiny 2. It is all thanks to the players in the Reddit and Discord groups of the game who were kind enough to share some workarounds that managed to work for them.
Players encountering the issue have had it resolved thanks to some loopholes and methods, which we are now going to discuss as briefly as possible. We highly encourage you to follow each one carefully as even using these fixes can help you cure the stress of this problem within a few minutes. They are mostly centered around your network connection as well as a few other fixes that are related to the hardware side of things.
- More From eXputer: As Dusk Falls Multiplayer Not Working
Restart The Game Or The System
Starting off with the first workaround or fix that is easily one of the oldest tricks in the book revolves around simply restarting your game, or even better, the console or PC. It is one of the most essential tricks that you should apply first to kickstart any video game that is causing random issues or has gotten stuck unexpectedly.
It is a universal fix that most gamers have been using since the dawn of the time when video game consoles first started existing in the 70s. You can instantly force quit most games on your PS5 or Xbox Series X by simply quitting or closing the application from the main dashboard of the console. After which you should have no trouble relaunching it again to see if the error code bee persists or not at the login screen in Destiny 2.
Meanwhile, PC users can opt to instantly force quit Destiny 2 by pressing the ALT + F4 keys together which lets you instantly close out an application or software on your desktop. It is one of the handiest features that are solely available to Desktop users of Destiny 2 that can let them instantly close out and restart the game
We highly suggest booting up the game a couple of times to ensure it isn’t the one acting weird by prompting you with an error code out of the blue. Furthermore, you can also boot up and log in to the game relatively fast and quickly if you have it installed on any of the high-speed storage devices such as an SSD or M.2 drives.
However, if restarting the game just doesn’t work out then it might be time to reboot your console or PC to see if it fixes the error code from persisting. It will then refresh the state of their functionality or the software if it’s the one causing any major issues to the game application. Preferably, if you have your Windows OS installed on an SSD drive then you can pretty much boot it up within a short span of a few seconds.
Alternatively, you can also try “Power Cycling” your PC or console. It isn’t too complicated to do and ensures the OS of your PC runs with increased efficiency across the board. Just completely shut off your PC and unplug its power cable from the main switch output. Give it a couple of minutes and then plug everything back into place and boot it up. Head back into the game and check if the Error Code Bee is resolved or not in Destiny 2.
Evaluate The Destiny 2 Server Status
The next step that all guardians of Destiny 2 should take is to check if there is no ongoing maintenance happening in the game at the moment. The backend servers in massively multiplayer games like Destiny 2 are the backbones for their proper working subroutines. There are different regional servers for the game which all connect back to the main ones at Bungie so that players can connect to the game in peace.
However, developers will often need to take the game offline for immediate purposes such as resolving game-breaking bugs or glitches. It is the same case with D2 as the game undergoes scheduled maintenance for a brief period of time, especially before an expansion launches or to send out a crucial patch to its playerbase. In fact, these actually help to provide stability and firmness to the general ecosystem of the game.
So for those who are unaware, the game will let you know most of the time when maintenance is about to occur with an in-game notification once you’re in the orbit screen. But there is a quick and easy way to check that beforehand too and that is by visiting and following the Bungie Help Twitter page.
It is essentially the Technical support page by the developers who will constantly update users with any ongoing issues to the game or any sort of major problems for which the game will momentarily be taken offline.
Furthermore, you can also check out the Up-to-Date Maintenance List by the developers at Bungie which lets you know about any future offline statuses for the game. So be sure to always verify the status of the servers before you play the game using the sites provided by Bungie in order to ensure you don’t run into issues such as the error code bee in Destiny 2.
Verify Integrity Of Game Files On Steam
Steam by Valve is easily the most accessible and widely used game launcher on the market, even with the rise of the Epic Games Store, it has managed to retain its popularity after all these years. The launcher itself has many useful features that go missed by users, especially the one that lets you verify and scan the integrity of the directory files of the games in your library on the platform.
The “Verify Integrity of Game Files” feature will allow users to review the game files in their directory that have gone either missing or corrupted to cross-check with the ones stored in the internal servers of Steam. Doing the process with Destiny 2 will let you assure that any deleted game files are the ones causing the error code bee. You can easily accomplish this by following the exact step-by-step procedure we have listed for you:
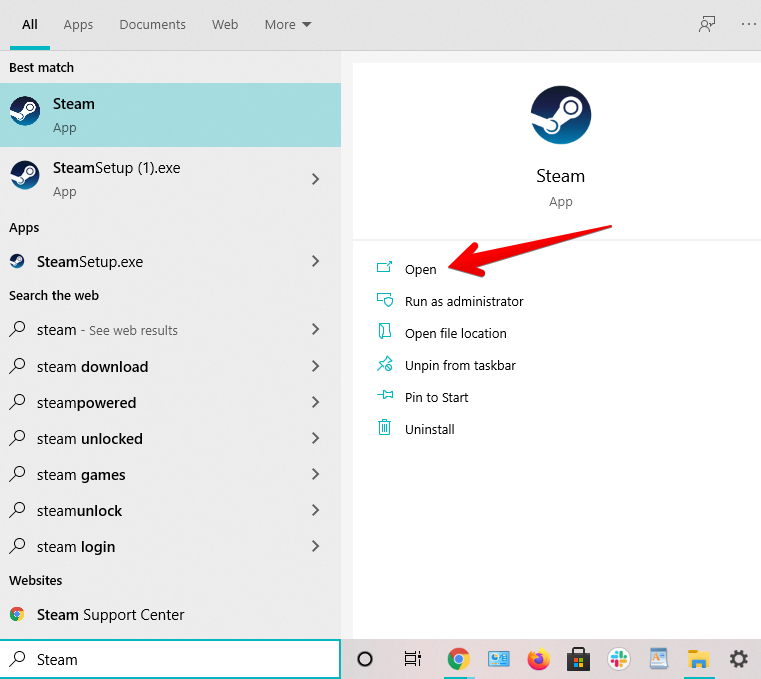
- First things first, launch the Steam client application by either typing its name in your Windows Search bar or you can also have it permanently pinned under your taskbar to open it in an instant.
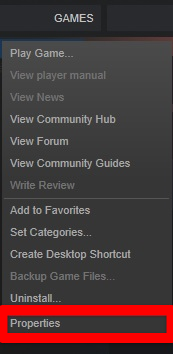
- Once you have launched Steam, look upwards to the interface of different options and head into your “Library” and here you should see the list of your games in the left sidebar menu. Locate Destiny 2 and Right-click on it to open up a small sub-menu, here click on the ‘properties’ option to get to the next step.
- The Properties menu has a variety of features that can let you tinker with the characteristics of the game from managing its beta versions and even manually checking for any updates pending on them. But our main focus here is to just navigate towards the “Local Files” option. Select it and lo and behold, you should now have the option to verify the game files of Destiny 2 by simply clicking on the option as shown in the image.
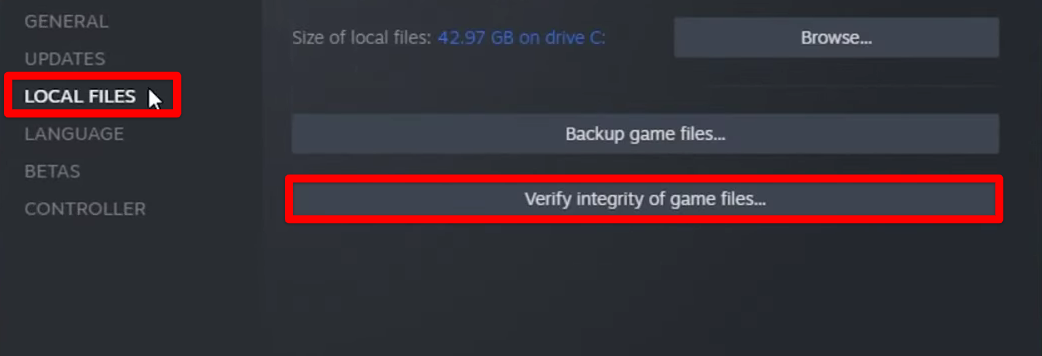
It is worth keeping in mind that the verification process can take upwards of roughly 10 to 20 minutes but it all mostly depends on the size of the game as well as the missing files. If there is any vital file that has gone absent from the directory of the game, Steam will notify you of it at once and put it in your downloads section. Once it is done head back into Destiny 2 and check if the error code bee is resolved so we can move on to the next step.
Enabling Static IP Address
Bungie has already summarized in their official troubleshooting that the issue may stem from your router wiring or the internal connection in it. Thankfully there is a way to bypass that roadblock completely without having the need to contact your Internet Service Provider. Users can essentially enable a Static IP address on their Desktop which in comparison to dynamic IP addresses will improve their connection with outgoing servers.
Doing this entire process will also let you enable Port Forwarding to Destiny 2 but before we even do that, let’s go over the exact steps to get the necessary information about your router so you can use that in order to set up the Static IP in your Windows system:
- First of all, you will need to clarify and gather the details of your router network connection which isn’t hard at all. Thankfully, these credentials can relatively be found with a simple check from a menu box.
- Open up the Windows Command Box by pressing the Windows + R Keys in conjunction.
- Type ‘CMD’ in the search box and then proceed to run it.
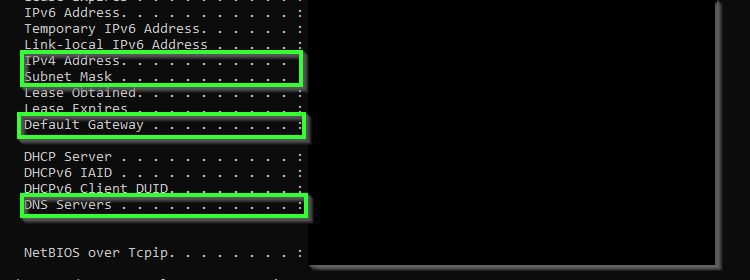
- that opens up, paste the text “ipconfig /all” and hit the enter button.
- You should now be able to notice and access your IPv4 Address, Subnet Mask, Default Gateway, and DNS Servers information which we are going to use to organize a static IP address.
Next up is assigning the static IP to get a secure connection of your System to your internet router or modem, which is covered in the following step-by-step process:
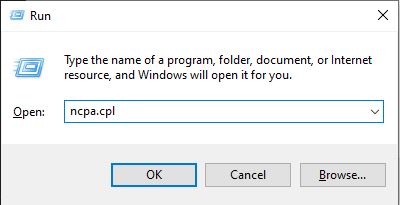
- Just like before, press together the Windows + R key to open up the Windows command box.
- Type in “npca.cpl” and hit the Enter key to continue.
- You should now have a list of your currently available Network connections including wireless and ethernet-connected ones displayed on the screen.
- Select the one you currently use on your desktop and click on its Properties.
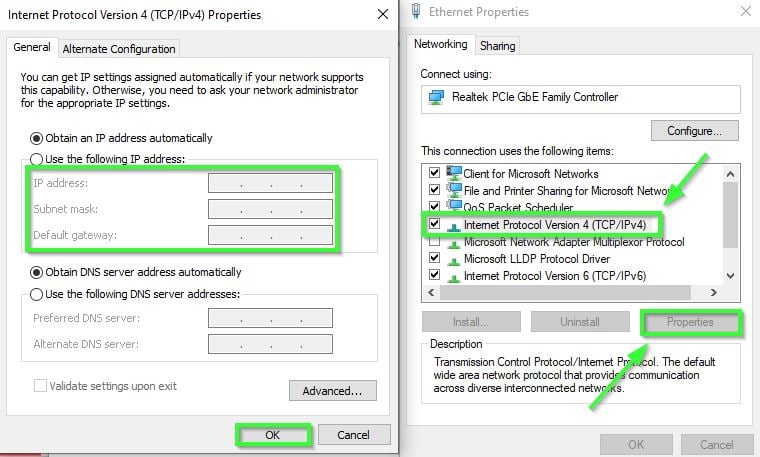
- Select and open up the Internet Protocol Version 4 (TCP/IPv4) menu, as shown in the image above, and click on properties to modify its options.
- In the next menu, click on the setting to “Use the following IP Address” instead of an automatic one.
- Fill in the relevant information we discovered in the first steps of the process, which are the following router data: IP address, Subnet mask, Default gateway, and DNS servers.
- Alternatively, you can opt to use the Official Google DNS settings which is done by inputting ‘8.8.8.8′ in the Preferred DNS Server box and in the Alternate DNS Server box, simply typing ‘8.8.4.4’ should do the trick. The Google DNS is a great way that has helped a few users in the past and present to successfully establish stable connections.
Console players of the game will unfortunately need to access their network settings in order to get the information and you might need to modify the router settings themselves. We recommend contacting your ISP to do that since every router menu is different than the others in most instances.
Back to the finishing touches, simply click on OK to apply the changes on your internet connection, and then head back into Destiny 2 to verify if it fixed the bee error code, if not then it’s time you unlocked the ports of the game on your system or console, provided by Bungie themselves.
Port Forwarding Destiny 2
Once you have successfully enabled a static IP address, you can then move on to applying port forwarding to the game by setting it up manually through your router or by contacting your ISP. It is an added benefactor that can ensure your private network is firmly connected through its peer-to-peer connections (P2P). Port forwarding can boost the connection speed, and any chance of latency or lag plus improve your overall multiplayer gameplay.
It basically involves heading into the main router settings and inputting the various port numbers from two different port destinations: TCP & UDP. Just keep in mind that the router menu may differ for everyone, so here is how you can enable ports in Destiny 2:
- The Default Gateway IP address will be your key to logging into your router mainframe, it is different for everyone but luckily, you should already know about it as we covered it in the Static IP methods above.
- The tricky step will be to locate the actual menu in the router interface to set up the ports but it shouldn’t be too difficult to find since in most cases, it tends to have its own special menu or under the IP settings.
- Once you locate the menu, if it asks for it then fill in your Static IP address.
- You should now notice different rows to paste in the Port digits for Destiny 2, which you need to accordingly with all of the TCP and UDP port routes tailored for the PC version of the game:
- TCP: 80, 443, 1119-1120, 3074, 3724, 4000, 6112-6114, 7500-7509, 30000-30009
- UDP: 80, 443, 1119-1120, 3074, 3097-3196, 3724, 4000, 6112-6114, 27015-27200
This is generally considered as the most beneficial workaround to fix most of the network connection errors of Destiny 2 since Bungie has already stated that the Bee error code coincides with the ‘Lion’ and ‘Fly’ codes too on their troubleshooting website.
There have been numerous threads on the subreddits of the game where users have managed to potentially fix the problem by port forwarding the correct routes associated with their console or PC to the Destiny 2 backend servers. However, if it still doesn’t work out, then worry not as we have a couple of more tricks up the sleeve to alleviate the error in the game.
Swapping To a VPN Connection
There is a constant evolution in the genre of the multiplayer title, games like Apex Legends and Fortnite are such heavy-hitters that have garnered the attention of millions who actively play them on a regular basis. But most of the time, that increase in the surge of players trying to log into the game or playing it can ultimately crash other users. To combat this issue, users will more often than not, switch to a VPN connection to play without any issues.
The VPN essentially stands for a Virtual Protocol Network. It basically provides users with a secured accessway to private and public networks with ease as well as bypasses any barriers of issues or problems when connecting to the backend servers of Multiplayer-only games such as Destiny 2.
Players will rely on a VPN to log into most games with relative ease if the regional servers are malfunctioning or if the game itself is posing random issues for no specific reason. The network error codes in Destiny 2 such as the Bee or Weasel will kick you back to the login screen, so it is here that you are advised to use a VPN which will hopefully prevent any of these issues from occurring at all.
Thankfully there are tons of options to choose from when it comes to a verified and stable VPN service, there is a wide variety of options to use that can get your various region-locked video games and applications up and running safely.
There is the option of well-known and popular premium services such as NordVPN and ExpressVPN which will easily get the job done. If you are not a fan of paying for premium subscriptions, then you might surely consolidate with the offerings of Windscribe or ProtonVPN, which have excellent free trials you can use.
They are all excellent and high-quality VPNs, trusted by popular by many Tech Gurus on the internet that can let you browse anonymously without having to fear that your data is getting leeched away or publicly accessed. It is the best way to smoothly log into Destiny 2 without any hindrances.
Allow Windows Firewall Defender Access
One of the few nifty tricks that should be worth applying is to allow your multiplayer games to have permission through the Windows Firewall Defender. It is essentially the gateway from the Windows OS that allows applications and software to access your Public and Private networks. Permitting Destiny 2 through both of these domains will make sure it freely has access to connect to the backend servers, without causing any problems.
Most of the time when you launch a game for the first time, you will be notified immediately by your Operating System if you want to grant the application access to the Private and Public networks of your location. But if by the slight chance you missed that prompt, we have got you covered on how to manually do it on your desktop:
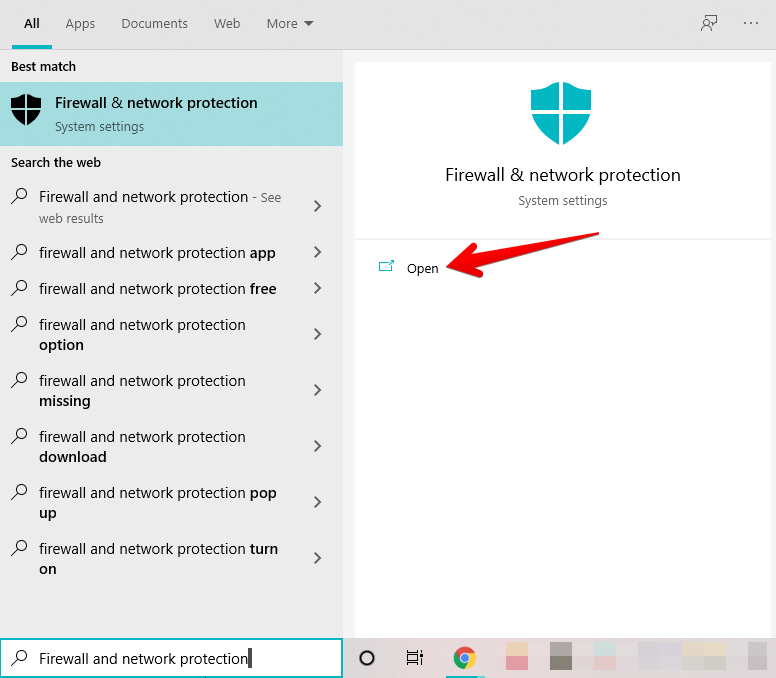
- First of all, open up the “Firewall and network protection” section of Windows Security on your PC. Users can do that by simply searching for it using the Windows Search bar, heading into the security settings of the OS, or just simply heading into the Control Panel.
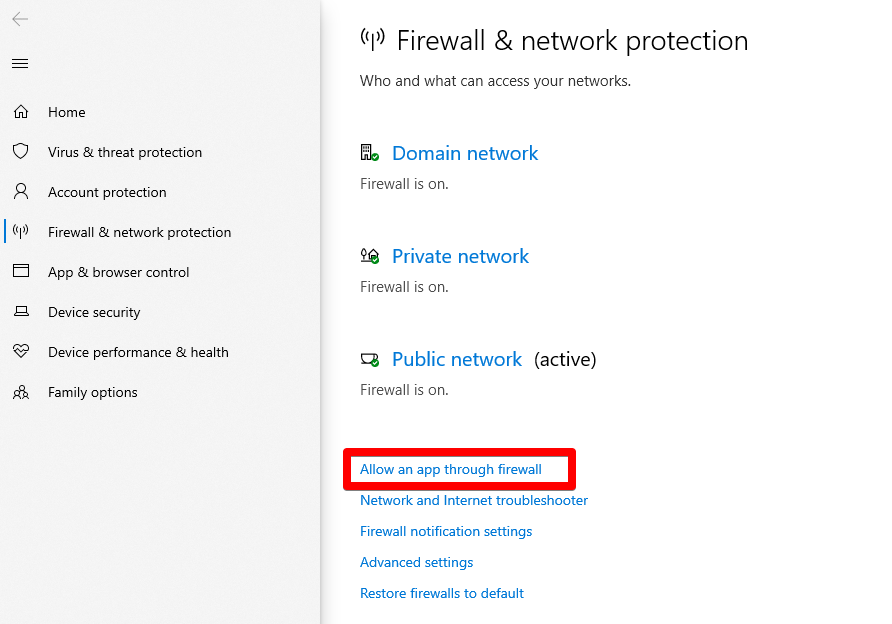
- You will now be in the Windows Security options and the next steps will involve you needing to navigate through some self-explanatory menus after clicking on the “Allow an app through firewall” option.
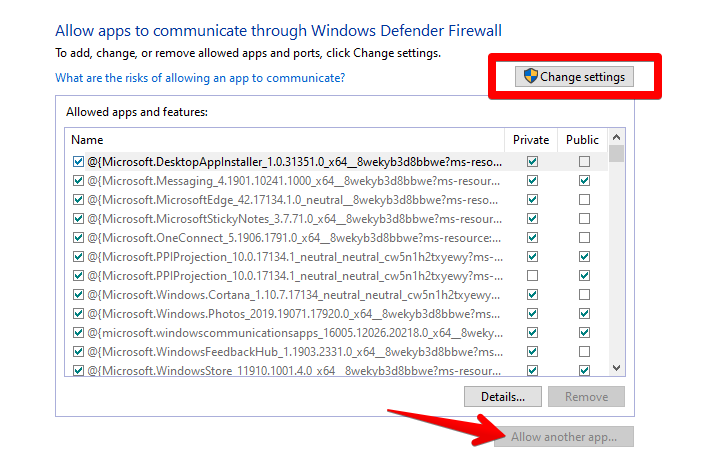
- You will now be in the Windows Firewall settings where you will be able to browse through the long list of applications and software found on your PC to grant access to your private or public networks. It is here where you need to only add the ‘Exe’ or the Executable file of Destiny from its main directory.
- Browse through your PC and locate the file and add it to the list.
- Once you have added the application to the list, you now just have to check the boxes next to it as shown in the image above to allow it to access both your Private and Public networks. Lastly, don’t forget to click on OK at the bottom to apply these changes.
- Head Back into Destiny 2 and inspect if the error code bee has been cured by playing any activity like a strike or crucible match without it booting you out of it, otherwise, we recommend moving on to the last method in our list.
Improving Your Network Connection
Destiny 2 is a live-service title that is constantly shifting its algorithms and functionality instances as you are playing the game on a daily basis. The game requires a steady stream of internet connection so that it can run without any hiccups or interruptions.
According to Bungie on their Official Error code Bee guide, they stated that they “…recently detected a 25% packet loss from the UK at the same time a number of users located there saw errors”. What it means is that the error code might just be stemming from poor or weak network connections of several users.
We have already discussed how you enable a Static IP which will establish a proper link for private networks such as yours and other destiny 2 players to connect effectively to the backend servers. You can further boost that potential by adding in a Google DNS and most importantly, by port forwarding the TCP and UDP routes.
However, an even better safeguard would be to switch from a wireless internet connection to an ethernet cable one as it will greatly improve your overall speed. If by any chance, your router is located in another part of the house or office we strongly recommend wiring an ethernet wire back to the modem or device. Doing so, you will notice a dramatic change in bandwidth and connectivity.
Furthermore, in a game such as Destiny 2, your poor internet connection will also affect other players in your lobby such as in the PVP matches in the Crucible. What it means is that enemy players may be affected by the latency and lag that you experience, making it unfair for your opponents to hit you back at all. It will end up getting you reported for weak and unstable connection so refrain from playing under insecure internet speed.
We strongly suggest contacting your ISP and asking for an upgrade in your internet package or better yet, for a professional to come by your establishment and reroute an ethernet cable to your PC or console. It is the surefire way that you can get back into the game, especially if you were previously using a Wi-Fi connection.
Was this article helpful?
Thanks! Do share your feedback with us. ⚡
How could we improve this post? Please Help us. ✍
Содержание
- 1 Решение 1. Измените способ подключения к Интернету
- 2 Решение 2. Перезапустите и полностью отключите вашу консоль
- 3 Решение 3: Перенаправление портов
- 4 Решение 4. Обратитесь к своему интернет-провайдеру и замените старое оборудование
Код ошибки Bee — один из самых печально известных кодов ошибок Destiny, и он давно беспокоит пользователей. Официальное заявление Bungie состоит в том, что код ошибки вызван неправильной связью между вашим модемом и серверами Bungie, но большинство людей утверждают, что их сетевые настройки почти идеальны.
Ошибка может быть решена различными способами, и вы никогда не знаете, каково реальное решение для вашего случая. Вот почему мы рекомендуем вам следовать всем приведенным выше решениям, чтобы увидеть, каково реальное решение для вашего кода ошибки Bee.
Решение 1. Измените способ подключения к Интернету
Большинство пользователей уже знают, что играть по беспроводному соединению небезопасно, и это может привести к большой задержке и частым отключениям. Однако некоторые пользователи сообщают, что иногда все наоборот, когда они переключаются с прямого подключения к модему на использование Wi-Fi.
Это означает, что код ошибки может появиться либо из-за неисправного соединения с модемом, либо с маршрутизатором. Если вы использовали соединение Ethernet, попробуйте переключиться на Wi-Fi и запустить игру, чтобы проверить, появляется ли код ошибки; и наоборот. Обе эти опции могут помочь вам навсегда избавиться от кода ошибки Bee.
Заметка: Если вы находитесь в положении, вы также можете попробовать заменить маршрутизатор, если у вас есть запасной, поскольку некоторые маршрутизаторы не позволяют Destiny правильно подключаться из-за большого количества используемых портов.
Решение 2. Перезапустите и полностью отключите вашу консоль
Это решение помогло многим людям разобраться с их кодом ошибки Bee, и это решение является довольно общим методом для решения почти всех проблем, связанных с Xbox. Естественно, этот метод может применяться только к пользователям, играющим в Destiny на Xbox.
Тем не менее, убедитесь, что все ваши игры синхронизируются в сети и создаются резервные копии, поскольку этот процесс может в конечном итоге удалить их из локальной памяти Xbox One. Есть два способа удалить кеш на Xbox One и полностью перезагрузить консоль:
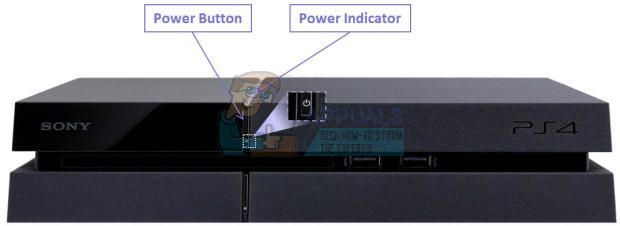
- Нажмите и удерживайте кнопку питания на передней панели консоли Xbox, пока она полностью не отключится.
- Отключите блок питания от задней части Xbox. Нажмите и удерживайте кнопку питания на Xbox несколько раз, чтобы убедиться, что нет оставшегося питания, и это на самом деле очистит кэш.

- Подключите блок питания и подождите, пока индикатор, расположенный на блоке питания, изменит свой цвет с белого на оранжевый.
- Снова включите Xbox, как обычно, и проверьте, отображается ли код ошибки Tapir при запуске Destiny или Destiny 2.
Альтернатива для Xbox One:
- Перейдите к настройкам Xbox One и нажмите «Сеть» >> «Дополнительные настройки».
- Прокрутите вниз до параметра «Альтернативный Mac-адрес» и выберите опцию «Очистить».

- Вам будет предложено выбрать действительно сделать это, так как ваша консоль будет перезапущена. Ответьте утвердительно, и ваш кеш теперь должен быть очищен. Откройте Destiny или Destiny 2 после перезапуска консоли и проверьте, не появляется ли код ошибки Tapir.
Если вы используете PlayStation 4 для игры в Destiny, следуйте приведенным ниже инструкциям, чтобы выполнить полную перезагрузку PlayStation 4, поскольку PS4 не имеет возможности очистить кэш:
- Полностью выключите PlayStation 4.
- Когда консоль полностью выключится, отсоедините шнур питания от задней части консоли.
- Пусть консоль остается отключенной от сети хотя бы на пару минут.
- Подключите шнур питания обратно в PS4 и включите его, как обычно.
Решение 3: Перенаправление портов
Переадресация портов на самом деле является отличным решением проблем такого типа, потому что Destiny использует довольно странные порты маршрутизатора, которые довольно высоки, и некоторые маршрутизаторы блокируют эти порты по умолчанию, а некоторые нет. Важно выполнить эти изменения достаточно осторожно, поскольку вам нужно будет открыть эти порты на маршрутизаторе, если у вас есть для этого необходимые разрешения. Внимательно следуйте приведенным ниже инструкциям и избавьтесь от кода ошибки Bee:
Прежде всего, нам нужно вручную назначить статический IP-адрес вашей консоли для маршрутизатора, который вы используете в данный момент, и этот процесс несколько отличается от PS4, чем на Xbox One.
Пользователи PlayStation 4:
- Вы можете попытаться навсегда назначить свой PS4 IP-адресу, который он использует в настоящее время. Чтобы узнать IP-адрес, включите консоль PS4.
- В главном меню PlayStation 4 выберите «Настройки» >> «Сеть» >> «Просмотр состояния подключения».
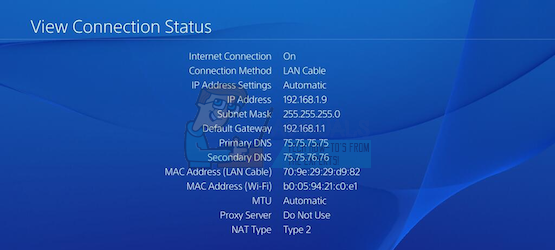
- Найдите IP-адрес на открывшемся экране и обязательно запишите его где-нибудь, поскольку он понадобится для включения переадресации портов. Убедитесь, что вы также записали MAC-адрес вашего PS4.
Пользователи Xbox One:
Вы можете попытаться назначить свой Xbox One навсегда IP-адресу, который он использует в данный момент. Текущий IP-адрес можно найти в разделе «Дополнительные настройки» в меню панели инструментов Xbox One. Чтобы узнать IP-адрес, включите Xbox One.
- Перейдите на начальный экран и нажмите кнопку меню на контроллере вашего Xbox.
- Перейдите в Настройки >> Сеть >> Расширенные настройки.
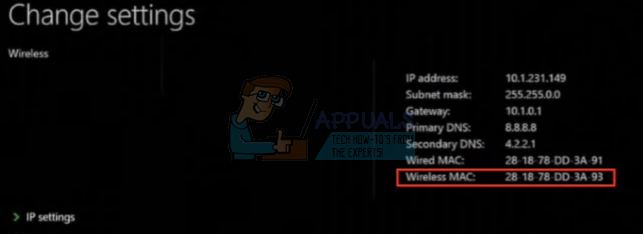
- В разделе настроек IP вы должны увидеть IP-адрес в списке. Запишите этот номер, потому что вам нужно будет назначить IP-адрес позже.
- Вы также должны увидеть проводной MAC-адрес или беспроводной MAC-адрес в списке настроек IP. Запишите 12-значный адрес для соединения, которое вы используете.
Это был первый шаг, когда мы собрали информацию о соответствующих консолях. Теперь нам нужно назначить статические IP-адреса для консолей, выполнив следующие действия:
- Откройте веб-браузер, введите свой номер шлюза по умолчанию (IP-адрес) в адресную строку и нажмите Enter.
- Введите имя пользователя и пароль для доступа к интерфейсу вашего маршрутизатора. Имя пользователя и пароль по умолчанию должны быть указаны в документации к маршрутизатору, на наклейке на боковой панели маршрутизатора или на веб-сайте Port Forward. Если имя пользователя и пароль были изменены по умолчанию, и вы их не помните, вам необходимо сбросить настройки маршрутизатора.
- Экран, позволяющий добавлять новые IP-адреса, отличается от маршрутизатора к маршрутизатору, и к нему нет общих правил.
- Прежде всего, найдите опцию «Включить ручное назначение» и нажмите переключатель рядом с «Да». Название опции может быть другим или опция может вообще отсутствовать.
- Найдите окно, которое позволяет вам ввести MAC-адрес и IP-адрес по вашему выбору, поэтому введите адреса, которые вы собрали в предыдущих шагах для соответствующей консоли.
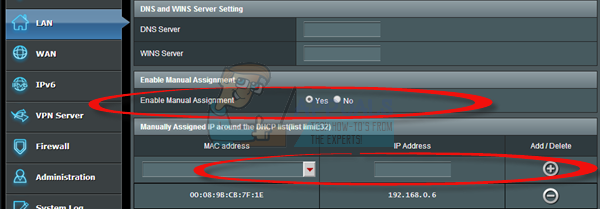
- После того, как вы это сделали, нажмите на опцию Добавить, и вы теперь добавили IP-адрес своей консоли к маршрутизатору.
Последний шаг состоит в том, чтобы фактически перенаправить порты, используемые Destiny, через ваш маршрутизатор и через консоль, чтобы снова запустить игру правильно. Опять же, эти настройки могут отличаться от маршрутизатора к маршрутизатору, но основа та же. Если у вас возникли проблемы с выполнением этих настроек, убедитесь, что вы ищете страницу справки производителя вашего маршрутизатора, где эти настройки могут быть объяснены более четко.
- Найдите раздел «Переадресация портов», пока вы все еще подключены к вашему маршрутизатору. Каждый роутер будет немного отличаться. Общими метками меню для раздела настроек, который содержит переадресацию портов, являются «Переадресация портов», «Приложения», «Игры», «Брандмауэр» и «Защищенная настройка». Если вы не видите ни одного из них или чего-то подобного, попробуйте «Расширенные настройки» и найдите подраздел «Переадресация портов».
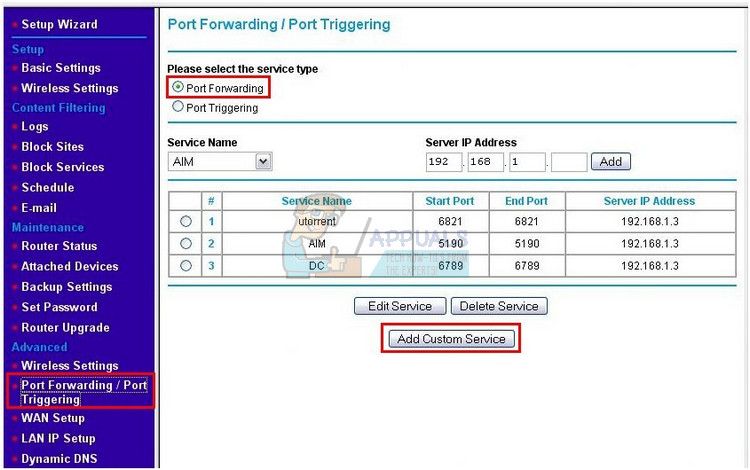
- Независимо от того, какой маршрутизатор или интерфейс, вам нужно будет ввести одну и ту же основную информацию. Введите порт, который вы хотите открыть в разделе «Внутренний и внешний», или введите диапазон портов, которые необходимо открыть в разделе «Начало» и «Конец». Специально для Destiny и Destiny 2 в маршрутизаторе необходимо открыть несколько диапазонов, они представлены ниже:
7500-17899 (TCP) Исходящий
30000-40399 (TCP) Исходящий
35000-35099 (UDP) Входящий и исходящий
- Сокращения TCP и UDP — это опции, которые вы должны выбрать в разделе «Тип сервиса». Поскольку вы можете выбрать только один из вариантов (или оба), повторите эти шаги несколько раз, пока вы не охватите все диапазоны, представленные выше.
- Введите статический IP-адрес, который вы создали для своей консоли в приведенных выше шагах, и убедитесь, что вы нажимаете на опцию Включить, если она доступна.
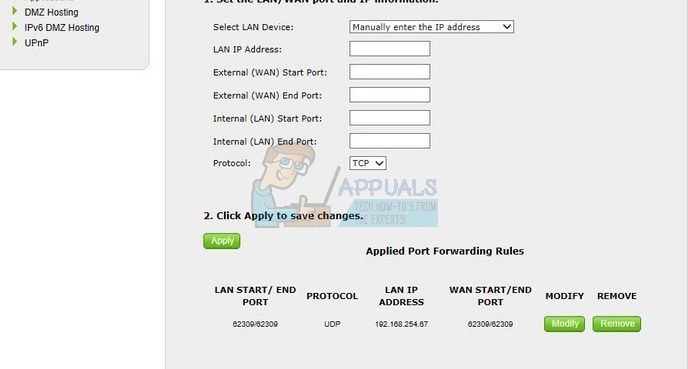
- Нажмите кнопку «Сохранить применить» и убедитесь, что вы перезагружаете маршрутизатор и консоль, чтобы полностью применить эти изменения.
Решение 4. Обратитесь к своему интернет-провайдеру и замените старое оборудование
Оказывается, что проблема с этим кодом ошибки была вызвана людьми, имеющими плохое оборудование, которое они использовали для своего подключения к Интернету, и они не заменяли его годами. В большинстве случаев эти люди использовали кабельный Интернет, чтобы играть в игру, и оказалось, что простая замена их смогла решить проблему.
Если вы пользуетесь кабельным Интернетом и не заменяли какое-либо оборудование более двух лет, возможно, вам следует обратиться к специалисту кабельной компании или просто купить и заменить оборудование самостоятельно.
Тем не менее, если вы используете какой-либо тип подключения к Интернету и начинаете замечать снижение производительности, обязательно обратитесь к своему интернет-провайдеру и убедитесь, что он делает все запрошенное, прежде чем проверять, продолжает ли появляться код ошибки.
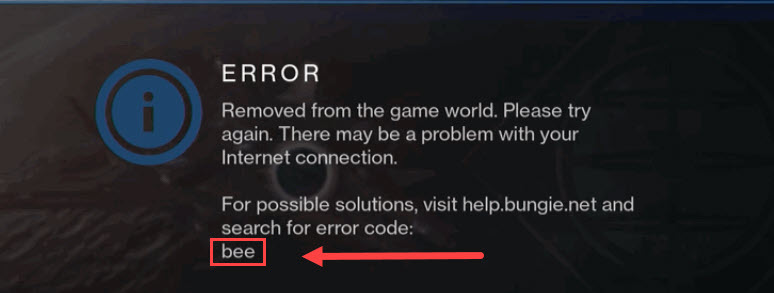
Destiny 2 is an online multiplayer game introduced by Bungie in order to match the expectations of the gaming community by providing them an environment featuring fictionalized characters and giving them the role of guardians of the earth’s last safe city. Although it is a well-structured and robust platform for online gaming, quiet recently, gamers are reporting several network errors and the most common among them is error code bee that states: Removed from the game world. Please try again. When this issue arises the game disconnects from the servers preventing the player from staying in the game and after several users’ reports, we looked into this problem and illustrated some efficient solutions that will help you to terminate the destiny 2 codes issue.

What Causes the Error Code BEE on Destiny 2?
After a deep survey of the user reports on this issue we have concluded that there are numerous triggers that might trigger this error on your system when you try to play the game.
- You might encounter this error if your console is experiencing a weak signal strength from your internet connection.
- If the console’s cache contains corrupted files, then you might come across the error code bee.
- Destiny 2 needs some open ports to operate properly and if they aren’t available, this error might be triggered.
If you have encountered this issue on your system, proceed to the remedies that are indexed below.
Pre-tips:
It is a temporary glitch that can be solved simply by power-cycling the internet router. If you have just encountered an error code bee, then try to follow the most basic troubleshooting steps before you proceed to any major solution.
- Take the power adapter of your router out of the socket and wait for it to shut down.
- In the meanwhile, detach all the power cords form your console and disconnect it from the power source.
- Shift all the electronic devices away from the router so that they don’t interfere with its wifi signals. If possible, change the position of your router and bring it closer to the console.
- Now power cycle the router by inserting its power adapters into the socket and wait for it to start.
- When the router shows full signal strength, insert the power adapter of your console into the socket and wait until it is turned ON and afterward check if the error still persists.
- If multiple users are connected to the common router ask them to avoid file-sharing, video streaming, or other bandwidth-intensive tasks on any device connected to your network.
How can you fix the Error Code BEE on Destiny 2?
Solution 1: Switch to a wired connection
This problem mostly occurs on your console due to a network connectivity issue that might not be permanent. The most efficient remedy to terminate network errors is to simply increase the signal strength and the best way to do this is to switch to a wired connection from a wireless connection. All you have to do is to disable WiFi in the console and connect your console directly to the modem with the help of an ethernet cable. After doing this there would be no packet losses in the network while playing the game and it will run smoothly. After connecting your console directly to the router via LAN cable, it is recommended to power cycle your router by following the steps stated in the Pre-tips section above.
Solution 2: Clear cache and data
There might be a chance that your console’s data and cache are responsible for the game issues hence, they need to be wiped out. In order to clear the data and cache, power cycle your console and follow the steps stated below to resolve this issue.
For Xbox:
- Open the Xbox settings and proceed to the Network option.
- Navigate to Advanced settings and select Alternate Mac Address.

Alternate Mac Address - Now select the Clear cache option.
- A window will appear on the screen and from there select Yes and wait for the console to restart.

For Play Station:
- Press and hold the power button of your console and wait for it to shut down.
- Detach the power cords from your console and repeatedly press and release the power button to clear the console’s cache.
- Now, attach the power cable to your console and insert the power adapter into the switch and wait for the console to restart.
Solution 3: Apply port forwarding
In some routers, the users apprised that they aren’t able to open the closed ports but it is not a big deal. Fortunately, there is a way around by forwarding some essential ports of the router to set an Open NAT type. Follow the steps indexed below and check if the destiny 2 codes issue is rectified.
- Navigate to the Settings of your console and select Network Settings.
- Navigate to the IP Address section and note down the IP Address and the MAC address on a piece of paper.
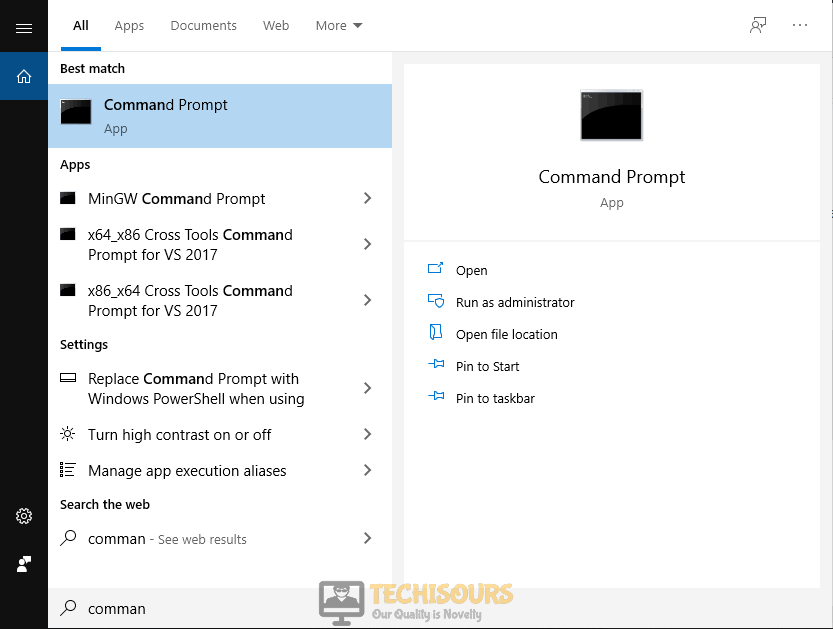
- Now start your computer and click the search button in the taskbar and type Command Prompt.

Type Command prompt - Type the following command in the prompt and hit enter to execute it.
ipconfig
- Scroll down until you see a setting for Default Gateway under Ethernet or Wi-Fi.

Note down Default Gateway - Copy the router’s Default Gateway IP Address and paste it in your browser’s search bar to open your Internet Settings.
- In the internet settings, enable the Manual Assignment option and add the IP address and Mac address that you noted before from the console. After typing in the addresses, click the Add button.
- Now navigate to the Port Forwarding section and open the following ports.
For Xbox:
UDP: 80, 500, 1200, 3074, 3544, 4500
TCP: 3074For Play Station:
UDP: 3074, 3478, 3479
TCP: 1935, 3478, 3480For PC:
UDP: 3074, 3097, 4380, 27000-27031, 27036
TCP: 2705 – 27030, 27036 – 27037 - In the Server IP Address, enter the static IP address that we created.
- Apply the settings and power cycle your router. (If you are playing the game on PC then proceed to the steps below)
- Now click on the search button in the taskbar, search for Windows Defender Firewall and select Advanced settings.

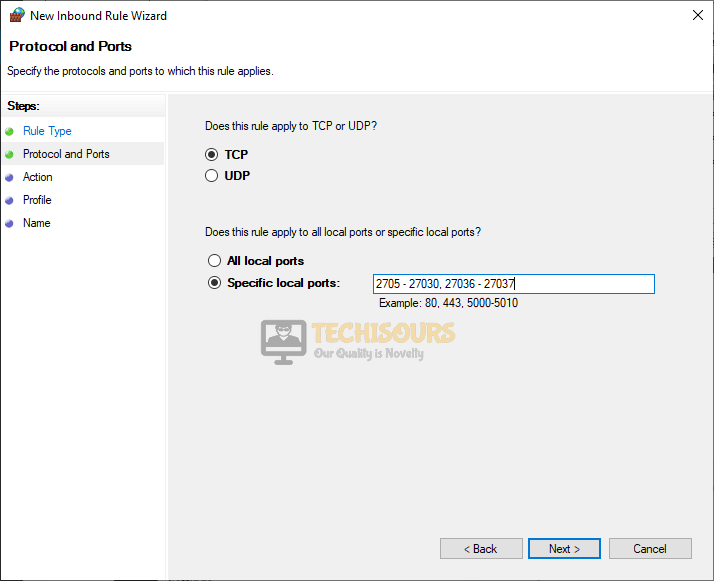
Choose Advanced settings - From the left pane, click on Inbound Rules and select the New rule option from the right pane.

Choose New rule - Check the button parallel to the Port option and select Next.

Select Port - Make sure that both options TCP and Specific local ports are checked and enter the TCP port numbers in the input field. Click next and follow the onscreen instructions.
Setting ports - Follow the same procedure to enter the UDP ports.
- Now, click on the Outbound Rules in the Advanced Security window and select New Rule.
Select Outbound Rules - Add the UDP and TCP ports here by following the same procedure you followed for Inbound Rules.
- If you have an operational Anti-virus software, disable it and restart your computer to check if the error is eliminated.


Solution 4: Enable UPnP in your router
In most of the cases, people encounter error code bee destiny 2 if they have set a Strict NAT type in their router which prevents their console to connect to the Bungie server. Hence, it is suggested to switch to Open NAT type from Strict NAT and enable the Universal Plug and Play (UPnP) feature in your router by following the steps given below.
- Click the search button in the taskbar and type Command Prompt.
Type command prompt - Type the following command in the prompt and hit enter to execute it.
ipconfig
- Scroll down until you see a setting for Default Gateway under Ethernet or Wi-Fi.
Note down Default Gateway - Copy the router’s Default Gateway IP Address and paste it in your browser’s search bar to open your Internet Settings.
- Navigate to the Firewall section and make a new Firewall level within your Router.
- Afterward, proceed to the Forwarding tab and select UPnP.
- Click on the Enable button parallel to UPnP to enable it.

Enable UPnP - Also, locate and disable Extended security and Assigned Games & Applications if they are already enabled.
- Apply the changes and restart your router to see if the error persists.

Solution 5: Tweak QoS Settings
Quality of Service (QoS) is an essential feature of the router that is used to prioritize traffic for the devices connected to your router. If your game unexpectedly disconnects from the server, then navigate to your QoS settings and give high priority to your consoles so that this error is rectified. Follow the steps to carry this task out:
- Click the search button in the taskbar and type Command Prompt.
Run Command prompt - Type the following command in the prompt and hit enter to execute it.
ipconfig
- Scroll down until you see a setting for Default Gateway under Ethernet or Wi-Fi.
Choose Default Gateway - Copy the router’s Default Gateway IP Address and paste it in your browser’s search bar to open your Internet Settings.
- Navigate to WPS wizard and select QoS settings from the left pane.
- Check the box parallel to Enable WMM settings and then click on Setup QoS rules.

Setup QoS rules - Click on Delete All button and then select Add Priority Rules.

Add Priority Rules - In the Priority Category, select the Mac address option.

Priority Category - Now click the button parallel to console you are using and set the priority to Highest. In our case, the console is Xbox.

Setting priority - Click Add and then Apply the settings.
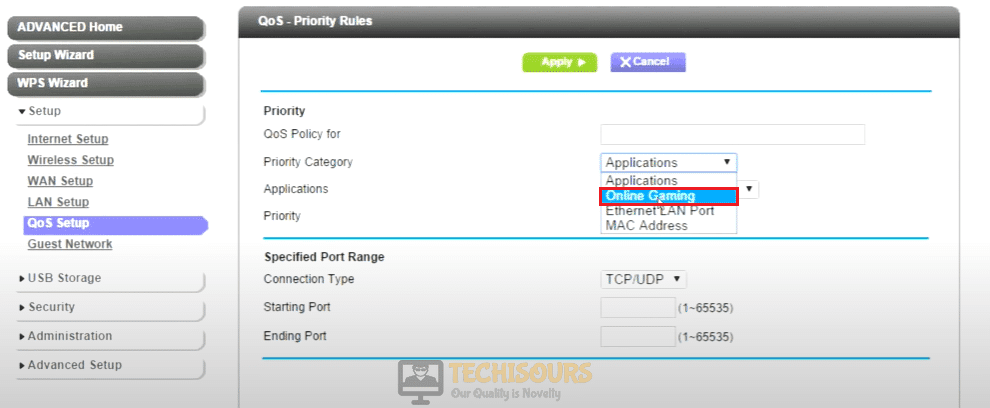
- Now go back to Setup QoS rules window and click on Add Priority Rule.
- In the Priority Category, select Online Gaming.

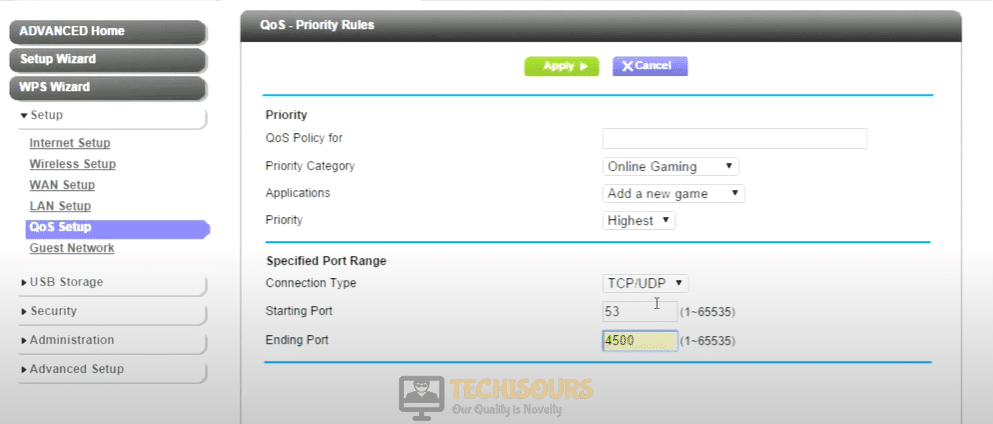
Online Gaming - In the Application drop-down menu, select Add a new game option.

Add a new game - Set the priority to Highest and make sure that the connection type is set as TCP/UDP. Now enter the starting and ending ports that are required for your console (These ports are listed in the above solution).

Setting ports - Apply the settings and go back to the QoS setup window.
- Check the box parallel to Turn Bandwidth Control On and enable the button parallel to Automatically check internet uplink bandwidth option.

Turn Bandwidth Control On - Restart your router and check if the error is rectified.


Solution 6: Run a ping and network diagnostic test
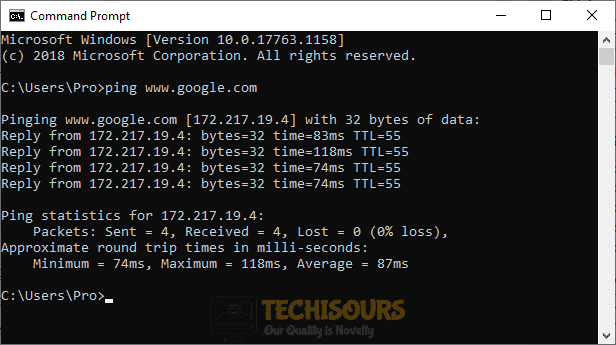
If you want to check that your computer is communicating with a server properly, then the most efficient way is to carry out a Ping test. If the other applications on your system are working fine and the problem is with only this particular game, then you can run a Ping and a network diagnostic test on your computer. This will ensure that the problem isn’t at your end.
- Click on the search button in the taskbar and search for Command prompt.
- Type the following command and hit enter to execute it.
ping www.google.com

Ping test - If you get a reply successfully then proceed to run a Network Diagnostic test.
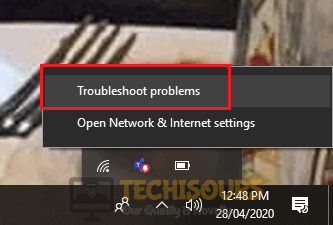
- Right-click on the WiFi icon at the bottom-right of the screen and select Troubleshoot Problem.

Network diagnostic test - When the scan is completed check whether the error code bee is eliminated and if it still exists proceed to the next potential fix below.
Solution 7: Replace network equipment
Several users have reported that the fault was with their old network equipment and when they got it replaced the error was eliminated. Monitor your network equipment by turning ON the hotspot of your mobile and connecting your console to that hotspot. If this remedy fixes this issue, then replace the Ethernet cable connected to the router first and check if the issue is resolved. If it doesn’t help, contact your Network Provider and replace your old router with a new one and get rid of this issue.
Solution 8: Contact your ISP
If none of the solutions explained above helped you to rectify the destiny 2 error code bee then it might be a chance that your area is experiencing high traffic at the moment that is preventing you to connect to the servers of Bungie. The last option you are left with is to contact your ISP, explain to them the exact issue, and wait for them to provide you a reliable solution to this problem.
Workaround:
The design engineers of this game have acknowledged the fact that the client and server connection might cease if the Bungie servers are under maintenance. If this is the case, then this is a temporary issue and the only thing you can do is wait for the maintenance to finish. Although you don’t receive a report on server maintenance, you can visit Destiny forums to check whether other people are having this problem at the same time too. If yes then it means that the servers are most probably down and you will get rid of this issue soon.
Hopefully, the error might have gone by now but if you need further assistance, contact here.
Если вы являетесь игроком Destiny, то вы уже либо получили ошибку с кодом BEE или так или иначе получите. Эта ошибка не позволит вам полностью закончить игру, что совершенно непозволительно.
Большая часть игроков получают эту ошибку прямо во время игры. Не так давно игра все-таки получила обновление и количество игроков сталкивающихся с данной проблемой уменьшилось. Однако ошибка все еще всплывает у некоторых людей.
Причины появления ошибки BEE
- Интернет-соединение: Вы можете получать данную ошибку в Destiny из-за проблем с сетью.
Если у вас медленное соединение и вы используете различные сторонние приложения полагающееся на Интернет, то вы вполне можете испытывать подобную проблему. - Рассоединение: Если у вас есть потеря пакетов или вас отсоединило от официальных серверов, то вы также можете получить данную ошибку.
Решения ошибки BEE в Destiny
- Вам необходимо выполнить правильную настройку вашего сетевого подключения для стабильной игры.
- Избегайте использования WiFi. Данный вариант конечно наиболее удобный , но порой он бывает одним из самых нестабильных. Для игры в Destiny вам необходимо стабильное Интернет-соединение и, желательно, чтобы оно было проводным.
- Подождите немного для стабилизации соединения перед началом игры. Большую часть времени, ошибка BEE возникает из-за нестабильной сети.
- Выполните правильную настройку своей консоли.
Destiny 2 может быть одной из самых популярных видеоигр, но она не застрахована от ошибок. Время от времени его игроки сообщают о множественных ошибках, и некоторые из них ломают игру. Одна из самых неприятных ошибок — Bee, которая связана с проблемами в сети. Чтобы помочь вам, мы собираемся упомянуть несколько методов, которые могут исправить код ошибки Bee в Destiny 2.
Содержание
- Как исправить код ошибки Bee в Destiny 2
- Перезагрузите маршрутизатор
- Используйте проводное соединение
- Обновите сетевые драйверы
Согласно официальному заявлению Bungie, код ошибки Bee появляется из-за сбоя связи между серверами Bungie и модемом пользователя. Из-за этого вам нужно сосредоточиться на решениях, связанных с вашим интернет-соединением. Прежде чем приступить к решениям, упомянутым ниже, мы предлагаем вам выполнить тест скорости Интернета, чтобы убедиться, что ваше соединение работает правильно или нет.

Перезагрузите маршрутизатор
Первое, что вам нужно сделать, это перезагрузить интернет-роутер. В большинстве случаев ошибка исправляется после перезагрузки маршрутизатора. Мы рекомендуем выполнять цикл питания вместо обычного перезапуска, так как он всегда оказывался лучше. Для выключения питания выключите маршрутизатор с помощью кнопки и выньте кабель питания из розетки. Затем вам нужно оставить его как есть примерно на 2-3 минуты. После этого вы можете подключить кабель и включить маршрутизатор.
Используйте проводное соединение
Wi-Fi позволяет обойтись без кабеля, но проводное соединение всегда более стабильное и быстрое. Если вы подключены к сети Wi-Fi и постоянно получаете код ошибки Bee в Destiny 2, мы рекомендуем вам переключиться на проводное соединение. Для этого вам понадобится кабель Ethernet, который напрямую подключит ваш ПК или консоль к маршрутизатору.
Обновите сетевые драйверы
Это решение предназначено для тех, у кого возникает ошибка на ПК. Если вы давно не обновляли сетевые драйверы, будет разумно сделать это прямо сейчас. Устаревшие сетевые драйверы могут вызывать различные проблемы с подключением и мешать вам правильно играть в онлайн-игры. Чтобы обновить их, перейдите в Диспетчер устройств, щелкните Сетевые адаптеры и щелкните правой кнопкой мыши имя вашего адаптера. Затем нажмите «Обновить драйверы» и дождитесь завершения процесса.
Destiny 2 is an online multiplayer game introduced by Bungie in order to match the expectations of the gaming community by providing them an environment featuring fictionalized characters and giving them the role of guardians of the earth’s last safe city. Although it is a well-structured and robust platform for online gaming, quiet recently, gamers are reporting several network errors and the most common among them is error code bee that states: Removed from the game world. Please try again. When this issue arises the game disconnects from the servers preventing the player from staying in the game and after several users’ reports, we looked into this problem and illustrated some efficient solutions that will help you to terminate the destiny 2 codes issue.
What Causes the Error Code BEE on Destiny 2?
After a deep survey of the user reports on this issue we have concluded that there are numerous triggers that might trigger this error on your system when you try to play the game.
- You might encounter this error if your console is experiencing a weak signal strength from your internet connection.
- If the console’s cache contains corrupted files, then you might come across the error code bee.
- Destiny 2 needs some open ports to operate properly and if they aren’t available, this error might be triggered.
If you have encountered this issue on your system, proceed to the remedies that are indexed below.
Pre-tips:
It is a temporary glitch that can be solved simply by power-cycling the internet router. If you have just encountered an error code bee, then try to follow the most basic troubleshooting steps before you proceed to any major solution.
- Take the power adapter of your router out of the socket and wait for it to shut down.
- In the meanwhile, detach all the power cords form your console and disconnect it from the power source.
- Shift all the electronic devices away from the router so that they don’t interfere with its wifi signals. If possible, change the position of your router and bring it closer to the console.
- Now power cycle the router by inserting its power adapters into the socket and wait for it to start.
- When the router shows full signal strength, insert the power adapter of your console into the socket and wait until it is turned ON and afterward check if the error still persists.
- If multiple users are connected to the common router ask them to avoid file-sharing, video streaming, or other bandwidth-intensive tasks on any device connected to your network.
How can you fix the Error Code BEE on Destiny 2?
Solution 1: Switch to a wired connection
This problem mostly occurs on your console due to a network connectivity issue that might not be permanent. The most efficient remedy to terminate network errors is to simply increase the signal strength and the best way to do this is to switch to a wired connection from a wireless connection. All you have to do is to disable WiFi in the console and connect your console directly to the modem with the help of an ethernet cable. After doing this there would be no packet losses in the network while playing the game and it will run smoothly. After connecting your console directly to the router via LAN cable, it is recommended to power cycle your router by following the steps stated in the Pre-tips section above.
Solution 2: Clear cache and data
There might be a chance that your console’s data and cache are responsible for the game issues hence, they need to be wiped out. In order to clear the data and cache, power cycle your console and follow the steps stated below to resolve this issue.
For Xbox:
- Open the Xbox settings and proceed to the Network option.
- Navigate to Advanced settings and select Alternate Mac Address.
Alternate Mac Address - Now select the Clear cache option.
- A window will appear on the screen and from there select Yes and wait for the console to restart.
For Play Station:
- Press and hold the power button of your console and wait for it to shut down.
- Detach the power cords from your console and repeatedly press and release the power button to clear the console’s cache.
- Now, attach the power cable to your console and insert the power adapter into the switch and wait for the console to restart.
Solution 3: Apply port forwarding
In some routers, the users apprised that they aren’t able to open the closed ports but it is not a big deal. Fortunately, there is a way around by forwarding some essential ports of the router to set an Open NAT type. Follow the steps indexed below and check if the destiny 2 codes issue is rectified.
- Navigate to the Settings of your console and select Network Settings.
- Navigate to the IP Address section and note down the IP Address and the MAC address on a piece of paper.
- Now start your computer and click the search button in the taskbar and type Command Prompt.
Type Command prompt - Type the following command in the prompt and hit enter to execute it.
ipconfig
- Scroll down until you see a setting for Default Gateway under Ethernet or Wi-Fi.
Note down Default Gateway - Copy the router’s Default Gateway IP Address and paste it in your browser’s search bar to open your Internet Settings.
- In the internet settings, enable the Manual Assignment option and add the IP address and Mac address that you noted before from the console. After typing in the addresses, click the Add button.
- Now navigate to the Port Forwarding section and open the following ports.
For Xbox:
UDP: 80, 500, 1200, 3074, 3544, 4500
TCP: 3074For Play Station:
UDP: 3074, 3478, 3479
TCP: 1935, 3478, 3480
For PC:
UDP: 3074, 3097, 4380, 27000-27031, 27036
TCP: 2705 – 27030, 27036 – 27037
- In the Server IP Address, enter the static IP address that we created.
- Apply the settings and power cycle your router. (If you are playing the game on PC then proceed to the steps below)
- Now click on the search button in the taskbar, search for Windows Defender Firewall and select Advanced settings.
Choose Advanced settings - From the left pane, click on Inbound Rules and select the New rule option from the right pane.
Choose New rule - Check the button parallel to the Port option and select Next.
Select Port - Make sure that both options TCP and Specific local ports are checked and enter the TCP port numbers in the input field. Click next and follow the onscreen instructions.
Setting ports - Follow the same procedure to enter the UDP ports.
- Now, click on the Outbound Rules in the Advanced Security window and select New Rule.
Select Outbound Rules - Add the UDP and TCP ports here by following the same procedure you followed for Inbound Rules.
- If you have an operational Anti-virus software, disable it and restart your computer to check if the error is eliminated.
Solution 4: Enable UPnP in your router
In most of the cases, people encounter error code bee destiny 2 if they have set a Strict NAT type in their router which prevents their console to connect to the Bungie server. Hence, it is suggested to switch to Open NAT type from Strict NAT and enable the Universal Plug and Play (UPnP) feature in your router by following the steps given below.
- Click the search button in the taskbar and type Command Prompt.
Type command prompt - Type the following command in the prompt and hit enter to execute it.
ipconfig
- Scroll down until you see a setting for Default Gateway under Ethernet or Wi-Fi.
Note down Default Gateway - Copy the router’s Default Gateway IP Address and paste it in your browser’s search bar to open your Internet Settings.
- Navigate to the Firewall section and make a new Firewall level within your Router.
- Afterward, proceed to the Forwarding tab and select UPnP.
- Click on the Enable button parallel to UPnP to enable it.
Enable UPnP - Also, locate and disable Extended security and Assigned Games & Applications if they are already enabled.
- Apply the changes and restart your router to see if the error persists.
Solution 5: Tweak QoS Settings
Quality of Service (QoS) is an essential feature of the router that is used to prioritize traffic for the devices connected to your router. If your game unexpectedly disconnects from the server, then navigate to your QoS settings and give high priority to your consoles so that this error is rectified. Follow the steps to carry this task out:
- Click the search button in the taskbar and type Command Prompt.
Run Command prompt - Type the following command in the prompt and hit enter to execute it.
ipconfig
- Scroll down until you see a setting for Default Gateway under Ethernet or Wi-Fi.
Choose Default Gateway - Copy the router’s Default Gateway IP Address and paste it in your browser’s search bar to open your Internet Settings.
- Navigate to WPS wizard and select QoS settings from the left pane.
- Check the box parallel to Enable WMM settings and then click on Setup QoS rules.
Setup QoS rules - Click on Delete All button and then select Add Priority Rules.
Add Priority Rules - In the Priority Category, select the Mac address option.
Priority Category - Now click the button parallel to console you are using and set the priority to Highest. In our case, the console is Xbox.
Setting priority - Click Add and then Apply the settings.
- Now go back to Setup QoS rules window and click on Add Priority Rule.
- In the Priority Category, select Online Gaming.
Online Gaming - In the Application drop-down menu, select Add a new game option.
Add a new game - Set the priority to Highest and make sure that the connection type is set as TCP/UDP. Now enter the starting and ending ports that are required for your console (These ports are listed in the above solution).
Setting ports - Apply the settings and go back to the QoS setup window.
- Check the box parallel to Turn Bandwidth Control On and enable the button parallel to Automatically check internet uplink bandwidth option.
Turn Bandwidth Control On - Restart your router and check if the error is rectified.
Solution 6: Run a ping and network diagnostic test
If you want to check that your computer is communicating with a server properly, then the most efficient way is to carry out a Ping test. If the other applications on your system are working fine and the problem is with only this particular game, then you can run a Ping and a network diagnostic test on your computer. This will ensure that the problem isn’t at your end.
- Click on the search button in the taskbar and search for Command prompt.
- Type the following command and hit enter to execute it.
ping www.google.com
Ping test - If you get a reply successfully then proceed to run a Network Diagnostic test.
- Right-click on the WiFi icon at the bottom-right of the screen and select Troubleshoot Problem.
Network diagnostic test - When the scan is completed check whether the error code bee is eliminated and if it still exists proceed to the next potential fix below.
Solution 7: Replace network equipment
Several users have reported that the fault was with their old network equipment and when they got it replaced the error was eliminated. Monitor your network equipment by turning ON the hotspot of your mobile and connecting your console to that hotspot. If this remedy fixes this issue, then replace the Ethernet cable connected to the router first and check if the issue is resolved. If it doesn’t help, contact your Network Provider and replace your old router with a new one and get rid of this issue.
Solution 8: Contact your ISP
If none of the solutions explained above helped you to rectify the destiny 2 error code bee then it might be a chance that your area is experiencing high traffic at the moment that is preventing you to connect to the servers of Bungie. The last option you are left with is to contact your ISP, explain to them the exact issue, and wait for them to provide you a reliable solution to this problem.
Workaround:
The design engineers of this game have acknowledged the fact that the client and server connection might cease if the Bungie servers are under maintenance. If this is the case, then this is a temporary issue and the only thing you can do is wait for the maintenance to finish. Although you don’t receive a report on server maintenance, you can visit Destiny forums to check whether other people are having this problem at the same time too. If yes then it means that the servers are most probably down and you will get rid of this issue soon.
Hopefully, the error might have gone by now but if you need further assistance, contact here.

Alan is a hardcore tech enthusiast that lives and breathes tech. When he is not indulged in playing the latest video games, he helps users with technical problems that they might run into. Alan is a Computer Science Graduate with a Masters in Data Science.