
Столкновение со странным кодом ошибки в Destiny 2 может расстраивать, если вы не знаете, как его исправить. Получение кода ошибки Beetle может быть одним из самых раздражающих, потому что в Интернете не так много специальных исправлений. Вот наши рекомендации по восстановлению вашей игры Destiny 2, если вы столкнулись с кодом ошибки Beetle.
Если вы получаете код ошибки Beetle в Destiny 2, у вашей игры проблемы с подключением к серверам. . Это может быть связано с интенсивным трафиком, который сервер имеет в данный момент, поэтому мы рекомендуем подключаться через VPN, если она у вас есть, и подключаться через сервер в другом месте. Имейте в виду, что сервер, к которому вы подключаетесь, может привести к некоторой задержке.

Если описанное выше не сработало, мы рекомендуем очистить кеш, если вы используете PlayStation или Xbox. Для этого полностью выключите консоль (не переводите ее в режим покоя). Когда он выключен, отключите консоль от розетки на 30 секунд или минуту, а затем снова включите ее.
Если ничего из вышеперечисленного не помогло, мы рекомендуем перезагрузить маршрутизатор и убедиться, что все работает нормально. . Если есть возможность, попробуйте проводное подключение с помощью кабеля Ethernet. Если после всего этого у вас по-прежнему появляется код ошибки Beetle, мы рекомендуем обратиться в службу поддержки Bungie или удалить Destiny 2, а затем переустановить ее.
Код ошибки Destiny Beetle, вероятно, является самым печально известным из всех кодов ошибок Destiny из-за того, что в настоящее время в Интернете доступно довольно мало информации. Люди в Bungie еще не опубликовали статью о том, как на самом деле решить проблему, и пользователи часто вынуждены пролистывать огромные сообщения на форуме, пытаясь найти ответ.

Мы собрали несколько рабочих решений от нескольких пользователей, которые утверждали, что решение им помогло, поэтому обязательно попробуйте их все, прежде чем отказываться от этой темы.
Решение 1. Очистите кеш, жестко загрузив Xbox
Это решение помогло довольно немногим людям справиться с кодом ошибки Beetle, и это решение является довольно общим методом устранения почти всех проблем, связанных с Xbox. Естественно, этот метод может быть применен только к пользователям, играющим в Destiny на Xbox.
Однако убедитесь, что все ваши игры синхронизированы онлайн и созданы резервные копии, поскольку в результате этого процесса они могут быть удалены из локальной памяти Xbox One. Есть два способа удалить кеш на Xbox One:
- Нажмите и удерживайте кнопку питания на передней панели консоли Xbox, пока она полностью не выключится.
- Отключите блок питания от задней панели Xbox. Нажмите и удерживайте кнопку питания на Xbox несколько раз, чтобы убедиться, что заряда нет, и это действительно очистит кеш.

- Подключите блок питания и подождите, пока индикатор на блоке питания не изменит свой цвет с белого на оранжевый.
- Снова включите Xbox, как обычно, и проверьте, появляется ли код ошибки Beetle при запуске Destiny или Destiny 2.
Альтернатива:
- Перейдите к настройкам Xbox One и нажмите Сеть >> Расширенные настройки.
- Прокрутите вниз до опции «Альтернативный Mac-адрес» и выберите появившуюся опцию «Очистить».

Вам будет предложено выбрать, действительно ли это сделать, когда ваша консоль будет перезапущена. Ответьте утвердительно, и теперь ваш кеш должен быть очищен
Если вы используете PlayStation 4, убедитесь, что вы следуете приведенным ниже инструкциям:
- Полностью выключите PlayStation 4.
- Когда консоль полностью выключится, отсоедините шнур питания от задней части консоли.
- Оставьте консоль отключенной от сети хотя бы пару минут.
- Подключите шнур питания обратно к PS4 и включите его обычным способом.
Похоже, что проблема была вызвана неисправной системой приглашения клана, и это, по-видимому, является основной проблемой для большинства людей, которые борются с кодом ошибки Beetle. Когда кто-то приглашает вас в клан, это наиболее вероятное время возникновения ошибки. Убедитесь, что у вас нет ожидающих приглашения клана, чтобы не получать это сообщение об ошибке, пока команде Bungie не удастся решить проблему.
Попросите администратора клана выкинуть вас из клана, к которому вы присоединились, чтобы удалить приглашение и избежать сообщения об ошибке

Альтернативный способ избежать этой проблемы — проверить на Bungie.net, есть ли у вас новое приглашение в клан на странице членства. Если вы это сделаете, вступите в клан, а затем немедленно покиньте его, чтобы вообще не получать сообщение об ошибке
Решение 3. Переустановите игру
Большинство пользователей сообщают, что эта ошибка начала появляться после недавнего патча, который, возможно, немного испортил ситуацию, когда дело дошло до подключения игры к Интернету. Однако пользователям, которые стали часто видеть код ошибки после патча, удалось решить проблему, просто переустановив игру. Коды ошибок появлялись один или два раза после переустановки, и после этого их больше не видели.
Переустановка игры на PlayStation 4
- Включите систему PlayStation 4 и войдите в свой профиль PSN.
- Нажмите на крестовине вверх, перейдите в меню «Настройки» и нажмите на меню «Управление системным хранилищем».

- Щелкните меню «Приложения» и нажмите кнопку «Параметры», когда будет выделена «Судьба». Нажмите «Удалить» >> «Выбрать все» и нажмите «Удалить», чтобы удалить игру.
- Нажмите OK, чтобы подтвердить удаление выбранного приложения, и игра будет полностью удалена с жесткого диска.

Очистка кеша консоли после удаления Destiny помогает убедиться, что в кеше консоли не хранятся временные файлы, которые могут повлиять на новую установку Destiny. Вот рекомендуемые шаги по очистке кеша консоли:
- Полностью выключите PlayStation 4.
- Когда консоль полностью выключится, отсоедините шнур питания от задней части консоли.
- Оставьте консоль отключенной от сети хотя бы пару минут.
- Подключите шнур питания обратно к PS4 и включите его обычным способом.
Переустановить игру на PS4 можно с физического диска с игрой:
- Включите систему PlayStation 4 и войдите в свой профиль PSN.
- Вставьте исходный диск с игрой, который вы использовали для установки игры в первую очередь, и установка должна начаться автоматически. Вы можете следить за прогрессом на индикаторе выполнения.
Вы также можете установить игру, загрузив ее с помощью PlayStation и подключения к Интернету. При загрузке игры таким способом рекомендуется использовать проводное соединение.
- Включите систему PlayStation 4 и войдите в свой профиль PSN.
- Откройте элемент «Библиотека» на главном экране, найдите Destiny в списке и нажмите кнопку «Загрузить».
- Индикатор выполнения будет отображаться во время установки игры на жесткий диск консоли.

Переустановка игры на Xbox One
- Включите консоль Xbox One и войдите в нужный профиль Xbox One.
- В окне главного меню Xbox выберите «Мои игры и приложения», нажмите «Игры» и выделите Destiny.

- Нажмите кнопку «Меню» и выберите «Управление игрой» >> «Удалить все». Нажмите «Удалить» еще раз, чтобы подтвердить свой выбор на следующем экране.
- Через мгновение игра будет удалена с жесткого диска.
Очистка кеша консоли после удаления Destiny помогает убедиться, что в кеше нет временных файлов, которые могут повлиять на новую установку Destiny. Вот рекомендуемые шаги по очистке кеша консоли:
Нажмите и удерживайте кнопку питания на передней панели консоли Xbox, пока она полностью не выключится

Отключите блок питания от задней панели Xbox. Нажмите и удерживайте кнопку питания на Xbox несколько раз, чтобы убедиться, что заряда нет, и это действительно очистит кеш
Переустановить игру на Xbox One можно с физического диска с игрой:
- Включите консоль Xbox One и войдите в нужный профиль Xbox One.
- Вставьте диск с игрой в дисковод, и процесс установки начнется автоматически. Вы сможете следить за прогрессом, пока игра не будет установлена.
Вы также можете установить игру, загрузив ее с помощью PlayStation и подключения к Интернету. При загрузке игры таким способом рекомендуется использовать проводное соединение.
- Включите консоль Xbox One и войдите в нужный профиль Xbox One.
- Перейдите в раздел меню «Все готово к установке», найдите Destiny и выберите опцию «Установить».

- Прогресс загрузки и установки можно увидеть в разделе меню «Очередь».
- Индикатор выполнения будет отображаться во время установки игры на жесткий диск консоли.
Исправление: Цыпленок с кодом ошибки Destiny

С кодами ошибок Destiny и Destiny 2 иногда бывает довольно сложно справиться, поскольку сама игра довольно новая, а команда Bungie все еще
Исправлено: капуста с кодом ошибки Destiny

Код ошибки Cabbage, который был довольно частым явлением среди игроков Destiny и Destiny 2, вызвал такое возмущение, что даже онлайн
Исправлено: Кабан с кодом ошибки Destiny

Если вы в настоящее время получаете код ошибки Boar, возможно, вы теряете соединение с PlayStation Network или Xbox Live, в зависимости от того, на какой консоли
Исправлено: Муравьед с кодом ошибки Destiny

Есть довольно много кодов ошибок, которые могут появиться у вас, если вы играете в Destiny на соответствующей консоли. Однако работа с этими кодами ошибок
Исправлено: гитара с кодом ошибки Destiny

Код ошибки Guitar, вероятно, является одним из менее известных кодов ошибок, с которыми вы можете столкнуться во время игры в Destiny или Destiny 2, а Bungie еще не опубликовал
Destiny 2 Server overloads are considered as one of the common causes of Beetle Error Code. Due to high incoming traffic, the servers are unable to function properly. This is where some users will see frequent disconnection. It is one side of the story, there can be issues at your end also. Destiny 2 Beetle error is associated with connectivity. It can be a faulty internet connection or high traffic from a region. Considering all the factors this article is compiled to provide you the best common fixes to resolve the problem.
Error Code Beetle is reported by users of Destiny and Destiny 2 both. Due to a lack of resources, this error can pop-up on your screen and stuck there for some time. If you are constantly getting this error even after fixing the internet connection then it can be due to damage game files. To learn the Destiny 2 troubleshooting tips in detail refer to all the fixes below.
Verify your Internet Connection or Try a VPN
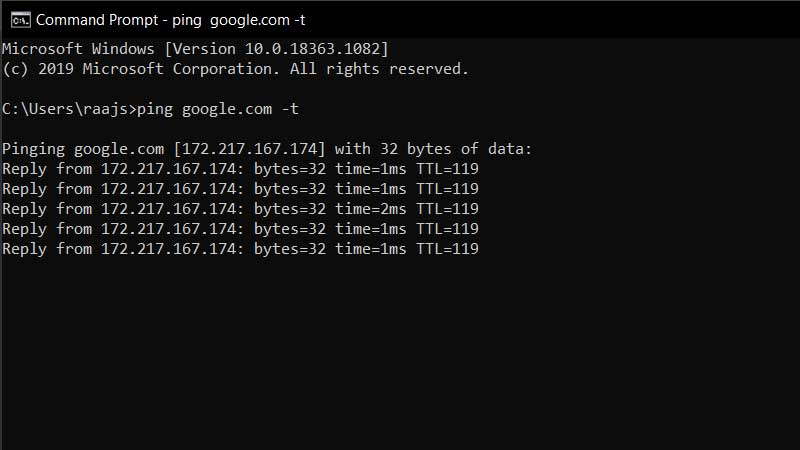
Games like Destiny 2 requires a high bandwidth stable internet connection. If there is any break in the connectivity you will be kicked out of the server. To verify if your internet connection is stable or not run the following command in CMD.
- ping google.com -t
Your screen will display the following image. Watch the reply and time, if there is a break in between like Request Time Out then your internet is not stable. Also if time= is higher let say a 1000ms or more then contact your ISP. Your internet connection must be stable and fast with the lowest ping rate for playing Destiny or Destiny 2.
Another way to resolve this is by using a VPN. A VPN will change your region, you will be playing through a separate IP address. But there is an issue of high ping rate here. If you are using a really good VPN service then you won’t face Destiny 2 Beetle or disconnection error.
Delete Clan Invites
A solution by Destiny players, you can wipe out all pending clan invites from the game. The clan system allows you to play in a group and lot o users are sending invites for no reason. This fills up your list and you can remove them. You can inform the clan about clearing the invites, they can send it again. It is one of the quickest ways to fix the Destiny 2 Beetle Error Code.
Clear Game Cache or Re-install Destiny 2
Turn off your console and disconnect it from the power. Turn it on after some time and check again. If you are connected on Wifi then connect your console with a LAN cable. Run Settings > Initialization > Initialize PS4 to improve the console’s performance. It will help you to optimize the output of your console and draw out the better output from the same.
Finally, if nothing works one way is to re-install the game. It will consume your data but re-installing the game will restore all damaged game files. There is nothing to worry all your progress is stored on the cloud. So you are not going to lose anything.
Just remove the game and then go to the store and download it again. Log in with your default Bungie account and continue playing the game.
Destiny and Destiny 2 error code Beetle is the most notorious of all the error codes due to the lack of resources available online to resolve the problem. Even on the Bungie help article, all they say is “Bungie is actively tracking this general networking error. Your disconnect was reported the moment it occurred.” And another sentence instructing to follow their Network Troubleshooting Guide which in itself is so vast one does not know where to start.
If you visit the
various forums, be it Reddit, Bungie, Twitter or others, there is no solution,
just people confirming the excruciating experiencing of not being able to play
the game. No worries though, if you are reading this blog, you will be able to
resolve your problems with some simple fix.
Cause of the Beetle Error Code
The Beetle error means that Bungie’s servers are over-trafficked or otherwise not functioning at maximum capacity. It’s an error that occurs due to a disconnect between the host and the server, so the fault can be from your end. This does not specifically have to do with your internet connection but heavy traffic from your location to Bungie or fault with the SIP.
If you continue to receive the same error code the problem can be due to corrupted files or a connection problem. Try these simple fixes to resolve the Destiny 2 Beetle error.
Fix 1: Connect the Game via VPN
One of the causes of this error can be a large number of users logging into the game from the same location, which can overload the Bungie server and result in the Beetle error. Entering the game using a VPN allows you to select the server from around the globe. Once you successfully log-into the game and start playing, you can disconnect or turn off the VPN. The game will still work. This resolution has worked for a lot of users. It’s effortless with a wide range of free VPNs available in the market. To help you, we compiled a list of the top free VPNs in the market. So, if you are not using a VPN, check the blog by following the link. Few things to consider before using VPN.
• Depending on
the VPN the bandwidth speed may be considerably diminished, which can be the
cause of a whole new problem. So, consider the lag-time before selecting a VPN.
• VPNs are illegal in most countries, so be cautious and use them at your own risk.
As mentioned
earlier, you need the VPN only for a slight bit, during login, after you can
uninstall the VPN or simply turn it off.
Fix 2: Delete Pending Clan Invites
A large number
of users have reported the problem occurring when there is a pending clan
invite, so the possible cause can be the clan invite system of Destiny 2.
Therefore, it worth the shot to try this solution. Leave your current clan and
ensure you have no pending clan invites. Don’t worry, inform the clan members
and once you stop receiving the problem you can join the clan again.
Request the admin of your current clan to boot you out of the clan. Additionally, also check if you have any new clan invite. If you do, join the clan and leave it immediately. Do this to stop the Destiny 2 error code Beetle message from appearing.
Fix 3: Clearing the Console Cache
Sometimes the cache
stored on your console gets corrupted, overwritten, or some other fault in the
codes can arise, which can prevent the console from connecting with the server.
In this situation, your internet appears to be fine but you repeatedly face the
same error, generally one that reports disconnect with the server. However, the
fix is simple, all you need to do it clear the cache from the console. To do
this, follow the below steps.
- Shut down the console.
- Unplug the power cord from the
console once it has completely shut down. - Let the console sit idle for 5
minutes for all operations to end and the console powers down completely. - Put the power cords back and
restart the console normally.
Open the game and check if the error code still appears.
Fix 4: Reinstall the Game
If nothing works, try reinstalling the game. A large number of users have reported the problem arising after a recent patch. When they reinstalled the game, the problem appeared a few times and then it was never to be seen again. So, as a last resort reinstall the game. Don’t worry the game progress will not be lost as it’s stored in the Bungie server and will connect again once you log from the same account.
Read Next:
- How to Fix Destiny 2 Error Code Kale
- Destiny 2 Error Code Lettuce
- Destiny 2 Error Code Broccoli Fix
- Fix Destiny 2 Error Code Beet
Jannah Theme License is not validated, Go to the theme options page to validate the license, You need a single license for each domain name.
Destiny 2 is a really popular game and is loved by a huge fanbase all across the world. However, we have recently received reports from users that have acquired the Error Code Beet on Destiny 2 while loading into the game and mostly this error is associated with a request timeout. Don’t worry as we have compiled some of the most convenient workarounds and solutions to help you fix this error completely.

What Causes the Error Code Beet on Destiny 2?
This error code doesn’t specify one particular issue and there can be a couple of reasons behind its occurrence. We have listed some below.
- Cache: The first thing that comes to mind when such an issue arises is the corrupted cache. The cache can often be corrupted due to storage failure and it can cause the long loading times due to which the request gets timed out and the Error Code Beet is sprung up on the screen.
- Outdated Drivers: If your computer hasn’t received the latest driver updates to support the hardware installed on your computer, you might be getting the Error Code Beet on your screen while trying to load into the game. Therefore, it is best to ensure that all driver updates have been installed.
Now that you are familiar with some of the most obvious reasons behind the occurrence of the destiny 2 error code beet, we will be moving on towards implementing the fixes.
Before you start:
In most situations, users have encountered Error Code Beet while playing Destiny 2 if their computer does not meet the requirements of the game to run smoothly. Make sure your systems meet the following requirement before proceeding to play Destiny 2 on your PC.


Fixing the Error Code Beet on Destiny 2:
Solution 1: Clear console’s cache
Xbox Users:
- Open the Xbox settings and proceed to the “Network” option.
- Navigate to “Advanced settings” and choose “Alternate Mac Address”.

Alternate MAC Address - Now select the “Clear cache” option, select “Yes” and wait for the console to restart
- When the console restarts, check whether the destiny 2 error code beet is rectified.

Play Station Users:
- Press and hold the power button of your console and wait for it to shut down.
- Detach the power cords from your console and repeatedly press and release the power button to clear the console’s cache.

Removing the Plug - Now, attach the power cable to your console and insert the power adapter into the switch and wait for the console to restart.
- When the console restarts, check if the bungie error code beet is rectified.

Solution 2: Update device drivers automatically
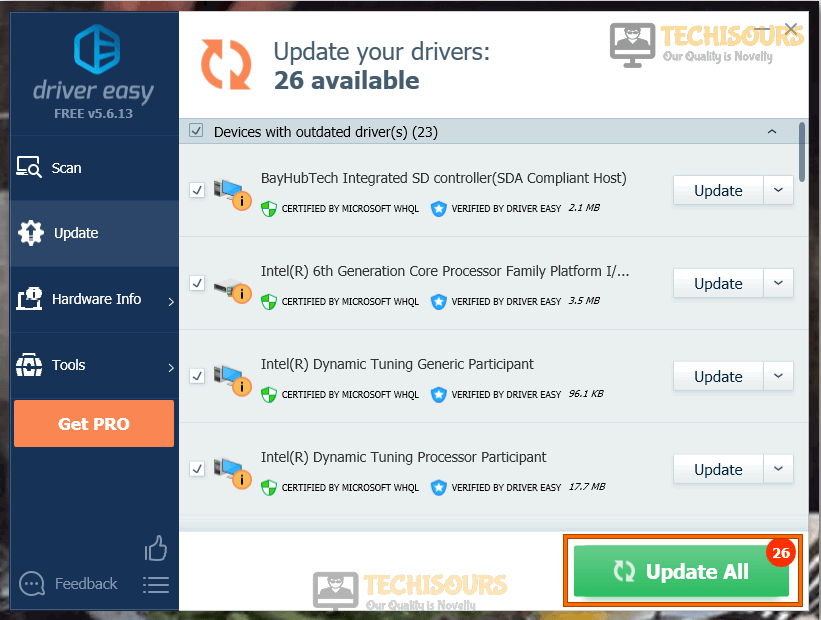
- Navigate to your favorite browser and download Driver Easy.
- Double-click on the downloaded executable file and install the tool by following the on-screen instructions.
- Click the “Scan Now” button to start the scanning process.

Click on Scan now - Now a list will appear that will be comprising all of the outdated drivers on your computer. It is up to you that you update them selectively or collectively by clicking the “Update All” button at the bottom.

Updating Drivers - When the drivers are updated successfully, restart your computer and hopefully, the error would’ve been resolved.

Solution 3: Run a repair tool
- Open your favorite browser and download the Advanced System Repair tool.
- Now double-click on the downloaded executable file and follow the onscreen instructions to install Advanced System Repair on your system.
- When the tool is installed on your computer, launch it and click on the “Scan” button to scan for corrupted files and click “Fix all now” to fix all the corrupted system files on your computer.

Advanced System Repair Tool - Once you have fixed all the corrupted files, proceed to launch Destiny 2 again and see if the error is rectified.

Workaround:
If you have encountered Error Code Beet while playing a private match with a lobby of 12 players, try to rejoin that private match that is already in progress by directly joining a participating friend on their roster screen.
If you are still unable to fix this issue, you can contact us for any further assistance.

Alan is a hardcore tech enthusiast that lives and breathes tech. When he is not indulged in playing the latest video games, he helps users with technical problems that they might run into. Alan is a Computer Science Graduate with a Masters in Data Science.
Back to top button