
Some Windows users are reporting that they’ve recently done a DISM scan that ultimately resulted in the 1392 error code. This issue is confirmed to occur on Windows 7, Windows 8.1, and Windows 10.

After investigating this particular issue, it turns out that this particular issue is always related to some kind of system file corruption that is affecting your OS’s ability to identify and replace corrupted system files.
Even though the underlying cause is the same, the fix that you should follow is dependent on a couple of different scenarios that your PC might be dealing with.
Now that you know the reason why you are seeing this error code, here’s a list of verified methods that other affected users have successfully used to fix the issue:
Method 1: Running a ‘CHKDSK Forceofflinefix’ scan
If the DISM (Deployment Image Servicing and Management) utility has previously thrown the 1392 error code, it’s clear that you’re dealing with some kind of corruption issue. One of the quickest ways to fix this problem is to run a ‘/offlinescanandfix‘ scan on the affected volume with the CHKDSK (Check Disk) utility.
What this will essentially do is it will run an offline scan on the specified volume that triggered the 1392 error and fix errors that were previously flagged for corruption. Several affected users have confirmed that this method was the only thing that allowed them to get rid of the 1392 error without having to reset every associated OS file.
If you haven’t tried this yet, follow the instructions below to run a CHKDSK Forceofflinefix scan on the affected drive:
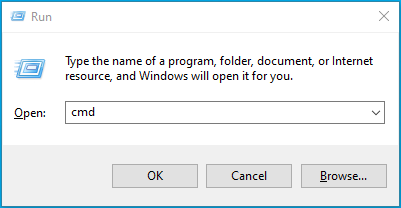
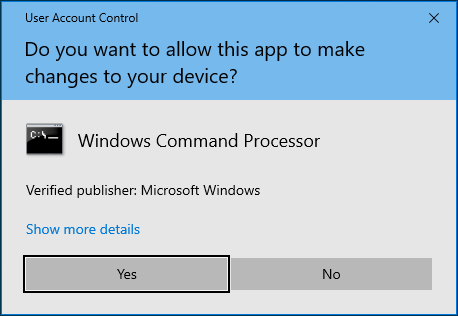
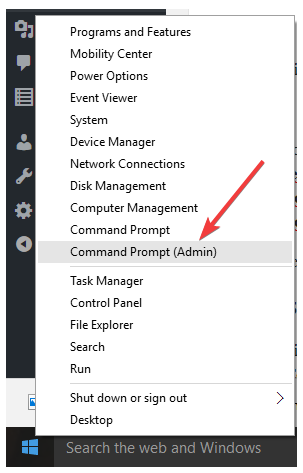
- Press Windows key + R to open up a Run dialog box. Inside the run box, type ‘cmd’, then press Ctrl + Shift + Enter to open up an elevated Command Prompt. When you are prompted by the UAC (User Account Control), click Yes to grant admin access.

Opening an Elevated Command Prompt - Inside the elevated Command Prompt, type the following command and press Enter to initiate an Offline Scan with the Check Disk Utility:
chkdsk /offlinescanandfix
- Wait patiently until the operation is complete, then restart your computer after the process is finished.
- Once your computer boots back up, run another DISM scan and see if the issue is now fixed.

In case the DISM scan is still ultimately triggering the same 1392 error, move down to the next potential fix below.
Method 2: Running a Full SFC Scan
If you haven’t done this already, the next step you should take is to run a full scan using another built-in tool called SFC (System File Checker). There’s a lot of similarities between DISM and SFC, but the major difference is that SFC doesn’t require an internet connection in order to complete the scan.
So if the reason why you’re seeing the 1392 error is because of a corrupted system file that’s involved in facilitating the download of ‘healthy system files’, going this route might help you avoid the issue altogether.
Some users dealing with the same issue have confirmed that the issue was finally resolved after they run a full SFC scan and allowed the utility to replace the corrupted instances with healthy files from the locally stored archive.
If you’re looking for steps that will allow you to run a Full SFC scan, follow the instructions below:
- Press Windows key + R to open up a Run dialog box. Next, type ‘cmd’ and press Ctrl + Shift + Enter to open up an elevated Command Prompt. When you are prompted by the UAC (User Account Control), prompt, click Yes to grant admin access.
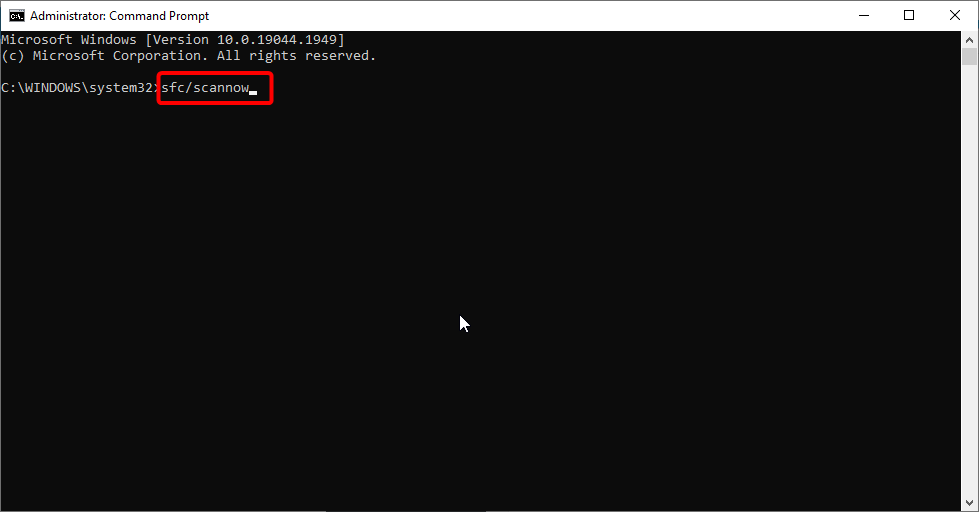
Opening the elevated Command Prompt - Inside the elevated Command Prompt, type the following command and press Enter to initiate a full SFC scan:
sfc /scannow
- Wait patiently until the operation is complete, then restart your computer and do another DISM scan to see if the process is still interrupted abruptly by the 1392 error.

If the issue is still not resolved, move down to the next potential fix below.
Method 3: Running the long DISM Version (Windows 10 Only)
If you already tried both the potential fixes above and you’re still seeing the same 1392 error while running DISM scans, one potential fix is to run a more thorough scan using the long version of the Deployment Image Servicing and Management utility.
By taking the time to create a compatible installation media and mounting it on your computer before initiating a long DISM scan, you will give it heightened permissions and capabilities that will hopefully allow it to fix the system file corruption without the need to refresh every OS component.
If you haven’t tried this yet, follow the instructions below:
Note: The instructions below are only applicable to Windows 10 users. If you’re using an older version, move down to the next method below.
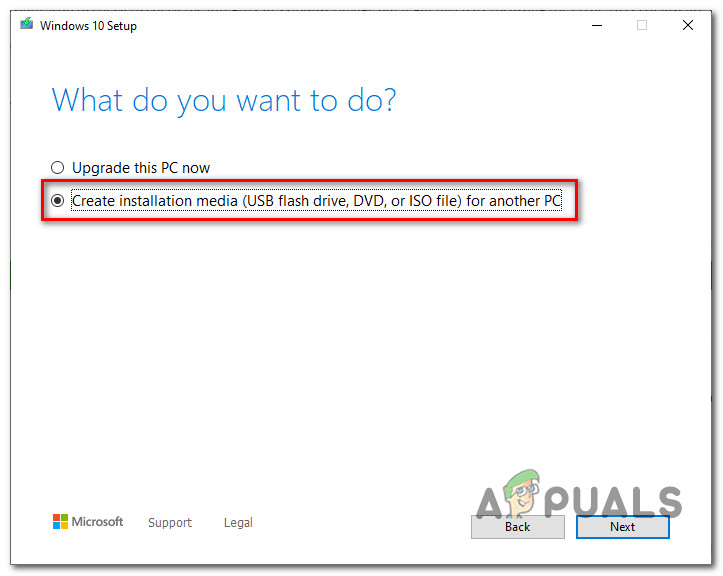
- Open your default browser and navigate to the Windows 10 download page. Once you are inside, click on the Download tool now button (under Create Windows 10 installation media).

Download Win 10 iso - Wait until the MediaCreationTool is downloaded, then double-click on it and click Yes at the UAC (User Account Control) when prompted to do so.
- Next, wait patiently until the app is finished with initializing, then accept the ToS and choose to Create installation media (USB flash drive, DVD, ISO file) for another PC) before clicking Next.

Creating an Installation Media using Windows 10 Setup - At the next step, uncheck Use the recommended options for this PC and adjust the Language, Edition, and Architecture to make it specific to your current OS version in case the options already selected are incorrect. Once you’ve done that, click on Next once again.

Creating the correct installation media - At the next prompt, choose ISO file from the options available to you and click on Next once again.
- As soon as you click Next, you’ll see a Select a path popup that you need to use in order to select a viable location for the .ISO file that you are about to create. After you select the correct location, hit Next one final time and wait until the ISO is successfully created.

Downloading and Creating Windows 10 Note: This utility will start by downloading the latest Windows 10 build before turning it into an ISO, so depending on your Internet connection, respect this operation to last a couple of hours.
- Once the ISO is successfully created, close the Windows 10 setup utility, then use File Explorer to navigate to the location where you created the ISO and double-click on it to mount it on your computer. Click Yes at the confirmation prompt.
- Once the Windows 10 installation media is successfully created and mounted, press Windows key + R to open up a Run command, then type ‘cmd’ inside the text box and press Ctrl + Shift + Enter to open up an elevated command prompt.
Opening an elevated Command Prompt - Once you’re inside the elevated CMD prompt, type the following command by being mindful of the placeholder that needs to be replaced:
DISM /Online /Cleanup-Image /RestoreHealth /source:WIM:X:SourcesInstall.wim:1 /LimitAccess
Note: Replace X with the drive letter where the iso is located. If you have it in a default location, you’ll most likely find it on the C:/ drive.
- Wait patiently until the long DISM version scan is performed, then restart your computer at the end of it.
Note: Keep in mind that this operation will take longer than a standard DISM operation, so depending on the side of your disc and if you’re using SSDs or HHDs, this might take several hours. - Once the long DISM version scan is completed, restart your computer and see if the issue is now resolved.


If you still end up encountering the 1392 error code while running a regular scan, move down to the next potential fix below.
Method 4: Refreshing every Windows Component
If none of the potential fixes above have worked in your case, it’s almost certain that you’re dealing with some kind of system file corruption that cannot be solved conventionally. In this case, your only options are to reset every system file belonging to your operating system to ensure that no corrupted instance is causing the 1392 error.
And depending on the time on your hands and the importance of the files you are currently starting on the OS drive, you have 2 options at this point:
- Repair install – If you have a lot of important files on your C: drives and you are short of time, this operation will probably is probably the best choice for you. A repair install (A.K.A. in-place repair) will refresh the vast majority of Windows components without touching any personal files (including apps, games, personal media, user preferences, etc.). But the main drawback of this method is that it doesn’t solve any case of system file corruption and you’ll need compatible installation media in order to get it started. (You already have it if you followed Method 3)
- Clean install – This is the easiest procedure out of the two. You don’t need compatible installation media as you can get this operation started directly from the GUI menus of Windows. However, unless you back up your data in advance you will lose anything personal that’s currently being stored on the OS drive.

Kevin Arrows
Kevin Arrows is a highly experienced and knowledgeable technology specialist with over a decade of industry experience. He holds a Microsoft Certified Technology Specialist (MCTS) certification and has a deep passion for staying up-to-date on the latest tech developments. Kevin has written extensively on a wide range of tech-related topics, showcasing his expertise and knowledge in areas such as software development, cybersecurity, and cloud computing. His contributions to the tech field have been widely recognized and respected by his peers, and he is highly regarded for his ability to explain complex technical concepts in a clear and concise manner.
Contents
- What Is the DISM Error 1392?
- Why Does DISM Fail?
- How to Fix the DISM Error 1392 on Windows 10
- Temporarily disable your antivirus program
- Windows Security
- AVG
- McAfee
- Avast
- Kaspersky
- Run a full malware scan
- If you use Windows Security, follow these steps to run the full scan:
- Remove temporary files
- Use Disk Cleanup:
- Here’s how to use the Settings application to clear out temporary files:
- Run CHKDSK
- Follow the guide below to run the CHKDSK tool via File Explorer:
- Restore your system to an earlier state
- The following steps will show you how to perform a system restore:
- Reset Windows
- Follow these steps to reset your Windows 10 PC properly:
- Conclusion

Microsoft releases regular Windows 10 updates and patches to keep the OS going with as few issues as possible. However, users still experience a slew of errors and glitches. From software incompatibility to system file damage, various problems can cripple the entire system or result in specific errors that halt certain operations.
Microsoft continues the tradition of leaving built-in Windows tools at the disposal of users because the company’s experts understand that errors are inevitable. But those tools can spit out errors, too.
You’re on this page because you’re looking for solutions to the DISM error 1392. The DISM (Deployment Image Servicing and Management) tool is responsible for servicing and preparing Windows image files, including those used for repair purposes.
In Windows 10, the tool is used to fetch recovery files that the System File Checker tool uses to replace problematic system files. It can also fix image files when the operating system becomes faulty. The utility is also used for advanced purposes, such as mounting a virtual hard disk or Windows image.
Running DISM involves using the Command Prompt, as it is a command-line tool. These are the most common DISM commands:
- DISM /Online /Cleanup-image /CheckHealth
- DISM /Online /Cleanup-image /ScanHealth
- DISM /Online /Cleanup-image /RestoreHealth
Sometimes, the DISM scan fails with error 1392. Other commands can also produce the error.
What Is the DISM Error 1392?
The full error message reads as follows:
“Error: 1392
The file or directory is corrupt or unreadable”
The message implies that some system files are corrupt or unavailable. An unreadable system file could be the reason you ran the scan in the first place. If the issue isn’t resolved as soon as possible, you’ll experience system-wide problems, such as data losses, crashes, hardware failures, and, in some cases, blue screens of death.
Why Does DISM Fail?
Different system issues can trigger the error. Your antivirus program might be blocking a crucial system file that the tool needs to carry out the scan, or your computer might be under a malware attack. Other possible causes of the problem are listed below:
- Faulty hard disk sectors
- Temporary files
- Application conflicts
- Damaged system files
How to Fix the DISM Error 1392 on Windows 10
One of the solutions in this article will help you resolve the issue for good. You have to follow the solutions as they are arranged to fix the problem as fast as possible.
Temporarily disable your antivirus program
Your antivirus program could be erroneously blocking some system files because it suspects them of being security risks. When this happens, the files in question become unreadable, causing DISM to display the error message. Temporarily disable your protection program, then run the command to check if the issue persists.
You’ll find out how to disable major antivirus programs below.
Windows Security
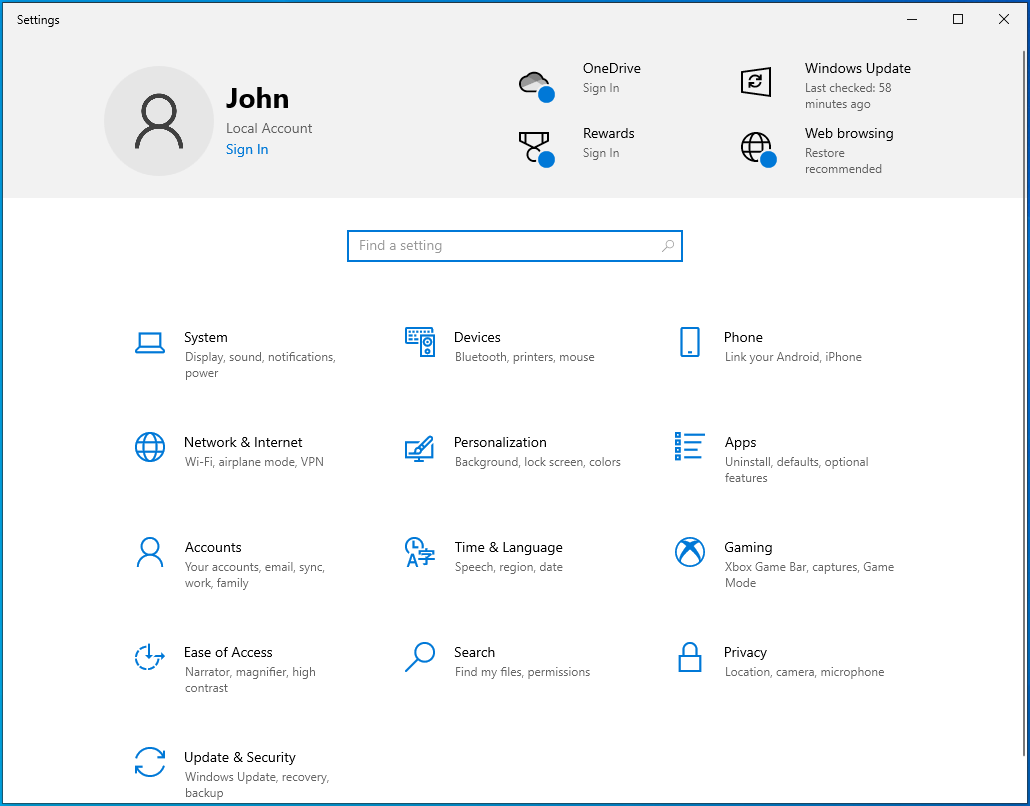
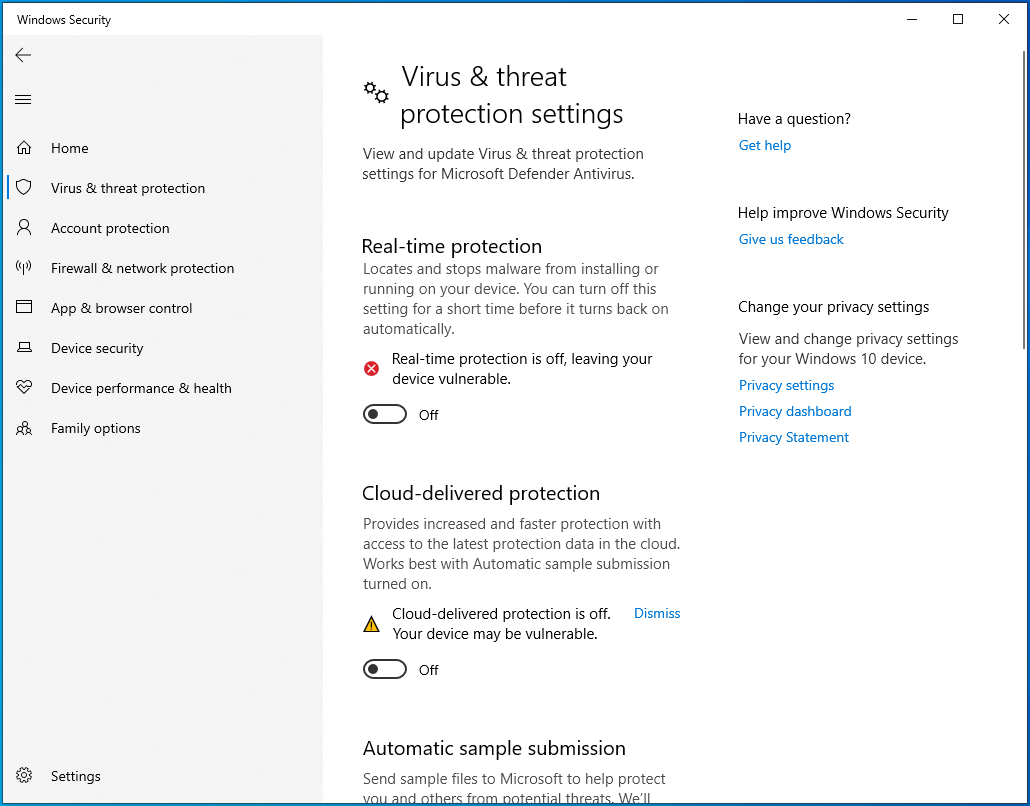
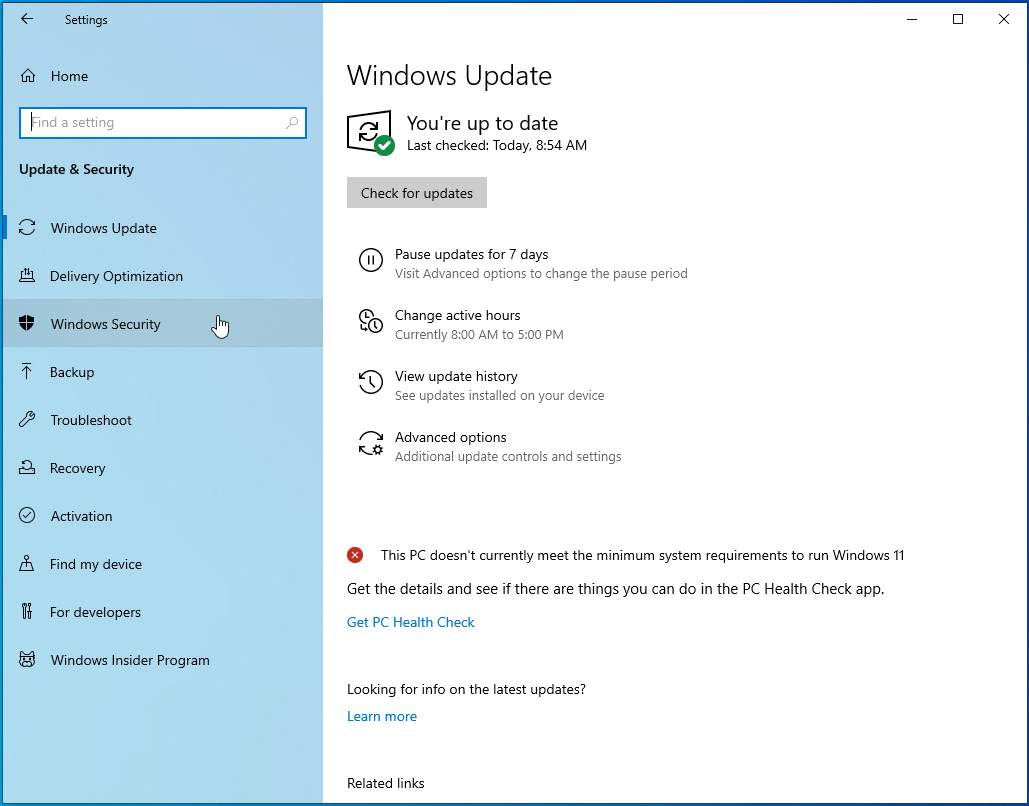
- Use the Windows + I keyboard shortcut to launch the Settings application.

- When the home page of Settings comes up, click on the Update & Security icon.
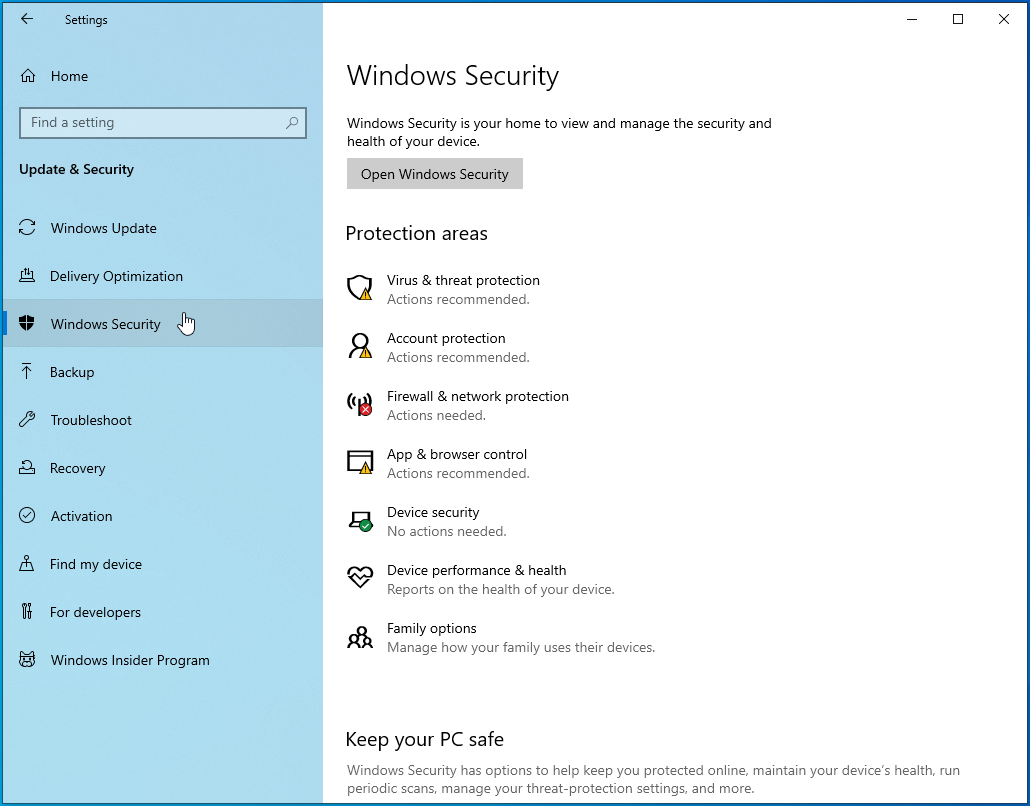
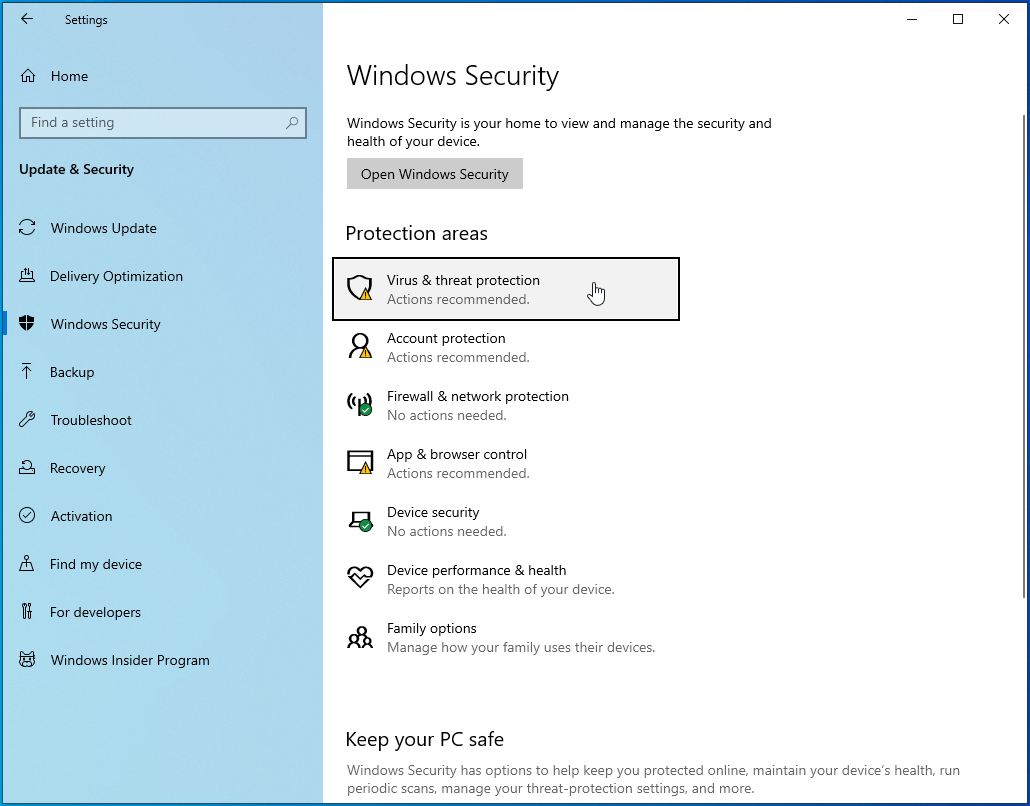
- Once the Update & Security page shows up, go to the left pane and click on Windows Security.
- After that, navigate to the right side of the window and click on Virus & Threat Protection under Protection Areas.
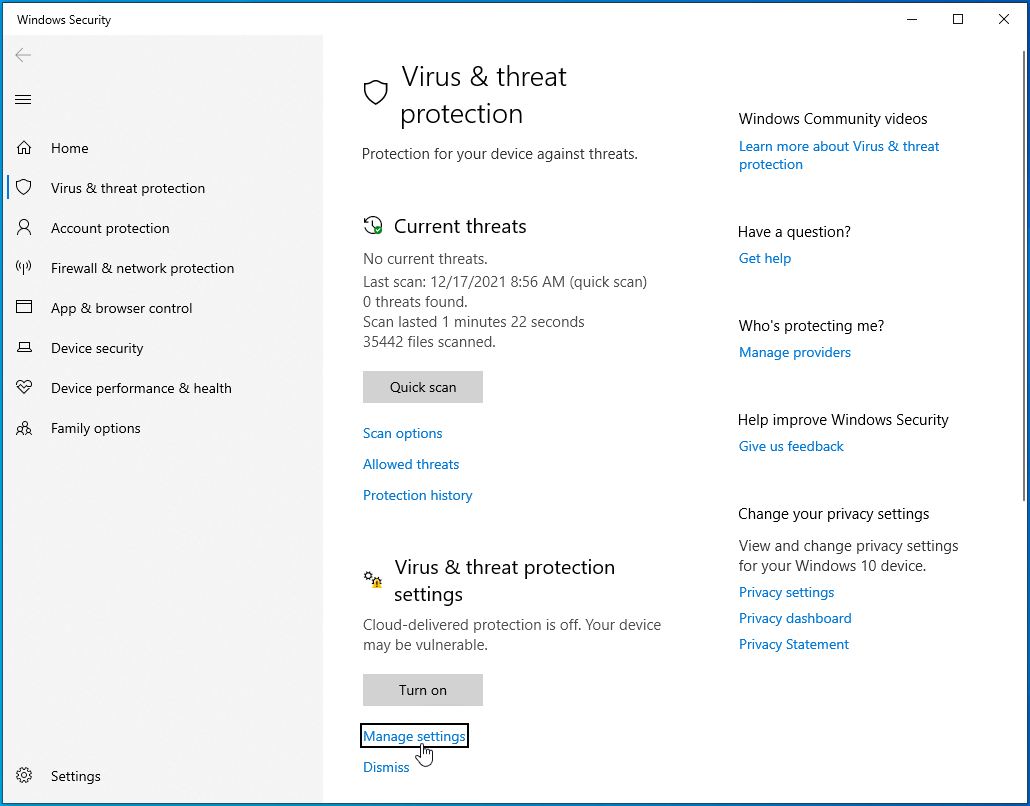
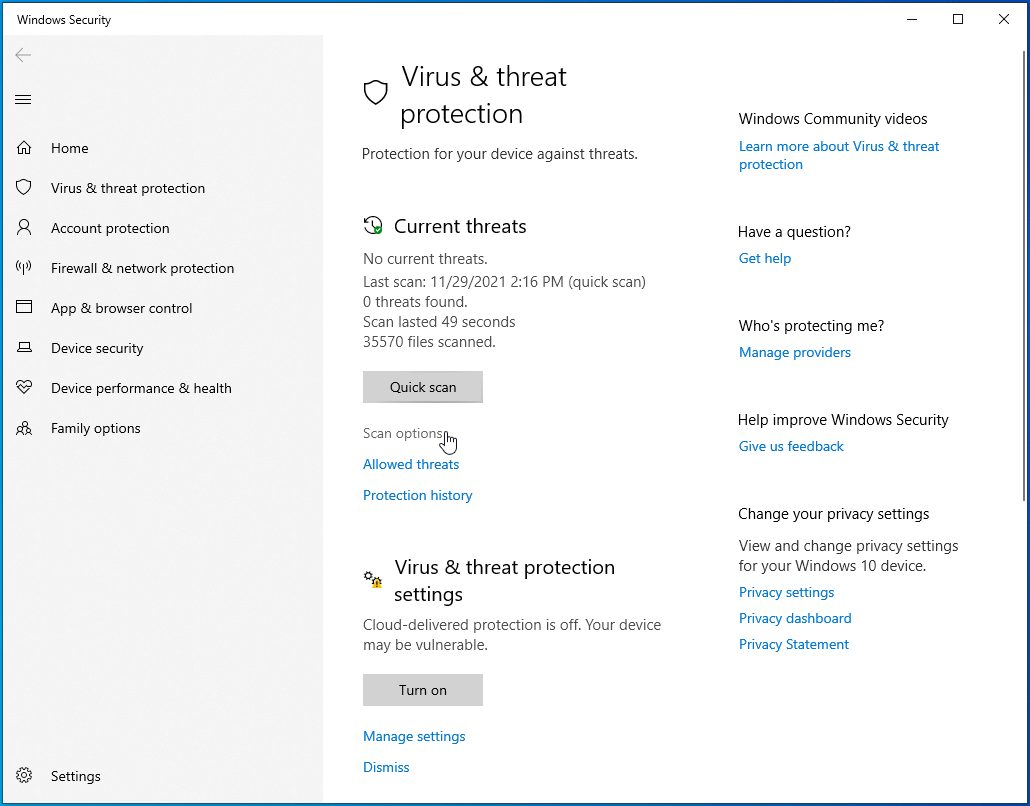
- Once the Virus & Threat Protection interface appears, scroll down to the Virus & Threat Protection Settings section, and then click on Manage Settings.
- When you get to the Virus & Threat Protection Settings page, turn off the Real-Time Protection toggle.
- Try running the DISM scan.

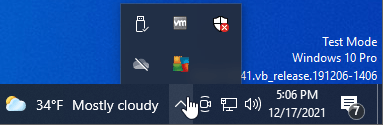
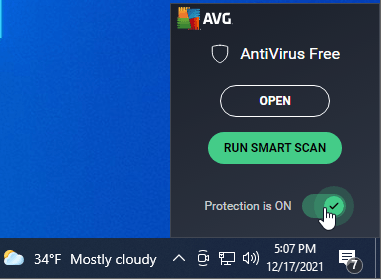
AVG
- Head to the right end of your taskbar and right-click on AVG’s icon.
- If the icon isn’t visible on the taskbar, click on the “Show hidden icons” arrow to expand the system tray.

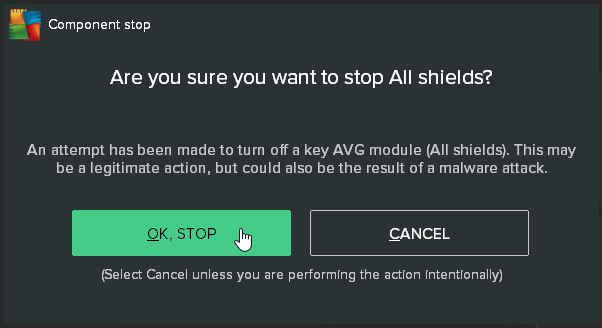
- Once the hidden icons appear, right-click on AVG’s icon and turn off the Protection switch.

- When the confirmation dialog window pops up, click on OK, STOP.

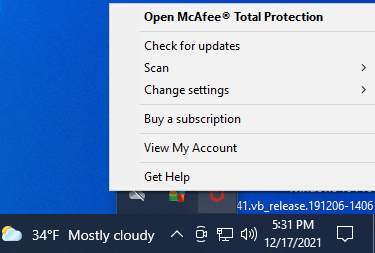
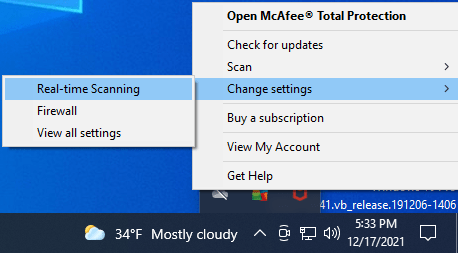
McAfee
- Go to your taskbar’s far-right section and click on the “Show hidden icons” arrow to expand the system tray.

- When you see the expanded system tray, right-click on the McAfee icon.

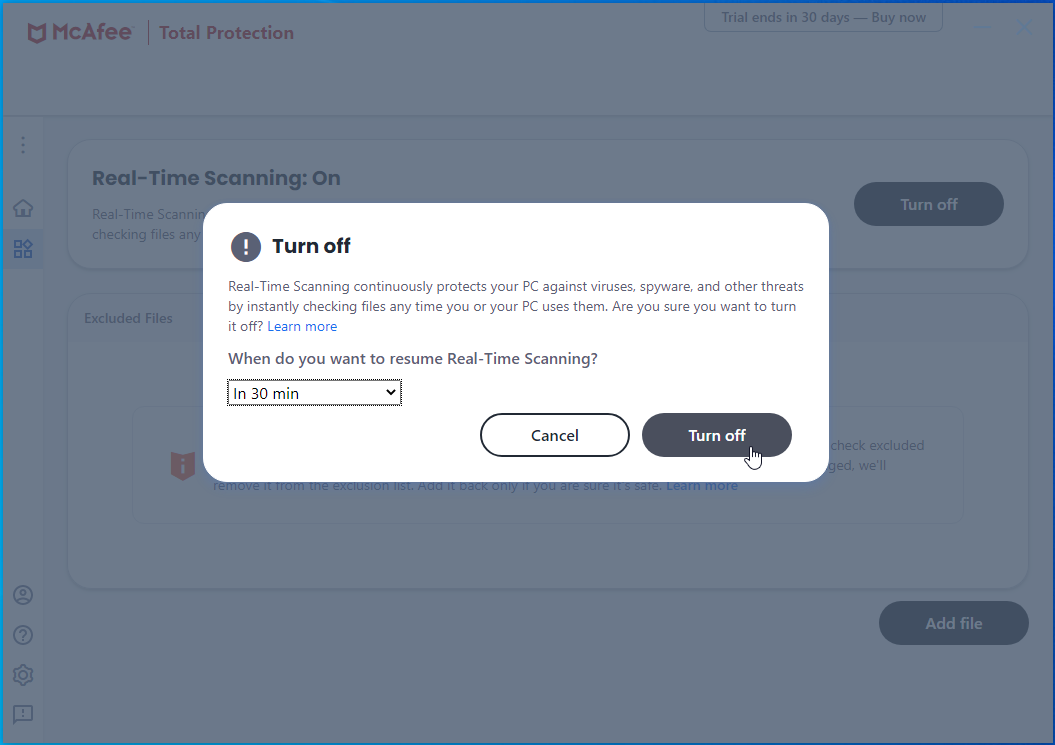
- Place your mouse pointer over Change Settings, and then select Real-time Scanning.

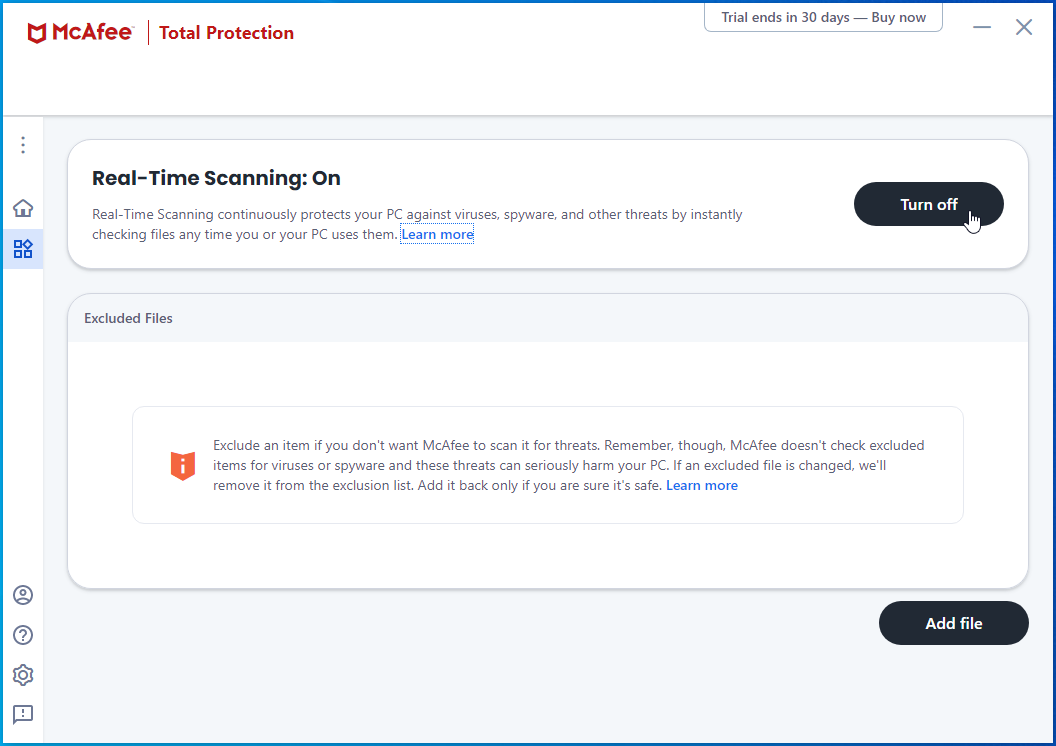
- Once you see the Real-Time Scanning interface, navigate to the bottom of the screen and click on the Turn Off button.

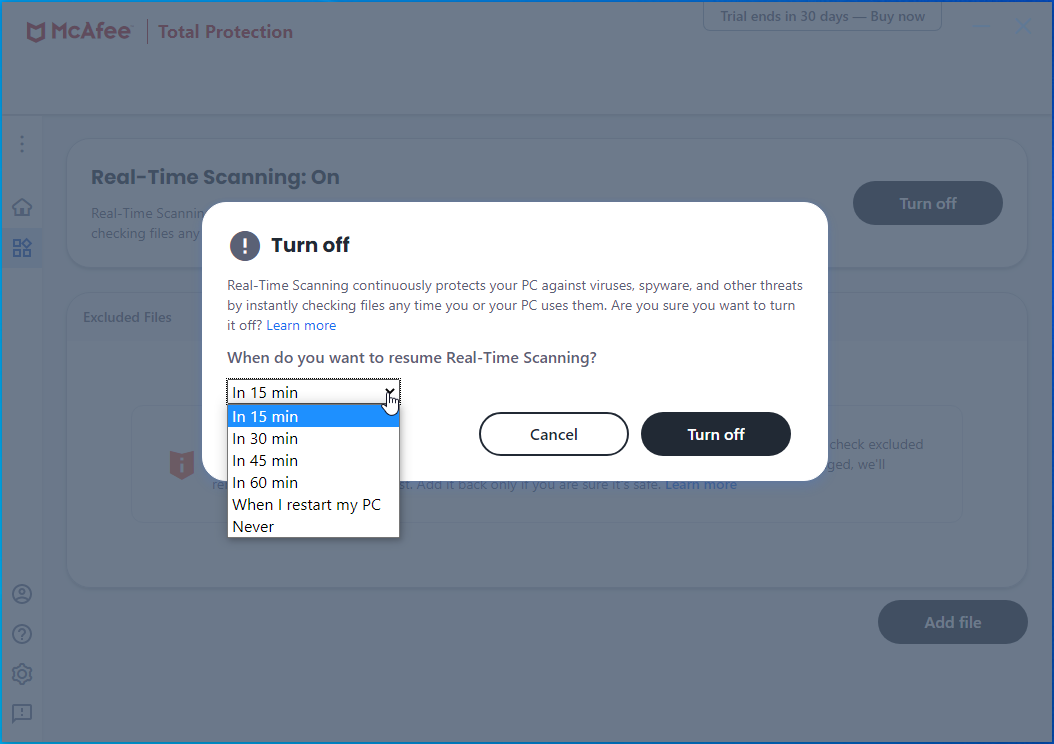
- Next, go to the drop-down menu under “When do you want to resume real-time scanning?” after the Turn Off dialog window pops up, and then choose how long you want to keep Real-Time Scanning turned off.

- Now click on Turn Off and try running the command.

Avast
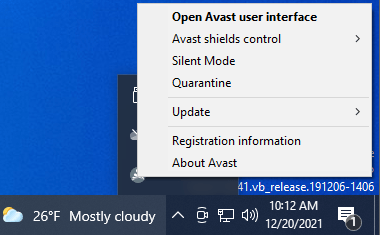
- Go to your taskbar’s far-right edge and click on the “Show hidden icons” arrow to expand the system tray.

- When you see the expanded system tray, right-click on the Avast icon.

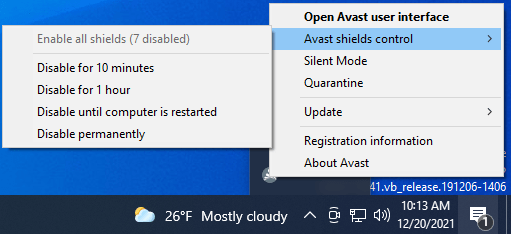
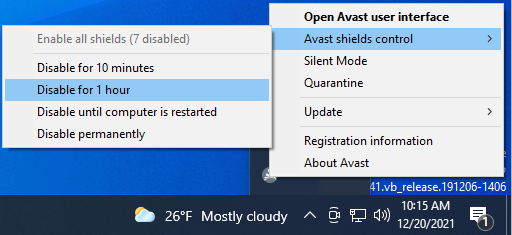
- Navigate to “Avast shields control.”

- Click on Disable for “Avast shields control” and set a duration.

- Now try running the command.
Kaspersky
- Head to the right of your taskbar.
- Click on “Show hidden icons” if the Kaspersky icon is not on the taskbar. Right-click on the icon once you see it.
- Once the context menu shows up, select Pause Protection.
- After you see the Pause Protection dialog window, you can pause protection for a specified duration, until you start the application again, or until you choose to resume real-time protection.
- Click on Pause Protection after choosing an option.
- You can now try running the command.
Run a full malware scan
If turning off the antivirus program does not resolve the problem, you have to eliminate the possibility of malware infection. Some malware applications are designed to infiltrate system folders and behave like system files. In some cases, they might tamper with or replace individual system files to escape discovery.
You have to run a full malware scan and allow the antivirus program to check your system folders. Running the full scan shouldn’t be an issue, as you can easily find the option on the first page of your antivirus tool’s GUI.
If you use Windows Security, follow these steps to run the full scan:
- Use the Windows + I keyboard shortcut to launch the Settings application.
- When the home page of Settings comes up, click on the Update & Security icon.

- Once the Update & Security page shows up, go to the left pane and click on Windows Security.
- After that, navigate to the right side of the window and click on Virus & Threat Protection under Protection Areas.
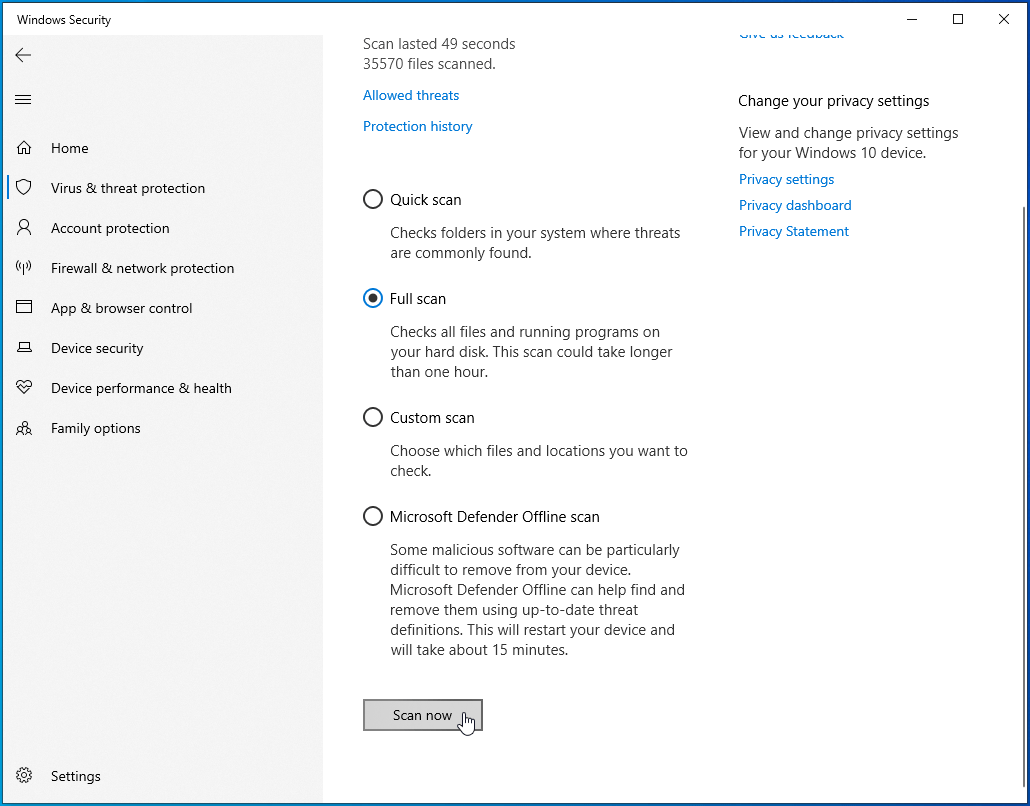
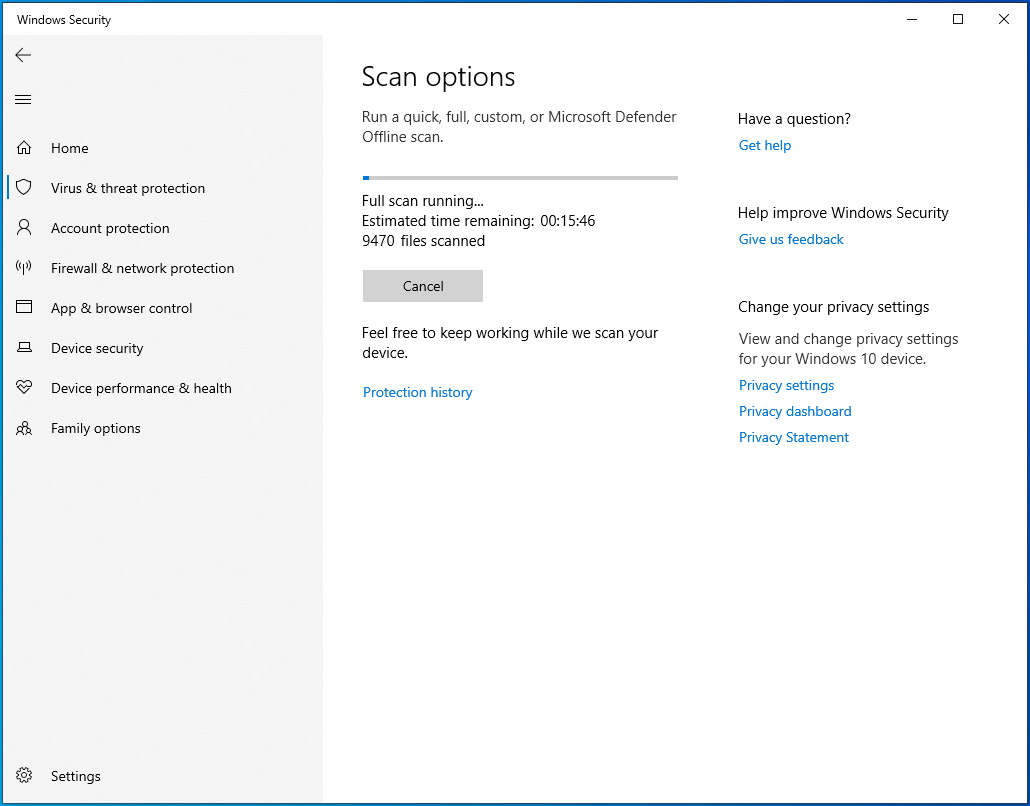
- Once the Virus & Threat Protection interface appears, click on Scan Options.
- After you see the Scan Options page, select Full Scan, and then click on Scan Now.
- The Full Scan usually runs longer than the Quick Scan, as it goes into deeper areas.
- Once the scan is complete, allow the tool to remove any malware that it finds and restart your system.
- You can now try running the command.

Remove temporary files
Temporary files serve a purpose for a short period, after which they become useless. However, they go on to cause problems, especially when they become corrupt. In some cases, you’ll have to flush out leftover installation files or files that are yet to be installed, such as Windows Update files.
You’ll find out how to remove temporary files using the Disk Cleanup utility and the Settings application.
Use Disk Cleanup:
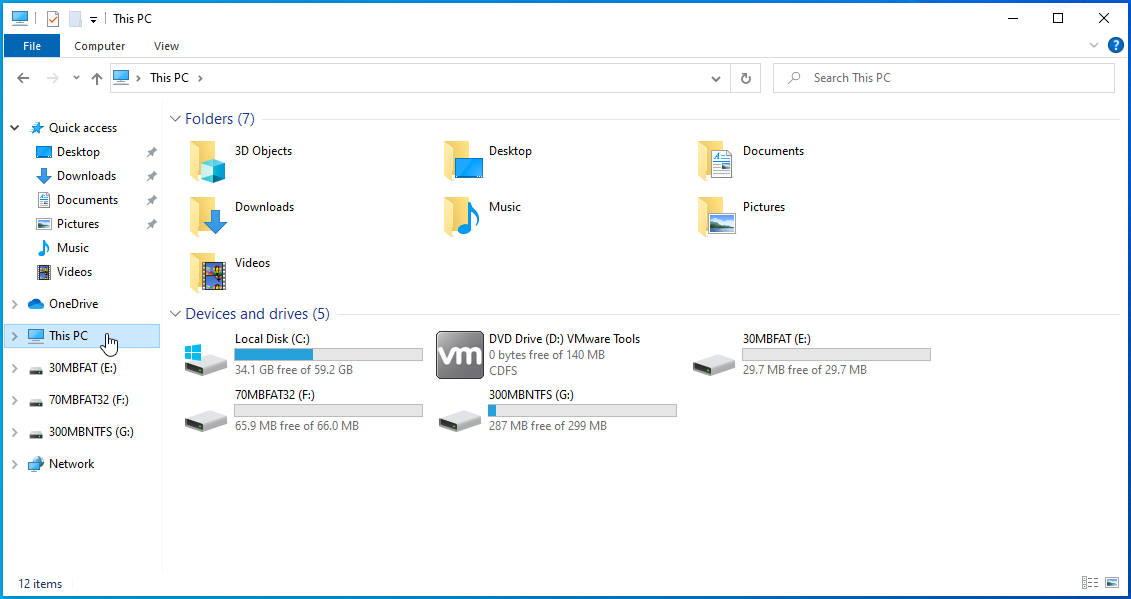
- Navigate to the taskbar and click on the folder icon to open a File Explorer window. The Windows + E keyboard shortcut is another means of summoning a File Explorer window.

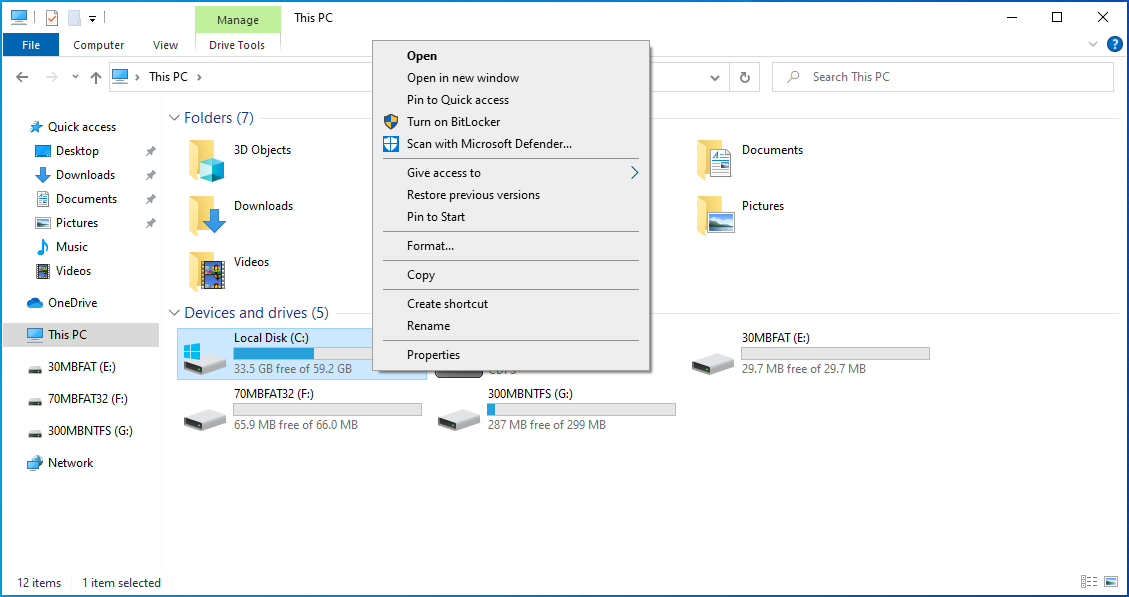
- Once File Explorer opens, go to the left pane and click on This PC.

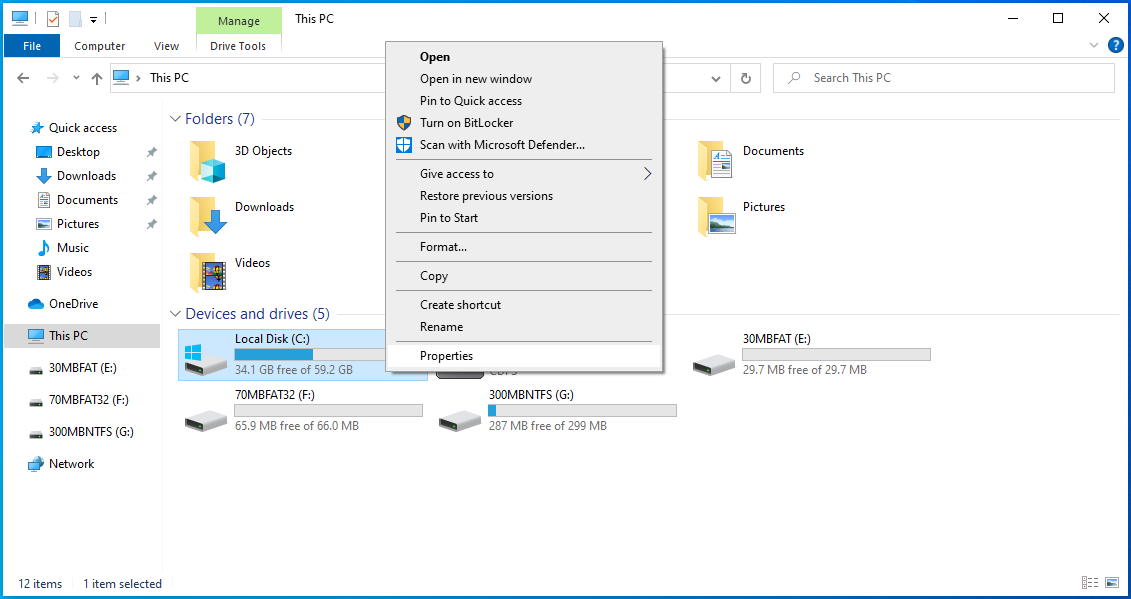
- Head to the right pane, right-click on your first drive and click on Properties.
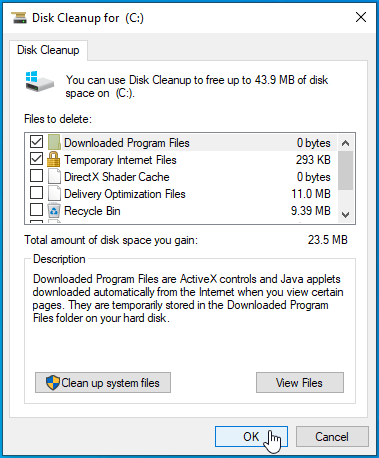
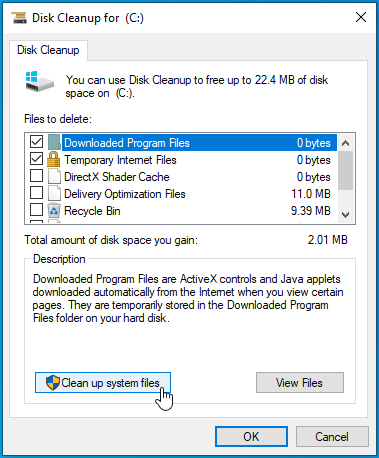
- Immediately the Properties dialog window opens, click on Disk Cleanup.

- Once the Disk Cleanup utility scans your temporary files and shows you the files to delete, select the ones you want to remove and click on OK.

- Click on the “Clean up system files” button to get rid of system files that are no longer in use.
- After that, try running the DISM command and check for the problem.

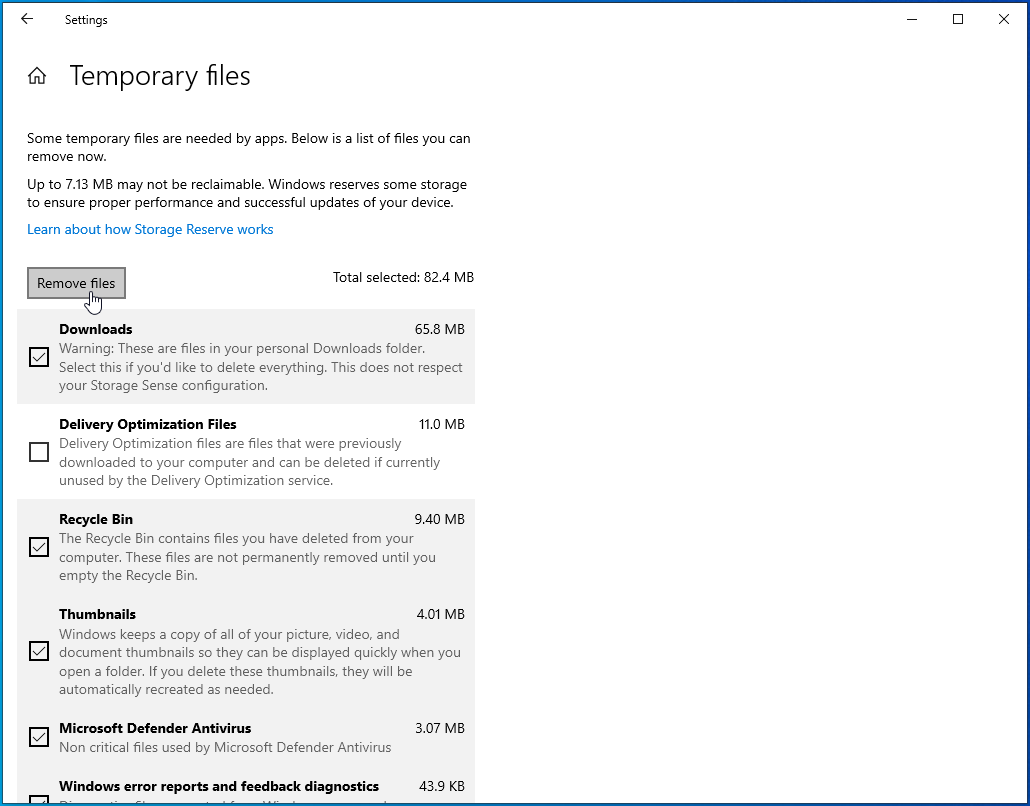
Here’s how to use the Settings application to clear out temporary files:
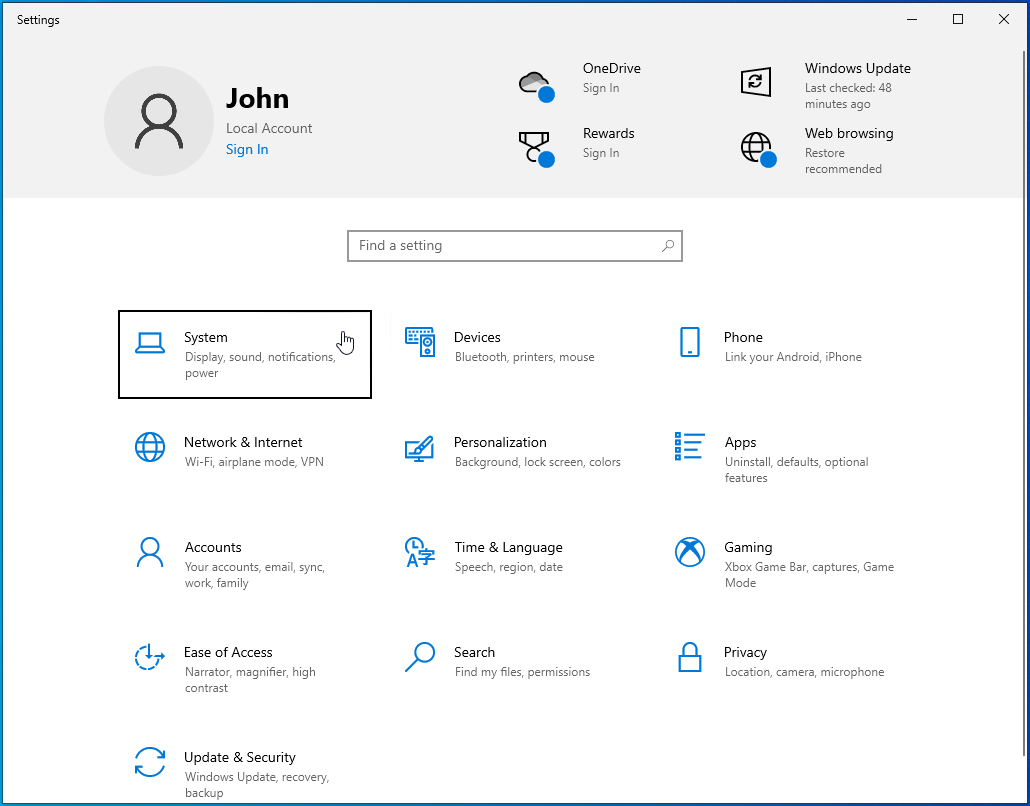
- Open the Settings application by pressing the Windows + I keyboard shortcut.
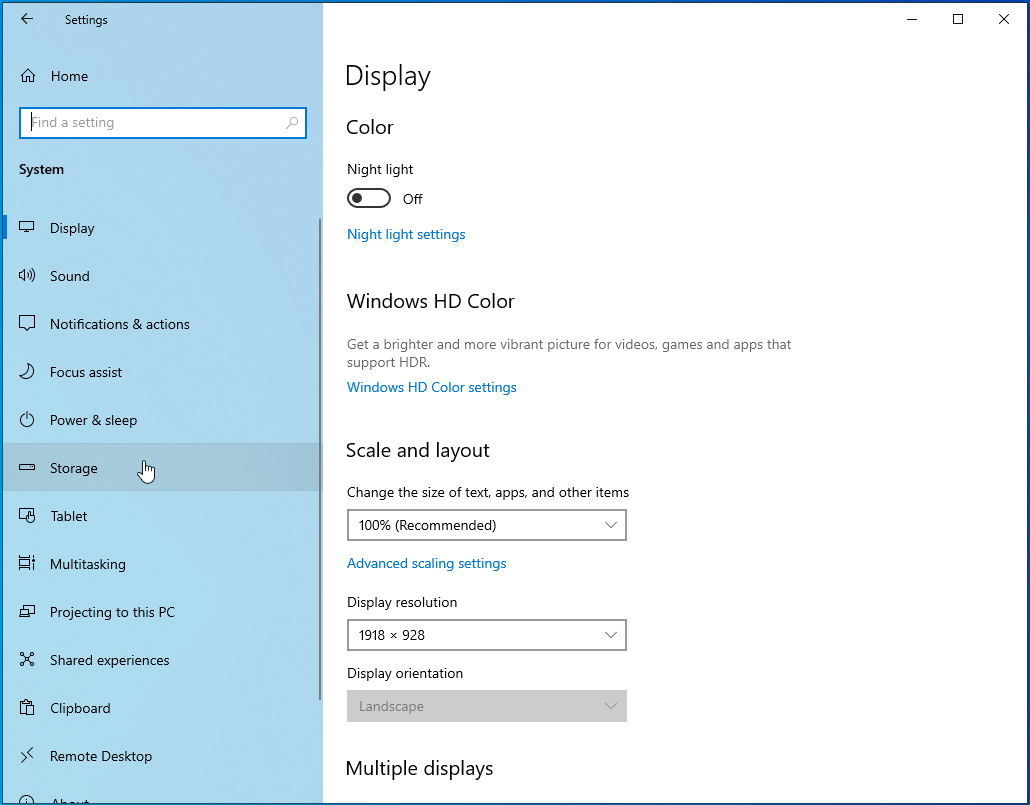
- After the home page of Settings appears, click on System.
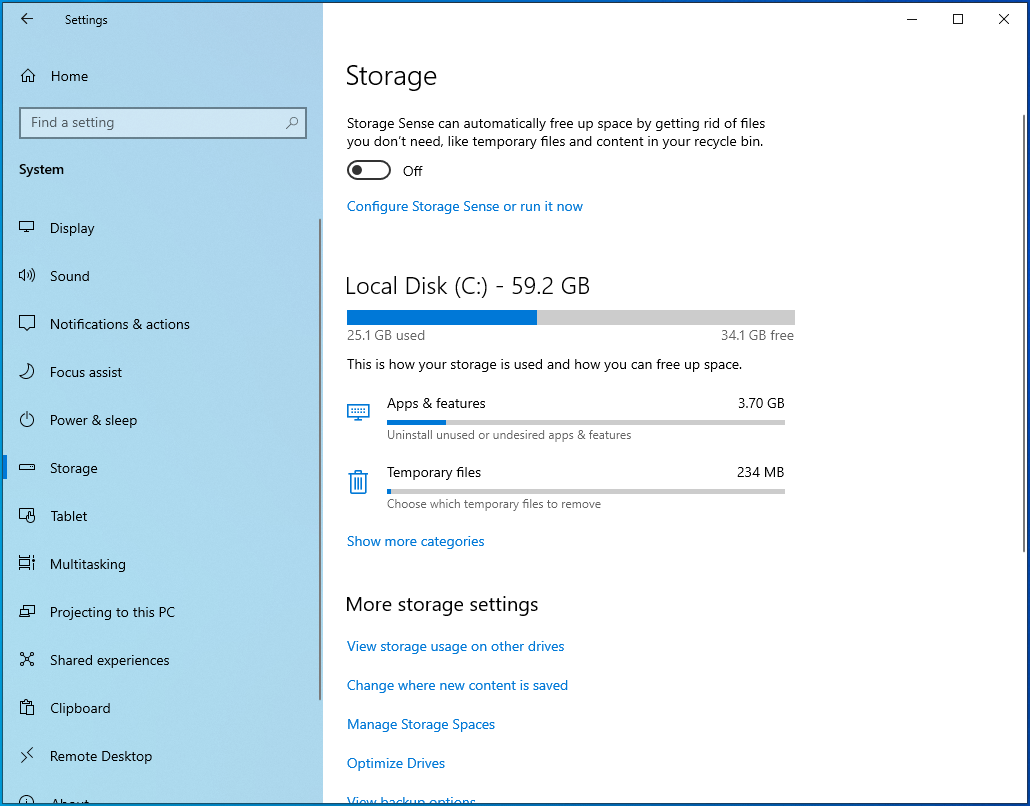
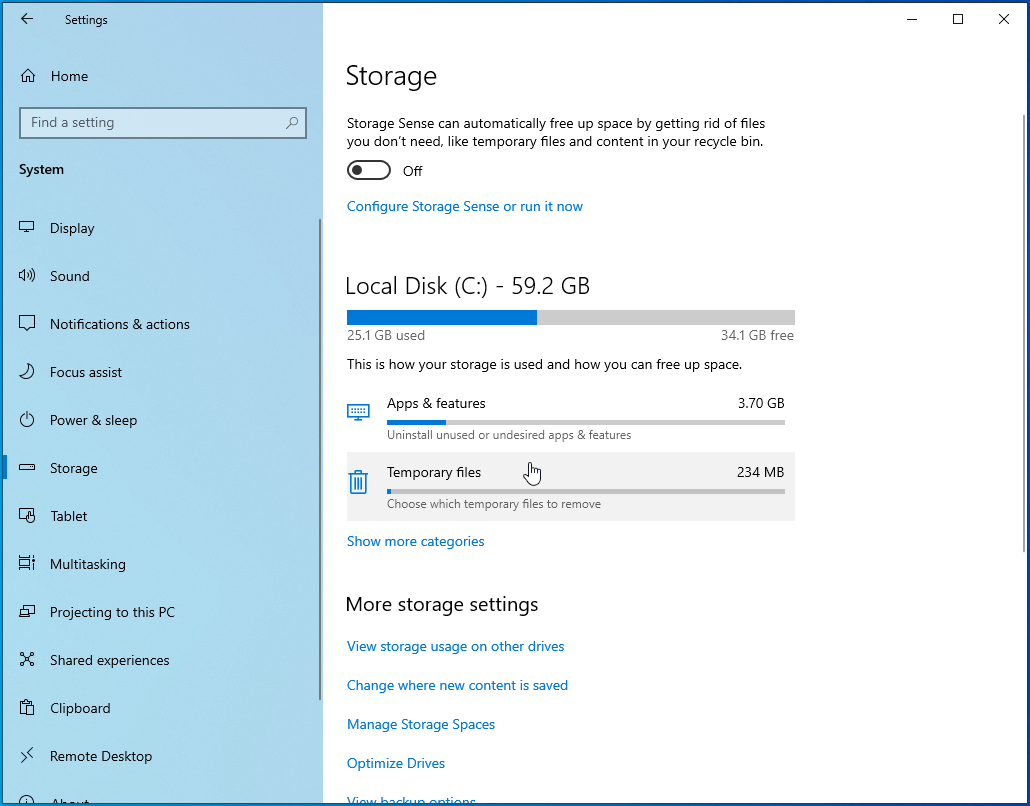
- Go to the left pane of the System page and click on Storage.

- On the right side of the page, you’ll see the Storage tab, where information about your system’s hard drive is displayed.
- Click on Temporary Files.
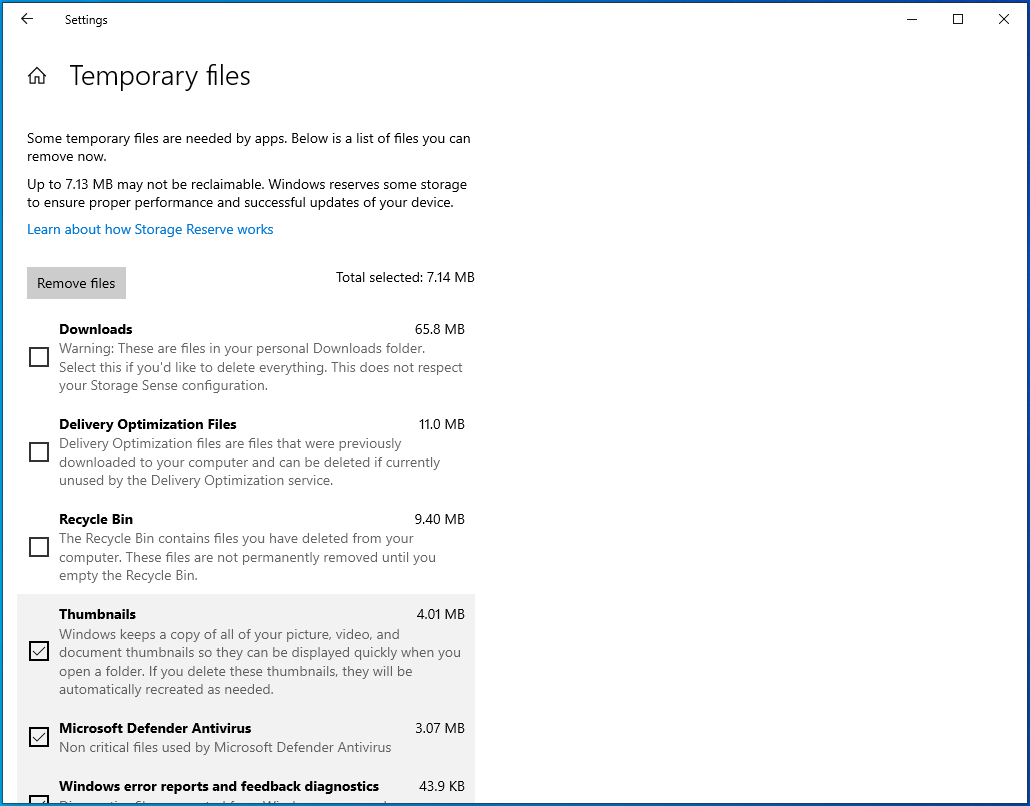
- Windows will now scan your temporary files and list them according to their categories, showing you the size of each file.
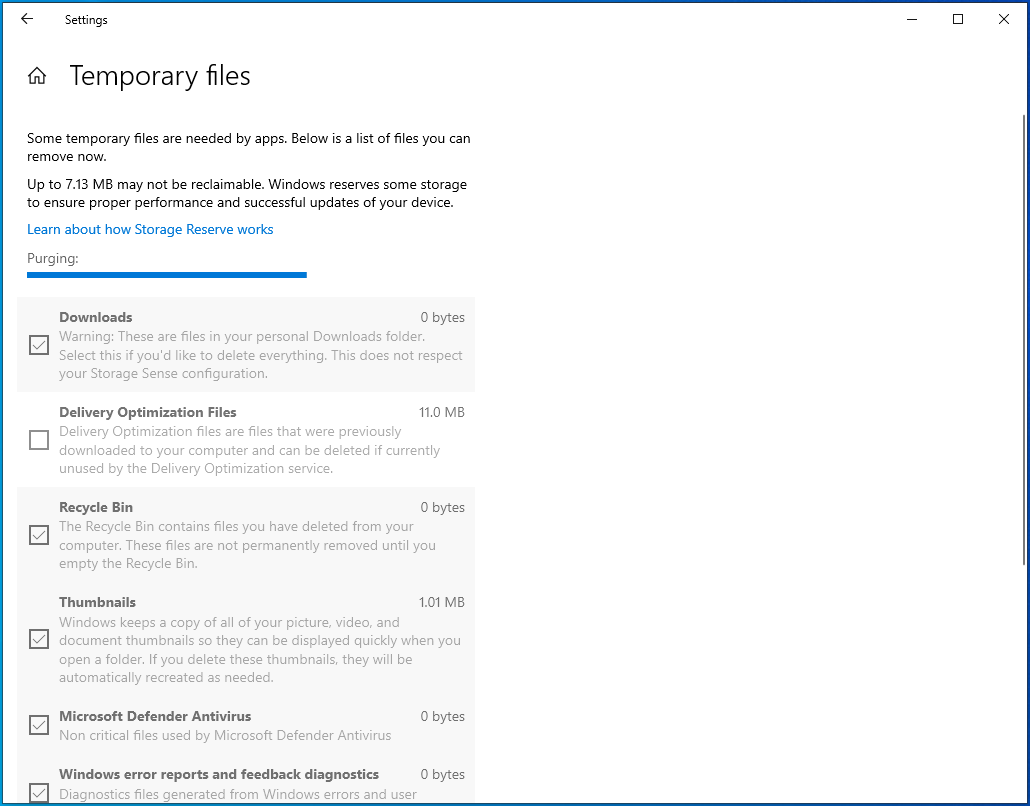
- Use the boxes beside the categories to select the ones you want to delete, and then click on the Remove Files button at the top of the page.
- Allow Windows to remove the files, and then try running the command to check if the error still occurs.
You can automate the removal of temporary files and other problematic entities, like corrupt registry keys, by installing Auslogics BoostSpeed.
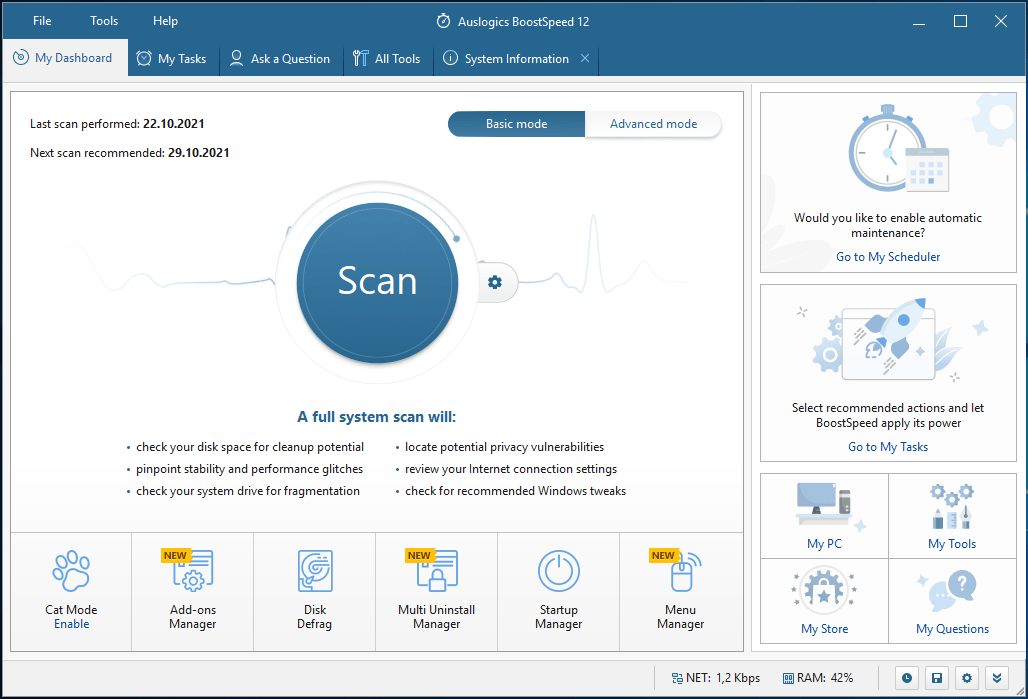
The tool has many system optimization algorithms that help it track such items and remove them.
Run CHKDSK
The problem might lie with your hard disk. If the file that DISM needs to work is located in a bad sector, this may result in the error in question. You can quickly resolve that problem by running the CHKDSK command.
First, we’ll show you how to run the CHKDSK tool via your regular user interface. If that doesn’t get the job done, we’ll show you how to run the tool in Command Prompt.
Follow the guide below to run the CHKDSK tool via File Explorer:
- Click on the folder icon in your taskbar to open a File Explorer window. The Windows + E keyboard shortcut is another means of summoning a File Explorer window.
- Once File Explorer opens, go to the left pane and click on This PC.

- Head to the right pane, right-click on your first drive and click on Properties.
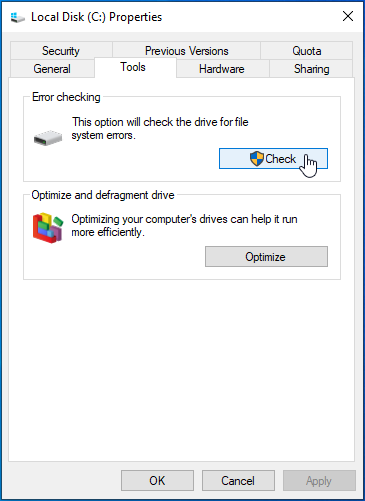
- Immediately the Properties dialog window opens, switch to the Tools tab and click on the Check button under Error Checking.

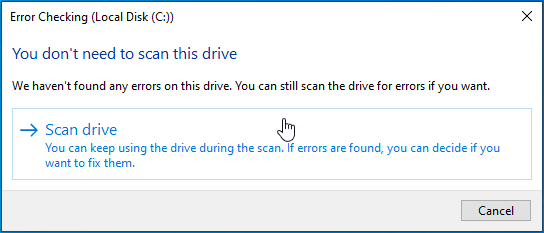
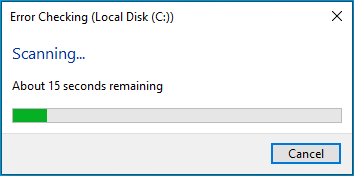
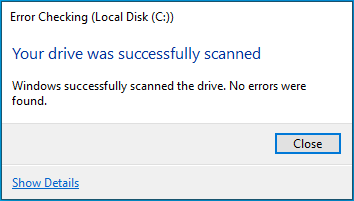
- Once you see the “You don’t need to scan this drive” dialog, click on Scan Drive.

- The CHKDSK utility will now begin to scan your hard disk for errors.

- Once the scan is complete, a dialog will appear showing you the results.

If going through File Explorer does not work, use an elevated Command Prompt window to run a more thorough check of the hard disk. Follow the guide below:
- Open the Run dialog box by right-clicking the Start button and clicking on Run in the Power User menu. Tapping the Windows and R keys simultaneously will also launch the dialog box.

- Once Run opens, type “CMD” into the text field, and then press Ctrl + Shift + Esc.
- Once the User Account Control dialog requests permission to run the Command Prompt as an administrator, click on Yes.

- Immediately the Command Prompt window appears, type in the line below and hit the Enter key:
chkdsk C: /f /r /x
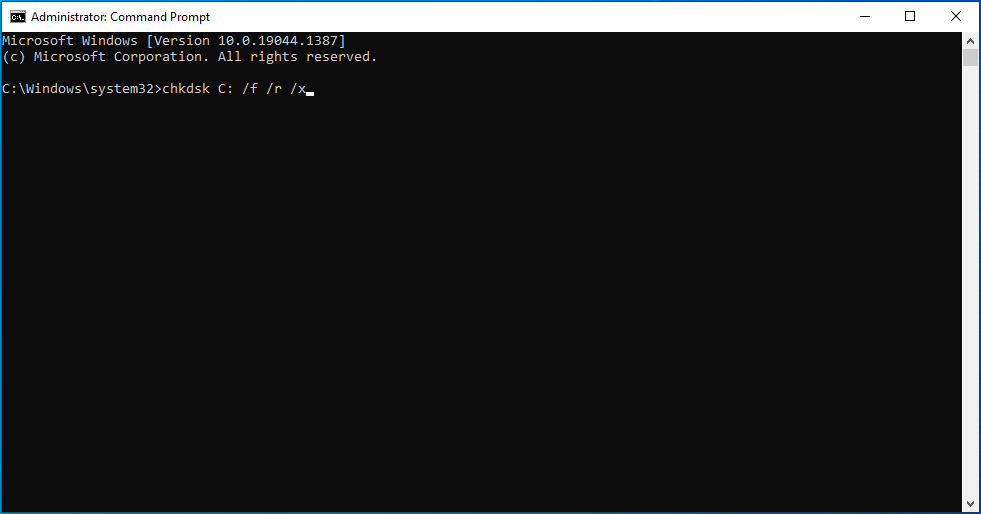
Note that the letter “C” in the command is a placeholder for your Windows volume drive letter.
The additional command switches do the following:
The “/x” parameter allows the tool to unmount the volume before it is scanned.
The “/r” parameter allows the tool to look for bad sectors and recover any readable information.
The “/f” parameter allows the tool to fix any error that it finds during the scan.
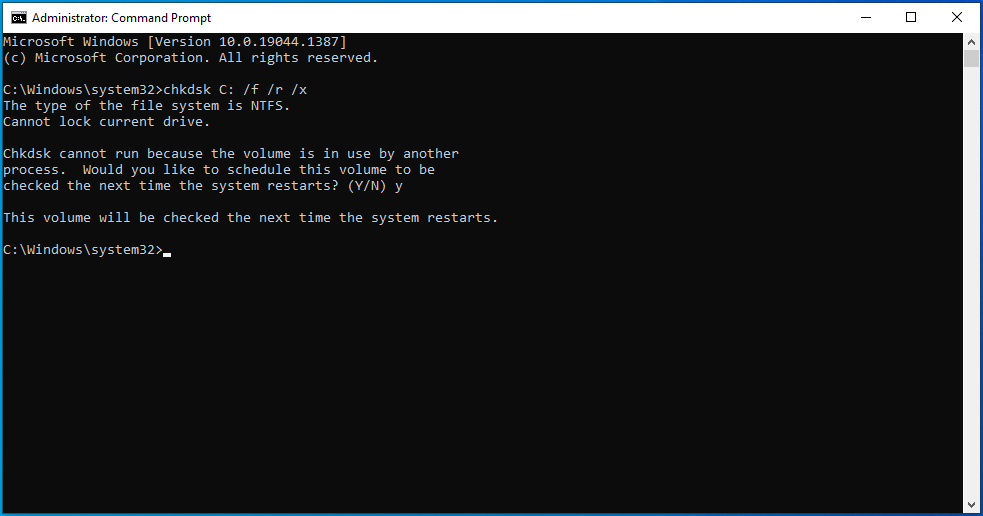
If the message below shows up, then the volume you are trying to scan is currently busy. Tap the Y key if the Command Prompt asks you to schedule the scan for your next reboot:
“Chkdsk cannot run because the volume is in use by another process. Would you like to schedule this volume to be checked the next time the system restarts? (Y/N)”
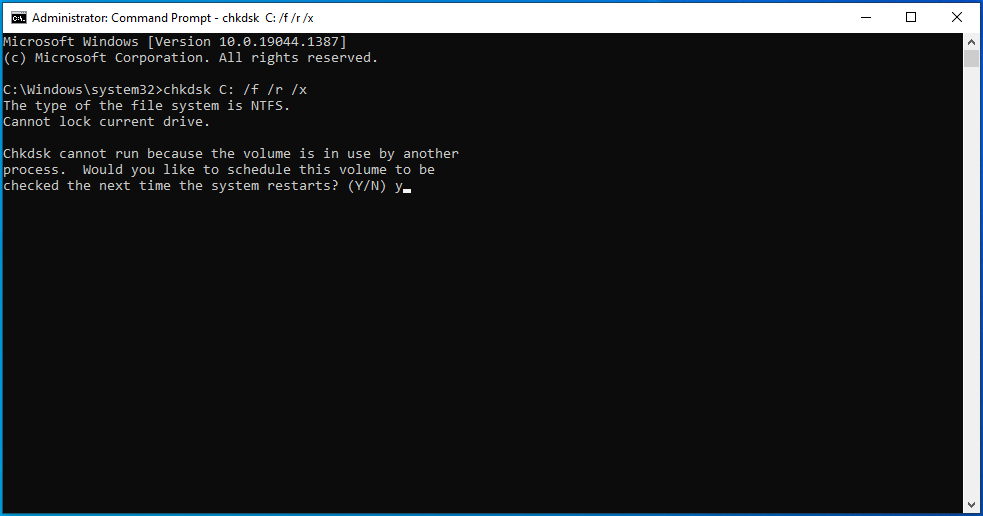
After pressing Y, reboot your PC to complete the check, then try carrying out your backup and check for the error.
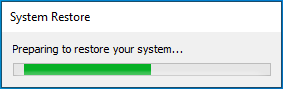
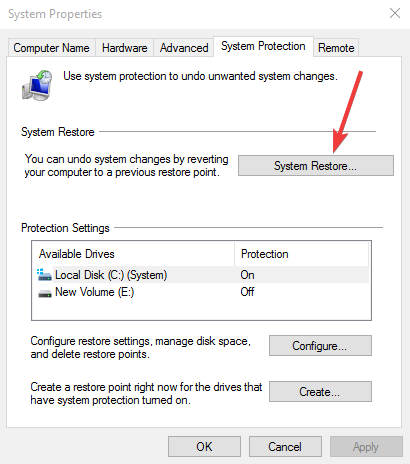
Restore your system to an earlier state
Suppose the problem started after you made significant changes to your system, such as installing or uninstalling a program or a driver. In that case, you can reverse them by running System Restore. Windows creates automatic restore points to help you return your system to a previous state if issues like this occur.
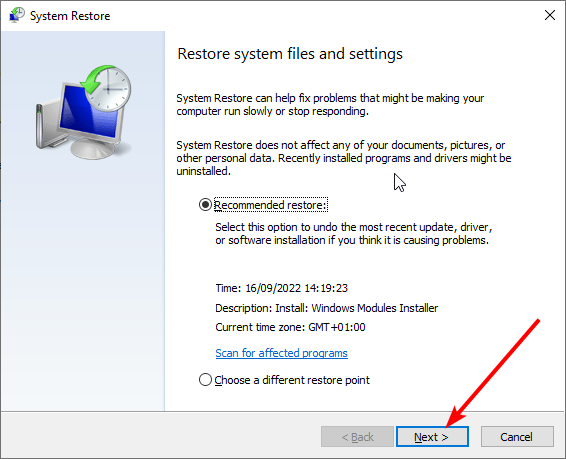
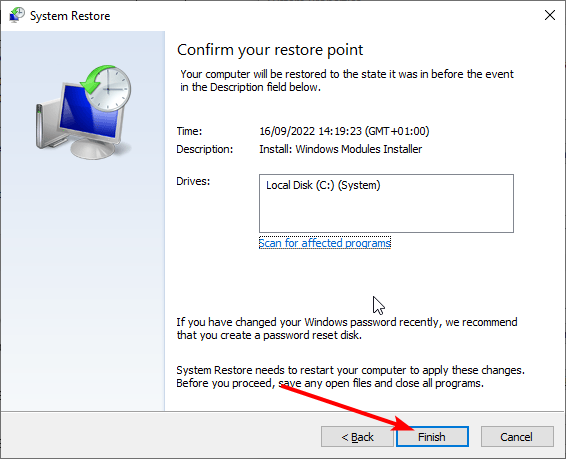
The following steps will show you how to perform a system restore:
- Open the Start menu and type “System restore.”

- Click on “Create a restore point” in the search results.

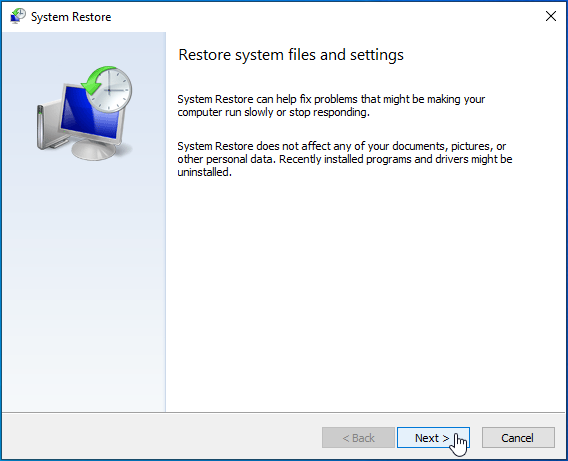
- Once the System Properties dialog window opens, click on the System Restore button.

- Click on Next on the first page of the System Restore wizard. You can select “Choose a different restore point” if you don’t want to use the recommended restore point.

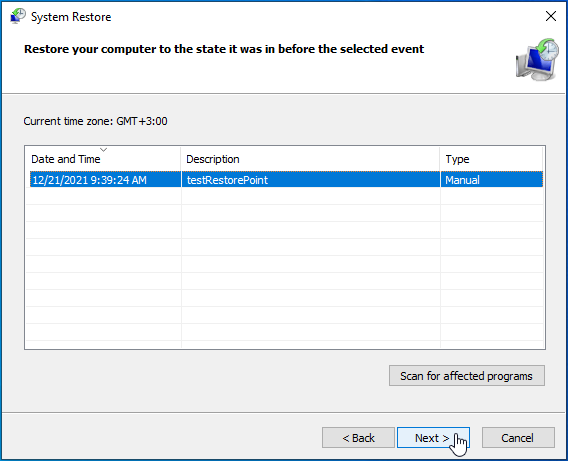
- Select a restore point and click Next.
- Click on Finish and allow your system to restart.
- Your system will be restored.

- Once your computer reboots, check for the problem.


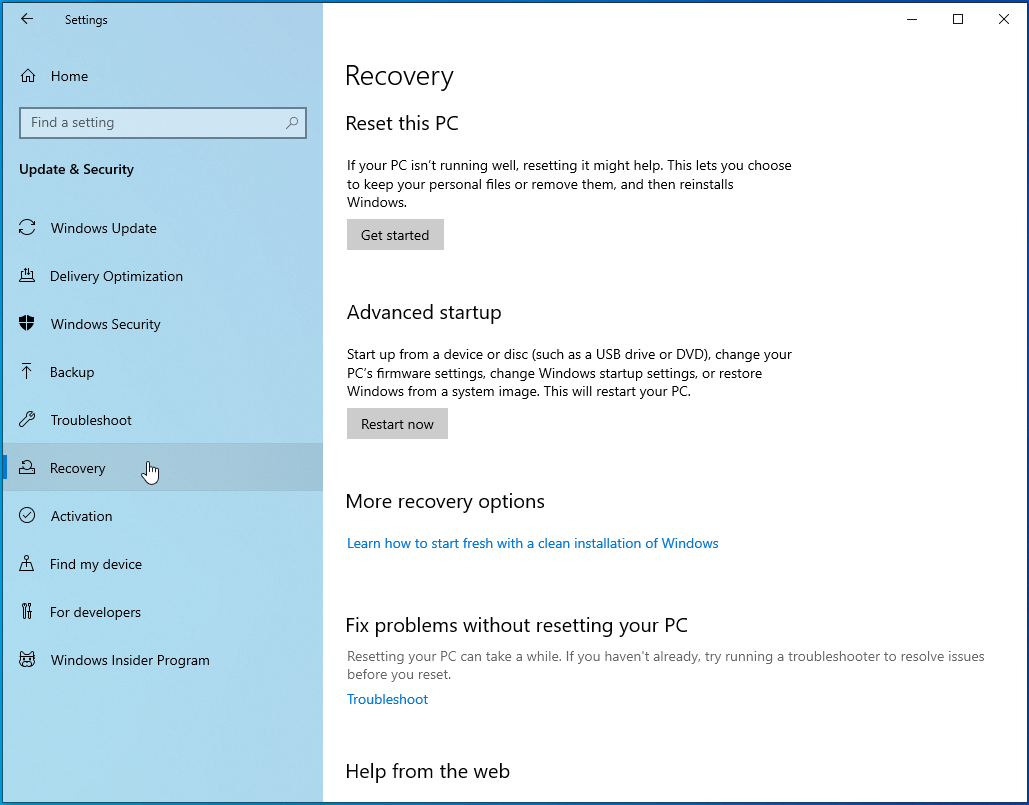
Reset Windows
If nothing works, then you should consider resetting your operating system. You can keep your files, but your applications and preferences will be lost.
Follow these steps to reset your Windows 10 PC properly:
- Click on the Start menu and select the Settings icon above the Power icon.

- Once the Settings interface appears, click on the Update & Security icon at the bottom of the screen.
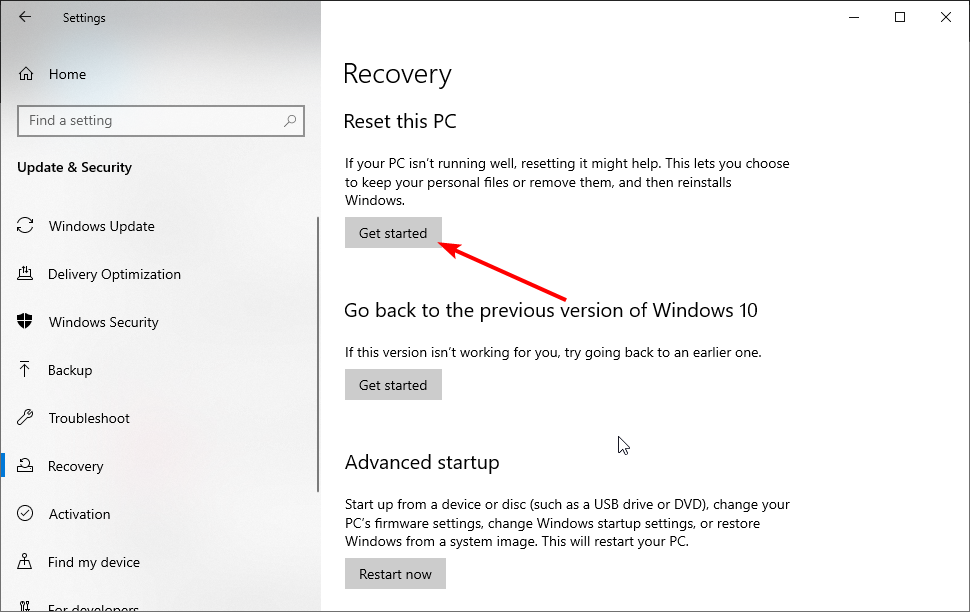
- Next, go to the left side of the Update & Security page and click on Recovery.

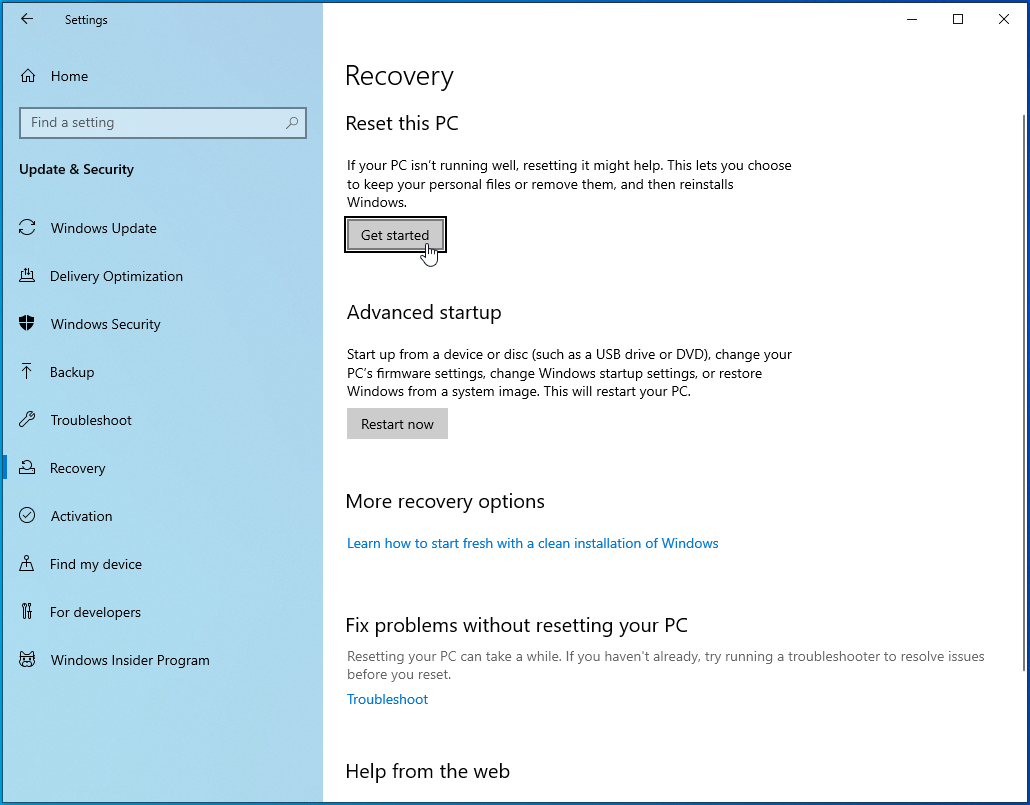
- Navigate to the right side of the screen and click on Get Started under Reset this PC.
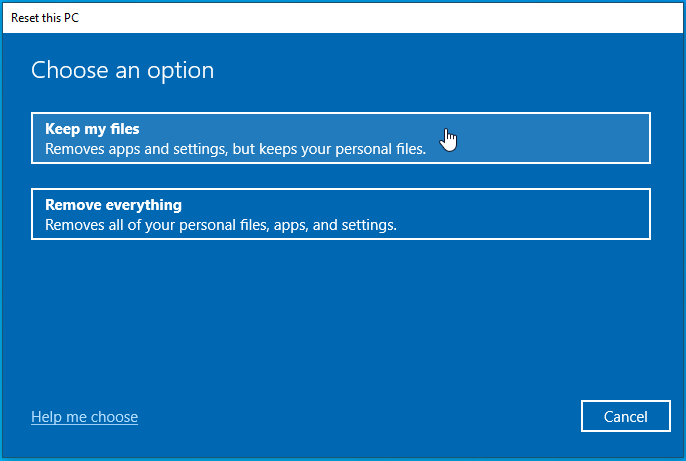
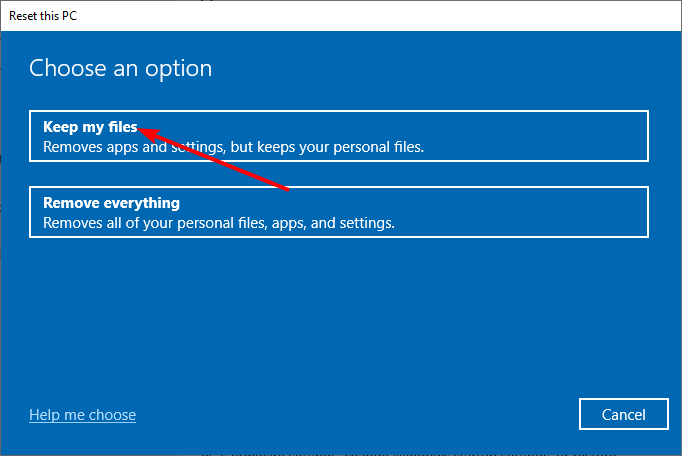
- Once the “Reset this PC” setup wizard appears, select “Keep my files” or “Remove everything” under Choose an Option, depending on your preference.

- If you go for “Keep my files,” Windows will keep your files intact, but your apps and settings will return to their defaults. If you select “Remove everything,” Windows will wipe out all your files, including your installed apps and settings, and the OS will ask if you want to clean your hard drive.
- Once you’ve chosen what you’d like to keep, click on the Next button, then click on Reset.
- Allow Windows to complete the job.

Conclusion
The DISM error 1392 shouldn’t bug you any longer. If you have any questions or want to share your experience, please use the comments section below.
На чтение 7 мин. Просмотров 8.4k. Опубликовано 03.09.2019
Dism.exe ошибка 1392 обычно отображается всякий раз, когда файл или каталог поврежден и не читается.
Расположение, указанное в сообщении об ошибке, указывает, что некоторые временные файлы повреждены. Поскольку файлы являются только временными, одно из быстрых исправлений, которые вы можете сделать, – это удалить упомянутый файл в сообщении об ошибке и проверить, сохраняется ли проблема.
Ошибка вызвана отсутствием системных файлов или поврежденными поврежденными данными, которые следует исправить как можно скорее, чтобы предотвратить дальнейшее повреждение оборудования и приложений, так как это может привести к сбоям системы, потере данных или отказу оборудования в большинстве случаев.
Ошибка 1392 проявляется в таких проблемах, как предупреждающие сообщения, замедление или отставание производительности ПК, зависание системы, проблемы с блокировкой программ, запуском или завершением работы, а также с ошибками при установке приложений или других программ и обновлений.
Если вы попытались удалить временный файл и ничего не произошло, попробуйте другие решения, перечисленные здесь.
Содержание
- Как исправить ошибку Dism.exe 1392
- Решение 1. Выполните сканирование SFC
- Решение 2. Запустите проверку диска, чтобы проверить и исправить ошибки диска
- Решение 3. Временно отключите антивирусную программу
- Решение 4. Сканирование компьютера на наличие вредоносных программ
- Решение 5. Удалите ненужные файлы с помощью очистки диска
- Решение 6. Выполните восстановление системы
Как исправить ошибку Dism.exe 1392
-
- Выполнить сканирование SFC
- Запустите Check disk, чтобы проверить и исправить ошибки диска
- Временно отключить антивирусную программу
- Сканирование вашего компьютера на наличие вредоносных программ
- Очистите ненужные файлы с помощью Disk Cleanup
- Выполните восстановление системы
Решение 1. Выполните сканирование SFC
Всякий раз, когда вы обнаружите ошибку dism.exe 1392, скорее всего, есть поврежденные файлы, и программа проверки системных файлов вызовет такие файлы, так как сканирует все защищенные системные файлы, а затем заменяет неправильные версии подлинными, правильными версиями Microsoft.
- Нажмите Пуск .
- Перейдите в поле поиска и введите CMD .
- Перейдите в Командную строку .
- Нажмите правой кнопкой мыши и выберите Запуск от имени администратора .

- Введите sfc/scannow

- Нажмите Enter .
Перезагрузите компьютер и проверьте, исчезла ли ошибка dism.exe 1392.
Решение 2. Запустите проверку диска, чтобы проверить и исправить ошибки диска
Вы должны очень часто использовать инструмент проверки диска для проверки целостности дисков. Это проверяет диски и может исправить многие типы распространенных ошибок на дисках FAT16, FAT32 и NTFS. Один из способов, с помощью которого Check Disk обнаруживает ошибки, заключается в сравнении растрового изображения тома с секторами диска, назначенными файлам в файловой системе.
Check Disk не может восстановить поврежденные данные в файлах, которые кажутся структурно неповрежденными. Вы можете запустить Check Disk из командной строки или через графический интерфейс.
- Нажмите правой кнопкой мыши на Пуск и выберите Командная строка (администратор) .

- Введите следующую команду: chkdsk/f h: и нажмите клавишу ввода (h – это диск с проблемой disk.exe ошибка 1392)
Вы также можете попробовать следующую команду: chkdsk/F/R и затем нажмите enter
Примечание. Check Disk проанализирует диск и выдаст сообщение о состоянии, в котором он обнаружил возникшие проблемы. Если вы не укажете дополнительные параметры, Check Disk не будет устранять проблемы, но для поиска и исправления ошибок на диске C используйте chkdsk/f C: .
Когда вы используете эту команду, Check Disk выполняет анализ диска, а затем исправляет все найденные ошибки, если диск не используется. Если он используется, Check Disk отображает запрос, который спрашивает, хотите ли вы запланировать проверку диска при следующей перезагрузке системы. Нажмите да , чтобы запланировать эту проверку.
- ТАКЖЕ ЧИТАЙТЕ: исправлено: Windows 10 chkdsk зависла
Полный синтаксис для Check Disk выглядит следующим образом:
CHKDSK [том [[путь] имя файла]] [/ F] [/ V] [/ R] [/ X] [/ I] [/ C ] [/ L [: размер]]
- V предназначен для громкости , чтобы настроить громкость для работы с
- путь/имя файла . Указывает файлы для проверки на фрагментацию (только FAT16 и FAT32).
- /F Исправляет ошибки на диске
- /V . Отображает полный путь и имя каждого файла на диске (FAT16 и FAT32); отображает сообщения очистки, если таковые имеются (NTFS)
- /R Находит поврежденные сектора и восстанавливает читаемую информацию (подразумевается/F)
- /X . Вынуждает том сначала отключиться при необходимости (подразумевается/F).
- /I Выполняет минимальную проверку записей индекса (только NTFS)
- /C Пропускает проверку циклов в структуре папок (только NTFS)
- /L: размер . Устанавливает размер файла журнала (только NTFS).
- /B Повторная оценка сбойных кластеров на томе (только NTFS; подразумевает/R)
Решение 3. Временно отключите антивирусную программу
- Перейдите на панель задач рядом с часами и щелкните значок антивирусного программного обеспечения
- Щелкните по нему правой кнопкой мыши
- Выберите опцию, чтобы отключить
Примечание. Антивирусное программное обеспечение может помочь защитить компьютер от вирусов и других угроз безопасности. В большинстве случаев вы не должны отключать его. Если вам необходимо временно отключить его для установки другого программного обеспечения, включите его снова, как только вы закончите.
Если вы подключены к Интернету или сети, когда антивирусное программное обеспечение отключено, ваш компьютер открыт для атак.
- ТАКЖЕ ПРОЧИТАЙТЕ: 5 лучших антивирусных инструментов с неограниченным сроком действия [2018 Список]
Решение 4. Сканирование компьютера на наличие вредоносных программ
Ошибка dism.exe 1392 может быть связана с заражением вашего компьютера вредоносным ПО, так как они могут повредить, повредить или даже удалить файлы, связанные с ошибками во время выполнения, или ошибка может быть связана с компонентом вредоносной программы. Проведите полное сканирование, чтобы исключить проблемы с вредоносным ПО.
Решение 5. Удалите ненужные файлы с помощью очистки диска
По мере использования компьютера со временем накапливаются ненужные файлы, а если они не очищены, они могут привести к замедлению работы компьютера или его зависанию, а также могут вызвать ошибку dism.exe 1392 из-за конфликтов файлов или перегрузки жесткого диска.
Их очистка может устранить ошибку и повысить производительность и скорость вашего компьютера.
- Войдите в систему как администратор .
- Нажмите Пуск и выберите Проводник .
- Разверните Этот компьютер .
- Нажмите правой кнопкой мыши на Локальный диск (C:) и выберите Свойства .
- Перейдите на вкладку Инструменты .

- В разделе Оптимизировать и дефрагментировать диск выберите Оптимизировать .

- Нажмите «Применить», затем нажмите «Ввод» или «ОК».
Решение 6. Выполните восстановление системы
- Нажмите Пуск .
- Перейдите в поле поиска и введите Восстановление системы .
- Нажмите Создать точку восстановления в списке результатов поиска.

- Введите пароль учетной записи администратора или предоставьте разрешения, если будет предложено
- В диалоговом окне Восстановление системы нажмите Восстановление системы .

- Нажмите Далее .
- Нажмите точку восстановления, созданную до возникновения проблемы
- Нажмите Далее .
- Нажмите Готово .
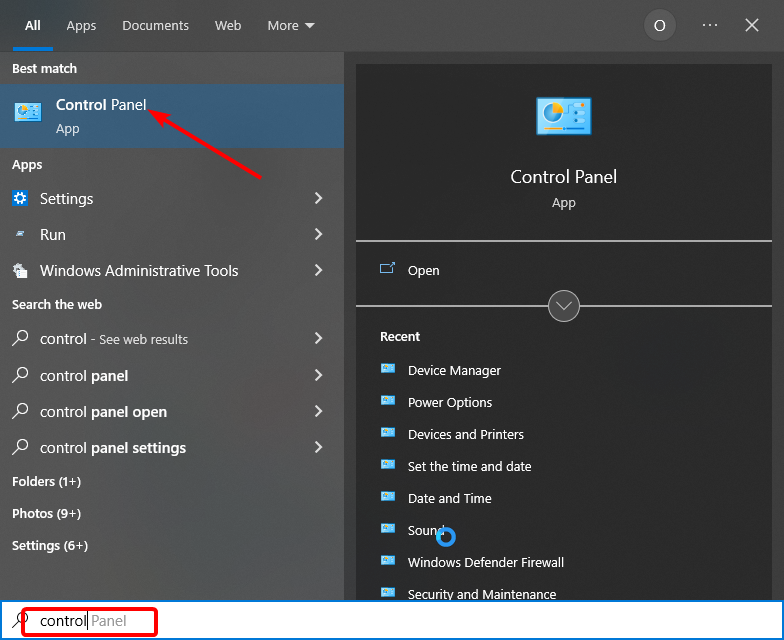
Чтобы вернуться к точке восстановления, выполните следующие действия:
- Нажмите правой кнопкой мыши Пуск .
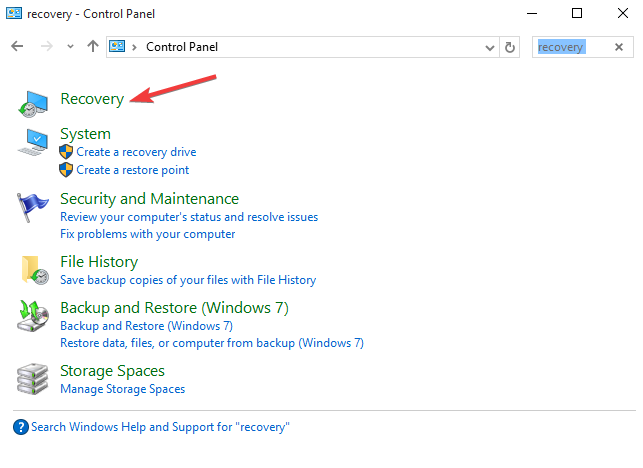
- Выберите Панель управления .
- В поле поиска панели управления введите Восстановление .
- Выберите Восстановление .

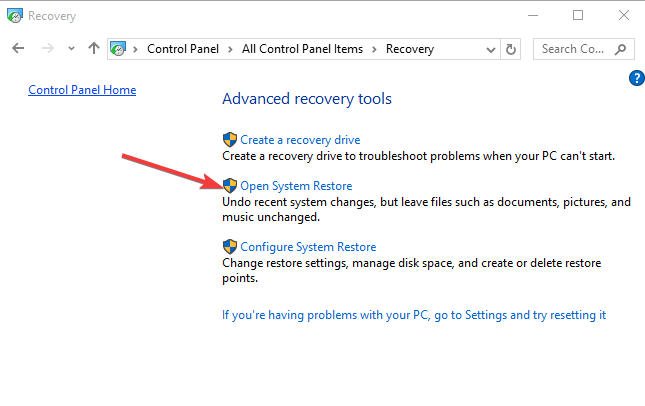
- Нажмите Открыть восстановление системы .

- Нажмите Далее .
- Выберите точку восстановления, связанную с проблемной программой/приложением, драйвером или обновлением
- Нажмите Далее .
- Нажмите Готово .
Другие вещи, которые можно попробовать:
- Обновите драйверы вашего компьютера, поскольку ошибки 1392 могут быть связаны с повреждением или устареванием драйверов устройств. Поиск точного драйвера для проблемы dism.exe error 1392 может быть трудным, но вы можете использовать инструмент обновления драйверов для автоматизации процесса.Ошибка может быть не связана с драйверами, но хорошо убедиться, что все драйверы обновлены для оптимальной производительности ПК
- Установите все доступные обновления Windows, так как Microsoft постоянно обновляет системные файлы, связанные с ошибкой, поэтому решение проблем с ошибками во время выполнения может быть выполнено путем установки последних обновлений или пакетов обновления или других регулярно выпускаемых исправлений
- Удалите и установите заново программу, связанную с ошибкой dism.exe 1392.
- Выполните чистую установку Windows. Сделайте резервную копию всех ваших файлов и данных, прежде чем начать этот трудоемкий процесс. Это последнее средство в попытке решить проблему с ошибкой 1392, но она сотрет все с вашего жесткого диска, поэтому вы можете начать с новой системы. Это также очищает накопленный мусор.
Примечание. Если после чистой установки ошибка dism.exe не устранена, ошибки времени выполнения не связаны с программным обеспечением, а связаны с оборудованием, поэтому замените оборудование, вызывающее ошибку dism.exe 1392.
Инструмент обслуживания образов развертывания и управления ими (DISM) помогает сканировать и восстанавливать образ системы Windows, поэтому его полезно использовать время от времени. Однако были случаи, когда поврежденные файлы влияли на способность системы выполнять сканирование DISM.
Одной из наиболее распространенных ошибок DISM в таком случае является ошибка DISM 1392. Если вы столкнулись с этой ошибкой, давайте рассмотрим несколько способов ее исправить.
Используйте встроенную в Windows служебную программу SFC
Средство проверки системных файлов (SFC) встроено в Windows и может помочь восстановить поврежденные и поврежденные системные файлы. Фактически, он обычно запускается в тандеме с системой обслуживания образов развертывания и управления ими (DISM), чтобы полностью устранить ошибки, которые могли быть вызваны отсутствием файлов.
Утилиту SFC можно запустить из командной строки:
-
В строке поиска меню «Пуск» введите cmd. В результатах поиска щелкните правой кнопкой мыши Командная строка> Запуск от имени администратора.
-
В консоли командной строки введите sfc / scannow и нажмите Enter.
-
Дождитесь завершения сканирования.
-
Закройте командную строку и перезагрузите компьютер.
Связано: в чем разница между CHKDSK, SFC и DISM в Windows 10
После перезагрузки компьютера попробуйте снова запустить утилиту DISM и посмотрите, сохраняется ли ошибка. Скорее всего, SFC исправила бы любые поврежденные или отсутствующие файлы, которые были причиной ошибки DISM 1392.
Если запуск сканирования SFC не устранил проблему, скорее всего, это поможет сканирование Check Disk (CHKDSK). Утилита CHKDSK существует уже давно, и с каждой итерацией Windows она становится лучше.
Ошибки, связанные с диском, вполне могут вызывать появление кода ошибки 1392 всякий раз, когда вы запускаете утилиту DISM. Это легко исправить, запустив автономное сканирование CHKDSK:
-
В строке поиска меню «Пуск» введите cmd и в результатах поиска щелкните правой кнопкой мыши Командная строка> Запуск от имени администратора.
-
В консоли введите chkdsk / offlinescanandfix и нажмите клавишу Enter.
-
Будьте терпеливы, поскольку сканирование CHKDSK требует времени.
-
По завершении сканирования выйдите из командной строки и перезагрузите компьютер.
После перезагрузки используйте командную строку для запуска утилиты DISM. Скорее всего, вы больше не получите ошибку.
Такие ошибки, как ошибка DISM 1392, также могут быть вызваны вредоносным ПО, скрывающимся на вашем компьютере. Компьютерные вирусы могут полностью изменять или удалять системные файлы. В некоторых случаях они также могут вызывать ненормальное поведение этих файлов.
Связано: Общие сведения о вредоносных программах: распространенные типы, о которых вам следует знать
Windows 10 поставляется со встроенным Защитником Microsoft, поэтому вы можете использовать его для выполнения полного сканирования, чтобы убедиться, что на вашем компьютере нет вредоносных программ.
Сканирование на наличие вредоносных программ с помощью Защитника Windows
-
Нажмите кнопку «Пуск», затем щелкните значок шестеренки «Настройки» слева.
-
На панели настроек щелкните раздел «Обновление и безопасность».
-
На панели навигации слева нажмите Безопасность Windows.
-
В разделе «Области защиты» выберите «Защита от вирусов и угроз».
-
В новом окне в разделе «Текущие угрозы» нажмите «Параметры сканирования».
-
Выберите «Полная проверка», затем нажмите «Сканировать сейчас».
-
Дождитесь завершения сканирования. Если Windows обнаружит вирус, она сообщит вам об этом.
После завершения сканирования снова запустите DISM, чтобы проверить, сохраняется ли ошибка.
Отключите антивирусное программное обеспечение
Учитывая предыдущую запись, это может показаться нелогичным. Однако известно, что антивирусное программное обеспечение мешает функциям Windows, особенно сторонним.
Чтобы исключить это как причину появления кода ошибки DISM 1392, лучше отключить их перед повторным запуском утилиты DISM.
Как отключить Защитник Windows
-
Щелкните меню «Пуск», затем откройте «Настройки».
-
На панели настроек нажмите «Обновление и безопасность».
-
Перейдите в Безопасность Windows с помощью панели навигации слева.
-
В разделе «Области защиты» щелкните Защита от вирусов и угроз.
-
В новом окне нажмите «Управление настройками» в разделе «Настройки защиты от вирусов и угроз».
-
Установите для параметра Постоянная защита значение ВЫКЛ.
-
Закройте окно и попробуйте снова запустить утилиту DISM.
Убедитесь, что вы повторно включили защиту в реальном времени после запуска утилиты DISM. Чтобы еще больше повысить безопасность, перенастройте Защитник Windows для защиты вашего компьютера.
Как отключить стороннее антивирусное программное обеспечение
Учитывая огромное количество поставщиков антивирусных программ на рынке, процесс может немного отличаться в зависимости от программного обеспечения.
Обычно эти антивирусные решения можно легко отключить, щелкнув правой кнопкой мыши значок на панели задач и выбрав Отключить защиту.
Используйте альтернативный метод для запуска утилиты DISM
Если ни одно из перечисленных выше исправлений не помогло, попробуйте запустить DISM в сочетании с Windows Media Creation Tool.
Этот инструмент загрузит последнюю версию Windows в виде файла ISO. Используя модифицированную командную строку DISM, ваш компьютер может восстановить образ диска, сравнив его с файлом ISO, чтобы обнаружить ошибки.
Этот метод может занять некоторое время, поэтому главное — терпение.
Создайте ISO-файл Windows с помощью средства создания мультимедиа
-
Загрузите Windows Media Creation Tool из Официальный сайт Microsoft.
-
Запустите инструмент и примите лицензионное соглашение.
-
На следующем экране выберите Создать установочный носитель для другого ПК. Нажмите «Далее.
-
На следующем экране снимите флажок Использовать рекомендуемые настройки для этого ПК. Нажмите «Далее.
-
Выберите вариант файла ISO и нажмите Далее.
-
Выберите место для загрузки. Обязательно запомните его, потому что он вам понадобится позже.
-
Дождитесь завершения загрузки.
-
После завершения загрузки перейдите к ISO-файлу на вашем компьютере и дважды щелкните его, чтобы смонтировать.
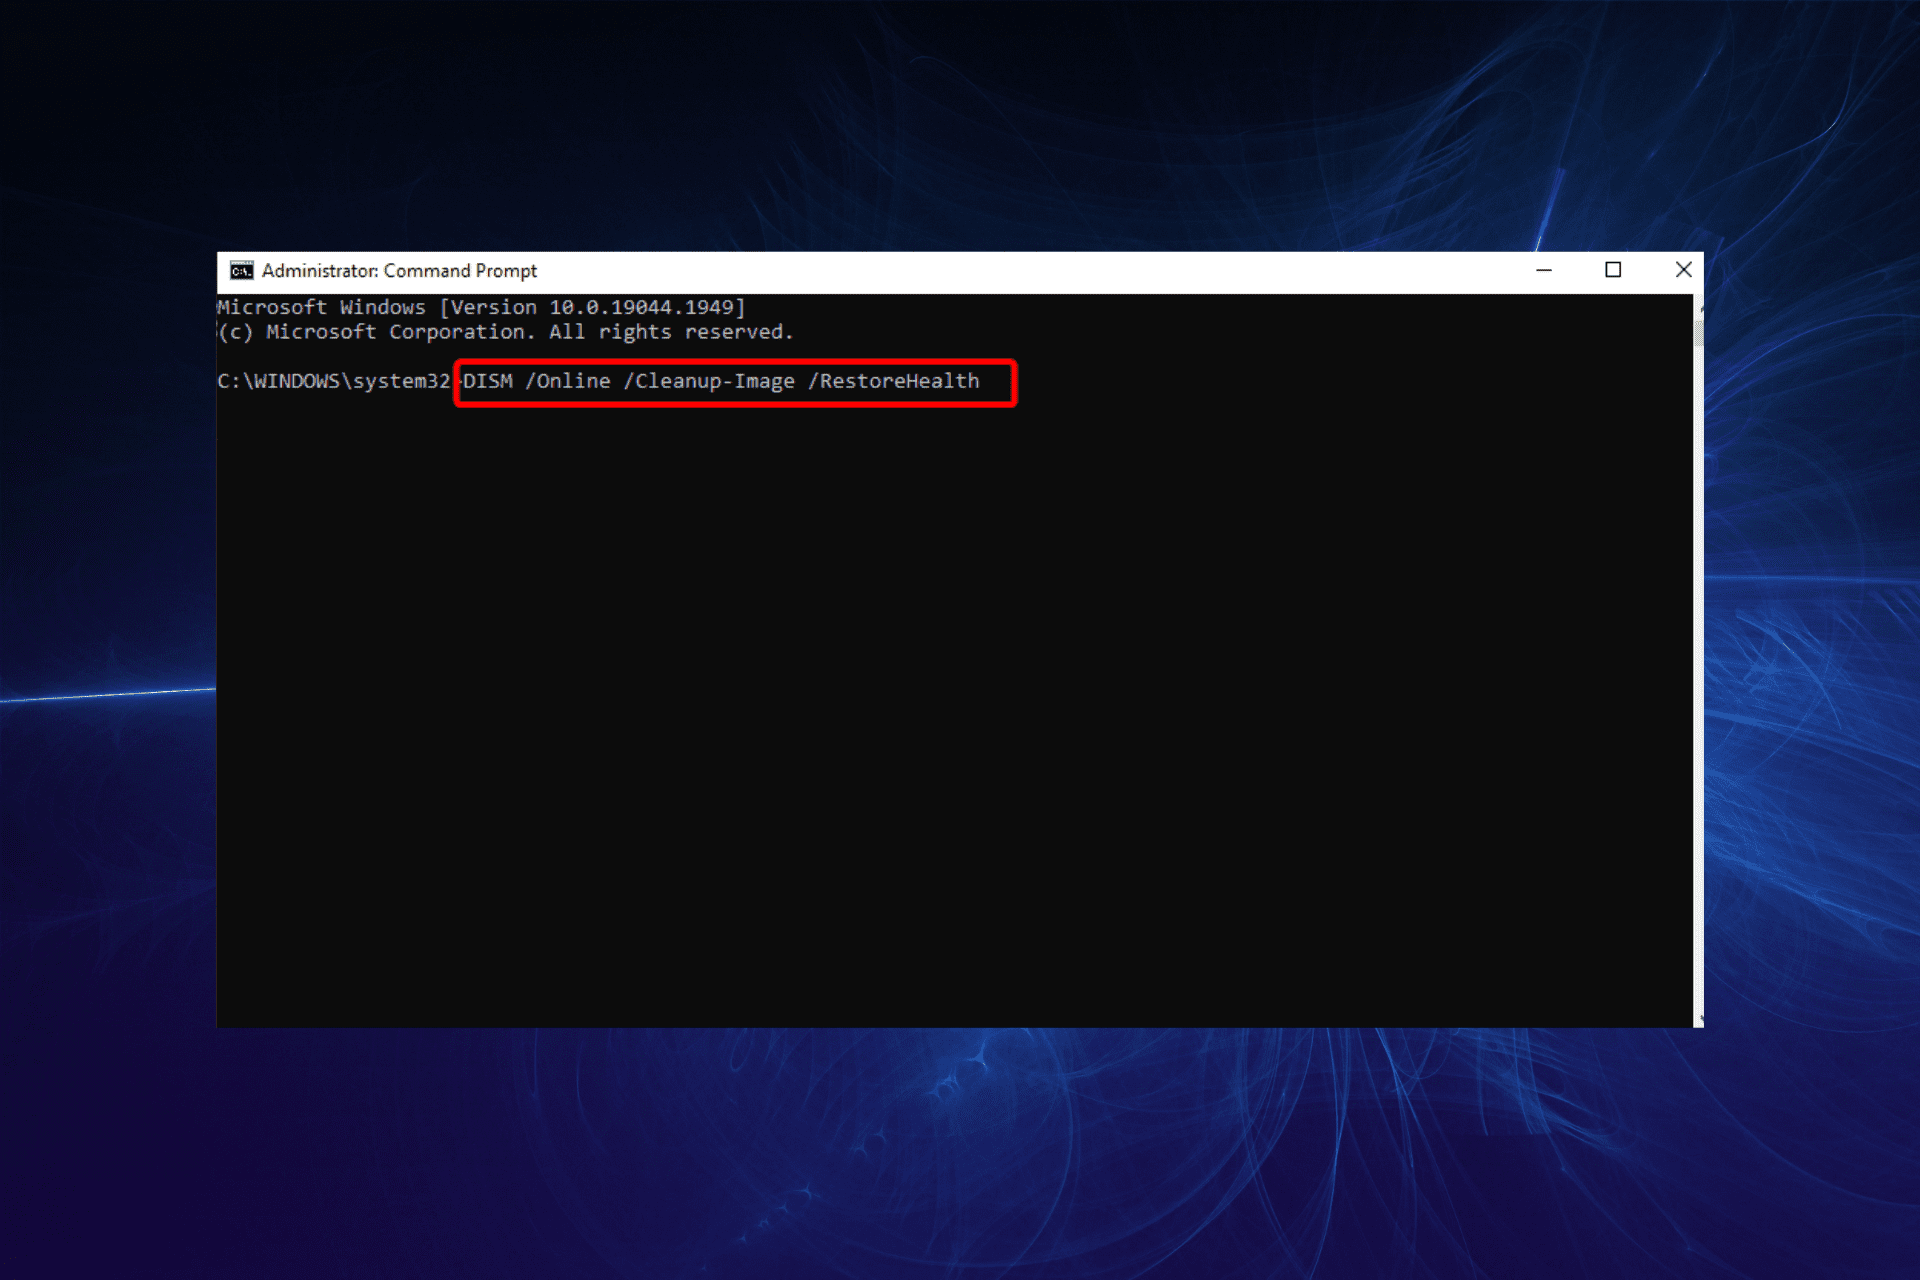
Запустите измененную версию DISM
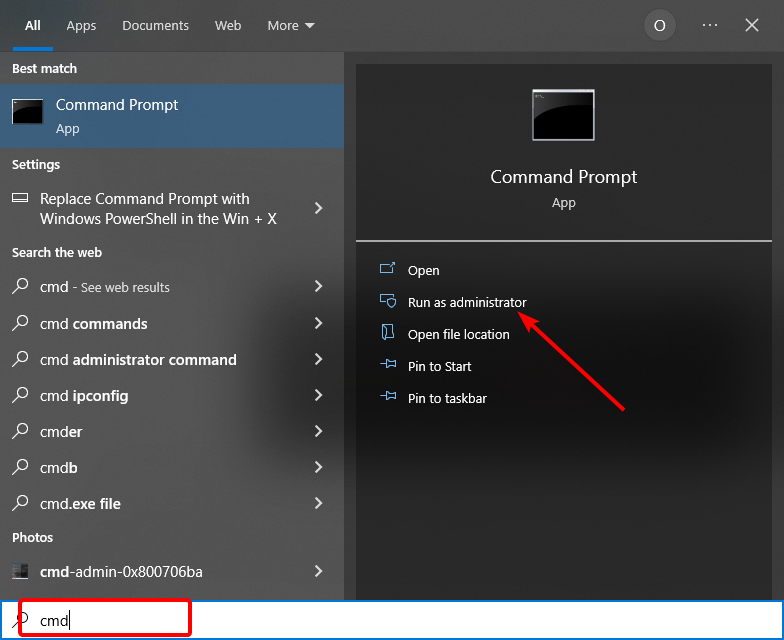
-
После монтирования ISO воспользуйтесь строкой поиска меню «Пуск» для поиска командной строки и запустите ее от имени администратора.
-
В консоли введите: DISM / Online / Cleanup-Image / RestoreHealth /source:WIM:X:SourcesInstall.wim:1 / LimitAccess
-
Не забудьте заменить X именем раздела диска, на который вы загрузили ISO. Например, если вы загрузили его на диск C, замените X: на C: .
-
Дождитесь завершения сканирования DISM.
При запуске этой модифицированной версии DISM вы не должны столкнуться с кодом ошибки 1392. Фактически, после завершения сканирования любое последующее выполнение команды DISM также должно быть безошибочным.
В случае, если метод не работает, попробуйте полностью переустановить Windows, используя параметр «Сбросить этот компьютер» в меню «Пуск»> «Настройки»> «Обновление и безопасность»> «Восстановление». Перед тем как сделать резервную копию важных данных, убедитесь, что вы сделали резервную копию.
Устранение ужасной ошибки DISM 1392
Ошибка DISM 1392 немного загадочна и не дает полной информации о том, как ее исправить. Однако есть множество стратегий, которые вы можете использовать, чтобы исправить это и, надеюсь, избавиться от этой досадной ошибки раз и навсегда.
В дополнение к DISM есть много других команд CMD, о которых вы должны знать, которые сделают вашу жизнь проще.
Corrupt system files and directories can cause this issue
by Milan Stanojevic
Milan has been enthusiastic about technology ever since his childhood days, and this led him to take interest in all PC-related technologies. He’s a PC enthusiast and he… read more
Updated on September 19, 2022
Reviewed by
Vlad Turiceanu

Passionate about technology, Windows, and everything that has a power button, he spent most of his time developing new skills and learning more about the tech world. Coming… read more
- The Dism error 1932 is usually caused by corrupt files, directories, or bad hard driver sectors.
- To fix this issue, you can try to perform an SFC scan or use a different antivirus that interferes less with the system.
- Another effective fix for this issue is to perform a system restore on your PC.
XINSTALL BY CLICKING THE DOWNLOAD FILE
This software will repair common computer errors, protect you from file loss, malware, hardware failure and optimize your PC for maximum performance. Fix PC issues and remove viruses now in 3 easy steps:
- Download Restoro PC Repair Tool that comes with Patented Technologies (patent available here).
- Click Start Scan to find Windows issues that could be causing PC problems.
- Click Repair All to fix issues affecting your computer’s security and performance
- Restoro has been downloaded by 0 readers this month.
Dism.exe error 1392 is usually displayed whenever a file or directory is corrupted and unreadable.
The location specified in the error message states that some temporary files are corrupt. Since the files are only temporary, you could delete the mentioned file in the error message and check if the issue persists.
The error is caused by missing system files or broken corrupted data, which should be fixed as soon as possible. Taking action should prevent further hardware and app damage, as this can lead to system crashes, data loss, or hardware failure in most cases.
Error 1392 manifests in issues like warning messages, slow or lagging PC performance, system freeze, program lock-up, startup or shutting down problems, and errors in installing apps or other programs and updates.
If you tried to delete the temporary file and nothing happened, try the other solutions in this guide.
What is error 1392?
The DISM error 1392 is usually displayed when a file or directory is corrupt. Also, this issue can be down to unreadable bad sectors on your hard drive.
Below are some of the causes of the DISM error 1392:
- Corrupt system files
- Antivirus interference
- Presence of malware
- Bad sectors on the hard disk
How can I fix the Dism.exe error 1392?
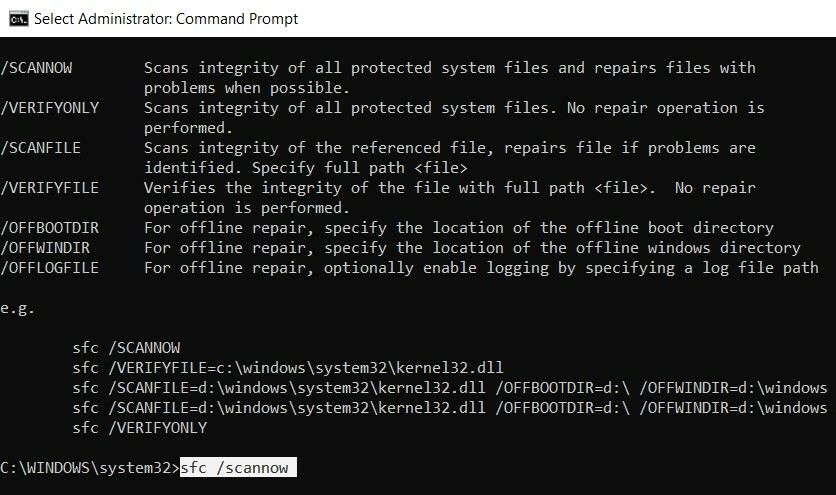
1. Perform an SFC scan
- Press the Windows button and type cmd.
- Click the Run as administrator option under Command Prompt.

- Type the command below and hit Enter:
sfc/scannow
Whenever you find the Dism error 1392, most likely there are corrupted files, and a system file checker scan will help you replace the incorrect versions with the genuine, correct Microsoft versions.
Restart your computer and check if the Dism error 1392 goes away after completing the above procedure.
2. Run Check disk to check and fix disk errors
- Right-click on the Start icon and select Command Prompt (Admin).

- Copy and paste the command below, and press Enter to run it.
chkdsk /f h: - Note that you need to replace the letter h in the command above with the letter of the drive with the dism.exe error 1392 problem.

After the command, Check Disk will analyze the disk and return a status message regarding any problems it encounters. One of the ways Check Disk locates errors is by comparing the volume bitmap with the disk sectors assigned to files in the file system.
Check Disk can’t repair corrupted data within files that appear structurally intact. Unless you specify further options, Check Disk won’t fix problems, which is why you should use the format of the command above.
When you use this command, Check Disk analyzes the disk and then repairs any errors it finds if it is not in use.
The complete syntax for Check Disk is as follows:
CHKDSK [volume[[path]filename]] [/F] [/V] [/R] [/X] [/I] [/C] [/L[:size]]- V is for volume to set the volume to work with
- path/filename specifies files to check for fragmentation (FAT16 and FAT32 only)
- /F fixes errors on the disk
- /V displays the full path and name of every file on the disk (FAT16 and FAT32); displays cleanup messages if any (NTFS)
- /R locates bad sectors and recovers readable information (implies /F)
- /X forces the volume to dismount first if necessary (implies /F)
- /I perform a minimum check of index entries (NTFS only)
- /C skips checking of cycles within the folder structure (NTFS only)
- /L:size sets the log file size (NTFS only)
- /B re-evaluates bad clusters on the volume (NTFS only; implies /R)
3. Scan your computer for malware
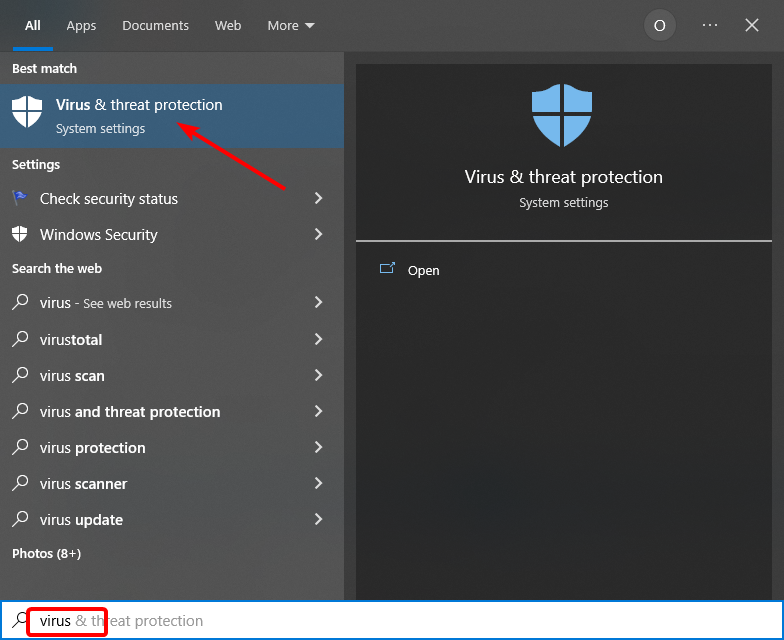
- Press the Windows key and type virus.
- Select the Virus & threat protection option.
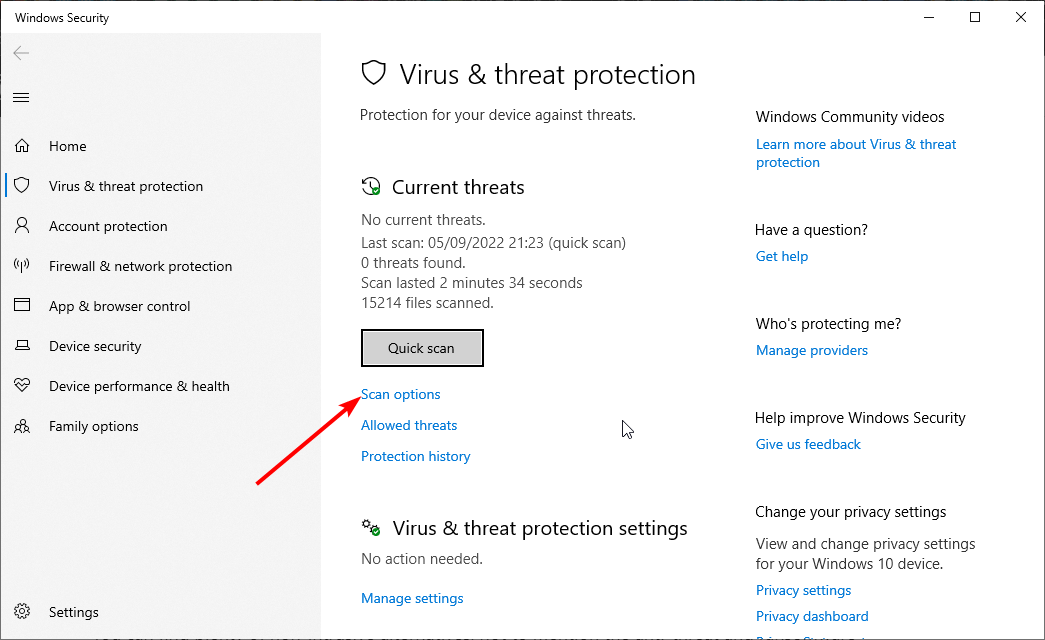
- Choose Scan options.

- Select your preferred scan option and click the Scan now button.
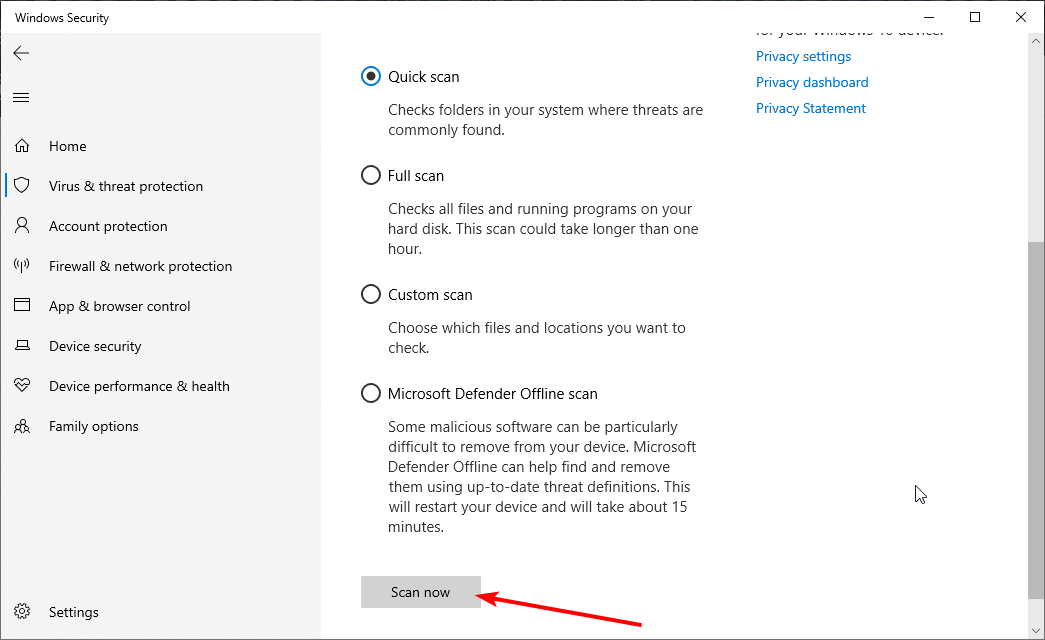
The Dism error 1392 could be related to a malware infection on your computer system. This can damage, corrupt, or even delete Runtime error-related files.
You should choose either the Windows Defender Offline scan or the Full scan option for a deep scan.
Alternatively, you can use one of the best dedicated antivirus software to do a fast scan and detect any malware or virus that can pose a threat and create this issue.
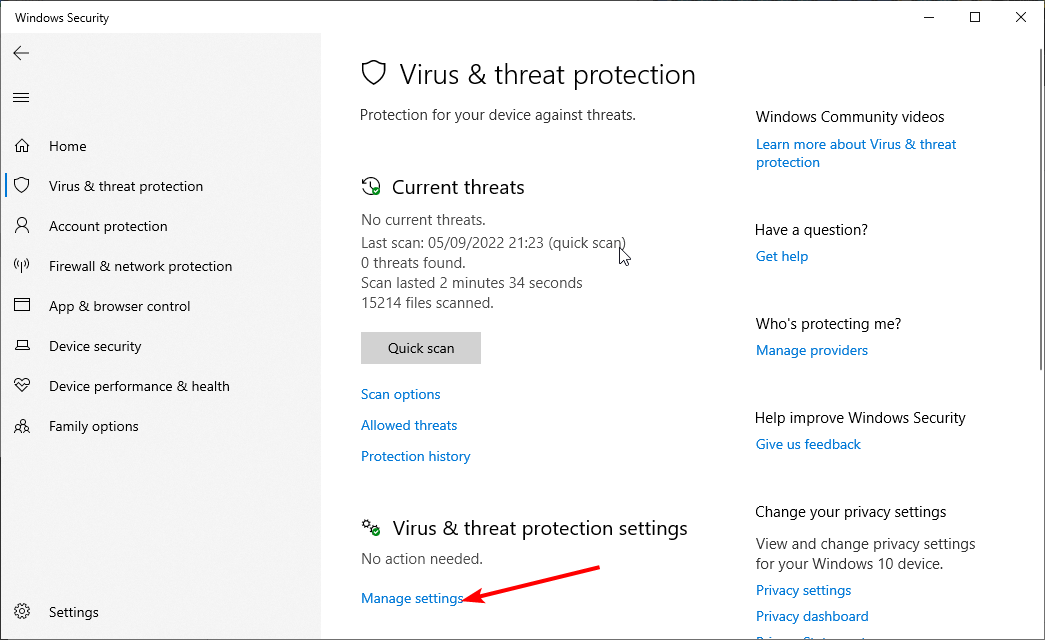
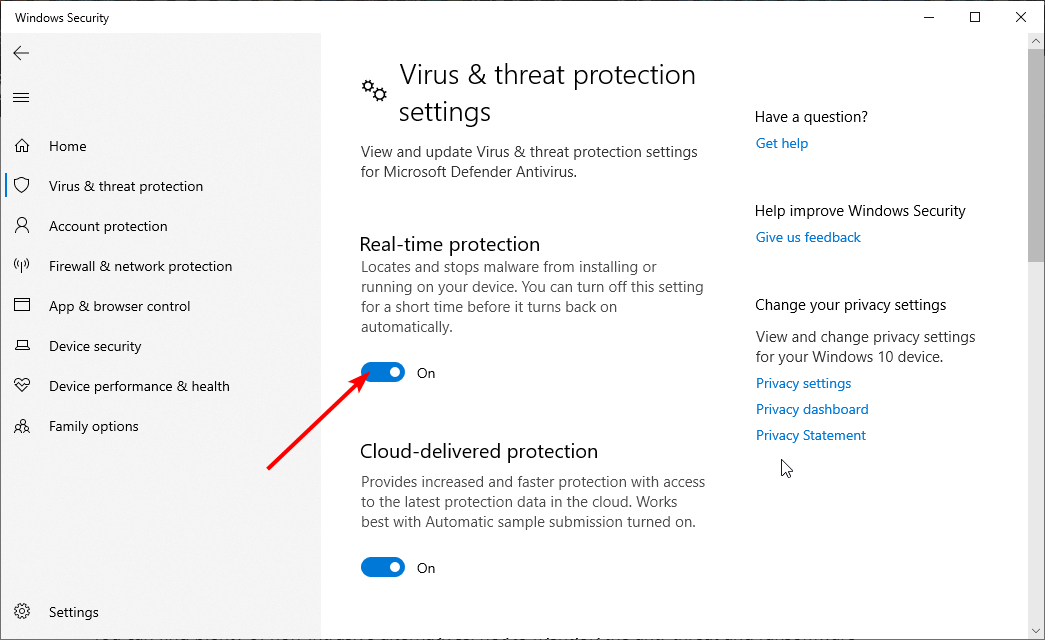
4. Temporarily disable the antivirus program
- Press the Windows key and type virus.
- Select the Virus & threat protection option.
- Click the Manage settings option.
- Now, toggle off the switch for Real-time protection backward to disable it.
- Click the Yes button when prompted to complete the process.
Some PC issues are hard to tackle, especially when it comes to corrupted repositories or missing Windows files. If you are having troubles fixing an error, your system may be partially broken.
We recommend installing Restoro, a tool that will scan your machine and identify what the fault is.
Click here to download and start repairing.
Antivirus software can help protect your computer against viruses and other security threats. In most cases, you shouldn’t disable it.
When you have to temporarily disable it to see whether it causes the Dism error 1392 or not, do note that your computer is open to attacks all this time.
Therefore, it’s time to think of an alternative. For top-rated protection and seamless performance, try antivirus software with low CPU usage.
You can find plenty of non-intrusive alternatives, not to mention the anti-threat and ransomware protection that always keeps you away from system performance and security issues.
5. Perform a system restore
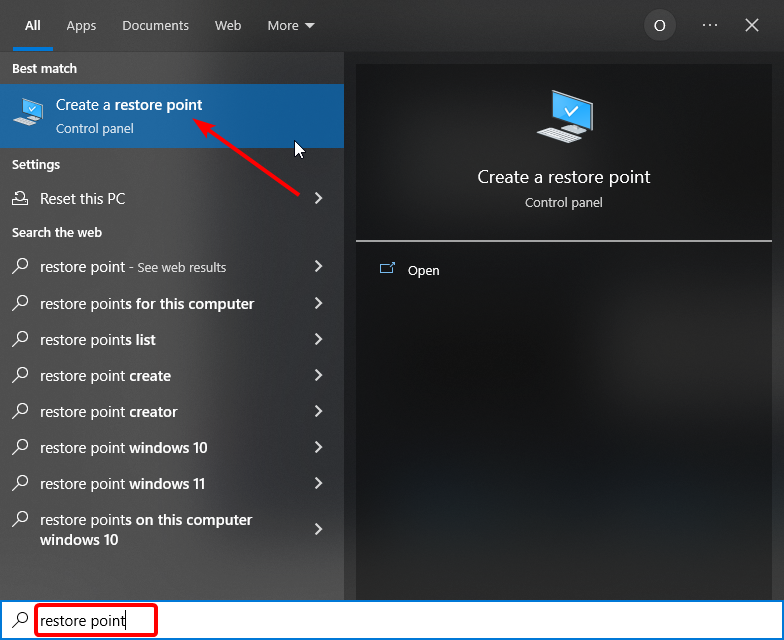
- Press the Windows key + S and type restore point.
- Click Create a restore point in the list of search results.
- Enter your administrator account password or grant permissions if prompted to.
- In the System Properties dialog box, click System Restore.

- Click Next.

- Now, click a restore point created before you experienced the problem.
- Finally, click the Next button, followed by Finish.
To go back to a restore point, do the following:
- Press the Windows key and type control.
- Select Control Panel.
- Type recovery in the control panel search box.
- Select Recovery.

- Click Open System Restore.

- Click Next.
- Choose the restore point related to the problematic program/app, driver, or update.
- Click Next, followed by Finish.
If the Dism error 1392 persists after a clean install, your runtime errors are not software but hardware related. So, replace the hardware that is causing dism.exe error 1392.
- Full Fix: The file or directory is corrupted and unreadable
- Fix: A Service Installation Section in this INF is Invalid
6. Clean out junk files
As you use your computer, over time, junk files accumulate and if not cleaned out, they may cause your computer to slow down or lag.
This may also bring up the Dism error 1392 due to file conflicts, or an overloaded hard drive. To clean these files, it is advised you use a top cleaner in CCleaner.
This tool removes all junk and unwanted files that can be dragging down your PC. Also, it can be used to uninstall all unwanted apps and their associated files.
CCleaner might just be the only tool needed to keep your PC running optimally.

CCleaner
The best way to clean up your PC and make it smoother.
7. Update PC
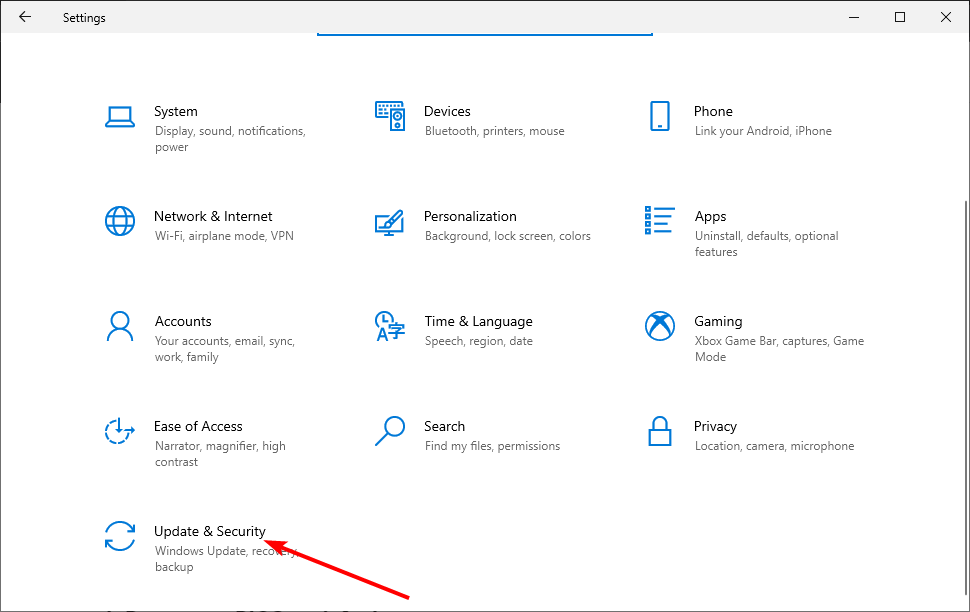
- Press the Windows key + I to open the Settings app.
- Select the Update & Security option.

- Click the Check for update button.
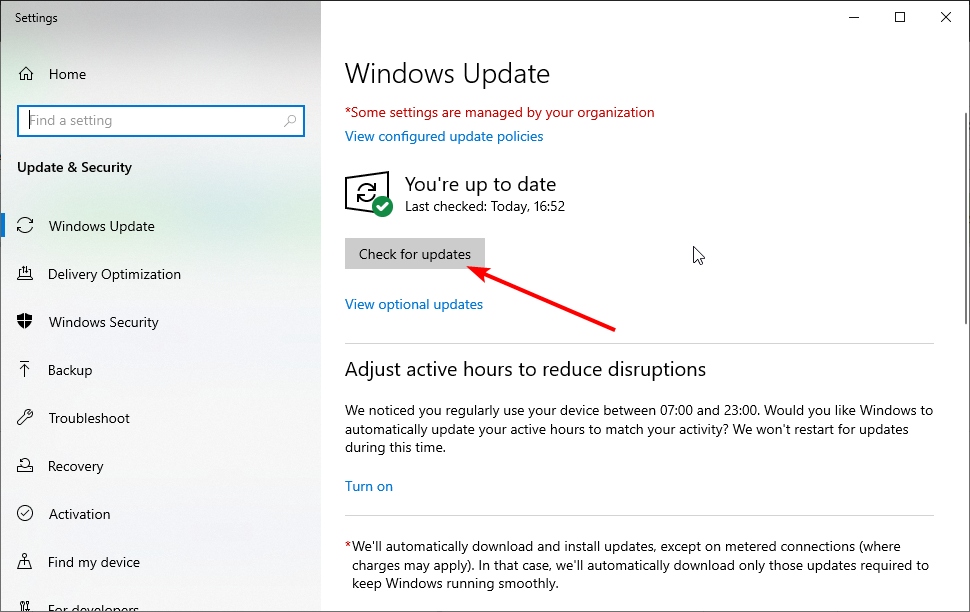
Outdated PC can lead to the operating system error 1392, the file or directory is corrupted and unreadable encountered error message. The only fix, in this case, is to update your system to the latest version.
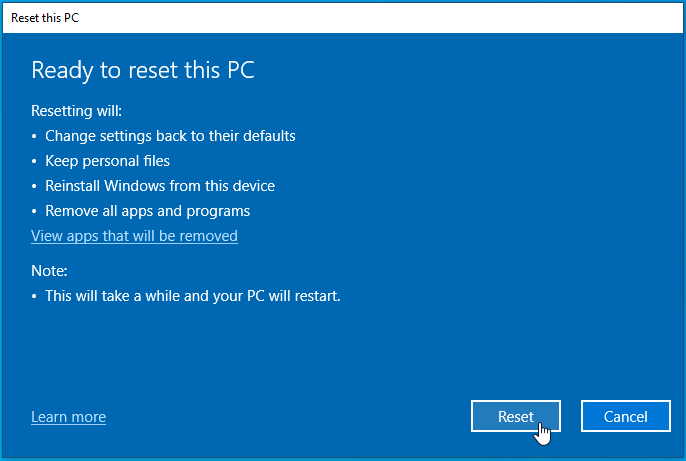
8. Reset PC
- Press the Windows key + I to open Settings.
- Click the Update & Security option.
- Choose Recovery in the left pane.
- Click the Get started button under the Reset this PC section.
- Choose the Keep my files option and follow the onscreen instruction to complete the process.


If you face the unrecognized win32 error code: 1392 on your PC, you might need to reset your PC if the previous solutions could not solve it. This solution will not delete your valuable files. So you have nothing to lose.
Should I run DISM or SFC scan first?
DISM and SFC are repair tools used to fix issues on your PC. However, the SFC scan comes first and is used to detect and fix corrupt system files.
But if this fails, you can run the DISM scan to fix more complicated issues, including problems with SFC.
The Dism error 1392 can be annoying. Fortunately, it is not the most difficult to fix, as shown in this guide.
Do you want to know how to fix the DISM failed on Windows 10/11 issue? Then, check our guide to do it effortlessly.
Feel free to let us know in the comments below which of these solutions worked in your case.
![]()