
- Remove From My Forums
-
Вопрос
-
Hi, folks
i am unable to take the system state backup from windows Server 2003 Ent /SP2/Domain controller.
The backup log shows the following error
Backup Status
Operation: Backup
Active backup destination: File
Media name: «backup 28022010.bkf created 3/5/2010 at 7:45 PM»Volume shadow copy creation: Attempt 1.
Error returned while creating the volume shadow copy:0x80042301.
Error returned while creating the volume shadow copy:80042301
Aborting Backup.———————-
The operation did not successfully complete.
———————-
Any ideas what may be causing this, please suggest?
If anyone can provide assistance troubleshooting that will be most grateful.
Thanks!
Ответы
-
-
Помечено в качестве ответа
1 апреля 2010 г. 9:43
-
Помечено в качестве ответа
-
Hi,
I faced the same error recently..
The error was :-
Error returned while creating the volume shadow copy:0xffffffff.
Error returned while creating the volume shadow copy:ffffffff
I followed these steps by refering link http://support.microsoft.com/kb/940032
- Click Start, click Run, type cmd, and then click OK.
- Type the following commands at a command prompt. Press ENTER after you type each command.
- cd /d %windir%system32
- Net stop vss
- Net stop swprv
- regsvr32 ole32.dll
- regsvr32 oleaut32.dll
- regsvr32 vss_ps.dll
- vssvc /register
- regsvr32 /i swprv.dll
- regsvr32 /i eventcls.dll
- regsvr32 es.dll
- regsvr32 stdprov.dll
- regsvr32 vssui.dll
- regsvr32 msxml.dll
- regsvr32 msxml3.dll
- regsvr32 msxml4.dll
I tried to take backup after this and this time i got different error.
Error returned while creating the volume shadow copy:0x8007000e.
Error returned while creating the volume shadow copy:Not enough storage is available to complete this operation.
I deleted old Shadow Copies by acccessing <Drive> Properties —> Shaodow Copies —> Delete Now.
Executed ntbackup again and tried to take backup. This time it worked.
Hope this will also help you to get rid of the problem.
Regards…..
-
Помечено в качестве ответа
Tim Quan
1 апреля 2010 г. 9:43
Copyright © 2023 Synology Inc. Все права защищены.
Положения и условия
|
Конфиденциальность
|
Настройки файлов cookie
|
Россия — Русский
There are a lot of error codes (0x800f0954, 0x800f0950, 0x8024402c, etc.) indicating the same problem – DISM failed on your computer. How desperate it is to see such an error message! But you need to cheer up; it’s not the end of the world, after all. The good news is that there are several effective ways for you to troubleshoot the DISM errors.
If you search on the internet, you’ll find numerous people are caring about this topic – DISM failed. This is a common error that can appear on any versions of Windows system (Windows 10, Windows 8, Windows 7, and so on). So what does this DISM error mean? How it will affect you? Can you fix it when DISM not working? All these issues will be covered in the following sections. Additionally, you can find a data restore tool that can help you easily recover deleted files.
Please go to MiniTool’s official siteand pick suitable tools to protect your data and take good care of your system.
DISM Failed. No Operation Was Performed
DISM Failure
People are complaining about this problem on the internet: the DISM won’t run. If you search online and browse the forums, you’ll find that DISM failure is a popular problem that bothers users now and then. Some users said both the sfc /scannow and Dism /Online /Cleanup-image /RestoreHealth commands failed and they received 0x80240021 Failure DISM.
How to deal with the hard disk failure recovery yourself?
What Is DISM
DISM is the acronym of Deployment Image Servicing and Management; it is actually a command-line tool built-in every Windows system (Windows 10, Windows 8, Windows 7, etc.). DISM is mainly used for mounting and servicing the Windows images (including the ones used for Windows Recovery Environment, Windows PE, and Windows Setup) before deployment. To put it in a simple way, DISM is a basic Windows utility designed for network administrators to finish tasks like system images preparation, modification, and repair, when necessary.
What Does DISM Do
You, as an ordinary Windows user, can also make use of the DISM tool to fix some common problems. Why? It is because that the hidden recovery image on your computer can do you a favor.
- By using DISM, you can mount and get information about the Windows image (.wim) files or virtual hard disk (.vhd or .vhdx) files.
- If you want to do any tasks like capture, split, or manage .wim files, DISM can also help you.
- Besides, the DISM tool allows you to install, uninstall, configure, and update things like drivers, Windows features, packages, and international settings (in a .wim file or .vhd/.vhdx). These operations can all be done easily through DISM servicing commands.
- The subsets of the DISM commands can be used to service a running operating system.
- DISM takes the place of deployment tools, such as ImageX, PEimg, and Package Manager.
Please read this webpage if your operating system went wrong:
DISM Not Working
When you try to repair the Windows image on Windows 10 by running “DISM /Online /Cleanup-Image /RestoreHealth” in the Command Prompt window, you may find the DISM is not working. The DISM error 1910 “The object exporter specified was not found” could appear on your screen.
How to Fix When DISM Failed
What are the common error messages of DISM error?
- DISM failed no operation was performed: in the cases mentioned above, both users said their DISM failed and no operation was performed. You’re indeed able to fix this by using Windows 10 ISO file.
- DISM failed 0x8000ffff, 0x800f0954, 0x800f0950, 0x800f0907, 0x800f081f (The source files could not be found. Use the “Source” option to specify the location of the files that are required to restore the feature.): if you see error codes like this, you should use the install.wim file to start a DISM scan (after copying it from your Windows 10 ISO).
- DISM failure when attempting to copy boot files: some users said they have solved this error by cleaning up the system image components. You should try.
- DISM.exe failed validating command line, to load wim manager: if you are in face of such problems, you should try to fix it by restarting the Windows update components, as many people said this method is helpful.
- Error Code 2, 3, 11, 50, 87, 112, 1393, 1726, 1910, and so on.
- DISM failed while processing command cleanup-image, add-package.
- DISM failed to load the provider, to unload offline registry, to flush file buffers, to set the windows directory, mount the image.
- More waiting for you to discover…
DISM Failed on Windows
Sometimes, you may find your DISM failed: it can’t run or complete a command on PC. Why does this happen? One of the possible reasons is proxy. Though proxy is mainly used to protect privacy, it could crash your system and lead to issues like DISM failure. So you should disable proxy before you try any other solutions mentioned below.
If you are a victim of DISM error, please follow the steps mentioned below to solve your problem. See what you can do if DISM /Online /Cleanup-image /Restorehealth is stuck.
# 1. Check Antivirus or Security Programs
The antivirus software you have installed on your computer may cause a lot of problems (such as compatibility issues and file loss). Unfortunately, it will also cause the DISM error. The antivirus software of the security program is able to interfere with your system and intervene in any critical operation.
Therefore, I advise you to disable all the antivirus/security programs or uninstall them temporarily, if possible, and then repeat the DISM scan to see whether it works.
- If this has helped to solve the DISM not working problem, you’d better consider changing the antivirus software or disabling the security features.
- If this method didn’t help, it means the DISM failure has nothing to do with the antivirus and you should move on to see the rest of the methods.
How to turn off Windows Defender?
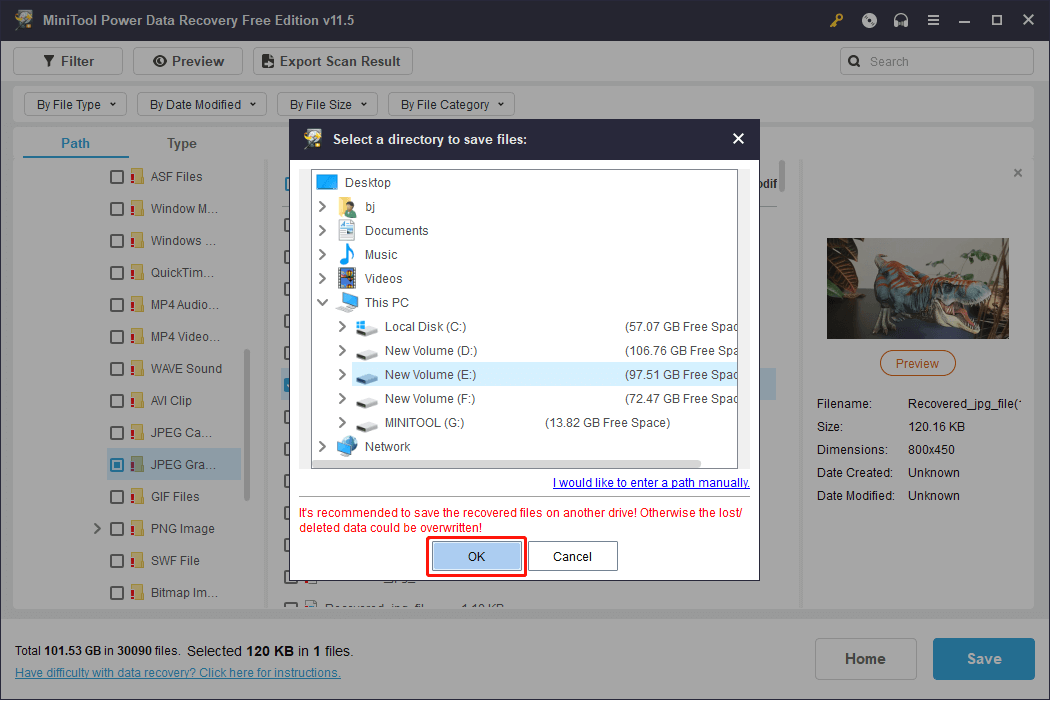
# 2. Get Off the Important Data
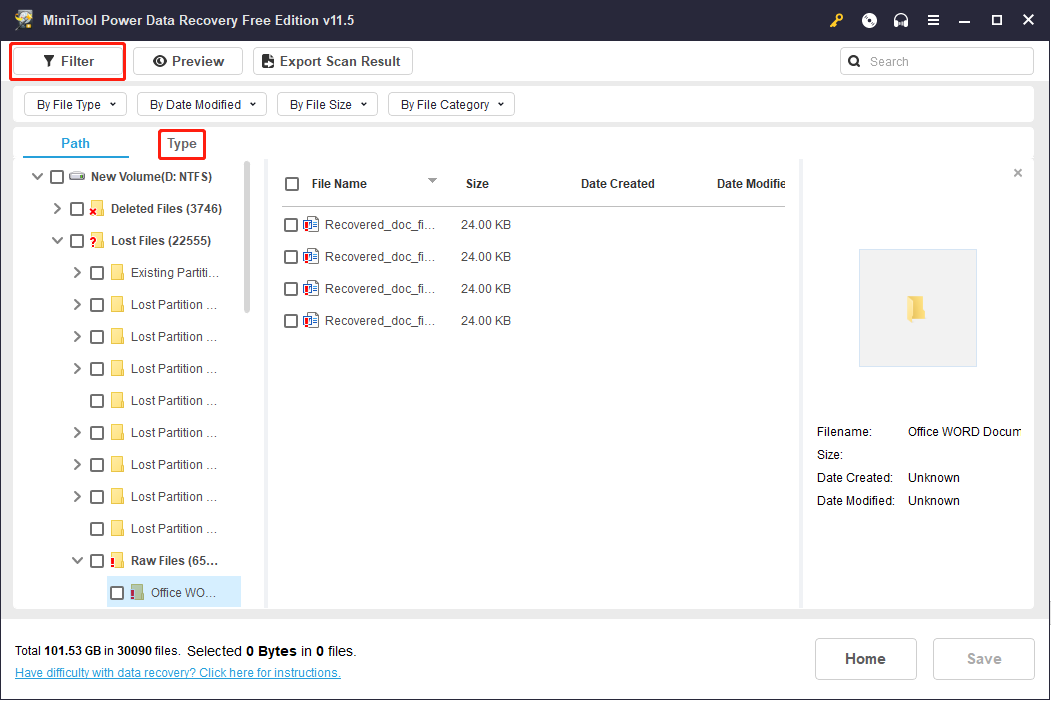
You are suggested to take good care of your data before doing anything else. You can use the best free data recovery software for Windows, MiniTool Power Data Recovery, to do this work.
Please follow these steps below.
Step 1: get MiniTool Power Data Recovery software and install it on your computer.
Free Download
Step 2: run the data recovery software and choose Logical Drives from the left sidebar.
Step 3: specify the drive that contains very important data you need from the right pane.
Step 4: double click on the drive or click on the Scan button to start a full scan on it.
Step 5: wait for the scan and browse the found items to pick out your desired data.
Step 6: click on the Save button at the bottom right and choose a storage path for the data.
Step 7: click on the OK button to confirm your choice and wait for the hard drive data recovery to complete.
Attention!
If you’d like to scan the whole disk, you should select Devices and double click on the hard disk to scan. Then, finish the rest steps mentioned above.
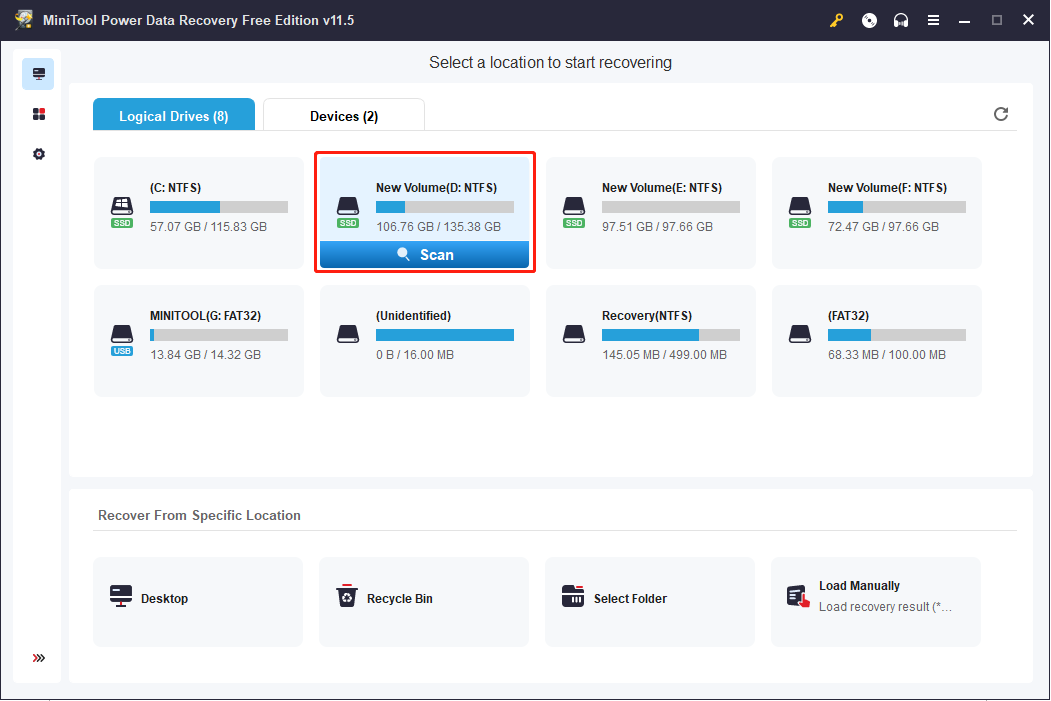
MiniTool Power Data Recovery can also help you recover files from a broken computer when necessary.
Click to Tweet
# 3. Run DISM Command in Clean Boot
This method works for the cases where the DISM is failed due to service conflict.
- Open your Settings app by clicking on Windows and choosing Settings (you can also open it by pressing Win + I directly).
- Scroll down to the bottom and select Update & Security.
- Shift to the Recovery option in the left pane.
- Look for the Advanced startup section in the right pane. Then, click Restart now under it.
- Select Troubleshoot in the Choose an option window.
- Choose Advanced options, and then click Command Prompt.
- Choose your account to continue.
- Run DISM command (for instance, DISM /Online /Cleanup-Image /CheckHealth) and see if it works or not.
# 4. Specify/Tweak the Correct Location of Install.wim File
It’s necessary to check the location of install.wim file when you receive the source files could not be found error. Under the circumstances, you need the help of a bootable disk (or at least an ISO file of the system).
Warning: The DISM command is case sensitive; you must confirm that your spell every word correctly before executing the command.
How to specify the correct location of install.wim file:
- Get the bootable disk at hand (if it’s an ISO file, you’ll need to create a bootable drive by using it).
- Open Windows search box and type cmd.
- Right click on Command Prompt and choose Run as administrator while keeping the drive letter of the bootable disk in mind.
- Type this command into Command Prompt window: DISM /Online /Cleanup-Image /RestoreHealth /source:WIM:F:SourcesInstall.wim:1 /LimitAccess (* stands for the bootable disk drive letter). Then, hit Enter on the keyboard.
- Wait for the command to be finished.
How to copy install.wim (from the bootable disk to local disk C:):
- Insert the bootable disk to your computer or mount the ISO file and create one.
- Locate the install.wim file and then copy it pressing Ctrl + C.
- Go to the local disk C: (if your system is installed on another drive, please go there). Then, paste the file by pressing Ctrl + V.
- Run Command Prompt as administrator and type DISM /Online /Cleanup-Image /RestoreHealth /source:WIM:C:Install.wim:1 /LimitAccess (C refers to the location of your system).
- Then, press Enter and wait for the command to finish.
How to recover files by using CMD (Command Prompt) tool?
# 5. Uncheck Install.wim Read-Only
- Open File Explorer to locate the wim file.
- Right click on it and choose Properties.
- Look at the Attributes section at the bottom.
- Uncheck the Read-only option.
- Click on the Apply button and OK button below to confirm.
- Now, run the DISM command via specifying the source again.

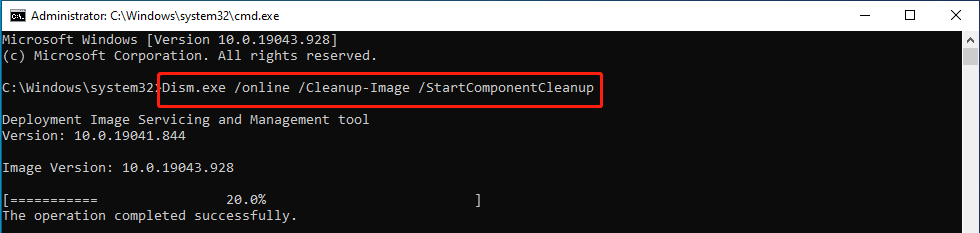
# 6. Clean up System Image Components
- Run Command Prompt as administrator.
- Type or copy & paste the command into the Administrator: Command Prompt window — Dism.exe /online /Cleanup-Image /StartComponentCleanup.
- Press Enter on the keyboard and wait for the command to finish.
- Restart your computer and try to perform the DISM scan again.

If this command failed, you can take your chances with the following commands:
- DISM /Online /Cleanup-Image /StartComponentCleanup
- DISM /Online /Cleanup-Image /AnalyzeComponentStore
- DISM.exe /online /Cleanup-Image /StartComponentCleanup
- DISM.exe /online /Cleanup-Image /StartComponentCleanup /ResetBase
# 7. Reset Windows Update Service
- Also, run Command Prompt as administrator.
- Type net stop wuauserv and hit Enter.
- Wait for the command to complete.
- Repeat step 2 and step 3 to run these commands in order: cd %systemroot%SoftwareDistribution, ren Download Download.old, net start wuauserv, net stop bits, net start bits, net stop cryptsvc, cd %systemroot%system32, ren catroot2 catroot2old, and net start cryptsvc.
- Restart your computer and try to use DISM.
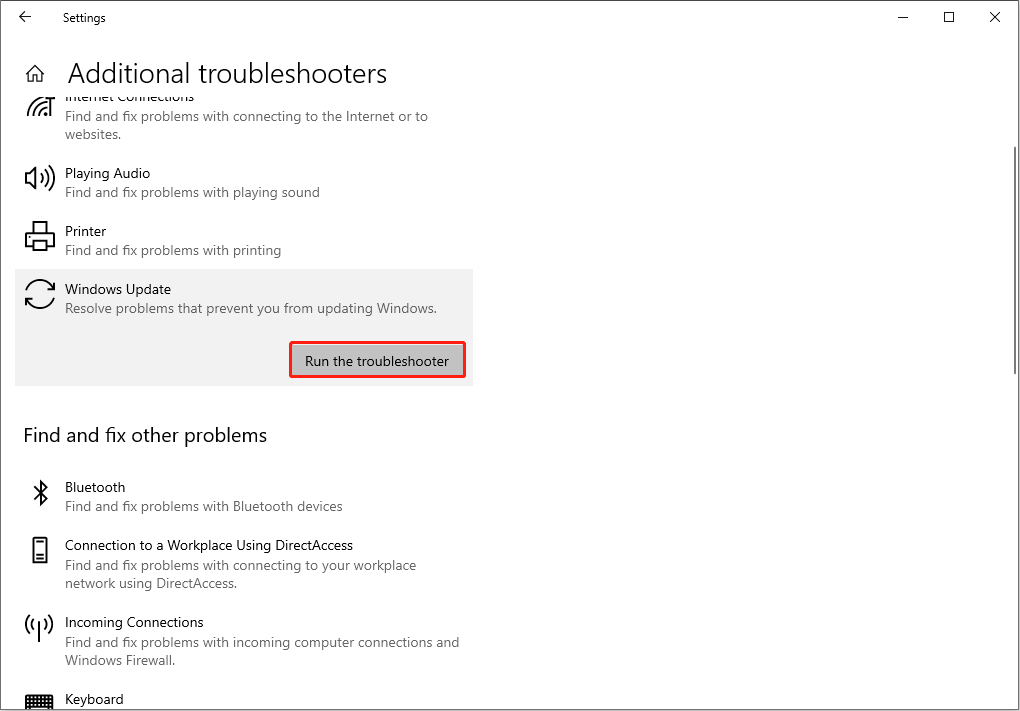
# 8. Run the Troubleshooter
- Press Win + I on the keyboard to open Settings.
- Choose Update & Security (Windows Update, recovery, backup).
- Shift to the Troubleshoot option in the left pane.
- Look for Windows Update and select it in the right pane.
- Click on the Run the troubleshooter button appeared just now.
- Follow the on-screen instructions to complete the rest process.

# 9. Disable Proxy on Your PC
- Open Settings app by pressing Win + I or other ways.
- Choose Network & Internet (Wi-Fi, airplane mode, VPN) from the list.
- Shift to the Proxy option in the left pane.
- Switch the button under all the options in the right pane to Off (for instance, Automatically detect settings and Use setup script).

If all the above solutions failed, you may try to fix the DISM not working issue by performing an in-place upgrade with Media Creation Tool. (How to fix Media Creation Tool not enough space error?)
Click to Tweet
Final Words
If you haven’t used the DISM tool before, you may be wondering how to use DISM. In fact, DISM can be very useful when you need to repair the image of Windows 10.
How to recover missing files Windows 10?
How to Run DISM
- The first step is to run the Command Prompt tool as an administrator.
- The second step is to type the correct command into the Command Prompt Administrator window.
- Press Enter on the keyboard and wait for the command to finish.
What Are the Commonly Used DISM Commands
- DISM /Online /Cleanup-Image /CheckHealth (checking issues)
- DISM /Online /Cleanup-Image /ScanHealth (checking issues)
- DISM /Online /Cleanup-Image /RestoreHealth (repairing issues)
How To Use The DISM Restore Health Command To Repair Windows?
By the way: another way to repair issues with DISM is using the WIM image.
Some people may be curious about the difference between SFC scan and DISM, right? In fact, the biggest difference is that DISM is more powerful than SFC. The DISM commands can be used to correct issues found in your system when the SFC /Scannow command fails to do such work.
All in all, you should keep calm when you find the DISM failed on your computer. Issues like DISM won’t run and DISM is not responding are pretty common and can be fixed most of the time. What you should do is following the solutions and steps mentioned in the above part carefully. When you need to retrieve your files, please don’t hesitate to try MiniTool’s professional data recovery software.
Please leave us a message if you are still in trouble or want to solve other disk and system problems.
Windows 10, version 1809, all editions Windows 10, version 1903, all editions More…Less
Symptom
When trying to install updates from Windows Update you might receive «Updates Failed, There were problems installing some updates, but we’ll try again later» with one of the following errors:
-
0x80073701
-
0x800f0988
Workaround
First, you should try checking for updates again. If you need help, see Update Windows 10.
If you receive the same message and error on subsequent retries, try this workaround to mitigate the issue:
-
Select the start button and type cmd
-
Right click or long press on Command Prompt and select Run as administrator.
-
If you receive a User Access Control (UAC) dialog for Windows Command Processor stating, «Do you want to allow this app to make changes to your device?», select Yes.
-
Type or copy and paste the following command into the Command Prompt window:
dism /online /cleanup-image /startcomponentcleanup -
Wait for the command to complete.
-
Restart your device.
-
Try checking for updates again.
If you are still having issues, see Get help with Windows 10 upgrade and installation errors.
Need more help?
Want more options?
Explore subscription benefits, browse training courses, learn how to secure your device, and more.
Communities help you ask and answer questions, give feedback, and hear from experts with rich knowledge.

Существует множество инструментов для восстановления Windows 10/11, которые можно использовать для восстановления сломанных или поврежденных файлов. Например, если ваша установка Windows 10 повреждена, вы обычно можете исправить это с помощью встроенной команды SFC /scannow.
Однако SFC также может выйти из строя, или проблема может заключаться не только в ней. В этом случае вам нужно использовать другую встроенную команду восстановления в DISM.
Что теперь произойдет, если DISM выйдет из строя в Windows 10/11? В этом руководстве мы покажем вам, как исправить инструмент, и вернемся к поддержанию вашего ПК в отличной форме.
Что такое ошибка DISM?
Существуют различные причины сбоя DISM в Windows 10. Ниже приведены некоторые варианты ошибки DISM и причины ее возникновения:
- Сбой DISM, операция не выполнялась — это довольно распространенная проблема с DISM. Однако вы можете решить эту проблему, выполнив DISM, используя ISO-файл Windows 10.
- DISM не удалось загрузить поставщика, выгрузить автономный реестр, очистить файловые буферы, установить каталог Windows и смонтировать образ — вот некоторые распространенные проблемы, с которыми вы можете столкнуться при сканировании DISM. Однако вы сможете исправить большинство из них, используя наши решения.
- Ошибка DISM 0x8000ffff, 0x800f0954, 0x800f081f. Если вы получаете какую-либо из этих ошибок, попробуйте скопировать файл install.wim из ISO-образа Windows 10 и использовать его для сканирования DISM.
- Сбой DISM при обработке команды cleanup-image, add-package — это некоторые распространенные проблемы с DISM, но их можно решить с помощью одного из наших решений.
- Сбой DISM при попытке скопировать загрузочные файлы. Это еще одна распространенная проблема с DISM, но вы можете исправить ее, очистив компоненты образа системы.
- Dism.exe не удалось проверить командную строку для загрузки диспетчера wim. Если у вас возникли какие-либо из этих проблем, перезапустите компоненты обновления Windows и проверьте, помогает ли это.
Удаляет ли DISM файлы?
DISM работает в основном для восстановления сломанных и поврежденных файлов на ПК. Он ведет журнал ошибок, обнаруженных на вашем ПК, и примененных исправлений.
Он не удаляет ваши файлы, приложения или данные. Так что вам не о чем беспокоиться.
Как исправить ошибку DISM?
1. Проверьте свой антивирус
В некоторых редких случаях эта проблема может быть вызвана вашим антивирусом. Ваш антивирус может мешать работе вашей системы и вызывать эту проблему.
Если в вашей системе произошел сбой DISM, вы можете решить проблему, просто отключив определенные антивирусные функции или приложение. Вы также пытаетесь удалить антивирусное программное обеспечение, если его отключение не решает проблему.
Если это решит проблему, вам, возможно, придется рассмотреть одно из лучших современных антивирусных программ в ESET NOD 32.
Это программное обеспечение использует передовые технологии для обеспечения безопасности вашего ПК, не вызывая ошибок. Более того, он обеспечивает как автономную, так и онлайн-безопасность и гарантирует вашу конфиденциальность. Так что пусть он позаботится о вашей безопасности, пока вы беспокоитесь о других вещах.
2. Введите правильное местоположение файла Install.wim.
Если DISM выдает сообщение «Не удается найти исходные файлы», вам необходимо смонтировать ISO-файл Windows 10 и указать расположение файла Install.wim.
Чтобы указать расположение файла, введите следующую команду в командной строке и нажмите Enterдля ее запуска:DISM /Online /Cleanup-Image /RestoreHealth /source:WIM:X:SourcesInstall.wim:1 /LimitAccess
Помните, что вам нужно заменить X буквой, соответствующей диску, на котором смонтирован ISO-файл Windows 10.
3. Скопируйте Install.wim на жесткий диск.
Немногие пользователи предположили, что вы можете решить эту проблему, скопировав Install.wim в корневой каталог вашего жесткого диска.
Чтобы получить файл Install.wim, загрузите ISO-образ Windows 10, смонтируйте его и найдите файл Install.wim.
После копирования файла Install.wim обязательно укажите правильное расположение файла Install.wim перед запуском сканирования DISM.
Кроме того, помните, что команда DISM чувствительна к регистру, и пользователи сообщали, что ввод install.wim вместо Install.wim приводил к сбою DISM. Поэтому введите правильное имя файла перед запуском сканирования DISM.
Несколько пользователей также сообщили, что DISM не поддерживает пробелы в исходном расположении. Итак, убедитесь, что в имени папки, содержащей файл, нет пробелов.
4. Очистите компоненты образа системы
- Откройте командную строку от имени администратора.
- Введите команду ниже и нажмите Enter.
Dism.exe /online /Cleanup-Image /StartComponentCleanup

- Дождитесь завершения процесса.
- Кроме того, вы также можете запустить следующие команды:
DISM /Online /Cleanup-Image /StartComponentCleanupDISM /Online /Cleanup-Image /AnalyzeComponentStore - Попробуйте снова выполнить сканирование DISM после выполнения этих команд. Запустите команды ниже:
Dism.exe /online /Cleanup-Image /StartComponentCleanupDism.exe /online /Cleanup-Image /StartComponentCleanup /ResetBase
Если вы столкнулись с ошибкой DISM 193, 740, 14098, 3017 и подобными вариантами, вы можете решить эти проблемы, очистив компоненты образа системы. Это просто, если вы выполните шаги, описанные выше.
5. Запустите средство устранения неполадок Центра обновления Windows.
- Нажмите Windows + I, чтобы открыть приложение «Настройки».
- Выберите параметр «Обновление и безопасность».

- Выберите «Устранение неполадок» в меню слева.
- Выберите Центр обновления Windows и нажмите Запустить средство устранения неполадок.

- Следуйте инструкциям на экране, чтобы завершить устранение неполадок.
По словам пользователей, иногда проблемы с DISM могут возникать из-за проблем с Центром обновления Windows.
Если DISM не удалось завершить или запустить в вашей системе, вы можете решить проблему, запустив средство устранения неполадок Центра обновления Windows.
После завершения устранения неполадок попробуйте повторно запустить сканирование DISM, и оно должно завершиться.
6. Сбросьте службы Центра обновления Windows
- Откройте командную строку от имени администратора.
- Когда запустится командная строка, выполните следующие команды:
net stop wuauservcd %systemroot%SoftwareDistributionren Download Download.oldnet start wuauservnet stop bitsnet start bitsnet stop cryptsvccd %systemroot%system32ren catroot2 catroot2oldnet start cryptsvc
Если DISM не удалось завершить, показывая, что DISM не поддерживает обслуживание на ПК с Windows, проблема может быть связана со службами Центра обновления Windows.
Однако вы можете решить эту проблему, просто сбросив службы Центра обновления Windows. После выполнения этих команд компоненты Центра обновления Windows должны перезапуститься, и проблема будет решена.
7. Отключить прокси
- Откройте приложение «Настройки».
- Выберите опцию «Сеть и Интернет».

- Выберите Прокси в меню слева. На правой панели отключите все настройки.

Если DISM не удалось завершить или запустить на вашем ПК, проблема может заключаться в вашем прокси-сервере. Многие пользователи используют прокси-сервер для защиты своей конфиденциальности в Интернете, но иногда ваш прокси-сервер может мешать работе вашей системы и приводить к этой и другим проблемам.
После отключения прокси проверьте, решена ли проблема. Хотя прокси — отличный способ защитить вашу конфиденциальность в Интернете, многие пользователи предпочитают использовать VPN, а не прокси.
Если вы хотите защитить свою конфиденциальность в Интернете и ищете хороший VPN, мы настоятельно рекомендуем вам рассмотреть PIA.
8. Убедитесь, что ваш. wim не доступен только для чтения
Для этого выполните следующие действия:
- Найдите файл install.wim на жестком диске, щелкните его правой кнопкой мыши и выберите «Свойства».

- Когда откроется окно «Свойства», обязательно снимите флажок «Только для чтения». Теперь нажмите «Применить» и «ОК», чтобы сохранить изменения.

Многие пользователи копируют файл install.wim из установочного ISO-образа Windows 10, чтобы запустить сканирование DISM в автономном режиме.
Однако несколько пользователей сообщили, что DISM дал сбой из-за того, что файл install.wim был установлен как файл только для чтения.
Если это произойдет, ваш компьютер не сможет ничего записать в файл install.wim, и сканирование DISM не будет завершено. Таким образом, изменение свойств файла install.wim должно решить проблему в этом случае.
После внесения этих изменений попробуйте повторно запустить сканирование DISM.
9. Выполните обновление на месте
- Скачайте и запустите Media Creation Tool.
- Теперь выберите опцию «Обновить этот компьютер сейчас».
- Программа установки подготовит необходимые файлы, так что вам придется подождать.
- Выберите Загрузить и установить обновления (рекомендуется) и нажмите Далее.
- Подождите, пока скачаются обновления.
- Следуйте инструкциям на экране. На экране «Все готово к установке» нажмите «Изменить, что сохранить».
- Выберите «Сохранить личные файлы и приложения» и нажмите «Далее».
- Следуйте инструкциям на экране, чтобы завершить процесс обновления на месте.
Если сканирование DISM не удалось завершить на вашем ПК, вашим окончательным решением может быть обновление на месте. Этот процесс переустановит Windows 10 и принудительно обновит ее до последней версии.
В отличие от переустановки, этот процесс сохранит все ваши файлы и установленные приложения, поэтому вы сможете продолжить с того места, на котором остановились.
Как узнать, работает ли DISM?
DISM не требует много времени для сканирования вашего ПК на наличие ошибок. Обычно это от 10 до 30 минут, но иногда может занять несколько часов.
Пользователи иногда сообщают, что он зависает на отметке прогресса около 20%. Но это не значит, что он не работает, это нормально. Пока он показывает прогресс, но команда все еще работает.
Что делать, если DISM не работает в Windows 11?
Если вы перешли на новую ОС, вы уже знаете, что она не так уж сильно отличается от Windows 10, за исключением некоторых новых функций и улучшенного дизайна.
И да, DISM может выходить из строя в Windows 11 так же часто, как и в более старых ОС, так что к этому нужно быть готовым.
К счастью, все перечисленные выше решения будут без проблем работать на новой ОС, и она станет еще более доступной.

В Windows 11 проще получить доступ к средству устранения неполадок
Как вы можете видеть на нашем снимке экрана выше, в Windows 11 параметр «Устранение неполадок» находится прямо в настройках системы, для доступа к нему требуется меньше кликов.
Сбой DISM в Windows 10 может лишить вас необходимого встроенного инструмента для бесплатного восстановления вашего ПК. Но с исправлениями в этом руководстве вы сможете снова заставить его работать.
Не стесняйтесь сообщить нам, если вам удалось снова заставить DISM работать в Windows 10, в комментариях ниже.