
Если при попытке запустить команду DISM на устройстве с Windows 10 вы обнаружите «Ошибка 1009: база данных реестра конфигурации повреждена.«, То этот пост призван помочь вам. В этом посте мы предложим наиболее подходящие решения, которые вы можете попытаться успешно решить. Решения в этом посте относятся к другим ошибкам DISM в серии 10xx. Если это не так, дайте знать в разделе комментариев после публикации.

Ошибка DISM 1009 может появиться при попытке восстановить образ Windows с поврежденным (поврежденным) реестром с помощью одной из следующих команд DISM в командной строке:
Dism /Online /Cleanup-Image /Restorehealth
Dism /Online /Cleanup-image /Restorehealth /source:wim:X:sourcesinstall.wim:1 /LimitAccess
Вы также можете столкнуться с этой ошибкой при выполнении приведенной ниже команды DISM в среде восстановления Windows (WinRE).
Dism.exe /Image:X: /Cleanup-Image /Restorehealth
Второй сценарий, который вызывает эту ошибку, — это сбой обновления Windows в Windows 10. Как правило, код ошибки указывает на ошибку, вызванную повреждением файлов реестра, и они должны быть исправлены для решения проблемы.
Если вы столкнулись с этой проблемой, вы можете попробовать наши рекомендуемые решения ниже в произвольном порядке и посмотреть, поможет ли это решить проблему.
- Удалить Центр обновления Windows
- Восстановить реестр из резервной копии
- Выполните восстановление системы
- Выполните восстановление Windows 10 с обновлением на месте
Давайте посмотрим на описание процесса, связанного с каждым из перечисленных решений.
Перед устранением ошибки вам необходимо иметь установочный носитель Windows 10 — это DVD или USB. Если у вас нет его под рукой, вы можете создать установочный носитель на рабочем ПК с Windows 10 или создать установочный носитель на компьютере Linux или Mac, если он у вас есть.
1]Удалить Центр обновления Windows
Если у вас возникла проблема после установки обновлений, вам необходимо удалить эти обновления с вашего ПК с Windows 10 с помощью установочного носителя. Вот как:
- Загрузите компьютер с установочного носителя Windows 10.
- На экране загрузки откройте командную строку, нажав Shift + F10или, как вариант, вы можете нажать на Следующий а затем выберите Почини свой компьютер > Устранение неполадок> Командная строка.
- В командной строке CMD введите команду ниже и нажмите Enter:
wmic logicaldisk get name
- Затем введите
dir C:в командной строке, чтобы найти диск, на котором находится папка Windows. Это диск, на котором установлена Windows. Замените C алфавитом вашего диска, на котором установлена Windows. - Как только вы определите диск, содержащий папку Windows. затем вы можете ввести
C:и нажмите Enter. Если это не C, введите соответствующую букву. - Затем вы должны создать рабочую папку на своем диске, набрав команду ниже и нажав Enter:
mkdir C:Scratch
- Теперь запустите команду ниже, чтобы откатить установленные вами обновления.
DISM /Image:C: /ScratchDir:C:Scratch /Cleanup-Image /RevertPendingActions
После выполнения команды вы получите следующее сообщение;
Отмена отложенных действий с изображения….
Операция была завершена. Любой откат ожидающих действий будет предпринята после перезагрузки.
Операция завершилась успешно.
- После получения вышеуказанного сообщения вы можете выйти из командной строки и перезагрузить компьютер.
Если Windows загружается успешно, все в порядке. Но если он не загружается и пытается снова установить обновления, сделайте следующее:
- Перезагрузите компьютер и загрузитесь с установочного носителя, как и раньше.
- Запустите командную строку, следуя инструкциям выше.
- Теперь вы запускаете следующие три команды в указанном порядке и нажимаете Enter после каждой строки. Заменять
C:с буквой вашего диска.
del C:WindowsSoftwareDistribution

del C:WindowsWinSxScleanup.xml

del C:WindowsWinSxSpending.xml
После выполнения команд перезагрузите компьютер.
Если система по-прежнему не загружается снова, вам следует снова загрузиться с установочного носителя и открыть командную строку, а затем выполнить следующий набор команд. Заменять C: с вашим приводом, как в предыдущих шагах.
chkdsk /f C:

sfc /scannow /offbootdir=C: /offwindir=C:windows

dism /image:C: /cleanup-image /restorehealth
После выполнения команд перезагрузите компьютер.
В Ошибка DISM 1009 — база данных реестра конфигурации повреждена. ошибка должна быть устранена сейчас. Если нет, попробуйте следующее исправление.
2]Восстановить реестр из резервной копии
Это решение требует восстановления реестра Windows с помощью RegBack папка. Вот как:
- Загрузите компьютер с установочного носителя Windows 10 и войдите в командную строку, как показано выше.
- Тип
C:и нажмите Enter, чтобы открыть папку Windows на диске. ЗаменятьC:с буквой вашего диска. - Затем в командной строке CMD введите команду ниже и нажимайте Enter после каждой строки:
cd windowssystem32config
md Backup
copy *.* Backup
- Теперь перейдите в папку RegBack, выполнив команду
cd RegBackв командной строке.
Возможны два сценария: во-первых, будет список файлов, и их размеры будут отображаться в байтах; вы можете заметить файлы с нулевым байтом (0). Это показывает, что такие файлы реестра либо повреждены, либо пусты, и это должно быть причиной проблемы. Теперь вам следует остановиться на этом, потому что лучше всего здесь восстановить Windows 10 до предыдущего рабочего состояния, которое мы опишем в Решении 3 ниже.
Второй сценарий — это когда ни один из отображаемых файлов не имеет нулевых байтов (0). В этом случае вам необходимо выполнить следующую команду:
copy *.* ..
- Выполнение этой команды скопирует файлы реестра из Windows System32 Config RegBack папку в Windows System32 Config папка.
- Если вам будет предложено, вы должны нажать букву А на клавиатуре, чтобы перезаписать файлы в папке назначения.
- После того, как файлы закончили копирование, вы теперь набираете
exitи нажмите Enter, чтобы выйти из командной строки. - Перезагрузите компьютер.
Если вы не можете успешно загрузиться на рабочий стол, вам следует снова загрузиться с установочного носителя, открыть командную строку и выполнить следующие команды одну за другой:
chkdsk /f C:
sfc /scannow /offbootdir=C: /offwindir=C:windows
dism /image:C: /cleanup-image /restorehealth
После выполнения команд перезагрузите компьютер. Он должен без проблем загрузиться на рабочий стол. В противном случае попробуйте следующее решение.
3]Выполните восстановление системы
Как упоминалось в исправлении выше, если вы получили значение Ноль (0) в некоторых из файлов, перечисленных ранее. Вам нужно восстановить Windows 10, потому что это показывает, что реестр серьезно поврежден.
Примечание: Если вы можете загрузиться с рабочего стола, вы можете следовать инструкциям в этом руководстве, чтобы выполнить восстановление системы, в противном случае следуйте инструкциям ниже.
- Загрузите компьютер с установочного носителя Windows 10.
- На экране загрузки нажмите на Следующий а затем выберите Почини свой компьютер > Устранение неполадок> Дополнительные параметры.
- Далее выбираем Восстановление системы, или на некоторых ПК вы увидите опцию Вернуться к предыдущей сборке.
- Теперь выберите свою операционную систему на следующем экране.
- Нажмите Следующий в мастере восстановления системы.
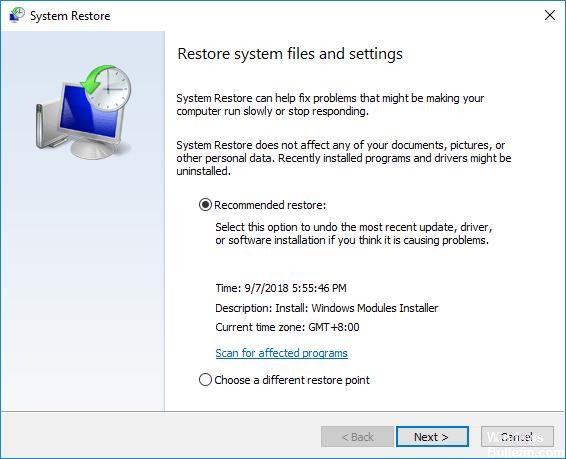
- Выберите точку восстановления. Вам нужно выбрать дату, когда ваша система работала нормально.
- Нажмите Следующий чтобы запустить процесс восстановления системы. По завершении вам будет предложено перезагрузить компьютер или, в большинстве случаев, он перезагрузится автоматически.
Если проблема все еще не решена, попробуйте следующее решение.
4]Выполните восстановление Windows 10 при обновлении на месте
Если эту ошибку не удалось исправить с помощью восстановления системы, окончательное решение — выполнить восстановление с обновлением на месте до Windows 10, и если это не удалось, вы можете создать резервную копию своих файлов, а затем выполнить чистую установку Windows 10.
Надеюсь это поможет!
Связанный пост: Исправить ошибки DISM 87, 112, 11, 50, 2, 3, 87, 1726, 1393, 1910, 0x800f081f и т. Д.
This tutorial contains instructions to resolve the following problem when running the DISM command in Windows 10: «Error 1009: The configuration registry database is corrupt». The DISM error 1009 can appear when you try to repair a Windows image with a damaged (corrupted) registry, by using one of the following DISM commands in command prompt:
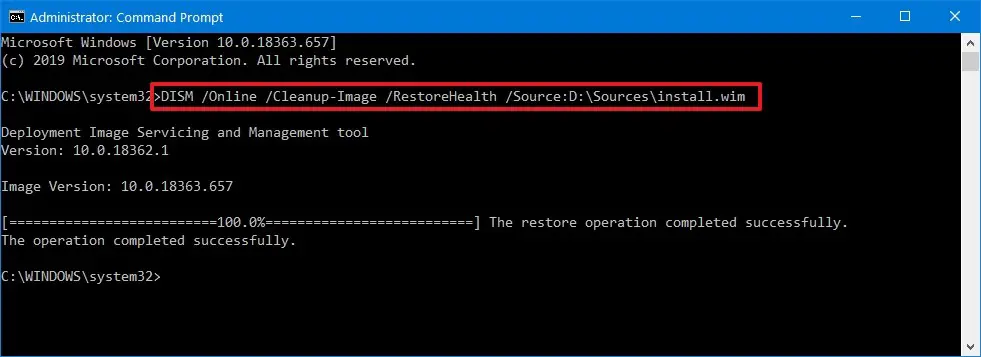
- Dism /Online /Cleanup-Image /Restorehealth
- Dism /Online /Cleanup-image /Restorehealth /source:wim:X:sourcesinstall.wim:1 /LimitAccess
…or when using the DISM command in Windows Recovery Environment (WinRE)
- Dism.exe /Image:X: /Cleanup-Image /Restorehealth
How to fix DISM Error 1009: Registry database is Corrupted.
Requirements: In order to resolve the dism 1009 error, you will need to boot your computer from a Windows installation media (USB or DVD). If you don’t own a Windows Installation Media then you can create one by using Microsoft’s Media Creation tool.
- How to create a Windows 10 USB installation media.
- How to create a Windows 10 DVD installation media.
Method 1. Restore Windows 10 as it was before installing the updates.
The DISM error 1009, usually appears after an unsuccessful installation of a Windows Update. So, first of all cancel the installation of the updates. To do that:
1. Boot your system from a Windows installation media.
2. At the below screen press the SHIFT + F10 keys to launch command prompt. (or click Next and go to Repair My Computer > Troubleshoot > Command Prompt).

3. At command prompt, get a list of all drives, on your system with this command:
- wmic logicaldisk get name

4. Then find out which drive contains the «Windows» folder, by typing this command: *
- dir DriveLetter:
* e.g. To see the contents of the C: drive, type: «dir C:» (without quotes). If you cannot see the «Windows» folder on the C: drive, then continue to the next drive letter (e.g. «dir D:», «dir E:», etc.), until you see the «Windows» folder on one of the listed drives (from the above command).
[As you can see at the screenshot below, the Windows folder (at this case) is located at the D: drive.]

5. Once you find on which drive the «Windows» drive is located (e.g. at drive «D:» in this example), navigate to that drive by typing DriveLetter: + Enter.
6. Then create a scratch folder on the drive by typing this command:
- mkdir D:Scratch

7. Then give the below command to rollback your system, after the unsuccessful update:
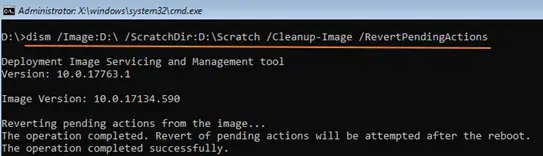
- DISM /Image:D: /ScratchDir:D:Scratch /Cleanup-Image /RevertPendingActions
* Note: Change the drive letter D according to your case.
8. Once the above DISM command is executed, you should receive the following message on screen:
«Reverting pending actions from the image….
The operation completed. Any revert of pending actions will be attempted after the reboot
The operation completed successfully.»

9. Close command prompt and restart your computer. *
10. If Windows boot normally, then continue to your work. If Windows won’t boot and tries again to install the updates, then:
1. Power off you PC.
2. Start again your computer from the Windows installation media.
3. Launch command prompt.
4. At command prompt give the following commands in order (don’t forget to change the drive letter D according to your case):
-
- del D:WindowsSoftwareDistribution
- del D:WindowsWinSxScleanup.xml
- del D:WindowsWinSxSpending.xml
5. When done, close command prompt and restart your PC. *
* Note: If the boot fails again, then boot again is WinRE command prompt and give the following commands (don’t forget to change the drive letter D according to your case):
- chkdsk /r D:
- sfc /scannow /offbootdir=D: /offwindir=D:windows
- dism /image:D: /cleanup-image /restorehealth
Method 2. Restore Windows Registry from Backup.
The next method to fix the dism error 1009, is to restore the Windows registry from the ‘RegBack’ folder. *
* Info: The ‘RegBack’ folder, (full path=WindowsSystem32ConfigRegBack), is the location where Windows stores automatically a backup of the registry files whenever the machine is starting up.
To restore the registry from the RegBack folder:
1. Boot your system from a Windows installation media and then follow the steps 1-5 from the method-1 above to navigate to the Windows drive. (e.g. the «D:» in this example).
2. First of all, take a backup of the current registry files, by giving the following commands in order. (Press Enter after typing each command):
- cd windowssystem32config
- md Backup
- copy *.* Backup

3. Now navigate to RegBack folder by giving this command:
- cd RegBack
4. Then type DIR (to view the contents of RegBack folder).
5. Now see if any of the listed files has 0 (zero) bytes in their file size and proceed below according your case:
- Case A. If any of the listed files has 0 (Zero) bytes in its size, then stop here, and continue to the next method, because the registry backup files are useless or corrupted.
- Case B. If all the listed files, have a size different from zero (like in the screenshot below), then proceed to the next step.

6. Copy the registry files from the WindowsSystem32ConfigRegBack folder to WindowsSystem32Config folder, by giving this command:
- copy *.* ..
7. When prompted, press A to overwrite the files in destination after giving the copy command.

8. When the copy is completed, type exit and press Enter to close command prompt.
9. Restart your computer and try to boot to Windows.
* Note: If the Windows fails to boot again, then boot again is WinRE command prompt and give the following commands (don’t forget to change the drive letter D according to your case):
- chkdsk /r D:
- sfc /scannow /offbootdir=D: /offwindir=D:windows
- dism /image:D: /cleanup-image /restorehealth
Method 3. Restore Windows 10 to a Previous Working State.
The next method to solve the dism error «1009 – The configuration registry database is corrupt», is to restore your system to a previous working state. To do that:
1. Boot your system from the Windows installation media.
2. At the below screen click Next and then click Repair your Computer > Troubleshoot.

3. At Advanced Options click System Restore. *
* Note: If the Go Back to a Previous Build option, is available on this screen then choose that option.

4. At the next screen click your Operating System.

5. Then at System Restore Wizard, click Next and then choose an earlier working state (Date/Time) and click Next to start the restore process.

Method 4. Repair Windows 10.
The final method to resolve dism errors, is to repair Windows 10 with In-Place Upgrade or to backup your files and then to clean install Windows 10.
That’s all folks! Did it work for you?
Please leave a comment in the comment section below or even better: like and share this blog post in the social networks to help spread the word about this solution.
If this article was useful for you, please consider supporting us by making a donation. Even $1 can a make a huge difference for us.

by Milan Stanojevic
Milan has been enthusiastic about technology ever since his childhood days, and this led him to take interest in all PC-related technologies. He’s a PC enthusiast and he… read more
Updated on December 10, 2020
- Repairing your system isn’t hard, and to do that you need to use the DISM command.
- Many users reported DISM error 1009, and in today’s article, we’re going to show you how to fix this error once and for all.
- Want to learn more about SFC and system repair? Our dedicated System File Checker article has all the information you need.
- Having more problems with your PC? Be sure to check our Windows Errors section for more in-depth solutions.

XINSTALL BY CLICKING THE DOWNLOAD FILE
This software will keep your drivers up and running, thus keeping you safe from common computer errors and hardware failure. Check all your drivers now in 3 easy steps:
- Download DriverFix (verified download file).
- Click Start Scan to find all problematic drivers.
- Click Update Drivers to get new versions and avoid system malfunctionings.
- DriverFix has been downloaded by 0 readers this month.
DISM is a useful tool that can help you if you encounter any issues with your Windows installation. However, many users reported getting the DISM error 1009.
This can be a problem and prevent you from repairing your installation, but today we’re going to show you how to get rid of DISM error 1009 once and for all.
How can I fix DISM error 1009 an initialization error occurred?
1. Install the latest updates
- Press Windows Key + I to open the Settings app.
- Go to the Update & Security section and click the Check for updates button.


Once the latest updates are installed, the DISM errors will be resolved.
In case you can’t download the update, you’ll need to download and install the update manually. To do that find the KB code of the update you want to download. You can do that in the Update & Security section.
After getting the update code, follow these steps:
- Go to the Microsoft Update Catalog.
- Enter the KB code in the search field.
- Now download the update for your system and install it manually.


2. Perform an in-place upgrade

- Download Media Creation Tool.
- Start the application and select Upgrade this PC now.
- Wait while the software prepares the necessary files.
- Follow the instructions on the screen until you see the Ready to install window. Now select Change what to keep.
- Make sure that Keep personal files and apps is selected. Click Next and follow the instructions.
After the process is finished, your system will be upgraded to the latest version and the Error 1009 the configuration registry database is corrupted message will be gone.
3. Reset Windows 10

In case all other methods failed to fix your problem, the only thing that you can do is to reset Windows 10 to default. This process will remove all installed applications and files and reset your system.
Performing a Windows 10 reset is simple, and we wrote an in-depth guide on how to factory reset Windows 10, so be sure to check it out and follow the instructions from it closely.
Error 1009 the configuration registry database is corrupted can cause a lot of problems, but we hope that you managed to fix it using one of our solutions.
Still having issues? Fix them with this tool:
SPONSORED
Some driver-related issues can be solved faster by using a dedicated tool. If you’re still having problems with your drivers, just download DriverFix and get it up and running in a few clicks. After that, let it take over and fix all of your errors in no time!
![]()
Если при попытке запустить команду DISM на устройстве с Windows 10 вы обнаружите «Ошибка 1009: база данных реестра конфигурации повреждена.«, То этот пост призван помочь вам. В этом посте мы предложим наиболее подходящие решения, которые вы можете попытаться успешно решить. Решения в этом посте относятся к другим ошибкам DISM в серии 10xx. Если это не так, дайте знать в разделе комментариев после публикации.
Ошибка DISM 1009 может появиться при попытке восстановить образ Windows с поврежденным (поврежденным) реестром с помощью одной из следующих команд DISM в командной строке:
Dism /Online /Cleanup-Image /Restorehealth
Dism /Online /Cleanup-image /Restorehealth /source:wim:X:sourcesinstall.wim:1 /LimitAccess
Вы также можете столкнуться с этой ошибкой при выполнении приведенной ниже команды DISM в среде восстановления Windows (WinRE).
Dism.exe /Image:X: /Cleanup-Image /Restorehealth
Второй сценарий, который вызывает эту ошибку, — это сбой обновления Windows в Windows 10. Как правило, код ошибки указывает на ошибку, вызванную повреждением файлов реестра, и они должны быть исправлены для решения проблемы.
Если вы столкнулись с этой проблемой, вы можете попробовать наши рекомендуемые решения ниже в произвольном порядке и посмотреть, поможет ли это решить проблему.
- Удалить Центр обновления Windows
- Восстановить реестр из резервной копии
- Выполните восстановление системы
- Выполните восстановление Windows 10 с обновлением на месте
Давайте посмотрим на описание процесса, связанного с каждым из перечисленных решений.
Перед устранением ошибки вам необходимо иметь установочный носитель Windows 10 — это DVD или USB. Если у вас нет его под рукой, вы можете создать установочный носитель на рабочем ПК с Windows 10 или создать установочный носитель на компьютере Linux или Mac, если он у вас есть.
1]Удалить Центр обновления Windows
Если у вас возникла проблема после установки обновлений, вам необходимо удалить эти обновления с вашего ПК с Windows 10 с помощью установочного носителя. Вот как:
- Загрузите компьютер с установочного носителя Windows 10.
- На экране загрузки откройте командную строку, нажав Shift + F10или, как вариант, вы можете нажать на Следующий а затем выберите Почини свой компьютер > Устранение неполадок> Командная строка.
- В командной строке CMD введите команду ниже и нажмите Enter:
wmic logicaldisk get name
- Затем введите
dir C:в командной строке, чтобы найти диск, на котором находится папка Windows. Это диск, на котором установлена Windows. Замените C алфавитом вашего диска, на котором установлена Windows. - Как только вы определите диск, содержащий папку Windows. затем вы можете ввести
C:и нажмите Enter. Если это не C, введите соответствующую букву. - Затем вы должны создать рабочую папку на своем диске, набрав команду ниже и нажав Enter:
mkdir C:Scratch
- Теперь запустите команду ниже, чтобы откатить установленные вами обновления.
DISM /Image:C: /ScratchDir:C:Scratch /Cleanup-Image /RevertPendingActions
После выполнения команды вы получите следующее сообщение;
Отмена отложенных действий с изображения….
Операция была завершена. Любой откат ожидающих действий будет предпринята после перезагрузки.
Операция завершилась успешно.
- После получения вышеуказанного сообщения вы можете выйти из командной строки и перезагрузить компьютер.
Если Windows загружается успешно, все в порядке. Но если он не загружается и пытается снова установить обновления, сделайте следующее:
- Перезагрузите компьютер и загрузитесь с установочного носителя, как и раньше.
- Запустите командную строку, следуя инструкциям выше.
- Теперь вы запускаете следующие три команды в указанном порядке и нажимаете Enter после каждой строки. Заменять
C:с буквой вашего диска.
del C:WindowsSoftwareDistribution

del C:WindowsWinSxScleanup.xml

del C:WindowsWinSxSpending.xml
После выполнения команд перезагрузите компьютер.
Если система по-прежнему не загружается снова, вам следует снова загрузиться с установочного носителя и открыть командную строку, а затем выполнить следующий набор команд. Заменять C: с вашим приводом, как в предыдущих шагах.
chkdsk /f C:

sfc /scannow /offbootdir=C: /offwindir=C:windows

dism /image:C: /cleanup-image /restorehealth
После выполнения команд перезагрузите компьютер.
В Ошибка DISM 1009 — база данных реестра конфигурации повреждена. ошибка должна быть устранена сейчас. Если нет, попробуйте следующее исправление.
2]Восстановить реестр из резервной копии
Это решение требует восстановления реестра Windows с помощью RegBack папка. Вот как:
- Загрузите компьютер с установочного носителя Windows 10 и войдите в командную строку, как показано выше.
- Тип
C:и нажмите Enter, чтобы открыть папку Windows на диске. ЗаменятьC:с буквой вашего диска. - Затем в командной строке CMD введите команду ниже и нажимайте Enter после каждой строки:
cd windowssystem32config
md Backup
copy *.* Backup
- Теперь перейдите в папку RegBack, выполнив команду
cd RegBackв командной строке.
Возможны два сценария: во-первых, будет список файлов, и их размеры будут отображаться в байтах; вы можете заметить файлы с нулевым байтом (0). Это показывает, что такие файлы реестра либо повреждены, либо пусты, и это должно быть причиной проблемы. Теперь вам следует остановиться на этом, потому что лучше всего здесь восстановить Windows 10 до предыдущего рабочего состояния, которое мы опишем в Решении 3 ниже.
Второй сценарий — это когда ни один из отображаемых файлов не имеет нулевых байтов (0). В этом случае вам необходимо выполнить следующую команду:
copy *.* ..
- Выполнение этой команды скопирует файлы реестра из Windows System32 Config RegBack папку в Windows System32 Config папка.
- Если вам будет предложено, вы должны нажать букву А на клавиатуре, чтобы перезаписать файлы в папке назначения.
- После того, как файлы закончили копирование, вы теперь набираете
exitи нажмите Enter, чтобы выйти из командной строки. - Перезагрузите компьютер.
Если вы не можете успешно загрузиться на рабочий стол, вам следует снова загрузиться с установочного носителя, открыть командную строку и выполнить следующие команды одну за другой:
chkdsk /f C:

sfc /scannow /offbootdir=C: /offwindir=C:windows

dism /image:C: /cleanup-image /restorehealth
После выполнения команд перезагрузите компьютер. Он должен без проблем загрузиться на рабочий стол. В противном случае попробуйте следующее решение.
3]Выполните восстановление системы
Как упоминалось в исправлении выше, если вы получили значение Ноль (0) в некоторых из файлов, перечисленных ранее. Вам нужно восстановить Windows 10, потому что это показывает, что реестр серьезно поврежден.
Примечание: Если вы можете загрузиться с рабочего стола, вы можете следовать инструкциям в этом руководстве, чтобы выполнить восстановление системы, в противном случае следуйте инструкциям ниже.
- Загрузите компьютер с установочного носителя Windows 10.
- На экране загрузки нажмите на Следующий а затем выберите Почини свой компьютер > Устранение неполадок> Дополнительные параметры.
- Далее выбираем Восстановление системы, или на некоторых ПК вы увидите опцию Вернуться к предыдущей сборке.
- Теперь выберите свою операционную систему на следующем экране.
- Нажмите Следующий в мастере восстановления системы.
- Выберите точку восстановления. Вам нужно выбрать дату, когда ваша система работала нормально.
- Нажмите Следующий чтобы запустить процесс восстановления системы. По завершении вам будет предложено перезагрузить компьютер или, в большинстве случаев, он перезагрузится автоматически.
Если проблема все еще не решена, попробуйте следующее решение.
4]Выполните восстановление Windows 10 при обновлении на месте
Если эту ошибку не удалось исправить с помощью восстановления системы, окончательное решение — выполнить восстановление с обновлением на месте до Windows 10, и если это не удалось, вы можете создать резервную копию своих файлов, а затем выполнить чистую установку Windows 10.
Надеюсь это поможет!
Связанный пост: Исправить ошибки DISM 87, 112, 11, 50, 2, 3, 87, 1726, 1393, 1910, 0x800f081f и т. Д.
by Milan Stanojevic
Milan has been enthusiastic about technology ever since his childhood days, and this led him to take interest in all PC-related technologies. He’s a PC enthusiast and he… read more
Published on December 10, 2020
- Repairing your system isn’t hard, and to do that you need to use the DISM command.
- Many users reported DISM error 1009, and in today’s article, we’re going to show you how to fix this error once and for all.
- Want to learn more about SFC and system repair? Our dedicated System File Checker article has all the information you need.
- Having more problems with your PC? Be sure to check our Windows Errors section for more in-depth solutions.
XINSTALL BY CLICKING THE DOWNLOAD FILE
This software will keep your drivers up and running, thus keeping you safe from common computer errors and hardware failure. Check all your drivers now in 3 easy steps:
- Download DriverFix (verified download file).
- Click Start Scan to find all problematic drivers.
- Click Update Drivers to get new versions and avoid system malfunctionings.
- DriverFix has been downloaded by 0 readers this month.
DISM is a useful tool that can help you if you encounter any issues with your Windows installation. However, many users reported getting the DISM error 1009.
This can be a problem and prevent you from repairing your installation, but today we’re going to show you how to get rid of DISM error 1009 once and for all.
How can I fix DISM error 1009 an initialization error occurred?
1. Install the latest updates
- Press Windows Key + I to open the Settings app.
- Go to the Update & Security section and click the Check for updates button.
Once the latest updates are installed, the DISM errors will be resolved.
In case you can’t download the update, you’ll need to download and install the update manually. To do that find the KB code of the update you want to download. You can do that in the Update & Security section.
After getting the update code, follow these steps:
- Go to the Microsoft Update Catalog.
- Enter the KB code in the search field.
- Now download the update for your system and install it manually.
2. Perform an in-place upgrade
- Download Media Creation Tool.
- Start the application and select Upgrade this PC now.
- Wait while the software prepares the necessary files.
- Follow the instructions on the screen until you see the Ready to install window. Now select Change what to keep.
- Make sure that Keep personal files and apps is selected. Click Next and follow the instructions.
After the process is finished, your system will be upgraded to the latest version and the Error 1009 the configuration registry database is corrupted message will be gone.
3. Reset Windows 10
In case all other methods failed to fix your problem, the only thing that you can do is to reset Windows 10 to default. This process will remove all installed applications and files and reset your system.
Performing a Windows 10 reset is simple, and we wrote an in-depth guide on how to factory reset Windows 10, so be sure to check it out and follow the instructions from it closely.
Error 1009 the configuration registry database is corrupted can cause a lot of problems, but we hope that you managed to fix it using one of our solutions.
Still having issues? Fix them with this tool:
SPONSORED
If the advices above haven’t solved your issue, your PC may experience deeper Windows problems. We recommend downloading this PC Repair tool (rated Great on TrustPilot.com) to easily address them. After installation, simply click the Start Scan button and then press on Repair All.
![]()
Newsletter
Содержание
- FIX: DISM Error 1009 The configuration registry database is corrupt (Solved).
- How to fix DISM Error 1009: Registry database is Corrupted.
- Ошибка DISM 1009 — база данных реестра конфигурации повреждена.
- Ошибка DISM 1009 — база данных реестра конфигурации повреждена.
- 1] Удалить Windows обновление
- 2] Восстановить реестр из резервной копии
- 3] Выполните восстановление системы
- 4] Выполнить Windows 10 ремонт на месте
FIX: DISM Error 1009 The configuration registry database is corrupt (Solved).
This tutorial contains instructions to resolve the following problem when running the DISM command in Windows 10: «Error 1009: The configuration registry database is corrupt». The DISM error 1009 can appear when you try to repair a Windows image with a damaged (corrupted) registry, by using one of the following DISM commands in command prompt:
- Dism /Online /Cleanup-Image /Restorehealth
- Dism /Online /Cleanup-image /Restorehealth /source:wim:X:sourcesinstall.wim:1 /LimitAccess
…or when using the DISM command in Windows Recovery Environment (WinRE)
- Dism.exe /Image:X: /Cleanup-Image /Restorehealth
How to fix DISM Error 1009: Registry database is Corrupted.
Requirements: In order to resolve the dism 1009 error, you will need to boot your computer from a Windows installation media (USB or DVD). If you don’t own a Windows Installation Media then you can create one by using Microsoft’s Media Creation tool.
Method 1. Restore Windows 10 as it was before installing the updates.
The DISM error 1009, usually appears after an unsuccessful installation of a Windows Update. So, first of all cancel the installation of the updates. To do that:
1. Boot your system from a Windows installation media.
2. At the below screen press the SHIFT + F10 keys to launch command prompt. (or click Next and go to Repair My Computer > Troubleshoot > Command Prompt).
3. At command prompt, get a list of all drives, on your system with this command:
- wmic logicaldisk get name
4. Then find out which drive contains the «Windows» folder, by typing this command: *
- dir DriveLetter :
* e.g. To see the contents of the C: drive, type: «dir C:» (without quotes). If you cannot see the «Windows» folder on the C: drive, then continue to the next drive letter (e.g. «dir D:», «dir E:», etc.), until you see the «Windows» folder on one of the listed drives (from the above command).
[As you can see at the screenshot below, the Windows folder (at this case) is located at the D: drive.]
5. Once you find on which drive the «Windows» drive is located (e.g. at drive «D:» in this example), navigate to that drive by typing DriveLetter : + Enter.
6. Then create a scratch folder on the drive by typing this command:
- mkdir D :Scratch
7. Then give the below command to rollback your system, after the unsuccessful update:
- DISM /Image: D : /ScratchDir:D:Scratch /Cleanup-Image /RevertPendingActions
* Note: Change the drive letter D according to your case.
8. Once the above DISM command is executed, you should receive the following message on screen:
«Reverting pending actions from the image….
The operation completed. Any revert of pending actions will be attempted after the reboot
The operation completed successfully.»
9. Close command prompt and restart your computer. *
10. If Windows boot normally, then continue to your work. If Windows won’t boot and tries again to install the updates, then:
1. Power off you PC.
2. Start again your computer from the Windows installation media.
3. Launch command prompt.
4. At command prompt give the following commands in order (don’t forget to change the drive letter D according to your case):
-
- del D :WindowsSoftwareDistribution
- del D :WindowsWinSxScleanup.xml
- del D :WindowsWinSxSpending.xml
5. When done, close command prompt and restart your PC. *
* Note: If the boot fails again, then boot again is WinRE command prompt and give the following commands (don’t forget to change the drive letter D according to your case):
- chkdsk /r D :
- sfc /scannow /offbootdir= D : /offwindir= D :windows
- dism /image: D : /cleanup-image /restorehealth
Method 2. Restore Windows Registry from Backup.
The next method to fix the dism error 1009, is to restore the Windows registry from the ‘RegBack’ folder. *
* Info: The ‘RegBack’ folder, (full path=WindowsSystem32ConfigRegBack), is the location where Windows stores automatically a backup of the registry files whenever the machine is starting up.
To restore the registry from the RegBack folder:
1. Boot your system from a Windows installation media and then follow the steps 1-5 from the method-1 above to navigate to the Windows drive. (e.g. the «D:» in this example).
2. First of all, take a backup of the current registry files, by giving the following commands in order. (Press Enter after typing each command):
- cd windowssystem32config
- md Backup
- copy *.* Backup
3. Now navigate to RegBack folder by giving this command:
4. Then type DIR (to view the contents of RegBack folder).
5. Now see if any of the listed files has (zero) bytes in their file size and proceed below according your case:
- Case A. If any of the listed files has 0 (Zero) bytes in its size, then stop here, and continue to the next method, because the registry backup files are useless or corrupted.
- Case B. If all the listed files, have a size different from zero (like in the screenshot below), then proceed to the next step.
6. Copy the registry files from the WindowsSystem32ConfigRegBack folder to WindowsSystem32Config folder, by giving this command:
7. When prompted, press A to overwrite the files in destination after giving the copy command.
8. When the copy is completed, type exit and press Enter to close command prompt.
9. Restart your computer and try to boot to Windows.
* Note: If the Windows fails to boot again, then boot again is WinRE command prompt and give the following commands (don’t forget to change the drive letter D according to your case):
- chkdsk /r D :
- sfc /scannow /offbootdir= D : /offwindir= D :windows
- dism /image: D : /cleanup-image /restorehealth
Method 3. Restore Windows 10 to a Previous Working State.
The next method to solve the dism error «1009 – The configuration registry database is corrupt», is to restore your system to a previous working state. To do that:
1. Boot your system from the Windows installation media.
2. At the below screen click Next and then click Repair your Computer > Troubleshoot.
3. At Advanced Options click System Restore. *
* Note: If the Go Back to a Previous Build option, is available on this screen then choose that option.
4. At the next screen click your Operating System.
5. Then at System Restore Wizard, click Next and then choose an earlier working state (Date/Time) and click Next to start the restore process.
Method 4. Repair Windows 10.
The final method to resolve dism errors, is to repair Windows 10 with In-Place Upgrade or to backup your files and then to clean install Windows 10.
That’s all folks! Did it work for you?
Please leave a comment in the comment section below or even better: like and share this blog post in the social networks to help spread the word about this solution.
Источник
Если при попытке запуск команды DISM на Windows 10 устройство, и вы столкнетесь с «Ошибка 1009: база данных реестра конфигурации повреждена.«, То этот пост призван помочь вам. В этом посте мы предложим наиболее подходящие решения, которые вы можете попытаться успешно решить. Решения в этом посте относятся к другим ошибкам DISM в серии 10xx. Если это не так, дайте знать в разделе комментариев после публикации.


Ошибка DISM 1009 может появиться при попытке отремонтировать Windows изображение с поврежденным (поврежденным) реестром, используя одну из следующих команд DISM в командной строке:
Вы также можете столкнуться с этой ошибкой при выполнении команды DISM ниже в Windows Восстановительная среда (WinRE).
Второй сценарий, который вызывает эту ошибку, — когда Windows обновление не удалось на Windows 10. Как правило, код ошибки указывает на ошибку, вызванную повреждением файлов реестра, и их необходимо исправить, чтобы решить проблему.
Ошибка DISM 1009 — база данных реестра конфигурации повреждена.
Если вы столкнулись с этой проблемой, вы можете попробовать наши рекомендуемые решения ниже в произвольном порядке и посмотреть, поможет ли это решить проблему.
- Удалить Windows обновление
- Восстановить реестр из резервной копии
- Выполнить восстановление системы
- Выполнять Windows 10 ремонт на месте
Давайте посмотрим на описание процесса, связанного с каждым из перечисленных решений.
Перед устранением ошибки необходимо иметь Windows 10 Установочный носитель — это DVD или USB. Если у вас его нет под рукой, вы можете создать установочный носитель на рабочем Windows 10 ПК или создать установочный носитель на компьютере Linux или Mac если это то, что у вас есть.
1] Удалить Windows обновление
Если у вас возникла проблема после установки обновлений, вам необходимо удалить эти обновления со своего компьютера. Windows 10 ПК с помощью установочного носителя. Вот как:
- Загрузите компьютер с помощью Windows 10 установочный носитель.
- На экране загрузки откройте командную строку, нажав Shift + F10или, как вариант, вы можете нажать на Далее и затем выберите Восстановление системы > Устранение неполадок> Командная строка.
- В командной строке CMD введите команду ниже и нажмите Enter:
- Затем введите dir C: в командной строке, чтобы найти диск с Windows папка. Это драйв, который Windows установка. Замените C на алфавит вашего диска, где Windows установлен.
- Как только вы определите диск, содержащий Windows папка. затем вы можете ввести C: и нажмите Enter. Если это не C, введите соответствующую букву.
- Затем вы должны создать рабочую папку на своем диске, набрав команду ниже и нажав Enter:
- Теперь запустите приведенную ниже команду, чтобы откатить установленные вами обновления.
После выполнения команды вы получите следующее сообщение;
Отмена отложенных действий с изображения….
Операция была завершена. Любой откат ожидающих действий будет предпринята после перезагрузки.
Операция завершилась успешно.
- После получения вышеуказанного сообщения вы можете выйти из командной строки и перезагрузить компьютер.
If Windows загружается удачно, все нормально и хорошо. Но если он не загружается и пытается снова установить обновления, сделайте следующее:
- Перезагрузите компьютер и загрузитесь с установочного носителя, как и раньше.
- Запустите командную строку, следуя инструкциям выше.
- Теперь вы запускаете следующие три команды в указанном порядке и нажимаете Enter после каждой строки. Заменить C: с буквой вашего диска.
После выполнения команд перезагрузите компьютер.
Если система по-прежнему не загружается снова, вам следует снова загрузиться с установочного носителя и открыть командную строку, а затем выполнить следующий набор команд. Заменить C: с вашим приводом, как в предыдущих шагах.
После выполнения команд перезагрузите компьютер.
Компания Ошибка DISM 1009 — база данных реестра конфигурации повреждена. ошибка должна быть устранена сейчас. Если нет, попробуйте следующее исправление.
2] Восстановить реестр из резервной копии
Это решение требует, чтобы вы восстановили Windows реестр с использованием RegBack папка. Вот как:
- Загрузите компьютер с помощью Windows 10 установочный носитель и откройте командную строку, как показано выше.
- Тип C: и нажмите Enter, чтобы открыть Windows папку на диске. Заменить C: с буквой вашего диска.
- Затем в командной строке CMD введите команду ниже и нажимайте Enter после каждой строки:
- Теперь перейдите в папку RegBack, выполнив команду cd RegBack В командной строке.
Возможны два сценария: во-первых, будет список файлов, и их размеры будут отображаться в байтах; вы можете заметить файлы с нулевым байтом (0). Это показывает, что такие файлы реестра либо повреждены, либо пусты, и это должно быть причиной проблемы. Теперь вам следует остановиться здесь, потому что лучше всего здесь восстановить Windows 10 в предыдущее рабочее состояние, которое мы опишем в решении 3 ниже.
Второй сценарий — это когда ни один из отображаемых файлов не имеет нулевых байтов (0). В этом случае вам необходимо выполнить следующую команду:
- Выполнение этой команды скопирует файлы реестра из WindowsSystem32ConfigRegBack папки в WindowsSystem32Config папку.
- Если вам будет предложено, вы должны нажать букву A на клавиатуре, чтобы перезаписать файлы в папке назначения.
- После того, как файлы закончили копирование, введите exit и нажмите Enter, чтобы выйти из командной строки.
- Перезагрузите компьютер.
Если вы не можете успешно загрузиться на рабочий стол, вам следует снова загрузиться с установочного носителя, открыть командную строку и выполнить следующие команды одну за другой:
После выполнения команд перезагрузите компьютер. Он должен без проблем загрузиться на рабочий стол. В противном случае попробуйте следующее решение.
3] Выполните восстановление системы
Как упоминалось в исправлении выше, если вы получили значение Ноль (0) в некоторых из файлов, перечисленных ранее. Вам нужно восстановить Windows 10 потому что это показывает, что реестр серьезно поврежден.
Внимание: Если вы можете загрузиться с рабочего стола, вы можете следовать инструкции в этом руководстве для восстановления системы — в противном случае следуйте инструкциям ниже.
- Загрузите компьютер с помощью Windows 10 установочный носитель.
- На экране загрузки нажмите на Далее и затем выберите Восстановление системы > Устранение неполадок> Дополнительные параметры.
- Затем выберите Восстановить, или на некоторых ПК вы увидите опцию Вернуться к предыдущей сборке.
- Теперь, выберите вашу операционную систему на следующем экране.
- Нажмите Далее в мастере восстановления системы.
- Выберите точку восстановления. Вам нужно выбрать дату, когда ваша система работала нормально.
- Нажмите Далее чтобы запустить процесс восстановления системы. По завершении вам будет предложено перезагрузить компьютер или, в большинстве случаев, он перезагрузится автоматически.
Если проблема все еще не решена, попробуйте следующее решение.
4] Выполнить Windows 10 ремонт на месте
Если эту ошибку не удалось исправить с помощью восстановления системы, окончательное решение — выполнять Windows 10 Ремонт при обновлении на месте и если это не удалось, вы можете сделать резервную копию своих файлов, а затем чистая установка Windows 10.
Источник
Contents
- What Is the Configuration Registry Database Is Corrupt Error?
- How to Fix ‘The Configuration Registry Database Is Corrupt’ Error on Windows 10?
- Option One: Revert to a Previous Version of Windows
- Option Two: Restore the Registry from Backup
- Option Three: Perform a System Restore
- Option Four: Run a Windows 10 In-Place Upgrade Repair

Some Windows 10 users have recently reported running into the DISM Error 1009 on their PCs. When this happens, they typically receive the following error message: “Error 1009: The configuration registry database is corrupt.” If you have also found yourself bothered by this error message, you’ve come to the right place. In this post, we will look into several possible solutions on how to fix DISM error 1009.
What Is the Configuration Registry Database Is Corrupt Error?
There are several situations in which you may be running into this error. In a lot of cases, it occurs when you are trying to repair a Windows image with a damaged or corrupted registry. You probably used one of the DISM commands below:
- Dism /Online /Cleanup-Image /Restorehealth
- Dism /Online /Cleanup-image /Restorehealth /source:wim:X:sourcesinstall.wim:1 /LimitAccess
Another situation when you may encounter the DISM Error 1009 is if you run this DISM command in Windows Recovery Environment (WinRE):
Dism.exe /Image:X: /Cleanup-Image /Restorehealth
The error can also be triggered by a failed Windows update.
So, what is a corrupt registry database issue? Basically, when you see this error code, it means that there is one or more corrupt registry file somewhere in your system. Thus, your best chance of getting rid of the error is fixing the corrupted file.
How to Fix ‘The Configuration Registry Database Is Corrupt’ Error on Windows 10?
As we’ve mentioned above, there are several things you can try to remove ‘the configuration registry database is corrupt’ error. Here are some of the possible solutions:
- Reverting to a previous version of Windows
- Restoring registry from backup
- Performing a System Restore
- Running a Windows 10 in-place upgrade repair
Below, we will go over the steps for each of the above solutions. We suggest you start at the top of the list and make your way down in case the first method doesn’t work.
Important: note that before proceeding with the fixes below you will need to have your Windows 10 Installation Media handy. If you don’t have it, you can create the installation media on your Windows 10 PC or use a Linux or Mac computer to do it.
To download the Installation Media, go to Windows 10 Download page and find the Download tool. Go on to download an executable file titled MediaCreationTool.
Now, let’s get started.
Option One: Revert to a Previous Version of Windows
If you’ve noticed the DISM Error 1009 on your PC after installing a Windows update, removing that latest update might help you get rid of the problem. Here’s how to do it:
- First, boot your PC with Windows 10 installation media.
- When you are on the boot screen, go to Command Prompt. To access it, use the Shift + F10 key combo on your keyboard. Alternatively, you can click Next and then navigate to Repair your computer > Troubleshoot > Command Prompt.
- In the new window, type in the following command:
wmic logicaldisk get name
- Press the Enter key.
- Type in “dir C:” (no quotes). This command will locate the drive that has the Windows folder. Make sure to replace the letter “c” (if needed) with the letter of the drive where Windows is installed.
- Go on to create a scratch folder on your drive. Type in the following command:
mkdir C:Scratch
- Press the Enter key.
- Next, run the command below:
DISM /Image:C: /ScratchDir:C:Scratch /Cleanup-Image /RevertPendingActions
- Once the command is executed, you will receive several messages ending in:
The operation completed successfully.
Now, you can close Command Prompt and restart your computer.
If your system boots successfully, you’re all set.
However, if it fails to boot and starts installing updates again you will need to do the following:
- Restart your computer and boot using the installation media (just like you did in the first step).
- Open Command Prompt.
- Run the following commands (remember to replace “c” with the drive letter you need):
del C:WindowsSoftwareDistribution
del C:WindowsWinSxScleanup.xml
del C:WindowsWinSxSpending.xml
Once more, restart your computer.
If your system still can’t boot properly, you will need to repeat the first few steps:
- Boot your PC with the installation media.
- Open Command Prompt.
- Run the commands below (replacing the letter “c” as needed):
chkdsk /f C:
sfc /scannow /offbootdir=C: /offwindir=C:windows
dism /image:C: /cleanup-image /restorehealth
Restart your computer again.
At this point, you should have no problem booting your system and you should no longer be seeing the DISM error 1009 message. If this method hasn’t worked, move on to the next solution.
Option Two: Restore the Registry from Backup
With this method, you will need to restore the Windows registry using the RegBack folder. Here’s how to proceed:
- Boot your PC with Windows 10 installation media.
- Launch Command Prompt.
- Type “C:” (no quotes) and press the Enter key (make sure to replace “c” with the needed drive letter).
- Type this command and press Enter after each line:
cd windowssystem32config
md Backup
copy *.* Backup
- In Command Prompt, run the following command to get to the RegBack folder:
RegBack
Now, there are two possible scenarios here:
- You may see a list of files with their respective sizes displayed in bytes. Some of these files will have zero bytes. This means that these registry files are either corrupted or empty and, thus, could be the ones causing the error. If this is the case, stop here and go to Option Three below where we will tell you how to restore Windows 10 to a previous working state.
- The second possible scenario is that none of the files in the list will have zero bytes. In this case, run the following command:
copy *.* ..
- By executing this command you will be copying registry files from WindowsSystem32ConfigRegBack folder to WindowsSystem32Config folder.
- If you receive a prompt, press A on your keyboard to overwrite the files in the destination folder.
- Once this is done, type “exit” (no quotes) and press the Enter key on your keyboard to close Command Prompt.
- Restart your computer.
If you can’t boot to your desktop, you will need to boot with the installation media again and open Command Prompt.
Next, run the following commands:
chkdsk /f C:
sfc /scannow /offbootdir=C: /offwindir=C:windows
dism /image:C: /cleanup-image /restorehealth
Once these commands are executed, restart your computer. You should now be able to boot to your desktop without any issues. The error message should not be bothering you either. If this is not the case, try the next solution.
Option Three: Perform a System Restore
As mentioned earlier, if you noticed some files with zero byte value in the list from the above solution, you will need to restore Windows 10 to an earlier version as the registry has been damaged.
Naturally, you can only use this method if you have previously created a System Restore Point. If you haven’t, we will include the instructions for creating one down below. If you have, you can proceed with these steps:
- Boot your PC with Windows 10 installation media.
- Once you are on the boot screen, click Next.
- Go to Repair your computer.
- Select Troubleshoot.
- Click Advanced Options.
- Click System Restore or Go back to a previous build.
- On the next screen, you will need to select your OS.
- In the System Restore Wizard window, click Next.
- Next, you will need to choose a restore point. This has to be a point in time where your system was working properly and you were not getting the error message.
- Click Next for the system restore process to start.
- Once the process is complete, you will be prompted to restart your PC.
You should no longer be seeing the error message on your PC. If you are still having issues, you can move on to the next fix in this list.
If you don’t have a Restore Point on your PC, here’s how to create one for the future.
First, you will need to make sure that System Restore is enabled on your computer. Typically, it is enabled by default. However, it may have been manually disabled. If this is the case, you will need to turn it back on again. Here’s how:
- In the search bar, type “system restore” (no quotes).
- Select Create a restore point.
- Navigate to System Protection.
- Choose the needed drive.
- Click Configure.
- Make sure the following option is toggled to ON: Turn on system protection.
Now, proceed to creating a System Restore Point:
- Right-click the Start button.
- Go to the Control Panel.
- Select System and Maintenance.
- Click System.
- In the left section, select System protection.
- In the System Protection tab, select Create.
- Enter a description for the restore point. It can be a date on which it has been created or a description of why you are creating it: for instance, “before update”.
- Click Create.
Option Four: Run a Windows 10 In-Place Upgrade Repair
If none of the above solutions have been successful, you can try performing a Windows 10 in-place upgrade repair.
Before you proceed with this solution, you will need to do the following:
- Make sure you are signed in with admin privileges.
- Remove all external devices connected to your PC (except for the mouse, keyboard and LAN)
- Disable/uninstall any third-party anti-malware apps.
Once this is done, you can proceed with performing a Windows 10 in-place upgrade. During this process, you will be upgrading your Windows 10 to the next feature update without using any ISO. Here’s how to do it:
- You will need Windows 10 Installation Media to proceed.
- Run it.
- If you are shown the Microsoft License terms, accept it.
- You will then see a “Getting Ready screen.” Hold on for a few seconds.
- You will see two options:
Upgrade PC Now
Create installation media (USB, DVD, or ISO file)
- For this method, you will need to select the Upgrade PC Now option.
- Click Next.
- File download will begin — it can take a while, depending on your internet speed.
- Once the download is complete, you will be given a choice: you will be able to either keep your personal files or remove everything and start from scratch.
- It is generally advised to keep your files. This way, you will be able to get rid of system errors and won’t have to re-download all your files later.
- Once the process is complete, your PC might need to restart several times.
- After this, you should be able to get back to the login screen.
We hope you now know how to get rid of DISM error 1009 on Windows 10 and that at least one of the solutions mentioned above has been helpful.
Now, if you are frequently running into errors related to corrupt Registry files, you may benefit from a specialized tool like Auslogics Registry Cleaner. Coming as a tool in Auslogics BoostSpeed, it is the ultimate solution for fixing a variety of Registry issues that may be causing glitches and crashes on your PC. As you may already know, corrupt or broken entries in the Registry can adversely affect your entire system, and fixing these manually can be a real hassle.
Auslogics Registry Cleaner efficiently cleans out registry keys left by uninstalled applications — thus helping you avoid lots of unwanted issues in the future. What’s more, Auslogics BoostSpeed comes with a whole selection of other helpful tools that can help you optimize your PC and boost system performance. You will be able to free up gigabytes of storage space without expensive hardware upgrades or spending hours cleaning your PC.
Если при попытке запуск команды DISM на Windows 10 устройство, и вы столкнетесь с «Ошибка 1009: база данных реестра конфигурации повреждена.«, То этот пост призван помочь вам. В этом посте мы предложим наиболее подходящие решения, которые вы можете попытаться успешно решить. Решения в этом посте относятся к другим ошибкам DISM в серии 10xx. Если это не так, дайте знать в разделе комментариев после публикации.
Ошибка DISM 1009 может появиться при попытке отремонтировать Windows изображение с поврежденным (поврежденным) реестром, используя одну из следующих команд DISM в командной строке:
Dism / Online / Cleanup-Image / Restorehealth
Dism / Online / Cleanup-image / Restorehealth /source:wim:X:sourcesinstall.wim:1 / LimitAccess
Вы также можете столкнуться с этой ошибкой при выполнении команды DISM ниже в Windows Восстановительная среда (WinRE).
Dism.exe / Изображение: X: / Cleanup-Image / Restorehealth
Второй сценарий, который вызывает эту ошибку, — когда Windows обновление не удалось на Windows 10. Как правило, код ошибки указывает на ошибку, вызванную повреждением файлов реестра, и их необходимо исправить, чтобы решить проблему.
Если вы столкнулись с этой проблемой, вы можете попробовать наши рекомендуемые решения ниже в произвольном порядке и посмотреть, поможет ли это решить проблему.
- Удалить Windows обновление
- Восстановить реестр из резервной копии
- Выполнить восстановление системы
- Выполнять Windows 10 ремонт на месте
Давайте посмотрим на описание процесса, связанного с каждым из перечисленных решений.
Перед устранением ошибки необходимо иметь Windows 10 Установочный носитель — это DVD или USB. Если у вас его нет под рукой, вы можете создать установочный носитель на рабочем Windows 10 ПК или создать установочный носитель на компьютере Linux или Mac если это то, что у вас есть.
1] Удалить Windows обновление
Если у вас возникла проблема после установки обновлений, вам необходимо удалить эти обновления со своего компьютера. Windows 10 ПК с помощью установочного носителя. Вот как:
- Загрузите компьютер с помощью Windows 10 установочный носитель.
- На экране загрузки откройте командную строку, нажав Shift + F10или, как вариант, вы можете нажать на Далее и затем выберите Восстановление системы > Устранение неполадок> Командная строка.
- В командной строке CMD введите команду ниже и нажмите Enter:
wmic logicdisk получает имя
- Затем введите
dir C:в командной строке, чтобы найти диск с Windows папка. Это драйв, который Windows установка. Замените C на алфавит вашего диска, где Windows установлен. - Как только вы определите диск, содержащий Windows папка. затем вы можете ввести
C:и нажмите Enter. Если это не C, введите соответствующую букву. - Затем вы должны создать рабочую папку на своем диске, набрав команду ниже и нажав Enter:
Mkdir C: нуля
- Теперь запустите приведенную ниже команду, чтобы откатить установленные вами обновления.
DISM / Изображение: C: / ScratchDir: C: Scratch / Cleanup-Image / RevertPendingActions
После выполнения команды вы получите следующее сообщение;
Отмена отложенных действий с изображения….
Операция была завершена. Любой откат ожидающих действий будет предпринята после перезагрузки.
Операция завершилась успешно.
- После получения вышеуказанного сообщения вы можете выйти из командной строки и перезагрузить компьютер.
If Windows загружается удачно, все нормально и хорошо. Но если он не загружается и пытается снова установить обновления, сделайте следующее:
- Перезагрузите компьютер и загрузитесь с установочного носителя, как и раньше.
- Запустите командную строку, следуя инструкциям выше.
- Теперь вы запускаете следующие три команды в указанном порядке и нажимаете Enter после каждой строки. Заменить
C:с буквой вашего диска.
дель С:WindowsSoftwareDistribution del C:WindowsWinSxScleanup.xml del C:WindowsWinSxSpending.xml
После выполнения команд перезагрузите компьютер.
Если система по-прежнему не загружается снова, вам следует снова загрузиться с установочного носителя и открыть командную строку, а затем выполнить следующий набор команд. Заменить C: с вашим приводом, как в предыдущих шагах.
chkdsk / f C: sfc / scannow / offbootdir = C: / offwindir = C:windows

DISM / образ: C: / cleanup-image / restorehealth
После выполнения команд перезагрузите компьютер.
Компания Ошибка DISM 1009 — база данных реестра конфигурации повреждена. ошибка должна быть устранена сейчас. Если нет, попробуйте следующее исправление.
2] Восстановить реестр из резервной копии
Это решение требует, чтобы вы восстановили Windows реестр с использованием RegBack папка. Вот как:
- Загрузите компьютер с помощью Windows 10 установочный носитель и откройте командную строку, как показано выше.
- Тип
C:и нажмите Enter, чтобы открыть Windows папку на диске. ЗаменитьC:с буквой вашего диска. - Затем в командной строке CMD введите команду ниже и нажимайте Enter после каждой строки:
cd windowssystem32config md Резервная копия *. * Резервная копия
- Теперь перейдите в папку RegBack, выполнив команду
cd RegBackВ командной строке.
Возможны два сценария: во-первых, будет список файлов, и их размеры будут отображаться в байтах; вы можете заметить файлы с нулевым байтом (0). Это показывает, что такие файлы реестра либо повреждены, либо пусты, и это должно быть причиной проблемы. Теперь вам следует остановиться здесь, потому что лучше всего здесь восстановить Windows 10 в предыдущее рабочее состояние, которое мы опишем в решении 3 ниже.
Второй сценарий — это когда ни один из отображаемых файлов не имеет нулевых байтов (0). В этом случае вам необходимо выполнить следующую команду:
копия *. * ..
- Выполнение этой команды скопирует файлы реестра из WindowsSystem32ConfigRegBack папки в WindowsSystem32Config папку.
- Если вам будет предложено, вы должны нажать букву A на клавиатуре, чтобы перезаписать файлы в папке назначения.
- После того, как файлы закончили копирование, введите
exitи нажмите Enter, чтобы выйти из командной строки. - Перезагрузите компьютер.
Если вы не можете успешно загрузиться на рабочий стол, вам следует снова загрузиться с установочного носителя, открыть командную строку и выполнить следующие команды одну за другой:
chkdsk / f C: sfc / scannow / offbootdir = C: / offwindir = C:windows

DISM / образ: C: / cleanup-image / restorehealth
После выполнения команд перезагрузите компьютер. Он должен без проблем загрузиться на рабочий стол. В противном случае попробуйте следующее решение.
3] Выполните восстановление системы
Как упоминалось в исправлении выше, если вы получили значение Ноль (0) в некоторых из файлов, перечисленных ранее. Вам нужно восстановить Windows 10 потому что это показывает, что реестр серьезно поврежден.
Внимание: Если вы можете загрузиться с рабочего стола, вы можете следовать инструкции в этом руководстве для восстановления системы — в противном случае следуйте инструкциям ниже.
- Загрузите компьютер с помощью Windows 10 установочный носитель.
- На экране загрузки нажмите на Далее и затем выберите Восстановление системы > Устранение неполадок> Дополнительные параметры.
- Затем выберите Восстановить, или на некоторых ПК вы увидите опцию Вернуться к предыдущей сборке.
- Теперь, выберите вашу операционную систему на следующем экране.
- Нажмите Далее в мастере восстановления системы.
- Выберите точку восстановления. Вам нужно выбрать дату, когда ваша система работала нормально.
- Нажмите Далее чтобы запустить процесс восстановления системы. По завершении вам будет предложено перезагрузить компьютер или, в большинстве случаев, он перезагрузится автоматически.
Если проблема все еще не решена, попробуйте следующее решение.
4] Выполнить Windows 10 ремонт на месте
Если эту ошибку не удалось исправить с помощью восстановления системы, окончательное решение — выполнять Windows 10 Ремонт при обновлении на месте и если это не удалось, вы можете сделать резервную копию своих файлов, а затем чистая установка Windows 10.
Надеюсь это поможет!
Загрузите PC Repair Tool, чтобы быстро найти и исправить Windows ошибки автоматически
Похожие темы: Исправить ошибки DISM 87, 112, 11, 50, 2, 3, 87,1726, 1393, 1910, 0, 800x081fXNUMXf и т. Д..
Оригинал статьи
Обновлено 2023 января: перестаньте получать сообщения об ошибках и замедлите работу вашей системы с помощью нашего инструмента оптимизации. Получить сейчас в эту ссылку
- Скачайте и установите инструмент для ремонта здесь.
- Пусть он просканирует ваш компьютер.
- Затем инструмент почини свой компьютер.
Некоторые пользователи Windows 10 недавно сообщили, что на их ПК возникает ошибка DISM 1009. Когда это происходит, они обычно получают следующее сообщение об ошибке: «Ошибка 1009: база данных реестра конфигурации повреждена». Если вы тоже столкнулись с этим сообщением об ошибке, вы находитесь в правильном месте.
В этой статье мы рассмотрим несколько возможных решений для исправления ошибки DISM 1009.

- Это может произойти, когда команда DISM выполняется в WinRE.
- Второй сценарий, в котором возникает эта ошибка, — это сбой обновления Windows 10.
- Это также ошибка, возникающая при попытке восстановить образ Windows с поврежденным реестром.
Как восстановить «Dism error 1009» на компьютере с Windows?
Обновление за январь 2023 года:
Теперь вы можете предотвратить проблемы с ПК с помощью этого инструмента, например, защитить вас от потери файлов и вредоносных программ. Кроме того, это отличный способ оптимизировать ваш компьютер для достижения максимальной производительности. Программа с легкостью исправляет типичные ошибки, которые могут возникнуть в системах Windows — нет необходимости часами искать и устранять неполадки, если у вас под рукой есть идеальное решение:
- Шаг 1: Скачать PC Repair & Optimizer Tool (Windows 10, 8, 7, XP, Vista — Microsoft Gold Certified).
- Шаг 2: Нажмите «Начать сканирование”, Чтобы найти проблемы реестра Windows, которые могут вызывать проблемы с ПК.
- Шаг 3: Нажмите «Починить все», Чтобы исправить все проблемы.


Восстановить Windows до более ранней рабочей версии
- Загрузите систему с установочного носителя.
- Нажмите «Восстановить компьютер», затем выберите «Устранение неполадок».
- Затем выберите «Дополнительные параметры» и нажмите «Восстановление системы» или «Вернуться к предыдущей версии».
- На следующем экране добавьте свою операционную систему, чтобы открыть мастер восстановления системы.
- Следуйте инструкциям на экране и нажмите «Далее», чтобы восстановить предыдущее рабочее состояние Windows.
- После завершения процесса перезагрузите компьютер.
Выполнение обновления на месте
- Загрузите инструмент создания медиа.
- После успешной установки откройте приложение и нажмите «Обновить этот компьютер сейчас».
- Следуйте инструкциям на экране.
- В окне «Все готово к установке» выберите элементы, которые вы хотите сохранить на вашем компьютере после установки.
- Нажмите Далее и следуйте инструкциям на экране, чтобы начать установку Windows.
Сбросить настройки Windows 10
- Откройте приложение «Настройки» и нажмите «Обновление и безопасность».
- Выберите «Восстановить» с левой стороны.
- Нажмите «Начать», чтобы начать процесс.
- Откроется новое окно, в котором вы можете сохранить или удалить файлы.
- Выберите «Сохранить мои файлы», если вы не хотите потерять свои данные.
- Затем следуйте инструкциям на экране, чтобы сбросить настройки Windows.
- Если это не решит вашу проблему, повторите первые три шага и выберите «Удалить все», прежде чем начинать сброс Windows.
Совет экспертов: Этот инструмент восстановления сканирует репозитории и заменяет поврежденные или отсутствующие файлы, если ни один из этих методов не сработал. Это хорошо работает в большинстве случаев, когда проблема связана с повреждением системы. Этот инструмент также оптимизирует вашу систему, чтобы максимизировать производительность. Его можно скачать по Щелчок Здесь
Сообщение Просмотров: 146
The error “DISM Error 1009: The Configuration Registry Database Is Corrupt” isn’t new for Windows users. It can show up when you’re trying to open programs on your PC, but in this post, we’re addressing this error concerning DISM tool on your PC. You already know that DISM help diagnoses various problems on your PC, but if it turns out that the tool isn’t working and is showing errors such as the “DISM Error 1009”. You probably won’t be able to run some troubleshoots on your Windows PC.
What Is DISM Error 1009: The Configuration Registry Database Is Corrupt?
It’s an error that shows up when you attempt to repair Windows image with a corrupt registry. It mostly occurs when you run these two commands:
-
Dism /Online /Cleanup-Image /Restorehealth.
-
Dism /Online /Cleanup-image /Restorehealth /source:wim:X:sourcesinstall.wim:1
/LimitAccess.
Also, it can show up when running the DISM command in WinRE (Windows Recovery Environment). The popular command that causes the problem is: “Dism.exe /Image:X: /Cleanup-Image /Restorehealth”.
The second scenario that shows up this error is when the Windows update failed on Windows 10. Generally, when you Look at the error code, we can conclude that it’s an error caused by corrupt registry files and they have to be fixed to solve the problem.
What Is DISM Error 1009
How To Fix DISM Error 1009
Before solving the error, you need to have your Windows Installation Media. That’s either a DVD or USB. If you don’t have access to it, then you need to download online or use Microsoft’s Media creation tool.
Fix 1: Remove Windows Update
If you started experiencing the problem after installing updates, you need to remove these updates from your PC. Here is how to do that from your installation media:
- Boot the PC using your Installation media.
- On the boot screen, you should open Command Prompt by pressing Shift + F10, or alternatively, you can click on “Next” and then select Repair My Computer > Troubleshoot > Command Prompt.
- Type this command when the Command Prompt opens:
wmic logicaldisk get name
- Hit enter to run the command, all the drives on your PC will be listed with this command.
- Next, you type “dir C:” in the command prompt to locate the drive that has the “Windows” folder. It’s the drive that has Windows installation. You should replace the “C” with the alphabet of your drive or any other name you gave to your drive where windows are installed. It can be the letter D: or F:, just replace with the appropriate letter.
- Once you trace the drive that contains the Windows folder you then run C: and hit enter. That’s if the name of your drive is C:/. Whatever the name of the drive is, you should type the name in the command prompt and hit enter.
- Next, you should create a scratch folder on your drive by typing the command
mkdir C:Scratch
- You now run this command:
DISM /Image:C: /ScratchDir:C:Scratch /Cleanup-Image /RevertPendingActions
to roll back the updates you have installed. Always remember to replace “C:” with the name of your drive.
- After executing the command above, you’ll be receiving the message:
"Reverting pending actions from the image….

The operation was completed.  Any revert of pending actions will be attempted after the reboot

The operation completed successfully".
everting pending actions from the image….
- After receiving the above message, you then close Command Prompt and restart your PC.
If Windows can boot successfully, you now continue working with your PC. If on the other hand it fails to boot and is attempting to install the updates again, you should execute these steps:
- Restart your PC and boot using the installation media as you did previously.
- Launch the command prompt following the steps above.
- You now run the following three commands in order and don’t forget to replace “C:” with your drive name:
del C:WindowsSoftwareDistribution

del C:WindowsWinSxScleanup.xml

del C:WindowsWinSxSpending.xml
- Hit enter after each command to run, and when successfully done, you should restart your PC.
- If the system still fails to boot again, you should boot again and open the command prompt, then run the following set of commands:
chkdsk /f C:

sfc /scannow /offbootdir=C: /offwindir=C:windows

dism /image:C: /cleanup-image /restorehealth
- Replace “C:” with your drive as in the previous steps.
- You now restart your PC, and hopefully, you’ll be able to get rid of DISM Error 1009 “The configuration registry database is corrupt”, and if not, you should proceed to the next fix.
Fix 2: Registry restore from backup
The next troubleshoot you need to try now is restoring the Windows registry using the “RegBack” folder and here is how to execute the steps:
- Boot Windows with installation media like you did previously, open the command prompt, and run the command “wmic logicaldisk get name” to list down your drives and then locate the Windows folder from the drive you’re using. Note that you’re running this command if you don’t know the name of the drive windows is installed. If you already know you just need to run “C:” to open the Windows folder on the drive (keeping in mind to replace “C:” with your drive name.
- You now run these three commands one by one:
cd windowssystem32config
md Backup
copy *.* Backup

md Backup
- You then navigate to the RegBack folder by running the command “cd RegBack” in the command prompt.
- There would be two scenarios: first, there would be a list of files, and their sizes will be displayed in bytes, you might notice files that have zero bytes (0). This shows that such registry files are either corrupt or empty and that should be the cause of the problem. You should now stop here because the best thing to do here is to restore Windows which we’ll outline in the next fix.
- The second scenario is that when none of the files displayed have zero bytes (0). In this case, you need to run this command “copy *.* ..” executing this command will copy registry files from ‘WindowsSystem32ConfigRegBack’ Folder to “WindowsSystem32Config” Folder.
- If you’re prompted, you should press the letter “A” on your keyboard to overwrite the files in the destination folder.
- Once the files have finished copying, you now type “Exit” and press enter to exit the command prompt Windows.
- Restart your PC and see if things are working.
- If you’re not able to boot successfully, you should boot again with WinRE. Open the command prompt just like in the previous steps during boot and run these commands one by one:
chkdsk /f C:

sfc /scannow /offbootdir=C: /offwindir=C:windows

dism /image:C: /cleanup-image /restorehealth
- Hopefully, you might solve the problem when windows restart.
Fix 3: Restore Windows to a previous working version
As mentioned in the fix above, if you received a Zero (0) value in some of the files listed earlier. You need to restore windows because it shows that the registry is seriously damaged. Here is how to do that:
- You first boot your PC using Installation media as you did in the previous methods.
- Select the option “Repair Your Computer” and then “Troubleshoot”.
- The next option to choose on the screen is “Advanced Options” and then choose “System Restore”, or in some PC’s you’ll see the option “Go back to a previous build”.
- You’ll now select your operating system in the next screen that shows up.
- Click next when you’re at the System Restore Wizard.
- You then select the restore point, you need to select a date when your system was working smoothly.
- Click “Next” to start the system restore process. When finished you’ll be prompted to restart your PC, or in most cases, it will restart automatically.
- You now check for the error to see if it’s gone or not.

system restore windows 10
Fix 4: Repair Windows
If “DISM Error 1009 The configuration registry database is corrupt” couldn’t be fixed with system restore, you now repair windows. This is pretty simple, you should boot your computer using Installation media, as usual. Then you select the option Repair your computer, and you’ll be guided through the process. It will take some time because Windows will now compare the original files on your installation media to the current files on the PC and then automatically repair the files affected.
So far these are the most effective solutions for DISM Error 1009 “The configuration registry database is corrupt”. Let us know the troubleshoot that solved the error for you even if it’s not listed here so that our readers can learn more about this error.
Confront with DISM error 1009 and don’t have any idea to solve it? Don’t fret! This article on MiniTool Website will help you out on that. It is worth noting that most operations are related to the system, so you must make sure to follow these instructions carefully.
DISM Error 1009 Windows 10/11
DISM, also known as Deployment Image Servicing and Management, is an inbuilt command-line tool in Windows which allows you to prepare, modify and repair system images. In most cases, you can use DISM together with SFC to scan and repair the computer and return it to a healthy working state without reinstallation.
However, the error message “DISM Error 1009: The configuration registry database is corrupted.” or “DISM error 1009 an initialization error occurred” might show up when you use it in the following conditions:
- Repair Windows image with a corrupt registry and run the two commands: Dism /Online /Cleanup-Image /Restorehealth and Dism /Online /Cleanup-image /Restorehealth /source:wim:X:sourcesinstall.wim:1 /LimitAccess
- Run exe /Image:X: /Cleanup-Image /Restorehealth in Windows Recovery Environment.
- Update Windows but it fails.
In this post, we are going to show you how to fix DISM error 1009 on Windows 10/11 step by step and you need to execute these steps as carefully as you can.
Does your DISM command tool work normally? If not, you need to repair it under the guidelines of this article — [Solved 2022] DISM Failed On Windows 10/8/7 Computer.
How to Fix DISM Error Code 1009 Windows 10/11?
Preparation Before Troubleshooting DISM Error 1009
To fix DISM error 1009 on Windows 10, you need to boot your computer from a Windows installation media. If you don’t have your Windows 10 installation media at this moment, you must create one on your computer. You can either create a Windows 10 USB installation media or a DVD one. Now, let me show you how to create a bootable USB flash disk:
Step 1. Download Media Creation Tool from Microsoft Website.
Step 2. Run it and accept the License terms.
Step 3. Tick Create installation media (USB flash drive, DVD, or ISO file) for another PC.

Step 4. If you run Windows 10 now, Windows will recognize automatically your current version of Windows. Leave the Language, Edition & Architecture options unchanged, tick Use the recommended options for this PC and hit Next.
Tip: Unticking Use the recommended options for this PC and changing the Windows Language, Edition & Architecture allows you to install Windows 10 on another computer.
Step 5. Check USB flash drive and press Next.
Step 6. Connect your USB drive (not less than 4GB) to your computer and hit Next. Media Creation Tool will start to download the Windows 10 installation files.
Step 7. When this process is completed, your Windows 10 installation media is ready to use. Click on Finish.
If you are a Windows 11 user, you can find guidelines on creating a Windows 11 installation media from this article — How to Create Windows 11 Installation Media on PC, Mac, or Linux.
Fix 1: Remove Windows Updates
If you experience DISM error code 1009 in a Windows update failure, you are supposed to get rid of these updates.
Step 1. Boot your PC using the installation media you created.
Step 2. On the boot screen, press Shift + F10 at the same time to evoke Command Prompt.
Step 3. Type wmic logicaldisk get name in the command window and hit Enter to get a list of all the drives of your system.

Step 4. If your Windows folder is in Drive D:, type dir D:. You can replace D with the drive which contains the Windows folder.
Step 5. Type D: again and tap on Enter.
Step 6. Copy & paste the following command to create a scratch folder in your drive and hit Enter.
mkdir D:Scratch
Step 7. Now remove the recently installed updates by executing the following DISM command:
DISM /Image:D: /ScratchDir:D:Scratch /Cleanup-Image /RevertPendingActions
Step 8. Exit Command Prompt and reboot your PC until you receive a message which informs you of the completion of this operation.
If your computer boot successfully, congratulations, you have solved DISM error 1009. If it fails to boot and even tries to install the updates again, you can follow these guidelines:
Step 1. Restart your computer using the installation media and launch Command Prompt again.
Step 2. Copy & paste the three commands one by one and hit Enter before running each command. Make sure to replace D: with the drive which contains the Windows folder.
del D:WindowsSoftwareDistribution
del D:WindowsWinSxScleanup.xml
del D:WindowsWinSxSpending.xml
Step 3. After executing these commands successfully, close Command Prompt and restart your computer again.
If you experience a boot failure again, don’t worry! There’s still a fix for you.
Step 1. Boot your computer a third time and open Command Prompt from Windows Recovery Environment.
Step 2. Run the following commands and don’t forget to replace D: with the right driver letter as mentioned in previous steps.
chkdsk /f D:
sfc /scannow /offbootdir=D: /offwindir=D:windows
dism /image:D: /cleanup-image /restorehealth
Now, you will probably boot the computer successfully. If it still goes wrong, you can try the next fix.
Fix 2: Restore Registry from Backup
Restoring the Windows registry also helps to solve DISM error code 1009 Windows 10/11. Here’s what you should do:
Step 1. Enter Windows Recovery Environment and access Command Prompt.
Step 2. Type D: and tap on Enter to open the Windows folder. (You should also replace D: with the corresponding drive letter.)
Step 3. Run these commands below one by one.
cd windowssystem32config
md Backup
copy *.* Backup

Step 4. Locate the RegBack folder by running cd RegBack.
There will be two conditions. One is seeing files contain 0 bytes, the other is that none of the files displayed has 0 bytes. The former means that registry files are either corrupted or empty and you should stop your operation and then restore Windows. If you are in the latter condition, you can continue the following instructions.
Step 5. Run the copy *.* .. command to copy the registry files to the Windows folder.
Step 6. Type A to overwrite the files in the destination.
Step 7. Once the file copying process is done, type exit and hit Enter to close Command Prompt.
Step 8. Restart your device.
If you boot the computer unsuccessfully, boot it again with installation media and launch Command Prompt to execute these commands one after another:
chkdsk /f D:
sfc /scannow /offbootdir=D: /offwindir=D:windows
dism /image:D: /cleanup-image /restorehealth
Step 9. Reboot your PC and if still having trouble booting, please try the next solution.
Fix 3: Perform System Restore
As mentioned in the fourth step in Fix 2, one condition is that you might notice some files with 0 bytes due to corrupt registry files. In this case, you need to perform a system restore to restore your Windows to an earlier version.
Step 1. Boot your system from the Windows installation media.
Step 2. If you see a page named Windows Setup, hit Next > Repair your computer > Troubleshoot.
Step 3. Under Advanced options, hit System Restore.

Step 4. Now, you can choose a target operating system. Select one and hit Next at System Restore Wizard.
Step 5. Select a restore point when your system was running normally.
Step 6. Tap Next to start the system restore process. When finishing this process, your system will restart automatically and then you can check if DISM error 1009 is gone.
What to do when System Restore failed? Don’t worry! Every problem has a fix. You can turn to this guide for help — System Restore Failed And Did Not Complete Successfully: 5 Fixes.
Fix 4: Perform an In-place Upgrade
Performing an in-place upgrade also helps to remove DISM error code 1009 Windows 10. To do so, you need to make some preparations:
- Log in with administrator rights.
- Disable all the third-party anti-virus software.
- Remove all the external devices except for the LAN cable, keyboard and mouse.
Step 1. Download Media Creation Tool.
Step 2. After downloading & installing it successfully, open this application and tick Upgrade this PC now.

ALT= choose Upgrade this PC now
Step 3. Follow the on-screen instructions. In the window named Ready to Install, choose the items you want to keep in your computer after installation.
Step 4. Hit Next and follow the instructions on the screen to start the installation. As soon as the in-place upgrade is done, the DISM error 1009 will disappear.
Fix 5: Reset Windows
If none of the solutions works out for you, you can try the last but the most effective resort – reset your Windows 10/11 to get rid of DISM error 1009 thoroughly. This operation will remove all installed applications & files and reset your system hence you must back up your personal data with a reliable backup tool before proceeding.
Free Download
Do you know what the difference of reset Windows, clean install and fresh start is? If you are interested in it, please go to — Windows 10 Reset VS Clean Install VS Fresh Start, Detailed Guide.
Preparations Before Resetting your PC
Before resetting your device, you had better back up your important files in advance. To easily keep your data safe, a professional backup software, MiniTool ShadowMaker will be a good choice. It is specially designed to back up files, folders, systems, disks and partitions on Windows 11/10/8/7. At the same time, it supports full backup, incremental backup, differential backup and even automatic backup.
Now, you only need to do a few simple steps to back up your files:
Step 1. Download & install MiniTool ShadowMaker Trial.
Free Download
Step 2. Launch it and click on Keep Trial to enjoy its service for free.
Step 3. Go to the Backup functional page and hit Source > Folders and Files.
Step 4. You can select the desired files/folders now. After making your choice, click OK to go back to the Backup functional page.
Step 5. Hit Destination on the right pane to choose a destination path for your backup image.

Step 6. The last step is to click on Back up Now to start the backup task at once.
That’s all about how to create a file backup. Now you can put your whole heart into resetting your Windows 10.
Step 1. Click on the gear icon to open Windows Settings.
Step 2. In the settings menu, scroll down to find Update & Security and tap on it.
Step 3. In the Recovery tab, hit Get started under Reset this PC.

Step 4. In the new window, you should decide either to keep your files or remove them. Select Keep my files if you want to save your data.
Step 5. Now follow the guidelines on the screen to reset your Windows.
Step 6. If DISM error 1009 is still there, you can follow the steps above again and will have to choose Remove everything before resetting Windows.
Final Words
To sum up, this article shows you what DISM error 1009 is and when you might meet it. Most importantly, it walks you through five detailed solutions to DISM error 1009 Windows 10/11.
If you figure out any better solution to DISM error 1009, you can drop a comment below. Or you have any confusion with this post or MiniTool ShadowMaker, please feel free to send an email to us via [email protected] and we will spare no effort to help you.
The error “DISM Error 1009: The Configuration Registry Database Is Corrupt” isn’t new for Windows users. It can show up when you’re trying to open programs on your PC, but in this post, we’re addressing this error concerning DISM tool on your PC. You already know that DISM help diagnoses various problems on your PC, but if it turns out that the tool isn’t working and is showing errors such as the “DISM Error 1009”. You probably won’t be able to run some troubleshoots on your Windows PC.
What Is DISM Error 1009: The Configuration Registry Database Is Corrupt?
It’s an error that shows up when you attempt to repair Windows image with a corrupt registry. It mostly occurs when you run these two commands:
-
Dism /Online /Cleanup-Image /Restorehealth.
-
Dism /Online /Cleanup-image /Restorehealth /source:wim:X:sourcesinstall.wim:1
/LimitAccess.
Also, it can show up when running the DISM command in WinRE (Windows Recovery Environment). The popular command that causes the problem is: “Dism.exe /Image:X: /Cleanup-Image /Restorehealth”.
The second scenario that shows up this error is when the Windows update failed on Windows 10. Generally, when you Look at the error code, we can conclude that it’s an error caused by corrupt registry files and they have to be fixed to solve the problem.
What Is DISM Error 1009
How To Fix DISM Error 1009
Before solving the error, you need to have your Windows Installation Media. That’s either a DVD or USB. If you don’t have access to it, then you need to download online or use Microsoft’s Media creation tool.
Fix 1: Remove Windows Update
If you started experiencing the problem after installing updates, you need to remove these updates from your PC. Here is how to do that from your installation media:
- Boot the PC using your Installation media.
- On the boot screen, you should open Command Prompt by pressing Shift + F10, or alternatively, you can click on “Next” and then select Repair My Computer > Troubleshoot > Command Prompt.
- Type this command when the Command Prompt opens:
wmic logicaldisk get name
- Hit enter to run the command, all the drives on your PC will be listed with this command.
- Next, you type “dir C:” in the command prompt to locate the drive that has the “Windows” folder. It’s the drive that has Windows installation. You should replace the “C” with the alphabet of your drive or any other name you gave to your drive where windows are installed. It can be the letter D: or F:, just replace with the appropriate letter.
- Once you trace the drive that contains the Windows folder you then run C: and hit enter. That’s if the name of your drive is C:/. Whatever the name of the drive is, you should type the name in the command prompt and hit enter.
- Next, you should create a scratch folder on your drive by typing the command
mkdir C:Scratch
- You now run this command:
DISM /Image:C: /ScratchDir:C:Scratch /Cleanup-Image /RevertPendingActions
to roll back the updates you have installed. Always remember to replace “C:” with the name of your drive.
- After executing the command above, you’ll be receiving the message:
"Reverting pending actions from the image….

The operation was completed.  Any revert of pending actions will be attempted after the reboot

The operation completed successfully".
everting pending actions from the image….
- After receiving the above message, you then close Command Prompt and restart your PC.
If Windows can boot successfully, you now continue working with your PC. If on the other hand it fails to boot and is attempting to install the updates again, you should execute these steps:
- Restart your PC and boot using the installation media as you did previously.
- Launch the command prompt following the steps above.
- You now run the following three commands in order and don’t forget to replace “C:” with your drive name:
del C:WindowsSoftwareDistribution

del C:WindowsWinSxScleanup.xml

del C:WindowsWinSxSpending.xml
- Hit enter after each command to run, and when successfully done, you should restart your PC.
- If the system still fails to boot again, you should boot again and open the command prompt, then run the following set of commands:
chkdsk /f C:

sfc /scannow /offbootdir=C: /offwindir=C:windows

dism /image:C: /cleanup-image /restorehealth
- Replace “C:” with your drive as in the previous steps.
- You now restart your PC, and hopefully, you’ll be able to get rid of DISM Error 1009 “The configuration registry database is corrupt”, and if not, you should proceed to the next fix.
Fix 2: Registry restore from backup
The next troubleshoot you need to try now is restoring the Windows registry using the “RegBack” folder and here is how to execute the steps:
- Boot Windows with installation media like you did previously, open the command prompt, and run the command “wmic logicaldisk get name” to list down your drives and then locate the Windows folder from the drive you’re using. Note that you’re running this command if you don’t know the name of the drive windows is installed. If you already know you just need to run “C:” to open the Windows folder on the drive (keeping in mind to replace “C:” with your drive name.
- You now run these three commands one by one:
cd windowssystem32config
md Backup
copy *.* Backup
md Backup
- You then navigate to the RegBack folder by running the command “cd RegBack” in the command prompt.
- There would be two scenarios: first, there would be a list of files, and their sizes will be displayed in bytes, you might notice files that have zero bytes (0). This shows that such registry files are either corrupt or empty and that should be the cause of the problem. You should now stop here because the best thing to do here is to restore Windows which we’ll outline in the next fix.
- The second scenario is that when none of the files displayed have zero bytes (0). In this case, you need to run this command “copy *.* ..” executing this command will copy registry files from ‘WindowsSystem32ConfigRegBack’ Folder to “WindowsSystem32Config” Folder.
- If you’re prompted, you should press the letter “A” on your keyboard to overwrite the files in the destination folder.
- Once the files have finished copying, you now type “Exit” and press enter to exit the command prompt Windows.
- Restart your PC and see if things are working.
- If you’re not able to boot successfully, you should boot again with WinRE. Open the command prompt just like in the previous steps during boot and run these commands one by one:
chkdsk /f C:
sfc /scannow /offbootdir=C: /offwindir=C:windows
dism /image:C: /cleanup-image /restorehealth
- Hopefully, you might solve the problem when windows restart.
Fix 3: Restore Windows to a previous working version
As mentioned in the fix above, if you received a Zero (0) value in some of the files listed earlier. You need to restore windows because it shows that the registry is seriously damaged. Here is how to do that:
- You first boot your PC using Installation media as you did in the previous methods.
- Select the option “Repair Your Computer” and then “Troubleshoot”.
- The next option to choose on the screen is “Advanced Options” and then choose “System Restore”, or in some PC’s you’ll see the option “Go back to a previous build”.
- You’ll now select your operating system in the next screen that shows up.
- Click next when you’re at the System Restore Wizard.
- You then select the restore point, you need to select a date when your system was working smoothly.
- Click “Next” to start the system restore process. When finished you’ll be prompted to restart your PC, or in most cases, it will restart automatically.
- You now check for the error to see if it’s gone or not.
system restore windows 10
Fix 4: Repair Windows
If “DISM Error 1009 The configuration registry database is corrupt” couldn’t be fixed with system restore, you now repair windows. This is pretty simple, you should boot your computer using Installation media, as usual. Then you select the option Repair your computer, and you’ll be guided through the process. It will take some time because Windows will now compare the original files on your installation media to the current files on the PC and then automatically repair the files affected.
So far these are the most effective solutions for DISM Error 1009 “The configuration registry database is corrupt”. Let us know the troubleshoot that solved the error for you even if it’s not listed here so that our readers can learn more about this error.