

-
Привет Всем! Помогите разобраться с проблемой в коде .Не проходит компиляцию выдает вот это
sketch_apr04a:23: error: ‘Bounce’ does not name a type
Ниже сам скетч! заранее спасибо всем !/*
LCD screen for motorized camera dolly
Code written by: Philip Sorri
*/
#include <LiquidCrystal.h> //LCD library
#include <Bounce.h> //debounce library
int button3 = 6; //button pins
int button2 = 7;
int button1 = 8;
int startStop = 9;
int runTime1;
int show = 1; //what menu to show
int dollySpeedNum = 0; //number of the speed
int delayTime = 100; //delay after pressedbutton (see the functions)
int delayDolly = 0; //delay before running
int runTime = 0; //time to run after delay
int motorPin = 10;
int val4;
int shutter = 1;
int shutterCount = 0;
int shutterVal = 0;
Bounce bouncer1 = Bounce(button1, 15); //deblounce (button, milliseconds)
Bounce bouncer2 = Bounce(button2, 15);
Bounce bouncer3 = Bounce(button3, 15);
Bounce bouncer4 = Bounce(startStop, 15);
LiquidCrystal lcd(12,11,5,4,3,2); //pins of the LCD to arduino
void setup() {
pinMode(button1, INPUT); //button as inputs
pinMode(button2, INPUT);
pinMode(button3, INPUT);
pinMode(startStop, INPUT);
pinMode(motorPin, OUTPUT);
pinMode(shutter, OUTPUT);
lcd.begin(16,2);
lcd.setCursor(0,0);
lcd.print(«DOLLYDUINO V 1.1»);
lcd.setCursor(0,1);
lcd.print(«By ThePhilleBoy»);
delay(3000);
}
void loop() {
if(shutterVal > 1) {
shutterVal = 0;
}
runTime1 = runTime;
if(runTime == 0) {
runTime1 = 10;
}
else {
runTime1 = runTime;
}
bouncer1.update(); //update the buttons
bouncer2.update();
bouncer3.update();
bouncer4.update();
int val1 = bouncer1.read(); //reads the value
int val2 = bouncer2.read(); //and sets the new variables to it
int val3 = bouncer3.read(); //So if button is pressed value = HIGH
val4 = bouncer4.read();
if (show > 4) { //Number of menus
show = 1;
}
if(val3 == HIGH) { //scroll through the different menus
show = show + 1; //the show number indicates which menu we’re in
delay(delayTime * 5);
}
if(show == 1) { //if show is 1 the dollySpeed function is chosen/shown
dollySpeed(val1, val2); //To change values in this menu with same buttons
} //in all the menus
else if(show == 2) { //if show is 2 delay function is chosen/shown on LCD
dollyDelay(val1, val2);
}
else if(show == 3) {
runningTime(val1, val2);
}
else if(show == 4) { //shows all the setting that are chosen
settings();
if(val1 == HIGH || val2 == HIGH) {
shutterVal = shutterVal + 1;
delay(delayTime*3);
}
}
if(val4 == HIGH && shutterVal == 0){
motorOn();
}
if(val4 == LOW){
analogWrite(motorPin, LOW);
}
if(val4 == HIGH && shutterVal == 1) {
motorOn();
lcd.setCursor(0,0);
lcd.print(«P:»);
lcd.setCursor(4,0);
lcd.print(shutterCount);
}
}
void dollySpeed(int num1, int num2) {
lcd.setCursor(0,0); //sets the startpoint of the text to (0,0)
lcd.print(«Dolly speed: «); //Writes «Dolly speed:» to the LCD
if(num1 == HIGH) { //if num1 which is val1/button1 is pressed the speed
dollySpeedNum = dollySpeedNum + 1; //increases with 1
delay(delayTime); //delay before next press, otherwise it would
} //scroll fast as hell
if(num2 == HIGH) { //if button2 is pressed decrease with 1
dollySpeedNum = dollySpeedNum — 1;
delay(delayTime);
}
lcd.setCursor(0,1); //sets the starting point of the print
lcd.print(dollySpeedNum); //prints to the start point (0,1)
if(dollySpeedNum < 10) {
lcd.setCursor(1, 1);
lcd.print(«% «); //makes a percent sign after the number
} //the space after it is to hide numbers that might
if(dollySpeedNum >= 10 && dollySpeedNum < 100) { //be shown from the last
lcd.setCursor(2, 1); //menu that we scrolled from.
lcd.print(«% «); //if the speed if over 10 and less than 100 it moves
} //the percentsign one step to the right.
if(dollySpeedNum == 100) { //same here
lcd.setCursor(3, 1);
lcd.print(«% «);
}
if(dollySpeedNum > 100) { //I wanted the speed to be in percent so I
dollySpeedNum = 0; //have to limit the value of dollySpeedNum.
} //if the value is higher than 100 it makes it to 0
if(dollySpeedNum < 0) { //and if it’s lower than 0 it goes to 100.
dollySpeedNum = 100;
}
}
void dollyDelay(int but1, int but2) {
int decimal;
decimal = delayDolly%10;
lcd.setCursor(0,0);
lcd.print(«Delay: «);
if(but1 == HIGH) {
delayDolly = delayDolly + 1;
delay(delayTime);
}
if(but2 == HIGH) {
delayDolly = delayDolly — 1;
delay(delayTime);
}
lcd.setCursor(0,1);
lcd.print(delayDolly/10);
if(delayDolly < 10) {
lcd.setCursor(1, 1);
lcd.print(«.»);
lcd.setCursor(2,1);
lcd.print(decimal);
lcd.setCursor(3,1);
lcd.print(» s «);
}
if(delayDolly >= 10 && delayDolly < 100) {
lcd.setCursor(1, 1);
lcd.print(«.»);
lcd.setCursor(2,1);
lcd.print(decimal);
lcd.setCursor(3,1);
lcd.print(» s «);
}
if(delayDolly > 99) {
lcd.setCursor(2, 1);
lcd.print(«.»);
lcd.setCursor(3,1);
lcd.print(decimal);
lcd.setCursor(4,1);
lcd.print(» s «);
}
if(delayDolly > 999) {
delayDolly = 0;
}
if(delayDolly < 0) {
delayDolly = 999;
}
}
void runningTime(int num1, int num2) {
int decimal1;
decimal1 = runTime%10;
lcd.setCursor(0,0);
lcd.print(«Run time: «);
if(num1 == HIGH) {
runTime = runTime + 1;
delay(delayTime);
}
if(num2 == HIGH) {
runTime = runTime — 1;
delay(delayTime);
}
lcd.setCursor(0,1);
lcd.print(runTime/10);
if(runTime < 10) {
lcd.setCursor(1, 1);
lcd.print(«.»);
lcd.setCursor(2,1);
lcd.print(decimal1);
lcd.setCursor(3,1);
lcd.print(» s «);
}
if(runTime >= 10 && runTime < 100) {
lcd.setCursor(1, 1);
lcd.print(«.»);
lcd.setCursor(2,1);
lcd.print(decimal1);
lcd.setCursor(3,1);
lcd.print(» s «);
}
if(runTime > 99) {
lcd.setCursor(2, 1);
lcd.print(«.»);
lcd.setCursor(3,1);
lcd.print(decimal1);
lcd.setCursor(4,1);
lcd.print(» s «);
}
if(runTime > 999) {
runTime = 0;
}
if(runTime < 0) {
runTime = 999;
}
}
void settings() {
int decimal1;
int decimal2;
decimal1 = runTime%10;
decimal2 = delayTime%10;
lcd.setCursor(0,0);
lcd.print(«S: «);
lcd.setCursor(3,0);
lcd.print(dollySpeedNum);
if(dollySpeedNum < 10) {
lcd.setCursor(4,0);
lcd.print(«% «);
}
if(dollySpeedNum >= 10 && dollySpeedNum < 100) {
lcd.setCursor(5,0);
lcd.print(«% «);
}
if(dollySpeedNum == 100) {
lcd.setCursor(6,0);
lcd.print(«% «);
}
lcd.setCursor(8,0);
lcd.print(«R: «);
lcd.setCursor(11,0);
lcd.print(runTime/10);
if(runTime < 10) {
lcd.setCursor(12, 0);
lcd.print(«.»);
lcd.setCursor(13,0);
lcd.print(decimal1);
lcd.setCursor(14,0);
lcd.print(«s»);
}
if(runTime >= 10 && runTime < 100) {
lcd.setCursor(12,0);
lcd.print(«.»);
lcd.setCursor(13,0);
lcd.print(decimal1);
lcd.setCursor(14,0);
lcd.print(«s»);
}
if(runTime > 99) {
lcd.setCursor(13,0);
lcd.print(«.»);
lcd.setCursor(14,0);
lcd.print(decimal1);
lcd.setCursor(15,0);
lcd.print(«s»);
}
lcd.setCursor(0,1);
lcd.print(«D: «);
lcd.setCursor(3,1);
lcd.print(delayDolly/10);
if(delayDolly < 10) {
lcd.setCursor(4, 1);
lcd.print(«.»);
lcd.setCursor(5,1);
lcd.print(decimal1);
lcd.setCursor(6,1);
lcd.print(«s»);
}
if(delayDolly >= 10 && delayDolly < 100) {
lcd.setCursor(4,1);
lcd.print(«.»);
lcd.setCursor(5,1);
lcd.print(decimal2);
lcd.setCursor(6,1);
lcd.print(«s»);
}
if(delayDolly > 99) {
lcd.setCursor(5, 1);
lcd.print(«.»);
lcd.setCursor(6,1);
lcd.print(decimal1);
lcd.setCursor(7,1);
lcd.print(«s»);
}
if(val4 == LOW) {
if(shutterVal == 0) {
lcd.setCursor(10,1);
lcd.print(«I=OFF»);
}
if(shutterVal == 1) {
lcd.setCursor(10,1);
lcd.print(«I=ON «);
}
}
}
void motorOn () {
int speedValue = map(dollySpeedNum, 0, 100, 0, 255);
analogWrite(motorPin, speedValue);
delay(runTime1*100);
if(delayDolly > 0) {
analogWrite(motorPin, LOW);
picture();
shutterCount = shutterCount + 1;
delay(delayDolly*100);
}
}
void picture() {
pinMode(shutter, HIGH);
delay(50);
pinMode(shutter, LOW);
} -
Библиотеку забыли положить.
-
Дело в том что она та там и есть … лежит и радуется .. а работать скетч не хочет
-
Скажите, а может ли быть дело в том что вышла новая библиотека Bounce и из -за этого она не работает на этом скетче ?
-
может что путь до библиотеки не правильный
-
другие же библиотеки работаю без проблем
-
‘Bounce’ does not name a type
1. переводим: ‘Bounce’ — это не имя типа данных.
2. находим строку, которая делает что? : «Bounce bouncer1 = Bounce(button1, 15); » — объявляет bouncer1 типом Bounce.
3. Вывод — мы не «достигаем» библиотеки <Bounce.h> по какой-то причине, либо в ней ошибка. И не важно, что другие библиотеки работают.
Что можно сделать.
1. Найти эту библиотеку и переписать ее заново в папку.
Если это не помогает — в библиотеке ошибка. Выход «прост»:
2. Забить на нее и писать код с проверкой антидребезга — примеров в инете хватает.
3. Искать ошибку в библиотеке. Но проще пункт 2.Последнее редактирование: 4 апр 2014
-
Спасибо за ответы . будем писать по антидребезгу
-
у вас Ардуинка не с похожим окошком запускаться?
-
Megakoteyka нравится это.
-
Коллеги! А зачем вообще весь этот огород с библиотекой, если можно писать так:
if (digitalRead(12) == 0) { // Стандартная проверка с антидребезгом;
delay(20); // Ждем для устранения дребезга;
if (digitalRead(12) == 0) { // Проверяем еще раз;
do…
}
}Последнее редактирование: 6 апр 2014
-
Все же 20 мс — иногда немало. В идеале нужно дребезг аппаратно снимать и не мучать контроллер.
-
дело не в умении читать ,а в том что большинство новичков зачастую просто игнорируют похожие сообщения !с оф сайта библиотека рабочая только 2-я версия!(Bounce2.h)
-
к сожалению у меня по какой то причине работает только первая версия Bounce … я выложил тут .. сейчас мучаюсь с кодом и пытаюсь переписать и меню и управления шаговым двигателем … но к сожалению пока ничего не получается …
-
есть специальная библиотека <Stepper.h> чтоб не мучаться
или по каким-то причинам она вам не подходит? -
Дело в том что ШД у меня подключен через Motor Shield… и по началу не мог заставить работать правильно ШД. Сейчас я добавил в код вот это :
void motorOn () {
motor.setSpeed (4); //скорость вращения Ш.двигателя 4 оборота в минуту
motor.release(); //отключение питания Ш.двигателя для установки ракурса первого снимкаint speedValue = map(dollySpeedNum,200, 100, 50, 4);
analogWrite(motorPin, speedValue);
delay(runTime1*100);
if(delayDolly > 0) {
analogWrite(motorPin, LOW);
motor.step(speedValue, BACKWARD, INTERLEAVE);
picture();
shutterCount = shutterCount + 1;
delay(delayDolly*100);
}ШД стал откликаться и работать .. но не так как нужно … причина я думаю в том что неправильно прописан алгоритм работы двигателя и неправильно понимаются величины которые задаются через меню кторое тут есть ….и пока что я в тупике …и не знаю даже как правильно исправить …
/*
LCD screen for motorized camera dolly
Code written by: Philip Sorri
*/#include <AFMotor.h>
#include <LiquidCrystal.h> //LCD library
#include <Bounce.h> //debounce library
int button3 = A5; //button pins
int button2 =A4;
int button1 = A3;
int startStop = A2;
int runTime1;
int show = 1; //what menu to show
int dollySpeedNum = 0; //number of the speed
int delayTime = 100; //delay after pressedbutton (see the functions)
int delayDolly = 0; //delay before running
int runTime = 0; //time to run after delay
int motorPin = 10;
int angle=200*22/360; //задание числа шагов Ш.двигателя на один кадр, используемый Ш.двигатель совершает 200 шагов на полный оборот
int panstep=1500; //задание числа снимков
int shotPin=0; //определение контакта управления съемкой через USB
int pause=1000; //определение паузы для процесса съемки
int shot=0; //определение длительности сигнала USB 5В управления съемкой
AF_Stepper motor(200, 1);
int val4;
int shutter = 1;
int shutterCount = 0;
int shutterVal = 0;
Bounce bouncer1 = Bounce(button1, 15); //deblounce (button, milliseconds)
Bounce bouncer2 = Bounce(button2, 15);
Bounce bouncer3 = Bounce(button3, 15);
Bounce bouncer4 = Bounce(startStop, 15);
LiquidCrystal lcd(4, 5, 10, 11, 12, 13); //pins of the LCD to arduino
void setup() {
pinMode(button1, INPUT); //button as inputs
pinMode(button2, INPUT);
pinMode(button3, INPUT);
pinMode(startStop, INPUT);
pinMode(motorPin, OUTPUT);
pinMode(shutter, OUTPUT);
lcd.begin(16,2);
lcd.setCursor(0,0);
lcd.print(«DOLLYDUINO V 1.1»);
lcd.setCursor(0,1);
lcd.print(«By ThePhilleBoy»);
delay(3000);
}
void loop() {
if(shutterVal > 1) {
shutterVal = 0;
}
runTime1 = runTime;
if(runTime == 0) {
runTime1 = 10;
}
else {
runTime1 = runTime;
}
bouncer1.update(); //update the buttons
bouncer2.update();
bouncer3.update();
bouncer4.update();
int val1 = bouncer1.read(); //reads the value
int val2 = bouncer2.read(); //and sets the new variables to it
int val3 = bouncer3.read(); //So if button is pressed value = HIGH
val4 = bouncer4.read();
if (show > 4) { //Number of menus
show = 1;
}
if(val3 == HIGH) { //scroll through the different menus
show = show + 1; //the show number indicates which menu we’re in
delay(delayTime * 5);
}
if(show == 1) { //if show is 1 the dollySpeed function is chosen/shown
dollySpeed(val1, val2); //To change values in this menu with same buttons
} //in all the menus
else if(show == 2) { //if show is 2 delay function is chosen/shown on LCD
dollyDelay(val1, val2);
}
else if(show == 3) {
runningTime(val1, val2);
}
else if(show == 4) { //shows all the setting that are chosen
settings();
if(val1 == HIGH || val2 == HIGH) {
shutterVal = shutterVal + 1;
delay(delayTime*3);
}
}
if(val4 == HIGH && shutterVal == 0){
motorOn();
}
if(val4 == LOW){
analogWrite(motorPin, LOW);
}
if(val4 == HIGH && shutterVal == 1) {
motorOn();
lcd.setCursor(0,0);
lcd.print(«P:»);
lcd.setCursor(4,0);
lcd.print(shutterCount);
}
}
void dollySpeed(int num1, int num2) {
lcd.setCursor(0,0); //sets the startpoint of the text to (0,0)
lcd.print(«SPEED: «); //Writes «Dolly speed:» to the LCD
if(num1 == HIGH) { //if num1 which is val1/button1 is pressed the speed
dollySpeedNum = dollySpeedNum + 1; //increases with 1
delay(delayTime); //delay before next press, otherwise it would
} //scroll fast as hell
if(num2 == HIGH) { //if button2 is pressed decrease with 1
dollySpeedNum = dollySpeedNum — 1;
delay(delayTime);
}
lcd.setCursor(0,1); //sets the starting point of the print
lcd.print(dollySpeedNum); //prints to the start point (0,1)
if(dollySpeedNum < 10) {
lcd.setCursor(1, 1);
lcd.print(«% «); //makes a percent sign after the number
} //the space after it is to hide numbers that might
if(dollySpeedNum >= 10 && dollySpeedNum < 100) { //be shown from the last
lcd.setCursor(2, 1); //menu that we scrolled from.
lcd.print(«% «); //if the speed if over 10 and less than 100 it moves
} //the percentsign one step to the right.
if(dollySpeedNum == 100) { //same here
lcd.setCursor(3, 1);
lcd.print(«% «);
}
if(dollySpeedNum > 100) { //I wanted the speed to be in percent so I
dollySpeedNum = 0; //have to limit the value of dollySpeedNum.
} //if the value is higher than 100 it makes it to 0
if(dollySpeedNum < 0) { //and if it’s lower than 0 it goes to 100.
dollySpeedNum = 100;
}
}
void dollyDelay(int but1, int but2) {
int decimal;
decimal = delayDolly%10;
lcd.setCursor(0,0);
lcd.print(«Delay: «);
if(but1 == HIGH) {
delayDolly = delayDolly + 1;
delay(delayTime);
}
if(but2 == HIGH) {
delayDolly = delayDolly — 1;
delay(delayTime);
}
lcd.setCursor(0,1);
lcd.print(delayDolly/10);
if(delayDolly < 10) {
lcd.setCursor(1, 1);
lcd.print(«.»);
lcd.setCursor(2,1);
lcd.print(decimal);
lcd.setCursor(3,1);
lcd.print(» s «);
}
if(delayDolly >= 10 && delayDolly < 100) {
lcd.setCursor(1, 1);
lcd.print(«.»);
lcd.setCursor(2,1);
lcd.print(decimal);
lcd.setCursor(3,1);
lcd.print(» s «);
}
if(delayDolly > 99) {
lcd.setCursor(2, 1);
lcd.print(«.»);
lcd.setCursor(3,1);
lcd.print(decimal);
lcd.setCursor(4,1);
lcd.print(» s «);
}
if(delayDolly > 999) {
delayDolly = 0;
}
if(delayDolly < 0) {
delayDolly = 999;
}
}
void runningTime(int num1, int num2) {
int decimal1;
decimal1 = runTime%10;
lcd.setCursor(0,0);
lcd.print(«Run time: «);
if(num1 == HIGH) {
runTime = runTime + 1;
delay(delayTime);
}
if(num2 == HIGH) {
runTime = runTime — 1;
delay(delayTime);
}
lcd.setCursor(0,1);
lcd.print(runTime/10);
if(runTime < 10) {
lcd.setCursor(1, 1);
lcd.print(«.»);
lcd.setCursor(2,1);
lcd.print(decimal1);
lcd.setCursor(3,1);
lcd.print(» s «);
}
if(runTime >= 10 && runTime < 100) {
lcd.setCursor(1, 1);
lcd.print(«.»);
lcd.setCursor(2,1);
lcd.print(decimal1);
lcd.setCursor(3,1);
lcd.print(» s «);
}
if(runTime > 99) {
lcd.setCursor(2, 1);
lcd.print(«.»);
lcd.setCursor(3,1);
lcd.print(decimal1);
lcd.setCursor(4,1);
lcd.print(» s «);
}
if(runTime > 999) {
runTime = 0;
}
if(runTime < 0) {
runTime = 999;
}
}
void settings() {
int decimal1;
int decimal2;
decimal1 = runTime%10;
decimal2 = delayTime%10;
lcd.setCursor(0,0);
lcd.print(«S: «);
lcd.setCursor(3,0);
lcd.print(dollySpeedNum);
if(dollySpeedNum < 10) {
lcd.setCursor(4,0);
lcd.print(«% «);
}
if(dollySpeedNum >= 10 && dollySpeedNum < 100) {
lcd.setCursor(5,0);
lcd.print(«% «);
}
if(dollySpeedNum == 100) {
lcd.setCursor(6,0);
lcd.print(«% «);
}
lcd.setCursor(8,0);
lcd.print(«R: «);
lcd.setCursor(11,0);
lcd.print(runTime/10);
if(runTime < 10) {
lcd.setCursor(12, 0);
lcd.print(«.»);
lcd.setCursor(13,0);
lcd.print(decimal1);
lcd.setCursor(14,0);
lcd.print(«s»);
}
if(runTime >= 10 && runTime < 100) {
lcd.setCursor(12,0);
lcd.print(«.»);
lcd.setCursor(13,0);
lcd.print(decimal1);
lcd.setCursor(14,0);
lcd.print(«s»);
}
if(runTime > 99) {
lcd.setCursor(13,0);
lcd.print(«.»);
lcd.setCursor(14,0);
lcd.print(decimal1);
lcd.setCursor(15,0);
lcd.print(«s»);
}
lcd.setCursor(0,1);
lcd.print(«D: «);
lcd.setCursor(3,1);
lcd.print(delayDolly/10);
if(delayDolly < 10) {
lcd.setCursor(4, 1);
lcd.print(«.»);
lcd.setCursor(5,1);
lcd.print(decimal1);
lcd.setCursor(6,1);
lcd.print(«s»);
}
if(delayDolly >= 10 && delayDolly < 100) {
lcd.setCursor(4,1);
lcd.print(«.»);
lcd.setCursor(5,1);
lcd.print(decimal2);
lcd.setCursor(6,1);
lcd.print(«s»);
}
if(delayDolly > 99) {
lcd.setCursor(5, 1);
lcd.print(«.»);
lcd.setCursor(6,1);
lcd.print(decimal1);
lcd.setCursor(7,1);
lcd.print(«s»);
}
if(val4 == LOW) {
if(shutterVal == 0) {
lcd.setCursor(10,1);
lcd.print(«I=OFF»);
}
if(shutterVal == 1) {
lcd.setCursor(10,1);
lcd.print(«I=ON «);
}
}
}
void motorOn () {
motor.setSpeed (4); //скорость вращения Ш.двигателя 4 оборота в минуту
motor.release(); //отключение питания Ш.двигателя для установки ракурса первого снимкаint speedValue = map(dollySpeedNum,200, 100, 50, 4);
analogWrite(motorPin, speedValue);
delay(runTime1*100);
if(delayDolly > 0) {
analogWrite(motorPin, LOW);
motor.step(speedValue, BACKWARD, INTERLEAVE);
picture();
shutterCount = shutterCount + 1;
delay(delayDolly*100);
}
}
void picture() {
pinMode(shutter, HIGH);
delay(50);
pinMode(shutter, LOW);
}
")
I have written a library, but have problem with error does not name a type. I’ve tryed everything, searched for couple of hours and no luck. Library is placed in the «libraries» folder of the arduino sketch folder. Please help!!! I am using OSX, but the same problem occurs on Windows also.
This is header file of the library:
#ifndef OpticalSensor_h
#define OpticalSensor_h

#include <Arduino.h>
#include <SD.h>
#include <Wire.h>
#include <Adafruit_MCP23017.h>
#include <Adafruit_RGBLCDShield.h>
#include <String.h>

class OpticalSensor
{
    public:
        OpticalSensor(int analogPort);
        void LCDInit(int columns, int rows);
        void SerialInit(int bitRate);
        void SDInit();
        double& ReadFromAnalogPort();
        void SDCreateFile(String fileName);
        void SDDeleteFile(String fileName);
        void SDWriteToFile(String fileName);
        void SDStreamToFile(String Text);
        void SDOpenFileToStream(String fileName);
    private:
        int _analogPort;
        bool _displayFlag;
        Adafruit_RGBLCDShield _lcd;
        File _MainRecFile;
        double _voltage;
        void _LCDClearAll();
        void _LCDWriteInTwoRows(String row1, String row2);
        void _DelayAndClearLCD(bool returnStatus);
};

#endif
This is .cpp file of the library:
#include <OpticalSensor.h>

Adafruit_RGBLCDShield _lcd;
File _MainRecFile;
double _voltage;

OpticalSensor::OpticalSensor(int analogPort)
{
    _analogPort = analogPort;
}

void OpticalSensor::LCDInit(int columns, int rows)
{

    _lcd = Adafruit_RGBLCDShield();
    _lcd.begin(columns,rows);
}

void OpticalSensor::SerialInit(int bitRate)
{
    Serial.begin(bitRate);
    _bitRate = bitRate;
    while(!Serial) {
        //wait until serial is not open
    }
}

void OpticalSensor::SDInit()
{
    // On the Ethernet Shield, CS is pin 4. It's set as an output by default.
    // Note that even if it's not used as the CS pin, the hardware SS pin
    // (10 on most Arduino boards, 53 on the Mega) must be left as an output
    // or the SD library functions will not work.
    pinMode(10, OUTPUT);

    //check if SD can be found and initialized. Print also message to
    //Serial if initialized and to _lcd if initialized.
   if(!SD.begin(4)) {
     if(Serial){
         Serial.println("Initialization failed!");
     }
     if(_lcd){
         _lcd.print("Init failed!");
     }
     _DelayAndClearLCD(true);
   }
   else {
       if(Serial) {
           Serial.println("Initialization done!");
       }
       if(_lcd) {
           lcd.print("Init done!");
       }
       _DelayAndClearLCD(false);
   }
}

void OpticalSensor::SDCreateFile(String fileName)
{
    //check if file allready exists, if not it creates one
    //and writes apropriate response to
    //lcd and Serial if they are initialized.
    if(SD.exists(fileName)) {
        if(Serial) {
            Serial.println(fileName + " already exists!");
        }
        if(_lcd) {
            _LCDWriteInTwoLines(fileName,"already exists!");
        }
        _DelayAndClearLCD(false);
    }
    else
    {
        if(Serial) {
            Serial.println(fileName + "Creating file " + fileName + "...");
        }
        if(_lcd) {
            _LCDWriteInTwoLines("Creating file", fileName);
        }
        _MainRecFile = SD.open(fileName + ".txt", FILE_WRITE);
        _MainRecFile.close();
        _DelayAndClearLCD(false);


        //check if file was created successffully and print apropriate response
        //to lcd and Serial if they are initialized
        if(SD.exists(fileName + ".txt")) {
            if(Serial) {
                Serial.println(fileName + ".txt" + " created successffully!");
            }
            if(_lcd) {
                _LCDWriteInTwoLines(fileName + ".txt", "created!");
            }
            _DelayAndClearLCD(false);
        }
        else {
            if(Serial) {
                Serial.println("error: failed to create file!");
            }
            if(_lcd) {
                _LCDWriteInTwoLines("error: failed to","create file!");
            }
            _DelayAndClearLCD(false);
        }
    }
}

//delete file from SD card
void OpticalSensor::SDDeleteFile(String fileName)
{

}

//open file, write data to it, and close file after.
void OpticalSensor::SDWriteToFile(String fileName, String Text)
{
    _MainRecFile = SD.open(fileName + ".txt", FILE_WRITE);
    _MainRecFile.println(Text);
    _MainRecFile.close();
}

//Open file to stream data to it.
void OpticalSensor::SDOpenFileToStream(String fileName)
{
    _MainRecFile = SD.open(fileName + ".txt", FILE_WRITE);
}

//Write data to file while file is open.
//Notice that you can stream data only to one file at a time!!!
//For instance, if you have two sensors that you want to
//write data to two different files, you have to use SDWriteToFile
//function!!!
void OpticalSensor::SDStreamToFile(String Text)
{
    if(_MainRecFile) {
        _MainRecFile.println(Text);
    }
}

//close file that you streamed data too.
void OpticalSensor::SDCloseStreaming(String fileName)
{
    _MainRecFile.close();
}

//clear entire LCD
void OpticalSensor::_LCDClearAll()
{
    _lcd.clear();
    _lcd.setCursor(0,0);
}

void OpticalSensor::_LCDWriteInTwoRows(String row1, String row2)
{
    //write first String in row1
    _lcd.print(row1);
    //set cursor to the beginning of row 2
    _lcd.setCursor(0,1);
    //write second String to row 2
    _lcd.print(row2);
}

void OpticalSensor::_DelayAndClearLCD(bool returnStatus)
{
    //if Serial or _lcd are initialized, delay for 2 seconds
    //and clear LCD
    if(Serial || _lcd) {
        delay(2000);
        if(_lcd)
            _LCDClearAll();
    }
    //terminate
    if(bool == true) {
        return;
    }
}

double& ReadFromAnalogPort()
{
    _voltage = analogRead(_analogPort);
    return _voltage;
}
And this is the .ino file where library is included:
#include <OpticalSensor.h>

OpticalSensor sensor(0);

void setup() {
  sensor.LCDInit(16,2);
  sensor.SerialInit(9600);
  sensor.SDInit();
  sensor.SDCreateFile("test1");
  sensor.SDOpenFileToStream("test1");
}

void loop() {

}
this is the error:
In file included from Test_OpticalSensorLib.ino:1:
/Users/gaspersladic/Documents/Arduino/libraries/OpticalSensor/OpticalSensor.h:34:
error: ‘Adafruit_RGBLCDShield’ does not name a type
/Users/gaspersladic/Documents/Arduino/libraries/OpticalSensor/OpticalSensor.h:35:
error: ‘File’ does not name a type
Offline
Зарегистрирован: 15.07.2015
#include <EEPROM.h>

// чтение
int EEPROM_int_read(int addr) {
  byte raw[2];
  for(byte i = 0; i < 2; i++) raw[i] = EEPROM.read(addr+i);
  int &num = (int&)raw;
  return num;
}
int cycleTimer = 0;
cycleTimer = EEPROM_int_read(0);

void setup(){
}
void loop(){
}
Уже больше часа потратил на размышление и поиск решения, почему при компиляции этого наглядного примера скетча, что выше, появляется ошибка: ‘cycleTimer’ does not name a type. Уже решил использовать EEPROM.get, но все таки хочу понять, почему в объявленную ранее переменную не может идти запись?
Вот в этом примере ошибок не возникает:
#include <EEPROM.h>

// чтение
int EEPROM_int_read(int addr) {
  byte raw[2];
  for(byte i = 0; i < 2; i++) raw[i] = EEPROM.read(addr+i);
  int &num = (int&)raw;
  return num;
}
int cycleTimer = EEPROM_int_read(0);

void setup(){
}
void loop(){
}
Arduino is an open-source platform used by developers to create interactive programmable devices. Often times, when you’re setting up and running Arduino sketches, you may find errors, such as «does not name a type». This error can be caused by a number of factors, such as mismatched libraries, mismatched board connections, or incorrect coding syntax. To help you resolve this error, I have outlined the steps for troubleshooting and fixing Arduino Serial Errors: «Does Not Name a Type».
Step 1: Check the Libraries
The first step to troubleshooting the «does not name a type» error is to check the libraries that you are using with the project. If the libraries that you are using for the project do not match, then this could lead to the «does not name a type» error. Check the libraries you are using and ensure that each one is consistent with the other.
Step 2: Check the Arduino Connections
The second step to solving the «does not name a type» issue is to review the Arduino connections. Make sure that the Arduino is properly connected to the computer and to any other peripherals you are using. If the Arduino is not properly connected, then this could lead to the «does not name a type» error.
Step 3: Check Your Syntax
The third step to fixing the «does not name a type» issue is to review your code and check the syntax. Ensure that the syntax of your code is consistent with the language you are using and that the syntax is correct. Common syntax errors that can lead to «does not name a type» issues include missing brackets and semicolons, as well as incorrect words used for data types and variables.
Step 4: Update the Arduino IDE
If steps 1-3 do not help you identify and fix the «does not name a type» issue, then the fourth step is to update the Arduino IDE. Often times, when the IDE is updated, the outdated code will be replaced by the new code and the «does not name a type» error should be fixed.
FAQ
What is the «does not name a type» error?
The «does not name a type» error is an error that occurs when coding with the Arduino IDE. This error can be caused by inconsistencies between libraries, incorrect connections and/or syntax errors in the code.
How can I fix the «does not name a type» issue?
To fix the «does not name a type» issue, first check the libraries that you are using. Then, review the Arduino connections, and check the code syntax. Lastly, update the Arduino IDE if necessary.
What are some common syntax errors that can lead to the «does not name a type» error?
Common syntax errors that can lead to the «does not name a type» error include missing brackets and semicolons, as well as incorrect words used for data types and variables.
How do I update the Arduino IDE?
You can update the Arduino IDE by going to the Arduino website and downloading the latest version of the IDE.
What Libraries are used for Arduino projects?
The libraries used for Arduino projects are typically C++ and Arduino libraries, such as Wire, SoftwareSerial and Serial.h.
Further Resources
For more information on troubleshooting and fixing Arduino Serial Errors: «Does Not Name a Type», please refer to the following resources:
- Arduino Forum: Does Not Name a Type
- Arduino Docs: Troubleshooting the Compiling and Uploading Process
- Arduino Troubleshooting Guide
The Arduino software is an open-source and easy to use platform which configures the Arduino board into functioning in a certain way. An Arduino code is written in C++ but with additional functions and methods. An Arduino is a hardware and software platform widely used in electronics.
In this article, we will see a few quick fixes for the error ‘does not name a type‘ or the ‘no such file or directory‘ error.
Also read: How to stop an Arduino program?
What does the error mean?
In almost every coding language known to man, every variable has a specific data type. In general, there are multiple data types like int indicating integer, float for decimal values, char and String for alphabets and sentences, boolean for true or false and many more. In Arduino, there are 16 data types commonly used.
- void: Used in function declarations, and indicates that the function will not return anything.
- boolean: It is a true or false value.
- char: Stores a character value in one byte of the memory.
- Unsigned char: Unsigned data type which encodes numbers between 0 and 255 and occupies one byte of the memory.
- byte: It is an 8-bit unsigned number holding a value between 0 and 255.
- int: It is a primary data type which stores a 16-bit integer value. It can store negative values.
- Unsigned int: Unsigned integer that stores only positive integer values in the 2 byte memory.
- long: It is a 32-bit memory for storing numbers, both positive and negative.
- Unsigned long: Unsigned long variables store only positive numbers in the 32-bit memory storage.
- short: It is a 16-bit data type storing positive and negative numbers.
- float: It is a decimal value having a 32-bit memory.
- double: It is a double floating number having either 32 or 64 bit memory depending on the board.
- word: Based on the type of board, it stores either 16-bit or 32-bit unsigned number.
- array: It is a collection of variables which is accessible using index numbers.
- String-char array: Converts the string into an array of characters.
- String-object: Class which can be used to manipulate, concatenate and perform other operations on strings and arrays.
The error ‘does not name a type‘ or the ‘no such file or directory‘ are errors that occur during the compilation process. They generally indicate missing data types or wrongly used data types. It may also indicate missing directories or libraries.
Also read: Arduino UNO vs Arduino Mega.
Here are two ways to fix the error.
Check data type
Every user-defined function and variable initialised or declared in the code should have a corresponding data type. The data type of the variable or function should also coincide with the value being stored or returned.
Consider a small example sample code below.
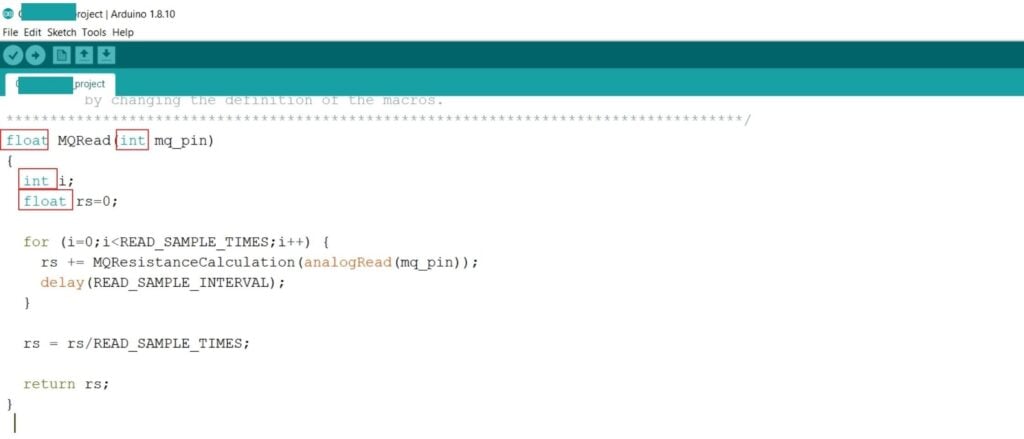
Here the function MQRead is of the type float. The variables i and mq_pin are integer type, while rs is float type. In the for loop, i is given the value 0, an integer value. The analogRead function always reads an integer value, which is being assigned to the mq_pin variable. Since the value or type for rs, the float type suffices for any value assigned to it as a result of the calculation. The user-defined function MQRead is of type float, which means that the return type for it is float, which is achieved by returning the value of rs for the function.
The error occurs if any of these data types don’t stand to the data being stored in the variables. Always check and recheck the data type for every variable, function and return type.
Library folder
In many cases, you may use libraries that are not standard or included in Arduino. But Arduino is flexible with the import of new libraries, making it easy to use all functions from any library. Follow the path below to check the currently available libraries in your Arduino software.
My Documents -> Arduino -> Libraries
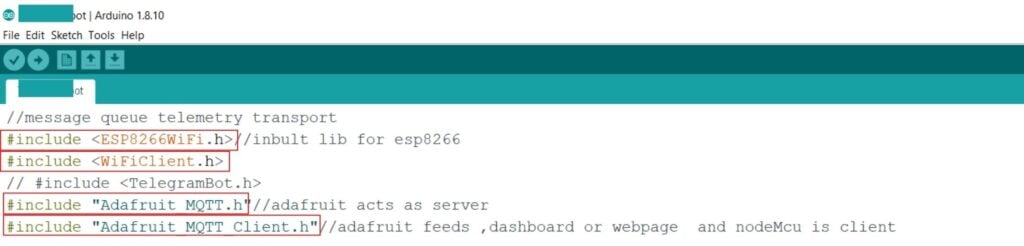
Consider the snippet of code below. There are four library folders that are included for the code to work. But these aren’t a part of the standard library of Arduino.
There are two ways to import a library to the Arduino.
Method 1
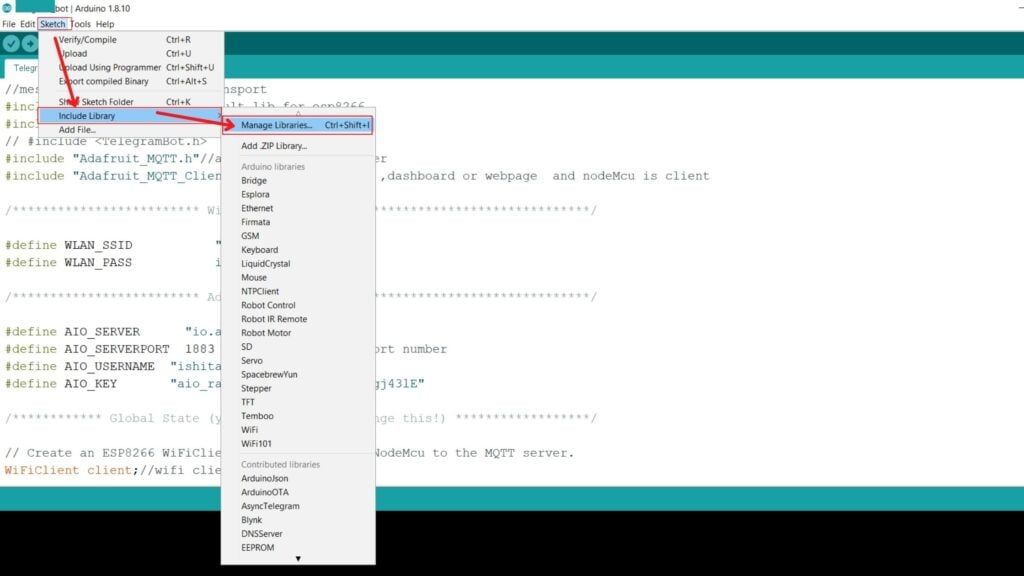
Step 1: Click on Sketch on the top left panel of the window. Go to the include Library option and select Manage Libraries.
Keyboard Shortcut: Ctrl+Shift+I.
Step 2: Search or select from the options available and click on Install.
Note that a few Libraries may not be available if your software isn’t updated with the latest version.

All the libraries you are planning to use may not be easily found under the Manage Libraries section. In such cases, we use Method 2 for importing the libraries.
Method 2
Step 1: Download a zip file for the library from GitHub or any other reliable source present online.
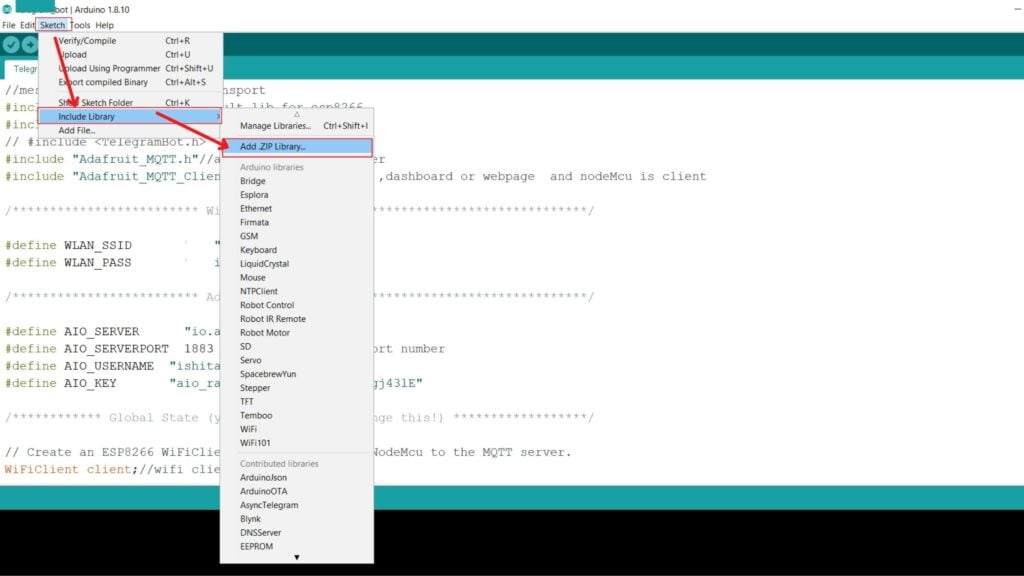
Step 2: Click on Sketch on the top left panel of the window. Go to the include Library option and select Add ZIP Library.
Step 3: Set the file type to be ZIP files and folders.
Step 4: Go to the download location of the zip file and select it. Click on Open.
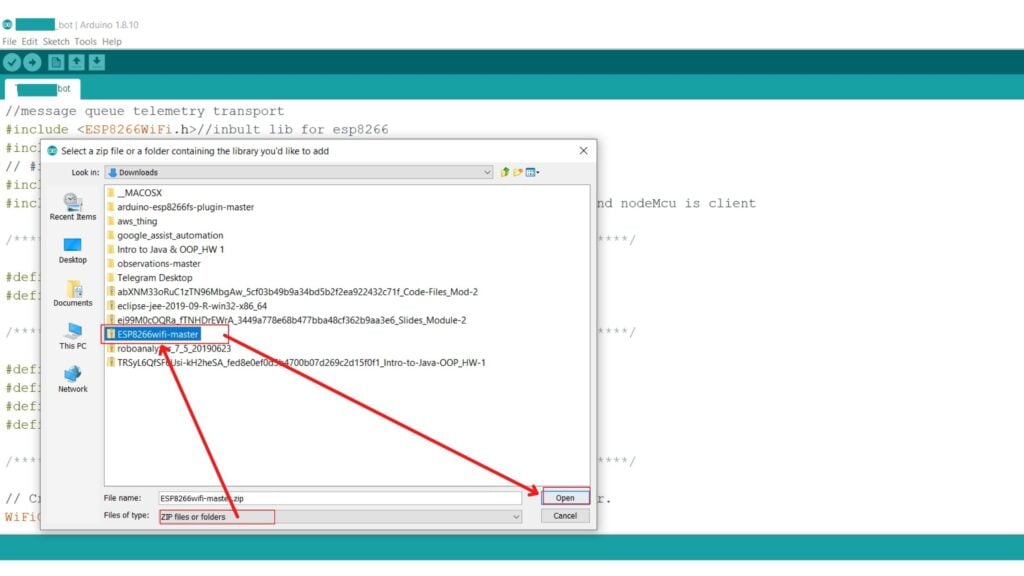
The library is successfully added to the Arduino software now.
Also read: NodeMCU vs Arduino vs Raspberry Pi.