
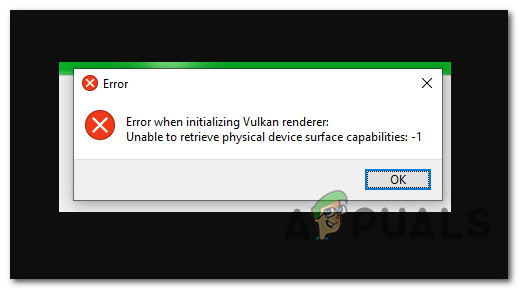
Some Windows users are reportedly seeing the ‘Error when initiating Vulkan renderer‘ when trying to emulate Wi-U games on their Windows computer using the CEMU emulating software. This particular issue is mostly reported to occur on Windows 10 computers.
After investigating this particular issue thoroughly, it turns out that there are several different underlying causes that might be the determining factor of the ‘Error when initiating Vulkan renderer‘ issue. Here’s a list of potential culprits:
- Minimum requirements aren’t met – Keep in mind that it’s possible to see this error if the PC you’re trying to use to emulate Wii-U games on your computer doesn’t meet the minimum requirements. If your components fall below the minimum threshold, the only viable fix is to upgrade your PC.
- An outdated version of CEMU – Over these past few months, the CEMU WII-U emulator has been receiving a lot of performance issues and bugfixes. If you’re not using the latest version, there’s a chance that upgrading to the latest stable released version should take care of the issue automatically.
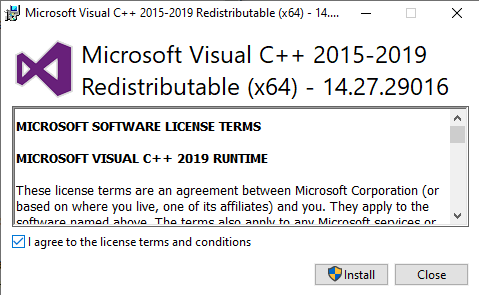
- Missing Microsoft Visual C++ Installation – Even though CEMU doesn’t have many dependencies, the Microsoft Visual C++ X64 redist package is the most important one. If this redist package is missing from your computer, you should be able to fix the issue by manually downloading and installing the Visual C++ 2017 Redist package
- GPU drivers are outdated – Keep in mind that when a new version of CEMU is released, the community of devs will adapt the application to the latest driver releases from Nvidia, AMD, and Intel. In order to avoid issues produced by outdated hardware, ensure that your dedicated graphics card GPU is updated to the latest version compatible with your GPU model.
- Remnant corrupted GPU files – According to some affected users, you can also expect this problem to occur in situations where the target PC has remnants from older GPU driver installations that were uninstalled unsuccessfully. In this case, you need to use a utility like DDU to remove the remnant files before re-trying the driver installation.
- Missing Vulkan Runtime environment – If you’re using an Intel-based integrated GPU, there’s a very high chance that you’ll need to install the Vulkan Runtime environment before you’ll be able to emulate any Wii-U game via the CEMU emulator. Several affected users have confirmed that in their case, the issue was entirely resolved after they’ve installed the Vulkan Runtime environment via the official channels.
- PreCompiled Shaders are enabled in CEMU – With Nvidia GPUs, the most common issue that will trigger this particular error is a case where PreCompiled shaders are enabled for the game or for the entire application which will end up crashing most emulation attempts. In this case, you can fix the issue by disabling the precompiled shaders feature on both the game profile settings and the settings menu of CEMU.
Now that you know every potential scenario that might spawn this issue, here’s a list of methods that other affected users have successfully used to fix the issue in this particular case:
Method 1: Ensure that you meet the Minimum Requirements
Keep in mind that although this emulator is by no means demanding to regular PC configurations, there are still some minimum requirements that you need to meet in order to emulate Wii-U games.
Here are the minimum requirements for Windows computers:
- Windows 7 (x64) or above
- OpenGL 4.5 or Vulkan 1.1
- RAM: 4 GB minimum, 8 GB or more recommended
On top of this, you need to be mindful of your GPU configuration – Even though both Nvidia and AMD GPUs are almost entirely supported, you need to ensure that you have installed the latest driver versions (See Method 3)
However, Intel GPUs don’t work very well as limited support is offered for them. Vulkan is recommended as the alternative.
If you’ve made sure that you meet the minimum requirements, move down to the next potential fix below.
Method 2: Downloading the most Recent Version of CEMU
Keep in mind that the CEMU Wii U Emulator has been getting a lot of support from the gaming community receiving constant stability patches and hotfixes that are increasingly making Wii U games more stable and enjoyable.
So the first thing you should do if you’re dealing with the ‘Error when initiating Vulkan renderer‘ issue is to ensure that you’re using the latest version of the Wii U Emulator.
To do so, follow the instructions below to install or update your current Cemu version to the latest:
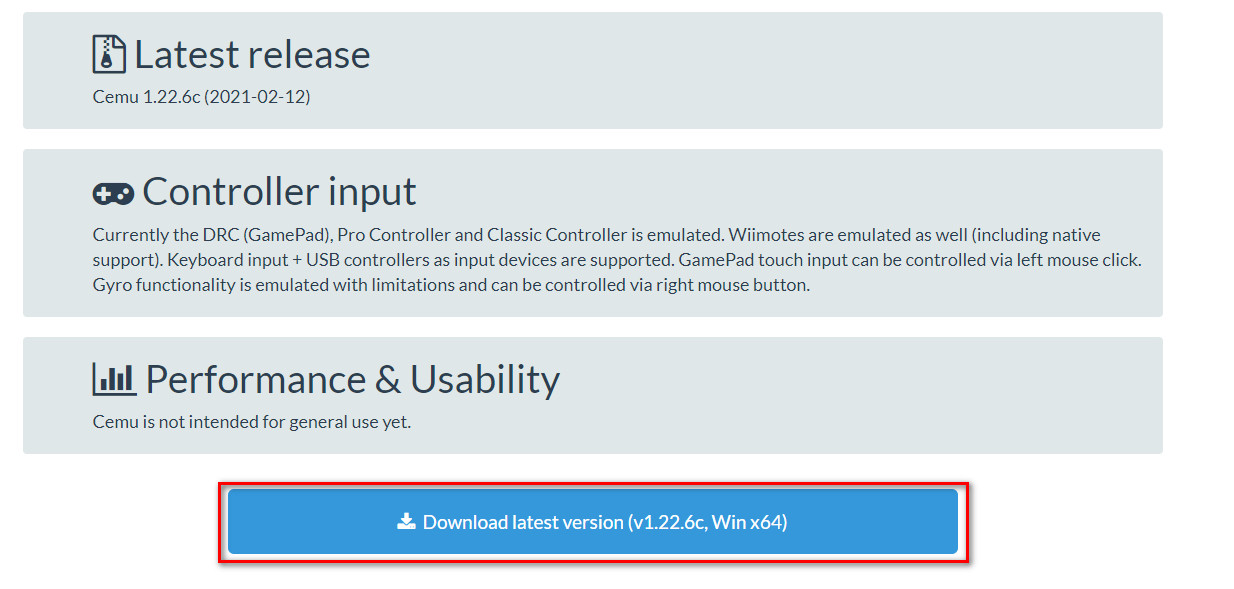
- Open your default browser and navigate to the official download page of Cemu Wii-U emulator.
- After you’re inside the download page, scroll down to the bottom of the page and click on the Download latest version button.

Downloading the latest version of CEMU - Once the download is complete, use a utility like WinRar, WinZip, or 7Zip to extract the contents of the Cemu archive in a standalone folder.
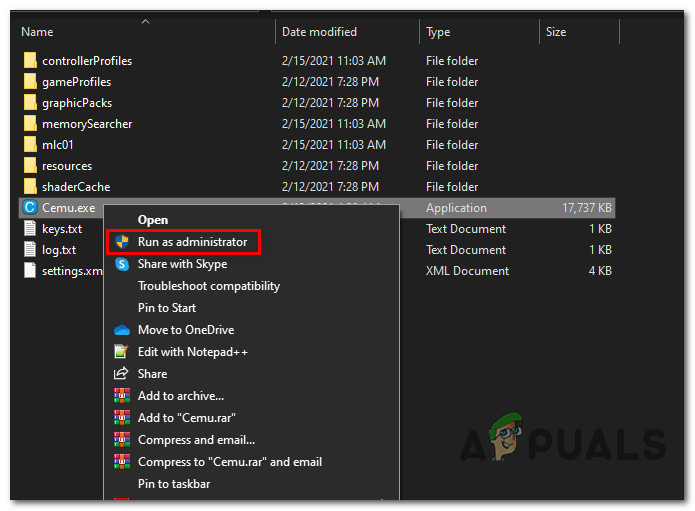
- Once the extraction process is complete, navigate to the location where you extracted the latest version of Cemu, right-click on Cemu.exe and choose Run as Administrator from the context menu.

Running latest version of CEMU with admin access - Repeat the action that was previously causing the ‘Error when initiating Vulkan renderer‘ issue and see if the problem is now fixed.
If the same problem is still occurring, move down to the next potential fix below.
Method 3: Installing the Microsoft Visual C++ 2017 X64 Redistributable
Keep in mind that one major requirement that is often reported to be the underlying cause for the ‘Error when initiating Vulkan renderer’ issue is the missing of the Microsoft Visual C++ 2017 X64 Redistributable.
Unless you have this Visual C++ Redist package installed on your computer, you can expect to see the issue appearing every time you attempt to emulate a Wii-U game using Cemu.
Fortunately, a lot of affected users have confirmed that they finally managed to fix this issue after installing Visual C++ Redist. package using the official channels.
If you’re looking for step by step instructions on how to do this, follow the steps below to install Microsoft Visual C++ 2017 X64 Redistributable using the official channels:
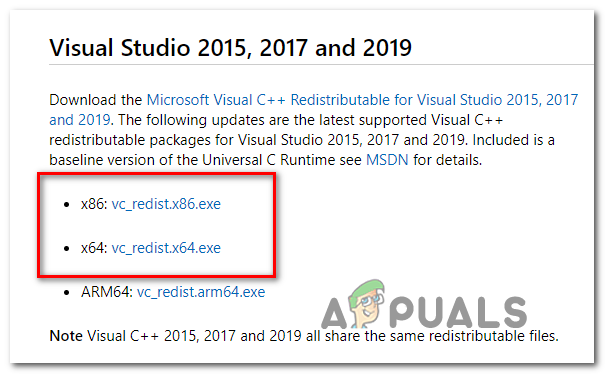
- Open your browser and visit the official Microsoft download page to reach the page associated with the Visual C++ Redist 2017 download pack.
- Once you’re inside the correct page, scroll all the way down to the listing associated with Visual Studio 2015, 2017, 2019 section and click on vc_redist.x86.exe if your Windows version is on 32-bit or vc_redist.x64.exe if your Windows version is on 64 bit.

Downloading the correct Visual C++ Redist version - After the download is finally complete, double-click on the executable and click Install when prompted to do so, then follow the on-screen prompts to install the missing C++ Redist Package.

Installing the missing redist package - After the installation is complete, reboot your computer and see if the issue is fixed once the next startup is complete.
If you’re still seeing the same ‘Error when initiating Vulkan renderer‘ issue when attempting to emulate a Wii-U game using the Cemu launcher, move down to the next potential fix below.
Method 4: Update Drivers to the Latest Versions
Keep in mind that CEMU developers assume that you have already updated your GPU driver to the latest version available – Whenever they update the CEMU app, they optimizing for the latest stable release of Nvidia and AMD drivers (not beta releases) while indirectly unsupporting older versions.
If you’re not convinced that you’re using the latest version of your graphics card driver, follow the instructions below to uninstall your current GPU drivers before reinstalling the latest equivalents from the official channels:
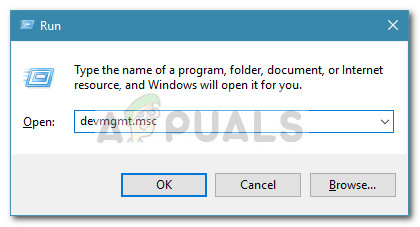
- Open up a Run dialog box by pressing Windows key + R. Inside the text box, type ‘devmgmt.msc’ and press Enter to open up Device Manager. When you’re prompted by the UAC (User Account Control), click Yes to grant admin access.

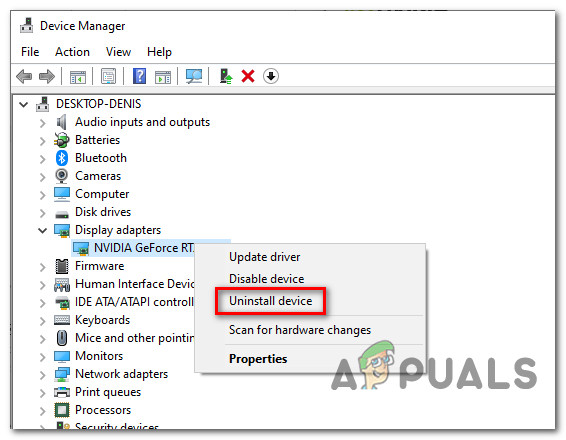
Opening Device Manager via Run box - Once you’re inside Device Manager, scroll down through the list of device types and expand the drop-down menu associated with Display Adapters.
- After this menu is expanded, right-click on the GPU driver that you’re currently using and choose Uninstall device from the context menu that just appeared.

Uninstalling the current GPU driver - When asked to confirm, click Yes and wait for the process to complete before restarting your computer.
- Once your computer boots back up, the missing driver will be replaced with a generic equivalent.
- Next, use the proprietary software associated with your GPU manufacturer, install it and run it in order to automatically install the latest compatible driver version for your GPU model. Here’s list of proprietary driver updating tools for the most popular GPU manufacturers:
GeForce Experience - Nvidia
Adrenalin - AMD
Intel Driver - Intel
- Once your driver version is updated, restart your computer once again and repeat the action inside CEMU once the next startup is complete.
If this problem is still occurring in your case, move down to the next potential fix below.
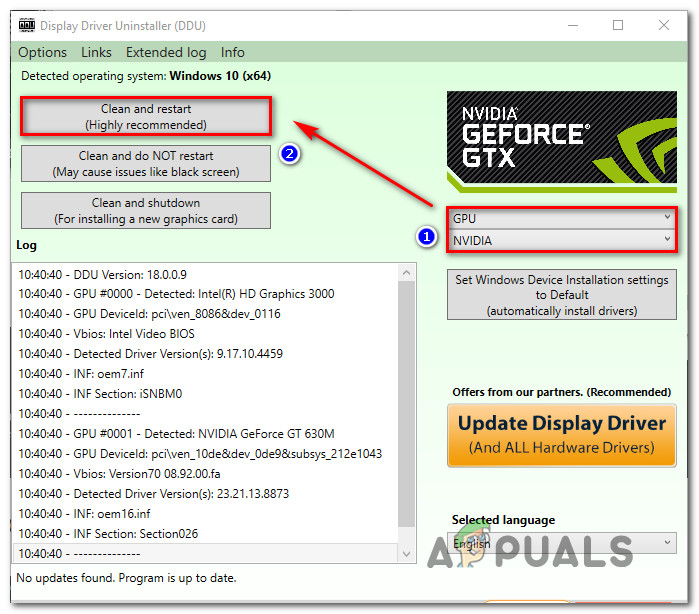
Method 5: Running the DDU Utility
If none of the fixes above have worked for you, it’s likely that you’re dealing with some kind of corruption that is affecting your GPU driver or some associated dependency. This type of issue can keep occurring even after you try installing the GPU driver conventionally.
Several affected users that were dealing with the same kind of issue have reported that the issue was finally resolved after they used a 3rd party utility (Display Driver Uninstaller – DDU) capable of removing every remnant file of the GPU driver.
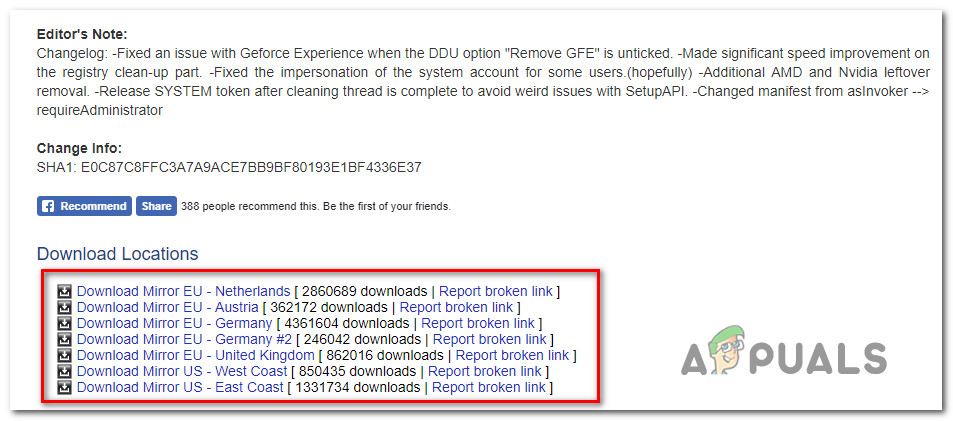
Running this utility will end up removing any type of file corruption associated with your graphics driver. Follow the instructions below to download and deploy the DDU freeware to fix the driver issue that might be contributing to the apparition of the ‘Error when initiating Vulkan renderer‘:
- Open up your default browser and visit the official download page of Display Driver Uninstaller. Once you get to the correct page, select a mirror that’s closest to your physical location and wait until the download is complete.

Downloading the DDU freeware - After the download is complete use a utility like 7Zip or WinZip to extract the contents of the DDU archive into an accessible folder.
- Once the extraction process is complete, right-click on the main installer executable of DDU and choose Run as Administrator from the context menu that just appeared. When you’re prompted by the UAC (User Account Control), click Yes to grant admin access.
- Inside the Display Driver Uninstaller interface, choose GPU from the Select device type from the drop-down menu. Next, click on Clean and restart to begin the GPU cleaning process.

Cleaning up GPU remnant files - Wait until the process is complete, then reboot manually if the operation is not automatic.
- Use the compatible auto-updating software associated with your GPU manufacturer to install the latest version of the graphics card driver:
GeForce Experience – Nvidia
Adrenalin – AMD
Intel Driver – Intel
If the same problem is still occurring even after you used the DDU utility, move down to the next potential fix below.
Method 6: Manually install the Latest Vulkan Runtime Environment (if applicable)
In case you’re encountering this issue on an Intel-based GPU, you will likely need to install the Vulkan Runtime environment before you’ll be able to emulate any Wii-U game on your current configuration. Several affected users have confirmed that the issue was finally fixed after they installed the Vulkan Runtime environment on the affected computer.
Note: Keep in mind that even if you correctly installed the Vulkan Runtime environment, there’s still a good chance WII-U games will not run as well on the CEMU emulator as they would with an Nvidia or AMD graphics card. This has been consistently reported by a lot of affected users that were trying to get this emulator to work on an Intel GPU.
If this scenario is applicable (you’re trying to use an Intel’s GPU) and the Vulkan Runtime environment is missing from your computer, follow the instructions below to download it from the official channels and install it on your computer:
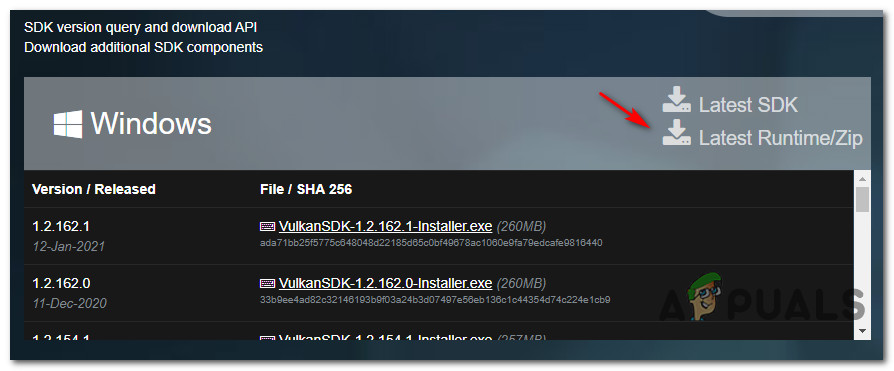
- Open your default browser and navigate to the official download page for the Vulkan Runtime environment pack.
- When you arrive at the correct location, click on the Windows icon inside the download button, then scroll down to the Windows section and click on the Latest Runtime/ZIp hyperlink to download the latest version of the Vulkan environment.

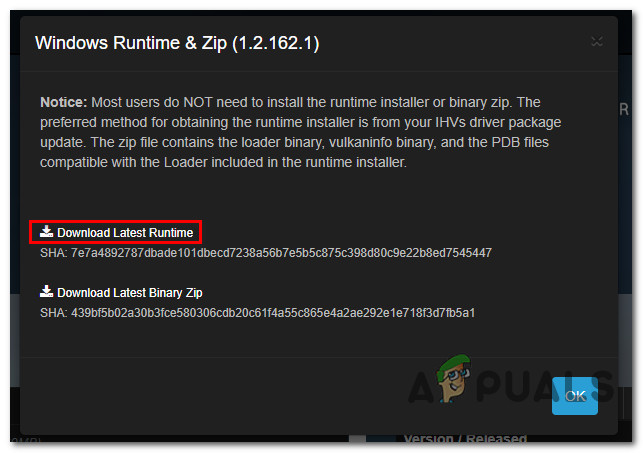
Downloading the latest version of the Vulkan Environment - At the next prompt, click on Download Latest Runtime to confirm the operation and download the latest runtime version of the Vulkan SDK.

Downloading the latest version of the Vulkan SDK - Once the installer is successfully downloaded, double-click on vulkan_runtime.exe and click Yes when prompted by the UAC (User Account Control) prompt.
- Inside the installation window, start by clicking on I Agree to accept ToS, then wait for the installation to complete.
- Restart your computer and see if the problem is fixed once the next startup is complete.
In case you’re still encountering the same ‘Error when initiating Vulkan renderer‘ issue, move down to the final potential fix below.
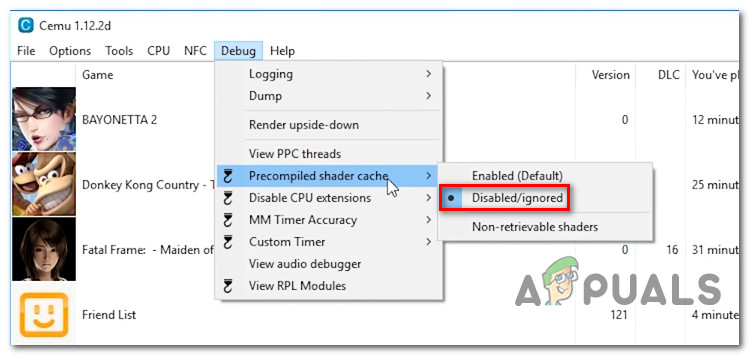
Method 7: Disable PreCompiled Shaders (AMD GPU Only)
In some cases, this issue is caused due to a conflict in the debug settings of the CEMU application. If none of the methods above have worked for you and you’re using an AMD GPU, chances are you will be able to fix this particular issue by disabling the precompiled shaders option from your CEMU Settings menu.
Important: This particular fix is only reported to be effective for AMD-based GPUs. If you’re using an Nvidia or Intel graphics card, this fix will not be effective in your case.
This method has been confirmed to be effective by a lot of AMD GPU users that were encountering this issue while trying to emulate The Legend of Zelda: Breath of the Wild.
If this scenario is applicable, follow the instructions below to access the Settings menu of CEMU and disable PreCompiled Shaders for the game that’s causing this issue as well as making sure that this setting is not enforced at an application level:
- First things first, start by ensuring that the game causing this issue is completely closed and not running in the background.
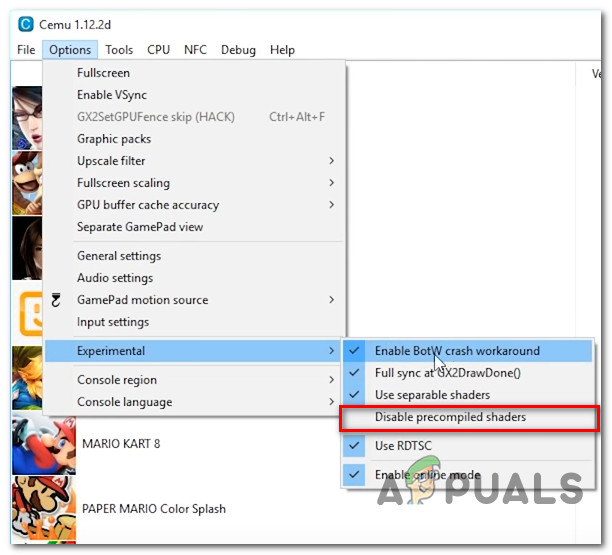
- Open CEMU emulator and use the ribbon menu at the top to access the Debug menu, then click on Precompiled shader cache and set it to Disabled / Ignored.

Disabling the Precompiled shader cache - Next, go to Options from the same ribbon bar menu, access the Experimental tab, and check the option named Disable precompiled shaders.

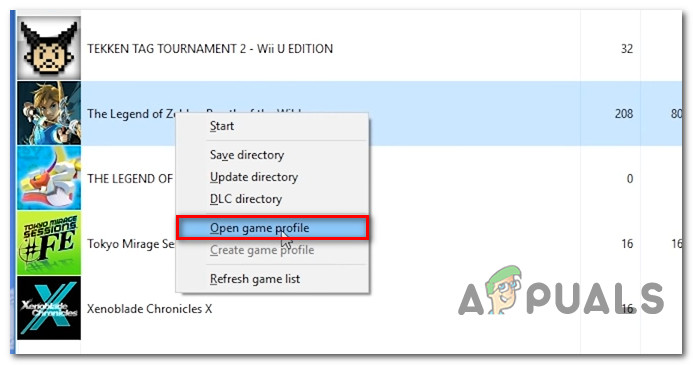
Disabling precompiled shaders - Next, right-click on the game that is causing the ‘Error when initiating Vulkan renderer‘ issue and click on Open game profile.

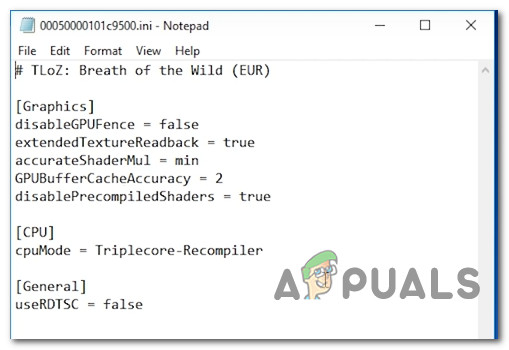
Accessing the game profile in CEMU - Inside the newly opened notepad file, add the following code line under the Graphics tab:
disablePrecompiledShaders = true

Disabling Precompiled Shades for Zelda: Breath of the Wild Note: Due to a bug in CEMU, you need to set this to true in order to prevent the application-wide setting from overriding the default behavior.
- Once the above changes have been enforced, launch the game once again and see if the issue is now resolved.
Create an account to follow your favorite communities and start taking part in conversations.
r/cemu
Posted by3 years ago
Archived

![]()
I’m new to cemu and I just tried running botw in it. I get an error message saying failed to find a gpu with vulkan support. It runs at 20-25fps with heavy stuttering when I tried it with Opengl instead. My specs : gtx1660maxq Ryzen 7 3750h
This thread is archived
New comments cannot be posted and votes cannot be cast
![]()
level 1
I suggest using DDU.
-
Download DDU and the standalone driver installer for your GPU and Intel iGPU
-
Reboot into Windows Safe Mode
-
Run DDU, uninstall your current driver. Do not reboot.
-
Run DDU again for your iGPU. Do not reboot.
-
Install your drivers using the standalone installers you got earlier.
-
Reboot
-
Set up your GPU driver for Cemu again following my guide in the subreddit menu.
This *should* resolve Vulkan compatibility issues.
level 2
Yeah, the problem is the dropdown to select the graphics card shows up empty.
level 2
Yup, I’m running the GA502.
level 1
Hi, I used this video to set up Cemu for BOTW. I use Vulkan but in the video there are also the settings for OpenGL.
Thanks to this tutorial I can run BOTW at 60fps.
Link for the video tutorial
level 1
If the graphics card name doesn’t show up, you can select Vulkan pressing the arrows then enter, and when the name show up, do the same thing. It worked for me. I was having the same problem just like yours.
level 2
I used the arrow keys for selecting vulkan but still nothing shows up in graphics devices.
About Community

Cemu’s Official Subreddit
Сообщается, что некоторые пользователи Windows видят «Ошибка при запуске модуля рендеринга Vulkan‘При попытке эмулировать игры Wi-U на своем компьютере под управлением Windows с помощью программного обеспечения эмуляции CEMU. Эта конкретная проблема чаще всего возникает на компьютерах с Windows 10.

После тщательного изучения этой конкретной проблемы выясняется, что существует несколько различных основных причин, которые могут быть определяющим фактором » Ошибка при запуске модуля рендеринга Vulkan ‘ проблема. Вот список потенциальных виновников:
- Минимальные требования не соблюдены — Помните, что эта ошибка может появиться, если компьютер, который вы пытаетесь использовать для эмуляции игр Wii-U на вашем компьютере, не соответствует минимальным требованиям. Если ваши компоненты упадут ниже минимального порога, единственное жизнеспособное решение — обновить ваш компьютер.
- Устаревшая версия CEMU — За последние несколько месяцев эмулятор CEMU WII-U получал множество проблем с производительностью и исправлений. Если вы не используете последнюю версию, есть вероятность, что обновление до последней стабильной версии решит проблему автоматически.
- Отсутствует установка Microsoft Visual C ++ — Несмотря на то, что у CEMU не так много зависимостей, пакет Redist Microsoft Visual C ++ X64 является наиболее важным. Если этот пакет redist отсутствует на вашем компьютере, вы сможете решить проблему, вручную загрузив и установив пакет Redist Visual C ++ 2017.
- Драйверы графического процессора устарели — Имейте в виду, что при выпуске новой версии CEMU сообщество разработчиков адаптирует приложение к последним выпускам драйверов от Nvidia, AMD и Intel. Во избежание проблем, связанных с устаревшим оборудованием, убедитесь, что графический процессор вашей выделенной видеокарты обновлен до последней версии, совместимой с вашей моделью графического процессора.
- Остаточные поврежденные файлы графического процессора — По словам некоторых затронутых пользователей, вы также можете ожидать, что эта проблема возникнет в ситуациях, когда на целевом ПК есть остатки от старых установок драйверов графического процессора, которые были безуспешно удалены. В этом случае вам необходимо использовать такую утилиту, как DDU, для удаления остаточных файлов перед повторной попыткой установки драйвера.
- Отсутствует среда выполнения Vulkan — Если вы используете встроенный графический процессор на базе Intel, очень высока вероятность, что вам потребуется установить среду выполнения Vulkan, прежде чем вы сможете эмулировать любую игру Wii-U с эмулятором CEMU. Несколько затронутых пользователей подтвердили, что в их случае проблема была полностью решена после того, как они установили среду выполнения Vulkan через официальные каналы.
- Предварительно скомпилированные шейдеры включены в CEMU — С NvidiGPU наиболее распространенной проблемой, которая вызывает эту конкретную ошибку, является случай, когда предварительно скомпилированные шейдеры включены для игры или для всего приложения, что в конечном итоге приведет к сбою большинства попыток эмуляции. В этом случае вы можете решить проблему, отключив функцию предварительно скомпилированных шейдеров как в настройках игрового профиля, так и в меню настроек CEMU.
Теперь, когда вы знаете все потенциальные сценарии, которые могут вызвать эту проблему, вот список методов, которые другие затронутые пользователи успешно использовали для решения проблемы в данном конкретном случае:
Метод 1. Убедитесь, что вы соответствуете минимальным требованиям
Имейте в виду, что, хотя этот эмулятор ни в коем случае не требует обычных конфигураций ПК, все же есть некоторые минимальные требования, которым вы должны соответствовать для эмуляции игр Wii-U.
Вот минимальные требования для компьютеров с Windows:
- Windows 7 (x64) или выше
- OpenGL 4.5 или Vulkan 1.1
- ОЗУ: минимум 4 ГБ, рекомендуется 8 ГБ или больше
Вдобавок к этому вы должны помнить о конфигурации вашего графического процессора — хотя графические процессоры Nvidi и AMD почти полностью поддерживаются, вам необходимо убедиться, что вы установили последние версии драйверов (См. Метод 3)
Однако графические процессоры Intel работают не очень хорошо, поскольку для них предлагается ограниченная поддержка. В качестве альтернативы рекомендуется Вулкан.
Если вы убедились, что соответствуете минимальным требованиям, перейдите к следующему потенциальному исправлению ниже.
Имейте в виду, что эмулятор CEMU Wii U пользуется большой поддержкой игрового сообщества, получая постоянные исправления стабильности и исправления, которые делают игры для Wii U все более стабильными и приятными.
Итак, первое, что вам следует сделать, если вы имеете дело с «Ошибка при запуске модуля рендеринга VulkanПроблема заключается в том, чтобы убедиться, что вы используете последнюю версию эмулятора Wii U.
Для этого следуйте приведенным ниже инструкциям, чтобы установить или обновить текущую версию Cemu до последней:
- Откройте браузер по умолчанию и перейдите к официальная страница загрузки эмулятора Cemu Wii-U.
- Перейдя на страницу загрузки, прокрутите страницу вниз и нажмите Скачать последнюю версию кнопка.

Скачивание последней версии CEMU - После завершения загрузки используйте такую утилиту, как WinRar, WinZip или 7Zip, чтобы извлечь содержимое архива Cemu в отдельную папку.
- После завершения процесса извлечения перейдите в место, где вы извлекли последнюю версию Cemu, щелкните правой кнопкой мыши на Cemu.exe и выберите Запустить от имени администратора из контекстного меню.
Запуск последней версии CEMU с правами администратора - Повторите действие, которое ранее вызывало » Ошибка при запуске модуля рендеринга Vulkan ‘Проблема и посмотрите, устранена ли проблема.


Если та же проблема все еще возникает, перейдите к следующему потенциальному исправлению ниже.
Метод 3: установка распространяемого пакета Microsoft Visual C ++ 2017 X64
Имейте в виду, что одно важное требование, которое, как часто сообщается, является основной причиной «Ошибка при запуске модуля рендеринга Vulkan. Проблема заключается в отсутствии распространяемого пакета Microsoft Visual C ++ 2017 X64.
Если у вас нет этого Visual C ++ Redist пакет, установленный на вашем компьютере, вы можете ожидать, что проблема будет появляться каждый раз, когда вы пытаетесь имитировать игру Wii-U с помощью Cemu.
К счастью, многие затронутые пользователи подтвердили, что им наконец удалось решить эту проблему после установки Visual C ++ Redist. пакет по официальным каналам.
Если вы ищете пошаговые инструкции, как это сделать, выполните следующие действия, чтобы установить Распространяемый компонент Microsoft Visual C ++ 2017 X64 по официальным каналам:
- Откройте браузер и посетите официальная страница загрузки Microsoft, чтобы перейти на страницу, связанную с пакетом загрузки Visual C ++ Redist 2017.
- Оказавшись на нужной странице, прокрутите вниз до списка, связанного с Visual Studio 2015, 2017, 2019 раздел и нажмите vc_redist.x86.exe если у вас 32-разрядная версия Windows или vc_redist.x64.exe если у вас 64-битная версия Windows.
Загрузка правильной версии Visual C ++ Redist - После завершения загрузки дважды щелкните исполняемый файл и нажмите Установить при появлении соответствующего запроса следуйте инструкциям на экране, чтобы установить отсутствующий Пакет C ++ Redist.
Установка отсутствующего пакета redist - После завершения установки перезагрузите компьютер и посмотрите, будет ли проблема устранена после завершения следующего запуска.


Если вы все еще видите то же самое » Ошибка при запуске модуля рендеринга Vulkan ‘Проблема при попытке эмуляции игры Wii-U с помощью средства запуска Cemu, перейдите к следующему потенциальному исправлению ниже.
Метод 4: обновите драйверы до последних версий
Имейте в виду, что разработчики CEMU предполагают, что вы уже обновили драйвер своего графического процессора до последней доступной версии — всякий раз, когда они обновляют приложение CEMU, они оптимизируются для последней стабильной версии драйверов Nvidi и AMD (не Betreleases), косвенно не поддерживая более старые версии.
Если вы не уверены, что используете последнюю версию драйвера видеокарты, следуйте приведенным ниже инструкциям, чтобы удалить текущие драйверы графического процессора, прежде чем переустанавливать последние эквиваленты по официальным каналам:
- Открыть Запустить диалоговое окно, нажав Клавиша Windows + R. Внутри текстового поля введите ‘Devmgmt.msc’ и нажмите Входить открыться Диспетчер устройств. Когда вам будет предложено UAC (Контроль учетных записей пользователей)нажмите да чтобы предоставить доступ администратора.
Открытие окна диспетчера устройств viRun - Как только вы окажетесь внутри Диспетчер устройств, прокрутите список типов устройств и разверните раскрывающееся меню, связанное с Видеоадаптеры.
- После того, как это меню развернется, щелкните правой кнопкой мыши драйвер графического процессора, который вы используете в настоящее время, и выберите Удалить устройство из только что появившегося контекстного меню.
Удаление текущего драйвера графического процессора - Когда вас попросят подтвердить, нажмите да и дождитесь завершения процесса, прежде чем перезагружать компьютер.
- Как только ваш компьютер загрузится, отсутствующий драйвер будет заменен общим эквивалентом.
-
Затем используйте проприетарное программное обеспечение, связанное с производителем вашего графического процессора, установите его и запустите, чтобы автоматически установить последнюю совместимую версию драйвера для вашей модели графического процессора. Вот список проприетарных инструментов для обновления драйверов для самых популярных производителей графических процессоров:
GeForce Experience — NvidiАдреналин — AMD Драйвер Intel — Intel
- После обновления версии драйвера перезагрузите компьютер еще раз и повторите действие внутри CEMU после завершения следующего запуска.


Если эта проблема все еще возникает в вашем случае, перейдите к следующему потенциальному исправлению ниже.
Метод 5: запуск утилиты DDU
Если ни одно из вышеперечисленных исправлений не помогло вам, вероятно, вы имеете дело с неким повреждением, которое влияет на ваш драйвер графического процессора или какую-либо связанную с ним зависимость. Проблема такого типа может продолжаться даже после попытки установить драйвер графического процессора обычным способом.
Несколько затронутых пользователей, которые имели дело с той же проблемой, сообщили, что проблема была окончательно решена после того, как они использовали стороннюю утилиту (Программа удаления драйвера дисплея — DDU) способный удалить все остаточные файлы драйвера графического процессора.
Запуск этой утилиты приведет к удалению любого типа повреждения файла, связанного с вашим графическим драйвером. Следуйте приведенным ниже инструкциям, чтобы загрузить и развернуть бесплатное ПО DDU, чтобы исправить проблему с драйвером, которая могла способствовать появлению «Ошибка при запуске модуля рендеринга Vulkan‘:
- Откройте браузер по умолчанию и посетите официальная страница загрузки Display Driver Uninstaller. Как только вы перейдете на нужную страницу, выберите зеркало, которое находится ближе всего к вашему физическому местоположению, и дождитесь завершения загрузки.
Загрузка бесплатного программного обеспечения DDU - После завершения загрузки используйте утилиту, такую как 7Zip или WinZip, для извлечения содержимого архива DDU в доступную папку.
- После завершения процесса извлечения щелкните правой кнопкой мыши основной исполняемый файл установщика DDU и выберите Запустить от имени администратора из только что появившегося контекстного меню. Когда вам будет предложено UAC (Контроль учетных записей пользователей)нажмите да чтобы предоставить доступ администратора.
- В интерфейсе деинсталлятора драйвера дисплея выберите GPU от Выберите тип устройства из раскрывающегося меню. Далее нажмите на Очистите и перезапустите чтобы начать процесс очистки графического процессора.
Очистка остаточных файлов графического процессора - Дождитесь завершения процесса, затем перезагрузитесь вручную, если операция не выполняется автоматически.
- Используйте совместимое программное обеспечение для автоматического обновления, связанное с производителем вашего графического процессора, чтобы установить последнюю версию драйвера видеокарты: GeForce Experience — Nvidia Адреналин — AMD Драйвер Intel — Intel


Если та же проблема все еще возникает даже после использования утилиты DDU, перейдите к следующему потенциальному исправлению ниже.
Метод 6. Вручную установите последнюю версию среды выполнения Vulkan (если применимо)
Если вы столкнулись с этой проблемой на графическом процессоре Intel, вам, вероятно, потребуется установить среду выполнения Vulkan, прежде чем вы сможете эмулировать любую игру Wii-U в вашей текущей конфигурации. Несколько затронутых пользователей подтвердили, что проблема была окончательно устранена после того, как они установили среду выполнения Vulkan на пораженный компьютер.
Примечание: Имейте в виду, что даже если вы правильно установили среду выполнения Vulkan, все равно есть большая вероятность, что игры WII-U не будут работать на эмуляторе CEMU так же хорошо, как на графической карте Nvidior AMD. Об этом постоянно сообщали многие затронутые пользователи, которые пытались заставить этот эмулятор работать на графическом процессоре Intel.
Если этот сценарий применим (вы пытаетесь использовать графический процессор Intel) и на вашем компьютере отсутствует среда выполнения Vulkan, следуйте приведенным ниже инструкциям, чтобы загрузить ее с официальных каналов и установить на свой компьютер:
- Откройте браузер по умолчанию и перейдите к официальному страница загрузки пакета среды выполнения Vulkan.
-
Когда вы окажетесь в нужном месте, щелкните значок Windows внутри кнопки загрузки, затем прокрутите вниз до раздела Windows и щелкните гиперссылку «Последняя среда выполнения / ZIp», чтобы загрузить последнюю версию среды Vulkan.
Скачивание последней версии Vulkan Environment - При следующем запросе нажмите Скачать последнюю версию для подтверждения операции и загрузки последней версии среды выполнения Vulkan SDK.
Скачивание последней версии Vulkan SDK - После успешной загрузки установщика дважды щелкните vulkan_runtime.exe и нажмите да когда будет предложено UAC (Контроль учетных записей пользователей) Подсказка.
- В окне установки начните с нажатия на Я согласен чтобы принять ToS, затем дождитесь завершения установки.
- Перезагрузите компьютер и посмотрите, будет ли проблема устранена после завершения следующего запуска.


Если вы все еще сталкиваетесь с тем же «Ошибка при запуске модуля рендеринга Vulkan«Проблема, перейдите к последнему потенциальному исправлению ниже.
Метод 7: отключить предварительно скомпилированные шейдеры (только AMD GPU)
В некоторых случаях эта проблема возникает из-за конфликта в настройках отладки приложения CEMU. Если ни один из вышеперечисленных методов не помог вам и вы используете графический процессор AMD, скорее всего, вы сможете решить эту конкретную проблему, отключив параметр предварительно скомпилированных шейдеров в меню настроек CEMU.
Важный: Сообщается, что это конкретное исправление действует только для графических процессоров AMD. Если вы используете видеокарту Nvidior Intel, это исправление не будет эффективным в вашем случае.
Эффективность этого метода была подтверждена многими пользователями графических процессоров AMD, которые сталкивались с этой проблемой при попытке эмуляции Легенда о Зельде: Дыхание дикой природы.
Если этот сценарий применим, следуйте приведенным ниже инструкциям, чтобы получить доступ к меню настроек CEMU и отключить предварительно скомпилированные шейдеры для игры, которая вызывает эту проблему, а также убедитесь, что этот параметр не применяется на уровне приложения:
- Прежде всего, начните с того, что убедитесь, что игра, вызывающая эту проблему, полностью закрыта и не работает в фоновом режиме.
- Откройте эмулятор CEMU и используйте ленточное меню вверху для доступа к Отлаживать меню, затем нажмите Предварительно скомпилированный кеш шейдера и установите его на Отключено / игнорируется.
Отключение кеша предварительно скомпилированных шейдеров - Далее перейдите к Параметры из того же меню ленты, откройте Экспериментальный вкладка и отметьте опцию под названием Отключить предварительно скомпилированные шейдеры.
Отключение предварительно скомпилированных шейдеров -
Затем щелкните правой кнопкой мыши игру, вызывающую » Ошибка при запуске модуля рендеринга Vulkan ‘Вопрос и нажмите Откройте игровой профиль.
Доступ к игровому профилю в CEMU -
Внутри только что открытого файла блокнота добавьте следующую строку кода на вкладке Графика:
disablePrecompiledShaders = true
Отключение предварительно скомпилированных оттенков для Zelda: Breath of the Wild Примечание: Из-за ошибки в CEMU вам необходимо установить для него значение true, чтобы предотвратить переопределение общими настройками приложения поведения по умолчанию.
- Как только вышеуказанные изменения вступят в силу, запустите игру еще раз и посмотрите, решена ли проблема.


Ever since the 5/12 build (possibly sooner), Xenia crashes on startup with the message «Unable to initialize Vulkan graphics subsystem. Ensure you have the latest drivers for you GPU and that it supports Vulkan.» However, my graphics card is an NVIDIA GeForce GTX 1060 6GB (yes, it’s on the list of supported graphics cards). I even updated my GPU’s drivers and it still crashes with that same message. To top it all off, the 4/21 build (which also exclusively uses Vulkan) runs just fine, so I’m not sure what happened between updates. I double checked with the current master build and the error still occurs.
I couldn’t find any duplicates of my error here, so if this issue has been solved or if anyone has any idea what’s going wrong, please let me know.
Log file:
i> 00001528 Build: detached / 5f16e46 on Jun 8 2018
i> 00001528 Initializing Vulkan 1.1.0…
i> 00001528 Found 3 global layers:
i> 00001528 — VK_LAYER_NV_optimus (spec: 1.0.65, impl: 0.0.1)
i> 00001528 NVIDIA Optimus layer
i> 00001528 — VK_LAYER_VALVE_steam_overlay (spec: 1.0.3, impl: 0.0.1)
i> 00001528 Steam Overlay Layer
i> 00001528 — VK_LAYER_LUNARG_standard_validation (spec: 1.0.65, impl: 0.0.1)
i> 00001528 LunarG Standard Validation Layer
i> 00001528 Found 11 global extensions:
i> 00001528 — VK_EXT_debug_report (0.0.9)
i> 00001528 — VK_EXT_display_surface_counter (0.0.1)
i> 00001528 — VK_KHR_get_physical_device_properties2 (0.0.1)
i> 00001528 — VK_KHR_get_surface_capabilities2 (0.0.1)
i> 00001528 — VK_KHR_surface (0.0.25)
i> 00001528 — VK_KHR_win32_surface (0.0.6)
i> 00001528 — VK_KHX_device_group_creation (0.0.1)
i> 00001528 — VK_KHR_external_fence_capabilities (0.0.1)
i> 00001528 — VK_KHR_external_memory_capabilities (0.0.1)
i> 00001528 — VK_KHR_external_semaphore_capabilities (0.0.1)
i> 00001528 — VK_NV_external_memory_capabilities (0.0.1)
i> 00001528 Verifying layers and extensions…
i> 00001528 — optional extension VK_EXT_debug_marker not found
i> 00001528 — enabling extension VK_KHR_surface (0.0.25)
i> 00001528 — enabling extension VK_KHR_win32_surface (0.0.6)
i> 00001528 Initializing application instance…
!> 00001528 vkCreateInstance returned VK_ERROR_INCOMPATIBLE_DRIVER
!> 00001528 Instance initialization failed; cannot find a compatible Vulkan installable client driver (ICD)
!> 00001528 Failed to create instance
!> 00001528 Failed to initialize vulkan instance
X> 00001528 Unable to initialize Vulkan graphics subsystem.
Ensure you have the latest drivers for your GPU and that it supports Vulkan. See http://xenia.jp/faq/ for more information and a list of supported GPUs.
Cemu
The first step is to ensure the game you are wanting to play has been deemed playable, as many games are either: not yet supported, are only known to boot but simply crash, or they have regressions in compatibility due to Cemu updates or issues with new GPU drivers. Before asking for any help, please check the Game Compatibility ListOpen in new window and subsequent Wiki entries, just be aware of outdated testing results.
We encourage our users to submit their testing results and to otherwise keep the wiki up-to-date so that everyone’s questions may be answered.
Stuck on «Loading…» / Crash to Desktop (CTD) when starting a game
Cause #1
- Open
Task Manageron Windows - Click the
(^) More detailsbutton if necessary - Navigate to the
Detailstab - Make sure Cemu.exe is not available in your process list before trying to run Cemu again — that it is otherwise fully closed
There is an issue recently where Cemu.exe can get stuck in the background which will cause issues for saving your games, running games, loading your shaderCache, and a wider assortment of other complications.
Cause #2
- Open your Cemu folder and temporarily rename your
shaderCachefolder- This will allow you to test a fresh cache to see if the problem was related to the cache that was being used
- If renaming the
shaderCachefolder did not help, ensure Cemu is fully closed and then rename your earliershaderCachefolder back to the name «shaderCache»- You will need to delete the one that was created by Cemu after you renamed your original copy
Cause #3
Accidentally loading an Update or DLC as a game by using File -> Load can cause this. Alternatively if you accidentally merged the Update or DLC data into the Base Game trying to save space, this will break the Base Game — all of the game’s data will need to be redumped from your Wii U and replaced. Ensure you’re launching the game correctly or otherwise that Update and DLC data are being installed properly.
Cause #4
To continue off of Cause #3, this could be caused by an incomplete or otherwise corrupt dump of your Base Game / Update / DLC copy. Sometimes dumping software just doesn’t work the way it’s intended to, but it’s better than not having it available. Try redumping the data from your Wii U again — reinstalling any game data will not affect your saves.
Cause #5
Illicitly obtained game data will also cause this to happen. Dumping your game data is the only method that Cemu provides support for. Asking for help with illegally downloaded data will result in an immediate ban or warning.
«Error: This title is encrypted. To run this application …»
If you followed this guide you should not be dealing with this type of problem. dumplingOpen in new window will dump your games in a decrypted format and does not require you to have Encryption Keys or have you mess with keys.txt — if you used the wrong homebrew to dump the game software, please go back and use dumpling instead.
This error means the key that came with your encrypted game dump is not in your keys.txt file. Random keys from the internet will not work. To get the correct keys from your console without redumping the game again, you must follow this small guide:
- Obtaining your Wii U Common Key and Encryption Keys for your keys.txtOpen in new window
«Error: Can’t initialise DirectInput»
This can be fixed by unplugging the controller and restarting your computer. After your PC has fully booted, plug the controller back in. Ensure you are using the latest official version of Cemu, it is also encouraged to be using the latest version of Windows 10/11.
Constant stuttering / visual lag during gameplay
This is caused by shaderCache creation or Vulkan’s pipelineCache creation. With OpenGL and Vulkan, the shaderCache will build as you play and will eventually become nearly unnoticable. As mentioned, Vulkan also requires a pipelineCache — this cache type will build quickly and have minor stutter. Keep in mind that it has to be rebuilt from scratch every time you update your GPU driver or Cemu as a sideeffect from becoming invalidated when either of these change.
To alleviate gameplay stalls caused by shader and pipeline building, read Async Shader Compile further below.
Can I disable, preload, or download shader caches?
If you simply want to turn off the notification that tells you they are being made, you can do this in Options -> General settings -> Overlay.
Unfortunately, you cannot create a cache before playing the game, nor can you disable shaders or pipelines to prevent stalling. Shaders and pipelines are what allow your games to work on your GPU. If they were disabled, you would only see a black screen, with no graphical output.
Pre-compiled shader and pipeline caches are available at chriztr.github.io/cemu_shader_and_pipeline_cachesOpen in new window, however not all games are supported. Follow Optimizing Cemu for more information on importing shader and pipeline caches.
Async Shader Compile
This feature is only available for GPUs with drivers that support Vulkan 1.2 or newer; not Vulkan 1.1!
Users that fit this criteria should navigate to Cemu’s Options -> General settings -> Graphics section, then enable the Async shader compile feature. While using Async Shader Compile almost all Shaders and Pipelines will be built at the same time while you are playing, greatly reducing the amount of gameplay stalling that you could encounter without this option; some temporary graphical issues should be expected. Not all shaders and pipelines can be created in this way and will still result in some minor stalling.
Newer Intel iGPUs support this feature as long as they both support Vulkan 1.2 and are using the latest available drivers. If you encounter issues while using this feature, please disable it and try again after a future driver update.
I use Steam to launch Cemu, what can happen?
Steam caches shaders on its own unless you turn this off, this majorly conflicts with Async Shader Compile. The symptoms are graphics or models failing to render, usually a very broken-looking game. To prevent this, look for the Shader Precaching option within Steam’s settings and disable it to resolve the issue. We recommend that you do not use 3rd party launchers like Steam to launch Cemu due to potential problems that we have no control over.
If you encounter similar symptoms to this but you aren’t using Steam to launch Cemu, please refer to this section below.
Otherwise, beyond problems with Async Shader Compile, you may also experience some controller difficulties as Steam enforces their own drivers; this may prevent Cemu from working as expected with your device.
Problems with Vulkan within Cemu
Such problems include:
- When I try to open General Settings, Cemu crashes.
- There is no Vulkan option even though my GPU should have Vulkan Support.
- I have a Vulkan option but my GPU doesn’t show up in the dropdown.
- When I select the Vulkan option in the dropdown menu, Cemu crashes.
- When I try to launch a game that’s supposed to work with Vulkan, it immediately crashes.
If you experience any of the above symptoms, please do the following:
- Ensure Cemu is fully up-to-date; issues with older Cemu versions will not be available for troubleshooting support.
- Verify that your GPU supports Vulkan 1.1 or newer and is up-to-date with Nvidia/AMD/Intel’s latest driver version.
- Multi-vendor Lists: HereOpen in new window, hereOpen in new window, & hereOpen in new window
- Nvidia GPU Support: HereOpen in new window
- AMD GPU Support: HereOpen in new window
- Intel GPU Support: HereOpen in new window
- If you’ve confirmed your support and yet it still fails, please reinstall both your iGPU/APU & dGPU drivers with DDU:
DDU — Display Driver Uninstaller GuideOpen in new window
Yes, you must install both the iGPU/APU and dGPU drivers; skipping one will likely cause the issue to not be resolved.
If this fails to help then it’s time to see what our Discord Server has to say; you may also try downgrading your GPU driver to an earlier version. Please do some research on the subject to see if any other people with your GPU have had issues with Vulkan in other games (not specifically Cemu.)
Crashing with [File] -> [Load] or [Install Game Title, Update, or DLC]
This refers to when the Window’s File Explorer window is supposed to pop up. This is a longstanding issue that’s caused by either:
- Incompatibility with a 3rd party program installed on your PC, usually one that edits how Windows visually looks or those that edit the Taskbar/Tray.
- If your PC supports Intel Optane / RST, you must keep the drivers and features for it installed. Not having the software available can cause this issue; if you removed them or never installed them, it is encouraged for you to do so, but only if your motherboard supports this feature and you get this type of crash.
- A broken or semi-corrupt Windows installation.
We encourage you to try and find the afflicting program and remove it, otherwise you should consider installing the latest version of Windows 10, cleanly. Migrations, in-place upgrades, «refresh» and any other non-clean installation methods can result in the problem migrating with you to your newer installation. If you are not sure of how to do a clean Windows reinstallation, we suggest you follow a tutorial. Please be smart and back-up any files, settings, and programs / program names / product keys that you want to transfer beforehand.
The Legend of Zelda: Breath of the Wild
Full Cemu Wiki listing of issuesOpen in new window
Please review the above link as it goes over nearly every problem that has been recorded to date! Most (but not all) of the common issues are listed below.
«A System update is required» / White or Yellow Screen after «Open your eyes…»
This is caused by the game’s latest update not being installed. Breath of the Wild must be using the latest update to work properly. Follow our dumping guide to rip and then install the latest game update on Cemu, make sure the game is updated on your Wii U console before proceeding.
Game is stuck at around 20~30FPS
- Ensure you’re running the latest game update and Cemu version.
- Ensure FPS++ is enabled and set to above 30 or you will be locked into this state.
- Make sure your hardware is supposed to be able to exceed 30FPS, try going into a Shrine.
- Try disabling Vsync temporarily and see if this changes the behavior.
Game feels like it’s playing in Slowmotion or Fastforward
- This will occur if you do not have the game fully updated and you haphazardly enable FPS++
- On occasion FPS++ will incorrectly apply after starting the game. Restarting Cemu usually resolves this.
- Do not use FPS++’s
Static Mode (Enabled)instead ofDisabled (Default, Dynamic);Static Modewill cause this behavior. - Changing the
Frame Averageto a higher value instead of using the default value8can also cause this issue.
Cutscenes cause the game to freeze / softlock
This can be caused by setting the framerate above 60FPS. If it still occurs at 60FPS, then set it to 30FPS or disable FPS++ temporarily, then change the setting back after the cutscene has finished, save, and then restart Cemu. Alternatively you may try using OpenGL instead of Vulkan.
If disabling FPS++ and using OpenGL doesn’t resolve this, this is a sign that your game’s data is corrupt and needs replaced. You should replace the Update and DLC as well.
Invisible water in the air
This is an infrequent issue on Vulkan, a simple Cemu restart should resolve the invisible water. This may be fixed in the future. Contrary to popular belief, this has nothing to do with Async Shader Compile.
A lot of objects or other assets aren’t appearing
It’s recommended that if you use Steam to launch Cemu that you refer to this: Click Here
- Disable any 3rd party mods if you downloaded and installed any, then test the game.
- Disable the Extended Memory and Draw Distance GraphicPacks, then test the game.
- Test FPS++’s
Advanced Settings‘sFence Methodset toAccurateinstead ofPerformance
If none of these helped, this is a sign that your game’s data is corrupt and needs replaced. You should replace the Update and DLC as well.
I get a white or black screen when a cutscene is supposed to start
This is a sign that your game’s data is corrupt and needs replaced. You should replace the Update and DLC as well.
I get a green screen when a cutscene is supposed to start
This should only affect Linux users for now. You must have Cemuhook installed and correctly hooked into Cemu and have the Debug -> Use Cemuhook H264 option enabled. If you do not know how to do this, visit the #Linux channel on the Cemu Discord server for assistance. This should no longer be required after Cemu’s H264 support is updated / after Cemu gets a native Linux build.
If you are also getting this behavior on Windows, try using Debug -> Use Cemuhook H264. If you are already using this option and you are an older Intel iGPU user, try disabling Use Cemuhook H264 instead. Otherwise you may request assistance on our Discord Server.
Other miscellaneous issues with any game on Cemu
Emulation isn’t a perfect science and new or old problems can surface, or ones that don’t match other descriptions. If you do encounter something that isn’t listed here, check the Game Compatibility ListOpen in new window as each game has its own wiki entry.
If what you’re having problems with is not listed there, please make sure that your GPU supports Vulkan 1.1 or OpenGL 4.5; if it doesn’t you will not have full support, which will result in a multitude of game-breaking bugs that you cannot fix.
If you do have confirmed support, the safest bet is to:
- Disable all 3rd-party game mods and test the result; many mods cause problems.
- Disable all graphicPacks (excluding FPS++) and then see if the issue stops.
- Try renaming your shaderCache folder to see if it’s the cause of the problem. If the shaderCache isn’t the culprit, you can rename your shaderCache folder back to its original name in order to resume using it after a Cemu restart.
- Unfortunately not all issues are repairable; you should always try to fully redump the game, update, and DLC from your Wii U console.
You may always visit us on our Discord to see if we can figure out the problem together.

Here we can see “cemu crashes when loading game”
CemuPermalink
The first step is to make sure the game you’re eager to play has been deemed playable, as many games are either not yet supported, is only known else but crash, or need regressions in compatibility thanks to Cemu updates or issues with new GPU Drivers. Before posing for any help, please check the Game Compatibility List and subsequent Wiki entries; remember outdated testing results.
We encourage our users to submit their testing results and keep the wiki up-to-date otherwise so that everyone’s questions could also be answered.
Stuck on “”Loading…”” / Crash to Desktop (CTD) when starting a gamePermalink
Cause #1
Open Task Manager on Windows -> Clicks the (^) More Details button if necessary -> Navigate to the small print tab. Please confirm Cemu.exe isn’t available in your process list before trying to run Cemu again – that it’s otherwise fully closed. There’s a problem recently where Cemu.exe can grind to a halt within the background, which can cause issues for saving your games, running games, loading your shader cache, and a wider assortment of other complications.
Cause #2
Open your Cemu folder and temporarily rename your shader cache folder. This may allow you to check a fresh cache to ascertain if the matter was associated with the getting used cache. If renaming the shader cache folder didn’t help, ensure Cemu is fully closed, then rename your earlier shader cacher back to the name “shader cache”; you’ll get to delete the one that Cemu created after you renamed your original copy.
Cause #3
Accidentally loading an Update or DLC as a game by using File -> Load can cause this. Alternatively, if you mistakenly merged the Update or DLC data into the bottom Game trying to save lots of space, this may break the bottom Game – all of the game’s data will be got to be dumped from your Wii U and replaced. So ensure you’re launching the Game correctly or otherwise that Update and DLC data is being installed properly.
Cause #4
To continue off of Cause #3, this might be caused by an incomplete or otherwise corrupt dump of your Base Game / Update / DLC copy. Sometimes Dumping software doesn’t work the way it’s intended to, but it’s better than not having it available. Try dumping the info from your Wii U again – reinstalling any game data won’t affect your saves.
Cause #5
Illicitly obtained game data also will cause this to happen. Dumping your game data is that the only method that Cemu provides support for. Posing for help with illegally downloading that data will end in an immediate ban or warning.
Crashing with [File] -> [Load] or [Install Game Title, Update, or DLC]Permalink
This refers to when the Window’sWindow’s File Explorer window is meant to crop up. This is often a longstanding issue that either causes that:
- Incompatibility with a third-party program installed on your PC, usually one that edits how Windows visually looks or people who edit the Taskbar/Tray.
- If your PC supports Intel Optane / RST, you want to keep the drivers and features for it installed. Not having the software available can cause this issue; if you removed them or never installed them, it’s encouraged for you to try to do so, but as long as your motherboard supports this feature and you get this sort of crash.
- A broken or semi-corrupt Windows installation.
We encourage you to undertake and find the afflicting program and take it away. Otherwise, you ought to consider installing the newest version of Windows 10 cleanly. Migrations, in-place upgrades, “refresh”, and the other non-clean installation methods may result in the problem migrating with you to your newer installation. If you’re unsure how to do a clean Windows reinstallation, we propose you follow a tutorial. Please be smart and back up any files, settings, and programs/program names/product keys that you want to transfer beforehand.
User Questions:
- Cemu crashes whenever I attempt to load a game
I know it can’t have something to try to do with the games I’m loading since I’ve tried multiple. the difficulty occurs on any version of cemu I’veI’ve tried. Does anyone know a fix?
- [SOLVED] Cemu 1.13.0 crashing when loading a game
I’m guessing the primary line is that the culprit (wine: cannot find L” ” C:windowssystem32winemenubuilder.exe”)? Does anyone skills to repair it? Thanks
- Cemu Wii U emulator crashes after selecting Game on radeonsi
under wine-staging 2.3 after selecting game cemu crashes with page fault error
and this message is displayed
Mesa: User error: GL_INVALID_ENUM in glGetString(GL_EXTENSIONS)
note i’m using MESA_GL_VERSION_OVERRIDE=”4.0″ MESA_GLSL_OVERRIDE=”400″
in nvidia proprietary drivers it works fine
so i suggest it’s a mesa problem
- Cemu keeps crashing when loading breath of the wild
I’ve been using this for a short time now and have had no problems so far, and it started giving trouble once I downloaded and ran the most recent cemu program. It just wouldn’t load the Game and kept telling me that it needed to be updated when it already is. Once I went back to the older one that worked right, I could not find any of my saves, and it kept crashing after the open your eyes scene. If anything, I hope this thing didn’t erase my save games once I ran it.
Перейти к содержанию
На чтение 2 мин Просмотров 19 Опубликовано 22 мая, 2023
Не можете запустить свои любимые игры для Wii U на ПК с помощью Cemu? Это исправление вам поможет.
На Wii U были одни из лучших игр, такие как Super Mario Maker, Bayonetta 2, Mario Kart 8 и другие. А с помощью эмулятора Cemu вы сможете играть в эти игры на своем ПК. Но при попытке играть многие игроки получают ошибку «Невозможно запустить игру» на Cemu и нуждаются в ее исправлении. К счастью, есть несколько вещей, которые вы можете сделать, чтобы решить эту проблему. Итак, вот исправление как для пользователей ПК, так и для пользователей Steam Deck.
Прежде чем проверять приведенные ниже исправления, это руководство предназначено только для образовательных целей. Мы НЕ ПОДДЕРЖИВАЕМ пиратство, независимо от того, получаете ли вы игровые ключи или настоящие игровые файлы, обязательно извлеките их из своей собственной Wii U и ее игр.
Как исправить ошибку «Невозможно запустить игру» на Cemu

Эта ошибка в основном появляется по двум причинам: либо вы не извлекли Файлы игры корректны, или вы не добавили свои ключи. И эта причина применима независимо от того, используете ли вы Cemu на ПК или Steam Deck. Вот как их легко исправить.
- Добавить ключи:У каждой игры для Wii U есть ключ, зависящий от региона игры. Используя инструкции по извлечению игровых ключей, представленные на официальной странице Cemu, получите ключ для своей игры. Теперь вставьте этот ключ в файл Keys.txt для Cemu. Вы можете найти файл Keys.txt в папке, где изначально был установлен эмулятор.
- Проверьте ПЗУ: есть вероятность, что вы не извлекали ПЗУ. правильно, и окончательный файл мог быть поврежден. Снова извлеките игру и попробуйте использовать это новое ПЗУ, и вы больше не столкнетесь с этой проблемой.
- Обновите Cemu: Хотя на самом деле это не должно быть большой проблемой. проблема. Вы должны стараться обновлять Cemu до последней версии. Это поможет вам не столкнуться с такими ошибками.
Это все, что вам нужно сделать, когда вы получите сообщение об ошибке «Невозможно запустить игру» на Cemu. Если вы хотите узнать больше об эмуляции, проверьте также, можете ли вы играть в Legend of Zelda TOTK на ПК и как играть в Pokemon Sword & Щит на ПК.
Xander Grishchenko
6.11.2022
Помочь не помогу, но помню с выходом BOTW гироскоп пробовали эмулировать, подключая к смартфону. Мудрено, но работало
Ответить
Развернуть ветку
Дмитрий Воротников
6.11.2022
Автор
Есть вариант с мышью ещё, подключаем второе устройство ввода и вуаля. Но хочется именно с пада
Ответить
Развернуть ветку
Dendy
6.11.2022
я зельду на цему лет 5 назад так и проходил управление с пада а шрайны проходил с мышкой она гиру эмулировала.
Ответить
Развернуть ветку
knight.killer
6.11.2022
Если что я не особо в курсе последних обнов, но раньше вроде нужен был.
Ответить
Развернуть ветку
Jony Karate
28 янв
Нужно в игре еще в самой включить в настройках системы
Ответить
Развернуть ветку
Samuel F Martin
10 фев
Здравствуй! Понял как ? Тоже начал проходить зельду на дуалсенсе и точно такая же фигня. Есть варик вообще?
Ответить
Развернуть ветку
Дмитрий Воротников
11 фев
Автор
Неа, так и не понял. Проходил с помощью мышки, хоть и неудобно очень
Ответить
Развернуть ветку
Дмитрий Шилов
7 янв
У меня сначала заработала связка CEMU и DS4Windows, но при следующем запуск всё сломалось.
Оказалось нужно было в CEMU нажать две кнопки и гироскоп начинает работать без сторонних программ
Ответить
Развернуть ветку
Samuel F Martin
10 фев
А что за кнопки то ? У меня как не работало, так и не работает ничего
Ответить
Развернуть ветку
SpaceyPlane
6.11.2022
А какой контроллер эмулируется? Там нужно выставить Wii U gamepad
Ответить
Развернуть ветку