
-
#1
Здравствуйте добрые люди. Помогите пожалуйста новичку, 2й день пошел как мучаюсь с esp8266. Имею модуль esp8266 ESP-01. После получения проделывал следующее:
1. Прошил прошивкой AT21SDK95-2015-01-24
Модуль стал реагировать на AT команды, видеть сети wi-fi, домашний роутер, с помощью АТ команд даже подключился к нему.
2. Залил через arduino uno скетч брал отсюда ESP8266 – Шаг №1 * WI-FI подключение | Программирование ESP8266 в среде Arduino IDE
ввел данные от своего роутера, но esp8266 не хочет подключаться.
Создает свою точку доступа (в мониторе порта пишет:
WiFi up AP
Start 2-WebServer) со смартфона видится, можно подключиться.
При попытке в браузере подключиться, пишет что нет не удается установить соединение. Помогите пожалуста, 2 дня уже мучаюсь. поиски по интернету и форуму не дали ответа.
более-менее похожая тема https://esp8266.ru/forum/threads/ne-podkljuchaetsja-wifi-pri-proshivke-cherez-arduino-ide.3672/ пробовал менять, мне не помогло.
-
#2
Start 2 Покажите все при помощи скриншотов, подробно.
-
#3
извините. не понял, что именно сфотографировать?
-
#4
Скетч, процесс заливки, результат работы и то, что может помочь увидеть, что у вас творится.
-
#5
Ура, часть проблемы я решил. А именно чтобы создалась точка доступа. К сожалению к роутеру подключиться пока не могу. Описываю по-порядку как и что делал. может кому-то пригодится.
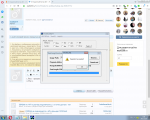
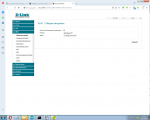
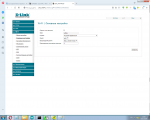
1. Прошил прошивкой AT21SDK95-2015-01-24 (рис 1, 1_2)
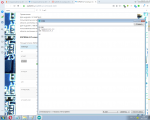
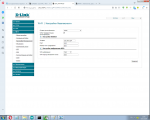
2. Командой AT+CLAP вывел список всех wifi сетей, нашел свой роутер (рис_2)
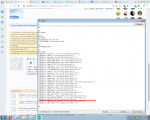
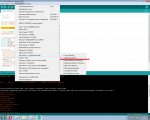
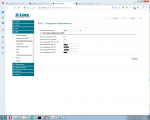
3. Командой AT+CWJAP подключился к своему роутеру (рис 3_1). Посмотрел на телефоне, модуль
появился (рис 3_2)
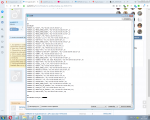
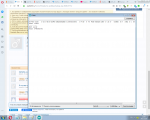
4. Залил скетч. Шаг №2 * WebServer WEB сервер | Программирование ESP8266 в среде Arduino IDE как я понял, если esp не сможет подключиться к роутеру, то он создаст свою точку. (рис 4_1). перезагрузил esp.
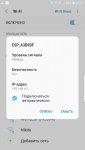
5. Модуль несколько секунд думает (пытается подключиться к роутеру), потом создает свою точку с именем WiFi. (рис 5_1, 5_2)
6. Далее вводим ip который ввели в скетче, в IPAddress apIP (у меня 192, 168, 4, 101); до 7 пункта при попытке зайти на страницу была ошибка err_connection_refused
7. на каком-то сайте (закрыл случайно вкладку) обсуждалась эта пробьлема. оказывается нужно поменять на (рис 6_2). Мне помогло, заработало.
Вопрос с подключением к роутеру домашней сети остается открытым. Может кто знает в чем проблема?
Вложения
-

239.8 KB
Просмотры: 43 -
337.8 KB
Просмотры: 40 -
240 KB
Просмотры: 43 -
225.5 KB
Просмотры: 37 -
111.4 KB
Просмотры: 39
-
#6
в одно сообщение не влезли скриншоты.
Вложения
-
96.1 KB
Просмотры: 35 -
149.2 KB
Просмотры: 45 -
123.8 KB
Просмотры: 60

-
#7
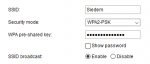
Скетч виден, как на ладони… Настройки роутера аналогично.
Попробуйте в роутере установить шифрование wpa2.
-
#8
/*
* Шаг №1
* WI-FI подключение
*/
#include <ESP8266WiFi.h> //Содержится в пакете
IPAddress apIP(192, 168, 4, 1);
// Определяем переменные
String _ssid = «waflya»; // Для хранения SSID
String _password = «*****»; // Для хранения пароля сети
String _ssidAP = «WiFi»; // SSID AP точки доступа
String _passwordAP = «»; // пароль точки доступа
void setup() {
Serial.begin(115200);
Serial.println(«»);
Serial.println(«Start 1-WIFI»);
//Запускаем WIFI
WIFIinit();
}
void loop() {
delay(1);
}
void WIFIinit() {
// Попытка подключения к точке доступа
WiFi.mode(WIFI_STA);
byte tries = 11;
WiFi.begin(_ssid.c_str(), _password.c_str());
while (—tries && WiFi.status() != WL_CONNECTED)
{
Serial.print(«.»);
delay(1000);
}
if (WiFi.status() != WL_CONNECTED)
{
// Если не удалось подключиться запускаем в режиме AP
Serial.println(«»);
Serial.println(«WiFi up AP»);
StartAPMode();
}
else {
Serial.println(«»);
Serial.println(«WiFi connected»);
Serial.println(«IP address: «);
Serial.println(WiFi.localIP());
}
}
bool StartAPMode()
{
WiFi.disconnect();
WiFi.mode(WIFI_AP);
WiFi.softAPConfig(apIP, apIP, IPAddress(255, 255, 255, 0));
WiFi.softAP(_ssidAP.c_str(), _passwordAP.c_str());
return true;
}
извиняюсь за глупый вопрос, когда ставлю на роутере wpa2 какие настройки в скетче ставить? если все тоже оставлять, то не соединяется. На рис 3_1 я приводил пример, что с помощью АТ команды и настроек роутера (Сетевая аутентификация: open) модуль подключается. через скетч нет.
Вложения
-
88.5 KB
Просмотры: 23 -
102.6 KB
Просмотры: 20 -
107.2 KB
Просмотры: 15 -
109.3 KB
Просмотры: 19
-
#9
Вместе с wpa2 обычно идет пароль.
В настройках безопасности роутера кроме Open, что там еще есть?
Нормальное подключение к сети выглядит так
Код:
  WiFi.mode(WIFI_STA);
  WiFi.begin(ssid, password);
Зачем брать пример, который не ясно как работает(не посмотрел что есть вторая часть скетча), возьмите пример ESP8266WiFi WiFiClient из ардуиноиде и на нем попробуйте.
-
#10
Извините что долго не отвечал. сделал как вы сказали, все заработало. спасибо большое.
-
#11
Всем привет. Есть аналогичная проблема. Все из темы перепробовал. Сеть видит, но пишет, что неправильный пароль (точно правильный) и не подключается, понятное дело.
Посоветуйте по делу. Спасибо!

-
#12
Всем привет. Есть аналогичная проблема. Все из темы перепробовал. Сеть видит, но пишет, что неправильный пароль (точно правильный) и не подключается, понятное дело.
Посоветуйте по делу. Спасибо!
Извините, но экстрасенсы в отпуске.
Кто видит сеть? На чем поднята сеть? Какое шифрование у сети? Откуда известно, что пароль правильный? Кто не подключается?
Одни вопросы. Чем вам можно помочь?
-
#13
модуль esp8266 ESP-01
прошито AT21SDK95
точка доступа создается и работает
подключаюсь, но пишет, что неправильный пароль (точно правильный)
-
#14
Почему так решили, если
пишет, что неправильный пароль
Задайте имя точки доступа ESP8266 и пароль 123456789 и попробуйте ещё раз.
-
#15
подключаюсь, но пишет, что неправильный пароль (точно правильный)
Пароль, должен содержать не менее 8 символов.
-
#16
а он там стандартный? я другой использую, который я задавал.
-
#17
или мы о разных вещах говорим или я не все понимаю. возможно оба варианта сразу
-
#18
я другой использую, который я задавал.
Что вам мешает задать пароль который вам посоветовал
Задайте имя точки доступа ESP8266 и пароль 123456789
-
#19
или мы о разных вещах говорим или я не все понимаю. возможно оба варианта сразу
Я предлагаю задать пароль в котором нельзя сделать ошибку и содержащий только разрешенные знаки. Для проверки. Потом можете поменять. Но дело ваше.
-
#20
Что вам мешает задать пароль который вам посоветовал
где его указывать?
п.с. новичок, немного запутался или не понимаю (возможно). строго не судите

В последнее время наши клиенты часто сталкиваются с проблемами при установке пакета для работы с Wi-Fi модулями ESP8266 в среде Arduino IDE. Так же проблемы возникают и после обновления уже установленных ранее паков.
Дело в том, что Arduino IDE хранит всю информацию обо всех устанавливаемых паках, и от их версий зависит контекст — каждый раз, когда вы выбираете в списке конкретную плату

Arduino IDE переключает зависимости для пред- и пост- компиляции. Это и дефайны, зависящие от конкретной платы, и указания на место, где лежат библиотеки, и т.д.

Данная ошибка гарантированно проявляется, если вы переключаетесь с более старого пакета линейки – stable, на свежий nightlybild. В этом случае дерево папок разворачиваемого пакета перестаёт совпадать с используемыми в скриптах разворачивания и установки. В итоге, получается, что в Менеджере плат, вы, как бы, установили пакет, и даже можете выбрать ESP8266 из списка,

но при попытке компиляции вы увидите ошибку – «Boardunknown», или «notfoundG++».
В обоих случаях, не нужно пытаться переустанавливать пакет, а так же удалять среду Arduino IDE и устанавливать ее заново – не поможет! Самый простой путь для решения проблемы открыть вкладку «Cвойства». Необходимо посмотреть в самом низу ссылку на папку где хранится preference.txt, и удалить всю эту папку.

Продолжение статьи читайте в электронном и печатном журнале «Amperkot.ru» (11/2018)
Данная статья является собственностью Amperkot.ru. При перепечатке данного материала активная ссылка на первоисточник, не закрытая для индексации поисковыми системами, обязательна.
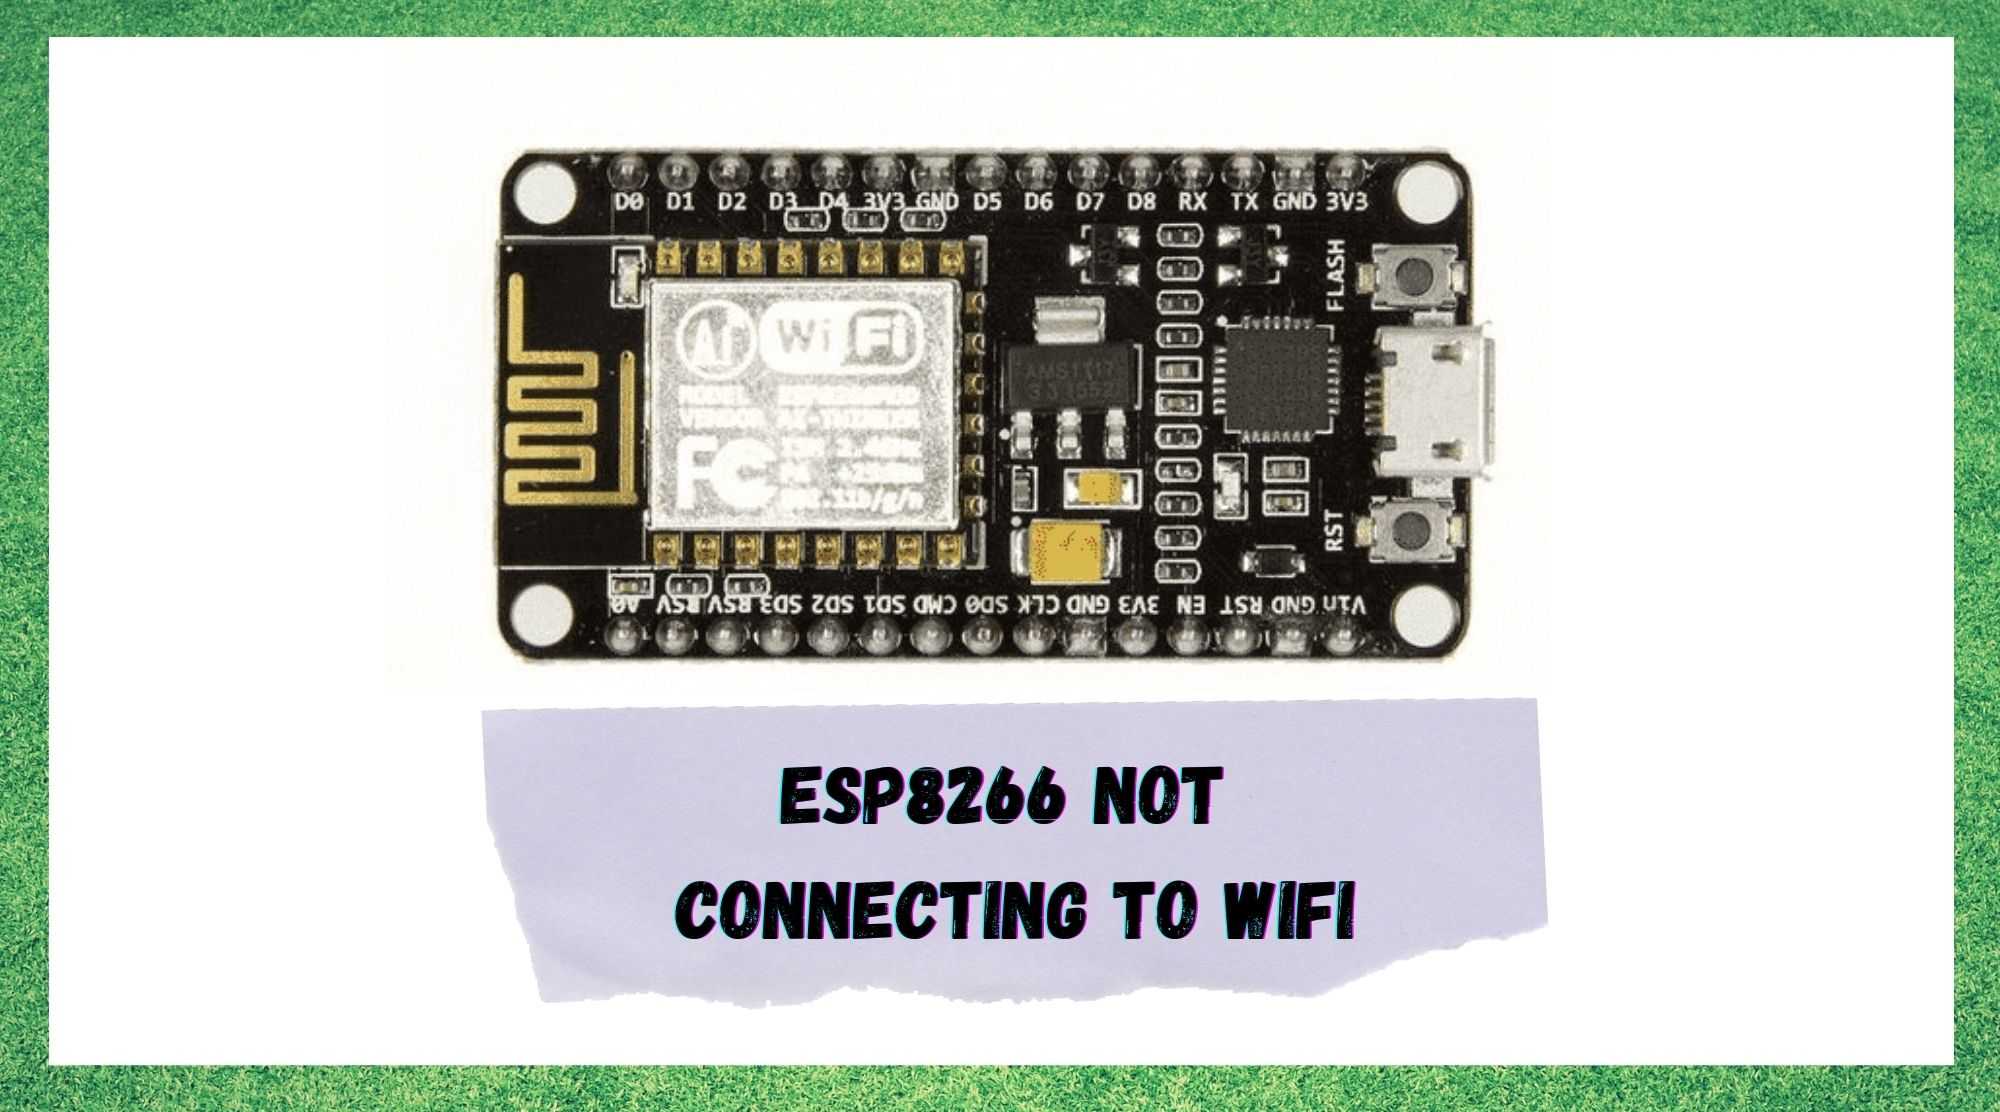
If your ESP8266 based board is not connecting to WiFi, there are some specific things you can troubleshoot in order to get it to work. In this article we cover everything you need to fix the problem of ESP8266 not connecting to WiFi.
This article is suitable for anyone having trouble with their ESP8266 based board, meaning any board with an ESP8266 chip on board.
This could be one of the popular Wemos D1 Mini type boards. It could be an ESP-01 module or any other board that features the ESP-12 module.
Table Of Contents
- Did You Set The ESP8266 With The Correct SSID And Password?
- Are You Trying To Connect The ESP8266 To A Router Set To Channel 13 or 14?
- Are You Trying To Connect The ESP8266 To A 2.4GHz Access Point?
- Is The ESP8266 Set Up In Station Mode?
- Are You Trying To Read The Analog To Digital Converter?
- Are You Trying To Connect ESP8266 To A WEP Key Network?
- Conclusion
Did You Set The ESP8266 With The Correct SSID And Password?
Ok we should start with the obvious. Yes I know, I know, we are all super-duper electronics experts, of course we didn’t do something as type an incorrect password… did we?
Is your SSID typed in EXACTLY as it needs to be?
Is your password typed in EXACTLY as it needs to be?
Go check again, yes again …and again, at least three times to be sure!
I have been caught out by this one several times, especially when setting up the ESP8266 to connect in the Arduino IDE.
#include <ESP8266WiFi.h>

// Set WiFi credentials
#define WIFI_SSID "YOUR WIFI NETWORK SSID"
#define WIFI_PASS "YOUR WIFI PASSWORD"

void setup() {
  // put your setup code here, to run once:

}

void loop() {
  // put your main code here, to run repeatedly:

}
If you are trying to set up an ESP8266 to connect to WiFi with Arduino, you should definitely check out my tutorial on how to do this, its very easy to follow and has simple yet detailed examples of code, check it out!
Are You Trying To Connect The ESP8266 To A Router Set To Channel 13 or 14?
There has been some discussion regarding channels 13 and 14, whereby users have been unable to connect an ESP8266.
I decided to look into this a little further and I found that Espressif published a WiFi selection guide for the ESP8266. Within this document, the following table is published:
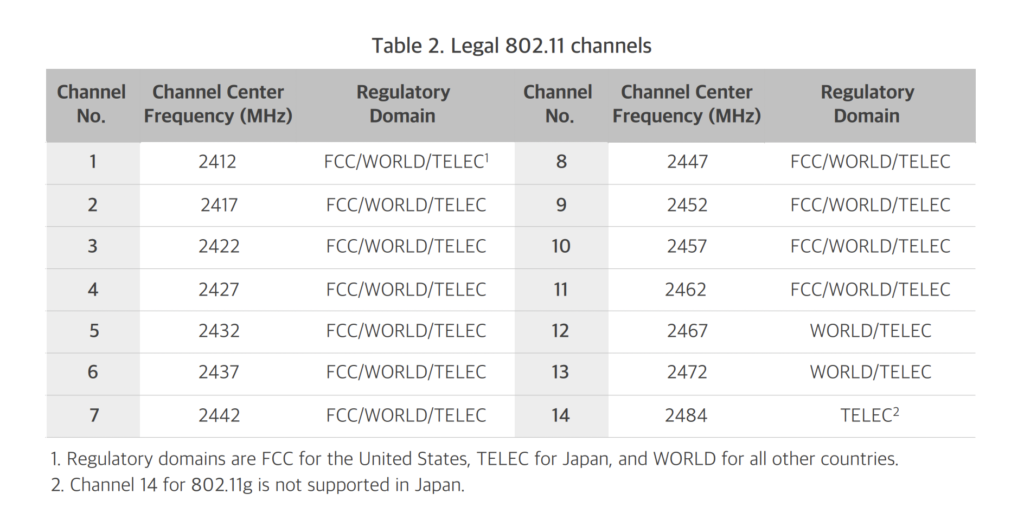
This would seem to support some of the feedback given regarding channels 13 and 14. It seems channels 12 through to 14 are not legal for use in geographical regions governed by the FCC (the United States).
In any case the simple solution to this problem would be to ensure that your router is not set to these channels and make sure you operate on a channel that is known to work.
Most likely setting your router channel and bandwidth to the auto setting will solve this issue.
Are You Trying To Connect The ESP8266 To A 2.4GHz Access Point?
The ESP8266 only operates on the 2.4GHz band and it is not compatible with the 5.8GHz band.
You must ensure that the router you are trying to connect to has the 2.4GHz band enabled and that you are trying to connect to it.
Depending on the router, you may needs to set the router AP band to 2.4GHz.

Is The ESP8266 Set Up In Station Mode?
There are two modes that the ESP8266 can operate in:
- Station mode
- AP mode
In station mode the ESP8266 is operating like a WiFi client and is able to connect to a WiFi access point, like your router.
In AP mode (access point mode) your ESP8266 is acting as the AP, so it IS the router.
If your ESP8266 is configured in AP mode, you will not be able to connect to the router, you must configure it in station mode.
Note that your ESP8266 may retain certain settings from previous projects. It is advisable to include the instruction to switch to station mode within the code to make sure the mode is correct.
For further information on how to set up the ESP8266 in station mode, check out this tutorial. It is also possible to get the ESP8266 to function in station mode and AP mode simultaneously!
Are You Trying To Read The Analog To Digital Converter?
Another problem that has been reported by several sources concerns the analog to digital converter (ADC) within the ESP8266.
The ADC has the capability to read the voltage applied to the amplifier and in this configuration the A0 (TOUT) pin must be left floating.
Although it is not clear from the datasheet, it is generally known that the analogRead() function can disrupt the WiFi signal if it is called very frequently.
The simple solution to the problem is to make sure that there is a delay in the code using the millis() function, such as in the following example taken from Stack Exchange.
unsigned int tempSensRead() {

  const unsigned long MEASURE_INTERVAL = 2L * 1000 * 60; // 2 minutes
  static unsigned long lastMeasureMillis;
  static unsigned int lastValue;

  if (millis() - lastMeasureMillis > MEASURE_INTERVAL) {
    lastMeasureMillis = millis();
    lastValue = analogRead(A0);
  }
  return lastValue;
}
Are You Trying To Connect ESP8266 To A WEP Key Network?
So you’re the oldskool type and want to connect to a network that requires a WEP key? …nothing wrong with that!
However you should be aware that in terms of security, WEP is about as useful as an ashtray on a motorbike. Therefore it is necessary to write into your code that you understand that you are being reckless.
In order to connect the ESP8266 to a network that requires a WEP key, you must first enable WEP with the following code before you begin the WiFi:
WiFi.enableInsecureWEP();
Conclusion
As we have seen in this article, there are a number of things that could be preventing the ESP8266 from connecting to WiFi. All of which are relatively easy to solve, once you understand what is happening.
If you are still having problems, I would recommend going back to the beginning and starting with this tutorial.
If you have two ESP8266 boards available you can also follow this tutorial which will teach you how to link them together with WiFi.
If you have another problem that is not listed here, I would be very interested to hear about it so I can consider adding it to this guide, just drop me an email. Thanks!
As more and more homes and businesses rely on wireless networks to keep in touch with what is happening in the world, new technologies arise to enhance reliability of internet connections.
As the complex world wide web has always been, it counts on satellites, routers, modems, microchips, senders and receivers, antennas, and a whole bunch of gadgets that enable the signal to reach small devices such as your smartwatch.
One of such devices is the Espressif Systems ESP8266, an advanced wireless microchip with microcontroller features and a TCP/IP stack. Despite its high technological design, as with so many other Wi-Fi devices, it is simply not exempt from the occasional issue.
With the intent of providing answers to the users who have been reporting issues with the ESP8266, we came up with a list of seven easy fixes any user can perform without a single risk of damaging their equipment.
So, without further ado, let us walk you through the list of fixes that you can perform to have your wireless connection working flawlessly.
- Clear the Cache
As with so many other electronic devices, the ESP8266 also has a storage unit dedicated to temporary files that help the connection with other devices. Unfortunately, this storage unit is not unlimited, and you will need to perform a cleanse every now and then.
So, go to the router settings and get the cache cleaned to give your system more room to run as it gets rid of the unnecessary temporary files.
- Verify The Wi-Fi SSID

The SSID of your Wi-Fi or, in more simple terms, the name of your network, should not have any spaces between the characters. Should that happen, the connection procedure may identify it as two separate tasks and not reach the point of connection.
So, go to the router settings and make sure your Wi-Fi SSID has no spaces between the characters. While in there you can opt to change it as well, though it’s not really recommended as your carrier should have a set of names listed on their system and that may cause discrepancies in the identification of your device.
- Check The Frequency Of The Wi-Fi Network
The frequency of the Wi-Fi also plays a key role in the connectivity process. Should you attempt to connect your Wi-Fi microchip through a frequency it is not designed to use, it will simply not happen.
As the waves will not be properly received by your Wi-Fi microchip, it will also transmit waves in a frequency that may not be received by other devices, leaving it in a limbo.
In the case of ESP8266, make sure you are not attempting connections through 2.4Ghz frequencies, as that one will not work with the microchip and prevent any connection.
Go to the router settings and make sure the frequency is set to 5Ghz, the ideal one for ESP8266, and enjoy the outstanding connection quality promised by the manufacturer.
- Make Sure The Channel Is Available

As a peculiarity of the ESP8266, the Wi-Fi AP will not run if they are set do to so through channels 13 and 14. Consider it superstition or whatever suits you, it will simply not work! Luckily, you can always change the settings and select other channels – or even let them be set automatically.
Make sure to verify the selected channel as you allow the automatic configuration, even if it is just to check if they are visible and available for the microchip. As channels 13 and 14 are not in the visibility spectrum of ESP8266, simply choose any other channel and have it connect through that.
- Check The Router Operation Configuration
One more set of configurations worth checking is the router and modem operation mode. As different modems and routers work with their own set of connection ranges, users have to make sure the selected operation mode is compatible with the router or modem used.
In the case of ESP8266, go to the router and modem settings and choose 802.11G+N, the optimal operation mode. After that, make sure to verify if the automatic channel configuration opted for 11 to automatic or 20 to automatic, and that should do it.
- Tweak The Hostname Settings

As the hostname plays an important role in the initial stages of a connection process, make sure yours is tuned to perfection. With ESP8266 the automatic initial configuration will provide you with general SSID and password, as with any other Wi-Fi microchip.
The key here is to tweak the hostname settings and add ESP-host before the Wi-Fi SSID to give it priority over other connections. That should do the trick and solve the “Not Connecting to Wi-Fi” issue.
- Check If The Issue Is Not With The Wi-Fi Connection

Should you try all the six fixes above and still notice the issue, there is a big chance the problem is not with ESP8266, but with the Wi-Fi connection. Thankfully, a simple router reboot should do the trick, as long as it is through unplugging the power cord and giving it a minute before plugging it back again.
It is fairly known that this procedure allows the router system to refresh its settings and clear storage units, running smoother and from a fresh starting point afterwards.
Finally, should you attempt all the fixes herein and still experience connection issues between the Wi-Fi and your ESP8266, give Espressif System a call. Its customer support relies on highly-trained professionals that will be glad to aid you in any sort of issues, even the replacement of components.
Совет по разработке Wi-Fi, который я недавно получил, написал stm32, подключенный к DHT11, для сбора текущих данных о температуре и влажности (Почему бы напрямую не использовать модуль DHT esp8266 для непосредственного сбора температуры и влажности, потому что я обнаружил, что температура и влажность сбора DHT в nodemcu слишком неточна, и реакция также очень медленная, поэтому используйте stm32 для подключения сбора DHT), А затем отправьте его в esp8266 через последовательный порт. Esp8266 служит в качестве TCP-клиента и просто анализирует данные о температуре и влажности, полученные последовательным портом esp8266, и отправляет их на TCP-сервер на Raspberry Pi.
В esp8266 из-за использования печати непрерывная печать вызовет текущую ситуацию, когда файл Lua не может быть прошит, поэтому я решил снова прошить прошивку, но использовалnodemcu-flasher-master(https://github.com/nodemcu/nodemcu-flasher)Перепрошивка прошивки nodemcu снова, перепрошивка прошивки не удалась: (Кубок …
Проверьте сообщения других людей в Интернете, чтобы сказать даNodeMCU-PyFlasher-3.0-x64.exe(https://github.com/marcelstoer/nodemcu-pyflasher/releases)Очистите прошивку nodemcu. Используя это программное обеспечение, можно отформатировать и стереть всю память платы, чтобы вспомогательный последовательный порт не мешал мигать прошивке, а затем мигание можно завершить. Nodemcu-flasher-master мигает старая прошивка nodemcu, и она не очень хорошо поддерживает новую прошивку. Она не может быть отформатирована перед перепрошивкой. Без этой функции перепрошивка не удастся в этой ситуации.NodeMCU PyFlasher, Это визуальная версия, основанная на esptool.py, без установки Python, вы можете непосредственно запустить программу EXE под окном. Откройте интерфейс операции следующим образом:

Обратите внимание на последний выборyes,wipes all data,После перепрошивки используйте ESPlorer.При использовании следующей демонстрации Wi-Fi (выберите сохранить в ESP), я обнаружил, что соединение Wi-Fi не может быть достигнуто. , , ГГ окончен, я думал, что эта доска закончилась. , , Последовательный порт печатается циклически жду подключения, статус wifi показывает 255,На самом деле роутер работает нормально. , , После попытки n перезапуска, форматирования и записи в программу lua, это результат. , ,
station_cfg={}
station_cfg.ssid="star201"
station_cfg.pwd="xingxinggongyu"
station_cfg.save=false
wifi.sta.config(station_cfg)
wifi.sta.connect()

tmr.alarm(0, 1000, tmr.ALARM_AUTO, function()
    if wifi.sta.getip() == nil then
        print('waiting for connected')
        print('wifi status:'..wifi.sta.status())
    else
        tmr.stop(0)
        print('esp8266 ip :' .. wifi.sta.getip())
    end
end)

ledswitch=0
pin=4
gpio.mode(pin,gpio.OUTPUT)
tmr.alarm(1,1000,1,function()
    if ledswitch==0 then
        ledswitch=1 --led on
        gpio.write(pin,gpio.LOW)
    else
        ledswitch=0 --led off
        gpio.write(pin,gpio.HIGH)
    end
end)
--dofile('tcpclient.lua')
Ничего не произошло. Я искал в интернете и не нашел хорошего решения. Кажется, никто не сталкивался с такой ситуацией. , ,
Продолжите поиск, а затем увидите, что есть документ, связанный с nodemcuLuaLoader(Скачать вводный адресhttp://www.benlo.com/esp8266/)Инструмент, попробуйте использовать этот инструмент для управления доской, а мертвая лошадь — доктор живой лошади. , ,

Установите параметры последовательного порта текущей платы в меню «Настройки» -> «Параметры порта связи», а затем нажмите «Настройки» -> «Открыть COMx». После подключения к плате область вывода последовательного порта будет продолжать печататься циклически.Ожидание подключения, статус Wi-Fi255«Сообщение об ошибке. Затем я попытался нажать эти кнопки справа от моего кадра. После нажатия этих кнопок я фактически отправил соответствующие инструкции в nodemcu. Причина, по которой я лично попытался вылечить плату и не смог подключиться к Wi-Fi, заключается в том, чтоНажмите Set AP и Survey справа. Две платы Wi-Fi на моей стороне, казалось, нажимали эти кнопки. Я предполагаю, что могут быть ошибки в самом esp8266. После нажатия этих кнопок, статус Wi-Fi Это 0, а не 255, и нет ошибки циклической печати, и IP-адрес может быть получен и распечатан позже, указывая, что рабочее соединение Wi-Fi теперь нормально, возбуждено и, наконец, оживает, и может продолжать играть счастливо, и, наконец, присоединить двух братьев Семейный портрет. , ,
