Pretty straightforward solution that worked for me, see below:-
Problem
$ git clone git@github.com:xxxxx/xxxx.git my-awesome-proj
Cloning into 'my-awesome-proj'...
ssh: connect to host github.com port 22: Connection timed out
fatal: Could not read from remote repository.
This should also timeout
$ ssh -T git@github.com
ssh: connect to host github.com port 22: Connection timed out
This might work
$ ssh -T -p 443 git@ssh.github.com
Hi xxxx! You've successfully authenticated, but GitHub does not provide shell access.
Override SSH settings
$ vim ~/.ssh/config

# You can also manually open the file and copy/paste the section below
# Add section below to it
Host github.com
  Hostname ssh.github.com
  Port 443
Then try again
$ ssh -T git@github.com
Hi xxxxx! You've successfully authenticated, but GitHub does not
provide shell access.
Try cloning now (should work)
$ git clone git@github.com:xxxxxx/xxxxx.git my-awesome-proj
Cloning into 'my-awesome-proj'...
remote: Enumerating objects: 15, done.
remote: Counting objects: 100% (15/15), done.
remote: Compressing objects: 100% (14/14), done.
remote: Total 15 (delta 0), reused 15 (delta 0), pack-reused 0
Receiving objects: 100% (15/15), 22.90 KiB | 4.58 MiB/s, done.
Reference: here => Use HTTPS with Port 443
This tutorial shows you the two main origins and solutions to the error, «fatal: could not read from remote repository.» These are:
- Git pushing to non-existing remote URL
- Failing to config SSH keys properly
First, the tutorial briefly takes you through Git remote and creating an SSH connection between Git and GitHub. Next, the tutorial creates the error then shows you how to solve it step by step.
We use GitHub for the demos, but you can still follow along with a different website.
Git remote
Git tracks its connection to GitHub using the git remote command. For example, you can check the destination URLs using the git remote -v command.
steve@thisHostname:~/workingDir/pyFiles/.git$ git remote -v
origin  https://github.com/Stevealila/Python.git (fetch)
origin  https://github.com/Stevealila/Python.git (push)
origin is an alias for the https://github.com/Stevealila/Python.git URL. You can modify or update it.
The https part shows that the connection is via HTTPs, not SSH. github.com is the website, while Python is the name of the remote repository. (fetch) or (push) means we can get (clone or pull) or send (push) data through the remote URL, respectively.
Since getting or sending data to a remote may occur through multiple branches, you need to specify the (default is main) branch after the origin part.
git push origin main
You may ignore the origin main part if the remote only has one branch and the branch is checked out during the git push process.
git push
The key takeaway is that Git must know the path to fetching from or pushing changes to a remote repository. Otherwise, it may throw the error fatal: could not read from remote repository.
Before diving into practical examples, let me show you another common origin of the error.
ALSO READ: Getting started with GitHub [Create your first Project]
SSH Connection
Secure Shell (SSH) ensures two remote computers can connect and share data securely. In this case, your (local) computer and (remote) GitHub server want to share code.
But instead of asking you to input your username and password every time you want to push to the remote repository, SSH automatically completes the connection because the computers already remember each other after the initial connection.
So, you probably get the message, «fatal: could not read from remote repository.» because the remote machine cannot remember (authenticate) your local computer.
But how do you know if an SSH connection exists?
First, check the existence of the keys in the ~/.ssh folder of your local computer.
ls ~/.ssh
Better yet, you can generate a new one.
ssh-keygen -t ed25519 -C "<your GitHub email address>"
ssh-keygen is the command to generate a key.
The -t option specifies the type of encryption used to generate the key. I have used ed25519 algorithm. You can also try out rsa algorithm.
The -C option stands for comment.
Running the command outputs an SSH key pair: public and private. The public key ends in a .pub extension, while the private key lacks an extension.
You should inform your computer’s SSH agent about the new keys. The agent is the wallet that safely stores your various SSH keys. You can start up the SSH agent using the following commands.
eval "$(ssh-agent -s)"
Next, store your private key in the agent’s wallet using the following commands.
ssh-add ~/.ssh/id_ed25519
id_ed25519 is the private key we generated earlier. Its full path is ~/.ssh/id_ed25519. We add it to the activated SSH agent using the ssh-add command.
ALSO READ: GitHub delete repository the RIGHT way [Step-by-Step]
Note: You need to add a config file before using the command on MacOS.
Next, log in to GitHub and store the public the key under SSH (New) key text box. Use this path: Settings->SSH and GPG keys
![[SOLVED] fatal: could not read from remote repository. [SOLVED] fatal: could not read from remote repository.](https://www.golinuxcloud.com/wp-content/uploads/settings-1.jpg)
Now that you have securely connected two remote machines, let’s invoke and solve the error fatal: could not read from remote repository.
Source~1: Pushing to non-existing remote
Despite authenticating the local machine, Git and GitHub may fail to understand each other if you attempt to push to a remote repository that does not exist.
Let’s build a local repository and attempt to push the changes to a non-existing remote.
Steps
steve@thisHostname:~$ mkdir test_repo && cd test_repo steve@thisHostname:~/test_repo$ git init Initialized empty Git repository in /home/steve/test_repo/.git/ steve@thisHostname:~/test_repo$ cat >> example.py print('Hello world') steve@thisHostname:~/test_repo$ git status On branch main No commits yet Untracked files: (use "git add <file>..." to include in what will be committed) example.py nothing added to commit but untracked files present (use "git add" to track) steve@thisHostname:~/test_repo$ git add . steve@thisHostname:~/test_repo$ git commit -m "Testing 1, 2, 3" [main (root-commit) aae3b47] Testing 1, 2, 3 1 file changed, 1 insertion(+) create mode 100644 example.py steve@thisHostname:~/test_repo$ git log commit aae3b47090a9fc9cc561fee37fd3077864fe573b (HEAD -> main) Author: Stevealila <stevealila25@gmail.com> Date: Tue Feb 7 10:43:37 2023 +0300 Testing 1, 2, 3
We create test_repo directory and convert it to a Git repository using the git init command. We then create example.py file in the working directory before staging and committing the changes.
ALSO READ: How to unstage files in git without loosing changes
Problem
Two errors pop up on attempting to push changes to an unknown remote. One of the errors is fatal: Could not read from remote repository.
steve@thisHostname:~/test_repo$ git push origin main fatal: 'origin' does not appear to be a git repository fatal: Could not read from remote repository. Please make sure you have the correct access rights and the repository exists.
Solved
The solution is to create the repo
and set its URL as the local repository’s remote URL.
steve@thisHostname:~/test_repo$ git remote add origin https://github.com/Stevealila/test_repo.git steve@thisHostname:~/test_repo$ git remote set-url origin git@github.com:Stevealila/test_repo.git steve@thisHostname:~/test_repo$ git push origin main Enumerating objects: 3, done. Counting objects: 100% (3/3), done. Writing objects: 100% (3/3), 237 bytes | 237.00 KiB/s, done. Total 3 (delta 0), reused 0 (delta 0), pack-reused 0 To github.com:Stevealila/test_repo.git * [new branch] main -> main
Now the connection goes through after adding or setting the remote connection.
Source~2: Incorrectly linking through SSH keys
You may also get the error when you fail to connect the machines with the SSH keys correctly.
For example, you could be pushing to or cloning from the remote after connecting the machines with SSH for the first time.
The (local) machine asks, «Are you sure you want to continue connecting (yes/no/[fingerprint])?» You should input ‘yes’ followed by clicking the enter key. If you input ‘no’ or leave it blank, the connection fails and throws the error fatal: could not read from remote repository.
Problem
steve@thisHostname:~$ git clone git@github.com:Stevealila/Python.git pyFiles
Cloning into 'pyFiles'...
The authenticity of host 'github.com (140.82.121.4)' can't be established.
ED25519 key fingerprint is SHA256:+DiY3wvvV6TuJJhbpZisF/zLDA0zPMSvHdkr4UvCOqU.
This key is not known by any other names
Are you sure you want to continue connecting (yes/no/[fingerprint])?
Host key verification failed.
fatal: Could not read from remote repository.
Please make sure you have the correct access rights
and the repository exists.
solved
steve@thisHostname:~$ git clone git@github.com:Stevealila/Python.git pyFiles
Cloning into 'pyFiles'...
The authenticity of host 'github.com (140.82.121.4)' can't be established.
ED25519 key fingerprint is SHA256:+DiY3wvvV6TuJJhbpZisF/zLDA0zPMSvHdkr4UvCOqU.
This key is not known by any other names
Are you sure you want to continue connecting (yes/no/[fingerprint])? yes
Warning: Permanently added 'github.com' (ED25519) to the list of known hosts.
remote: Enumerating objects: 10, done.
remote: Counting objects: 100% (10/10), done.
remote: Compressing objects: 100% (6/6), done.
remote: Total 10 (delta 0), reused 4 (delta 0), pack-reused 0
Receiving objects: 100% (10/10), done.
The pull process goes through after we type ‘yes’.
ALSO READ: Git command Cheat Sheet [One STOP Solution]
Conclusion
You just learned the main causes of the error fatal: could not read from remote repository and how to solve them. Now it is your turn to apply the knowledge.
Before you can read from a private repository or write to a Git repository, you must be authenticated. If you use the wrong Uniform Resource Locator (URL) to connect to a repository, or have incorrectly set up your Secure Shell (SSH) authentication, you’ll encounter the “fatal: Could not read from remote repository” error.
This guide discusses what this error means and why you may see it. It walks you through two potential solutions so you can overcome this problem when using Git.

Find Your Bootcamp Match
- Career Karma matches you with top tech bootcamps
- Access exclusive scholarships and prep courses
Select your interest
First name
Last name
Phone number
By continuing you agree to our Terms of Service and Privacy Policy, and you consent to receive offers and opportunities from Career Karma by telephone, text message, and email.
fatal: Could not read from remote repository
SSH is a protocol for authenticating with remote devices. SSH is commonly used to authenticate with Git because you don’t need to type in your password every time you authenticate.
Every platform has its own way of authenticating users over SSH. Using GitHub, for instance, you must provide your SSH key on their dashboard. Then, you can use the SSH URL associated with your repository to authenticate with GitHub.
By default, the private SSH key for your device will be in a file called ~/.ssh/id_rsa. This file is in the hidden .ssh directory in your root folder. This key will only exist if you have generated it. Otherwise, you’ll need to use the ssh-keygen command to generate a new key.
If you have not correctly set up SSH authentication, Git will be unable to verify your identity.
The two common causes to the “fatal: Could not read from remote repository” error are:
- Not adding your SSH key to the SSH agent
- Using a HTTP URL to connect to a repository
Let’s discuss each of these causes.
Cause #1: SSH Agent Issue
The SSH agent stores your SSH key. When you try to authenticate with a Git repository over SSH, Git will check the SSH agent for your key.
Your SSH key can be removed from the SSH agent for various reasons. This will make it impossible to authenticate with a Git repository.
Let’s try to clone a Git repository that is private to our local machine:
git clone git@github.com:career-karma-tutorials/ck-git
When we try to sign in, the Git command line returns an error:
fatal: Could not read from remote repository.
This error informs us we have an authentication issue. If you encounter an SSH authentication issue, your first port of call is to add your key to the SSH keychain:
This will add our id_rsa key to the keychain.
Another common mistake is to add the wrong key to your keychain. If you use a key with a different name than id_rsa to authenticate with Git, make sure you add that key to your keychain and not the id_rsa key.
Cause #2: Using a HTTP URL
There are two ways you can authenticate with Git: over HTTP and SSH. The Hypertext Transfer Protocol (HTTP) method requires specifying your username and password to a Git server to access a repository.
To authenticate with HTTP, you’ll use a URL that looks like this:
https://github.com/career-karma-tutorials/ck-git
You cannot use this URL to connect to a Git server over SSH. This is because SSH and HTTP are different protocols. If you try to sign in to the above URL using SSH, you’ll be prompted to enter your username and password.
We’ve got to use an SSH URL to connect to a repository over SSH. You can verify the URLs that you use to connect to a remote repository using the git remote -v command:
origin    https://github.com/career-karma-tutorials/ck-git (fetch)
origin    https://github.com/career-karma-tutorials/ck-git (push)
We can see that our “origin” remote uses HTTP instead of SSH. For an existing repository, we can change our URL to use SSH using the git remote set-url command:
git remote set-url origin git@github.com:career-karma-tutorials/ck-git
This command sets the “origin” URL to be equal to our SSH URL. Now that we’ve run this command, our existing Git repository will use the SSH URL to connect to the remote version of the repository.
If you are cloning a new repository, you don’t need to change the URL with which you are working. Instead, you just need to make sure you use an SSH URL to clone the repo:
git clone git@github.com:career-karma-tutorials/ck-git
Now, we can run commands like git pull, git commit, and git push on our repository because we have the correct access privileges.
Conclusion
The Git “fatal: Could not read from remote repository” error occurs when there is an issue authenticating with a Git repository. This is common if you have incorrectly set up SSH authentication.
To solve this error, make sure your SSH key is in your keychain and you connecting to a repository using the correct URL.
Время на прочтение
2 мин
Количество просмотров 105K
Много статей (в том числе и на Хабре) посвящено подключению к Git по SSH-ключам. Почти во всех из них используется один из двух способов: либо с помощью puttygen.exe, либо командами ssh-keygen или ssh-add.
Вчера на одном из компьютеров у меня не получилось сделать это для msysgit ни одним из описанных в интернете способов, и я потратил несколько часов на попытки настроить SSH-доступ, так ни чего и не добившись.
Как я решил эту проблему — под катом.
BitBucket всё время ругался на то, что ему требуется подключение с помощью ключа:
Permission denied (publickey).
fatal: Could not read from remote repository.
Please make sure you have the correct access rights and the repository exists.
Мои попытки сгенерировать ключи, указать пути в переменных среды, привязать ключи к гиту были бесполезны. Либо гит ругался крякозябрами (в случае ssh-agent cmd.exe), либо просто игнорировал всё предложенное.
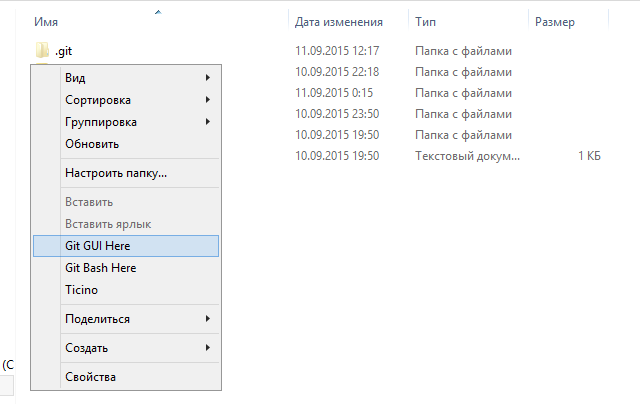
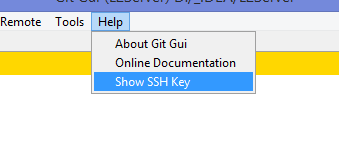
Решение оказалось куда удобнее и проще. Достаточно запустить в локальном репозитории GIT GUI Here, и в меню перейти в
Help -> Show SSH Key:
Скрины
Если вы столкнулись с такой проблемой, то скорее всего у вас там ни чего не будет:
Окно генерации SSH Key
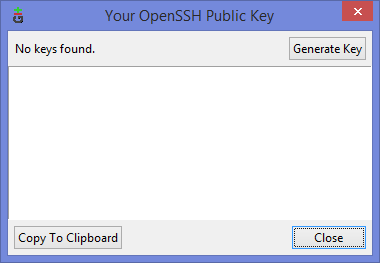
Ну а дальше читать будут, скорее всего, только самые педантичные… Жмём Generate key, видим окно запроса пароля (два раза) для приватного ключа:
Запрос пароля
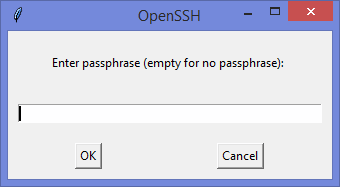
И видим сгенерировавшийся публичный ключ:
Публичный ключ
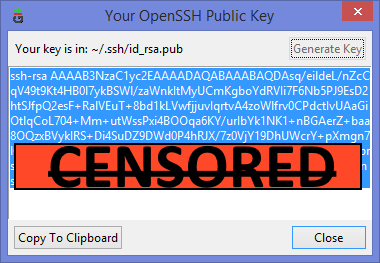
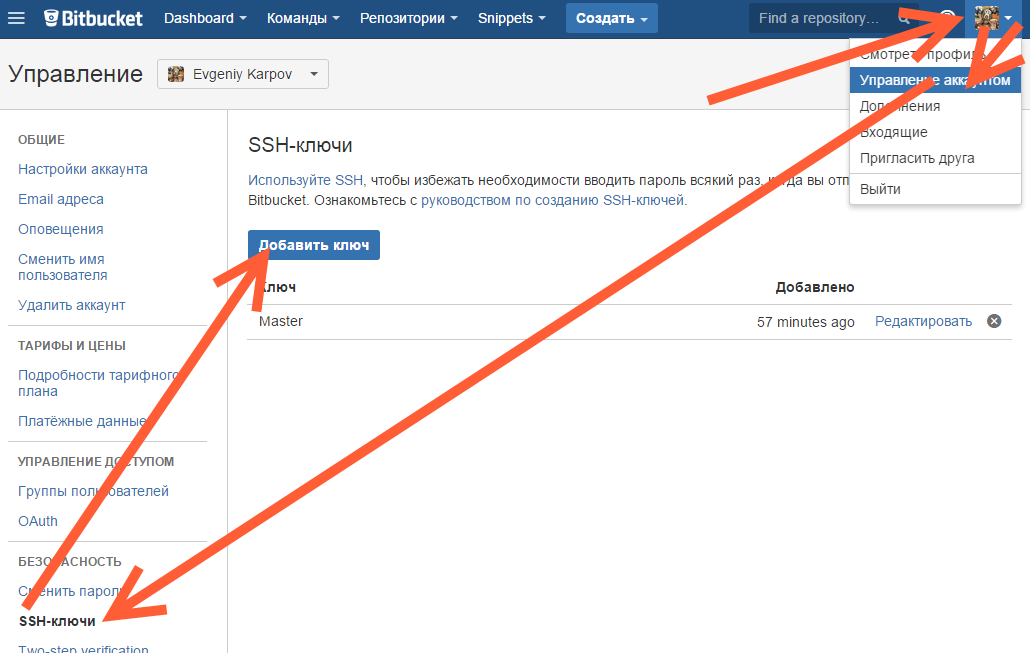
Копируем его, и добавляем вэб-морду ГИТа (в моём случае это BitBucket; ключи там можно добавить в двух местах — в настройках аккаунта и в настройках проекта, нам первый вариант, ибо второй — для деплоя проекта) [Аккаунт] — Управление аккаунтом — SSH-ключи — Добавить ключ:
Добавление ключа в BitBucket
Ну, а дальше — просто делаем что нужно — или пуш, или клон (предполагается, что git remote add вы уже сделали сами). Git спросит, можно ли добавить хост к доверенным, и запросит passphrase (пароль приватного ключа). Всё, можно работать.
Удачных разработок!
PS: Большое спасибо за наводку на решение моему коллеге Ивану!
При первой загрузке/выгрузке изменений в/из Github часто возникает ошибка git@github.com: Permission denied (publickey). fatal: Could not read from remote repository. Данная статья раз и навсегда положит этим ошибкам конец!

Всё то, о чём пойдет речь ниже, можно посмотреть в этом видео
Открываем терминал в том месте где у вас лежит код, который вы хотите интегрировать в Github или Gitlab. Проверяем есть ли уже существующий SSH ключ, для этого вводим команду ниже:
ls -al ~/.ssh
Пример НЕсуществующего ключа SSH:
Пример существующего ключа SSH:
Если ключ существует переходите сразу к шагу 4 или создайте отдельный новый ключ специально для Github.
ШАГ 2. Генерация нового SSH ключа
- Введите в терминале команду ниже:
ssh-keygen -t ed25519 -C «your_email@example.com»
Пояснения команды:ssh-keygen команда для генерации SSH ключа -t ed25519 алгоритм шифрования, по умолчанию алгоритм rsa, Github рекомендует использовать алгоритм ed25519 -C значит «комментарий», все что после этой команды в кавычках будет комментарием «your_email@example.com» комментарий, замените на свой email в Github — это нужно чтобы различать SSH ключи между собой, их может быть несколько - Теперь нужно указать путь и название файла, можно оставить по умолчанию и нажать Enter, но давайте поменяем имя файла, чтобы понимать что он сгенерирован именно для Github!
Скопируйте и вставьте путь по умолчанию, поменяйте имя файла и нажмите Enter.
- Далее нужно будет задать пароль (кодовую фразу) для нашего ключа, пропускаем этот шаг, просто два раза нажимаем Enter, иначе придется постоянно вводить этот пароль.
- Если вы все сделали правильно будет примерно также, как на скриншоте ниже:
ШАГ 3. Добавление SSH ключа в SSH-agent
Не пропускайте этот шаг! Без него ничего работать не будет.
Что же такое SSH-agent на сайте habr.com вот такое описание: «ssh-agent — это менеджер ключей для SSH. Он хранит ваши ключи и сертификаты в памяти, незашифрованные и готовые к использованию ssh . Это избавляет вас от необходимости вводить пароль каждый раз, когда вы подключаетесь к серверу.»
- Сначала запустим SSH-agent командой ниже:
eval «$(ssh-agent -s)»
надпись Agent pid 61 (у вас будет любое другое число) говорит о том, что агент успешно запущен!
- Добавьте SSH ключ в SSH агент командой ниже, предварительно поменяв название SSH ключа на ваше:
ssh-add ~/.ssh/id_ed25519_github
надпись примерная как на скрине ниже, говорит о том, что ключ успешно добавлен
- Добавим конфигурационный файл, чтобы SSH ключ автоматически добавлялся в SSH-agent, введите команду ниже, она создаст файл config, если он отсутствует:
touch ~/.ssh/config - Теперь в созданный файл config добавим следующий текст, заменив id_ed25519_github на название своего ключа, если нужно:
Host *
  AddKeysToAgent yes
  IdentityFile ~/.ssh/id_ed25519_github
- Для пользователей MacOS вводим команду ниже, откроется обычный редактор текста, вставляем в него текст и сохраняем изменения
open ~/.ssh/config - Для пользователей Windows вводим команду ниже и нажимаем Enter
cat > ~/.ssh/config <<EOF
далее вставить текст, нажать Enter, ввести команду ниже и нажать Enter
EOF
- Для пользователей MacOS вводим команду ниже, откроется обычный редактор текста, вставляем в него текст и сохраняем изменения
- Проверьте что текст был добавлен в файл config командой
cat ~/.ssh/config
должно быть как на скриншоте:
ШАГ 4. Добавление SSH в Github
Готово! Проверьте что ключ работает
Возвращаемся в наш терминал и вводим команду git pull, файлы должны загрузиться или как в моем случае должна появиться надпись, что все уже обновлено.

Спасибо за внимание!

![[SOLVED] fatal: could not read from remote repository. [SOLVED] fatal: could not read from remote repository.](https://www.golinuxcloud.com/wp-content/uploads/ssh-keys.jpg)
![[SOLVED] fatal: could not read from remote repository. fatal: could not read from remote repository.](https://www.golinuxcloud.com/wp-content/uploads/source1.jpg)
![[SOLVED] fatal: could not read from remote repository. [SOLVED] fatal: could not read from remote repository.](https://www.golinuxcloud.com/wp-content/uploads/new-repo-12-1.jpg)
![[SOLVED] fatal: could not read from remote repository. fatal: could not read from remote repository](https://www.golinuxcloud.com/wp-content/uploads/wrong-connection-e1676360398533.png)
