Использование функций потерь
Функция потерь (или объективная функция, или функция оценки результатов оптимизации) является одним из двух параметров, необходимых для компиляции модели:
model.compile(loss=’mean_squared_error’, optimizer=’sgd’)
from keras import losses
model.compile(loss=losses.mean_squared_error, optimizer=’sgd’)
Можно либо передать имя существующей функции потерь, либо передать символическую функцию TensorFlow/Theano, которая возвращает скаляр для каждой точки данных и принимает следующие два аргумента:
y_true: истинные метки. Тензор TensorFlow/Theano.
y_pred: Прогнозы. Тензор TensorFlow/Theano той же формы, что и y_true.
Фактически оптимизированная цель — это среднее значение выходного массива по всем точкам данных.
Доступные функции потери
mean_squared_error
keras.losses.mean_squared_error(y_true, y_pred)
mean_absolute_error
keras.losses.mean_absolute_error(y_true, y_pred)
mean_absolute_percentage_error
keras.losses.mean_absolute_percentage_error(y_true, y_pred)
mean_squared_logarithmic_error
keras.losses.mean_squared_logarithmic_error(y_true, y_pred)
squared_hinge
keras.losses.squared_hinge(y_true, y_pred)
hinge
keras.losses.hinge(y_true, y_pred)
categorical_hinge
keras.losses.categorical_hinge(y_true, y_pred)
logcosh
keras.losses.logcosh(y_true, y_pred)
Логарифм гиперболического косинуса ошибки прогнозирования.
log(cosh(x)) приблизительно равен (x ** 2) / 2 для малого x и abs(x) — log(2) для большого x. Это означает, что ‘logcosh’ работает в основном как средняя квадратичная ошибка, но не будет так сильно зависеть от случайного сильно неправильного предсказания.
Аргументы
- y_true: тензор истинных целей.
- y_pred: тензор прогнозируемых целей.
Возвращает
Тензор с одной записью о скалярной потере на каждый сэмпл.
huber_loss
keras.losses.huber_loss(y_true, y_pred, delta=1.0)
categorical_crossentropy
keras.losses.categorical_crossentropy(y_true, y_pred, from_logits=False, label_smoothing=0)
sparse_categorical_crossentropy
keras.losses.sparse_categorical_crossentropy(y_true, y_pred, from_logits=False, axis=-1)
binary_crossentropy
keras.losses.binary_crossentropy(y_true, y_pred, from_logits=False, label_smoothing=0)
kullback_leibler_divergence
keras.losses.kullback_leibler_divergence(y_true, y_pred)
poisson
keras.losses.poisson(y_true, y_pred)
cosine_proximity
keras.losses.cosine_proximity(y_true, y_pred, axis=-1)
is_categorical_crossentropy
keras.losses.is_categorical_crossentropy(loss)
Примечание: при использовании потери categorical_crossentropy ваши данные должны быть в категориальном формате (например, если у вас 10 классов, то целью для каждой выборки должен быть 10-мерный вектор, который является полностью нулевым, за исключением 1 в индексе, соответствующем классу выборки). Для того, чтобы преобразовать целые данные в категорические, можно использовать утилиту Keras to_categorical:
from keras.utils import to_categorical
categorical_labels = to_categorical(int_labels, num_classes=None)
При использовании переменной sparse_categorical_crossentropy loss, ваши данные должны быть целыми. Если у вас есть категориальные данные, следует использовать categoryical_crossentropy.
categoryical_crossentropy — это еще один термин для обозначения потери лога по нескольким классам.
You’ve created a deep learning model in Keras, you prepared the data and now you are wondering which loss you should choose for your problem.
We’ll get to that in a second but first what is a loss function?
In deep learning, the loss is computed to get the gradients with respect to model weights and update those weights accordingly via backpropagation. Loss is calculated and the network is updated after every iteration until model updates don’t bring any improvement in the desired evaluation metric.
So while you keep using the same evaluation metric like f1 score or AUC on the validation set during (long parts) of your machine learning project, the loss can be changed, adjusted and modified to get the best evaluation metric performance.
You can think of the loss function just like you think about the model architecture or the optimizer and it is important to put some thought into choosing it. In this piece we’ll look at:
- loss functions available in Keras and how to use them,
- how you can define your own custom loss function in Keras,
- how to add sample weighing to create observation-sensitive losses,
- how to avoid nans in the loss,
- how you can monitor the loss function via plotting and callbacks.
Let’s get into it!
Keras loss functions 101
In Keras, loss functions are passed during the compile stage, as shown below.
In this example, we’re defining the loss function by creating an instance of the loss class. Using the class is advantageous because you can pass some additional parameters.
from tensorflow import keras
from tensorflow.keras import layers

model = keras.Sequential()
model.add(layers.Dense(64, kernel_initializer='uniform', input_shape=(10,)))
model.add(layers.Activation('softmax'))

loss_function = keras.losses.SparseCategoricalCrossentropy(from_logits=True)
model.compile(loss=loss_function, optimizer='adam')
If you want to use a loss function that is built into Keras without specifying any parameters you can just use the string alias as shown below:
model.compile(loss='sparse_categorical_crossentropy', optimizer='adam')
You might be wondering how does one decide on which loss function to use?
There are various loss functions available in Keras. Other times you might have to implement your own custom loss functions.
Let’s dive into all those scenarios.
Which loss functions are available in Keras?
Binary Classification
Binary classification loss function comes into play when solving a problem involving just two classes. For example, when predicting fraud in credit card transactions, a transaction is either fraudulent or not.
Binary Cross Entropy
The Binary Cross entropy will calculate the cross-entropy loss between the predicted classes and the true classes. By default, the sum_over_batch_size reduction is used. This means that the loss will return the average of the per-sample losses in the batch.
y_true = [[0., 1.], [0.2, 0.8],[0.3, 0.7],[0.4, 0.6]]
y_pred = [[0.6, 0.4], [0.4, 0.6],[0.6, 0.4],[0.8, 0.2]]
bce = tf.keras.losses.BinaryCrossentropy(reduction='sum_over_batch_size')
bce(y_true, y_pred).numpy()
The sum reduction means that the loss function will return the sum of the per-sample losses in the batch.
bce = tf.keras.losses.BinaryCrossentropy(reduction='sum')
bce(y_true, y_pred).numpy()
Using the reduction as none returns the full array of the per-sample losses.
bce = tf.keras.losses.BinaryCrossentropy(reduction='none')
bce(y_true, y_pred).numpy()
array([0.9162905 , 0.5919184 , 0.79465103, 1.0549198 ], dtype=float32)
In binary classification, the activation function used is the sigmoid activation function. It constrains the output to a number between 0 and 1.
Multiclass classification
Problems involving the prediction of more than one class use different loss functions. In this section we’ll look at a couple:
Categorical Crossentropy
The CategoricalCrossentropy also computes the cross-entropy loss between the true classes and predicted classes. The labels are given in an one_hot format.
cce = tf.keras.losses.CategoricalCrossentropy()
cce(y_true, y_pred).numpy()
Sparse Categorical Crossentropy
If you have two or more classes and the labels are integers, the SparseCategoricalCrossentropy should be used.
y_true = [0, 1,2]
y_pred = [[0.05, 0.95, 0], [0.1, 0.8, 0.1],[0.1, 0.8, 0.1]]
scce = tf.keras.losses.SparseCategoricalCrossentropy()
scce(y_true, y_pred).numpy()
The Poison Loss
You can also use the Poisson class to compute the poison loss. It’s a great choice if your dataset comes from a Poisson distribution for example the number of calls a call center receives per hour.
y_true = [[0.1, 1.,0.8], [0.1, 0.9,0.1],[0.2, 0.7,0.1],[0.3, 0.1,0.6]]
y_pred = [[0.6, 0.2,0.2], [0.2, 0.6,0.2],[0.7, 0.1,0.2],[0.8, 0.1,0.1]]
p = tf.keras.losses.Poisson()
p(y_true, y_pred).numpy()
Kullback-Leibler Divergence Loss
The relative entropy can be computed using the KLDivergence class. According to the official docs at PyTorch:
KL divergence is a useful distance measure for continuous distributions and is often useful when performing direct regression over the space of (discretely sampled) continuous output distributions.
y_true = [[0.1, 1.,0.8], [0.1, 0.9,0.1],[0.2, 0.7,0.1],[0.3, 0.1,0.6]]
y_pred = [[0.6, 0.2,0.2], [0.2, 0.6,0.2],[0.7, 0.1,0.2],[0.8, 0.1,0.1]]
kl = tf.keras.losses.KLDivergence()
kl(y_true, y_pred).numpy()
In a multi-class problem, the activation function used is the softmax function.
Object Detection
The Focal Loss
In classification problems involving imbalanced data and object detection problems, you can use the Focal Loss. The loss introduces an adjustment to the cross-entropy criterion.
It is done by altering its shape in a way that the loss allocated to well-classified examples is down-weighted. This ensures that the model is able to learn equally from minority and majority classes.
The cross-entropy loss is scaled by scaling the factors decaying at zero as the confidence in the correct class increases. The factor of scaling down weights the contribution of unchallenging samples at training time and focuses on the challenging ones.
import tensorflow_addons as tfa

y_true = [[0.97], [0.91], [0.03]]
y_pred = [[1.0], [1.0], [0.0]]
sfc = tfa.losses.SigmoidFocalCrossEntropy()
sfc(y_true, y_pred).numpy()
array([0.00010971, 0.00329749, 0.00030611], dtype=float32)
Generalized Intersection over Union
The Generalized Intersection over Union loss from the TensorFlow add on can also be used. The Intersection over Union (IoU) is a very common metric in object detection problems. IoU is however not very efficient in problems involving non-overlapping bounding boxes.
The Generalized Intersection over Union was introduced to address this challenge that IoU is facing. It ensures that generalization is achieved by maintaining the scale-invariant property of IoU, encoding the shape properties of the compared objects into the region property, and making sure that there is a strong correlation with IoU in the event of overlapping objects.
gl = tfa.losses.GIoULoss()
boxes1 = tf.constant([[4.0, 3.0, 7.0, 5.0], [5.0, 6.0, 10.0, 7.0]])
boxes2 = tf.constant([[3.0, 4.0, 6.0, 8.0], [14.0, 14.0, 15.0, 15.0]])
loss = gl(boxes1, boxes2)
Regression
In regression problems, you have to calculate the differences between the predicted values and the true values but as always there are many ways to do it.
Mean Squared Error
The MeanSquaredError class can be used to compute the mean square of errors between the predictions and the true values.
y_true = [12, 20, 29., 60.]
y_pred = [14., 18., 27., 55.]
mse = tf.keras.losses.MeanSquaredError()
mse(y_true, y_pred).numpy()
Use Mean Squared Error when you desire to have large errors penalized more than smaller ones.
Mean Absolute Percentage Error
The mean absolute percentage error is computed using the function below.
It is calculated as shown below.
y_true = [12, 20, 29., 60.]
y_pred = [14., 18., 27., 55.]
mape = tf.keras.losses.MeanAbsolutePercentageError()
mape(y_true, y_pred).numpy()
Consider using this loss when you want a loss that you can explain intuitively. People understand percentages easily. The loss is also robust to outliers.
Mean Squared Logarithmic Error
The mean squared logarithmic error can be computed using the formula below:
Here’s an implementation of the same:
y_true = [12, 20, 29., 60.]
y_pred = [14., 18., 27., 55.]
msle = tf.keras.losses.MeanSquaredLogarithmicError()
msle(y_true, y_pred).numpy()
Mean Squared Logarithmic Error penalizes underestimates more than it does overestimates. It’s a great choice when you prefer not to penalize large errors, it is, therefore, robust to outliers.
Cosine Similarity Loss
If your interest is in computing the cosine similarity between the true and predicted values, you’d use the CosineSimilarity class. It is computed as:
The result is a number between -1 and 1 . 0 indicates orthogonality while values close to -1 show that there is great similarity.
y_true = [[12, 20], [29., 60.]]
y_pred = [[14., 18.], [27., 55.]]
cosine_loss = tf.keras.losses.CosineSimilarity(axis=1)
cosine_loss(y_true, y_pred).numpy()
LogCosh Loss
The LogCosh class computes the logarithm of the hyperbolic cosine of the prediction error.
Here’s its implementation as a stand-alone function.
y_true = [[12, 20], [29., 60.]]
y_pred = [[14., 18.], [27., 55.]]
l = tf.keras.losses.LogCosh()
l(y_true, y_pred).numpy()
LogCosh Loss works like the mean squared error, but will not be so strongly affected by the occasional wildly incorrect prediction. — TensorFlow Docs
Huber loss
For regression problems that are less sensitive to outliers, the Huber loss is used.
y_true = [12, 20, 29., 60.]
y_pred = [14., 18., 27., 55.]
h = tf.keras.losses.Huber()
h(y_true, y_pred).numpy()
Learning Embeddings
Triplet Loss
You can also compute the triplet loss with semi-hard negative mining via TensorFlow addons. The loss encourages the positive distances between pairs of embeddings with the same labels to be less than the minimum negative distance.
import tensorflow_addons as tfa

model.compile(optimizer='adam',
              loss=tfa.losses.TripletSemiHardLoss(),
              metrics=['accuracy'])
Creating custom loss functions in Keras
Sometimes there is no good loss available or you need to implement some modifications. Let’s learn how to do that.
A custom loss function can be created by defining a function that takes the true values and predicted values as required parameters. The function should return an array of losses. The function can then be passed at the compile stage.
def custom_loss_function(y_true, y_pred):
   squared_difference = tf.square(y_true - y_pred)
   return tf.reduce_mean(squared_difference, axis=-1)

model.compile(optimizer='adam', loss=custom_loss_function)
Let’s see how we can apply this custom loss function to an array of predicted and true values.
import numpy as np

y_true = [12, 20, 29., 60.]
y_pred = [14., 18., 27., 55.]
cl = custom_loss_function(np.array(y_true),np.array(y_pred))
cl.numpy()
Use of Keras loss weights
During the training process, one can weigh the loss function by observations or samples. The weights can be arbitrary, but a typical choice is class weights (distribution of labels). Each observation is weighted by the fraction of the class it belongs to (reversed) so that the loss for minority class observations is more important when calculating the loss.
One of the ways to do this is to pass the class weights during the training process.
The weights are passed using a dictionary that contains the weight for each class. You can compute the weights using Scikit-learn or calculate the weights based on your own criterion.
weights = { 0:1.01300017,1:0.88994364,2:1.00704935, 3:0.97863318,      4:1.02704553, 5:1.10680686,6:1.01385603,7:0.95770152, 8:1.02546573,
               9:1.00857287}
model.fit(x_train, y_train,verbose=1, epochs=10,class_weight=weights)
The second way is to pass these weights at the compile stage.
weights = [1.013, 0.889, 1.007, 0.978, 1.027,1.106,1.013,0.957,1.025, 1.008]

model.compile(optimizer=tf.keras.optimizers.SGD(),
              loss=tf.keras.losses.SparseCategoricalCrossentropy(),
              loss_weights=weights,
              metrics=['accuracy'])
How to monitor Keras loss function [example]
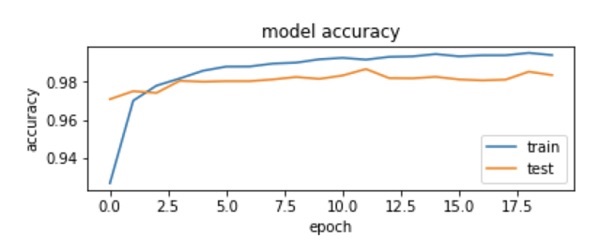
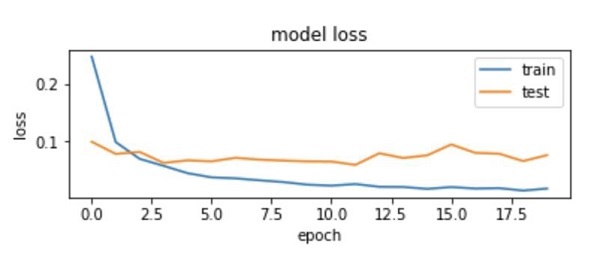
It is usually a good idea to monitor the loss function on the training and validation set as the model is training. Looking at those learning curves is a good indication of overfitting or other problems with model training.
There are two main options of how this can be done.
Monitor Keras loss using console logs
The quickest and easiest way to log and look at the losses is simply printing them to the console.
import tensorflow as tf

mnist = tf.keras.datasets.mnist
(x_train, y_train), (x_test, y_test) = mnist.load_data()
x_train, x_test = x_train / 255.0, x_test / 255.0

model = tf.keras.models.Sequential([
   tf.keras.layers.Flatten(input_shape=(28, 28)),
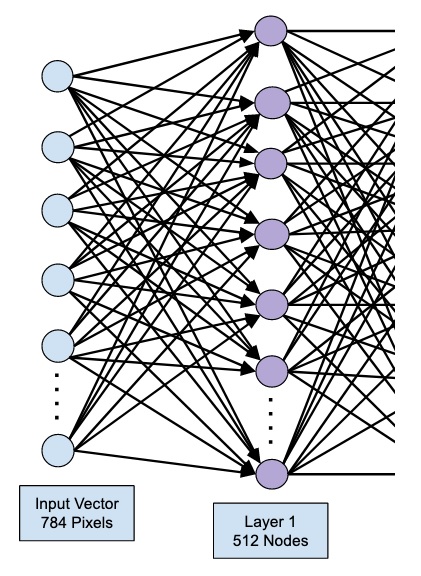
   tf.keras.layers.Dense(512, activation='relu'),
   tf.keras.layers.Dropout(0.2),
   tf.keras.layers.Dense(10, activation='softmax')
])

model.compile(optimizer='sgd',
             loss='sparse_categorical_crossentropy',
             metrics=['accuracy'])

model.fit(x_train, y_train,verbose=1, epochs=10)
The problem with this approach is that those logs can be easily lost, it is difficult to see progress, and when working on remote machines, you may not have access to it.
Monitor Keras loss using a callback
Another cleaner option is to use a callback that will log the loss somewhere on every batch and epoch ended.
You need to decide where and what you would like to log, but it is really simple.
For example, logging Keras loss to neptune.ai could look like this:
from keras.callbacks import Callback

class NeptuneCallback(Callback):
    def on_batch_end(self, batch, logs=None):
        for metric_name, metric_value in logs.items():
            neptune_run[f"{metric_name}"].log(metric_value)

    def on_epoch_end(self, epoch, logs=None):
        for metric_name, metric_value in logs.items():
            neptune_run[f"{metric_name}"].log(metric_value)
You can create the monitoring callback yourself or use one of the many available Keras callbacks both in the Keras library and in other libraries that integrate with it, like neptune.ai, TensorBoard, and others.
Once you have the callback ready, you simply pass it to the model.fit(...):
pip install neptune-tensorflow-keras# the same as above
import neptune.new as neptune
from neptune.new.integrations.tensorflow_keras import NeptuneCallback
run = neptune.init_run()
neptune_callback = NeptuneCallback(run=run)
model.fit(
x_train,
y_train,
validation_split=0.2,
epochs=10,
callbacks=[neptune_callback],
)
And monitor your experiment learning curves in the web app:
Note: For the most up-to-date code examples, please refer to the Neptune-Keras integration docs.
With neptune.ai, you can not only track losses, but also other metrics and parameters, as well as artifacts, source code, system metrics and more.
Why Keras loss nan happens
Most of the time, losses you log will be just some regular values, but sometimes you might get nans when working with Keras loss functions.
When that happens, your model will not update its weights and will stop learning, so this situation needs to be avoided.
There could be many reasons for nan loss but usually, what happens is:
- nans in the training set will lead to nans in the loss,
- NumPy infinite in the training set will also lead to nans in the loss,
- Using a training set that is not scaled,
- Use of very large l2 regularizers and a learning rate above 1,
- Use of the wrong optimizer function,
- Large (exploding) gradients that result in a large update to network weights during training.
So in order to avoid nans in the loss, ensure that:
- Check that your training data is properly scaled and doesn’t contain nans;
- Check that you are using the right optimizer and that your learning rate is not too large;
- Check whether the l2 regularization is not too large;
- If you are facing the exploding gradient problem, you can either: re-design the network or use gradient clipping so that your gradients have a certain “maximum allowed model update”.
Vanishing and Exploding Gradients in Neural Network Models: Debugging, Monitoring, and Fixing
Understanding Gradient Clipping (and How It Can Fix Exploding Gradients Problem)
Final thoughts
Hopefully, this article gave you some background into loss functions in Keras.
We’ve covered:
- Built-in loss functions in Keras,
- Implementation of your own custom loss functions,
- How to add sample weighing to create observation-sensitive losses,
- How to avoid loss nans,
- How you can visualize loss as your model is training.
For more information, check out the Keras Repository and the TensorFlow Loss Functions documentation.
При обучении нейронной сети на обучающей выборке на выходе нейросети вычисляются два ключевых параметра эффективности обучения — ошибка и точность предсказания. Для этого используются функция потери (loss) и метрика точности. Эти метрики различаются в зависимости от поставленной задачи (классификация или сегментация изображения, детекция объекта, регрессия). В Keras мы можем определить свои собственные функцию потери и метрики точности под свою конкретную задачу. О таких кастомных функциях и пойдет речь в статье. Кому интересно, прошу под кат.
Для примера предположим, что нам необходимо реализовать функцию ошибки Mean Average Error (MAE). Кастомную функцию потерь MAE можно реализовать следующим образом:
from keras import backend as K

def mae(y_true, y_pred):
    true_value = K.sum(y_true * K.arange(0, 100, dtype="float32"), axis=-1)
    pred_value = K.sum(y_pred * K.arange(0, 100, dtype="float32"), axis=-1)
    mae = K.mean(K.abs(true_value - pred_value))
return mae
Здесь мы используем функции sum, arange, mean и abs, определенные в Keras.
Точно так же можно определить свою метрику точности. К примеру определим метрику earth_movers_distance для сравнения двух гистограмм:
from keras import backend as K

def earth_movers_distance(y_true, y_pred):
    cdf_true = K.cumsum(y_true, axis=-1)
    cdf_pred = K.cumsum(y_pred, axis=-1)
    emd = K.sqrt(K.mean(K.square(cdf_true - cdf_pred), axis=-1))
    return K.mean(emd)
Чтобы использовать наши метрики mae и earth_movers_distance импортируем соответствующие функции из отдельного модуля и добавим их в параметры loss и metrics при компиляции модели:
from utils.metrics import mae, earth_movers_distance

loss = earth_movers_distance
model.compile(optimizer=optimizer, loss=loss, metrics=[mae, "accuracy"])
Загрузка модели Keras с кастомной функцией потери
При обучении модели в Keras можно сохранять веса модели в h5 файл для последующей загрузки обученной модели на этапе предсказания. Если мы используем кастомные функции потерь и метрики качества, то мы можем столкнуться с проблемой. Когда мы загружаем обученные веса из файла h5 для модели с помощью метода load_weights мы можем получить такую ошибку:
ValueError: Unknown loss function:earth_movers_distance
Это известный баг в Keras (о нем писали в официальном репозитории на github).
Чтобы решить проблему нужно добавить наши кастомные функции потери и метрики качества в Keras:
from keras.utils.generic_utils import get_custom_objects
get_custom_objects().update({"earth_movers_distance": earth_movers_distance, "age_mae": age_mae})
Пока на этом все. Всем удачи и до новых встреч!
Все курсы > Вводный курс > Занятие 21
В завершающей лекции вводного курса ML мы изучим основы нейронных сетей (neural network), более сложных алгоритмов машинного обучения.
Алгоритмы нейронных сетей принято относить к области глубокого обучения (deep learning). Все изученные нами ранее алгоритмы относятся к так называемому традиционному машинному обучению (traditional machine learning).
Прежде чем перейти к этому занятию, настоятельно рекомендую пройти предыдущие уроки вводного курса.
Смысл, структура и принцип работы
Смысл алгоритма нейронной сети такой же, как и у классических алгоритмов. Мы также имеем набор данных и цель, которой хотим добиться, обучив наш алгоритм (например, предсказать число или отнести объект к определенному классу).
Отличие нейросети от других алгоритмов заключается в ее структуре.
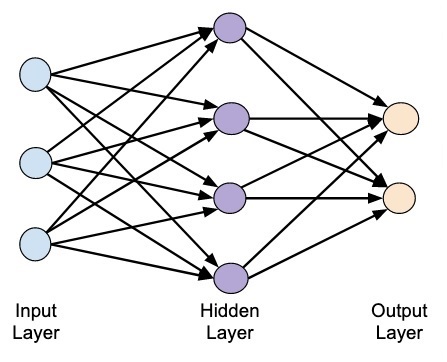
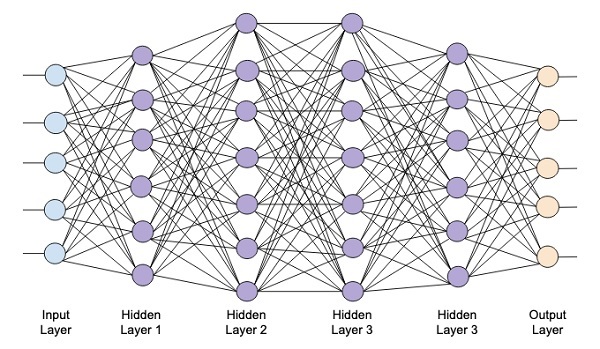
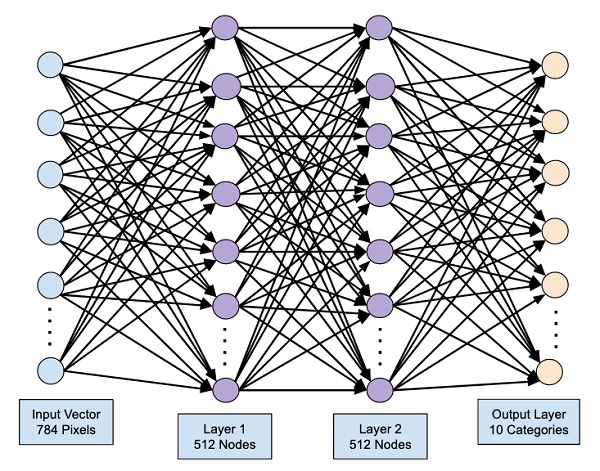
Как мы видим, нейронная сеть состоит из нейронов, сгруппированных в слои (layers), у нее есть входной слой (input layer), один или несколько скрытых слоев (hidden layers) и выходной слой (output layer). Каждый нейрон связан с нейронами предыдущего слоя через определенные веса.
Количество слоев и нейронов не ограничено. Эта особенность позволяет нейронной сети моделировать очень сложные закономерности, с которыми бы не справились, например, линейные модели.
Функционирует нейросеть следующим образом.
На первом этапе данные подаются в нейроны входного слоя (x и y) и умножаются на соответствующие веса (w1, w2, w3, w4). Полученные произведения складываются. К результату прибавляется смещение (bias, в данном случае b1 и b2).
$$ w_{1}cdot x + w_{3}cdot y + b_{1} $$
$$ w_{2}cdot x + w_{4}cdot y + b_{2} $$
Получившаяся сумма подаётся в функцию активации (activation function) для ограничения диапазона и стабилизации результата. Этот результат записывается в нейроны скрытого слоя (h1 и h2).
$$ h_{1} = actfun(w_{1}cdot x + w_{3}cdot y + b_{1}) $$
$$ h_{2} = actfun(w_{2}cdot x + w_{4}cdot y + b_{2}) $$
На втором этапе процесс повторяется для нейронов скрытого слоя (h1 и h2), весов (w5 и w6) и смещения (b3) до получения конечного результата (r).
$$ r = actfun(w_{5}cdot h_{1} + w_{6}cdot h_{2} + b_{3}) $$
Описанная выше нейронная сеть называется персептроном (perceptron). Эта модель стремится повторить восприятие информации человеческим мозгом и учитывает три этапа такого процесса:
- Восприятие информации через сенсоры (входной слой)
- Создание ассоциаций (скрытый слой)
- Реакцию (выходной слой)
Основы нейронных сетей на простом примере
Приведем пример очень простой нейронной сети, которая на входе получает рост и вес человека, а на выходе предсказывает пол. Скрытый слой в данном случае мы использовать не будем.
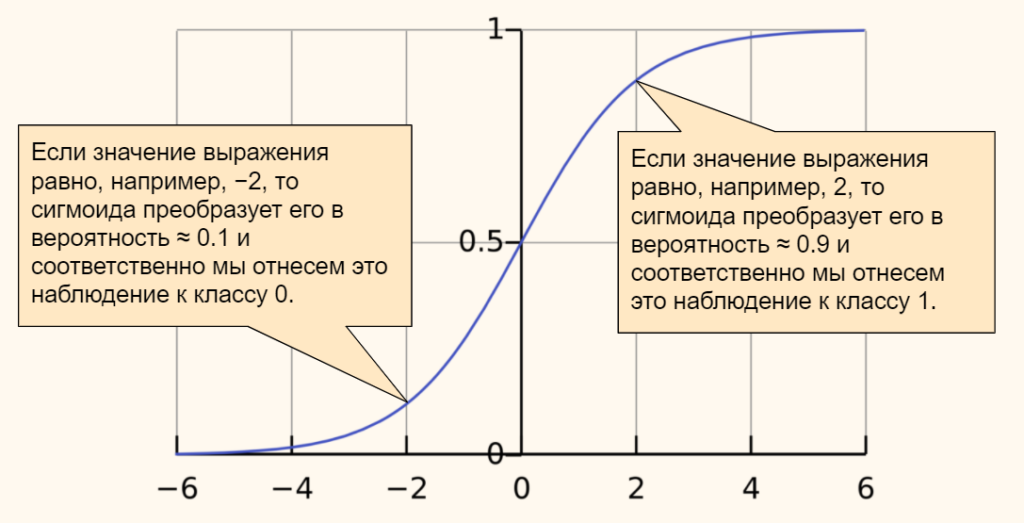
В качестве функции активации мы возьмём сигмоиду. Ее часто используют в задачах бинарной (состоящей из двух классов) классификации. Приведем формулу.
$$ f(x) = frac{mathrm{1} }{mathrm{1} + e^{-x}} $$
График сигмоиды выглядит следующим образом.
Эта функция преобразует любые значения в диапазон (или вероятность) от 0 до 1. В случае задачи классификации, если результат (вероятность) близок к нулю, мы отнесем наблюдение к одному классу, если к единице, то к другому. Граница двух классов пройдет на уровне 0,5.
Общее уравнение нейросети выглядит следующим образом.
$$ r = sigmoid(w_{1}cdot weight + w_{2}cdot height + bias) $$
Теперь предположим, что у нас есть следующие данные и параметры нейросети.
Откроем ноутбук к этому занятию⧉
|
# даны вес и рост трех человек # единицей мы обозначим мужской пол, а нулем — женский. data = { ‘Иван’: [84, 180, 1], ‘Мария’: [57, 165, 0], ‘Анна’: [62, 170, 0] } |
|
# и даны следующие веса и смещение w1, w2, b = 0.3, 0.1, —39 |
Пропустим первое наблюдение через нашу нейросеть. Следуя описанному выше процессу, вначале умножим данные на соответствующие веса и прибавим смещение.
|
r = w1 * data[‘Иван’][0] + w2 * data[‘Иван’][1] + b |
Теперь к полученному результату (r) применим сигмоиду.
|
np.round(1 / (1 + np.exp(—r)), 3) |
Результат близок к единице, значит пол мужской. Модель сделала верный прогноз. Повторим эти вычисления для каждого из наблюдений.
|
# пройдемся по ключам и значениям нашего словаря с помощью метода .items() for k, v in data.items(): # вначале умножим каждую строчку данных на веса и прибавим смещение r1 = w1 * v[0] + w2 * v[1] + b # затем применим сигмоиду r2 = 1 / (1 + np.exp(—r1)) # если результат больше 0,5, модель предскажет мужской пол if r2 > 0.5: print(k, np.round(r2, 3), ‘male’) # в противном случае, женский else: print(k, np.round(r2, 3), ‘female’) |
|
Иван 0.985 male Мария 0.004 female Анна 0.032 female |
Как мы видим, модель отработала верно.
Обучение нейронной сети
В примере выше был описан первый этап работы нейронной сети, называемый прямым распространением (forward propagation).
И кажется, что этого достаточно. Модель справилась с поставленной задачей. Однако, обратите внимание, веса были подобраны заранее и никаких дополнительных действий от нас не потребовалось.
В реальности начальные веса выбираются случайно и отклонение истинного результата от расчетного (т.е. ошибка) довольно велико.
Как и с обычными алгоритмами ML, для построения модели, нам нужно подобрать идеальные веса или заняться оптимизацией. Применительно к нейронным сетям этот процесс называется обратным распространением (back propagation).
В данном случае мы как бы двигаемся в обратную сторону и, уже зная результат (и уровень ошибки), с учётом имеющихся данных рассчитываем, как нам нужно изменить веса и смещения, чтобы уровень ошибки снизился.
Для того чтобы математически описать процесс оптимизации, нам не хватает знаний математического анализа (calculus) и, если говорить более точно, понятия производной (derivative).
Затем, уже с новыми весами, мы снова повторяем весь процесс forward propagation слева направо и снова рассчитываем ошибку. После этого мы вновь меняем веса в ходе back propagation.
Эти итерации повторяются до тех пор, пока ошибка не станет минимальной, а веса не будут подобраны идеально.
Создание нейросети в библиотеке Keras
Теперь давайте попрактикуемся в создании и обучении нейронной сети с помощью библиотеки Keras. В первую очередь установим необходимые модули и библиотеки.
|
# установим библиотеку tensorflow (через нее мы будем пользоваться keras) и модуль mnist !pip install tensorflow mnist |
И импортируем их.
|
# импортируем рукописные цифры import mnist # и библиотеку keras from tensorflow import keras |
1. Подготовка данных
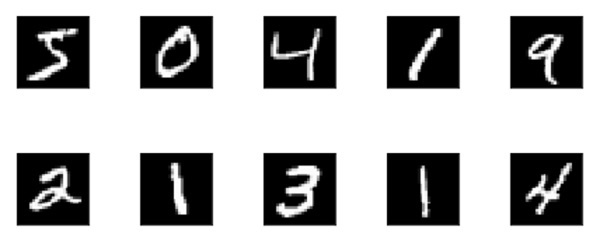
Как вы вероятно уже поняли, сегодня мы снова будем использовать уже знакомый нам набор написанных от руки цифр MNIST (только на этот раз воспользуемся не библиотекой sklearn, а возьмем отдельный модуль).
В модуле MNIST содержатся чёрно-белые изображения цифр от 0 до 9 размером 28 х 28 пикселей. Каждый пиксель может принимать значения от 0 (черный) до 255 (белый).
Данные в этом модуле уже разбиты на тестовую и обучающую выборки. Посмотрим на обучающий набор данных.
|
# сохраним обучающую выборку и соответсвующую целевую переменную X_train = mnist.train_images() y_train = mnist.train_labels() # посмотрим на размерность print(X_train.shape) print(y_train.shape) |
Как мы видим, обучающая выборка содержит 60000 изображений и столько же значений целевой переменной. Теперь посмотрим на тестовые данные.
|
# сделаем то же самое с тестовыми данными X_test = mnist.test_images() y_test = mnist.test_labels() # и также посмотрим на размерность print(X_test.shape) print(y_test.shape) |
Таких изображений и целевых значений 10000.
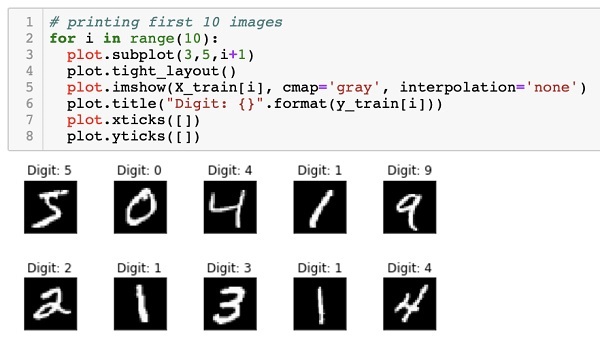
Посмотрим на сами изображения.
|
# создадим пространство для четырех картинок в один ряд fig, axes = plt.subplots(1, 4, figsize = (10, 3)) # в цикле for создадим кортеж из трех объектов: id изображения (всего их будет 4), самого изображения и # того, что на нем представлено (целевой переменной) for ax, image, label in zip(axes, X_train, y_train): # на каждой итерации заполним соответствующее пространство картинкой ax.imshow(image, cmap = ‘gray’) # и укажем какой цифре соответствует изображение с помощью f форматирования ax.set_title(f‘Target: {label}’) |
Нейросети любят, когда диапазон входных значений ограничен (нормализован). В частности, мы можем преобразовать диапазон [0, 255] в диапазон от [–1, 1]. Сделать это можно по следующей формуле.
$$ x’ = 2 frac {x-min(x)}{max(x)-min(x)}-1 $$
Применим эту формулу к нашим данным.
|
# функция np.min() возвращает минимальное значение, # np.ptp() — разницу между максимальным и минимальным значениями (от англ. peak to peak) X_train = 2. * (X_train — np.min(X_train)) / np.ptp(X_train) — 1 X_test = 2. * (X_test — np.min(X_test)) / np.ptp(X_test) — 1 |
Посмотрим на новый диапазон.
|
# снова воспользуемся функцией np.ptp() np.ptp(X_train) |
Теперь нам необходимо «вытянуть» изображения и превратить массивы, содержащие три измерения, в двумерные матрицы. Мы уже делали это на занятии по компьютерному зрению.
Применим этот метод к нашим данным.
|
# «вытянем» (flatten) наши изображения, с помощью метода reshape # у нас будет 784 столбца (28 х 28), количество строк Питон посчитает сам (-1) X_train = X_train.reshape((—1, 784)) X_test = X_test.reshape((—1, 784)) # посмотрим на результат print(X_train.shape) print(X_test.shape) |
Посмотрим на получившиеся значения пикселей.
|
# выведем первое изображение [0], пиксели с 200 по 209 X_train[0][200:210] |
|
array([—1. , —1. , —1. , —0.61568627, 0.86666667, 0.98431373, 0.98431373, 0.98431373, 0.98431373, 0.98431373]) |
Наши данные готовы. Теперь нужно задать конфигурацию модели.
2. Конфигурация нейронной сети
Существует множество различных архитектур нейронных сетей. Пока что мы познакомились с персептроном или в более общем смысле нейросетями прямого распространения (Feed Forward Neural Network, FFNN), в которых данные (сигнал) поступают строго от входного слоя к выходному.
Такую же сеть мы и будем использовать для решения поставленной задачи. В частности, на входе мы будем одновременно подавать 784 значения, которые затем будут проходить через два скрытых слоя по 64 нейрона каждый и поступать в выходной слой из 10 нейронов (по одному для каждой из цифр или классов).
В первую очередь воспользуемся классом Sequential библиотеки Keras, который укажет, что мы задаём последовательно связанные между собой слои.
|
# импортируем класс Sequential from tensorflow.keras.models import Sequential # и создадим объект этого класса model = Sequential() |
Далее нам нужно прописать сами слои и связи между нейронами.
Тип слоя Dense, который мы будем использовать, получает данные со всех нейронов предыдущего слоя. Функцией активации для скрытых слоев будет уже известная нам сигмоида.
|
# импортируем класс Dense from tensorflow.keras.layers import Dense # и создадим первый скрытый слой (с указанием функции активации и размера входного слоя) model.add(Dense(64, activation = ‘sigmoid’, input_shape = (784,))) # затем второй скрытый слой model.add(Dense(64, activation = ‘sigmoid’)) # и наконец выходной слой model.add(Dense(10, activation = ‘softmax’)) |
Выходной слой будет состоять из 10 нейронов, по одному для каждого из классов (цифры от 0 до 9). В качестве функции активации будет использована новая для нас функция softmax (softmax function).
Если сигмоида подходит для бинарной классификации, то softmax применяется для задач многоклассовой классификации. Приведем формулу.
$$ text{softmax}(vec{z})_{i} = frac{e^{z_i}}{sum_{j=1}^K e^{z_i}} $$
Функция softmax на входе принимает вектор действительных чисел (z), применяет к каждому из элементов zi экспоненциальную функцию и нормализует результат через деление на сумму экспоненциальных значений каждого из элементов.
На выходе получается вероятностное распределение любого количества классов (K), причем каждое значение находится в диапазоне от 0 до 1, а сумма всех значений равна единице. Приведем пример для трех классов.
Очевидно, вероятность того, что это кошка, выше. Теперь, когда мы задали архитектуру сети, необходимо заняться ее настройками.
Работа над ошибками. Внимательный читатель безусловно обратил внимание, что вероятности на картинке не соответствуют приведенным в векторе значениям. Если подставить эти числа в формулу softmax вероятности будут иными.
|
z = ([1, 2, 0.5]) np.exp(z) / sum(np.exp(z)) |
|
array([0.2312239 , 0.62853172, 0.14024438]) |
Впрочем, алгоритм по-прежнему уверен, что речь идет о кошке.
3. Настройки
Настроек будет три:
- тип функции потерь (loss function) определяет, как мы будем считать отклонение прогнозного значения от истинного
- способ или алгоритм оптимизации этой функции (optimizer) поможет снизить потерю или ошибку и подобрать правильные веса в процессе back propagation
- метрика (metric) покажет, насколько точна наша модель
Функция потерь
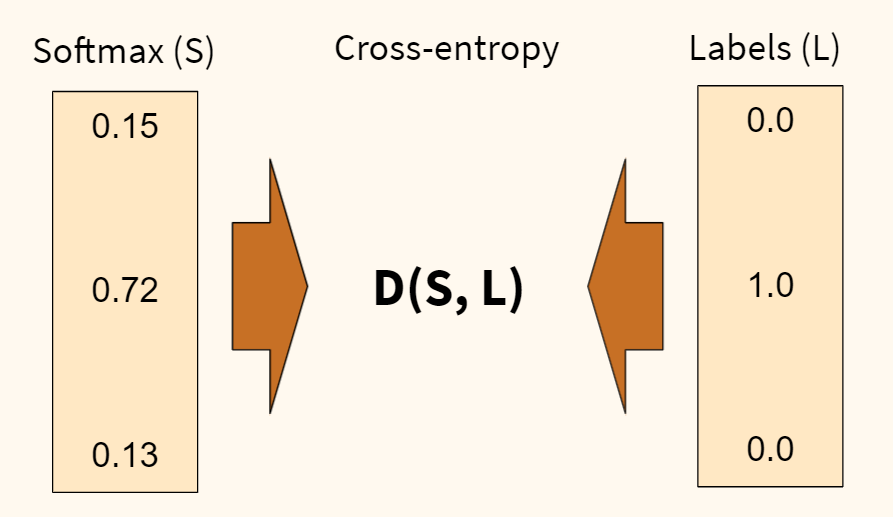
В первую очередь, определимся с функцией потерь. Раньше, например, в задаче регрессии, мы использовали среднеквадратическую ошибку (MSE). Для задач классификации мы будем использовать функцию потерь, называемую перекрестной или кросс-энтропией (cross-entropy). Продолжим пример с собакой, кошкой и попугаем.
Функция перекрестной энтропии (D) показывает степень отличия прогнозного вероятностного распределения (которое мы получили на выходе функции softmax (S)) от истинного (наша целевая переменная (L)). Чем больше отличие, тем выше ошибка.
Также обратите внимание, наша целевая переменная закодирована, вместо слова «кошка» напротив соответсвующего класса стоит единица, а напротив остальных классов — нули. Такая запись называется унитарным кодом, хотя чаще используется анлийский термин one-hot encoding.
Когда мы будем обучать наш алгоритм, мы также применим эту кодировку к нашим данным. Например, если в целевой переменной содержится цифра пять, то ее запись в one-hot encoding будет следующей.
В дополнение замечу, что функция кросс-энтропии, в которой применяется one-hot encoding, называется категориальной кросс-энтропией (categorical cross-entropy).
Отлично! С тем как мы будем измерять уровень ошибки (качество обучения) нашей модели, мы определились. Теперь нужно понять, как мы эту ошибку будем минимизировать. Для этого существует несколько алгоритмов оптимизации.
Алгоритм оптимизации
Классическим алгоритмом является, так называемый, метод стохастического градиентного спуска (Stochastic Gradient Descent или SGD).
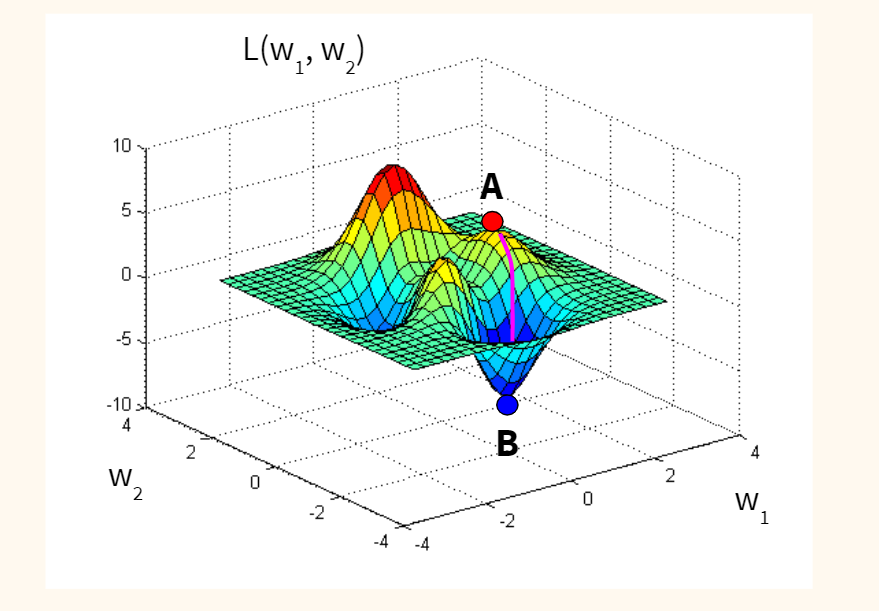
Если предположить для простоты, что наша функция потерь оптимизирует один вес исходной модели, и мы находимся изначально в точке А (с неидеальным случайным весом), то наша задача — оказаться в точке B, где ошибка (L) минимальна, а вес (w) оптимален.
Спускаться мы будем вдоль градиента, то есть по кратчайшему пути. Идею градиента проще увидеть на функции с двумя весами. Такая функция имеет уже три измерения (две независимых переменных, w1 и w2, и одну зависимую, L) и графически похожа на «холмистую местность», по которой мы будем спускаться по наиболее оптимальному маршруту.
Стохастичность (или случайность) этого алгоритма заключается в том, что мы берем не всю выборку для обновления весов модели, а лишь одно или несколько случайных наблюдений. Такой подход сильно сокращает время оптимизации.
Метрика
Остается определиться с метрикой качества. Здесь мы просто возьмём знакомую нам метрику accuracy, которая посчитает долю правильно сделанных прогнозов.
Посмотрим на используемый код.
|
model.compile( loss = ‘categorical_crossentropy’, optimizer = ‘sgd’, metrics = [‘accuracy’] ) |
4. Обучение модели
Теперь давайте соберём все описанные выше элементы и посмотрим на работу модели в динамике. Повторим ещё раз изученные выше шаги.
- Значения пикселей каждого изображения поступают в 784 нейрона входного слоя
- Далее они проходят через скрытые слои, где они умножаются на веса, складываются, смещаются и поступают в соответствующую функцию активации
- На выходе из функции softmax мы получаем вероятности для каждой из цифр
- После этого результат сравнивается с целевой переменной с помощью функции перекрестной энтропии (функции потерь); делается расчет ошибки
- На следующем шаге алгоритм оптимизации стремится уменьшить ошибку и соответствующим образом изменяет веса
- После этого процесс повторяется, но уже с новыми весами.
Давайте выполним все эти операции в библиотеке Keras.
|
# вначале импортируем функцию to_categorical, чтобы сделать one-hot encoding from tensorflow.keras.utils import to_categorical |
|
# обучаем модель model.fit( X_train, # указываем обучающую выборку to_categorical(y_train), # делаем one-hot encoding целевой переменной epochs = 10 # по сути, эпоха показывает сколько раз алгоритм пройдется по всем данным ) |
|
1 2 3 4 5 6 7 8 9 10 11 12 13 14 15 16 17 18 19 20 21 |
Epoch 1/10 1875/1875 [==============================] — 4s 2ms/step — loss: 2.0324 — accuracy: 0.4785 Epoch 2/10 1875/1875 [==============================] — 3s 2ms/step — loss: 1.2322 — accuracy: 0.7494 Epoch 3/10 1875/1875 [==============================] — 3s 2ms/step — loss: 0.7617 — accuracy: 0.8326 Epoch 4/10 1875/1875 [==============================] — 3s 2ms/step — loss: 0.5651 — accuracy: 0.8663 Epoch 5/10 1875/1875 [==============================] — 3s 2ms/step — loss: 0.4681 — accuracy: 0.8827 Epoch 6/10 1875/1875 [==============================] — 3s 2ms/step — loss: 0.4121 — accuracy: 0.8923 Epoch 7/10 1875/1875 [==============================] — 3s 2ms/step — loss: 0.3751 — accuracy: 0.8995 Epoch 8/10 1875/1875 [==============================] — 3s 2ms/step — loss: 0.3487 — accuracy: 0.9045 Epoch 9/10 1875/1875 [==============================] — 3s 2ms/step — loss: 0.3285 — accuracy: 0.9090 Epoch 10/10 1875/1875 [==============================] — 3s 2ms/step — loss: 0.3118 — accuracy: 0.9129 <keras.callbacks.History at 0x7f36c3f09490> |
На обучающей выборке мы добились неплохого результата, 91.29%.
5. Оценка качества модели
На этом шаге нам нужно оценить качество модели на тестовых данных.
|
# для оценки модели воспользуемся методом .evaluate() model.evaluate( X_test, # который применим к тестовым данным to_categorical(y_test) # не забыв закодировать целевую переменную через one-hot encoding ) |
|
313/313 [==============================] — 1s 1ms/step — loss: 0.2972 — accuracy: 0.9173 [0.29716429114341736, 0.9172999858856201] |
Результат «на тесте» оказался даже чуть выше, 91,73%.
6. Прогноз
Теперь давайте в качестве упражнения сделаем прогноз.
|
# передадим модели последние 10 изображений тестовой выборки pred = model.predict(X_test[—10:]) # посмотрим на результат для первого изображения из десяти pred[0] |
|
array([1.0952151e-04, 2.4856537e-04, 1.5749732e-03, 7.4032680e-03, 6.2553445e-05, 8.7646207e-05, 9.4199123e-07, 9.7065586e-01, 5.3100550e-04, 1.9325638e-02], dtype=float32) |
Работа над ошибками. На видео я говорю про первые десять изображений. Разумеется, это неверно. Срез [-10:] выводит последние десять изображений.
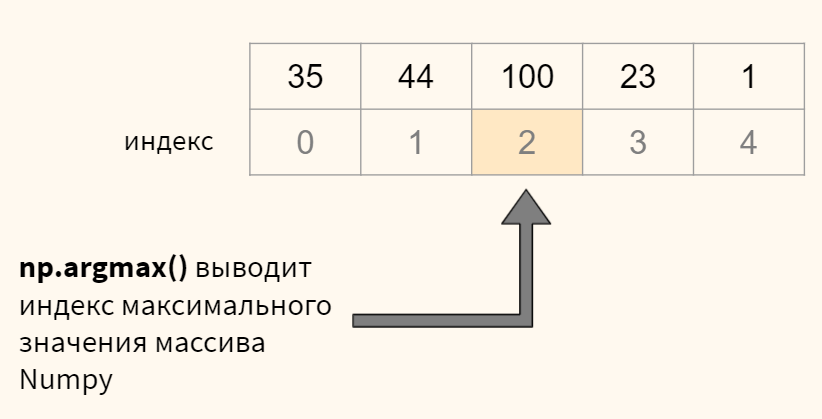
В переменной pred содержится массив numpy с десятью вероятностями для каждого из десяти наблюдений. Нам нужно выбрать максимальную вероятность для каждого изображения и определить ее индекс (индекс и будет искомой цифрой). Все это можно сделать с помощью функции np.argmax(). Посмотрим на примере.
Теперь применим к нашим данным.
|
# для кажого изображения (то есть строки, axis = 1) # выведем индекс (максимальное значение), это и будет той цифрой, которую мы прогнозируем print(np.argmax(pred, axis = 1)) # остается сравнить с целевой переменной print(y_test[—10:]) |
|
[7 8 9 0 1 2 3 4 5 6] [7 8 9 0 1 2 3 4 5 6] |
Для первых десяти цифр модель сделала верный прогноз.
7. Пример улучшения алгоритма
Существует множество параметров модели, которые можно настроить. В качестве примера попробуем заменить алгоритм стохастического градиентного спуска на считающийся более эффективным алгоритм adam (суть этого алгоритма выходит за рамки сегодняшней лекции).
Посмотрим на результат на обучающей и тестовой выборке.
|
# снова укажем настройки модели model.compile( loss = ‘categorical_crossentropy’, optimizer = ‘adam’, # однако заменим алгоритм оптимизации metrics = [‘accuracy’] ) # обучаем модель методом .fit() model.fit( X_train, # указываем обучающую выборку to_categorical(y_train), # делаем one-hot encoding целевой переменной epochs = 10 # прописываем количество эпох ) |
|
1 2 3 4 5 6 7 8 9 10 11 12 13 14 15 16 17 18 19 20 21 |
Epoch 1/10 1875/1875 [==============================] — 4s 2ms/step — loss: 0.2572 — accuracy: 0.9252 Epoch 2/10 1875/1875 [==============================] — 4s 2ms/step — loss: 0.1738 — accuracy: 0.9497 Epoch 3/10 1875/1875 [==============================] — 4s 2ms/step — loss: 0.1392 — accuracy: 0.9588 Epoch 4/10 1875/1875 [==============================] — 4s 2ms/step — loss: 0.1196 — accuracy: 0.9647 Epoch 5/10 1875/1875 [==============================] — 4s 2ms/step — loss: 0.1062 — accuracy: 0.9685 Epoch 6/10 1875/1875 [==============================] — 4s 2ms/step — loss: 0.0960 — accuracy: 0.9708 Epoch 7/10 1875/1875 [==============================] — 4s 2ms/step — loss: 0.0883 — accuracy: 0.9732 Epoch 8/10 1875/1875 [==============================] — 4s 2ms/step — loss: 0.0826 — accuracy: 0.9747 Epoch 9/10 1875/1875 [==============================] — 4s 2ms/step — loss: 0.0766 — accuracy: 0.9766 Epoch 10/10 1875/1875 [==============================] — 4s 2ms/step — loss: 0.0699 — accuracy: 0.9780 <keras.callbacks.History at 0x7f36c3d74590> |
|
# и оцениваем результат «на тесте» model.evaluate( X_test, to_categorical(y_test) ) |
|
313/313 [==============================] — 1s 1ms/step — loss: 0.1160 — accuracy: 0.9647 [0.11602973937988281, 0.9646999835968018] |
Как вы видите, с помощью одного изменения мы повысили долю правильных прогнозов до 96,47%.
Более подходящие для работы с изображениями сверточные нейронные сети (convolutional neural network, CNN) достигают свыше 99% точности на этом наборе данных, как это видно в примере⧉ на официальном сайте библиотеки Keras.
Подведем итог
На сегодняшнем занятии изучили основы нейронных сетей. В частности, мы узнали, что такое нейронная сеть, какова ее структура и алгоритм функционирования. Многие шаги, например, оценка уровня ошибки через функцию кросс-энтропии или оптимизация методом стохастического градиентного спуска, разумеется, требуют отдельного занятия. Эти уроки еще впереди.
При этом, я надеюсь, у вас сложилось целостное представление о том, что значит создать и обучить нейросеть, и какие шаги для этого требуются.
Вопросы для закрепления
Перечислите типы слоев нейронной сети
Посмотреть правильный ответ
Ответ: обычно используется входной слой, один или несколько скрытых слоев и выходной слой.
Из каких двух этапов состоит обучение нейронной сети?
Посмотреть правильный ответ
Ответ: вначале (1) при forward propagation мы пропускаем данные от входного слоя к выходному, затем, рассчитав уровень ошибки, (2) начинается обратный процесс back propagation, при котором, мы улучшаем веса исходной модели.
Для чего используются сигмоида и функция softmax в выходном слое нейронной сети в задачах классификации?
Посмотреть правильный ответ
Ответ: сигмоида используется, когда нужно предсказать один из двух классов, если классов больше двух, применяется softmax.
Ответы на вопросы
Вопрос. Что означает число 1875 в результате работы модели?
Ответ. Я планировал рассказать об этом на курсе по оптимизации, но попробую дать общие определения уже сейчас. Как я уже сказал, при оптимизации методом градиентного спуска мы можем использовать (1) все данные, (2) часть данных или (3) одно наблюдение для каждого обновления весов. Это регулируется параметром batch_size (размер партии).
- в первом случае, количество наблюдений (batch, партия) равно размеру датасета, веса не обновляются пока мы не пройдемся по всем наблюдениям, это простой градиентный спуск
- во втором случае, мы берем часть наблюдений (mini-batch, мини-партия), и когда обработаем их, то обновляем веса; после этого мы обрабатываем следующую партию
- и наконец мы можем взять только одно наблюдение и сразу после его анализа обновить веса, это классический стохастический градиентный спуск (stochastic gradient descent), параметр batch_size = 1
В чем преимущество каждого из методов? Если мы берем всю партию и по результатам ее обработки обновляем веса, то двигаемся к минимуму функции потерь наиболее плавно. Минус в том, что на расчет требуется время и вычислительные мощности.
Если берем только одно наблюдение, то считаем все быстро, но расчет минимума функции потерь менее точен.
В библиотеке Keras (и нашей нейросети) по умолчанию используется второй подход и размер партии равный 32 наблюдениям (
batch_size = 32). С учетом того, что в обучающей выборке 60000 наблюдений, разделив 60000 на 32 мы получим 1875 итераций или обновлений весов в рамках одной эпохи. Отсюда и число 1875.
Повторим, алгоритм обрабатывает 32 наблюдения, обновляет веса и после этого переходит к следующей партии (batch) из 32-х наблюдений. Обработав таким образом 60000 изображений, алгоритм заканчивает первую эпоху и начинает вторую. Размер партии и количество эпох регулируется параметрами batch_size и epochs соответственно.
Keras Tutorial: Руководство для начинающих по глубокому обучению на Python 3
В этом пошаговом руководстве по Keras вы узнаете, как построить сверточную нейронную сеть на Python!
Фактически, мы будем обучать классификатор для рукописных цифр, который может похвастаться более чем 99% точностью в известном наборе данных MNIST.
Прежде чем мы начнем, мы должны отметить, что это руководство ориентировано на новичков, которые заинтересованы в прикладном глубокого изучения.
Наша цель — познакомить вас с одной из самых популярных и мощных библиотек для построения нейронных сетей на Python. Это означает, что мы разберем большую часть теории и математики, но мы также укажем вам на большие ресурсы для их изучения.
Для начала изучения машинного обучения на Python с библиотекой Keras, желательно, чтобы Вы:
- Понимали основные концепции машинного обучения
- Имели навыки программирования на Python
Почему Keras?
Keras — рекомендуемая библиотека для глубокого изучения Python, особенно для начинающих. Его минималистичный, модульный подход позволяет с легкостью построить и запустить глубокие нейронные сети.
Типичные рабочие процессы Keras выглядят так:
- Определите ваши тренировочные данные: входной тензор и целевой тензор.
- Определите сеть слоев (или модель), которая отображает входные данные для наших целей.
- Настройте процесс обучения, выбрав функцию потерь, оптимизатор и некоторые показатели для мониторинга.
- Повторяйте данные тренировки, вызывая метод fit() вашей модели.
Что такое глубокое обучение?
Глубокое обучение относится к нейронным сетям с несколькими скрытыми слоями, которые могут изучать все более абстрактные представления входных данных. Это явное упрощение, но для нас это практическое определение для старта в этой дисциплине.
Например, глубокое обучение привело к значительным достижениям в области компьютерного зрения. Теперь мы можем классифицировать изображения, находить в них объекты и даже помечать их заголовками. Для этого глубокие нейронные сети со многими скрытыми слоями могут последовательно изучать более сложные функции из исходного входного изображения:
- Первые скрытые слои могут изучать только локальные контуры.
- Затем каждый последующий слой (или фильтр) изучает более сложные представления.
- Наконец, последний слой может классифицировать изображение как кошку или кенгуру.
Эти типы глубоких нейронных сетей называются сверточными нейронными сетями.
Что такое сверточные нейронные сети (Convolutional Neural Networks CNN)?
Короче говоря, сверточные нейронные сети (CNN) представляют собой многослойные нейронные сети (иногда до 17 или более слоев), которые предполагают, что входные данные являются изображениями.
Типичная архитектура CNN:
Удовлетворяя это требование, CNN могут резко сократить количество параметров, которые должны быть настроены. Следовательно, CNN могут эффективно справляться с высокой размерностью необработанных изображений.
Их основная механика выходит за рамки этого урока, но вы можете прочитать о них здесь.
Чем эта статья не является
Это не полный курс по глубокому обучению. Это руководство предназначено для того, чтобы перенести вас с нуля в вашу первую сверточную нейронную сеть с минимально возможной головной болью!
Если вы заинтересованы в овладении теорией глубокого обучения, мы рекомендуем этот замечательный курс из Стэнфорда:
- CS231n: сверточные нейронные сети для визуального распознавания
О моделях Keras
В Keras доступно два основных типа моделей: последовательная модель и класс Model, используемый с функциональным API .
Эти модели имеют ряд общих методов и атрибутов:
model.layersэто плоский список слоев, составляющих модель.model.inputsсписок входных тензоров модели.model.outputsсписок выходных тензоров модели.model.summary()печатает краткое представление вашей модели.model.get_config()возвращает словарь, содержащий конфигурацию модели.model.get_weights()возвращает список всех весовых тензоров в модели в виде массивов Numpy.model.set_weights(weights)устанавливает значения весов модели из списка массивов Numpy. Массивы в списке должны иметь ту же форму, что и возвращаемыеget_weights().model.to_json()возвращает представление модели в виде строки JSON. Обратите внимание, что представление не включает веса, только архитектуру.model.to_yaml()возвращает представление модели в виде строки YAML. Обратите внимание, что представление не включает веса, только архитектуру.model.save_weights(filepath)сохраняет вес модели в виде файла HDF5.model.load_weights(filepath, by_name=False)загружает вес модели из файла HDF5 (созданногоsave_weights). По умолчанию ожидается, что архитектура не изменится.
Методы API последовательной модели (Sequential model API)
Компиляция — Compile
compile(
        optimizer,
        loss=None,
        metrics=None,
        loss_weights=None,
        sample_weight_mode=None,
        weighted_metrics=None,
        target_tensors=None
)
Настраивает модель для обучения.
Аргументы:
- optimizer: строка (имя оптимизатора) или экземпляр оптимизатора.
- loss (потеря): строка (имя целевой функции) или целевая функция или
Lossэкземпляр. Смотрите потери. Если модель имеет несколько выходов, вы можете использовать разные потери на каждом выходе, передав словарь или список потерь. Значение потерь, которое будет минимизировано моделью, будет тогда суммой всех индивидуальных потерь. - metrics: список метрик, которые будут оцениваться моделью во время обучения и тестирования. Как правило, вы будете использовать
metrics=['accuracy']. Чтобы указать разные метрики для разных выходов модели с несколькими выходами, вы также можете передать словарь, напримерmetrics={'output_a': 'accuracy', 'output_b': ['accuracy', 'mse']}. Вы также можете передать список (len = len (выводы)) списков метрик, таких какmetrics=[['accuracy'], ['accuracy', 'mse']]илиmetrics=['accuracy', ['accuracy', 'mse']]. - loss_weights: необязательный список или словарь, задающий скалярные коэффициенты (числа Python) для взвешивания вкладов потерь в различные выходные данные модели. Значение потерь, которое будет минимизировано моделью, будет затем взвешенной суммой всех индивидуальных потерь, взвешенных по
loss_weightsкоэффициентам. Если список, ожидается, что он будет иметь соотношение 1: 1 к выходам модели. Если это диктат, ожидается, что выходные имена (строки) будут сопоставлены скалярным коэффициентам. - sample_weight_mode: Если вам нужно сделать взвешивание выборки по временным шагам (2D веса), установите это значение
"temporal".Noneпо умолчанию используются веса выборки (1D). Если модель имеет несколько выходов, вы можете использовать разныеsample_weight_modeна каждом выходе, передав словарь или список режимов. - weighted_metrics: список метрик, которые будут оцениваться и взвешиваться по sample_weight или class_weight во время обучения и тестирования.
- target_tensors: по умолчанию Keras создаст заполнители для цели модели, которые будут снабжены целевыми данными во время обучения. Если вместо этого вы хотите использовать свои собственные целевые тензоры (в свою очередь, Keras не будет ожидать внешних данных Numpy для этих целей во время обучения), вы можете указать их с помощью
target_tensorsаргумента. Это может быть один тензор (для модели с одним выходом), список тензоров или точные сопоставления выходных имен с целевыми тензорами. - **kwargs: при использовании бэкэндов Theano / CNTK эти аргументы передаются в
K.function. При использовании бэкэнда TensorFlow эти аргументы передаются вtf.Session.run.
fit
Обучает модель для фиксированного числа эпох (итераций в наборе данных).
fit(
        x=None,
        y=None,
        batch_size=None,
        epochs=1,
        verbose=1,
        callbacks=None,
        validation_split=0.0,
        validation_data=None,
        shuffle=True,
        class_weight=None,
        sample_weight=None,
        initial_epoch=0,
        steps_per_epoch=None,
        validation_steps=None,
        validation_freq=1,
        max_queue_size=10,
        workers=1,
        use_multiprocessing=False
)
Аргументы:
- x: входные данные. Это может быть:
- Массив Numpy (или похожий на массив) или список массивов (в случае, если модель имеет несколько входов).
- Диктовое отображение (dict mapping) входных имен в соответствующий массив / тензоры, если модель имеет именованные входы.
- Генератор или
keras.utils.Sequenceвозвращение(inputs, targets)или(inputs, targets, sample weights). - None (default) — Нет (по умолчанию) при подаче из тензоров, встроенных в каркас (например, тензоры данных TensorFlow).
- y: целевые данные. Как и входные данные
x, это могут быть либо массив (ы) Numpy, тензор (ы), встроенные в платформу, список массивов Numpy (если модель имеет несколько выходных данных), либо None (по умолчанию), если они поступают из тензоров, встроенных в платформу (например, TensorFlow) тензоры данных). Если выходным слоям в модели присвоены имена, вы также можете передать словарь, отображающий выходные имена в массивы Numpy. Ifxявляется генератором илиkeras.utils.Sequenceэкземпляром,yуказывать не следует (поскольку цели будут получены изx). - batch_size: целое число или
None. Количество образцов на обновление градиента. Еслиbatch_sizeне указан, по умолчанию будет 32. Не указывайте,batch_sizeесли ваши данные представлены в виде символических тензоров, генераторов илиSequenceэкземпляров (так как они генерируют пакеты). - epochs: целочисленные. Количество эпох для обучения модели. Эпоха — это итерация по всему
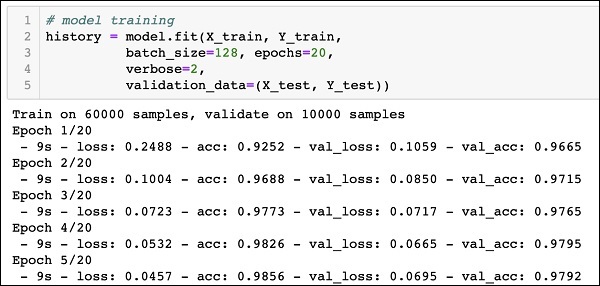
xиyпредоставленным данным. Обратите внимание, что в сочетании сinitial_epoch,epochsследует понимать как «конечную эпоху». Модель не обучается для ряда итераций, заданныхepochs, а просто до тех пор, пока неepochsбудет достигнута эпоха индекса . - verbose: Integer. 0, 1 или 2. Режим многословия. 0 = тихий, 1 = индикатор выполнения, 2 = одна строка за эпоху.
- callbacks: список
keras.callbacks.Callbackэкземпляров. Список обратных вызовов, применяемых во время обучения и проверки (если). Смотрите обратные вызовы. - validation_split: с плавающей точкой от 0 до 1. Доля данных обучения, которые будут использоваться в качестве данных проверки. Модель выделит эту часть обучающих данных, не будет обучаться им и будет оценивать потери и любые метрики модели на этих данных в конце каждой эпохи. Данные проверки выбираются из последних выборок
xиyпредоставленных данных перед перетасовкой. Этот аргумент не поддерживается, когда онxявляется генератором илиSequenceэкземпляром. - validation_data:
данные для оценки потерь и любые метрики модели в конце каждой эпохи. Модель не будет обучаться на этих данных.
validation_dataперекроетvalidation_split.validation_dataможет быть: — кортеж(x_val, y_val)массивов или тензоров(x_val, y_val, val_sample_weights)Numpy — кортеж массивов Numpy — набор данных или итератор набора данныхДля первых двух случаев,
batch_sizeдолжны быть предоставлены. Для последнего случая,validation_stepsдолжны быть предоставлены. -
shuffle: Boolean (следует ли перемешивать данные тренировки перед каждой эпохой) или str (для «партии»). «пакетная» — это специальная опция для работы с ограничениями данных HDF5; он тасуется кусками размером с партию. Не имеет эффекта, когда
steps_per_epochнетNone. -
class_weight: необязательный словарь, отображающий индексы класса (целые числа) на значение веса (с плавающей запятой), используемое для взвешивания функции потерь (только во время обучения). Это может быть полезно для того, чтобы сказать модели «уделять больше внимания» выборкам из недопредставленного класса.
- sample_weight: необязательный массив весов Numpy для обучающих выборок, используемый для взвешивания функции потерь (только во время обучения). Вы можете либо передать плоский (1D) массив Numpy такой же длины, что и входные выборки (отображение весов и выборок 1: 1), либо в случае временных данных вы можете передать двумерный массив с формой
(samples, sequence_length), чтобы применить разный вес для каждого временного шага каждого образца. В этом случае вы должны обязательно указатьsample_weight_mode="temporal"вcompile(). Этот аргумент не поддерживается, когдаxгенератор илиSequenceэкземпляр вместо этого предоставляют sample_weights в качестве третьего элементаx. - initial_epoch: целое число. Эпоха, с которой начинается тренировка (полезно для возобновления предыдущего тренировочного заезда).
- steps_per_epoch: целое число или
None. Общее количество шагов (партий образцов) до объявления одной эпохи законченной и начала следующей эпохи. При обучении с использованием входных тензоров, таких как тензоры данных TensorFlow, значение по умолчаниюNoneравно числу выборок в вашем наборе данных, деленному на размер пакета, или 1, если это невозможно определить. - validation_steps: только релевантно, если
steps_per_epochуказано. Общее количество шагов (партий образцов) для проверки перед остановкой. - validation_steps: релевантно, только если
validation_dataпредоставлено и является генератором. Общее количество шагов (партий образцов), которые нужно нарисовать перед остановкой при выполнении проверки в конце каждой эпохи. - validation_freq: уместно, только если предоставлены данные проверки. Целое число или список / кортеж / набор. Если целое число, указывает, сколько тренировочных эпох должно быть выполнено до того, как будет выполнен новый прогон проверки, например,
validation_freq=2выполняет проверку каждые 2 эпохи. Если в списке, кортеже или наборе указываются эпохи, в которых нужно выполнять проверку, например,validation_freq=[1, 2, 10]выполняет проверку в конце 1-й, 2-й и 10-й эпох. - max_queue_size: целое число. Используется только для генератора или
keras.utils.Sequenceвхода. Максимальный размер очереди генератора. Если не указано, поmax_queue_sizeумолчанию будет 10. - workers: целое число. Используется только для генератора или
keras.utils.Sequenceвхода. Максимальное количество процессов, которые могут ускоряться при использовании потоков на основе процессов. Если не указан, поworkersумолчанию будет 1. Если 0, будет запускать генератор в основном потоке. - use_multiprocessing: Boolean. Используется только для генератора или
keras.utils.Sequenceвхода. ЕслиTrue, используйте процессные потоки. Если не указано, поuse_multiprocessingумолчаниюFalse. Обратите внимание, что, поскольку эта реализация опирается на многопроцессорность, вы не должны передавать невыгружаемые аргументы генератору, так как они не могут быть легко переданы дочерним процессам. - **kwargs: используется для обратной совместимости.
Краткий обзор учебника/статьи по Keras
Вот перечень шагов для создания вашей первой сверточной нейройнной сети (CNN) с использованием Keras:
- Настройте свою среду.
- Установите Керас / Keras.
- Импорт библиотек и модулей.
- Загрузить данные изображения из MNIST.
- Предварительная обработка входных данных для Keras.
- Метки препроцесс-класса для Keras.
- Определите архитектуру модели.
- Скомпилируйте модель.
- Подгонка модели по тренировочным данным.
- Оценить модель по данным испытаний.
Шаг 1: Настройте свою рабочую среду
убедитесь, что на вашем компьютере установлено следующее:
- Python 2.7+ (Python 3 тоже хорошо, но Python 2.7 все еще более популярен для науки о данных в целом)
- SciPy с NumPy
- Matplotlib (необязательно, рекомендуется для исследовательского анализа)
- Theano * ( Инструкция по установке )
Theano — это библиотека Python, которая позволяет нам так эффективно оценивать математические операции, включая многомерные массивы. В основном он используется при создании проектов глубокого обучения. Он работает намного быстрее на графическом процессоре (GPU), чем на CPU. Theano достигает высоких скоростей, что создает жесткую конкуренцию реализациям на языке C для задач, связанных с большими объемами данных.
Theano знает, как брать структуры и преобразовывать их в очень эффективный код, который использует numpy и некоторые нативные библиотеки. Он в основном предназначен для обработки типов вычислений, требуемых для алгоритмов больших нейронных сетей, используемых в Deep Learning. Именно поэтому, это очень популярная библиотека в области глубокого обучения.
Рекомендуется установить Python, NumPy, SciPy и matplotlib через дистрибутив Anaconda. Он поставляется со всеми этими пакетами.
Conda Cheatsheet: command line package and environment manager.pdf
Краткий обзор как настроить Анаконду здесь:
Инструкция по Anaconda & Conda. Как управлять и настроить среду для Python?
* Примечание: TensorFlow также поддерживается (как альтернатива Theano), но мы придерживаемся Theano для простоты. Основное отличие состоит в том, что вам необходимо изменить данные немного по-другому, прежде чем передавать их в свою сеть.
Еще раз пробежимся по устанавливаемым библиотекам:
SciPy (произносится как сай пай) — это пакет прикладных математических процедур, основанный на расширении Numpy Python. С SciPy интерактивный сеанс Python превращается в такую же полноценную среду обработки данных и прототипирования сложных систем, как MATLAB, IDL, Octave, R-Lab и SciLab.
Matplotlib — библиотека на языке программирования Python для визуализации данных.
Theano — библиотека, которая используется для разработки систем машинного обучения как сама по себе, так и в качестве вычислительного бекэнда для более высокоуровневых библиотек, например, Lasagne, Keras или Blocks.
NumPy — это библиотека языка Python, добавляющая поддержку больших многомерных массивов и матриц, вместе с большой библиотекой высокоуровневых (и очень быстрых) математических функций для операций с этими массивами.
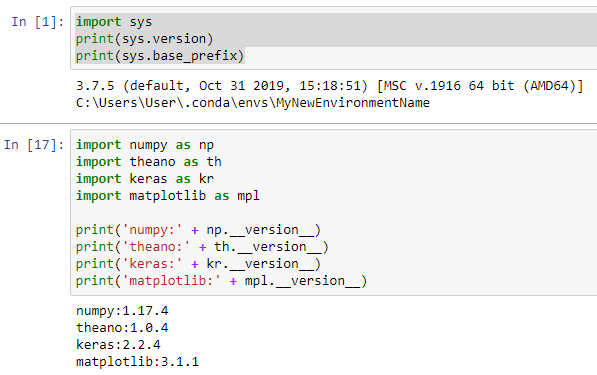
Проверим правильно ли мы все установили
Переходим в Jupyter Notebook в среде, которая имеет установленные библиотеки/пакеты. Запускаем следующие команды:
1. Для проверки среды:
import sys
print(sys.version)
print(sys.base_prefix)
Результата:
3.7.5 (default, Oct 31 2019, 15:18:51) [MSC v.1916 64 bit (AMD64)]
C:UsersUser.condaenvsMyNewEnvironmentName
2. Для проверки библиотек:
import numpy as np
import theano as th
import keras as kr
import matplotlib as mpl

print('numpy:' + np.__version__)
print('theano:' + th.__version__)
print('keras:' + kr.__version__)
print('matplotlib:' + mpl.__version__)
Результат:
numpy:1.17.4
theano:1.0.4
keras:2.2.4
matplotlib:3.1.1
Как это выглядит в Jupyter Notebook:
Шаг 2. Импортируем библиотеки и модули для нашего проекта
Удаляем предыдущие проверочные шаги из Notebook.
Теперь начнем с импорта numpy и установки начального числа для генератора псевдослучайных чисел на компьютере. Это позволяет нам воспроизводить результаты из нашего скрипта:
import numpy as np
np.random.seed(123)  # for reproducibility
Далее мы импортируем тип модели Sequential из Keras. Это просто линейный набор слоев нейронной сети, и он идеально подходит для того типа CNN с прямой связью, который мы строим в этом руководстве.
from keras.models import Sequential
Далее, давайте импортируем «основные» слои из Keras. Это слои, которые используются практически в любой нейронной сети:
from keras.layers import Dense, Dropout, Activation, Flatten
Затем мы импортируем слои CNN из Keras. Это сверточные слои, которые помогут нам эффективно тренироваться на данных изображения:
from keras.layers import Convolution2D, MaxPooling2D
Наконец, мы импортируем некоторые утилиты. Это поможет нам преобразовать наши данные позже:
from keras.utils import np_utils
Теперь у нас есть все необходимое для построения архитектуры нейронной сети.
Полный текст скрипта после шага 2:
import numpy as np
np.random.seed(123)  # for reproducibility

from keras.models import Sequential
from keras.layers import Dense, Dropout, Activation, Flatten
from keras.layers import Convolution2D, MaxPooling2D
from keras.utils import np_utils
Шаг 3. Загружаем изображения из MNIST
MNIST — отличный набор данных для начала глубокого обучения и компьютерного зрения. Это достаточно сложная задача, чтобы гарантировать нейронные сети, но она управляема на одном компьютере.
Библиотека Keras удобно уже включает это. Мы можем загрузить это так:
from keras.datasets import mnist

# Load pre-shuffled MNIST data into train and test sets
(X_train, y_train), (X_test, y_test) = mnist.load_data()
Мы можем посмотреть на форму набора данных:
print(X_train.shape)
Результат:
(60000, 28, 28)
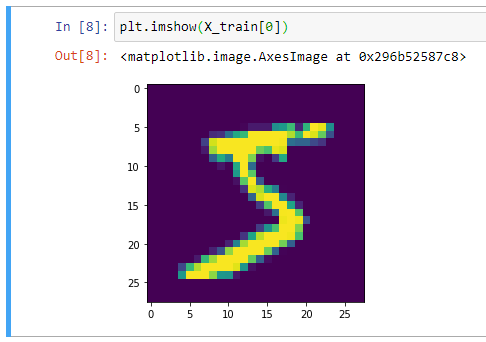
Отлично, получается, что в нашем обучающем наборе 60 000 сэмплов, и размер каждого изображения составляет 28 х 28 пикселей. Мы можем подтвердить это, построив первый пример в matplotlib:
from matplotlib import pyplot as plt
plt.imshow(X_train[0])
Вывод изображения:
В целом, при работе с компьютерным зрением полезно визуально отобразить данные, прежде чем выполнять какую-либо работу алгоритма. Это быстрая проверка работоспособности, которая может предотвратить легко предотвратимые ошибки (например, неверную интерпретацию измерений данных).
Полный скрипт после шага 3
import numpy as np
np.random.seed(123)  # for reproducibility

from keras.models import Sequential
from keras.layers import Dense, Dropout, Activation, Flatten
from keras.layers import Convolution2D, MaxPooling2D
from keras.utils import np_utils
from keras.datasets import mnist

from matplotlib import pyplot as plt

# Загрузка предварительно перемешанных данных MNIST в наборы trains и tests
(X_train, y_train), (X_test, y_test) = mnist.load_data()

# Форма набора данных
print(X_train.shape)

# Вывод изображения
plt.imshow(X_train[0])
Шаг 4: Предварительная обработка входных данных для Keras
При использовании бэкэнда Theano вы должны явно объявить размер для глубины входного изображения. Например, полноцветное изображение со всеми 3 каналами RGB будет иметь глубину 3.
Наши изображения MNIST имеют глубину только 1, но мы должны явно объявить это.
Другими словами, мы хотим преобразовать наш набор данных из формы (n, ширина, высота) в (n, глубина, ширина, высота).
Вот как мы можем сделать это легко:
X_train = X_train.reshape(X_train.shape[0], 1, 28, 28)
X_test = X_test.reshape(X_test.shape[0], 1, 28, 28)
Чтобы подтвердить, мы можем снова напечатать размеры X_train:
print(X_train.shape)
Результат:
(60000, 1, 28, 28)
Последний шаг предварительной обработки для входных данных — преобразовать наш тип данных в float32 и нормализовать наши значения данных в диапазоне [0, 1].
X_train = X_train.astype('float32')
X_test = X_test.astype('float32')
X_train /= 255
X_test /= 255
Теперь наши входные данные готовы к обучению модели.
Полный текст скрипта после 4 шага
import numpy as np
np.random.seed(123)  # для воспроизводимости

from keras.models import Sequential
from keras.layers import Dense, Dropout, Activation, Flatten
from keras.layers import Convolution2D, MaxPooling2D
from keras.utils import np_utils
from keras.datasets import mnist

from matplotlib import pyplot as plt

# Загрузка предварительно перемешанных данных MNIST в наборы trains и tests
(X_train, y_train), (X_test, y_test) = mnist.load_data()

# Форма набора данных
print("=== Результат X_train.shape ===")
print(X_train.shape)

# Вывод изображения
plt.imshow(X_train[0])

# Преобразование набора данных из формы (n, ширина, высота) в (n, глубина, ширина, высота)
X_train = X_train.reshape(X_train.shape[0], 1, 28, 28)
X_test = X_test.reshape(X_test.shape[0], 1, 28, 28)

# Вывод размеров X_train
print("=== Результат X_train.shape ===")
print(X_train.shape)

# Преобразование типа данных в float32
X_train = X_train.astype('float32')
X_test = X_test.astype('float32')

# Нормализация значений данных в диапазоне [0, 1]
X_train /= 255
X_test /= 255
Шаг 5. Предварительная обработка меток классов для Keras
Далее, давайте посмотрим на форму наших данных меток классов:
print(y_train.shape)
Результат:
(60000,)
Хм … это может быть проблематично. У нас должно быть 10 разных классов, по одному на каждую цифру, но, похоже, у нас есть только одномерный массив. Давайте посмотрим на ярлыки для первых 10 учебных образцов:
print(y_train[:10])
Результат:
[5 0 4 1 9 2 1 3 1 4]
И есть проблема. Данные y_train и y_test не разделены на 10 различных меток классов, а представлены в виде одного массива со значениями классов.
Мы можем это легко исправить:
# Convert 1-dimensional class arrays to 10-dimensional class matrices
Y_train = np_utils.to_categorical(y_train, 10)
Y_test = np_utils.to_categorical(y_test, 10)
Метод np_utils.to_categorical — Преобразует вектор класса (целые числа) в двоичную матрицу классов.
Теперь мы можем взглянуть еще раз:
print(Y_train.shape)
Результат:
(60000, 10)
Полный текст скрипта после 5 шага
import numpy as np
np.random.seed(123)  # для воспроизводимости

from keras.models import Sequential
from keras.layers import Dense, Dropout, Activation, Flatten
from keras.layers import Convolution2D, MaxPooling2D
from keras.utils import np_utils
from keras.datasets import mnist

from matplotlib import pyplot as plt

# Загрузка предварительно перемешанных данных MNIST в наборы trains и tests
(X_train, y_train), (X_test, y_test) = mnist.load_data()

# Форма набора данных
print("=== Результат X_train.shape ===")
print(X_train.shape)

# Вывод изображения
plt.imshow(X_train[0])

# Преобразование набора данных из формы (n, ширина, высота) в (n, глубина, ширина, высота)
X_train = X_train.reshape(X_train.shape[0], 1, 28, 28)
X_test = X_test.reshape(X_test.shape[0], 1, 28, 28)

# Вывод размеров X_train
print("=== Результат X_train.shape ===")
print(X_train.shape)

# Преобразование типа данных в float32
X_train = X_train.astype('float32')
X_test = X_test.astype('float32')

# Нормализация значений данных в диапазоне [0, 1]
X_train /= 255
X_test /= 255

# Просмотр формы меток классов наших данных
print("=== Результат y_train.shape ===")
print(y_train.shape)

print("=== Результат y_train[:10] ===")
print(y_train[:10])

# Преобразование одномерных массивов классов в 10-мерные матрицы классов
Y_train = np_utils.to_categorical(y_train, 10)
Y_test = np_utils.to_categorical(y_test, 10)

# Вывод после преобразования
print("=== Результат Y_train.shape после np_utils.to_categorical ===")
print(Y_train.shape)
Результат:
=== Результат X_train.shape ===
(60000, 28, 28)

=== Результат X_train.shape ===
(60000, 1, 28, 28)

=== Результат y_train.shape ===
(60000,)

=== Результат y_train[:10] ===
[5 0 4 1 9 2 1 3 1 4]

=== Результат Y_train.shape после np_utils.to_categorical ===
(60000, 10)
Шаг 6: Зададим архитектуру модели нейронной сети
Теперь мы готовы определить архитектуру нашей модели. В реальной научно-исследовательской работе исследователи потратят значительное количество времени на изучение архитектуру моделей.
Чтобы продолжать этот урок, мы не будем обсуждать здесь теорию или математику.
Когда вы только начинаете, вы можете просто воспроизвести проверенную архитектуру из академических работ или использовать существующие примеры. Вот список примеров реализации в Keras.
Начнем с объявления последовательного формата модели:
model = Sequential()
Далее мы объявляем входной слой:
model.add(Conv2D(32,(3, 3), activation = 'relu', input_shape=(1,28,28), data_format='channels_first'))
Входной параметр shape должен иметь форму 1 образца. В этом случае это то же самое (1, 28, 28), которое соответствует (глубина, ширина, высота) каждого изображения цифры.
Но что представляют собой первые 3 параметра? Они соответствуют количеству используемых фильтров свертки, количеству строк в каждом ядре свертки и количеству столбцов в каждом ядре свертки соответственно.
* Примечание. Размер шага по умолчанию равен (1,1), и его можно настроить с помощью параметра «subsample».
Мы можем подтвердить это, напечатав форму текущей модели:
print(model.output_shape)
Результат:
(None, 32, 26, 26)
Затем мы можем просто добавить больше слоев в нашу модель, как будто мы строим legos:
model.add(Conv2D(32, (3, 3), activation='relu'))
model.add(MaxPooling2D(pool_size=(2,2)))
model.add(Dropout(0.25))
Опять же, мы не будем слишком углубляться в теорию, но важно выделить слой Dropout, который мы только что добавили. Это метод регуляризации нашей модели с целью предотвращения переоснащения. Вы можете прочитать больше об этом здесь .
MaxPooling2D — это способ уменьшить количество параметров в нашей модели, переместив фильтр пула 2×2 по предыдущему слою и взяв максимум 4 значения в фильтре 2×2.
Пока что для параметров модели мы добавили два слоя свертки. Чтобы завершить архитектуру нашей модели, давайте добавим полностью связанный слой, а затем выходной слой:
model.add(Flatten())
model.add(Dense(128, activation='relu'))
model.add(Dropout(0.5))
model.add(Dense(10, activation='softmax'))
Для плотных слоев первым параметром является выходной размер слоя. Keras автоматически обрабатывает связи между слоями.
Обратите внимание, что конечный слой имеет выходной размер 10, соответствующий 10 классам цифр.
Также обратите внимание, что веса из слоев Convolution должны быть сплющены (сделаны одномерными) перед передачей их в полностью связанный плотный слой.
Вот как выглядит вся архитектура модели:
model = Sequential()

model.add(Conv2D(32,(3, 3), activation = 'relu', input_shape=(1,28,28), data_format='channels_first'))
model.add(Conv2D(32, (3, 3), activation='relu'))
model.add(MaxPooling2D(pool_size=(2,2)))
model.add(Dropout(0.25))

model.add(Flatten())
model.add(Dense(128, activation='relu'))
model.add(Dropout(0.5))
model.add(Dense(10, activation='softmax'))
Теперь все, что нам нужно сделать, это определить функцию потерь и оптимизатор, и тогда мы будем готовы обучить ее.
Шаг 7. Скомпилируем модель
Сложная часть уже закончилась.
Теперь нам просто нужно скомпилировать модель, и мы будем готовы обучать ее. Когда мы компилируем модель, мы объявляем функцию потерь и оптимизатор (SGD, Adam и т.д.).
model.compile(loss='categorical_crossentropy',
              optimizer='adam',
              metrics=['accuracy'])
Keras имеет множество функций потери и встроенных оптимизаторов на выбор.
Шаг 8. Обучим модель на тестовых данных (тренировочных данных)
Чтобы соответствовать модели, все, что нам нужно сделать, это объявить размер партии и количество эпох для обучения, а затем передать наши данные обучения.
model.fit(X_train, Y_train,
          batch_size=32, epochs=10, verbose=1)
Результат:
Epoch 1/10
60000/60000 [==============================] - 38100s 635ms/step - loss: 0.2253 - acc: 0.9337
Epoch 2/10
60000/60000 [==============================] - 728s 12ms/step - loss: 0.1195 - acc: 0.9650
Epoch 3/10
60000/60000 [==============================] - 964s 16ms/step - loss: 0.0927 - acc: 0.9724
Epoch 4/10
60000/60000 [==============================] - 1169s 19ms/step - loss: 0.0778 - acc: 0.9768
Epoch 5/10
60000/60000 [==============================] - 1223s 20ms/step - loss: 0.0709 - acc: 0.9794
Epoch 6/10
60000/60000 [==============================] - 730s 12ms/step - loss: 0.0640 - acc: 0.9809
Epoch 7/10
60000/60000 [==============================] - 749s 12ms/step - loss: 0.0578 - acc: 0.9828
Epoch 8/10
60000/60000 [==============================] - 730s 12ms/step - loss: 0.0554 - acc: 0.9825
Epoch 9/10
60000/60000 [==============================] - 728s 12ms/step - loss: 0.0528 - acc: 0.9848
Epoch 10/10
60000/60000 [==============================] - 719s 12ms/step - loss: 0.0495 - acc: 0.9852
Вы также можете использовать различные обратные вызовы для установки правил ранней остановки, сохранения весов моделей по ходу дела или регистрации истории каждой эпохи обучения.
Шаг 9: Оценка работы модели на тестовых данных
Наконец, мы можем оценить нашу модель по тестовым данным:
score = model.evaluate(X_test, Y_test, verbose=0)
score
Результат:
[2.3163251502990723, 0.0986]
4.4
9
голоса
Рейтинг статьи
В
наших занятиях по пакету Keras мы часто использовали метод compile(), через
который связывали модель с оптимизатором, функцией потерь и метриками:
model = keras.Sequential([
    layers.Input(shape=(784,)),
    layers.Dense(128, activation='relu'),
    layers.Dense(64, activation='relu'),
    layers.Dense(10, activation='softmax'),
])

model.compile(optimizer='adam',
             loss='categorical_crossentropy',
             metrics=['accuracy'])
Чаще
всего мы их определяли через строки, используя параметры по умолчанию. Если же
требуется более тонкая настройка, то следует использовать соответствующие
классы. В частности, для оптимизаторов частым выбором являются следующие
классы:
- SGD – стохастический
градиентный спуск (с моментами, в том числе и Нестерова); - RMSprop – оптимизатор RMSprop;
- Adam
– оптимизатор
Adam; - Adadelta
– оптимизатор
Adadelta; - Adagrad
– оптимизатор
Adagrad.
У
каждого из этих оптимизаторов есть свой набор параметров, подробнее о них можно
почитать в официальной документации:
https://keras.io/api/optimizers/
Например,
класс наиболее популярного оптимизатора Adam имеет следующий
синтаксис:
tf.keras.optimizers.Adam(learning_rate=0.001,
beta_1=0.9, beta_2=0.999, epsilon=1e-07, amsgrad=False, name=»Adam»,
**kwargs)
Именно
с такими параметрами он вызывается по умолчанию. Если требуются другие
значения, то мы должны создать экземпляр этого класса и указать нужные
параметры, например, так:
model.compile(optimizer=keras.optimizers.Adam(learning_rate=0.01),
             loss='categorical_crossentropy',
             metrics=['accuracy'])
То
же самое и с функциями потерь. Существует их стандартный набор в пакете Keras, например:
- BinaryCrossentropy
– бинарная кросс-энтропия; - CategoricalCrossentropy
– категориальная кросс-энтропия; - KLDivergence
– дивергенция Кульбака-Лейблера; - MeanSquaredError
– средний квадрат ошибки; - MeanAbsoluteError
– средняя абсолютная ошибка.
Полный
перечень этих классов можно посмотреть на странице:
https://keras.io/api/losses/
Также
на занятиях по курсу «Нейронные сети» мы подробно говорили когда (для каких
задач) какую функцию лучше применять. Если вы этого не знаете, то рекомендую
этот курс к просмотру.
Соответственно,
если нам нужно обратиться непосредственно к классу, то это можно реализовать,
следующим образом:
model.compile(optimizer=keras.optimizers.Adam(learning_rate=0.01),
             loss=keras.losses.CategoricalCrossentropy(),
             metrics=['accuracy'])
Наконец,
метрики также можно задавать с помощью различных предопределенных классов:
- Accuracy
- BinaryAccuracy
- CategoricalAccuracy
Полный
перечень этих классов можно посмотреть на странице:
https://keras.io/api/metrics/
Применяются
они очевидным образом:
model.compile(optimizer=keras.optimizers.Adam(learning_rate=0.01),
             loss=keras.losses.CategoricalCrossentropy(),
             metrics=[keras.metrics.CategoricalAccuracy()])
Собственные функции потерь
Конечно,
при необходимости, оптимизаторы, функции потерь и метрики мы можем
конструировать свои собственные. Чаще всего это относится к функциям потерь и
реже к метрикам. Создавать свои «хорошие» оптимизаторы – это уже удел избранных
и мы оставим это за рамками текущего курса (в принципе, встроенных вполне
достаточно для большинства реальных проектов).
Итак,
собственные потери в Kerasможно определить двумя способами:
- непосредственно
через функцию; - с
помощью класса, унаследованного от keras.losses.Loss.
Начнем
с наиболее простого варианта – определение своей функции потерь. Для этого
достаточно объявить функцию с двумя аргументами y_true, y_pred и
математическими операциями над этими тензорами, например, так:
def myloss(y_true, y_pred):
    return tf.reduce_mean(tf.square(y_true - y_pred))
Здесь
мы вычисляем средний квадрат рассогласования значений между требуемым выходом y_true и
спрогнозированным сетью y_pred. Все вычисления
лучше всего делать через функции Tensorflow, так как они, затем, будут
участвовать в автоматическом дифференцировании для вычисления градиентов. А эта
операция гарантированно корректно работает именно с функциями пакета Tensorflow (например,
функции NumPy здесь использовать
нельзя).
После
того, как функция объявлена, мы должны передать ссылку на нее в методе compile, следующим
образом:
model.compile(optimizer=keras.optimizers.Adam(learning_rate=0.001),
             loss=myloss,
             metrics=[keras.metrics.CategoricalAccuracy()])
Все,
теперь параметры модели будут подстраиваться для минимизации указанной функции
потерь.
Второй
способ определения потерь – это описание дочернего класса от базового keras.losses.Loss.
Зачем это нужно?Например, если мы хотим передавать дополнительные параметры для
вычисления потерь. Давайте предположим, что функция потерь имеет вид:
то
есть, здесь два дополнительных параметра α и β. Как раз их можно
определить, используя класс в качестве функции потерь, следующим образом:
class MyLoss(keras.losses.Loss):
    def __init__(self, alpha=1.0, beta=1.0):
        super().__init__()
        self.alpha = alpha
        self.beta = beta

    def call(self, y_true, y_pred):
        return tf.reduce_mean(tf.square(self.alpha * y_true - self.beta * y_pred))
Здесь
в конструкторе создаются два локальных свойства alpha и beta, а затем, в
методе call() производится
вычисление среднего квадрата ошибок с учетом этих параметров.
В
методе compile() мы можем
воспользоваться этим классом, например, так:
model.compile(optimizer=keras.optimizers.Adam(learning_rate=0.001),
             loss=MyLoss(0.5, 2.0),
             metrics=[keras.metrics.CategoricalAccuracy()])
Опять
же, это лишь пример того, как можно задавать пользовательские потери в пакете Keras. Необходимость
в этом возникает редко – в нестандартных задачах. Как правило, мы пользуемся
уже встроенными функциями или классами.
Пользовательские метрики
Наряду
с потерями можно создавать и собственные метрики. Для этого описывается класс
на основе базового tf.keras.metrics.Metric со следующим набором методов:
- __init__(self)
– конструктор для инициализации метрики; - update_state(self, y_true, y_pred, sample_weight=None) – обновление переменных состояния,
которые, затем, используются в методе result() для
окончательного вычисления метрики; - result(self)
– метод для вычисления метрики на основе переменных состояния; - reset_states(self)
– сброс переменных состояния (например, при переходе к новой эпохе при обучении
нейронной сети).
Давайте
на конкретном примере посмотрим, как это все работает. Я взял за основу
довольно удачный пример из документации:
https://www.tensorflow.org/guide/keras/train_and_evaluate
и
видоизменил его для подсчета доли правильно классифицированных данных, то есть,
фактически, повторил метрику CategoricalAccuracy. Сам класс имеет
следующий вид:
class CategoricalTruePositives(keras.metrics.Metric):
    def __init__(self, name="my_metric"):
        super().__init__(name=name)
        self.true_positives = self.add_weight(name="acc", initializer="zeros")
        self.count = tf.Variable(0.0)

    def update_state(self, y_true, y_pred, sample_weight=None):
        y_pred = tf.reshape(tf.argmax(y_pred, axis=1), shape=(-1, 1))
        y_true = tf.reshape(tf.argmax(y_true, axis=1), shape=(-1, 1))
        values = tf.cast(y_true, "int32") == tf.cast(y_pred, "int32")

        if sample_weight is not None:
            sample_weight = tf.cast(sample_weight, "float32")
            values = tf.multiply(values, sample_weight)

        values = tf.cast(values, "float32")

        self.true_positives.assign_add(tf.reduce_mean(values))
        self.count.assign_add(1.0)

    def result(self):
        return self.true_positives / self.count

    def reset_states(self):
        self.true_positives.assign(0.0)
        self.count.assign(0.0)
Смотрите,
вначале в конструкторе мы формируем две переменные состояния: true_positives – сумма долей
верной классификации; count – общее число долей. Затем, в методе update_state() мы для
каждого мини-батча вычисляем вектор верной классификации (values), определяем
долю правильной классификации и увеличиваем счетчик count на единицу. В методе result() делаем
окончательные вычисления для метрики (вычисляем среднюю долю верной
классификации), а в методе reset_states() сбрасываем
переменные true_positives и count в ноль.
После
этого, мы можем добавить наш класс метрики к списку метрик:
model.compile(optimizer=keras.optimizers.Adam(learning_rate=0.001),
             loss=keras.losses.CategoricalCrossentropy(),
             metrics=[keras.metrics.CategoricalAccuracy(), CategoricalTruePositives()])
И
при обучении сети обе метрики должны показывать одинаковые результаты. По
аналогии можно создавать самые разные метрики для контроля за процессом подбора
параметров моделей.
Настройка сети с несколькими выходами
Давайте
теперь представим, что мы проектируем сеть с несколькими выходами. Например,
это может быть модель автоэнкодера с дополнительным выходом для классификации
изображений:
Описать
такую архитектуру достаточно просто, используя функциональный подход:
enc_input = layers.Input(shape=(28, 28, 1))
x = layers.Conv2D(32, 3, activation='relu')(enc_input)
x = layers.MaxPooling2D(2, padding='same')(x)
x = layers.Conv2D(64, 3, activation='relu')(x)
x = layers.MaxPooling2D(2, padding='same')(x)
x = layers.Flatten()(x)
hidden_output = layers.Dense(8, activation='linear')(x)

x = layers.Dense(7 * 7 * 8, activation='relu')(hidden_output)
x = layers.Reshape((7, 7, 8))(x)
x = layers.Conv2DTranspose(64, 5, strides=(2, 2), activation="relu", padding='same')(x)
x = layers.BatchNormalization()(x)
x = layers.Conv2DTranspose(32, 5, strides=(2, 2), activation="linear", padding='same')(x)
x = layers.BatchNormalization()(x)
dec_output = layers.Conv2DTranspose(1, 3, activation="sigmoid", padding='same', name="dec_output")(x)

x2 = layers.Dense(128, activation='relu')(hidden_output)
class_output = layers.Dense(10, activation='softmax', name="class_output")(x2)

model = keras.Model(enc_input, [dec_output, class_output])
Смотрите,
здесь классификатор представляет собой обычную полносвязную сеть с десятью
выходами. Затем, с помощью класса Model мы создаем
модель сети с одним входом и двумя выходами.
Далее,
нам бы хотелось обучить эту сеть, но функции потерь для выходов следует брать
разными:
- для
первого выхода – средний квадрат ошибок рассогласований между входом и выходом; - для
второго выхода – категориальную кросс-энтропию.
Сделать
это можно, по крайней мере, двумя способами. В первом случае в методе compile() указать
список соответствующих функций для параметра loss:
model.compile(optimizer='adam',
             loss=['mean_squared_error', 'categorical_crossentropy']
)
Тогда
средний квадрат ошибок будет связан с первым выходом модели, а категориальная
кросс-энтропия – со вторым. Кроме того, при обучении в методе fit() также нужно
будет указать список требуемых выходных данных для обоих выходов:
model.fit(x_train, [x_train, y_train], epochs=1)
Во
втором случае мы можем в методах compile() и fit() словари,
вместо списков, что может быть несколько удобнее. Например, функции потерь
можно связать с выходами по их именам, следующим образом:
model.compile(optimizer='adam',
             loss={
                 'dec_output': 'mean_squared_error',
                 'class_output': 'categorical_crossentropy'
             }
)
И с метриками:
model.compile(optimizer='adam',
            loss={
                 'dec_output': 'mean_squared_error',
                 'class_output': 'categorical_crossentropy'
            },
            metrics={
                'dec_output': None,
                'class_output': 'acc'
            }
)
Обратите
внимание, мы для первого выхода указали метрику None, то есть, она
отсутствует. По идее, можно было бы вообще не указывать первую строчку в
словаре для metrics, а оставить
только вторую.
И
то же самое в методе fit() – для указания выходных значений
воспользуемся словарем:
model.fit(x_train, {'dec_output': x_train, 'class_output': y_train}, epochs=1)
Как
видите, все достаточно удобно. При этом, общая функция потерь будет
складываться из значений функция для обоих выходов. Если нам нужно
дополнительно указать веса loss_weightsпри их сложении:
то
это можно сделать через параметр loss_weights, следующим образом:
model.compile(optimizer='adam',
            loss={
                 'dec_output': 'mean_squared_error',
                 'class_output': 'categorical_crossentropy'
            },
            loss_weights = [1.0, 0.5],
            metrics={
                'dec_output': None,
                'class_output': 'acc'
            }
)
Здесь
использован список, но также можно указать словарь.
Давайте
в конце этой программы пропустим через обученный автоэнкодер первое тестовое
изображение и оценим полученные выходы:
p = model.predict(tf.expand_dims(x_test[0], axis=0))

print( tf.argmax(p[1], axis=1).numpy() )

plt.subplot(121)
plt.imshow(x_test[0], cmap='gray')
plt.subplot(122)
plt.imshow(p[0].squeeze(), cmap='gray')
plt.show()
После
запуска (с весами loss_weights = [1.0, 1.0]), увидим максимальное значение на 7-м
выходе классификатора и следующее восстановленное изображение на декодере:
Конечно,
одной эпохи обучения для такой задачи мало, это лишь пример того, как можно
независимо настраивать параметры для модели с множеством разнотипных выходов.
И, я надеюсь, вы теперь хорошо себе это представляете.
Видео по теме
Deep Learning with Keras — Introduction
Deep Learning has become a buzzword in recent days in the field of Artificial Intelligence (AI). For many years, we used Machine Learning (ML) for imparting intelligence to machines. In recent days, deep learning has become more popular due to its supremacy in predictions as compared to traditional ML techniques.
Deep Learning essentially means training an Artificial Neural Network (ANN) with a huge amount of data. In deep learning, the network learns by itself and thus requires humongous data for learning. While traditional machine learning is essentially a set of algorithms that parse data and learn from it. They then used this learning for making intelligent decisions.
Now, coming to Keras, it is a high-level neural networks API that runs on top of TensorFlow — an end-to-end open source machine learning platform. Using Keras, you easily define complex ANN architectures to experiment on your big data. Keras also supports GPU, which becomes essential for processing huge amount of data and developing machine learning models.
In this tutorial, you will learn the use of Keras in building deep neural networks. We shall look at the practical examples for teaching. The problem at hand is recognizing handwritten digits using a neural network that is trained with deep learning.
Just to get you more excited in deep learning, below is a screenshot of Google trends on deep learning here −
As you can see from the diagram, the interest in deep learning is steadily growing over the last several years. There are many areas such as computer vision, natural language processing, speech recognition, bioinformatics, drug design, and so on, where the deep learning has been successfully applied. This tutorial will get you quickly started on deep learning.
So keep reading!
Deep Learning with Keras — Deep Learning
As said in the introduction, deep learning is a process of training an artificial neural network with a huge amount of data. Once trained, the network will be able to give us the predictions on unseen data. Before I go further in explaining what deep learning is, let us quickly go through some terms used in training a neural network.
Neural Networks
The idea of artificial neural network was derived from neural networks in our brain. A typical neural network consists of three layers — input, output and hidden layer as shown in the picture below.
This is also called a shallow neural network, as it contains only one hidden layer. You add more hidden layers in the above architecture to create a more complex architecture.
Deep Networks
The following diagram shows a deep network consisting of four hidden layers, an input layer and an output layer.
As the number of hidden layers are added to the network, its training becomes more complex in terms of required resources and the time it takes to fully train the network.
Network Training
After you define the network architecture, you train it for doing certain kinds of predictions. Training a network is a process of finding the proper weights for each link in the network. During training, the data flows from Input to Output layers through various hidden layers. As the data always moves in one direction from input to output, we call this network as Feed-forward Network and we call the data propagation as Forward Propagation.
Activation Function
At each layer, we calculate the weighted sum of inputs and feed it to an Activation function. The activation function brings nonlinearity to the network. It is simply some mathematical function that discretizes the output. Some of the most commonly used activations functions are sigmoid, hyperbolic, tangent (tanh), ReLU and Softmax.
Backpropagation
Backpropagation is an algorithm for supervised learning. In Backpropagation, the errors propagate backwards from the output to the input layer. Given an error function, we calculate the gradient of the error function with respect to the weights assigned at each connection. The calculation of the gradient proceeds backwards through the network. The gradient of the final layer of weights is calculated first and the gradient of the first layer of weights is calculated last.
At each layer, the partial computations of the gradient are reused in the computation of the gradient for the previous layer. This is called Gradient Descent.
In this project-based tutorial you will define a feed-forward deep neural network and train it with backpropagation and gradient descent techniques. Luckily, Keras provides us all high level APIs for defining network architecture and training it using gradient descent. Next, you will learn how to do this in Keras.
Handwritten Digit Recognition System
In this mini project, you will apply the techniques described earlier. You will create a deep learning neural network that will be trained for recognizing handwritten digits. In any machine learning project, the first challenge is collecting the data. Especially, for deep learning networks, you need humongous data. Fortunately, for the problem that we are trying to solve, somebody has already created a dataset for training. This is called mnist, which is available as a part of Keras libraries. The dataset consists of several 28×28 pixel images of handwritten digits. You will train your model on the major portion of this dataset and the rest of the data would be used for validating your trained model.
Project Description
The mnist dataset consists of 70000 images of handwritten digits. A few sample images are reproduced here for your reference
Each image is of size 28 x 28 pixels making it a total of 768 pixels of various gray scale levels. Most of the pixels tend towards black shade while only few of them are towards white. We will put the distribution of these pixels in an array or a vector. For example, the distribution of pixels for a typical image of digits 4 and 5 is shown in the figure below.
Each image is of size 28 x 28 pixels making it a total of 768 pixels of various gray scale levels. Most of the pixels tend towards black shade while only few of them are towards white. We will put the distribution of these pixels in an array or a vector. For example, the distribution of pixels for a typical image of digits 4 and 5 is shown in the figure below.
Clearly, you can see that the distribution of the pixels (especially those tending towards white tone) differ, this distinguishes the digits they represent. We will feed this distribution of 784 pixels to our network as its input. The output of the network will consist of 10 categories representing a digit between 0 and 9.
Our network will consist of 4 layers — one input layer, one output layer and two hidden layers. Each hidden layer will contain 512 nodes. Each layer is fully connected to the next layer. When we train the network, we will be computing the weights for each connection. We train the network by applying backpropagation and gradient descent that we discussed earlier.
Deep Learning with Keras — Setting up Project
With this background, let us now start creating the project.
Setting Up Project
We will use Jupyter through Anaconda navigator for our project. As our project uses TensorFlow and Keras, you will need to install those in Anaconda setup. To install Tensorflow, run the following command in your console window:
>conda install -c anaconda tensorflow
To install Keras, use the following command −
>conda install -c anaconda keras
You are now ready to start Jupyter.
Starting Jupyter
When you start the Anaconda navigator, you would see the following opening screen.
Click ‘Jupyter’ to start it. The screen will show up the existing projects, if any, on your drive.
Starting a New Project
Start a new Python 3 project in Anaconda by selecting the following menu option −
File | New Notebook | Python 3
The screenshot of the menu selection is shown for your quick reference −
A new blank project will show up on your screen as shown below −
Change the project name to DeepLearningDigitRecognition by clicking and editing on the default name “UntitledXX”.
Deep Learning with Keras — Importing Libraries
We first import the various libraries required by the code in our project.
Array Handling and Plotting
As typical, we use numpy for array handling and matplotlib for plotting. These libraries are imported in our project using the following import statements
import numpy as np
import matplotlib
import matplotlib.pyplot as plot
Suppressing Warnings
As both Tensorflow and Keras keep on revising, if you do not sync their appropriate versions in the project, at runtime you would see plenty of warning errors. As they distract your attention from learning, we shall be suppressing all the warnings in this project. This is done with the following lines of code −
# silent all warnings
import os
os.environ['TF_CPP_MIN_LOG_LEVEL']='3'
import warnings
warnings.filterwarnings('ignore')
from tensorflow.python.util import deprecation
deprecation._PRINT_DEPRECATION_WARNINGS = False
Keras
We use Keras libraries to import dataset. We will use the mnist dataset for handwritten digits. We import the required package using the following statement
from keras.datasets import mnist
We will be defining our deep learning neural network using Keras packages. We import the Sequential, Dense, Dropout and Activation packages for defining the network architecture. We use load_model package for saving and retrieving our model. We also use np_utils for a few utilities that we need in our project. These imports are done with the following program statements −
from keras.models import Sequential, load_model
from keras.layers.core import Dense, Dropout, Activation
from keras.utils import np_utils
When you run this code, you will see a message on the console that says that Keras uses TensorFlow at the backend. The screenshot at this stage is shown here −
Now, as we have all the imports required by our project, we will proceed to define the architecture for our Deep Learning network.
Creating Deep Learning Model
Our neural network model will consist of a linear stack of layers. To define such a model, we call the Sequential function −
model = Sequential()
Input Layer
We define the input layer, which is the first layer in our network using the following program statement −
model.add(Dense(512, input_shape=(784,)))
This creates a layer with 512 nodes (neurons) with 784 input nodes. This is depicted in the figure below −
Note that all the input nodes are fully connected to the Layer 1, that is each input node is connected to all 512 nodes of Layer 1.
Next, we need to add the activation function for the output of Layer 1. We will use ReLU as our activation. The activation function is added using the following program statement −
model.add(Activation('relu'))
Next, we add Dropout of 20% using the statement below. Dropout is a technique used to prevent model from overfitting.
model.add(Dropout(0.2))
At this point, our input layer is fully defined. Next, we will add a hidden layer.
Hidden Layer
Our hidden layer will consist of 512 nodes. The input to the hidden layer comes from our previously defined input layer. All the nodes are fully connected as in the earlier case. The output of the hidden layer will go to the next layer in the network, which is going to be our final and output layer. We will use the same ReLU activation as for the previous layer and a dropout of 20%. The code for adding this layer is given here −
model.add(Dense(512))
model.add(Activation('relu'))
model.add(Dropout(0.2))
The network at this stage can be visualized as follows −
Next, we will add the final layer to our network, which is the output layer. Note that you may add any number of hidden layers using the code similar to the one which you have used here. Adding more layers would make the network complex for training; however, giving a definite advantage of better results in many cases though not all.
Output Layer
The output layer consists of just 10 nodes as we want to classify the given images in 10 distinct digits. We add this layer, using the following statement −
model.add(Dense(10))
As we want to classify the output in 10 distinct units, we use the softmax activation. In case of ReLU, the output is binary. We add the activation using the following statement −
model.add(Activation('softmax'))
At this point, our network can be visualized as shown in the below diagram −
At this point, our network model is fully defined in the software. Run the code cell and if there are no errors, you will get a confirmation message on the screen as shown in the screenshot below −
Next, we need to compile the model.
Deep Learning with Keras — Compiling the Model
The compilation is performed using one single method call called compile.
model.compile(loss='categorical_crossentropy', metrics=['accuracy'], optimizer='adam')
The compile method requires several parameters. The loss parameter is specified to have type ‘categorical_crossentropy’. The metrics parameter is set to ‘accuracy’ and finally we use the adam optimizer for training the network. The output at this stage is shown below −
Now, we are ready to feed in the data to our network.
Loading Data
As said earlier, we will use the mnist dataset provided by Keras. When we load the data into our system, we will split it in the training and test data. The data is loaded by calling the load_data method as follows −
(X_train, y_train), (X_test, y_test) = mnist.load_data()
The output at this stage looks like the following −
Now, we shall learn the structure of the loaded dataset.
The data that is provided to us are the graphic images of size 28 x 28 pixels, each containing a single digit between 0 and 9. We will display the first ten images on the console. The code for doing so is given below −
# printing first 10 images
for i in range(10):

plot.subplot(3,5,i+1)
plot.tight_layout()
plot.imshow(X_train[i], cmap='gray', interpolation='none')
plot.title("Digit: {}".format(y_train[i]))
plot.xticks([])
plot.yticks([])
In an iterative loop of 10 counts, we create a subplot on each iteration and show an image from X_train vector in it. We title each image from the corresponding y_train vector. Note that the y_train vector contains the actual values for the corresponding image in X_train vector. We remove the x and y axes markings by calling the two methods xticks and yticks with null argument. When you run the code, you would see the following output −
Next, we will prepare data for feeding it into our network.
Deep Learning with Keras — Preparing Data
Before we feed the data to our network, it must be converted into the format required by the network. This is called preparing data for the network. It generally consists of converting a multi-dimensional input to a single-dimension vector and normalizing the data points.
Reshaping Input Vector
The images in our dataset consist of 28 x 28 pixels. This must be converted into a single dimensional vector of size 28 * 28 = 784 for feeding it into our network. We do so by calling the reshape method on the vector.
X_train = X_train.reshape(60000, 784)
X_test = X_test.reshape(10000, 784)
Now, our training vector will consist of 60000 data points, each consisting of a single dimension vector of size 784. Similarly, our test vector will consist of 10000 data points of a single-dimension vector of size 784.
Normalizing Data
The data that the input vector contains currently has a discrete value between 0 and 255 — the gray scale levels. Normalizing these pixel values between 0 and 1 helps in speeding up the training. As we are going to use stochastic gradient descent, normalizing data will also help in reducing the chance of getting stuck in local optima.
To normalize the data, we represent it as float type and divide it by 255 as shown in the following code snippet −
X_train = X_train.astype('float32')
X_test = X_test.astype('float32')
X_train /= 255
X_test /= 255
Let us now look at how the normalized data looks like.
Examining Normalized Data
To view the normalized data, we will call the histogram function as shown here −
plot.hist(X_train[0])
plot.title("Digit: {}".format(y_train[0]))
Here, we plot the histogram of the first element of the X_train vector. We also print the digit represented by this data point. The output of running the above code is shown here −
You will notice a thick density of points having value close to zero. These are the black dot points in the image, which obviously is the major portion of the image. The rest of the gray scale points, which are close to white color, represent the digit. You may check out the distribution of pixels for another digit. The code below prints the histogram of a digit at index of 2 in the training dataset.
plot.hist(X_train[2])
plot.title("Digit: {}".format(y_train[2])
The output of running the above code is shown below −
Comparing the above two figures, you will notice that the distribution of the white pixels in two images differ indicating a representation of a different digit — “5” and “4” in the above two pictures.
Next, we will examine the distribution of data in our full training dataset.
Examining Data Distribution
Before we train our machine learning model on our dataset, we should know the distribution of unique digits in our dataset. Our images represent 10 distinct digits ranging from 0 to 9. We would like to know the number of digits 0, 1, etc., in our dataset. We can get this information by using the unique method of Numpy.
Use the following command to print the number of unique values and the number of occurrences of each one
print(np.unique(y_train, return_counts=True))
When you run the above command, you will see the following output −
(array([0, 1, 2, 3, 4, 5, 6, 7, 8, 9], dtype=uint8), array([5923, 6742, 5958, 6131, 5842, 5421, 5918, 6265, 5851, 5949]))
It shows that there are 10 distinct values — 0 through 9. There are 5923 occurrences of digit 0, 6742 occurrences of digit 1, and so on. The screenshot of the output is shown here −
As a final step in data preparation, we need to encode our data.
Encoding Data
We have ten categories in our dataset. We will thus encode our output in these ten categories using one-hot encoding. We use to_categorial method of Numpy utilities to perform encoding. After the output data is encoded, each data point would be converted into a single dimensional vector of size 10. For example, digit 5 will now be represented as [0,0,0,0,0,1,0,0,0,0].
Encode the data using the following piece of code −
n_classes = 10
Y_train = np_utils.to_categorical(y_train, n_classes)
You may check out the result of encoding by printing the first 5 elements of the categorized Y_train vector.
Use the following code to print the first 5 vectors −
for i in range(5):
   print (Y_train[i])
You will see the following output −
[0. 0. 0. 0. 0. 1. 0. 0. 0. 0.]
[1. 0. 0. 0. 0. 0. 0. 0. 0. 0.]
[0. 0. 0. 0. 1. 0. 0. 0. 0. 0.]
[0. 1. 0. 0. 0. 0. 0. 0. 0. 0.]
[0. 0. 0. 0. 0. 0. 0. 0. 0. 1.]
The first element represents digit 5, the second represents digit 0, and so on.
Finally, you will have to categorize the test data too, which is done using the following statement −
Y_test = np_utils.to_categorical(y_test, n_classes)
At this stage, your data is fully prepared for feeding into the network.
Next, comes the most important part and that is training our network model.
Deep Learning with Keras — Training the Model
The model training is done in one single method call called fit that takes few parameters as seen in the code below −
history = model.fit(X_train, Y_train,
   batch_size=128, epochs=20,
   verbose=2,
   validation_data=(X_test, Y_test)))
The first two parameters to the fit method specify the features and the output of the training dataset.
The epochs is set to 20; we assume that the training will converge in max 20 epochs — the iterations. The trained model is validated on the test data as specified in the last parameter.
The partial output of running the above command is shown here −
Train on 60000 samples, validate on 10000 samples
Epoch 1/20
- 9s - loss: 0.2488 - acc: 0.9252 - val_loss: 0.1059 - val_acc: 0.9665
Epoch 2/20
- 9s - loss: 0.1004 - acc: 0.9688 - val_loss: 0.0850 - val_acc: 0.9715
Epoch 3/20
- 9s - loss: 0.0723 - acc: 0.9773 - val_loss: 0.0717 - val_acc: 0.9765
Epoch 4/20
- 9s - loss: 0.0532 - acc: 0.9826 - val_loss: 0.0665 - val_acc: 0.9795
Epoch 5/20
- 9s - loss: 0.0457 - acc: 0.9856 - val_loss: 0.0695 - val_acc: 0.9792
The screenshot of the output is given below for your quick reference −
Now, as the model is trained on our training data, we will evaluate its performance.
Evaluating Model Performance
To evaluate the model performance, we call evaluate method as follows −
loss_and_metrics = model.evaluate(X_test, Y_test, verbose=2)
To evaluate the model performance, we call evaluate method as follows −
loss_and_metrics = model.evaluate(X_test, Y_test, verbose=2)
We will print the loss and accuracy using the following two statements −
print("Test Loss", loss_and_metrics[0])
print("Test Accuracy", loss_and_metrics[1])
When you run the above statements, you would see the following output −
Test Loss 0.08041584826191042
Test Accuracy 0.9837
This shows a test accuracy of 98%, which should be acceptable to us. What it means to us that in 2% of the cases, the handwritten digits would not be classified correctly. We will also plot accuracy and loss metrics to see how the model performs on the test data.
Plotting Accuracy Metrics
We use the recorded history during our training to get a plot of accuracy metrics. The following code will plot the accuracy on each epoch. We pick up the training data accuracy (“acc”) and the validation data accuracy (“val_acc”) for plotting.
plot.subplot(2,1,1)
plot.plot(history.history['acc'])
plot.plot(history.history['val_acc'])
plot.title('model accuracy')
plot.ylabel('accuracy')
plot.xlabel('epoch')
plot.legend(['train', 'test'], loc='lower right')
The output plot is shown below −
As you can see in the diagram, the accuracy increases rapidly in the first two epochs, indicating that the network is learning fast. Afterwards, the curve flattens indicating that not too many epochs are required to train the model further. Generally, if the training data accuracy (“acc”) keeps improving while the validation data accuracy (“val_acc”) gets worse, you are encountering overfitting. It indicates that the model is starting to memorize the data.
We will also plot the loss metrics to check our model’s performance.
Plotting Loss Metrics
Again, we plot the loss on both the training (“loss”) and test (“val_loss”) data. This is done using the following code −
plot.subplot(2,1,2)
plot.plot(history.history['loss'])
plot.plot(history.history['val_loss'])
plot.title('model loss')
plot.ylabel('loss')
plot.xlabel('epoch')
plot.legend(['train', 'test'], loc='upper right')
The output of this code is shown below −
As you can see in the diagram, the loss on the training set decreases rapidly for the first two epochs. For the test set, the loss does not decrease at the same rate as the training set, but remains almost flat for multiple epochs. This means our model is generalizing well to unseen data.
Now, we will use our trained model to predict the digits in our test data.
Predicting on Test Data
To predict the digits in an unseen data is very easy. You simply need to call the predict_classes method of the model by passing it to a vector consisting of your unknown data points.
predictions = model.predict_classes(X_test)
The method call returns the predictions in a vector that can be tested for 0’s and 1’s against the actual values. This is done using the following two statements −
correct_predictions = np.nonzero(predictions == y_test)[0]
incorrect_predictions = np.nonzero(predictions != y_test)[0]
Finally, we will print the count of correct and incorrect predictions using the following two program statements −
print(len(correct_predictions)," classified correctly")
print(len(incorrect_predictions)," classified incorrectly")
When you run the code, you will get the following output −
9837 classified correctly
163 classified incorrectly
Now, as you have satisfactorily trained the model, we will save it for future use.
Deep Learning with Keras — Saving Model
We will save the trained model in our local drive in the models folder in our current working directory. To save the model, run the following code −
directory = "./models/"
name = 'handwrittendigitrecognition.h5'
path = os.path.join(save_dir, name)
model.save(path)
print('Saved trained model at %s ' % path)
The output after running the code is shown below −
Now, as you have saved a trained model, you may use it later on for processing your unknown data.
Loading Model for Predictions
To predict the unseen data, you first need to load the trained model into the memory. This is done using the following command −
model = load_model ('./models/handwrittendigitrecognition.h5')
Note that we are simply loading the .h5 file into memory. This sets up the entire neural network in memory along with the weights assigned to each layer.
Now, to do your predictions on unseen data, load the data, let it be one or more items, into the memory. Preprocess the data to meet the input requirements of our model as what you did on your training and test data above. After preprocessing, feed it to your network. The model will output its prediction.
Deep Learning with Keras — Conclusion
Keras provides a high level API for creating deep neural network. In this tutorial, you learned to create a deep neural network that was trained for finding the digits in handwritten text. A multi-layer network was created for this purpose. Keras allows you to define an activation function of your choice at each layer. Using gradient descent, the network was trained on the training data. The accuracy of the trained network in predicting the unseen data was tested on the test data. You learned to plot the accuracy and error metrics. After the network is fully trained, you saved the network model for future use.
Время на прочтение
2 мин
Количество просмотров 5.1K
При обучении нейронной сети на обучающей выборке на выходе нейросети вычисляются два ключевых параметра эффективности обучения — ошибка и точность предсказания. Для этого используются функция потери (loss) и метрика точности. Эти метрики различаются в зависимости от поставленной задачи (классификация или сегментация изображения, детекция объекта, регрессия). В Keras мы можем определить свои собственные функцию потери и метрики точности под свою конкретную задачу. О таких кастомных функциях и пойдет речь в статье. Кому интересно, прошу под кат.
Кастомные функции потери в Keras
Для примера предположим, что нам необходимо реализовать функцию ошибки Mean Average Error (MAE). Кастомную функцию потерь MAE можно реализовать следующим образом:
from keras import backend as K

def mae(y_true, y_pred):
    true_value = K.sum(y_true * K.arange(0, 100, dtype="float32"), axis=-1)
    pred_value = K.sum(y_pred * K.arange(0, 100, dtype="float32"), axis=-1)
    mae = K.mean(K.abs(true_value - pred_value))
return mae
Здесь мы используем функции sum, arange, mean и abs, определенные в Keras.
Точно так же можно определить свою метрику точности. К примеру определим метрику earth_movers_distance для сравнения двух гистограмм:
from keras import backend as K

def earth_movers_distance(y_true, y_pred):
    cdf_true = K.cumsum(y_true, axis=-1)
    cdf_pred = K.cumsum(y_pred, axis=-1)
    emd = K.sqrt(K.mean(K.square(cdf_true - cdf_pred), axis=-1))
    return K.mean(emd)
Чтобы использовать наши метрики mae и earth_movers_distance импортируем соответствующие функции из отдельного модуля и добавим их в параметры loss и metrics при компиляции модели:
from utils.metrics import mae, earth_movers_distance

loss = earth_movers_distance
model.compile(optimizer=optimizer, loss=loss, metrics=[mae, "accuracy"])
Загрузка модели Keras с кастомной функцией потери
При обучении модели в Keras можно сохранять веса модели в h5 файл для последующей загрузки обученной модели на этапе предсказания. Если мы используем кастомные функции потерь и метрики качества, то мы можем столкнуться с проблемой. Когда мы загружаем обученные веса из файла h5 для модели с помощью метода load_weights мы можем получить такую ошибку:
ValueError: Unknown loss function:earth_movers_distance
Это известный баг в Keras (о нем писали в официальном репозитории на github).
Чтобы решить проблему нужно добавить наши кастомные функции потери и метрики качества в Keras:
from keras.utils.generic_utils import get_custom_objects
get_custom_objects().update({"earth_movers_distance": earth_movers_distance, "age_mae": age_mae})
Пока на этом все. Всем удачи и до новых встреч!
You’ve created a deep learning model in Keras, you prepared the data and now you are wondering which loss you should choose for your problem.
We’ll get to that in a second but first what is a loss function?
In deep learning, the loss is computed to get the gradients with respect to model weights and update those weights accordingly via backpropagation. Loss is calculated and the network is updated after every iteration until model updates don’t bring any improvement in the desired evaluation metric.
So while you keep using the same evaluation metric like f1 score or AUC on the validation set during (long parts) of your machine learning project, the loss can be changed, adjusted and modified to get the best evaluation metric performance.
You can think of the loss function just like you think about the model architecture or the optimizer and it is important to put some thought into choosing it. In this piece we’ll look at:
- loss functions available in Keras and how to use them,
- how you can define your own custom loss function in Keras,
- how to add sample weighing to create observation-sensitive losses,
- how to avoid nans in the loss,
- how you can monitor the loss function via plotting and callbacks.
Let’s get into it!
Keras loss functions 101
In Keras, loss functions are passed during the compile stage, as shown below.
In this example, we’re defining the loss function by creating an instance of the loss class. Using the class is advantageous because you can pass some additional parameters.
from tensorflow import keras
from tensorflow.keras import layers

model = keras.Sequential()
model.add(layers.Dense(64, kernel_initializer='uniform', input_shape=(10,)))
model.add(layers.Activation('softmax'))

loss_function = keras.losses.SparseCategoricalCrossentropy(from_logits=True)
model.compile(loss=loss_function, optimizer='adam')
If you want to use a loss function that is built into Keras without specifying any parameters you can just use the string alias as shown below:
model.compile(loss='sparse_categorical_crossentropy', optimizer='adam')
You might be wondering how does one decide on which loss function to use?
There are various loss functions available in Keras. Other times you might have to implement your own custom loss functions.
Let’s dive into all those scenarios.
Which loss functions are available in Keras?
Binary Classification
Binary classification loss function comes into play when solving a problem involving just two classes. For example, when predicting fraud in credit card transactions, a transaction is either fraudulent or not.
Binary Cross Entropy
The Binary Cross entropy will calculate the cross-entropy loss between the predicted classes and the true classes. By default, the sum_over_batch_size reduction is used. This means that the loss will return the average of the per-sample losses in the batch.
y_true = [[0., 1.], [0.2, 0.8],[0.3, 0.7],[0.4, 0.6]]
y_pred = [[0.6, 0.4], [0.4, 0.6],[0.6, 0.4],[0.8, 0.2]]
bce = tf.keras.losses.BinaryCrossentropy(reduction='sum_over_batch_size')
bce(y_true, y_pred).numpy()
The sum reduction means that the loss function will return the sum of the per-sample losses in the batch.
bce = tf.keras.losses.BinaryCrossentropy(reduction='sum')
bce(y_true, y_pred).numpy()
Using the reduction as none returns the full array of the per-sample losses.
bce = tf.keras.losses.BinaryCrossentropy(reduction='none')
bce(y_true, y_pred).numpy()
array([0.9162905 , 0.5919184 , 0.79465103, 1.0549198 ], dtype=float32)
In binary classification, the activation function used is the sigmoid activation function. It constrains the output to a number between 0 and 1.
Multiclass classification
Problems involving the prediction of more than one class use different loss functions. In this section we’ll look at a couple:
Categorical Crossentropy
The CategoricalCrossentropy also computes the cross-entropy loss between the true classes and predicted classes. The labels are given in an one_hot format.
cce = tf.keras.losses.CategoricalCrossentropy()
cce(y_true, y_pred).numpy()
Sparse Categorical Crossentropy
If you have two or more classes and the labels are integers, the SparseCategoricalCrossentropy should be used.
y_true = [0, 1,2]
y_pred = [[0.05, 0.95, 0], [0.1, 0.8, 0.1],[0.1, 0.8, 0.1]]
scce = tf.keras.losses.SparseCategoricalCrossentropy()
scce(y_true, y_pred).numpy()
The Poison Loss
You can also use the Poisson class to compute the poison loss. It’s a great choice if your dataset comes from a Poisson distribution for example the number of calls a call center receives per hour.
y_true = [[0.1, 1.,0.8], [0.1, 0.9,0.1],[0.2, 0.7,0.1],[0.3, 0.1,0.6]]
y_pred = [[0.6, 0.2,0.2], [0.2, 0.6,0.2],[0.7, 0.1,0.2],[0.8, 0.1,0.1]]
p = tf.keras.losses.Poisson()
p(y_true, y_pred).numpy()
Kullback-Leibler Divergence Loss
The relative entropy can be computed using the KLDivergence class. According to the official docs at PyTorch:
KL divergence is a useful distance measure for continuous distributions and is often useful when performing direct regression over the space of (discretely sampled) continuous output distributions.
y_true = [[0.1, 1.,0.8], [0.1, 0.9,0.1],[0.2, 0.7,0.1],[0.3, 0.1,0.6]]
y_pred = [[0.6, 0.2,0.2], [0.2, 0.6,0.2],[0.7, 0.1,0.2],[0.8, 0.1,0.1]]
kl = tf.keras.losses.KLDivergence()
kl(y_true, y_pred).numpy()
In a multi-class problem, the activation function used is the softmax function.
Object Detection
The Focal Loss
In classification problems involving imbalanced data and object detection problems, you can use the Focal Loss. The loss introduces an adjustment to the cross-entropy criterion.
It is done by altering its shape in a way that the loss allocated to well-classified examples is down-weighted. This ensures that the model is able to learn equally from minority and majority classes.
The cross-entropy loss is scaled by scaling the factors decaying at zero as the confidence in the correct class increases. The factor of scaling down weights the contribution of unchallenging samples at training time and focuses on the challenging ones.
import tensorflow_addons as tfa

y_true = [[0.97], [0.91], [0.03]]
y_pred = [[1.0], [1.0], [0.0]]
sfc = tfa.losses.SigmoidFocalCrossEntropy()
sfc(y_true, y_pred).numpy()
array([0.00010971, 0.00329749, 0.00030611], dtype=float32)
Generalized Intersection over Union
The Generalized Intersection over Union loss from the TensorFlow add on can also be used. The Intersection over Union (IoU) is a very common metric in object detection problems. IoU is however not very efficient in problems involving non-overlapping bounding boxes.
The Generalized Intersection over Union was introduced to address this challenge that IoU is facing. It ensures that generalization is achieved by maintaining the scale-invariant property of IoU, encoding the shape properties of the compared objects into the region property, and making sure that there is a strong correlation with IoU in the event of overlapping objects.
gl = tfa.losses.GIoULoss()
boxes1 = tf.constant([[4.0, 3.0, 7.0, 5.0], [5.0, 6.0, 10.0, 7.0]])
boxes2 = tf.constant([[3.0, 4.0, 6.0, 8.0], [14.0, 14.0, 15.0, 15.0]])
loss = gl(boxes1, boxes2)
Regression
In regression problems, you have to calculate the differences between the predicted values and the true values but as always there are many ways to do it.
Mean Squared Error
The MeanSquaredError class can be used to compute the mean square of errors between the predictions and the true values.
y_true = [12, 20, 29., 60.]
y_pred = [14., 18., 27., 55.]
mse = tf.keras.losses.MeanSquaredError()
mse(y_true, y_pred).numpy()
Use Mean Squared Error when you desire to have large errors penalized more than smaller ones.
Mean Absolute Percentage Error
The mean absolute percentage error is computed using the function below.
It is calculated as shown below.
y_true = [12, 20, 29., 60.]
y_pred = [14., 18., 27., 55.]
mape = tf.keras.losses.MeanAbsolutePercentageError()
mape(y_true, y_pred).numpy()
Consider using this loss when you want a loss that you can explain intuitively. People understand percentages easily. The loss is also robust to outliers.
Mean Squared Logarithmic Error
The mean squared logarithmic error can be computed using the formula below:
Here’s an implementation of the same:
y_true = [12, 20, 29., 60.]
y_pred = [14., 18., 27., 55.]
msle = tf.keras.losses.MeanSquaredLogarithmicError()
msle(y_true, y_pred).numpy()
Mean Squared Logarithmic Error penalizes underestimates more than it does overestimates. It’s a great choice when you prefer not to penalize large errors, it is, therefore, robust to outliers.
Cosine Similarity Loss
If your interest is in computing the cosine similarity between the true and predicted values, you’d use the CosineSimilarity class. It is computed as:
The result is a number between -1 and 1 . 0 indicates orthogonality while values close to -1 show that there is great similarity.
y_true = [[12, 20], [29., 60.]]
y_pred = [[14., 18.], [27., 55.]]
cosine_loss = tf.keras.losses.CosineSimilarity(axis=1)
cosine_loss(y_true, y_pred).numpy()
LogCosh Loss
The LogCosh class computes the logarithm of the hyperbolic cosine of the prediction error.
Here’s its implementation as a stand-alone function.
y_true = [[12, 20], [29., 60.]]
y_pred = [[14., 18.], [27., 55.]]
l = tf.keras.losses.LogCosh()
l(y_true, y_pred).numpy()
LogCosh Loss works like the mean squared error, but will not be so strongly affected by the occasional wildly incorrect prediction. — TensorFlow Docs
Huber loss
For regression problems that are less sensitive to outliers, the Huber loss is used.
y_true = [12, 20, 29., 60.]
y_pred = [14., 18., 27., 55.]
h = tf.keras.losses.Huber()
h(y_true, y_pred).numpy()
Learning Embeddings
Triplet Loss
You can also compute the triplet loss with semi-hard negative mining via TensorFlow addons. The loss encourages the positive distances between pairs of embeddings with the same labels to be less than the minimum negative distance.
import tensorflow_addons as tfa

model.compile(optimizer='adam',
              loss=tfa.losses.TripletSemiHardLoss(),
              metrics=['accuracy'])
Creating custom loss functions in Keras
Sometimes there is no good loss available or you need to implement some modifications. Let’s learn how to do that.
A custom loss function can be created by defining a function that takes the true values and predicted values as required parameters. The function should return an array of losses. The function can then be passed at the compile stage.
def custom_loss_function(y_true, y_pred):
   squared_difference = tf.square(y_true - y_pred)
   return tf.reduce_mean(squared_difference, axis=-1)

model.compile(optimizer='adam', loss=custom_loss_function)
Let’s see how we can apply this custom loss function to an array of predicted and true values.
import numpy as np

y_true = [12, 20, 29., 60.]
y_pred = [14., 18., 27., 55.]
cl = custom_loss_function(np.array(y_true),np.array(y_pred))
cl.numpy()
Use of Keras loss weights
During the training process, one can weigh the loss function by observations or samples. The weights can be arbitrary, but a typical choice is class weights (distribution of labels). Each observation is weighted by the fraction of the class it belongs to (reversed) so that the loss for minority class observations is more important when calculating the loss.
One of the ways to do this is to pass the class weights during the training process.
The weights are passed using a dictionary that contains the weight for each class. You can compute the weights using Scikit-learn or calculate the weights based on your own criterion.
weights = { 0:1.01300017,1:0.88994364,2:1.00704935, 3:0.97863318,      4:1.02704553, 5:1.10680686,6:1.01385603,7:0.95770152, 8:1.02546573,
               9:1.00857287}
model.fit(x_train, y_train,verbose=1, epochs=10,class_weight=weights)
The second way is to pass these weights at the compile stage.
weights = [1.013, 0.889, 1.007, 0.978, 1.027,1.106,1.013,0.957,1.025, 1.008]

model.compile(optimizer=tf.keras.optimizers.SGD(),
              loss=tf.keras.losses.SparseCategoricalCrossentropy(),
              loss_weights=weights,
              metrics=['accuracy'])
How to monitor Keras loss function [example]
It is usually a good idea to monitor the loss function on the training and validation set as the model is training. Looking at those learning curves is a good indication of overfitting or other problems with model training.
There are two main options of how this can be done.
Monitor Keras loss using console logs
The quickest and easiest way to log and look at the losses is simply printing them to the console.
import tensorflow as tf

mnist = tf.keras.datasets.mnist
(x_train, y_train), (x_test, y_test) = mnist.load_data()
x_train, x_test = x_train / 255.0, x_test / 255.0

model = tf.keras.models.Sequential([
   tf.keras.layers.Flatten(input_shape=(28, 28)),
   tf.keras.layers.Dense(512, activation='relu'),
   tf.keras.layers.Dropout(0.2),
   tf.keras.layers.Dense(10, activation='softmax')
])

model.compile(optimizer='sgd',
             loss='sparse_categorical_crossentropy',
             metrics=['accuracy'])

model.fit(x_train, y_train,verbose=1, epochs=10)
The problem with this approach is that those logs can be easily lost, it is difficult to see progress, and when working on remote machines, you may not have access to it.
Monitor Keras loss using a callback
Another cleaner option is to use a callback that will log the loss somewhere on every batch and epoch ended.
You need to decide where and what you would like to log, but it is really simple.
For example, logging Keras loss to neptune.ai could look like this:
from keras.callbacks import Callback

class NeptuneCallback(Callback):
    def on_batch_end(self, batch, logs=None):
        for metric_name, metric_value in logs.items():
            neptune_run[f"{metric_name}"].append(metric_value)

    def on_epoch_end(self, epoch, logs=None):
        for metric_name, metric_value in logs.items():
            neptune_run[f"{metric_name}"].append(metric_value)
You can create the monitoring callback yourself or use one of the many available Keras callbacks both in the Keras library and in other libraries that integrate with it, like neptune.ai, TensorBoard, and others.
Once you have the callback ready, you simply pass it to the model.fit(...):
pip install neptune-tensorflow-keras# the same as above
import neptune
from neptune.integrations.tensorflow_keras import NeptuneCallback
run = neptune.init_run()
neptune_callback = NeptuneCallback(run=run)
model.fit(
x_train,
y_train,
validation_split=0.2,
epochs=10,
callbacks=[neptune_callback],
)
And monitor your experiment learning curves in the web app:
Note: For the most up-to-date code examples, please refer to the Neptune-Keras integration docs.
With neptune.ai, you can not only track losses, but also other metrics and parameters, as well as artifacts, source code, system metrics and more.
Why Keras loss nan happens
Most of the time, losses you log will be just some regular values, but sometimes you might get nans when working with Keras loss functions.
When that happens, your model will not update its weights and will stop learning, so this situation needs to be avoided.
There could be many reasons for nan loss but usually, what happens is:
- nans in the training set will lead to nans in the loss,
- NumPy infinite in the training set will also lead to nans in the loss,
- Using a training set that is not scaled,
- Use of very large l2 regularizers and a learning rate above 1,
- Use of the wrong optimizer function,
- Large (exploding) gradients that result in a large update to network weights during training.
So in order to avoid nans in the loss, ensure that:
- Check that your training data is properly scaled and doesn’t contain nans;
- Check that you are using the right optimizer and that your learning rate is not too large;
- Check whether the l2 regularization is not too large;
- If you are facing the exploding gradient problem, you can either: re-design the network or use gradient clipping so that your gradients have a certain “maximum allowed model update”.
Vanishing and Exploding Gradients in Neural Network Models: Debugging, Monitoring, and Fixing
Understanding Gradient Clipping (and How It Can Fix Exploding Gradients Problem)
Final thoughts
Hopefully, this article gave you some background into loss functions in Keras.
We’ve covered:
- Built-in loss functions in Keras,
- Implementation of your own custom loss functions,
- How to add sample weighing to create observation-sensitive losses,
- How to avoid loss nans,
- How you can visualize loss as your model is training.
For more information, check out the Keras Repository and the TensorFlow Loss Functions documentation.
Built-in loss functions.
View aliases
Main aliases
tf.losses
Classes
class BinaryCrossentropy: Computes the cross-entropy loss between true labels and predicted labels.
class BinaryFocalCrossentropy: Computes focal cross-entropy loss between true labels and predictions.
class CategoricalCrossentropy: Computes the crossentropy loss between the labels and predictions.
class CategoricalHinge: Computes the categorical hinge loss between y_true & y_pred.
class CosineSimilarity: Computes the cosine similarity between labels and predictions.
class Hinge: Computes the hinge loss between y_true & y_pred.
class Huber: Computes the Huber loss between y_true & y_pred.
class KLDivergence: Computes Kullback-Leibler divergence loss between y_true & y_pred.
class LogCosh: Computes the logarithm of the hyperbolic cosine of the prediction error.
class Loss: Loss base class.
class MeanAbsoluteError: Computes the mean of absolute difference between labels and predictions.
class MeanAbsolutePercentageError: Computes the mean absolute percentage error between y_true & y_pred.
class MeanSquaredError: Computes the mean of squares of errors between labels and predictions.
class MeanSquaredLogarithmicError: Computes the mean squared logarithmic error between y_true & y_pred.
class Poisson: Computes the Poisson loss between y_true & y_pred.
class Reduction: Types of loss reduction.
class SparseCategoricalCrossentropy: Computes the crossentropy loss between the labels and predictions.
class SquaredHinge: Computes the squared hinge loss between y_true & y_pred.
Functions
KLD(...): Computes Kullback-Leibler divergence loss between y_true & y_pred.
MAE(...): Computes the mean absolute error between labels and predictions.
MAPE(...): Computes the mean absolute percentage error between y_true & y_pred.
MSE(...): Computes the mean squared error between labels and predictions.
MSLE(...): Computes the mean squared logarithmic error between y_true & y_pred.
binary_crossentropy(...): Computes the binary crossentropy loss.
binary_focal_crossentropy(...): Computes the binary focal crossentropy loss.
categorical_crossentropy(...): Computes the categorical crossentropy loss.
categorical_hinge(...): Computes the categorical hinge loss between y_true & y_pred.
cosine_similarity(...): Computes the cosine similarity between labels and predictions.
deserialize(...): Deserializes a serialized loss class/function instance.
get(...): Retrieves a Keras loss as a function/Loss class instance.
hinge(...): Computes the hinge loss between y_true & y_pred.
huber(...): Computes Huber loss value.
kl_divergence(...): Computes Kullback-Leibler divergence loss between y_true & y_pred.
kld(...): Computes Kullback-Leibler divergence loss between y_true & y_pred.
kullback_leibler_divergence(...): Computes Kullback-Leibler divergence loss between y_true & y_pred.
log_cosh(...): Logarithm of the hyperbolic cosine of the prediction error.
logcosh(...): Logarithm of the hyperbolic cosine of the prediction error.
mae(...): Computes the mean absolute error between labels and predictions.
mape(...): Computes the mean absolute percentage error between y_true & y_pred.
mean_absolute_error(...): Computes the mean absolute error between labels and predictions.
mean_absolute_percentage_error(...): Computes the mean absolute percentage error between y_true & y_pred.
mean_squared_error(...): Computes the mean squared error between labels and predictions.
mean_squared_logarithmic_error(...): Computes the mean squared logarithmic error between y_true & y_pred.
mse(...): Computes the mean squared error between labels and predictions.
msle(...): Computes the mean squared logarithmic error between y_true & y_pred.
poisson(...): Computes the Poisson loss between y_true and y_pred.
serialize(...): Serializes loss function or Loss instance.
sparse_categorical_crossentropy(...): Computes the sparse categorical crossentropy loss.
squared_hinge(...): Computes the squared hinge loss between y_true & y_pred.
Usage of loss functions
A loss function (or objective function, or optimization score function) is one of the two parameters required to compile a model:
model.compile(loss='mean_squared_error', optimizer='sgd')
from keras import losses

model.compile(loss=losses.mean_squared_error, optimizer='sgd')
You can either pass the name of an existing loss function, or pass a TensorFlow/Theano symbolic function that returns a scalar for each data-point and takes the following two arguments:
- y_true: True labels. TensorFlow/Theano tensor.
- y_pred: Predictions. TensorFlow/Theano tensor of the same shape as y_true.
The actual optimized objective is the mean of the output array across all datapoints.
For a few examples of such functions, check out the losses source.
Available loss functions
mean_squared_error
mean_squared_error(y_true, y_pred)
mean_absolute_error
mean_absolute_error(y_true, y_pred)
mean_absolute_percentage_error
mean_absolute_percentage_error(y_true, y_pred)
mean_squared_logarithmic_error
mean_squared_logarithmic_error(y_true, y_pred)
squared_hinge
squared_hinge(y_true, y_pred)
hinge
hinge(y_true, y_pred)
categorical_hinge
categorical_hinge(y_true, y_pred)
logcosh
logcosh(y_true, y_pred)
Logarithm of the hyperbolic cosine of the prediction error.
log(cosh(x)) is approximately equal to (x ** 2) / 2 for small x and
to abs(x) - log(2) for large x. This means that ‘logcosh’ works mostly
like the mean squared error, but will not be so strongly affected by the
occasional wildly incorrect prediction. However, it may return NaNs if the
intermediate value cosh(y_pred - y_true) is too large to be represented
in the chosen precision.
categorical_crossentropy
categorical_crossentropy(y_true, y_pred)
sparse_categorical_crossentropy
sparse_categorical_crossentropy(y_true, y_pred)
binary_crossentropy
binary_crossentropy(y_true, y_pred)
kullback_leibler_divergence
kullback_leibler_divergence(y_true, y_pred)
poisson
poisson(y_true, y_pred)
cosine_proximity
cosine_proximity(y_true, y_pred)
Note: when using the categorical_crossentropy loss, your targets should be in categorical format (e.g. if you have 10 classes, the target for each sample should be a 10-dimensional vector that is all-zeros except for a 1 at the index corresponding to the class of the sample). In order to convert integer targets into categorical targets, you can use the Keras utility to_categorical:
from keras.utils.np_utils import to_categorical

categorical_labels = to_categorical(int_labels, num_classes=None)


