
Системы контроля версий предназначены для управления дополнениями, вносимыми в проект множеством распределенных авторов (обычно разработчиков). Иногда один и тот же контент могут редактировать сразу несколько разработчиков. Если разработчик A попытается изменить код, который редактирует разработчик B, может произойти конфликт. Для предотвращения конфликтов разработчики работают в отдельных изолированных ветках. Основная задача команды git merge заключается в слиянии отдельных веток и разрешении любых конфликтующих правок.
Общие сведения о конфликтах слияния
Слияние и конфликты являются неотъемлемой частью работы с Git. В других инструментах управления версиями, например SVN, работа с конфликтами может быть дорогой и времязатратной. Git позволяет выполнять слияния очень просто. В большинстве случаев Git самостоятельно решает, как автоматически интегрировать новые изменения.
Обычно конфликты возникают, когда два человека изменяют одни и те же строки в файле или один разработчик удаляет файл, который в это время изменяет другой разработчик. В таких случаях Git не может автоматически определить, какое изменение является правильным. Конфликты затрагивают только того разработчика, который выполняет слияние, остальная часть команды о конфликте не знает. Git помечает файл как конфликтующий и останавливает процесс слияния. В этом случае ответственность за разрешение конфликта несут разработчики.
Типы конфликтов слияния
Конфликт во время слияния может произойти в двух отдельных точках — при запуске и во время процесса слияния. Далее рассмотрим, как разрешать каждый из этих конфликтных сценариев.
Git прерывает работу в самом начале слияния
Выполнение команды слияния прерывается в самом начале, если Git обнаруживает изменения в рабочем каталоге или разделе проиндексированных файлов текущего проекта. Git не может выполнить слияние, поскольку иначе эти ожидающие изменения будут перезаписаны новыми коммитами. Такое случается из-за конфликтов не с другими разработчиками, а с ожидающими локальными изменениями. Локальное состояние необходимо стабилизировать с помощью команд git stash, git checkout, git commit или git reset. Если команда слияния прерывается в самом начале, выдается следующее сообщение об ошибке:
error: Entry '<fileName>' not uptodate. Cannot merge. (Changes in working directory) Git прерывает работу во время слияния
Сбой В ПРОЦЕССЕ слияния говорит о наличии конфликта между текущей локальной веткой и веткой, с которой выполняется слияние. Это свидетельствует о конфликте с кодом другого разработчика. Git сделает все возможное, чтобы объединить файлы, но оставит конфликтующие участки, чтобы вы разрешили их вручную. При сбое во время выполнения слияния выдается следующее сообщение об ошибке:
error: Entry '<fileName>' would be overwritten by merge. Cannot merge. (Changes in staging area) Создание конфликта слияния
Чтобы лучше разобраться в конфликтах слияния, в следующем разделе мы смоделируем конфликт для дальнейшего изучения и разрешения. Для запуска моделируемого примера будет использоваться интерфейс Git c Unix-подобной командной строкой.
$ mkdir git-merge-test
$ cd git-merge-test
$ git init .
$ echo "this is some content to mess with" > merge.txt
$ git add merge.txt
$ git commit -am"we are commiting the inital content"
[main (root-commit) d48e74c] we are commiting the inital content
1 file changed, 1 insertion(+)
create mode 100644 merge.txt
С помощью приведенной в этом примере последовательности команд выполняются следующие действия.
- Создается новый каталог с именем
git-merge-test, выполняется переход в этот каталог и инициализация его как нового репозитория Git. - Создается новый текстовый файл
merge.txtс некоторым содержимым. - В репозиторий добавляется файл
merge.txtи выполняется коммит.
Теперь у нас есть новый репозиторий с одной веткой main и непустым файлом merge.txt. Далее создадим новую ветку, которая будет использоваться как конфликтующая при слиянии.
$ git checkout -b new_branch_to_merge_later
$ echo "totally different content to merge later" > merge.txt
$ git commit -am"edited the content of merge.txt to cause a conflict"
[new_branch_to_merge_later 6282319] edited the content of merge.txt to cause a conflict
1 file changed, 1 insertion(+), 1 deletion(-)
Представленная выше последовательность команд выполняет следующие действия.
- Создает новую ветку с именем
new_branch_to_merge_laterи выполняет переход в нее. - Перезаписывает содержимое файла
merge.txt. - Выполняет коммит нового содержимого.
В этой новой ветке new_branch_to_merge_later мы создали коммит, который переопределил содержимое файла merge.txt.
git checkout main
Switched to branch 'main'
echo "content to append" >> merge.txt
git commit -am"appended content to merge.txt"
[main 24fbe3c] appended content to merge.tx
1 file changed, 1 insertion(+)
Эта последовательность команд выполняет переключение на ветку main, добавляет содержимое в файл merge.txt и делает коммит. После этого в нашем экспериментальном репозитории находятся два новых коммита, первый — в ветке main, а второй — в ветке new_branch_to_merge_later. Теперь запустим команду git merge new_branch_to_merge_later и посмотрим, что из этого выйдет!
$ git merge new_branch_to_merge_later
Auto-merging merge.txt
CONFLICT (content): Merge conflict in merge.txt
Automatic merge failed; fix conflicts and then commit the result.
БАХ! 💥 Возник конфликт. Хорошо, что система Git сообщила нам об этом.
Выявление конфликтов слияния
Как мы убедились на выполняемом примере, Git выводит небольшое описательное сообщение о возникновении КОНФЛИКТА. Чтобы получить более глубокое понимание проблемы, можно запустить команду git status.
$ git status
On branch main
You have unmerged paths.
(fix conflicts and run "git commit")
(use "git merge --abort" to abort the merge)Unmerged paths:
(use "git add <file>..." to mark resolution)
both modified: merge.txt
Вывод команды git status говорит о том, что из-за конфликта не удалось слить пути. Теперь файл merge.text отображается как измененный. Давайте изучим этот файл и посмотрим, что изменилось.
$ cat merge.txt
<<<<<<< HEAD
this is some content to mess with
content to append
=======
totally different content to merge later
>>>>>>> new_branch_to_merge_later
Для просмотра содержимого файла merge.txt воспользуемся командой cat. Видно, что в файле появились новые странные дополнения:
<<<<<<< HEAD=======>>>>>>> new_branch_to_merge_later
Эти новые строки можно рассматривать как «разделители конфликта». Строка ======= является «центром» конфликта. Все содержимое между этим центром и строкой <<<<<<< HEAD находится в текущей ветке main, на которую ссылается указатель HEAD. А все содержимое между центром и строкой >>>>>>> new_branch_to_merge_later является содержимым ветки для слияния.
Разрешение конфликтов слияния с помощью командной строки
Самый простой способ разрешить конфликт — отредактировать конфликтующий файл. Откройте файл merge.txt в привычном редакторе. В нашем примере просто удалим все разделители конфликта. Измененное содержимое файла merge.txt будет выглядеть следующим образом:
this is some content to mess with
content to append
totally different content to merge later
После редактирования файла выполните команду git add merge.txt, чтобы добавить новое объединенное содержимое в раздел проиндексированных файлов. Для завершения слияния создайте новый коммит, выполнив следующую команду:
git commit -m "merged and resolved the conflict in merge.txt"Git обнаружит, что конфликт разрешен, и создаст новый коммит слияния для завершения процедуры слияния.
Команды Git, с помощью которых можно разрешить конфликты слияния
Общие инструменты
Команда status часто используется во время работы с Git и помогает идентифицировать конфликтующие во время слияния файлы.
При передаче аргумента --merge для команды git log будет создан журнал со списком конфликтов коммитов между ветками, для которых выполняется слияние.
Команда diff помогает найти различия между состояниями репозитория/файлов. Она полезна для выявления и предупреждения конфликтов слияния.
Инструменты для случаев, когда Git прерывает работу в самом начале слияния
Команда checkout может использоваться для отмены изменений в файлах или для изменения веток.
Команда reset может использоваться для отмены изменений в рабочем каталоге или в разделе проиндексированных файлов.
Инструменты для случаев, когда конфликты Git возникают во время слияния
При выполнении команды git merge с опцией --abort процесс слияния будет прерван, а ветка вернется к состоянию, в котором она находилась до начала слияния.
Команду git reset можно использовать для разрешения конфликтов, возникающих во время выполнения слияния, чтобы восстановить заведомо удовлетворительное состояние конфликтующих файлов.
Резюме
Конфликты слияния могут пугать. К счастью, Git предлагает мощные инструменты их поиска и разрешения. Большую часть слияний система Git способна обрабатывать самостоятельно с помощью функций автоматического слияния. Конфликт возникает, когда в двух ветках была изменена одна и та же строка в файле или когда некий файл удален в одной ветке и отредактирован в другой. Как правило, конфликты возникают при работе в команде.
Существует множество способов разрешения конфликтов слияния. В этой статье мы рассмотрели немалое количество инструментов командной строки, которые предоставляет Git. Более подробную информацию об этих инструментах см. на отдельных страницах для команд git log, git reset, git status, git checkout и git reset. Помимо этого многие сторонние инструменты также предлагают оптимизированные функции, поддерживающие работу с конфликтами слияния.
Конфликты слияния происходят при слиянии ветвей, имеющих конкурирующие фиксации, и Git требуется ваша помощь, чтобы принять решение относительно того, какие изменения следует включить в окончательное слияние.
Git часто может разрешать различия между ветвями и автоматически объединять их. Как правило, изменения находятся в разных строках или даже в разных файлах, что упрощает понимание слияния компьютерами. Однако иногда возникают конфликтующие изменения, которые Git не может устранить без вашей помощи. Часто конфликты слияния возникают, когда участники вносят разные изменения в одну строку одного файла или когда один участник редактирует файл, а другой — удаляет тот же файл.
Прежде чем объединить запрос на вытягивание на GitHub, необходимо разрешить все конфликты слияния. Если в запросе на вытягивание возник конфликт слияния между ветвью сравнения и базовой ветвью, вы можете просмотреть список файлов с конфликтующими изменениями над кнопкой Слияние запроса на вытягивание. Кнопка Слияние запроса на вытягивание будет отключена, пока вы не устраните все конфликты между ветвью сравнения и базовой ветвью.

Разрешение конфликтов слияния
Чтобы устранить конфликт слияния, необходимо вручную отредактировать конфликтующий файл и выбрать изменения, которые необходимо сохранить в окончательном слиянии. Существует несколько разных способов устранения конфликта слияния:
- Если конфликт слияния вызван конкурирующими изменениями строк, например при внесении разных изменений в одну строку одного файла в разных ветвях в репозитории Git, его можно разрешить на GitHub с помощью редактора конфликтов. Дополнительные сведения см. в разделе Разрешение конфликта слияния в GitHub.
- Для остальных типов конфликтов слияния необходимо разрешить конфликт слияния в локальном клоне репозитория и отправить изменение в ветвь на GitHub. Для отправки изменений можно использовать командную строку или средство, например GitHub Desktop. Дополнительные сведения см. в разделе Разрешение конфликта слияния с помощью командной строки.
Если в командной строке есть конфликт слияния, локальные изменения нельзя отправлять в GitHub, пока не будет разрешен конфликт слияния локально на компьютере. При попытке объединения ветвей в командной строке с конфликтом слияния появится сообщение об ошибке. Дополнительные сведения см. в разделе Разрешение конфликта слияния с помощью командной строки.
$ git merge BRANCH-NAME
> Auto-merging styleguide.md
> CONFLICT (content): Merge conflict in styleguide.md
> Automatic merge failed; fix conflicts and then commit the result
Дополнительные материалы
- «Сведения о слиянии запросов на вытягивание»
- «Сведения о запросах на вытягивание»
- «Разрешение конфликта слияния с помощью командной строки»
- «Разрешение конфликта слияния в GitHub»
Время на прочтение
8 мин
Количество просмотров 147K
Предлагаю читателям «Хабрахабра» перевод публикации «Painless Merge Conflict Resolution in Git»
из блога blog.wuwon.id.au.
В моей повседневной работе, часто приходится иметь дело со множеством git ветвей (branch). Это могут быть ветви промежуточных релизов, ветви с устаревшим API находящиеся на поддержке для некоторых клиентов, или ветви с экспериментальными свойствами. Лёгкость создания ветвей в модели Git так и соблазняет разработчиков создавать все больше и больше ветвей, и как правило бремя от большого количества ветвей становится очень ощутимым, когда приходится все эти ветви поддерживать и периодически делать слияния (merge) с другими ветвями.
Слияния очень важны для поддержания кода в актуальном состоянии, и как правило ошибка сделанная при слиянии может привести к большей головной боли, нежели ошибка сделанная при простом коммите. К сожалению ошибки слияния далеко не редкость, потому что во-первых слияния имеют несколько родительских ветвей. Даже при анализе истории слияния ветвей, бывает очень трудно понять, какие же изменения были сделаны для разрешения конфликта. Во-вторых, отмена неудачного слияния может превратиться в большую головную боль. В-третьих, большая часть конфликтов слияния происходит при работе с чужим кодом, потому что само понятие ветвей подразумевает множество пользователей, т.е. далеко не всегда слияние производит тот же человек который работал с той или иной веткой. В сухом остатке, сделать ошибку при слиянии очень легко, её трудно исправить и трудно найти. Таким образом время потраченное на изучение и понимание процесса слияния ветвей, окупится с лихвой.
Удивительно, но я обнаружил, что многие доступные инструменты и интерфейсы предназначенные для выполнения слияний, не достаточно хорошо оснащены для эффективного выполнения этого процесса. Часто программист просто надеется что команда git merge сделает за него всю работу. Но когда все-таки происходит конфликт, то обычно стратегия слияния заключается в беглом просмотре кода вокруг строки конфликта, и интуитивном угадывании что именно данный кусок кода предпочтительней другого.
В данной статье я надеюсь продемонстрировать что процесс разрешения конфликтов может быть пошагово точным, при котором отпадает необходимость что-либо там угадывать.
Голубые Розы (Roses are Blue)
Давайте предположим что вашей команде поручили писать поэмы в отведённом для этих целей репозитории. (Какой кошмар!) А вам доверили самое главное — делать слияния последних фиксов из ветки master в ветку beta. Итак, вы переключаетесь в ветку beta и выполняете следующую команду:
$ git merge master
Auto-merging roses.txt
CONFLICT (content): Merge conflict in roses.txt
Automatic merge failed; fix conflicts and then commit the result.
Ого, это конфликт. Вы решаете просмотреть файл на который ссылается git:
$ cat roses.txt
<<<<<<< HEAD
roses are #ff0000
violets are #0000ff
all my base
are belong to you
=======
Roses are red,
Violets are blue,
All of my base
Are belong to you.
>>>>>>> master

(Listing 1)
Замечательно! Весь файл, как показывает Listing 1, находится в конфликтном состоянии. Какой же вариант файла является более корректным? Оба варианта выглядят корректно. Верхний вариант написан в хакер-стиле с элементами цветовой кодировки в стиле HTML и с использованием только строчных букв. Нижний вариант выглядит более натурально, с использованием пунктуации и заглавных букв.
Если бы это был ваш проект, вы бы могли просто выбрать один вариант и покончить с этим слиянием. Но проблема в том, что это не ваша поэма, вы никогда не читали эту поэму раньше, не были ответственны за написание или редактирование, и вы отлично понимаете что в случае не верного решения чья-то тяжёлая работа может кануть в небытие. Однако вас всё же назначили ответственным по слиянию этих веток. Что же вам делать?
Назад к Базе (Back to Base)
Хитрость заключается в том, что Listing 1 не даёт вам полную информацию, необходимую для совершения корректного слияния. На самом деле, в процессе слияния участвуют четыре важных части информации (состояния), три из которых просто необходимы для успешного разрешения конфликта. В случае Listing 1, Git предоставил вам только два состояния.
Следующая диаграмма иллюстрирует эти четыре состояния:
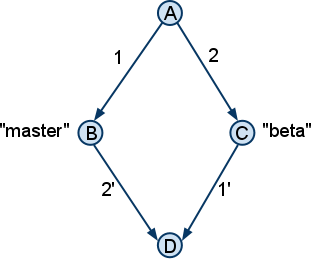
Состояния (B) и © относятся к текущим положениям (head) веток master и beta соответственно, эти два состояния как раз таки и отражены в Listing 1. Состояние (D) это результат слияния, то что вы хотите получить/сгенерировать в конечном итоге (в большинстве случаев Git автоматически генерирует состояние (D)). Состояние (А) на самом верху, представляет собой базу (основу) слияния веток master и beta. База слияния (A) это последний общий предок веток master и beta, и пока предположим что это база слияния уникальна. Как мы увидим позже состояние (A) играет ключевую роль в разрешении конфликтов. На диаграмме я также отразил дельты 1 и 2, которые представляют изменения между состояниями (A)-(B), и (A)-© соответственно. Зная состояния (A), (B) и © дельты 1 и 2 могут быть легко получены (вычислены). Обратите внимание, что дельты 1 и 2 могут состоять из более чем одного коммита. Но для наших целей будем считать что все дельты монолитны.
Чтобы понять, как получить состояние (D), вы должны понимать что же операция слияния пытается сделать. Состояние (D) должно представлять собой сочетание изменений, внесённых в ветку master и beta соответственно. Т.е. другими словами сочетание дельт 1 и 2. Идея проста на поверхности и большую часть времени не требует вмешательства со стороны человека, за исключением особых случаев когда дельты затрагивают наслаиваемые (пересекающиеся) части файла. В такой ситуации вам требуется помочь машине сгенерировать результат (D), путём сравнения дельт 1 и 2.
Определение Отличий (Identifying the Differences)
Для того чтобы найти изменения внесённые в каждую ветку, необходимо знать как выглядит база слияния, состояние (A). Самый простой механизм получения информации о базе слияния, это установка опции merge.conflictstyle в значение diff3
$ git config merge.conflictstyle diff3После включения этой опции, попробуйте заново сделать слияние (git reset —hard; git merge master) и проинспектируйте конфликтующий файл ещё раз:
$ cat roses.txt
<<<<<<< HEAD
roses are #ff0000
violets are #0000ff
all my base
are belong to you
|||||||
roses are red
violets are blue
all my base
are belong to you
=======
Roses are red,
Violets are blue,
All of my base
Are belong to you.
>>>>>>> master

(Listing 2)
Теперь мы видим третий фрагмент посередине, который и является базой слияния или состояние (A). Изменения видны как на ладони: в ветке beta (HEAD) человеческие названия цветов были заменены на HTML коды, а в ветку master добавили капитализацию и пунктуацию. Основываясь на этих знаниях, мы теперь знаем что результат должен включать в себя капитализацию, пунктуацию и HTML коды цветов.
В принципе на этом можно было бы и закончить, потому что результат достигнут. Но есть решение и получше.
Графическое Слияние (GUI Merging)
Хотя и простое текстовое представление конфликта слияния делает свою работу в простых случаях, на практике конфликты могут быть более радикальными и сложными. В таких случаях могут помочь графические инструменты. Мой выбор пал на простой инструмент написанный на Python под названием meld, но может подойти любой другой графический инструмент, способный представить слияние в трёх-колоночном виде.
Для использования графического инструмента (он должен быть установлен), после того как git пожаловался что есть конфликт, введите следующую команду:
$ git mergetoolПоследует вопрос какой программой для слияния вы хотели бы воспользоваться, просто введите meld и нажмите Enter. Вот как окно программы может выглядеть (подразумевается опция merge.conflictstyle не была включена):
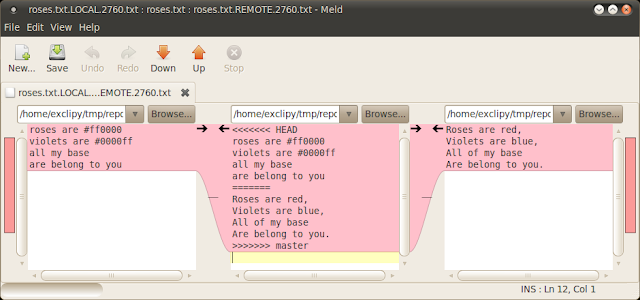
Несмотря на то что информация представлена бок о бок, она не отображает нужные фрагменты которые были в Listing 2. Мы не видим здесь фрагмента базы слияния (состояния (A)), что мы видим это файл roses.txt.LOCAL.2760.txt в левой колонке и файл roses.txt.REMOTE.2760.txt в правой колонке и файл посередине это неудачное слияние. Т.е. по сути нам представили состояния (B), © и несостоявшееся состояние (D), но состояние (A) отсутствует…
Правда отсутствует? Давайте проверим, в старом добром терминале:
$ ls -1
roses.txt
roses.txt.BACKUP.2760.txt
roses.txt.BASE.2760.txt
roses.txt.LOCAL.2760.txt
roses.txt.REMOTE.2760.txt
Видим интересующий нас файл: roses.txt.BASE.2760.txt. Это и есть файл базы слияния. Теперь нам осталось всего лишь найти изменения внесённые в ветки master и beta, по отношению к базе. Мы можем сделать это двумя отдельными вызовами meld:
$ meld roses.txt.LOCAL.2760.txt roses.txt.BASE.2760 &
$ meld roses.txt.BASE.2760 roses.txt.REMOTE.2760.txt &
(Кто-то может подметить что было бы более разумно, поменять порядок аргументов в первом вызове, для того чтобы файл базы находился в левой колонке в обоих случаях, но именно такой порядок сохраняет подобие трёх-колоночного вида, при котором база остаётся по середине.) Результат выполнения — два окна как показано ниже:

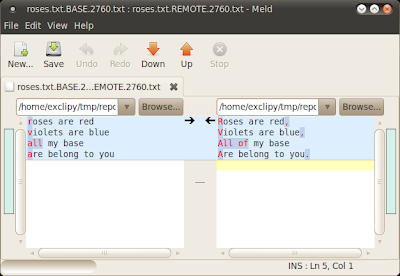
При чтении первого окна справа налево и второго окна слева направо, становится ясно как день, какие изменения произошли в каждой ветке. Так как meld любезно подсветил все изменения, теперь практически не возможно пропустить даже мелко заметные правки (Кто-нибудь заметил добавление предлога «of» при просмотре текстового представления разрешения конфликта Listing 1 или даже Listing 2?)
Вооружившись этими знаниями, мы теперь можем вернуться к трёх-колоночному представлению и сделать изменения. Моя стратегия ручного слияния это взять весь текст из ветки с более весомыми изменениями (в данном случае master/REMOTE т.е. beta), и поверх него производить пошаговые правки, т.е. вносить изменения сделанные в другой ветке (master). Вот что получилось:
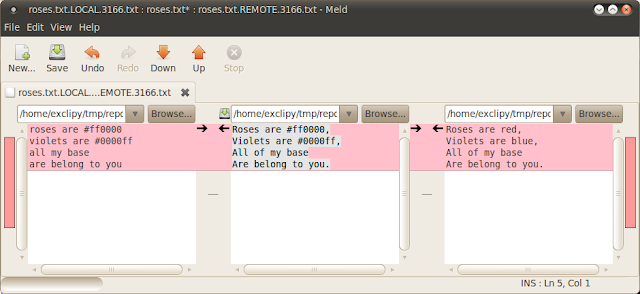
А теперь всё вместе (All Together Now)
Надеюсь, вы найдёте этот трёх-окошечный метод разрешения конфликтов, таким же полезным каким нахожу его я. Но согласитесь что запускать новые вызовы meld вручную каждый раз при разрешении конфликтов, не очень то и удобно. Выход, это настроить git таким образом чтобы все три окна открывались автоматически при вызове команды git mergetool. Для этого можно создать выполняемый скрипт, который должен находится в переменной окружения PATH (например $HOME/bin/gitmerge), со следующим содержимым:
#!/bin/sh
meld $2 $1 &
sleep 0.5
meld $1 $3 &
sleep 0.5
meld $2 $4 $3
И добавьте следующее в ваш ~/.gitconfig файл:
[merge]
    tool = mymeld
[mergetool "mymeld"]
    cmd = $HOME/bin/gitmerge $BASE $LOCAL $REMOTE $MERGED
Теперь, когда вы в следующий раз будете запускать команду git mergetool для разрешения конфликта, откроются все три окна:
Окно дифа между BASE и LOCAL
Окно дифа между BASE и REMOTE
Окно трёх-колоночного вида
После того как вы привыкните к такому разрешению конфликтов с использованием трёх вышеупомянутых окон, вы скорее всего обнаружите, что процесс стал более методичным и механическим. В большинстве случаев, вам даже не придётся читать и понимать куски кода из каждой ветки, для того чтобы понять какой же вариант применить для слияния. Вам больше не понадобится догадываться, потому что вы будете гораздо более уверенным в корректности вашего комита. Из-за этой уверенности, появится чувство что разрешение конфликтов превратилось в увлекательное занятие.
Бонус от переводчика
Для тех кто пользуется tmux и n?vim, предлагаю следующий скрипт gitmerge:
#!/bin/sh
sn=gitmerge

tmux new-session -d -s "$sn" -n "diff3" "nvim -d $2 $4 $3"
tmux split-window -t "$sn:1" -v "nvim -d $2 $1"
tmux split-window -t "$sn:1" -h "nvim -d $1 $3"Примечание: если вы не используете эту опцию в своем ~/.tmux.conf, то вам надо поменять в двух последних строках "$sn:1" на "$sn:0"
Соответственно добавьте следующее в ваш ~/.gitconfig
[mergetool "gitmerge"]
    cmd = $HOME/bin/gitmerge "$BASE" "$LOCAL" "$REMOTE" "$MERGED"
[merge]
    tool = gitmerge
Воркфлоу разрешения конфликта будет выглядеть так:

Пока игнорируем вопрос (Was the merge successful [y/n]?) и переключаемся в сессию под названием gitmerge (сочетание TMUXPREFIX + s):

Видим наше трёх-оконное представление на одном экране. Цифрами обозначены сплиты (panes) tmux’a, буквами соответствующие состояния. Делаем правки для разрешения конфликта, т.е. редактируем состояние (D) и сохраняем. После этого возвращаемся обратно в исходную сессию tmux’a и подтверждаем что слияние произошло успешно.

git rebase master
Лично я предпочитаю и считаю более правильным делать сначала rebase master в ветке beta, и только после этого переключаться в master и делать git merge beta. В принципе воркфлоу не сильно отличается, за исключением трёх-оконного вида.

Переключаемся в сессию gitmerge
Обратите внимание, что состояния (B) и © поменялись местами:

Рекомендую всем поиграться с примером репозитария хотя бы один раз, сделать разрешение конфликта по вышеописанной схеме. Лично я больше не гадаю а что же выбрать «Accept theirs» или «Accept yours».
I find merge tools rarely help me understand the conflict or the resolution. I’m usually more successful looking at the conflict markers in a text editor and using git log as a supplement.
Here are a few tips:
Tip One
The best thing I have found is to use the «diff3» merge conflict style:
git config merge.conflictstyle diff3
This produces conflict markers like this:
<<<<<<<
Changes made on the branch that is being merged into. In most cases,
this is the branch that I have currently checked out (i.e. HEAD).
|||||||
The common ancestor version.
=======
Changes made on the branch that is being merged in. This is often a
feature/topic branch.
>>>>>>>
The middle section is what the common ancestor looked like. This is useful because you can compare it to the top and bottom versions to get a better sense of what was changed on each branch, which gives you a better idea for what the purpose of each change was.
If the conflict is only a few lines, this generally makes the conflict very obvious. (Knowing how to fix a conflict is very different; you need to be aware of what other people are working on. If you’re confused, it’s probably best to just call that person into your room so they can see what you’re looking at.)
If the conflict is longer, then I will cut and paste each of the three sections into three separate files, such as «mine», «common» and «theirs».
Then I can run the following commands to see the two diff hunks that caused the conflict:
diff common mine
diff common theirs
This is not the same as using a merge tool, since a merge tool will include all of the non-conflicting diff hunks too. I find that to be distracting.
Tip Two
Somebody already mentioned this, but understanding the intention behind each diff hunk is generally very helpful for understanding where a conflict came from and how to handle it.
git log --merge -p <name of file>
This shows all of the commits that touched that file in between the common ancestor and the two heads you are merging. (So it doesn’t include commits that already exist in both branches before merging.) This helps you ignore diff hunks that clearly are not a factor in your current conflict.
Tip Three
Verify your changes with automated tools.
If you have automated tests, run those. If you have a lint, run that. If it’s a buildable project, then build it before you commit, etc. In all cases, you need to do a bit of testing to make sure your changes didn’t break anything. (Heck, even a merge without conflicts can break working code.)
Tip Four
Plan ahead; communicate with co-workers.
Planning ahead and being aware of what others are working on can help prevent merge conflicts and/or help resolve them earlier — while the details are still fresh in mind.
For example, if you know that you and another person are both working on different refactoring that will both affect the same set of files, you should talk to each other ahead of time and get a better sense for what types of changes each of you is making. You might save considerable time and effort if you conduct your planned changes serially rather than in parallel.
For major refactorings that cut across a large swath of code, you should strongly consider working serially: everybody stops working on that area of the code while one person performs the complete refactoring.
If you can’t work serially (due to time pressure, maybe), then communicating about expected merge conflicts at least helps you solve the problems sooner while the details are still fresh in mind. For example, if a co-worker is making a disruptive series of commits over the course of a one-week period, you may choose to merge/rebase on that co-workers branch once or twice each day during that week. That way, if you do find merge/rebase conflicts, you can solve them more quickly than if you wait a few weeks to merge everything together in one big lump.
Tip Five
If you’re unsure of a merge, don’t force it.
Merging can feel overwhelming, especially when there are a lot of conflicting files and the conflict markers cover hundreds of lines. Often times when estimating software projects we don’t include enough time for overhead items like handling a gnarly merge, so it feels like a real drag to spend several hours dissecting each conflict.
In the long run, planning ahead and being aware of what others are working on are the best tools for anticipating merge conflicts and prepare yourself to resolve them correctly in less time.
Merging in Git is typically fairly easy.
Since Git makes it easy to merge another branch multiple times, it means that you can have a very long lived branch but you can keep it up to date as you go, solving small conflicts often, rather than be surprised by one enormous conflict at the end of the series.
However, sometimes tricky conflicts do occur.
Unlike some other version control systems, Git does not try to be overly clever about merge conflict resolution.
Git’s philosophy is to be smart about determining when a merge resolution is unambiguous, but if there is a conflict, it does not try to be clever about automatically resolving it.
Therefore, if you wait too long to merge two branches that diverge quickly, you can run into some issues.
In this section, we’ll go over what some of those issues might be and what tools Git gives you to help handle these more tricky situations.
We’ll also cover some of the different, non-standard types of merges you can do, as well as see how to back out of merges that you’ve done.
Merge Conflicts
While we covered some basics on resolving merge conflicts in Basic Merge Conflicts, for more complex conflicts, Git provides a few tools to help you figure out what’s going on and how to better deal with the conflict.
First of all, if at all possible, try to make sure your working directory is clean before doing a merge that may have conflicts.
If you have work in progress, either commit it to a temporary branch or stash it.
This makes it so that you can undo anything you try here.
If you have unsaved changes in your working directory when you try a merge, some of these tips may help you preserve that work.
Let’s walk through a very simple example.
We have a super simple Ruby file that prints ‘hello world’.
#! /usr/bin/env ruby

def hello
  puts 'hello world'
end

hello()
In our repository, we create a new branch named whitespace and proceed to change all the Unix line endings to DOS line endings, essentially changing every line of the file, but just with whitespace.
Then we change the line “hello world” to “hello mundo”.
$ git checkout -b whitespace
Switched to a new branch 'whitespace'

$ unix2dos hello.rb
unix2dos: converting file hello.rb to DOS format ...
$ git commit -am 'Convert hello.rb to DOS'
[whitespace 3270f76] Convert hello.rb to DOS
 1 file changed, 7 insertions(+), 7 deletions(-)

$ vim hello.rb
$ git diff -b
diff --git a/hello.rb b/hello.rb
index ac51efd..e85207e 100755
--- a/hello.rb
+++ b/hello.rb
@@ -1,7 +1,7 @@
 #! /usr/bin/env ruby

 def hello
-  puts 'hello world'
+  puts 'hello mundo'^M
 end

 hello()

$ git commit -am 'Use Spanish instead of English'
[whitespace 6d338d2] Use Spanish instead of English
 1 file changed, 1 insertion(+), 1 deletion(-)
Now we switch back to our master branch and add some documentation for the function.
$ git checkout master
Switched to branch 'master'

$ vim hello.rb
$ git diff
diff --git a/hello.rb b/hello.rb
index ac51efd..36c06c8 100755
--- a/hello.rb
+++ b/hello.rb
@@ -1,5 +1,6 @@
 #! /usr/bin/env ruby

+# prints out a greeting
 def hello
   puts 'hello world'
 end

$ git commit -am 'Add comment documenting the function'
[master bec6336] Add comment documenting the function
 1 file changed, 1 insertion(+)
Now we try to merge in our whitespace branch and we’ll get conflicts because of the whitespace changes.
$ git merge whitespace
Auto-merging hello.rb
CONFLICT (content): Merge conflict in hello.rb
Automatic merge failed; fix conflicts and then commit the result.
Aborting a Merge
We now have a few options.
First, let’s cover how to get out of this situation.
If you perhaps weren’t expecting conflicts and don’t want to quite deal with the situation yet, you can simply back out of the merge with git merge --abort.
$ git status -sb
## master
UU hello.rb

$ git merge --abort

$ git status -sb
## master
The git merge --abort option tries to revert back to your state before you ran the merge.
The only cases where it may not be able to do this perfectly would be if you had unstashed, uncommitted changes in your working directory when you ran it, otherwise it should work fine.
If for some reason you just want to start over, you can also run git reset --hard HEAD, and your repository will be back to the last committed state.
Remember that any uncommitted work will be lost, so make sure you don’t want any of your changes.
Ignoring Whitespace
In this specific case, the conflicts are whitespace related.
We know this because the case is simple, but it’s also pretty easy to tell in real cases when looking at the conflict because every line is removed on one side and added again on the other.
By default, Git sees all of these lines as being changed, so it can’t merge the files.
The default merge strategy can take arguments though, and a few of them are about properly ignoring whitespace changes.
If you see that you have a lot of whitespace issues in a merge, you can simply abort it and do it again, this time with -Xignore-all-space or -Xignore-space-change.
The first option ignores whitespace completely when comparing lines, the second treats sequences of one or more whitespace characters as equivalent.
$ git merge -Xignore-space-change whitespace
Auto-merging hello.rb
Merge made by the 'recursive' strategy.
 hello.rb | 2 +-
 1 file changed, 1 insertion(+), 1 deletion(-)
Since in this case, the actual file changes were not conflicting, once we ignore the whitespace changes, everything merges just fine.
This is a lifesaver if you have someone on your team who likes to occasionally reformat everything from spaces to tabs or vice-versa.
Manual File Re-merging
Though Git handles whitespace pre-processing pretty well, there are other types of changes that perhaps Git can’t handle automatically, but are scriptable fixes.
As an example, let’s pretend that Git could not handle the whitespace change and we needed to do it by hand.
What we really need to do is run the file we’re trying to merge in through a dos2unix program before trying the actual file merge.
So how would we do that?
First, we get into the merge conflict state.
Then we want to get copies of our version of the file, their version (from the branch we’re merging in) and the common version (from where both sides branched off).
Then we want to fix up either their side or our side and re-try the merge again for just this single file.
Getting the three file versions is actually pretty easy.
Git stores all of these versions in the index under “stages” which each have numbers associated with them.
Stage 1 is the common ancestor, stage 2 is your version and stage 3 is from the MERGE_HEAD, the version you’re merging in (“theirs”).
You can extract a copy of each of these versions of the conflicted file with the git show command and a special syntax.
$ git show :1:hello.rb > hello.common.rb
$ git show :2:hello.rb > hello.ours.rb
$ git show :3:hello.rb > hello.theirs.rb
If you want to get a little more hard core, you can also use the ls-files -u plumbing command to get the actual SHA-1s of the Git blobs for each of these files.
$ git ls-files -u
100755 ac51efdc3df4f4fd328d1a02ad05331d8e2c9111 1	hello.rb
100755 36c06c8752c78d2aff89571132f3bf7841a7b5c3 2	hello.rb
100755 e85207e04dfdd5eb0a1e9febbc67fd837c44a1cd 3	hello.rb
The :1:hello.rb is just a shorthand for looking up that blob SHA-1.
Now that we have the content of all three stages in our working directory, we can manually fix up theirs to fix the whitespace issue and re-merge the file with the little-known git merge-file command which does just that.
$ dos2unix hello.theirs.rb
dos2unix: converting file hello.theirs.rb to Unix format ...

$ git merge-file -p
    hello.ours.rb hello.common.rb hello.theirs.rb > hello.rb

$ git diff -b
diff --cc hello.rb
index 36c06c8,e85207e..0000000
--- a/hello.rb
+++ b/hello.rb
@@@ -1,8 -1,7 +1,8 @@@
  #! /usr/bin/env ruby

 +# prints out a greeting
  def hello
-   puts 'hello world'
+   puts 'hello mundo'
  end

  hello()
At this point we have nicely merged the file.
In fact, this actually works better than the ignore-space-change option because this actually fixes the whitespace changes before merge instead of simply ignoring them.
In the ignore-space-change merge, we actually ended up with a few lines with DOS line endings, making things mixed.
If you want to get an idea before finalizing this commit about what was actually changed between one side or the other, you can ask git diff to compare what is in your working directory that you’re about to commit as the result of the merge to any of these stages.
Let’s go through them all.
To compare your result to what you had in your branch before the merge, in other words, to see what the merge introduced, you can run git diff --ours:
$ git diff --ours
* Unmerged path hello.rb
diff --git a/hello.rb b/hello.rb
index 36c06c8..44d0a25 100755
--- a/hello.rb
+++ b/hello.rb
@@ -2,7 +2,7 @@

 # prints out a greeting
 def hello
-  puts 'hello world'
+  puts 'hello mundo'
 end

 hello()
So here we can easily see that what happened in our branch, what we’re actually introducing to this file with this merge, is changing that single line.
If we want to see how the result of the merge differed from what was on their side, you can run git diff --theirs.
In this and the following example, we have to use -b to strip out the whitespace because we’re comparing it to what is in Git, not our cleaned up hello.theirs.rb file.
$ git diff --theirs -b
* Unmerged path hello.rb
diff --git a/hello.rb b/hello.rb
index e85207e..44d0a25 100755
--- a/hello.rb
+++ b/hello.rb
@@ -1,5 +1,6 @@
 #! /usr/bin/env ruby

+# prints out a greeting
 def hello
   puts 'hello mundo'
 end
Finally, you can see how the file has changed from both sides with git diff --base.
$ git diff --base -b
* Unmerged path hello.rb
diff --git a/hello.rb b/hello.rb
index ac51efd..44d0a25 100755
--- a/hello.rb
+++ b/hello.rb
@@ -1,7 +1,8 @@
 #! /usr/bin/env ruby

+# prints out a greeting
 def hello
-  puts 'hello world'
+  puts 'hello mundo'
 end

 hello()
At this point we can use the git clean command to clear out the extra files we created to do the manual merge but no longer need.
$ git clean -f
Removing hello.common.rb
Removing hello.ours.rb
Removing hello.theirs.rb
Checking Out Conflicts
Perhaps we’re not happy with the resolution at this point for some reason, or maybe manually editing one or both sides still didn’t work well and we need more context.
Let’s change up the example a little.
For this example, we have two longer lived branches that each have a few commits in them but create a legitimate content conflict when merged.
$ git log --graph --oneline --decorate --all
* f1270f7 (HEAD, master) Update README
* 9af9d3b Create README
* 694971d Update phrase to 'hola world'
| * e3eb223 (mundo) Add more tests
| * 7cff591 Create initial testing script
| * c3ffff1 Change text to 'hello mundo'
|/
* b7dcc89 Initial hello world code
We now have three unique commits that live only on the master branch and three others that live on the mundo branch.
If we try to merge the mundo branch in, we get a conflict.
$ git merge mundo
Auto-merging hello.rb
CONFLICT (content): Merge conflict in hello.rb
Automatic merge failed; fix conflicts and then commit the result.
We would like to see what the merge conflict is.
If we open up the file, we’ll see something like this:
#! /usr/bin/env ruby

def hello
<<<<<<< HEAD
  puts 'hola world'
=======
  puts 'hello mundo'
>>>>>>> mundo
end

hello()
Both sides of the merge added content to this file, but some of the commits modified the file in the same place that caused this conflict.
Let’s explore a couple of tools that you now have at your disposal to determine how this conflict came to be.
Perhaps it’s not obvious how exactly you should fix this conflict.
You need more context.
One helpful tool is git checkout with the --conflict option.
This will re-checkout the file again and replace the merge conflict markers.
This can be useful if you want to reset the markers and try to resolve them again.
You can pass --conflict either diff3 or merge (which is the default).
If you pass it diff3, Git will use a slightly different version of conflict markers, not only giving you the “ours” and “theirs” versions, but also the “base” version inline to give you more context.
$ git checkout --conflict=diff3 hello.rbOnce we run that, the file will look like this instead:
#! /usr/bin/env ruby

def hello
<<<<<<< ours
  puts 'hola world'
||||||| base
  puts 'hello world'
=======
  puts 'hello mundo'
>>>>>>> theirs
end

hello()
If you like this format, you can set it as the default for future merge conflicts by setting the merge.conflictstyle setting to diff3.
$ git config --global merge.conflictstyle diff3The git checkout command can also take --ours and --theirs options, which can be a really fast way of just choosing either one side or the other without merging things at all.
This can be particularly useful for conflicts of binary files where you can simply choose one side, or where you only want to merge certain files in from another branch — you can do the merge and then checkout certain files from one side or the other before committing.
Merge Log
Another useful tool when resolving merge conflicts is git log.
This can help you get context on what may have contributed to the conflicts.
Reviewing a little bit of history to remember why two lines of development were touching the same area of code can be really helpful sometimes.
To get a full list of all of the unique commits that were included in either branch involved in this merge, we can use the “triple dot” syntax that we learned in Triple Dot.
$ git log --oneline --left-right HEAD...MERGE_HEAD
< f1270f7 Update README
< 9af9d3b Create README
< 694971d Update phrase to 'hola world'
> e3eb223 Add more tests
> 7cff591 Create initial testing script
> c3ffff1 Change text to 'hello mundo'
That’s a nice list of the six total commits involved, as well as which line of development each commit was on.
We can further simplify this though to give us much more specific context.
If we add the --merge option to git log, it will only show the commits in either side of the merge that touch a file that’s currently conflicted.
$ git log --oneline --left-right --merge
< 694971d Update phrase to 'hola world'
> c3ffff1 Change text to 'hello mundo'
If you run that with the -p option instead, you get just the diffs to the file that ended up in conflict.
This can be really helpful in quickly giving you the context you need to help understand why something conflicts and how to more intelligently resolve it.
Combined Diff Format
Since Git stages any merge results that are successful, when you run git diff while in a conflicted merge state, you only get what is currently still in conflict.
This can be helpful to see what you still have to resolve.
When you run git diff directly after a merge conflict, it will give you information in a rather unique diff output format.
$ git diff
diff --cc hello.rb
index 0399cd5,59727f0..0000000
--- a/hello.rb
+++ b/hello.rb
@@@ -1,7 -1,7 +1,11 @@@
  #! /usr/bin/env ruby

  def hello
++<<<<<<< HEAD
 +  puts 'hola world'
++=======
+   puts 'hello mundo'
++>>>>>>> mundo
  end

  hello()
The format is called “Combined Diff” and gives you two columns of data next to each line.
The first column shows you if that line is different (added or removed) between the “ours” branch and the file in your working directory and the second column does the same between the “theirs” branch and your working directory copy.
So in that example you can see that the <<<<<<< and >>>>>>> lines are in the working copy but were not in either side of the merge.
This makes sense because the merge tool stuck them in there for our context, but we’re expected to remove them.
If we resolve the conflict and run git diff again, we’ll see the same thing, but it’s a little more useful.
$ vim hello.rb
$ git diff
diff --cc hello.rb
index 0399cd5,59727f0..0000000
--- a/hello.rb
+++ b/hello.rb
@@@ -1,7 -1,7 +1,7 @@@
  #! /usr/bin/env ruby

  def hello
-   puts 'hola world'
 -  puts 'hello mundo'
++  puts 'hola mundo'
  end

  hello()
This shows us that “hola world” was in our side but not in the working copy, that “hello mundo” was in their side but not in the working copy and finally that “hola mundo” was not in either side but is now in the working copy.
This can be useful to review before committing the resolution.
You can also get this from the git log for any merge to see how something was resolved after the fact.
Git will output this format if you run git show on a merge commit, or if you add a --cc option to a git log -p (which by default only shows patches for non-merge commits).
$ git log --cc -p -1
commit 14f41939956d80b9e17bb8721354c33f8d5b5a79
Merge: f1270f7 e3eb223
Author: Scott Chacon <schacon@gmail.com>
Date:   Fri Sep 19 18:14:49 2014 +0200

    Merge branch 'mundo'

    Conflicts:
        hello.rb

diff --cc hello.rb
index 0399cd5,59727f0..e1d0799
--- a/hello.rb
+++ b/hello.rb
@@@ -1,7 -1,7 +1,7 @@@
  #! /usr/bin/env ruby

  def hello
-   puts 'hola world'
 -  puts 'hello mundo'
++  puts 'hola mundo'
  end

  hello()
Undoing Merges
Now that you know how to create a merge commit, you’ll probably make some by mistake.
One of the great things about working with Git is that it’s okay to make mistakes, because it’s possible (and in many cases easy) to fix them.
Merge commits are no different.
Let’s say you started work on a topic branch, accidentally merged it into master, and now your commit history looks like this:
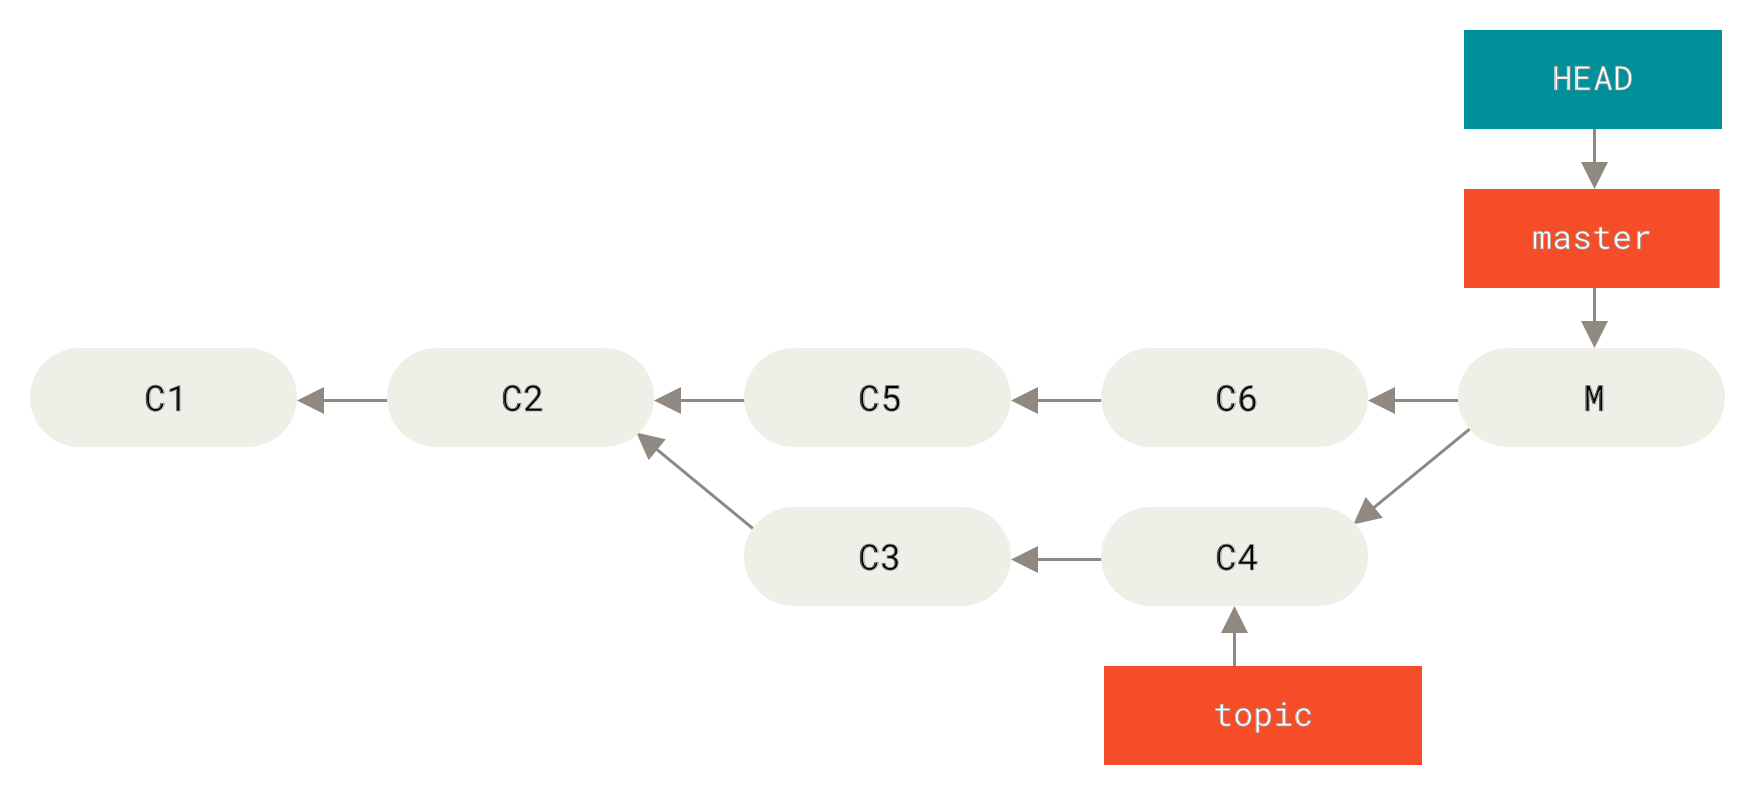
Figure 155. Accidental merge commit
There are two ways to approach this problem, depending on what your desired outcome is.
Fix the references
If the unwanted merge commit only exists on your local repository, the easiest and best solution is to move the branches so that they point where you want them to.
In most cases, if you follow the errant git merge with git reset --hard HEAD~, this will reset the branch pointers so they look like this:
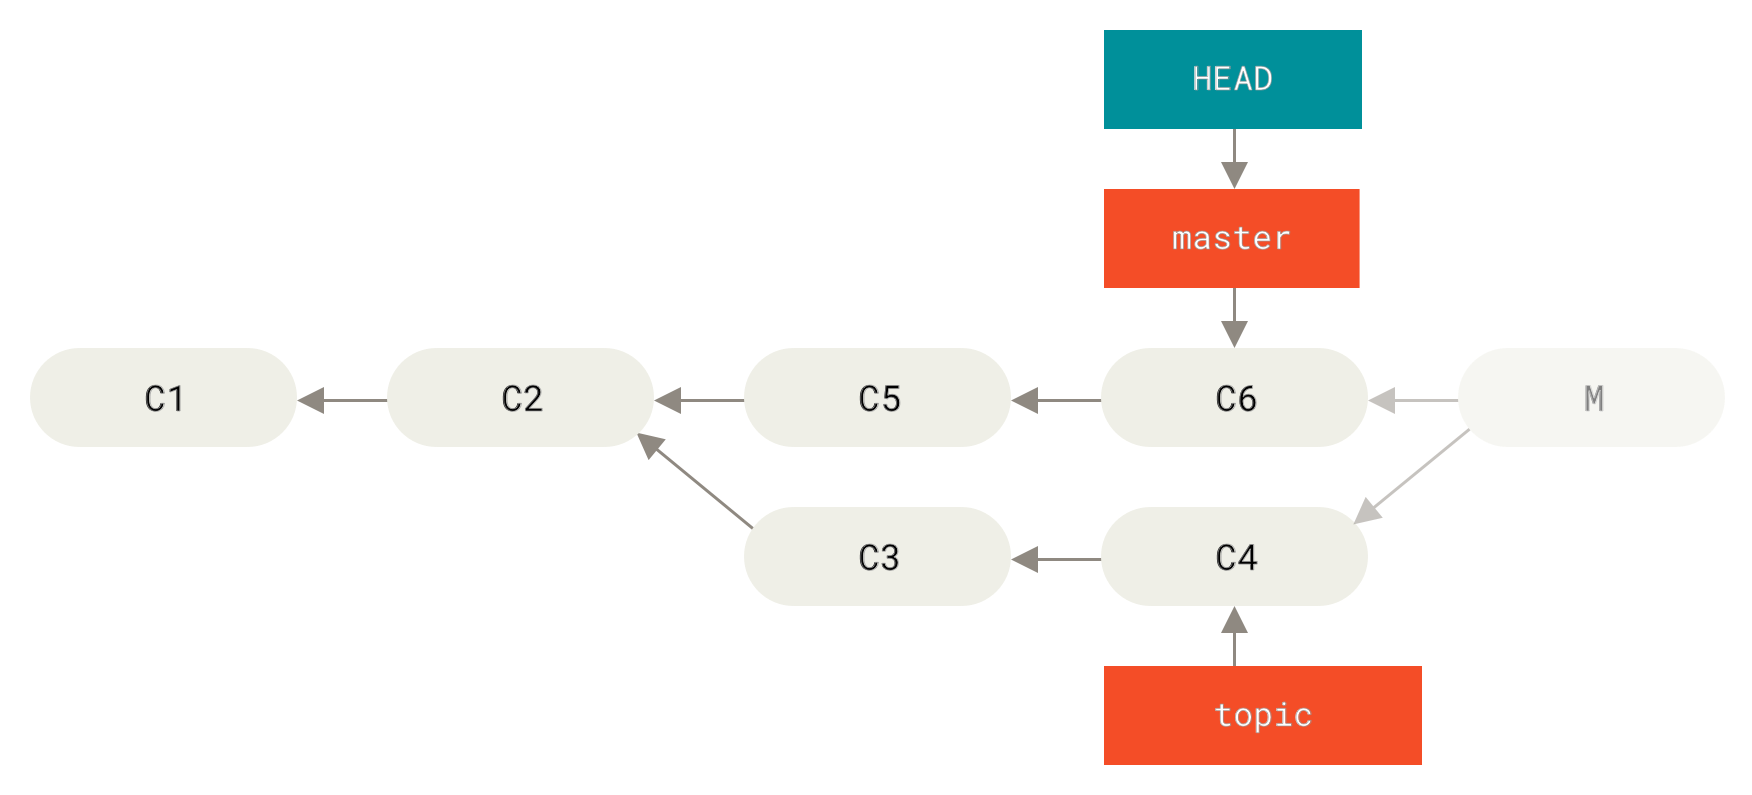
Figure 156. History after git reset --hard HEAD~
We covered reset back in Reset Demystified, so it shouldn’t be too hard to figure out what’s going on here.
Here’s a quick refresher: reset --hard usually goes through three steps:
-
Move the branch HEAD points to.
In this case, we want to movemasterto where it was before the merge commit (C6). -
Make the index look like HEAD.
-
Make the working directory look like the index.
The downside of this approach is that it’s rewriting history, which can be problematic with a shared repository.
Check out The Perils of Rebasing for more on what can happen; the short version is that if other people have the commits you’re rewriting, you should probably avoid reset.
This approach also won’t work if any other commits have been created since the merge; moving the refs would effectively lose those changes.
Reverse the commit
If moving the branch pointers around isn’t going to work for you, Git gives you the option of making a new commit which undoes all the changes from an existing one.
Git calls this operation a “revert”, and in this particular scenario, you’d invoke it like this:
$ git revert -m 1 HEAD
[master b1d8379] Revert "Merge branch 'topic'"
The -m 1 flag indicates which parent is the “mainline” and should be kept.
When you invoke a merge into HEAD (git merge topic), the new commit has two parents: the first one is HEAD (C6), and the second is the tip of the branch being merged in (C4).
In this case, we want to undo all the changes introduced by merging in parent #2 (C4), while keeping all the content from parent #1 (C6).
The history with the revert commit looks like this:

Figure 157. History after git revert -m 1
The new commit ^M has exactly the same contents as C6, so starting from here it’s as if the merge never happened, except that the now-unmerged commits are still in HEAD’s history.
Git will get confused if you try to merge topic into master again:
$ git merge topic
Already up-to-date.
There’s nothing in topic that isn’t already reachable from master.
What’s worse, if you add work to topic and merge again, Git will only bring in the changes since the reverted merge:
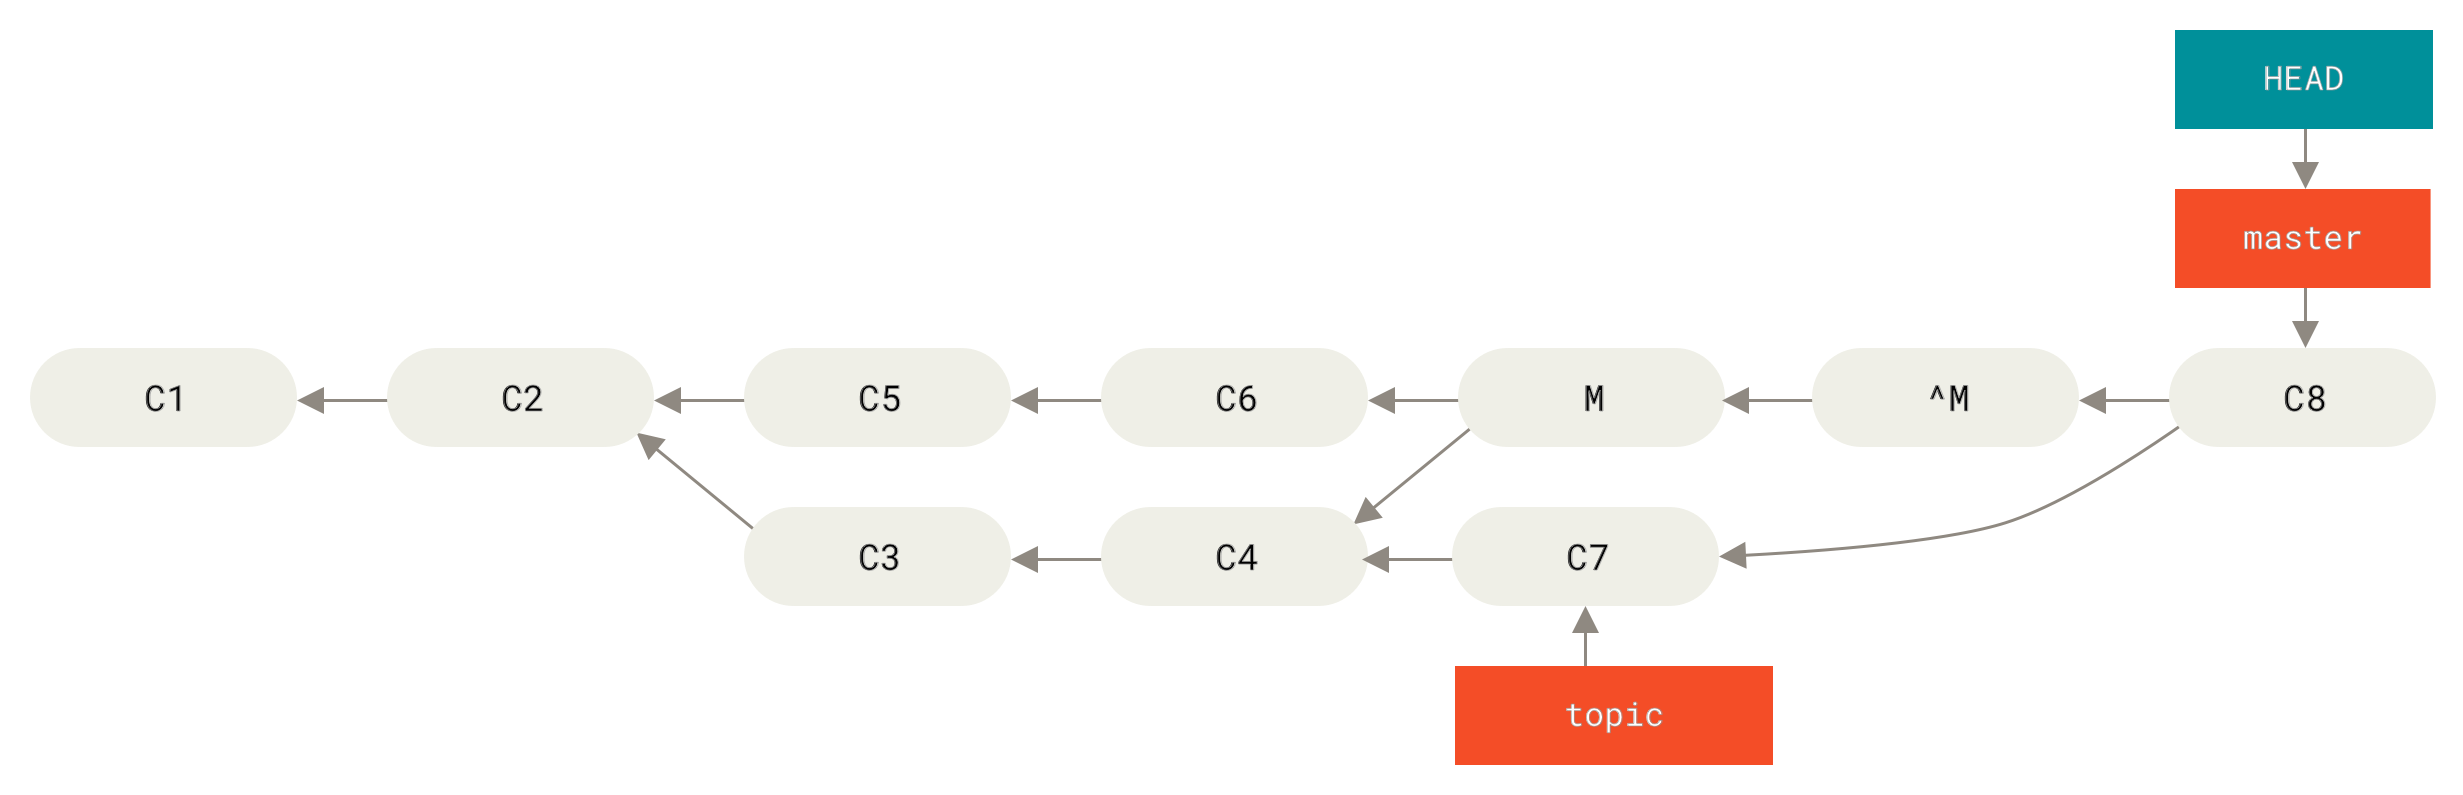
Figure 158. History with a bad merge
The best way around this is to un-revert the original merge, since now you want to bring in the changes that were reverted out, then create a new merge commit:
$ git revert ^M
[master 09f0126] Revert "Revert "Merge branch 'topic'""
$ git merge topic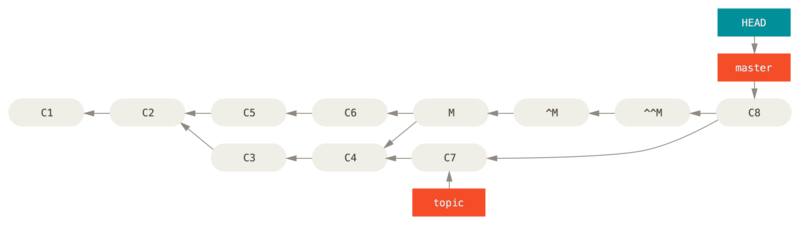
Figure 159. History after re-merging a reverted merge
In this example, M and ^M cancel out.
^^M effectively merges in the changes from C3 and C4, and C8 merges in the changes from C7, so now topic is fully merged.
Other Types of Merges
So far we’ve covered the normal merge of two branches, normally handled with what is called the “recursive” strategy of merging.
There are other ways to merge branches together however.
Let’s cover a few of them quickly.
Our or Theirs Preference
First of all, there is another useful thing we can do with the normal “recursive” mode of merging.
We’ve already seen the ignore-all-space and ignore-space-change options which are passed with a -X but we can also tell Git to favor one side or the other when it sees a conflict.
By default, when Git sees a conflict between two branches being merged, it will add merge conflict markers into your code and mark the file as conflicted and let you resolve it.
If you would prefer for Git to simply choose a specific side and ignore the other side instead of letting you manually resolve the conflict, you can pass the merge command either a -Xours or -Xtheirs.
If Git sees this, it will not add conflict markers.
Any differences that are mergeable, it will merge.
Any differences that conflict, it will simply choose the side you specify in whole, including binary files.
If we go back to the “hello world” example we were using before, we can see that merging in our branch causes conflicts.
$ git merge mundo
Auto-merging hello.rb
CONFLICT (content): Merge conflict in hello.rb
Resolved 'hello.rb' using previous resolution.
Automatic merge failed; fix conflicts and then commit the result.
However if we run it with -Xours or -Xtheirs it does not.
$ git merge -Xours mundo
Auto-merging hello.rb
Merge made by the 'recursive' strategy.
 hello.rb | 2 +-
 test.sh  | 2 ++
 2 files changed, 3 insertions(+), 1 deletion(-)
 create mode 100644 test.sh
In that case, instead of getting conflict markers in the file with “hello mundo” on one side and “hola world” on the other, it will simply pick “hola world”.
However, all the other non-conflicting changes on that branch are merged successfully in.
This option can also be passed to the git merge-file command we saw earlier by running something like git merge-file --ours for individual file merges.
If you want to do something like this but not have Git even try to merge changes from the other side in, there is a more draconian option, which is the “ours” merge strategy.
This is different from the “ours” recursive merge option.
This will basically do a fake merge.
It will record a new merge commit with both branches as parents, but it will not even look at the branch you’re merging in.
It will simply record as the result of the merge the exact code in your current branch.
$ git merge -s ours mundo
Merge made by the 'ours' strategy.
$ git diff HEAD HEAD~
$
You can see that there is no difference between the branch we were on and the result of the merge.
This can often be useful to basically trick Git into thinking that a branch is already merged when doing a merge later on.
For example, say you branched off a release branch and have done some work on it that you will want to merge back into your master branch at some point.
In the meantime some bugfix on master needs to be backported into your release branch.
You can merge the bugfix branch into the release branch and also merge -s ours the same branch into your master branch (even though the fix is already there) so when you later merge the release branch again, there are no conflicts from the bugfix.
Subtree Merging
The idea of the subtree merge is that you have two projects, and one of the projects maps to a subdirectory of the other one.
When you specify a subtree merge, Git is often smart enough to figure out that one is a subtree of the other and merge appropriately.
We’ll go through an example of adding a separate project into an existing project and then merging the code of the second into a subdirectory of the first.
First, we’ll add the Rack application to our project.
We’ll add the Rack project as a remote reference in our own project and then check it out into its own branch:
$ git remote add rack_remote https://github.com/rack/rack
$ git fetch rack_remote --no-tags
warning: no common commits
remote: Counting objects: 3184, done.
remote: Compressing objects: 100% (1465/1465), done.
remote: Total 3184 (delta 1952), reused 2770 (delta 1675)
Receiving objects: 100% (3184/3184), 677.42 KiB | 4 KiB/s, done.
Resolving deltas: 100% (1952/1952), done.
From https://github.com/rack/rack
 * [new branch]      build      -> rack_remote/build
 * [new branch]      master     -> rack_remote/master
 * [new branch]      rack-0.4   -> rack_remote/rack-0.4
 * [new branch]      rack-0.9   -> rack_remote/rack-0.9
$ git checkout -b rack_branch rack_remote/master
Branch rack_branch set up to track remote branch refs/remotes/rack_remote/master.
Switched to a new branch "rack_branch"
Now we have the root of the Rack project in our rack_branch branch and our own project in the master branch.
If you check out one and then the other, you can see that they have different project roots:
$ ls
AUTHORS         KNOWN-ISSUES   Rakefile      contrib         lib
COPYING         README         bin           example         test
$ git checkout master
Switched to branch "master"
$ ls
README
This is sort of a strange concept.
Not all the branches in your repository actually have to be branches of the same project.
It’s not common, because it’s rarely helpful, but it’s fairly easy to have branches contain completely different histories.
In this case, we want to pull the Rack project into our master project as a subdirectory.
We can do that in Git with git read-tree.
You’ll learn more about read-tree and its friends in Git Internals, but for now know that it reads the root tree of one branch into your current staging area and working directory.
We just switched back to your master branch, and we pull the rack_branch branch into the rack subdirectory of our master branch of our main project:
$ git read-tree --prefix=rack/ -u rack_branchWhen we commit, it looks like we have all the Rack files under that subdirectory — as though we copied them in from a tarball.
What gets interesting is that we can fairly easily merge changes from one of the branches to the other.
So, if the Rack project updates, we can pull in upstream changes by switching to that branch and pulling:
$ git checkout rack_branch
$ git pull
Then, we can merge those changes back into our master branch.
To pull in the changes and prepopulate the commit message, use the --squash option, as well as the recursive merge strategy’s -Xsubtree option.
The recursive strategy is the default here, but we include it for clarity.
$ git checkout master
$ git merge --squash -s recursive -Xsubtree=rack rack_branch
Squash commit -- not updating HEAD
Automatic merge went well; stopped before committing as requested
All the changes from the Rack project are merged in and ready to be committed locally.
You can also do the opposite — make changes in the rack subdirectory of your master branch and then merge them into your rack_branch branch later to submit them to the maintainers or push them upstream.
This gives us a way to have a workflow somewhat similar to the submodule workflow without using submodules (which we will cover in Submodules).
We can keep branches with other related projects in our repository and subtree merge them into our project occasionally.
It is nice in some ways, for example all the code is committed to a single place.
However, it has other drawbacks in that it’s a bit more complex and easier to make mistakes in reintegrating changes or accidentally pushing a branch into an unrelated repository.
Another slightly weird thing is that to get a diff between what you have in your rack subdirectory and the code in your rack_branch branch — to see if you need to merge them — you can’t use the normal diff command.
Instead, you must run git diff-tree with the branch you want to compare to:
$ git diff-tree -p rack_branchOr, to compare what is in your rack subdirectory with what the master branch on the server was the last time you fetched, you can run:
$ git diff-tree -p rack_remote/master