

Preface
Please read this manual thoroughly before testing. It provides all information you need to use the product. Please only purchase test strips in your country. Use of test strips from different countries might get deviated test results under such circumstance. We hereafter call RightestTM GM100 Blood Glucose Monitoring System as GM100 BGMS, RightestTM GM100 Blood Glucose Meter as GM100 meter, and RightestTM GS100 Blood Glucose Test Strip as GS100 test strip for short. It is recommended to monitor blood glucose regularly. To prevent derived complications effectively, it is recommended to monitor blood glucose regularly. GM100 BGMS accurate and easy-to-use, is your reliable assistant for diabetes management.
GM100 BGMS was manufactured and supported by BionimeCorporation and its authorized representative. If you have any question or concern, please contact your localBionimeCustomerServiceoremailto rightest@bionime.com. We will provide best assistance and solutions for you.
Intended Use
GM100 BGMS is intended for in vitro (oustside the body) diagnostic use and self-testing only. Coding is not required. The testing result is calibrated to plasma equivalent with fresh capillary whole blood samples from the fingertip, palm or forearm. You may consult your healthcare professional for instructions how to use the system correctly. Our customer support staff is also available to assist you.
Package of Meter Kit

- GM100 Meter (with one CR2032 battery installed)
- GS100 Test Strips (0/10/25 pcs) *
- Control Solution *
- GM100 meter Instructions for Use
- GS100 Test Strips Package Insert *
- GD500 Lancing Device *
- Disposable Lancets (10pcs) *
- Instructions for the lancing device *
- Log Book
- Warranty Card + Emergency Card
- Carrying Case *
(Different packages have different bundled items. Some of packages might not include items.)
The RightestTM Meter

Test Strip Port
Insert test strip here until you hear a click.
Display Window
Show your test result, messages and relative information.
Main Button
For operating the meter, please check details in following sections.
Plastic Tape
Pull it off to activate meter. (If time and date of your meter has been set in advance, the plastic tape will be removed. Hence, please discard this step)
Battery Cover
Slide cover to change battery.
Precautions
GS100 Test Strips
GM100 meter is designed to use with GS100 test strip only. Please note that misuse of other test strips might cause unexpected damage or produce inaccurate test results.
Sample Entry
Apply a drop of blood or Control Solution here. The test request is only 1.4 µ L of blood.
Hand Bar
Grip here to insert test strip into meter.
View Window
This window is yellow before applying blood sample. It gradually turns red when filled with blood.
Indication Symbol
Insert strip with indication symbol up and toward meter.
Electrode Contacts
Sensing signal output terminals.
PRECAUTION
- Re-cap the test strip vial immediately after removing a test strip.
- Do not reuse test strips.
- Do not use expired test strips.
- Record the date of opening a new test strip vial for the first time. Discard the vial of test strips after 3 months from opening.
- Store the test strips in a cool and dry location. Do not expose to direct sunlight or heat.
- For detailed information, please refer to the GS100 Test Strips Package Insert.
Battery Installation
Your meter comes with one CR2032, 3 volt, battery installed. One new battery will provide power to perform about 1,000 tests under normal use. Before using it, please pull off the plastic tape and press the main button to activate the meter (If time and date of your meter has been set in advance, the plastic tape will be removed. Hence, please discard this step).
- Turn the meter over. Press and push battery cover to open.
- Install the battery. Be sure to put battery in correct direction.

- Slide the battery cover back until it snaps into place.
- The meter performs a self-test and all symbols on the display will blink.
- Press any button to exit the self-test and enter Setting Mode.
- Set the time and date when the battery is replaced. See Setting the Date, Time and Unit section. Prior test results are still stored in the memory.


PRECAUTION
- Danger of explosion might happen if the battery is incorrectly replaced.
- Please follow the local regulation and discard a used battery properly.
Setting Up Your Meter-Setting the Date, Time, and Unit……
You can enter Setting Mode by below two ways.
- Reload battery
After removing the battery, please press the main button for several times until no signal on screen, then follow the battery installation steps to load battery. The meter will do self test. Press the main button to close the test and enter Setting Mode. - With Battery inserted
Press the main button first to turn on the meter. Then press and hold the main button for 5 seconds (the meter will be turned off during this period, please keep pressing) until you hear a beep, indicating you have successfully entered Setting Mode. The display screen will show setting data.
 NOTE
NOTE
- When you keep pressing the main button for 2 seconds, the display on screen will turn off. Please don’t care it. Keep pressing the main button till entering setting data.
- Quick press the main button allows you to change setting while hold it for 2 seconds will confirm the setting. However, if you press and hold the main button over 5 seconds it will escape from setting mode and return to time screen.
- Year setting
With the year format blinking, press the main button to adjust it. Then hold the same button for 2 seconds to confirm it. Meantime, it will shift to next digit for setting. Repeat the above action until the year setting is completed. Then it will move to month setting. - Month setting
With the month blinking, press the main button until the current month appears. Then hold the same button for 2 seconds to confirm it and move to day setting. - Day setting
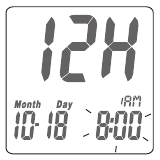
With the day blinking, press the main button to adjust it. Then hold the same button for 2 seconds to confirm it. Meantime, it will shift to next digit for setting. Repeat the above action until the day setting is completed. Then it will move to time format setting. - Time format
12/24H selection With the time format blinking, press the main button to adjust it. Then hold the same button for 2 seconds to confirm it and move to hours setting. - Hour setting
With the hour blinking, press the main button until the current hour appears. Then hold the same button for 2 seconds to confirm it and move to minute setting. - Minute setting
With the minute blinking, press the main button to adjust it. Then hold the same button for 2 seconds to confirm it. Meantime, it will shift to next digit for setting. Repeat the above action until the minute setting is completed. Then it will move to measurement of unit setting. - Ending setting
After confirming the setting, you’ll hear a sound of » beep «. All the settings are saved and completed and will return to time screen.


 NOTE
NOTE
- When you do not do any settings of meter for over 2 minutes, the meter will leave setting mode and power off automatically.
- Any time you would like to escape from the setting mode, please press and hold the main button for over 5 seconds. Meantime, all the current settings will be saved.
Turning on /off the Meter
- How to turn on the Power
- Press the main button
- Insert one piece of test strip
- Manual Power off
If you want to turn off the meter, please keep pressing the main button for 2 seconds. - Auto Power off
The meter will power off automatically if you don’t operate it over 2 minutes.
Performing a Blood Test

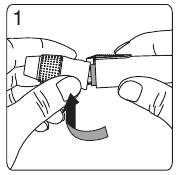
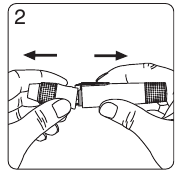
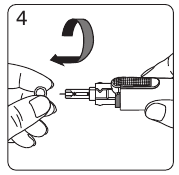
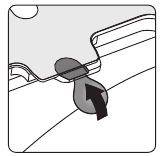
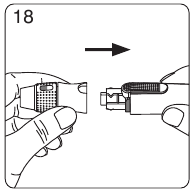
- Hold the adjustable cap in one hand and hold the hub in the other hand. Bend the cap towards the down side. When a gap appears between the cap and hub, pull them off in opposite directions.
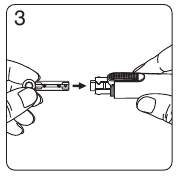
- Pull off the depth adjustable cap.
- Insert a new disposable lancet firmly into lancet carrier.
- Twist off and set aside the protective cover of the disposable lancet.
- Replace the depth adjustable cap.
- Choose a depth of penetration by rotating the top portion of the depth adjustable cap until the setting depth matches the window. Settings are based on skin type «» for soft or thin skin; «» for average skin; «» for thick or calloused skin.
- Hold the hub in one hand and pull on the plunger in the other hand. The device will be cocked. Release the plunger, it will automatically move back to its original position near the hub.
- Wash your hands with warm soapy water and dry thoroughly.
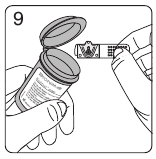
- Take one strip from the vial. Re-cap the vial cap immediately.
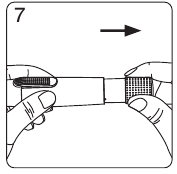
- Insert the strip into the strip port on meter with the indication symbol facing up.
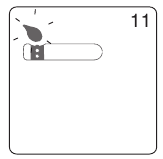
- While the blood drop symbol flashing, you are ready to apply the blood sample.
- Place the lancing device against the pad of your fingertip and press the release button. The best puncture sites are on the middle or ring fingers. Press the release button.
- Touch and hold the drop to the edge of sample entry until you hear a » beep » and the view window is totally filled with blood. If the view window is not totally filled with blood or the test does not start. Please discard the test strip and repeat the test with a new test strip.
- You will see the countdown mode on the screen. After 8 seconds, the test result appears.
- Pull off the depth adjustable cap. Without touching the used disposable lancet, stick the lancet tip into the protective cover.
- Hold the release button in one hand and pull on the plunger in the other hand will safely eject the used disposable lancet.
- Discard the used disposable lancet into an appropriate puncture-proof or biohazard container.
- Replace the depth adjustable cap after finishing the test.


PRECAUTION
Do not touch your blood drop to the sample entry on the strip until you see the « » appear. The meter is performing an internal test and will display «» and «
 » if you apply blood too soon. Then you will waste a test strip.
View window appearance
Make sure your blood sample covers the whole area of the View Window to get an accurate test result. Insufficient blood sample will cause inaccurate test result. Repeat the test with a new test strip.
PRECAUTION

- Check the expiration date printed on the package every time you use a test strip. Do not use expired test strips.
- Use each test strip immediately after removing from the vial.
- Do not reuse test strips.
- Do the test at least 30 minutes after moving into a different location with significant change in temperature.
- Place the blood drop only on the sample entry of the test strip.
- Please don’t drip or inject the blood sample directly by syringe to the entry port of test strip. Doing this might contaminate the meter or cause damage and is not recommended.
Blood glucose test results are shown on the meter as mg/dL or mmol/L, depending on which unit of measurement you have chosen. ( This meter * for some countries is fixed at mmol/L or mg/dL and is not able to be changed freely.) Consult your healthcare professional before making any changes to your diabetes medication program. If your blood glucose result is unusually high or low, or if you question your testing results, repeat the test with a new test strip. You can also run a Quality Control Test with to check your meter and test strip. If the test result still remains unusually high or low, contact your healthcare professional immediately. If you are experiencing symptoms that are not consistent with your blood glucose test results and you have made sure to follow all instructions of this manual, contact your healthcare professional immediately.
Recalling Test Result & Average
The GM100 meter is able to store 150 test results with time and date automatically. If your meter has stored 150 results, which is the maximum memory of the meter, the newest test result will replace the oldest one.
To recall your test memory, start with the meter without test strip inserted.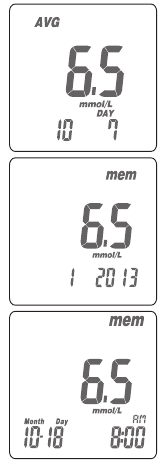
- Press the main button to switch to screen to memory function, you will see «AVG» symbol on the up left corner of the screen. The display sequence will be 1-day, 7-day, 14-day, 30-day, 90- day average, and then memory 1 reading, memory 2 reading,…until memory 150 reading which will show «MEM» on the up right corner of the screen.
- Under average screen, the number on the down right corner of the screen means how many days of readings have been calculated as the average while the number on the down left corner of the screen means how many readings have been counted in. Under memory screen, it will show the sequence number on the down left corner and then display date and time.
- Quick Searching: you could also quick press the main button twice, and then it will automatically display the average and memory by sequence. Anytime you want to stop it, you could just press the main button again. It will stop and display the reading right at the moment you press the main button. You could just apply the way above; especially when you find a particular reading you want to check with.
- Reading right after test: if you just finish the test and press the main button to review. The display sequence will be the latest reading, 1-day, 7-day, 14- day, 30-day, 90-day average, and the memory 2 reading until the oldest one (memory 150 reading).
The GM100 meter displays results between 0.6 and 33.3 mmol/L. If your test result is below 0.6 mmol/L, « » will appear on the screen. Please repeat your test again by a new test strip. If you still get » » result, you should immediately contact your healthcare professional.
If your test result is above the high end of the system’s detection range 33.3 mmol/L, « » will appear on the screen. Please repeat your test again by a new test strip. If you still get «
 » result, you should immediately contact your healthcare professional.
PRECAUTION
Quality Control Test
Please use Control Solution tested with GM100 BGMS under Control Solution Mode. If the test result is within the Control Solution Range printed on the strip vial label, the GM100 BGMS passes Quality Control Test. That means your GM100 BGMS is working correctly.
Entering Control Solution Mode
Insert the strip into the strip port on meter. While the blood drop symbol flashing, press and hold the main button for over 5 seconds. Then you will see « » symbol blinking on the screen indicating that you’ve successfully entered the Control Solution Mode. Control Solution Range
Control Solution Range
Example of Control Solution Range printed on your test strip vial label.
When should perform a Quality Control Test?
Before doing a blood glucose test with your meter for the first time.
When you open and start using a new test strip vial.
When your meter is dropped or splashed with liquids.
Whenever you think your test result does not consistent with the way you feel.
Whenever you want to check if your system is working properly or not. Whenever you want to practice testing and check correct procedure.
The possible reasons your Control Solution results are out of the range:
- Your Control Solution has expired or after 3 months since opened.
- Your test strip has expired.
- You leave the cap off the vial of test strips or Control Solution for a long time.
- You didn’t perform the test proce — Malfunction of the meter.
If Control Solution results are out of the range, your GM100 BGMS may not be working properly. Repeat the Quality Control Test. If your Control Solution results outside the range still exist, do not use the GM100 BGMS to test your blood glucose. And contact Bionime authorized representative or Customer Service.
PRECAUTION
Each time you open a new bottle of Control Solution, write the discard date on the label. Control Solution is good for 3 months after opening the bottle, or until the expiration date printed on the label, whichever comes first.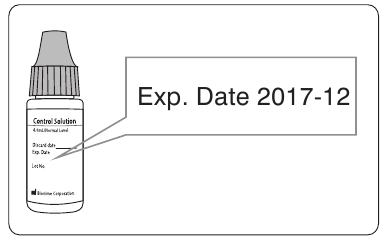
Performing a Quality Control Test
Use with Control Solution


PRECAUTION
Maintenance
Keep your meter and test strip free of dust, water or any other liquid. Store the meter in the carrying case when not in use. If meter is dropped or damaged, perform a Quality Control Test before doing a blood glucose test.
Cleaning Meter
Clean the outside of the meter with a damp cloth and mild soap/detergent. Keep the test strip port from getting wet.
Error Message and Trouble Shooting
Er1 — The inserted test strip has been used or damaged. Please use a new test strip from vial.
Er2 — Meter has malfunctioned. Do the Quality Control Test or reinstall the battery to see if the meter works properly.
Er3 — Signal transmission is disrupted, repeat the test. Above, if error screen still appears contact Bionime authorized representative or Customer Service.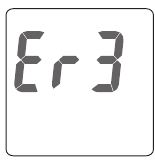
Battery Error

Temperature Error
In order to get accurate test result, perform testing between 10 ~40 ˚C (50 ~ 104 ˚F).
Sampling Error
Before « » appears. Please don’t apply the blood to the entry of the strip because the meter is still doing internal check. If you do so, the meter will show «
 » and ««. Please remove the test strip and insert a new one to do the test again.
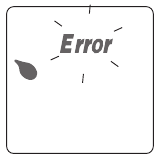
Meter Malfunction
If you find the meter can’t be switched on, please follow the steps below for quick inspection.
- Open the battery cover, take out the battery.
- Wait for 5 minutes and reload the new battery.
The meter should be work normally after finishing above steps. If not, please contact Bionime authorized representative or Customer Service.
Specification
| Measurement Technology | Oxidase Electrochemical Sensor |
| Sample | Capillary whole blood |
| Minimum Sample Volume | 1.4 microliters ( µ L ) |
| Measuring Range | 0.6 — 33.3 mmol/L |
| Test Time | 8 seconds |
| Memory Capacity | 150 blood glucose test results with date and time |
| Power Saving | Turn off automatically after 2 minutes no use. Or press the « » button for 2 seconds. » button for 2 seconds. |
| Operating Temperature | 10 ~ 40 ˚C (50 ~ 104 ˚F) |
| Operating Relative Humidity | 10 — 90 % |
| Hematocrit | 35 — 48 % |
| Power Supply | One CR2032 battery |
| Battery Life | About 1,000 tests |
| Meter Dimension | 95.0 mm x 43.8 mm x 13.0 mm |
| Meter Weight | 43.0 g with batteries |
| Monitor Display Area | LCD display 38.0 mm x 29.0 mm |
| Meter Storage Conditions | -10 ~ 60 ˚C (14 ~ 140 ˚F) |
| Test Strip Storage Conditions | 4~30 ˚C(39~86 ˚F), < 90% relative humidity |
Limitations
- GM100 BGMS is not intended for serum or plasma test.
- Inaccurate test results may be obtained at high altitude more than about 10,000 feet ( 3,048 meters ) above sea level.
- Severe dehydration and excessive water loss may cause inaccurately low results.
- GM100 BGMS has not been validated for use on neonates.
- The glucose test may be interfered under abnormal concentration of
Ascorbic Acid ≧ 5 mg/dL ( 0.28 mmol/L )
Dopamine Hcl ≧ 2 mg/dL ( 0.11 mmol/L )
L-Dopa ≧ 3 mg/dL ( 0.15 mmol/L )
Tolazamide ≧ 15 mg/dL ( 0.48 mmol/L )
Cholesterol ≧ 500 mg/dL ( 12.93 mmol/L )
Glutathione reduced ≧ 60 mg/dL ( 1.95 mmol/L )
Hemoglobin ≧ 6,000 mg/dL ( 0.94 mmol/L )
Uric acid ≧ 9 mg/dL ( 0.54 mmol/L )
Customer Service
We sincerely like to provide complete, considerate services to our customers. Please review all the instructions to make sure you are performing the steps correctly. If you have any questions or problems of RightestTM GM100 products, please contact your local Bionime distributor. Or email to rightest@bionime.com.
Warranty
Bionime Corporation warrants that your GM100 Meter will be free from defects in materials and workmanship for five years from the date of purchase.
This warranty does not apply to the performance of a GM100 Meter that has been altered, misused, tampered with or abused in any way.
This warranty applies only to the original purchaser of the meter. Please complete and return the enclosed warranty card to Bionime authorized representative.
Different models have different specifications. Some of the models are not included with the warranty card.
Parts of Critical Component
Blood Glucose Meter, Test Strip, Control Solution and Lancing Device
Manufacturer: Bionime Corp.
Product complied with In Vitro Diagnostic Medical Device Directive 98/79/EC.
(CE 0197)
EU Rep: BIONIME GmbH; Tramstrasse 16, 9442 Berneck, Switzerland E-mail: info@bionime.ch
Disposable Sterile Lancets
Manufacturer: SteriLance Medical (SuZhou) Inc.
No.68 LiTangHe RD, XiangCheng, SuZhou, JiangSu 215133, P.R. China EC- Rep:
EMERGO EUROPE, Molenstraat 15, 2513 BH The Hague, The Netherlands
Product complied with Medical Device Directive 93/42/EEC ( CE0197 ).
 BIONIME CORPORATION
No. 100, Sec. 2, Daqing St., South Dist.,
Taichung City 40242, Taiwan
Tel: +886 4 23692388
Fax: +886 4 22617586
E-mail: info@bionime.com
http://www.bionime.com

Bionime GmbH
Tramstrasse 16
9442 Berneck
Switzerland
E-mail: info@bionime.ch


Here you can download full pdf version of manual, it may contain additional safety instructions, warranty information, FCC rules, etc.
Blood Glucose Monitoring System
Instructions for Use
Preface
Thank you for selecting the
Blood Glucose Monitoring System.
Please read this manual thoroughly before you start testing. It provides all the
information you need to use the product. You will get a correct test result by the
following instruction of this manual. Please only purchase the test strips in
your country, the use of the test strips of different countries is not
suggested and might get deviated test results under such circumstance.
It is quite important for you to monitor blood glucose regularly. A derived
complication can thus be effectively reduced. Through the assistance of
Blood Glucose Monitoring system, which provides considerate
design and accurate results, your diabetes management can become more
reliable and ease-to-use.
The
Blood Glucose Monitoring System was manufactured by
supported by Bionime Corporation and its authorized representative. If you
have any questions or concerns, please contact your Bionime authorized
representative or call us by phone number, 886 4 24951268 ( GMT+08:00,
08:30~17:30 ). We will provide best assistance and solutions for you.
1.
Intended Use
The
Blood Glucose Monitoring System is intended for in vitro
diagnostic use ( for self-testing ) only ( outside the body ) and coding is not
required. The testing result is calibrated to be plasma equivalent for test with
fresh capillary whole blood samples from the fingertip, palm or forearm
depends on what kind of lancing device you are using. You may consult your
healthcare professional for instructions on how to use the system correctly. Our
customer support staff is available to assist you as well.
2.
Package of Meter Kit
1.
Meter
7. Disposable Sterile Lancets
(10pcs) *
2.
Test Strips (0/10/25 pcs) *
8. Instruction for the lancing device *
3.
Control Solutions *
9. Log Book
4.
Instructions for Use
10. Warranty Card + Emergency
5.
Blood Glucose Test Strip
11. CR2032 Battery (Inserted into the
Package Insert *
meter)
6.
Lancing Device *
12. Carrying Case *
( Different packages have different bundled items. Some of packages might not
include * items.)
2 *
3 *
4
1
Test Strips
5 *
7 *
8 *
6 *
3.
The
Meter
Test Strip Port
Insert test strip here until you
hear a click.
Display Window
Show your test result,
messages and relative
Model Number
information.
Meter Serial
Number
Main Button
Press to turn on/off meter.
Battery Cover
Switch different function
Slide cover to
screen.
change battery.
Press and hold down until
enter to the setting mode.
Plastic Tape
(There will be a power-off
Pull it off to activate meter.
period during this process.)
4.
Precautions
— Before using the
System to test your blood glucose, please read
all the instructions and practice the tests including quality control test.
— Please do the quality control test regularly to make sure the test results are
accurate .
— The
GM100 Blood Glucose Meter can only be used with the
GS100 Blood Glucose Test strips. The use of any other brand
strips should not be used under any circumstances. The use of other brands
of strips may produce inaccurate results.
— The
Blood Glucose Monitoring System is intended for self-testing. It
should not be used to diagnose diabetes mellitus.
—
Blood Glucose Monitoring System has not been validated for use
on neonates. Therefore, it’s not intended for use of neonates.
— This meter can be only tested with capillary whole blood. Please don’t test with
arterial blood.
— Do the test at least 30 minutes after moving into a different location with
significant change in temperature.
— Dispose of used batteries properly.
— Please note the meter kit contains small parts like test strips which could result
in a choking hazard for children.
— Prevent water from entering the meter. Never immerse the meter or hold it
under running water.
— The minimum blood sample size for testing is 1.4µl
)
1.0
µl
1.4
µl
2.0
µl
3.0
µl
Sample Size Example
We suggest you use a sample between 1.4~2.5µl. A blood sample size above
4.0µl is too large. A blood sample size below 1.4µl may give an inaccurate test
result. In this case, repeat the test with a new test strip.
5.
The
Test Strip ( GS100 Test Strip )
GM100 is designed to use with GS100 strip only. Please note that
misuse of other strips might cause unexpected damage or produce
inaccurate test results.
Sample Entry
Noble Metal Electrodes
Apply a drop of blood or control solution
Electrochemical sensor
here. The test request is only 1.4 of blood.
Hand Bar
Grip here to insert
test strip into meter.
Indication Symbol
View Window
Insert strip with indication symbol
This window is yellow before applying
up and toward meter.
blood sample. It gradually turns red
when filled with blood.
Electrode Contacts
Sensing signal output terminals.
PRECAUTION
— Re-cap the test strip the vial immediately after removing a test strip.
— Do not reuse test strips.
— Do not use expired test strips.
— Record the date of opening a new strip vial for the first time. Discard the
vial of strips after 3 month from opening.
— Store the test strips in a cool and dry location. Do not expose to direct
sunlight or heat.
— For detailed information, please refer to the
GS100 Test Strip
Package Insert.
6.
Battery Installation
Your meter comes with one CR2032, 3volt, battery installed. One
new battery will provide power to perform about 1000 tests under
normal use. Before using it, please pull off the plastic tape and
press the main button to activate the meter. The low battery
symbol «
» will keep appearing on your display if your battery
runs low. Please keep spares on hand and replace the battery
soon when a battery symbol appears.
1. Turn the meter over. Press and push battery
cover to open.
2. Install the battery. Be sure to put battery in
correct direction.
3. Slide the battery cover back until it snaps into place.
4. The meter performs a self-test and all symbols on the display
will blink.
5. Press any button to exit the self-test and enter Setting Mode.
6. Set the time and date when the batteries are replaced. See Setting the Date,
Time and Unit section. Prior test results are still stored in the memory.
PRECAUTION
— Danger of explosion might happen if the battery is incorrectly replaced.
— Please follow the local regulation and discard a used battery properly.
7.
Setting Up Your Meter-Setting the Date, Time, and Unit ……
You can enter Setting Mode by below two ways.
1. Reload battery
After removing the battery, please press the main button for several times
until no signal on screen, then follow the battery installation steps to load
battery. The meter will do self test. Press the main button to close the test
and enter Setting Mode.
2. With Battery inserted
Press the main button first to turn on the meter. Then press and hold the main
button for 5 seconds (the meter will be turned off during this period, please
keep pressing) until you hear a beep, indicating you have successfully
entered Setting Mode. The display screen will show setting data.
NOTE
— When you keep pressing the main button for 2 seconds, the display on
screen will turn off. Please don’t care it. Keep pressing the main button
till entering setting data.
— Quick press the main button allows you to change setting while hold it
4 µl
.0
for 2 seconds will confirm the setting. However, if you press and hold
the main button over 5 seconds it will escape from setting mode and
return to time screen.
1. Year setting
With the year format blinking, press the main button to adjust
it. Then hold the same button for 2 seconds to confirm it.
Meantime, it will shift to next digit for setting. Repeat the above
action until the year setting is completed. Then it will move to
month setting.
2. Month setting
With the month blinking, press the main button until the
current month appears. Then hold the same button for 2
seconds to confirm it and move to day setting.
µl
3. Day setting
With the day blinking, press the main button to adjust it. Then
hold the same button for 2 seconds to confirm it. Meantime, it
will shift to next digit for setting. Repeat the above action until
the day setting is completed. Then it will move to time format
setting.
4. Time format 12/24H selection
With the time format blinking, press the main
button to adjust it. Then hold the same button
for 2 seconds to confirm it and move to hours
setting.
5. Hour setting
With the hour blinking, press the main button until the current
hour appears. Then hold the same button for 2 seconds to
confirm it and move to minute setting.
6. Minute setting
With the minute blinking, press the main button
to adjust it. Then hold the same button for 2
seconds to confirm it. Meantime, it will shift to
next digit for setting. Repeat the above action
until the minute setting is completed. Then it will
move to average-day setting.
7. Average-day setting
With the number » 1, 7, 14, 30 » blinking, press
the main button for the days of the average you
would like to read. Then hold the same button
for 2 seconds to confirm it and move to
measurement unit setting.
8. Setting the unit of measurement
With milligrams per deciliter (mg/dL) or
minimole per liter (mmol/L) blinking, press the
main button to switch. Then hold the same button for 2 seconds to confirm it.
9. Ending setting
After confirm the measurement unit, you’ll hear a sound of » beep «. All the
settings are saved and completed and will return to time screen.
NOTE
— When you do not do any settings of meter for over 2 minutes, the meter
will leave setting mode and power off automatically.
— Any time you would like to escape from the setting mode, please press
and hold the main button for over 5 seconds. Meantime, all the current
settings will be saved.
Turning on /off the Meter
1. Auto Power off
The meter will power off automatically if you don’t operate it over 2 minutes.
2. Manual Power off
If you want to turn off the meter, please keep pressing the main button for 2
seconds.
3. How to turn on the Power
1) Press the main button
2) Insert one piece of test strip
8.
Performing a Blood Test
Depth adjustable cap
Release button
Plunger
Lancet carrier
Hub
1. Pull off the depth adjustable cap.
2. Insert a new disposable lancet firmly into lancet carrier.
3. Twist off and set aside the protective cover of the disposable lancet.
4. Replace the depth adjustable cap.
1
2
3
4
5. Choose a depth of penetration by rotating the
5
top portion of the depth adjustable cap until
the setting depth matches the window.
Settings are based on skin type «
» for soft
or thin skin; «
» for average skin; «
» for
thick or calloused skin.
6. Hold the hub in one hand and pull on the plunger in the other hand. The
device will be cocked. Release the plunger, it will automatically move back to
its original position near the hub.
7
8
7. Wash your hands with warm
soapy water and dry thoroughly.
8. Take one strip from the vial. Re-
cap the vial cap immediately.
9. Insert the strip into the strip port on meter with the indication symbol facing
up.
10. While the blood drop symbol flashing, you are ready to apply the blood
sample.
10
11. Place the lancing device against the pad of
your fingertip and press the release button.
The best puncture sites are on the middle or
ring fingers. Press the release button.
12
12. Touch and hold the drop to the edge of
sample entry until you hear a » beep » and the
view window is totally filled with blood. If the
view window is not totally filled with blood or
the test does not start. Please discard the test
strip and repeat the test with a new test strip.
13. You will see the countdown mode on the
screen. After 8 seconds, the test result
appears.
14. Pull off the depth adjustable cap. Without touching the used disposable
lancet, stick the lancet tip into the protective cover.
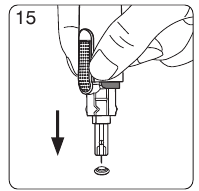
15. Hold the release button in one hand and pull on the plunger in the other
hand will safely eject the used disposable lancet.
16. Discard the used disposable lancet into an appropriate puncture-proof or
biohazard container.
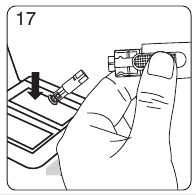
17. Replace the depth adjustable cap after finishing the test.
14
15
16
17
2
1
PRECAUTION
Do not touch your blood drop to the sample entry on the strip until you
see the «
» appear. The meter is performing an internal test and will
display «
» and «
» if you apply blood too soon. Then you will waste
a test strip.
6
9
11
13
Blood Glucose Monitoring System
Instructions for Use
Preface
Thank you for selecting the
Blood Glucose Monitoring System.
Please read this manual thoroughly before you start testing. It provides all the
information you need to use the product. You will get a correct test result by the
following instruction of this manual. Please only purchase the test strips in
your country, the use of the test strips of different countries is not
suggested and might get deviated test results under such circumstance.
It is quite important for you to monitor blood glucose regularly. A derived
complication can thus be effectively reduced. Through the assistance of
Blood Glucose Monitoring system, which provides considerate
design and accurate results, your diabetes management can become more
reliable and ease-to-use.
The
Blood Glucose Monitoring System was manufactured by
supported by Bionime Corporation and its authorized representative. If you
have any questions or concerns, please contact your Bionime authorized
representative or call us by phone number, 886 4 24951268 ( GMT+08:00,
08:30~17:30 ). We will provide best assistance and solutions for you.
1.
Intended Use
The
Blood Glucose Monitoring System is intended for in vitro
diagnostic use ( for self-testing ) only ( outside the body ) and coding is not
required. The testing result is calibrated to be plasma equivalent for test with
fresh capillary whole blood samples from the fingertip, palm or forearm
depends on what kind of lancing device you are using. You may consult your
healthcare professional for instructions on how to use the system correctly. Our
customer support staff is available to assist you as well.
2.
Package of Meter Kit
1.
Meter
7. Disposable Sterile Lancets
(10pcs) *
2.
Test Strips (0/10/25 pcs) *
8. Instruction for the lancing device *
3.
Control Solutions *
9. Log Book
4.
Instructions for Use
10. Warranty Card + Emergency
5.
Blood Glucose Test Strip
11. CR2032 Battery (Inserted into the
Package Insert *
meter)
6.
Lancing Device *
12. Carrying Case *
( Different packages have different bundled items. Some of packages might not
include * items.)
2 *
3 *
4
1
Test Strips
5 *
7 *
8 *
6 *
3.
The
Meter
Test Strip Port
Insert test strip here until you
hear a click.
Display Window
Show your test result,
messages and relative
Model Number
information.
Meter Serial
Number
Main Button
Press to turn on/off meter.
Battery Cover
Switch different function
Slide cover to
screen.
change battery.
Press and hold down until
enter to the setting mode.
Plastic Tape
(There will be a power-off
Pull it off to activate meter.
period during this process.)
4.
Precautions
— Before using the
System to test your blood glucose, please read
all the instructions and practice the tests including quality control test.
— Please do the quality control test regularly to make sure the test results are
accurate .
— The
GM100 Blood Glucose Meter can only be used with the
GS100 Blood Glucose Test strips. The use of any other brand
strips should not be used under any circumstances. The use of other brands
of strips may produce inaccurate results.
— The
Blood Glucose Monitoring System is intended for self-testing. It
should not be used to diagnose diabetes mellitus.
—
Blood Glucose Monitoring System has not been validated for use
on neonates. Therefore, it’s not intended for use of neonates.
— This meter can be only tested with capillary whole blood. Please don’t test with
arterial blood.
— Do the test at least 30 minutes after moving into a different location with
significant change in temperature.
— Dispose of used batteries properly.
— Please note the meter kit contains small parts like test strips which could result
in a choking hazard for children.
— Prevent water from entering the meter. Never immerse the meter or hold it
under running water.
— The minimum blood sample size for testing is 1.4µl
)
1.0
µl
1.4
µl
2.0
µl
3.0
µl
Sample Size Example
We suggest you use a sample between 1.4~2.5µl. A blood sample size above
4.0µl is too large. A blood sample size below 1.4µl may give an inaccurate test
result. In this case, repeat the test with a new test strip.
5.
The
Test Strip ( GS100 Test Strip )
GM100 is designed to use with GS100 strip only. Please note that
misuse of other strips might cause unexpected damage or produce
inaccurate test results.
Sample Entry
Noble Metal Electrodes
Apply a drop of blood or control solution
Electrochemical sensor
here. The test request is only 1.4 of blood.
Hand Bar
Grip here to insert
test strip into meter.
Indication Symbol
View Window
Insert strip with indication symbol
This window is yellow before applying
up and toward meter.
blood sample. It gradually turns red
when filled with blood.
Electrode Contacts
Sensing signal output terminals.
PRECAUTION
— Re-cap the test strip the vial immediately after removing a test strip.
— Do not reuse test strips.
— Do not use expired test strips.
— Record the date of opening a new strip vial for the first time. Discard the
vial of strips after 3 month from opening.
— Store the test strips in a cool and dry location. Do not expose to direct
sunlight or heat.
— For detailed information, please refer to the
GS100 Test Strip
Package Insert.
6.
Battery Installation
Your meter comes with one CR2032, 3volt, battery installed. One
new battery will provide power to perform about 1000 tests under
normal use. Before using it, please pull off the plastic tape and
press the main button to activate the meter. The low battery
symbol «
» will keep appearing on your display if your battery
runs low. Please keep spares on hand and replace the battery
soon when a battery symbol appears.
1. Turn the meter over. Press and push battery
cover to open.
2. Install the battery. Be sure to put battery in
correct direction.
3. Slide the battery cover back until it snaps into place.
4. The meter performs a self-test and all symbols on the display
will blink.
5. Press any button to exit the self-test and enter Setting Mode.
6. Set the time and date when the batteries are replaced. See Setting the Date,
Time and Unit section. Prior test results are still stored in the memory.
PRECAUTION
— Danger of explosion might happen if the battery is incorrectly replaced.
— Please follow the local regulation and discard a used battery properly.
7.
Setting Up Your Meter-Setting the Date, Time, and Unit ……
You can enter Setting Mode by below two ways.
1. Reload battery
After removing the battery, please press the main button for several times
until no signal on screen, then follow the battery installation steps to load
battery. The meter will do self test. Press the main button to close the test
and enter Setting Mode.
2. With Battery inserted
Press the main button first to turn on the meter. Then press and hold the main
button for 5 seconds (the meter will be turned off during this period, please
keep pressing) until you hear a beep, indicating you have successfully
entered Setting Mode. The display screen will show setting data.
NOTE
— When you keep pressing the main button for 2 seconds, the display on
screen will turn off. Please don’t care it. Keep pressing the main button
till entering setting data.
— Quick press the main button allows you to change setting while hold it
4 µl
.0
for 2 seconds will confirm the setting. However, if you press and hold
the main button over 5 seconds it will escape from setting mode and
return to time screen.
1. Year setting
With the year format blinking, press the main button to adjust
it. Then hold the same button for 2 seconds to confirm it.
Meantime, it will shift to next digit for setting. Repeat the above
action until the year setting is completed. Then it will move to
month setting.
2. Month setting
With the month blinking, press the main button until the
current month appears. Then hold the same button for 2
seconds to confirm it and move to day setting.
µl
3. Day setting
With the day blinking, press the main button to adjust it. Then
hold the same button for 2 seconds to confirm it. Meantime, it
will shift to next digit for setting. Repeat the above action until
the day setting is completed. Then it will move to time format
setting.
4. Time format 12/24H selection
With the time format blinking, press the main
button to adjust it. Then hold the same button
for 2 seconds to confirm it and move to hours
setting.
5. Hour setting
With the hour blinking, press the main button until the current
hour appears. Then hold the same button for 2 seconds to
confirm it and move to minute setting.
6. Minute setting
With the minute blinking, press the main button
to adjust it. Then hold the same button for 2
seconds to confirm it. Meantime, it will shift to
next digit for setting. Repeat the above action
until the minute setting is completed. Then it will
move to average-day setting.
7. Average-day setting
With the number » 1, 7, 14, 30 » blinking, press
the main button for the days of the average you
would like to read. Then hold the same button
for 2 seconds to confirm it and move to
measurement unit setting.
8. Setting the unit of measurement
With milligrams per deciliter (mg/dL) or
minimole per liter (mmol/L) blinking, press the
main button to switch. Then hold the same button for 2 seconds to confirm it.
9. Ending setting
After confirm the measurement unit, you’ll hear a sound of » beep «. All the
settings are saved and completed and will return to time screen.
NOTE
— When you do not do any settings of meter for over 2 minutes, the meter
will leave setting mode and power off automatically.
— Any time you would like to escape from the setting mode, please press
and hold the main button for over 5 seconds. Meantime, all the current
settings will be saved.
Turning on /off the Meter
1. Auto Power off
The meter will power off automatically if you don’t operate it over 2 minutes.
2. Manual Power off
If you want to turn off the meter, please keep pressing the main button for 2
seconds.
3. How to turn on the Power
1) Press the main button
2) Insert one piece of test strip
8.
Performing a Blood Test
Depth adjustable cap
Release button
Plunger
Lancet carrier
Hub
1. Pull off the depth adjustable cap.
2. Insert a new disposable lancet firmly into lancet carrier.
3. Twist off and set aside the protective cover of the disposable lancet.
4. Replace the depth adjustable cap.
1
2
3
4
5. Choose a depth of penetration by rotating the
5
top portion of the depth adjustable cap until
the setting depth matches the window.
Settings are based on skin type «
» for soft
or thin skin; «
» for average skin; «
» for
thick or calloused skin.
6. Hold the hub in one hand and pull on the plunger in the other hand. The
device will be cocked. Release the plunger, it will automatically move back to
its original position near the hub.
7
8
7. Wash your hands with warm
soapy water and dry thoroughly.
8. Take one strip from the vial. Re-
cap the vial cap immediately.
9. Insert the strip into the strip port on meter with the indication symbol facing
up.
10. While the blood drop symbol flashing, you are ready to apply the blood
sample.
10
11. Place the lancing device against the pad of
your fingertip and press the release button.
The best puncture sites are on the middle or
ring fingers. Press the release button.
12
12. Touch and hold the drop to the edge of
sample entry until you hear a » beep » and the
view window is totally filled with blood. If the
view window is not totally filled with blood or
the test does not start. Please discard the test
strip and repeat the test with a new test strip.
13. You will see the countdown mode on the
screen. After 8 seconds, the test result
appears.
14. Pull off the depth adjustable cap. Without touching the used disposable
lancet, stick the lancet tip into the protective cover.
15. Hold the release button in one hand and pull on the plunger in the other
hand will safely eject the used disposable lancet.
16. Discard the used disposable lancet into an appropriate puncture-proof or
biohazard container.
17. Replace the depth adjustable cap after finishing the test.
14
15
16
17
2
1
PRECAUTION
Do not touch your blood drop to the sample entry on the strip until you
see the «
» appear. The meter is performing an internal test and will
display «
» and «
» if you apply blood too soon. Then you will waste
a test strip.
6
9
11
13
Содержание
- 1 Преимущества модели
- 2 Технические характеристики
- 3 Функции и комплектация устройства
- 4 Рекомендации по применению глюкометра
- 5 Оценка прибора пользователями
- 6 Проверка точности анализатора
Швейцарская фармацевтическая компания Bionime Corp занимается разработкой и производством медицинской техники. Серия ее глюкометров Bionime GM отличается точностью, функциональностью, простотой применения. Биоанализаторы используют в домашних условиях для контроля сахара крови, полезны они и медработникам больничных стационаров, санаториев, домов престарелых, подразделений МЧС для экспресс-тестов на глюкозу в капиллярной крови при первичном приеме или на медосмотре.
Устройства не применяют для постановки или снятия диагноза диабетикам. Важным преимуществом глюкометра Вionime GM 100 является его доступность: и прибор, и расходные материалы к нему можно отнести к бюджетному ценовому сегменту. Для диабетиков, контролирующих гликемию ежедневно, это убедительный аргумент в пользу его приобретения, причем – не единственный.
Преимущества модели
Бионайм – авторитетный производитель биоанализаторов, использующий инновационные технологии, обеспечивающие высокую точность и надежность приборов.

- Высокая скорость обработки биоматериала – в течение 8 секунд прибор выдает результат на дисплей;
- Малоинвазивный прокалыватель – ручка с тончайшей иглой и регулятором глубины прокалывания делает малоприятную процедуру забора крови практически безболезненной;
- Достаточная точность – электрохимический метод измерения, применяемый в глюкометрах этой линейки, считается самым прогрессивным на сегодняшний день;
- Большой (39 мм х 38 мм) жидкокристаллический дисплей и крупный шрифт – для диабетиков с ретинопатией и другими нарушениями зрения эта особенность позволяет сделать анализ самостоятельно, без помощи посторонних;
- Компактные размеры (85 мм х 58 мм х 22 мм) и вес (985 г с батарейками) предоставляют ввозможность использовать мобильный прибор в любых условиях – дома, на работе, в дороге;
- Пожизненная гарантия – производитель не ограничивает срок эксплуатации своей продукции, поэтому можно рассчитывать на ее надежность и долговечность.
Технические характеристики
В качестве технологии измерения в устройстве используются оксидированные электрохимические сенсоры. Калибровка выполняется по цельной капиллярной крови. Диапазон допустимых измерений – от 0,6 до 33,3 ммоль/л. При заборе крови показатели гематокрита (соотношение эритроцитов и плазмы) должны быть в рамках 30-55%.
Прибор сохраняет в памяти результаты 300 последних измерений, фиксируя также дату и время процедуры.
Можно рассчитать средние показатели за неделю, две, месяц. Устройство не самое кровожадное: для анализа ему достаточно 1,4 микролитра биоматериала.

Работает аппарат от двух батареек ААА мощностью 1,5 V
Такого потенциала достаточно для 1000 измерений. Автоматическое отключение устройства после трехминутного бездействия обеспечивает экономию энергии. Диапазон операционных температур достаточно широкий – от +10 до +40°С при относительной влажности <90%. Хранить глюкометр можно при температуре от -10 до +60°С. Для тест-полосок инструкция рекомендует температурный режим в пределах от +4 до +30°С при относительной влажности <90%. Избегать перегрева, активных солнечных лучей, детского внимания.
Функции и комплектация устройства
 Глюкометр Bionime GM-100 инструкция представляет как прибор для скрининговых измерений концентрации глюкозы в плазме.
Стоимость модели Bionime GM-100 – около 3 000 рублей.
Прибор совместим с одноименными пластиковыми тест-полосками. Главная их особенность – позолоченные электроды, гарантирующие максимальную точность измерений. Забор крови они производят автоматически. Биоанализатор Bionime GM-100 укомплектован:
- Батарейками ААА – 2 шт.;
- Тестовыми полосками – 10 шт.;
- Ланцетами – 10 шт.;
- Ручкой-скарификатором;
- Дневником самоконтроля;
- Визиткой-идентификатором с информацией для окружающих об особенностях заболевания;
- Руководством по применению – 2 шт. (к глюкометру и к прокалывателю отдельно);
- Гарантийным талоном;
- Чехлом для хранения и транспортировки с насадкой для забора крови в альтернативном месте.

Рекомендации по применению глюкометра
Результат измерения зависит не только от точности глюкометра, но и от соблюдения всех условий хранения и использования прибора. Алгоритм анализа крови на сахар в домашних условиях стандартный:
- Проверьте наличие всех необходимых принадлежностей – прокалывателя, глюкометра, тубуса с тест-полосками, одноразовых ланцетов, ваты со спиртом. Если требуются очки или дополнительное освещение, надо побеспокоиться об этом заранее, так как прибор времени на размышления не оставляет и уже через 3 минуты бездействия отключается автоматически.
- Подготовьте ручку для прокалывания пальца. Для этого снимите с нее наконечник и установите ланцет до упора, но без особых усилий. Осталось скрутить защитный колпачок (не спешите его выбрасывать) и закрыть иглу наконечником ручки. Индикатором глубины прокола установите свой уровень. Чем больше полос в окошке, тем глубже прокол. Для кожи средней плотности достаточно 5 полосок. Если оттянуть сдвигающуюся часть с обратной стороны назад, ручка будет готова к процедуре.
- Чтобы настроить глюкометр, его можно включить вручную, кнопкой, или автоматически, при установке тест-полоски до характерного щелчка. На экране появляется требование о вводе кода тест-полос. Из предлагаемых вариантов кнопкой надо выбрать то число, что указано на тубусе. Если на экране появилось изображение тестовой полоски с мигающей каплей, значит, прибор готов к работе. Не забудьте плотно закрыть пенал сразу же после извлечения тест-полоски.
- Подготовьте руки, вымыв их теплой водой с мылом и высушив феном или естественным путем. Спиртовая ватка в этом случае будет лишней: кожа от спирта грубеет, возможно искажение результатов.
- Чаще всего для забора крови используют средний или безымянный палец, но при необходимости можно взять кровь из ладони или предплечья, где нет сетки вен. Прижимая ручку плотно к боковой стороне подушечки, необходимо нажать на кнопку, чтобы осуществить прокол. Слегка помассировав палец, надо выдавить кровь. Важно не перестараться, так как межклеточная жидкость искажает результаты измерений.
- Первую каплю лучше не использовать, а снять ее аккуратно ватным тампоном. Сформируйте вторую порцию (прибору необходимо для анализа всего 1,4 мкл). Если поднести палец с каплей к концу полоски, кровь она втянет автоматически. На экране начинается обратный отсчет и через 8 секунд появляется результат.
- Все этапы сопровождаются звуковыми сигналами. После измерения надо вынуть тест-полоску и выключить прибор. Чтобы извлечь из ручки одноразовый ланцет, надо снять верхнюю часть, надеть на иглу наконечник, который снимали в начале процедуры, зажать кнопку и оттянуть заднюю часть ручки. Игла выпадает автоматически. Осталось утилизировать расходники в мусорном контейнере.
Несмотря на то, что прибор способен сохранять в памяти до 300 последних результатов, определяя средние значения за 7,14 или 30 дней, свои показания надо регулярно заносить в дневник диабетика.
Отслеживать динамику развития болезни полезно не только пациенту – врач по этим данным может сделать выводы об эффективности выбранной схемы лечения, чтобы скорректировать при необходимости дозировку лекарств.
Оценка прибора пользователями
О глюкометре Вionime GM 100 отзывы неоднозначны. Многим нравится его авторитетное происхождение, современный дизайн, простота эксплуатации. Некоторые жалуются на погрешности в измерениях, плохое качество тест-полосок.
Юлия, 27 лет, г. Санкт-Петербург «Я купила прибор Бионайм 100 своей бабушке по акции (в подарок предлагали еще 50 тестовых полосок). Она говорит, что это самый простой и понятный глюкометр из тех, что у нее были. Как диабетик со стажем, она уже многие модели перепробовала. Нравятся ей крупные цифры на дисплее, полоска легко вставляется. Бабушка живет одна, и мне важно, чтобы измерения она могла проводить сама.»
Андрей, 43 года, г. Воронеж «У меня тоже Bionime GM 100. Если расходников к нему в вашей аптеке нет, их всегда можно заказать в интернете, так даже дешевле выходит. Мне приходится измерять сахар каждый день – прибор точный и надежный, меня пока ни разу не подвел. Я смотрел сравнительные характеристики даже на немецких сайтах – мой аппарат лучше, не зря гарантия на него пожизненная.»
Сергей Владимирович, 51 год, г. Москва «Лет 7 уже глюкометрами пользуюсь, но такое впервые. Из 25-ти полосок, что в пенале, 10 уже не показывают результат. Можно ли их поменять или сам прибор Бионайм проверять надо? Куда сдают глюкометры на проверку, может, кто в курсе?»
Проверка точности анализатора
Проверить работоспособность биоанализатора можно и в домашних условиях, если приобрести специальный контрольный раствор глюкозы (продается отдельно, инструкция прилагается).
 Но для начала надо проверить батарейку и соответствие кода на упаковке тест-полос и дисплее, а также срок годности расходного материала. Контрольные измерения повторяют для каждой новой упаковки тест-полос, а также при падении устройства с высоты.
Прибор с прогрессивным электрохимическим методом измерений и тест-полоски с золотыми контактами подтвердили свою эффективность многолетней клинической практикой, поэтому, прежде чем сомневаться в его надежности, внимательно изучите инструкцию.
Количество глюкозы в крови — главный критерий оценки состояния здоровья человека. Изменения показаний в сторону сильного увеличения или уменьшения свидетельствуют о развитии болезни. Определить уровень сахара в крови помогает медицинский прибор — глюкометр. Процедура делает возможным контролировать состояние организма и вовремя фиксировать изменения углеводного обмена у людей, которые страдают сахарным диабетом.
Принцип работы глюкометра
Как работает глюкометр на основе фотометрического и электрохимического принципа действия, объясним ниже.
Фотометрия — по силе изменения цвета реагента после контакта с кровью определяется концентрация глюкозы. Прибор, используя оптический блок и контрольные образцы, делает сравнение и выводит результаты. Показания глюкометра фотометрического типа характеризуются неточностью. В ходе эксплуатации линзы оптики прибора загрязняются, теряют фокус из-за смещения от ударов или вибрации.
Электрохимическое определение — анализ концентрации глюкозы происходит за счет подсчета общего заряда электронов после реакции крови с химическими соединениями. Контрольный элемент — тест полоска. На полоске нанесены контактные группы, покрытые слоем реагента. При нанесении капли крови на тест происходит химическая реакция. Выделяемое электричество формирует протекающий между контактами ток. Показания высчитываются на основе серии замеров. Анализ продолжается до тех пор, пока значение тока не перестает меняться, до окончания реакции между химическим составом контрольной полосы и глюкозой.
В набор глюкометра входит измерительный прибор, тест-полоски и колющий инструмент со сменными ланцетами.

Нормы сахара в крови
Уровень сахара в крови меняется в течение дня. Зависит от приема лекарств, пищи и физической нагрузки. Нервное напряжение влияет на точность результата, поэтому важно оставаться спокойным в момент измерения. Рекомендуется измерять сахар глюкометром неоднократно в течение дня: до приема пищи и через 2 часа после.
Среднестатистические показатели нормы глюкозы:
- до еды — от 3,5 до 5,5 ммоль/л;
- после приема пищи — от 7 до 7,8 ммоль/л.
Если уровень сахара в крови слегка завышен, скорректируйте собственное питание, удалите из рациона вредные продукты, отрегулируйте собственный режим сна, и тем самым вернете уровень глюкозы в норму. Если уровень сахара в крови слегка понижен, скушайте сладкое.
Настройка и правила использования глюкометра
Для получения достоверного результата важно знать, как правильно измерять сахар глюкометром. Прежде чем измерять, важно правильно настроить. После первого включения задаются базовые параметры:
- Дата и время.
- Язык экранного меню.
- Единицы измерения. Устанавливается измерение в единицах ммоль/л.
- Установка границ нижней и верхней концентрации сахара. Какой лучше задать диапазон допустимых значений сахара, лучше проконсультироваться с лечащим врачом. Когда прибор определяет, что концентрация глюкозы выше или ниже установленных граничных уровней, то подается звуковой сигнал и выводится показатель на дисплей.
- Калибровка прибора. Большинство производителей включают в комплект специальную калибровочную жидкость с заданным уровнем сахара, который наносят на тест-полоску. После сверяют результат на дисплее со значением, которое дает инструкция по эксплуатации прибора.
Правильная настройка, перед тем как измерять глюкометром, дает преимущество получать достоверные результаты измерений в будущем.
Правила при использовании глюкометра
С этим прибором в домашних условиях справится каждый человек. Нюансы и отличия в отношении того, как пользоваться глюкометром, указаны в инструкции к каждой конкретной модели. Главное — наличие расходных материалов (тест-полосок) с действующим сроком годности. Испорченные изделия не дадут необходимой точности. Правила использования в различных моделях схожи:
- Встряхивание рукой для увеличения притока крови к пальцам;
- Тщательное мытье рук;
- Дезинфекция места прокола раствором антисептика;
- Дождаться, пока дезинфицирующий состав испарится;
- Вставка полоски в аппарат до упора;
- Прокол кончика пальца специальным скарификатором (ланцетом или ручкой-прокалывателем);
- Нанесение крови на тест-полоску;
- Дождаться появления результата на дисплее (5‒40 секунд);
- Извлечь использованную тест-полоску и утилизировать.
В фотометрический аппарат полоска вставляется с уже нанесенной кровью. В электрохимический помещается чистой.
Как измерить уровень сахара глюкометром?
Информация как правильно измерить сахар в крови глюкометром содержится в инструкции по применению. Измерение сахара глюкометром выглядит следующим образом:
- Достаньте тест-полоску и вставьте в глюкометр.
- С помощью ланцета проколите палец.
- Первая капля крови не используется для анализа.
- Вторую каплю наносят на тест-полоску, ориентируясь на специальные пометки.
- Дождитесь втягивания необходимого количества крови в индикатор и появления результатов измерения на экране глюкометра.
- Запишите показания.
Глюкометр доступен каждому. Приобрести прибор могут не только диабетики, но и люди, которые контролируют и поддерживают свое здоровье. Востребованные модели можно купить в Минске в магазинах «Польза» или на сайте polza-shop.by
Для пациентов с нарушением эндокринной системы большое значение имеет скорость замеров и точность показаний уровня глюкозы. Приобрести глюкометр могут не только диабетики, но и здоровые люди, которые контролируют и поддерживают нужный уровень сахара.

Ассортимент измерительных аппаратов
Изготовители устройств для измерения сахара в крови производят огромный ассортимент товара. Функционируют приборы по-разному, есть преимущества и недостатки.
Аппарат бывает:
- Лазерный. На кожном покрове делается прокол лазером. Цена выше 10 тысяч рублей.
- Электрохимический. В работе используются тестовые полоски.
- Фотометрический. Уровень глюкозы определяется с помощью окрашивания тестируемой зоны.
- Романовский. Глюкоза выделяется после спектроскопии кожи.
- Бесконтактный. Делается быстро, прокалывание кожи не требуется.


Выбирая измеритель для домашнего пользования, необходимо учитывать, что большая часть приборов приемлема для первого типа сахарного диабета. При втором типе необходимо чаще проводить замеры.
Больные диабетом 2 типа имеют право на получение бесплатного глюкометра, а тестовые полоски бесплатно выдают на месяц по рецепту врача в аптеке (3 штуки в день).
Подбирая глюкометр, следует подсчитать нужное количество расходного материала и его стоимость.

Анализ устройств
Анализируя различные модели приборов и отзывы на них, внимание уделялось функциональности аппарата:
- точный замер;
- скорость получения информации;
- получение результатов об артериальном давлении, кетоновых телах, холестерине и других показателях;
- вывод и передача данных на ноутбук;
- звуковое оповещение;
- объем памяти и количество измерений;
- подсветка дисплея.
Также для оценочного критерия немаловажно:
- удобство эксплуатации, особенно для пациентов с нарушениями моторики или с плохим зрением;
- стоимость глюкометра и цена расходников;
- наличие тестовых полосок в продаже;
- сроки хранения расходных материалов;
- количество жалоб на брак;
- наличие сумки-чехла для сохранности прибора;
- внешний вид.

Чтобы было легче выбрать глюкометр для дома, мы составили рейтинг лучших аппаратов от известных производителей.
Фотометрические глюкометры
К лучшим фотометрическим глюкометрам относятся аппараты Accu-Chek. Производитель Roche Diagnostics добился отличного результата. Благодаря инновационным технологиям, глюкометром Акку Чек выдается погрешность до 15%. Согласно стандартам, допускается неточность 20%.

Accu Chek Active
Практичный в использовании измеритель делает замер за 5 секунд. Информация хорошо читается на большом экране. Достоинства популярной модели Accu-Chek Active:
- четкость изображения;
- простота пользования;
- 350 измерений;
- вывод средних значений глюкозы;
- результаты до и после принятия пищи;
- автовключение при входе полоски;
- передача результатов на носитель.

К технике прилагается аппарат для проколов, 10 полосок и столько же ланцетов, батарейка, сумка-переноска и инструкция. К недостаткам можно отнести:
- высокую стоимость расходного материала;
- отсутствие автоматического забора крови;
- отсутствие звука и подсветки;
- небольшой заряд батарейки;
- может выдавать ошибку, если капля крови попала не в центр.

Согласно отзывам, данная модель практичная, удобная, подходит для пожилых людей с ослабленным зрением, но расходники обойдутся дороже самого аппарата. Стоимость измерителя 600 руб., а тестовые полоски обойдутся в 900 руб.
Accu Chek Mobile
Относится к лучшим фотометрическим глюкометрам. Фирма Roche дает гарантию высокотехнологичному устройству на 50 лет. Аппарат объединил в себе самое необходимое. В данной модели используются тест-кассеты, что исключает порчу расходных материалов.
Плюсы:
- безболезненный забор крови;
- отличная точность измерений;
- скорость 5 сек.;
- в набор входит также прибор для прокола и тест-кассета;
- неоднократное использование ланцета (если его использует один человек);
- большая память;
- не требуется установка ПО для передачи сведений на компьютер;
- меню на русском.

Итак, пользователи отмечают точность, удобство в пользовании, высокую скорость и безболезненное прокалывание, после которого выступает минимум крови.
Минусы:
- цена 3500 рублей;
- жужжащий звук.

Согласно мнениям потребителей, Accu-Chek Mobile покупали бы чаще, если бы цена измерительного устройства была ниже.
Accu Chek Compact Plus
Хорошие отзывы получила модель Accu-Chek Compact Plus. Принимая во внимание критику пользователей, разработчики уменьшили время анализа и сократили его до 5 секунд. Автоматическое управление доставляет удобство пользователю, которому практически не нужно нажимать кнопки.
Преимущества:
- широкий экран;
- индикатор замеров;
- простота замены игл;
- ручка для прокалывания регулируется;
- память сохраняет 100 измерений;
- передача информации на персональный компьютер;
- сумка-чехол;
- гарантия 3 года.

Недостатки:
- трудности с покупкой барабана с лентами;
- жужжание при перемотке;
- высокая цена (3 500 рублей).

Несмотря на высокую стоимость и сложность в поисках лент, модель пользуется популярностью среди покупателей.
Accu-Chek Performa Nano
Модель отличает современный дизайн и портативные размеры. Удобство пользования обеспечивает широкий экран с подсветкой.
Преимущества:
- точность результатов;
- скорость 5 секунд;
- компактность;
- большая память;
- высвечивается время, дата и будильник, оповещающий время анализа.

К минусам можно отнести только дорогие расходники. Цена самого глюкометра от компании Roche 1500 рублей, что намного ниже стоимости фотометрических устройств этого производителя.
Электрохимические устройства
Такие приборы применяются в стационарах, когда в результате реакции крови и реактивов образуется ток, и тест-полоска реагирует, выявляя уровень глюкозы. Немецкий производитель Bayer выпускает инновационные биоанализаторы, которые пользуются спросом.

Bayer Contour TS
Самым надежным прибором по точности считается модель Bayer Contour TS, которая с успехом используется больше 10 лет. Немецкий бренд производит высококачественную и надежную технику, а сборку устройства производят в Японии.
Название модели переводится как «абсолютно просто», характеризуя прибор, как легкую в пользовании модель.
Преимущества:
- высокая точность измерений;
- дизайн и портативность;
- регулировка глубины прокола;
- немецкий концерн часто устраивает акции на расходники;
- уходит минимум крови;
- 250 замеров;
- сведения переносятся в компьютер;
- длительность процедуры 5 секунд;
- опция гематокрит;
- сорбент в боксе с тест-полосками увеличивает срок их хранения;
- гарантийный срок 5 лет.

В комплектации идет 10 ланцетов, батарея, устройство для прокола, инструкция.
Минусы:
- царапается дисплей;
- полоску нужно вставлять точно по центру, что не всегда получается;
- неудобство при доставании тестовых полосок.

Стоимость аппарата составляет 500-700 рублей, цена расходного материала колеблется в таком же диапазоне.
One Touch Select
К популярным электрохимическим аппаратам относится также модель One Touch Select, производя замер сахара за несколько секунд.
Плюсы:
- легкость использования;
- скорость анализа 5 секунд;
- удобный экран с четким изображением цифр;
- расчет среднего результата;
- минимум крови;
- доступность полосок;
- одной батареи хватает на 1500 замеров;
- удобство эксплуатации;
- крепление сумки на поясе;
- передача данных на ПК;
- бессрочная гарантия.

К минусам можно отнести погрешность измерений. Если аппарат включен и в него была помещена полоска, то кровь необходимо наносить быстро, так как материал может испортиться.
Несмотря на недостатки, отзывы об этой модели позитивные.
Стоимость 50 полосок равняется стоимости самого аппарата, поэтому приходится искать упаковки с большим количеством материала для анализов.

Результаты измерений при правильном применении отлично подходят для контроля уровня глюкозы дома.
One Touch Select Simple
Современная модель имеет закругленные углы и смотрится стильно. На передней панели One Touch Select Simple расположен только дисплей и 2 индикатора для разных уровней глюкозы. Измеритель изготовлен из высококачественного пластика, имеет небольшой вес и портативные размеры. Устройство легко помещается в руке, что является жизненно важным для пожилого человека с нарушением зрения.
Достоинства:
- компактные размеры;
- простота и комфортное пользование;
- стоимость 1000 рублей.

К недостаткам можно отнести дорогие расходные материалы.
One Touch Select Plus
Модель One Touch Select Plus представляет собой портативный прибор, на экране которого имеется трехцветный индикатор для контроля диабета, который показывает, в каком диапазоне находится уровень сахара.
Достоинства:
- простое управление;
- широкий экран с подсветкой;
- скорость 5 секунд, доступно 500 измерений;
- цветной индикатор;
- антискользящее покрытие корпуса;
- твердый защитный чехол;
- бессрочная гарантия.

В дополнение прилагается инструкция, скарификатор, 10 полосок и столько же ланцетов.
Недостатки:
- отсутствие звуковых оповещений;
- высокая стоимость расходников.

Стоимость аппарата колеблется от 750 до 900 рублей, сами же тест-полоски стоят 1200 — 1900 рублей.
Elta Sattelit Express
Российский производитель Элта сделал все, чтобы облегчить самоконтроль диабетиков и сделать его доступным. Дешевый аппарат Элта Сателлит Экспресс ПКГ 03 не уступает иностранным аналогам по точности, но намного экономнее по стоимости.
Преимущества:
- легкость пользования устройством;
- большой дисплей с четким изображением;
- скорость 7 секунд;
- небольшая цена техники и полосок;
- кровь для биоанализа берется в минимальном количестве;
- 60 замеров.

В комплектации идет футляр, 25 игл и столько же полосок, а также регулируемая ручка.
Минусы:
- не синхронизируется с ПК;
- замеры могут иметь отличия от исследований в лаборатории, что не подходит больным с тяжким течением диабета.
Если правильно следовать инструкции, Elta Sattelit Express предоставляет точные данные. Претензии к неточности могут быть связаны с тем, что потребители не кодируют новые тестовые полоски.

Bioptik Technology Easy Touch
Лучший прибор среди биохимических глюкометров. Кроме анализа крови на глюкозу, показывает данные о гемоглобине и холестерине. Подходит пациентам с различными заболеваниями.
Достоинства:
- широкий экран с подсветкой;
- скорость измерения 6 секунд;
- в комплекте прилагаются тестовые полоски.
Недостатки:
- дороговизна (3000 рублей);
- дорогие тестовые полоски.

Модель Bioptik Technology Easy Touch подойдет тем, кому жизненно необходимо проводить анализ важных показателей дома.
Обратите внимание, что данные биоанализа будут с небольшой погрешностью.
Неинвазивные приборы
Производство высокотехнологичных приборов с использованием инновационных научных разработок позволило выйти на новый уровень. Аппараты нового поколения не требуют забора крови. Стоимость их высока, производство ведется небольшими партиями. Немногочисленные отзывы говорят о совершенстве выпускаемой техники.

Omelon B-2
Российская компания Омелон вместе с Московским университетом разработала уникальный глюкометр, который не имеет аналогов. Принцип его работы основан на связи уровня сахара с сердечным и мышечным тонусом. Инновационный глюкометр от лучших специалистов рассчитывает уровень глюкозы, основываясь на замерах пульса, давления и сосудов.
Преимущества:
- безболезненные замеры без взятия крови и кожных проколов;
- больной может также держать под контролем давление и пульс;
- удобнее, чем инвазивные измерители;
- гарантийный срок 2 года.

Минусы:
- большие габариты не позволяют переносить его в кармане;
- правильные данные зависят от состояния пациента и движений во время измерения.
Стоимость глюкометра Омелон В-2 6900 рублей на сайте производителя, но высокая цена компенсируется, так как отпадает необходимость в приобретении расходных материалов.
Какой измеритель лучше
Если выбирать устройство по ценовой политике, то ориентироваться лучше стоит на цену тестовых полосок. Здесь однозначно выгодной будет покупка российского глюкометра фирмы Элта.
Таблица сравнения глюкометров
| Модель | Время измерения (сек.) | Память | Цена прибора (руб.) | Стоимость тестовых полосок |
| Accu-Chek Active | 5 сек. | 350 замеров | 600 руб. | 900-1200 руб. |
| Accu-Chek Mobile | 5 | 250 | 3500 | 500 |
| Accu-Chek Compact Plus | 10 | 100 | 3500 | 500 |
| Accu-Chek Performa Nano | 5 | 500 | 1500 | 1000 |
| Bioptik Technoloqy Easy Touch | 6 | 300 | 3000 | 500 |
| Bayer Contour TS | 5 | 350 | 500-700 | 500 |
| One touch select simple | 5 | 300 | 1000 | 600 |
| One Touch Select Plus | 5 | 500 | 750-900 | 1200 (50 шт.), 1900 (100 шт.) |
| Elta Sattelit Express | 7 | 60 | 1000 | 1350 |

Многие потребители выбирают продукцию производителей One Touch и Bayer. Если вы сторонник новейших технологий, хотите получить точнее информацию и готовы платить за удобство, то выбирайте аппараты Accu-Chek и Омелон.
Описание товара
Функциональный и мощный GM700 обеспечивает надежный мониторинг уровня глюкозы в крови, на который вы можете положиться. Принимает различные образцы крови, широкий диапазон HCT и поставляется с полезными маркерами приема пищи, чтобы держать вас в курсе насколько это возможно.
Полное соответствие стандартам EN ISO 15197: 2015 и ISO 15197: 2013.
Особенности продукта:
— Большой дисплей — легко просматривать результаты.
— Автокодирование — устраняет необходимость ручного кодирования и обеспечивает максимальную точность.
— Широкий диапазон HCT — подходит для новорожденных и пациентов с анемией.
— Сменный держатель ленты — избегает загрязнения, вызванного образцами крови, заменив держатель тест-полоски на новый.
— Принятие различных проб крови — пропускает капиллярную, венозную и артериальную кровь.
Диапазон HCT
Концентрации глюкозы ≦ 200 мг / дл, диапазон HCT 20-70%
Концентрации глюкозы> 200 мг / дл, диапазон HCT 20-60%
Диапазон измерения
0,6 — 33,3 ммоль / л (10 — 600 мг / дл)
Действие
Мониторинг уровня глюкозы в крови.
Рекомендации по применению
1. Вставьте полоску в гнездо счетчика. Калибровка произойдет автоматически.
2. Прикоснитесь пробой крови к отверстию для ввода пробы на полоске.
3. Через 5 секунд появится результат теста.
4. Поверните и потяните вверх, чтобы удалить тест-полоску.
Купить Система контроля уровня глюкозы в крови BIONIME RIGHTEST GM 700S,c принадлежностями (10)
Цена на Система контроля уровня глюкозы в крови BIONIME RIGHTEST GM 700S,c принадлежностями (10)
Инструкция по применению для Система контроля уровня глюкозы в крови BIONIME RIGHTEST GM 700S,c принадлежностями (10)
Количество глюкозы в крови — главный критерий оценки состояния здоровья человека. Изменения показаний в сторону сильного увеличения или уменьшения свидетельствуют о развитии болезни. Определить уровень сахара в крови помогает медицинский прибор — глюкометр. Процедура делает возможным контролировать состояние организма и вовремя фиксировать изменения углеводного обмена у людей, которые страдают сахарным диабетом.
Принцип работы глюкометра
Как работает глюкометр на основе фотометрического и электрохимического принципа действия, объясним ниже.
Фотометрия — по силе изменения цвета реагента после контакта с кровью определяется концентрация глюкозы. Прибор, используя оптический блок и контрольные образцы, делает сравнение и выводит результаты. Показания глюкометра фотометрического типа характеризуются неточностью. В ходе эксплуатации линзы оптики прибора загрязняются, теряют фокус из-за смещения от ударов или вибрации.
Электрохимическое определение — анализ концентрации глюкозы происходит за счет подсчета общего заряда электронов после реакции крови с химическими соединениями. Контрольный элемент — тест полоска. На полоске нанесены контактные группы, покрытые слоем реагента. При нанесении капли крови на тест происходит химическая реакция. Выделяемое электричество формирует протекающий между контактами ток. Показания высчитываются на основе серии замеров. Анализ продолжается до тех пор, пока значение тока не перестает меняться, до окончания реакции между химическим составом контрольной полосы и глюкозой.
В набор глюкометра входит измерительный прибор, тест-полоски и колющий инструмент со сменными ланцетами.
Нормы сахара в крови
Уровень сахара в крови меняется в течение дня. Зависит от приема лекарств, пищи и физической нагрузки. Нервное напряжение влияет на точность результата, поэтому важно оставаться спокойным в момент измерения. Рекомендуется измерять сахар глюкометром неоднократно в течение дня: до приема пищи и через 2 часа после.
Среднестатистические показатели нормы глюкозы:
- до еды — от 3,5 до 5,5 ммоль/л;
- после приема пищи — от 7 до 7,8 ммоль/л.
Если уровень сахара в крови слегка завышен, скорректируйте собственное питание, удалите из рациона вредные продукты, отрегулируйте собственный режим сна, и тем самым вернете уровень глюкозы в норму. Если уровень сахара в крови слегка понижен, скушайте сладкое.
Настройка и правила использования глюкометра
Для получения достоверного результата важно знать, как правильно измерять сахар глюкометром. Прежде чем измерять, важно правильно настроить. После первого включения задаются базовые параметры:
- Дата и время.
- Язык экранного меню.
- Единицы измерения. Устанавливается измерение в единицах ммоль/л.
- Установка границ нижней и верхней концентрации сахара. Какой лучше задать диапазон допустимых значений сахара, лучше проконсультироваться с лечащим врачом. Когда прибор определяет, что концентрация глюкозы выше или ниже установленных граничных уровней, то подается звуковой сигнал и выводится показатель на дисплей.
- Калибровка прибора. Большинство производителей включают в комплект специальную калибровочную жидкость с заданным уровнем сахара, который наносят на тест-полоску. После сверяют результат на дисплее со значением, которое дает инструкция по эксплуатации прибора.
Правильная настройка, перед тем как измерять глюкометром, дает преимущество получать достоверные результаты измерений в будущем.
Правила при использовании глюкометра
С этим прибором в домашних условиях справится каждый человек. Нюансы и отличия в отношении того, как пользоваться глюкометром, указаны в инструкции к каждой конкретной модели. Главное — наличие расходных материалов (тест-полосок) с действующим сроком годности. Испорченные изделия не дадут необходимой точности. Правила использования в различных моделях схожи:
- Встряхивание рукой для увеличения притока крови к пальцам;
- Тщательное мытье рук;
- Дезинфекция места прокола раствором антисептика;
- Дождаться, пока дезинфицирующий состав испарится;
- Вставка полоски в аппарат до упора;
- Прокол кончика пальца специальным скарификатором (ланцетом или ручкой-прокалывателем);
- Нанесение крови на тест-полоску;
- Дождаться появления результата на дисплее (5‒40 секунд);
- Извлечь использованную тест-полоску и утилизировать.
В фотометрический аппарат полоска вставляется с уже нанесенной кровью. В электрохимический помещается чистой.
Как измерить уровень сахара глюкометром?
Информация как правильно измерить сахар в крови глюкометром содержится в инструкции по применению. Измерение сахара глюкометром выглядит следующим образом:
- Достаньте тест-полоску и вставьте в глюкометр.
- С помощью ланцета проколите палец.
- Первая капля крови не используется для анализа.
- Вторую каплю наносят на тест-полоску, ориентируясь на специальные пометки.
- Дождитесь втягивания необходимого количества крови в индикатор и появления результатов измерения на экране глюкометра.
- Запишите показания.
Глюкометр доступен каждому. Приобрести прибор могут не только диабетики, но и люди, которые контролируют и поддерживают свое здоровье. Востребованные модели можно купить в Минске в магазинах «Польза» или на сайте polza-shop.by
210009 г. Витебск, пр-т Фрунзе, 71В
тел./факс +375 212 33-13-66
e-mail: voed@vitebsk.by
info@voedvit.by
Время работы диспансера
Понедельник—пятница: 07:00–20:00
Суббота: 08:00–16:12
Время приема врачей
Понедельник—пятница: 08:00–20:00
Суббота: 08:00–16:00
Время работы лаборатории
Понедельник—пятница: 07:30–20:00 (забор крови 8.00-10.00)
Время забора анализов
Понедельник—пятница: 08:00–10:00
Телефоны для записи на прием
Предварительная запись на приём к врачу по телефону
8-0212-33-13-64 (регистратура)
с 08:00 до 19:00 кроме выходных и праздничных дней.
Предварительная запись на УЗИ (платно) по телефону
8-0212-33-13-67 (касса)
с 13:00 до 16:00 кроме выходных и праздничных дней.
Приём пациентов осуществляется по направлениям из поликлиник.
При обращении пациентов без направления прием и обследования осуществляются платно.
При обращении пациентов в диспансер при себе иметь документ, удостоверяющий личность (паспорт).
Описание товара
Именно в таких ситуациях важны скрининговые мероприятия для выявления диабета. Наличие глюкометра в семье, где есть риск диабета, во многих странах давно уже стало нормой.
Глюкометр Bionime GM100 занимает лидирующие позиции на мировом рынке товаров для диабетиков. Удобство его использования и эталонная точность измерений (особенно на низких сахарах) – выше всяких похвал. Часто складывается ощущение, что этот продукт разработан людьми, которые сами больны диабетом – настолько он продуман и прост в обращении.
Bionime GM100 не требует введения кода для идентификации тестовой полоски, что в разы сокращает время проведения процедуры измерения. В течение всего 8 секунд Вы можете получить результат содержания глюкозы в крови, сопоставимый с лабораторными исследованиями. Глюкометр Bionime GM 100 – настоящая поликлиника на дому!
Прибор способен удержать в своей памяти до 150 измерений, а также рассчитать среднее значение уровня глюкозы в крови за последние 1, 7, 14, 30 или 90 дней.
Освоить последовательность действий при измерении будет под силу любому желающему — в комплектацию прибора входит очень подробная пошаговая инструкция по эксплуатации. При возникновении каких-либо сложностей с использованием глюкометра, можно проконсультироваться по телефону горячей линии Bionime 8(029) 258-54-05, где работают опытные специалисты с медицинским образованием.
Система определения глюкозы в крови Bionime GM100 – Ваша уверенность в завтрашнем дне!
Комплектация: Ланцетное устройство + Глюкометр GM 100 (чехол в комплект НЕ ВХОДИТ)
Особенности:
* Пожизненная гарантия;
*память: 150 измерений;
*прибор откалиброван по плазме крови;
* диапазон измерения 0,6 — 33,3 ммоль/л.
*время ожидания результата: 8 секунд;
* габаритные размеры: высота – 9,5 см, ширина – 4,4 см, толщина – 1,3 см.;
* вес глюкометра: 43 гр.
Купить Система контроля уровня глюкозы в крови Rightest GM 100 с принадлежностями (25)
Цена на Система контроля уровня глюкозы в крови Rightest GM 100 с принадлежностями (25)
Инструкция по применению для Система контроля уровня глюкозы в крови Rightest GM 100 с принадлежностями (25)
Заказать с доставкой Система контроля уровня глюкозы в крови Rightest GM 100 с принадлежностями (25) на дом