
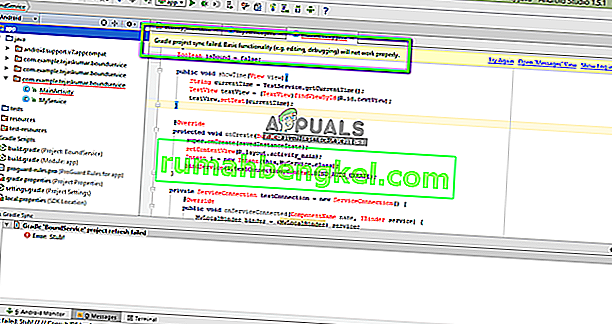
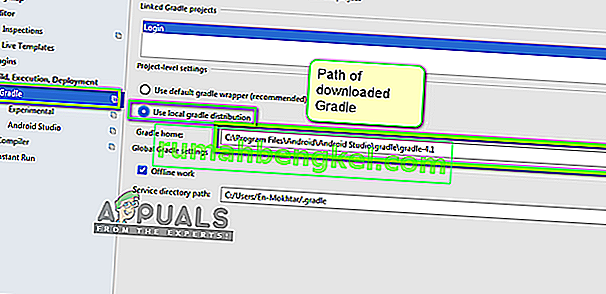
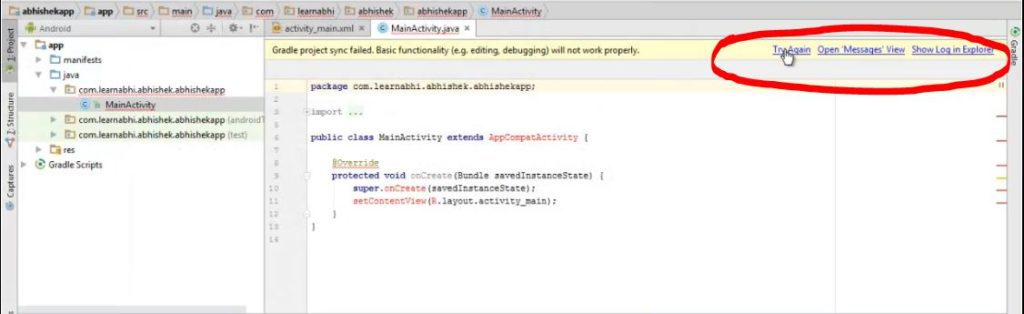
When I started up my project this morning it randomly gave me a message saying Gradle project sync failed. Basic Functionality(eg. editing, debugging) will not work properly. in Android Studio. I looked at other answers that people had put up for this problem but they haven’t been working. I invalidated my chaches/restarted my project but no luck. I also deleted my .gradle folder from my project folder and still no luck. If any of you guys could help me that would be awesome! This didn’t happen yesterday when I was working on the project or anything, I wonder why its happening now. Oh yea it also says this as a gradle message: Error:C:UsersDave.gradlecaches2.2.1scriptssettings_ad4t0wp5ikihzl1y1o83b5sbwSettingsScriptbuildscriptcache.properties (The system cannot find the file specified) :
Thanks again for anyone who reads this/ can help!
![]()
ZaidRehman
1,5712 gold badges18 silver badges29 bronze badges
asked Apr 5, 2015 at 16:38
![]()
3
There is a file — «cache.properties» that gradle creates for you, upon first time inception of any project. The path for this file is «~Home_Directory.gradle2.2.1taskArtifacts». You may find this path in your home directory. So basically, this file — «cache.properties» is missing from the «taskArtifacts» folder.
One of the solution that worked for me is to copy file — «cache.properties» from any test project of yours to this project that’s currently experiencing an issue.
Regards
answered Jul 3, 2015 at 8:16
![]()
HamitHamit
9066 silver badges6 bronze badges
I had to choose using the Default Gradle Wrapper instead of local.
<< SETTINGS —>/ BUILD TOOLS —> Gradle —> radio button switch… >>
It has helped me to fix the same problem.
answered Sep 20, 2015 at 7:49
![]()
I had experience similar sync failed problem with gradle based android project (in Android Studio 1.1.0). I solved this problem without deleting .gradle from my user directory,
steps I followed was
-
Go to File -> Settings -> Compiler(Gradle Based Android Project)
-
Change VM options to
-Xmx512m -XX:MaxPermSize=512m. -
Click Apply -> OK and then tap on
Try Againoption in sync failed message to clean build the project.
Works like charm!!
UPDATE — 1 : For Android Studio 1.3, Compiler option mentioned in above Step-1 is present inside tab Build, Execution, Deployment.
answered Apr 6, 2015 at 12:19
![]()
Amrit Pal SinghAmrit Pal Singh
7,0787 gold badges39 silver badges50 bronze badges
2
I had faced similar kind of problem earlier!
But don`t know after rebuild the project and cleaning it, it worked normally.
answered Apr 5, 2015 at 16:51
![]()
Ziaridoy20Ziaridoy20
291 silver badge3 bronze badges
Invalidate dependency cache by running
gradle clean build --refresh-dependencies
from project root and then re-import your project. Worked for me once.
answered Apr 5, 2015 at 16:56
![]()
mushfek0001mushfek0001
3,8051 gold badge20 silver badges20 bronze badges
1
May be you have put Android Studio into offline mode. To fix it, go to Preferences -> Gradle and ensure that the «Offline work» checkbox is not checked.
Than do
- File -> Invalidate caches / Restart
- Shutdown Android Studio
- Rename/remove .gradle folder in the user home directory
- Restart Android Studio let it download all the Gradle stuff it needs
android studio 0.4.2: Gradle project sync failed error
![]()
answered Jun 5, 2015 at 6:37
![]()
Naveen rajNaveen raj
88110 silver badges18 bronze badges
Delete the folder C:Users.gradle and reopening the android studio solved my problem
answered Jan 24, 2016 at 18:40
![]()
arun-rarun-r
3,0662 gold badges22 silver badges20 bronze badges
In this article, we will see how to fix the error: “Gradle project sync failed. Please fix your project and try again” in Android Studio”. Before getting into the solution part, let’s discuss Gradle.
What is Gradle?
Gradle is an open-source build automation tool that automates the creation of applications. The various steps involved in creating an application are compiling, linking, packaging the code. This process becomes much easier and convenient with the help of build automation tools like Gradle.
Why is Gradle used in Android Studio?
Gradle is used in Android Studio to develop the .APK files which are non-other than the Apps on our mobile phones. The Gradle combines all the Java and XML files into dex files and with the help of its tools produces an APK file.
What does the error, Gradle project sync failed Please fix your project and try again” in Android Studio mean?
Gradle sync is one of the Gradle tasks which checks for all the dependencies present in the build. Gradle files. It then downloads all the specified versions online. Here the meaning of error is that the Gradle sync has not functioned properly i.e it has not downloaded all the required files for the project due to various reasons as discussed below.
Why does Gradle Project Sync Fail?
There are various reasons as to why Gradle Project Sync can Fail to compile or build the project files. Some of the reasons are listed below:
- Lack of good internet connection: Gradle’s job is to install all the missing versions and packages online which are required for compiling the project, Hence it won’t be able to download in case of a bad internet connection
- Problems in Gradle Compilation: Sometimes there might be issues in the Gradle Compiler, In that case, we have to take the extra effort to download and load the Gradle manually
- Missing Files: There is a chance of Gradle files getting misplaced. This can be solved by re-installing the required files.
- Using the Proxy Servers: There was an issue with the syncing of the Gradle when Proxy Servers were turned on. Disabling it can help
- Cache Memory: Android Studio uses Cache memory for fast and smooth usage of the app. Sometimes the cache gets corrupted due to which Gradle sync fails.
How to Fix the Error?
Method 1. Check your Internet Connectivity
Gradle Sync requires a stable internet connection for downloading various versions required for the project online. Hence it is always advised to check your internet connection before syncing your project in Android Studio.
Method 2. Disabling the Proxy Server
Nowadays, there is an increase in the usage of the ProxyServer’s all around the world. It is basically used to increase the speed of the network and save on the network bandwidth. Usage of such ProxyServers can affect the Gradle sync. Hence it is better to disable the proxy server while syncing the Gradle. You can also make sure whether you are using a ProxyServer in the following way.
Step 1: Press Windows+R and type inetcpl.cpl
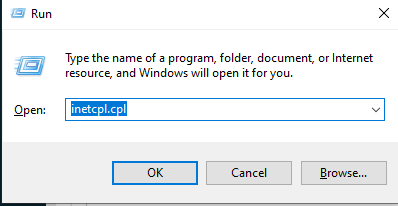
Windows + R
Step 2: You will observe a window displaying Internet Properties. Here click on the Connections tab present at the top.
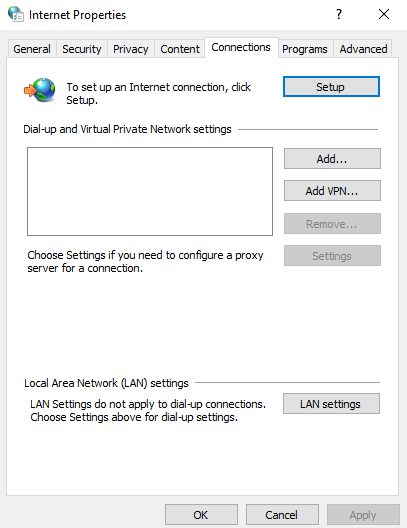
Internet Properties
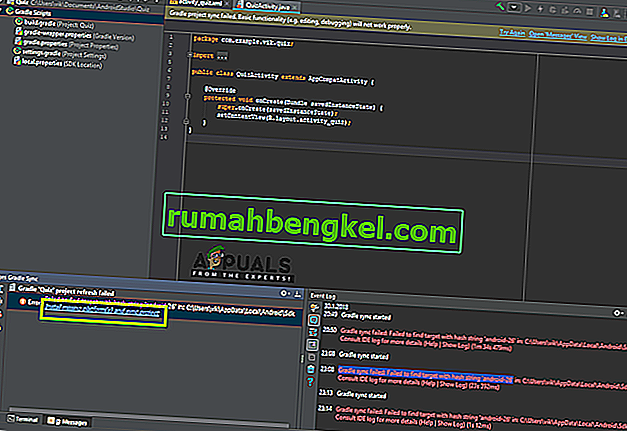
Step 3: Now press on the LAN settings, A LAN network settings window will be opened.
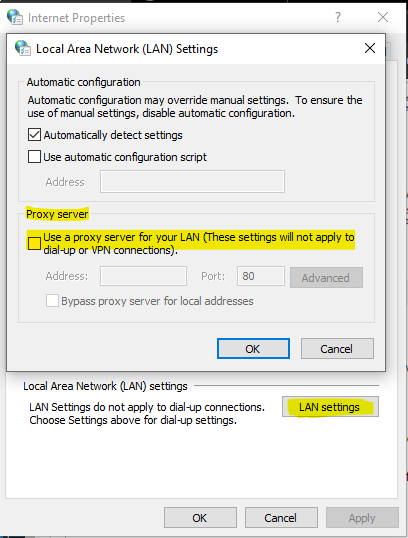
LAN Settings
Step 4: Then under the proxy server settings, uncheck the box saying “Use a proxy server for your LAN” if you have checked it. This will Disable the ProxyServer. Now you can verify if the issues have been resolved.
Method 3. Invalidating the Cache Files/Restart
A cache is a temporary storage that is used to store the temporary data for accessing it quickly. Even Android Studio stores the cache for faster and smoother running of the app. However, there are instances where the cache can go corrupt, which can hinder the Gradle Sync Process. In order to solve this, we will delete or refresh all the cache in Android Studio in the following way.
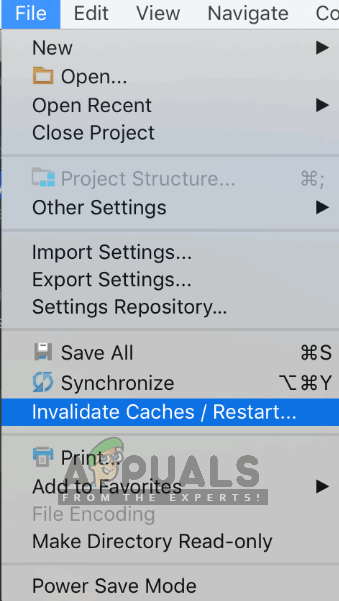
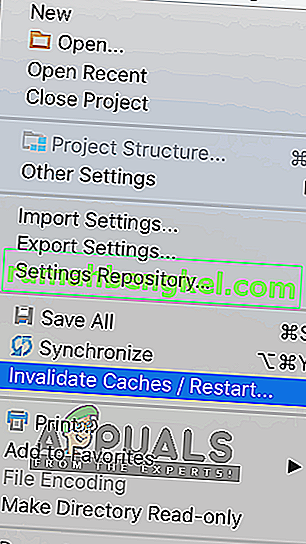
- Step 1. Firstly, we have to open Android Studio and go to the File > Press Invalidate Caches/Restart.
- Step 2. Then wait for the process to complete which will be done in around 5 mins.
- Step 3. Now, Restart Android Studio and check if the error still persists.
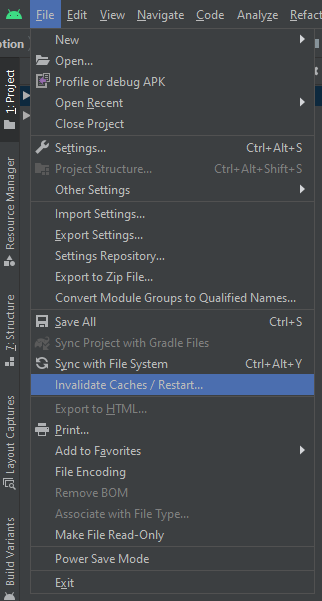
Invalidating the Cache
Method 4. Downloading a new version of Gradle Files
Every time a project is created, Gradle downloads the required versions and modules from the online distributions. However, sometimes there may be an issue with online distribution. To solve it is advised to download the Gradle distribution again manually. Here are the steps you can follow for downloading the files manually.
- Step 1. Visit the official Gradle website and download the latest version of Gradle
- Step 2. Now unzip the Gradle Files and place them in a Folder.
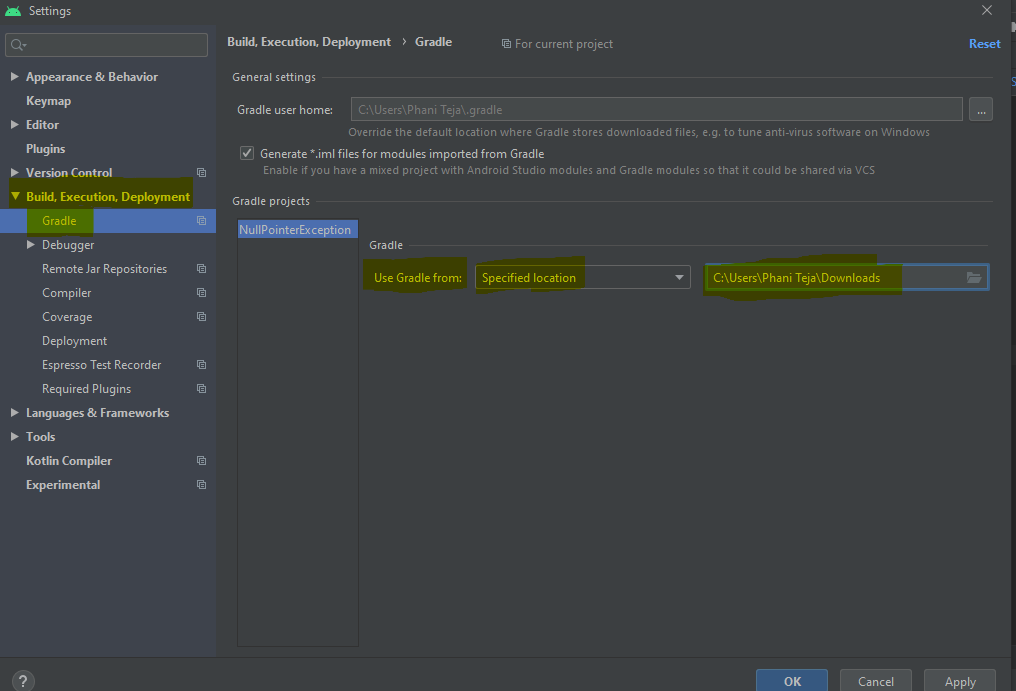
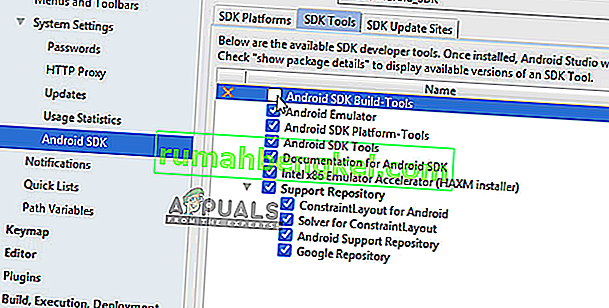
- Step 3. Then open Android Studio and go to File > Settings > Build, Execution and Deployment > Gradle > Use Gradle from > Set the path of the downloaded Gradle.
- Step 4. Now try syncing the Gradle again and check if the error still persists.
Loading the Gradle manually
Method 5. Updating Packages in SDK Manager
Updating the packages present in SDK Manager can solve the problem.
- Step 1. Open SDK Manager in Android Studio i.e: Tools > SDK Manager > Android SDK
- Step 2. Now check the “-” sign beside any package and click OK to install the required packages
- Step 3. Then Reload the android studio and start syncing the Gradle and check whether the error is resolved
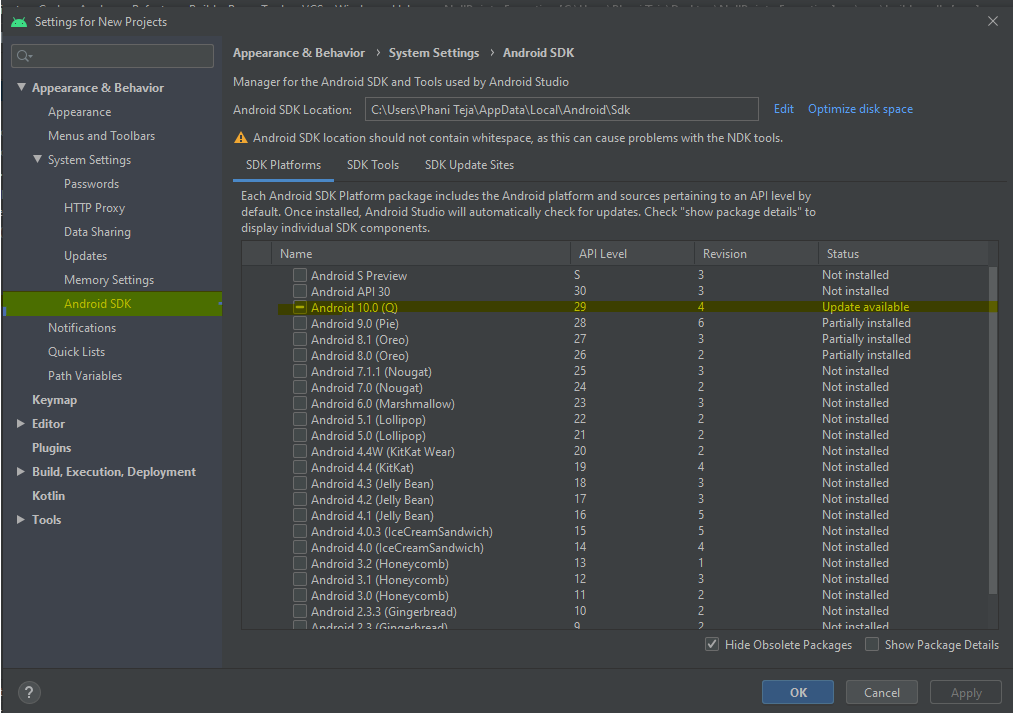
Downloading the Required SDK Packages
Hence In this way, you can fix the “Error running android: Gradle project sync failed. Please fix your project and try again” in Android Studio.
Last Updated :
15 May, 2021
Like Article
Save Article
Programmers using the IDE Android Studio experience the error message “Gradle Project Sync Failed” when they are compiling their code or running it on their Android device (either real or emulated). Gradle Sync is a Gradle task who’s main function is to check all the dependencies in your build.gradle files which are associated with your Android studio project and then download that specified version (if not downloaded already).

There are many variations in which this error message might occur. You might be facing something as simple as an internet connection to complex issues where your gradle compilation isn’t working. In this article, we will go through all the causes as to why this issue occurs and then move on to the solutions.
What causes the error message “Gradle Project Sync Failed” in Android Studio?
Like mentioned before, there are several reasons as to why your Gradle project might fail to compile or sync. Here are some of the causes (each one of them might not be applicable to you):
- Bad internet connection: Since Gradle downloads all the missing versions which are required to run your project, it might fail if you don’t have a valid internet connection.
- Issues in Gradle compiler: There might be cases where your Gradle compiler is not working properly. Here we can manually try to load Gradle and see if this does the trick for you.
- Bad cache in Android Studio: Android Studio makes use of cache in your computer in order to work properly. In some cases, it might get corrupt and cause issues in several modules (including Gradle).
- Missing files: There might also be missing files which are required to run Gradle. Installing them solves the issue instantly.
- Proxy servers: Even though proxy servers are becoming increasingly popular, we saw some cases where Gradle wasn’t syncing on them properly. Disabling the proxy server resolves the issue.
Before we start with the solutions, make sure that you have a backup of your current project. Save the file and make a copy elsewhere as well just in case. Also, make sure that you are logged in as an administrator on your computer.
Solution 1: Checking Internet Connection
Gradle requires that you have a working internet connection on your computer. As its main job is to download all the required versions from the internet which are missing on your computer, it is mandatory to have a proper internet connection. You also check the connection by trying to connect other devices to the same network. Once you are absolutely sure that this isn’t the problem, you can move to other solutions.
Solution 2: Disabling Proxy Server
Proxy servers are getting common day by day where they are used in organizations and other institutes to boost the current bandwidth and provide better internet access to all the users. However, proxy servers have their limitations. One of them include issues where syncing modules don’t work as required. This includes Gradle as well. Here is the method to make sure that you are not using a proxy server.
- Press Windows + R, type “inetcpl.cpl” in the dialogue box and press Enter.
- Now Internet Properties will be opened. Click on the tab Connections and then LAN settings.
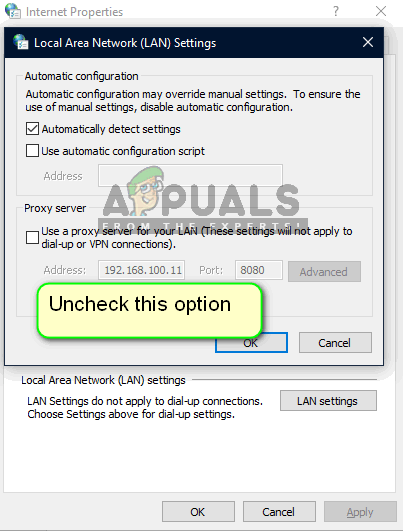
- Now if you are using a proxy server, the field will be checked with the details inside. Uncheck any proxy servers if enabled. Now restart the Android Studio and check if the issue is resolved.
Solution 3: Installing Missing Components
Before we indulge in more technical methods, you should check if you have some modules missing which are necessary for syncing Gradle. Gradle isn’t standalone itself and it requires other services as well to perform properly.
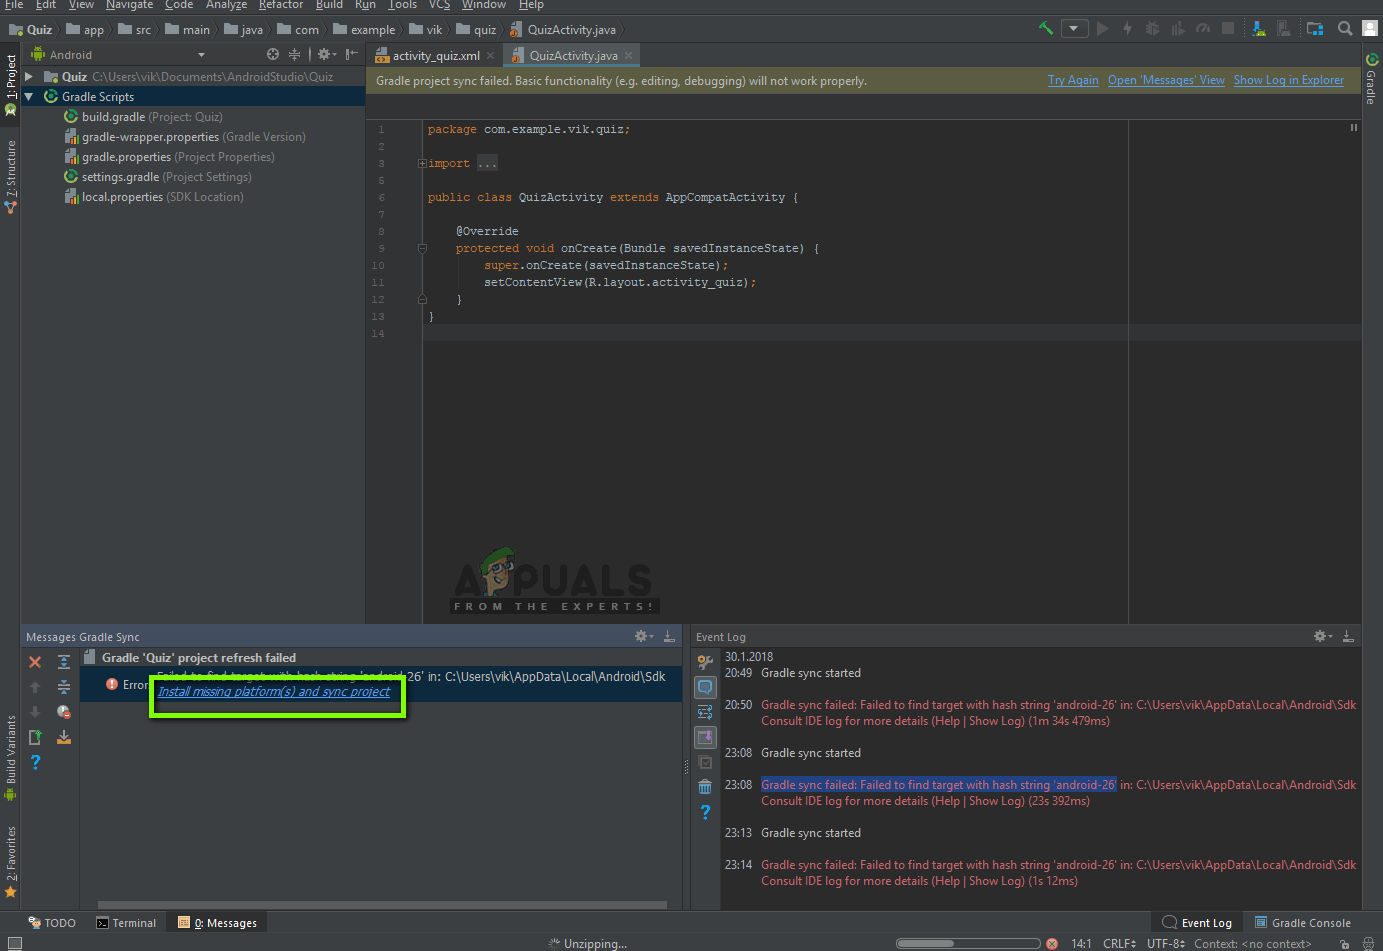
Now whenever you try to sync Gradle and the error message appears, check if there is any hyperlink underneath the issue with the heading Install missing platform(s) and sync project. After clicking the link, Android Studio will start the download process and install everything which is missing. Try syncing your project now and see if this solves the issue.
Solution 4: Utilizing Local Gradle Distribution
Whenever you build your project and Gradle gets activated, it connects to an online distribution which is latest and downloads all the required modules or versions from there. We came across several cases where the online distribution was not working as expected and failed the Gradle sync. Another workaround to this issue is to download the Gradle distribution manually and make use of that. Follow the steps below:
- Download the latest version of Gradle from the official Gradle Release Website.
- After downloading, extract all the files to an accessible folder.
- Now launch Android Studio and go to File > Settings > Build, Execution, Deployment > Gradle.
- Now select the option of Local Gradle Distribution. Also, when in the Gradle home, point to the path where you just extracted the files.
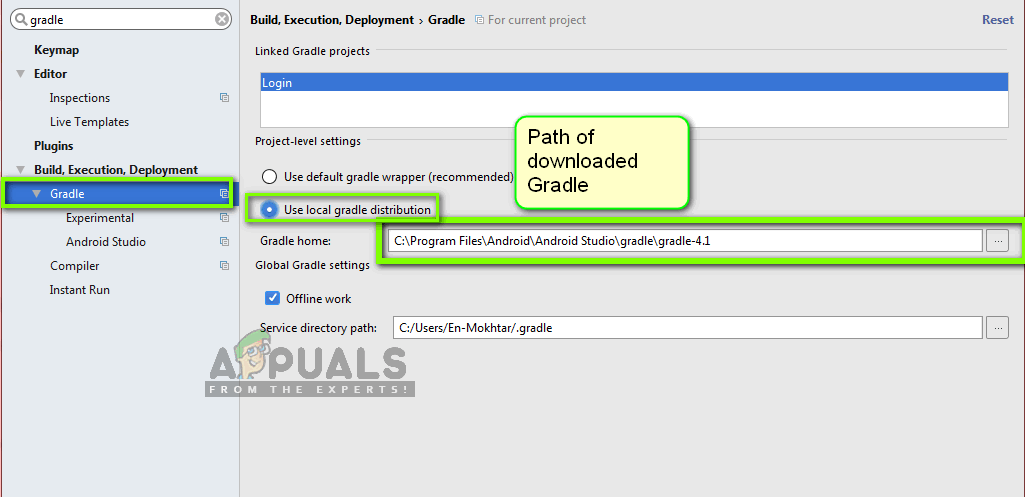
Note: If you are using offline work in the Global Gradle Settings, uncheck that option.
- Now try building your project and check if Gradle syncs properly. You would have to repeat these steps every time you create a new project.
Solution 5: Enabling GPU Debugger
The GPU Debugger enables you to debug and analyze OpenGL ES applications. It has several functionalities where it lets you inspect the GPU state and also understand what caused a rendering outcome. In some Gradle build instances, there is some bug in the system where this is not enabled. In this solution, we will force the modules to refresh and install this component.
- Click on Tools and then select Android > SDK Manager.
- Now click on the tab of SDK Tools and then uncheck the option of Android SDK Build-Tools. After waiting for around 5 seconds, enable the option again.
- Now, wait a little while until the list is refreshed and items are populated.
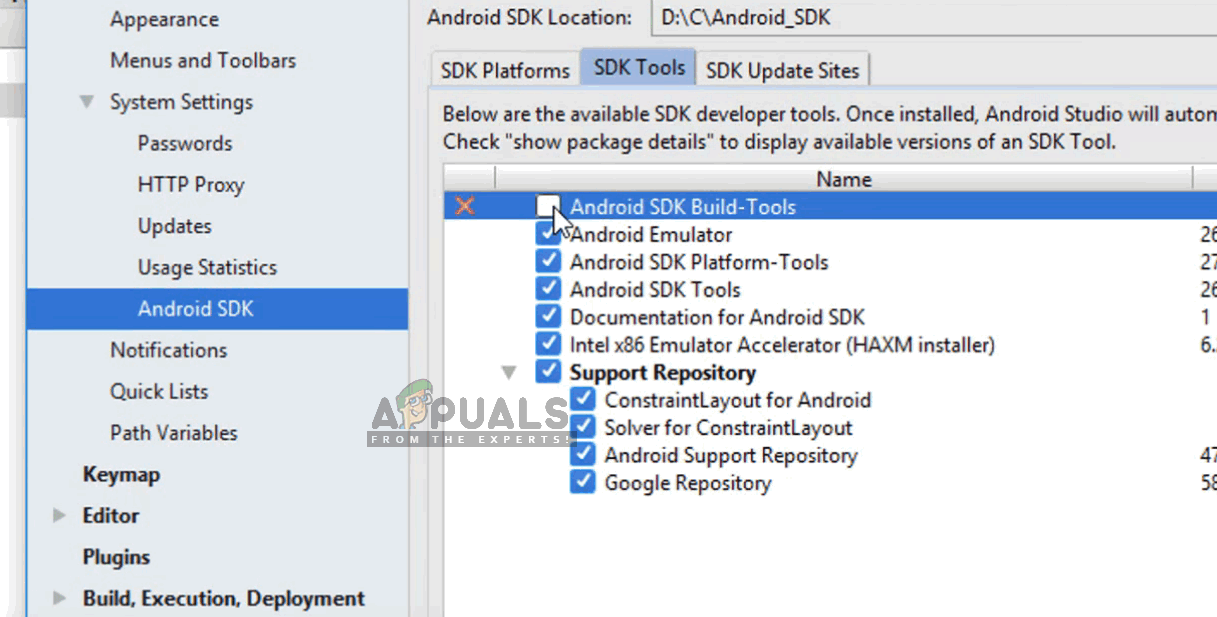
- Once new items are populated, look at the list and check the option of GPU Debugging Tools. Press OK when you are done.
Now, these tools will be downloaded into your Android Studio application and you will be able to sync the Gradle properly without any issues.
Solution 6: Refreshing the Cache
Every application including Microsoft Windows has cache’s everywhere to help the application in running smoothly without any issues. They serve as temporary storage where the application stores preferences or temporary data to pick up later on. We determined that this cache, if corrupt, will halt the gradle build process. In this solution, we will refresh the entire cache and after deleting the existing Gradle files, restart Android Studio and see if this fixes the issue.
- Navigate to File and click Invalidate cache/Restart.

Invalidate cache/Restart - Now after the process is done, shut Android Studio down completely.
- Navigate to the .gradle folder in your Android Studio installation directory. Now you can either cut/paste it to some other location or simply rename it.
Now when Android studio tries to access the Gradle files, it will see that there are none present and it will attempt at downloading the entire thing again. - Restart your Android Studio and try Gradle sync again. Now check if the issue is resolved.

Kevin Arrows
Kevin Arrows is a highly experienced and knowledgeable technology specialist with over a decade of industry experience. He holds a Microsoft Certified Technology Specialist (MCTS) certification and has a deep passion for staying up-to-date on the latest tech developments. Kevin has written extensively on a wide range of tech-related topics, showcasing his expertise and knowledge in areas such as software development, cybersecurity, and cloud computing. His contributions to the tech field have been widely recognized and respected by his peers, and he is highly regarded for his ability to explain complex technical concepts in a clear and concise manner.
Программисты, использующие IDE Android Studio, сталкиваются с сообщением об ошибке « Gradle Project Sync Failed », когда они компилируют свой код или запускают его на своем устройстве Android (реальном или эмулированном). Gradle Sync — это задача Gradle, основная функция которой — проверить все зависимости в ваших файлах build.gradle, которые связаны с вашим проектом студии Android, а затем загрузить эту указанную версию (если она еще не загружена).
Это сообщение об ошибке может появляться во многих вариантах. Возможно, вы столкнетесь с чем-то настолько простым, как подключение к Интернету, со сложными проблемами, когда ваша компиляция gradle не работает. В этой статье мы рассмотрим все причины возникновения этой проблемы, а затем перейдем к решениям.
Что вызывает сообщение об ошибке «Ошибка синхронизации проекта Gradle» в Android Studio?
Как упоминалось ранее, существует несколько причин, по которым ваш проект Gradle может не компилироваться или синхронизироваться. Вот некоторые из причин (каждая из них может быть неприменима к вам):
- Плохое подключение к Интернету: поскольку Gradle загружает все недостающие версии, необходимые для запуска вашего проекта, он может выйти из строя, если у вас нет действующего подключения к Интернету.
- Проблемы с компилятором Gradle: могут быть случаи, когда ваш компилятор Gradle не работает должным образом. Здесь мы можем вручную попробовать загрузить Gradle и посмотреть, поможет ли это вам.
- Плохой кеш в Android Studio: Android Studio использует кеш на вашем компьютере для правильной работы. В некоторых случаях он может быть поврежден и вызвать проблемы в нескольких модулях (включая Gradle).
- Отсутствующие файлы: также могут отсутствовать файлы, необходимые для запуска Gradle. Их установка мгновенно решает проблему.
- Прокси-серверы: несмотря на то, что прокси-серверы становятся все более популярными, мы видели некоторые случаи, когда Gradle не синхронизировался с ними должным образом. Отключение прокси-сервера решает проблему.
Прежде чем мы начнем с решений, убедитесь, что у вас есть резервная копия вашего текущего проекта. Сохраните файл и сделайте копию в другом месте на всякий случай. Также убедитесь, что вы вошли в систему как администратор на своем компьютере.
Решение 1. Проверка подключения к Интернету
Gradle требует, чтобы на вашем компьютере было рабочее интернет-соединение. Поскольку его основная задача — загрузить из Интернета все необходимые версии, которые отсутствуют на вашем компьютере, необходимо иметь надлежащее подключение к Интернету. Вы также проверяете соединение, пытаясь подключить другие устройства к той же сети. Убедившись, что проблема не в этом, можно переходить к другим решениям.
Решение 2. Отключение прокси-сервера
Прокси-серверы становятся обычным явлением изо дня в день, когда они используются в организациях и других учреждениях для увеличения текущей пропускной способности и обеспечения лучшего доступа в Интернет для всех пользователей. Однако у прокси-серверов есть свои ограничения. Одна из них включает проблемы, при которых модули синхронизации не работают должным образом. Это также включает Gradle. Вот способ убедиться, что вы не используете прокси-сервер.
- Нажмите Windows + R, введите « inetcpl. cpl »в диалоговом окне и нажмите Enter.
- Теперь Интернет-ресурсы будут открыты. Щелкните вкладку « Подключения», а затем « Настройки локальной сети» .
- Теперь, если вы используете прокси-сервер, поле будет проверено с деталями внутри. Снимите флажки с любых прокси-серверов, если они включены. Теперь перезапустите Android Studio и проверьте, решена ли проблема.
Решение 3. Установка отсутствующих компонентов
Прежде чем мы перейдем к более техническим методам, вам следует проверить, отсутствуют ли у вас какие-либо модули, необходимые для синхронизации Gradle. Gradle сам по себе не является автономным, и для правильной работы ему требуются и другие службы.
Теперь всякий раз, когда вы пытаетесь синхронизировать Gradle и появляется сообщение об ошибке, проверьте, есть ли какая-либо гиперссылка под проблемой с заголовком « Установить недостающие платформы и синхронизировать проект» . После нажатия на ссылку Android Studio начнет процесс загрузки и установит все, чего не хватает. Попробуйте синхронизировать свой проект сейчас и посмотрите, решит ли это проблему.
Решение 4. Использование локального распределения Gradle
Каждый раз, когда вы создаете свой проект и активируется Gradle, он подключается к онлайн-дистрибутиву, который является последним, и загружает оттуда все необходимые модули или версии. Мы столкнулись с несколькими случаями, когда онлайн-распространение не работало должным образом и не выполнялось синхронизация Gradle. Еще один способ решения этой проблемы — загрузить дистрибутив Gradle вручную и использовать его. Следуйте инструкциям ниже:
- Загрузите последнюю версию Gradle с официального веб-сайта Gradle Release.
- После загрузки распакуйте все файлы в доступную папку.
- Теперь запустите Android Studio и перейдите в Файл> Настройки> Сборка, Выполнение, Развертывание> Gradle .
- Теперь выберите опцию Local Gradle Distribution . Также, находясь в доме Gradle, укажите путь, по которому вы только что извлекли файлы.
Примечание. Если вы используете автономную работу в глобальных настройках Gradle, снимите этот флажок.
- Теперь попробуйте собрать свой проект и проверьте, правильно ли синхронизируется Gradle. Вам придется повторять эти шаги каждый раз, когда вы создаете новый проект.
Решение 5. Включение отладчика графического процессора
Отладчик GPU позволяет вам отлаживать и анализировать приложения OpenGL ES. У него есть несколько функций, позволяющих проверить состояние графического процессора, а также понять, что вызвало результат рендеринга. В некоторых экземплярах сборки Gradle в системе есть некоторая ошибка, когда это не включено. В этом решении мы заставим модули обновиться и установить этот компонент.
- Нажмите Инструменты, а затем выберите Android> SDK Manager .
- Теперь щелкните вкладку SDK Tools, а затем снимите флажок с Android SDK Build-Tools . Подождав около 5 секунд, снова включите опцию.
- Теперь подождите немного, пока список не обновится и элементы не будут заполнены.
- После того, как новые элементы будут заполнены, посмотрите список и отметьте опцию инструментов отладки графического процессора . По завершении нажмите ОК.
Теперь эти инструменты будут загружены в ваше приложение Android Studio, и вы сможете правильно синхронизировать Gradle без каких-либо проблем.
Решение 6. Обновление кеша
Каждое приложение, включая Microsoft Windows, имеет кеш повсюду, чтобы помочь приложению работать без проблем. Они служат в качестве временного хранилища, в котором приложение хранит настройки или временные данные, которые можно использовать позже. Мы определили, что этот кеш, если он поврежден, остановит процесс сборки gradle. В этом решении мы обновим весь кеш и после удаления существующих файлов Gradle перезапустим Android Studio и посмотрим, решит ли это проблему.
- Перейдите в раздел « Файл» и нажмите « Недействительный кеш / перезапуск» .

- Теперь, когда процесс будет завершен, полностью выключите Android Studio.
- Перейдите в папку .gradle в каталоге установки Android Studio. Теперь вы можете вырезать / вставить его в другое место или просто переименовать.
Теперь, когда студия Android пытается получить доступ к файлам Gradle, она увидит, что их нет, и попытается снова загрузить все это.
- Перезагрузите Android Studio и снова попробуйте синхронизацию Gradle. Теперь проверьте, решена ли проблема.
October 28, 2017
PC SOLUTIONS,
As an Android Developer, I believe Gradle Project Sync Failed error is the first error almost every developer get while creating their first project. If you are too one of them, then you are in right place. Here is the full error, “Gradle Project Sync Failed. Basic functionality (e.g. editing, debugging) will not work properly“.
How to fix Gradle Project Sync Failed error in Android Studio 2.3.3
Go to Tools
Select Android
From the list of options, select SDK Manager
A new window will open, select SDK Update Site Tab
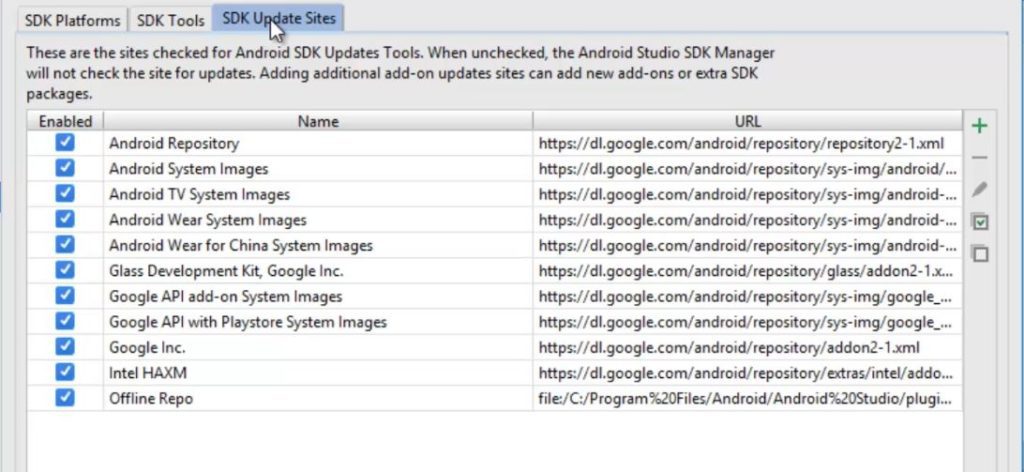
Disable and Re-enable Android Repository option. (Sometime, it may also show you red symbol error.)
Wait for few seconds until it complete the loading process
Once loading complete, click on Apply and OK.
Now, from the area you are able to see this gradle project sync failed error, click on Try Again
Bingo, its all done. You must see the error has been fixed successfully.
Here, is a video tutorial:
Gradle Project Sync Failed | Android Studio 2.3.3 | Fixed | 100% Working Solution 2017
SUBSCRIBE to my YouTube Channel TECHNICAL TECH, for more interesting videos
Found this post helpful, please let us know in the comment section below. We would love to here your feedback.