
401 – Unauthorized is the internet equivalent of a “Restricted Entry” sign at a posh nightclub. Sure, it may help you keep away some unsavory visitors. But it can also turn away legitimate customers while making you look like a snob.
Worse still, 401 errors are often caused by reasons that have nothing to do with the visitor, making them extra frustrating to encounter. But not to worry! Here are a few simple steps you can take as a website owner to troubleshoot the 401 error before it starts impacting your website’s trust.
What is the 401 Unauthorized Error?
The 401 Unauthorized error is an HTTP status code indicating that the client is not authorized access to the requested resource.
What that actually means: 401 – Unauthorized is an authentication error, which means that the web page you are trying to visit is password-protected, and you don’t have the correct permissions to access it. This can happen when the user enters a wrong password or when there’s a restriction on accessing the web page from the user’s geographic location.
Of course, 401 errors can also be false positives, meaning that the error can occur even when the visitor has the right credentials to log into a website. It may even occur when the web page isn’t supposed to be password-protected at all. For example, it can be caused by a jittery firewall, a troublesome plugin, or an uncooperative extension added to your website.
You may notice the 401 error as one of these messages popping up in your browser window:
- 401 Authorization Required
- 401 Unauthorized
- HTTP 401 Error – Unauthorized
- Access Denied
- HTTP Error 401

401 Unauthorized: Potential Causes of the HTTP Error Code
401 errors occur when a web browser has trouble authenticating the visitor’s login credentials with the website’s server. Here are a few common causes why that might happen:
- Error or typo in the website’s URL.
- Outdated cookies or browser cache.
- IP address restrictions on-site access.
- Errors in server configuration.
- Incompatible plugin or website theme.
- Incorrect login attempts by the user.
401 errors are normally client-side errors, meaning they can often be fixed by clearing your browser’s cookies or inputting the correct password. However, server-side issues like plugins and firewalls can also cause these errors, making it very important for site admins to be aware of potential conflicts.
But these are all surface-level explanations. If you want to know what causes a 401 error, you must understand how authentication works in web development.
When a client (i.e., a web browser) requests access to a protected resource on a website, the website will need the client to provide some form of valid authentication. These credentials could be in the form of API keys, a username and password, digital certificates, or something else — depending on the authentication scheme used by the site.
The website then processes the authentication credentials to verify their validity. This could involve checking the credentials against a stored database of users and passwords, contacting an external authentication provider, or performing some other form of validation.
If the authentication is successful, it returns a 200 status code, and the website will generate a session token for the client. This identifies the authenticated client and tracks the client’s interactions within the website. The session token is often stored in a cookie in the client’s browser or as a header in any subsequent requests.
However, if the authentication is unsuccessful, the website will return an HTTP error message, such as the 401 error code. The 401 error message typically includes a WWW-Authenticate header, which explains how to authenticate with the server in the user’s browser. This header can include more context about the 401 error, such as the type of authentication required (e.g. Basic, Digest, or OAuth).
How to Diagnose the 401 Error as a User or Administrator
401 access control errors are pretty common when logging into a membership site or accessing a protected web page. Luckily, they are also very easy to fix most of the time. Here are a few things you can do to address this error, both as a website visitor and a web administrator:
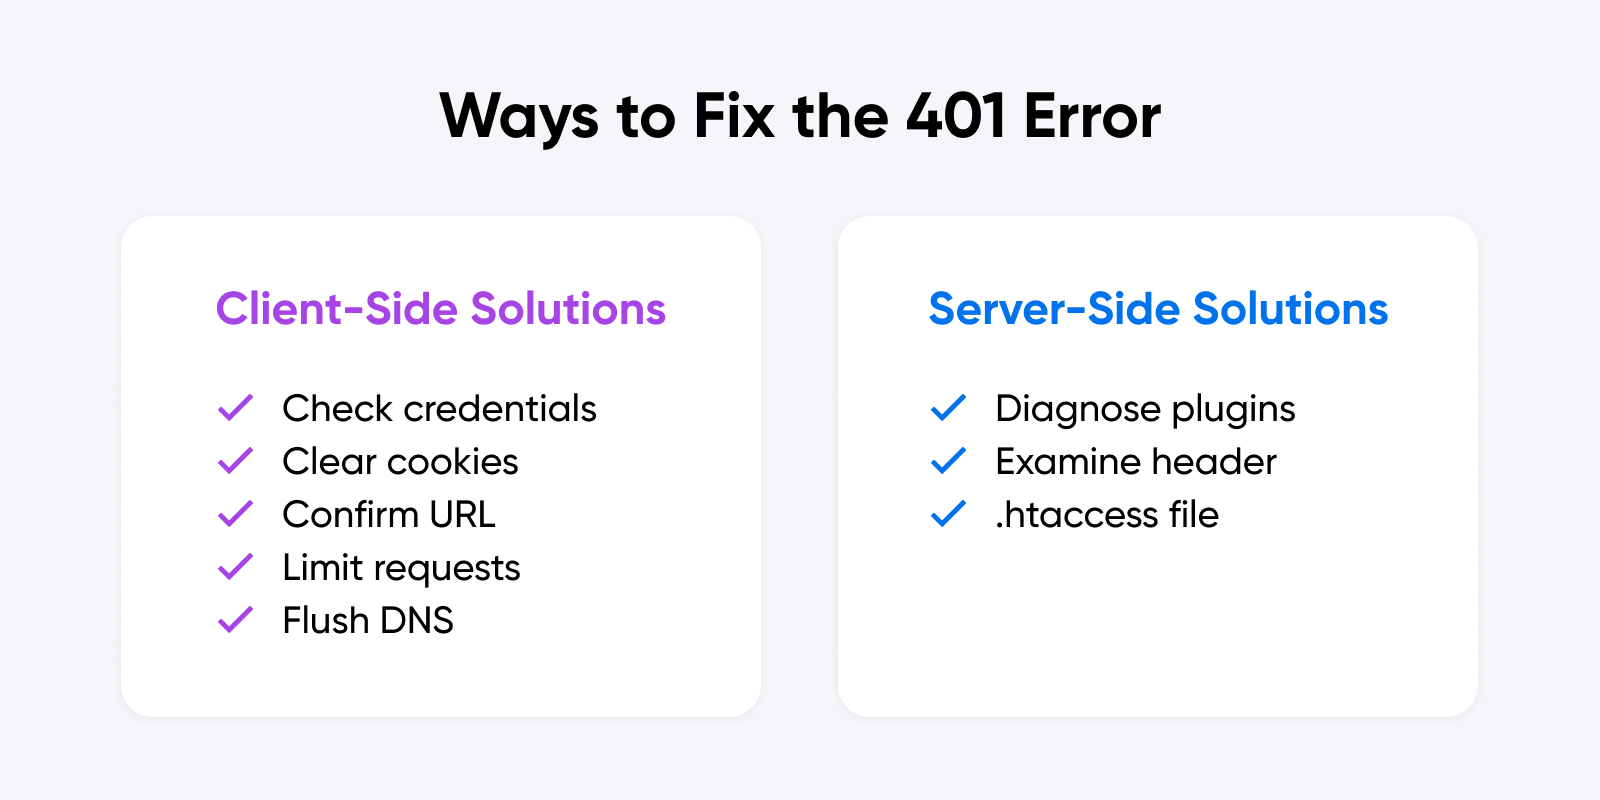
Client-Side Solutions
401 error pages are sometimes caused by client-side issues like login credentials or even the web browser used to access your website’s password protection system. These can be fixed with a few simple steps from the visitor’s end:
- Check User Credentials: Make sure you entered the correct username and password combination. Double-check your authentication credentials for the slightest typo. Remember, usernames and passwords are case-sensitive.
- Clear Browser Cookies: If the website uses cookies for authentication, the error may be because of invalid or expired cookies. Normally, cookies have an expiration date or just expire when the browser is closed. If you’re having trouble accessing a website, clear browsing data by following the instructions for your specific web browser to help solve the issue.
Cookies
Cookies are pieces of data sent to a user’s computer or mobile device by a web server. They are then stored on the user’s device. Cookies can be used for authentication, identification of a user session, personalization of web content, or collecting information about the use of a website.
Read More
- Verify URL: Make sure the URL you’re trying to access is correct and up-to-date. Otherwise, the DNS server may not be able to find the website and instead return the 401 error. If you’re following a link from another website, it’s quite possible that the link is using the wrong URL.
- Rate Limiting: If the website server is rate limiting requests from the same IP address, this can lead to a 401 Unauthorized Error. Make sure that you don’t exceed the number of login requests allowed by the server. The limit is often indicated in the login form.

DNS Flushing
What is DNS?
The Domain Name System (DNS) protocol keeps records of which domain names correspond to specific IP addresses. This system enables you to browse the web by typing in regular URLs instead of IP addresses.
Read More
DNS Caches help improve loading speed and website performance when browsing the internet, but they can sometimes become corrupted and result in an authorization error when accessing specific web pages. Fixing this is as easy as flushing (clearing) your DNS server, which can be done a few different ways:
Windows: To flush your DNS on Windows 10/11, follow these steps:
- Open the Command Prompt by pressing Windows+R and typing “̌cmd” (without quotes) into the Run dialog box.
- Now type in the command “ipconfig/flushdns” inside Command Prompt.
- If you are a Windows PowerShell user, you can do this by opening PowerShell and typing in “Clear-DnsClientCache” (without quotes).
- This will flush the DNS and clear all the records from the local DNS cache.
MacOS: If you’re using a Macbook or iMac, you can flush your DNS cache using Terminal.
- Open Terminal on your Mac by using Spotlight Search or pressing Command+Space and typing Terminal into the search box.
- Inside Terminal, type in “sudo dscacheutil -flushcache;sudo killall -HUP mDNSResponder” (without quotes).
- Your DNS cache has now been flushed on your Apple computer.
Google Chrome: If you’re using Google Chrome, the browser has its own DNS cache that’s independent of the Operating System (Windows or Mac). To clear Chrome’s DNS cache:
- Type “chrome://net-internals/#dns” into the address bar.
- Now, click on the “Clear host cache” button to clear your DNS records.
WordPress Plugins
Plugins are a staple for WordPress websites, but they can sometimes also cause errors if configured improperly. This can happen when the plugin contains code that creates a website security issue or conflicts with the platform’s core functionality.
So, what can a site admin do to fix this issue? Well, the first step is to identify which plugin or plugins are causing the issue. Usually, this can be done by disabling each plugin one-by-one and checking if the error still appears. Once the plugin causing the issue is identified, you can either update, reconfigure, or permanently remove it. Common culprits may include:
- CDN services like Cloudflare and KeyCDN.
- Web firewalls like Sucuri and Wordfence.
- Poorly built WordPress themes.
Follow these simple steps to enable or disable plugins on your WordPress site:
- First, log in to your WordPress dashboard.
- Click on the “Plugins” option in the left-hand menu.
- Find the plugin you want to enable or disable and click on the “Activate” or “Deactivate” button below the plugin name.
- If you want to disable multiple plugins at once, check the box next to each plugin and select “Deactivate” from the “Bulk Actions” drop-down menu.
- If you want to enable multiple plugins at once, check the box next to each plugin and select “Activate” from the “Bulk Actions” drop-down menu.
In some cases, it is also possible to fix the issue by disabling or reconfiguring specific settings within a plugin. For example, if your website uses a caching plugin, it’s worth trying to clear the cache and check if the error still appears.
WWW-Authenticate Header
In a few rare cases, 401 errors can result from a server error. You can find out more about this by looking at your WWW-Authenticate Header.
The WWW-Authenticate Header is a response header sent by the server that contains information on the authentication methods supported by the site. This header helps the user’s browser decide which authentication protocol to use when requesting data from the server.
The header is also used to send additional information about the authentication process. This may include the domain being protected by the authentication scheme, or the algorithm used by the server.
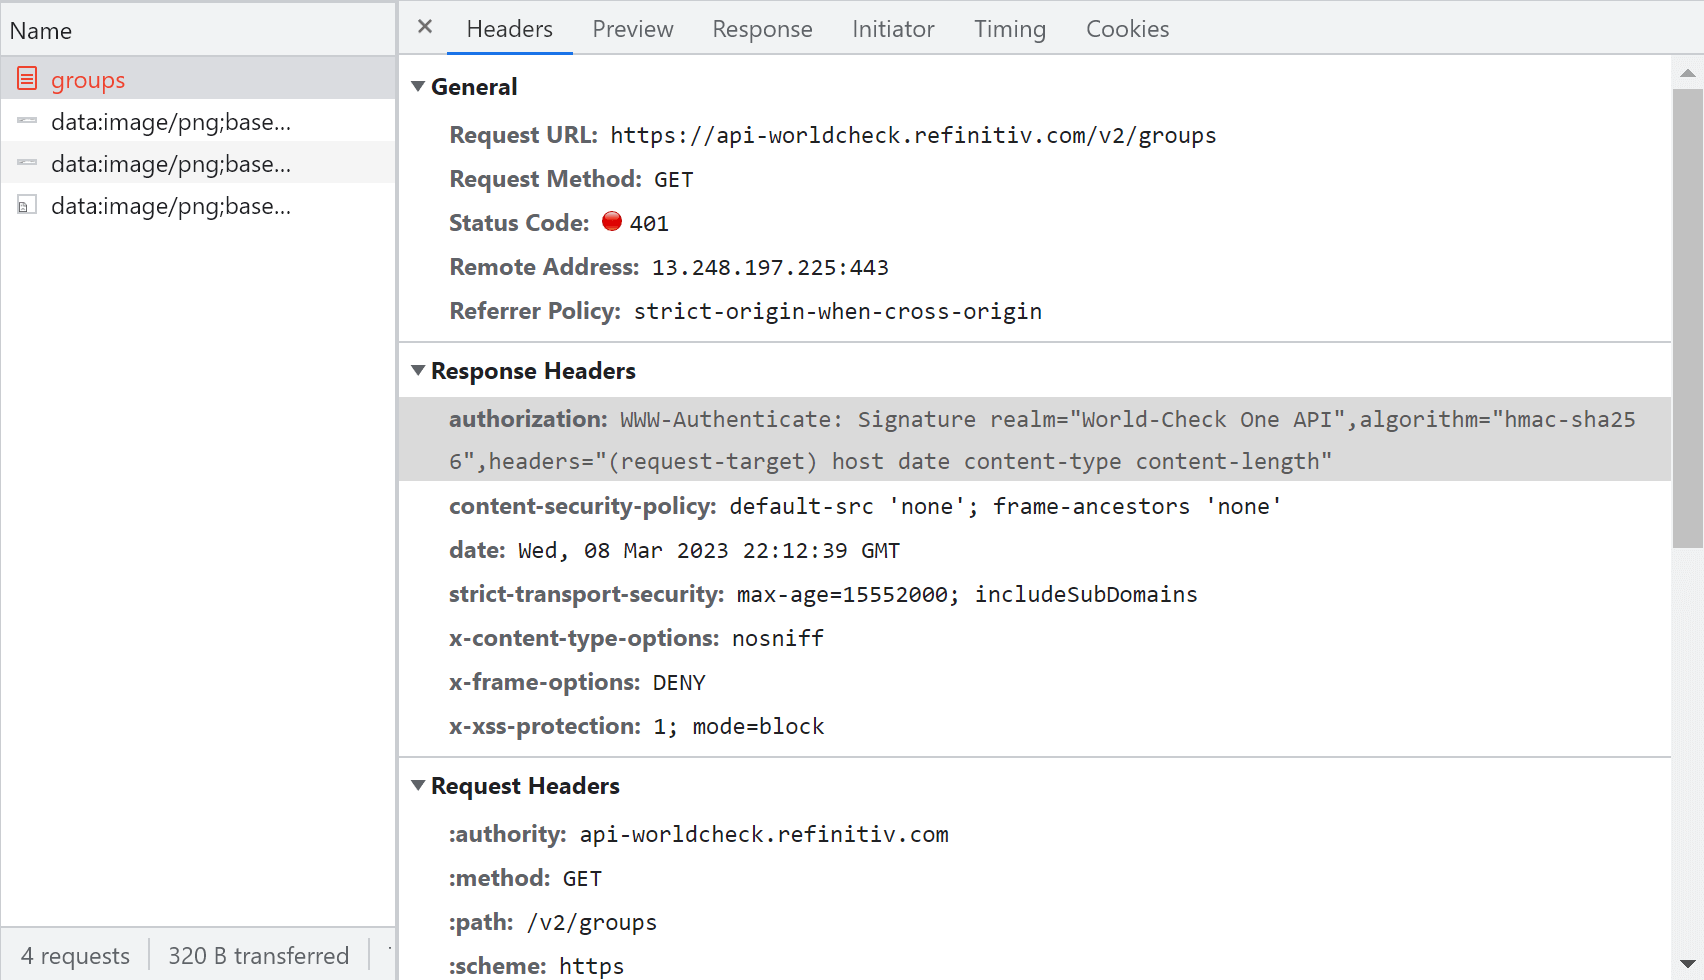
To check the WWW-Authenticate Header, open Chrome, navigate to the URL causing the 401 error, and right-click anywhere on the page. From the drop-down menu, select ‘Inspect’. This will bring up the Developer Tools window.
Select the Network tab once inside the Developer Tools window. Here, you’ll see all the requests the browser sends when loading the page. If the response from the server contains a WWW-Authenticate header, it will be visible in this tab.
By inspecting the WWW-Authenticate header, you can get a better understanding of the authentication process used by the server. Next, check that the response was sent and identify what authentication scheme was used to send it. That’ll help you narrow down the problem before looking for a specific solution. Here are a few authentication schemes found in the WWW-Authenticate Header, along with descriptions of how they work, for reference:
- Basic: This scheme uses a base64-encoded username and password separated by a colon. This is considered the least secure authentication method and should only be used over HTTPS.
- Digest: This scheme uses a challenge-response protocol to authenticate clients. The server sends a nonce value to the client, which the client uses to create a response based on the username, password, and request information.
- Bearer: This scheme is used for OAuth 2.0 authentication. The client receives a token from the server, which it uses to authenticate subsequent requests.
- Negotiate: This scheme is used for Kerberos authentication.
- AWS4-HMAC-SHA256: This authentication scheme is used to authenticate requests to Amazon Web Services (AWS) using an AWS access key and a secret access key.
- Token: This scheme is used to authenticate with a token-based system.
.htaccess File
If you’re experiencing a 401 error on your website, one possible cause could be an issue with your .htaccess file. The .htaccess file is a configuration file used by Apache web servers to control access to your website’s directories and files. Here’s how to check your .htaccess file for causes of a 401 error:
- Connect to your website’s server using an FTP client or file manager.
- Navigate to the directory where your .htaccess file is located. This is usually the root directory of your website.
- Download a copy of your .htaccess file to your computer.
- Open the .htaccess file in a text editor (like Notepad++) and look for any lines that specify access controls or authentication requirements. Specifically, you’ll want to look for the following parameters: AuthUserFile, AuthName, AuthType, and Require.
- Check that the access controls or authentication requirements specified in the .htaccess file match the settings you intend to use for your website. For example, if you have recently updated your website’s authentication mechanism (AuthType), you may need to update the corresponding settings in your .htaccess file as well.
- Save the changes to your .htaccess file and upload it back to your website’s server.
- Test your website to see if the 401 error has been resolved.
If You’re Still Having Trouble, It’s Time to Contact an Expert
HTTP response codes offer little context on their own, which makes them troublesome to navigate without the proper technical assistance. It’s part of the reason why DreamHost offers 24/7 support to help you troubleshoot downtime on your website and domain.
If you’re having trouble diagnosing or fixing a 401 error on your website, you can try contacting your hosting provider for support. It’s also possible to contract a technical expert, such as a web developer, for help with the issue.
401 errors can be jarring for the end user, but they are often an easy fix. If you’re contacted by someone unable to access your website due to this error, walk them through the common client-side solutions before looking into any potential server issues, such as WordPress plugins or the WWW-Authenticate header. If you’re still having trouble, you can always bring in some technical help to diagnose the issue.
Get Content Delivered Straight to Your Inbox
Subscribe to our blog and receive great content just like this delivered straight to your inbox.
OK, here is the 7th day of unsuccessfull attempt to find an answer why 401 error appears…
Now,
.htaccess in the root folder contains the only 3 strings (was simplified) and there are NO more .htaccess files in the project:
RewriteEngine On
RewriteCond %{HTTPS} !on
RewriteRule (.*) https://%{HTTP_HOST}%{REQUEST_URI}
So, it redirects all requests to be https. It works fine for any urls, even for /administration directory.
So,
http://mydomain.com
becomes
https://mydomain.com
If https://mydomain.com was entered, there are no redirections.
http://mydomain.com/administration/index.php
becomes
https://mydomain.com/administration/index.php
If https://mydomain.com/administration/index.php was entered, there are no redirections.
That’s clear, and the problem is below.
I want /administration directory to be password protected. My Shared Hosting Control Panel allows to protect directories without manual creating of .htaccess and .htpasswd (you choose a directory to protect, create username and password, and .htaccess and .htpasswd are created automatically). So, .htaccess appears in the /administration folder. .htpasswd appears somewhere else, the path to .htpasswd is correct, and everything looks correct (it works the same way as to create it manually). So, there are 2 .htaccess files in the project, one in the root directory and one in the /administration directory (with .htpasswd at the directory .htaccess knows where it is).
Once the password is created,
the results are:
You enter:
https://mydomain.com/administration/index.php
Then it asks to enter a password.
If you enter it correctly,
https://mydomain.com/administration/index.php is displayed.
The result: works perfect.
But, if you enter
http://mydomain.com/administration/index.php (yes, http, without S)
then instead of redirecting to the same,but https page,
it redirects to
https://mydomain.com/401.shtml (starts with httpS)
by unknown reason and even does NOT ask a password. Why?
I’ve contacted a customer support regarding this question and they are sure the problem is in .htaccess file, and they do not fix .htaccess files (that’s clear, they do not, I don’t mind).
Why does this happen?
Did I forget to put some flags, or some options to change default settings in the .htaccess file?
P.S.Creating .htaccess and .htpasswd manually (not from hosting Control Panel) for the folder /administration causes the same 401 error in case if not https, but http was entered.
And the problem appears with URLs to /administration directory only.
Thank you.
Occasionally, when you try to access a web page, you may stumble across the “401 Error Unauthorized Access”. Like other HTTP errors, there could be various causes. This article will outline the most common problems and how to fix them.
The HTTP status code “401 Unauthorized Access” is a client-side error, which indicates that the website’s server sends a “WWW-Authenticate” header response back to the visitor with a challenge. Since the visitor failed to provide valid authentication credentials for the target resource, access has been denied, and the error page has been loaded.
In other words, you get this error because you are trying to access a page protected by the server. The server requires the correct login details to grant you access. The exact error message may vary depending on your browser or the website’s hosting server. Other variations of the 401 error are:
- HTTP 401 Error – Unauthorized
- Access Denied
- Error 401 Unauthorized
- 401 Unauthorized
- 401 Authorization Required
Usually, when you visit a protected page, you will first see a login prompt. It will require a username and password.

To view the page, you need to provide the correct logins. If you cancel the prompt or provide incorrect credentials, you will see the message with the error. You can see an example of the error page below.

In many cases, the website owners intentionally protect the page’s URL with a password. They prefer that the page remains inaccessible for the general visitor until fully developed, or they want this page to be available to authorized users only.
What causes the “401 Error Unauthorized Access”?
Although the URL protection may be set by design, there are cases where the restriction is set unintentionally or caused by local issues from the visitor’s side. We will examine the most common causes below.
Expired browser cache or cookies
Modern browsers keep local cache and cookies in your device to improve the loading speed. However, if your browser’s cache is corrupted or expired, it may prevent you from accessing the page correctly, and the error “401 Unauthorized Access” may occur.
Incorrect URL
Another cause of the error page is an incorrect webpage URL. It may be an outdated page address or a misspelled URL.
Protected URL from the server
Many hosting providers offer the functionality to set password protection directly on the server. The login prompt may come from such protection specified in the hosting panel.
Plugin misconfiguration
Another common cause of restricted access is plugin functionality. For example, many security plugins for WordPress provide different options to limit or restrict access. If the plugin is misconfigured, it may prevent access by mistake or detect a legitimate visit as suspicious activity.
Restrictions in the .htaccess file of the site
Password protection may come from Apache directives in the website’s .htaccess file. The website owner may have set them previously and forgotten to remove them. The directives may have been added automatically by a plugin as well.
How to Fix the 401 Unauthorized Access?
Now that we listed the most common causes of the “401 Error Code”, we can explore the solutions.
Clear your browser cache and cookies
Corrupted and outdated browser cache and cookies can lead to unexpected behavior in your internet browsing. The “HTTP Error 401” is one of the possible results. Clearing your browser cache and cookies is recommended for troubleshooting the “401 Unauthorized” error as well as for most of the errors you encounter.
Below, you can see detailed instructions on how to clear the cache for various browsers and devices.
- How to clear cache and cookies in your browser?
- How to clear the cache in your iPhone or other iOS devices?
- How to clear the cache in your Android phone?
Clear your device’s DNS cache
Corrupted or outdated local DNS settings in your device are not a very common cause of the “401 HTTP Error”. Nonetheless, it is worth considering flushing the device’s DNS cache. Depending on the operating system (OS), the process is different.
For detailed instructions, check the following guides:
- How to flush the DNS cache in Windows?
- How to flush the DNS cache in Mac?
- How to flush the DNS cache in Linux?
Inspect the website URL
Carefully check the URL of the page in your browser’s address bar. You may see the “Error code 401” if you try to access an outdated or misspelled URL. It means that the URL is non-existent, and the server may return a server error “401 Unauthorized Access”.
Maybe you saved the page address in your browser, but the page address has been changed, or it has been deleted. To test further, open the website home page and check if there is a link to the page producing the “Unauthorized 401” error. If the page opens this way, check if the URL of the page is the same as the one that triggered the error.
Revise the web hosting’s security settings
If none of the solutions so far helped and you are the website owner, you may need to look closer into the security settings of the website. If you see the login prompt on the page and you don’t recognize it, the URL may be protected by the server.
To examine this possibility, open your hosting panel and check if there is a tool for setting password protection.
SiteGround users have the feature Protected URLs in Site Tools. For more information, read this guide on how to password-protect a URL.
To check its settings, open Site Tools for the website, navigate to the Security section, and open Protected URLs.
If the URL is protected, you will see it listed in the section Manage Protected URLs.

If this protection is not needed, you can delete it. Under the Actions column, select the Delete icon (trash bin). A popup will appear to confirm the action. Select Confirm to delete the URL protection.

If the protection was intended, but the logins are not accepted in the login prompt, you may have the wrong username or password. You can see the existing user for the protected URL in Manage Protection URLs under the column Users.
To make sure you have the correct user password, select the section USERS. In the USERS section, select the kebab menu under the column Actions. Select Change Password to reset the password.

Another possibility is that the protection was set with a user that was later deleted. The protection remains active, but since there is no existing user, the login prompt can not be completed.
When you open the section URLS in Protected URLs, there will be no assigned user.

To add a user to the URL, select the Manage Access button. You will see a popup window that allows you to add one of the existing users to the URL. Select the user from the drop-down menu Users and then press Confirm. If there is no existing user yet, you will be prompted to create one.

Reload the web page after the protection is deleted or the user and password are reset. The page should load properly if the protection is deleted. If you’ve kept the protection, test the user and password. After the logins are entered, you should load the page correctly.
Inspect the website’s .htaccess file
The hosting panel is not the only source of password protection. If it is not set in the hosting panel but the website still prompts a login, it may be forced by directives in its .htaccess file.
Perhaps you set the .htaccess code earlier, and you forgot about it, or it was added by a plugin.
To check if there are such directives, open the website’s folder from FTP or File Manager and inspect the .htaccess file.
SiteGround clients can use the respective Site Tools to review the .htaccess file. Navigate to the section Site and open File Manager.
In Site Tools, the root folder for your website is the website name/public_html. In our example, the website name is sg-testing.com. Hence, the root folder is sg-testing.com/public_html.
In this directory, find the file .htaccess, select it, and then choose Edit.

It will open the file in Editor mode and you can view the code.

In this example, the website’s protection is defined by the highlighted code:
AuthType Basic
AuthName "restricted area"
AuthUserFile /home/customer/www/sg-testing.com/public_html/.htpasswd
require valid-user
The protection’s login credentials are specified in the file .htpasswd. It contains the user name and the encrypted password.
If the protection is not intended, delete the code from the .htaccess file and confirm the changes with Save.
Deactivate the website’s security plugins
Another common cause of the error “401 Not Allowed” for WordPress sites is a misconfigured plugin. A security plugin may block visitors by mistake or force restrictions on specific pages.
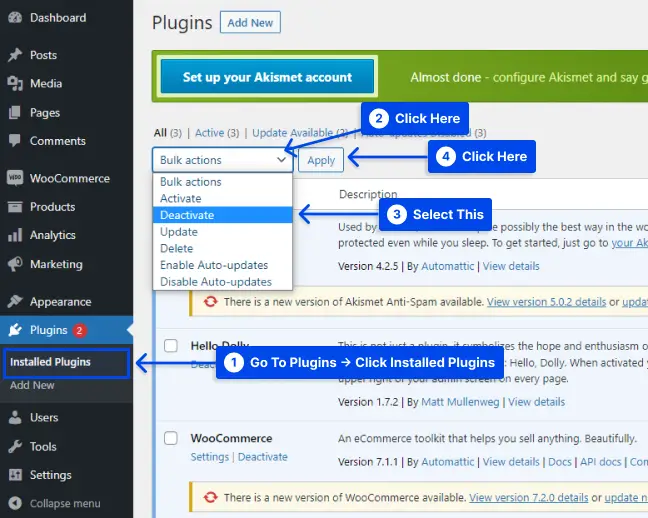
To troubleshoot, you may consider disabling the plugins. Open your WordPress site dashboard, go to the Plugins section, then select Installed Plugins.
Look at the plugins’ description to find out which of your plugins provide security features.

Check the box for the plugin you wish to disable, then select Deactivate from the drop-down menu and hit Apply.
Test again if the page showing the “401 Error” message will now load correctly.
Sometimes, an ongoing error may prevent access to the dashboard. In such cases, you can disable all plugins for the website from Site Tools or its database.
Read the guides below for detailed instructions.
- How to disable WordPress plugins from Site Tools?
- How to disable WordPress plugins from the database?
After the plugins are disabled, you should be able to access the dashboard and activate the plugins one by one. When you enable the culprit, the error will most likely return.
If a plugin was the cause of the “Unauthorized Error 401”, contact its support to report the error or replace it with an alternative one.
Summary
Fixing the 401 unauthorized error may require investigation, but it is important to note that it is related to the security and protection settings of the websites.
This guide examined the common causes and how to fix the error “401 Access Denied”.
Another similar error related to restricted access is the HTTP Error 403. Read more about it in the following guide on what is 403 Forbidden Error and how to fix it.
For more information on the various HTTP codes, read this article on HTTP status codes explained.
How do you fix a “401 Unauthorized” error? Whether that site is your own or someone else’s. Either if it’s your site or someone else’s, it is not convenient to see this error once you open a website.
A 401 error is one of the most frustrating HTTP response codes because it does not provide information about how the error can be diagnosed or resolved.
As a result, 401 errors can occur in any web browser, a common problem people encounter. In most cases, it is simple to resolve.
This article will explain the 401 error code, what causes it, 401 error variations, how to fix the 401 unauthorized error with seven methods, and the error 401 vs. error 403 comparison.
What Is the 401 Error Code?
As defined by the Internet Engineering Task Force (IETF), the error code 401 Unauthorized is as follows:
The 401 Unauthorized status code indicates that a request could not be processed because the target resource’s authentication credentials were invalid.
A server that generates a 401 response must include at least one WWW-Authenticate header field containing the challenge for the target resource.
You may encounter HTTP 400 status codes if there is a problem making your request. The 401 status code is mainly encountered when your browser denies you access to a website.
As a result, the browser will display an error message instead of loading the webpage. 401 errors are possible in any browser, so the message that appears may be different depending on the browser.
A website requiring a login may cause these errors in most cases. Usually, this implies that there is either a problem with the credentials or that the browser can’t read them correctly.
There is some similarity between HTTP 403 Forbidden Error and HTTP 401 Forbidden Error in that access to the site is denied. However, unlike HTTP 403, the 401 error indicates that the authentication process failed.
In this case, the code is sent via the WWW-Authenticate header, which indicates the method of authentication being used for access to the web page or resource.
What Causes a 401 Error?
When you encounter an error code in the 400 range, you know you are experiencing a problem at the client or browser level.
It may be true that the problem is occurring within your browser, but this does not necessarily imply that it is the cause.
The 401 error occurs when you attempt to access restricted resources of your WordPress website, such as password-protected pages.
The authentication credentials must be the cause of the problem, so it can be safely assumed that it is the cause of the problem.
Reason 1: Outdated Browser Cache and Cookies
Your browser’s cache and cookies may be outdated, which prevents the authorization from going through successfully, causing a 401 error.
You will be rejected by the server if your browser is not using valid authentication credentials or if no authentication credentials are provided at all. You have to clear your browser cache to fix it.
Reason 2: Plugin Incompatibility
Sometimes, this error may be caused by a plugin conflict or error. For example, a security plugin or firewall may mistake your login attempt for malicious activity and return an error 401 to protect your website.
Reason 3: Incorrect URL or Outdated Link
It is also possible that a minor error causes the problem. Common examples of such mistakes include incorrectly typed URLs or outdated links.
401 Error Variations
The 401 error is no longer just a bland and plain message. You can now get many different types of errors due to the variations in the online environment.
Listed below are some error messages that might appear when a 401 error occurs:
- 401 Authorization Required
- Access Denied
- 401 Unauthorized Error
- HTTTP Error 401
Taking a look at some of the most common error messages that clients encounter, let’s look at a few variations of the popular 401 error message:
- 401.504: You are using a hostname listed on the server’s deny list.
- 401.503: There is a chance that your IP address is on the server’s deny list when this error occurs.
- 401.502: In this case, the error occurs due to countless requests sent to the same web server by the same client. The client has reached the daily limit for sending requests to the same web server based on dynamic IP Restriction Concurrent access.
- 401.501: The error occurs if you, as the client, send multiple requests that exceed the maximum number of requests.
- 401.3: An Access Control List (ACL) has prevented the login attempt from being successful.
- 401.2: An attempt to log in was unsuccessful due to configuration issues on the server.
- 401.1: An attempt to log in has failed.
How to Fix the 401 Unauthorized Error (7 Methods)?
Throughout this section, we will examine seven effective methods for resolving the 401 Unauthorized error:
Method 1: Confirm the URL Is Correct
When the browser’s address bar is filled with the incorrect URL, the user may receive a 401 error message.
It is highly recommended that you check the URL that you have entered before attempting any other method. Make sure no special characters or numbers are missing from the URL.
It is recommended that you double-check the hyperlink if it contains typos. Sometimes the hyperlink might be faulty or outdated, resulting in the 401 error.
If you want the correct URL, go to the website’s homepage and manually navigate to the problematic page. In addition, you may find the page by searching on Google.
Method 2: Clear Your Browser’s Cache
Typically, your browser’s cache reduces the time it takes to load pages and improves your online experience. Unfortunately, sometimes this can also cause interruptions to your online experience.
One of the common causes of the 401 error is the presence of outdated or incorrect cache data or cookies. In this case, if you do not observe any problems with the URL of the page, you should clear the cache in your browser.
Using this method, you will remove any invalid information stored locally in your browser, which may interfere with authentication. Furthermore, your browser’s cookies may contain authentication data that needs to be updated.
Follow these steps to clear your browser’s cache in Google Chrome:
- Click on the menu icon in the top-right corner of the browser.
- Click on the Settings option.
- Click on the Privacy and security section.
- Click on the Clear browsing data option.
- Check all three boxes are selected under the Basic tab.
- Click on the Clear data button.
There may be some differences in the appearance of this process in other browsers.
Follow these steps in Mozilla Firefox:
- Click on the library icon in the top-right corner of the browser.
- Go to History.
- Click on the Clear Recent History option.
- Choose Everything in the drop-down menu.
- Check the box near the Cache option.
- Click on the Clear Now button.
Method 3: Flushing DNS Cache
Additionally, DNS records are stored locally on your device in addition to the cache and cookies maintained by your browser.
As a result of the data in the DNS cache, your device can match URLs to their IP addresses more quickly, which can result in faster loading. Nevertheless, unlike the browser’s cache and cookies, the DNS cache is a system-level cache.
401 HTTP status codes are generated by DNS errors, although these are rare. There is a possibility that the DNS cache is outdated, containing incorrect information regarding URLs and IP addresses.
If you flush your DNS, it will delete all of your device’s existing DNS records, forcing it to make a completely new request and reauthenticate the URLs with the new DNS records.
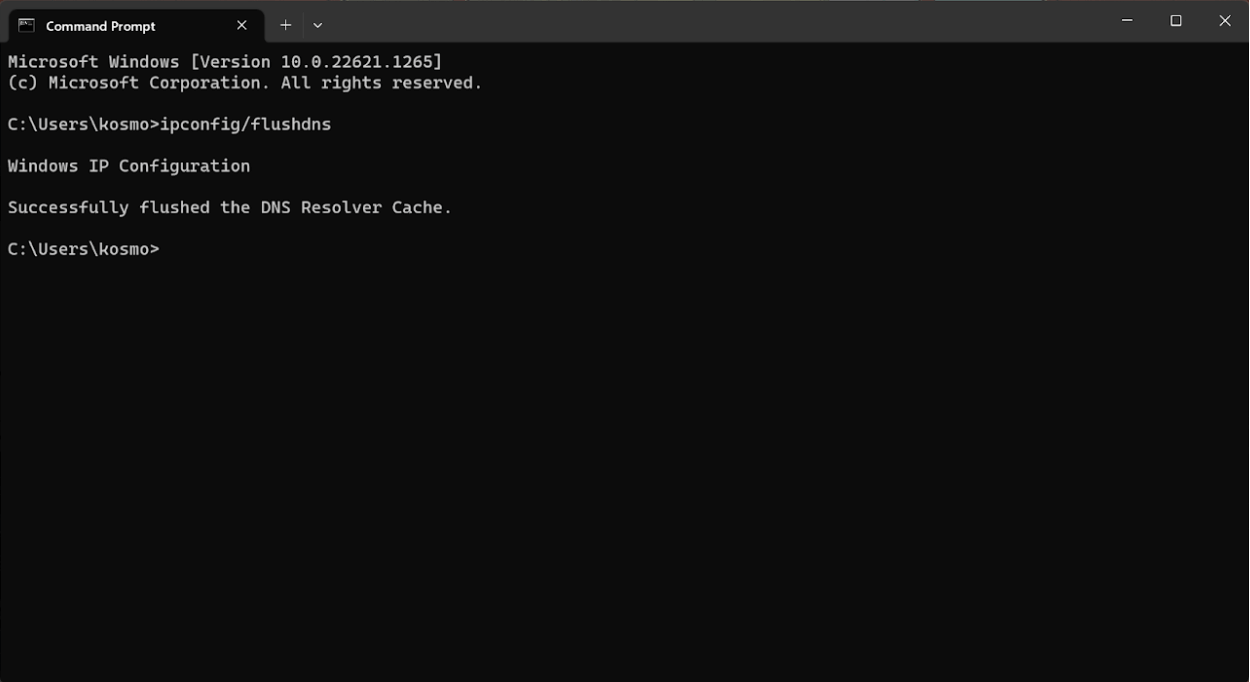
Follow these steps to flush your DNS cache on Windows:
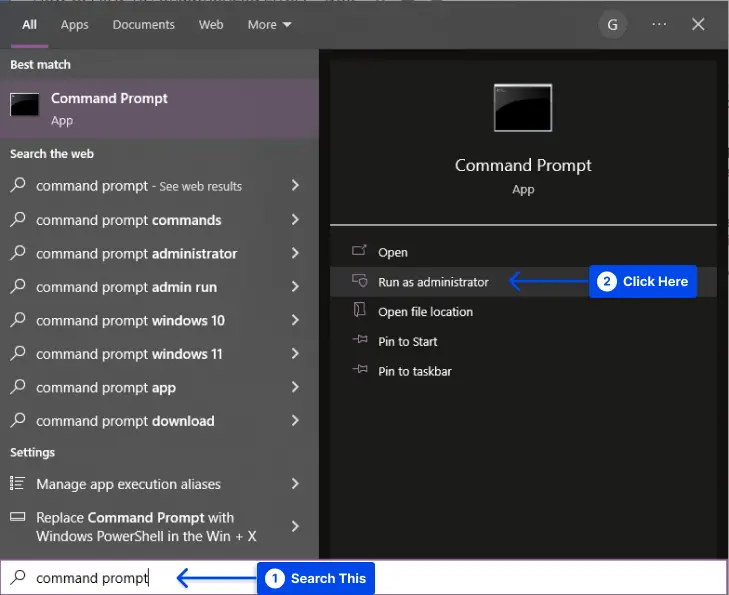
- Go to the search bar and type in Command Prompt.
- Run Command Prompt as Administrator.
- Type in the command “
ipconfig/flushdns” and press Enter.
A successful flush of the DNS resolver cache will be indicated by a message such as “Successfully flushed the DNS Resolver Cache“.
Method 4: Deactivate Your WordPress Plugins
Your browser may not be the cause of your 401 error. There is also a possibility that one or more plugins may be the cause of your difficulty logging into your WordPress website.
Security-related plugins are configured to display a 401 error message when suspicious login activity is detected that may indicate an attack.
Alternatively, some may be experiencing compatibility issues, so it might be worthwhile to deactivate all of your WordPress plugins and test if that resolves the problem.
Follow these steps to deactivate all your plugins at the same time in your dashboard:
- Go to Plugins in your WordPress dashboard.
- Click on the Installed Plugins option.
- Check the checkbox next to each plugin.
- Click on Bulk actions.
- Select Deactivate and click on the Apply button.
Once you have completed the above steps, try reloading the page that returned the 401 error to see if it has resolved the problem.
For further investigation, you may manually activate each plugin one at a time to determine which one is causing the problem.
Then you may want to remove the plugin and replace it with a new one, or you may want to contact its developer for assistance.
Method 5: Check Authentication Credentials
When you attempt to access a password-protected page with an invalid authentication credential, you may receive the 401 Unauthorized Error code. Consequently, you can’t access the page.
You should double-check to ensure that you are logged in with a valid username and password; if you are certain that you have entered the information correctly, you should change your password.
It may be necessary to reset your WordPress password if you have difficulty accessing a password-protected WordPress site.
Method 6: Disable Password Protection
You may want to temporarily disable password protection on the problematic section of your site if you are a webmaster and want to resolve the 401 error.
Follow these steps if you have enabled password protection using the .htpasswd and .htaccess files:
- Access your hosting account’s File Manager.
- Open the password-protected website directory.
- Locate the
.htaccessfile that was created when you enabled password protection. - Back up the file’s content in case you want to re-enable password protection.
- Delete the
.htaccessfile from the directory. - Locate the secret location of the
.htpasswdfile, back it up, and delete it too.
Method 7: Check .htaccess File
There are other ways to protect your passwords besides the hosting panel. In some cases, a website won’t prompt for login even though it’s not set in the hosting panel, but directives in its .htaccess file may cause it to.
There may be a problem with the .htaccess code that you entered earlier and forgot about or from a plugin that added it.
Follow these steps to check if there are such directives:
- Open the website’s folder from FTP or File Manager.
- Check the
.htaccessfile. User credentials for the protection are specified in.htpasswd. This file includes the user name and the encrypted password for protection. - Delete the code from the
.htaccessfile if the protection is not intended. - Save the changes.
Error 401 vs. Error 403 Comparison
A 401 error code indicates that the client’s web browser failed to receive resources from the web server caused by insufficient or incorrect authentication information.
Nevertheless, the 403 Forbidden Error signifies that the server has received the request, but not all parts of the website are accessible.
Incorrect login details are usually responsible for the 401 error, and insufficient access levels are responsible for the 403 client error.
An example of this might be a WordPress site containing a membership feature that prevents users with a “visitor role” from accessing the members-only pages.
It is also possible for geo-blocking to result in the 403 client error status message. There may be a restriction on IP addresses from specific countries or regions that are allowed on the web server.
The 403 HTTP status code may also appear in other variations: “403 Forbidden”, “Forbidden: You don’t have permission to access [directory] on this server”, and “Access Denied ‒ You don’t have permission to access”.
Conclusion
This article has explained the 401 error code, what causes it, 401 error variations, how to fix the 401 unauthorized error with seven methods, and the error 401 vs. error 403 comparison.
Thanks for taking the time to take a look at this article. We are pleased to provide it to you. Please use the comments section to post your questions and comments.
We regularly update our Facebook and Twitter pages, so we invite you to follow them so that you can keep up with the latest developments.
The proper 401 Error meaning is an HTTP status code that indicates the request lacks valid authentication credentials for the requested resource. It means that the server knows about the client but the client doesn’t have sufficient permissions to access the resource and is not authorized to do so without proper authentication.
If you are a web developer, admin, or regular user, knowing the importance of the 401 Error is crucial because it helps you diagnose and troubleshoot issues related to authentication and access control.
For example, if you are an administrator, it will help you implement effective security measures. Meanwhile, for regular users, it will be beneficial for them to understand the reason behind denied access to certain resources.

401 Error variations
Here are some of the 401 error variations which indicate the same:
- HTTP Error 401
- Access denied
- 401 Unauthorized Error
- 401 Authorization Required
- 401 Unauthorized
Understanding HTTP Status codes
If you are a non-techie and don’t know exactly what are HTTP status codes, they can be understood as a set of standardized three-digit numbers used by web servers to communicate the outcome of a client’s request.
This means they provide you with the status or information about the success redirection, type of errors, and other states of the request-response cycle.
These status codes play a crucial role in web communication as they provide important feedback, indicating whether a request was successful or encountered any problems. With the assistance of these codes, one can readily take appropriate actions based on the response received from the server.
Now, when discussing the 4xx series status codes, such as 401 errors, they are typically classified as client error codes. This series indicates that the client’s request has failed or is invalid due to certain reasons. These error codes generally represent the issues or errors caused by the client’s request or a lack of proper authentication.
Some examples of 4xx Series error codes
As we have already discussed, the 4xx series is called client-side errors which includes some of the popular error codes that you might have familiar with.
- 400 (Bad Request Error)
- 403 (Forbidden)
- 404 (Not Found)
Now, let us focus on 401 Error. This error is specifically used when the client is unable to provide valid authentication credentials to access a resource. Its main purpose is to show the client that the requested resources require valid credentials to proceed further.
What causes 401 Error?
Some of the most common scenarios when you might face a 401 Error message:
- Missing or invalid credentials: If you are unable to provide authentic credentials due to any reasons or provide incurred or expired credentials, a 401 error will be triggered.
- Unauthorized access attempt: When you try to access a resource that requires authentication, but the provided credentials do not grant sufficient permission, a 401 Error will be returned.
- Revoked or Expired tokens: If you use an expired or outdated authentication token, the server may respond with a 401 error.
- Corrupt or outdated Browser cache and cookies: If you ever see a 401 error, it’s usually because your browser’s cache and cookies are outdated or corrupted. This can cause trouble with authorization. If your browser doesn’t have the correct authentication credentials (or any at all), the server won’t accept your request. Just remember to keep your browser’s cache and cookies up to date to avoid running into these kinds of errors.
- Incorrect or Outdated URL: Sometimes, in a rush, you might mistakenly enter the wrong URL or encounter a situation where the URL has been changed. This can trigger a 401 error as a result.
- Plugin conflicts: Sometimes, a 401 error can happen because of a plugin issue. For example, if you are using a firewall or security plugin that might mistakenly think your login attempt is suspicious and block access with a 401 error to keep the page safe.
How a 401 Error affects the user experience?
The 401 Error code can have various impacts on the user experience. It typically results in the user being denied access to the requested resource or receiving an error page instead. The error message associated with the 401 Error should provide guidance on how to resolve the issue or provide appropriate instructions.
Now that you have obtained a solid understanding of the 401 unauthorized error and its background, let’s delve into the methods to resolve and fix this issue.
- Ensure the URL is correct
- Check Authentic credentials
- Clear your browser cache and cookies
- Flush Your DNS cache
- Disable WordPress Plugins
- Check out your website’s .htaccess file
- Check the WWW-Authenticate header
1. Ensure the URL is correct
One of the most common mistakes that many users make is typing an incorrect URL in the browser’s address bar. Therefore, it’s important to take a moment and carefully enter the correct URL, ensuring that there are no misspelled or outdated entries.
If you happen to enter a wrong, outdated, or misspelled URL, you might encounter an “Error code 401” message. But there’s no need to worry! This error simply indicates that the URL you were trying to access doesn’t exist, resulting in a “401 unauthorized access” response from the server.
Let us understand it with an example, Suppose you have bookmarked a page or saved its address in your browsers, but things can change over time. The page’s address might have been updated or even deleted.
To investigate it further, you can try going to the website’s homepage and looking for a link to the page that is causing the “Unauthorized 401” error. If the page opens correctly through that link, make sure to compare the URL of the page with the one that initially gave you the error.
2. Ensure correct Authentication credentials
Sometimes, you might come across the frustrating 401 Error code when you’re trying to access a locked resource, such as a password-protected page. It basically means that your authentication credentials are not valid, and as a result, you’re denied access to the page you’re trying to open.
Here’s what you can do to tackle this issue. Take your time to double-check if you are logged in with the correct login credentials such as the user ID and password or not.
If you’re confident that you’ve entered the details correctly, you might want to consider changing your password. This could help ensure that you have the right credentials to access the resource without any hiccups.
However, in case you are unable to access your password-protected website, Check out our complete guide on “How To Easily Reset WordPress & Start Over?“.
3. Clear your browser cache and cookies
Without a doubt, browser cache and cookies are intended to enhance your online experience by speeding up website loading. However, there are occasions when they can also be the culprit behind triggering errors.
Specifically, corrupted or outdated cache files and cookies can result in unexpected interruptions or browsing issues. To resolve this, the best course of action is to completely clear your browser’s cache and cookies.
If you are using Chrome browser, follow the steps given below:
Read: 🚩 Browser Market Share & Usage Statistics
Step 1: Depending on your browser, Go to the settings menu.
In Google Chrome, for example, you can find the settings menu by clicking on the three vertical dots located in the upper right corner of the window.
Step 2: To proceed, select “More tools” and then click on “Clear browsing data”.

Step 3: A pop-up window will be displayed, and you can choose all three options located under the “Basic” section as depicted in the picture below. These options consist of “Browsing history,” “Cookies and other site data,” and “Cached images and files.
Step 4: Click on “Clear data” to initiate the process.

By doing so, any corrupt or invalid information stored locally in your browser will be completely erased. This ensures that if it was causing the authentication issue, it won’t occur again.
4. Flush your DNS Cache
Similar to your browser cache and cookies, the DNS cache is also stored locally on your computer. Although it is uncommon for a DNS cache to trigger a 401 error, it is worth giving it a try as a troubleshooting step.
For Windows 10 and Windows 11 users:
Step 1: Open the Run command by pressing the Windows key and R. Alternatively, you can search for it in the Start menu.
Step 2: Type “cmd” and hit Enter to open the Command Prompt.

Step 3: Once the Command Prompt window is open, type “ipconfig/release” to release your current IP address.

Step 4: Next, type “ipconfig/flushdns” to release the DNS cache.
Step 5: Type “ipconfig /renew” to obtain a new IP address.

Step 6: Type “netsh int ip set dns” and hit Enter to reset your IP settings.
Step 7: Finally, type “netsh winsock reset” to restore the Winsock Catalog.

Step 8: After completing these steps, restart your computer to ensure the changes take effect.
For MacOS users:
Step 1: First of all, open the system preference options on your Mac. If you have Gas Mask installed, it can make searching for system-related tasks easier.
Step 2: Next, navigate to the Ethernet tab and click on the advanced options.
Step 3: Under the TCP/IP tab, you will find the option to release a DHCP lease. Clicking on this option will allow you to clear out the local DNS on your Mac.

Step 4: Go to Utilities > Terminal and enter the command to clear the local DNS cache.
Step 5: The command for flushing the local DNS cache is “dscacheutil -flushcache”.
Step 6: Once you have entered the command, there will be no separate success or failure message that pops up. However, in most cases, the cache will be cleared without any major issues.
5. Disable WordPress Plugins
It is important to note that the cause of the 401 error may not always lie with your browser, but rather with your WordPress plugins. If you are experiencing difficulties accessing your WordPress site, it is possible that certain plugin(s) are responsible for this issue.
Especially, security plugins have a reputation for causing these types of problems. These plugins are designed to block access and return a 401 error message if they detect any suspicious activity.
Another possibility is that there may be compatibility issues with certain plugins. Some plugins can conflict with your website and trigger such issues. In such cases, the best course of action is to disable all the installed WordPress plugins and check if this resolves the issue.
Step 1: Log in to your WordPress admin dashboard
Step 2: Navigate to the “Plugins” menu option on the left-hand side of the dashboard.
Step 3: A list of installed plugins will be displayed. Take note of the currently active plugins or make a list if needed.
Step 4: Select all the plugins by ticking the checkboxes next to their names or use the “Bulk Actions” dropdown menu to select all.
Step 5: From the “Bulk Actions” dropdown menu, choose “Deactivate” and click the “Apply” button. This will deactivate all the selected plugins simultaneously.

Step 6: Once the deactivation process is complete, try accessing your website and check if the 401 error is resolved.
If the error is no longer occurring, it indicates that one or more of the plugins were causing the issue. You can then proceed with identifying the conflicting or incompatible plugins by reactivating them one by one and testing the website after each activation until the error reappears. This way, you can pinpoint the specific plugin causing the conflict.
If you find the defective plugin, consider either updating it to a newer version or reaching out to the plugin developer for support. Alternatively, you may need to find an alternative plugin that serves a similar purpose but does not cause conflicts.
6. Check out your website’s .htaccess file
You might be surprised to learn, especially if you are not aware of it, that the hosting panel is not the only place where you can set a password for your website. Another method is by configuring the code in the .htaccess file.
If you have previously set a password through the .htaccess file but have either forgotten about it or it was added through a plugin, it’s essential to check or examine your website’s .htaccess file to determine if it is causing the issue.
Let us see how you can proceed.
If your web hosting provider offers you cPanel accessibility, it will become easy for you to locate WordPress .htaccess files without using an FTP client.
1. To do this, first, you need to login into your cPanel as shown below:

2. Lookout for the Files section and click on the File Manager option as shown.

3. Now you will be able to see a list of all the core files displayed on your screen. Select and click on the public_html folder to open.

4. Now if you have an existing .htacess file available, it will reflect in the public_html or htdocs folder, if not then either it is hidden or doesn’t exist yet.

However, if your WordPress .htaccess file is hidden, you can unhide it by simply going to the Settings section located at the top right corner of the “files manager window” as shown in the image below:

A preferences window will pop out as shown in the picture below:

Now simply, check the ” Show Hidden Files (dotfiles)” box and click on Save. All the hidden files will start reflecting on your file manager window.
Read: 🚩 WordPress .htaccess File: How to Create And Edit it?
Now when you right-click on the .htaccess file and select the edit option, Its content should look similar to this:
AuthType Basic
AuthName "Permission required"
AuthUserFile ../../.htpasswd
require valid-user
The login credentials for the protection are stored in a file called “.htpasswd.” This file contains the encrypted password and the associated username.
If you no longer require the protection, you can remove the corresponding code from the .htaccess file and save the changes to confirm.
If the above troubleshooting methods don’t work, this means the issue is from the server side.
The “WWW-Authenticate” header is an HTTP response header that is used to indicate the type of authentication required for accessing a resource on a web server. When a server sends a “401 Unauthorized” status code, it includes the “WWW-Authenticate” header to specify the authentication scheme that the client needs to use in order to access the requested resource.
This header provides information to the client about the authentication method that should be used, such as Basic Authentication or Digest Authentication. It typically includes a challenge, which is a value that the client needs to include in subsequent requests to authenticate itself.
To check the “WWW-Authenticate” header, you can follow these steps:
Step 1: Open your web browser and navigate to the desired web page that generates a 401 error code.
Step 2: Right-click anywhere on the page and select “Inspect” or “Inspect Element” from the context menu. This will open the browser’s developer tools.
Step 3: In the developer tools, navigate to the “Network” tab.

Step 4: Refresh the page by pressing the “F5” key or clicking the refresh button in the browser.
Step 5: Look for the request corresponding to the resource you want to check in the list of network requests. It should have a “401 Unauthorized” status code.
Step 6: Click on the request to view its details.
Step 7: In the headers section, locate the “WWW-Authenticate” header. This header will provide information about the authentication scheme required for accessing the resource.

Step 8: The value of the “WWW-Authenticate” header will indicate the authentication method to be used, such as “Basic”, “Digest”, or others.
You can also refer to HTTP Authentication Scheme Registry for more information about page authentication methods.
Comparison: 401 vs 403 Error
The 401 Error differentiates itself by focusing specifically on the lack of valid authentication credentials. It indicates that the client needs to provide proper authentication to gain access to the resource, while the 400 and 403 errors highlight other issues, such as invalid requests or insufficient permissions.
Here is a comparison table between a 401 error and a 403 error:
| Error Code | Error Name | Meaning or authentication information |
|---|---|---|
| 401 | Unauthorized | Indicates the need for authentication. |
| The client lacks valid credentials |
| Error Code | Error Name | Meaning of authentication information. |
|---|---|---|
| 403 | Forbidden | Indicates that the client is authenticated, but lacks the necessary permissions to access the requested resource |
In summary, a 401 error signifies the need for authentication, while a 403 error indicates that the client is authenticated but lacks the necessary permissions to access the requested resource.
Real-world Examples of 401 Errors
Examples from popular websites or web applications
- Social media platform: If a user attempts to access a private profile or restricted content without logging in or providing valid credentials, a 401 Error may be returned.
- Cause: The user attempts to view a private post without logging in or providing valid credentials.
- Resolution: The platform returns a 401 Error and prompts the user to log in or create an account to gain access to the restricted content.
- Online banking: When a client tries to access account information or perform financial transactions without proper authentication, a 401 Error can occur.
- Cause: The user tries to access account details or perform financial transactions without providing the correct authentication credentials.
- Resolution: The banking system returns a 401 Error and directs the user to enter valid login credentials to access their account securely.
By analyzing real-world examples of 401 Errors, it becomes evident that these errors occur when accessing sensitive or restricted resources, emphasizing the importance of proper authentication and authorization.
Conclusion
A “401 Error” is triggered when the client lacks or is unable to provide valid authentication credentials to access a password-protected resource. Additionally, you may have noticed that this error is primarily caused by the client side, making it easily fixable. However, it can also be triggered from the server side, although this is rare.
So, in this post, we have compiled some of the best 7 troubleshooting methods that you can try to fix 401 errors.
- Ensure the URL is correct
- Check Authentic credentials
- Clear your browser cache and cookies
- Flush Your DNS cache
- Disable WordPress Plugins
- Check out your website’s .htaccess file
- Check the WWW-Authenticate header
We hope the methods mentioned above will help you fix the 401 error and resolve your issues. If you have any queries or would like to suggest any additional methods, please let us know in the comment section below.
Frequently Asked Questions
How do I fix a 401 error?
You can fix a 401 error by following these methods:
1. Ensure the URL is correct
2. Check Authentic credentials
3. Clear your browser cache and cookies
4. Flush Your DNS cache
5. Disable WordPress Plugins
6. Check out your website’s .htaccess file
7. Check the WWW-Authenticate header
What is the reason for 401 unauthorized error?
The reason for the 401 unauthorized error are:
1. Missing or invalid credentials
2. Unauthorized access attempt
3. Revoked or Expired tokens
4. Corrupt or outdated Browser cache and cookies
5. Incorrect or Outdated URL
6. Plugin conflicts
What is an example of a 401 error?
An example of a 401 error is If a user attempts to access a private profile or restricted content on a social media platform without logging in or providing valid credentials, a 401 Error may be returned.