
There can be many reasons a user cannot gain access to a website. One of these is known as a 404! error. Quite simply an HTML 404! error message is a Hypertext Transfer Protocol (HTTP) status code indicating the server could not find the requested website. In other words, your web browser can connect with the server, but the specific page you are trying to access cannot be reached. In this tutorial, we will build an HTML 404 error web page to customize what the visitor sees when they land there. We will use some CSS as well to further enhance the page.

Why the 404! HTML Error Appears
When an HTTP 404 appears on your screen, it means that although the server is reachable, the specific page you are looking for is not. The web page is either broken, or it no longer exists. The 404 error code can appear in any browser, regardless of the type of browser you are using.
There are several reasons why you might be getting an HTTP 404 code:
- One typical trigger for an error 404 message is when the page has been deleted from the website.
- The page was moved to another URL and the redirection was done incorrectly.
- You entered an incorrect URL address.
- Although it happens very rarely, sometimes the server malfunctions.
- The entered domain name does not exist anymore.
Unfortunately, broken links are often left for long periods of time after the page has been deleted or moved. Even when web owners maintain their web sites, sometimes the owner may delete the site, or change the name of the site. This means that when someone clicks on an “old” link, they will no longer be able to find that site. Unfortunately, due to many people putting up URLS to web sites all over the place, there will ultimately be links that actually link to nowhere.
It is common for owners of websites to not check their external links regularly which leads to users trying to access a dead link. Web maintenance is essential for this reason.
Create a “Page Not Found” HTML Web Page
If a visitor to your website reaches an old and non-existent web page, the server that hosts that website will show a “404” error that basically says the page can not be found. Instead of allowing the server to show a bland, default error page, you can create one of your own and get as creative as you want with it.
Let us jump into step one of our tutorial.
Step 1: Create an HTML Landing Web Page
Let us start by simply creating a basic HTML page. This will be the foundation for creating a more exciting and informative 404! Error web page for visitors to land on.
Open a text editor, save the file as “shorelinesurfteam.html” and put in the following HTML code. Save your file again when done.
<html><head>
<style type=text/css>
</style></head>
<body>
</body></html>
To assist those who have landed on this “non-existent” page, you can add some helpful information to guide them on the right path. Perhaps add some information as to why the page does not exist anymore. Add something like this into the HTML. Feel free to copy the following code and resave your html file.
<html>
<head>
<style type=text/css>
</style>
</head>
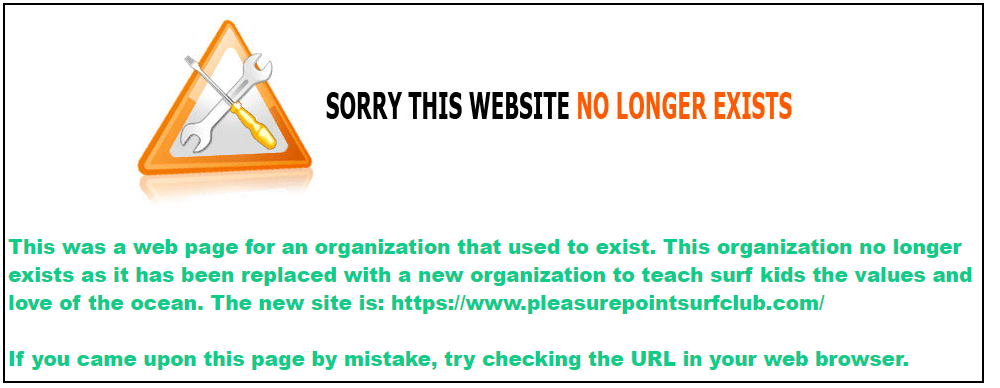
<body><p>This was a web page for an organization that used to exist. This organization no longer exists as it has been replaced with a new organization to teach surf kids the values and love of the ocean. The new site is: https://www.pleasurepointsurfclub.com/
<br><br>
If you came upon this page by mistake, try checking the URL in your web browser.</p>
</body>
</html>
The following illustration identifies the text we added to make the page more informative.

To punch up the text font, let us add a style. Copy the following code and resave your HTML file.
!DOCTYPE html><html><head>
<style type=text/css>
p { color: blue; font-weight: 900; font-size: 20px; font-family: Helvetica, Arial, sans-serif; }
</style></head>
<body><p>This was a web page for an organization that used to exist. This organization no longer exists as it has been replaced with a new organization to teach surf kids the values and love of the ocean. The new site is: https://www.pleasurepointsurfclub.com/
<br><br>
If you came upon this page by mistake, try checking the URL in your web browser.</p>
</body></html>
Add an image and change your text color to a custom hex color if you want as well by adding the HTML to reference the image. The image can go in your root directory as well.
!DOCTYPE html><html><head>
<style type=text/css>
p { color: #0ecc8a; font-weight: 900; font-size: 20px; font-family: Helvetica, Arial, sans-serif; }
</style></head>
<body>
<a href="#"><img src="site.jpg"></a>
<p>This was a web page for an organization that used to exist. This organization no longer exists as it has been replaced with a new organization to teach surf kids the values and love of the ocean. The new site is: https://www.pleasurepointsurfclub.com/
<br><br>
If you came upon this page by mistake, try checking the URL in your web browser.</p>
</body></html>
Step 2: Tell the Server to Use Your HTML 404! Error Page
Create a “.htaccess” file. This text file serves the purpose of passing on instructions to the server.
There might already be a .htaccess file in the root folder of your web hosting space. If there is, download it and amend that. It may be a hidden file. If so, you may need to adjust your server settings so that you can view this file.
In this “.htaccess” file you will need to add this line:
ErrorDocument 404 /shorelinesurfteam.html
This is all you need to add. You do not need to add any HTML code.
What this does is tell the server that when it encounters a 404 error, it should load the shorelinesurfteam.html file in the root folder.
Step 3: Save .htaccess File to the Root Directory
Save your “.htaccess” file and upload it to the root folder of your web site. When the server encounters a not-found error, your error page will be shown.
Now when a visitor finds the web page (per our code above)
Instead of seeing this:

They will see the following more informative and friendly error page that you have created.
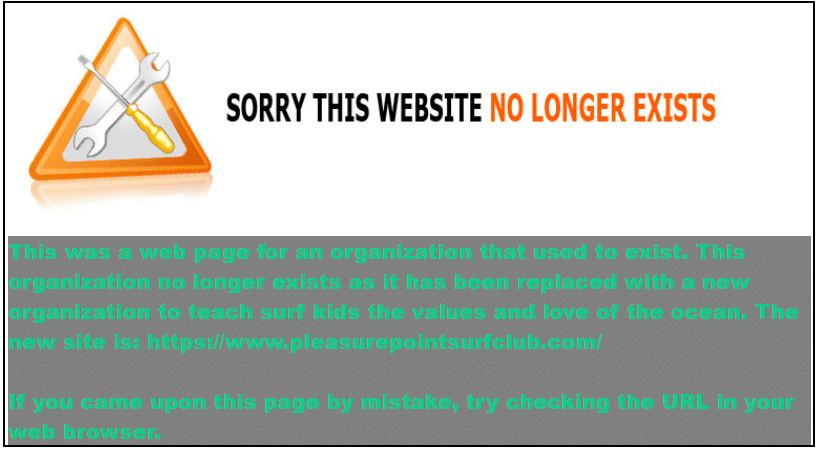
To make the green text stand out more, you can add a div element with a color background as such:
<head>
<style type=text/css>
p {
color: #0ecc8a;
font-weight: 900;
font-size: 20px;
font-family: Helvetica, Arial, sans-serif;
}
div {
background-color: gray;
}
</style>
</head>
<body>
<a href=”#”><img src=”site.jpg”></a>
<div>
<p>This was a web page for an organization that used to exist. This organization no longer exists as it has been replaced with a new organization to teach surf kids the values and love of the ocean. The new site is: https://www.pleasurepointsurfclub.com/
<br><br>
If you came upon this page by mistake, try checking the URL in your web browser.</p>
</div>
</body>
</html>
This will yield the following:
Now, you can be as artistic as you like to create your fancy, informative 404.html page. Always keep the visitor to the page in mind to enhance their experience.
See the HTML Font Families to learn how to enhance your text, and also check out the CSS Background Tutorial to learn how to enhance the background of your web page.
Where to Next?
This introduction to the 404 page error should provide a starting point for further inquiry into web page management and the unlimited creative aspects that HTML offers. In the next blogs, you will be able to explore other areas of HTML design. Continue to be inspired, explore further and dive deeper into the world of web design.
Enroll in our Intro to Programming Nanodegree program today!
Start Learning

Постараюсь не сильно вдаваться в подробности, что такое 404-ая страница, достаточно открыть гугл и по запросу «Как сделать 404 страницу» — Вы обнаружите огромное количество сайтов с подробным описанием, что это такое. Я просто хочу поделиться с читателем своим способом создания 404-ой страницы. И вот, что у нас должно получиться в итоге.

Почему обязательно надо делать свою 404-ую страницу?
Главная и единственная причина – это не потерять посетителя. У каждого пользователя наверняка возникала такая ситуация, когда нажимая на ссылки на каком-нибудь сайте, браузер вместо запрашиваемой страницы показывал свою дефолтную страницу ошибки. Ошибка возникает в результате неправильно введенного запроса или запрашиваемая страница, была удалена самим веб-мастером. В таком случае все посетители ведут себя одинаково – закрывают страницу и уходят с вашего сайта.
Хватит воду лить! Давай конкретику!
Создаем два файла – 404.html и .htaccess (этот файл без имени, но с расширением htaccess), который автоматически перенаправляет посетителя на 404.html, в случае возникновения ошибки. Чтобы перенаправление работало, в этот файл надо прописать одну единственную строку:
ErrorDocument 404 http://www.site.ru/404.html
Когда оба файла будут готовы, залить их на сервер в корень домена.
Мы уже создали пустой файл 404.html и теперь будем наполнять HTML кодом саму 404 страницу, активно применяя HTML5 и CSS3. Я придумал свой способ, как сделать простую и красивую 404 страницу.
Первым делом нужно подобрать большую и качественную картинку или фотографию размером не менее 1200×750 пикселей. Существует много сайтов со свободной лицензией, откуда можно скачать очень качественные фотографии. Я бесплатно скачал с популярного сайта pixabay.com это забавное изображение.

Я хочу расположить картинку как фон на все окно браузера и в центре браузера написать – 404 страница не найдена и поставить ссылку на главную. Разберем подробнее самые важные моменты.
Эффект полупрозрачности RGBA
Выбранное изображение слишком яркое, надо его слегка затемнить, тогда текст будет более читаемый. Эффект полупрозрачного затемнения, можно получить используя RGBA, прописав в стилях блока следующую строчку кода:
background: rgba (0, 0, 0, 0.7);
Первые три буквы обозначают – красный, зеленый, синий и они равны нулю (то есть получаем черный цвет). А последняя буква «а» – представляет собой альфа-канал, отвечающий за полупрозрачность элемента. В нашем случае цифра 0.7 – говорит о 70% затемнения. Шкала от полной прозрачности до полной непрозрачности находиться между нулем и единицей (0…1).
Позиционирование элементов
Для правильной верстки моего примера 404 страницы, без понимания как работает свойство position, будет трудно. Посмотрев на конечный результат 404 страницы, нам надо понять структуру HTML документа. Здесь мы видим три слоя, наложенных друг на друга. Нижний слой <body> – сама картинка, средний в теге <div> – полупрозрачный блок затемнения и верхний <div> – текст. Наша задача задать нужное позиционирование содержимого этих слоев.
У среднего слоя будет абсолютное позиционирование, поскольку положение элемента (блок затемнения) задается относительно краев браузера с нулевыми отступами.
position: absolute;
Верхний текстовый слой позиционируем относительно элемента среднего слоя.
position: relative;
Код страницы 404
Имея этот готовый код и меняя только само изображение, можно наделать себе массу разных «ошибочных» страниц.
<!DOCTYPE html>

<html>

<head>

<meta charset="utf-8">

<title>Код страницы 404</title>

<style>

html { height: 100%; }

body {

  background: url(your_image.jpg) no-repeat;

  background-size: cover; /* Масштабирует картинку сохраняя пропорции */

  }

.over {

  background: rgba(0, 0, 0, 0.7); /* Цвет фона и значение прозрачности */

  position: absolute; /* Абсолютное позиционирование */

  left: 0; right: 0; top: 0; bottom: 0; /* Отступы от краев браузера */

  }

.404 {

  margin-top: 100px;

  text-align: center; /* Выравнивание текста по центру */

  font-size: 10em;

  color: #fcf9f9;

  position: relative; /* Относительное позиционирование */

  z-index: 2; /* Порядок наложения элемента по высоте */

  }

.notfound {

  text-align: center;

  color: #fff;

  font-size: 2em;

  position: relative; /* Относительное позиционирование */

  z-index: 2; /* Порядок наложения элемента по слоям в глубину */

  }

.notfound a {

  color: #fff;

  font-size: 0.8em;

  }

.notfound a:hover {

  color: yellow;

  text-decoration: none;

  }

</style>

</head>

<body>

<div class="over"></div>

<div class="404">404</div>

<div class="notfound">страница не найдена<br>

<a href="#"> перейти на главную страницу..</a>

</div>

</body>

</html>
Если Вы планируете заниматься созданием сайтов на заказ, то разобраться во всех тонкостях верстки, используя HTML5 и CSS3, Вам поможет мой видеокурс.
-

Создано 05.10.2017 01:11:33
-
Михаил Русаков

Копирование материалов разрешается только с указанием автора (Михаил Русаков) и индексируемой прямой ссылкой на сайт (http://myrusakov.ru)!
Добавляйтесь ко мне в друзья ВКонтакте: http://vk.com/myrusakov.
Если Вы хотите дать оценку мне и моей работе, то напишите её в моей группе: http://vk.com/rusakovmy.
Если Вы не хотите пропустить новые материалы на сайте,
то Вы можете подписаться на обновления: Подписаться на обновления
Если у Вас остались какие-либо вопросы, либо у Вас есть желание высказаться по поводу этой статьи, то Вы можете оставить свой комментарий внизу страницы.
Если Вам понравился сайт, то разместите ссылку на него (у себя на сайте, на форуме, в контакте):
-
Кнопка:
Она выглядит вот так:
-
Текстовая ссылка:
Она выглядит вот так: Как создать свой сайт
- BB-код ссылки для форумов (например, можете поставить её в подписи):


Hello readers, Today in this blog you’ll learn how to create a Custom 404 Error Page using only HTML & CSS. Earlier I have shared many blogs related to Web Design like (Responsive Footer Design, Responsive Drop-down Menu, and Responsive Sidebar Menu). But now I’m going to create a 404 Error page which is also a part or section of the Website.
The HTTP 404, 404 Not Found, or 404 Page Not Found error message is a Hypertext Transfer Protocol (HTTP) standard response code, in computer network communications, to indicate that the browser was able to interact with a given server but the server could not locate what was requested. This error displays when the user-requested page or URL doesn’t exist on a particular site.
In this program (Custom 404 Error Page Design), at first, on the webpage, there is a linear-gradient background with a white container box. Inside the box, there is title text, description, and two buttons. That 404 text has a mask animation that means there is gradient-color animation that flows top to bottom. This error page is created only for design purposes and it won’t redirect you to any other page when you click on the buttons.
If you’re feeling difficult to understand what I am saying. You can watch a full video tutorial on this program (Custom 404 Error Page Design).
Video Tutorial of Custom 404 Error Page Design
As you have seen the actual text mask moving animation in the video and I believe you understood the basic codes behind creating this error page. This is a pure CSS program so there are no vast codes used to create this program. Nowadays every website has its custom 404 error page which helps to inform the user about their requested pages are not exist on the website.
You can also create this type of error page and use it on your projects and HTML pages. If you know JavaScript then you can add advanced features to this program and take this program to the next level. If you like this program (Custom 404 Error Page Design) and want to get source codes. You can easily get the source codes of this program. To get the source codes you just need to scroll down.
You might like this:
- Awesome Pagination Design
- Responsive Footer Section Design
- Responsive Sidebar Menu Design
- Responsive Drop-down Menu Bar
Custom 404 Error Page Design [Source Codes]
To create this program (Custom 404 Error Page Design). First, you need to create two Files one HTML File and another one is CSS File. After creating these files just paste the following codes in your file.
First, create an HTML file with the name of index.html and paste the given codes in your HTML file. Remember, you’ve to create a file with .html extension.
<!DOCTYPE html>
<!-- Created By CodingNepal -->
<html lang="en" dir="ltr">
   <head>
      <meta charset="utf-8">
      <title>404 Error Page | CodingNepal</title>
      <link rel="stylesheet" href="style.css">
   </head>
   <body>
      <div id="error-page">
         <div class="content">
            <h2 class="header" data-text="404">
               404
            </h2>
            <h4 data-text="Opps! Page not found">
               Opps! Page not found
            </h4>
            <p>
               Sorry, the page you're looking for doesn't exist. If you think something is broken, report a problem.
            </p>
            <div class="btns">
               <a href="https://www.codingnepalweb.com/">return home</a>
               <a href="https://www.codingnepalweb.com/">report problem</a>
            </div>
         </div>
      </div>
   </body>
</html>
Second, create a CSS file with the name of style.css and paste the given codes in your CSS file. Remember, you’ve to create a file with .css extension.
@import url('https://fonts.googleapis.com/css?family=Poppins:400,500,600,700&display=swap');
*{
  margin: 0;
  padding: 0;
  outline: none;
  box-sizing: border-box;
  font-family: 'Poppins', sans-serif;
}
body{
  height: 100vh;
  background: -webkit-repeating-linear-gradient(-45deg, #71b7e6, #69a6ce, #b98acc, #ee8176, #b98acc, #69a6ce, #9b59b6);
  background-size: 400%;
}
#error-page{
  position: absolute;
  top: 10%;
  left: 15%;
  right: 15%;
  bottom: 10%;
  display: flex;
  align-items: center;
  justify-content: center;
  background: #fff;
  box-shadow: 0px 5px 10px rgba(0,0,0,0.1);
}
#error-page .content{
  max-width: 600px;
  text-align: center;
}
.content h2.header{
  font-size: 18vw;
  line-height: 1em;
  position: relative;
}
.content h2.header:after{
  position: absolute;
  content: attr(data-text);
  top: 0;
  left: 0;
  right: 0;
  background: -webkit-repeating-linear-gradient(-45deg, #71b7e6, #69a6ce, #b98acc, #ee8176, #b98acc, #69a6ce, #9b59b6);
  background-size: 400%;
  -webkit-background-clip: text;
  -webkit-text-fill-color: transparent;
  text-shadow: 1px 1px 2px rgba(255,255,255,0.25);
  animation: animate 10s ease-in-out infinite;
}
@keyframes animate {
  0%{
    background-position: 0 0;
  }
  25%{
    background-position: 100% 0;
  }
  50%{
    background-position: 100% 100%;
  }
  75%{
    background-position: 0% 100%;
  }
  100%{
    background-position: 0% 0%;
  }
}
.content h4{
  font-size: 1.5em;
  margin-bottom: 20px;
  text-transform: uppercase;
  color: #000;
  font-size: 2em;
  max-width: 600px;
  position: relative;
}
.content h4:after{
  position: absolute;
  content: attr(data-text);
  top: 0;
  left: 0;
  right: 0;
  text-shadow: 1px 1px 2px rgba(255,255,255,0.4);
  -webkit-background-clip: text;
  -webkit-text-fill-color: transparent;
}
.content p{
  font-size: 1.2em;
  color: #0d0d0d;
}
.content .btns{
  margin: 25px 0;
  display: inline-flex;
}
.content .btns a{
  display: inline-block;
  margin: 0 10px;
  text-decoration: none;
  border: 2px solid #69a6ce;
  color: #69a6ce;
  font-weight: 500;
  padding: 10px 25px;
  border-radius: 25px;
  text-transform: uppercase;
  transition: all 0.3s ease;
}
.content .btns a:hover{
  background: #69a6ce;
  color: #fff;
}
That’s all, now you’ve successfully created a Custom 404 Error Page Design using HTML & CSS. If your code doesn’t work or you’ve faced any error/problem then please comment down or contact us from the contact page.
404 pages are a great way to inform your web users that you have broke your server or that they are too stupid to type in the correct URL. 404 pages in general should be used to signify that the URL used links to no document. Additionally on your 404 page you should have some form of navigation to allow the user to navigate back to your site content. Another good thing to have on your 404 page is some form of logging. If you log the 404 page visits you can see what pages people are trying to view on your site and allow you to fix the cause of the problem. It could be a simple broken link, or misspelled URL allowing you to fix the link or rename the hard to spell URL to a simpler one.
[embedyt] http://www.youtube.com/watch?v=5POQvIg1JzA[/embedyt]
In our 404 page we’re going to add an HTML canvas that will allow the user to change how the 404 appears. Using JavaScript and an HTML canvas we can change the size, colour, shape, gradient, stroke and background for our 404 error message.
Creating The HTML page
To start the error page we first need an html page with a canvas element.
|
1 2 3 4 5 6 7 8 9 10 11 12 13 14 15 16 17 |
<DOCTYPE html> <head> <title>404 — Not Found</title> </head> <style> body { margin:0px; } #cv { position: absolute; background-color: #AAA } </style> <body> <canvas id=«cv» width=«1000» height=«1000»></canvas> </body> </html> |
Now we have the base for our 404 page we can start adding the JavaScript to control the canvas.
|
<script language=«JavaScript»> var c = document.getElementById(«cv»); var ctx = c.getContext(«2d»); </script> |
The above code should be placed before the </body> tag so it will be loaded after all the other HTML elements have loaded. This JavaScript creates 2 new variables, c for the canvas and ctx for the context of the canvas. The context is what we will be making our JavaScript changes to.
Adding our 404 Characters
As we are making a 404 page we now need to define two 4’s and a 0 that we can use to signify the position of each block that makes up the 404. Below I have 3 arrays, one for each character of the 404.
|
var four = [[2,0],[1,1],[0,2],[1,2],[2,2],[3,2],[2,3],[2,1]]; var zero = [[6,0],[5,1],[5,2],[6,3],[7,2],[7,1]]; var four2 =[[11,0],[10,1],[9,2],[10,2],[11,2],[12,2],[11,3],[11,1]]; |
I could have used just one array for both of the 4s but having two means less code.
Now we have our 404 defined we need a function to draw the 404 on the canvas. Our first function will call the draw function for each of the characters.
|
function drawFOF(xpos,ypos){ drawArray(ctx,four, xpos,ypos); drawArray(ctx,zero, xpos,ypos); drawArray(ctx,four2, xpos,ypos); } |
Our second function will draw a single character.
|
1 2 3 4 5 6 7 8 9 10 11 12 13 14 15 16 17 18 19 20 21 22 23 24 25 26 27 28 29 30 31 32 33 34 35 36 37 38 39 |
function drawArray(ctx,array, xpos,ypos){ var wid = window.innerWidth; var hei = window.innerHeight; ctx.save(); array.forEach(function(item,index){ // pos x (based on x pos of size control) var x = (xpos+((item[0] —7.5) * ((sizeCircle.posx / wid) * 40))); // posy (based on x pos of size control) var y = (ypos+((item[1] —2)* ((sizeCircle.posx / wid) * 40))); // width (based on y pos of size control) var w = ((sizeCircle.posx / wid ) * (40 * (sizeCircle.posy / hei ))); // height ( based on y pos of size control) var h = ((sizeCircle.posx / wid) * (40 * (sizeCircle.posy / hei ))); // shadow var sx = ((shadowCircle.posx / wid) * 20) —10; var sy = ((shadowCircle.posy / hei) * 20) —10; ctx.beginPath(); // manual shadow (canvas shadow is extremely slow) ctx.fillStyle=hslToRgb((shadowColourCircle.posx / wid),1—(shadowColourCircle.posy / hei)); ctx.fillRect(x+sx,y+sy,w,h); // do stroke ctx.strokeStyle=hslToRgb((strokeColourCircle.posx / wid),1—(strokeColourCircle.posy / hei)); ctx.lineWidth=(strokeCircle.posx / wid) * 10; ctx.rect(x,y,w,h); // Create gradient var grd=ctx.createLinearGradient(x,y,x,y+h); grd.addColorStop(0,hslToRgb((fillTopColourCircle.posx / wid),1—(fillTopColourCircle.posy / hei))); grd.addColorStop(1,hslToRgb((fillbottomColourCircle.posx / wid),1—(fillbottomColourCircle.posy / hei))); ctx.fillStyle=grd; ctx.fillRect(x,y,w,h); ctx.stroke(); }); ctx.restore(); } |
The drawArray function takes the canvas context to draw on, the array of points for the character, the horizontal position and the vertical position as arguments. It then loops through each point. Each point is then drawn to the context using ctx.fillRect for the shadow rectangle, ctx.stroke for the border and ctx.fillRect using the fillStyle grd for the gradient.
Adding Our Controls
The sizeCircle, shadowCircle, fillTopColourCircle etc are the objects we will be using to control the different aspects of the characters. Let’s add them now.
Add the following code to define the control objects:
|
var sizeCircle = {posx:500, posy:200, radius:10, text:«Size»}; var strokeCircle = {posx:250, posy:150, radius:10, text:«Stroke Width»}; var strokeColourCircle = {posx:10, posy:80, radius:10, text:«Stroke Colour»}; var fillTopColourCircle= {posx:500, posy:50, radius:10, text:«Top Colour»}; var fillbottomColourCircle= {posx:900, posy:100, radius:10, text:«Bottom Colour»}; var shadowColourCircle= {posx:100, posy:110, radius:10, text:«Shadow Colour»}; var shadowCircle= {posx:130, posy:160, radius:10, text:«Shadow»}; var windCircle= {posx:20, posy:100, radius:10, text:«Wind Direction»}; var backgroundCircle= {posx:20, posy:150, radius:10, text:«Background»}; |
This code defines each of the controls we will be using. The contain the x and y position, their radius (as they will be circles) and their text.
We now need to be able to draw them on the canvas. We will use a function to allow us to draw a single control. The code is below:
|
1 2 3 4 5 6 7 8 9 10 11 12 13 14 15 16 17 18 19 20 21 |
function drawSingleControl(ctx, object){ ctx.beginPath(); ctx.arc(object.posx,object.posy,object.radius,0,2*Math.PI); if(object.text == ‘Stroke Colour’ || object.text == ‘Top Colour’ || object.text == ‘Bottom Colour’ || object.text == ‘Shadow Colour’ ){ var hue = (object.posx / window.innerWidth); var sat = 1— (object.posy / window.innerHeight); ctx.fillStyle=hslToRgb(hue,sat); }else{ ctx.fillStyle=‘red’; } ctx.fill(); ctx.lineWidth = «2»; ctx.strokeStyle=‘black’; ctx.stroke(); ctx.fillStyle=‘black’; ctx.font=«10px Arial»; ctx.fillText(object.text,object.posx+(object.radius * 1.2),object.posy+3); } |
This function takes the canvas context and an object as its arguments. The object is one of the controls we defined earlier. This function just draws the control to the canvas using the ctx.arc function and adds text to the right of the control. The ctx.arc function takes 5 arguments. The x and y position of the circle, the size of the circle, the start of the arc and the end of the arc. Using 0 and 1*Math.PI for the start and end of the arc would create a semi-circle.
Now we can draw a single control, let’s add a function to draw all controls so we don’t have to type out a function call each time we want to show a control. To do this we will put all the objects into an array like so:
|
var sphereControls = [ sizeCircle ,strokeCircle ,strokeColourCircle ,fillTopColourCircle ,fillbottomColourCircle ,shadowColourCircle ,shadowCircle ,windCircle ,backgroundCircle ]; |
Now we create a function to loop through that array calling the draw controls function we just made.
|
function drawControls(controls){ controls.forEach(function(item,index){ drawSingleControl(ctx,item); }); } |
Our code up to now doesn’t do much when you run it. This is because we haven’t told it to render and we’re still missing a function to convert our controls position to an RGB colour. So let’s get this done so we can see some changes to our HTML page.
Additional functions and Rendering
Let’s add the control position to colour function first. The function is converted from an hsltoRgb function I found online at http://stackoverflow.com/questions/2353211/hsl-to-rgb-color-conversion.
It has been converted from a 0-255 scaled RGB to a hex string. This allows use to convert control positions to colour values the browser/canvas will understand.
|
1 2 3 4 5 6 7 8 9 10 11 12 13 14 15 16 17 18 19 20 21 22 23 24 25 26 27 28 29 30 31 32 33 34 35 36 37 |
function hslToRgb(h,l){ s = 1; if(l < 0) l=0; if(l > 1) l = 1; var r, g, b; if(s == 0){ r = g = b = l; // achromatic }else{ var hue2rgb = function hue2rgb(p, q, t){ if(t < 0) t += 1; if(t > 1) t -= 1; if(t < 1/6) return p + (q — p) * 6 * t; if(t < 1/2) return q; if(t < 2/3) return p + (q — p) * (2/3 — t) * 6; return p; } var q = l < 0.5 ? l * (1 + s) : l + s — l * s; var p = 2 * l — q; r = hue2rgb(p, q, h + 1/3); g = hue2rgb(p, q, h); b = hue2rgb(p, q, h — 1/3); } ro = Math.round(r * 255).toString(16); go = Math.round(g * 255).toString(16); bo = Math.round(b * 255).toString(16); // add preceeding 0 for single digit values if(ro.length < 2) ro = ‘0’+ro; if(go.length < 2) go = ‘0’+go; if(bo.length < 2) bo = ‘0’+bo; return ‘#’+ro+go+bo; } |
Now we need to render everything. So let’s make a function.
|
function render(){ drawFOF((window.innerWidth/2),(window.innerHeight/2)); drawControls(sphereControls); requestAnimationFrame(render); } render(); |
Here will define our function that will render our 404 characters using screen width /2 and screen height /2 to position them in the middle, render our controls and requestAnimationFrame(render). The requestAnimationFrame function is used to tell the browser that the canvas is ready to draw itself and would like to be drawn when the browser is capable. The requestAnimationFrame function takes a function as an argument and this function must contain the requestAnimationFrame function to create a loop. It is possible to draw to the canvas using setInterval but this will create sync issues with refresh rates whereas requestAniamtionFrame will always try to refresh at a rate that syncs.
Now we can save our page and run it. It will show a 1000×1000 canvas with our 404 and controls inside. The display of controls might look misshapen depending on the screen resolution you are using. We will fix hat issue now by adding some code to resize the canvas to fill the browser and while we’re here empty the screen ready for the next render.
|
function clearScreen(){ c.width = window.innerWidth; c.height = window.innerHeight; ctx.clearRect(0, 0, c.width, c.height); ctx.width = window.innerWidth; ctx.height = window.innerHeight; } |
Above is the clearScreen function which sets the canvas to fill the browser window and then empties the canvas using the clearRect function. Add clearScreen() as the first item in the render function as shown below:
|
function render(){ clearScreen(); drawFOF((window.innerWidth/2),(window.innerHeight/2)); drawControls(sphereControls); requestAnimationFrame(render); } |
Part 1 Check
Your code should be similar to the following file html-p1
Events and Mouse Control
Now we have rendered our 404 and our controls its time to allow the user to move the controls. To do that we will need 4 variables to store mx, my, down and attached. mx is the mouse x position, my is the mouse y position, down is whether the mouse button is down and finally attached is the control object that is currently attached to the mouse.
|
var mdown = false; var attached = false; var mx =0; var my = 0; |
Add the variables near the top of the script with your other vars.
Now we have the variables we need to add event listeners for the mouse events.
|
if (document.addEventListener) { document.addEventListener(«mousemove», getMouseXY); document.addEventListener(«mousedown», function(){mdown = true}); document.addEventListener(«mouseup», function(){ mdown = false; // MOUSE DOWN FLAG attached = false; // ATTACHED CONTROL FLAG }); } else if (document.attachEvent) { document.attachEvent(«mousemove», getMouseXY); document.attachEvent(«mousedown», function(){mdown = true}); document.attachEvent(«mouseup», function(){ mdown = false; // MOUSE DOWN FLAG attached = false; // ATTACHED CONTROL FLAG }); } |
Here we have an if conditional that tries to add an event listener if that fails it tries to attach an event listener. This is to allow older browsers which don’t support the addEventListener to still have event listeners. The above listeners just set flags expect the mousemove listener which calls a separate function to get the x and y pos of the mouse. The getMouseXY function code is below:
|
1 2 3 4 5 6 7 8 9 10 11 12 13 14 15 16 17 18 19 |
var tempX = 10 var tempY = 10 var IE = document.all?true:false function getMouseXY(e) { if (IE) { tempX = event.clientX + document.body.scrollLeft tempY = event.clientY + document.body.scrollTop } else { tempX = e.pageX tempY = e.pageY } if (tempX < 0){tempX = 0} if (tempY < 0){tempY = 0} mx = tempX; my = tempY; return true } |
We can now react to events created by the mouse but we still need to react to clicks on the controls. To do that we will update our render function to monitor our variables we create earlier. Our render code should be changed to:
|
1 2 3 4 5 6 7 8 9 10 11 12 13 14 15 16 17 18 19 20 |
function render(){ clearScreen(); drawFOF((window.innerWidth/2),(window.innerHeight/2)); drawControls(sphereControls); if(attached == false){ if(mdown && (current = hoveredControl(mx, my))){ attached = current; current.posx = mx; current.posy = my; attached = current; } }else{ attached.posx = mx; attached.posy = my; } requestAnimationFrame(render); } |
We also need to add a function to see if the mouse position is over a control. We do that with the following code:
|
function hoveredControl(posx, posy){ var current = false; // no control sphereControls.forEach(function(item,index){ if(posx > (item.posx — item.radius) && posx < (item.posx + item.radius) && posy > (item.posy — item.radius) && posy < (item.posy + item.radius)){ current = item; } }); return current; } |
This function loops through each control and checks if the mouse x and mouse y falls inside a control’s position.
Each frame we are now checking to see if we have an attached control. If we do not we check to see if the mouse button is down and if the mouse pointer is over a control with the hoveredControl function. If the mouse button is down and the hoveredControl function returns a control then we are trying to move the control so we set the attached variable to the control object and update the control’s position to the mouse x/y. The next rendered frame will have an object in the attached var so will skip this block and only update the positions x/y.
Part 2 Check
You can now save your code and test it in a browser. You should be able to move the controls with the mouse and the 404 characters should change accordingly. If you are getting any errors or it is not responding verify your code matches this file html-p2
Some controls still do nothing such as wind direction and background.
The background
The background is made up of 3 different background types with a 4th blank background. The first background we will look at is the starfield background type.
Starfield
The starfield background is a background which tries to imitate flying through space with stars getting closer to the user. This is achieved by creating stars at the center of the screen and they move outward towards the edges getting bigger as they get closer to the edge.
Our first step is to create an array to store each star that is created. While we’re here we may as well add the arrays for the rain and for the bubble clouds.
|
var stars = []; var drops = []; var clouds = []; |
We will need a function to create a star which we will call each render frame. This would create a star each frame unless we limit the amount of stars per second. We will do that by using the Math.random function and only adding a star each 10% of the time.
|
function addStar(){ if(Math.random() * 100 > 90){ var w = window.innerWidth; var h = window.innerHeight; var vx = (Math.random() * 2) — 1; //( -1 to +1) var vy = (Math.random() * 2) — 1; var star = {posx:w/2, posy:h/2, xvel:vx, yvel:vy, size:0.2}; stars.push(star); } } |
The stars object has 5 properties; The x and y position, the x and y velocities and the size. The x and y position is the position the star is at on the canvas. The x and y velocities are the direction the star is moving and is create using (Math.random() * 2) -1 to create a value between -1 and 1. This is done for both x axis and y axis. The size is set to 0.2 and is then added to the star array.
In order to render the star a renderStar function will be made. It will loop through each item in the star array and then render it to the canvas. The code is below:
|
1 2 3 4 5 6 7 8 9 10 11 12 13 14 15 16 17 18 19 |
function renderStar(){ stars.forEach(function(item,index){ ctx.beginPath(); ctx.fillStyle=‘#ffffff’; ctx.arc(item.posx,item.posy,item.size,0,2*Math.PI); item.posx += item.xvel / 30; item.posy += item.yvel / 30; item.xvel *= 1.04; item.yvel *= 1.04; item.size *= 1.015; ctx.fill(); if(item.posx < 0 || item.posx > window.innerWidth || item.posy < 0 || item.posy > window.innerHeight){ stars.splice( index, 1 ); } }); } |
To make the star get bigger I increase the size each frame by 1.5% by multiplying the star size by 1.015 each frame. This creates the illusion of the stars getting bigger. I use the value 1.04 for the x and y velocities. Finally, we check to see if the star has gone off the screen and remove it from the array if it has.
So now we have our function to create and render our stars but they are never called in the render function. As we will have 4 backgrounds including the blank one we will use the backgroundCircle position to decide which background to show. Update your render function to look like this.
|
1 2 3 4 5 6 7 8 9 10 11 12 13 14 15 16 17 18 19 20 21 22 23 24 25 26 27 28 29 30 31 32 |
function render(){ clearScreen(); var bgv = Math.round((backgroundCircle.posx / window.innerWidth) * 3)+1; if(bgv == 1){ addStar(); renderStar(); }else if(bgv == 2){ addDrop(); renderDrop(); }else if(bgv == 3){ addCloud(); renderCloud(); } drawFOF((window.innerWidth/2),(window.innerHeight/2)); drawControls(sphereControls); if(attached == false){ if(mdown && (current = hoveredControl(mx, my))){ attached = current; current.posx = mx; current.posy = my; attached = current; } }else{ attached.posx = mx; attached.posy = my; } requestAnimationFrame(render); } |
You can save this and test it in a browser to show the starfield in action. Here’s an updated HTML file including everything we have done so far. html-p3
Rain Background
The rain background creates raindrops at the top of the screen which fall slowly at an angle based on the wind direction control. Since we already have the control we just need to add our add raindrop and render raindrop functions.
|
1 2 3 4 5 6 7 8 9 10 11 12 13 14 15 16 17 18 19 20 21 22 23 24 25 26 27 28 |
//RAIN DROPS function addDrop(){ var w = Math.random() * window.innerWidth; var h = 0; var vx = 0; var vy = 1; var drop = {posx:w, posy:h, xvel:vx, yvel:vy, size:2}; drops.push(drop); } function renderDrop(){ drops.forEach(function(item,index){ ctx.beginPath(); ctx.fillStyle=‘#6666aa’; ctx.arc(item.posx,item.posy,item.size,0,2*Math.PI); item.posx += ((windCircle.posx / innerWidth) —0.5) * 8; item.posy += ((windCircle.posy / innerHeight) + 1) *2; ctx.fill(); if(item.posx < 0 || item.posx > window.innerWidth || item.posy < 0 || item.posy > window.innerHeight){ drops.splice( index, 1 ); } }); } |
We use addDrop to add a new drop, except this time we set the y position to the top of the browser and set the y velocity to 1 so it starts falling downwards. The x velocity is set to 0 so no horizontal movement as this will be set in the renderDrop function.
The renderDrop function loops through each drop in the array and draws a blue circle. The raindrop is then updated using the windCircle control to move it left/right based on the x position of the control and down using the y position of the control. Finally, we check if the drop has gone off the screen and remove it from the array if it has.
Bubble Clouds
Our last background is the bubble clouds. Our create cloud and render cloud functions will be pretty similar to our previous functions for the rain and starfield backgrounds.
|
1 2 3 4 5 6 7 8 9 10 11 12 13 14 15 16 17 18 19 20 21 22 23 24 25 26 27 28 29 30 31 32 33 34 35 36 37 38 39 40 41 42 |
// CLOUDS function addCloud(){ if(Math.random() * 100 > 75){ var w = Math.random() * window.innerWidth; var z = (Math.random() * 0.8) + 0.2; var h = 0 — (1—z) * 100; var s = 1; var cloud = {posx:w, posy:h, ratio:z, size:s}; clouds.push(cloud); //compare before render or flicker on first insert clouds.sort(compareClouds); } } function compareClouds(a,b) { if (a.ratio < b.ratio) return —1; if (a.ratio> b.ratio) return 1; return 0; } function renderCloud(){ clouds.forEach(function(item,index){ var hex = Math.round(((item.ratio * 125) + 125)).toString(16); size = (1—item.ratio) * 100 ctx.beginPath(); ctx.fillStyle=‘#’+hex+»+hex+»+hex; ctx.arc(item.posx,item.posy,size,0,2*Math.PI); item.posy += item.ratio; ctx.fill(); }); clouds.forEach(function(item,index){ if(item.posy > (window.innerHeight + (((1—item.ratio) * 100)*2))){ clouds.splice( index, 1 ); } }); } |
In the code above you can see we have and extra function call compareClouds. This function sorts our array of bubble clouds so that the bigger bubbles are drawn first so they appear to be at the back whereas the smaller ones are drawn on top appearing to be at the front.
You now have everything needed to have your own custom 404 error page using canvas and JavaScript. A copy of the complete code can be downloaded here Final Code.
For more information on HTML Canvas visit w3schools at http://www.w3schools.com/html/html5_canvas.asp
Views: 3,395
Веб-сервер при выполнении ряда задач всегда возвращает браузеру код состояния запроса, который выражается в виде числа. Код 404 означает, что документ по запрошенному адресу отсутствует. Такое состояние возникает, когда пользователь набирает неправильный адрес документа или пользуется ссылкой, которая ведет на не существующий файл. Как правило, это происходит, если файл, на который указывает ссылка, был переименован, перенесен в другое место или удален. Возможно также, что пользователь ошибся в наборе адреса или воспользовался битой ссылкой.
Чтобы в подобном случае показать пользователю адекватное сообщение об ошибке и создают отдельную страницу, где пишут, что запрашиваемый документ не найден и что при этом можно сделать.
Автоматическое перенаправление пользователя на нужную страницу при возникновении ошибки происходит с помощью файла .htaccess (именно так, с точкой впереди и без расширения). Этот файл добавляется в корень сайта и должен содержать следующую строку.
Файл .htaccess
ErrorDocument 404 /err404.html
Последний параметр представляет собой имя файла, который загружается в браузере при возникновении ошибки 404. В данном случае он называется err404.html и располагается в корне сайта.
Учтите, что файл err404.html может быть вызван из любого места сайта, поэтому в нем следует использовать абсолютные ссылки (http://site.ru/images/error.png) или ссылки относительно корня сайта (/images/error.png).