

#1
![]()
OFFLINE
Dmitryfins
-

- Пользователи
-
- 3 сообщений
Начинающий летчик


- Город:Москва
Отправлено 27 мая 2017 — 03:12
Друзья, привет!
аппарат phantom 3 standart
По IMU возникают постоянные проблемы при запуске практически везде, кроме чистого поля без ЛЭП.
Даже со своего участка за городом не могу запустить его, пишет ошибку. Рестарт не помогает.
Неужели он такой чувствительный?? Как же тогда в городе видео снимают? Ведь летит он у людей
Заранее спасибо за совет.
-
0
#2
![]()
OFFLINE
olegnsk
olegnsk
-
- Модераторы
-
- 7 702 сообщений
Опытный летчик АС

- Город:Москва, исторически Новосибирск и Камчатка
- Коптер:младшенький Mavic и ещё небольшая эскадрилья
Отправлено 27 мая 2017 — 03:54
Dmitryfins, У вас выдаёт ошибку IMU или компаса? Калибровку IMU проводили? Только вот это делать лучше вдали от источников помех и железобетонных конструкций, т.е. условно в чистом поле на ровной поверхности.
-
0
#3
![]()
OFFLINE
Dmitryfins
Dmitryfins
-
- Пользователи
-
- 3 сообщений
Начинающий летчик
- Город:Москва
Отправлено 27 мая 2017 — 04:59
Его калибровку не проводил! Как ее сделать?
У меня он был без русской инструкции, по компасу понял как делать: вращение горизонт, вращение вертикаль.
А как IMU подскажете калибровать?
Эта калибровка разовая или перед каждым полетом как компас?
И по городу вопрос, летать то в нем реально на таком дроне?
-
0
#4
![]()
OFFLINE
olegnsk
olegnsk
-
- Модераторы
-
- 7 702 сообщений
Опытный летчик АС
- Город:Москва, исторически Новосибирск и Камчатка
- Коптер:младшенький Mavic и ещё небольшая эскадрилья
Отправлено 27 мая 2017 — 05:51
Dmitryfins, В полётном меню иконка коптер — меню MC setting — нижняя команда advanced setting — sensor state — внизу справа IMU Calibration
Повторю калибруйте вдали от источников радио и магнитных помех, железа при калибровке нужно коптер поставить на ровную поверхность и не трогать его до окончания процедуры. Калибровать IMU часто не требуется, в случае только если будет вылазить ошибка. Все в городах как то летают, но всё ближе и ближе от себя… помех стало с развитием wifi и т.п. очень много.
Сообщение отредактировал olegnsk: 27 мая 2017 — 06:58
-
0
#5
![]()
OFFLINE
Somni
Somni
- Город:Нижний Тагил
- Коптер:DJI P3A
Отправлено 01 июля 2017 — 11:21
нужно коптер поставить на ровную поверхность
ну и что б поверхность была параллельна земли (строго горизонтальна). Это можно проверить строительным уровнем. Горизонтальность положения коптера при калибровки IMU обеспечит верное выставление нуля гироскопа, а статичность (не трогать, не шевелить, не перемещать) — верное выставление нуля акселерометра.
По поводу заполненности эфира: в Нижнем Тагиле очень редко вижу предупреждение о интерференции волн. В основном она возникает в моём городе если пролетать возле сотовой вышки и то очень редко интерференция. В городе от проводов исходит незначительное (малое по размерам) электро-магнитное поле, например, от силовых проводов 220В. Это от ЛЭП, где напряжение составляет несколько тысяч вольт, исходит достаточно мощное электро-магнитное поле, оно может вызвать сбой компаса.
В основном, если ошибка компаса не появляется постоянно, то ошибка может появляться из-за стальных предметов на площадке запуска или в теле оператора при калибровке.
К датчикам IMU относятся гироскоп (определяет ориентацию тела в пространстве) и акселерометр (определяет значение ускорений тела по 3-ём осям), следовательно ошибка IMU может возникнуть если коптер пошевелить, переместить во время включения или из-за достаточно неровной площадки запуска.
Мы пробовали на форуме разобраться относится ли компас к датчикам IMU, да так и не определились с этим. Может кто знает?
-
0
#6
![]()
OFFLINE
ZZaaZZ
ZZaaZZ
-
- Пользователи
-
- 25 сообщений
Начинающий летчик
- Город:Новороссийск
- Коптер:P3A
Отправлено 01 июля 2017 — 04:31
Калибровка IMU разовая . И компас достаточно один раз откалибровать в месте без магнитных помех .
-
0
#7
![]()
OFFLINE
Somni
Somni
- Город:Нижний Тагил
- Коптер:DJI P3A
Отправлено 01 июля 2017 — 06:08
Как можно выполнить калибровку IMU в поле, если нужна ровная горизонтальная поверхность? Как обеспечить строгую горизонтальность плоскости под коптером при калибровке вне дома?
-
0
#8
![]()
OFFLINE
Serjik
Serjik
- Город:Москва
- Коптер:Пара гоночных дронов
Отправлено 10 июля 2017 — 10:35
Как обеспечить строгую горизонтальность плоскости под коптером при калибровке вне дома?
Кусок фанеры и вот такая штука
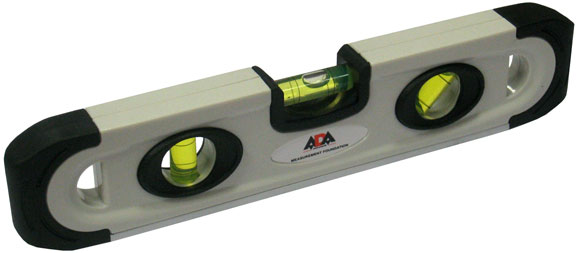
-
1
#9
![]()
OFFLINE
Somni
Somni
- Город:Нижний Тагил
- Коптер:DJI P3A
Отправлено 10 июля 2017 — 01:22
Serjik, у меня есть уровень. Я им вожу по фанере, а там криво, под фанеру подкладываю что нибудь, здесь уровень нормально стал показывать, а по другой оси криво стало.
Чем обеспечивать горизонтальность фанеры: что — то под неё толкать (как настройка червячного зацепления изменением количества регулировочных колец у конических подшипников, у меня такая ассоциация с этим методом) или подвешать фанеру или что с ней делать в поле?
-
0
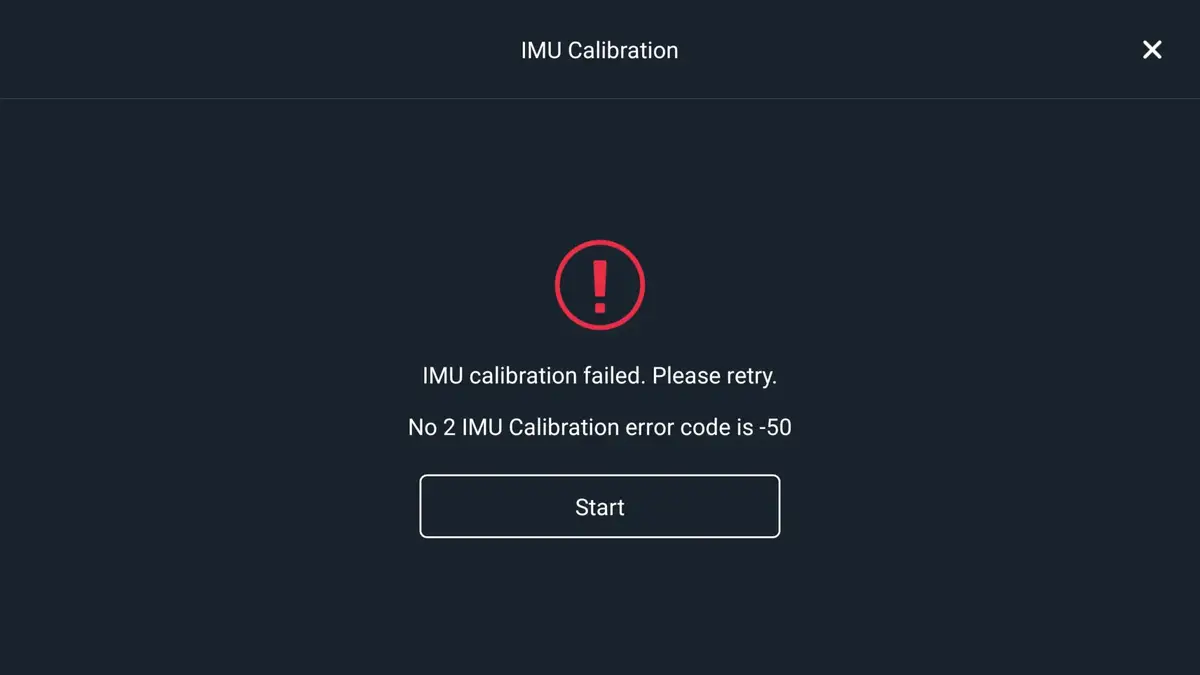
There is a problem with DJI Mavic pro where it gives you ” IMU calibration error code -50″ I had this exact problem a couple of days before writing this article, and I went on google but no one had a clear answer.
Then I contacted DJI support but they couldn’t have been more naive, anyways after reading a bunch of forums, hours of frustration, I finally solved mine so I thought I could do the same for others
What is causing Mavic Pro IMU Calibration Error -50
There is no one single reason you are getting IMU Calibration Error -50 on your Mavic pro, but the common reasons are, being near to a metal structure, a messed up software and/or hardware.
So in the next sections, I will show you how to properly calibrate your Mavic mini.
1. perform IMU calibration
For a successful IMU calibration, it is crucial that you follow the steps exactly as you see on the screen, or you will get stuck on one of the steps.
Before doing this process you can turn your house’s ac to go below room temperature, Get the AirCraft (A/C) as cold as possible, you can even place it in a refrigerator, and then recalibrate the IMU.
The colder you can get it, the sooner you can get the process started after removing it from the cold area.
You can also do this process at night outside of your house where the temperature is colder, then when you want to fly your drone at day time it wouldn’t take as much time to initialize IMU.
- First, startup Aircraft & Controller
- From DJI go 4 app go to Menu on the top right
- Go to Aircraft button (in the menu the uppermost button)
- Then go to Advanced Settings then Sensors State
- “IMU Calibration”
- When done (can take UP TO 10mins!) -> “Check IMU”
2. Refresh firmware in DJI assistant 2
You should also do the classic troubleshooting methods staring of with refreshing the firmware
- Power on the drone
- Connect it to your computer using the USB cable DJI provides
- Open the DJI Assistant 2 software on your laptop
- Log in to the DJI Assistant 2 app and select your drone
- Next, you will see the firmware version
- Tap update and choose the latest version
- If it is already the latest version click refresh
- Repeat process with other batteries(if you own one)
Update/refresh Controller Firmware
The Drone’s and the controller’s firmware must match so after refreshing or updating your drone’s firmware you should do the same for the controller.
So, to update/refresh your RC’s firmware-
- Power on the remote controller
- Connect it to your computer using a USB cable provided
- Open and log into the DJI Assistant 2 software on your laptop
- Select your drone’s remote controller
- Next, you will see the firmware version
- Tap update if you have an older version or tap refresh if it is up to date
- Click on “Start Update”
- On the next screen, you will see the firmware being downloaded, then transmitted and updating the remote controller
- At 100%, you will see the message, “Update Complete”
- After the firmware is complete, the controller will restart automatically
3. Downgrade firmware
If both of the previous methods don’t seem to work, you can downgrade the firmware till the next update comes out.
You can downgrade your firmware both in DJI assistant and DJI go 4.
To downgrade firmware in DJI assistant–
- Power on the drone
- Connect it to your computer using the USB cable
- Open the DJI Assistant 2 software on your laptop
- Log in to the DJI Assistant 2 app and select your drone
- Next, you will see the firmware version and older versions lined up
- Choose the version one below the current version you have
- Then click install
- Then the drone will automatically restart
To downgrade firmware in DJI go 4
press and hold the menu icon (three horizontal lines in the top right corner) for five seconds and a special firmware menu appears. You can now select which previous firmware version you would like to downgrade to. Check it out.
It is better if you downgrade with DJI go 4 because the controller will follow automatically.
If you downgrade in DJI assistant you most likely have to do the same with the controller
4. Factory reset the Mavic pro
- First, Install the DJI Assistant 2 Program on your device, make sure you download the proper one.
- Connect your drone to your laptop using the USB cable provided, and wait for the software till it to detect your drone
- You’ll be able to see your drone on the Connected Devices screen. Select your drone and then click on confirm.
- Click on Firmware Update. After that, you’ll be able to see the “Restore factory defaults” button.
- Click on the factory reset button and then confirm when you are asked to confirm the reset. A progress bar will pop up showing the progress of the reset. You’ll be notified when the reset is complete.
Note: After a factory reset you have to calibrate everything again.
5. Use a different phone
If you are using android to calibrate the IMU and it is not working try swapping it with ios, and vice versa.
6. Change location and avoid metal structures
I am not sure why but DJI recommends doing IMU calibration on an open field, so if you are doing the imu calibration in a tightly enclosed space go out and try it again.
Final choice
If none of the methods fix it you there might be a problem with one internal component and you might to send it to a professional.
If your drone is within a year period from activation, which I would guess is not because this error usually happens on older drones, however, if it is or if you have DJI care DJI will fix it for you for free
If not you might have to pay a good sum of money depending on the situation
After you hand it to DJI it can take up to 15 days till they fix it and send it back to you, and it can take longer if you don’t live in the united states
If you are located in Armenia, you may contact the local dealer or DJI’s support via email to start a case and send the unit back.
DJI IMU Calibration error is one of the typical errors, that any DJI drone user could face. Every series of DJI drone users are asking for solutions for this error in forums (including DJI forums), social media posts, and also in youtube videos.
So as an active troubleshooting member of the drone community, I decided to give every possible solution to troubleshoot the error according to my experience and collected data related to the error. Hope this article would help with fixing your drone error.
Let’s have a brief talk about the causes of DJI IMU calibration error -50.
1. Calibration Surface.
If you are trying to calibrate the DJI drone’s IMU while placing the aircraft on a tilted surface, it could cause IMU miscalibration. So the system would refuse the IMU calibration process and throws the “IMU Calibration Error-50”.
2. Low Battery Power.
When calibrating the aircraft while having low battery power, the power won’t be sufficient to calibrate the IMU. So the IMU calibration process would be refused and error would be thrown.
3. Calibration Surrounding (Electromagnetic Interference).
If you calibrate the aircraft’s IMU near a metal, electronics, or any kind of electromagnetic interference, it also could miscalibrate the aircraft’s IMU. Therefore the system prevents the IMU calibration in that kind of surroundings. That’s why DJI advises keeping electronics and metal structures away from the aircraft before calibrating the IMU.
4. Outdated firmware and firmware glitches.
Firmware is so important in IMU calibration because the firmware is in charge of managing operations in almost every component of the aircraft, including IMU calibration. All the scripts and programs related to IMU calibration are included in the firmware. So if the firmware is glitched it could mess up the IMU calibration and cause the IMU Calibration error -50.
5. Faulty IMU data and settings.
Faulty IMU data and settings are another reason for the IMU calibration error. When the system detects those faulty IMU data and settings, the system stops the process because that could affect the IMU calibration.
6. Damaged or Faulty IMU.
If your aircraft’s IMU (Inertial Measurement Unit) is damaged or faulty, it would be unable to get calibrated.
7. Faulty DJI mobile application (DJI GO/ DJI Fly).
As you know, users use DJI mobile applications (DJI GO/DJI Fly) to execute the IMU calibration. So if the DJI mobile app is glitched or outdated that could affect to the process.
How To Fix DJI IMU Calibration Error -50.
Let’s follow the step-by-step process of fixing the DJI IMU calibration error. Following this process would fix all the reasons for the IMU calibration error and ultimately fix the IMU calibration error.
1. Restart the aircraft.
If you are having the IMU calibration error just because of temporary IMU data or settings, the error could be easily fixed by erasing those data and settings. To erase those data and settings you just need to restart the aircraft. So before going to other steps, restart the aircraft and check whether the error is gone.
2. Check whether you are calibrating the IMU properly.
The improper procedure of calibrating the IMU also could cause this error. So follow the below steps and calibrate the IMU properly.
Before Calibrating the IMU,
- Charge the aircraft full or to a sufficient level.
- Update or Install the latest DJI GO/ DJI Fly app.
- Keep electronics, metals, and any kind of electromagnetic stuff away from the aircraft. if you are wearing jewelry or a watch, remove them before calibrating the IMU.
- Choose a flat surface to place the aircraft when calibrating the IMU.
- Remove Propellers Before calibrating IMU.
How to Calibrate the DJI IMU (Inertial Measurement Unit).
- Place the DJI Aircraft on a flat surface.
- Power on the aircraft. (If the drone is foldable, power on the aircraft with its arms closed in.)
- Open the DJI App (DJI Fly/ DJI GO) and enter the camera view.
DJI GO/ DJI GO 4 users,
- Click on the three dots at the top left corner and click on the drone icon go to Main Controller Settings > Advanced Settings > Sensors > IMU and hit the “Calibrate IMU” button.
DJI Fly Users,
- Click on the three dots at the top right corner and open the menu bar. Then click on “Safety” and scroll down until you found the ”IMU normal” under the “Sensors” section. Then click on the “Calibrate” button. And hit start.
Then follow the below steps to calibrate the aircraft’s IMU in different positions.
- Start with the DJI Aircraft on its belly and wait until the DJI app drone model turns onto its right side.
- Next, move the Aircraft onto its right side and wait until the DJI app drone model turns onto its left side.
- Then Change the DJI Aircraft over to the left side and wait until the DJI app drone model stands on its back.
- Then Stand the Aircraft on its back ends and wait until the DJI app drone model turns upside down.
- Then Turn the Aircraft upside down so that it’s the camera is pointing upwards and wait until the calibration process goes to 100%.
After following those steps the IMU calibration would complete successfully. If you are still getting the error, let’s go to the next step.
3. Update/ Refresh the firmware using DJI Assistant 2.
As I mentioned before, glitched or outdated firmware could affect the IMU calibration process. So let’s update the firmware and give it another try on IMU calibration. When updating the firmware, I highly recommend updating the firmware through DJI Assistant 2 PC application.
- Download and install DJI Assistant 2 from the DJI Download center.
- Connect the aircraft to the PC using the USB cable and power on the aircraft.
- Open DJI Assistant 2 application on the PC and log in to your DJI account.
- Then select your DJI Drone and click on the “Firmware Updates” on the left panel and click on the “Upgrade” option.
- Click on “Start Update”.
- Wait until the firmware is downloaded and installed. Then restart the aircraft.
- Go through the same steps with connecting the remote controller and update its firmware too.
- Then try calibrating the IMU as explained in step 2.
4. Factory reset the aircraft.
If the IMU calibration error is caused by stored faulty IMU data or settings, factory resetting the aircraft fixes the issue. Because resetting the aircraft back all the data and settings to default.
- Download and install DJI Assistant 2 from the DJI Download center.
- Connect the aircraft to the PC using the USB cable and power on the aircraft.
- Log in to your DJI account and choose your DJI drone.
- Then hit “Factory Restore Defaults” and wait until the process completes.
- Then try calibrating the IMU as explained in step 2.
5. Contact DJI support or professionals.
Read the detailed article: How to get DJI Support to repair/fix your DJI drone issue.
If you are still unable to fix the IMU calibration error, something is wrong with the hardware IMU (Inertial Measurement Unit) or the aircraft. So the only option to fix this error at this stage is to replace or repair the IMU or aircraft. Get in touch with DJI Support and get help with repairing or replacing the unit.
If it’s not possible to contact DJI, meet professionals and get help with repairing the hardware. Also if you suspect that the IMU is damaged, you can buy it online and replace it yourself. There are many videos about IMU replacement on youtube and you can follow those demonstrations and replace the IMU. Below the video is the IMU replacement of DJI Mavic Pro.
This in my code:
import pyrealsense2 as rs
import numpy as np
import cv2
import time

print('nusing librealsense sdk version: ' + str(rs.__version__))

# Stream Setting
device_id = None  # Default: None
enable_imu = True
accel_fps = 63
gyro_fps = 200
enable_depth = True
depth_resolution = (640, 360)
depth_fps = 60
enable_rgb = True
rgb_resolution = (640, 360)
rgb_fps = 60
do_align = True
if do_align and (not enable_depth or not enable_rgb):
    print('do align only if depth and color enabled!')
    exit()

if enable_imu:  # IMU Pipeline Configuration
    imu_pipeline = rs.pipeline()
    imu_config = rs.config()
    if device_id is not None:
        imu_config.enable_device(device_id)
    imu_config.enable_stream(rs.stream.accel, rs.format.motion_xyz32f, accel_fps)
    imu_config.enable_stream(rs.stream.gyro, rs.format.motion_xyz32f, gyro_fps)
    imu_profile = imu_pipeline.start(imu_config)

if enable_depth or enable_rgb:  # Depth + Color Pipeline Configuration
    pipeline = rs.pipeline()
    config = rs.config()
    if device_id is not None:
        config.enable_device(device_id)
    if enable_depth:
        config.enable_stream(rs.stream.depth, depth_resolution[0], depth_resolution[1], rs.format.z16, depth_fps)
    if enable_rgb:
        config.enable_stream(rs.stream.color, rgb_resolution[0], rgb_resolution[1], rs.format.bgr8, rgb_fps)
    profile = pipeline.start(config)
    if do_align:
        depth_sensor = profile.get_device().first_depth_sensor()
        depth_scale = depth_sensor.get_depth_scale()
        align_to = rs.stream.color
        align = rs.align(align_to)

time.sleep(2)  # Delay after starting pipeline(s)

try:
    frame_count = 0  # If needed
    while True:
        time1 = time.time()
        if enable_imu and do_align:
            frames = pipeline.wait_for_frames()
            imu_frames = imu_pipeline.wait_for_frames()
            aligned_frames = align.process(frames)
            aligned_depth_frame = aligned_frames.get_depth_frame()
            aligned_color_frame = aligned_frames.get_color_frame()
            accel_frame = imu_frames.first_or_default(rs.stream.accel).as_motion_frame()
            gyro_frame = imu_frames.first_or_default(rs.stream.gyro).as_motion_frame()
            if (not aligned_depth_frame or not aligned_color_frame) and (not accel_frame and not gyro_frame):
                print('aligned_depth_frame: %r' % aligned_depth_frame)
                print('aligned_color_frame: %r' % aligned_color_frame)
                print('accel_frame        : %r' % accel_frame)
                print('gyro_frame         : %r' % gyro_frame)
                continue

            if aligned_depth_frame and aligned_color_frame:
                depth_image = np.asanyarray(aligned_depth_frame.get_data())
                color_image = np.asanyarray(aligned_color_frame.get_data())
            else:
                depth_image = None
                color_image = None
            if accel_frame:
                accel_sample = np.asanyarray(accel_frame.get_motion_data())
            else:
                accel_sample = None
            if gyro_frame:
                gyro_sample = np.asanyarray(gyro_frame.get_motion_data())
            else:
                gyro_sample = None

        depth_colormap = cv2.applyColorMap(cv2.convertScaleAbs(depth_image, alpha=0.03), cv2.COLORMAP_JET)
        cv2.imshow("Color", color_image)
        cv2.imshow("Depth Colormap", depth_colormap)
        print('Accelerometer: ' + str(accel_sample))
        print('Gyroscope: ' + str(gyro_sample))
        key = cv2.waitKey(1)
        if key == 27:
#            if enable_imu:
#                imu_pipeline.stop()
#            if enable_depth or enable_rgb:
#                pipeline.stop()
            break
        print('Done 1 Frame! Time: {0:0.3f}ms & FPS: {1:0.2f}'.format(
            (time.time()-time1)*1000,
            1/(time.time()-time1)
        ))

finally:
    if enable_imu:
        imu_pipeline.stop()
    if enable_depth or enable_rgb:
        pipeline.stop()
    cv2.destroyAllWindows
First, after restart: worked, then exit properly.
$ python3 stream3in1.py

using librealsense sdk version: 2.32.1
Accelerometer: x: 0.284393, y: -9.64974, z: 0.509946
Gyroscope: x: 0, y: 0.00349066, z: 0
Done 1 Frame! Time: 213.311ms & FPS: 4.69
Accelerometer: x: 0.26478, y: -9.66936, z: 0.490332
Gyroscope: x: -0.00174533, y: 0.00349066, z: 0
Done 1 Frame! Time: 71.718ms & FPS: 13.94
Accelerometer: x: 0.284393, y: -9.66936, z: 0.490332
Gyroscope: x: -0.00523599, y: -0.00174533, z: 0
Done 1 Frame! Time: 70.885ms & FPS: 14.11
Accelerometer: x: 0.304006, y: -9.66936, z: 0.490332
Gyroscope: x: 0, y: -0.00174533, z: -0.00349066
Done 1 Frame! Time: 31.395ms & FPS: 31.85
Accelerometer: x: 0.304006, y: -9.64974, z: 0.490332
Gyroscope: x: 0, y: 0, z: 0
Done 1 Frame! Time: 67.800ms & FPS: 14.75
Accelerometer: x: 0.284393, y: -9.64974, z: 0.490332
Gyroscope: x: 0, y: -0.00523599, z: 0
Done 1 Frame! Time: 29.272ms & FPS: 34.16
Accelerometer: x: 0.284393, y: -9.68897, z: 0.509946
Gyroscope: x: -0.00523599, y: 0, z: 0.00349066
Done 1 Frame! Time: 43.204ms & FPS: 23.14
Accelerometer: x: 0.304006, y: -9.66936, z: 0.529559
Gyroscope: x: -0.00349066, y: 0.00174533, z: 0
Done 1 Frame! Time: 56.655ms & FPS: 17.65
Accelerometer: x: 0.284393, y: -9.66936, z: 0.490332
Gyroscope: x: 0, y: 0.00174533, z: -0.00349066
Done 1 Frame! Time: 34.464ms & FPS: 29.01
Accelerometer: x: 0.26478, y: -9.66936, z: 0.490332
Gyroscope: x: -0.00698132, y: 0.00174533, z: 0
Done 1 Frame! Time: 58.594ms & FPS: 17.07
Accelerometer: x: 0.284393, y: -9.66936, z: 0.509946
Gyroscope: x: -0, y: -0.00349066, z: 0.00174533
Done 1 Frame! Time: 61.028ms & FPS: 16.38
Accelerometer: x: 0.284393, y: -9.66936, z: 0.509946
Gyroscope: x: -0.00523599, y: -0.00174533, z: 0
Done 1 Frame! Time: 55.823ms & FPS: 17.91
Accelerometer: x: 0.284393, y: -9.66936, z: 0.490332
Gyroscope: x: -0.00698132, y: 0, z: 0
Done 1 Frame! Time: 46.720ms & FPS: 21.39
Accelerometer: x: 0.284393, y: -9.68897, z: 0.470719
Gyroscope: x: -0.00349066, y: 0, z: 0
Done 1 Frame! Time: 51.219ms & FPS: 19.52
Accelerometer: x: 0.284393, y: -9.64974, z: 0.490332
Gyroscope: x: -0.00174533, y: 0.00174533, z: 0
Done 1 Frame! Time: 41.964ms & FPS: 23.83
Accelerometer: x: 0.304006, y: -9.66936, z: 0.509946
Gyroscope: x: 0, y: 0.00349066, z: 0
Done 1 Frame! Time: 33.170ms & FPS: 30.14
Accelerometer: x: 0.304006, y: -9.66936, z: 0.490332
Gyroscope: x: 0, y: 0.00523599, z: -0.00174533
Done 1 Frame! Time: 35.163ms & FPS: 28.44
Accelerometer: x: 0.284393, y: -9.64974, z: 0.509946
Gyroscope: x: -0.00349066, y: 0, z: 0
Done 1 Frame! Time: 56.777ms & FPS: 17.61
Accelerometer: x: 0.284393, y: -9.66936, z: 0.509946
Gyroscope: x: -0.00174533, y: -0.00174533, z: -0.00174533
Done 1 Frame! Time: 29.440ms & FPS: 33.96
Accelerometer: x: 0.304006, y: -9.66936, z: 0.509946
Gyroscope: x: -0.00698132, y: 0, z: 0.00174533
Done 1 Frame! Time: 43.360ms & FPS: 23.06
Accelerometer: x: 0.284393, y: -9.68897, z: 0.509946
Gyroscope: x: -0.00174533, y: 0, z: 0
Done 1 Frame! Time: 45.114ms & FPS: 22.16
Accelerometer: x: 0.284393, y: -9.66936, z: 0.509946
Gyroscope: x: -0.00523599, y: 0, z: -0.00174533
Done 1 Frame! Time: 35.628ms & FPS: 28.06
I noticed that with these simple tasks, I got very poor FPS even though my setting was 60FPS for the depth+color. Yes, this is not the legal way to check the FPS, just as an indicator
Second, tried to run the program again:
$ python3 stream3in1.py

using librealsense sdk version: 2.32.1
Accelerometer: x: 0.284393, y: -9.68897, z: 0.509946
Gyroscope: x: -0.00174533, y: 0, z: 0.00174533
Done 1 Frame! Time: 3570.331ms & FPS: 0.28
Traceback (most recent call last):
  File "stream3in1.py", line 57, in <module>
    imu_frames = imu_pipeline.wait_for_frames()
RuntimeError: Frame didn't arrive within 5000
Third, unplug the RealSense for a minute, and plug it back, and run the program again:
$ python3 stream3in1.py

using librealsense sdk version: 2.32.1
Accelerometer: x: 0.166713, y: -8.50237, z: 0.402073
Gyroscope: x: -0.00523599, y: 0, z: 0
Done 1 Frame! Time: 3551.788ms & FPS: 0.28
Traceback (most recent call last):
  File "stream3in1.py", line 57, in <module>
    imu_frames = imu_pipeline.wait_for_frames()
RuntimeError: Frame didn't arrive within 5000
I realized it managed to get the first IMU frames, but with no depth+color (the cv2.imwrite() didn’t show anything). I tried once more to make sure:
$ python3 stream3in1.py

using librealsense sdk version: 2.32.1
Traceback (most recent call last):
  File "stream3in1.py", line 57, in <module>
    imu_frames = imu_pipeline.wait_for_frames()
RuntimeError: Frame didn't arrive within 5000
Now it didn’t manage to get the first IMU frames. Very strange huh!
Hi everyone, I got one new D455 and run it on a virtual machine that supports USB 3.0. Datastream works fine on both realsense-ros and realsense-viewer until I attempt to run the IMU calibration tool.
waiting for realsense device...

Error: No RealSense device.
Traceback (most recent call last):
  File "rs-imu-calibration.py", line 757, in <module>
    main()
  File "rs-imu-calibration.py", line 746, in main
    if os.name == 'posix' and old_settings is not None:
UnboundLocalError: local variable 'old_settings' referenced before assignmen
I followed the instruction and installed the python wrapper correctly. rs-emuerate-device can detect my camera. I wasn’t sure it is related to the virtual machine environment or else. It would be helpful if you have any ideas related to this failure.