
Вы столкнулись с сообщением «Ошибка 403»? Что делать, мы расскажем в этой статье.
Если при открытии вашего сайта вы получили одно из следующих уведомлений:
- В доступе на страницу отказано,
- 403 Forbidden,
- Forbidden, доступ запрещён,
- Forbidden You don’t have permission to access,
- Access denied.
Ошибка 403 говорит о том, что доступ к запрашиваемой странице запрещён или у пользователя нет прав на просмотр контента.
Причинами такой ошибки, чаще всего, являются неправильные настройки сайта, которые может решить только создатель ресурса. Со стороны пользователя также бывают проблемы, но они случаются намного реже.
Возможные причины и их решения, если проблема на стороне владельца сайта
Заблокирована работа хостинга
403 ошибка может возникнуть, если услуга хостинга была заблокирована. Блокировка может произойти, если превышены технические ограничения тарифа или нарушены условия договора оферты. Перед блокировкой на контактный email владельца услуги придёт предупреждение. У него будет 24 часа на устранение причины блокировки.
Проверьте вашу электронную почту. Если вам приходило уведомление о блокировке, следуйте рекомендациям в письме. После снятия блокировки сайт будет доступен. Если вы пропустили такое сообщение или не устранили проблему вовремя, услуга блокируется. Для снятия блокировки следуйте инструкции в письме или обратитесь в техническую поддержку.
Если подобных писем не приходило и услуга не блокировалась, причина ошибки в другом.
Некорректно задана главная страница сайта
Главная страница сайта (индексный файл) – это первая страница, которая открывается пользователю, если он перешёл по домену без указания точной страницы сайта, например www.test.ru. По общепринятым правилам она называется index.html или index.php. Если в корневой папке сайта отсутствует файл с названием index.html или index.php, возникнет ошибка 403. В качестве индексного файла может использоваться файл, отличный от index.html или index.php. Но название данного файла должно быть указано в настройках.
Проверьте, чтобы:
- в корневой папке сайта существовал файл главной страницы (индексный файл),
- в настройках указано соответствующее название файла главной страницы (индексного файла).
Чтобы это проверить войдите в панель управления хостингом и следуйте соответствующей инструкции ниже:
Как проверить, какое название файла главной страницы указано в настройках
-
1.
В левом меню перейдите на страницу Сайты.
-
2.
Выберите домен, на котором возникает ошибка 403, и нажмите кнопку Изменить.
-
3.
В пункте «Индексная страница» в поле ввода должно быть указано название файла главной страницы сайта. По умолчанию index.php index.html.

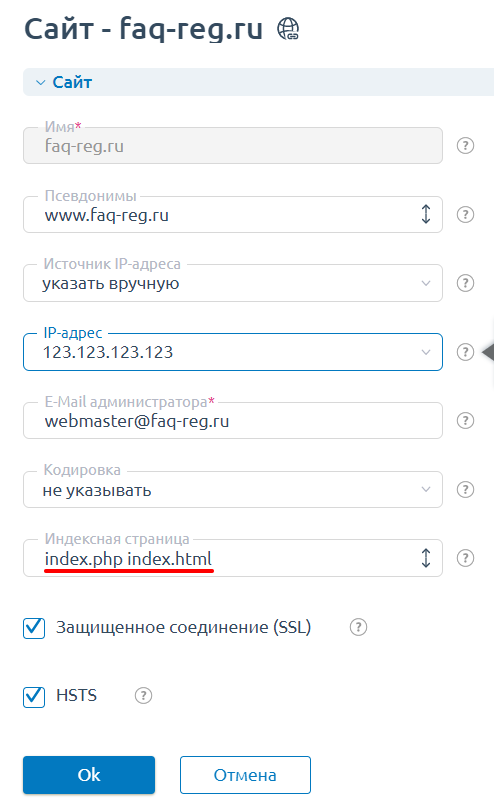
Если название файла главной страницы, который расположен в корневой папке сайта, не соответствует названию, указанному в настройках, измените на правильное и нажмите Ок.
Как проверить наличие индексного файла в корневой папке
-
1.
В левом меню перейдите на страницу Сайты.
-
2.
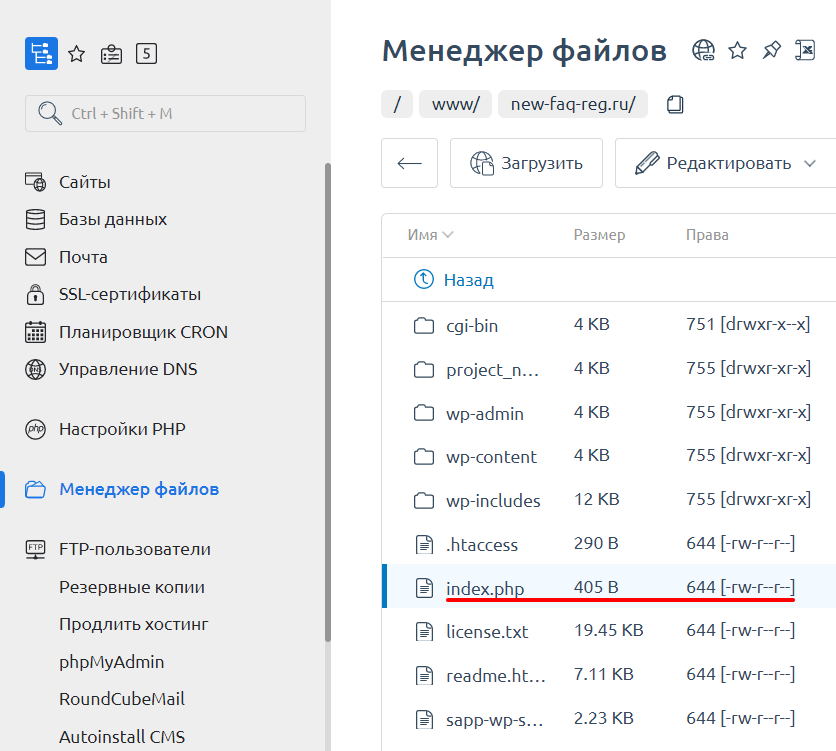
Выберите домен, на котором возникает ошибка 403, и нажмите кнопку Файлы сайта. Откроется корневая папка вашего сайта.
-
3.
Убедитесь, что в данной папке существует индексный файл, название которого указано в настройках домена:
Если в корневой папке есть индексный файл и его название соответствует названию в настройках домена, но 403 ошибка сохраняется, попробуйте другой вариант.
Как проверить, какое название файла главной страницы указано в настройках
Для панели управления CPanel название индексного файла установлено по умолчанию index.html и index.php. Изменить его можно только вручную, через файл .htaccess. Поэтому в случае с cPanel необходимо убедиться только в том, что в корневой папке сайта существует файл index.html или index.php.
Как проверить наличие индексного файла в корневой папке
Обратите внимание: если вид вашей панели управления отличается от представленного в статье, в разделе «Основная информация» переключите тему с paper_lantern на jupiter.
-
1.
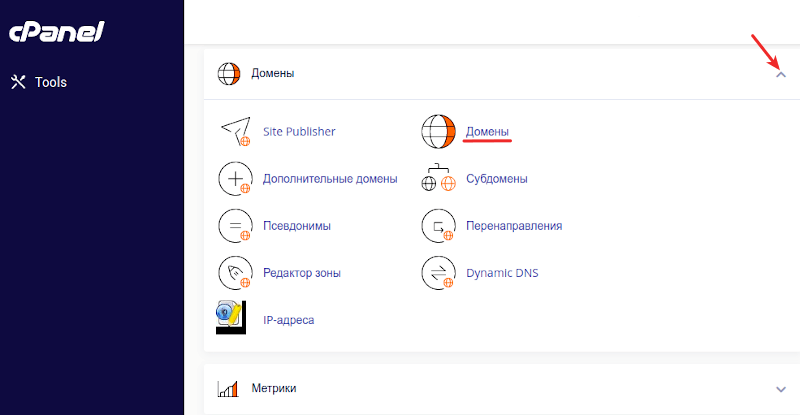
В разделе «Домены» перейдите на страницу Домены:
-
2.
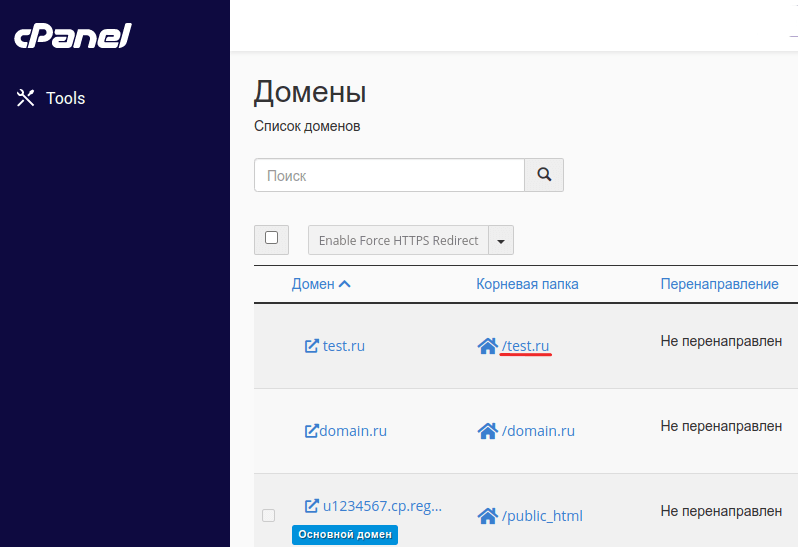
Нажмите по строке, где указана корневая папка домена, на котором возникает ошибка 403. Откроется корневая папка вашего сайта:
-
3.
Убедитесь, что в данной папке существует индексный файл, название которого указано в настройках домена.
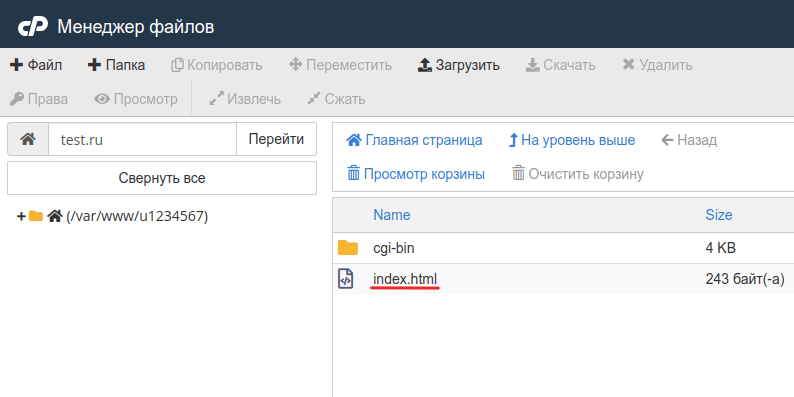
Если индексный файл index.html или index.php существует в корневой папке сайта, но 403 ошибка сохраняется, переходите к следующим действиям.
Как проверить, какое название файла главной страницы указано в настройках
Для панели управления Plesk название индексного файла установлено по умолчанию index.html и index.php. Изменить его можно только вручную, через файл .htaccess. Поэтому в случае с панелью Plesk необходимо убедиться только в том, что в корневой папке сайта существует файл index.html или index.php.
Как проверить наличие индексного файла в корневой папке
-
1.
Под нужным доменом нажмите по строке, где указана корневая папка домена. Откроется корневая папка вашего сайта.
-
2.
Убедитесь, что в данной папке существует индексный файл, название которого указано в настройках домена.

Если индексный файл index.html или index.php существует в корневой папке сайта, но 403 ошибка сохраняется, то переходите к следующим действиям.
Установлены некорректные права на файлы и каталоги сайта
В большинстве случаев корректными правами для каталогов являются «755», а для файлов «644». Проверьте и измените права на файлы и папки.
Если все права доступа к файлам и папкам указаны корректно, перейдите к следующему шагу.
Файлы сайта находятся не в корневой директории
При переходе на ваш сайт домен обращается к корневой папке, которая была указана в настройках домена. Если сайт был загружен в другую папку или подпапку в корневой директории, то возникнет ошибка 403.
Чтобы узнать корневую директорию и проверить, загружены ли в неё файлы сайта, выберите свою панель и следуйте соответствующей инструкции:
-
1.
В левом меню перейдите на страницу Сайты.
-
2.
Выберите домен, на котором возникает ошибка 403, и нажмите кнопку Файлы сайта.
-
3.
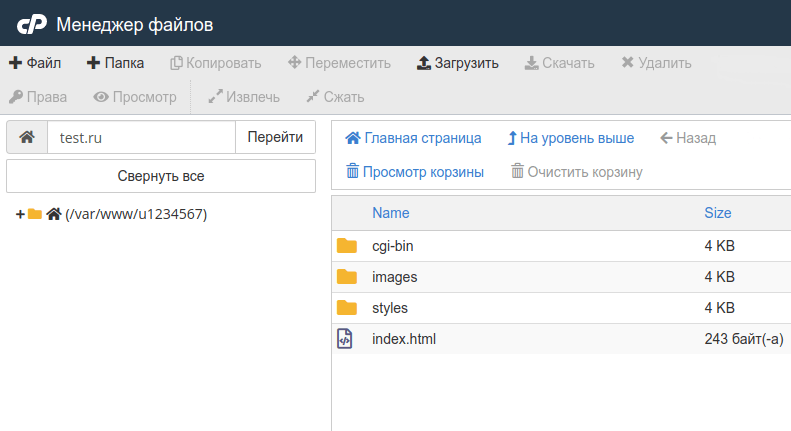
Откроется корневая папка вашего сайта. Убедитесь, что файлы сайта загружены в эту папку, а не в подпапку.
При отсутствии файлов сайта в корневой папке, добавьте их по инструкции Как разместить сайт на хостинге. Если ошибка 403 сохраняется, то переходите к следующему шагу.
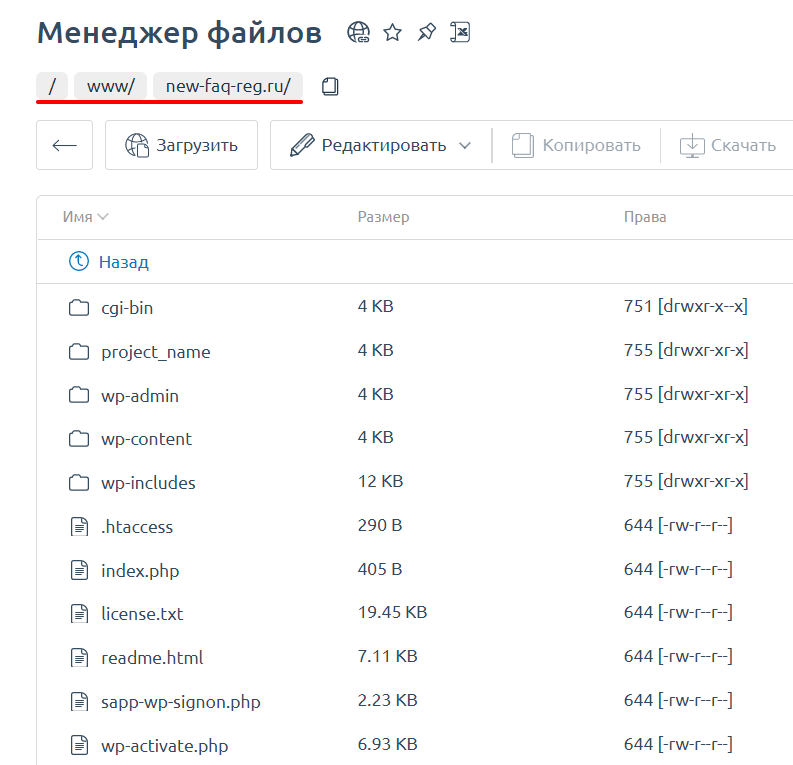
Обратите внимание: если вид вашей панели управления отличается от представленного в статье, в разделе «Основная информация» переключите тему с paper_lantern на jupiter.
-
1.
В разделе «Домены» перейдите на страницу Домены:
-
2.
Нажмите по строке, где указана корневая папка домена, на котором возникает ошибка 403. Откроется корневая папка вашего сайта:
-
3.
Убедитесь, что файлы сайта загружены в эту папку, а не в подпапку.
При отсутствии файлов сайта в корневой папке, добавьте их по инструкции Как разместить сайт на хостинге. Если ошибка 403 сохраняется, то переходите к следующему шагу.
-
1.
Под нужным доменом нажмите по строке, где указана корневая папка домена. Откроется корневая папка вашего сайта.
-
2.
Убедитесь, что файлы сайта загружены в эту папку, а не в подпапку.
При отсутствии файлов сайта в корневой папке, добавьте их по инструкции Как разместить сайт на хостинге. Если ошибка 403 сохраняется, то переходите к следующему шагу.
Неправильно настроен файл .htaccess (только для хостинга Linux)
Проверьте правила в конфигурационном файле .htaccess. Попробуйте временно изменить имя файла .htaccess, например, на .htaccess_old, и проверьте работоспособность сайта.
Если сайт станет доступен или на нём будет отображаться другая ошибка (не 403), дело в некорректных правилах или директивах, заданных в .htaccess.
Чтобы поправить, обратитесь к разработчикам сайта. Как правило, проблемы связаны с условиями «deny from all» и «RewriteRule».
Если вы используете на своём сайте CMS (например, WordPress, Bitrix и т.п.), вам может помочь замена существующего файла .htaccess на стандартный для вашей CMS.
Если после изменения названия файла .htaccess ошибка 403 не пропала, переходите к следующим действиям.
Некорректная версия ASP.NET (только для хостинга для ASP.NET)
Ошибка может возникнуть, если ваш сайт написан для версии ASP.NET 4.x, а на услуге хостинга установлен ASP.NET 3.5. Чтобы изменить версию ASP.NET для услуги хостинга, оставьте заявку в службу поддержки.
Некорректная работа плагинов в WordPress
Если ваш сайт сделан на WordPress, нужно проверить, не мешают ли работе сайта плагины.
Сначала обновите все плагины до последней версии. Иногда устаревшие версии работают некорректно и могут появляться различные ошибки.
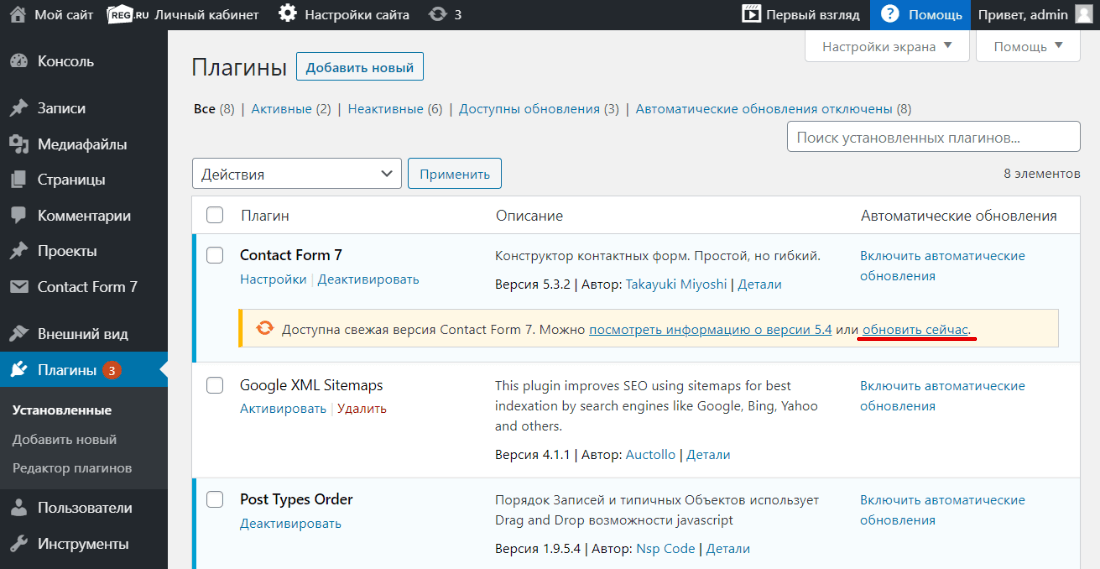
После обновления проверьте, работает ли сайт. Если нет, отключите плагины. Если это помогло, значит, один из них нарушает работу веб-ресурса. Отключайте плагины по очереди, пока не найдете плагин-виновник.
Что может сделать пользователь со своей стороны
- Проверьте правильность написания URL. Возможно, адрес был введён неверно, поэтому браузер выдал ошибку. Также обратите внимание, что вы вводите адрес веб-страницы или файла, а не каталога. Обычный URL-адрес заканчивается на .com, .ru .php, .html. URL-адрес каталога обычно заканчивается символом «/».
- Убедитесь, что у вас действительно есть доступ к этому сайту. Некоторые корпоративные сайты ограничивают виды пользователей, которые могут посещать сервис или для просмотра нужно вводить корпоративный VPN.
- Обновите страницу или зайдите позже. Если проблема на стороне владельца сайта, подождите, когда он устранит неполадку.
- Очистите кэш и cookies браузера. Это может быть эффективно, если ранее вы заходили на сайт без проблем.
- Сайт ограничен для пользователей определённого региона. Каждому устройству, который работает с интернетом присвоен IP-адрес, который содержит информацию о регионе, где пользуются устройством. Если вы пытаетесь зайти на сайт, который можно просматривать только в определенном месте, появляется ошибка 403. Для решения этой проблемы можно использовать прокси-сервер или VPN.
- Если вы уверены, что сайт работает у других пользователей и вы попробовали все вышеперечисленные способы, обратитесь к интернет-провайдеру. Поставщик интернета мог попасть в чёрный список, что привело к ошибке 403 Forbidden на страницах одного или нескольких сайтов.
«403 Forbidden» — наиболее распространенная ошибка при работе с NGINX. В этой статье мы расскажем о причинах возникновения 403 forbidden NGINX, а также о том, как найти ее причину и исправить основную проблему.
- Об ошибке
- Поиск файла конфигурации NGINX
- Некорректный индексный файл
- Автоиндекс
- Права доступа к файлам
- Идентификация пользователя NGINX
- Установите права собственности на файл
- Установите права доступа
«403 Forbidden» — это универсальная ошибка NGINX, которая указывает на то, что вы запросили что-то, а NGINX (по ряду причин) не может это предоставить. «403» является кодом состояния HTTP, который означает, что веб-сервер получил и понял ваш запрос, но не может предпринять никаких дальнейших действий.
По умолчанию файлы конфигурации NGINX находятся в папке /etc/nginx. Если вы просмотрите этот каталог, то найдете несколько конфигурационных файлов для различных модулей сервера.
Главный файл конфигурации — /etc/nginx/nginx.conf. Он содержит основные директивы для NGINX и является аналогом файла httpd.conf для Apache.
Чтобы отредактировать этот файл, используйте команду:
CentOS 7: sudo nano /etc/nginx/conf.d/test.example.com.conf
Ubuntu 16.04: sudo nano /etc/nginx/sites-available/test.example.com.conf
Одна из наиболее распространенных причин ошибки 403 forbidden NGINX — некорректная настройка индексного файла.
nginx.conf указывает, какие индексные файлы должны загружаться, и в каком порядке. Например, приведенная ниже строка указывает NGINX искать index.html, затем index.htm, затем index.php:
index index.html index.htm index.php;
Если ни один из этих трех файлов не будет найден в каталоге, NGINX вернет ошибку «403 Forbidden».
Примечание. Имена файлов чувствительны к регистру. Если nginx.conf указывает index.html, а файл называется Index.html, это приведет к ошибке «403 Forbidden».
Если вы хотите использовать имя индексного файла, которое ваш веб-сервер NGINX не распознает, отредактируйте nginx.conf и добавьте имя файла в строку конфигурации индекса.
Например, чтобы добавить index.py в список распознаваемых индексных файлов, отредактируйте эту строку следующим образом:
index index.html index.htm index.php index.py;
Сохраните изменения, а затем перезапустите NGINX командой:
Альтернативным решением является разрешение индекса директории. Индекс директории означает, что если индексный файл не найден, сервер отобразит все содержимое директории.
По соображениям безопасности индекс директории в NGINX по умолчанию отключен.
При «403 forbidden NGINX», если вы хотите показать индекс директории в ситуациях, когда NGINX не может найти (идентифицировать) файл, отредактируйте nginx.conf, как описано выше, и добавьте в него две следующие директивы:
Autoindex on;
Autoindex_exact_size off;
Эти директивы должны быть добавлены в блок location. Можно либо добавить их в существующий блок location/, либо добавить новый. Окончательный результат должен выглядеть так:
location / {
  [pre-existing configurations, if applicable]
  autoindex on;
  autoindex_exact_size off;
  }
Также можно активировать индексирование директории в определенной папке, если не хотите, чтобы она была доступна для всего сайта:
location /myfiles {
  autoindex on;
  autoindex_exact_size off;
  }
Сохраните изменения в файле, затем перезапустите NGINX командой:
Некорректные права доступа к файлам являются еще одной причиной ошибки «403 Forbidden NGINX». Для использования с NGINX рекомендуется стандартная настройка: для каталогов — 755 и для файлов — 644. Пользователь NGINX также должен быть владельцем файлов.
Для начала нужно определить, от имени какого пользователя запущен NGINX. Для этого используйте команду:
В этом примере рабочий процесс NGINX работает от имени пользователя nginx.
Перейдите на уровень выше корневой директории документа сайта. Например, если корневая директория вашего сайта /usr/share/nginx/example.com, перейдите в /usr/share/nginx с помощью команды:
Измените права собственности на все файлы в директориях нижних уровней на пользователя nginx с помощью команды:
sudo chown -R nginx:nginx *
403 forbidden NGINX — как исправить: установите права доступа для каждой директории на 755 с помощью команды:
sudo chmod 755 [имя директории]
Например, чтобы установить права доступа для директории example.com, используется команда:
sudo chmod 755 example.com
Затем перейдите в корневой каталог веб-документа:
sudo chmod 755 example.com
Измените права доступа для всех файлов в этой директории с помощью команды:
Все мы, путешествуя по просторам интернета, натыкаемся на различные ошибки при загрузке сайтов. Одна из них, кстати, достаточно часто встречается – я говорю об ошибке сервера 403 Forbidden Error. Сегодня я рассмотрю причины ее возникновения и способы устранения со стороны владельца сайта и его пользователя.
Что означает ошибка 403 и почему она появляется
Ошибка сервера 403 Forbidden означает ограничение или отсутствие доступа к материалу на странице, которую вы пытаетесь загрузить. Причин ее появления может быть несколько, и вот некоторые из них:
- Формат индексного файла неверен.
- Некорректно выставленные права на папку/файл.
- Файлы были загружены в неправильную папку.
Комьюнити теперь в Телеграм
Подпишитесь и будьте в курсе последних IT-новостей
Подписаться
Исправление ошибки сервера 403 Forbidden
Чтобы исправить ошибку сервера 403 Forbidden, обязательно нужен доступ к панели управления вашего хостинга. Все описанные ниже шаги применимы к любой CMS, но примеры будут показаны на основе WordPress.
Проверка индексного файла
Сначала я проверю, правильно ли назван индексный файл. Все символы в его имени должны быть в нижнем регистре. Если хотя бы один символ набран заглавной буквой, возникнет ошибка 403 Forbidden. Но это больше относится к ОС Linux, которой небезразличен регистр.
Еще не стоит забывать, что индексный файл может быть нескольких форматов, в зависимости от конфигураций сайта: index.html, index.htm, или index.php. Кроме того, он должен храниться в папке public_html вашего сайта. Файл может затеряться в другой директории только в том случае, если вы переносили свой сайт.

Любое изменение в папке или файле фиксируется. Чтобы узнать, не стала ли ошибка итогом деятельности злоумышленников, просто проверьте графу «Дата изменения».
Настройка прав доступа
Ошибка 403 Forbidden появляется еще тогда, когда для папки, в которой расположен искомый файл, неправильно установлены права доступа. На все директории должны быть установлены права на владельца. Но есть другие две категории:
- группы пользователей, в числе которых есть и владелец;
- остальные, которые заходят на ваш сайт.
На директории можно устанавливать право на чтение, запись и исполнение.
Так, по умолчанию на все папки должно быть право исполнения для владельца. Изменить их можно через панель управления TimeWeb. Для начала я зайду в раздел «Файловый менеджер», перейду к нужной папке и выделю ее. Далее жму на пункт меню «Файл», «Права доступа».

Откроется новое окно, где я могу отрегулировать права как для владельца, так и для всех остальных.

Отключение плагинов WordPress
Если даже после всех вышеперечисленных действий ошибка не исчезла, вполне допустимо, что влияние на работу сайта оказано со стороны некоторых плагинов WordPress. Быть может они повреждены или несовместимы с конфигурациями вашего сайта.
Для решения подобной проблемы необходимо просто отключить их. Но сначала надо найти папку с плагинами. Открываю папку своего сайта, перехожу в раздел «wp-content» и нахожу в нем директорию «plugins». Переименовываю папку – выделяю ее, жму на меню «Файл» и выбираю соответствующий пункт. Название можно дать вот такое: «plugins-disable». Данное действие отключит все установленные плагины.

Теперь нужно попробовать вновь загрузить страницу. Если проблема исчезла, значит, какой-то конкретный плагин отвечает за появление ошибки с кодом 403.
Но что делать, если у вас плагин не один, а какой из них влияет на работу сайта – неизвестно? Тогда можно вернуть все как было и провести подобные действия с папками для определенных плагинов. Таким образом, они будут отключаться по отдельности. И при этом каждый раз надо перезагружать страницу и смотреть, как работает сайт. Как только «виновник торжества» найден, следует переустановить его, удалить или найти альтернативу.
Читайте также

Как решить проблему, если вы – пользователь
Выше я рассмотрела способы устранения ошибки 403 Forbidden для владельцев сайта. Теперь же разберу методы исправления в случаях с пользователем.
- Сначала надо убедиться, что проблема заключается именно в вашем устройстве. Внимательно проверьте, правильно ли вы ввели URL сайта. Может, в нем есть лишние символы. Или, наоборот, какие-то символы отсутствуют.
- Попробуйте загрузить страницу с другого устройства. Если на нем все будет нормально, значит, проблема кроется именно в используемом вами девайсе. Если нет – надо перейти к последнему шагу.
- Еще хороший вариант – немного подождать и обновить страницу. Делается это либо кликом по иконке возле адресной строки браузера, либо нажатием на комбинацию Ctrl + F5. Можно и без Ctrl, на ваше усмотрение.
- Если ничего из вышеперечисленного не помогло, надо очистить кэш и cookies. Провести такую процедуру можно через настройки браузера. Для этого необходимо открыть историю просмотров, чтобы через нее перейти к инструменту очистки. Эту же утилиту часто можно найти в настройках, в разделе «Конфиденциальность и безопасность». В новом окне нужно отметить пункты с кэшем и cookies и нажать на кнопку для старта очистки.

- Ошибка 403 Forbidden возникает и тогда, когда пользователь пытается открыть страницу, для доступа к которой сначала надо осуществить вход в систему. Если у вас есть профиль, просто войдите в него и попробуйте вновь загрузить нужную страницу.
- Если вы заходите со смартфона, попробуйте отключить функцию экономии трафика в браузере. Она находится в настройках, в мобильном Google Chrome под нее отведен отдельный раздел.
- Последний шаг – подождать. Когда ни один способ не помогает, значит, неполадки возникли именно на сайте. Возможно, его владелец уже ищет способы решения проблемы и приступает к их исполнению, но это может занять какое-то время. Пользователям остается только дождаться, когда все работы будут завершены.
Еще одна допустимая причина появления ошибки сервера 403 – доступ к сайту запрещен для определенного региона или страны, в которой вы находитесь. Бывает и такое, что сайт доступен для использования только в одной стране. Если вы используете VPN, попробуйте отключить его и перезагрузите страницу. Вдруг получится все исправить.
Если ничего из вышеперечисленного не сработало, рекомендуется обратиться к владельцу сайта. Есть вероятность, что никто не знает о возникшей проблеме, и только ваше сообщение может изменить ситуацию.
Introduction
When a web server denies access to a particular webpage or web content, it displays the 403 Forbidden error. Different web servers report different variations of the 403 Forbidden error.
In this article, you will learn what a 403 error is and how to fix it.
The 403 Forbidden error happens when a web server denies access to a webpage to a user trying to access it trough a web browser. The name «403 error» derives from the HTTP status code that the web server uses to describe that type of error.
There are several variations of the error and several reasons why the web server has denied access. The following sections deal with the different ways the error is displayed and its causes.
Common 403 Error Messages
Like with other errors, webmasters can customize how the 403 error is displayed. Its contents also depend on the web server used. That is why there are many different 403 pages across different websites.
Some common 403 error messages are:
- 403 Forbidden
- HTTP 403
- Forbidden
- HTTP Error 403 – Forbidden
- HTTP Error 403.14 – Forbidden
- Error 403
- Forbidden: You don’t have permission to access [directory] on this server
- Error 403 – Forbidden
- 403 Forbidden Error
- 403 Error
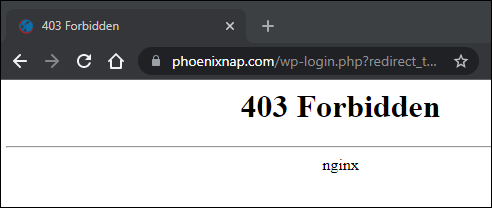
The image above shows an example of a 403 Forbidden error served by an Nginx web server.
What Causes the 403 Forbidden Error
The 403 Forbidden error usually occurs due to access misconfiguration. The misconfiguration involves improper read, write, or execute permission settings for a file or directory.
Possible causes for the 403 Forbidden error are:
- An empty website directory. If there is no index.php or index.html page, the 403 error displays.
- Missing index page. The 403 error may occur if the homepage name isn’t index.html or index.php.
- Permission/ownership errors. Incorrect permission settings or ownership cause the 403 error.
- Incorrect .htaccess file settings. The .htaccess file holds important website configuration settings, and it could be corrupted.
- Malware infection. If your files are infected with malware, it can keep corrupting the .htaccess file.
- Cached outdated webpage. The 403 error comes up if the page link has been updated, which is now different from the cached version.
- Faulty plugin. Improperly configured WordPress plugins or their incompatibility could trigger the 403 error.
The following section deals with different ways of fixing the 403 Forbidden error.
How to Fix the 403 Forbidden Error (Tips for Webmasters)
You can do several things to fix the 403 Forbidden error, depending on whether you are a website visitor or a webmaster.
The following fixes for the 403 Forbidden error are resources for site webmasters:
Check Website Directory
An empty website directory may cause the 403 error. Make sure that the content is in the correct directory on the server.
Depending on the server you are using, the correct directory for your content is:
- For Nginx: /var/www/vhosts/domain.com/httpdocs/
- For Apache: /home/username/public_html/
If there is no such directory, create one.
Add an Index Page
The website homepage by default is index.html or index.php. If there is no such page on your website, the visitors can encounter a 403 Error. Resolve this by uploading an index page to your httpdocs or public_html directory.
If you already have a homepage named other than index, you can rename it or set up a redirect in your .htaccess file to that homepage.
Warning: Be careful when editing the .htaccess file as it contains server configuration instructions and affects your web server’s behavior. The file is usually hidden as a precaution, but you can find it in your public_html directory by checking the Show Hidden Files option.
To redirect to your homepage, follow the steps below:
1. Log in to cPanel and navigate to your public_html directory.
Note: You can also download and edit the .htaccess file locally using an FTP client instead of cPanel.
2. Right-click the .htaccess file and choose Edit from the dropdown menu.
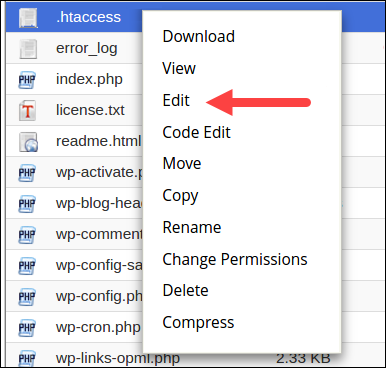
3. Redirect the index.php or index.html file to your existing homepage by inserting the following code snippet:
redirect /index.html /homepage.htmlReplace homepage.html with the actual name of your page.
Check File and Directory Permissions
Each file and directory on your website have permissions that control access to those files and directories. Incorrect file or directory permissions can cause the 403 Forbidden error. The permissions specify who has read or write access to the file or directory in question.
The permissions are represented with numeric values. The general practice is to use:
- 755 for directories
- 644 for static content
- 700 for dynamic content
Note: Linux file permissions can include numbers, letters, or words, as well as an entry stating to whom the file has been assigned — Owner, Group, or Both.
You can change file permissions recursively with the chmod command. If you prefer a GUI, use an FTP client to change file or directory permissions.
Create a New .htaccess File
A 403 error can be the result of improper .htaccess file configuration. The .htaccess file controls the high-level website configuration.
Follow the steps below to check if the .htaccess file is the cause of the 403 error:
1. Find the .htaccess file via your file management software (e.g., cPanel) or via an sFTP or FTP client.
2. Right-click the .htaccess file and select Download to create a local backup.
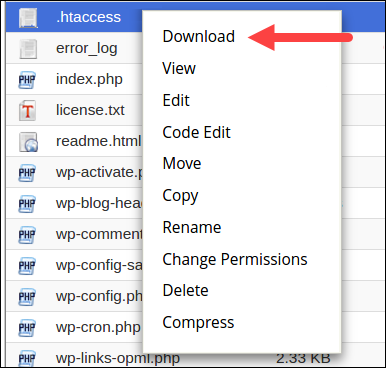
3. Next, click Delete to delete the file.
4. Visit your website. If the 403 error no longer appears, it means that the .htaccess file was corrupt.
5. Now you need to generate a new .htaccess file. Log in to your dashboard and click Settings > Permalinks.
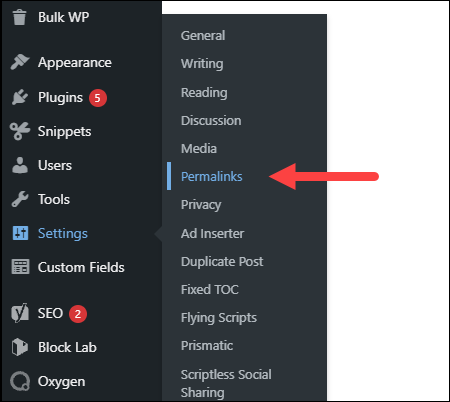
6. Don’t make any changes. Just click the Save Changes button to create a new .htaccess file.
Visit your website to check if the error is fixed.
Enable Directory Browsing
If the website shows a 403 error when you’re trying to browse a directory, you may need to enable directory browsing in your web server software. You can turn on directory browsing in the config file. If you don’t feel confident editing the config files yourself, seek help from a web master or your hosting provider.
The following examples show how to enable directory browsing in different web servers:
- IIS Express
1. Open the Web.config file of your project.
2. Add the following tags within <system.webServer>:
<directoryBrowse enabled="true" />
<modules runAllManagedModulesForAllRequests="true" />
- Nginx
Change the autoindex value to on in the config file:
The following is an example of the config file with the on value for autoindex.
server {
 listen 80;
 server_name phoenixnap.com www.phoenixnap.com;
 access_log /var/...........................;
 root /path/to/root;
 location / { index index.php index.html index.htm; }
 location /somedir { autoindex on; }
}
Apache
You have to specify the DirectoryIndex directive in the site’s .conf file (found in /etc/apache2/sites-available on Linux).
Turn on directory browsing in the Options directive. Following is an example of the .conf file with directory browsing turned on:
<Directory /usr/local/apache2/htdocs/listme>
  Options +Indexes
</Directory>
Contact the Hosting Company
The reason for the 403 Forbidden error could be with the hosting company and not with you. If everything else fails to remove the error, get in touch with your hosting company and let them check what could be causing the issue.
Disable WordPress Plugins
Sometimes, a faulty or incompatible plugin is what causes a 403 forbidden error. You can try to fix the error by disabling all plugins to check if the error goes away.
Follow the steps below to disable all plugins:
1. Log into the WP Admin and navigate to Plugins > Installed Plugins.
2. Select all plugins, choose Deactivate from the drop-down menu and click Apply.
3. Try to access your website. If there is no 403 forbidden error, that means that the cause was one of the plugins.
4. Now enable one plugin at a time to determine which one is causing the 403 error. When you find the root of the problem, update or remove the plugin or install an alternative one to resolve the issue.
Check the A Record
One of the reasons for the 403 Forbidden error can be a domain name pointing to the wrong IP address, where you don’t have the permission to view the content. This happens when the A record of a migrated website still points to the old IP address.
Follow the steps below to check if the domain A record points to the right IP address:
1. Log in to cPanel.
2. In the Domains section, click DNS Zone Editor.
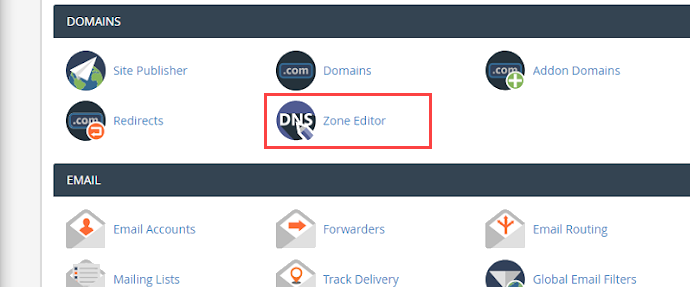
3. In the list of DNS records, find the record with the A label in the Type column.
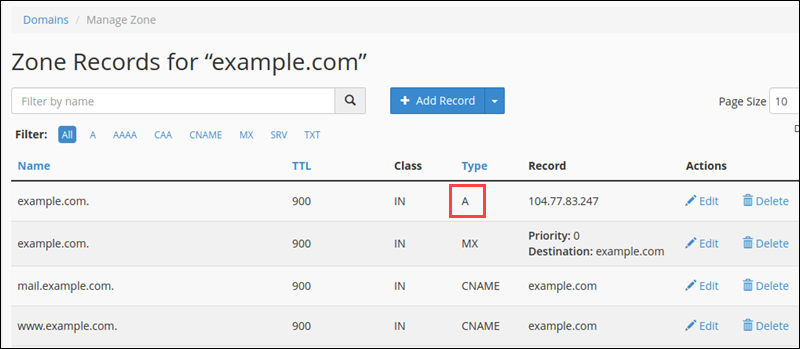
4. Check if the A record IP address in the Record column is correct. If it’s wrong, click Edit to change it.
5. Click Update to finish.
Revisit the website to see if the issue has been resolved.
Scan for Malware
Having malware on your web server can cause the 403 Forbidden error. The malware can keep injecting unwanted lines into the .htaccess file, and that way the error persists even if you generate a new .htaccess file.
Use a security plugin to scan your web server for malware and remove it if any is found. Most plugins also offer actions when detecting malware infected files, such as deleting the infected file or restoring it.
Some of the best security plugins for WordPress are Sucuri, Wordfence, Defender, etc.
How to Fix the 403 Forbidden Error (Tips for Site Visitors)
If you are a site visitor that has encountered the 403 error, below is a list of things you can try to fix the issue.
Check URL
A wrong URL is a common cause of the 403 Forbidden error. Make sure that you’re trying to access an actual webpage instead of a directory.
Many websites don’t allow visitors to browse through directories, so if you are trying to acces a directory, you will likely get a 403 Forbidden error.
Clear History/Cache
Your browser stores cached webpages to load them faster the next time you visit them. Sometimes the website link has been updated, making the actual link different from the cached version. Loading the cached version then results in a 403 error.
The stored cookies on your browser can also cause the 403 error. If the cookies are invalid or corrupted, they can cause improper server authentication. Clearing browser cache and cookies should resolve this issue.
Note: Clearing the browser cache and cookies means that the next time you load the webpage, your browser requests all the site files again, making it load slower. Clearing the cookies also signs you out from all logged-in websites.
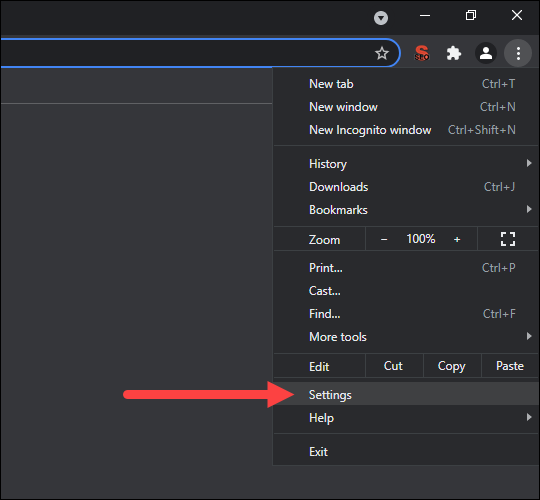
Follow the steps below to clear the cache and cookies on Google Chrome:
- Click the three-dot button on the top right corner and select Settings.
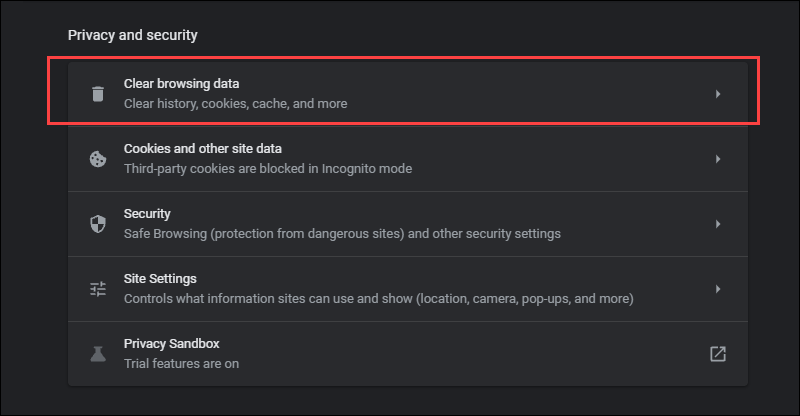
2. Find the Privacy and security section and click Clear browsing data.
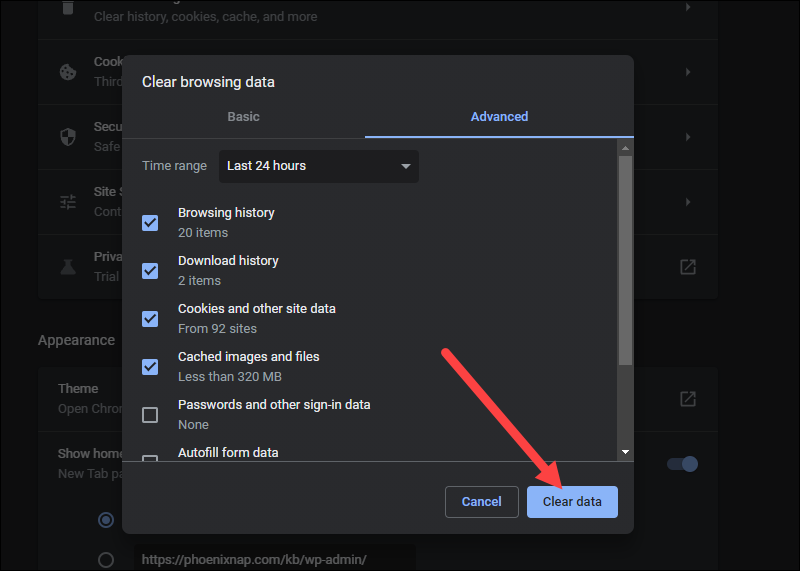
- In the drop-down menu, select the data deletion time frame.
- Check the Cookies and other site data and Cached images and files options and click Clear data.
Try to reload the site to see if the problem persists.
Log in
A 403 Forbidden error code could sometimes appear because you need to log in to a website to access a page. If possible, log in with your credentials to gain access to the content.
Note: Although the 401 error is usually displayed when you need special permission to access content, sometimes the 403 Forbidden error is displayed instead.
Reload the Page
Sometimes, reloading the page is the trick to getting around the 403 Forbidden error. Each browser has its own reload button near the address bar. Press Ctrl+F5 on Windows and Linux or Cmd+Shift+R on Mac to reload the page if you prefer using the keyboard.
Try Later
If you aren’t the only one denied access to the website, then the problem is usually with the host. Revisit the site later and see if the issue has been resolved.
Contact Your ISP
If you cannot get around the 403 error on a website, but it works for other people, contact your internet service provider (ISP).
Your IP address could be added to a blocklist, and it is causing the 403 forbidden error. In that case, your ISP cannot help you, and the only way to access the website is to use a VPN.
Conclusion
High website availability provides the best user experience and shows reliability. That is why website owners try to keep their site available at all times and invest in website maintenance services.
Preventing or quickly resolving HTTP errors is crucial if you want to retain your visitors. After reading this guide, you should be able to promptly fix the 403 Forbidden error and keep your business running.
You must have encountered some common errors while trying to access your WordPress site that shows a forbidden message. You likely came across a 403 forbidden error. In this guide, we will take you through how to fix the 403 error code. We will cover detailed information on how to resolve the issue so without any further delay let’s get started.
What does 403 Forbidden mean?
403 forbidden error or 403 forbidden access to this resource on the server is denied! is one of the HTTP errors that you face while working on WordPress. There are some HTTP status codes defined by Microsoft’s Internet Information Services which are considered standard internet codes.
These codes are used by web servers to communicate with your web browsers (like Chrome, Firefox, Opera, etc.). These codes are defined within the HTTP header. In normal circumstances when the website is working fine, the server sends Status Code as 200.

In case there is something wrong with the requested resource, it returns an error code. There are lots of error codes used by HTTP, for example, a 404 error is returned for a resource not found and a 500 error code signifies an internal server error. Another such HTTP response code is 403 which signifies that the user is prohibited or forbidden to access the requested web resource, which exists on the web server. We have tried to resolve all the common errors like 404 error, 504 gateway timeout error, 502 bad gateway error, etc faced while working on WordPress.
These types of errors are classified into two categories, they are either “client-side” errors or they are “server-side” errors.
Example of Client-Side Errors:
- 400 Bad Request
- 401 Unauthorized
- 403 Forbidden
- 404 Not Found, and
- 408 Request Timeout Error
Example of Server Side Errors:
- 500 Internal Server Error
- 502 Bad Gateway
- 503 Service Unavailable and
- 504 Gateway Timeout
To make the identification of these HTML errors easier 4xx are client-side errors, while 5xx are server-side errors.
In this article, we will learn about the reasons for 403 errors, and possible ways to troubleshoot them for your visitors to easily access your website or web application without any errors.
Different browsers show different messages for the 403 error :
- Forbidden: You don’t have permission to access / on this server.
- HTTP Error 403 – Forbidden
- 403 forbidden requests forbidden by administrative rules
- 403 Forbidden
- Access Denied You don’t have permission to access
- 403 – Forbidden: Access is denied
- Error 403 – Forbidden
- 403 forbidden nginx– You are not allowed to access this address 403 Forbidden – Nginx HTTP Error 403 – Forbidden – You do not have permission to access the document or program you requested
- 403 Forbidden – Access to this resource on the server is denied
- 403. That’s an error. Your client does not have permission to get URL / from this server
- You are not authorized to view this page
What are the Causes of 403 Forbidden Error?
- Incorrect File Permissions
- No Index file or Empty Folder
1. Incorrect File Permissions:
The most common reason behind this error is files and folder permissions on the webserver. This can be easily fixed by going into your File Manager under cPanel and checking the permission settings. We will discuss the issue in detail in the subsequent sections.
The ideal folder permissions on a web server should look like this:
- Permission Status for Folders: 755
- Static Content: 644
- Dynamic Content: 700
Understanding File Permissions
- 7 : Stands for full access (Read, Write, Execute)
- 6 : for the Only Read and Write Access
- 5 : Stands for Reading and Execute
- 4 : Only Read Access
- 0 : Stands for No Access Rights
The 3 digits in the permission codes specify Owner | Group | Public in that order
So, if a folder permission codes look like 7|5|4 it means the owner has full access (7), while Group can Read and Execute (5) while Public/Everyone else can only Read (4) the resource.
These codes can be changed under File Manager if you are using a Cpanel. File permissions can also be changed using an FTP tool like Filezilla.
What does the Read/Write/Execute means?
- Read – view the files and subfolders within the folder.
- Write – add, edit or delete the files and subfolders inside the folder
- Execute – process/execute the resources using a script or commands to change their value.
Setting File Permission using FTP Tool like Filezilla


Setting File Permission using File Manager in Cpanel


Folder permissions can also be changed using SSH under chmod commands.
2. No Index file or Empty Folder:
One of the other reasons for this error is the empty Http directory, or in other words, no website or web application files are uploaded to the server directory.
The default landing page for a website or web application is index.html or index.php. The server will return a 403 error status if none of the 2 exists on the server. Or you have defined some other file in Nginx config or .htaccess as the home page, and that file is not uploaded in the directory.
These are some of the common reasons behind the 403 Forbidden errors.
The other specific reasons and level of resource access forbidding can be determined by identifying the sub-status code, which is as follows (though they are not standard codes):
- 403.1 – Execute access forbidden.
- 403.2 – Read access is forbidden.
- 403.3 – Write access forbidden.
- 403.4 – SSL required
- 403.5 – SSL 128 required.
- 403.6 – IP address rejected.
- 403.7 – Client certificate required.
- 403.8 – Site access denied.
- 403.9 – Too many users.
- 403.10 – Invalid configuration.
- 403.11 – Password change.
- 403.12 – Mapper denied access.
- 403.13 – Client certificate revoked.
- 403.14 – Directory listing denied.
- 403.15 – Client Access Licenses exceeded.
- 403.16 – Client certificate is untrusted or invalid.
- 403.17 – Client certificate has expired or is not yet valid.
- 403.18 – Cannot execute request from that application pool.
- 403.19 – Cannot execute CGIs for the client in this application pool.
- 403.20 – Passport logon failed.
- 403.21 – Source access denied.
- 403.22 – Infinite depth is denied.
- 403.502 – Too many requests from the same client IP; Dynamic IP Restriction limit reached.
- 403.503 – Rejected due to IP address restriction
Based on one of the identified above sub-status error codes you can easily troubleshoot the error.
On WordPress, there can be additional events that can cause a temporary 403 Forbidden error in cases like:
- Access denied to WordPress Dashboard. In that case, you have to check the settings for the wp-admin directory.
- Access may be denied during WordPress installation
- Access may be denied during theme or plugin updates
How to Fix 403 Forbidden Error on Your WordPress Website?

Irrespective of the platform, most of the troubleshooting methods apply to all the websites. You can use these methods to resolve the “403 forbidden access to this resource on the server is denied!” Error –
- Check Missing Core Files and Theme Files
- Check .htaccess file configuration
- Directory Browsing and 403 Error
- Check file and folder permissions
- Check Plugins
- Clear Browser Cache and Cookies
- Try to fix issues from your Chrome Browser
- Deactivate Browser Extensions
- Check Firewall Settings
First things first, before making any changes we recommend you take a backup of your files and database. In case you are using WordPress and can access the WordPress Dashboard you can take the help of a backup plugin. We recommend using a backup plugin that creates automatic backups at regular intervals.
Check Missing Core Files and Theme Files:
Please check that all WordPress Core Files are in place, you can upload the core files manually using a File Transfer tool.
Also, check that all these files are properly uploaded. Specially check the index.php files at root, inside wp-admin, theme folder, and individual plugin folders.

Check .htaccess file configuration:
.htaccess is a hidden file in the public_html directory of your Apache-based web server. The function of the .htaccess file is to define the web response to various queries, especially to set up the redirects, restrict access to various bots, etc. In some cases, there are differences .htaccess files for the root directory and subdirectories in WordPress like wp-admin and wp-includes.
To access this hidden file you can go to File Manager, and select the hidden checkbox in the options provided in the pop up as shown in the image below:

If a pop-up doesn’t appear you can go to Settings under File Manager at Top Right as shown below:

Once you have selected to show the hidden files you will be able to see the .htaccess file

You can download it to your local machine and edit using an editor, a Notepad, Dreamweaver, or any other similar editing tool.
You can also right-click on it and Edit it as shown below:

This will open up an editable file like this:

If a .htaccess file is not yet created on your system, you can create it as well. To create it go into your public_html folder, or the website-specific default folder if you have hosted multiple websites on your Cpanel, and click on Add New File:


So, if your WordPress website is facing a 403 forbidden error issue, and a .htaccess file exists, delete it and try to access the website or the specific page with the issue. If it works fine it means that your .htaccess file was not configured correctly. If you don’t want to delete the .htaccess file, you can just remove all the code and save the empty file instead.
You can regenerate the fresh .htaccess file now from your WordPress Dashboard. You will have to go to Permalinks under Settings, as shown below:

And Click on the Save Changes button. Please note, you don’t have to change the settings here unless you want to change the permalink settings or URL structure.
Directory Browsing and 403 Error:
Directory browsing simply means in absence of a default home page file (index.php or index.html) the server will display the directory content to the visitor. A visitor will be able to see files and subfolders of the main folder and certainly, you don’t want to display it, as shown below:

Most of the servers by default disallow directory browsing to hide the content of the folder. In such cases, if the default root file (index.html or index.php) is missing the server will return a 403 Forbidden error.
How to Disable Directory Browsing using the .htaccess file?
Open the editable .htaccess file, as described in the previous section. (Note: remember to back up the existing .htaccess file)
By default the WordPress .htaccess file looks like this:
#BEGIN WordPress
RewriteEngine On
RewriteBase /
RewriteRule ^index.php$ - [L]
RewriteCond %{REQUEST_FILENAME} ! - f
RewriteCond %{REQUEST_FILENAME} ! - d
RewriteRule . /index.php [L]
#END WordPress
Just add this line of the code after the last line:
Options -Indexes
Update or Upload the edited .htaccess file, and refresh the page to see if the problem is resolved.
Check file and folder permissions:
The default file permission settings are applied to the core file and folders when WordPress is installed or a new file or folder is created in your Cpanel.
You can go to each folder and change the permission settings. You can do it for specific files as well. Some hosting providers also provide tools to reset the permission settings.
You can also edit permission settings using the FTP tool (Filezilla for example). It will give you additional options as follows:

- Permission settings to be only applied to selected directories or files
- It is to be applied in all subdirectories and files within the selected directory
- Also, it is to be applied only in all subdirectories within the selected directory
- Permissions settings are to be applied only in all files within the selected directory
Following are the default permission settings for WordPress Files:
- First of all change permission settings to 755 or 750 for all the directories
- Change permissions settings to 644 or 640 for all the files (select the “Apply to files only” option)
Note: There is an exception to the above rule for the wp-config.php file. The Wp Config file is used to connect WP files to the Database. It includes the necessary database name, DB username, and password. The file permission for wp-config should either be 440 or 400.
Changing the permission settings accordingly should resolve the 403 forbidden error issues.
Caution: Perform this step when you are sure about what you are doing. It is an expert job. Playing around with file permissions can lead to compromising your website or server’s security. Incorrectly configured file permissions can leave a gate open for hackers or malware.
Check Plugins:
If the issue is still not resolved you need to check if there is a plugin that is causing the issue.
To do this first deactivate and uninstall any of the recently installed plugins. If it resolves the issue you can identify the incompatible plugin.
If still, the problem persists, deactivate the other plugins one by one and check the website. You will be able to identify the problematic plugin, and you can replace it with another plugin that provides similar functionality.
- Deactivate all the plugins from your WordPress Dashboard
- Check the website if it works now.
- If it works Re-activate the plugins one by one to identify the problematic ones.
- Repeat steps two and three until the 403 error is shown.
- Congratulations, you have identified the plugin that is causing the problem.
- You may need to delete it entirely and replace it with another plugin with similar functionality.
One of the other lesser recommended methods of deactivating plugins is changing the name of the Plugins folder to something else. You can also change the name of individual plugin folders one by one If you follow this process of changing folder names, you will see several errors in your WordPress dashboard stating that “Plugin file doesn’t exist”. Don’t panic seeing this error message as it will be fine once the folder name is changed back to what it was originally. You will have to activate them again from WP Dashboard after changing them back to their original name.
Note: Most of the time the issue is found with either one of the caching plugins or the security plugins. So keep an eye on these plugins.
“403 forbidden access to this resource on the server is denied!” Error in WordPress Multisite
If you have WordPress Multisite installation and getting a 403 error the chances are you have created a wildcard subdomain.
Just change it to remove the wildcard setting for a subdomain, and it should resolve the issue.
You also need to check the subdomain redirects.

How to Fix 403 Forbidden Error on Google Chrome?

Sometimes your chrome browser can also be the culprit to trigger 403 forbidden errors. So, you resolve this issue from the chrome browser, there are certain methods you need to follow:
Some Quick and easy Solutions you must try at first:
- Refresh or Reload: Sometimes, the 403 forbidden error can trigger due to temporary glitches that can be eliminated by simply refreshing or reloading the webpage on Google chrome. Just click on the refresh button on the chrome browser and you are done.
- Try accessing the page after some time: sometimes, the server issue or the glitch can extend and might take a longer time than usual to resolve. If accessing the website is not on your priority list, you can wait for a few hours or even a day and try accessing it again. However, if you can’t wait and accessing the website is the utmost priority you can move on to other methods mentioned below:
- Incorrect Typed URL: It truly said, ” hurry-hurry spoils the curry”. Generally, users in a hurry type incorrect or misspelled URLs in the browser address bar, and the outcome result in these type of errors. So you must review your typed URL before pressing the enter key, and make sure the URL is 100% correct.
- Check on multiple devices or connections: You must also try to access the same website on multiple devices using the same network. If the error persists, move on to another internet connection and check if the error is due to the device or the internet connection.
- Reset to default settings: If none of the above methods work, try to reset everything from the browser to your wifi router to their default settings.
Clear Chrome Browser Cache and Cookies
If you are still seeing a 403 Forbidden error try deleting the specific cookies of your web browser. This is how website-specific cookies are deleted in Google Chrome:
- Open Chrome.
- Click on More Settings
- Next, click on Advanced.
- In this menu, find ‘Content settings’ Under “Privacy and security”
- Click on ‘Cookies’.
- Under “All cookies and site data,” search for the website’s name.
- To the right of the site, click Remove
To clear all the cookies you can just go to Google Chrome History, and delete the Cache completely. A similar process can be followed in other leading web browsers.
Go to History, and click on Clear Browsing Data as shown below:


You can select the time range, select the option of Cookies and other site data, select Cached Images and files, and then click on the “Clear data” button.
Deactivate Chrome Browser Extensions
All the browsers have some extensions installed on them by the user. While troubleshooting the 403 Forbidden error it is recommended to deactivate browser extensions.
Check Firewall Settings
There is a possibility that due to one of your Firewall settings the server is not displaying the requested page. You can momentarily disable the firewall while troubleshooting the 403 Forbidden error issue.
Effects of 403 Forbidden Error on Search Engine Rankings
If your website has started showing a 403 error page which is already ranked, then it is for sure that it will end up losing search engine rankings on prominent websites like Google, Bing, etc. As per the algorithm of search engines, they first downgrade the rankings and then eventually remove the pages from their index which are no more accessible to users or bots.
To avoid such a situation it is recommended that you keep a close watch on your website’s analytics, search console, and webmaster data, and see if there are no such errors.
You can simply log in to Google Search Console (previously known as Google Webmasters), Select your website, and click on Coverage under Index, as shown below:

It will display the number of errors as well as the type of errors faced by your visitors.
You can just keep an eye on it to keep your website Indexing healthy and avoid getting lower ranks on search engines.
In case if you have recently changed the URL of a page make sure to use a redirection plugin, and redirect the old URL to the new one. Also, update the XML sitemap in the search console.

We also recommend following the above-described troubleshooting methods under the guidance of a WordPress expert if you are a beginner.
Conclusion
Understanding it, in a nutshell, a 403 forbidden error means the resource or requested file exists on the server but is not accessible to the visitor due to one of the above-specified reasons.
Following the above-described method will most probably solve the issue quickly if you are still not able to troubleshoot using any of the above methods we suggest you contact the tech support of your hosting provider immediately and see what the problem is.
During maintenance or other phases, the server technical team possibly makes configuration changes accidentally. Also, there is a possibility that your IP has been blocked by the server. Ask the technical team to check and unblock your IP Address.
Hope you are enjoying our article. if you find anything missed or would like to add some value to it, please do let us know in the comment section below.
Poor web server performance and lack of proper maintenance can increase the risk of server errors such as 403 Forbidden Error. Host or migrate your website to a more reliable, sturdy, fastest, and reputed server instead. WPOven provides Linode’s powerful private servers with industry-leading features such as:
- Fastest Private Servers
- Fully WordPress optimized Servers
- Upto 100% server uptime guarantee
- Server stack
- FREE SSL Certificate
- FREE Daily malware Scanning & Offsite Backups
- Hardened Servers with high-end security
- 24X7 WordPress Expert support
- Datacentres around the world, etc.
You can have all these features and much more in a single plan with unlimited Free migrations, unlimited staging, and a 14-day risk-free guarantee. Check out our plans or Contact our support team that assists you to choose the right plan.
How do I fix 403 Forbidden error?
Here are some things you can try.
1. Refresh the Page.
2. Double Check the Address.
3. Clear Your Browser Cookies and Cache.
4. Check if You Have Permission to Access the URL.
5. Try Again Later.
6. Contact the Website.
7. Contact your ISP.
What causes a 403 Forbidden error?
The simple reason why we are seeing this error is that you are trying to access something you don’t have permission for. Throwing a 403 forbidden error is your website’s way of stating that you don’t have enough permissions to proceed further. This error is basically due to Incorrect file or folder permissions.
What does 403 Forbidden mean?
401 Unauthorized: If the request already included Authorization credentials, then the 401 response indicates that authorization has been refused for those credentials. 403 Forbidden: The server understood the request, but is refusing to fulfill it.