
Время на прочтение
24 мин
Количество просмотров 160K
 Вернуться Дальше
Я обнаружил, что Python Testing с pytest является чрезвычайно полезным вводным руководством к среде тестирования pytest. Это уже приносит мне дивиденды в моей компании.
Chris Shaver
VP of Product, Uprising Technology
Примеры в этой книге написаны с использованием Python 3.6 и pytest 3.2. pytest 3.2 поддерживает Python 2.6, 2.7 и Python 3.3+.
Исходный код для проекта Tasks, а также для всех тестов, показанных в этой книге, доступен по ссылке на веб-странице книги в pragprog.com. Вам не нужно загружать исходный код, чтобы понять тестовый код; тестовый код представлен в удобной форме в примерах. Но что бы следовать вместе с задачами проекта, или адаптировать примеры тестирования для проверки своего собственного проекта (руки у вас развязаны!), вы должны перейти на веб-страницу книги и скачать работу. Там же, на веб-странице книги есть ссылка для сообщений errata и дискуссионный форум.
Под спойлером приведен список статей этой серии.
Поехали
Это тест:
ch1/test_one.py
def test_passing():
    assert (1, 2, 3) == (1, 2, 3)
Вот как это выглядит при запуске:
$ cd /path/to/code/ch1
$ pytest test_one.py
===================== test session starts ======================
collected 1 items
test_one.py .
=================== 1 passed in 0.01 seconds ===================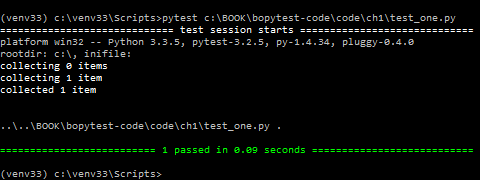
Точка после test_one.py означает, что один тест был запущен, и он прошел. Если вам нужна дополнительная информация, вы можете использовать -v или же --verbose:
$ pytest -v test_one.py
===================== test session starts ======================
collected 1 items
test_one.py::test_passing PASSED
=================== 1 passed in 0.01 seconds ===================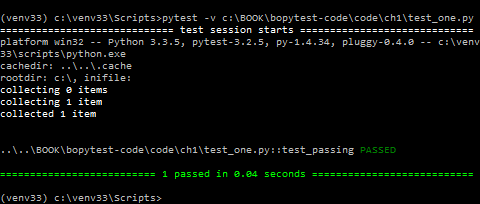
Если у вас есть цветной терминал, PASSED и нижняя строка зеленые. Прекрасно!
Это неудачный тест:
ch1/test_two.py
def test_failing():
    assert (1, 2, 3) == (3, 2, 1)
То, как pytest показывает сбои при тестирование, является одной из многих причин, почему разработчики любят pytest. Давайте посмотрим, что из этого выйдет:
$ pytest test_two.py
===================== test session starts ======================
collected 1 items
test_two.py F
=========================== FAILURES ===========================
_________________________ test_failing _________________________
def test_failing():
>    assert (1, 2, 3) == (3, 2, 1)
E     assert (1, 2, 3) == (3, 2, 1)
E         At index 0 diff: 1 != 3
E         Use -v to get the full diff

test_two.py:2: AssertionError
=================== 1 failed in 0.04 seconds ===================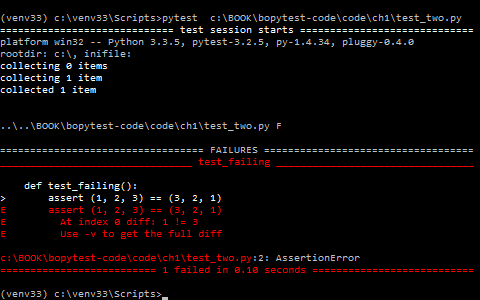
Отлично! Пробный тест test_failing получает свой раздел, чтобы показать нам, почему он не прошел.
И pytest точно сообщает, что первый сбой: index 0 — это несоответствие.
Значительная часть этого сообщения красного цвета, что делает его действительно выделяющимся (если у вас есть цветной терминал).
Это уже достаточно много информации, но есть строка с подсказкой, которая говорит Use -v, чтобы получить еще больше описаний различий.
Давайте заюзаем этот самый -v:
$ pytest -v test_two.py
===================== test session starts ======================
collected 1 items
test_two.py::test_failing FAILED
=========================== FAILURES ===========================
_________________________ test_failing _________________________
def test_failing():
>    assert (1, 2, 3) == (3, 2, 1)
E    assert (1, 2, 3) == (3, 2, 1)
E      At index 0 diff: 1 != 3
E      Full diff:
E      - (1, 2, 3)
E      ?   ^     ^
E      + (3, 2, 1)
E      ?   ^     ^

test_two.py:2: AssertionError
=================== 1 failed in 0.04 seconds ===================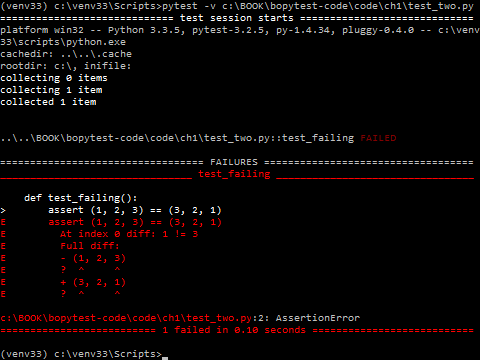
Вот это да!
pytest добавляет символ «карет» (^), чтобы показать нам в чем именно отличие.
Если вы уже впечатлены тем, как легко писать, читать и запускать тесты с pytest и как легко читать выходные данные, чтобы увидеть, где случилась неудачка, ну… вы еще ничего не видели. Там, откуда это прилетело, чудес намного больше. Оставайтесь и позвольте мне показать вам, почему я думаю, что pytest-это лучшая тестовая платформа.
В оставшейся части этой главы вы установите pytest, посмотрите на различные способы его запуска и выполните некоторые из наиболее часто используемых опций командной строки. В будущих главах вы узнаете, как написать тестовые функции, которые максимизируют мощность pytest, как вытащить код установки в разделы настройки и демонтажа, называемые фикстуры, и как использовать фикстуры и плагины, чтобы реально перегружать тестирование программного обеспечения.
Но сначала я должен извиниться. Извините, что тестирую assert (1, 2, 3) == (3, 2, 1), это так скучно. Я слышу храп?! Никто бы не написал такой тест в реальной жизни. Тесты программного обеспечения состоят из кода, который проверяет другое программное обеспечение, которое увы не всегда будет работать положительно. А (1, 2, 3) == (1, 2, 3) всегда будет работать. Вот почему мы не будем использовать слишком глупые тесты, подобные этому, в остальной части книги. Мы рассмотрим тесты для реального программного проекта. Мы будем использовать пример проекта Tasks, которому требуется тестовый код. Надеюсь, это достаточно просто, чтобы быть легко понято, но не так просто, чтобы быть скучным.
Еще одно полезное применение тестов программного обеспечения-это проверка ваших предположений о том, как работает тестируемое программное обеспечение, что может включать в себя тестирование вашего понимания сторонних модулей и пакетов и даже построение структур данных Python.
Проект Tasks использует структуру Task, основанную на фабричном методе namedtuple, который является частью стандартной библиотеки. Структура задачи используется в качестве структуры данных для передачи информации между пользовательским интерфейсом и API.
В остальной части этой главы я буду использовать Task для демонстрации запуска pytest и использования некоторых часто используемых параметров командной строки.
Вот задача:
from collections import namedtuple
Task = namedtuple('Task', ['summary', 'owner', 'done', 'id'])
Before we jump into the examples, let’s take a step back and talk about how to get pytest and install it.
Функция factory namedtuple() существует с Python 2.6, но я все еще обнаруживаю, что многие разработчики Python не знают, насколько это круто. По крайней мере, использование задачи для тестовых примеров будет интереснее, чем (1, 2, 3) == (1, 2, 3) или (1, 2)==3.
Прежде чем перейти к примерам, давайте сделаем шаг назад и поговорим о том, где взять pytest и как установить его.
Добываем pytest
Штаб-квартира pytest https://docs.pytest.org. Это официальная документация. Но распространяется он через PyPI (индекс пакета Python) в https://pypi.python.org/pypi/pytest.
Как и другие пакеты Python, распространяемые через PyPI, используйте pip для установки pytest в виртуальную среду, используемую для тестирования:
$ pip3 install -U virtualenv
$ python3 -m virtualenv venv
$ source venv/bin/activate
$ pip install pytest
Если вы не знакомы с virtualenv или pip, я вас познакомлю. Ознакомьтесь с Приложением 1 «Виртуальные среды» на стр. 155 и в Приложении 2, на странице 159.
Как насчет Windows, Python 2 и venv?
Пример для virtualenv и pip должен работать на многих POSIX системах, таких как Linux и macOS, а также на многих версиях Python, включая Python 2.7.9 и более поздних.
Источник venv/bin/activate в строке не будет работать для Windows, используйте вместо этого venvScriptsactivate.bat.
Выполните это:
C:> pip3 install -U virtualenv
C:> python3 -m virtualenv venv
C:> venvScriptsactivate.bat
(venv) C:> pip install pytest
Для Python 3.6 и выше, вы можете обойтись venv вместо virtualenv, и вы не должны беспокоиться о том что бы установить его в первую очередь. Он включен в Python 3.6 и выше. Тем не менее, я слышал, что некоторые платформы по-прежнему ведут себя лучше с virtualenv.
Запускаем pytest
$ pytest --help
usage: pytest [options] [file_or_dir] [file_or_dir] [...]
...
Без аргументов pytest исследует ваш текущий каталог и все подкаталоги для тестовых файлов и запустит тестовый код, который найдёт. Если вы передадите pytest имя файла, имя каталога или список из них, то будут найдены там вместо текущего каталога. Каждый каталог, указанный в командной строке, рекурсивно исследуется для поиска тестового кода.
Для примера, давайте создадим подкаталог, называемый задачами, и начнем с этого тестового файла:
ch1/tasks/test_three.py
"""Проверим тип данных Task."""

from collections import namedtuple
Task = namedtuple('Task', ['summary', 'owner', 'done', 'id'])
Task.__new__.__defaults__ = (None, None, False, None)

def test_defaults():
    """Без использования параметров, следует ссылаться на значения по умолчанию."""
    t1 = Task()
    t2 = Task(None, None, False, None)
    assert t1 == t2

def test_member_access():
    """Проверка свойства .field (поля) namedtuple."""
    t = Task('buy milk', 'brian')
    assert t.summary == 'buy milk'
    assert t.owner == 'brian'
    assert (t.done, t.id) == (False, None)
The test_member_access() test is to demonstrate how to access members by name nd not by index, which is one of the main reasons to use namedtuples.
Let’s put a couple more tests into a second file to demonstrate the _asdict() and _replace() functionality
Вы можете использовать __new __.__ defaults__ для создания объектов Task без указания всех полей. Тест test_defaults() предназначен для демонстрации и проверки того, как работают умолчания.
Тест test_member_access() должен продемонстрировать, как обращаться к членам по имени nd не по индексу, что является одной из основных причин использования namedtuples.
Давайте добавим еще пару тестов во второй файл, чтобы продемонстрировать функции _asdict() и _replace()
ch1/tasks/test_four.py
"""Тест типа данных Task."""

from collections import namedtuple
Task = namedtuple('Task', ['summary', 'owner', 'done', 'id'])
Task.__new__.__defaults__ = (None, None, False, None)

def test_asdict():
    """_asdict() должен возвращать словарь."""
    t_task = Task('do something', 'okken', True, 21)
    t_dict = t_task._asdict()
    expected = {'summary': 'do something',
                'owner': 'okken',
                'done': True,
                'id': 21}
    assert t_dict == expected

def test_replace():
    """должно изменить переданное в fields."""
    t_before = Task('finish book', 'brian', False)
    t_after = t_before._replace(id=10, done=True)
    t_expected = Task('finish book', 'brian', True, 10)
    assert t_after == t_expected
Для запуска pytest у вас есть возможность указать файлы и каталоги. Если вы не укажете какие-либо файлы или каталоги, pytest будет искать тесты в текущем рабочем каталоге и подкаталогах. Он ищет файлы, начинающиеся с test_ или заканчивающиеся на _test. Eсли вы запустите pytest из каталога ch1, без команд, вы проведете тесты для четырёх файлов:
$ cd /path/to/code/ch1
$ pytest
===================== test session starts ======================
collected 6 items
test_one.py .
test_two.py F
tasks/test_four.py ..
tasks/test_three.py ..
=========================== FAILURES ===========================
_________________________ test_failing _________________________
def test_failing():
>    assert (1, 2, 3) == (3, 2, 1)
E     assert (1, 2, 3) == (3, 2, 1)
E         At index 0 diff: 1 != 3
E         Use -v to get the full diff

test_two.py:2: AssertionError
============== 1 failed, 5 passed in 0.08 seconds ==============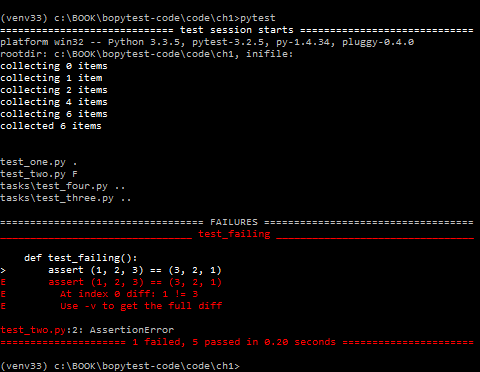
Чтобы выполнить только наши новые тесты задач, вы можете предоставить pytest все имена файлов, которые вы хотите запустить, или каталог, или вызвать pytest из каталога, где находятся наши тесты:
$ pytest tasks/test_three.py tasks/test_four.py
===================== test session starts ======================
collected 4 items
tasks/test_three.py ..
tasks/test_four.py ..
=================== 4 passed in 0.02 seconds ===================
$ pytest tasks
===================== test session starts ======================
collected 4 items
tasks/test_four.py ..
tasks/test_three.py ..
=================== 4 passed in 0.03 seconds ===================
$ cd /path/to/code/ch1/tasks
$ pytest
===================== test session starts ======================
collected 4 items
test_four.py ..
test_three.py ..
=================== 4 passed in 0.02 seconds ===================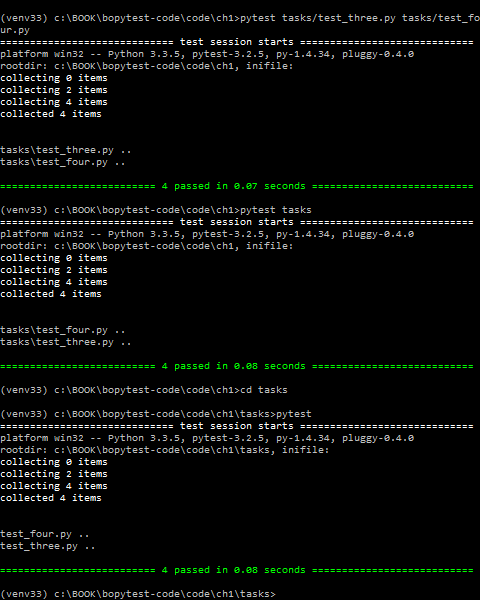
Часть выполнения pytest, где pytest проходит и находит, какие тесты запускать, называется test discovery (тестовым обнаружением). pytest смог найти все те тесты, которые мы хотели запустить, потому что мы назвали их в соответствии с соглашениями об именах pytest.
Ниже приведен краткий обзор соглашений об именах, чтобы ваш тестовый код можно было обнаружить с помощью pytest:
- Тестовые файлы должны быть названы
test_<something>.pyили<something>_test.py. - Методы и функции тестирования должны быть названы
test_<something>. - Тестовые классы должны быть названы
Test<Something>.
Поскольку наши тестовые файлы и функции начинаются с test_, то у нас всё в порядке. Есть способы изменить эти правила обнаружения, если у вас есть куча тестов с разными именами.
Я расскажу об этом в главе 6, «конфигурация», на странице 113.
Давайте более подробно рассмотрим результат запуска только одного файла:
$ cd /path/to/code/ch1/tasks
$ pytest test_three.py
================= test session starts ==================
platform darwin -- Python 3.6.2, pytest-3.2.1, py-1.4.34, pluggy-0.4.0
rootdir: /path/to/code/ch1/tasks, inifile:
collected 2 items
test_three.py ..
=============== 2 passed in 0.01 seconds ===============
Результат говорит нам совсем немного.
===== test session starts ====
.
pytest предоставляет изящный разделитель для начала тестового сеанса. Сеанс-это один вызов pytest, включая все тесты, выполняемые в нескольких каталогах. Это определение сеанса становится важным, когда я говорю о области сеанса по отношению к фикстурам pytest в определении области фикстур, на странице 56.
Платформа darwin — у меня на Mac. На компьютере с ОС Windows платформа отличается. Далее перечислены версии Python и pytest, а также зависимости от пакетов pytest. И py, и pluggy — это пакеты, разработанные командой pytest, чтобы помочь с реализацией pytest.
rootdir: /path/to/code/ch1/tasks, inifile:
rootdir — это самый верхний общий каталог для всех каталогов в которых ищется тестовый код. В inifile (здесь пустой) перечислены используемые файлы конфигурации. Конфигурационными файлами могут быть pytest.ini, tox.ini или setup.cfg. Более подробные сведения о конфигурационных файлах вы найдете в главе 6 «Конфигурация» на стр. 113.
collected 2 items
Это две тестовые функции в файле.
test_three.py ..
test_three.py показывает тестируемый файл. Для каждого тестового файла есть одна строка. Две точки означают, что тесты пройдены — по одной точке для каждой тестовой функции или метода. Точки предназначены только для прохождения тестов. Failures (сбоев), errors (ошибок), skips (пропусков), xfails, и xpasses обозначаются с F, E, s, x, и Х, соответственно. Если вы хотите видеть больше точек для прохождения тестов, используйте опцию -v или --verbose.
== 2 passed in 0.01 seconds ==
Эта строка относится к числу пройденных тестов и времени, затраченному на весь сеанс тестирования. При наличии непроходных тестов здесь также будет указан номер каждой категории.
Результат теста-это основной способ, благодаря которому пользователь, выполняющий тест или просматривающий результаты, может понять, что произошло в ходе выполнения теста. В pytest тестовые функции могут иметь несколько различных результатов, а не просто пройти или не пройти. Вот возможные результаты тестовой функции:
- PASSED (.): Тест выполнен успешно.
- FAILED (F): Тест не выполнен успешно (или XPASS + strict).
- SKIPPED (s): Тест был пропущен. Вы можете заставить pytest пропустить тест, используя декораторы
@pytest.mark.skip()илиpytest.mark.skipif(), обсуждаемые в разделе пропуск тестов, на стр. 34. - xfail (x): Тест не должен был пройти, был запущен и провалился. Вы можете принудительно указать pytest, что тест должен завершиться неудачей, используя декоратор
@pytest.mark.xfail(), описанный в маркировках тестов как ожидающий неудачу, на стр. 37. - XPASS (X): Тест не должен был пройти, был запущен и прошел!..
- ERROR (E): Исключение произошло за пределами функции тестирования, либо в фикстуре, обсуждается в главе 3, pytest Фикстуры, на стр. 49, или в hook function, обсуждается в главе 5, Плагины, на странице 95.
Выполнение Только Одного Теста
Пожалуй, первое, что вы захотите сделать, после того, как начали писать тесты, — это запустить только один. Укажите файл напрямую и добавьте имя ::test_name:
$ cd /path/to/code/ch1
$ pytest -v tasks/test_four.py::test_asdict
=================== test session starts ===================
collected 3 items
tasks/test_four.py::test_asdict PASSED
================ 1 passed in 0.01 seconds =================
Теперь давайте рассмотрим некоторые варианты.
Использование Опций
Мы уже пару раз использовали опцию verbose, -v или --verbose, но есть еще много опций, о которых стоит знать. Мы не собираемся использовать их все в этой книге, только некоторые. Ознакомиться с полным списком вы можете с помощью опции pytest --help.
Ниже приведены несколько вариантов, которые весьма полезны при работе с pytest. Это далеко не полный список, но этих опций для начала вполне достаточно.
$ pytest --help

usage: pytest [options] [file_or_dir] [file_or_dir] [...]

... subset of the list ...

positional arguments:
  file_or_dir

general:
  -k EXPRESSION         only run tests which match the given substring
                        expression. An expression is a python evaluatable
                        expression where all names are substring-matched
                        against test names and their parent classes. Example:
                        -k 'test_method or test_other' matches all test
                        functions and classes whose name contains
                        'test_method' or 'test_other', while -k 'not
                        test_method' matches those that don't contain
                        'test_method' in their names. Additionally keywords
                        are matched to classes and functions containing extra
                        names in their 'extra_keyword_matches' set, as well as
                        functions which have names assigned directly to them.
  -m MARKEXPR           only run tests matching given mark expression.
                        example: -m 'mark1 and not mark2'.
  --markers             show markers (builtin, plugin and per-project ones).
  -x, --exitfirst       exit instantly on first error or failed test.
  --maxfail=num         exit after first num failures or errors.

...

  --capture=method      per-test capturing method: one of fd|sys|no.
  -s                    shortcut for --capture=no.

...

 --lf, --last-failed   rerun only the tests that failed at the last run (or
                       all if none failed)
 --ff, --failed-first  run all tests but run the last failures first. This
                       may re-order tests and thus lead to repeated fixture
                       setup/teardown

...

reporting:
  -v, --verbose         increase verbosity.
  -q, --quiet           decrease verbosity.
  --verbosity=VERBOSE   set verbosity

...

  -l, --showlocals      show locals in tracebacks (disabled by default).
  --tb=style            traceback print mode (auto/long/short/line/native/no).

...

 --durations=N         show N slowest setup/test durations (N=0 for all).

...

collection:
  --collect-only        only collect tests, don't execute them.

...

test session debugging and configuration:
  --basetemp=dir        base temporary directory for this test run.(warning:
                        this directory is removed if it exists)
  --version             display pytest lib version and import information.
  -h, --help            show help message and configuration info
—collect-only
Параметр --collect-only показывает, какие тесты будут выполняться с заданными параметрами и конфигурацией. Этот параметр удобно сначала показать, чтобы выходные данные можно было использовать в качестве ссылки для остальных примеров. Если вы начинаете в каталоге ch1, вы должны увидеть все тестовые функции, которые вы смотрели до сих пор в этой главе:
$ cd /path/to/code/ch1
$ pytest --collect-only

=================== test session starts ===================
collected 6 items
<Module 'test_one.py'>
  <Function 'test_passing'>
<Module 'test_two.py'>
  <Function 'test_failing'>
<Module 'tasks/test_four.py'>
  <Function 'test_asdict'>
  <Function 'test_replace'>
<Module 'tasks/test_three.py'>
  <Function 'test_defaults'>
  <Function 'test_member_access'>

============== no tests ran in 0.03 seconds ===============
Параметр --collect-only полезен для проверки правильности выбора других опций, которые выбирают тесты перед запуском тестов. Мы будем использовать его снова с -k, чтобы показать, как это работает.
-k EXPRESSION
Параметр -k позволяет использовать выражение для определения функций тестирования.
Весьма мощная опция! Её можно использовать как ярлык для запуска отдельного теста, если имя уникально, или запустить набора тестов, которые имеют общий префикс или суффикс в их именах. Предположим, вы хотите запустить тесты test_asdict() и test_defaults(). Вы можете проверить фильтр с помощью: --collect-only:
$ cd /path/to/code/ch1
$ pytest -k "asdict or defaults" --collect-only

=================== test session starts ===================
collected 6 items
<Module 'tasks/test_four.py'>
  <Function 'test_asdict'>
<Module 'tasks/test_three.py'>
  <Function 'test_defaults'>

=================== 4 tests deselected ====================
============== 4 deselected in 0.03 seconds ===============
Ага! Это похоже на то, что нам надо. Теперь вы можете запустить их, удалив --collect-only:
$ pytest -k "asdict or defaults"
=================== test session starts ===================
collected 6 items
tasks/test_four.py .
tasks/test_three.py .

=================== 4 tests deselected ====================
========= 2 passed, 4 deselected in 0.03 seconds ==========
Упс! Просто точки. Так значит они прошли. Но были ли они правильными тестами? Один из способов узнать — использовать -v или --verbose:
$ pytest -v -k "asdict or defaults"

=================== test session starts ===================
collected 6 items
tasks/test_four.py::test_asdict PASSED
tasks/test_three.py::test_defaults PASSED

=================== 4 tests deselected ====================
========= 2 passed, 4 deselected in 0.02 seconds ==========
Ага! Это были правильные тесты.
-m MARKEXPR
Маркеры-один из лучших способов пометить подмножество тестовых функций для совместного запуска. В качестве примера, один из способов запустить test_replace() и test_member_access(), даже если они находятся в отдельных файлах, это пометить их. Можно использовать любое имя маркера. Допустим, вы хотите использовать run_these_please. Отметим тесты, используя декоратор @pytest.mark.run_these_please, вот так:
import pytest
...
@pytest.mark.run_these_please
def test_member_access():
...
Теперь то же самое для test_replace(). Затем вы можете запустить все тесты с тем же маркером с помощью pytest -m run_these_please:
$ cd /path/to/code/ch1/tasks
$ pytest -v -m run_these_please

================== test session starts ===================
collected 4 items
test_four.py::test_replace PASSED
test_three.py::test_member_access PASSED

=================== 2 tests deselected ===================
========= 2 passed, 2 deselected in 0.02 seconds =========
Выражение маркера не обязательно должно быть одним маркером. Вы можете использовать такие варианты, как -m "mark1 and mark2" для тестов с обоими маркерами, -m "mark1 and not mark2" для тестов, которые имеют метку 1, но не метку 2, -m "mark1 or mark2" для тестов с одним из и т. д., Я более подробно обсужу маркеры в Методах проверки маркировки, на стр. 31.
-x, —exitfirst
Нормальным поведением pytest является запустить все тесты, которые он найдет. Если тестовая функция обнаружит сбой assert или exception, выполнение этого теста останавливается, и тест завершается ошибкой. И тогда pytest запускает следующий тест. По большей части, это то что надо. Однако, особенно при отладке проблемы, мешает сразу всей тестовой сессии, когда тест не является правильным. Вот что делает -x опция. Давайте попробуем это на шести тестах, которые у нас есть в настоящий момент:
$ cd /path/to/code/ch1
$ pytest -x

====================== test session starts ====================
collected 6 items
test_one.py .
test_two.py F

============================ FAILURES =========================
__________________________ test_failing _______________________
    def test_failing():
>       assert (1, 2, 3) == (3, 2, 1)
E       assert (1, 2, 3) == (3, 2, 1)
E         At index 0 diff: 1 != 3
E         Use -v to get the full diff

test_two.py:2: AssertionError
=============== 1 failed, 1 passed in 0.38 seconds ============
В верхней части выходных данных вы видите, что все шесть тестов (или “элементов (items)”) были собраны, а в нижней строке вы видите, что один тест не прошел и один прошел, и pytest отобразил строку «прервано (Interrupted)», чтобы сообщить нам, что он остановлен. Без -x все шесть тестов были бы запущены. Давайте повторим еще раз без-x. А также используем --tb=no, чтобы отключить трассировку стека, так как вы ее уже видели и не обязательно видеть её снова:
$ cd /path/to/code/ch1
$ pytest --tb=no

=================== test session starts ===================
collected 6 items

test_one.py .
test_two.py F
tasks/test_four.py ..
tasks/test_three.py ..

=========== 1 failed, 5 passed in 0.09 seconds ============
Этот пример демонстрирует, что без -x, pytest отмечает сбой в test_two.py и продолжает дальнейшее тестирование.
—maxfail=num
Параметр -x приводит к остановке после первого отказа теста. Если вы хотите, чтобы некоторые число сбоев было допущено, но не целая тонна, используйте параметр --maxfail, чтобы указать, сколько ошибок допускается получить. Пока трудно показать это только с одним неудачным тестом в нашей системе, но давайте посмотрим в любом случае. Поскольку есть только один сбой, если мы установили --maxfail = 2, все тесты должны выполняться, а --maxfail = 1 должен действовать так же, как -x:
$ cd /path/to/code/ch1
$ pytest --maxfail=2 --tb=no

=================== test session starts ===================
collected 6 items
test_one.py .
test_two.py F
tasks/test_four.py ..
tasks/test_three.py ..

=========== 1 failed, 5 passed in 0.08 seconds ============

$ pytest --maxfail=1 --tb=no

=================== test session starts ===================
collected 6 items
test_one.py .
test_two.py F
!!!!!!!!! Interrupted: stopping after 1 failures !!!!!!!!!!

=========== 1 failed, 1 passed in 0.19 seconds ============
Eще раз мы использовали --tb=no, чтобы отключить трассировку.
-s and —capture=method
Флаг -s позволяет печатать операторы — или любой другой вывод, который обычно печатается в stdout, чтобы фактически быть напечатаным в стандартном выводе во время выполнения тестов. Это сокращенный вариант для --capture=no. Смысл в том, что обычно выходные данные захватываются во всех тестах. Неудачные тесты будут выводиться после того, как тест будет протекать в предположении, что выход поможет вам понять, что что то пошло не так. Параметр -s или --capture=no отключает захват выходных данных. При разработке тестов я обычно добавляю несколько операторов print(), чтобы можно было следить за ходом теста.
Другой вариант, который может помочь вам обойтись без операторов печати в вашем коде,-l/--showlocals, который распечатывает локальные переменные в тесте, если тест терпит неудачу.
Другие опции метода захвата --capture=fd и --capture=sys. — Опция --capture=sys заменяет sys.stdout/stderr в mem-файлах. Опция --capture=fd указывает файловые дескрипторы 1 и 2 на временный файл.
Я включаю описания sys и fd для полноты. Но, честно говоря, я никогда не нуждался и не использовал их. Я часто использую -s. И чтобы полностью описать, как работает -s, мне нужно было коснуться методов захвата.
У нас пока нет никаких операторов печати в наших тестах; демонстрация была бы бессмысленной. Тем не менее, я предлагаю вам немного поиграть с ними, чтобы вы увидели это в действии.
-lf, —last-failed
При сбое одного или нескольких тестов способ выполнения только неудачных тестов полезен для отладки. Просто используйте --lf и вы готовы к отладке:
Это удобно, если вы используете опцию --tb, которая скрывает некоторую информацию, и вы хотите повторить сбои с другой опцией отслеживания.
$ cd /path/to/code/ch1
$ pytest --lf

=================== test session starts ===================
run-last-failure: rerun last 1 failures
collected 6 items
test_two.py F

======================== FAILURES =========================
______________________ test_failing _______________________
    def test_failing():
>       assert (1, 2, 3) == (3, 2, 1)
E        assert (1, 2, 3) == (3, 2, 1)
E             At index 0 diff: 1 != 3
E             Use -v to get the full diff

test_two.py:2: AssertionError
=================== 5 tests deselected ====================
========= 1 failed, 5 deselected in 0.08 seconds ==========
–ff, —failed-first
Параметр --ff/--failed-first будет делать то же самое, что и --last-failed, а затем выполнять остальные тесты, прошедшие в прошлый раз:
$ cd /path/to/code/ch1
$ pytest --ff --tb=no

=================== test session starts ===================
run-last-failure: rerun last 1 failures first

collected 6 items

test_two.py F
test_one.py .
tasks/test_four.py ..
tasks/test_three.py ..

=========== 1 failed, 5 passed in 0.09 seconds ============
Обычно test_failing() из test_two.py запускается после test_one.py. Однако, поскольку test_failing() не удалось в последний раз, --ff заставляет его запускаться в первую очередь
-v, —verbose
Опция -v/--verbose предоставляет более развернутую информацию по итогам. Наиболее очевидным отличием является то, что каждый тест получает свою собственную строку, а имя теста и результат прописываются вместо точки.
Мы уже использовали его пару раз, но давайте запустим его снова для удовольствия в сочетании с --ff и --tb=no:
$ cd /path/to/code/ch1
$ pytest -v --ff --tb=no

=================== test session starts ===================
run-last-failure: rerun last 1 failures first
collected 6 items

test_two.py::test_failing FAILED
test_one.py::test_passing PASSED
tasks/test_four.py::test_asdict PASSED
tasks/test_four.py::test_replace PASSED
tasks/test_three.py::test_defaults PASSED
tasks/test_three.py::test_member_access PASSED

=========== 1 failed, 5 passed in 0.07 seconds ============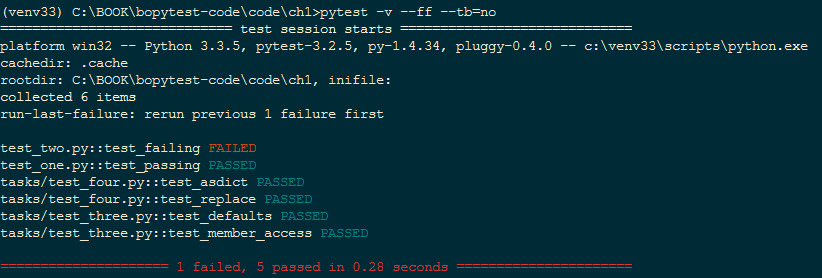
На цветном терминале в отчете вы также увидите красный результат FAILED и зеленые PASSED.
-q, —quiet
Опция -q/--quiet противоположна -v/--verbose; она сокращает объем информации в отчете. Мне нравится использовать его в сочетании с --tb=line, в этом случае выводятся только неудавшиеся строки любых неудачных тестов.
Попробуем —q самостоятельно:
$ cd /path/to/code/ch1
$ pytest -q
.F....
======================== FAILURES =========================
______________________ test_failing _______________________
    def test_failing():
>       assert (1, 2, 3) == (3, 2, 1)
E        assert (1, 2, 3) == (3, 2, 1)
E             At index 0 diff: 1 != 3
E             Full diff:
E             - (1, 2, 3)
E             ?  ^     ^
E             + (3, 2, 1)
E              ?  ^     ^

test_two.py:2: AssertionError
1 failed, 5 passed in 0.08 seconds
Опция -q делает вывод довольно кратким, но обычно этого достаточно. Мы будем часто использовать опцию -q в остальной части книги (а также --tb=no), чтобы ограничить вывод тем, что мы конкретно пытаемся понять в то время.
-l, —showlocals
При использовании параметра -l/--showlocals локальные переменные и их значения отображаются вместе с tracebacks для неудачных тестов.
До сих пор у нас не было неудачных тестов с локальными переменными. Если я возьму тест test_replace() и изменю
t_expected = Task('finish book', 'brian', True, 10)на
t_expected = Task('finish book', 'brian', True, 11)10 и 11 должны вызвать сбой. Любое изменение ожидаемого значения приведет к сбою. Но этого достаточно для демонстрации опции командной строки --l/--showlocals:
$ cd /path/to/code/ch1
$ pytest -l tasks

=================== test session starts ===================
collected 4 items
tasks/test_four.py .F
tasks/test_three.py ..

======================== FAILURES =========================
______________________ test_replace _______________________

    @pytest.mark.run_these_please
    def test_replace():
        """replace() should change passed in fields."""
        t_before = Task('finish book', 'brian', False)
        t_after = t_before._replace(id=10, done=True)
        t_expected = Task('finish book', 'brian', True, 11)
>       assert t_after == t_expected
E       AssertionError: assert Task(summary=...e=True, id=10) == Task(summary='...e=True, id=11)
E         At index 3 diff: 10 != 11
E         Use -v to get the full diff

t_after    = Task(summary='finish book', owner='brian', done=True, id=10)
t_before   = Task(summary='finish book', owner='brian', done=False, id=None)
t_expected = Task(summary='finish book', owner='brian', done=True, id=11)

taskstest_four.py:28: AssertionError
=========== 1 failed, 3 passed in 0.08 seconds ============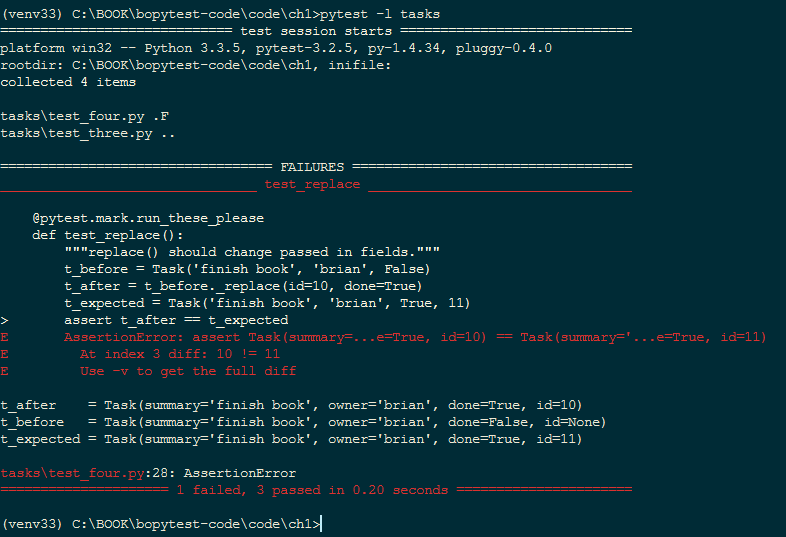
Локальные переменные t_after, t_before и t_expected отображаются после фрагмента кода со значением, которое они содержали во время неудавшегося assert-а.
—tb=style
Параметр --tb=style изменяет способ вывода пакетов трассировки для сбоев. При сбое теста pytest отображает список сбоев и так называемую обратную трассировку, которая показывает точную строку, в которой произошел сбой. Хотя tracebacks полезны большую часть времени, бывают случаи, когда они раздражают. Вот где опция--tb=style пригодится. Стили, которые я считаю полезными, это short, line и no. short печатает только строку assert и символ E без контекста; line сохраняет ошибку в одной строке; no полностью удаляет трассировку.
Давайте оставим пока модификацию test_replace(), чтобы она завершилась неудачей, и запустим ее с разными стилями трассировки. --tb=no полностью удаляет трассировку
$ cd /path/to/code/ch1
$ pytest --tb=no tasks
=================== test session starts ===================
collected 4 items
tasks/test_four.py .F
tasks/test_three.py ..
=========== 1 failed, 3 passed in 0.04 seconds ============
—tb=line in many cases is enough to tell what’s wrong. If you have a ton of failing tests, this option can help to show a pattern in the failures:
--tb=line во многих случаях достаточно, чтобы показать, что не так. Если у вас гора неудачных тестов, этот параметр может помочь отобразить шаблон в сбоях:
$ pytest --tb=line tasks
=================== test session starts ===================
collected 4 items
tasks/test_four.py .F
tasks/test_three.py ..
======================== FAILURES =========================
/path/to/code/ch1/tasks/test_four.py:20:
AssertionError: assert Task(summary=...e=True, id=10) == Task(
summary='...e=True, id=11)
=========== 1 failed, 3 passed in 0.05 seconds ============
Следующий шаг в verbose tracebacks --tb=short:
$ pytest --tb=short tasks
=================== test session starts ===================
collected 4 items
tasks/test_four.py .F
tasks/test_three.py ..
======================== FAILURES =========================
______________________ test_replace _______________________
tasks/test_four.py:20: in test_replace
assert t_after == t_expected
E AssertionError: assert Task(summary=...e=True, id=10) == Task(
summary='...e=True, id=11)
E At index 3 diff: 10 != 11
E Use -v to get the full diff
=========== 1 failed, 3 passed in 0.04 seconds ============
Это определенно достаточно, чтобы рассказать вам, что происходит.
Есть три оставшихся варианта трассировки, которые мы пока не рассмотрели.
pytest --tb=long покажет вам наиболее исчерпывающий и информативный traceback. pytest --tb=auto покажет вам длинную версию для первого и последнего tracebacks, если у вас есть несколько сбоев. Это поведение по умолчанию. pytest --tb=native покажет вам стандартную библиотеку traceback без дополнительной информации.
—durations=N
Опция --durations=N невероятно полезна, когда вы пытаетесь ускорить свой набор тестов. Она не меняет ваши тесты; сообщает самый медленный N номер tests/setups/teardowns по окончании тестов. Если вы передадите --durations=0, он сообщит обо всем в порядке от самого медленного к самому быстрому.
Поскольку наши тесты не достаточно длинные, я добавлю time.sleep(0.1) к одному из тестов. Угадайте, какой:
$ cd /path/to/code/ch1
$ pytest --durations=3 tasks
================= test session starts =================
collected 4 items
tasks/test_four.py ..
tasks/test_three.py ..
============== slowest 3 test durations ===============
0.10s call tasks/test_four.py::test_replace
0.00s setup tasks/test_three.py::test_defaults
0.00s teardown tasks/test_three.py::test_member_access
============== 4 passed in 0.13 seconds
Медленный тест с дополнительным sleep появляется сразу же после вызова метки, за которым следует установка и опровержение. Каждый тест по существу состоит из трех этапов: call(вызов), настройки(setup) и опровержения(teardown). Установка и опровержение также являются фикстурой, и вы можете добавить код для получения данных или тестируемой системы программного обеспечения в состояние предварительного условия до запуска теста, а также, при необходимости, очистить их. Я подробно освещаю фикстуры в главе 3, pytest Fixtures, на стр. 49.
—version
Опция --version показывает версию pytest и каталог, в котором он установлен:
$ pytest --version
This is pytest version 3.0.7, imported from
/path/to/venv/lib/python3.5/site-packages/pytest.py
Поскольку мы установили pytest в виртуальную среду, pytest будет находиться в каталоге site-packages этой виртуальной среды.
-h, —help
Опция -h/--help весьма полезна, даже после того, как вы привыкнете к pytest. Она не только показывает вам, как использовать stock-овый pytest, но также расширяется по мере установки плагинов, чтобы показать параметры и переменные конфигурации, добавленные плагинами.
Опция -h показывает:
- Использование: pytest [опции] [file_or_dir] [file_or_dir] […]
- Параметры командной строки и краткое описание, включая добавленные параметры через плагины
- Список опций, доступных для ini файлов конфигурации стиля, которые я буду обсуждать подробнее в главе 6, Конфигурация, на стр. 113
- Список переменных среды, которые могут влиять на поведение pytest (также обсуждается в главе 6, Конфигурация, на стр. 113)
- Напоминание о том, что pytest
--markersможно использовать для просмотра доступных маркеров, обсуждаемых в главе 2, Написание тестовых функций, на стр. 23 - Напоминание о том, что pytest
--fixturesмогут быть использованы для просмотра доступных фикстур, обсуждаемых в главе 3, Фикстуры pytest, на стр. 49
Последний часть информации текста справки отображает это примечание:
(shown according to specified file_or_dir or current dir if not specified)Это примечание важно, поскольку параметры, маркеры и фикстуры могут изменяться в зависимости от каталога или тестового файла. Это происходит потому, что по пути к указанному файлу или каталогу pytest может найти файлы conftest.py, которые могут включать функции-ловушки (hook functions), создающие новые параметры, определения фикстур и определения маркеров.
Возможность настраивать поведение pytest в файлах conftest.py и тестовых файлах позволяет настраивать поведение локально для проекта или даже подмножество тестов для проекта. Вы узнаете о файлах conftest.py и ini, таких как pytest.ini в главе 6 «Конфигурация», на странице 113.
Упражнения
-
Создайте новую виртуальную среду, используя
python -m virtualenvилиpython -m venv. Даже если вы знаете, что вам не нужны виртуальные среды для проекта, над которым вы работаете, порадуйте меня и достаточно узнайте о них, чтобы создать виртуалку, дабы опробовать вещи из этой книги. Я сопротивлялся их использованию очень долго, и теперь я всегда использую их. Прочтите Приложение 1, Виртуальная среда, на стр. 155, если у вас возникли трудности. -
Практикуйте активацию и деактивацию виртуальной среды несколько раз.
- $ source venv/bin/activate - $ deactivate On Windows: - C:Usersokkensandbox>venvscriptsactivate.bat - C:Usersokkensandbox>deactivate -
Установите pytest в новой виртуальной среде. См. Приложение 2, pip, на странице 159, если у вас возникли проблемы. Даже если вы думали, что у вас уже установлен pytest, вам нужно установить его в виртуальную среду, которую вы только что создали.
-
Создайте несколько тестовых файлов. Вы можете использовать те, которые мы использовали в этой главе или сделать свои собственные. Попрактикуйте pytest на этих файлах.
-
Измените операторы assert. Не просто используйте assert something == something_else; попробуйте такие вещи, как:
- assert 1 in [2, 3, 4]
- assert a < b
- assert ‘fizz’ not in ‘fizzbuzz’
Что дальше
В этой главе мы рассмотрели, где получить pytest и различные способы его запуска. Однако мы не обсуждали, что входит в тестовые функции. В следующей главе мы рассмотрим написание тестовых функций, параметризацию их так, чтобы они вызывались с различными данными, и группировку тестов в классы, модули и пакеты.
Вернуться Дальше
Starting from version 3.1, pytest now automatically catches warnings during test execution
and displays them at the end of the session:
# content of test_show_warnings.py
import warnings


def api_v1():
    warnings.warn(UserWarning("api v1, should use functions from v2"))
    return 1


def test_one():
    assert api_v1() == 1
Running pytest now produces this output:
$ pytest test_show_warnings.py
=========================== test session starts ============================
platform linux -- Python 3.x.y, pytest-7.x.y, pluggy-1.x.y
rootdir: /home/sweet/project
collected 1 item

test_show_warnings.py .                                              [100%]

============================= warnings summary =============================
test_show_warnings.py::test_one
  /home/sweet/project/test_show_warnings.py:5: UserWarning: api v1, should use functions from v2
    warnings.warn(UserWarning("api v1, should use functions from v2"))

-- Docs: https://docs.pytest.org/en/stable/how-to/capture-warnings.html
======================= 1 passed, 1 warning in 0.12s =======================
Controlling warnings
Similar to Python’s warning filter and -W option flag, pytest provides
its own -W flag to control which warnings are ignored, displayed, or turned into
errors. See the warning filter documentation for more
advanced use-cases.
This code sample shows how to treat any UserWarning category class of warning
as an error:
$ pytest -q test_show_warnings.py -W error::UserWarning
F                                                                    [100%]
================================= FAILURES =================================
_________________________________ test_one _________________________________

    def test_one():
>       assert api_v1() == 1

test_show_warnings.py:10:
_ _ _ _ _ _ _ _ _ _ _ _ _ _ _ _ _ _ _ _ _ _ _ _ _ _ _ _ _ _ _ _ _ _ _ _ _ _

    def api_v1():
>       warnings.warn(UserWarning("api v1, should use functions from v2"))
E       UserWarning: api v1, should use functions from v2

test_show_warnings.py:5: UserWarning
========================= short test summary info ==========================
FAILED test_show_warnings.py::test_one - UserWarning: api v1, should use ...
1 failed in 0.12s
The same option can be set in the pytest.ini or pyproject.toml file using the
filterwarnings ini option. For example, the configuration below will ignore all
user warnings and specific deprecation warnings matching a regex, but will transform
all other warnings into errors.
# pytest.ini
[pytest]
filterwarnings =
    error
    ignore::UserWarning
    ignore:function ham() is deprecated:DeprecationWarning
# pyproject.toml
[tool.pytest.ini_options]
filterwarnings = [
    "error",
    "ignore::UserWarning",
    # note the use of single quote below to denote "raw" strings in TOML
    'ignore:function ham() is deprecated:DeprecationWarning',
]
When a warning matches more than one option in the list, the action for the last matching option
is performed.
Note
The -W flag and the filterwarnings ini option use warning filters that are
similar in structure, but each configuration option interprets its filter
differently. For example, message in filterwarnings is a string containing a
regular expression that the start of the warning message must match,
case-insensitively, while message in -W is a literal string that the start of
the warning message must contain (case-insensitively), ignoring any whitespace at
the start or end of message. Consult the warning filter documentation for more
details.
@pytest.mark.filterwarnings
You can use the @pytest.mark.filterwarnings to add warning filters to specific test items,
allowing you to have finer control of which warnings should be captured at test, class or
even module level:
import warnings


def api_v1():
    warnings.warn(UserWarning("api v1, should use functions from v2"))
    return 1


@pytest.mark.filterwarnings("ignore:api v1")
def test_one():
    assert api_v1() == 1
Filters applied using a mark take precedence over filters passed on the command line or configured
by the filterwarnings ini option.
You may apply a filter to all tests of a class by using the filterwarnings mark as a class
decorator or to all tests in a module by setting the pytestmark variable:
# turns all warnings into errors for this module
pytestmark = pytest.mark.filterwarnings("error")
Credits go to Florian Schulze for the reference implementation in the pytest-warnings
plugin.
Disabling warnings summary
Although not recommended, you can use the --disable-warnings command-line option to suppress the
warning summary entirely from the test run output.
Disabling warning capture entirely
This plugin is enabled by default but can be disabled entirely in your pytest.ini file with:
[pytest]
addopts = -p no:warnings
Or passing -p no:warnings in the command-line. This might be useful if your test suites handles warnings
using an external system.
DeprecationWarning and PendingDeprecationWarning
By default pytest will display DeprecationWarning and PendingDeprecationWarning warnings from
user code and third-party libraries, as recommended by PEP 565.
This helps users keep their code modern and avoid breakages when deprecated warnings are effectively removed.
However, in the specific case where users capture any type of warnings in their test, either with
pytest.warns(), pytest.deprecated_call() or using the recwarn fixture,
no warning will be displayed at all.
Sometimes it is useful to hide some specific deprecation warnings that happen in code that you have no control over
(such as third-party libraries), in which case you might use the warning filters options (ini or marks) to ignore
those warnings.
For example:
[pytest]
filterwarnings =
    ignore:.*U.*mode is deprecated:DeprecationWarning
This will ignore all warnings of type DeprecationWarning where the start of the message matches
the regular expression ".*U.*mode is deprecated".
See @pytest.mark.filterwarnings and
Controlling warnings for more examples.
Note
If warnings are configured at the interpreter level, using
the PYTHONWARNINGS environment variable or the
-W command-line option, pytest will not configure any filters by default.
Also pytest doesn’t follow PEP 506 suggestion of resetting all warning filters because
it might break test suites that configure warning filters themselves
by calling warnings.simplefilter() (see issue #2430 for an example of that).
Ensuring code triggers a deprecation warning
You can also use pytest.deprecated_call() for checking
that a certain function call triggers a DeprecationWarning or
PendingDeprecationWarning:
import pytest


def test_myfunction_deprecated():
    with pytest.deprecated_call():
        myfunction(17)
This test will fail if myfunction does not issue a deprecation warning
when called with a 17 argument.
Asserting warnings with the warns function
You can check that code raises a particular warning using pytest.warns(),
which works in a similar manner to raises (except that
raises does not capture all exceptions, only the
expected_exception):
import warnings

import pytest


def test_warning():
    with pytest.warns(UserWarning):
        warnings.warn("my warning", UserWarning)
The test will fail if the warning in question is not raised. Use the keyword
argument match to assert that the warning matches a text or regex.
To match a literal string that may contain regular expression metacharacters like ( or ., the pattern can
first be escaped with re.escape.
Some examples:
>>> with warns(UserWarning, match="must be 0 or None"):
...     warnings.warn("value must be 0 or None", UserWarning)
...

>>> with warns(UserWarning, match=r"must be d+$"):
...     warnings.warn("value must be 42", UserWarning)
...

>>> with warns(UserWarning, match=r"must be d+$"):
...     warnings.warn("this is not here", UserWarning)
...
Traceback (most recent call last):
  ...
Failed: DID NOT WARN. No warnings of type ...UserWarning... were emitted...

>>> with warns(UserWarning, match=re.escape("issue with foo() func")):
...     warnings.warn("issue with foo() func")
...
You can also call pytest.warns() on a function or code string:
pytest.warns(expected_warning, func, *args, **kwargs)
pytest.warns(expected_warning, "func(*args, **kwargs)")
The function also returns a list of all raised warnings (as
warnings.WarningMessage objects), which you can query for
additional information:
with pytest.warns(RuntimeWarning) as record:
    warnings.warn("another warning", RuntimeWarning)

# check that only one warning was raised
assert len(record) == 1
# check that the message matches
assert record[0].message.args[0] == "another warning"
Alternatively, you can examine raised warnings in detail using the
recwarn fixture (see below).
The recwarn fixture automatically ensures to reset the warnings
filter at the end of the test, so no global state is leaked.
Recording warnings
You can record raised warnings either using pytest.warns() or with
the recwarn fixture.
To record with pytest.warns() without asserting anything about the warnings,
pass no arguments as the expected warning type and it will default to a generic Warning:
with pytest.warns() as record:
    warnings.warn("user", UserWarning)
    warnings.warn("runtime", RuntimeWarning)

assert len(record) == 2
assert str(record[0].message) == "user"
assert str(record[1].message) == "runtime"
The recwarn fixture will record warnings for the whole function:
import warnings


def test_hello(recwarn):
    warnings.warn("hello", UserWarning)
    assert len(recwarn) == 1
    w = recwarn.pop(UserWarning)
    assert issubclass(w.category, UserWarning)
    assert str(w.message) == "hello"
    assert w.filename
    assert w.lineno
Both recwarn and pytest.warns() return the same interface for recorded
warnings: a WarningsRecorder instance. To view the recorded warnings, you can
iterate over this instance, call len on it to get the number of recorded
warnings, or index into it to get a particular recorded warning.
Full API: WarningsRecorder.
Additional use cases of warnings in tests
Here are some use cases involving warnings that often come up in tests, and suggestions on how to deal with them:
-
To ensure that at least one of the indicated warnings is issued, use:
def test_warning():
    with pytest.warns((RuntimeWarning, UserWarning)):
        ...
-
To ensure that only certain warnings are issued, use:
def test_warning(recwarn):
    ...
    assert len(recwarn) == 1
    user_warning = recwarn.pop(UserWarning)
    assert issubclass(user_warning.category, UserWarning)
-
To ensure that no warnings are emitted, use:
def test_warning():
    with warnings.catch_warnings():
        warnings.simplefilter("error")
        ...
-
To suppress warnings, use:
with warnings.catch_warnings():
    warnings.simplefilter("ignore")
    ...
Custom failure messages
Recording warnings provides an opportunity to produce custom test
failure messages for when no warnings are issued or other conditions
are met.
def test():
    with pytest.warns(Warning) as record:
        f()
        if not record:
            pytest.fail("Expected a warning!")
If no warnings are issued when calling f, then not record will
evaluate to True. You can then call pytest.fail() with a
custom error message.
Internal pytest warnings
pytest may generate its own warnings in some situations, such as improper usage or deprecated features.
For example, pytest will emit a warning if it encounters a class that matches python_classes but also
defines an __init__ constructor, as this prevents the class from being instantiated:
# content of test_pytest_warnings.py
class Test:
    def __init__(self):
        pass

    def test_foo(self):
        assert 1 == 1
$ pytest test_pytest_warnings.py -q

============================= warnings summary =============================
test_pytest_warnings.py:1
  /home/sweet/project/test_pytest_warnings.py:1: PytestCollectionWarning: cannot collect test class 'Test' because it has a __init__ constructor (from: test_pytest_warnings.py)
    class Test:

-- Docs: https://docs.pytest.org/en/stable/how-to/capture-warnings.html
1 warning in 0.12s
These warnings might be filtered using the same builtin mechanisms used to filter other types of warnings.
Please read our Backwards Compatibility Policy to learn how we proceed about deprecating and eventually removing
features.
The full list of warnings is listed in the reference documentation.
Resource Warnings
Additional information of the source of a ResourceWarning can be obtained when captured by pytest if
tracemalloc module is enabled.
One convenient way to enable tracemalloc when running tests is to set the PYTHONTRACEMALLOC to a large
enough number of frames (say 20, but that number is application dependent).
For more information, consult the Python Development Mode
section in the Python documentation.
I am relatively new to pytest hooks and plugins and I am unable to figure out how to get my pytest code to give me test execution summary with reason of failure.
Consider the code:
class Foo:
    def __init__(self, val):
        self.val = val

    def test_compare12():
        f1 = Foo(1)
        f2 = Foo(2)
        assert f1 == f2, "F2 does not match F1"

    def test_compare34():
        f3 = Foo(3)
        f4 = Foo(4)
        assert f3 == f4, "F4 does not match F3"
When I run the pytest script with -v option, it gives me the following result on the console:
========================= test session starts=================================
platform darwin -- Python 2.7.5 -- py-1.4.26 -- pytest-2.7.0 --    /Users/nehau/src/QA/bin/python
rootdir: /Users/nehau/src/QA/test, inifile:
plugins: capturelog
collected 2 items

test_foocompare.py::test_compare12 FAILED
test_foocompare.py::test_compare34 FAILED

================================ FAILURES ===============================
_______________________________ test_compare12 _________________________

def test_compare12():
    f1 = Foo(1)
    f2 = Foo(2)
>       assert f1 == f2, "F2 does not match F1"
E       AssertionError: F2 does not match F1
E       assert <test.test_foocompare.Foo instance at 0x107640368> == <test.test_foocompare.Foo instance at 0x107640488>

test_foocompare.py:11: AssertionError
_____________________________ test_compare34______________________________

def test_compare34():
    f3 = Foo(3)
    f4 = Foo(4)
>       assert f3 == f4, "F4 does not match F3"
E       AssertionError: F4 does not match F3
E       assert <test.test_foocompare.Foo instance at 0x107640248> == <test.test_foocompare.Foo instance at 0x10761fe60>

test_foocompare.py:16: AssertionError

=============================== 2 failed in 0.01 seconds ==========================
I am running close to 2000 test cases, so it would be really helpful if I could have pytest display output in the following format:
::
test_foocompare.py::test_compare12 FAILED AssertionError:F2 does not match F1
test_foocompare.py::test_compare34 FAILED AssertionError:F2 does not match F1
::
I have looked at pytest_runtest_makereport plugin but can’t seem to get it working. Anyone has any other ideas?
Thanks
One of the advantages of Pytest over the unittest module is that we don’t need to use different
assert methods on different data structures. Pytest, by way of magic (also known as introspection)
can infere the actual value, the expected value, and the operation used in a plain old assert statement and can
provide a rather nice error message.
Let’s see a few of those error messages:
In these examples I’ll keep both the code under test and the testing function in the same file. You’ve already seen how it would look normally if we imported the functions under test from another module. If not check out the getting started with pytest article.
Also, in order to make the results clear, I’ve removed the summary of the test runs and kept only the actual
error reporting.
Comparing numbers for equality in Pytest
Probably the most basic thing to test is whether a function given some input returns an expected number.
examples/python/pt3/test_number_equal.py
def double(n):
    #return 2*n
    return 2+n

def test_string_equal():
    assert double(2) == 4
    assert double(21) == 42
In the above function double someone has mistakenly used + instead of *. The result of the test looks like this
$ pytest test_number_equal.py

    def test_string_equal():
        assert double(2) == 4
>       assert double(21) == 42
E       assert 23 == 42
E        +  where 23 = double(21)
The line starting with the > sign indicates the assert line that failed. The lines starting with E are the details.
Compare numbers relatively
In certain cases we cannot test for equality. For example if we would like to test if some process finishes within a given time, or whether a timeout is triggered at the right time. In such cases we need to compare if a number is less-than or greater-than some other number.
examples/python/pt3/test_number_less_than.py
def get_number():
    return 23

def test_string_equal():
    assert get_number() < 0
Running the test will provide the following error message:
$ pytest test_number_less_than.py

    def test_string_equal():
>       assert get_number() < 0
E       assert 23 < 0
E        +  where 23 = get_number()
The error-report looks quite similar to what we had above, but in this case too it is clear what was the comparision operation that failed.
Comparing strings
Similar to numbers we might want to know if a string received from some function is the same as we expect it to be.
examples/python/pt3/test_string_equal.py
def get_string():
    return "abc"

def test_string_equal():
    assert get_string() == "abd"
The result looks familiar:
$ pytest test_string_equal.py

    def test_string_equal():
>       assert get_string() == "abd"
E       AssertionError: assert 'abc' == 'abd'
E         - abc
E         + abd
For such short strings seeing both the expected string and the actual string is ok.
We can look at the strings and compare them character by character to see what was the actual difference.
Compare long strings
If the strings are much longer however, it would be really hard for us to pinpoint the specific location of the character (or characters) that differ. Luckily the authors of Pytest have thought about this problem as well:
examples/python/pt3/test_long_strings.py
import string

def get_string(s):
    return string.printable + s + string.printable

def test_long_strings():
    assert get_string('a') == get_string('b')
string.printable is a string containing all the printable ASCII characters:
0123456789abcdefghijklmnopqrstuvwxyzABCDEFGHIJKLMNOPQRSTUVWXYZ!»#$%&'()*+,-./:;<=>?@[\]^_`{|}~ tnrx0bx0c
Our brilliant get_string function will return it twice with an additional character between them.
We use this to create two nasty and long strings that differ by a single character.
The output looks like this:
$ pytest test_long_strings.py

    def test_long_strings():
>       assert get_string('a') == get_string('b')
E       AssertionError: assert '0123456789ab...tnrx0bx0c' == '0123456789abc...tnrx0bx0c'
E         Skipping 90 identical leading characters in diff, use -v to show
E         Skipping 91 identical trailing characters in diff, use -v to show
E           {|}~
E
E         - a012345678
E         ? ^
E         + b012345678
E         ? ^
I think this explains quite nicely where have the two strings differ and if you really, really want to see the
whole string you can use the -v flag.
Is string in longer string
If you need to check whether a string is part of a larger string we can use the regular in operator.
examples/python/pt3/test_substring.py
import string

def get_string():
    return string.printable * 30

def test_long_strings():
    assert 'hello' in get_string()
In case of failure the result will include only the beginning and the end of the «long string».
This can be very usefule if you need to test whether a certain string appears or not in an HTML page.
examples/python/pt3/test_substring.txt
    def test_long_strings():
>       assert 'hello' in get_string()
E       assert 'hello' in '0123456789abcdefghijklmnopqrstuvwxyzABCDEFGHIJKLMNOPQRSTUVWXYZ!"#$%&'()*+,-./:;<=>?@[\]^_`{|}~ tnrx0bx0c012345...x0bx0c0123456789abcdefghijklmnopqrstuvwxyzABCDEFGHIJKLMNOPQRSTUVWXYZ!"#$%&'()*+,-./:;<=>?@[\]^_`{|}~ tnrx0bx0c'
E        +  where '0123456789abcdefghijklmnopqrstuvwxyzABCDEFGHIJKLMNOPQRSTUVWXYZ!"#$%&'()*+,-./:;<=>?@[\]^_`{|}~ tnrx0bx0c012345...x0bx0c0123456789abcdefghijklmnopqrstuvwxyzABCDEFGHIJKLMNOPQRSTUVWXYZ!"#$%&'()*+,-./:;<=>?@[\]^_`{|}~ tnrx0bx0c' = get_string()
Testing any expression
Instead of calling a function we might have an expression on one side of the equation. (Actually I am not sure how often this would happen in the real world.
Maybe we only see these in examples on how pytest works.)
examples/python/pt3/test_expression_equal.py
def test_expression_equal():
    a = 3
    assert a % 2 == 0
The test result:
$ pytest test_expression_equal.py

    def test_expression_equal():
        a = 3
>       assert a % 2 == 0
E       assert (3 % 2) == 0
Is element in a list?
Besides comparing individual values we might also want to compare more complex data. First, let’s see what happens if our test must ensure that a value can be found in a list?
examples/python/pt3/test_in_list.py
def get_list():
    return ["monkey", "cat"]

def test_in_list():
    assert "dog" in get_list()
We can use the in operator of Python. The result will look like this:
$ pytest test_in_list.py

    def test_in_list():
>       assert "dog" in get_list()
E       AssertionError: assert 'dog' in ['monkey', 'cat']
E        +  where ['monkey', 'cat'] = get_list()
Pytest will conveniently show us the list that did not contain the expected value.
Compare lists in Pytest
A more interesting case might be testing if the returned list is the same as the expected list. Using the == operator can tell us if the two lists are equal or not, but if we need to understand what went wrong, we’d better know where do the lists differ.
Or at least where do they start to differ.
examples/python/pt3/test_lists.py
import string
import re

def get_list(s):
    return list(string.printable + s + string.printable)

def test_long_lists():
    assert get_list('a') == get_list('b')
The result:
$ pytest test_lists.py

    def test_long_lists():
>       assert get_list('a') == get_list('b')
E       AssertionError: assert ['0', '1', '2...'4', '5', ...] == ['0', '1', '2'...'4', '5', ...]
E         At index 100 diff: 'a' != 'b'
E         Use -v to get the full diff
We could further explore the output for the cases when multiple elements differ and when one list is a sublist of the other.
Compare dictionaries in Pytest
Dictionaries can differ in a number of ways. The keys might be identical, but some values might differ.
Some keys might be missing in the actual result or there might be some extra keys.
In this example we test all of these:
Using the string.printable we create a dictionary where the keys are the printable characters and the values
are their respective ASCII value returned by the ord function. Then we add (or replace) one of key-value pair.
examples/python/pt3/test_dictionaries.py
import string
import re

def get_dictionary(k, v):
    d = dict([x, ord(x)] for x in  string.printable)
    d[k] = v
    return d

def test_big_dictionary_different_value():
    assert get_dictionary('a', 'def') == get_dictionary('a', 'abc')

def test_big_dictionary_differnt_keys():
    assert get_dictionary('abc', 1) == get_dictionary('def', 2)
The result looks like this:
$ pytest test_dictionaries.py

______________ test_big_dictionary_different_value _______________

    def test_big_dictionary_different_value():
>       assert get_dictionary('a', 'def') == get_dictionary('a', 'abc')
E       AssertionError: assert {'t': 9, 'n...x0c': 12, ...} == {'t': 9, 'n'...x0c': 12, ...}
E         Omitting 99 identical items, use -v to show
E         Differing items:
E         {'a': 'def'} != {'a': 'abc'}
E         Use -v to get the full diff

_______________ test_big_dictionary_differnt_keys ________________

    def test_big_dictionary_differnt_keys():
>       assert get_dictionary('abc', 1) == get_dictionary('def', 2)
E       AssertionError: assert {'t': 9, 'n...x0c': 12, ...} == {'t': 9, 'n'...x0c': 12, ...}
E         Omitting 100 identical items, use -v to show
E         Left contains more items:
E         {'abc': 1}
E         Right contains more items:
E         {'def': 2}
E         Use -v to get the full diff
The first test function got two dictionaries where the value of a single key differed.
The second test function had an extra key in both dictionaries.
Testing for expected exceptions in Pytest
Finally let’s look at exceptions!
A good test suite will test the expected behaviour both when the input is fine and
also when the input triggers some exception. Without testing the exception we cannot
be sure that they will be really raiesed when necessary. An incorrect refactoring
might eliminate the error checking of our code therby letting through invalid data
and either triggering a different exception as in our example, or not generating any exception
just silently doing the wrong thing.
In this brilliant example the divide function checks if the divider is 0 and raises it
own type of exception instead of letting Python rais its own. If this is the defined behavior
someone using our module will probably wrap our code in some try expression and expect
a ValueError error. If someone changes our divide function and removed our
special exception then we basically have broken the exception-handling of our user.
examples/python/pt3/test_exceptions.py
import pytest

def divide(a, b):
    if b == 0:
        raise ValueError('Cannot divide by Zero')
    return a / b

def test_zero_division():
    with pytest.raises(ValueError) as e:
        divide(1, 0)
    assert str(e.value) == 'Cannot divide by Zero'
The test ha actually two parts. The first part:
    with pytest.raises(ValueError) as e:
        divide(1, 0)
checks if a ValueError was raised during our call to divide(1, 0)
and will assign the exception object to the arbitrarily named variable e.
The second part is a plain assert that checks if the text of the exception is what
we expect to be.
This is now the expected behaviour. Our test passes:
$ pytest test_exceptions.py

test_exceptions.py .
What if someone changes the error message in our exception from Zero to Null?
examples/python/pt3/test_exceptions_text_changed.py
import pytest

def divide(a, b):
    if b == 0:
        raise ValueError('Cannot divide by Null')
    return a / b

def test_zero_division():
    with pytest.raises(ValueError) as e:
        divide(1, 0)
    assert str(e.value) == 'Cannot divide by Zero'
The assert in the test will fail indicating the change in the text.
This is actually a plain string comparision.
$ pytest test_exceptions_text_changed.py


    def test_zero_division():
        with pytest.raises(ValueError) as e:
            divide(1, 0)
>       assert str(e.value) == 'Cannot divide by Zero'
E       AssertionError: assert 'Cannot divide by Null' == 'Cannot divide by Zero'
E         - Cannot divide by Null
E         ?                  ^^^^
E         + Cannot divide by Zero
E         ?                  ^^^^
In the second example we show the case when the special exception raising is gone.
Either by mistake or because someone decided that it should not be there.
In this case the first part of our test function will catch the different exception.
examples/python/pt3/test_exceptions_failing.py
import pytest

def divide(a, b):
#    if b == 0:
#        raise ValueError('Cannot divide by Zero')
    return a / b

def test_zero_division():
    with pytest.raises(ValueError) as e:
        divide(1, 0)
    assert str(e.value) == 'Cannot divide by Zero'
The report will look like this:
$ pytest test_exceptions_failing.py

    def test_zero_division():
        with pytest.raises(ValueError) as e:
>           divide(1, 0)

test_exceptions_failing.py:10:
_ _ _ _ _ _ _ _ _ _ _ _ _ _ _ _ _ _ _ _ _ _ _ _ _ _ _ _ _ _ _ _ _

a = 1, b = 0

    def divide(a, b):
    #    if b == 0:
    #        raise ValueError('Cannot divide by Zero')
>       return a / b
E       ZeroDivisionError: division by zero
Exception depositing money to the bank
Another case when checking for proper exceptions might be important is when
we want to avoid silently incorrect behavior.
For example in this code we have a function called deposit that expects
a non-negative number. We added our input validation that will raise an exception protecting
the balance of our bank account. (In our example we only indicated the location of the code
that actually changes the balance.)
examples/python/pt3/test_bank.py
import pytest

def deposit(money):
    if money < 0:
        raise ValueError('Cannot deposit negative sum')

    # balance += money

def test_negative_deposit():
    with pytest.raises(ValueError) as e:
        deposit(-1)
    assert str(e.value) == 'Cannot deposit negative sum'
We have also created a test-case that will ensure that the protection is there,
or at least that the function raises an exception if -1 was passed to it.
Conclusion
Pytest and its automatic error reporting is awesome.
TL;DR
Time is a precious resource so I won’t waste yours. Here’s how you can assert an exception is raised and how to check that in pytest.
Solution: Use pytest.raises
import pytest

def test_raises_exception():
    with pytest.raises(ZeroDivisionError):
        1 / 0
And here’s how you assert no exception is raised.
Solution: Enclose your code in a try/except block and and if the code raises, you can catch it and print a nice message. pytest is smart enough to make the test fail even if you don’t catch it but having a message makes your test cleaner.
def my_division_function(a, b):
    return a / b

def test_code_raises_no_exception():
    """
    Assert your python code raises no exception.
    """
    try:
        my_division_function(10, 5)
    except ZeroDivisionError as exc:
        assert False, f"'10 / 5' raised an exception {exc}"
And that’s it, if you want to know more, please follow along.
Introduction
In this tutorial, you’ll learn how to use pytest to:
- assert that an exception is raised
- assert the exception message
- assert the exception type
- assert that an exception is not raised
In a nutshell, we’ll see how to use pytest.raises for each of those cases with examples.
Table of Contents
- How to Assert That an Exception Is Raised
- How to Assert That NO Exception Is Raised
- How to Assert the Exception Message — And Type
- Conclusion
How to Assert That an Exception Is Raised
In this section, I’m going to show you how you can assert that your code raises an exception. This is a frequent use case and can sometimes tricky. The wonderful thing is, if you are using pytest you can do that in an idiomatic and cleaner way.
Let’s imagine that we have a function that checks for some keys in a dictionary. If a key is not present, it should raise a KeyError. As you can see, this is very generic and doesn’t tell the users much about the error. We can make it cleaner by raising custom exceptions, with different messages depending on the field.
import pytest


class MissingCoordException(Exception):
    """Exception raised when X or Y is not present in the data."""


class MissingBothCoordException(Exception):
    """Exception raised when both X and Y are not present in the data."""


def sum_x_y(data: dict) -> str:
    return data["x"] + data["y"]
Now, time to test this. How can we do that with pytest?
This code is deliberately wrong, as you can see we’re not raising anything. In fact, we want to see test failing first, almost like TDD. After seeing the test failing, we can fix our implementation and re-run the test.
def test_sum_x_y_missing_both():
    data = {"irrelevant": 1}
    with pytest.raises(MissingBothCoordException):
        sum_x_y(data)
Then we get the following output:
============================ FAILURES ============================
________________ test_sum_x_y_missing_both _________________

    def test_sum_x_y_missing_both():
        data = {"irrelevant": 1}
        with pytest.raises(MissingBothCoordException):
>           sum_x_y(data)

test_example.py:33:
_ _ _ _ _ _ _ _ _ _ _ _ _ _ _ _ _ _ _ _ _ _ _ _ _ _ _ _ _ _ _ _ _

data = {'irrelevant': 1}

    def sum_x_y(data: dict) -> str:
>       return data["x"] + data["y"]
E       KeyError: 'x'

test_example.py:27: KeyError
==================== short test summary info =====================
FAILED test_example.py::test_sum_x_y_missing_both - KeyEr...
======================= 1 failed in 0.02s ========================
Ok, this makes sense, now it’s time to fix it. We’ll check if the data dict has both x and y, otherwise we raise a MissingBothCoordException.
def sum_x_y(data: dict) -> str:
    if "x" not in data and "y" not in data:
        raise MissingBothCoordException("Both x and y coord missing.")
    return data["x"] + data["y"]
And when we re-run the test, it passes.
test_example.py .                                          [100%]

======================= 1 passed in 0.01s ========================
Great! And that is pretty much it. This is how you check if an exception is raised withpytest. In the next section, we’re going to improve our function and we’ll need another test.
How to Assert the Exception Message — And Type
In this section, we’ll improve our sum_x_y function and also the tests. I’ll show you how you can make your test more robust by checking the exception message.
With that in mind, let’s expand the sum_x_y function.
def sum_x_y(data: dict) -> str:
    if "x" not in data and "y" not in data and "extra" not in data:
        raise MissingBothCoordException("Both X and Y coord missing.")
    if "x" not in data:
        raise MissingCoordException("The Y coordinate is not present in the data.")
    if "y" not in data:
        raise MissingCoordException("The Y coordinate is not present in the data.")
    return data["x"] + data["y"]
The new test goes like this:
def test_sum_x_y_has_x_missing_coord():
    data = {"extra": 1, "y": 2}
    with pytest.raises(MissingCoordException):
        sum_x_y(data)
And it passes!
$ poetry run pytest -k test_sum_x_y_has_x_missing_coord
====================== test session starts =======================
collected 2 items / 1 deselected / 1 selected

test_example.py .                                          [100%]

================ 1 passed, 1 deselected in 0.01s =================
However, it’s a bit fragile… In case you haven’t noticed it, when "x" is missing, the exception message is: "The Y coordinate is not present in the data.". This is a bug, and one way to detect it is by asserting we return the right message. Thankfully, pytest makes it easier to do.
If we refactor the test to take into account the message, we get the following output:
def test_sum_x_y_has_x_missing_coord():
    data = {"extra": 1, "y": 2}
    with pytest.raises(MissingCoordException) as exc:
        sum_x_y(data)
    assert "The X coordinate is not present in the data." in str(exc.value)
============================ FAILURES ============================
_____________ test_sum_x_y_has_x_missing_coord _____________

def test_sum_x_y_has_x_missing_coord():
        data = {"extra": 1, "y": 2}
        with pytest.raises(MissingCoordException) as exc:
            sum_x_y(data)
>       assert "The X coordinate is not present in the data." in str(exc.value)
E       AssertionError: assert 'The X coordinate is not present in the data.' in 'The Y coordinate is not present in the data.'
E        +  where 'The Y coordinate is not present in the data.' = str(MissingCoordException('The Y coordinate is not present in the data.'))
E        +    where MissingCoordException('The Y coordinate is not present in the data.') = <ExceptionInfo MissingCoordException('The Y coordinate is not present in the data.') tblen=2>.value

test_example.py:32: AssertionError
==================== short test summary info =====================
FAILED test_example.py::test_sum_x_y_has_x_missing_coord
======================= 1 failed in 0.02s ========================
That’s exactly what we want. Let’s fix the code and re-run the test.
def sum_x_y(data: dict) -> str:
    if "x" not in data and "y" not in data and "extra" not in data:
        raise MissingBothCoordException("Both X and Y coord missing.")
    if "x" not in data:
        raise MissingCoordException("The X coordinate is not present in the data.")
    if "y" not in data:
        raise MissingCoordException("The Y coordinate is not present in the data.")
    return data["x"] + data["y"]
And the result…
$ poetry run pytest test_example.py::test_sum_x_y_has_x_missing_coord
====================== test session starts =======================
platform linux -- Python 3.8.5, pytest-6.1.1, py-1.9.0, pluggy-0.13.1
rootdir: /home/miguel/projects/tutorials/pytest-raises
collected 1 item

test_example.py .                                          [100%]

======================= 1 passed in 0.01s ========================
This is possible because pytest.raises returns an ExceptionInfo object that contains fields such as type, value, traceback and many others. If we wanted to assert the type, we could do something along these lines…
def test_sum_x_y_has_x_missing_coord():
    data = {"extra": 1, "y": 2}
    with pytest.raises(MissingCoordException) as exc:
        sum_x_y(data)
    assert "The X coordinate is not present in the data." in str(exc.value)
    assert exc.type == MissingCoordException
However, we are already asserting that by using pytest.raises so I think asserting the type like this a bit redundant. When is this useful then? It’s useful if we are asserting a more generic exception in pytest.raises and we want to check the exact exception raised. For instance:
def test_sum_x_y_has_x_missing_coord():
    data = {"extra": 1, "y": 2}
    with pytest.raises(Exception) as exc:
        sum_x_y(data)
    assert "The X coordinate is not present in the data." in str(exc.value)
    assert exc.type == MissingCoordException
One more way to assert the message is by setting the match argument with the pattern you want to be asserted. The following example was taken from the official pytest docs.
>>> with raises(ValueError, match='must be 0 or None'):
...     raise ValueError("value must be 0 or None")

>>> with raises(ValueError, match=r'must be d+$'):
...     raise ValueError("value must be 42")
As you can see, we can verify if the expected exception is raised but also if the message matches the regex pattern.
How to Assert That NO Exception Is Raised
The last section in this tutorial is about yet another common use case: how to assert that no exception is thrown. One way we can do that is by using a try / except. If it raises an exception, we catch it and assert False.
def test_sum_x_y_works():
    data = {"extra": 1, "y": 2, "x": 1}

    try:
        sum_x_y(data)
    except Exception as exc:
        assert False, f"'sum_x_y' raised an exception {exc}"
When we run this test, it passes.
$ poetry run pytest test_example.py::test_sum_x_y_works
====================== test session starts =======================
collected 1 item

test_example.py .                                          [100%]

======================= 1 passed in 0.00s ========================
Now, let’s create a deliberate bug so we can see the test failing. We’ll change our function to raise an ValueError before returning the result.
def sum_x_y(data: dict) -> str:
    if "x" not in data and "y" not in data and "extra" not in data:
        raise MissingBothCoordException("'extra field and x / y coord missing.")
    if "x" not in data:
        raise MissingCoordException("The X coordinate is not present in the data.")
    if "y" not in data:
        raise MissingCoordException("The Y coordinate is not present in the data.")
    raise ValueError("Oh no, this shouldn't have happened.")
    return data["x"] + data["y"]
And then we re-run the test…
    def test_sum_x_y_works():
        data = {"extra": 1, "y": 2, "x": 1}

        try:
            sum_x_y(data)
        except Exception as exc:
>           assert False, f"'sum_x_y' raised an exception {exc}"
E           AssertionError: 'sum_x_y' raised an exception Oh no, this shouldn't have happened.
E           assert False

test_example.py:52: AssertionError
==================== short test summary info =====================
FAILED test_example.py::test_sum_x_y_works - AssertionErr...
======================= 1 failed in 0.02s ========================
It works! Our code raised the ValueError and the test failed!
Conclusion
That’s it for today, folks! I hope you’ve learned something new and useful. Knowing how to test exceptions is an important skill to have. The way pytest does that is, IMHO, cleaner than unittest and much less verbose. In this article, I showed how you can not only assert that your code raises the expected exception, but also assert when they’re not supposed to be raised. Finally, we saw how to check if the exception message is what you expect, which makes test cases more reliable.
Other posts you may like:
-
Learn how to unit test REST APIs in Python with Pytest by example.
-
7 pytest Features and Plugins That Will Save You Tons of Time
-
How to Use Fixtures as Arguments in pytest.mark.parametrize
-
How to Check if an Exception Is Raised (or Not) With pytest
-
7 pytest Plugins You Must Definitely Use
-
How to Disable Autouse Fixtures in pytest
-
How to Unit Test Complex Data Like Numpy Arrays in Python
-
The Best Way to Compare Two Dictionaries in Python
See you next time!
This post was originally published at https://miguendes.me