
Installing a Secure Sockets Layer (SSL) certificate on your WordPress site enables it to use HTTPS to ensure secure connections. Unfortunately, there are a variety of things that can go wrong in the process of confirming a valid SSL certificate and making a connection between your site’s server and a visitor’s browser.
If you’ve encountered an “SSL Handshake Failed” error message and are confused as to what it means, you’re not alone. It’s a common error that doesn’t tell you much on its own. While this can be a frustrating experience, the good news is that there are simple steps you can take to resolve the issue.
In this post, we’ll explain what the SSL Handshake Failed error is and what causes it. Then we’ll provide you with several methods you can use to fix it.
Let’s get started!
An Introduction to the SSL Handshake
Before we dig deeper into what causes a TLS or SSL handshake failure, it’s helpful to understand what the TLS/SSL handshake is. Secure Sockets Layer (SSL) and Transport Layer Security (TLS) are protocols used to authenticate data transfers between servers and external systems such as browsers.
SSL certificates are needed in order to secure your website using HTTPS. We won’t get too in-depth about the difference between TLS vs SSL since it’s a minor one. The terms are often used interchangeably, so for simplicity’s sake, we’ll use “SSL” to refer to both.
With that out of the way, an SSL handshake is the first step in the process of establishing an HTTPS connection. To authenticate and establish the connection, the user’s browser and the website’s server must go through a series of checks (the handshake), which establish the HTTPS connection parameters.
Let us explain: the client (typically the browser) sends a request for a secure connection to the server. After the request is sent, the server sends a public key to your computer and checks that key against a list of certificates. The computer then generates a key and encrypts it, using the public key sent from the server.
To make a long story short, without the SSL handshake, a secure connection won’t be made. This can pose a significant security risk. Plus, there are a lot of moving parts involved in the process.
That means there are many different opportunities for something to go wrong and cause a handshake failure, or even lead to the “your connection is not private” error, causing visitors to leave.
Confronted with the ‘SSL Handshake Failed’ error? 🤝 Get a grip on how to solve it with these 5 methods ⤵️Click to Tweet
Understanding What Causes SSL Handshake Failures
An SSL Handshake Failure or Error 525 means that the server and browser were unable to establish a secure connection. This can happen for a variety of reasons.
Generally, an Error 525 means that the SSL handshake between a domain using Cloudflare and the origin web server failed:

However, it’s also important to understand that SSL errors can happen on the client-side or the server-side. Common causes of SSL errors on the client-side include:
- The wrong date or time on the client device.
- An error with the browser configuration.
- A connection that is being intercepted by a third party.
Some server-side causes include:
- A cipher suite mismatch.
- A protocol used by the client that isn’t supported by the server.
- A certificate that is incomplete, invalid, or expired.
Typically, if the SSL handshake fails, the issue can be attributed to something wrong with the website or server and their SSL configurations.
How to Fix the SSL Handshake Failed Error (5 Methods)
There are several potential causes behind the “SSL Handshake Failed” error. So there’s no simple answer when it comes to how you should fix it.
Fortunately, there are a handful of methods you can use to begin exploring potential issues and resolving them one by one. Let’s take a look at five strategies you can use to try and fix the SSL Handshake Failed error.
1. Update Your System Date and Time
Let’s start with one of the more unlikely causes, but one that is incredibly easy to correct if it is the problem: your computer’s clock.
If your system is using the wrong date and time, that may interrupt the SSL handshake. When the system clock is different than the actual time, for example, if it’s set too far into the future, it can interfere with the SSL certificate verification.
Your computer’s clock might have been set incorrectly due to human error or simply due to a glitch in your settings. Whatever the reason, it’s a good idea to check and make sure your system time is correct, and update it if it’s not.
Of course, if your clock is showing the correct information, it’s safe to assume that this isn’t the source of the “SSL Handshake Failed” issue.
2. Check to See If Your SSL Certificate Is Valid
Expiration dates are placed on SSL certificates, to help make sure their validation information remains accurate. Generally, the validity of these certificates lasts for anywhere between six months and two years.
If an SSL certificate is revoked or expired, the browser will detect this and be unable to complete the SSL handshake. If it’s been more than a year or so since you installed an SSL certificate on your website, it might be time to reissue it.
To view the status of your SSL certificate, you can use an SSL certificate checker tool such as the one offered by Qualys:
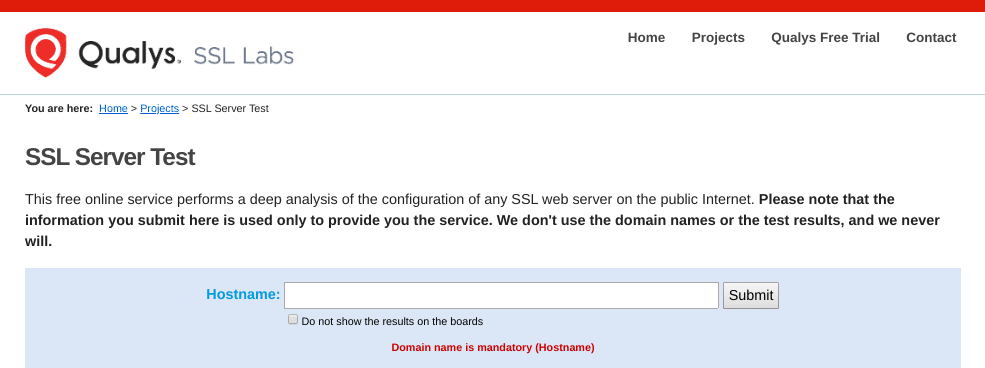
This tool is both reliable and free to use. All you need to do is input your domain name into the Hostname field, and then click on Submit. Once the checker is done analyzing your site’s SSL configuration, it will present you with some results:
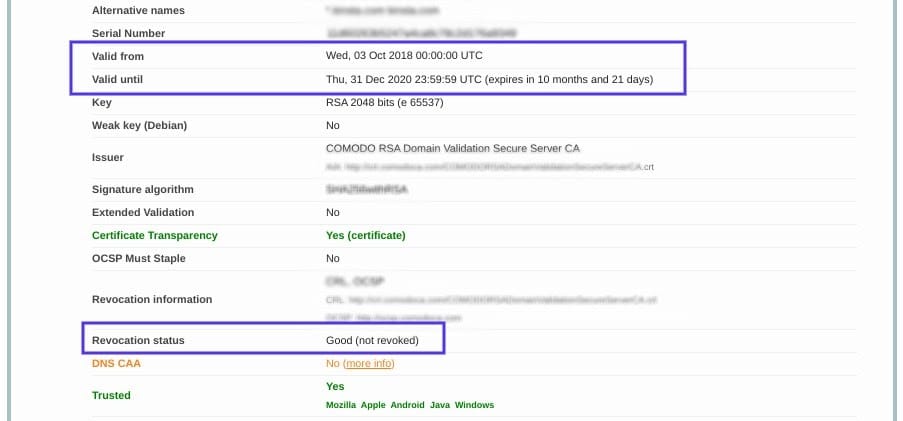
On this page, you can find out if your certificate is still valid and see if it has been revoked for any reason.
In either case, updating your SSL certificate should resolve the handshake error (and is vital for keeping your site and your WooCommerce store secure).
3. Configure Your Browser for the Latest SSL/TLS Protocol Support
Sometimes the best way to determine the root cause of an issue is by process of elimination. As we mentioned earlier, the SSL handshake failure can often occur due to a browser misconfiguration.
The quickest way to determine whether a particular browser is the problem is to try switching to a different one. This can at least help narrow down the problem. You may also try disabling any plugins and resetting your browser back to its default settings.
Another potential browser-related issue is a protocol mismatch. For example, if the server only supports TLS 1.2, but the browser is only configured for TLS 1.0 or TLS 1.1, there’s no mutually-supported protocol available. This will inevitably lead to an SSL handshake failure.
How you can check to see if this problem is occurring varies based on the browser you’re using. As an example, we’ll look at how the process works in Chrome. First, open your browser and go to Settings > Advanced. This will expand a number of menu options.
Under the System section, click on Open your computer’s proxy settings:
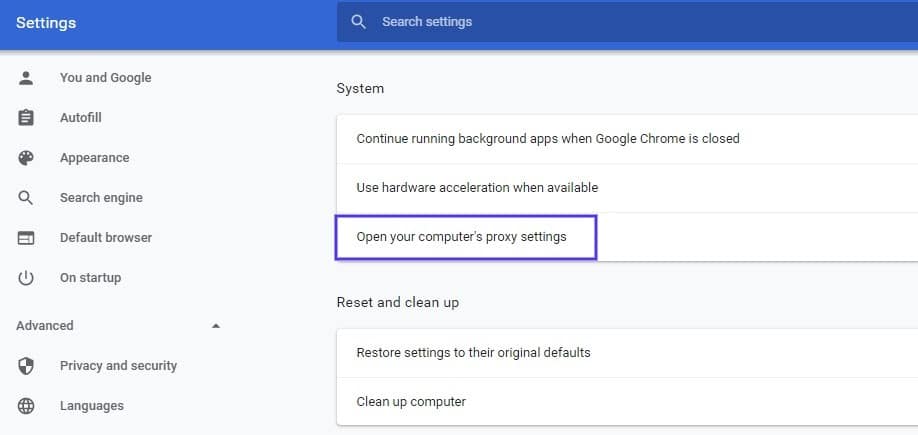
This will open up a new window. Next, select the Advanced tab. Under the Security section, check to see if the box next to Use TLS 1.2 is selected. If not, check that option:
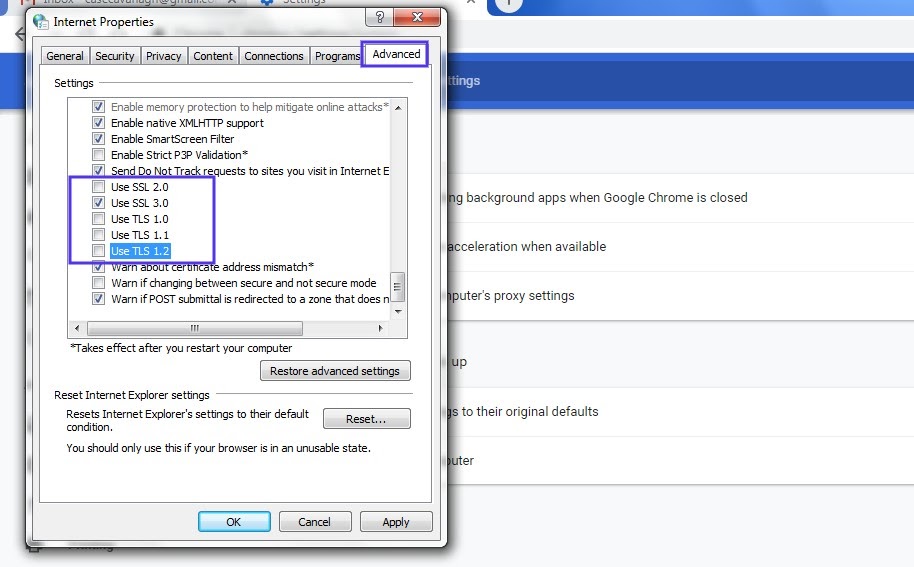
It’s also recommended that you uncheck the boxes for SSL 2.0 and SSL 3.0.
The same applies to TLS 1.0 and TLS 1.1 since they are being phased out. When you’re done, click on the OK button, and check to see if the handshake error has been resolved.
Note that if you’re using Apple Safari or Mac OS there isn’t an option to enable or disable SSL protocols. TLS 1.2 is automatically enabled by default. If you’re using Linux, you can refer to the Red Hat guide on TLS hardening.
4. Verify That Your Server Is Properly Configured to Support SNI
It’s also possible that the SSL handshake failure is being caused by improper Server Name Indication (SNI) configuration. The SNI is what enables a web server to securely host several TLS certificates for one IP address.
Each website on a server has its own certificate. However, if the server isn’t SNI-enabled, that can result in an SSL handshake failure, because the server may not know which certificate to present.
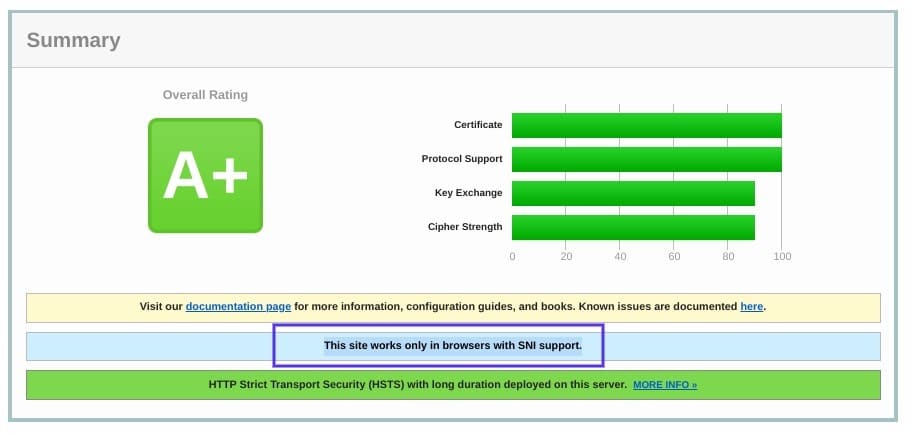
There are a few ways to check and see whether a site requires SNI. One option is to use Qualys’ SSL Server Test, which we discussed in the previous section. Input your site’s domain name, and then click on the Submit button.
On the results page, look for a message that reads “This site works only in browsers with SNI support”:
Another approach for detecting if a server is using SNI is to browse the server names in the ‘ClientHello’ message. This is a more technical process, but it can offer a lot of information.
It involves checking the extended hello header for a ‘server_name’ field, to see if the correct certifications are presented.
If you’re familiar with using tools such as the OpenSSL toolkit and Wireshark, you might find this method preferable. You can use openssl s_client with and without the -servername option:
# without SNI
 $ openssl s_client -connect host:port

 # use SNI
 $ openssl s_client -connect host:port -servername host
If you get two different certificates with the same name, it means that the SNI is supported and properly configured.
However, if the output in the returned certificates is different, or the call without SNI cannot establish an SSL connection, it indicates that SNI is required but not correctly configured. Resolving this issue may require switching to a dedicated IP address.
5. Make Sure the Cipher Suites Match
If you still haven’t been able to identify the cause of the SSL handshake failure, it might be due to a cipher suite mismatch. In case you’re unfamiliar with the term, ‘cipher suites’ refer to a set of algorithms, including ones for key exchange, bulk encryption, and message authentication code, that can be used for securing SSL and TLS network connections.
If the cipher suites that a server uses don’t support or match what’s used by Cloudflare, that can result in an “SSL Handshake Failed” error.
When it comes to figuring out whether there is a cipher suite mismatch, Qualys’ SSL Server Test proves yet again to be a useful tool.
When you input your domain and click on Submit, you’ll see a summary analysis page. You can find the cipher information under the Cipher Suites section:
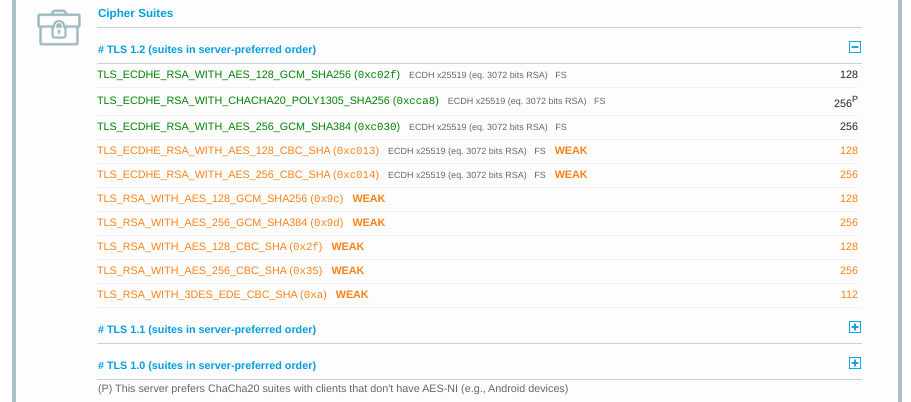
You can use this page to discover which ciphers and protocols the server supports. You’ll want to look out for any that display the ‘weak’ status. In addition, this section also details the specific algorithms for the cipher suites.
To correct this issue, you can compare the results against what your browser supports by using the Qualys SSL/TLS Capabilities of Your Browser tool. For more extensive information and guidance about cipher suites, we also recommend checking out the ComodoSSLStore guide.
Confused by the ‘SSL Handshake Failed’ error message? This guide explains what it is and, most importantly, 5 ways to fix it 🙌Click to Tweet
Summary
One of the most perplexing yet common types of SSL-related problems is the “SSL Handshake Failed” error. Dealing with this error can be stressful since it has many potential causes, including both client- and server-side issues.
However, there are some reliable solutions you can use to identify the problem and resolve it. Here are five ways you can use to fix the SSL Handshake Failed error:
- Update your system date and time.
- Check to see if your SSL certificate is valid (and reissue it if necessary).
- Configure your browser to support the latest TLS/SSL versions.
- Verify that your server is properly configured to support SNI.
- Make sure the cipher suites match.
Get all your applications, databases and WordPress sites online and under one roof. Our feature-packed, high-performance cloud platform includes:
- Easy setup and management in the MyKinsta dashboard
- 24/7 expert support
- The best Google Cloud Platform hardware and network, powered by Kubernetes for maximum scalability
- An enterprise-level Cloudflare integration for speed and security
- Global audience reach with up to 35 data centers and 275+ PoPs worldwide
Test it yourself with $20 off your first month of Application Hosting or Database Hosting. Explore our plans or talk to sales to find your best fit.
Installing a Secure Sockets Layer (SSL) certificate on your WordPress site enables it to use HTTPS to ensure secure connections. Unfortunately, there are a variety of things that can go wrong in the process of confirming a valid SSL certificate and making a connection between your site’s server and a visitor’s browser.
If you’ve encountered an “SSL Handshake Failed” error message and are confused as to what it means, you’re not alone. It’s a common error that doesn’t tell you much on its own. While this can be a frustrating experience, the good news is that there are simple steps you can take to resolve the issue.
In this post, we’ll explain what the SSL Handshake Failed error is and what causes it. Then we’ll provide you with several methods you can use to fix it.
Let’s get started!
An Introduction to the SSL Handshake
Before we dig deeper into what causes a TLS or SSL handshake failure, it’s helpful to understand what the TLS/SSL handshake is. Secure Sockets Layer (SSL) and Transport Layer Security (TLS) are protocols used to authenticate data transfers between servers and external systems such as browsers.
SSL certificates are needed in order to secure your website using HTTPS. We won’t get too in-depth about the difference between TLS vs SSL since it’s a minor one. The terms are often used interchangeably, so for simplicity’s sake, we’ll use “SSL” to refer to both.
With that out of the way, an SSL handshake is the first step in the process of establishing an HTTPS connection. To authenticate and establish the connection, the user’s browser and the website’s server must go through a series of checks (the handshake), which establish the HTTPS connection parameters.
Let us explain: the client (typically the browser) sends a request for a secure connection to the server. After the request is sent, the server sends a public key to your computer and checks that key against a list of certificates. The computer then generates a key and encrypts it, using the public key sent from the server.
To make a long story short, without the SSL handshake, a secure connection won’t be made. This can pose a significant security risk. Plus, there are a lot of moving parts involved in the process.
That means there are many different opportunities for something to go wrong and cause a handshake failure, or even lead to the “your connection is not private” error, causing visitors to leave.
Confronted with the ‘SSL Handshake Failed’ error? 🤝 Get a grip on how to solve it with these 5 methods ⤵️Click to Tweet
Understanding What Causes SSL Handshake Failures
An SSL Handshake Failure or Error 525 means that the server and browser were unable to establish a secure connection. This can happen for a variety of reasons.
Generally, an Error 525 means that the SSL handshake between a domain using Cloudflare and the origin web server failed:
However, it’s also important to understand that SSL errors can happen on the client-side or the server-side. Common causes of SSL errors on the client-side include:
- The wrong date or time on the client device.
- An error with the browser configuration.
- A connection that is being intercepted by a third party.
Some server-side causes include:
- A cipher suite mismatch.
- A protocol used by the client that isn’t supported by the server.
- A certificate that is incomplete, invalid, or expired.
Typically, if the SSL handshake fails, the issue can be attributed to something wrong with the website or server and their SSL configurations.
How to Fix the SSL Handshake Failed Error (5 Methods)
There are several potential causes behind the “SSL Handshake Failed” error. So there’s no simple answer when it comes to how you should fix it.
Fortunately, there are a handful of methods you can use to begin exploring potential issues and resolving them one by one. Let’s take a look at five strategies you can use to try and fix the SSL Handshake Failed error.
1. Update Your System Date and Time
Let’s start with one of the more unlikely causes, but one that is incredibly easy to correct if it is the problem: your computer’s clock.
If your system is using the wrong date and time, that may interrupt the SSL handshake. When the system clock is different than the actual time, for example, if it’s set too far into the future, it can interfere with the SSL certificate verification.
Your computer’s clock might have been set incorrectly due to human error or simply due to a glitch in your settings. Whatever the reason, it’s a good idea to check and make sure your system time is correct, and update it if it’s not.
Of course, if your clock is showing the correct information, it’s safe to assume that this isn’t the source of the “SSL Handshake Failed” issue.
2. Check to See If Your SSL Certificate Is Valid
Expiration dates are placed on SSL certificates, to help make sure their validation information remains accurate. Generally, the validity of these certificates lasts for anywhere between six months and two years.
If an SSL certificate is revoked or expired, the browser will detect this and be unable to complete the SSL handshake. If it’s been more than a year or so since you installed an SSL certificate on your website, it might be time to reissue it.
To view the status of your SSL certificate, you can use an SSL certificate checker tool such as the one offered by Qualys:
This tool is both reliable and free to use. All you need to do is input your domain name into the Hostname field, and then click on Submit. Once the checker is done analyzing your site’s SSL configuration, it will present you with some results:
On this page, you can find out if your certificate is still valid and see if it has been revoked for any reason.
In either case, updating your SSL certificate should resolve the handshake error (and is vital for keeping your site and your WooCommerce store secure).
3. Configure Your Browser for the Latest SSL/TLS Protocol Support
Sometimes the best way to determine the root cause of an issue is by process of elimination. As we mentioned earlier, the SSL handshake failure can often occur due to a browser misconfiguration.
The quickest way to determine whether a particular browser is the problem is to try switching to a different one. This can at least help narrow down the problem. You may also try disabling any plugins and resetting your browser back to its default settings.
Another potential browser-related issue is a protocol mismatch. For example, if the server only supports TLS 1.2, but the browser is only configured for TLS 1.0 or TLS 1.1, there’s no mutually-supported protocol available. This will inevitably lead to an SSL handshake failure.
How you can check to see if this problem is occurring varies based on the browser you’re using. As an example, we’ll look at how the process works in Chrome. First, open your browser and go to Settings > Advanced. This will expand a number of menu options.
Under the System section, click on Open your computer’s proxy settings:
This will open up a new window. Next, select the Advanced tab. Under the Security section, check to see if the box next to Use TLS 1.2 is selected. If not, check that option:
It’s also recommended that you uncheck the boxes for SSL 2.0 and SSL 3.0.
The same applies to TLS 1.0 and TLS 1.1 since they are being phased out. When you’re done, click on the OK button, and check to see if the handshake error has been resolved.
Note that if you’re using Apple Safari or Mac OS there isn’t an option to enable or disable SSL protocols. TLS 1.2 is automatically enabled by default. If you’re using Linux, you can refer to the Red Hat guide on TLS hardening.
4. Verify That Your Server Is Properly Configured to Support SNI
It’s also possible that the SSL handshake failure is being caused by improper Server Name Indication (SNI) configuration. The SNI is what enables a web server to securely host several TLS certificates for one IP address.
Each website on a server has its own certificate. However, if the server isn’t SNI-enabled, that can result in an SSL handshake failure, because the server may not know which certificate to present.
There are a few ways to check and see whether a site requires SNI. One option is to use Qualys’ SSL Server Test, which we discussed in the previous section. Input your site’s domain name, and then click on the Submit button.
On the results page, look for a message that reads “This site works only in browsers with SNI support”:
Another approach for detecting if a server is using SNI is to browse the server names in the ‘ClientHello’ message. This is a more technical process, but it can offer a lot of information.
It involves checking the extended hello header for a ‘server_name’ field, to see if the correct certifications are presented.
If you’re familiar with using tools such as the OpenSSL toolkit and Wireshark, you might find this method preferable. You can use openssl s_client with and without the -servername option:
# without SNI
 $ openssl s_client -connect host:port

 # use SNI
 $ openssl s_client -connect host:port -servername host
If you get two different certificates with the same name, it means that the SNI is supported and properly configured.
However, if the output in the returned certificates is different, or the call without SNI cannot establish an SSL connection, it indicates that SNI is required but not correctly configured. Resolving this issue may require switching to a dedicated IP address.
5. Make Sure the Cipher Suites Match
If you still haven’t been able to identify the cause of the SSL handshake failure, it might be due to a cipher suite mismatch. In case you’re unfamiliar with the term, ‘cipher suites’ refer to a set of algorithms, including ones for key exchange, bulk encryption, and message authentication code, that can be used for securing SSL and TLS network connections.
If the cipher suites that a server uses don’t support or match what’s used by Cloudflare, that can result in an “SSL Handshake Failed” error.
When it comes to figuring out whether there is a cipher suite mismatch, Qualys’ SSL Server Test proves yet again to be a useful tool.
When you input your domain and click on Submit, you’ll see a summary analysis page. You can find the cipher information under the Cipher Suites section:
You can use this page to discover which ciphers and protocols the server supports. You’ll want to look out for any that display the ‘weak’ status. In addition, this section also details the specific algorithms for the cipher suites.
To correct this issue, you can compare the results against what your browser supports by using the Qualys SSL/TLS Capabilities of Your Browser tool. For more extensive information and guidance about cipher suites, we also recommend checking out the ComodoSSLStore guide.
Confused by the ‘SSL Handshake Failed’ error message? This guide explains what it is and, most importantly, 5 ways to fix it 🙌Click to Tweet
Summary
One of the most perplexing yet common types of SSL-related problems is the “SSL Handshake Failed” error. Dealing with this error can be stressful since it has many potential causes, including both client- and server-side issues.
However, there are some reliable solutions you can use to identify the problem and resolve it. Here are five ways you can use to fix the SSL Handshake Failed error:
- Update your system date and time.
- Check to see if your SSL certificate is valid (and reissue it if necessary).
- Configure your browser to support the latest TLS/SSL versions.
- Verify that your server is properly configured to support SNI.
- Make sure the cipher suites match.
Get all your applications, databases and WordPress sites online and under one roof. Our feature-packed, high-performance cloud platform includes:
- Easy setup and management in the MyKinsta dashboard
- 24/7 expert support
- The best Google Cloud Platform hardware and network, powered by Kubernetes for maximum scalability
- An enterprise-level Cloudflare integration for speed and security
- Global audience reach with up to 35 data centers and 275+ PoPs worldwide
Test it yourself with $20 off your first month of Application Hosting or Database Hosting. Explore our plans or talk to sales to find your best fit.
В этой статье представлена ошибка с номером Ошибка 525, известная как Ошибка доступа к данным, описанная как Произошла ошибка объекта доступа к данным, которая не была перехвачена.
О программе Runtime Ошибка 525
Время выполнения Ошибка 525 происходит, когда Windows дает сбой или падает во время запуска, отсюда и название. Это не обязательно означает, что код был каким-то образом поврежден, просто он не сработал во время выполнения. Такая ошибка появляется на экране в виде раздражающего уведомления, если ее не устранить. Вот симптомы, причины и способы устранения проблемы.
Определения (Бета)
Здесь мы приводим некоторые определения слов, содержащихся в вашей ошибке, в попытке помочь вам понять вашу проблему. Эта работа продолжается, поэтому иногда мы можем неправильно определить слово, так что не стесняйтесь пропустить этот раздел!
- Доступ — НЕ ИСПОЛЬЗУЙТЕ этот тег для Microsoft Access, используйте вместо него [ms-access]
- Доступ к данным — Доступ к данным обычно относится к программному обеспечению и действиям, связанным с хранением, извлечением или работой с данными, размещенными в базе данных или другом репозитории.
- Объект доступа к данным — объект доступа к данным DAO, является шаблон проектирования в объектно-ориентированном проектировании программного обеспечения, создавая объект, который предоставляет абстрактный интерфейс для некоторого типа базы данных или другого механизма сохранения.
- Объект — объект — это любой объект, который может можно управлять с помощью команд на языке программирования.
- Access — Microsoft Access, также известный как Microsoft Office Access, представляет собой систему управления базами данных от Microsoft, которая обычно сочетает в себе реляционное ядро СУБД Microsoft JetACE. с графическим пользовательским интерфейсом и инструментами разработки программного bject, который предоставляет абстрактный интерфейс к некоторому типу базы данных или другому механизму сохранения.
Симптомы Ошибка 525 — Ошибка доступа к данным
Ошибки времени выполнения происходят без предупреждения. Сообщение об ошибке может появиться на экране при любом запуске %программы%. Фактически, сообщение об ошибке или другое диалоговое окно может появляться снова и снова, если не принять меры на ранней стадии.
Возможны случаи удаления файлов или появления новых файлов. Хотя этот симптом в основном связан с заражением вирусом, его можно отнести к симптомам ошибки времени выполнения, поскольку заражение вирусом является одной из причин ошибки времени выполнения. Пользователь также может столкнуться с внезапным падением скорости интернет-соединения, но, опять же, это не всегда так.
 Repair Tool")
(Только для примера)
Причины Ошибка доступа к данным — Ошибка 525
При разработке программного обеспечения программисты составляют код, предвидя возникновение ошибок. Однако идеальных проектов не бывает, поскольку ошибки можно ожидать даже при самом лучшем дизайне программы. Глюки могут произойти во время выполнения программы, если определенная ошибка не была обнаружена и устранена во время проектирования и тестирования.
Ошибки во время выполнения обычно вызваны несовместимостью программ, запущенных в одно и то же время. Они также могут возникать из-за проблем с памятью, плохого графического драйвера или заражения вирусом. Каким бы ни был случай, проблему необходимо решить немедленно, чтобы избежать дальнейших проблем. Ниже приведены способы устранения ошибки.
Методы исправления
Ошибки времени выполнения могут быть раздражающими и постоянными, но это не совсем безнадежно, существует возможность ремонта. Вот способы сделать это.
Если метод ремонта вам подошел, пожалуйста, нажмите кнопку upvote слева от ответа, это позволит другим пользователям узнать, какой метод ремонта на данный момент работает лучше всего.
Обратите внимание: ни ErrorVault.com, ни его авторы не несут ответственности за результаты действий, предпринятых при использовании любого из методов ремонта, перечисленных на этой странице — вы выполняете эти шаги на свой страх и риск.
Метод 1 — Закройте конфликтующие программы
Когда вы получаете ошибку во время выполнения, имейте в виду, что это происходит из-за программ, которые конфликтуют друг с другом. Первое, что вы можете сделать, чтобы решить проблему, — это остановить эти конфликтующие программы.
- Откройте диспетчер задач, одновременно нажав Ctrl-Alt-Del. Это позволит вам увидеть список запущенных в данный момент программ.
- Перейдите на вкладку «Процессы» и остановите программы одну за другой, выделив каждую программу и нажав кнопку «Завершить процесс».
- Вам нужно будет следить за тем, будет ли сообщение об ошибке появляться каждый раз при остановке процесса.
- Как только вы определите, какая программа вызывает ошибку, вы можете перейти к следующему этапу устранения неполадок, переустановив приложение.
Метод 2 — Обновите / переустановите конфликтующие программы
Использование панели управления
- В Windows 7 нажмите кнопку «Пуск», затем нажмите «Панель управления», затем «Удалить программу».
- В Windows 8 нажмите кнопку «Пуск», затем прокрутите вниз и нажмите «Дополнительные настройки», затем нажмите «Панель управления»> «Удалить программу».
- Для Windows 10 просто введите «Панель управления» в поле поиска и щелкните результат, затем нажмите «Удалить программу».
- В разделе «Программы и компоненты» щелкните проблемную программу и нажмите «Обновить» или «Удалить».
- Если вы выбрали обновление, вам просто нужно будет следовать подсказке, чтобы завершить процесс, однако, если вы выбрали «Удалить», вы будете следовать подсказке, чтобы удалить, а затем повторно загрузить или использовать установочный диск приложения для переустановки. программа.
Использование других методов
- В Windows 7 список всех установленных программ можно найти, нажав кнопку «Пуск» и наведя указатель мыши на список, отображаемый на вкладке. Вы можете увидеть в этом списке утилиту для удаления программы. Вы можете продолжить и удалить с помощью утилит, доступных на этой вкладке.
- В Windows 10 вы можете нажать «Пуск», затем «Настройка», а затем — «Приложения».
- Прокрутите вниз, чтобы увидеть список приложений и функций, установленных на вашем компьютере.
- Щелкните программу, которая вызывает ошибку времени выполнения, затем вы можете удалить ее или щелкнуть Дополнительные параметры, чтобы сбросить приложение.
Метод 3 — Обновите программу защиты от вирусов или загрузите и установите последнюю версию Центра обновления Windows.
Заражение вирусом, вызывающее ошибку выполнения на вашем компьютере, необходимо немедленно предотвратить, поместить в карантин или удалить. Убедитесь, что вы обновили свою антивирусную программу и выполнили тщательное сканирование компьютера или запустите Центр обновления Windows, чтобы получить последние определения вирусов и исправить их.
Метод 4 — Переустановите библиотеки времени выполнения
Вы можете получить сообщение об ошибке из-за обновления, такого как пакет MS Visual C ++, который может быть установлен неправильно или полностью. Что вы можете сделать, так это удалить текущий пакет и установить новую копию.
- Удалите пакет, выбрав «Программы и компоненты», найдите и выделите распространяемый пакет Microsoft Visual C ++.
- Нажмите «Удалить» в верхней части списка и, когда это будет сделано, перезагрузите компьютер.
- Загрузите последний распространяемый пакет от Microsoft и установите его.
Метод 5 — Запустить очистку диска
Вы также можете столкнуться с ошибкой выполнения из-за очень нехватки свободного места на вашем компьютере.
- Вам следует подумать о резервном копировании файлов и освобождении места на жестком диске.
- Вы также можете очистить кеш и перезагрузить компьютер.
- Вы также можете запустить очистку диска, открыть окно проводника и щелкнуть правой кнопкой мыши по основному каталогу (обычно это C
- Щелкните «Свойства», а затем — «Очистка диска».
Метод 6 — Переустановите графический драйвер
Если ошибка связана с плохим графическим драйвером, вы можете сделать следующее:
- Откройте диспетчер устройств и найдите драйвер видеокарты.
- Щелкните правой кнопкой мыши драйвер видеокарты, затем нажмите «Удалить», затем перезагрузите компьютер.
Метод 7 — Ошибка выполнения, связанная с IE
Если полученная ошибка связана с Internet Explorer, вы можете сделать следующее:
- Сбросьте настройки браузера.
- В Windows 7 вы можете нажать «Пуск», перейти в «Панель управления» и нажать «Свойства обозревателя» слева. Затем вы можете перейти на вкладку «Дополнительно» и нажать кнопку «Сброс».
- Для Windows 8 и 10 вы можете нажать «Поиск» и ввести «Свойства обозревателя», затем перейти на вкладку «Дополнительно» и нажать «Сброс».
- Отключить отладку скриптов и уведомления об ошибках.
- В том же окне «Свойства обозревателя» можно перейти на вкладку «Дополнительно» и найти пункт «Отключить отладку сценария».
- Установите флажок в переключателе.
- Одновременно снимите флажок «Отображать уведомление о каждой ошибке сценария», затем нажмите «Применить» и «ОК», затем перезагрузите компьютер.
Если эти быстрые исправления не работают, вы всегда можете сделать резервную копию файлов и запустить восстановление на вашем компьютере. Однако вы можете сделать это позже, когда перечисленные здесь решения не сработают.
Другие языки:
How to fix Error 525 (Data Access Error) — A Data Access Object error has occurred that was not specifically trapped.
Wie beheben Fehler 525 (Datenzugriffsfehler) — Ein Datenzugriffsobjektfehler ist aufgetreten, der nicht speziell abgefangen wurde.
Come fissare Errore 525 (Errore di accesso ai dati) — Si è verificato un errore dell’oggetto di accesso ai dati che non è stato specificamente intercettato.
Hoe maak je Fout 525 (Fout bij gegevenstoegang) — Er is een Data Access Object-fout opgetreden die niet specifiek is opgevangen.
Comment réparer Erreur 525 (Erreur d’accès aux données) — Une erreur d’objet d’accès aux données s’est produite qui n’a pas été spécifiquement interceptée.
어떻게 고치는 지 오류 525 (데이터 액세스 오류) — 특별히 트랩되지 않은 데이터 액세스 개체 오류가 발생했습니다.
Como corrigir o Erro 525 (Erro de acesso a dados) — Ocorreu um erro de objeto de acesso a dados que não foi especificamente interceptado.
Hur man åtgärdar Fel 525 (Dataåtkomstfel) — Ett fel med datatillgångsobjekt har inträffat som inte specifikt har fastnat.
Jak naprawić Błąd 525 (Błąd dostępu do danych) — Wystąpił błąd obiektu dostępu do danych, który nie został specjalnie przechwycony.
Cómo arreglar Error 525 (Error de acceso a datos) — Se ha producido un error de objeto de acceso a datos que no se detectó específicamente.
![]() Об авторе: Фил Харт является участником сообщества Microsoft с 2010 года. С текущим количеством баллов более 100 000 он внес более 3000 ответов на форумах Microsoft Support и создал почти 200 новых справочных статей в Technet Wiki.
Об авторе: Фил Харт является участником сообщества Microsoft с 2010 года. С текущим количеством баллов более 100 000 он внес более 3000 ответов на форумах Microsoft Support и создал почти 200 новых справочных статей в Technet Wiki.
Следуйте за нами: ![]()
![]()
![]()
Последнее обновление:
19/08/22 05:10 : Пользователь Windows 7 проголосовал за то, что метод восстановления 1 работает для него.
Рекомендуемый инструмент для ремонта:

Этот инструмент восстановления может устранить такие распространенные проблемы компьютера, как синие экраны, сбои и замораживание, отсутствующие DLL-файлы, а также устранить повреждения от вредоносных программ/вирусов и многое другое путем замены поврежденных и отсутствующих системных файлов.
ШАГ 1:
Нажмите здесь, чтобы скачать и установите средство восстановления Windows.
ШАГ 2:
Нажмите на Start Scan и позвольте ему проанализировать ваше устройство.
ШАГ 3:
Нажмите на Repair All, чтобы устранить все обнаруженные проблемы.
СКАЧАТЬ СЕЙЧАС
Совместимость
![]()
Требования
1 Ghz CPU, 512 MB RAM, 40 GB HDD
Эта загрузка предлагает неограниченное бесплатное сканирование ПК с Windows. Полное восстановление системы начинается от $19,95.
ID статьи: ACX03604RU
Применяется к: Windows 10, Windows 8.1, Windows 7, Windows Vista, Windows XP, Windows 2000
Совет по увеличению скорости #30
Защита беспроводного подключения к Интернету от несанкционированного использования:
Несанкционированное использование вашего беспроводного подключения к Интернету может привести к значительному снижению скорости вашего Интернета. Если вы подозреваете, что к вашей беспроводной сети подключается кто-то другой, проверьте панель управления устройством вашего маршрутизатора. Вы также можете изменить пароль вашего роутера там, чтобы еще больше защитить ваше соединение.
Нажмите здесь, чтобы узнать о другом способе ускорения работы ПК под управлением Windows
| Номер ошибки: | Ошибка во время выполнения 525 | |
| Название ошибки: | Data Access Error | |
| Описание ошибки: | A Data Access Object error has occurred that was not specifically trapped. | |
| Разработчик: | Microsoft Corporation | |
| Программное обеспечение: | Windows Operating System | |
| Относится к: | Windows XP, Vista, 7, 8, 10, 11 |
Обзор «Data Access Error»
«Data Access Error» обычно называется формой «ошибки времени выполнения». Когда дело доходит до программного обеспечения, как Windows Operating System, инженеры могут использовать различные инструменты, чтобы попытаться сорвать эти ошибки как можно скорее. К сожалению, инженеры являются людьми и часто могут делать ошибки во время тестирования, отсутствует ошибка 525.
Ошибка 525 может столкнуться с пользователями Windows Operating System, если они регулярно используют программу, также рассматривается как «A Data Access Object error has occurred that was not specifically trapped.». Когда это происходит, конечные пользователи могут сообщить Microsoft Corporation о наличии ошибок «Data Access Error». Microsoft Corporation может устранить обнаруженные проблемы, а затем загрузить измененный файл исходного кода, позволяя пользователям обновлять свою версию. Таким образом при выполнении обновления программного обеспечения Windows Operating System, он будет содержать исправление для устранения проблем, таких как ошибка 525.
Наиболее распространенные вхождения «Data Access Error» проблемы при загрузке Windows Operating System. Причины сбоев обработки можно отличить, классифицируя ошибки 525 следующим образом:.
Ошибка 525 Crash — это очень популярная ошибка выполнения ошибки 525, которая приводит к завершению работы всей программы. Если данный ввод недействителен или не соответствует ожидаемому формату, Windows Operating System (или OS) завершается неудачей.
Утечка памяти «Data Access Error» — ошибка 525 утечка памяти приводит к увеличению размера Windows Operating System и используемой мощности, что приводит к низкой эффективности систем. Возможные причины включают сбой Microsoft Corporation для девыделения памяти в программе или когда плохой код выполняет «бесконечный цикл».
Ошибка 525 Logic Error — логическая ошибка возникает, когда компьютер производит неправильный вывод, даже если вход правильный. Это происходит, когда исходный код Microsoft Corporation вызывает недостаток в обработке информации.
Microsoft Corporation проблемы с Data Access Error чаще всего связаны с повреждением или отсутствием файла Windows Operating System. Обычно, установка новой версии файла Microsoft Corporation позволяет устранить проблему, из-за которой возникает ошибка. Мы также рекомендуем выполнить сканирование реестра, чтобы очистить все недействительные ссылки на Data Access Error, которые могут являться причиной ошибки.
Ошибки Data Access Error
Наиболее распространенные ошибки Data Access Error, которые могут возникнуть на компьютере под управлением Windows, перечислены ниже:
- «Ошибка приложения Data Access Error.»
- «Ошибка программного обеспечения Win32: Data Access Error»
- «Извините, Data Access Error столкнулся с проблемой. «
- «Не удается найти Data Access Error»
- «Data Access Error не найден.»
- «Ошибка запуска программы: Data Access Error.»
- «Data Access Error не работает. «
- «Data Access Error выйти. «
- «Неверный путь к приложению: Data Access Error.»
Обычно ошибки Data Access Error с Windows Operating System возникают во время запуска или завершения работы, в то время как программы, связанные с Data Access Error, выполняются, или редко во время последовательности обновления ОС. Документирование проблем Data Access Error в Windows Operating System является ключевым для определения причины проблем с электронной Windows и сообщения о них в Microsoft Corporation.
Источники проблем Data Access Error
Заражение вредоносными программами, недопустимые записи реестра Windows Operating System или отсутствующие или поврежденные файлы Data Access Error могут создать эти ошибки Data Access Error.
Более конкретно, данные ошибки Data Access Error могут быть вызваны следующими причинами:
- Недопустимые разделы реестра Data Access Error/повреждены.
- Зазаражение вредоносными программами повредил файл Data Access Error.
- Вредоносное удаление (или ошибка) Data Access Error другим приложением (не Windows Operating System).
- Другое программное обеспечение, конфликтующее с Windows Operating System, Data Access Error или общими ссылками.
- Windows Operating System (Data Access Error) поврежден во время загрузки или установки.
Продукт Solvusoft
Загрузка
WinThruster 2022 — Проверьте свой компьютер на наличие ошибок.
Совместима с Windows 2000, XP, Vista, 7, 8, 10 и 11
Установить необязательные продукты — WinThruster (Solvusoft) | Лицензия | Политика защиты личных сведений | Условия | Удаление
Когда мы просматриваем Интернет в деловых, личных, образовательных или развлекательных целях, мы хотим, чтобы Интернет был быстрым. Несомненно, неприятно ждать долгое время загрузки страницы, которую мы просим, поэтому были созданы некоторые очень полезные инструменты, которые позволяют нам иметь безопасная и быстрая навигация .
Независимо от нашего интернет-провайдера или пакета, который мы арендуем, есть способы улучшить скорость , например, есть так называемые DNS, то есть система доменных имен, которые необходимо для подключения . Обычно это предоставляется оператором, которого вы нанимаете для предоставления интернет-услуг.
DNS превращает веб-адрес в IP-адрес , чтобы вы могли найти сервер с запрошенной информацией. Есть также публичные DNS-провайдеры. , хотя они немного медленнее из-за большого количества пользователей, конечно, с правильным DNS вы можете ускорить поиск на нужных страницах и повысить свою защиту во время просмотра.
Использование этих DNS также приносит пользу тем, кто посещает Интернет-страницы со своего мобильного телефона, так как это возможно: изменить или использовать другой DNS на своем мобильном устройстве, будь то Android или iOS .
Но не только DNS важен для быстрого просмотра и безопасно , также необходимо использовать так называемые CDN. По всему миру была создана сеть серверов, позволяющая хранить и тиражировать веб-страницы и информацию. Эти серверы, называемые CDN, позволяют нам приблизиться к нужным веб-сайтам, тем самым сокращая время отклика.
Как многие из вас уже знают, подключение к Интернету в основном связано с подключением одного компьютера к другому до тех пор, пока не будет создана сеть. По этой причине, чтобы иметь возможность подключиться к более высокая скорость с конкретным сервером, это Необходимо быть рядом с ним, что привело к созданию серверов во всех частях мира, способных повторять веб-сайты.
Таким образом, скорость соединений может быть увеличена за счет размещения серверов рядом с веб-страницами, которые мы посещаем. Эти так называемый CDN несомненно улучшили скорость и возможность доступа к различным веб-сайтам, конечно, всегда есть вещи, которые следует учитывать при просмотре Интернета и неудобства, которые возникают при использовании этих серверов.
Несколько лет назад был создан CloudFlare, чтобы решить некоторые проблемы и улучшить распространение контента. Кроме того, это помогло защитить нас от кибератак, сделав его одним из самых безопасных.
Выступая в качестве посредника для обратных прокси, он позволяет нам обнаруживать вредоносный трафик и спам в Интернете, что также обеспечивает защиту наших личных данных, особенно финансовых данных, которые часто подвергаются атакам.
Иногда при использовании сервера CloudFlare могут возникать проблемы, связанные с вашей инфраструктурой, но их можно решить. На этот раз поговорим в частности ошибка 525 « Ошибка протокола привязки SSL и как ее легко исправить с помощью этих советов.
Решение ошибки 525 ‘Ошибка согласования SSL
Для всех возможные сбои, возникающие при использовании CloudFlare, Есть определенные шаги, которые необходимо предпринять для их решения, в этом случае, если возникает ошибка подключения: ошибка 525 ‘Ошибка установления связи SSL.
Это происходит из-за ошибки конфигурации на веб-сервере, к которому вы пытаетесь подключиться; Есть два конкретных условия, которые должны быть выполнены для возникновения этой ошибки, одно из них — упомянутое нами.
Чтобы ошибка «SSL-согласование не удалось , что вам нужно сделать, это связаться с хостинг-провайдером. Чтобы определить, связана ли причина с распространенными ошибками на исходных веб-страницах.
Проверьте установленный SSL, порт 433 или другую защиту , Поддержка SNI и комплекты шифров; Таким образом можно определить источник сбоя и приступить к реализации необходимого решения проблемы. Точно так же в CloudFlare, они готовы дать вам нужный совет вам нужна эта проблема или, может быть, другая проблема, с которой вы столкнулись.
BNAME.RU » Код ошибки HTTP 525 SSL Handshake Failed Cloudflare
Ошибка 525: не удалось установить соединение SSL.
Ошибки 525 часто возникают из-за проблем с конфигурацией исходного веб-сервера. Ошибка 525 возникает, когда выполняются эти два условия:
- Связывание SSL между Cloudflare и исходным веб-сервером не удается, и
- Полный или полный (строгий) SSL устанавливается на вкладке «Обзор» вашего приложения Cloudflare SSL / TLS.
Как устранить ошибку 525 SSL handshake failed?
Обратитесь к своему хостинг-провайдеру, чтобы исключить следующие распространенные причины на вашем исходном веб-сервере:
- Не установлен действующий сертификат SSL
- Порт 443 (или другой настраиваемый безопасный порт) не открыт
- Нет поддержки SNI
- Наборы шифров, принятые Cloudflare, не совпадают с наборами шифров, поддерживаемыми исходным веб-сервером.
Если 525 ошибок возникают периодически, просмотрите журналы ошибок исходного веб-сервера, чтобы определить причину. Настройте Apache для регистрации ошибок mod_ssl. Кроме того, nginx включает ошибки SSL в свой стандартный журнал ошибок, но может потребовать повышения уровня журнала.
Информация о системе:
На вашем ПК работает: …
специальное предложение
Code 525 часто может появляться из-за неправильно настроенных параметров системы или из-за нарушений в реестре Windows. Эту ошибку относительно быстро и легко исправить, если использовать PC Repair, настроенную на решение всех распространенных проблем с реестром.
![]()
- Название ошибки: Code 525
- Совместимо с: Windows 10, 11, 8, 7, Vista, XP
- Code 525 появляется и начинает нарушать окно активной программы;
- Code 525 появляется на экране;
- Появляется сообщение ‘Обнаружена проблема, и Windows была выключена, чтобы предотвратить повреждение компьютера. Похоже, что проблема вызвана следующим файлом…’;
- Компьютер пользователя перестает работать, выдавая ошибку Code 525 при запуске программы;
- Windows работает плохо, медленно реагируя на команды;
- Компьютер пользователя часто зависает
Code 525 сообщения об ошибке могут появляться из-за засорения реестра Windows и ошибочных записей несуществующих программ, поскольку пользователь обычно неправильно удаляет программное обеспечение. Другими распространенными причинами являются неправильный ввод данных, отсутствие файлов, которые были случайно удалены из реестра, что вызывает проблемы в работе системы.
- 1. Скачать PC Repair.
- 2. Установить и запустить программу.
- 3. Нажмите Scan Now для обнаружения ошибок и различных отклонений от оптимального уровня.
- 4. Нажмите Repair All для устранения каждой проблемы.
Эта страница доступна на других языках:
English |
Deutsch |
Español |
Italiano |
Français |
Indonesia |
Nederlands |
Nynorsk |
Português |
Українська |
Türkçe |
Malay |
Dansk |
Polski |
Română |
Suomi |
Svenska |
Tiếng việt |
Čeština |
العربية |
ไทย |
日本語 |
简体中文 |
한국어
Are you looking forward to resolving Error 525 SSL handshake failed?
The error indicates that the SSL handshake between Cloudflare and the origin web server failed.
This problem happens mainly because of an invalid SSL certificate, closed port 445, etc.
At Bobcares, we often get requests from our customers to fix the Error 525 SSL handshake failed as part of our Server Management Services.
Today, let’s have a look for the reason of this error. We’ll also see how our Support Engineers fix this error.
Why Error 525 SSL handshake failed?
The error 525 essentially means the SSL handshake between Cloudflare and the origin web server failed. This inturn causes the error to pop up while accessing the website.
Again, this error occurs on the domain using Cloudflare Full or Full (Strict) SSL mode.
The most common causes of this error are:
- No valid SSL certificate installed on the website
- The website is not listening on port 443.
- The SNI is not supported by the website(sometimes not configured to SNI)
- The cipher suites that Cloudflare uses do not match what the origin accepts
While accessing the website the error appears as:

The major reasons and fixes of this error
At Bobcares, where we have more than a decade of expertise in managing servers, we see many customers face problems with error 525 SSL handshake failed.
Now, let’s see the major reasons for this error and how our Support Engineers fix it.
Invalid certificate
One of the major reasons for this error is due to the website not having a valid SSL certificate.
Therefore, when a customer reports the error, we check for the SSL certificate expiry date. If expired, we install the valid SSL certificate for the domain. Also, we double-check if the website uses the correct certificate.
Port 443
Recently, one of the customers approached us with the same error. On further analyzing, we could trace that the issue was due to closed SSL secure port 443.
We have checked that whether the port 443 was listening or not, by applying the command follows.
netstat -nltp | grep : 443We could see that the port was not listening and it was closed. So that we opened the SSL port and that fixed the problem.
SNI
Also, another major cause of the error is the improper configuration of SNI.
Server Name Indication (SNI) allows the server to safely host multiple TLS Certificates for multiple sites, all under a single IP address.
Here, we check and make sure whether the SNI is properly configured on the website. If the SNI is not supported or configured will cause this error to pop up.
If the server is not having SNI, then the website should need a dedicated IP address to avoid this error.
Cipher suites
Similarly, Cipher Suites also can be a cause for the 525 error.
A cipher suite is a set of algorithms that help secure a network connection that uses Transport Layer Security (TLS) or its now-deprecated predecessor Secure Socket Layer (SSL). The set of algorithms that cipher suites usually include: a key exchange algorithm, a bulk encryption algorithm, and a message authentication code (MAC) algorithm.
In certain cases, the cipher suites that the origin server uses do not match with Cloudflare. The cipher suites 115 that Cloudflare accepts 29 and the cipher suites that the origin server supports do not match. Thus, to fix the error, we always ensure that the version of Open SSL supports the cipher suites that Cloudflare support.
[Need assistance to fix Cloudflare error? We’ll help you.]
Conclusion
In short, Error 525 SSL handshake failed to occur mainly due to invalid SSL certificate, closed 443 port, SNI problem, and so on. Today, we have discussed this error in detail and saw how our Support Engineers fix this error for our customers.
PREVENT YOUR SERVER FROM CRASHING!
Never again lose customers to poor server speed! Let us help you.
Our server experts will monitor & maintain your server 24/7 so that it remains lightning fast and secure.
GET STARTED
var google_conversion_label = «owonCMyG5nEQ0aD71QM»;
Installing a Secure Sockets Layer (SSL) certificate on your WordPress site enables it to use HTTPS to ensure secure connections. Unfortunately, there are a variety of things that can go wrong in the process of confirming a valid SSL certificate and making a connection between your site’s server and a visitor’s browser.
If you’ve encountered an “SSL Handshake Failed” error message and are confused as to what it means, you’re not alone. It’s a common error that doesn’t tell you much on its own. While this can be a frustrating experience, the good news is that there are simple steps you can take to resolve the issue.
In this post, we’ll explain what the SSL Handshake Failed error is and what causes it. Then we’ll provide you with several methods you can use to fix it.
Let’s get started!
An Introduction to the SSL Handshake
Before we dig deeper into what causes a TLS or SSL handshake failure, it’s helpful to understand what the TLS/SSL handshake is. Secure Sockets Layer (SSL) and Transport Layer Security (TLS) are protocols used to authenticate data transfers between servers and external systems such as browsers.
SSL certificates are needed in order to secure your website using HTTPS. We won’t get too in-depth about the difference between TLS vs SSL since it’s a minor one. The terms are often used interchangeably, so for simplicity’s sake, we’ll use “SSL” to refer to both.
With that out of the way, an SSL handshake is the first step in the process of establishing an HTTPS connection. To authenticate and establish the connection, the user’s browser and the website’s server must go through a series of checks (the handshake), which establish the HTTPS connection parameters.
Let us explain: the client (typically the browser) sends a request for a secure connection to the server. After the request is sent, the server sends a public key to your computer and checks that key against a list of certificates. The computer then generates a key and encrypts it, using the public key sent from the server.
To make a long story short, without the SSL handshake, a secure connection won’t be made. This can pose a significant security risk. Plus, there are a lot of moving parts involved in the process.
That means there are many different opportunities for something to go wrong and cause a handshake failure, or even lead to the “your connection is not private” error, causing visitors to leave.
Confronted with the ‘SSL Handshake Failed’ error? 🤝 Get a grip on how to solve it with these 5 methods ⤵️Click to Tweet
Understanding What Causes SSL Handshake Failures
An SSL Handshake Failure or Error 525 means that the server and browser were unable to establish a secure connection. This can happen for a variety of reasons.
Generally, an Error 525 means that the SSL handshake between a domain using Cloudflare and the origin web server failed:
However, it’s also important to understand that SSL errors can happen on the client-side or the server-side. Common causes of SSL errors on the client-side include:
- The wrong date or time on the client device.
- An error with the browser configuration.
- A connection that is being intercepted by a third party.
Some server-side causes include:
- A cipher suite mismatch.
- A protocol used by the client that isn’t supported by the server.
- A certificate that is incomplete, invalid, or expired.
Typically, if the SSL handshake fails, the issue can be attributed to something wrong with the website or server and their SSL configurations.
How to Fix the SSL Handshake Failed Error (5 Methods)
There are several potential causes behind the “SSL Handshake Failed” error. So there’s no simple answer when it comes to how you should fix it.
Fortunately, there are a handful of methods you can use to begin exploring potential issues and resolving them one by one. Let’s take a look at five strategies you can use to try and fix the SSL Handshake Failed error.
1. Update Your System Date and Time
Let’s start with one of the more unlikely causes, but one that is incredibly easy to correct if it is the problem: your computer’s clock.
If your system is using the wrong date and time, that may interrupt the SSL handshake. When the system clock is different than the actual time, for example, if it’s set too far into the future, it can interfere with the SSL certificate verification.
Your computer’s clock might have been set incorrectly due to human error or simply due to a glitch in your settings. Whatever the reason, it’s a good idea to check and make sure your system time is correct, and update it if it’s not.
Of course, if your clock is showing the correct information, it’s safe to assume that this isn’t the source of the “SSL Handshake Failed” issue.
2. Check to See If Your SSL Certificate Is Valid
Expiration dates are placed on SSL certificates, to help make sure their validation information remains accurate. Generally, the validity of these certificates lasts for anywhere between six months and two years.
If an SSL certificate is revoked or expired, the browser will detect this and be unable to complete the SSL handshake. If it’s been more than a year or so since you installed an SSL certificate on your website, it might be time to reissue it.
To view the status of your SSL certificate, you can use an SSL certificate checker tool such as the one offered by Qualys:
This tool is both reliable and free to use. All you need to do is input your domain name into the Hostname field, and then click on Submit. Once the checker is done analyzing your site’s SSL configuration, it will present you with some results:
On this page, you can find out if your certificate is still valid and see if it has been revoked for any reason.
In either case, updating your SSL certificate should resolve the handshake error (and is vital for keeping your site and your WooCommerce store secure).
3. Configure Your Browser for the Latest SSL/TLS Protocol Support
Sometimes the best way to determine the root cause of an issue is by process of elimination. As we mentioned earlier, the SSL handshake failure can often occur due to a browser misconfiguration.
The quickest way to determine whether a particular browser is the problem is to try switching to a different one. This can at least help narrow down the problem. You may also try disabling any plugins and resetting your browser back to its default settings.
Another potential browser-related issue is a protocol mismatch. For example, if the server only supports TLS 1.2, but the browser is only configured for TLS 1.0 or TLS 1.1, there’s no mutually-supported protocol available. This will inevitably lead to an SSL handshake failure.
How you can check to see if this problem is occurring varies based on the browser you’re using. As an example, we’ll look at how the process works in Chrome. First, open your browser and go to Settings > Advanced. This will expand a number of menu options.
Under the System section, click on Open your computer’s proxy settings:
This will open up a new window. Next, select the Advanced tab. Under the Security section, check to see if the box next to Use TLS 1.2 is selected. If not, check that option:
It’s also recommended that you uncheck the boxes for SSL 2.0 and SSL 3.0.
The same applies to TLS 1.0 and TLS 1.1 since they are being phased out. When you’re done, click on the OK button, and check to see if the handshake error has been resolved.
Note that if you’re using Apple Safari or Mac OS there isn’t an option to enable or disable SSL protocols. TLS 1.2 is automatically enabled by default. If you’re using Linux, you can refer to the Red Hat guide on TLS hardening.
4. Verify That Your Server Is Properly Configured to Support SNI
It’s also possible that the SSL handshake failure is being caused by improper Server Name Indication (SNI) configuration. The SNI is what enables a web server to securely host several TLS certificates for one IP address.
Each website on a server has its own certificate. However, if the server isn’t SNI-enabled, that can result in an SSL handshake failure, because the server may not know which certificate to present.
There are a few ways to check and see whether a site requires SNI. One option is to use Qualys’ SSL Server Test, which we discussed in the previous section. Input your site’s domain name, and then click on the Submit button.
On the results page, look for a message that reads “This site works only in browsers with SNI support”:
Another approach for detecting if a server is using SNI is to browse the server names in the ‘ClientHello’ message. This is a more technical process, but it can offer a lot of information.
It involves checking the extended hello header for a ‘server_name’ field, to see if the correct certifications are presented.
If you’re familiar with using tools such as the OpenSSL toolkit and Wireshark, you might find this method preferable. You can use openssl s_client with and without the -servername option:
# without SNI
 $ openssl s_client -connect host:port

 # use SNI
 $ openssl s_client -connect host:port -servername host
If you get two different certificates with the same name, it means that the SNI is supported and properly configured.
However, if the output in the returned certificates is different, or the call without SNI cannot establish an SSL connection, it indicates that SNI is required but not correctly configured. Resolving this issue may require switching to a dedicated IP address.
5. Make Sure the Cipher Suites Match
If you still haven’t been able to identify the cause of the SSL handshake failure, it might be due to a cipher suite mismatch. In case you’re unfamiliar with the term, ‘cipher suites’ refer to a set of algorithms, including ones for key exchange, bulk encryption, and message authentication code, that can be used for securing SSL and TLS network connections.
If the cipher suites that a server uses don’t support or match what’s used by Cloudflare, that can result in an “SSL Handshake Failed” error.
When it comes to figuring out whether there is a cipher suite mismatch, Qualys’ SSL Server Test proves yet again to be a useful tool.
When you input your domain and click on Submit, you’ll see a summary analysis page. You can find the cipher information under the Cipher Suites section:
You can use this page to discover which ciphers and protocols the server supports. You’ll want to look out for any that display the ‘weak’ status. In addition, this section also details the specific algorithms for the cipher suites.
To correct this issue, you can compare the results against what your browser supports by using the Qualys SSL/TLS Capabilities of Your Browser tool. For more extensive information and guidance about cipher suites, we also recommend checking out the ComodoSSLStore guide.
Confused by the ‘SSL Handshake Failed’ error message? This guide explains what it is and, most importantly, 5 ways to fix it 🙌Click to Tweet
Summary
One of the most perplexing yet common types of SSL-related problems is the “SSL Handshake Failed” error. Dealing with this error can be stressful since it has many potential causes, including both client- and server-side issues.
However, there are some reliable solutions you can use to identify the problem and resolve it. Here are five ways you can use to fix the SSL Handshake Failed error:
- Update your system date and time.
- Check to see if your SSL certificate is valid (and reissue it if necessary).
- Configure your browser to support the latest TLS/SSL versions.
- Verify that your server is properly configured to support SNI.
- Make sure the cipher suites match.
BNAME.RU » Код ошибки HTTP 525 SSL Handshake Failed Cloudflare
Ошибка 525: не удалось установить соединение SSL.
Ошибки 525 часто возникают из-за проблем с конфигурацией исходного веб-сервера. Ошибка 525 возникает, когда выполняются эти два условия:
- Связывание SSL между Cloudflare и исходным веб-сервером не удается, и
- Полный или полный (строгий) SSL устанавливается на вкладке «Обзор» вашего приложения Cloudflare SSL / TLS.
Как устранить ошибку 525 SSL handshake failed?
Обратитесь к своему хостинг-провайдеру, чтобы исключить следующие распространенные причины на вашем исходном веб-сервере:
- Не установлен действующий сертификат SSL
- Порт 443 (или другой настраиваемый безопасный порт) не открыт
- Нет поддержки SNI
- Наборы шифров, принятые Cloudflare, не совпадают с наборами шифров, поддерживаемыми исходным веб-сервером.
Если 525 ошибок возникают периодически, просмотрите журналы ошибок исходного веб-сервера, чтобы определить причину. Настройте Apache для регистрации ошибок mod_ssl. Кроме того, nginx включает ошибки SSL в свой стандартный журнал ошибок, но может потребовать повышения уровня журнала.
Installing a Secure Sockets Layer (SSL) certificate on your WordPress site enables it to use HTTPS to ensure secure connections. Unfortunately, there are a variety of things that can go wrong in the process of confirming a valid SSL certificate and making a connection between your site’s server and a visitor’s browser.
If you’ve encountered an “SSL Handshake Failed” error message and are confused as to what it means, you’re not alone. It’s a common error that doesn’t tell you much on its own. While this can be a frustrating experience, the good news is that there are simple steps you can take to resolve the issue.
In this post, we’ll explain what the SSL Handshake Failed error is and what causes it. Then we’ll provide you with several methods you can use to fix it.
Let’s get started!
An Introduction to the SSL Handshake
Before we dig deeper into what causes a TLS or SSL handshake failure, it’s helpful to understand what the TLS/SSL handshake is. Secure Sockets Layer (SSL) and Transport Layer Security (TLS) are protocols used to authenticate data transfers between servers and external systems such as browsers.
SSL certificates are needed in order to secure your website using HTTPS. We won’t get too in-depth about the difference between TLS vs SSL since it’s a minor one. The terms are often used interchangeably, so for simplicity’s sake, we’ll use “SSL” to refer to both.
With that out of the way, an SSL handshake is the first step in the process of establishing an HTTPS connection. To authenticate and establish the connection, the user’s browser and the website’s server must go through a series of checks (the handshake), which establish the HTTPS connection parameters.
Let us explain: the client (typically the browser) sends a request for a secure connection to the server. After the request is sent, the server sends a public key to your computer and checks that key against a list of certificates. The computer then generates a key and encrypts it, using the public key sent from the server.
To make a long story short, without the SSL handshake, a secure connection won’t be made. This can pose a significant security risk. Plus, there are a lot of moving parts involved in the process.
That means there are many different opportunities for something to go wrong and cause a handshake failure, or even lead to the “your connection is not private” error, causing visitors to leave.
Confronted with the ‘SSL Handshake Failed’ error? 🤝 Get a grip on how to solve it with these 5 methods ⤵️Click to Tweet
Understanding What Causes SSL Handshake Failures
An SSL Handshake Failure or Error 525 means that the server and browser were unable to establish a secure connection. This can happen for a variety of reasons.
Generally, an Error 525 means that the SSL handshake between a domain using Cloudflare and the origin web server failed:
However, it’s also important to understand that SSL errors can happen on the client-side or the server-side. Common causes of SSL errors on the client-side include:
- The wrong date or time on the client device.
- An error with the browser configuration.
- A connection that is being intercepted by a third party.
Some server-side causes include:
- A cipher suite mismatch.
- A protocol used by the client that isn’t supported by the server.
- A certificate that is incomplete, invalid, or expired.
Typically, if the SSL handshake fails, the issue can be attributed to something wrong with the website or server and their SSL configurations.
How to Fix the SSL Handshake Failed Error (5 Methods)
There are several potential causes behind the “SSL Handshake Failed” error. So there’s no simple answer when it comes to how you should fix it.
Fortunately, there are a handful of methods you can use to begin exploring potential issues and resolving them one by one. Let’s take a look at five strategies you can use to try and fix the SSL Handshake Failed error.
1. Update Your System Date and Time
Let’s start with one of the more unlikely causes, but one that is incredibly easy to correct if it is the problem: your computer’s clock.
If your system is using the wrong date and time, that may interrupt the SSL handshake. When the system clock is different than the actual time, for example, if it’s set too far into the future, it can interfere with the SSL certificate verification.
Your computer’s clock might have been set incorrectly due to human error or simply due to a glitch in your settings. Whatever the reason, it’s a good idea to check and make sure your system time is correct, and update it if it’s not.
Of course, if your clock is showing the correct information, it’s safe to assume that this isn’t the source of the “SSL Handshake Failed” issue.
2. Check to See If Your SSL Certificate Is Valid
Expiration dates are placed on SSL certificates, to help make sure their validation information remains accurate. Generally, the validity of these certificates lasts for anywhere between six months and two years.
If an SSL certificate is revoked or expired, the browser will detect this and be unable to complete the SSL handshake. If it’s been more than a year or so since you installed an SSL certificate on your website, it might be time to reissue it.
To view the status of your SSL certificate, you can use an SSL certificate checker tool such as the one offered by Qualys:
This tool is both reliable and free to use. All you need to do is input your domain name into the Hostname field, and then click on Submit. Once the checker is done analyzing your site’s SSL configuration, it will present you with some results:
On this page, you can find out if your certificate is still valid and see if it has been revoked for any reason.
In either case, updating your SSL certificate should resolve the handshake error (and is vital for keeping your site and your WooCommerce store secure).
3. Configure Your Browser for the Latest SSL/TLS Protocol Support
Sometimes the best way to determine the root cause of an issue is by process of elimination. As we mentioned earlier, the SSL handshake failure can often occur due to a browser misconfiguration.
The quickest way to determine whether a particular browser is the problem is to try switching to a different one. This can at least help narrow down the problem. You may also try disabling any plugins and resetting your browser back to its default settings.
Another potential browser-related issue is a protocol mismatch. For example, if the server only supports TLS 1.2, but the browser is only configured for TLS 1.0 or TLS 1.1, there’s no mutually-supported protocol available. This will inevitably lead to an SSL handshake failure.
How you can check to see if this problem is occurring varies based on the browser you’re using. As an example, we’ll look at how the process works in Chrome. First, open your browser and go to Settings > Advanced. This will expand a number of menu options.
Under the System section, click on Open your computer’s proxy settings:
This will open up a new window. Next, select the Advanced tab. Under the Security section, check to see if the box next to Use TLS 1.2 is selected. If not, check that option:
It’s also recommended that you uncheck the boxes for SSL 2.0 and SSL 3.0.
The same applies to TLS 1.0 and TLS 1.1 since they are being phased out. When you’re done, click on the OK button, and check to see if the handshake error has been resolved.
Note that if you’re using Apple Safari or Mac OS there isn’t an option to enable or disable SSL protocols. TLS 1.2 is automatically enabled by default. If you’re using Linux, you can refer to the Red Hat guide on TLS hardening.
4. Verify That Your Server Is Properly Configured to Support SNI
It’s also possible that the SSL handshake failure is being caused by improper Server Name Indication (SNI) configuration. The SNI is what enables a web server to securely host several TLS certificates for one IP address.
Each website on a server has its own certificate. However, if the server isn’t SNI-enabled, that can result in an SSL handshake failure, because the server may not know which certificate to present.
There are a few ways to check and see whether a site requires SNI. One option is to use Qualys’ SSL Server Test, which we discussed in the previous section. Input your site’s domain name, and then click on the Submit button.
On the results page, look for a message that reads “This site works only in browsers with SNI support”:
Another approach for detecting if a server is using SNI is to browse the server names in the ‘ClientHello’ message. This is a more technical process, but it can offer a lot of information.
It involves checking the extended hello header for a ‘server_name’ field, to see if the correct certifications are presented.
If you’re familiar with using tools such as the OpenSSL toolkit and Wireshark, you might find this method preferable. You can use openssl s_client with and without the -servername option:
# without SNI
 $ openssl s_client -connect host:port

 # use SNI
 $ openssl s_client -connect host:port -servername host
If you get two different certificates with the same name, it means that the SNI is supported and properly configured.
However, if the output in the returned certificates is different, or the call without SNI cannot establish an SSL connection, it indicates that SNI is required but not correctly configured. Resolving this issue may require switching to a dedicated IP address.
5. Make Sure the Cipher Suites Match
If you still haven’t been able to identify the cause of the SSL handshake failure, it might be due to a cipher suite mismatch. In case you’re unfamiliar with the term, ‘cipher suites’ refer to a set of algorithms, including ones for key exchange, bulk encryption, and message authentication code, that can be used for securing SSL and TLS network connections.
If the cipher suites that a server uses don’t support or match what’s used by Cloudflare, that can result in an “SSL Handshake Failed” error.
When it comes to figuring out whether there is a cipher suite mismatch, Qualys’ SSL Server Test proves yet again to be a useful tool.
When you input your domain and click on Submit, you’ll see a summary analysis page. You can find the cipher information under the Cipher Suites section:
You can use this page to discover which ciphers and protocols the server supports. You’ll want to look out for any that display the ‘weak’ status. In addition, this section also details the specific algorithms for the cipher suites.
To correct this issue, you can compare the results against what your browser supports by using the Qualys SSL/TLS Capabilities of Your Browser tool. For more extensive information and guidance about cipher suites, we also recommend checking out the ComodoSSLStore guide.
Confused by the ‘SSL Handshake Failed’ error message? This guide explains what it is and, most importantly, 5 ways to fix it 🙌Click to Tweet
Summary
One of the most perplexing yet common types of SSL-related problems is the “SSL Handshake Failed” error. Dealing with this error can be stressful since it has many potential causes, including both client- and server-side issues.
However, there are some reliable solutions you can use to identify the problem and resolve it. Here are five ways you can use to fix the SSL Handshake Failed error:
- Update your system date and time.
- Check to see if your SSL certificate is valid (and reissue it if necessary).
- Configure your browser to support the latest TLS/SSL versions.
- Verify that your server is properly configured to support SNI.
- Make sure the cipher suites match.
Get all your applications, databases and WordPress sites online and under one roof. Our feature-packed, high-performance cloud platform includes:
- Easy setup and management in the MyKinsta dashboard
- 24/7 expert support
- The best Google Cloud Platform hardware and network, powered by Kubernetes for maximum scalability
- An enterprise-level Cloudflare integration for speed and security
- Global audience reach with up to 35 data centers and 275 PoPs worldwide
Test it yourself with $20 off your first month of Application Hosting or Database Hosting. Explore our plans or talk to sales to find your best fit.
Когда мы просматриваем Интернет в деловых, личных, образовательных или развлекательных целях, мы хотим, чтобы Интернет был быстрым. Несомненно, неприятно ждать долгое время загрузки страницы, которую мы просим, поэтому были созданы некоторые очень полезные инструменты, которые позволяют нам иметь безопасная и быстрая навигация .
Независимо от нашего интернет-провайдера или пакета, который мы арендуем, есть способы улучшить скорость , например, есть так называемые DNS, то есть система доменных имен, которые необходимо для подключения . Обычно это предоставляется оператором, которого вы нанимаете для предоставления интернет-услуг.
DNS превращает веб-адрес в IP-адрес , чтобы вы могли найти сервер с запрошенной информацией. Есть также публичные DNS-провайдеры. , хотя они немного медленнее из-за большого количества пользователей, конечно, с правильным DNS вы можете ускорить поиск на нужных страницах и повысить свою защиту во время просмотра.
Использование этих DNS также приносит пользу тем, кто посещает Интернет-страницы со своего мобильного телефона, так как это возможно: изменить или использовать другой DNS на своем мобильном устройстве, будь то Android или iOS .
Но не только DNS важен для быстрого просмотра и безопасно , также необходимо использовать так называемые CDN. По всему миру была создана сеть серверов, позволяющая хранить и тиражировать веб-страницы и информацию. Эти серверы, называемые CDN, позволяют нам приблизиться к нужным веб-сайтам, тем самым сокращая время отклика.
Как многие из вас уже знают, подключение к Интернету в основном связано с подключением одного компьютера к другому до тех пор, пока не будет создана сеть. По этой причине, чтобы иметь возможность подключиться к более высокая скорость с конкретным сервером, это Необходимо быть рядом с ним, что привело к созданию серверов во всех частях мира, способных повторять веб-сайты.
Таким образом, скорость соединений может быть увеличена за счет размещения серверов рядом с веб-страницами, которые мы посещаем. Эти так называемый CDN несомненно улучшили скорость и возможность доступа к различным веб-сайтам, конечно, всегда есть вещи, которые следует учитывать при просмотре Интернета и неудобства, которые возникают при использовании этих серверов.
Несколько лет назад был создан CloudFlare, чтобы решить некоторые проблемы и улучшить распространение контента. Кроме того, это помогло защитить нас от кибератак, сделав его одним из самых безопасных.
Выступая в качестве посредника для обратных прокси, он позволяет нам обнаруживать вредоносный трафик и спам в Интернете, что также обеспечивает защиту наших личных данных, особенно финансовых данных, которые часто подвергаются атакам.
Иногда при использовании сервера CloudFlare могут возникать проблемы, связанные с вашей инфраструктурой, но их можно решить. На этот раз поговорим в частности ошибка 525 « Ошибка протокола привязки SSL и как ее легко исправить с помощью этих советов.
Для всех возможные сбои, возникающие при использовании CloudFlare, Есть определенные шаги, которые необходимо предпринять для их решения, в этом случае, если возникает ошибка подключения: ошибка 525 ‘Ошибка установления связи SSL.
Это происходит из-за ошибки конфигурации на веб-сервере, к которому вы пытаетесь подключиться; Есть два конкретных условия, которые должны быть выполнены для возникновения этой ошибки, одно из них — упомянутое нами.
Чтобы ошибка «SSL-согласование не удалось , что вам нужно сделать, это связаться с хостинг-провайдером. Чтобы определить, связана ли причина с распространенными ошибками на исходных веб-страницах.
Проверьте установленный SSL, порт 433 или другую защиту , Поддержка SNI и комплекты шифров; Таким образом можно определить источник сбоя и приступить к реализации необходимого решения проблемы. Точно так же в CloudFlare, они готовы дать вам нужный совет вам нужна эта проблема или, может быть, другая проблема, с которой вы столкнулись.
Содержание
- Error 525 SSL handshake failed : Various methods to resolve !
- Why Error 525 SSL handshake failed?
- The major reasons and fixes of this error
- Invalid certificate
- Port 443
- Cipher suites
- Conclusion
- PREVENT YOUR SERVER FROM CRASHING!
- CloudFlare error 525 SSL handshake failed – How to fix
- How to resolve CloudFlare error 525 SSL handshake failed ?
- Conclusion
- PREVENT YOUR SERVER FROM CRASHING!
- How to Fix the “SSL Handshake Failed” Error?
- SSL Handshake Failed error occurs when the client or server fails to establish a secure connection.
- What is an SSL handshake?
- Why does the ‘SSL handshake failed’ error occur?
- How to Fix the “SSL Handshake Failed” Error?
- #1. Check your system’s time and date
- #2. Update your Web Browser
- #3. Deactivate recently installed plugins or extensions
- #4. Protocol Mismatch
- #5. Expired Certificate
- How to Fix the “SSL Handshake Failed” Error
- What Is an SSL Handshake?
- What Causes the “SSL Handshake Failed” Error
- How to Fix the “SSL Handshake Failed” Error (5 Ways)
- 1. Update Your Local Device’s Date and Time
- 2. Ensure That Your Browser Supports the Latest TLS Protocol
- 3. Make Sure Your SSL Certificate Is Valid
- 4. Check Your Server’s Server Name Identification (SNI) Configuration
- 5. Pause Cloudflare to Test Your SSL Certificate
- Conclusion
Error 525 SSL handshake failed : Various methods to resolve !
by Ansu Anto | Dec 17, 2019
Are you looking forward to resolving Error 525 SSL handshake failed?
The error indicates that the SSL handshake between Cloudflare and the origin web server failed.
This problem happens mainly because of an invalid SSL certificate, closed port 445, etc.
At Bobcares, we often get requests from our customers to fix the Error 525 SSL handshake failed as part of our Server Management Services.
Today, let’s have a look for the reason of this error. We’ll also see how our Support Engineers fix this error.
Why Error 525 SSL handshake failed?
The error 525 essentially means the SSL handshake between Cloudflare and the origin web server failed. This inturn causes the error to pop up while accessing the website.
Again, this error occurs on the domain using Cloudflare Full or Full (Strict) SSL mode.
The most common causes of this error are:
- No valid SSL certificate installed on the website
- The website is not listening on port 443.
- The SNI is not supported by the website(sometimes not configured to SNI)
- The cipher suites that Cloudflare uses do not match what the origin accepts
While accessing the website the error appears as:

The major reasons and fixes of this error
At Bobcares, where we have more than a decade of expertise in managing servers, we see many customers face problems with error 525 SSL handshake failed.
Now, let’s see the major reasons for this error and how our Support Engineers fix it.
Invalid certificate
One of the major reasons for this error is due to the website not having a valid SSL certificate.
Therefore, when a customer reports the error, we check for the SSL certificate expiry date. If expired, we install the valid SSL certificate for the domain. Also, we double-check if the website uses the correct certificate.
Port 443
Recently, one of the customers approached us with the same error. On further analyzing, we could trace that the issue was due to closed SSL secure port 443.
We have checked that whether the port 443 was listening or not, by applying the command follows.
We could see that the port was not listening and it was closed. So that we opened the SSL port and that fixed the problem.
Also, another major cause of the error is the improper configuration of SNI.
Server Name Indication (SNI) allows the server to safely host multiple TLS Certificates for multiple sites, all under a single IP address.
Here, we check and make sure whether the SNI is properly configured on the website. If the SNI is not supported or configured will cause this error to pop up.
If the server is not having SNI, then the website should need a dedicated IP address to avoid this error.
Cipher suites
Similarly, Cipher Suites also can be a cause for the 525 error.
A cipher suite is a set of algorithms that help secure a network connection that uses Transport Layer Security (TLS) or its now-deprecated predecessor Secure Socket Layer (SSL). The set of algorithms that cipher suites usually include: a key exchange algorithm, a bulk encryption algorithm, and a message authentication code (MAC) algorithm.
In certain cases, the cipher suites that the origin server uses do not match with Cloudflare. The cipher suites 115 that Cloudflare accepts 29 and the cipher suites that the origin server supports do not match. Thus, to fix the error, we always ensure that the version of Open SSL supports the cipher suites that Cloudflare support.
[Need assistance to fix Cloudflare error? We’ll help you.]
Conclusion
In short, Error 525 SSL handshake failed to occur mainly due to invalid SSL certificate, closed 443 port, SNI problem, and so on. Today, we have discussed this error in detail and saw how our Support Engineers fix this error for our customers.
PREVENT YOUR SERVER FROM CRASHING!
Never again lose customers to poor server speed! Let us help you.
Our server experts will monitor & maintain your server 24/7 so that it remains lightning fast and secure.
Источник
CloudFlare error 525 SSL handshake failed – How to fix
by Amritha V | Nov 12, 2021
Wondering how to resolve CloudFlare error 525 SSL handshake failed? We can help you.
As part of our Server Management Services, we assist our customers with several CloudFlare queries.
Today, let us see how our Support techs resolve this error.
How to resolve CloudFlare error 525 SSL handshake failed ?
Typical, error looks as shown below:
Error indicates that the SSL handshake between Cloudflare and the origin web server fail.
This only occurs when the domain is using Cloudflare Full or Full (Strict) SSL mode.
This is cause by a configuration issue in the origin web server.
Today, let us see the steps followed by our Support techs to resolve it:
1. Firstly, make sure you have a valid SSL certificate install on your origin server.
To display your origin certificate, replace 203.0.113.34 with the origin IP address of your web server & replace www.example.com with your domain and host name:
2. Then, check with your hosting provider to make sure they’re listening on port 443/whatever other port 106 you are using.
3. Next, check to make sure your origin server is properly configure for SNI 1.9k.
4. The cipher suites 469 that Cloudflare accepts 477 and the cipher suites that the origin server supports do not match.
Review the cipher suites your server is using to ensure they match what is supported by Cloudflare.
5. Next, if you are the site owner and you’re only seeing errors intermittently, this suggests the TCP connection between Cloudflare and your origin is being reset during the SSL handshake causing the error.
Then, ask your hosting provider/system administrator to check if there are any server issues.
7. Note that Apache must configure 404 to log mod_ssl errors and nginx includes these errors in its standard error log, but it may necessary to increase the log level.
8. Next, pause 203 Cloudflare or update your local hosts file to point directly at your server IP to test that your server is presenting a SSL certificate.
If you do not have a certificate install on your server you can generate one using our Origin CA 450 certificates.
9. If you cURL to the origin on port 443 and receive the error error:1408F10B:SSL routines:ssl3_get_record:wrong version number.
Disable TLS 1.3 on the Edge Certificates tab of the SSL/TLS app on the Cloudflare dashboard.
Then, to determine what TLS version is currently supported, use the following cURL command.
Then, replace MYORIGINIP with the IP address shown on the A record of your DNS app in the Cloudflare dashboard and www.example.com with your domain:
10. Finally, test a specific TLS version by adding one of the following options to your cURL:
[Stuck in between? We’d be glad to assist you]
Conclusion
In short, today we saw steps followed by our Support Techs to resolve CloudFlare error 525 SSL handshake failed.
PREVENT YOUR SERVER FROM CRASHING!
Never again lose customers to poor server speed! Let us help you.
Our server experts will monitor & maintain your server 24/7 so that it remains lightning fast and secure.
Источник
How to Fix the “SSL Handshake Failed” Error?
SSL Handshake Failed error occurs when the client or server fails to establish a secure connection.
Has your SSL handshake failed? For someone who isn’t quite adept in technology, the term ‘SSL handshake’ might seem cryptic or out of the context. If you are in that zone and know nothing about why this error is popping up on your system, then read until the end.
In this article, we shall not only discuss what an SSL handshake is, but we shall also delve deeper into why this error shows up and what you can do to fix it.
What is an SSL handshake?
The SSL handshake involves algorithm agreement, certificate exchange, and the exchange of keys using the shared algorithm. So, the ‘SSL handshake’ is the name given to a securely devised process that helps encrypt client-server communication through cryptographic keys. These keys are exchanged between the server and the client using one out of the two shared algorithms that both the server and the client mutually agreed upon. So, if any glitch occurs during this process, then the ‘SSL handshake failed’ error shows up.
Why does the ‘SSL handshake failed’ error occur?
An SSL handshake error, also known as error 525 occurs when the two endpoints (server and client) are unable to establish a secure connection. This can happen due to several issues, which might be on the server side or the client side. If you are experiencing this error, there is not much to worry about and no matter what’s causing it, we’ll help you fix it in no time. Let us now discuss some ways in which you can fix the SSL handshake error.
How to Fix the “SSL Handshake Failed” Error?
#1. Check your system’s time and date
Before you try any other fix for your SSL handshake error, we strongly recommend that you try correcting your system’s date and time. Silly as it may seem, this works for most people experiencing this sort of error. So, don’t undermine the power of your system’s date and time setting, which might be wrong due to many reasons.
It could be wrong due to pure neglect, a software glitch caused by malware, or simply because you are using a server located in another time zone through a VPN. If you are using a VPN, then it is recommended that you configure the date and time according to the server’s time zone. This refers to the date and time of the location in which the server is located, and not your physical location.
Windows user can reset the date and time in the following manner:
- Click on the ‘Windows’ button.
- Type ‘Date and Time Settings’ and choose the relevant option.
- If you wish to set the time automatically, toggle the ‘set time automatically’ button.
- If you are using a VPN or wish to set the time manually for any other reason, click on the ‘Set the date and time manually’ option.

On Mac, the same can be done by navigating to ‘Menu’ and then to ‘System Preferences’. You will find similar settings for all other Operating Systems.
#2. Update your Web Browser
At all times, you must keep your Operating System and applications up to date. This alone can prevent many errors, including the ‘SSL handshake failed’ error. Chrome users can check that by opening the Chrome browser and clicking on the three vertical dots in the top-right hand corner. Next, click on ‘More Tools’ and if your Chrome browser needs an update, then you’ll find one here. If you don’t, it only means that your Chrome browser is up to date.
#3. Deactivate recently installed plugins or extensions
Most browser plugins and extensions come from unknown developers and could very well be packed with malicious code. So, if you recently installed one of those and have been experiencing the SSL handshake error, then try uninstalling it and clearing your cache and cookies. After you’ve done that, try reconnecting to the same website and check if you can now establish a secure connection.
Chrome users can uninstall the extension by following the below mentioned steps:
- Click on the three vertical dots on the top-right corner
- Click on ‘Settings’
- Select ‘Extensions’
- Choose the extension you recently installed and click on remove

#4. Protocol Mismatch
Many people face the SSL handshake issue due to a protocol mismatch between the server and the client. Basically, there are multiple versions of the SSL/TLS protocol available and for a successful handshake, it is essential that the web server and the browser support the same version.
Often, the SSL handshake error shows up when the server runs on a protocol version that is much higher than that of the client computer. For instance, if the server uses the TLS 1.3 version but the browser’s using the TLS 1.1, then the SSL handshake is likely to fail because servers do not support previous versions. You can fix this by resetting your browser to its default settings and using it without any extensions.
To reset the browser settings to default on your Chrome browser, click on the three vertical dots on the top-right hand corner, choose ‘Settings’ and then ‘System’. Finally, click on the ‘reset settings to original default’ option and you are done.
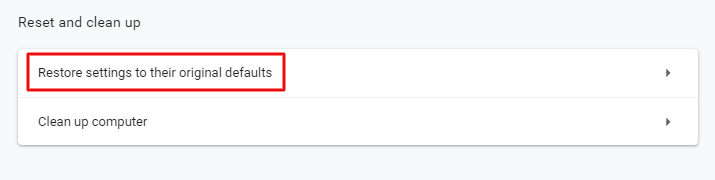
#5. Expired Certificate
You could be facing the handshake issue simply because you are trying to access a website that does not have a valid SSL certificate. Use our free SSL Certificate checker tool to validate your SSL certificate.
Conclusion:
We have discussed some of the most effective solutions for the SSL handshake problem, which might occur due to the browser or the system settings. In most cases, correcting the time and date settings or removing the trouble-causing extensions from the browser solves the issue.
For server-related concerns, it is only the website owner or administrator who can fix the ‘SSL handshake failed’ problem. Some of the common server-side issues are an invalid SSL certificate, a free SSL certificate from a fraudulent website, problems with the cipher suite, and incorrect installation of the SSL Certificate. In that case, it is recommended that you contact the website owner or administrator for an effective resolution.
Источник
How to Fix the “SSL Handshake Failed” Error
Posted on July 4, 2021 by Will Morris 1 Comment

Setting up a Secure Sockets Layer (SSL) certificate for your website has never been easier. You can generate certificates for free, and many hosting providers will even set them up for you. However, if you don’t configure your certificate properly, you may encounter errors such as “SSL handshake failed”.
The “SSL handshake failed” error shows up when your browser and the server can’t establish a secure connection. This article will explain what an SSL handshake is and what to do if you fail to establish one.
What Is an SSL Handshake?
As you may know, an SSL certificate validates your website’s “identity”. It does that using a cryptographic key that your browser checks to make sure the certificate is valid. Once you establish a connection, your browser can decrypt the content that the server sends it.
This process is called a “handshake”. Here’s how it works in more detail:
- You visit a website with an SSL certificate and your browser sends a request for data.
- The server sends the browser an encrypted public key.
- Your browser checks that key and sends its encrypted key back to the server.
- The server decrypts the key and sends encrypted content back to your browser.
- Your browser decrypts the content (hence completing the handshake).
All of this happens in seconds. SSL certificates and the HTTPS protocol enable your website to transmit data securely, without negatively impacting performance. That makes an SSL certificate vital for any website. However, like any element of your site, it can occasionally create unique problems.
What Causes the “SSL Handshake Failed” Error
The “SSL handshake failed” error tells you precisely what the problem is. It shows up when your browser fails to establish a connection with a website that has an SSL certificate:
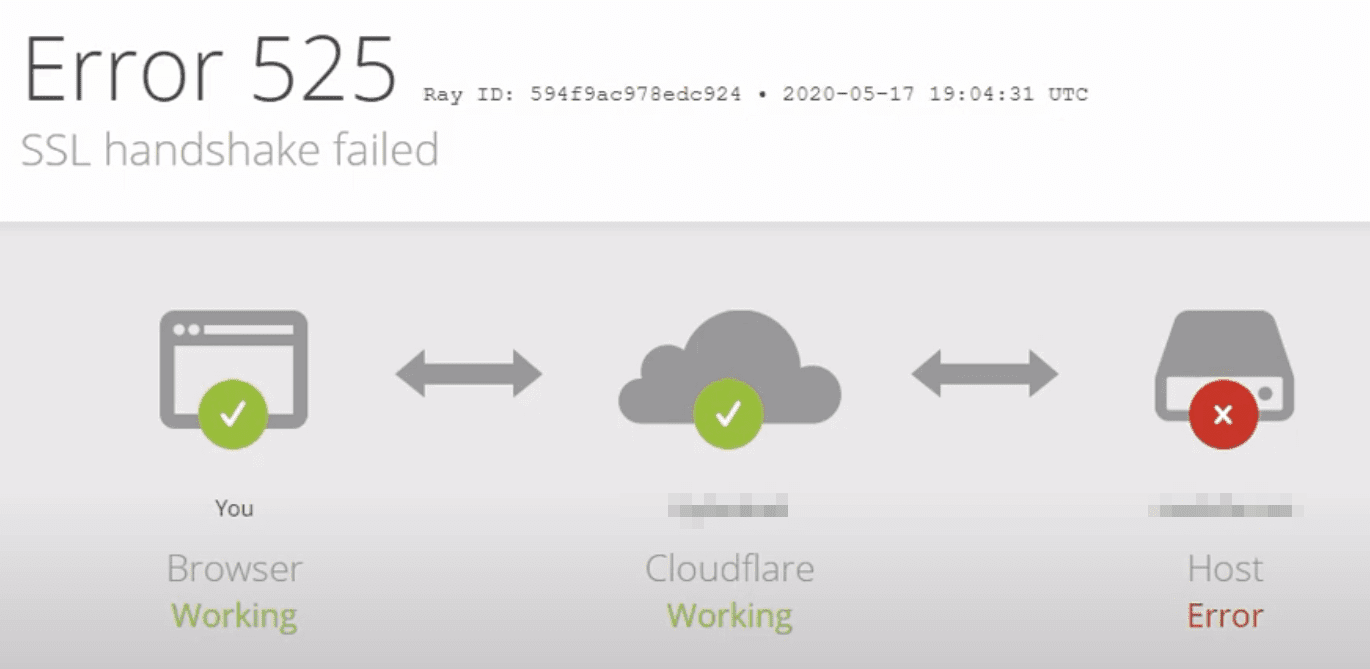
In this example from a website using Cloudflare, you can see that the “SSL handshake failed” error corresponds to the “525” code. Thus, the error can stem from both server- and client-side problems.
The most common causes of the “SSL handshake failed” error include:
- Your local device has the wrong date or time
- The browser doesn’t support the latest SSL protocol
- Your SSL certificate is invalid
- There’s a problem with your Server Name Identification (SNI) configuration
- There’s an issue with your Content Delivery Network (CDN), such as Cloudflare
That list includes two local issues, two that are related to your website’s server, and one that’s specific to a third-party service. In the next sections, we’ll explore how to tackle each of them.
How to Fix the “SSL Handshake Failed” Error (5 Ways)
Here, we’re going to start by showing you how to fix the client-side issues that can cause the “SSL handshake failed” error. Those solutions are pretty simple. In case they don’t work, however, we’ll then move on to more technical solutions you can try.
1. Update Your Local Device’s Date and Time
When your browser tries to establish an SSL handshake, it verifies the certificate against your computer’s date and time. It does this to verify that the SSL certificate is still valid.
If your local device’s date and time are off, that can lead to errors during the verification process (i.e., no handshake). Fortunately, this is an issue with a simple fix.
On a Windows device, open the Start menu and type in Date & Time settings. Select the option that appears, and a new window will pop up. Enable the setting Set time automatically, and ensure that your time zone is correct:
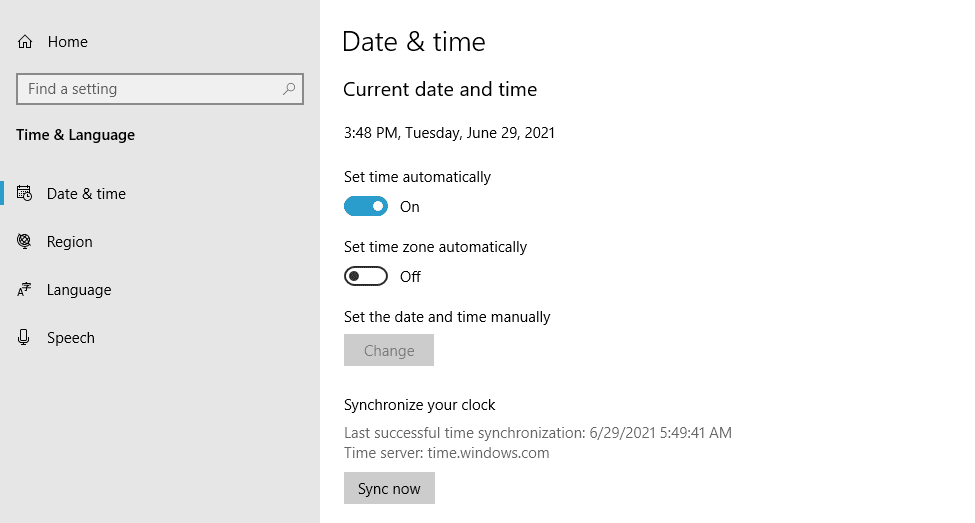
Verify that your date is now correct, and then try to reload the website.
Here’s how to fix your date and time on other Operating Systems (OSs):
If fixing the date and time on your local device doesn’t do the trick, you can move on to the next fix.
2. Ensure That Your Browser Supports the Latest TLS Protocol
In some cases, you may run into the “SSL handshake failed” error due to problems with your browser. The most common issue is that your browser doesn’t support the Transport Layer Security (TLS) protocol that your certificate uses.
To put it simply, both SSL and TLS are authentication protocols, and your certificate may use either one. Modern browsers support both protocols, but their older versions might not.
The easiest way to determine whether your browser is causing the issue is to use another one. If the “SSL handshake failed” error doesn’t appear in other browsers, the original one may be the problem.
To fix this issue in Windows, open the Start menu and type in Internet Options. Select the option that appears and go to the Advanced tab. Scroll down the list of settings until you find the options that correspond to SSL and TLS settings:
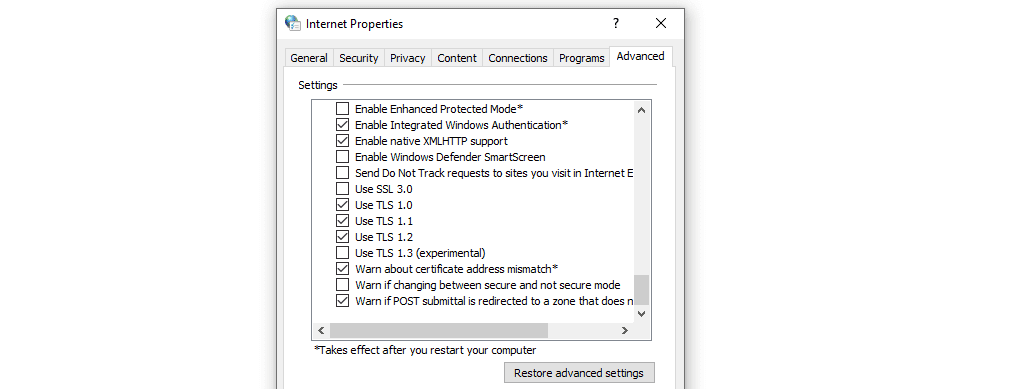
Ideally, you should un-check the box for SSL 3 and 2 (if you see those options). You only need to check the boxes for TLS 1, 1.1, and 1.2.
Then save the changes to your internet options and try re-accessing the website. Note that if you’re using macOS or iOS, TLS 1.2 should be enabled by default.
3. Make Sure Your SSL Certificate Is Valid
SSL certificates have expiration dates. That’s a built-in function that forces you to renew the certificate at some point, and validate your domain ownership.
If your SSL certificate expires, your browser won’t be able to establish a handshake. Depending on who your SSL certificate provider is, you’ll probably receive notifications well before it expires so you can renew it.
Even so, it doesn’t hurt to check if you’re not sure about your certificate’s expiration date. You can use a tool such as SSL Server Test to do so:
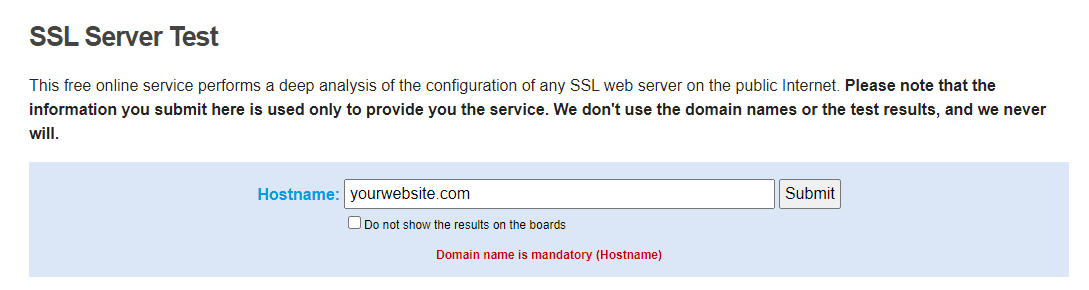
The service will return a lot of information about your website’s SSL certificate. If the certificate expired, you’ll see when its validity ran out:
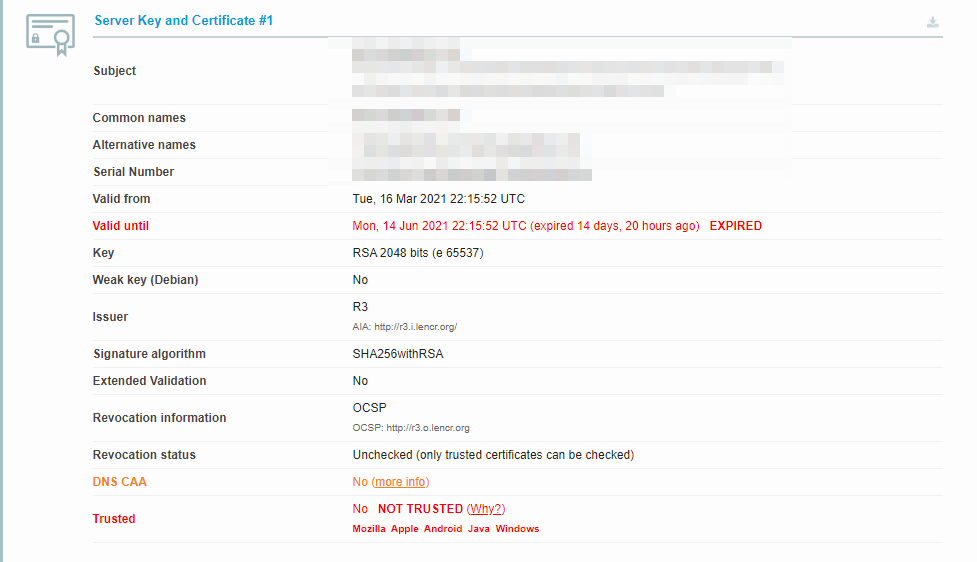
In this case, you’ll need to re-issue and install the SSL certificate on your website. Depending on who your hosting provider is, they might be able to help with that process.
4. Check Your Server’s Server Name Identification (SNI) Configuration
If you’re using a shared server to host your website, you can run into issues with multiple SSL certificates. Hosting providers use proper Server Name Identification (SNI) configuration to ensure that when visitors try to access your site, they get the correct SSL certificate (and not one from another property).
Generally speaking, most reputable hosting providers won’t present any issues with SNI configuration. Additionally, if you’re not using a shared server, you can move on to the next fix.
If you want to be 100% sure that your hosting provider isn’t presenting any issues with SNI configuration, you can contact its support for help. On a shared server, you won’t be able to access this configuration directly. If this turns out to be the problem, you may want to consider upgrading to a more robust hosting plan.
5. Pause Cloudflare to Test Your SSL Certificate
If you’re using Cloudflare, the “SSL handshake failed” error can be due to a problem with its connection to your website. The easiest way to test this is by temporarily disabling it.
Fortunately, Cloudflare offers a “pausing” feature you can use to disable the service at any time. Once you do this, we recommend clearing your browser’s cache before trying to access your website again.
If the SSL handshake error is gone, you’ll want to contact Cloudflare to see what the problem might be. While you wait for a response, keep the CDN disabled so other users can also access your website. On the other hand, if the SSL error persists, that means it’s probably due to an error with your server’s configuration (see above).
Conclusion
The “SSL handshake failed” error is relatively easy to fix, as long as you’re aware of what its potential causes are. The error might be due to an issue with your local device’s settings, your server’s configuration, or your CDN.
Here’s what you might need to do to fix the “SSL handshake failed” error:
- Update your local device’s date and time.
- Ensure that your browser supports the latest TLS protocol.
- Make sure your SSL certificate is valid.
- Check your server’s SNI configuration.
- Pause Cloudflare to test your SSL certificate.
Do you have any questions about how to fix the “SSL handshake failed” error? Let’s talk about them in the comments section below!
Источник
Are you looking forward to resolving Error 525 SSL handshake failed?
The error indicates that the SSL handshake between Cloudflare and the origin web server failed.
This problem happens mainly because of an invalid SSL certificate, closed port 445, etc.
At Bobcares, we often get requests from our customers to fix the Error 525 SSL handshake failed as part of our Server Management Services.
Today, let’s have a look for the reason of this error. We’ll also see how our Support Engineers fix this error.
Why Error 525 SSL handshake failed?
The error 525 essentially means the SSL handshake between Cloudflare and the origin web server failed. This inturn causes the error to pop up while accessing the website.
Again, this error occurs on the domain using Cloudflare Full or Full (Strict) SSL mode.
The most common causes of this error are:
- No valid SSL certificate installed on the website
- The website is not listening on port 443.
- The SNI is not supported by the website(sometimes not configured to SNI)
- The cipher suites that Cloudflare uses do not match what the origin accepts
While accessing the website the error appears as:

The major reasons and fixes of this error
At Bobcares, where we have more than a decade of expertise in managing servers, we see many customers face problems with error 525 SSL handshake failed.
Now, let’s see the major reasons for this error and how our Support Engineers fix it.
Invalid certificate
One of the major reasons for this error is due to the website not having a valid SSL certificate.
Therefore, when a customer reports the error, we check for the SSL certificate expiry date. If expired, we install the valid SSL certificate for the domain. Also, we double-check if the website uses the correct certificate.
Port 443
Recently, one of the customers approached us with the same error. On further analyzing, we could trace that the issue was due to closed SSL secure port 443.
We have checked that whether the port 443 was listening or not, by applying the command follows.
netstat -nltp | grep : 443We could see that the port was not listening and it was closed. So that we opened the SSL port and that fixed the problem.
SNI
Also, another major cause of the error is the improper configuration of SNI.
Server Name Indication (SNI) allows the server to safely host multiple TLS Certificates for multiple sites, all under a single IP address.
Here, we check and make sure whether the SNI is properly configured on the website. If the SNI is not supported or configured will cause this error to pop up.
If the server is not having SNI, then the website should need a dedicated IP address to avoid this error.
Cipher suites
Similarly, Cipher Suites also can be a cause for the 525 error.
A cipher suite is a set of algorithms that help secure a network connection that uses Transport Layer Security (TLS) or its now-deprecated predecessor Secure Socket Layer (SSL). The set of algorithms that cipher suites usually include: a key exchange algorithm, a bulk encryption algorithm, and a message authentication code (MAC) algorithm.
In certain cases, the cipher suites that the origin server uses do not match with Cloudflare. The cipher suites 115 that Cloudflare accepts 29 and the cipher suites that the origin server supports do not match. Thus, to fix the error, we always ensure that the version of Open SSL supports the cipher suites that Cloudflare support.
[Need assistance to fix Cloudflare error? We’ll help you.]
Conclusion
In short, Error 525 SSL handshake failed to occur mainly due to invalid SSL certificate, closed 443 port, SNI problem, and so on. Today, we have discussed this error in detail and saw how our Support Engineers fix this error for our customers.
PREVENT YOUR SERVER FROM CRASHING!
Never again lose customers to poor server speed! Let us help you.
Our server experts will monitor & maintain your server 24/7 so that it remains lightning fast and secure.
GET STARTED
var google_conversion_label = «owonCMyG5nEQ0aD71QM»;
Ошибка 525 может появляться при попытке подключиться к серверу роблокс и означает что Вам не удалось установить соединение SSL. Это означает что Вы не можете создать безопасное соединение с вашего компьютера на хост-сервер, к которому вы пытаетесь присоединиться в Roblox. Это одна из тех ошибок, которая может появляться при неправильной настройке модема (маршрутизатора), проблемах на стороне сервера Роблокс или блокировке соединения брандмауэрами и антивирусами. В этой статье разберем все причины появления этой ошибки и способы ее исправления.
 Сбой или неправильная настройка модема, роутера или маршрутизатора;
- Блокировка соединения Брандмауэром, антивирусом или блокировщиком рекламы;
- Слишком большой КЭШ;
- Проблемы на стороне сервера Roblox (отсутствие действующего сертификата SSL, отсутствие поддержки SNI, несовпадение наборов шифров принятых Cloudflare и наборов шифров поддерживаемых исходным веб-сервером и т.д.);
- Устаревший, не поддерживающий новые технологии браузер;
 Сбой или неправильная настройка модема, роутера или маршрутизатора;
Как исправить ошибку 525 в Роблокс
Рассмотрим все самые эффективные способы исправления ошибки 525 от простого к сложному.
1. Перезагрузите компьютер и модем. Возможно произошел сбой настроек сетевой карты или модема. После перезагрузки настройки вернуться к своему начальному состоянию и вы сможете войти в игру без ошибки.
2. Добавьте игру в список исключений брандмауэра и антивируса. Для этого нажмите комбинацию клавиш Win + R, введите команду control firewall.cpl и нажмите «Ок». В появившемся окне нажмите «Разрешить запуск программы или компонента через брандмауэр Windows«. В открывшемся окне нажмите кнопку «Изменить параметры», найдите в списке Роблокс, установите галочки и нажмите ОК.
3. Удалите все расширения блокирующие показ рекламы (например AdBlock). Некоторые блокировщики рекламы могут неправильно интерпретировать игровые запросы и элементы и блокировать их думая что это реклама. Поэтому стоит либо внести сайт в список исключений либо полностью удалить блокировщик рекламы.
4. Проверьте состояние серверов игры. Возможно в момент подключения к серверу на нем проводились технические работы или же он просто лег из за нагрузки. Попробуйте проверить статус серверов Роблокс через специальные сервисы, которые можно найти в поисковике если вбить запрос «состояние серверов роблокс«.
5. Очистите кэш игры. Нажмите комбинацию клавиш Win + R введите в появившемся окне команду %temp%Roblox и нажмите Inter. После чего откроется папка Roblox с кэшем игры. Вам нужно будет выделить все файлы находящиеся в этой папке и удалить их. Для быстрого выделения нажмите комбинацию Ctrl + A.
6. Используйте проверенные браузеры. Некоторые браузеры плохо оптимизированы для работы с игровыми приложениями и могут вызывать подобного рода ошибки. Попробуйте зайти в игру используя браузер Google Chrome, Mozila или Яндекс браузер.