
Follow our methods to solve the AutoIt error line 0
by Matthew Adams
Matthew is a freelancer who has produced a variety of articles on various topics related to technology. His main focus is the Windows OS and all the things… read more
Updated on May 31, 2023
Reviewed by
Vlad Turiceanu

Passionate about technology, Windows, and everything that has a power button, he spent most of his time developing new skills and learning more about the tech world. Coming… read more
- The AutoIt error can cause some trouble, but there are several ways to fix this issue.
- Some third-party anti-malware software might help you fix this issue on your PC.
- Many users have fixed this and similar errors by removing a couple of values in the registry.
XINSTALL BY CLICKING THE DOWNLOAD FILE
This software will repair common computer errors, protect you from file loss, malware, hardware failure and optimize your PC for maximum performance. Fix PC issues and remove viruses now in 3 easy steps:
- Download Restoro PC Repair Tool that comes with Patented Technologies (patent available here).
- Click Start Scan to find Windows issues that could be causing PC problems.
- Click Repair All to fix issues affecting your computer’s security and performance
- Restoro has been downloaded by 0 readers this month.
Some users have reported an AutoIt error on Microsoft’s support forum. When that issue arises, users see an AutoIt Error message pop up every time Windows starts up.
The specified file path within that error message can vary, but despite the file path, there are a couple of solutions that you can use to fix this problem.
What is AutoIt3 EXE?
AutoIt v3 is a scripting language developed for automating and mimicking keystrokes, mouse movement, and window/control manipulation.
Is AutoIt needed?
This is not a necessary operation for Windows and may be stopped if it is known to cause difficulties.
File corruption is a common cause of problems with Windows, including this one. This can happen anytime for unknown reasons, but the issues are minor and can be easily fixed by running scans with DISM and SFC.
If your computer has one or more autorun keys left behind by an application that is no longer available, you are likely to run into one of the most typical instances in which you would get this sort of error.
Another factor you should consider is the possibility that your Windows files have been compromised by a virus or other form of malicious software.
There are other causes, but these are the most common ones. Here are also the most common errors reported by our users regarding AutoIt:
- AutoIt Error Line 0 file C:/Users – Conceivably, the cause is a conflict between a program or service and one or more of Windows’s processes to boot up.
- AutoIt Error Line 0 – You may test whether or not this is the case by forcing Windows to boot with only the essential drivers and applications for the starting process.
- Allocating memory AutoIt error – Using File Explorer, delete all entries that include AutoIt.
- AutoIt Error opening the file – This can occur due to the residual autoruns.
- AutoIt Error ServiceGet – Delete any string values associated with AutoIt from the Registry Editor.
- Logonui.exe AutoIt error – Try using Startup Repair.
- AutoIt error line 865 – Delete any AutoIt scripts running when Windows starts.
- AutoIt error in Windows 7/10/11 – This issue is not specific to one OS iteration, but rather to all of them, or the latest ones. However, the solutions below are applicable to each iteration.
Without any further ado, let’s jump into the list of solutions to AutoIt errors in both Windows 10 and 11. Follow along!
How do I fix AutoIt error line 0 in Windows 10?
- What is AutoIt3 EXE?
- Is AutoIt needed?
- How do I fix AutoIt error line 0 in Windows 10?
- 1. Run a malware scan
- 2. Edit the registry
- Open the Run tool
- Enter this command in the Open box: regedit > Click Ok to open Registry Editor.
- Click File on the Registry Editor window and select Export option.
- Enter a file name for the registry backup and save it.
- Open this registry key path using a special coomand.
- Search for REG_SZ strings in the Run registry key.
- Then open this key in the Registry Editor:
- Repeat the 6th step
- Close Registry Editor
- 3. Uninstall AutoIt
- 4. Remove AutoIt scripts from startup
- 5. Reset your Windows 10
- Is AutoIt V3 script a virus?
- Is AutoIt malicious?
1. Run a malware scan
For those wondering how do I get rid of AutoIt virus, the error is often caused by malware known as Veronica, so you should start with a malware scan.
We suggest you use Eset Internet Security because it has a very high detection rate and multiple security features to ensure you are protected on all fronts.
Eset is an award-winning antivirus with a powerful anti-malware engine. It protects your PC in real-time, at all times, without impacting its functionality.
Other notable features of Eset Internet Security include:
- Banking and payment protection
- Parental controls
- Webcam protection
- Anti-phishing technology
- Multilayered protection
- Malware and ransomware protection
Eset lets you run a one-time full scan of your PC that will detect and remove any threats. It is online and completely free. It will help remove any threats and allow you to try the software.

Eset Internet Security
Remove malware and secure your whole digital experience with award-winning antivirus technology.
2. Edit the registry
The detailed solution below describes how to edit your Registry in order to resolve the AutoIt error on Windows PCs.
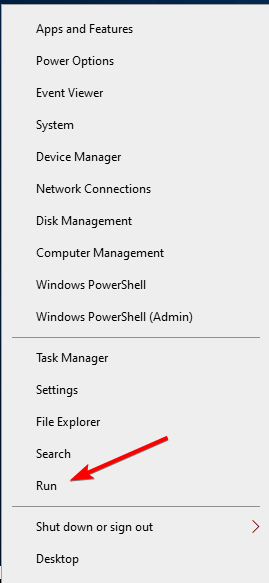
1. Open the Run tool
First, open the Run tool by right-clicking the Start button and selecting that option from the menu.
2. Enter this command in the Open box: regedit > Click Ok to open Registry Editor.
Enter the following command in the Open box: regedit. Then click OK to open the Registry Editor.
3. Click File on the Registry Editor window and select Export option.
Click File on the Registry Editor window. Select the Export option.
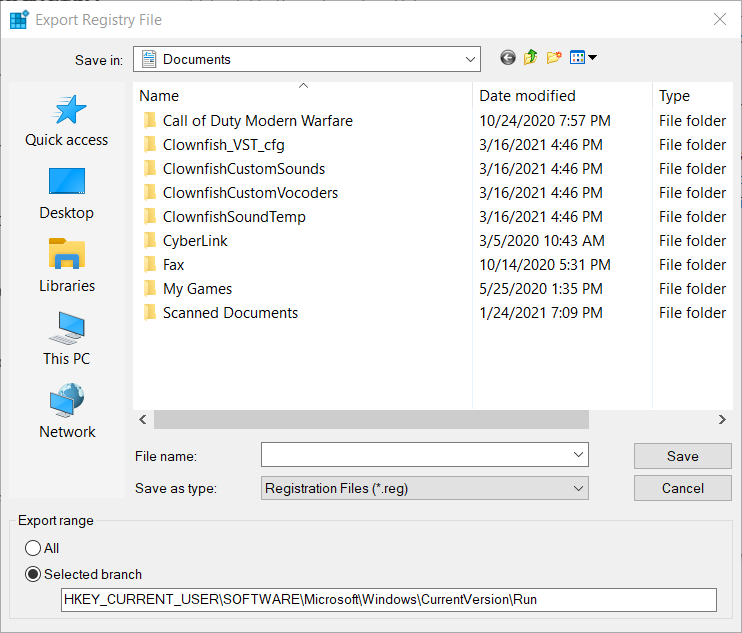
4. Enter a file name for the registry backup and save it.
Enter a file name for the registry backup. Choose a location for the registry backup file. Press the Save button.
5. Open this registry key path using a special coomand.
Open registry key path with: ComputerHKEY_CURRENT_USERSoftwareMicrosoftWindowsCurrentVersionRun
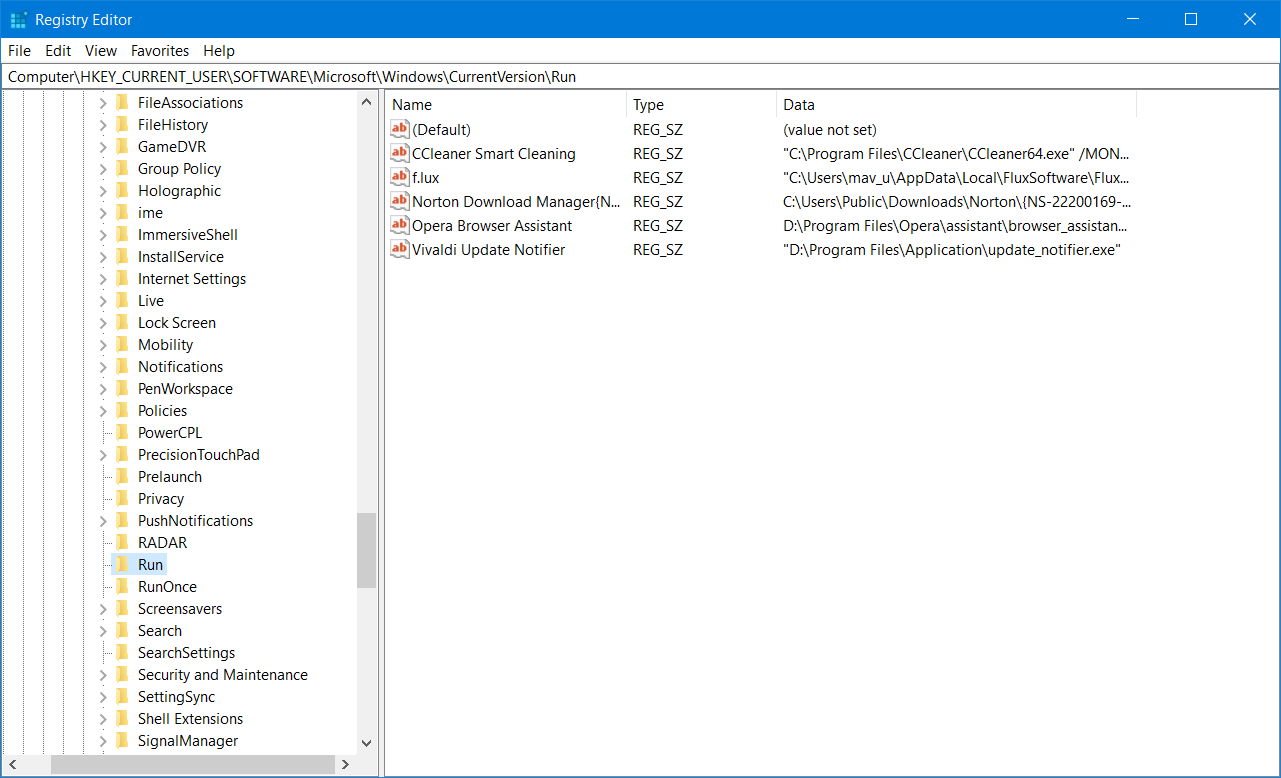
6. Search for REG_SZ strings in the Run registry key.
Look for these REG_SZ strings in the Run registry key: AdobeFlash, Windows Update, Adobe Update, and Google Chrome. Right-click all those REG_SZ strings and select Delete to erase them.
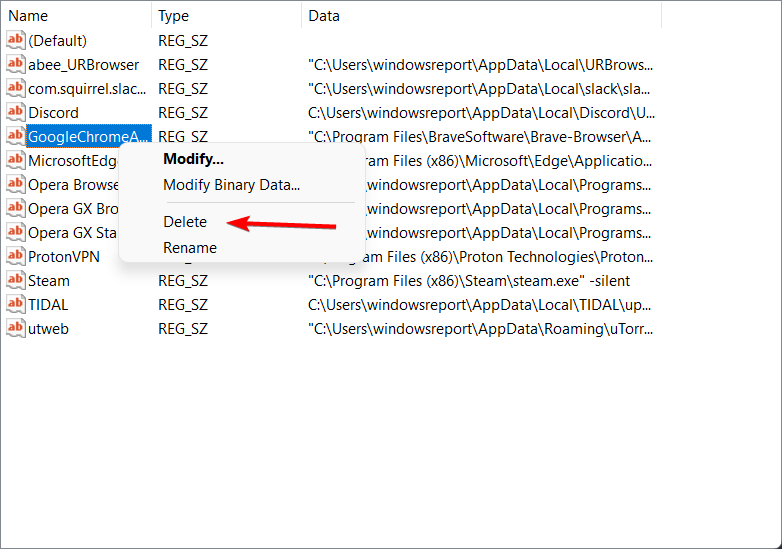
7. Then open this key in the Registry Editor:
ComputerHKEY_LOCAL_MACHINESoftwareMicrosoftWindowsCurrentVersionRun
8. Repeat the 6th step
Repeat the 6th step for the LOCAL_MACHINE Run key you’ve just opened.
9. Close Registry Editor
Close the Registry Editor, and restart your PC to see if the issue persists.
After making these changes, the AutoIt error in Windows 11 should be gone.
Note: The REG_SZ strings specified above will include autoit3.exe, windowsupdate.lnk, googleupdate.a3x, or googleupdate.lnk within their data paths. Entering those data path keywords within Registry Editor’s Find tool should also locate the REG_SZ strings you need to erase.
3. Uninstall AutoIt
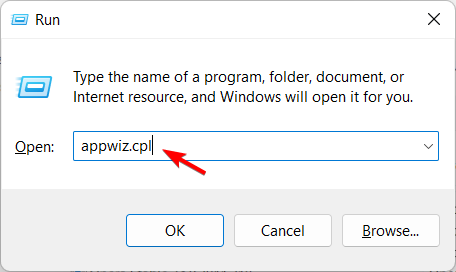
- Open the Run window. Type this Programs and Features command into Run: appwiz.cpl

- Next, select the AutoIt program listed.

- Click the Uninstall option for AutoIt.
- Restart your desktop or laptop after uninstalling AutoIt.

You can uninstall AutoIt and more thoroughly erase its leftover files and registry entries with third-party uninstaller software.
- 5+ Best uninstallers to remove programs from Windows 7
- Can’t uninstall a program on Windows 10/11, what tools to use?
- Best 6 software uninstallers for Windows 11
4. Remove AutoIt scripts from startup
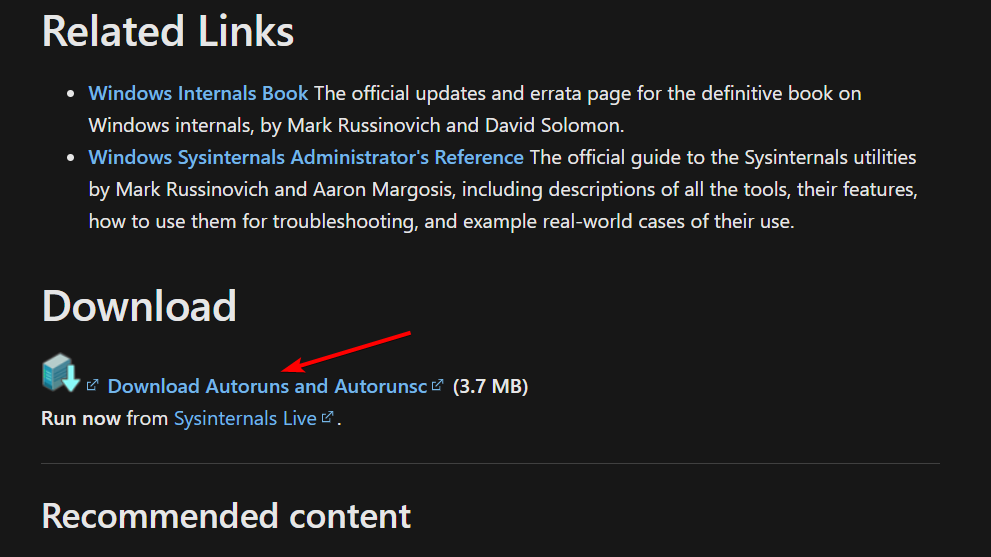
- Download Autoruns by pressing the Download Autoruns and Autorunsc option from Microsoft’s page.

- Extract it, locate its executable file and run it as administrator.
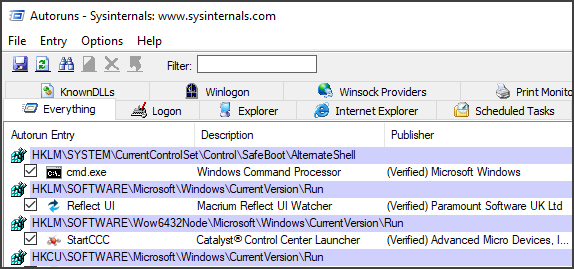
- Now input autoit3 in the Filter box.

- Locate AutoIt, right-click it, and choose Delete.
You can remove AutoIt scripts from the Windows startup with Autoruns. That’s one of the most detailed startup monitor tools for Windows. Using this tool, you should be able to fix the AutoIt error line 0 error opening the file message.
5. Reset your Windows 10
- Open the Settings app by pressing Windows + I and navigate to the Update & Security section.

- Select Recovery from the left pane. In the right pane, click on Get started button in the Reset this PC section.

- Choose the option to keep your files and follow the instructions on the screen.
- Once the process is finished, you’ll have a fresh installation of Windows ready.
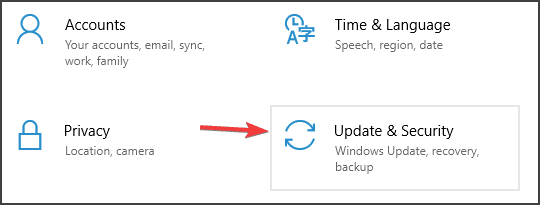
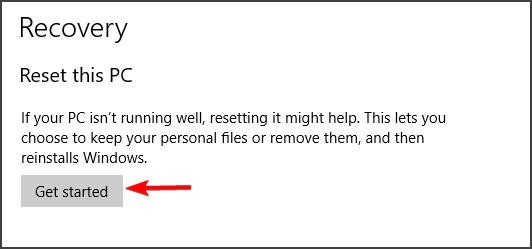
Remember that factory reset removes installed applications, so you’ll have to install them again.
Is AutoIt V3 script a virus?
If you have used AutoIt for any significant amount of time, you are probably aware that it is an excellent and highly effective scripting language.
As is the case with all vital languages, one of the potential drawbacks is the generation of viruses by individuals with nefarious intentions.
Your installation of AutoIt does not include any viruses, and if a script you have written is flagged as a virus even though you do not intend to cause harm, it is an example of a false positive.
Is AutoIt malicious?
No, unless you haven’t downloaded the software from the official source, AutoIt is completely safe.
For more automation software, check out our article with the five best automated macro software.
Did you find a solution to this problem on your own? Feel free to share it with us in the comments section below.
Still having issues? Fix them with this tool:
SPONSORED
If the advices above haven’t solved your issue, your PC may experience deeper Windows problems. We recommend downloading this PC Repair tool (rated Great on TrustPilot.com) to easily address them. After installation, simply click the Start Scan button and then press on Repair All.
![]()
What is ‘AutoIt error’ in Windows 10/11?
In this article, we are going to discuss on How to fix AutoIt error Windows 10/11. You will be guided with easy steps/methods to resolve the issue. Let’s starts the discussion.
‘AutoIt’: AutoIt is freeware programming language for Microsoft Windows OS based computer. It was primarily intended to create automation scripts for Microsoft Windows programs but has since grown to include enhancements in both programming language design and overall functionality. AutoIt Syntax is similar to that found in BASIC family of languages. AutoIt is general purpose, third-generation programming language with classical data model and variant data type that can store several types of data including arrays.
However, several Windows users reported they faced AutoIt error when they tried to start their Windows 10/11 computer. Some users reported the issue is occurred possibly due to corruption in data relating to AutoIt. It could be because files, registry values, and/or folders relating to AutoIt. The error is appeared with path of AutoIt that is causing error. Let’s take a look at error message.
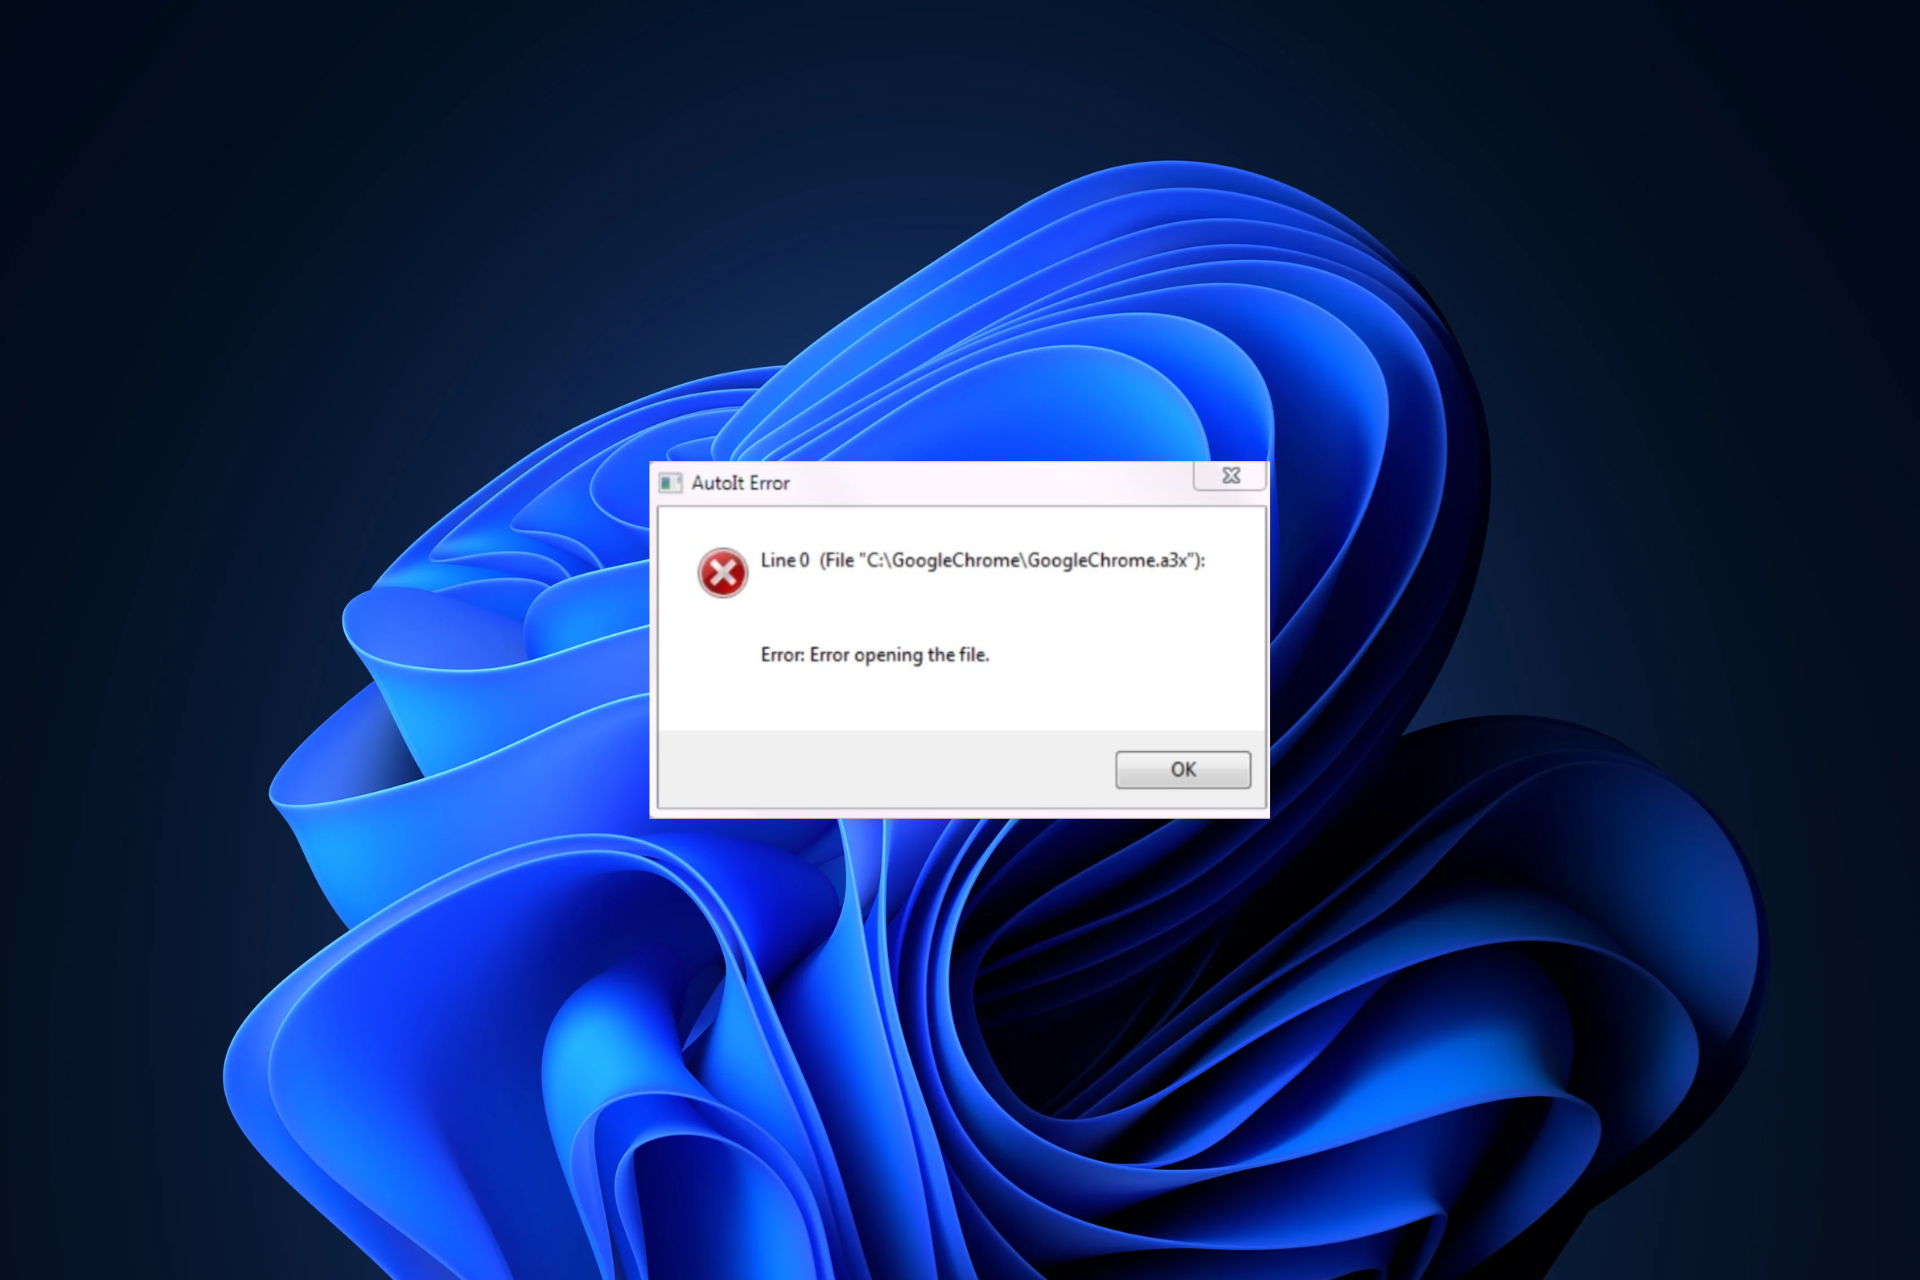
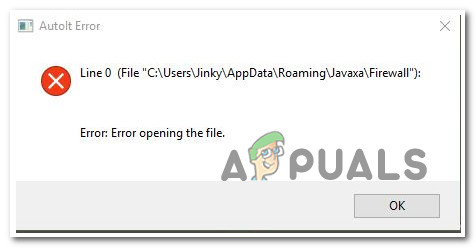
“Line 0 (File “C:GoogleChromeGoogleChrome.a3x”):
Error: Error opening the file.”
The possible way to fix the AutoIt error is to delete AutoIt entries from computer completely. Here, you are provided with several easy ways to remove AutoIt from your Windows 10/11 computer in order to fix the AutoIt error. This issue can also be occurred due to some malware or viruses infections in computer so you can run system scan for malware or viruses in computer with some powerful antivirus. Let’s go for the solution.
How to fix AutoIt error Windows 10/11?
Method 1: Fix ‘AutoIt error’ with ‘PC Repair Tool’
‘PC Repair Tool’ is easy & quick way to find and fix BSOD errors, DLL errors, EXE errors, problems with programs/applications, malware or viruses issues, system files or registry issues, and other system issues with just few clicks.
Method 2: Delete AutoIt entries using File Explorer
You can delete AutoIt entries including all files and folders relating to AutoIt from File Explorer in order to fix the issue.
Step 1: Open ‘File Explorer’ and go to ‘C: Drive’ or the drive where you have installed Windows. Or go to Program Files, Windows, System, System32, and more, in order to find suspicious files
Step 2: Find and delete suspicious files including KHATRA.exe, names.txt, svchost.com, sass.exe, Ask.com.exe, Exterminate It!.exe, driver—grap.exe, xerox.exe, etc, from there.
Step 3: Also check if there are folders like cuhu, CIDD_P, and bycool1, present in the user profile, Windows, and System folder. If yes, delete such malicious files/folders from there and once done, restart your computer and check if the issue is resolved.
Method 3: Delete AutoIt strings values using Registry Editor

If there are suspicious strings values like Windows Update, AutorunRemover.exe, GoogleChrome, UnlockerAssistant, USBScan.exe, NBKeyScan, ApnUpdater, SoundMan, ShStatEXE, PTHOSTTR, ShutdownEventCheck, WHITNEY_S2P, GhostStartTrayApp, igfxhkcmd, Adobe ARM, SkyTel, HotKeysCmds, BCSSync, GrooveMonitor, etc., then you need to delete these strings value in order to fix the issue.
Step 1: Open ‘Registry Editor’ in Windows PC via Windows Search Box and navigate to following path
HKEY_CURRENT_USERSoftwareMicrosoftWindowsCurrentVersionRun
Step 2: Select all those suspicious entries in right-pane, right-click on each of them and select ‘Delete’ to delete them.
Method 4: Remove AutoIt scripts from Windows Startup
You can also try to fix the issue by removing AutoIt scripts from Windows Startup.
Step 1: Download and install ‘Microsoft Autoruns for Windows’ from Microsoft Official site
Step 2: Once installed, open it and click ‘Logon’ tab
Step 3: Look for the references to ‘a3x’ and ‘GoogleChrome’. If you find such references, select them
Step 4: Press ‘Delete’ button and hit ‘Ok’ button to confirm
Step 5: If you are not able to find such entries, switch to ‘Everything’ tab, click ‘Search’ icon at top-left part of its interface to find ‘GoogleChrome’
Step 6: Once you find the item, uncheck the checkboxes selected for that entry. This will disable the Registry entry relating to that item. Once done, restart your computer and check if the issue is resolved.
Method 5: Uninstall AutoIt using Control Panel
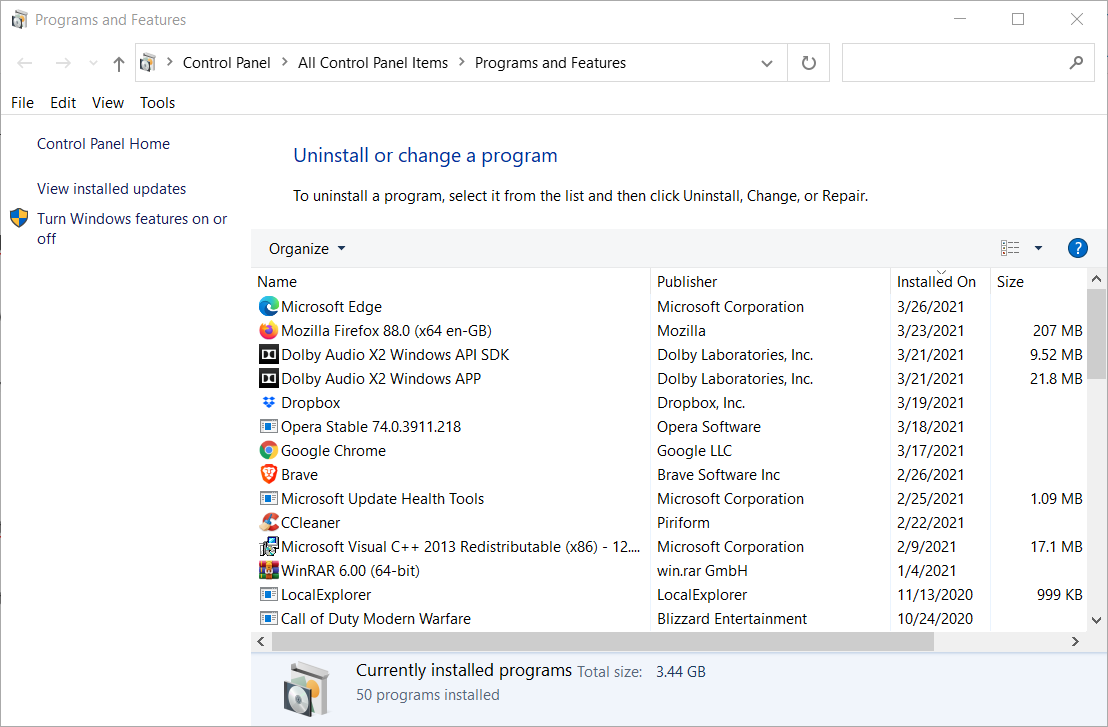
Step 1: Open ‘Control Panel’ in Windows PC and go to ‘Uninstall a Program > Programs & Features’
Step 2: Fins and select ‘AutoIt’, and click ‘Uninstall’ to uninstall it and once uninstalled, restart your computer and check if the issue is resolved.
Conclusion
I am sure this post helped you on How to fix AutoIt error Windows 10/11 with several easy steps/methods. You can read & follow our instructions to do so. That’s all. For any suggestions or queries, please write on comment box below.

There are a number of reports that have been seen in Microsoft Forums and on other platforms about the AutoIt Error message. This message pops up every time the user startup their Windows PC. The error message window titled, AutoIt Error with further information saying, “Line 0” along with the message “Error: Error opening the file.”
If you are also facing the same issue and want a resolution to this, then stick around to this fixing guide and I’ll show you the different ways to troubleshoot and fix the AutoIt Error on your Windows 11 or Windows 10 PC.

Attention Windows Users!!
Facing issues on your Windows PC every now and then? We would recommend you use the Restoro PC Repair tool.
It is a one-stop solution to repair common computer errors, protect your Windows PC from data loss, malware, hardware failure, Registry issues, BSOD errors, etc. and optimize your PC for maximum performance in just three simple steps:
- Download Restoro Tool that comes with Patented Technologies (see patents here).
- Install and click on Start Scan to find the issues on your Windows PC.
- Finally, click on Repair All to fix the issues.
4,533,876 users have downloaded Restoro till now.
The AutoIt error message can occur due to a number of causes. It can be due to a virus/malware, due to some improperly-working registry settings, pending windows updates, etc. Based on the causes, here are the various ways to fix this issue.
1. Run a Virus Scan
Previous experiences have revealed that the AutoIt error message is usually caused due to malware called Veronica. This malware has been found in a number of Windows PCs affected by the AutoIt error message.
Hence there is a very high possibility that the issue is again being caused by malware (probably Veronica) and its direct solution is to run a system malware scan.
For this, you can either rely on 3rd-party antivirus software or can also try the windows built-in malware scan. To run the Windows default malware scan on Windows 11:
- Open the Windows Settings by using the Win + I key combination.
- Navigate to Privacy & security > Windows Security.

- Click on Open Windows Security.
- On the Windows Security window, click on Virus & threat protection.

- Click on Scan options located right below the Quick scan button. You can also run the Quick scan if you want, prior the full scan.
- Select the Full Scan from the list and hit the Scan now button.


Let Windows scan the system and if there is any threat (virus/malware) found, treat it accordingly i.e. remove it and see if the issue is fixed or not.
2. Edit the Windows Registry
- Search for the Registry Editor and open it. You can also enter
regeditin the Run dialog box (Win + R) to open it.
- Click on File and select Export… to export and backup the current registry setup. Select an accessible location to export the registry.

- Once done, Navigate to the following path:
ComputerHKEY_CURRENT_USERSoftwareMicrosoftWindowsCurrentVersionRunYou can also directly copy and paste the path to the address bar of the window. - In the Run directory delete all the strings with the type REG_SZ.

- Now navigate to the following path:
ComputerHKEY_LOCAL_MACHINESoftwareMicrosoftWindowsCurrentVersionRun - Again select all the strings with the type REG_SZ and delete them.


Once done, restart your PC and your AutoIt error should be gone by now. If it’s not, then it is advised to import the registry backup that we backed up by going to Edit > Import… in the Registry Editor window.
3. Reinstall AutoIt
The files of the currently installed AutoIt might be facing some corruption. In such a case, you should try uninstalling and then reinstalling the AutoIt on your Windows PC.
- Open the Run dialog box by pressing Win + R on your keyboard.
- Enter
appwiz.cpland hit OK.
- This will open the Programs and Features window in Control Panel.
- Here, select the AutoIt program and click on Uninstall.

- Click on Yes to confirm the selection and uninstall it.
- Restart your PC and then download AutoIt’s new and fresh installer setup file from here.
- After downloading the file, open it and install AutoIt on your PC.


Once done, again restart your PC and see if the issue is resolved or not.
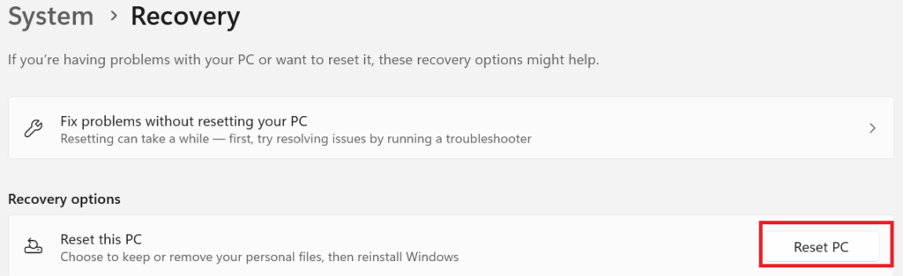
4. Reset Windows
Finally, if nothing works, try resetting your Windows PC. Resetting the PC will restore all the system files, programs, and settings to their default state. Here’s how to reset Windows 11.
- Open Windows Settings by pressing Win + I.
- Navigate to System > Recovery.

- Click on Reset PC under the Recovery options section.
- On the Reset this PC window, select an appropriate option. I would advise you to select the Keep my files option to prevent data loss.

- Now, follow the on-screen instructions to complete the resetting process.


Bottom Line
So these were the ways by which you can solve the AutoIt Error on your Windows PC. The issue is most probably happening due to some malware and hence running a thorough system scan is a really important thing to do.
If the windows system scan didn’t find any malware, you should consider a good third-party antivirus for your PC. However, if the malware is not the issue in your case, then editing the Windows registry in the way I have depicted above will definitely help.
For additional measures, you can also consider reinstalling AutoIt and can also try resetting the PC.
Also Read:
- Fix No Audio Output Device Is Installed on Windows 11/10
- Lid Open Action Missing? Try this fix on Windows 11/10
- Fix Discord installation has failed on Windows 11/10
- macOS DMG Files on Windows 11/10: How to Extract and Open
- How to Change Lid Open Action on Windows 11/10 Laptop
- Fix This File Is Too Big to Recycle on Windows 11/10
- How to Enable and use Microsoft Edge bar in Windows 11/10
- How to Downgrade/Rollback Nvidia GPU Drivers on Windows 11/10
- How to Change Default Font on Windows 11
- Fix Display Driver Stopped Responding And Has Recovered on Windows 11/10
Lately, we’ve seen several users being faced with the AutoIt error when Windows starts up. So it’s safe to say you’re not the only one experiencing the issue. The error message reads “Line 0 (File “C:GoogleChromeGoogleChrome.a3x”):” “Error: Error opening the file.” Well, this isn’t the only way the AutoIt error reads as the error code is dependent on the operation that spurs the error.

This issue is mainly caused when there are corrupt data related to the Windows Autolt. Other reasons that could cause such a problem will be discussed in the next section. Besides, the error is not something to be worried about as there are various ways to troubleshoot it on your PC. So, in this article, we’ll discuss the tested ways to fix the Autolt error in Windows 10/11.
All You Should Know About AutoIt
AutoIt is a freeware programming language for automating Windows applications. It basically writes scripts to run the UI and functionality of applications on your computer. Additionally, the programming language is also used to conduct user interface testing on computers using a combination of simulated keystrokes, mouse movement, and window manipulation.
Causes of AutoIt error
Here are some of the causes of AutoIt error in Windows 10/11:
- Downloading a corrupt file is the most well-known cause of AutoIt error. So, try as much as possible to be wary of the files you download.
- Unable wrong AutoIt script.
- Missing files in your Windows system.
- Having malware on your computer.
Looking for a way to fix the AutoIt error in Windows 10/11? These are the best fixes you can try to repair the problem on your computer:
1. Perform a system scan with antivirus
As previously stated, the majority of AutoIt errors are caused by accidentally downloading malware such as Veronica onto your computer. This corrupts the AutoIt system and, as a result, causes problems with the freeware’s performance.
Hence, if this is the cause of your problem, the best thing you can do to resolve it is to perform a system malware scan. This can be done with third-party software or the built-in malware detection system in Windows. Here’s how to do it if you’re using the latter:
Step 1: Search Setting in the Windows search box and open it.

Step 2: Navigate to Update & Security from the Settings Options and select Windows Security. For Windows 11, you’ll open Privacy & Security on the Settings page to access Windows Security.

Step 3: On the resulting page, click Open Windows Security. Afterward, select Virus and Threat protection.

Step 4: Click the Open app option at the bottom of the Virus and Threat protection window.
Step 5: Then the Antivirus connected to your PC will be opened, follow the on-screen prompts to start looking for malware.
Allow the malware detector to run and see whether your computer has any viruses. If there is, follow the prompts to remove the malware/virus; otherwise, proceed to the next step.
2. Remove AutoIt string values from the Windows Registry editor
The Windows Registry is responsible for storing low-level settings for applications that require it, such as AutoIt. If your Registry Editor contains ambiguous strings, you may experience the AutoIt problem.
Regardless, you can easily fix the AutoIt error by simply deleting the suspicious string value from your PC. Here’s how to do it:
Step 1: Open the Windows run box by pressing Windows+R keys simultaneously.
Step 2: Type regedit in the command box and press OK to run it.

Step 3: To create a restore point for your Registry, click File at the top left corner of the Registry and select Export.

Step 4: Then, open this location in your Registry Editor:
ComputerHKEY_CURRENT_USERSoftwareMicrosoftWindowsCurrentVersionRun

Better still, you can master the path in the address bar of the editor to open it.
Step 5: After opening the Run key, delete all the strings with the REG_SZ type.
Step 6: Again, navigate to this path:
ComputerHKEY_LOCAL_MACHINESoftwareMicrosoftWindowsCurrentVersionRun

Afterward, delete all strings with the type REG_SZ.
Once everything is done, restart your computer and see if the issue has been resolved.
Note: When using this approach, exercise extreme caution because the Windows Registry is highly sensitive. To avoid computer problems, double-check that each step is completed correctly and without errors. Better still, make a system restore point before attempting the fix.
3. Delete AutoIt entries via File Explorer
Another approach to fix AutoIt line 0 error is to delete AutoIt entries from File Explorer. These entries are AutoIt files saved on your computer, and they could be the source of the problem. This technique is manual as you’ll have to delete these files one by one.
Therefore, simply open File Explorer and look for the script under the C drive, specifically the System 32 folder. The names of the suspicious folders you should delete are as follows:
- KHATRA.exe
- sass.exe
- svchost.com
- Ask.com.exe
- cuhu
- name.txt
- Exterminate It!.exe
- driver— grap.exe
- xerox.exe
- CIDD_P
- bycool1
4. Remove AutoIt script from windows startup
It’s also possible that the AutoIt problem is caused by an AutoIt script that runs automatically when Windows starts up. You can detect these starting scripts and uninstall them using Windows Autorun. Here’s how you can get rid of the AutoIt script and fix AutoIt error:
Step 1: Download and Install Autorun for Windows from the Microsoft website.
Step 2: After the download, launch the package to open it and click the Logon tab
Step 3: Navigate to the references to a3x and GoogleChrome. You can as well use the search bar to look for them.
Step 4: If you happen to find the entries, select them and click delete. Then click OK to confirm the action
Step 5: If otherwise, go to the Everything tab and look for the a3x and GoogleChrome chrome entries again. Afterward, right-click the entries and delete them.
Restart your PC after everything and see if the workaround resolves the problem.
5. Reinstall AutoIt
We’ve observed users who’ve been able to fix AutoIt errors simply by reinstalling the program. If the error is caused by a problem with the AutoIt you’re using, this might work. In this scenario, reinstall AutoIt on your computer to fix the problem.
Step 1: In the Windows Search box, type control panel and open it

Step 2: Click Programs and select the Program and Features section

Step 3: Look for the AutoIt program in the install program list.
Step 4: Click on the program and select Uninstall.
Step 5: Select Yes to confirm the action
Step 6: Afterward, restart your computer and download a new AutoIt program
Step 7: Install the program on your computer to finally complete this solution
Hopefully, this should fix the AutoIt error on your Windows PC.
6. Try Resetting Windows
If none of the previously stated solutions worked, you might try resetting Windows. This will give your computer a fresh start. Here’s how you can do it:
Step 1: Search Settings in Windows Search Box and open it.

Step 2: Select Update & Security and click Recovery from the vertical list.
Step 3: Click Get started under Reset this PC.
Step 4: Select the option to keep your files and follow the on-screen prompts to get started with the Windows reset.

After the process, you’ll have a new installation for windows. But bear in mind that your application will be deleted during this.
Frequently Asked Questions
How do I download an AutoIt file?
To download an AutoIt file, go to the AutoIt website and navigate to the download page. Simply click on the most recent version and download it to your computer. The download is simple and free.
Is AutoIt a malware?
AutoIt is not malware, rather, it is a freeware that is used to run the interface and functionality of Windows applications. It’s also used to test user interfaces. The programming language, on the other hand, can be readily altered, which is why you must get it from its website.
Is AutoIt open source?
AutoIt is an open-source automation language for the Windows operating system. Additionally, the application can be downloaded for free from its website.
Final Words
After going over the reasons for AutoIt errors and the best ways to fix them, it’s time to put the solutions to the test. However, you may need to try more than one solution until you can find out the exact cause of the problem. Also, as stated in the article, it is best to be aware of the type of file you download to your computer to avoid future problems.
Some Windows 10 and Windows 11 are experiencing one or more startup errors like this one: “AutoIt Error Line 0 file C:Users65875AppDataRoamingServiceGetvapihas.dat”. This is just one variation, but there is a multitude of files that might be triggering this startup error every time the PC is started.
After investigating this issue, we discovered that there are actually several different underlying causes that might be at the root of this startup error. Here are several scenarios that you should consider:
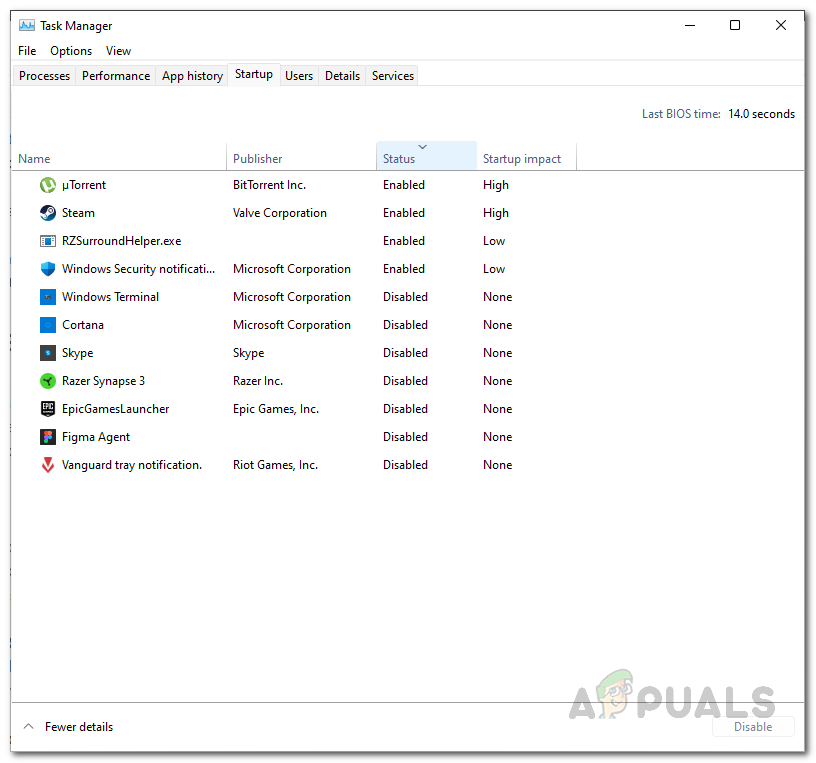
- Remnant autoruns – One of the most common scenarios where you might see this type of error is when your PC contains one or more autoruns keys that are left behind by an application that no longer exists. In this case, the easiest way to resolve the issue is to use the Autoruns utility to identify and remove the problematic autorun file.
- Virus infection – A possible malware or virus infection that has infiltrated your Windows files is another item you should take into account. Start a security scan with your antivirus program to see if it can find and get rid of any virus infections.
- 3rd party program interference – The “AutoIt Error Line 0” error code may be the consequence of a conflict between a startup service or application and Windows. To check if this is the case, you can force Windows to boot with only the essential startup programs and drivers. Finding any program incompatibilities that can be the cause of this particular issue will be made easier with the use of this startup method (clean boot).
- System File corruption – files can result in issues with Windows like this one. This can occur at any time for unidentified reasons, but they are small ones that are simply fixable by running DISM and SFC scans. In more serious circumstances, you might need to go for a clean install or repair install.
Now that we went over every potential culprit with the possibility of triggering this issue, let’s go over every verified fix that other affected users have successfully used to get to the bottom of this issue.
1. Delete the Autorun key via Autoruns
If you’re experiencing startup errors linked to a particular file, your security suite may have deleted the malicious file that was a component of the infection, or there may be a remnant file that keeps getting called during startup even though the parent application is no longer installed on the computer.
Note: When dealing with infections, it’s not uncommon for some security suites to miss some files. Even though a malicious file has been destroyed by a security program, startup items and registry keys can occasionally still be found on the system and cause the malicious file to run. Windows will automatically display a pop-up error whenever this occurs.
There are a few approaches you can take in order to resolve an AutoIt Error ‘Line 0: Error, but let’s choose the simplest one.
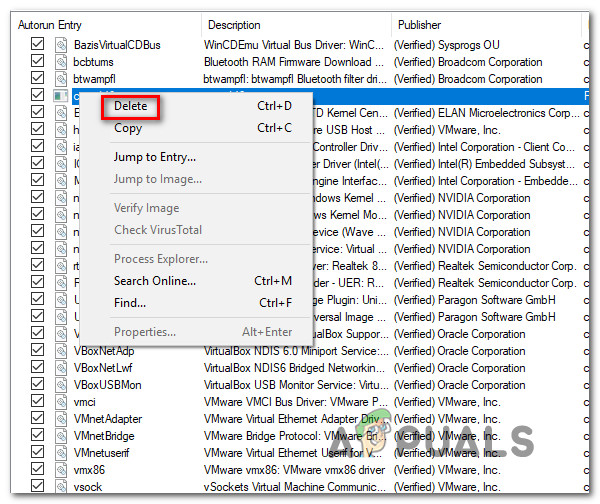
Note: Microsoft-approved software called Autoruns can locate, group, and remove unnecessary runonce, run, startup directories, and registry keys.
In our situation, we may use it to find and delete the startup items (or registry keys) that are still using the deleted file. Here is a basic tutorial on how to set up and use Autoruns to fix Line 0 startup errors:
- Let’s start by downloading the most recent version of the Autoruns tool.
- To start the download, go to the Autoruns download page from any browser.
- After landing on the relevant website, select Download Autoruns and Autorunsc.

Downloading Autoruns - After the download is finished, unzip the file, then double-click the Autoruns executable to launch it.

Extracting Autoruns - After Autoruns has been launched, wait until the Everything list has been filled out. Then, scroll down the list of accessible Autorun entries and find the file that is specified at the conclusion of the error.
Note: For example, if your error is “AutoIt Error Line 0 file C:Users65875AppDataRoamingServiceGetvapihas.dat”, look for the vapihas.dat. You can either look for this manually or make use of the search functionality at the top of the app. - To stop the executable from being launched when the system boots, right-click on it and select Delete from the context menu.

Downloading the AutoRun key - Restart your computer to check whether the same class of startup problem still appears.


Continue to the next method below if the problem is still unresolved or if you want to try an alternative strategy.
2. Eliminate a potential virus threat
Another thing that you should consider is a potential malware or virus infection that has successfully made its way among your Windows files. If you have an Antivirus, trigger a security scan and see if it manages to pinpoint and eliminate a virus infection.
Additionally, you should also take the time to deploy a Malwarebytes scan in order to go after pesky adware programs that are able to camouflage themselves as legitimate system processes.
As an extra security layer, you can also try running the Microsoft Safety Scanner in Safe Mode. By doing this, you can use the most potent virus-removal tool Microsoft has created without worrying about meddling from third parties.
The following is a fast guide for using Safe Mode to launch the Microsoft Safety scanner:
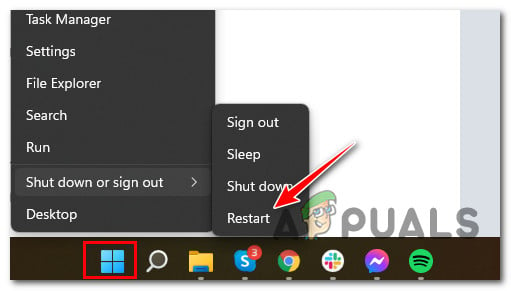
- Start your computer (or restart it if it’s currently running) and wait until the login screen appears.
- When the initial login window appears, select the power icon (bottom right corner).
- When the power contact menu appears, choose Restart while holding down the Shift key to force your computer to start in Safe Mode.

Boot in Safe Mode - Your computer will restart once you do this, enforcing the new state.
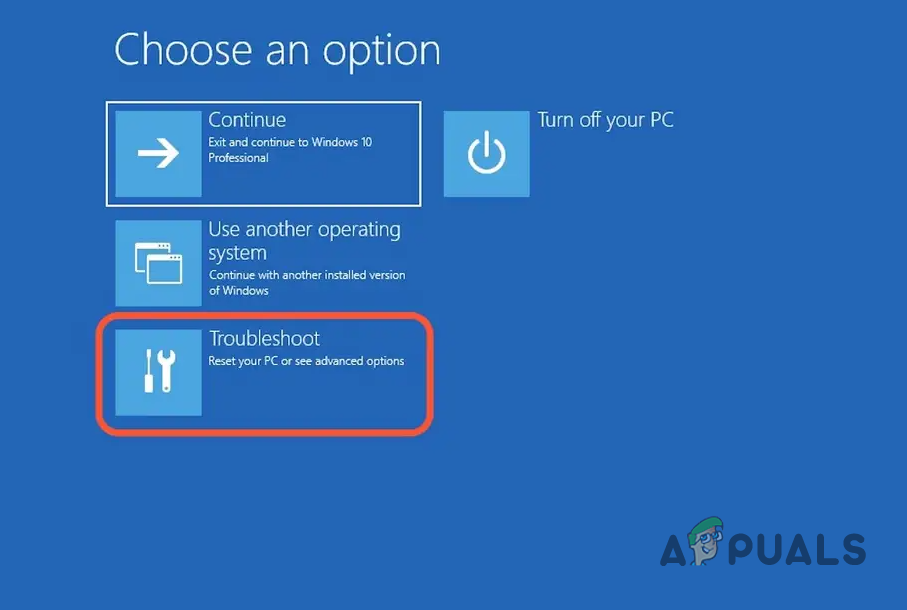
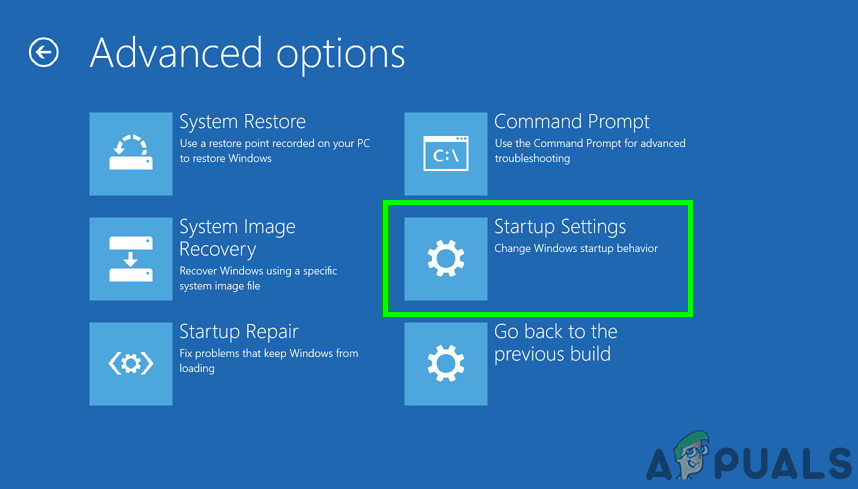
- Eventually, the Troubleshooting menu will appear on your computer. Click Troubleshoot when you see it.

Accessing the Troubleshoot menu - Select Startup Settings from the lengthy list of possible options once you’re within the Advanced Options screen.

Accessing the Startup Settings menu - To start the computer in Safe Mode with Networking, hit F5 in the Startup Settings window.
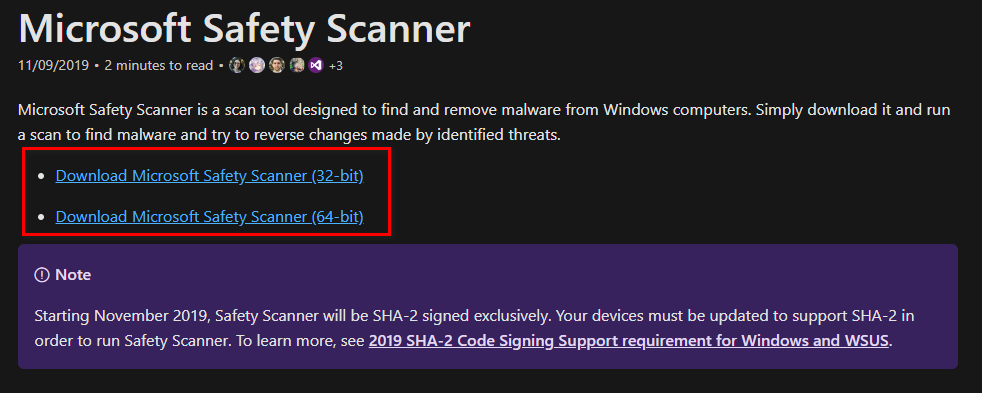
Accessing the Startup Settings menu Note: It’s crucial that you start your computer in Safe Mode with Networking so that it can access the Internet later on when we download and run the WindowsSafety Scanner tool.
- Download the most recent Microsoft Safety Scanner for your Windows bit version when your computer successfully boots into Safe Mode with Networking.

Download the Microsoft Safety Scanner - Following the successful completion of the download, double-click the MSERT.exe file to launch Microsoft Safety Scanner. Click Yes to provide administrative access if the UAC (User Account Control) prompt appears.
- Complete the remaining instructions to run a Microsoft Safety Scanner scan.
- Be patient and wait till the procedure is finished.
- After the procedure is finished, restart your computer to start it in normal mode and check to see if the issue startup error has been eliminated.

If this approach wasn’t successful for you, try the next method below.
3. Perform a clean boot
The “AutoIt Error Line 0” error code could be a result of a disagreement between an application or service and one or more Windows startup process.
You can force Windows to boot with only the necessary startup apps and drivers to see if this is the case. This kind of startup (clean boot) will assist you in finding any software conflicts that may be the root of this specific problem.
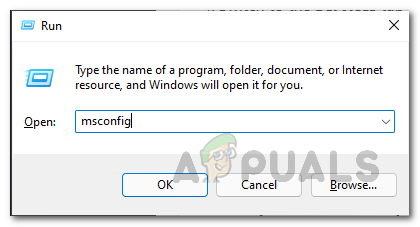
Here are the steps to follow in order to clean boot Windows and determine whether a third-party startup item or service is to blame for the startup error:
- Ensure that you are logged in with an administrative Windows account.
- To launch the System Configuration window, press Windows key + R to bring up the Run dialog box, type “msconfig,” and then press Enter.

Opening MsConfig
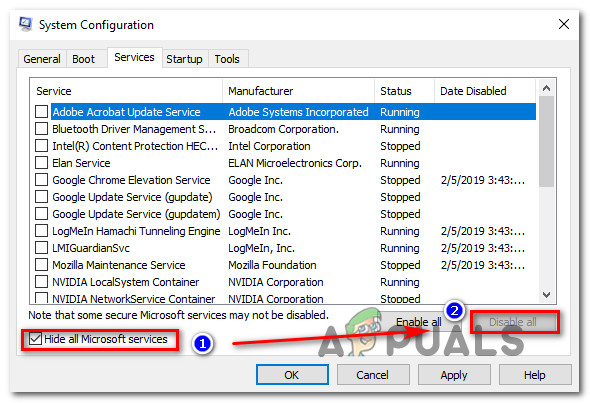
Note: If the User Account Control (UAC) asks you to grant administrator privileges, select Yes. - Next, Select the Services tab in the System Configuration window, then check the box next to Hide all Microsoft Services. This will ensure that you are not turning off any essential operating system functions.

Disable non-essential startup services - Click the Disable all button to immediately stop all remaining services.
Note: This action will prevent any built-in or third-party services that are not absolutely necessary from triggering an app conflict that could result in the starting issue. - After all services have been turned off, click Apply changes, then click Open Task Manager under the Startup tab.
- To stop a service from starting up automatically, pick each one separately in Task Manager’s Status tab, then click Disable.

Disabling Non-Essential apps - After disabling all third-party services, quit Task Manager and restart your computer in Clean Boot mode.
- Check Microsoft Store to see whether you can download the program or game that was previously failing when the subsequent startup sequence is finished.
Note: If not, systematically re-enabling each item that was deactivated one at a time while performing regular reboots will help you figure out which conflicting software or service is the source of the problem.
Move on to the next technique below if this method has established that no application, service, or procedure from a third party is the source of the problem.
4. Deploy SFC and DISM scans
Affected people advise you to examine the faulty system files to discover if any malicious files are there. Corrupted files can result in issues with Windows like this one. This can occur at any time for unidentified reasons, but they are small ones that are simply fixable.
By checking your computer for damaged files using the Command Prompt with administrator rights, you can resolve this. Pasting some commands that will complete the task will make it easy to accomplish this.
Run SFC (System File Checker) and DISM (Deployment Image Servicing and Management) scan quickly one after the other to do this. You need to restart your computer after the procedure is finished to finish it.
Make sure you are linked to a reliable internet connection before moving on to the procedures of this approach.
Here are the procedures you need to do in case you don’t know how to scan your system for corrupted files:
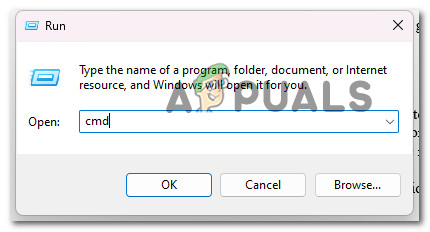
- You must first launch the Command Prompt with administrative rights. You must open the Run dialog box, type “cmd” into the search field, and then press CTRL + Shift + Enter to accomplish this.

Open up a Command Prompt window - The User Account Control (UAC) will then ask you to confirm that you want to grant the administrator privileges. You must select Yes in order to move further.
- Once the Command Prompt is shown on your computer, you must copy and paste the following command before pressing Enter to execute it:
sfc /scannow
- The scan will begin after this. Depending on the components of your computer, it may take some time and in some cases only a few minutes. Await the conclusion of the scan.
- To finish the operation, you must enter the next command after the SFC scan is finished:
DISM /Online /Cleanup-Image /RestoreHealth
- Once you’ve finished with it as well, either type exit to close the Command Prompt or just do it.
- You must now restart your computer to ensure that any modifications are put into effect.
- Check to see whether the File Explorer search box is still not returning any results once the machine has rebooted.
Continue to the next potential solution below if this strategy didn’t resolve your problem.
5. Clean install or Reinstall Windows
If you’ve read this far and you’re still getting the same ‘Line 0: Error Opening the File’ error, you obviously have a serious corruption problem that can’t be fixed in the usual way.
To ensure that all instances of faulty system files are eliminated in this situation, you must reset all Windows components.
The radical option, a clean install, which accomplishes the task but also deletes all personal data, including programs, games, media, and documents, is the one most users opt for.
You should choose a repair install if you wish to take a less drastic action that will allow you to update your Windows components without harming any of your personal stuff (games, apps, images, papers, etc.). You’ll be able to keep all of your personal information via this process.
If you want to carry out a repair install, go to this document for detailed information on how to do so.