
При запуске игр мы часто сталкиваемся с различными ошибками и сбоями, которые заставляют переключить нашу вовлеченность с игрового мира в процесс поиска способов их решения. Более того, некоторые из них не просто решить. В частности, к таким ошибкам при запуске Minecraft относится и «internal exception java.io.ioexception», которая препятствует подключению ПК к внешнему серверу игры.
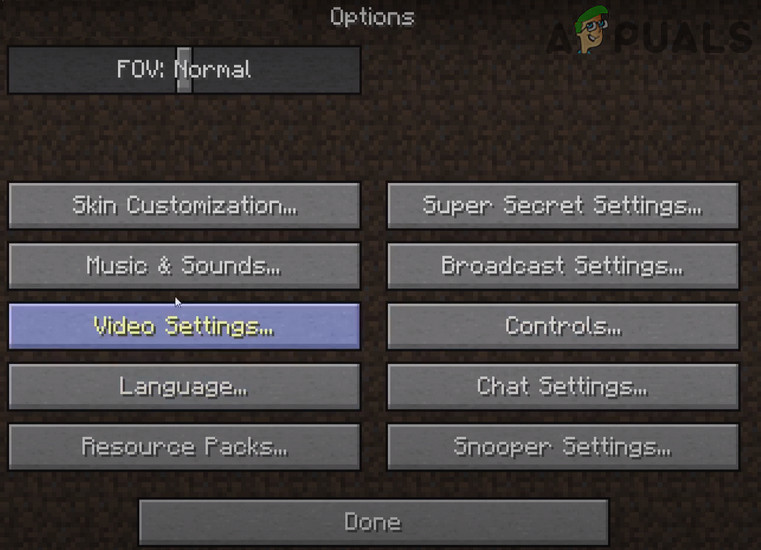
Простые решения
В общем она может появиться по ряду причин и некоторые из них можно исправить простыми способами. Поэтому прежде чем перейти к более продвинутым решениям выполните следующие шаги.
Во-первых, попробуйте исправить ошибку Java.Io.Ioexception обычным перезапуском Minecraft. В противном случае перезапустите компьютер и роутер. Также нужно проверить состояние внешнего сервера Minecraft. Если эти методы не сработали, перейдите к следующим шагам.
Варианты запуска
Ошибка внутреннего исключения «internal exception java.io.ioexception удаленный хост принудительно разорвал существующее подключение» в основном происходит из-за проблем с Java. Даже если игра работает, сбой может произойти из-за проблем этой среды выполнения. Иногда программа запуска использует старую версию java, хотя в системе установлен последний ее выпуск.
В этом случае нужно заставить загрузчик Minecraft использовать последнюю версию программной среды. Для этого нужно перейти в параметры запуска и в профиле переключить путь с устаревшей версии на новую.
Отключение межсетевого экрана
Межсетевые экраны, включая брандмауэр Windows, могут сбросить подключение с внешним сервером Minecraft на этапе запуска игры. Чтобы узнать, не причастен ли он к этому событию, попробуйте отключить эту функцию безопасности.
Откройте параметры Windows нажатием на Win + I и перейдите в раздел Обновление и безопасность. На вкладке Безопасность Windows выберите раздел Брандмауэр и защита сети.
Для активной частной сети переместите переключатель в положение «Отключено». После этого попробуйте запустить игру.
Установка разрешений в брандмауэре Windows
Если продолжаете сталкиваться с ошибкой внутреннего исключения java.io.ioexception, попробуйте добавить среду в список разрешений брандмауэра.
С помощью поискового запроса перейдите в брандмауэр. На панели слева перейдите на вкладку «Разрешение взаимодействия с приложением или компонентом в брандмауэре Windows». Затем щелкните на кнопку изменения параметров.

Найдите в списке файлы Java Platform SE и разрешите им доступ по частной сети.

После перезагрузки компьютера проблема должна быть решена.
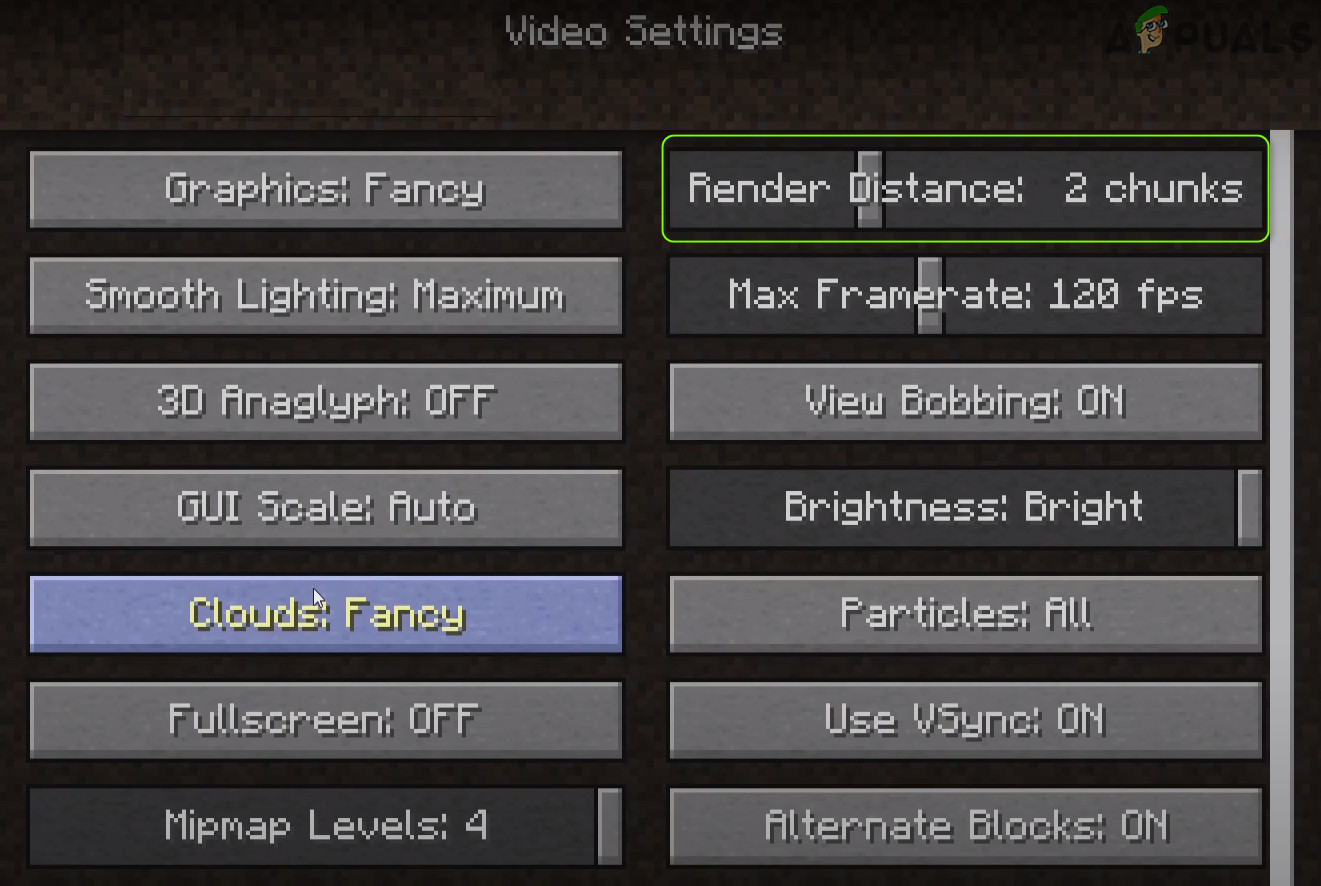
Уменьшение глубины прорисовки
С ошибкой внутреннего исключения можно столкнуться, когда Minecraft не сможет отобразить всю картинку в целом из-за низкой скорости Интернета. В этом случае уменьшите глубину прорисовки в настройках до минимально допустимого.
В настройках Майнкрафт в разделе «Настройки графики» переместите ползунок прорисовки до минимального, например, до 2-х позиций.
Если ошибка исчезла, увеличьте этот показатель на единицу, пока не достигните оптимального значения.

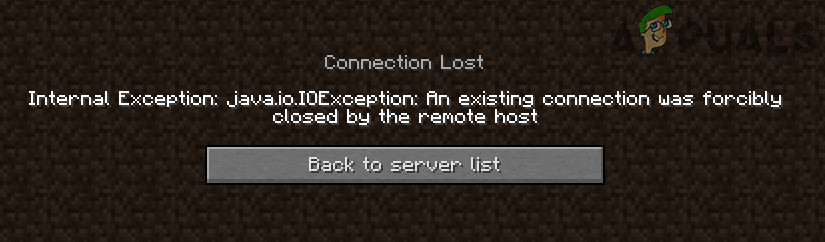
The Minecraft game has an enormous fanbase but errors like the Internal Exception java.io.IOException can be experienced by a lot of players. This error message comes entitled Connection Lost along with further elaboration saying, Internal Exception java.io.IOException: An existing connection was forcibly closed by the remote host.

If you are also facing the same issue on your Windows PC and looking for its fix, then bear with me this fixing guide where I am going to share various ways to fix the Internal Exception java.io.IOException Minecraft error.
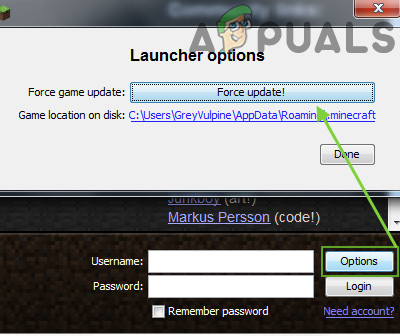
1. Update the Minecraft Launcher
An outdated Minecraft launcher can definitely put you in trouble and issues in the Minecraft game. Keeping the Minecraft launcher launched up to date ensures a bug-free experience. It also makes sure to keep the gamers like you away from any of the unusual incompatibility issues that can take place between the launcher and server.
But before heading towards the procedure, make sure that you have only one account configured with the Minecraft Launcher. If there is more than one, please remove all of these except one i.e. your main account.
1. Open the Minecraft Launcher.
2. Click on the Options button next to the Username field.
3. Click on the Force update! button on the popup window.
Let the Minecraft Launcher update itself. Once done, open the Minecraft Launcher and see if the issue is fixed.
2. Clear the Windows DNS Cache
It is possible that the issue is with your PC’s network configurations like the save DNS cache. If the DNS cache files on your system are corrupt then it is not a big deal that you are getting network-related issues in your games. To solve this, clearing the saved DNS cache may help a lot. Here’s how to do this.
1. Search and open the Command Prompt as administrator.
2. Now execute the following commands one by one:
ipconfig/flushdns

ipconfig/release

ipconfig/renew

3. Now exit the Command Prompt and restart your PC.
Once the PC is restarted launch the Minecraft Launcher and see if the Internal Exception java.io.IOException Minecraft error is still there.
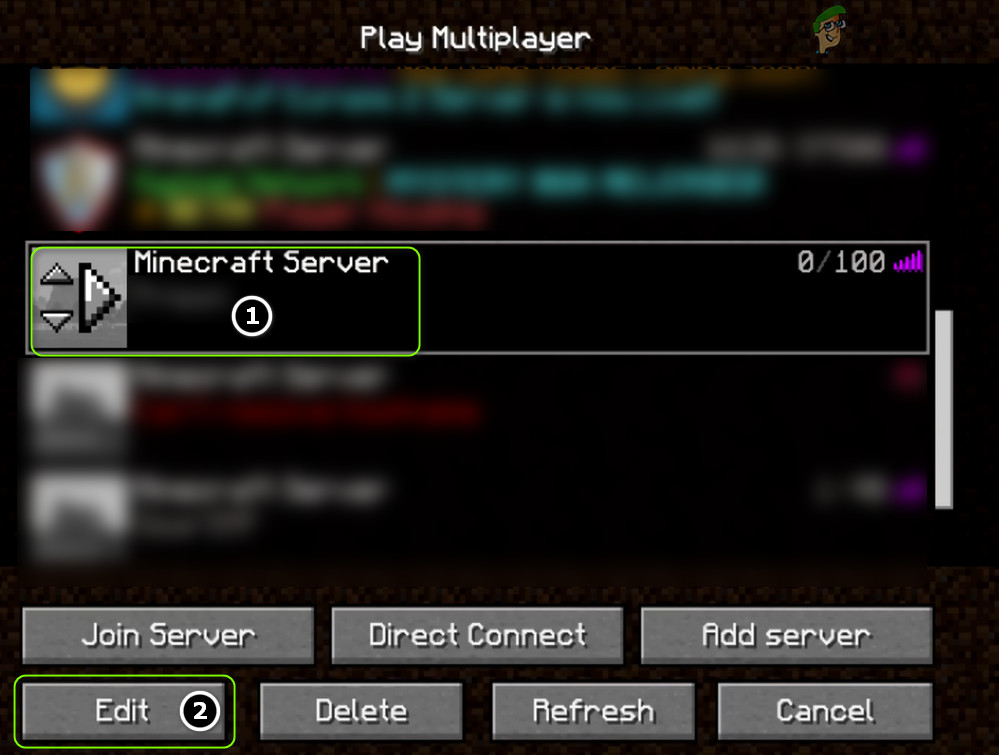
3. Disable Server’s Resource Pack
Most of the in-game customization in Minecraft is allowed by the Resource Pack e.g. the textures, music, splash tests, models, etc. But it has been reported by a couple of Minecraft players that sometimes the resource packs can interrupt b/w the client-server communication.
Hence it is not a big deal to re-enable the resource pack so you can give a try this method where you can go ahead to disable the resource pack of the server. Here’s how to do this.
1. Open Minecraft Launcher and go to Multiplayer.

2. Then select the server you are facing the issue with and click on Edit to edit the Minecraft server properties.
3. Click on the Server Resource Packs button to disable it if it was already enabled.
4. Finally, click on Done.
Once done, launch the game and see if the issue is fixed. If not, then head over to the next fix.
4. Decrease the Render Distance
The Internal Exception java.io.IOException can also arise if Minecraft is not able to render all the video blocks at once. This can be due to poor internet quality. Hence decreasing the rendering distance is advised to be decreased so that Minecraft doesn’t need to render a lot of video blocks simultaneously. To do so:
1. Open Minecraft Launcher.
2. Click on the Options... button.

3. Go to the Video Settings… option.

4. Set the Render Distance slider to about 2 or 3.

Once done, try to play the game and see if the issue is fixed or not. If it is not, then head over to the next fix.
Tip: The next couple of fixes are going to make changes to the Java that is installed on your PC. And prior to any of the Java-related fixes, make sure that your PC is loaded with only one Java.
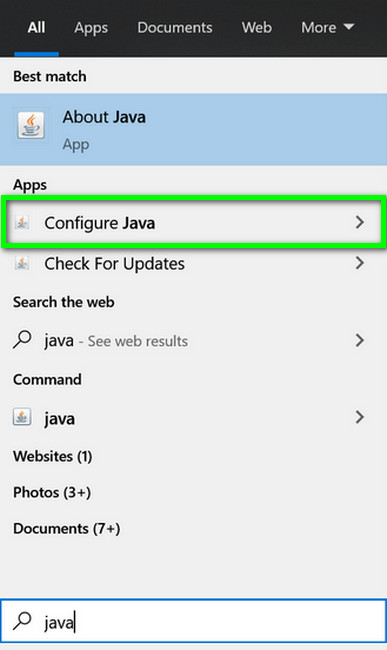
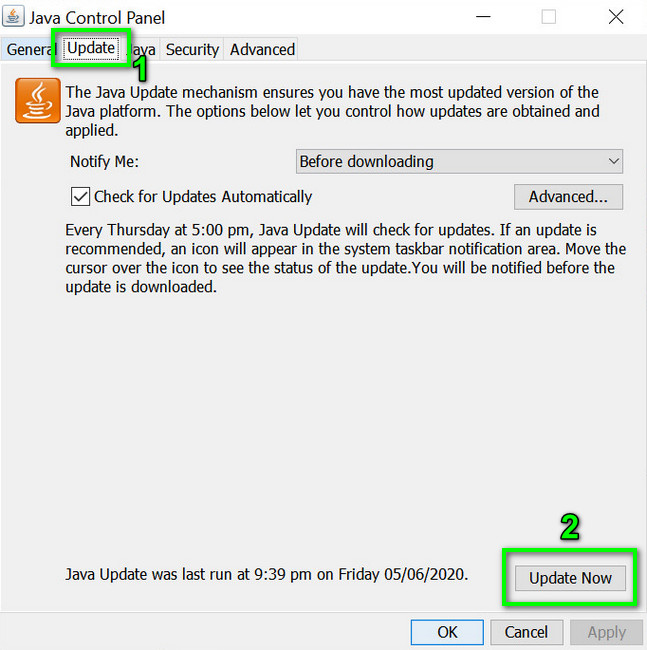
5. Update Java
Updating Java can also solve this issue. If the installed Java is not up to date then you can have the Internal Exception java.io.IOException error in Minecraft. To update Java:
1. Search for Configure Java and open it.

2. Switch to the Update tab and click on the Update Now button.

3. If the Update is available, download and install it by following the on-screen instructions.
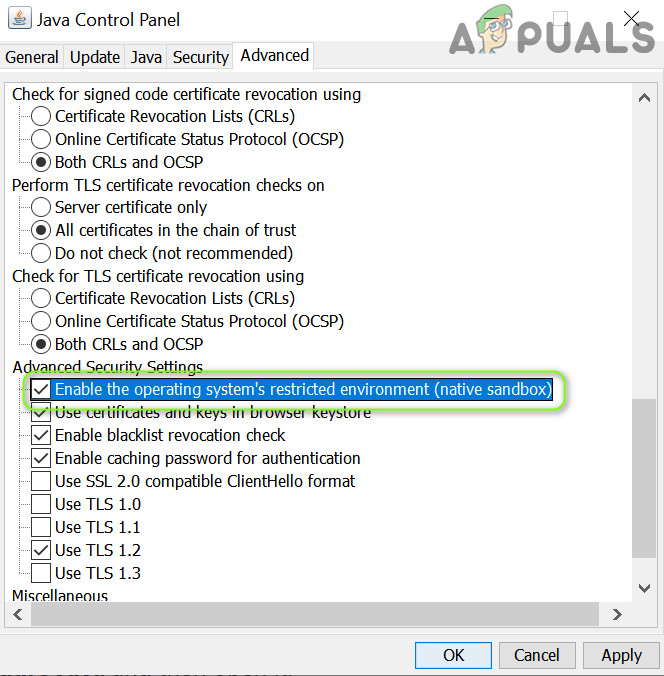
6. Enable Native Sandbox
The Native Smadbox can improve the compatibility of the system with the installed Java. Hence you can try enabling the Native Sandbox feature. To enable it:
1. Search for Configure Java and open it.
2. Switch to the Advanced tab.
3. Scroll down and check the Enable the Operating System’s Restricted Environment (Native Sandbox) box.

4. Click on OK and restart the PC.
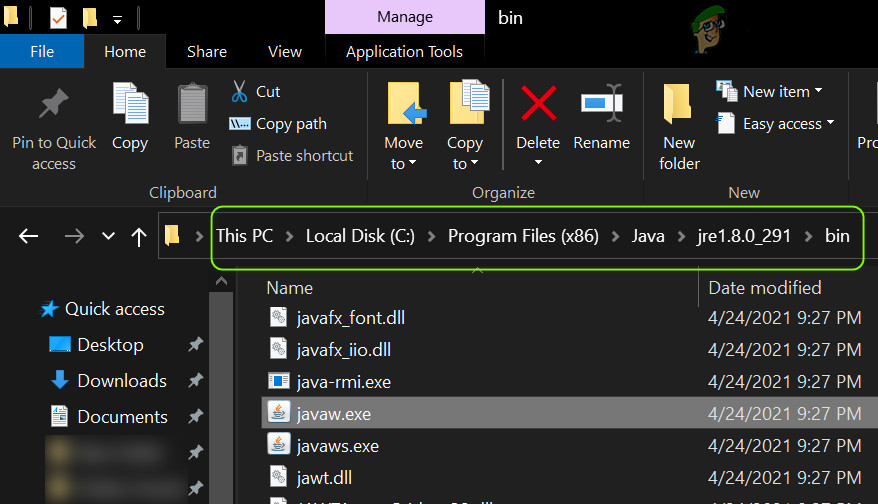
7. Edit the Java Path in the Launcher Settings
1. Press Win+R to open the Run dialogue box and navigate to the following path:
Program Files (x86)

Note: If there is no Java folder in the Program Files (x86) folder then go to the Program Files folder instead.
2. Once in the Program Files (x86) folder, open the Java folder and navigate to the latest version of Java installed (e.g., the jre1.8.0_311 folder).
3. Open the Bin folder, locate javaw.exe, and copy its path.

4. Now, open the Minecraft Launcher.
5. Go to Minecraft: Java Edition > Installations.

6. Click on three dots of your Minecraft: Java Edition and select Edit.

7. Click on MORE OPTIONS.

8. Under the JAVA EXECUTABLE option, paste the address that you previously copied Bin. The path would look something like this:
C:Program FilesJavajre1.8.0_311binjavaw.exe

9. Finally, click on Save.
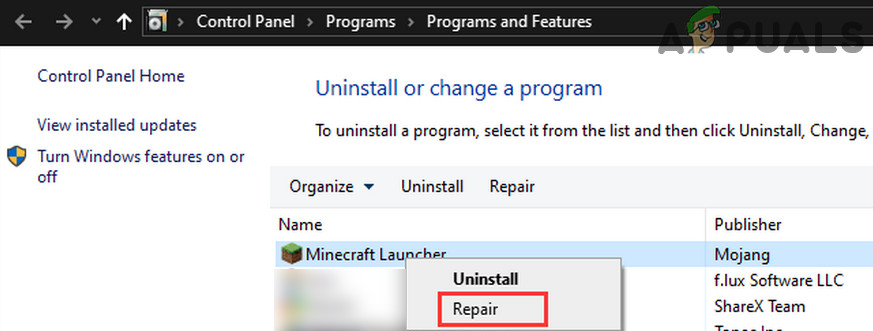
8. Repair / Reinstall Minecraft
You can perform a Repair of the Minecraft app. You can use the Windows built-in repair option that shows up in the Control panel.
1. Open Settings by pressing Win+I.
2. Go to Apps > Apps & Features > click on the three dots of the Minecraft Launcher > Advanced options.

3. Scroll down to the Reset section and click on Repair.

4. Proceed as per the on-screen instructions.
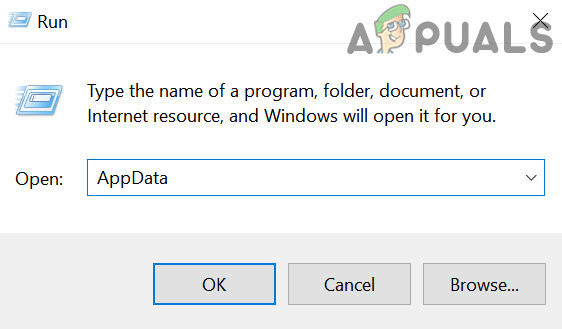
After the repair, restart your PC. This should repair Minecraft but if it was not working for you then try reinstalling Minecraft and Java. But before uninstalling both of these, make sure to back up the important stuff.
1. After backup, head over to the same Apps & features page in settings and uninstall both Minecraft and Java.
2. Reboot the PC.
3. Open Run by pressing Win+R on the keyboard and go to Appdata by entering the same in the run field.

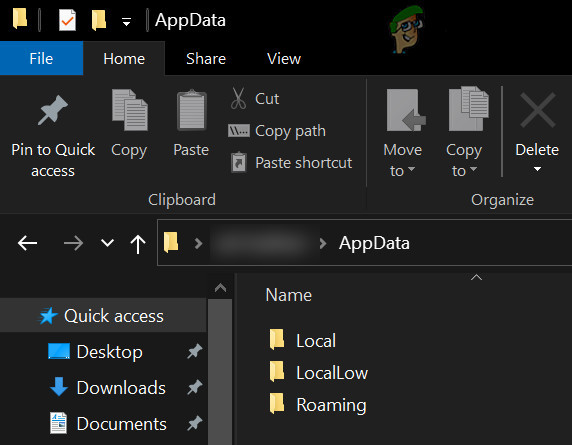
4. In the AppData location you should see Local, LocalLow, & Roaming folders. Open them and delete the Minecraft folder from each one of them.

5. Now download, install it as administrator, and reboot the PC.
6. Finally, download and install Minecraft and again reboot the PC.
Once all is done, launch the Minecraft Launcher and see if you are able to play the game without the Internal Exception java.io.IOException error.
9. Try switching to another Network or using a VPN
If you have not tried using some other network to connect to the internet, I would recommend you disconnect your PC from the current network and connect it to another one. For instance, if you were using your Router’s Wi-Fi, try using your smartphone’s hotspot. You can also try switching to a wired internet connection instead of a wireless one.
Also, try using a VPN service to make sure that you or the Minecraft server are not blocked on your connection. Lastly, try connecting the PC directly to the internet without the router to make sure your router is causing the problem.
10. Temporarily disable the Firewall
There are possibilities that this issue is occurring due to conflicts of the Windows firewall. This happens quite rarely but yes, it is possible that the Windows firewall behaves unusually with some genuine services like Minecraft. In such cases, you should try disabling the firewall temporarily.
1. Search for Control Panel and open it.
2. Go to System and Security.

3. Click on the Windows Defender Firewall option.

4. Click on the Turn Windows Defender Firewall on or off option from the menu on the left.

5. Now, enable the Turn off Windows Defender Firewall option for both Public and Private network settings and finally click on OK.

This will disable the firewall from the PC. Once done, open the Minecraft launcher and check if the issue is fixed.
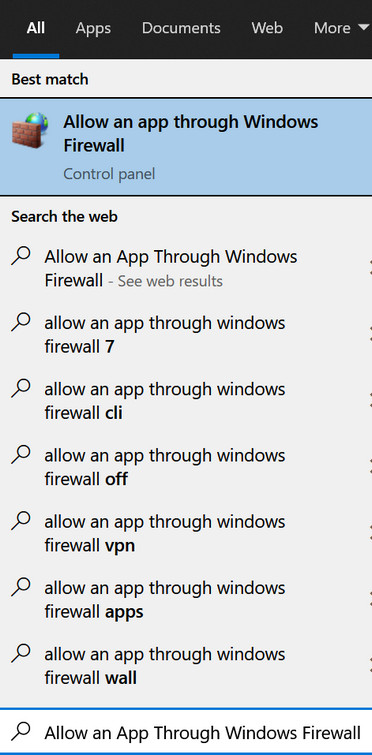
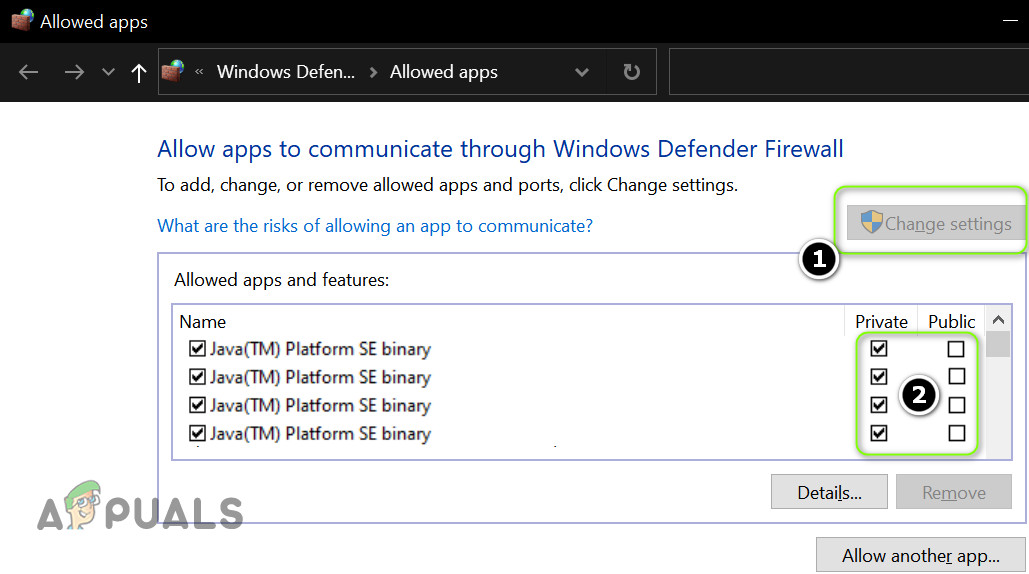
11. Set Java (TM) Platform SE Binary to Private in the Firewall Settings
1. Search for Allow an App Through Windows Firewall and open it.

2. Click on Change settings.

3. From the list, find Java (TM) Platform SE Binary. In case if it is not listed there, click on Allow another app… > Browser… > and navigate to the installation directory of Java. Then double-click on Javaw.exe.
4. Now uncheck all the Public boxes and checkmark the Private ones for all the Java (TM) Platform SE Binary processes.

5. Then click on the Java (TM) Platform SE Binary process and click on Details…

6. Open Network Type.

7. Checkmark the Private box.

8. Click on OK and reboot your PC.
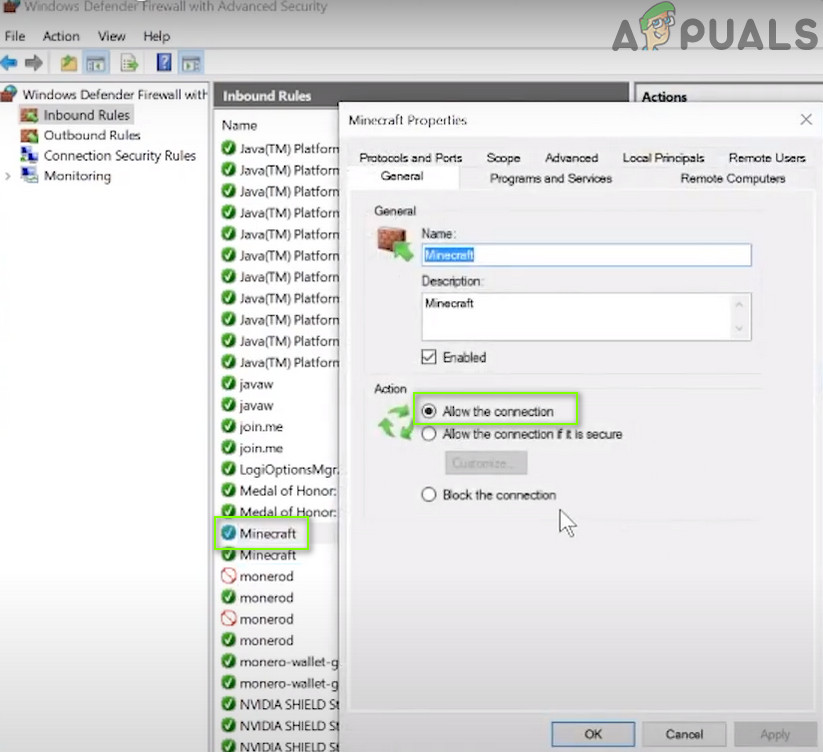
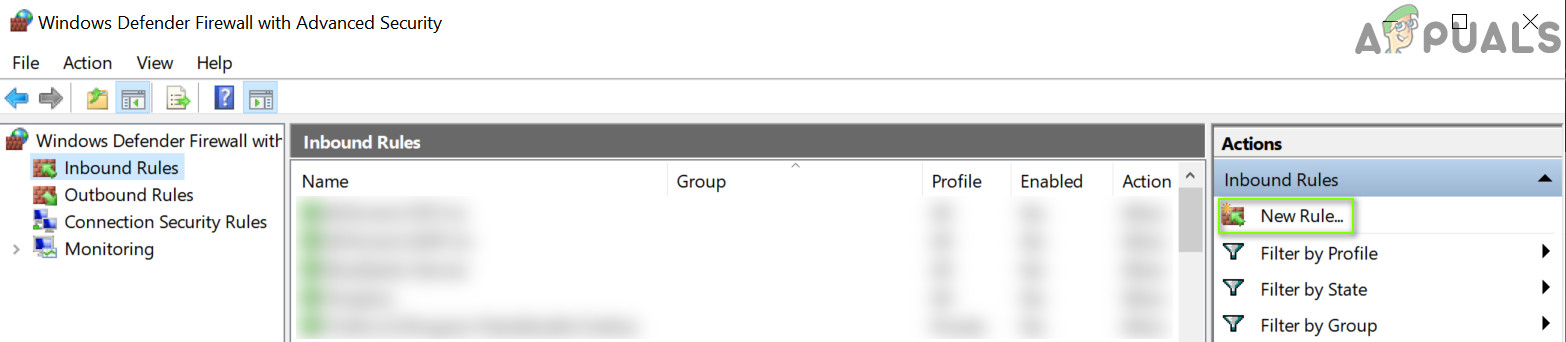
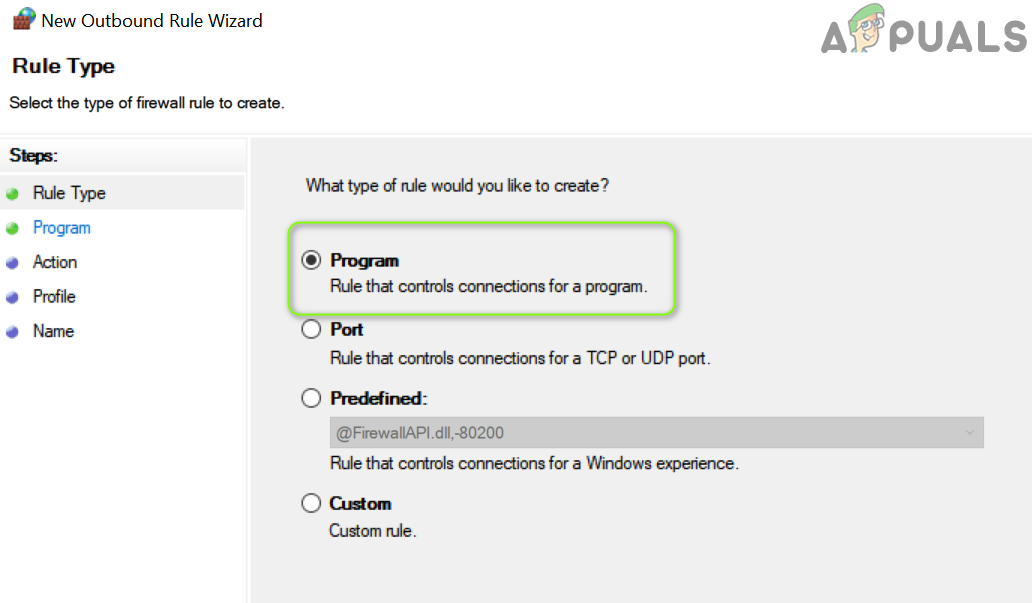
12. Allow Minecraft Through the Firewall
1. Search and open Windows Defender Firewall.

2. Go to Advanced settings from the left.

3. Go to Inbound Rules, look for Minecraft, and double-click on it.
4. Under the Action section, make sure the Allow the connection option is selected.
5. Do the same for Minecraft in the Outbound Rules.

6. Once done, again go to Inbound Rules > select Minecraft > Click on New Rule… from the right.

7. Select Program and click on Next.

8. Select the This program path option, click on Browse, and navigate to the Minecraft installation directory. From the directory, double-click the Minecraft.exe file. Click on Next.

9. Click Allow the connection and proceed by clicking on Next.

10. Select all three profiles namely Public, Private, & Domain.

11. Repeat the same for the Outbound Rules and restart the PC.
Here comes the end of this fixing guide and I am genuinely hoping that you would have got the solution to the Exception java.io.IOException Minecraft error. This error mainly occurs either due to conflicts in the installed Java or the improper settings in the Windows OS.
Based on the different possibilities related to these two causes, this fixing guide has mentioned different ways to fix the issue. Please let me know if you have any questions, suggestions, or any new fixing process that should be mentioned here. You can use the comments section for these purposes.
Also Read:
- Fix (0x803F8001) Minecraft Launcher Is Currently Not Available In Your Account
- How to Fix CPU does not have POPCNT error in Apex Legends
- Fix COD Vanguard Dev Error 5573 on PC, Xbox & PS
- Fix Error Code Vivacious in Call of Duty Vanguard
- 6 Ways to Fix Forza Horizon 5 memory leak issue on PC
The Minecraft launcher may show the ‘Internal Exception Java.IO.IOException’ issue if the Minecraft installation is corrupt or outdated. Moreover, the corrupt DNS cache of the system or improper configuration of Java may also cause the issue at hand.
The issue arises when the user tries to join or connect a server but encounters the following message:
“Connection Lost Internal Exception: java.io.IOException: An existing connection was forcibly closed by the remote host”
Before proceeding with the solutions to stop internal exceptions in Java IO IOException, check if trying another network cable (if using an ethernet connection) resolves the issue. If you have a long username (7+ characters), then check if reducing it to (7 or fewer characters) solves the issue. Also, check if your internet speed meets the minimum speed requirements of Minecraft. Moreover, make sure to log out/disconnect the Minechat (if using) and then close it. Additionally, check if launching the Minecraft launcher (or server) as an administrator resolves the issue.
Solution 1: Update the Minecraft Launcher to the Latest Build
You may encounter the internal exception issue if the Minecraft launcher of your system is outdated as it can create incompatibility between the launcher & server. In this context, updating the Minecraft launcher to the latest release may solve the problem. But before moving on, check if you have more than one account configured with the Minecraft launcher, if so, then remove all the other accounts but one.
- Open the Minecraft launcher & near the username, click on the Options.
- Then click on the Force Update button & apply the launcher update.

Force Update the Minecraft Launcher - Once updated, relaunch the Minecraft launcher and check if it is clear of the IOexception error.
- If not, check if using another launcher resolves the issue.
Solution 2: Clear the DNS Cache of Your System
The Java.io error may emerge if the DNS cache of your system is corrupt as it may lead to the system’s ability to resolve the domain name. In this context, flushing the DNS cache (which will force the system to re-fetch the combinations) may solve the problem.
- Click Windows, type: Command Prompt, and right-click on the result of Command Prompt. Then choose Run as Administrator.

Open Command Prompt as Administrator - Now execute the following one by one:
ipconfig /flushdns

ipconfig /release

ipconfig /renew

Flush the DNS Cache - Then exit the Command Prompt and check if the Java exception issue is resolved.


If the issue persists, then check if changing DNS server (e.g., Google DNS) resolves the internal exception issue.
Solution 3: Disable Server’s Resource Pack
Resource packs allow the players to do a lot of customization (like textures, music, models, splash tests, etc.) but this customization may hinder the client/server communication and thus cause the IOexception issue. In this scenario, disabling the server’s resource pack may solve the problem.
- Open the Minecraft launcher and select Multiplayer.
- Then select the problematic server and click on Edit.

Edit the Minecraft Server Properties - Now click on Server Resource Packs to set it to Disabled (if enabled) and click on Done.

Disable Server Resource Packs in Minecraft - Then check if the launcher is clear of the Java.io issue.
Solution 4: Uninstall the Conflicting Applications
You may encounter the Java.io issue if an application on your system is hindering the operation of Minecraft. In this scenario, removing the conflicting application may solve the problem. You can clean boot your PC to find out the problematic application. For illustration, we will discuss the process for the Hamachi VPN (reported by the users to cause the issue).
- Right-click Windows & open Apps and Features.
- Now click on LogMeIn Hamachi to expand it & then click on Uninstall.

Uninstall Hamachi - Then follow the prompts to remove Hamachi & reboot your PC.
- Upon reboot, check if the IOexception issue is resolved.
Solution 5: Decrease the Render Distance in the Minecraft Settings
The internal exception issue may arise if Minecraft could not render all the video blocks at once (due to the poor internet speed). In this context, decreasing the Render Distance in the Minecraft settings to the lowest possible may solve the problem.
- Open the Minecraft Launcher & open its Options (it will be also a good idea to lower the Render Distance in the server settings, if possible).

Open the Minecraft Options - Now select Video Settings & slide the Render Distance to the lowest possible (e.g., to 2).

Open Video Settings of Minecraft - Then check if the Java.io issue is resolved. If so, then you may increase the Render Distance by one till you reach your desired Render Distance.

Set Render Distance to 2 Chunks in Minecraft

Solution 6: Edit the Java Settings
The Java.io error may arise if the Java installation of your system is not properly configured. In this context, editing the Java settings (like enabling the Native Sandbox) may solve the problem. But before proceeding, make sure you have only one Java installation.
Update Java to the Latest Build
- Click Windows, type: Configure Java & then open it.

Open Configure Java - Now steer to the Update tab & click on the Update Now button.

Click Update Java in the Update Tab - If an update is available, apply the Java update & check if the internal exception issue is resolved.
Enable Native Sandbox
- Click Windows, type: Configure Java & open it.
- Now steer to the Advanced tab & checkmark Enable the Operating System’s Restricted Environment (Native Sandbox).

Enable the Operating System’s Restricted Environment (Native Sandbox) - Then apply your changes & reboot your PC.
- Upon reboot, check if the Minecraft IOexception issue is resolved.
Edit the Java Path in the Launcher Settings
- Right-click Windows & open Run.
- Now navigate to the following path:
Program Files (x86)

Open Program Files (x86) From Run - Then open the Java folder & steer to the latest version of the Java installation (e.g., the jre1.8.0_291 folder).
- Now open the Bin folder & copy the address from the address bar.

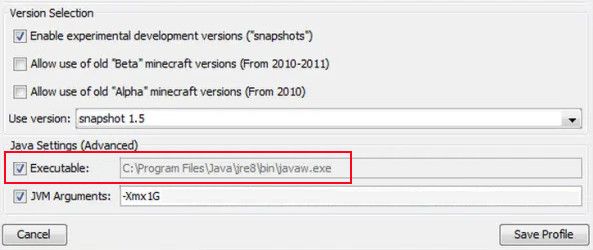
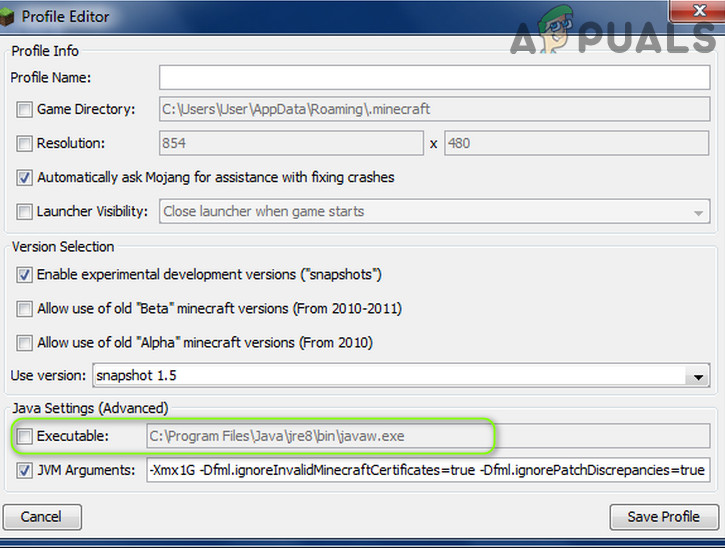
Copy the Java Path - Then open the Minecraft Launcher & select Edit Profile.
- Now, under Java Settings (Advanced), checkmark the option of Executable.
- Then paste the address (copied at step 4) up to Bin, so the path should be something like below:
C:Program Files (x86)Javajre1.8.0_291binjavaw.exe

Edit the Java Path in the Minecraft Profile Editor - Now apply your changes & check if the internal exception issue is resolved.

If the issue persists, then check if reinstalling Java sorts out the IOexception issue.
Solution 7: Repair / Reinstall the Minecraft
The Java.io issue may arise if the Minecraft installation is corrupt. In this context, repairing or reinstalling it may solve the problem.
- Click Windows, type: Control Panel, & launch it.

Open Control Panel - Now open Uninstall a Program & select Minecraft.

Repair the Minecraft Launcher - Then click on Repair & follow the prompts to repair Minecraft.
- Now reboot your PC & check if the IOexception issue is resolved.
- If not, uninstall Minecraft & Java (make sure to back up the essentials).
- Now reboot your PC & upon reboot, right-click Windows & select Run.
- Then navigate to the following path (copy-paste the address):
AppData

Open AppData Through the Run Box - Now open each directory (Local, LocalLow, & Roaming) one by one & delete the Minecraft folders in them.

Delete the Minecraft Directories in the AppData Folders - Then download the latest versions of Java & Minecraft.
- Then install Java as administrator & reboot your PC.
- Upon reboot, install Minecraft as administrator & check if the internal exception issue is resolved.
Solution 8: Edit the Network-Related Settings
Minecraft may show the internal exception issue if the network settings of your system are not properly configured (or your ISP is blocking access to a resource essential for the operation of Minecraft). In this case, editing the network settings (or trying another network/VPN) may solve the problem.
Try Another Network or a VPN
- Disconnect your system from the current network & connect to another network e.g., the hotspot of your phone to check if the IOexception issue is resolved. You can also check by using a VPN. Also, it will be a good idea to switch between the Wi-Fi and ethernet connection.
- If the issue persists, directly connect the system to the internet without the router to rule out if its configuration causing the issue.
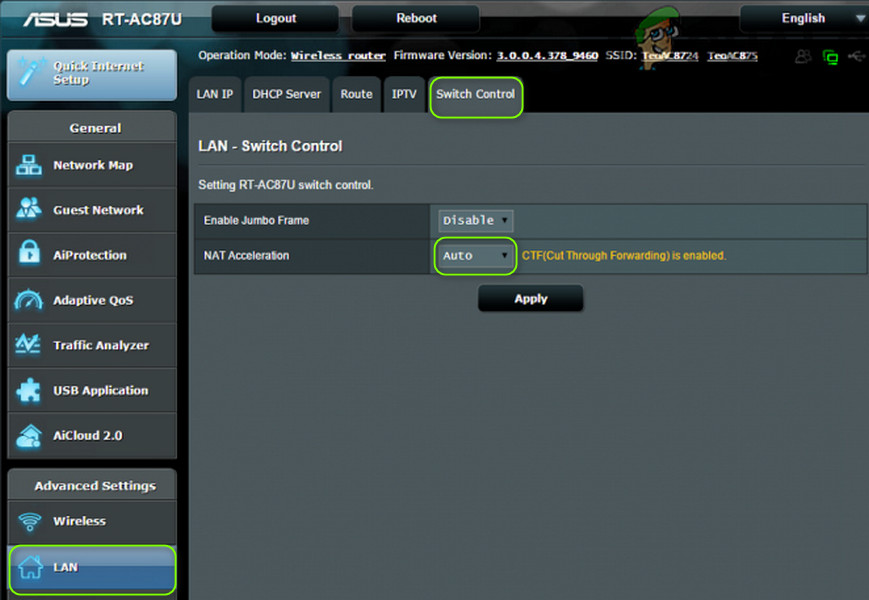
Disable NAT Acceleration in the Router’s Settings
- Launch a web browser & navigate to the Router’s control page.
- Now select LAN (in the left pane) & disable Hardware Acceleration in the Switch Control tab. If the Hardware Acceleration (the Asus branded router feature) is not shown, look for it with different names like CTF (Cut-Through Forwarding) & FA (Flow Accelerator).

Disable NAT Acceleration - Then apply your changes & check if the internal exception issue is resolved.
Solution 9: Edit the Firewall Settings
You may encounter the internal exception issue if the Firewall of your system is blocking access to a resource essential for the operation of Minecraft. In this context, editing the Firewall settings (like allowing Java (TM) Platform SE Binary in the Firewall settings) may solve the problem. Before proceeding, it will be a good idea to check if temporarily disabling the firewall of your system resolves the issue. For illustration, we will go through the process for the Windows Defender Firewall.
Warning: Advance at your own risk as editing the firewall’s settings is a skillful task & if done wrong, you may expose your system/data to threats.
Set Java (TM) Platform SE to Private in the Firewall Settings
- Click Windows, type: Allow an App Through Windows Firewall, & open it.

Open Allow an App Through Windows Firewall - Now click on Change Settings & in the list of Apps, find Java (TM) Platform SE Binary. If it is not present, click on Allow Another App & steer to the installation directory of Java (usually, the Java directory of Program Files and Program Files (X86) folders) and double-click on Javaw.exe.

Set Java (TM) Platform SE Binary to Private - Then uncheck the option of Public and checkmark the option of Private for all the Java (TM) Platform SE Binary processes.
- Now select Java (TM) Platform SE Binary & click on Details.
- Then open Network Type and checkmark Private.
- Now apply your changes & reboot your PC.
- Upon reboot, check if the IOexception issue is resolved.
Allow the Minecraft Through the Firewall
- Click Windows, type: Firewall, & open Windows Defender Firewall.

Open Windows Defender Firewall - Now make sure no Inbound and Outbound rules related to Minecraft are set to Block the Connection.

Allow the Minecraft Connection Through the Windows Defender Firewall - Then select Inbound Rules & click on New Rule.

Create a New Inbound Rule - Now select Program & click on Next.

Select Program in New Rule Window - Then click on Browse & steer to the installation directory of Minecraft.

Open Browse and Steer to The Installation Directory of Minecraft - Now double-click on Minecraft.exe & select Allow the Connection.
- Then click on Next & select all the three profiles (i.e., Public, Private, & Domain).
- Now name the rule & click on Finish.
- Then repeat the same for the Outbound Rule & reboot your PC.
- Upon reboot, check if the Java.io issue is resolved.


If the issue persists, check if allowing the Minecraft connections through the router’s Firewall (if any) resolves the issue (especially, if it is using some autoblocking feature). If that did not do the trick, check if the parental controls are not restricting the Minecraft access. Also, it will be a good idea to ensure that the ports are properly forwarded in the system/router firewall as required by Minecraft.
If the issue persists, check if allocating more RAM to Minecraft solves the problem. If that did not do the trick, you may contact the server’s admins to delete your player data or check for a server-side problem. If the issue did not resolve so far, you may have to perform a factory reset of your PC & if that did not do the trick, get your system (especially, hard disk and network/Wi-Fi card) checked for a hardware error.
Playing video games online can be very exciting as it enables you to play with your friends and also to make new ones. What’s more? Online video games are very engaging; you can spend several hours playing one before you get bored.
Despite all these fun and interesting things about online games, they are not without problems. For example, they are sometimes riddled with bugs and errors that either prevent you from playing or from enjoying them. While some of these errors can be fixed with simple steps, others require complex approaches.
One online video game that experiences such problems is Minecraft; its players sometimes face bugs and errors that disrupt their gameplay. A good number of these errors, including the java.io.ioexception, are Java-related. And this is because the video game was created with the Java language.
Internal exception java.io.ioexception is a common error Minecraft players face; it involves the forceful closure of an existing connection by a remote host. This error occurs when there’s a failure in input and output operations. That is, when the connection between the user’s computer and the game’s server is interrupted.
How Do I Fix The Internal exception java.io.ioexception Error?
There are several ways of resolving this error. Below are some of the easy ones.
Power Cycle Your Router
This is perhaps the easiest method to resolve this error. Because of this, endeavor to try it first before you try others.
Power cycling your router simply means restarting it. Sometimes, there is a problem with the router and it manifests as the java.io.ioexception error.
To resolve the error via this method, do the following:
- Unplug it from the power source to turn it off.
- Disconnect the Ethernet cable.
- Leave it idle for a few minutes.
- Reconnect the Ethernet cable.
- Plug the router to power it on.
- Restart your computer and launch the Minecraft program.
- Finally, reconnect the computer to your home network and confirm if the error is resolved or not.
If there is a connection problem between your router and your computer, this method will resolve it. If the error persists, then your router is not responsible for the problem. Proceed to other, more advanced methods.
Reinstall Minecraft
Sometimes, Minecraft itself is responsible for this error. To resolve it, you will simply need to install the game anew. That is, uninstall the Minecraft program on your device and then reinstall it.
Here is how to do this:
- Simultaneously click on the Windows key + “R” on your computer to open Run.
- Enter “appwiz.cpl” and select “OK.”
- Locate Minecraft from the list of installed apps and select it.
- Click on “Uninstall” and then click “OK” to confirm.
- Upon successfully uninstalling the program, download the Minecraft’s latest version of and reinstall it.
- Finally, restart your computer.
By the way, do not install Optifine or any texture pack immediately after reinstallation. First try to connect to the game’s server with your base game and confirm whether the error has been resolved.
If it is resolved, you can the go ahead and install the mods, texture packs, etc. you want.
Reinstall Java
Sometimes, the Java program is the culprit: it is preventing your computer from connecting to Minecraft’s server. You can remedy this by uninstalling the Java program and then reinstalling it.
- Click on the Windows key + “R” on your computer to open Run.
- Enter “Control” and select “OK.”
- Click on “Uninstall a Program.”
- Locate Java on the list of installed apps.
- Click “Uninstall.”
- Confirm your decision by clicking “OK.”
- After you’ve successfully uninstalled the programme, proceed to download the latest version of Java and install it.
Then, reboot your computer and confirm if there’s any change or if the problem persists.
Enable the Java Native Sandbox
The Java Native Sandbox allows you to launch Java applications in a restricted environment which can circumvent the problem interfering with your connection to the server. Since Minecraft is a Java application, you can run it with Java Native Sandbox.
To use this method, follow the steps below:
- Input “Control Panel” in search on your task bar.
- Click on the resulting entry.
- Locate “Programs” and click on it.
- A Java icon will come up on the succeeding screen, click on the header.
- A small page, labeled “Java Control Panel,” will pop up. Click on the switch to “Advanced” option.
- Scroll down until you see “Advanced Security Settings.” Click on it.
- Locate “Enable the Operating System’s Restricted Environment (Native Sandbox).” Then, click on the checkbox to enable it.
- Finally, select “Apply” and then click “OK” to confirm your choices.
After enabling this setting, restart your computer to enable these changes take effect. Once this happens, launch Minecraft. Then, check to see if your computer can now connect to the server.
If it cannot, disable the Native Sandbox to avoid compounding the error before you attempt other solutions.
Change the DNS on your Router
If your internet service provider (ISP) is experiencing issues with its DNS server, you can also experience this problem. Your system’s DNS settings is in the modern/router administration panel; it is normally configured automatically.
Fortunately, you can manually change the DNS servers. Here is how to do this:
- Click on the Windows key + “R” on your computer to open Run.
- Input “Control” and select “OK.”
- Proceed to “Network and Internet” in your “Control Panel” and click on it.
- Click on the “Change Adapter Settings” option on the left side of your screen.
- Right-click on your “Network Adapter.”
- Select “Properties.”
- Locate “Internet Protocol Version 4 (TCP/iPv4)” and select it.
- Click “Use the following DNS Server Addresses”
- Input the following codes in the spaces provided for “Preferred DNS Server” and “Alternate DNS Server” respectively.
- 8.8.8
- 8.4.4
- Click “OK.”
The modified settings will enable your computer to connect directly to Google’s servers; this is more reliable than that of your IPS. However, if you would rather do without Google’s DNS server, there are other third party, public servers you can utilize.
Finally, launch the game. Then, try connecting it to Minecraft’s server to check if the error is resolved.
Modify Windows Firewall Settings
Modifying your computer’s firewall settings can also resolve the error. Before you can do this, you have to be operating your system as an administrator.
If this is the case, proceed thus:
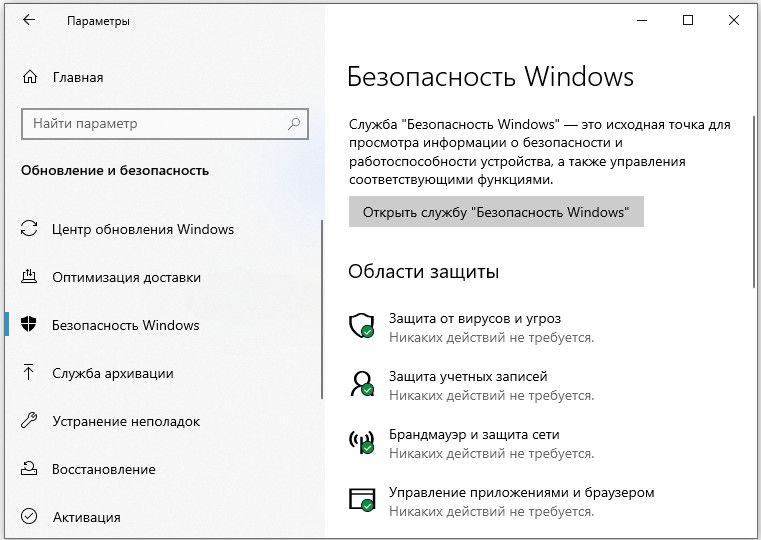
- Go to “Settings.”
- Click on “Update and Security”
- Open “Windows Security.”
- Locate “Firewall and Network Protection” and click on it.
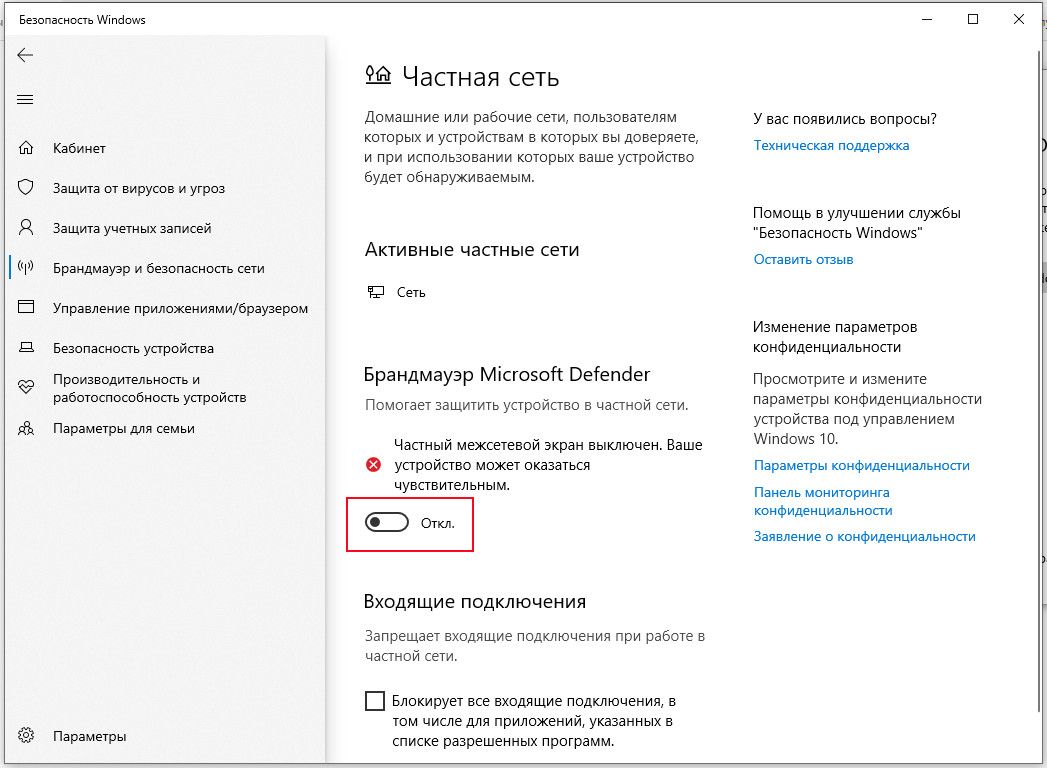
- Click on your active network.
- Turn Windows Firewall off.
- Launch Minecraft to confirm if the error is fixed.
If it is, proceed to activate private access for Java™ Platform SE Binary.
- Click on the Windows key + “R” on your computer to open Run.
- Input “appwiz.cpl” and select “OK.”
- Proceed to “System and Security” in the Control Panel.
- Click on “Windows Defender Firewall.”
- Select “Allow an App or Feature through Windows Defender Firewall.” You will find it on the left part of your screen.
- Locate Java™ Platform SE Binary.
- Click the “Private” box for all the options for Java platform.
- Click “OK.”
Restart your computer and reconnect it to the server. If it works, then the error has been resolved.
Conclusion
With the above, you should have been able to resolve the error. If you couldn’t, your next action should be to reach out to Minecraft’s customer support. Let them know the problem you are facing and the actions you have taken to resolve it. They can then guide you on what to do next.
You can reach out to them via email. However, there are guidelines to this on their website. So, read them and ensure your actions tally with them.
Средство запуска Minecraft может отображать проблему «Internal Exception Java.IO.IOException», если установка Minecraft повреждена или устарела. Более того, поврежденный кеш DNS системы или неправильная конфигурация Java также могут вызвать проблему.
Проблема возникает, когда пользователь пытается присоединиться к серверу или подключиться к нему, но встречает следующее сообщение:
«Внутреннее исключение при потере соединения: java.io.IOException: существующее соединение было принудительно закрыто удаленным узлом»
Прежде чем приступить к решениям по остановке внутренних исключений в Java IO IOException, проверьте, решает ли проблему попытка использования другого сетевого кабеля (при использовании соединения Ethernet).
Если у вас длинное имя пользователя (7+ символов), проверьте, решает ли проблему сокращение его до (7 или меньше символов). Также проверьте, соответствует ли скорость вашего интернета требованиям Minecraft к минимальной скорости.
Кроме того, убедитесь, что выйти из / отключить в Minechat (если используется) , а затем закройте его. Кроме того, проверьте, решает ли проблему запуск программы запуска Minecraft (или сервера) от имени администратора.
Вы можете столкнуться с проблемой внутреннего исключения, если программа запуска Minecraft в вашей системе устарела, поскольку это может создать несовместимость между программой запуска и сервером.
В этом контексте обновление средства запуска Minecraft до последней версии может решить проблему. Но прежде чем двигаться дальше, проверьте, настроено ли у вас более одной учетной записи с пусковой установкой Minecraft, если да, то удалите все остальные учетные записи, кроме одной.
- Откройте панель запуска Minecraft и рядом с именем пользователя нажмите Параметры.
- Затем нажмите кнопку «Принудительное обновление» и примените обновление средства запуска.
- После обновления перезапустите средство запуска Minecraft и проверьте, не возникла ли в нем ошибка IOexception.
- Если нет, проверьте, решает ли проблему использование другого средства запуска.
Решение 2. Очистите кеш DNS вашей системы
Ошибка Java.io может возникнуть, если кеш DNS вашей системы поврежден, поскольку это может привести к тому, что система не сможет разрешить доменное имя. В этом контексте очистка кеша DNS (что заставит систему повторно выбирать комбинации) может решить проблему.
- Кликните Windows, введите: Командная строка и кликните правой кнопкой мыши результат командной строки. Затем выберите «Запуск от имени администратора».
- Теперь выполните следующее одно за другим:
ipconfig /flushdns

ipconfig /release

ipconfig /renew
- Затем выйдите из командной строки и проверьте, решена ли проблема исключения Java.
Если проблема не исчезнет, проверьте, решает ли изменение DNS-сервера (например, Google DNS ) проблему внутреннего исключения.
Решение 3. Отключите пакет ресурсов сервера
Пакеты ресурсов позволяют игрокам выполнять множество настроек (например, текстуры, музыку, модели, тесты на всплески и т. д.), Но эта настройка может препятствовать обмену данными между клиентом и сервером и, таким образом, вызвать проблему исключения ввода-вывода. В этом сценарии отключение пакета ресурсов сервера может решить проблему.
- Откройте программу запуска Minecraft и выберите «Многопользовательская игра».
- Затем выберите проблемный сервер и нажмите «Изменить».
- Теперь нажмите Server Resource Packs, чтобы установить его в Disabled (если он включен), и нажмите Done.
- Затем проверьте, очищена ли программа запуска от проблемы Java.io.
Решение 4. Удалите конфликтующие приложения.
Вы можете столкнуться с проблемой Java.io, если приложение в вашей системе препятствует работе Minecraft. В этом случае удаление конфликтующего приложения может решить проблему.
Вы можете выполнить чистую загрузку своего ПК, чтобы определить проблемное приложение. Для иллюстрации мы обсудим процесс для Hamachi VPN (по сообщениям пользователей, вызывающий проблему).
- Кликните правой кнопкой мыши Windows и откройте «Приложения и компоненты».
- Теперь нажмите LogMeIn Hamachi, чтобы развернуть его, а затем нажмите Удалить.
- Затем следуйте инструкциям по удалению Hamachi и перезагрузите компьютер.
- После перезагрузки проверьте, решена ли проблема IOexception.
Решение 5.Уменьшите расстояние отрисовки в настройках Minecraft
Проблема с внутренним исключением может возникнуть, если Minecraft не может отобразить все видеоблоки сразу (из-за низкой скорости интернета). В этом контексте уменьшение расстояния рендеринга в настройках Minecraft до минимально возможного может решить проблему.
- Откройте Minecraft Launcher и откройте его Параметры (также будет хорошей идеей уменьшить Расстояние рендеринга в настройках сервера, если это возможно).
- Теперь выберите «Настройки видео» и сдвиньте расстояние рендеринга до минимально возможного (например, до 2).
- Затем проверьте, решена ли проблема с Java.io. Если да, то вы можете увеличить расстояние рендеринга на единицу, пока не достигнете желаемого расстояния рендеринга.
Решение 6. Измените настройки Java.
Ошибка Java.io может возникнуть, если установка Java в вашей системе настроена неправильно. В этом контексте изменение настроек Java (например, включение собственной песочницы) может решить проблему. Но прежде чем продолжить, убедитесь, что у вас только одна установка Java.
Обновите Java до последней сборки
- Кликните Windows, введите: Configure Java и затем откройте его.
- Теперь перейдите на вкладку «Обновить» и нажмите кнопку «Обновить сейчас».
- Если доступно обновление, примените обновление Java и проверьте, решена ли проблема с внутренним исключением.
Включить собственную песочницу
- Кликните Windows, введите: Configure Java & open it.
- Теперь перейдите на вкладку «Дополнительно» и установите флажок «Включить ограниченную среду операционной системы (собственная песочница)».
- Затем примените изменения и перезагрузите компьютер.
- После перезагрузки проверьте, решена ли проблема Minecraft IOexception.
Отредактируйте путь к Java в настройках программы запуска
- Кликните правой кнопкой мыши Windows и откройте «Выполнить».
- Теперь перейдите по следующему пути:
Program Files (x86)
- Затем откройте папку Java и перейдите к последней версии установки Java (например, папке jre1.8.0_291).
- Теперь откройте папку Bin и скопируйте адрес из адресной строки.
- Затем откройте программу запуска Minecraft и выберите «Редактировать профиль».
- Теперь в разделе «Настройки Java» («Дополнительно») установите флажок «Исполняемый файл».
- Затем вставьте адрес (скопированный на шаге 4) в Bin, так что путь должен быть примерно таким:
C:Program Files (x86)Javajre1.8.0_291binjavaw.exe
- Теперь примените свои изменения и проверьте, решена ли проблема с внутренним исключением.
Если проблема не исчезнет, проверьте , решает ли переустановка Java проблему исключения ввода-вывода.
Решение 7. Ремонт / переустановка Minecraft
Проблема с Java.io может возникнуть, если установка Minecraft повреждена. В этом контексте его ремонт или переустановка могут решить проблему.
- Кликните Windows, введите: Панель управления и запустите.
- Теперь откройте Удаление программы и выберите Minecraft.
- Затем нажмите «Восстановить» и следуйте инструкциям по ремонту Minecraft.
- Теперь перезагрузите компьютер и проверьте, решена ли проблема IOexception.
- Если нет, удалите Minecraft и Java (обязательно сделайте резервную копию самого необходимого).
- Теперь перезагрузите компьютер и после перезагрузки кликните правой кнопкой мыши Windows и выберите «Выполнить».
- Затем перейдите по следующему пути (скопируйте и вставьте адрес):
AppData
- Теперь откройте каждый каталог (Local, LocalLow и Roaming) один за другим и удалите в них папки Minecraft.
- Затем загрузите последние версии Java и Minecraft.
- Затем установите Java от имени администратора и перезагрузите компьютер.
- После перезагрузки установите Minecraft от имени администратора и проверьте, решена ли проблема с внутренним исключением.
Решение 8. Измените параметры, связанные с сетью
Minecraft может отображать проблему внутреннего исключения, если сетевые настройки вашей системы не настроены должным образом (или ваш интернет-провайдер блокирует доступ к ресурсу, необходимому для работы Minecraft). В этом случае изменение настроек сети (или попытка использования другой сети / VPN) может решить проблему.
Попробуйте другую сеть или VPN
- Отключите вашу систему от текущей сети и подключитесь к другой сети, например, к точке доступа вашего телефона, чтобы проверить, решена ли проблема IOexception. Вы также можете проверить с помощью VPN. Кроме того, это будет идея хорошо переключаться между с Wi-Fi и локальных сетей связи.
- Если проблема не исчезнет, подключите систему к Интернету напрямую без маршрутизатора, чтобы исключить, не вызывает ли проблема его конфигурация.
Отключите ускорение NAT в настройках роутера.
- Запустите браузер и перейдите на страницу управления маршрутизатором.
- Теперь выберите LAN (на левой панели) и отключите аппаратное ускорение на вкладке Switch Control. Если аппаратное ускорение (функция фирменного маршрутизатора Asus) не отображается, ищите его с другими названиями, такими как CTF (сквозная пересылка) и FA (ускоритель потока).
- Затем примените свои изменения и проверьте, решена ли проблема с внутренним исключением.
Решение 9. Отредактируйте настройки брандмауэра
Вы можете столкнуться с проблемой внутреннего исключения, если брандмауэр вашей системы блокирует доступ к ресурсу, необходимому для работы Minecraft. В этом контексте изменение настроек брандмауэра (например, разрешение Java ™ Platform SE Binary в настройках брандмауэра) может решить проблему.
Прежде чем продолжить, рекомендуется проверить, решает ли проблему временное отключение брандмауэра вашей системы. Для иллюстрации мы рассмотрим процесс для брандмауэра Защитника Windows.
Предупреждение : продвигайтесь вперед на свой страх и риск, поскольку редактирование настроек брандмауэра — это умелая задача, и в случае неправильного выполнения вы можете подвергнуть свою систему / данные угрозам.
Установите Java (TM) Platform SE на Private в настройках брандмауэра
- Кликните Windows, введите: Разрешить приложению через брандмауэр Windows и откройте его.
- Теперь нажмите «Изменить настройки» и в списке приложений найдите Java (TM) Platform SE Binary. Если нет, то нажмите на Разрешить другой App & бычка в директорию установки Явы (обычно, каталог Java в Program Files и Program Files (X86) папки) и двойным щелчком по javaw.exe.
- Затем снимите отметку с опции Public и отметьте опцию Private для всех двоичных процессов Java (TM) Platform SE.
- Теперь выберите Java (TM) Platform SE Binary и нажмите Details.
- Затем откройте «Тип сети» и установите флажок «Частная».
- Теперь примените ваши изменения и перезагрузите компьютер.
- После перезагрузки проверьте, решена ли проблема IOexception.
Разрешить Minecraft через брандмауэр
- Кликните Windows, введите: Брандмауэр и откройте брандмауэр Защитника Windows.
- Теперь убедитесь, что правила для входящего и исходящего трафика, связанные с Minecraft, не установлены для блокировки подключения.
- Затем выберите «Правила для входящих подключений» и нажмите «Новое правило».
- Теперь выберите «Программа» и нажмите «Далее».
Выберите программу в окне нового правила - Затем нажмите «Обзор» и перейдите в каталог установки Minecraft.
- Теперь дважды кликните на Minecraft.exe и выберите Разрешить подключение.
- Затем нажмите «Далее» и выберите все три профиля (т. Е. «Общедоступный», «Частный» и «Доменный»).
- Теперь назовите правило и нажмите Готово.
- Затем повторите то же самое для правила исходящего трафика и перезагрузите компьютер.
- После перезагрузки проверьте, решена ли проблема Java.io.
Если проблема не устранена , проверьте, разрешает ли подключение Minecraft через брандмауэр маршрутизатора (если есть) проблему (особенно, если он использует некоторую функцию автоблокировки).
Если это не помогло, проверьте , не ограничивает ли родительский контроль доступ Minecraft. Кроме того, будет хорошей идеей убедиться, что порты правильно перенаправлены в брандмауэре системы / маршрутизатора в соответствии с требованиями Minecraft.
Если проблема не исчезнет, проверьте, решает ли проблему выделение для Minecraft дополнительной оперативной памяти . Если это не помогло, вы можете связаться с администраторами сервера, чтобы удалить данные вашего игрока или проверить наличие проблем на стороне сервера.
Если проблема до сих пор не решена, возможно, вам придется выполнить сброс настроек вашего компьютера до заводских настроек, и если это не помогло, проверьте свою систему (особенно жесткий диск и сетевую / Wi-Fi карту) на наличие аппаратной ошибки.