

Данная публикация посвящается всем ценителям Minecraft и других игр, требующих установки Java. На днях знакомые попросили помочь: при попытке запустить Майнкрафт у них появлялось сообщение — Java Virtual Machine Launcher ошибка, как исправить сейчас расскажу.
Не хватает памяти
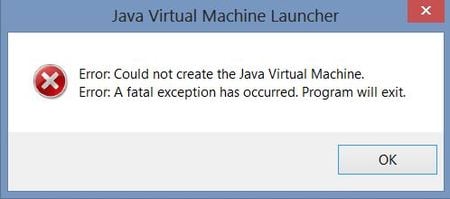
При установке Джавы, необходимой для работы некоторых игр, отображалось следующее окно:

Она указывает на то, что для создаваемой виртуальной машины не хватает памяти. Очень часто подобная ситуация возникает, если некорректно выходить из игры (нажав Alt + F4 ) или при внезапном отключении ПК.
В моем случае, ошибка появилась после того, как пользователь случайно удалил компонент Java, потом пытался его переустановить, но на последнем этапе инсталляции отображалось вышеупомянутое окно.
На зарубежных источниках нашел два решения. Начну с более простого.
Настройка переменной среды
- Открываем панель управления. В Windows 7 это можно сделать через меню «Пуск», в «десятке» достаточно кликнуть правой кнопкой мышки по кнопке «Старт» (или нажать Win + X ), и выбрать из списка нужный элемент:

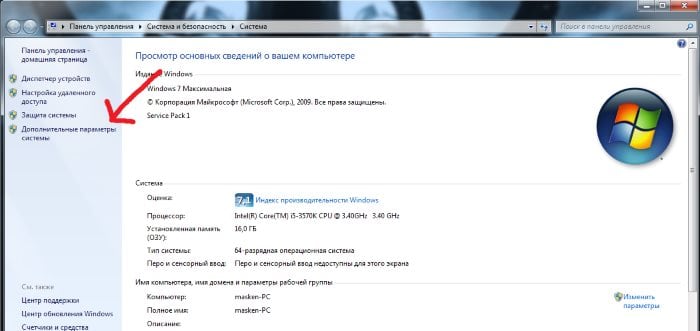
- Переходим к разделу «Система»:

- Слева кликаем по ссылке «Дополнительные параметры…»:

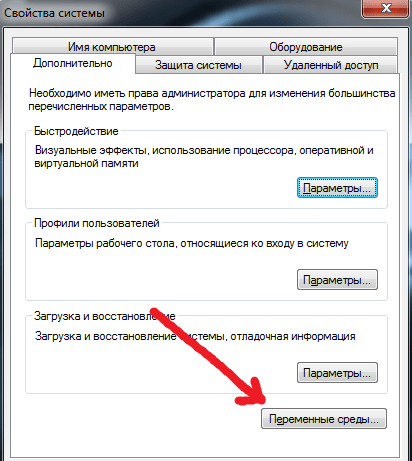
- В новом окне снизу есть кнопка «Переменные среды», которую стоит нажать:

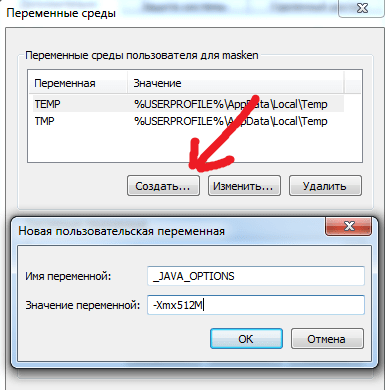
- Кликаем по кнопке «Создать…», присваиваем новой переменной:
имя «_JAVA_OPTIONS»
значение «-Xmx512M»

- Обязательно сохраняем все изменения, нажав на ОК. Перезагрузка компьютера не требуется.
Теперь при запуске установщика Джава ошибка Java Virtual Machine Launcher не появиться.
Переходим ко второму способу.
Создание файла запуска
Покажу всё на примере Minecraft.
- Открываем пользовательскую папку, где хранятся игровые настройки. Для этого нажимаем Win + R и пишем команду:
%appdata%
- На экране отобразится каталог, в котором нужно найти игровую директорию, войти в неё и внутри создать новый текстовый документ (Блокнот):

- Туда стоит записать следующую фразу:
java -Xms650m -jar "c:UsersUSER_NAMEAppDataRoaming.minecraftminecraft.exe

Вместо USER_NAME пишем название своего аккаунта. Оно указано в адресной строке окна. Учетная запись не должна содержать русских символов. Только латинские (английские), иначе способ не сработает.
- Теперь нажимаем на пункт меню «Файл», затем выбираем «Сохранить как». Указываем имя «minecraft.bat» и указываем тип «Все…», как показано на скриншоте:

- Осталось только создать ярлык для созданного элемента и отправить его на рабочий стол, чтобы через него запускать игру.
Видео

Вы узнали, как исправить ошибку Java Virtual Machine Launcher. Но если вопросы остались, обязательно задавайте их с помощью формы комментирования внизу страницы.
Рекомендуем:
- Устраняем ошибку «Опаньки» в Google Chrome
- Что делать если не работает безопасный режим в Windows 10
- Как восстановить удаленные фотографии, сообщения, контакты на iPhone?
- d3dx9_43.dll скачать, чтобы устранить ошибку на компьютере
- Четыре способа получить роль администратора в Windows 10

Вам помогло? Поделитесь с друзьями — помогите и нам!
Ошибка «Could not create the Java Virtual Machine» встречается во всех версиях операционной системы Windows. Она появляется как при запуске игр, которые требуют наличие виртуальной машины Java на устройстве, так и при установке самой виртуальной машины на компьютере. Текст ошибки Java Virtual Machine Launcher говорит нам следующее: системе не удалось создать виртуальную машину Java. В этой статье мы с вами рассмотрим причины, по которым возникает эта проблема и, конечно же, устраним саму ошибку.
Содержание
- Причины возникновения ошибки Джава
- Устраняем ошибку Java Virtual Machine Launcher
- Способ 2. Освобождаем оперативную память ПК
- Дополнительные методы устранения ошибки
Причины возникновения ошибки Джава
Чаще всего на появление данной ошибки жалуются игроки Minecraft. При клике на лаунчер и очередной запуск любимой игры, пользователи сталкиваются с окном ошибки. Это происходит из-за того, что в предыдущий раз сессия игры была прекращена некорректно. Возможно вы не дождались полного завершения игры и выключили устройство.
Ошибка JVM при запуске игр и приложений может также возникать по причине недостатка оперативной памяти на вашем устройстве. Для работы виртуальной машины Java требуется определенное количество выделенной памяти компьютером. Для компьютера это очень ценный ресурс, чем этой памяти больше, тем быстрей и лучше процессор справляется с поставленными задачами.
Устраняем ошибку Java Virtual Machine Launcher
Рассмотрим самый распространенный способ исправить ошибку «Could not create the Java Virtual Machine» – создание новой переменной среды.
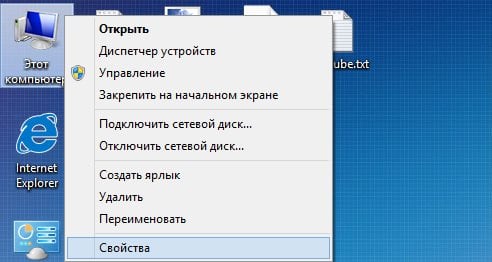
- Нажмите правой кнопкой по иконке «Мой компьютер» и выберите из контекстного меню «Свойства».

Выберите «Свойства» - В следующем окне в блоке слева выберите пункт «Дополнительные параметры».

- Далее найдите внизу окна кнопку «Переменные среды».

- Под списком переменных нажмите кнопку «Создать».

- Введите в первой строке «Имя переменной» – «_Java_Options», а напротив строки «Значение переменной» – значение «-Xmx512M» и подтвердите действия, нажав кнопку «Ок». Перезагрузите компьютер и попробуйте снова сделать те же действия, которые привели к ошибке.
Способ 2. Освобождаем оперативную память ПК
Следующий метод устранения ошибки заключается в освобождении оперативной памяти вашего компьютера. Как уже было сказано, ошибка может возникать по причине недостатка памяти. Чтобы ее освободить, нужно закрыть все ненужные программы, а также «убить» все лишние процессы. Ведь каждая программа нуждается в определенном количестве этого ресурса. На официальном сайте Майкрософт вы можете ознакомиться со всеми важными процессами Windows, прекращение которых повлечет за собой сбои системы. Чтобы остановить лишние процессы:
-
- Нажмите сочетание клавиш CTRL+SHIFT+ESC для Windows 7,8,10. CTRL+ALT+DEL – для Windows XP.
- Откроется окно со списком запущенных программ и процессов на вашем ПК.

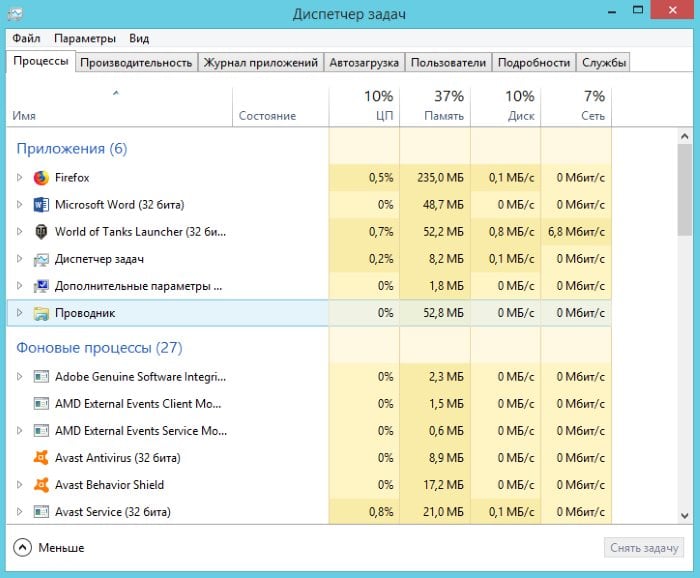
Чтобы закрыть программу или остановить процесс, нужно выделить мышью название программы или процесса, затем нажать на кнопку внизу окна «Снять задачу».
Некоторые запущенные фоновые программы не отображаются в списке, но их можно увидеть в списке процессов. Эта разнообразные модули обновлений, они работают в фоновом режиме и следят за выходом новых версий определенных программ. Они также потребляют оперативную память. Вашей задачей будет отыскать такие процессы и остановить для решения текущей проблемы. Когда вы очистите память и остановите все ненужные программы и процессы, попробуйте запустить снова игру, чтобы убедиться, что окно с ошибкой «Could not create the Java Virtual Machine» уже не появляется.
Дополнительные методы устранения ошибки
Если программное обеспечение, при запуске которого появляется ошибка, было скачано со сторонних ресурсов, варезных сайтов, торрент-трекеров, то его действия часто блокируют антивирусы. Чтобы избежать такой преграды при запуске вам необходимо проверить список карантина антивируса и, если в нем имеются игры или программы, вы можете их удалить с этого списка. Но будьте осторожны при этом. Ведь такое ПО может действительно нести угрозу для системы. Если вы полностью уверенны в программе или игре, вы можете добавить ее в список исключений. В таком случае антивирус перестанет «подозревать» такое ПО.
Если у вас не установлено программное обеспечение Java, вы можете загрузить его по ссылке https://www.java.com/ru/download/win8.jsp. Попадая на страницу, нажмите кнопку «Согласиться и начать бесплатную загрузку».
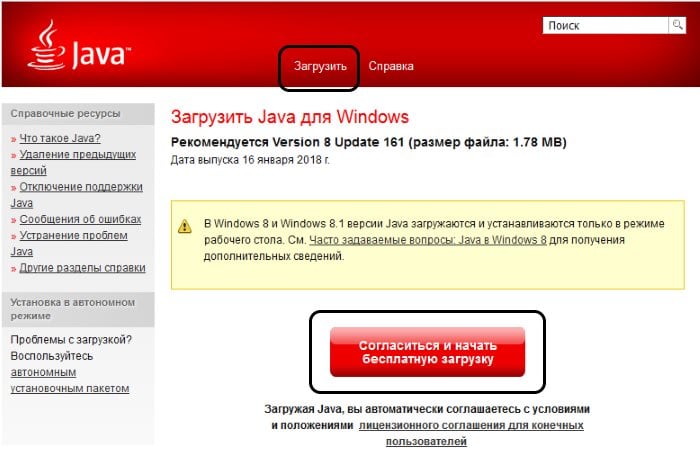
После этого будет загружен пакет данных, который нужно будет установить на свой ПК.
Причиной ошибки может также стать устаревшая версия Java. Если у вас уже были установлены более ранние версии Java, то их необходимо полностью удалить. Для этого вы можете воспользоваться специальной утилитой, которая помогает найти и проверить все файлы предыдущей версии. Скачать ее можно по следующей ссылке – https://www.java.com/ru/download/uninstalltool.jsp. Часто после полного удаления старой версии Java и установки последней, ошибка «Could not create the Java Virtual machine» навсегда исчезает.
Java is a versatile, machine-independent programming language that is used to write a variety of different applications. Unlike most other applications, you can run java applications equally well in Windows, Mac, or Linux, provided you have installed Java Virtual Machine (JVM) in your system. However, if JVM breaks, then none of your java applications run.
One recent impact having a broken JVM launcher was felt by users of Minecraft. A recent update brought new features, but also required Java 16 to set up a server. Those with older version of JVM were greeted with a Java Native Interface (JNI) error.
There are other examples where a malfunctioning JVM launcher caused an application to not work, and it could probably happen again in the future. We have this article prepared, so that you can be prepared when your JVM launcher has an error.
What Causes Java Virtual Machine Launcher Errors
When there is a JVM launcher error in your system, the following are the most common reasons:
- JVM needs to be updated.
- Default app has not been set to Java.
- Insufficient global maximum heap memory.
- Application needs administrative rights to run.
You can somewhat diagnose what is wrong with your JVM and attempt a corresponding fix based upon the type of error message that you see when you JVM does not work.
Reinstall/Update Java
If the error message you see is “Java Virtual Machine Launcher Could Not Find The Main Class,” then Java has been incorrectly installed or Java installation has been corrupted in your machine.
JNI errors can be caused by outdated version of Java.
To fix this, you need to reinstall Java Runtime Environment.
Windows 10
- Launch Settings (Press Win + I), then navigate to Apps.
- Scroll to find Java and select Uninstall.
- Download and install the latest version of Java.
- Restart your computer.
Windows 11
- Launch Settings, navigate to Apps > Apps & features.
- Scroll to find Java.
- Click on the kebab button to its right, then select Uninstall.
- Download and install the latest version of Java.
- Restart the computer.
Increase System Memory for Java
You will get a “Could not create the Java virtual machine” error if Java is trying to use more memory than has been assigned to it.
You can fix this by increasing the amount of memory allotted to Java.
Note: The variable value -Xmx512M sets memory available to Java to 512 MB. You can change this value depending upon how much memory your Java was utilizing before. For instance, setting this to -Xmx1024M assigns 1024 MB system memory to Java.
Run as Administrator
Sometimes JVM errors can occur because you do not have sufficient user privilege to run the application.
You can fix this by configuring Java to run as administrator.
- Press Win + E to launch Windows Explorer, then navigate to Java installation folder. (Usually located at “
…/Program Files(x86)/Common Files/Oracle/Java/javapath”) - Find
java.exeand right-click on it. - Select Properties.
- Switch to Compatibility tab and put a tick mark on Run this program as an administrator.

- Click Apply, then click OK.

Set File Type Association to Java
If your error message is “Unable to access Jar file,” then one of the reasons for this issue is that your jar file association is not set to Java.
Windows 10
- Launch Settings (Press Win + I)
- Navigate to Apps > Default apps.
- Click on Default apps by file type.
- Scroll to find
.jarfrom the list of file types. - Click on the currently set default application next to it.
- Click on Java(TM) Platform SE binary.

- Close Default apps setting.

Windows 11
- Press Win + I to launch Settings.
- Navigate to Apps > Default apps.
- Enter
.jarfile type in the box under Set a default for a file type of link type. - Click on the application that is currently selected to open .jar files, then click on Java under Other options.
- Close settings.
Frequently Asked Questions
What is Java Exception Error?
And exception is an unexpected event which occurs during program execution. Java has methods to catch and handle exceptions.
An application that has implemented exception handling methods will create an exception object when it runs into an exception during execution.
The object contains information such as name and description of the exception, as well as the state of the application when the exception was caught.
What is the Maximum Java Heap Size for Windows?
The maximum allowable heap size for Java in Windows is 16 EB (exabyte). For 32 bit of Windows, maximum heap size is 4 GB.
How Do I Install Java on Mac?
Please follow the steps below if you want to install Java on your MacOS:
- Download
jre-8u65-macosx-x64.pkgfrom the official site. - Launch the file by double clicking on it.
- Double click the package icon to launch Install Wizard.
- Follow on-screen instructions.
Please note that you need a macbook with Intel processor to install Java. Oracle does not officially support Java on M1/M2 processors yet.
A programming language like Java is more than just a way to write programs; game and app developers use it too. However, it’s very common to experience Java crashes. If you are having trouble when trying to launch an application that is built around Java, then this guide will help you fix the problem.
Not all Java virtual machine errors are the same. They can occur for many different reasons. In this article, we will explain the most common causes of Java virtual machine launcher error – Could not create the Java Virtual Machine and how to fix it.

What is Java in simple words?
Java is a popular programming language that can run on a variety of different operating systems and devices. It has many different uses, including in web development, mobile applications, desktop applications, and server-side programming. Java generates a virtual machine (VM) that executes the code written in Java. A Java virtual machine launcher error can occur if something goes wrong with the data or code that’s being processed by the Java virtual machine.
What is a Java virtual machine error?
A Java virtual machine error, also known as a JVM error, is classified as an error generated by the Java Virtual Machine. When this type of error occurs, it usually means that the computer cannot read or understand the code. This can happen for a number of reasons, such as when the computer isn’t updated with required patches or if it’s not compatible with Java. If you come across a JVM error while using your computer, it’s important to know how to recover from this problem. Here are some steps to take in order to fix this issue and continue using your computer.
Over the past couple of days, we have come to understand that some users have been experiencing an error known as Could not create the Java Virtual Machine. From what we’ve gathered, the error tends to pop up when a user is attempting to launch an application that was built using Java.
In order to resolve this issue, first, make sure that you have all of the necessary updates and that the program is installed correctly. After that, you can start looking for possible solutions to fix Java virtual machine launcher error on Windows 11/10:
- Add a new system variable for Java
- Run Java.exe as administrator
- Uninstall & Reinstall the Java application.
Could not create the Java Virtual Machine
Now let’s take a closer look at them:
1] Add a new system variable for Java
To fix this error, you must add a new variable to Java’s system and see if it solves the error. Please follow the steps below to resolve this issue:
- Right-click on the Start menu and select Run from the menu list.
- Type sysdm.cpl in the search box and click the OK button.
- Go to the Advanced tab and select Environment Variables at the bottom.
- Under the System variables section, click on the New button.
- On the next screen, type _JAVA_OPTIONS in the Variable name field.
- You will then need to input –Xmx512M in the Variable value box.
- Now click on the OK button to apply the changes.
Below you can find a detailed explanation of the above steps:
To get it started, open the System Properties window first. This can either be done through the Run dialog box or the File Explorer.
So, press the Windows + R keyboard shortcut to launch the Run command. Then type sysdm.cpl in the search box and click the OK button.
Alternatively, open File Explorer using Windows + E keyboard shortcut. Then right-click on This PC and select the Properties option from the context menu.

Inside the System Properties window, select Environment Variables at the bottom of the Advanced tab.

Then click on the New button in the System variables section.

You will now need to type _JAVA_OPTIONS in the Variable name field. To set a variable, you will need to enter –Xmx512M in the Variable value text box. By doing this, the RAM allocation will increase to 512 megabytes.
Once you have made your changes, click OK to save them. Also, click OK on the Environmental window.
2] Run the program as an administrator
According to the reports, some users could able to solve this error when they open the Java executable file with administrative privileges. The following steps will guide you through doing this:
- Press Windows key + Q keyboard shortcut.
- Type Java in the search box.
- Right-click on Java and select Open file location from the context menu.
- On the next page, right-click on Java executable file and select the Properties option.
- When the Java Properties window opens, switch to the Compatibility tab.
- Under the Settings section, mark the checkbox next to the Run the program as an administrator.
- Click on Apply and then hit the OK button to save changes.
- Now close the File Explorer window.
When you have finished all the steps above, restart your computer and see if the problem has been resolved now.
3] Uninstall & Reinstall the Java application
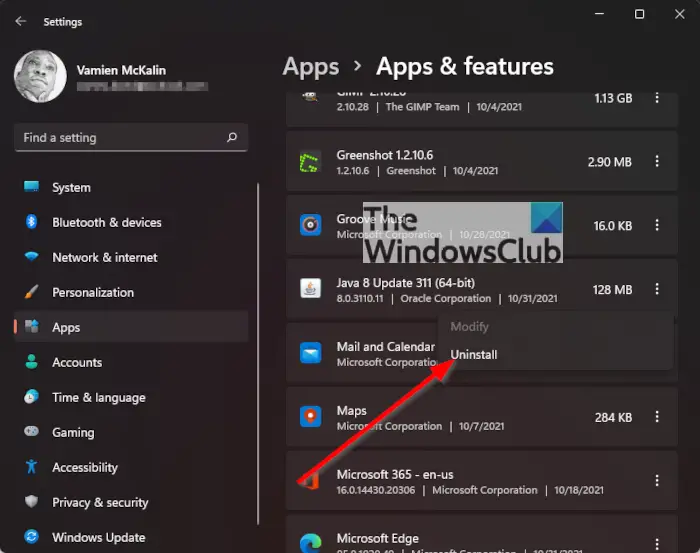
You could reinstall the Java JRE application. However, before we go down that road, it makes a lot of sense to uninstall the program first. Do this by pressing the Windows key + I to fire up the Settings menu, then go to Apps > Apps & Features. Scroll down until you’ve come across the Java program, then click on the three-dotted button, and be sure to select Uninstall to remove it.
In terms of reinstalling the app, you must visit the official Jave Runtime Environment page and download it for your Windows 11 computer. Once you’re done, install the tool, then restart your computer. From there, go ahead and check if Could Not Create The Java Virtual Machine is still showing up.
That’s it. Hopefully, one of these solutions will work for you!
What is the cause behind the Could not create the Java Virtual Machine error?
The cause for this error on Windows 11/10 varies quite a lot. For example, if you are running a homebrew Java application, then maybe it is being invoked by the wrong options. Alternatively, the Java application you’re trying to open could fail if the heap memory size is larger than the System Variable size.
What is Virtual Machine error in Java?
This error indicates that the Java Virtual Machine is not working properly or no longer has enough resources for it to continue operating.
Related:
- How to manually enable the latest Java version on Windows systems
- Java Install or Update did not complete – Error Code 1603.
Java is one of the best development tools for creating games and applications and server-side programs. Games or apps written in Java need the Java Virtual Machine environment to run.
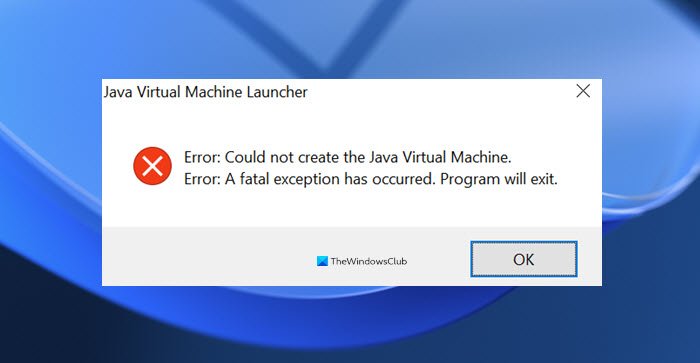
Games or applications developed with Java may crash unexpectedly or fail to open for various reasons, displaying the error «Could Not Create the Java Virtual Machine. Error: A fatal exception has occurred. Program will exit».

Below you will find several methods to resolve the Java Virtual Machine Launcher error «Could Not Create the Java Virtual Machine», in Windows 10/11 OS.
How to FIX: Could Not Create the Java Virtual Machine in Windows 10/11.*
* Suggestion: Before continuing with the following methods, try the following and see if the problem persists
-
- Install all Windows Updates.
- Press CTRL + SHIFT + ESC to open Task Manager and at Processes tab close all instances of Java Virtual Machine (right-click > End Task)
- 1. Install the Correct version of JAVA version for Java IDE app.
- 2. Increase Allocated Memory for JAVA Apps.
- 3. Launch JAVA with Admin rights.
- 4. Completely Remove and Reinstall JAVA.
Method 1. Install the Correct version of JAVA version for Java IDE app*
* Note: This method only applies to users using a JAVA IDE application for coding.
If you receive the mentioned error on a JAVA IDE application, you must ensure that the installed version of Java is compatible with the Java version (JRE or JDK) is running on JAVA IDE (Java Integrated Development Environment) application. So, proceed as follows:
Step 1. Check the JRE/JDK running version of JAVA IDE.
e.g. In the Eclipse IDE, check which version of the JRE or JDK it is running on by following the steps below:
1. From main menu, click Help > About Eclipse.
2. Click on Installation Details and choose the Configuration tab.
3. In the ‘Eclipse IDE Installation Details’ window, look at the line starting with -vm
4. The value at the line below will show you which JDK or JRE version on which Eclipse is running.
- e.g.: If the path contains “jre6”, that means that Eclipse is running JRE version 6
- e.g.:If the path contains «jdk1.8.0_05» means that Eclipse is running JDK version 8.
Step 2. Check which version of JRE or JDK is installed on Windows.
1. In the Search box type: cmd (or command prompt). Then select Run as administrator.

2. To find out the installed JAVA version give the following command and hit Enter:
- java –version

3. If the IDE does not support the Java version on your device, proceed to install the correct version of Java. *
* Note: In some cases the installed JRE & JDK versions may be different. So, if you JAVA IDE application running on JDK, proceed and check also if the installed JDK matches the running JDK of the JAVA IDE app. To find out the installed JDK version on Windows, give the following command:
- javac -version
Method 2. Increase Allocated Memory for JAVA Apps.
Launching an application that exceeds the maximum memory size of the Java virtual machine could result in the error «Could Not Create the Java Virtual Machine». To work around this problem, go ahead and increase the allocated system memory that JAVA can use as follows:
1. Click on the Start menu and type in search bar: view advanced system settings. Then click Open.
![image_thumb[8]](https://www.wintips.org/wp-content/uploads/2022/02/image_thumb8_thumb.png "image_thumb[8]")
2. In the ‘System Properties’ window, select the Advanced tab and click Environment Variables.

3. Below the System variables pane, select New.

4. Set the Variable name as _JAVA_OPTIONS and the Variable value as -Xmx1024M. Then, click OK twice to save the change and close all open windows. *
* Info: This will adjust the allocated memory for Java to 1GB (1024MB).

5. Restart your machine to apply the change.
6. Finally try to open your game or app on Java Virtual Machine. The problem should be gone.
Method 3. Launch java.exe with Admin rights.
The Java error also appears when the user does not have the admin rights or permissions to launch certain executables. Configuring Java to always run as an Administrator could fix the problem.
1. Press the Start menu and type Java in the search box.
2. Click Open file location.

3. In the File Explorer window, right-click the Java executable file and select Properties.

4. At ‘java Properties» window select the Compatibility tab and below the Settings pane, check the box Run this program as an administrator. Then click Apply and OK.

5. Finally, start the program that cannot run because of the «Could Not Create the Java Virtual Machine» error and see if the problem persists.
Method 4. Completely Remove and Reinstall JAVA.
In some cases, Java may be corrupted or missing components, causing games or applications you are trying to run to close. In this case, follow the instructions below to remove all versions of JAVA versions from your computer and reinstall it.
1. Download Java Uninstall tool.
2. Run the tool and select to remove all Java versions.

3. After removal, proceed and delete the Java folder(s) from the following locations on disk (if exist):
- C:Program Files
- C:Program Files (x86)
4. Restart your computer.
5. After reboot, visit Java official download page to download and install the latest version of Java.

That’s it! Which method worked for you?
Let me know if this guide has helped you by leaving your comment about your experience. Please like and share this guide to help others.
If this article was useful for you, please consider supporting us by making a donation. Even $1 can a make a huge difference for us in our effort to continue to help others while keeping this site free:

If you want to stay constantly protected from malware threats, existing and future ones, we recommend that you install Malwarebytes Anti-Malware PRO by clicking below (we
do earn a commision from sales generated from this link, but at no additional cost to you. We have experience with this software and we recommend it because it is helpful and useful):