
Operlaw пишет: Вообщем вот инструкция от КБ.
1. Удалить с АРМ КриптоПРО.
2. Перезагрузить ПК.
3. Удалить Континент АП.
4. Перезагрузить ПК.
5. Очистить систему утилитой от КриптоПРО (запуск от имени администратора) — www.cryptopro.ru/sites/default/files/public/cspclean.exe
6. Очистить систему утилитой от Кода Безопасности (запуск из командной строки от имени администратора с ключами –t и –v) —
Ссылка на утилиту CspCleaner.exe:
cloud.securitycode.ru/nextcloud/index.php/s/QfrzbrM5Gmd4PpN
Пароль: 5iXBS346
7. В случае, если запуск будет произведен не от имени администратора, утилита завершится без вывода какой-либо информации и очистка произведена не будет.
8. Перезагрузить ПК.
9. Установить КриптоПРО.
10. Перезагрузить ПК.
11. Установить Континент АП. При устанавки КАП выбрать максимальную установку с датчиками, с КБ CSP, и т.д.
12. Перезагрузить ПК.
13. В настройках КБ CSP установить биологический ДСЧ в место физического.
И все заработает.
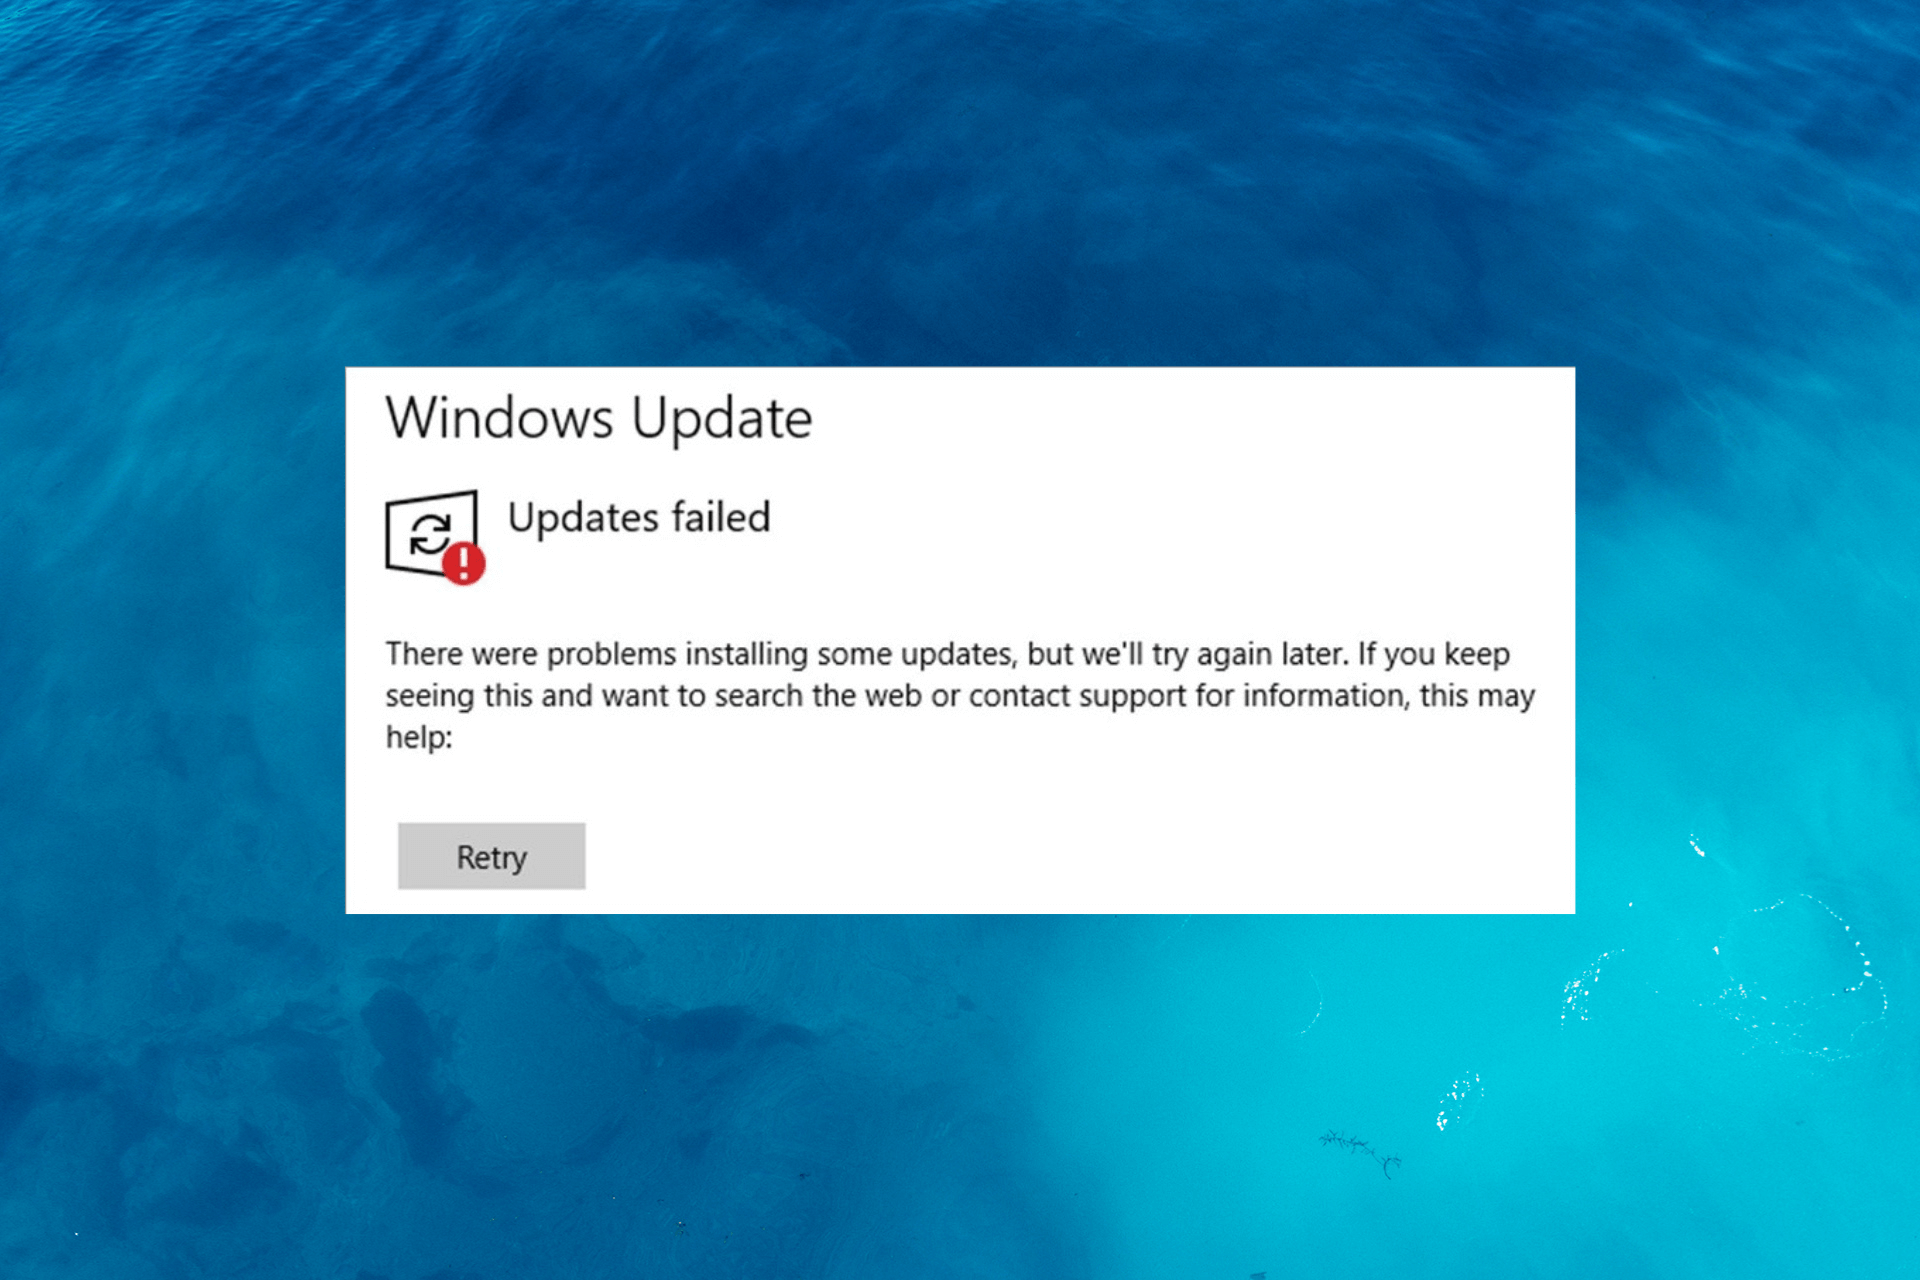
Не работает, выдаёт эту ошибку. А при установке Континента ап (последний 651) нет биологического накопления МИШЕНИй.,они не появляются
Если ошибка Центра обновления Windows 0x80090017 продолжает вас беспокоить, этот пост может вам помочь. Эта ошибка Windows Update 0x80090017 обычно возникает, если компоненты обновления Windows загружены неправильно или повреждены. К счастью, вы можете следовать некоторым простым советам, которые помогут исправить эту ошибку.
Чтобы исправить Ошибка Центра обновления Windows 0x80090017, сбросьте компоненты обновления и попробуйте установить обновления вручную. Если это не помогло, следуйте этим советам:
- Запустите средство устранения неполадок Центра обновления Windows.
- Сбросить компоненты Центра обновления Windows
- Временно отключите стороннее антивирусное программное обеспечение
- Перезапустите службу обновления Windows.
- Установите обновления Windows вручную
- Восстановление системы до состояния, предшествующего возникновению ошибки
Теперь давайте посмотрим на них подробно.
1]Запустите средство устранения неполадок Центра обновления Windows.
В Windows есть встроенная утилита под названием Средство устранения неполадок Центра обновления Windows, которая помогает исправить ошибки, связанные с обновлением. Запуск этого средства устранения неполадок может автоматически сканировать и исправлять ошибки, связанные с обновлением. Вот как вы можете запустить средство устранения неполадок обновления:
- Откройте «Настройки», нажав комбинацию клавиш Windows + I.
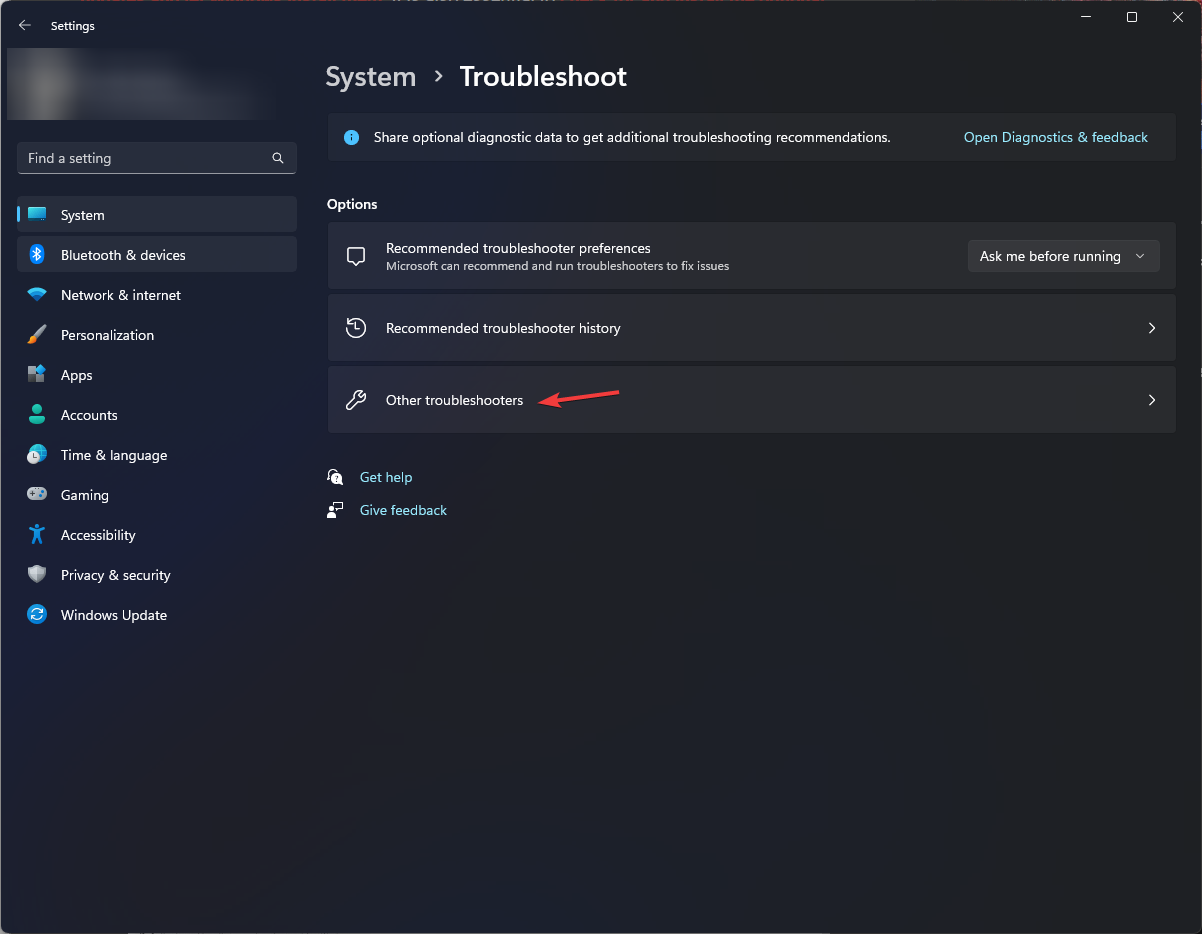
- Перейдите в «Система» > «Устранение неполадок» > «Другие средства устранения неполадок».
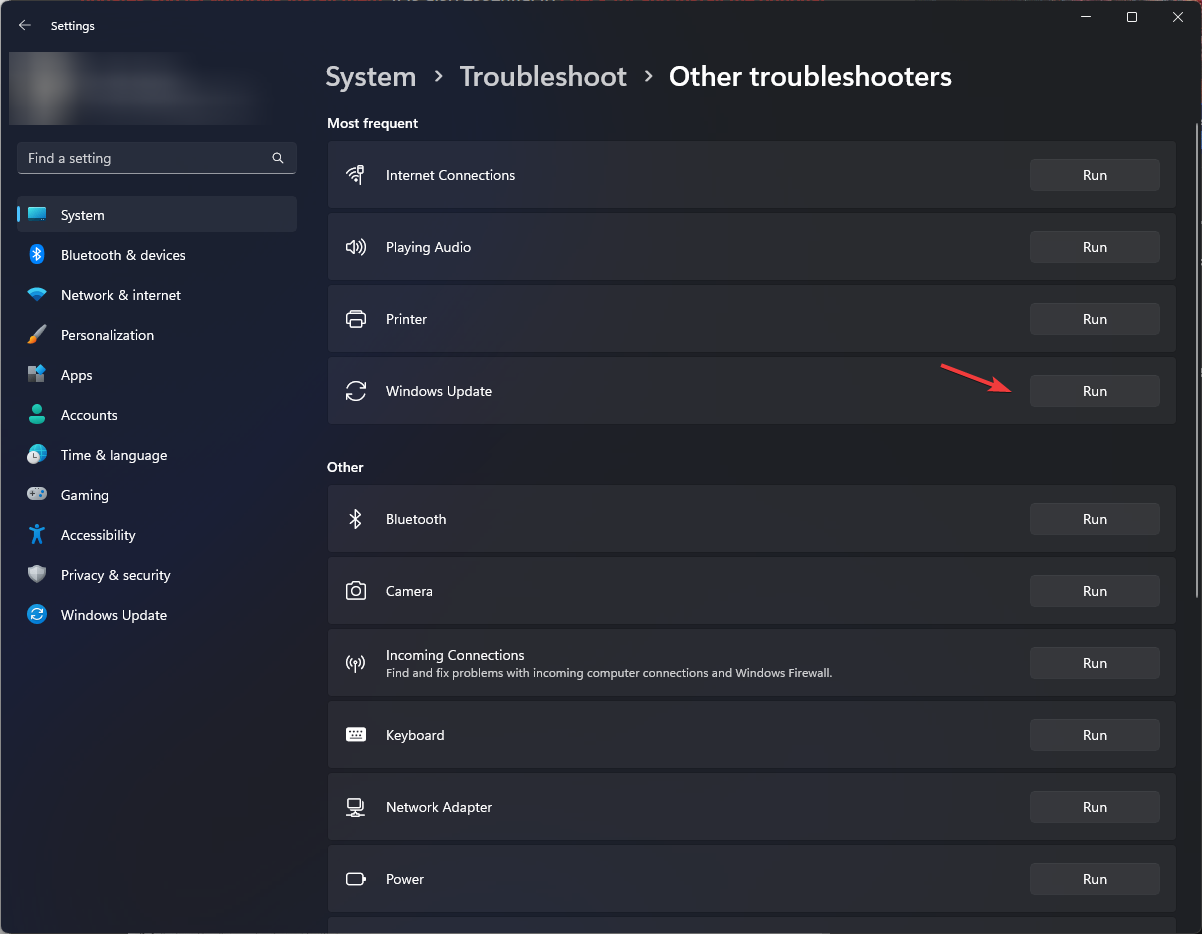
- Здесь нажмите «Выполнить» рядом Центр обновления Windows.
2]Сброс компонентов Центра обновления Windows
Поврежденные компоненты Центра обновления Windows — еще одна причина, по которой может возникнуть ошибка Центра обновления Windows 0x80090017. Эти компоненты обновлений содержат файлы кэша, которые действуют как хранилище и помогают устанавливать обновления. Сброс этих компонентов может очистить и сбросить все эти файлы кэша до их состояния по умолчанию. Вот как:
- Откройте командную строку от имени администратора.
- Введите следующие команды одну за другой и нажмите Enter.net stop bits net stop wuauserv net stop appidsvc net stop cryptsvc ren %systemroot%SoftwareDistribution SoftwareDistribution.old ren %systemroot%system32catroot2 catroot2.old net start bits net start wuauserv net запустить appidsvc чистый запуск cryptsvc
- После этого перезагрузите устройство и посмотрите, устанавливаются ли обновления.
3]Временно отключите стороннее антивирусное программное обеспечение.
Антивирусное программное обеспечение, установленное на вашем устройстве Windows, может помешать установке обновлений. Временно отключите их и посмотрите, исправит ли это ошибку. Если в вашей системе не установлено стороннее антивирусное программное обеспечение, отключите брандмауэр Защитника Windows и посмотрите, поможет ли это исправить ошибку Центра обновления Windows 0x80090017.
4]Перезапустите службу Центра обновления Windows.
Затем попробуйте перезапустить службу Центра обновления Windows. Эта служба поддерживает операционную систему и другое программное обеспечение Майкрософт в актуальном состоянии. Перезапуск службы может очистить все временные файлы или кеш, связанные со службой, и решить проблемы, связанные с обновлением. Вот как это сделать:
- Нажмите кнопку «Пуск», введите «Службы» и нажмите «Ввод».
- Прокрутите вниз и найдите службу Центра обновления Windows.
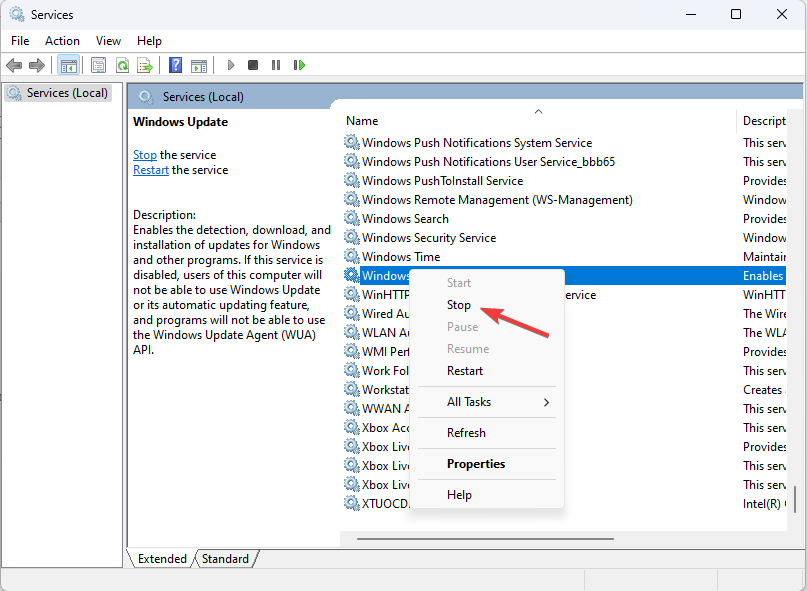
- Щелкните правой кнопкой мыши службу и выберите «Перезапустить».
5]Установите обновления Windows вручную
Если ни одно из этих предложений не помогло, рассмотрите возможность установки обновлений Windows вручную. Известно, что это помогает большинству пользователей исправить ошибку Центра обновления Windows 0x80090017.
6]Восстановление системы до момента возникновения ошибки
Если ошибка по-прежнему возникает при установке обновлений вручную, рассмотрите возможность восстановления системы. Это восстановит среду Windows, установив файлы и настройки, которые вы сохранили в точке восстановления. Вот как вы можете выполнить восстановление системы. Обратите внимание, что это можно сделать, только если вы ранее создали точку восстановления системы.
Читать: Программа не открывается после Центра обновления Windows
Мы надеемся, что эти предложения помогли вам.
Почему Windows не может устанавливать обновления?
Если ваше устройство Windows не может устанавливать обновления, во-первых, перезагрузите устройство и попробуйте установить обновления вручную. Кроме того, вы также можете отключить стороннее антивирусное программное обеспечение, если оно у вас есть.
First, check your internet connection
by Srishti Sisodia
Srishti Sisodia is an electronics engineer and writer with a passion for technology. She has extensive experience exploring the latest technological advancements and sharing her insights through informative… read more
Updated on May 16, 2023
Reviewed by
Alex Serban

After moving away from the corporate work-style, Alex has found rewards in a lifestyle of constant analysis, team coordination and pestering his colleagues. Holding an MCSA Windows Server… read more
- This error could occur due to a weak internet connection, low disk space, or malware infection.
- To fix it, you can retrieve disk space, run a Windows Update troubleshooter or reset Windows Update components.
XINSTALL BY CLICKING THE DOWNLOAD FILE
Windows update failures can be annoying! With Fortect, you will get rid of errors caused by missing or corrupted files after an update. The utility maintains a repository of the original Windows system file versions, and it uses a reverse algorithm to swap out the damaged ones for good ones.
- Download Fortect and install it on your PC
- Start the tool’s scanning process to look for corrupt files that are the source of the issues
- Right-click on Start Repair to resolve security and performance issues with your computer
- Fortect has been downloaded by 0 readers this month.
If you encountered the 0x80090017 Windows Update error while updating Windows, this guide could help! We will cover all the methods to get rid of this error right after discussing the causes.
What causes the 0x80090017 Windows Update error?
There could be various reasons for this update error; some of the common ones are mentioned here:
- Corrupted Cryptographic service provider – If the Cryptographic Service Provider on your PC becomes corrupted or damaged, it can lead to this update issue.
- Third-Party Software Interference – Some third-party security software may conflict with cryptographic operations performed during Windows Updates, leading to the problem.
- Outdated cryptographic algorithms – When the cryptographic algorithms used by the Cryptographic Service Provider are obsolete or incompatible with Windows, you may see the error.
- Misconfigured group policies – Group Policy settings, if misconfigured or altered incorrectly, can impact the Cryptographic Service Provider functionality, leading to these problems.
So, these are the causes for the error; let us check out the solutions for the problem.
How can I fix the 0x80090017 Windows Update error?
Before engaging in advanced troubleshooting steps, you should consider performing the following checks:
- Check your internet connection or talk to your ISP.
- Restart your computer & router.
- Try disabling the third-party antivirus tool temporarily.
- Run disk cleanup to retrieve space on your PC.
Some PC issues are hard to tackle, especially when it comes to missing or corrupted system files and repositories of your Windows.
Be sure to use a dedicated tool, such as Fortect, which will scan and replace your broken files with their fresh versions from its repository.
If these minor fixes didn’t work for you, move to the methods mentioned below.
1. Run the Windows Update troubleshooter
- Press Windows + I to open the Settings app.
- Go to System, then select Troubleshoot.

- Click Other troubleshooters.

- Locate Windows Update and click Run.

- Follow the onscreen instructions if prompted.

2. Restart the Windows Update Service
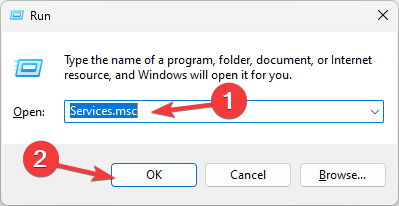
- Press Windows + R to open the Run dialog box.

- Type services.msc and click OK to open the Services app.
- Locate and right-click Windows Update service and click Stop.

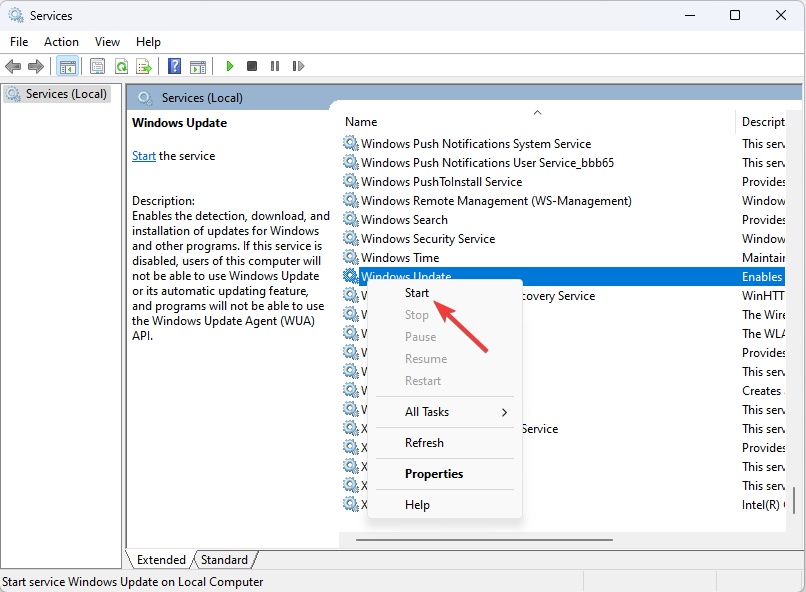
- Now wait for it to stop; once done, right-click it again and select Start.

- Let the service start, then close the Services app.
If you are not able to update Windows via the Settings app, then we advise you to read this guide to update Windows 10 offline.
3. Reset the Windows Update components
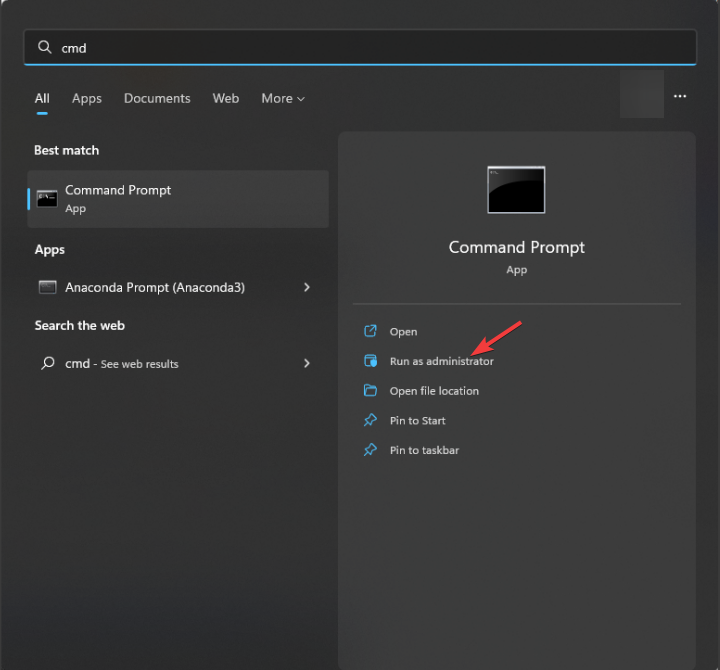
- Press the Windows key, type cmd and click Run as administrator.

- Copy & paste the following commands to stop Windows Update, BITS & Cryptographic services, one by one and hit Enter after every command:
net stop bits
net stop wuauserv
net stop appidsvc
net stop cryptsvc
- To delete the qmgr*.dat files, type the following command and press Enter:
Del "%ALLUSERSPROFILE%Application DataMicrosoftNetworkDownloaderqmgr*.dat" - Copy & paste the following commands one by one to clear the Windows Update cache to allow Windows to re-download the updates, and hit Enter after every command:
rmdir %systemroot%SoftwareDistribution /S /Q
rmdir %systemroot%system32catroot2 /S /Q
- To reset the BITS and Windows Update service to the default security descriptor, type the following commands one by one and press Enter after every command:
sc.exe sdset bits D:(A;;CCLCSWRPWPDTLOCRRC;;;SY)(A;;CCDCLCSWRPWPDTLOCRSDRCWDWO;;;BA)(A;;CCLCSWLOCRRC;;;AU)(A;;CCLCSWRPWPDTLOCRRC;;;PU)
sc.exe sdset wuauserv D:(A;;CCLCSWRPWPDTLOCRRC;;;SY)(A;;CCDCLCSWRPWPDTLOCRSDRCWDWO;;;BA)(A;;CCLCSWLOCRRC;;;AU)(A;;CCLCSWRPWPDTLOCRRC;;;PU)
- Copy & paste the following command and hit Enter:
cd /d %windir%system32 - To re-register the BITS files & the Windows Update-related DLL files, type the following commands one after the other and press Enter after every command:
regsvr32.exe /s atl.dll
regsvr32.exe /s urlmon.dll
regsvr32.exe /s mshtml.dll
regsvr32.exe /s shdocvw.dll
regsvr32.exe /s browseui.dll
regsvr32.exe /s jscript.dll
regsvr32.exe /s vbscript.dll
regsvr32.exe /s scrrun.dll
regsvr32.exe /s msxml.dll
regsvr32.exe /s msxml3.dll
regsvr32.exe /s msxml6.dll
regsvr32.exe /s actxprxy.dll
regsvr32.exe /s softpub.dll
regsvr32.exe /s wintrust.dll
regsvr32.exe /s dssenh.dll
regsvr32.exe /s rsaenh.dll
regsvr32.exe /s gpkcsp.dll
regsvr32.exe /s sccbase.dll
regsvr32.exe /s slbcsp.dll
regsvr32.exe /s cryptdlg.dll
regsvr32.exe /s oleaut32.dll
regsvr32.exe /s ole32.dll
regsvr32.exe /s shell32.dll
regsvr32.exe /s initpki.dll
regsvr32.exe /s wuapi.dll
regsvr32.exe /s wuaueng.dll
regsvr32.exe /s wuaueng1.dll
regsvr32.exe /s wucltui.dll
regsvr32.exe /s wups.dll
regsvr32.exe /s wups2.dll
regsvr32.exe /s wuweb.dll
regsvr32.exe /s qmgr.dll
regsvr32.exe /s qmgrprxy.dll
regsvr32.exe /s wucltux.dll
regsvr32.exe /s muweb.dll
regsvr32.exe /s wuwebv.dll
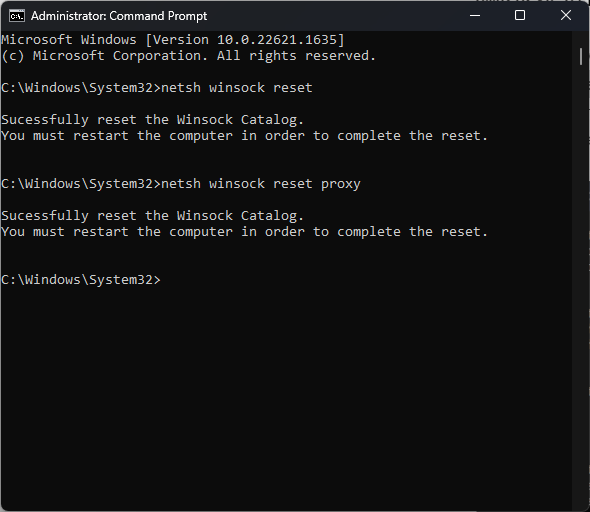
- Copy & paste the following commands one by one to reset winsock and hit Enter after every command:
netsh winsock reset
netsh winsock reset proxy
- Type the following commands to start Windows Update, BITS & Cryptographic services, and press Enter after every command:
net start bits
net start wuauserv
net start appidsvc
net start cryptsvc
- Reboot your PC to confirm the changes.
- CAA30194 Microsoft Team Error Code: How to Fix It
- Fix: Windows Update May Have Automatically Replaced AMD
4. Perform a System Restore
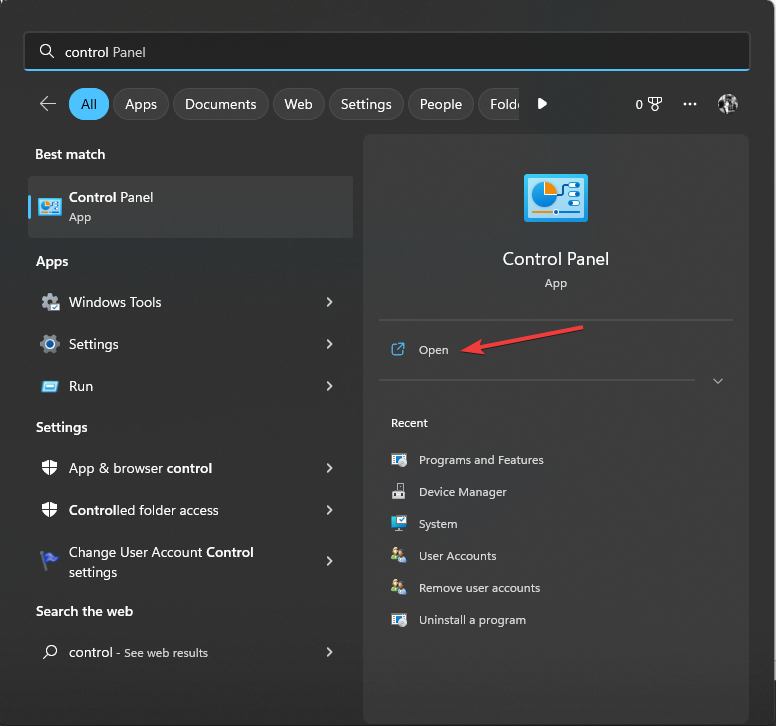
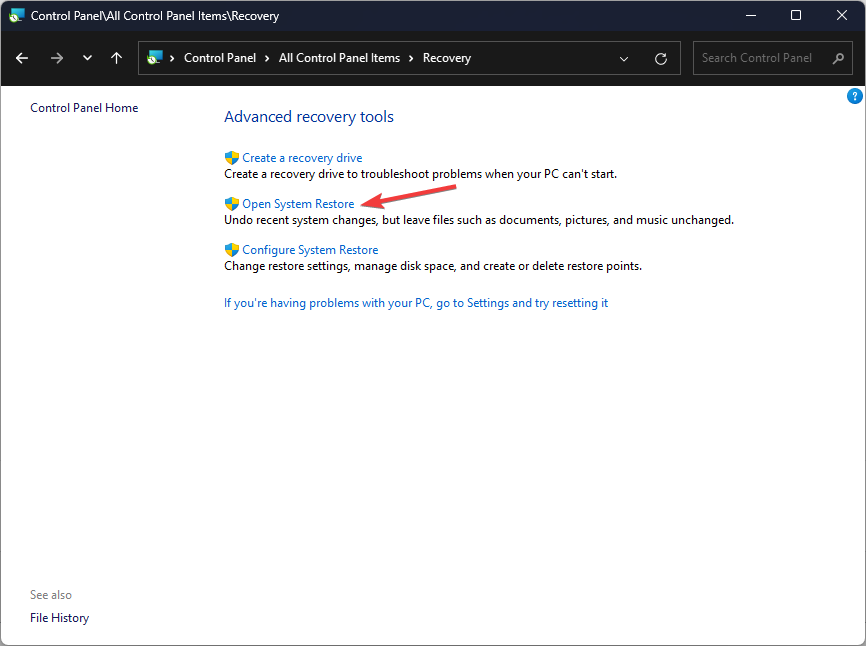
- Press Windows key, type control panel and click Open.

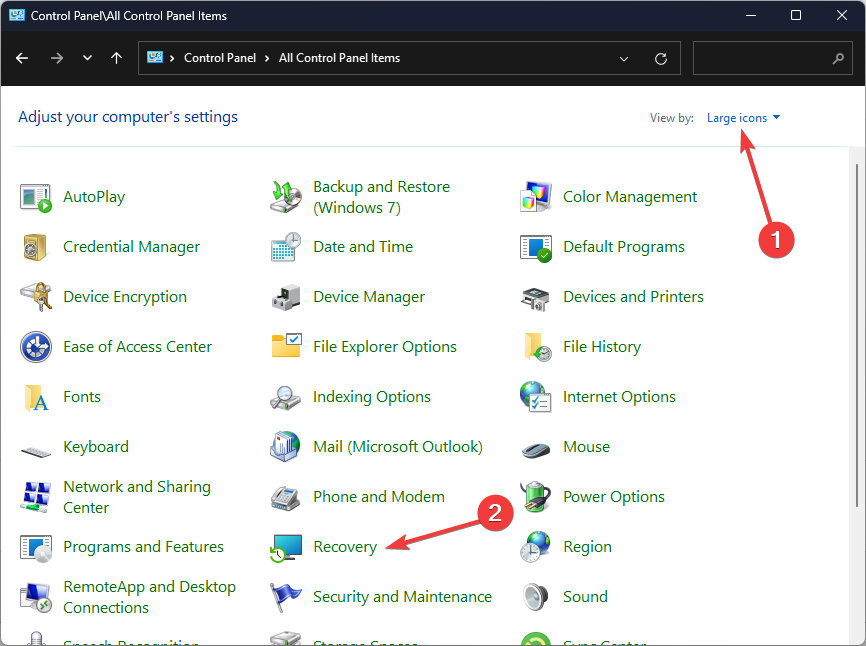
- Select Large icons for View by and click Recovery.

- Click Open System Restore.

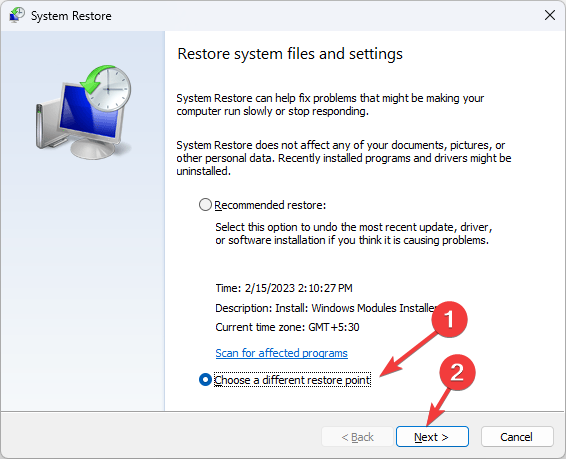
- On the System Restore window, select Choose a different restore point and click Next.

- Select the restore point and click Next.
- Click Finish to complete the process.


Now Windows will restart and restore the machine to the selected version. If the System Restore is not working for you, then we suggest you check our informative guide on it to know the solutions.
So these are the solutions that you can use to fix the 0x80090017 Windows Update error. If you have questions or suggestions, feel free to mention them in the comments section below.
Still experiencing issues?
SPONSORED
If the above suggestions have not solved your problem, your computer may experience more severe Windows troubles. We suggest choosing an all-in-one solution like Fortect to fix problems efficiently. After installation, just click the View&Fix button and then press Start Repair.
![]()
Проблема
При импорте сертификата в «Континент-АП» или при попытке подключения возникает ошибка: «Ошибка работы с криптопровайдером 0x80090017. Тип поставщика не определен».
Возможно, перед использованием «Континент-АП» на ПК была установлена система управления Континент, в составе которой есть криптопровайдер «Код Безопасности CSP».
Решение
Возможное решение проблемы – удалить «Континент-АП», очистить реестр от неиспользуемых данных (к примеру, программой CCleaner), повторно установить «Континент-АП». В ходе инсталляции будет восстановлен криптопровайдер, который вызывает ошибку.
Информация оказалась полезной?
Не нашли ответа на свой вопрос? Используйте внутренний поиск:
На чтение 6 мин Просмотров 1.4к.
Содержание
- Проблема
- Решение
- Ошибка работы с криптопровайдером 0х80090017. Тип поставщика не определен
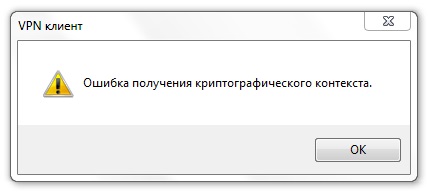
Ошибка получения криптографического контекста.
Проблема
Решение
Информация оказалась полезной?
115230, Россия, Москва,
1-й Нагатинский проезд, д. 10, стр. 1
2008-2019 © «Код Безопасности». Российский разработчик программных и аппаратных средств защиты информации. Наша продукция охватывает все уровни инфраструктурной безопасности.
Сегодня поговорим о двух ошибках в Континент АП, которые я решил описать в рамках одной статьи (обычно я описываю ошибку и способ её решения в одной статье).
Но так как нижеописаные ошибки – звенья одной цепи, разделять их нет смысла.
Кто бы мог подумать? В большинстве случаев крипто про устанавливается в первую очередь а потом уже весь необходимый софт. Вот и я за много лет отошел от этого правила и с удивление открыл для себя эти «новые» ошибки.
Ошибка работы с криптопровайдером 0х80090017. Тип поставщика не определен
Ошибка получения криптографического контекста.
Ошибка 0х80090017 возникла у меня, когда я пытался установить сертифика в континент ап.

Первым делом пришла мысль! А установлен ли у меня крипто про. Зашел в панель управления и понял что его нет ))) Быстренько решил этот вопрос. Поставил крипто про, после установки меня не уведомило окошко о «требуется перезагрузить компьютер», ну я радостный пытаюсь опять установить сертификат и соединение но . тут то и пришла на смену первой ошибки вторая.
Бегом перезагрузил компьютер, что бы исключить этот момент из сопутствующих моим ошибочкам.
Помогло. Сертификат континента установился и я смог подключиться.
Наступил 2019 год. Поэтому в соответствии с письмом УФК по Челябинской области «Об изменении порядка получения сертификатов Континента АП», с 01.01.2019 формирование запросов на сертификаты для работы в СКЗИ Континент АП, должно выполняться только с применением криптопровайдера «Код безопасности CSP» и алгоритма открытого ключа по ГОСТ Р 34.10-2012.
В связи с этим, я решил показать как сделать такой запрос на сертификат Континента АП. Первое, что нужно знать, это то, что такой запрос делается на версии программы не ниже чем 3.7.7.651. Если у вас версия другая, то получите нужную в вашем территориальном отделе Федерального казначейства и обновите свой Континент АП.
Кстати, обновить Континент АП до указанной версии очень просто. Не потребуется даже удалять предыдущую. Просто запускаете установку, а дальше установщик всё сделает сам. Правда это относится к версиям, которые используют криптопровайдер «Код безопасности CSP», например версия Континента АП 3.7.5.474. Если же у вас старая версия, какая как 3.5.68.0, то ее придется удалить штатными методами операционной системы, а потом установить новую.
Итак, приступим. После загрузки Вашего компьютера, в трее (в правом нижнем углу рабочего стола вашего ПК) должна быть иконка программы Континент АП. Кликнем по ней правой кнопкой мыши (ПКМ) и выполним пункт меню Сертификаты -> Создать запрос на пользовательский сертификат. Все это показано на рисунке ниже:

После этого откроется окошко, где нужно будет заполнить все поля. Я заполнил их так, как вы видите на рисунке ниже, вы же заполняйте по своему:

В блоке «Файлы для сохранения запроса на сертификат», можно отредактировать имена этих файлов. Не забудьте поставить галочку «Бумажная форма» и по кнопкам «Обзор» укажите место для сохранения файлов на вашем компьютере. После нажатия на кнопку «Подробно», откроются варианты выбора криптопровайдера и формата запроса (рис. 2). Как уже говорилось в начале статьи выбираем криптопровайдер «Код безопасности CSP» и формат запроса «Запрос для СД» (запрос для сервера доступа). Имя контейнера тоже можно отредактировать. Если все это сделано, жмем «ОК» и приступаем к процессу генерации закрытых ключей и запроса на сертификат (рис. 3):

Как видно из рисунка 3, на вашем экране появится мишень, которая перемещается по экрану. Ваша задача кликать по ней мышкой и смотреть за полоской индикатора в окне «Код безопасности CSP», которая должна двигаться. С такой мишенью вы сталкивались, если сами устанавливали программу на компьютер, я же рассказывал об том тут. В конце всех этих действий надо нажать на кнопку «ОК» и процесс генерации ключей и запроса продолжится дальше:


После ввода пароля на носитель, а тут нас заставляют это сделать, как видно из рис. 4, минимальная длина пароля должна быть 6 символов и выбора ключевого носителя для записи ключей (рис. 5), генерация будет завершена (рис. 6). Теперь осталось посмотреть печатную форму и файл запроса, которые были сгенерированы вместе с закрытыми ключами. Открываем форму и видим, что алгоритм открытого ключа остался старый, т.е. сделанный по ГОСТ Р 34.10-2001. Это видно на рисунке ниже:

Но, поверьте мне, повода для паники нет. У вас просто установлен старый шаблон печатной формы. Новый можно скачать отсюда. И еще, для очистки совести, можно узнать в каком виде у нас получился запрос, а именно *.req файл, который тоже был сгенерирован вместе с ключами, ведь на основе именно его содержимого выдается сертификат. Файл в этом формате можно прочитать специальной программой, которую вы можете скачать отсюда. Открыв файл в ней, мы увидим совсем другую картину:


На рис. 8 показан алгоритм открытого ключа в том случае, когда у вас на компьютере установлен Континент АП и выше указанная программа. На рис. 9 показан алгоритм открытого ключа, когда у вас не установлен Континент АП. И в том и в другом случае это нормально. Ну а печатную форму необходимо откорректировать, заменив ее шаблон. На этом всё, спасибо за внимание и пока!
И напоследок. Если вам понравилась эта статья и вы почерпнули из нее что-то новое для себя, то вы всегда можете выразить свою благодарность в денежном выражении. Сумма может быть любой. Это вас ни к чему не обязывает, все добровольно. Если вы всё же решили поддержать мой сайт, то нажмите на кнопку «Поблагодарить», которую вы можете видеть ниже. Вы будете перенаправлены на страницу моего сайта, где можно будет перечислить любую денежную сумму мне на кошелек. В этом случае вас ждет подарок. После успешного перевода денег, вы сможете его скачать.
When an automatic update is running, oftentimes the process gets stuck at a certain stage and starts throwing error code. One such error is 0x80090017. Even if the downloading shows one hundred percent complete, you will notice some of the downloaded files are not getting installed because of this fatal code. Every time you turn on the Windows 10 or 11 PC, the system attempts to download the unfinished updates and fails like earlier.
Error Code 0x80090017 mainly appears due to corrupted Windows update components. Furthermore, poor internet connection, overloaded hard disk, presence of malware, missing system elements are equally responsible. If the update error is arising due to some fault from Microsoft, all you need to do is wait for some days as it will get fixed automatically.
Here is how to fix Error Code 0x80090017 in Windows 11 or 10 Update –
1] Check internet connection
A good network is a mandatory condition to receive Windows updates without any issue. Even if the system has all available updates downloaded and ready to be installed, an active internet connection is required to finish the process. If your system can’t access the internet, several errors may rise up to obstruct the installation process. Despite being connected to Wi-Fi, often you will see a question mark on the network name that mainly indicates that there is no internet. There might be several reasons behind this but in most cases, a router without power supply is found to be guilty. In such a case, rebooting the router and making sure the power supply will work as a trick. If it doesn’t work, switch to another network or call the provider to fix the connection.
2] Run Windows Update troubleshooter
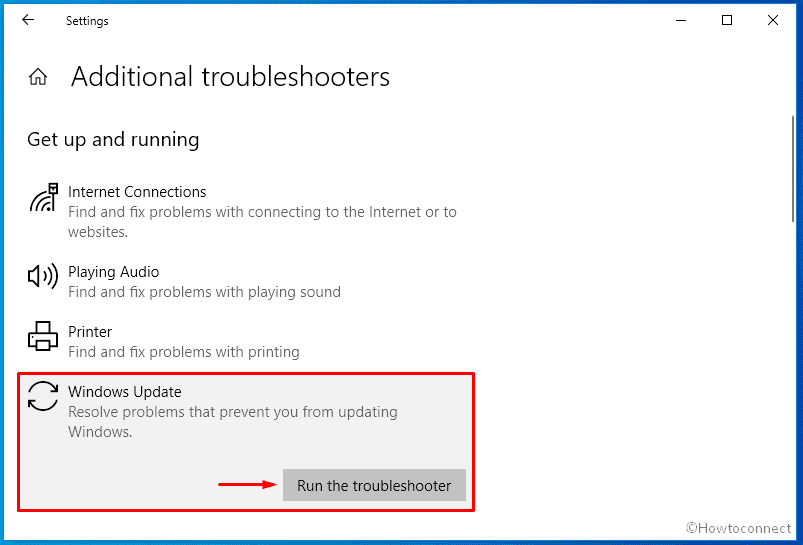
Update errors are pretty common, that’s why Microsoft offers a built-in utility to fix such issues automatically. Once you run the troubleshooter, it will scan the full system to find out what is the real cause behind error 0x80090017. Diagnosing the case, the utility will propose an automatic fix also. Before running the Windows update troubleshooter, ensure to connect the PC to an active internet connection. Now, follow the way –
- Press – Windows + S.
- Type in – troubleshoot.
- Hit – Enter.
- From the right-pane of appearing settings page, click – Additional troubleshooters or Other troubleshooters.
- Select – Windows update.
- Click – Run the troubleshooter.
- If you are using Windows 11, you can click Run Directly.
- Follow on-screen guidelines if any.
- In the end, click – Apply this fix.
- Close the troubleshooter and reboot Windows.
3] Reset update components to fix 0x80090017
Broken or corrupted update cache is one of the biggest reasons to cause error Code 0x80090017. This cache mainly works as a storehouse that holds all update files and helps in the installation of cumulative patches and builds. Corruption in the cache folder sometimes deletes the existing DLL related to Windows update and leads to update problems. Resetting the same will bring the folder to the default state and most probably fix the appearing too. Here are the steps to follow –
- Click search icon from the taskbar.
- Type in – cmd.
- Hit the – Ctrl+Shift+Enter.
- When User Account Control pop-up appears, click – Yes.
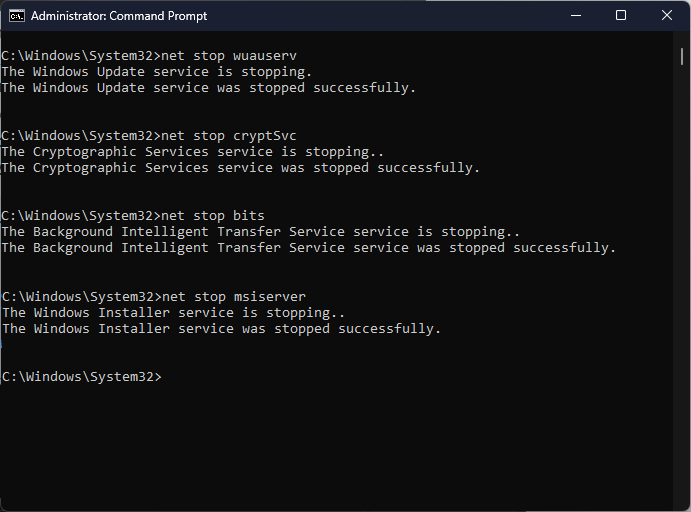
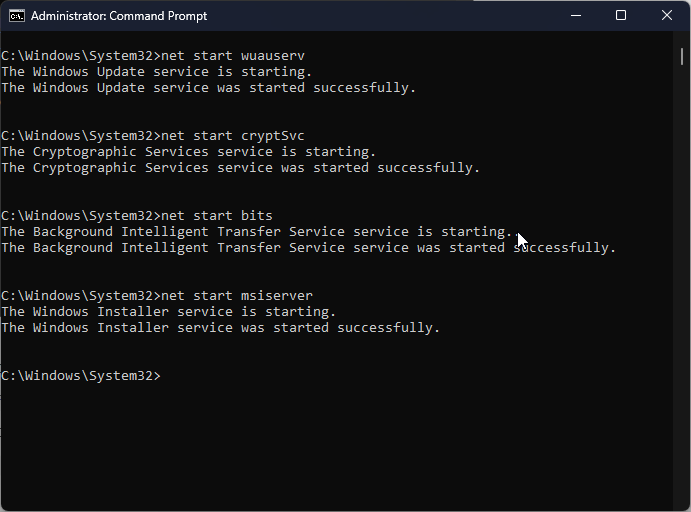
- Execute the following lines one after another –
net stop wuauservnet stop cryptSvcnet stop bitsnet stop msiserver
ren C:WindowsSoftwareDistribution SoftwareDistribution.oldren C:WindowsSystem32catroot2 Catroot2.old
net start wuauservnet start cryptSvcnet start bitsnet start msiserver
4] Try to install the latest update manually
As we said earlier, error 0x80090017 occurs when the system is set to install updates automatically. Therefore, try to get the same manually and see whether the error still exists.
- Press – Windows + I.
- Click – System.
- From the left sidebar, select – About.
- Note down the info present next to System type.
If you are using Windows 11, open Settings => move to the right of appearing System page and then click About.
- Navigate the official webpage of the update catalog.
- Click the search bar.
- Insert the KB number that is giving the error.
- Click – Search.
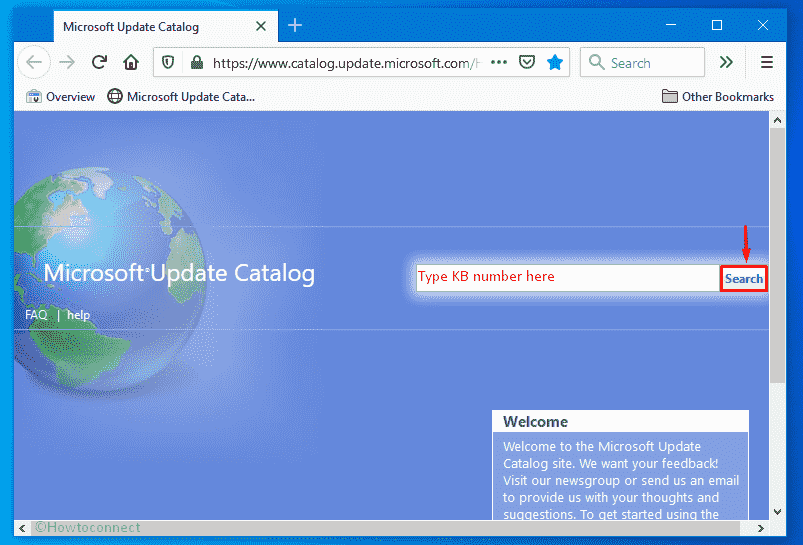
- Look for the version that matches the system type you noted.
- Click Download present next to the found version.
- Visit the directory where the system saves downloaded items.
- Double-click the MSU setup file you just got.
- Install it by following on-screen instructions.
5] Make sure Windows update related services are running
There are some services dedicated to Windows update that runs in the background. These allow Windows 10 and 11 to download and install new patches automatically. If any of them is disabled, the system may end up causing error 0x80090017 during the installation process. To check the services, follow the below steps –
- Press – Windows + Q.
- Type – services.
- Hit – Enter.
- Once in the Services window, double-click – Windows Update.
- Set the Startup type to Automatic.
- If the service was disabled before, click – Start.
- Move to Log on tab.
- Click the radio button present alongside – Local System account.
- Uncheck – Allow service to interact with desktop.
- Click Apply and then OK.
- In the same way, also modify Background Intelligent Transfer Service, Event Log, and Remote Procedure Call (RPC) service.
6] Delete old Windows files to fix error 0x80090017
Even after installing the newer Windows version, some of the old files stay in the system for a certain time period. They not only create collision but also occupy a good amount of hard disk space. When the hard disk lacks enough free space, the system fails to install the latest update and throws error 0x80090017. To fix it out, clean the old Windows files and also other junk. Here’s how –
- Click Start present on taskbar.
- Type in – cleanmgr.
- Hit – Enter.
- When Driver selection pop-up emerges with C: drive selected, click – OK.
- Hit – Clean up system files.
- Again, click – OK for Driver selection prompt.
- Check all the boxes available under Files to delete segment.
- Leave Downloads and Recycle Bin unchecked if needed.
- Click – OK.
- When the process ends, reboot the device.
7] Scan for malware
Due to virus attacks, the system often loses the important components that are required for the system to install updates. Before you try to regain the missing elements, find the malware that exists on the system and eliminate them as well. To do so –
- Click the Windows key.
- Type – Virus & threat protection.
- Hit – Enter.
- Shift to the right of the consequent window.
- Click the link – Scan options.
- Hit the radio button present before – Full scan.
- Click – Scan now.
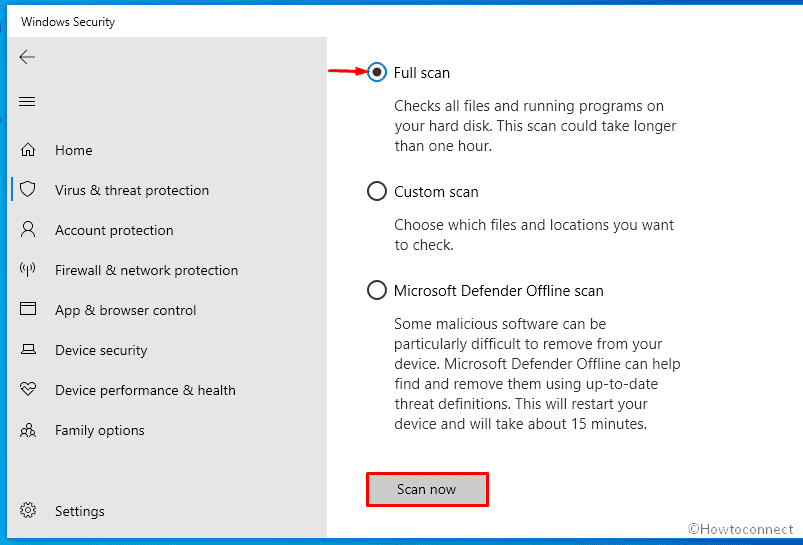
- If Windows Security comes by any malware, hit – Clean Threat.
- After that, click Remove and then Start actions.
- Reboot Windows device to make the changes effective.
8] Recover missing system components to fix 0x80090017
Windows 11 or 10 often gives rise to error 0x80090017 if the required components are either corrupted or missing. Usually, these elements don’t go faulty on their own. Malware infection, software conflict, abnormal application termination, and power outage are mostly found to cause corruption. To resolve the bad components and also recovering the same, here are the steps to follow –
- Press – Start button.
- Type – cmd.exe.
- Right-click on Command Prompt and select – Run as administrator.
- When User Account Control asks for approval, click – Yes.
- In the black pane, insert –
Sfc /scannow. - Hit – Enter.
- Once the scanning process ends, check the report.
- If the utility fixed existing issues, restart the device.
- Or else, do what the tool suggests.
9] Disable antimalware program
In order to keep you safe from any threat, antimalware programs block suspicious files from entering the system. There is a possibility that the security suite you are currently using mistaken the updated files as a danger and obstructing the installation. To avoid such a situation, disable the antivirus program for some time being. However, don’t forget to enable the antimalware tool after eradicating the update error 0x80090017.
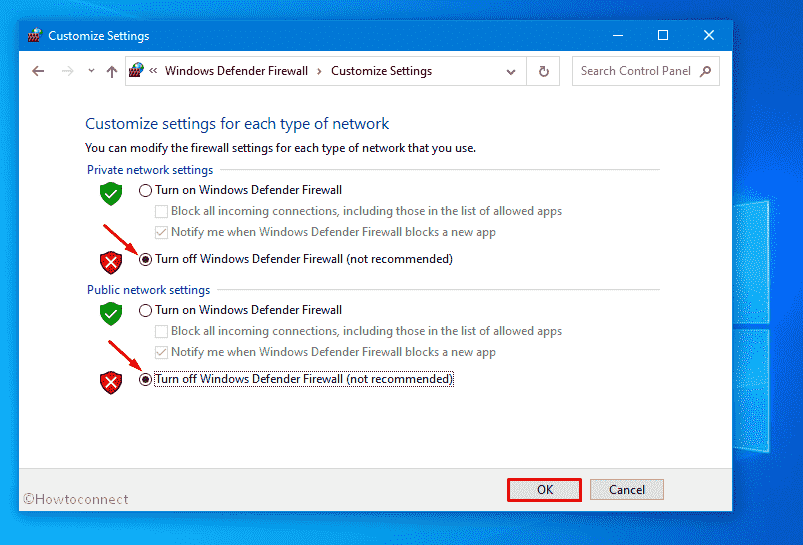
Turn Windows Defender Firewall off
- Press – Windows key.
- Type – firewall.cpl.
- Hit – Enter.
- From the left sidebar, click – Turn Windows Defender Firewall on or off.
- Choose Turn off Windows Defender Firewall (not recommended) option for both Private network settings and Public network settings.
- Click – OK.
Disable third-party antivirus to fix 0x80090017
- Click the up arrow icon from the notification bar.
- Right-click the antimalware icon.
- Choose – Disable.
- Opt for a time slot that decides how long the tool will remain disabled.
10] Restore an error-free state
If any recent changes tweak the registry wrongly or mischief with the settings of the system, update error 0x80090017 may evolve. Going back to the last known good configuration is the only way then. To restore Windows 11 or 10 –
- Press – Windows + R.
- In the Run box, insert – rstrui.
- Click – OK.
- When System Restore wizard shows up, hit – Choose a different restore point.
- Click – Next.
- Select the checkbox set before – Show more restore points.
- Choose a date when your Windows was error-free.
- Click – Next.
- Following that, hit – Finish.
- For the warning pop-up, click – Yes.
Methods list
1] Check internet connection
2] Run Windows Update troubleshooter
3] Reset update components
4] Try to install the update manually
5] Make sure Windows update related services are running
6] Delete old Windows files
7] Scan for malware
8] Recover missing system components
9] Disable antimalware program
10] Restore an error-free state
That’s all!!
Repair any Windows problems such as Blue/Black Screen, DLL, Exe, application, Regisrty error and quickly recover system from issues using Reimage.
Удаление или переименование файлов может быть невозможным из-за ошибки с кодом 0x80090017.

Это возникает вследствие многих причин, поэтому устранять сбой стоит следующими универсальными методами:
- Используйте стандартную утилиту Майкрософт. Скачайте ее с официального репозитория и запустите. Она работает во всех версиях Виндоус выше седьмой версии. С ее помощью решается большинство проблем с папками и файлами на компьютере.
- Загрузитесь в безопасном режиме. Если в таком случае проблема не проявляется, то вероятнее всего дело в сбоящем стороннем приложении или драйвере. Возможно перед началом появления ошибки к ПК подключалось новое оборудование либо же туда устанавливались новые программы. Обновите драйвера на подобные устройства, удалите приложения.
- Проверьте систему на вирусы. Стоит выполнять это поочередно при помощи некоторых антивирусов. Будет неплохо, если дисковый накопитель можно подключить к иному компьютеру и уже на нем выполнять проверку. Если ошибка 0x80090017 не возникает при выключенном антивирусе, то она наверняка вызвана вредоносным ПО.