
OneNote для Microsoft 365 OneNote 2021 OneNote 2016 OneNote 2013 Еще…Меньше
В OneNote 2016 или 2013 может возникать ошибка с кодом 0xE4020045 при щелчке желтой информационной панели, которая появляется при перетаскивании (или добавлении другим способом) локальной копии записной книжки в OneDrive для резервного копирования, синхронизации или предоставления общего доступа. Хотя может казаться, что записная книжка теперь находится в облаке, OneNote продолжит обрабатывать ее как локально сохраненную копию записной книжки, если записную книжку не перенести в OneDrive надлежащим образом.
Вы можете попытаться устранить эту проблему, выполнив следующие действия:
-
Выйдите из OneNote, если приложение еще работает.
-
На жестком диске компьютера перейдите в папку, где хранится проблемная записная книжка.
Совет: Как правило, по умолчанию локально хранящиеся записные книжки OneNote для Windows располагаются в папке C:Users<имя пользователя>DocumentsЗаписные книжки OneNote.
-
Найдите папку с тем же именем, как у проблемной записной книжки, и скопируйте ее в корневую папку жесткого диска.
Таким образом копия записной книжки будет фактически удалена из области синхронизации OneDrive.
-
В проводнике откройте Этот компьютер, дважды щелкните диск, в который скопировали записную книжку на предыдущем шаге, чтобы открыть его корневую папку, а затем дважды щелкните папку с именем скопированной записной книжки.
-
В папке скопированный записной книжки дважды щелкните файл Open Notebook.onetoc2.
Если этот файл отсутствует, дважды щелкните любой другой доступный файл *.onetoc2 в этой папке.
-
После открытия OneNote 2016 для Windows заметки из скопированной папки записной книжки должны отобразиться правильно.
Чтобы предотвратить повторное возникновение проблемы, настоятельно рекомендуем следовать инструкции правильного перемещения исходной записной книжки в учетную запись OneDrive, благодаря чему локально сохраненная записная книжка преобразуется в настоящую облачную записную книжку Облачные заметки останутся конфиденциальными, и вы получите более надежную синхронизацию и сможете открывать свои заметки с любого мобильного устройства или браузера.
Дополнительные сведения см. в статье Перемещение записной книжки OneNote в OneDrive. Инструкции в этой статье применимы также и к более ранним версиям OneNote для Windows, например OneNote 2013 или 2010.
Нужна дополнительная помощь?
Нужны дополнительные параметры?
Изучите преимущества подписки, просмотрите учебные курсы, узнайте, как защитить свое устройство и т. д.
В сообществах можно задавать вопросы и отвечать на них, отправлять отзывы и консультироваться с экспертами разных профилей.
OneNote for Microsoft 365 OneNote 2021 OneNote 2016 OneNote 2013 More…Less
You may see the 0xE4020045 error code in OneNote 2016 or 2013 after clicking a yellow Info Bar that appears when a locally stored notebook was dragged (or otherwise added) to OneDrive for the purpose of backing it up, syncing it, or sharing it. While this may give the appearance that the notebook is now a cloud-based notebook, OneNote will continue to treat it as a locally stored notebook unless the notebook is properly moved to OneDrive.
You can try to resolve this issue by doing the following:
-
Exit OneNote, if it is still running.
-
On your computer’s hard drive, navigate to the folder in which the affected notebook is stored.
Tip: Typically, the default location for locally stored OneNote for Windows notebook folders is C:Users<username>DocumentsOneNote Notebooks.
-
Copy the folder with the same name as the affected notebook to the root folder of your main hard drive.
Doing this effectively removes the copy of the notebook out of OneDrive’s sync scope.
-
In Windows File Explorer, click This PC, double-click to open the hard drive root location to which you just copied the notebook in the previous step, and then double-click the folder with the name of the copied notebook.
-
In the copied notebook folder, double-click the Open Notebook.onetoc2 file.
If this file is not present, double-click any other available *.onetoc2 file in this folder.
-
When OneNote 2016 for Windows opens, the notes from the copied notebook folder should now be displayed properly.
To prevent this issue from happening again, we strongly recommend that you follow the required procedure for properly moving the original affected notebook to your OneDrive account, which will convert it from a locally stored notebook to a true cloud-based notebook. Your cloud-based notes will still be private, but you’ll enjoy more reliable syncing and you’ll be able to access your notes from any mobile device or any Web browser that you use.
For more information, see Move a OneNote for Windows notebook to OneDrive. The instructions in this article also apply if you’re using older versions of OneNote for Windows, such as OneNote 2013 or 2010.
Need more help?
Want more options?
Explore subscription benefits, browse training courses, learn how to secure your device, and more.
Communities help you ask and answer questions, give feedback, and hear from experts with rich knowledge.
Пользовательский ROM | CyanogenMod | Приложения для Android | Обновление прошивки | MiUi | Все стоковые прошивки | Lineage OS |
Вы можете увидеть код ошибки 0xE4020045 в OneNote 2016 или 2013 после нажатия появившейся желтой информационной панели когда локально сохраненная записная книжка была перетащена (или иным образом добавлена) в OneDrive для ее резервного копирования, синхронизации или разделяя это. Хотя это может создать впечатление, что записная книжка теперь является облачной записной книжкой, OneNote будет продолжать рассматривать ее как локально сохраненную записную книжку, если записная книжка не будет правильно перемещена в OneDrive. Следуйте приведенной ниже статье, чтобы получить подробное руководство по исправлению кода ошибки OneNote 0xE4020045 (неподдерживаемый клиент).
Даже после выполнения всех инструкций, представленных в Интернете, вы не сможете исправить код ошибки 0xE4020045. Когда возникают проблемы с 0xE4020045 Onenote 2016, вы можете подумать, что ваш компьютер превратились в своего рода механический мусор, и поэтому у вас может остаться мотивация заменить свой компьютер.

Исправить код ошибки OneNote 0xE4020045 (неподдерживаемый клиент)
Способ 1
- Закройте OneNote, если он все еще работает.
- На жестком диске вашего компьютера перейдите в папку, в которой хранится пострадавший ноутбук.
C: Пользователи \ Документы Блокноты OneNote
- Скопируйте папку с тем же именем, что и у затронутого ноутбука, в корневую папку основного жесткого диска.
- Это эффективно удаляет копию записной книжки из области синхронизации OneDrive.
- В проводнике Windows щелкните «Этот компьютер», дважды щелкните, чтобы открыть корневой каталог жесткого диска, в который вы только что скопировали записную книжку на предыдущем шаге.
- А затем дважды щелкните папку с именем скопированной записной книжки.
- В папке скопированной записной книжки дважды щелкните файл Open Notebook.onetoc2.
- Если этого файла нет, дважды щелкните любой другой доступный файл * .onetoc2 в этой папке.
- При открытии OneNote 2016 для Windows заметки из скопированной папки записной книжки теперь должны отображаться правильно.
Способ 2
Шаг 1. Очистка диска
- Откройте «Очистка диска», нажав кнопку «Пуск» Изображение кнопки «Пуск».
- В поле поиска введите Очистка диска.
- Затем в списке результатов щелкните Очистка диска.
- В списке «Диски» щелкните жесткий диск, который нужно очистить.
- Затем нажмите ОК.
- В диалоговом окне «Очистка диска» на вкладке «Очистка диска».
- Теперь установите флажки для типов файлов, которые вы хотите удалить, и нажмите OK.
- В появившемся сообщении щелкните Удалить файлы.
Шаг 2: проверка системных файлов
- Проведите от правого края экрана.
- А затем нажмите «Поиск».
- Введите командную строку в поле поиска.
- В списке результатов смахните вниз или щелкните правой кнопкой мыши командную строку.
- Затем коснитесь или щелкните Запуск от имени администратора.
- В окне Администратор: командная строка введите следующую команду и нажмите Enter: sfc / scannow.
- Когда сканирование системы будет завершено, попробуйте снова установить Office.
Больше похоже на это
- Как исправить ошибку 0xE40105F9 (неподдерживаемая клиентская сборка) в OneNote
- Как исправить ошибку 0xE4010641 (сеть отключена) в OneNote
- Ошибка OneNote: как устранить ошибку 0xE000002E (несинхронизация с магазином)
- Как исправить код ошибки 0x2 bdf5f — OneNote не удалось синхронизировать
- Как исправить ошибку OneNote 0xE000005E (ReferencedRevisionNotFound)
- Что такое Microsoft Teams в Windows 10 и как установить?
In this post, we will see how to fix OneNote sync error 0xE4020045 (Unsupported Client). Because this is a OneNote sync error, you will not be able to sync your notebooks if this error occurs on your system. This error occurs usually when a user moves the locally saved notebook to OneDrive without following the right procedure in order to sync that notebook. Though the notebook appears as a cloud-based notebook after moving it to OneDrive, OneNote still treats it as a local notebook. Due to this reason, OneNote displays the sync error 0xE4020045.
")
Some users are experiencing the error 0xE4020045 on the notebooks that are already saved in OneDrive. If you are facing such an issue with your notebooks, follow the solutions listed in this article.
The following suggestions may help you if OneNote is not syncing:
- Close OneNote on other devices
- Force sync your notebooks
- Create a new section or notebook
- Copy your notebook folder to the root folder of the main drive
Let’s see all these fixes in detail.
1] Close OneNote from on devices
Some users have found that the error occurs when they open a notebook that is already opened on another device. In such cases, you can fix the problem simply by closing the notebook on all your devices.
2] Force sync your notebooks
One way to fix the syncing issues on OneNote notebooks is to force sync them. The steps to force sync OneNote notebooks are written below:

- Open OneNote.
- Go to “File > Info > View Sync Status.”
- Click on the Sync Now button next to the notebook which is giving you the syncing error.
You should also select Sync automatically whenever there are changes option to automatically sync your notebooks.
This should fix the problem.
3] Create a new section or notebook
Another effective way to fix the sync errors on OneNote is to create a new section or notebook and copy all the content to it from the affected notebook. If you are experiencing the sync error 0xE4020045 with a particular section of your notebook, follow the steps below to fix the problem:

- Right-click on it and select Move or Copy.
- In the Move or Copy Section window, select the same notebook.
- Click Copy. This will create a new section and copy the content from the affected section to it automatically.
- After that, OneNote will start syncing the newly created section. If no error occurs, you can delete the problematic section and rename the new one.
If the sync error is occurring on the entire notebook, create a new notebook and copy all your content to it. After OneNote syncs the new notebook successfully, you can delete the old notebook.
4] Copy your notebook folder to the root folder of the main drive
Follow this solution if you have added the locally saved notebook to OneDrive simply by using the copy and paste method. The steps are written below:
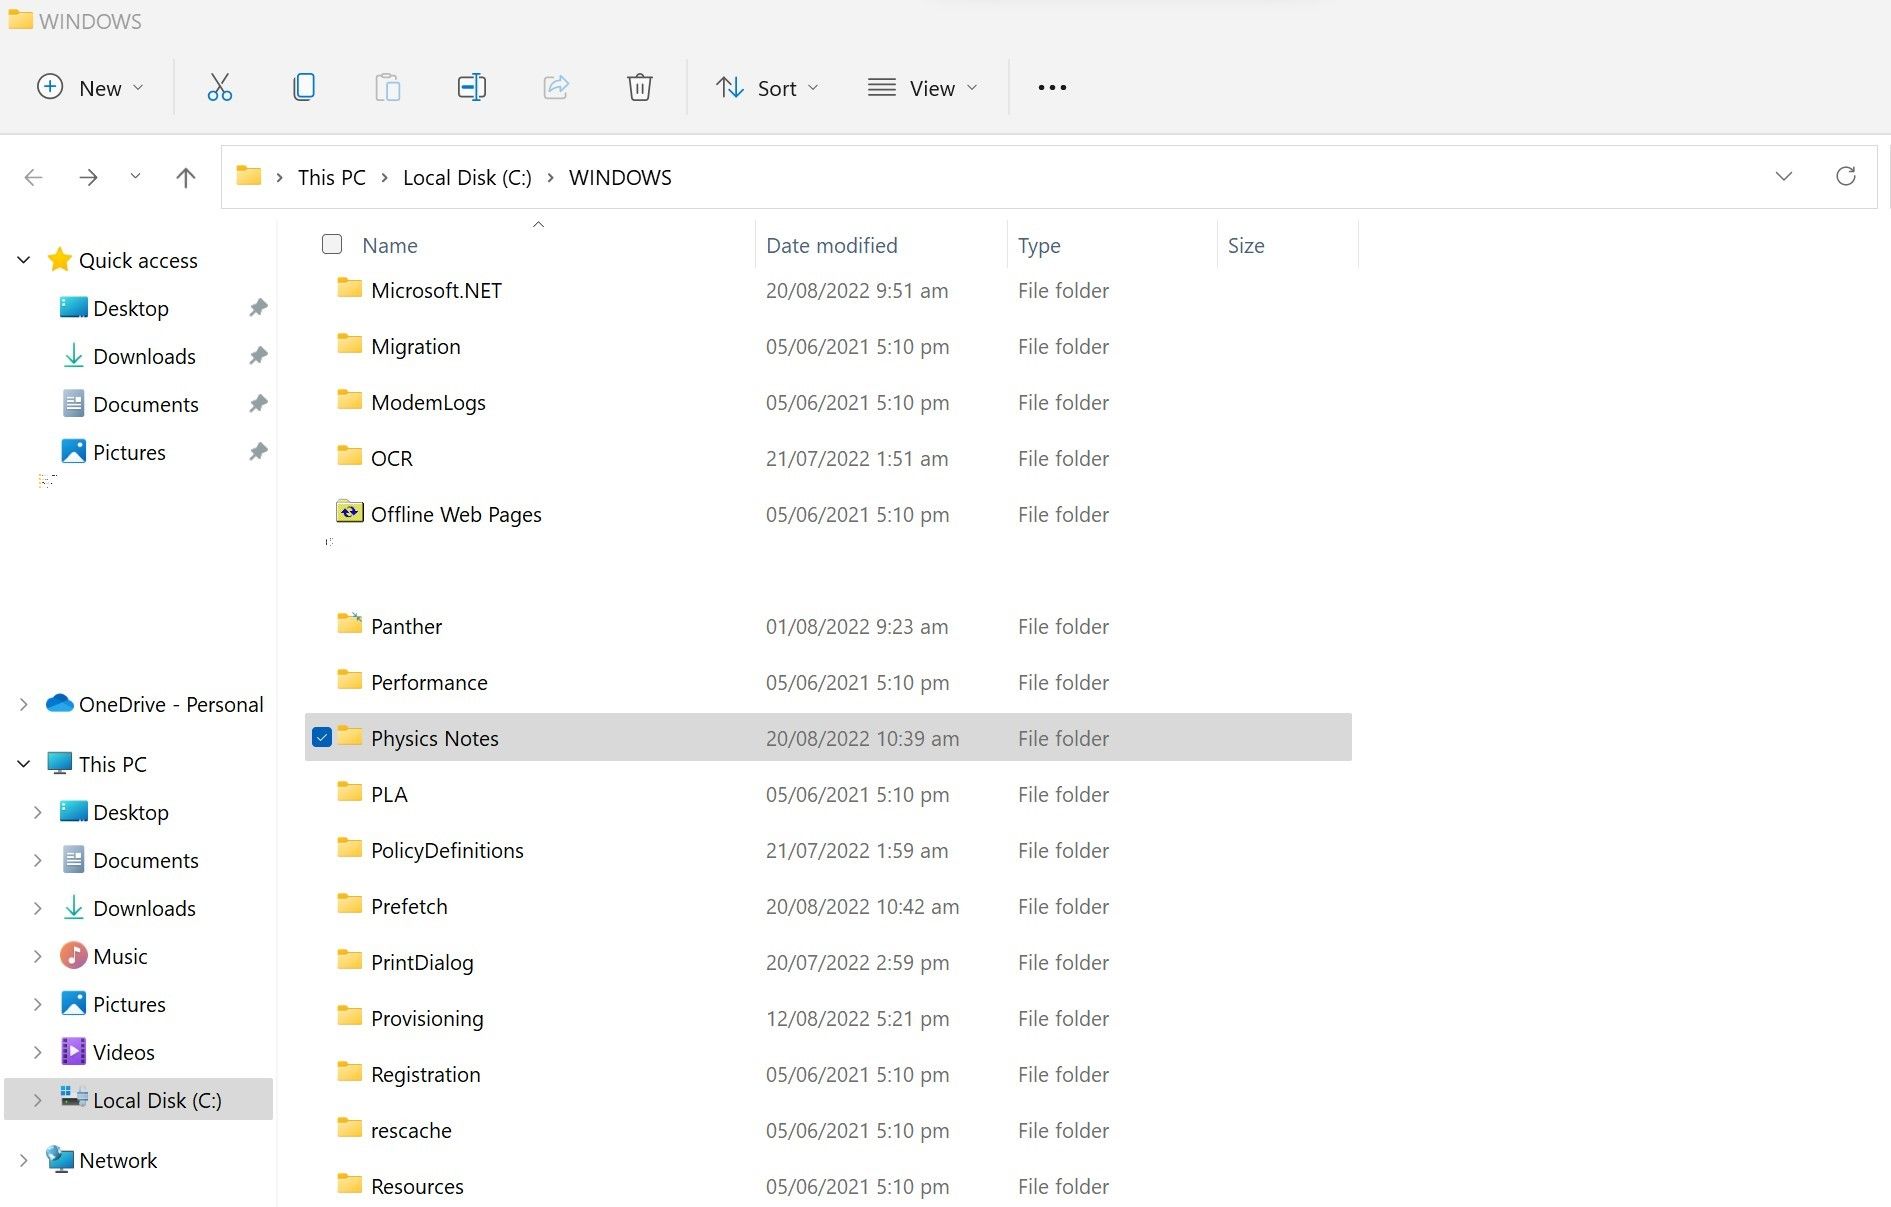
Close OneNote if it is already running. Open the location where the notebook is stored. By default OneNote notebooks are stored locally at the following location:
C:UsersusernameDocumentsOneNote Notebooks

Simply copy the above path and paste it into the address bar of the File Explorer. After that, press Enter. Replace the username in the above path with the name of your Windows 11/10 profile.
The OneNote Notebooks folder contains the folders with the name of your notebooks. Copy the folder with the name of the affected notebook.
Now, open the root folder of your main drive. The main drive in Windows 11/10 is the C drive. To open the root folder, launch the Run command box and type %SystemRoot%. Click OK. This will open the root folder. Now, paste the folder here that you have copied in the previous step.
Open the copied folder. It will contain a file, named Open Notebook.onetoc2. Double-click on that file. Windows will ask you to select a program to open that file. Select OneNote. This should open your netbook without displaying the error.
Read: Fix OneNote Not working, Not opening, Problems, Errors, Issues.
How do I refresh my OneNote?
The function key F9 is used to refresh OneNote. When you press the F9 key, OneNote will sync all your notebooks. On the other hand, if you want to refresh only the current notebook (the notebook you have currently opened), press Shift + F9.
What is error 0x80004005 in OneNote sync?
If you try to sync your Microsoft OneNote notebooks, then an error 0x80004005 for OneNote sync may occur. If you face this error, then close and re-open your notebook(s) to fix it. If that doesn’t work, create a new notebook and copy all notes from the old notebook to the new notebook. Also, clear the Temp folder, clear the OneNote cache, sign out and sign in again to OneNote to fix the issue or open your notebook to OneNote Online.
Hope this helps.
Read next: OneNote sync error 0xE000005E.
Are you experiencing issues syncing OneNote with your device? Here are some ways to resolve the problem.

When OneNote fails to sync properly, you’ll be presented with one of the numerous OneNote sync errors. Sync errors can be caused by a slow internet connection, a disabled sync feature, insufficient storage space, an outdated app, or even a problem with your OneNote account.
To help you solve this issue, we’ll discuss some of the most common OneNote sync errors and provide solutions for fixing them.
Preliminary Checks
Before you attempt to fix OneNote sync errors, perform the following preliminary checks first:
- Make sure OneDrive isn’t experiencing any downtime. This can be verified on Microsoft’s Service health page.
- Try opening the OneNote Web client without closing the OneNote app and see if the error persists. This will help determine whether the problem is with your account or the app itself.
- If only a single notebook fails to sync, close and reopen it to rule out temporary glitches.
- If you could see the Get Help button in the error window, click it to see more details on the error and relevant fixes.
- If most of the OneNote features aren’t working, you might need to fix OneNote itself instead of trying to fix each individual issue. For that, you can check out our article explaining fixes you can try if OneNote isn’t working.
If you encounter OneNote sync errors, avoid signing in and out of your account. Attempting to do so without getting the error fixed may result in data loss.
Now, let’s look at the most common sync errors you may encounter in OneNote, along with their solutions:
1. OneNote Sync Error Code 0xE4010641 (Network Disconnected)
The OneNote sync error 0xE4010641 (Network Disconnected) occurs when your storage server or internet connection goes down, preventing your notes from syncing. Here are some checks you can make to fix this error:
- Ensure your device has an active internet connection and is reasonably stable. You can try running other apps to see if they work fine.
- Ensure the organization server or third-party service, which stores your OneNote synced content, is online.
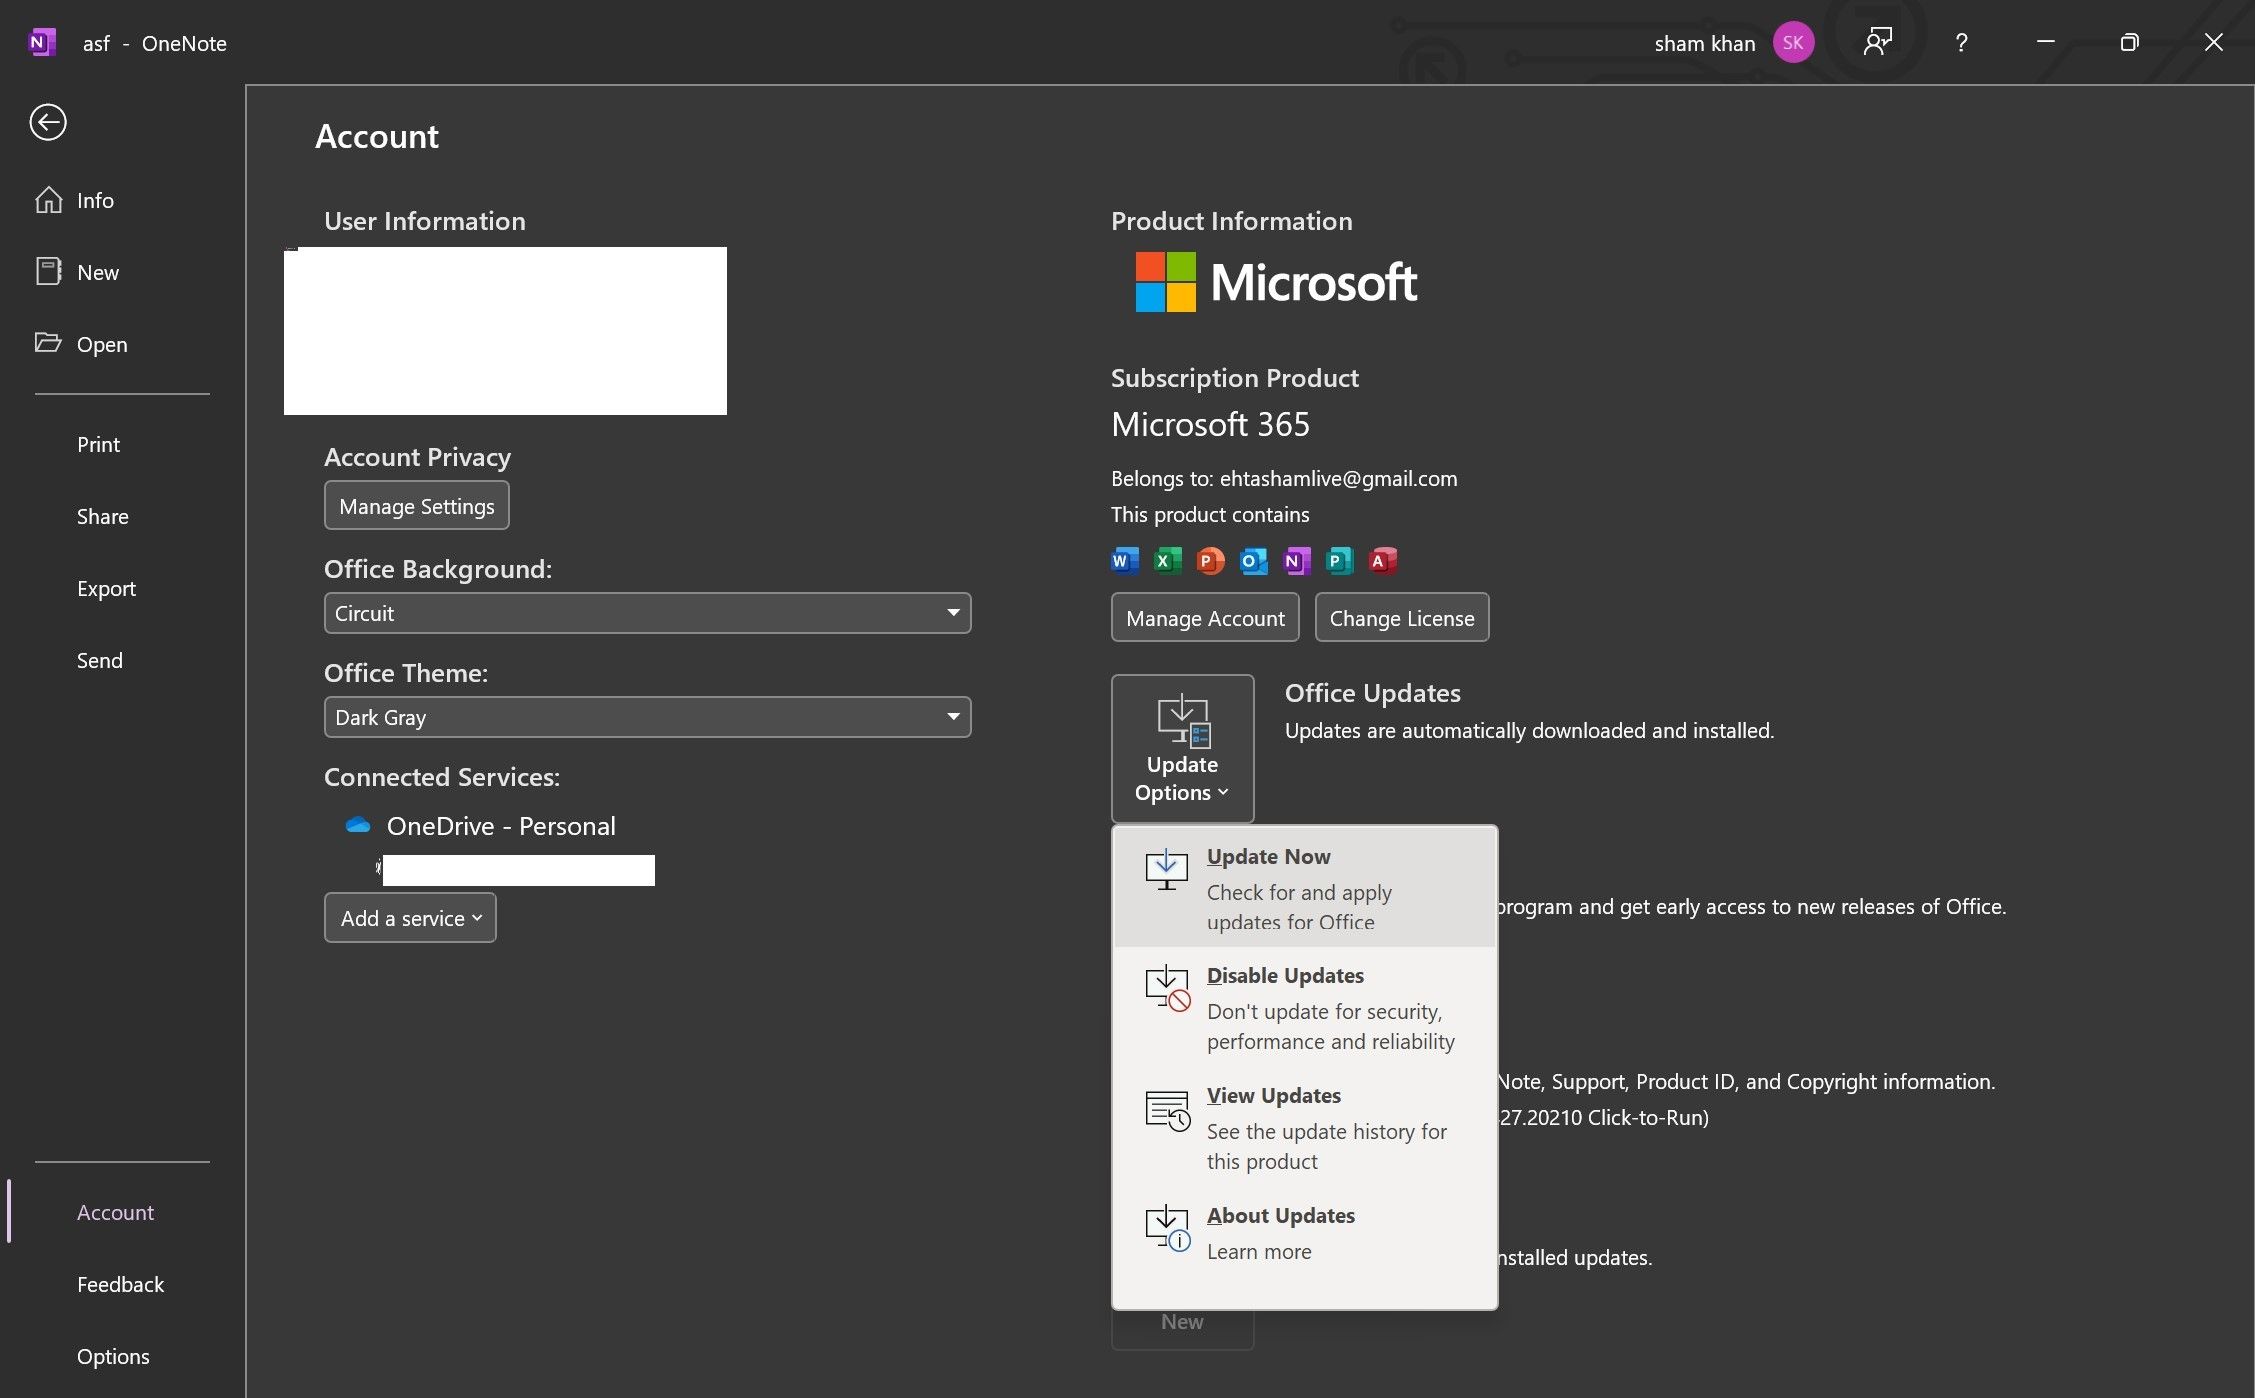
2. OneNote Sync Error Code 0xE40105F9 (Unsupported Client Build)
The 0xE40105F9 (Unsupported Client Build) error code appears when there is a mismatch between the OneNote version on your device and the one you used somewhere else to save the synced content. The solution to this is to update OneNote or download the latest version. Here are the steps you need to follow:
- Launch OneNote.
- Go to the File tab.
- In the bottom-left corner, click on Account.
- Click on the Update Now option from the Update Options dropdown.

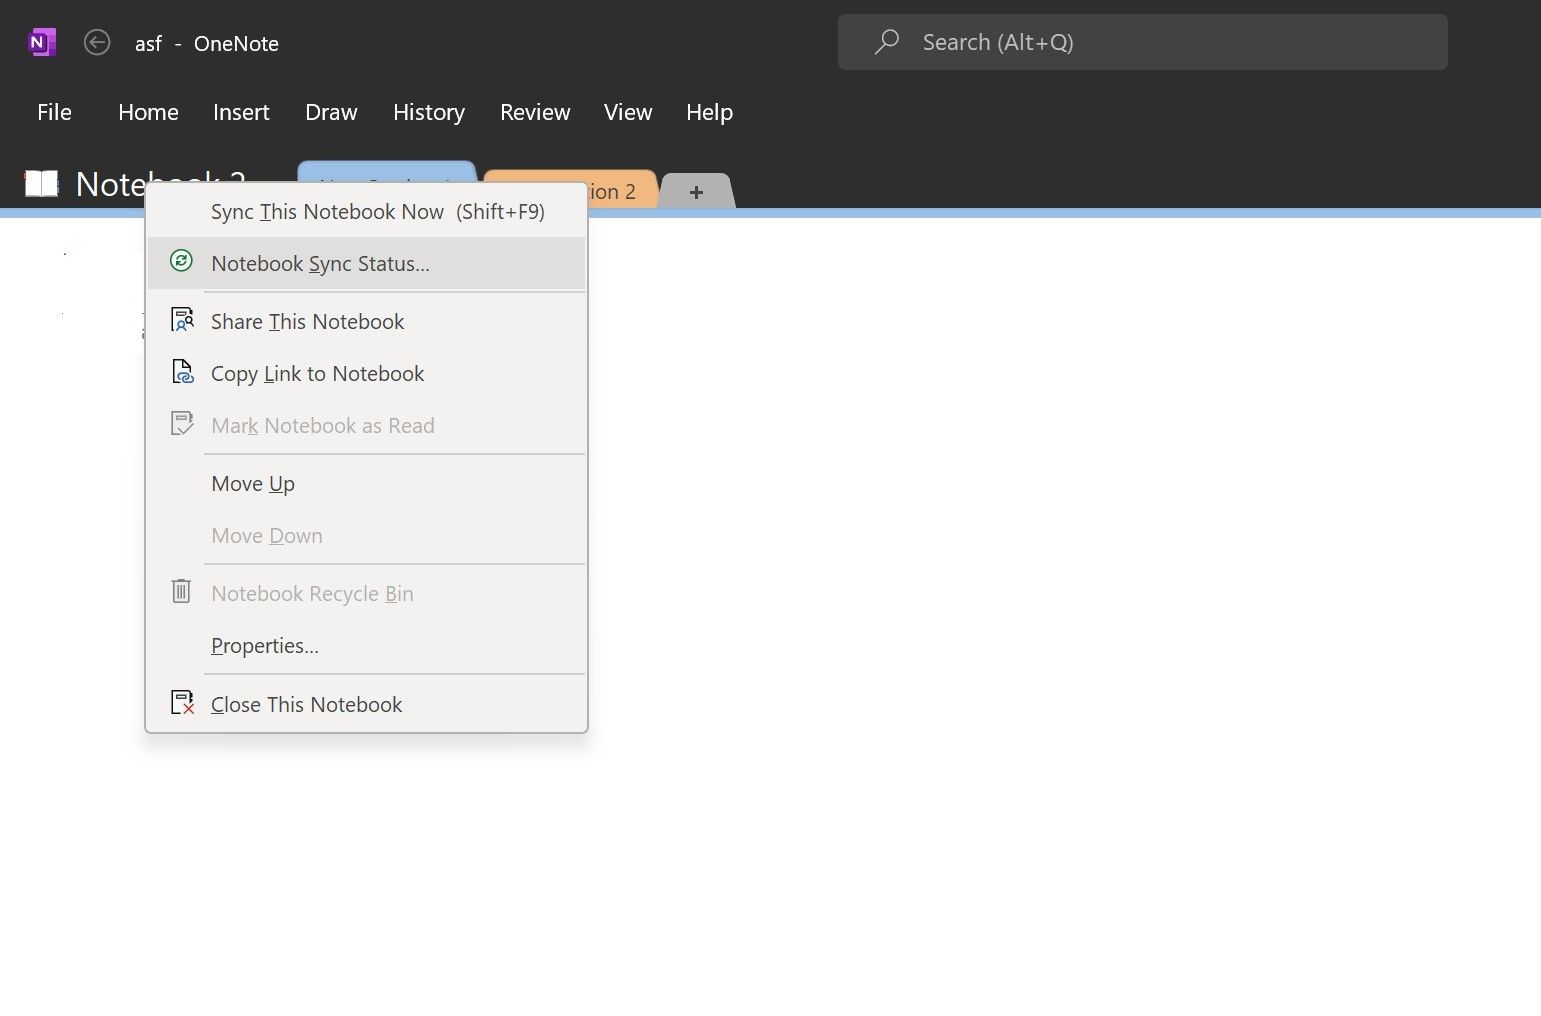
3. OneNote Sync Error Code 0xE000005E (ReferencedRevisionNotFound)
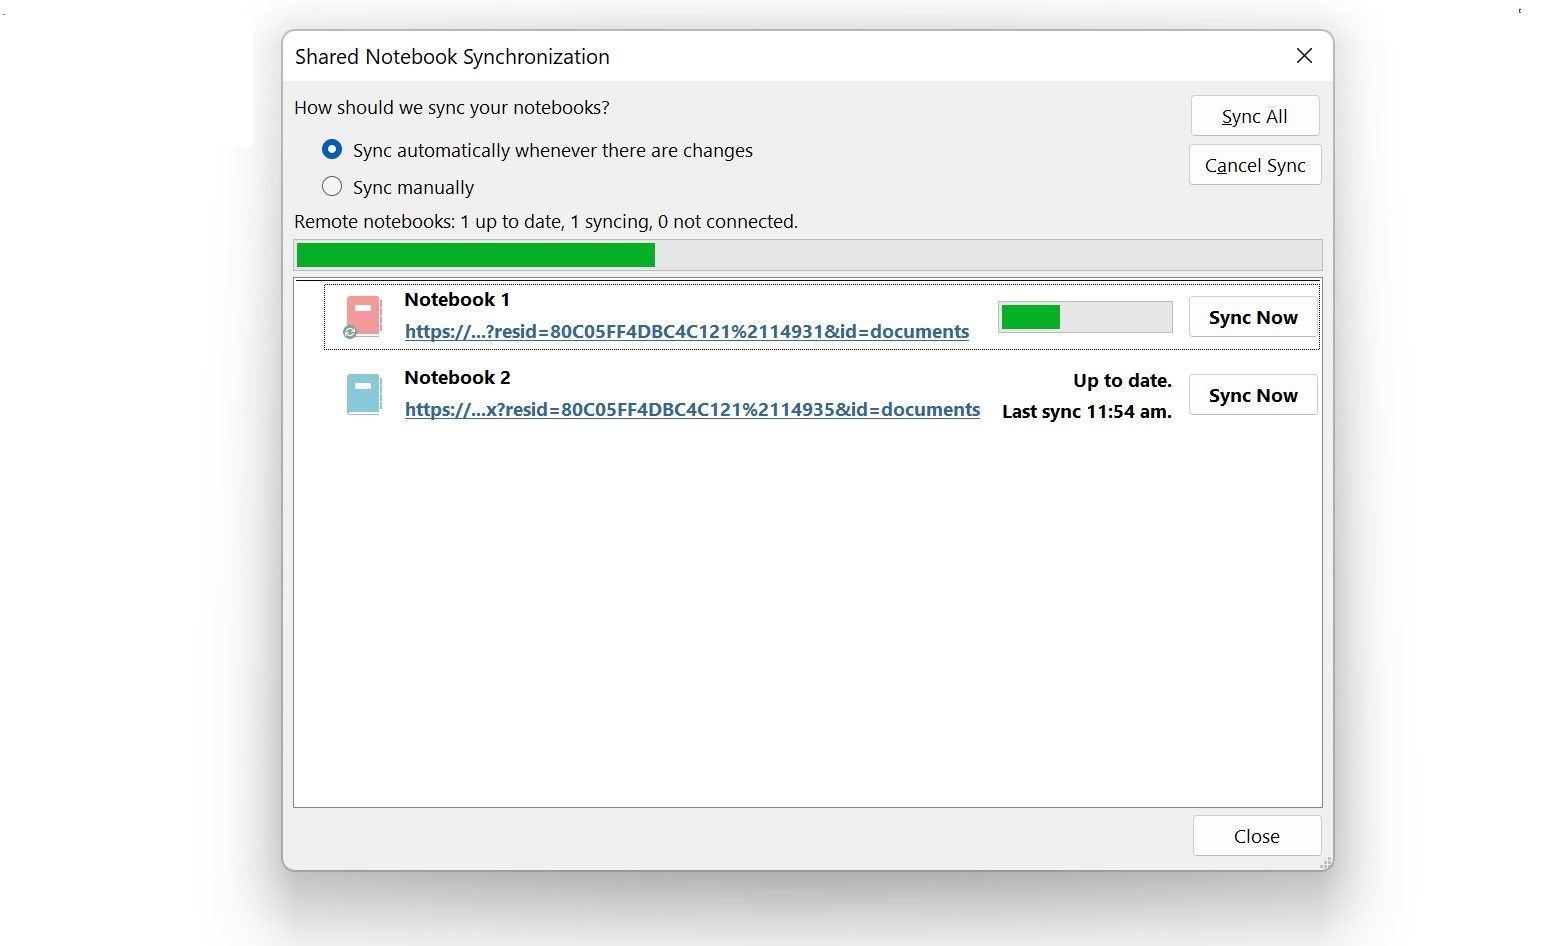
In OneNote, the 0xE000005E (ReferencedRevisionNotFound) error code appears when a section of one or more notebooks fails to sync. Follow the below steps to resolve this issue:
- Right-click on the notebook name in the top-right corner and click on Notebook Sync Status…

- In the Shared Notebook Synchronization window, click the Sync now button next to the notebook that isn’t syncing.

If you fail to sync it manually, you can create a new section in the same notebook, copy all content from your old notebook section to the new, and force sync OneNote again by pressing Shift + F9. If the new notebook syncs perfectly, you can delete the old one, and you’re good to go.
4. OneNote Sync Error Code 0xE000002E (Out of Sync with Store)
The OneNote sync error code 0xE000002E (Out of Sync with Store) occurs when OneNote fails to sync the information, but it needs to. When you encounter this error, you must run a sync to resolve the problem.
Pressing Shift + F9 will force a full sync and fix the error. If it doesn’t work, you can manually sync it using the same steps discussed above for error code 0xE000005E.
5. OneNote Sync Error Code 0xE0190193 (403: Forbidden)
The OneNote sync error code 0xE0190193 (403: Forbidden) occurs when you try to access a restricted section of a notebook that was previously available to you. This error can only occur if the notebook’s administrator has changed the permission, so you should ask him to permit you to access it once more to fix this error.
6. OneNote Sync Error Code 0xE4020045 (Unsupported Client)
The 0xE4020045 error code occurs when a locally stored notebook is not properly relocated to OneDrive during the backup or sync process.
When you incorrectly relocated the files, did you click the yellow Info Bar and encounter the error? If yes, you need to force sync OneNote by pressing Shift + F9 or manually sync it. If that doesn’t work, follow the below steps:
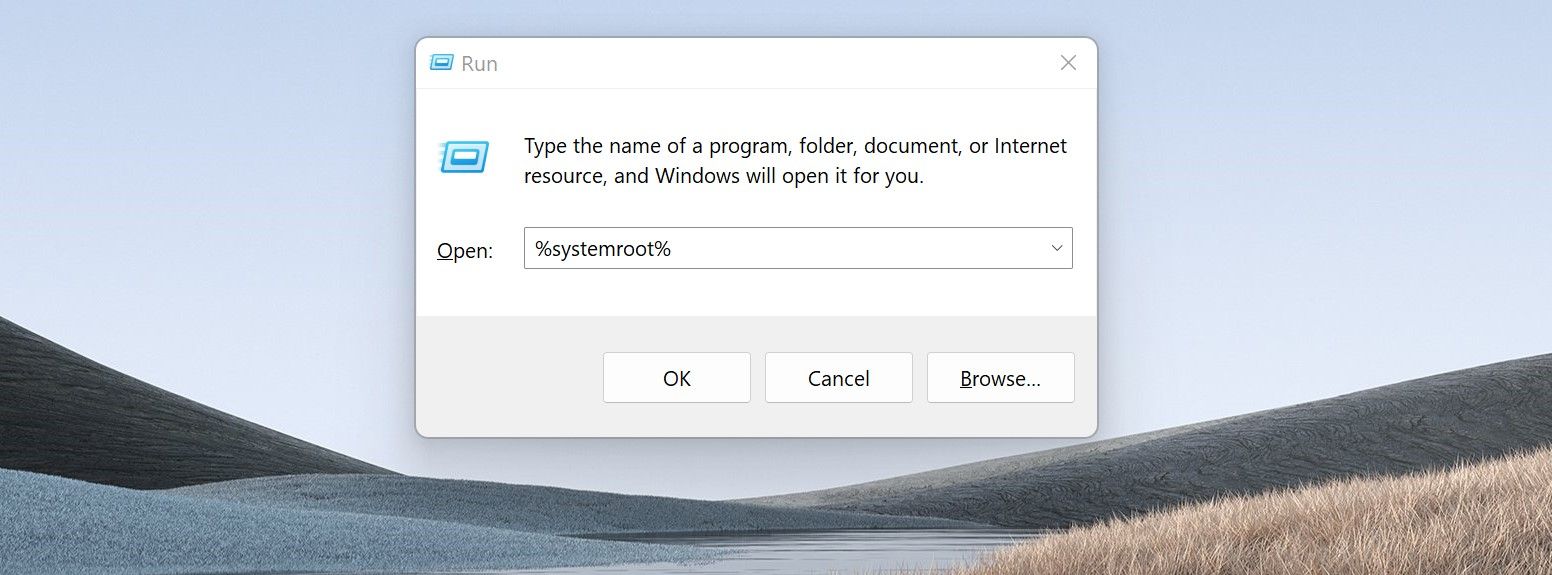
- Navigate to the folder where your OneNote notebooks are stored. Assuming you did not change it manually, you will find it here:
C:/Users/usernameDocumentsOneNote Notebooks
- Locate the folder containing the affected notebook’s data and copy it.
- Press Win + R, type «%systemroot%,» and hit Enter to access the system root location.

- Paste the copied folder into the root location.

- Open the copied folder again and locate a file named Notebook.onetoc2 (If it isn’t there, open any file ending in .ONETOC2).
- Select OneNote to open the file.
The above steps will help you re-open the notebook you’re having issues with, so you won’t encounter the same error again.
7. Sync Errors in OneNote Due to Low Disk Space
In OneNote, the error codes 0xE0000796 (Quota Exceeded) and 0xE00015E0 occur when there is insufficient disk space. Any of these errors indicate that your OneDrive or SharePoint storage is low on space, and if you store the files locally, it’s time to clear some space there.
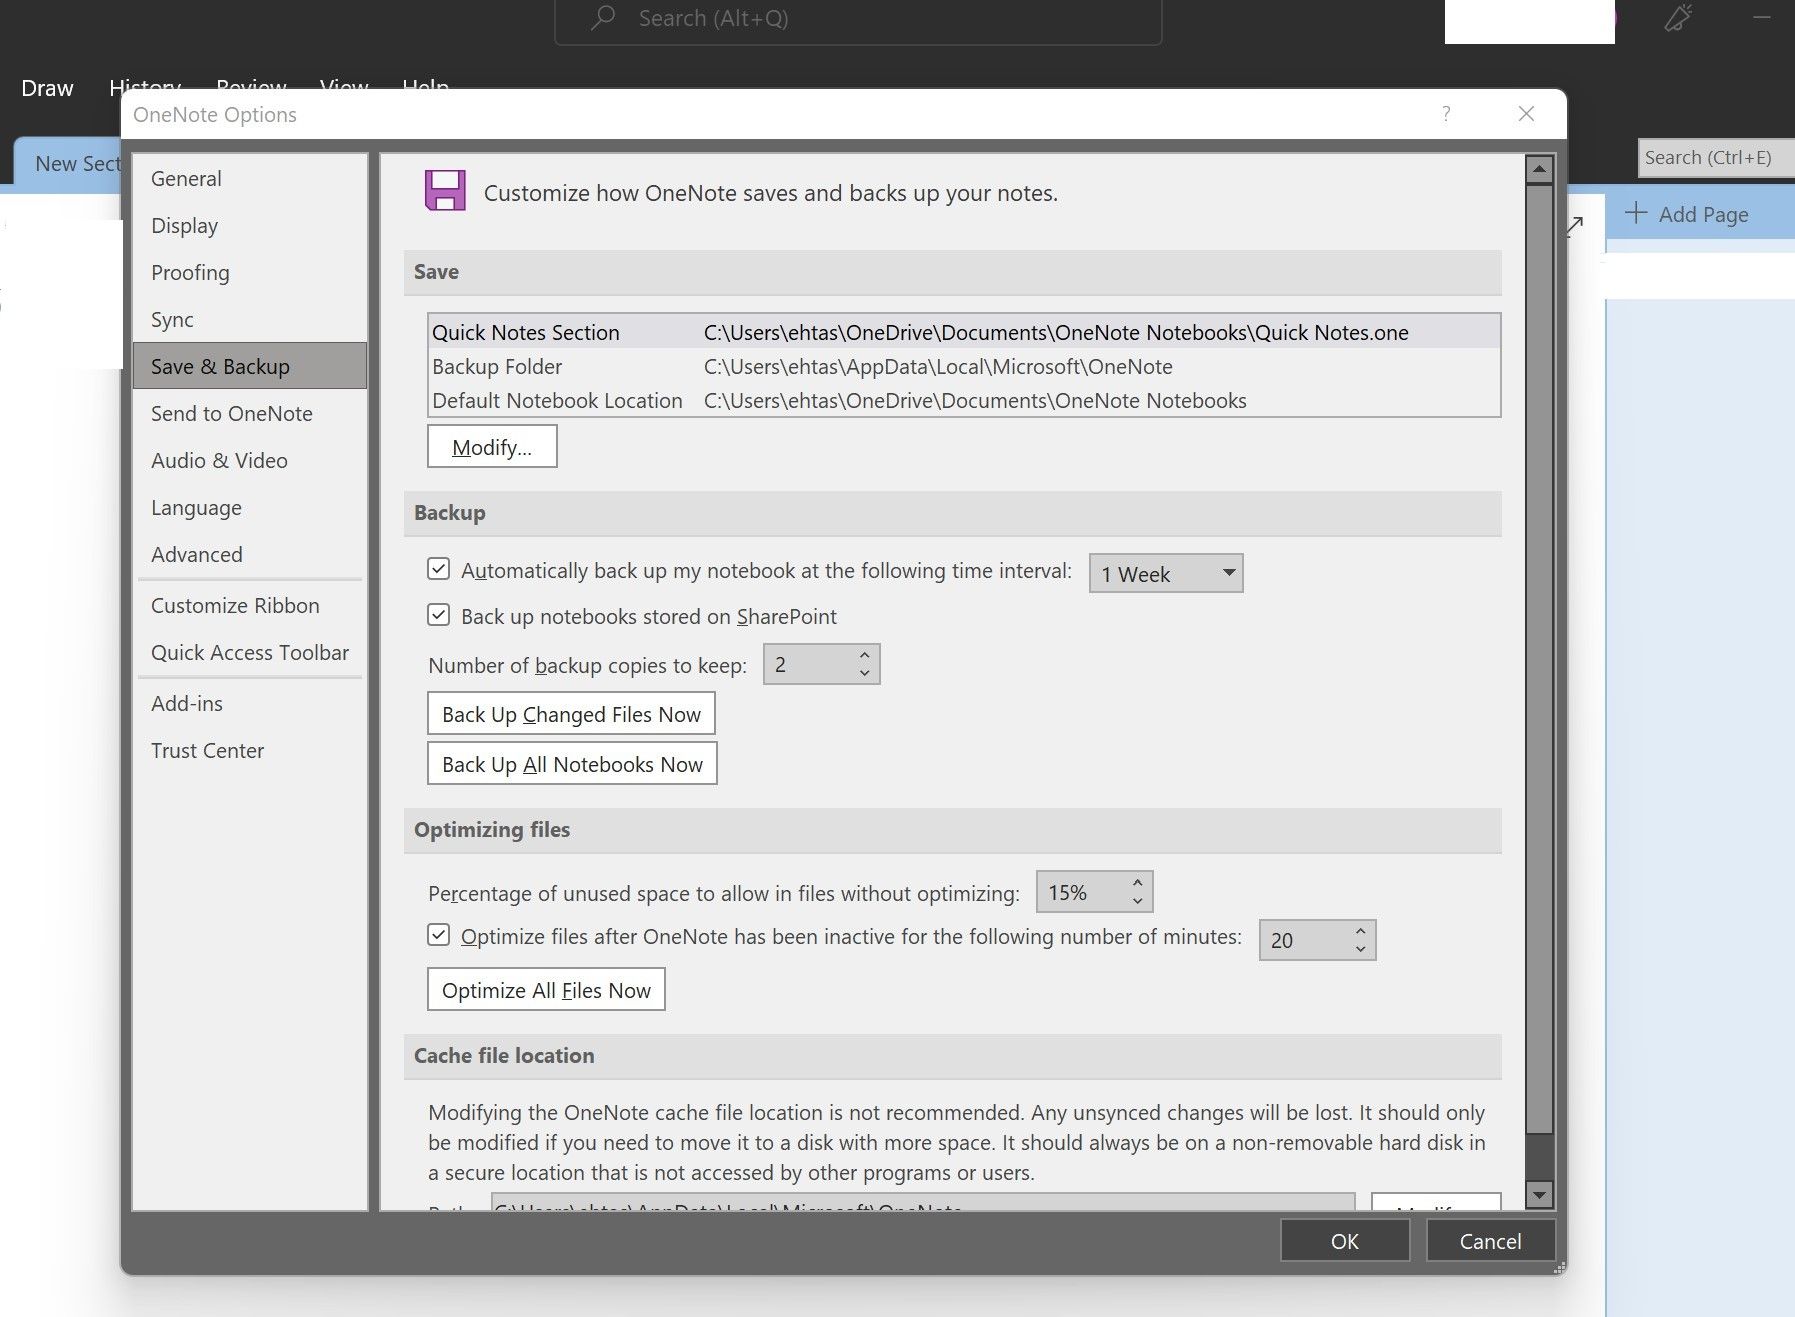
Therefore, you can either delete existing backups to make room for new ones or optimize them to take up less space. You can delete backups by heading to where they are stored. To optimize, follow these steps:
- In OneNote, go to File > Options.
- In the left-sidebar, click Save & Backup.
- Go to the Optimizing files section and click on Optimize All Files Now.

In case you continue to have issues with OneNote, you can also switch to Google Keep, which is one of the best alternatives to OneNote. Here are the differences between OneNote and Google Keep, so you can make an informed switch.
Get Rid of Sync Errors in OneNote
Hopefully, the solutions provided in this article will help you fix OneNote sync errors. As you are familiar with them now, you’ll know what to do if you encounter any of them.
Do you know you can text search in OneNote, color notebooks and give them nicknames, copy a link to a particular paragraph and send it to others? Perhaps you haven’t explored these features yet.
You may see the 0xE4020045 error code in OneNote 2016 or 2013 after clicking a yellow Info Bar that appears when a locally stored notebook was dragged (or otherwise added) to OneDrive for the purpose of backing it up, syncing it, or sharing it. While this may give the appearance that the notebook is now a cloud-based notebook, OneNote will continue to treat it as a locally stored notebook unless the notebook is properly moved to OneDrive.
You can try to resolve this issue by doing the following:
-
Exit OneNote, if it is still running.
-
On your computer’s hard drive, navigate to the folder in which the affected notebook is stored.
Tip: Typically, the default location for locally stored OneNote for Windows notebook folders is C:Users<username>DocumentsOneNote Notebooks.
-
Copy the folder with the same name as the affected notebook to the root folder of your main hard drive.
Doing this effectively removes the copy of the notebook out of OneDrive’s sync scope.
-
In Windows File Explorer, click This PC, double-click to open the hard drive root location to which you just copied the notebook in the previous step, and then double-click the folder with the name of the copied notebook.
-
In the copied notebook folder, double-click the Open Notebook.onetoc2 file.
If this file is not present, double-click any other available *.onetoc2 file in this folder.
-
When OneNote 2016 for Windows opens, the notes from the copied notebook folder should now be displayed properly.
To prevent this issue from happening again, we strongly recommend that you follow the required procedure for properly moving the original affected notebook to your OneDrive account, which will convert it from a locally stored notebook to a true cloud-based notebook. Your cloud-based notes will still be private, but you’ll enjoy more reliable syncing and you’ll be able to access your notes from any mobile device or any Web browser that you use.
For more information, see Move a OneNote for Windows notebook to OneDrive. The instructions in this article also apply if you’re using older versions of OneNote for Windows, such as OneNote 2013 or 2010.
Fix issues when you can’t sync OneNote Sorry you’re having trouble syncing OneNote. We’re continuously …
Sorry you’re having trouble syncing OneNote.
We’re continuously releasing product updates that fix issues and improve your syncing experience in OneNote, so it’s a good idea to keep your copy of OneNote up-to-date. Our product updates are free to download and use. Before you try the troubleshooting suggestions in this article, we recommend following the steps in Install Office updates to install the latest OneNote updates on your PC. If you’re on a Mac, follow the steps in Check for Office for Mac updates automatically.
If you’re still experiencing sync problems after updating OneNote, click on the sync issue that best describes the issue you’re seeing, or scroll to the end of this article to report your sync issue to the OneNote product team.
Before you try the troubleshooting suggestions below, we recommend following the steps in Install Office updates to install the latest OneNote update.
Notes won’t sync
If the notebook that won’t sync is stored on OneDrive or on newer versions of SharePoint, try opening the notebook in OneNote Online (at www.onenote.com). This can help determine if the problem is caused by the server or by OneNote.
-
In OneNote, click File > Info.
-
Right-click the URL shown below the name of the affected notebook, and click Copy.
-
In your Web browser, click inside the Address box, and then press Ctrl + V to paste the copied URL.
-
Press Enter to load the notebook in OneNote Online.
If you’re able to successfully open the notebook in OneNote Online and the changes appear, the problem may be caused by the desktop version of OneNote. Closing and re-opening the notebook there usually clears and successfully resets the connection. Follow these steps:
-
In OneNote, click File > Info.
-
Next to the name of the affected notebook, click Settings, and then click Close.
-
Switch back to the notebook in OneNote Online in your browser, and then click Open in OneNote on the ribbon.
Important: Depending on the notebook size and type of Internet connection you’re using, it may take a while to sync all the notebook content over to the desktop version of OneNote.
If you’re unable to open and view the notebook in OneNote Online, the source of the sync problem is likely with your server. If your notebook is stored on OneDrive, check our Service Status page for any known interruptions or outages. If your notebook is stored on SharePoint, you’ll need to contact your administrator to report and troubleshoot the problem.
Warning: Signing in or out of OneNote (or removing and reinstalling the app) is not recommended for troubleshooting, as this could result in data loss.
If you’re able to open and view the notebook in OneNote Online, but can’t see the changes, the information hasn’t yet synced. You can check the sync status for any specific errors by doing the following:
-
In OneNote, click File > Info.
-
Click the View Sync Status button.
-
Check for errors in the dialog box, note the error code and message and check the list of error codes in this article.
Note: You may see a Get Help button next to an error. If you do, click it as it should open a troubleshooting article specific to the error.
Sections won’t sync
There may be times when your shared notebook is syncing normally except for one of its sections. You can verify this by doing the following:
-
In OneNote, click File > Info > View Sync Status.
-
In the Shared Notebook Synchronization dialog box, click any notebook icon with a yellow triangle warning over it to see the name of any section that’s causing sync problems.
-
Click the Sync Now button next to the notebook containing the section.
Individual notebook sections can occasionally stop syncing properly. If you have a single section that isn’t syncing with the rest of an otherwise up-to-date notebook, you can try the following workaround:
-
In the same notebook, create a new section.
-
Copy (don’t move) all of the pages from the old section into the new one you just created. You can do this by right-clicking each page and then clicking Move or Copy.
-
When all of the pages have been copied to the new section, press Shift+F9 to manually sync the notebook. If a progress bar appears, wait for it to finish.
If following these steps successfully syncs the pages in the new section that you created, you can safely delete the old section and then continue working in the new. After the old section is deleted, you can rename the new section to the same name as the deleted section.
If these steps don’t work, section sync errors or problems can also be caused by a corrupted section located in the Notebook Recycle Bin. If you no longer want that section, you can delete it from the Recycle Bin to stop the error:
-
In the OneNote notebook, click the History tab, and then click the Notebook Recycle Bin.
-
Right-click the section (or page) and choose Move or copy.
-
You can also Copy and Paste the pages or content in the section to another page or section. Once that’s done, you can delete the original section or page.
Synchronization conflicts (also known as merge conflicts)
Version conflict messages typically appear if you and another user attempt to edit the same part of a page, such as changing the same paragraph of notes, at the same time. When this happens, OneNote creates multiple copies of the page to avoid data loss and an error message appears on the yellow Information bar. You will see an icon on a page that has the conflict.
To fix merge conflicts, do the following:
-
Click the yellow Information bar at the top of your page to view a page that lists the conflicting changes (highlighted in red).
-
Copy information from the page with the merge conflicts error and paste the changes into the main page, if necessary.
-
When you finish incorporating any changes, delete the conflicts page by right-clicking its page tab and then clicking Delete on the shortcut menu.
To avoid future synchronization conflicts, try and minimize the amount of work two or more users do on the same page.
«Server is busy» sync errors
Server is busy errors are typically seen when notebooks are stored in SharePoint, SharePoint Online, or OneDrive for Business. Even though they may seem to be sync errors, most are actually authentication errors that can be fixed by following one of these methods:
-
Sign out and sign in to OneNote.
-
Close and then re-open the notebook.
-
Check to make sure you have access to the notebook via OneNote Online (at www.onenote.com), SharePoint, or SharePoint Online.
«Not enough space» sync errors
Some errors, such as 0xE00015E0, indicate there’s not enough space on the device or notebook to sync a section. This may be caused by large backup files. To solve these sync issues, you can optimize, or delete existing notebook backups.
Optimize OneNote notebook
-
In OneNote, click File > Options.
-
In the Options dialog, click Save & Backup.
-
Click Optimize All Files Now. It may take a while to optimize the files.
You can also adjust the Number of backup copies to keep option in the same Save & Backup location to a lower number to save space.
Delete existing backups
-
Open File Explorer.
-
In the navigation bar near the top of the window, type %localappdata%, and press Enter.
-
Open the Microsoft folder and then open the OneNote folder.
-
Open the 16.0 folder if you have OneNote 2016 or the 15.0 folder if you have OneNote 2013, then open the Backup folder.
-
Delete the files or folders you no longer wish to save in the Backup folder.
If you get one of these errors, you should follow the steps in the related article:
-
Resolve the 0xE0000025 (File Too Large) error in OneNote
-
Resolve the 0xE0000794 (Hot Table Full) error when using OneNote 2010 with SharePoint
-
Resolve the 0xE0000796 (Quota Exceeded) error in OneNote
«Service not available» errors
Misplaced sections in OneNote
Misplaced sections appear in a notebook when OneNote tries to sync changes to a notebook section, but can’t find the section file. To resolve the issue, you can delete the section from your notebook or move it to another notebook. For more information, go to this article:
Resolve misplaced sections in OneNote
Sync errors in notebooks on SharePoint
Collaboration Space sync problems
Sync problems in the collaboration space may occur if a number of students try to edit the same page location at the same time or if a large file attachment is added on the edited page. There are some best practices you can follow to avoid these sync issues:
-
Separate students into small groups of up to 6 students.
-
Create a separate «section tab» for each group of students. For example, if there are 4 groups of 6 students, create 4 tabs.
-
Have each student create their own page or have each of them edit in different places on the page.
-
Avoid adding big file attachments.
Other sync errors
Best practices to sync OneNote notebooks
Our Support team maintains a list of tips that may help you to avoid sync errors in the future.
See OneNote syncing best practices for more information.
OneNote Diagnostics Tool
You can also use the OneNote Diagnostics Tool to collect diagnostic information for your installed version of OneNote 2016 for Windows and then send the information securely to Microsoft for troubleshooting.
Note: The OneNote Diagnostics Tool is currently only available in English. We’ll update this page when additional languages become available.
Before you try the troubleshooting suggestions below, we recommend following the steps in Check for Office for Mac updates automatically.
Notes won’t sync
If the notebook that won’t sync is stored on OneDrive or on newer versions of SharePoint, try opening the notebook in OneNote Online (at www.onenote.com). This can help determine if the problem is caused by the server or by OneNote.
-
On the toolbar in OneNote for Mac, click Notebooks > Notebooks > Copy Link to Notebook.
-
In your Web browser, click inside the Address box, and press Command + V to paste the copied URL.
-
Press Enter to load the notebook in OneNote Online.
If you’re able to successfully open the notebook in OneNote Online and the changes appear, the problem may be caused by OneNote for Mac. Closing and re-opening the notebook there usually clears and successfully resets the connection. Follow these steps:
-
On the menu bar in OneNote for Mac, click Notebooks > Notebooks > Close This Notebook.
-
Switch back to the notebook in OneNote Online in your Web browser, and then click Open in OneNote on the ribbon.
Important: Depending on the notebook size and type of Internet connection you’re using, it may take a while to sync all the notebook content over to OneNote for Mac.
If you’re unable to open and view the notebook in OneNote Online, the source of the sync problem is likely with your server. If your notebook is stored on OneDrive, check our Service Status page for any known interruptions or outages. If your notebook is stored on SharePoint, you’ll need to contact your administrator to report and troubleshoot the problem.
If you’re able to open and view the notebook in OneNote Online, but can’t see the changes, the information hasn’t yet synced. You can check the sync status for any specific errors by doing the following:
-
Click the Show Notebooks button
 to see a list of your notebooks.
 -
Move the mouse pointer over the warning triangle icon that appears next to the name of any notebook in the list, and then note any error code that may be displayed in the tooltip that appears. You can look for additional documentation about known errors elsewhere in this article, or scroll to the end of this page for details about how to contact the OneNote product team for help with undocumented issues.
 to see a list of your notebooks.
Sections won’t sync
If you receive an error when OneNote is trying to sync, such as «Can’t sync <section name> or <notebook name>» or if there is an error icon next to your notebook name, try the following steps to resolve the issue:
-
Click the Show Notebooks button
to see a list of your notebooks. -
Click the name of the notebook with sync issues to open it.
-
Create a new section in the same notebook.
-
Copy (but don’t move) all of the pages from the old section into the new one you just created.
-
When all the pages have been copied to the new section, click File > Sync All Notebooks.
Next, check to see if the notes you copied also have trouble syncing or if it’s only the original section that’s still affected.
If these steps don’t work, sync errors in can also be caused by any corrupted notes located in Deleted Notes. If you’re sure you no longer need such notes, you can delete them from the Recycle Bin to stop the errors:
-
In the OneNote notebook that has sync issues, click the View tab, and then click Deleted Notes.
-
For each item in this view, Control-click the name of the note, and then click Restore to.
-
Choose the notebook to which you want to restore the deleted notes to, and then click Restore.
-
Once a note has been copied to another notebook, you can delete the original note in the Deleted Notes view by Control-clicking the name of the note and clicking Delete Permanently.
Synchronization conflicts (also known as merge conflicts)
Version conflict messages typically appear if you and another user attempt to edit the same part of a page, such as changing the same paragraph of notes, at the same time. When this happens, OneNote creates multiple copies of the page to avoid data loss and an error message appears on the yellow Information bar. You will see a warning icon on any page that has a conflict.
To fix merge conflicts, do the following:
-
Go to the page with the merge conflicts error, click anywhere on the page, and then click Edit > Select All on the menu bar.
-
On your keyboard, press Command+C to copy the selection.
-
Go to the main version of the page, click where you want to append the information, and then press Command+V to paste the copied content.
-
When you have finished reviewing sync conflicts and have made any necessary changes, you can delete the page with the errors by clicking the Delete Version button on the yellow Information bar.
«Server is busy» sync errors
«Server is busy» errors are typically seen when notebooks are stored on SharePoint, SharePoint Online, or OneDrive for Business. Even though they may seem to be sync errors, most are actually authentication errors that can be fixed by following one of these methods:
-
Sign out of OneNote and then sign back in. On the menu bar, click OneNote >Sign Out. When you have successfully signed out, click OneNote > Sign In.
-
Close and then re-open the notebook. On the menu bar, click File > Close This Notebook. To reopen the notebook, click File > Open Recent, and then click the notebook you want to re-open.
Alternately, you can check to make sure you have access to the notebook via OneNote Online. Do the following:
-
On the menu bar, click Notebooks > Notebooks > Copy Link to Notebook.
-
In your Web browser, click the Address box, and then press Command+V to paste the copied URL.
-
Press Enter to load the notebook in OneNote Online.
If you’re able to successfully open the notebook in OneNote Online and the latest changes appear, then the problem may be caused by the Mac version of OneNote. Closing and re-opening affected notebooks usually clears and successfully resets the connection.
Misplaced sections in OneNote
Misplaced sections appear in a notebook when OneNote tries to sync changes to a notebook section, but can’t find the section file. To resolve the issue, you can move the section to another notebook or delete the section from the current notebook.
To move a misplaced section to another notebook, do the following:
-
Control-click the name of the misplaced section, and then click Move Section To.
-
Select the notebook to which you want to move the section, and then click Move.
To delete a misplaced section from your notebook, do the following:
-
Control-click the name of the section you want to delete, and then click Delete Section.
Caution: Deleting sections cannot be undone. When you delete a section, you also permanently delete all of the pages that are contained within it. If you aren’t sure that this is what you want to do, try moving the misplaced section to another part of your notebook instead.
Sync errors in notebooks on SharePoint
Collaboration Space sync problems
Sync problems in the collaboration space may occur if a number of students try to edit the same page location at the same time or if a large file attachment is added on the edited page.
Here are some best practices you can follow to avoid these types of sync issues:
-
Separate students into small groups of up to 6 students.
-
Create a separate section for each group of students. For example, if there are 4 groups of 6 students, create 4 sections.
-
Have each student create their own page or have each of them edit in different places on the page.
-
Avoid adding big file attachments.
Other sync errors
Here are some of the other sync errors you may experience:
0xE0000021: Need password to sync OneNote
First, make sure you have the latest version of OneNote installed from the Mac App Store.
-
Choose Apple menu > Software Update.
-
The App Store opens and will display any updates for your installed macOS apps.
-
Look for OneNote for Mac in the list of updates, and then click Update.
Next, try resetting your iCloud keychains in macOS
-
In a Finder window, click Go > Utilities, and then click Keychain Access.
-
From the Keychain Access menu, choose Preferences.
-
Click General > Reset My Default Keychains.
-
Sign in to your macOS account.
-
Quit Keychain Access and restart your Mac.
-
Open OneNote and try syncing your notebook. If prompted, enter your Microsoft account name and password.
0xE000002E: Resolve the 0xE000002E (Out of Sync with Store) error in OneNote
OneNote needs to refresh but can’t do so automatically. This is typically a temporary issue and should resolve itself the next time a full sync occurs. If you don’t want to wait for the next automatic sync, you can force a full sync of all open notebooks by pressing Shift+Command+S while OneNote for Mac is running.
0xE40105F9: Resolve the 0xE40105F9 (Unsupported Client Build) error in OneNote
This error can be resolved by updating OneNote for Mac to the latest update. For more information, see Check for Office for Mac updates automatically.
0xE000005E: Resolve the 0xE000005E (ReferencedRevisionNotFound) error in OneNote
This error is typically caused by a temporary issue and should resolve itself the next time a full sync occurs. If you don’t want to wait for the next automatic sync, you can force a full sync of all open notebooks by pressing Shift+Command+S while OneNote for Mac is running.
Report your OneNote sync issue to the OneNote team
If you’re still unable to resolve your sync issues, we apologize.
We’re constantly working to improve syncing functionality in OneNote. To help us identify and resolve new issues more quickly, please consider reporting your sync issue on the OneNote forums on Microsoft Answers.
Thank you!