
Summary:
Are you encountering error code 1407 on your Mac? The error doesn’t let you delete some of your files or transfer them to an external storage device. If you’re frustrated and don’t know what to do, don’t worry. Read this article to learn how to resolve the Apple Mac error code 1407 quickly. In case you face any unexpected data loss due to this error, download free Mac file recovery software to recover lost data on your macOS Ventura or earlier versions.

Contents
- Force Quit Finder
- Unlock the File
- Restart Mac
- Use First Aid of Disk Utility
- Reinstall macOS
- Use a Free Mac File Recovery Software
- Conclusion
The Apple Mac error code 1407 appears on your Mac when you try to drag and drop a file to Trash or move it to an external SD card, USB flash drive, HDD, or SSD. The error code appears along with a notification, such as “The operation can’t be completed because an unexpected error occurred. (Error Code -1407)”.
Reasons for the Mac Error Code 1407
- The file is locked
- The file is interfered by another program
- Finder is using the file
You need to resolve the error to complete the file deletion or file transfer process. The next sections describe several ways to troubleshoot the error on your Mac.
Force Quit Finder
To do away with the error code 1407, you should try quitting the Finder application forcefully. The steps are as follows:
a) Press the Option + Command + Esc keys simultaneously to open a window named Force Quit.
b) Select Finder from the list of options and click Force Quit. Then, select Relaunch.
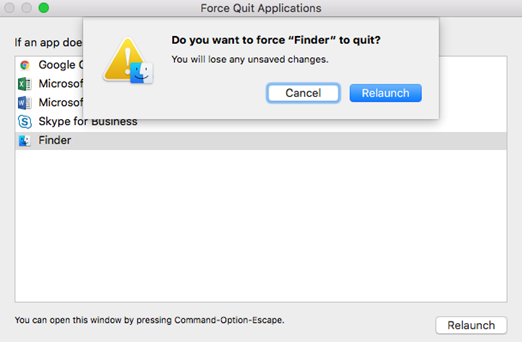
Now, try to delete or move your file. If you get the same error, then proceed to the next troubleshooting method.
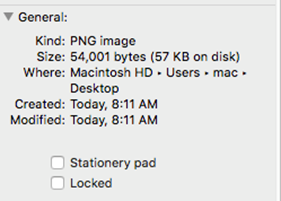
Unlock the File
Try to unlock the file that you can’t delete or move to an external storage medium due to the error code 1407. The steps are as follows:
a) Select the file you want to delete or move, then go to File > Get Info.
b) Ensure the locked checkbox is unchecked to unlock the file.
Or, you can use Terminal to unlock a file or folder. Steps are explained next:
a) Go to Applications > Utilities > Terminal to launch Terminal.
b) In the Terminal window, type sudo chflags – R nouchg P#, then press Return.
Here, replace P# with the path of the file or folder that you wish to unlock. You can drag and drop the file or folder to the command line to automatically add the path.
c) Enter the password when prompted. The file or the folder with the locked files are unlocked.
Hopefully, you can delete or move your files. If the error persists, go through the next method.
Restart Mac
Try restarting your Mac to resolve the error code 1407. The steps are as follows:
a) Go to Apple menu > Restart.
b) If prompted, click Yes to confirm the restart.
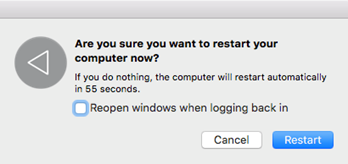
When the Mac starts again, try deleting or moving the files. When the error appears again, read the next troubleshooting method.
Use First Aid of Disk Utility
Try repairing your Mac storage drive to eliminate the error code 1407. Watch the following video for a quick overview on how to repair your Macintosh HD Startup Disk using Disk Utility:
The complete repair steps using Disk Utility are as follows:
a) Start or restart your Mac that throws the error code 1407. Then, immediately press and hold Command + R keys until Apple logo appears. Your Mac boots into macOS Recovery mode.
b) In macOS Utilities window, select Disk Utility, then click Continue to launch Disk Utility.
c) From the sidebar of Disk Utility, select the startup disk, then click First Aid from the top.
d) Click Run to initiate the Mac startup disk repair process. Wait till the repair is complete.
Hopefully, the error code 1407 is fixed. If the above method doesn’t help, proceed to the next troubleshooting procedure.
Reinstall macOS
When the Disk Utility’s repair method fails, you need to reinstall macOS. Steps to reinstall macOS are as follows:
Warning: Reinstalling macOS erases your Mac storage drive; so, back up your startup disk using Time Machine or manually save your files to an external hard drive. After the backup is over, reinstall macOS. The reinstallation steps are as follows:
a) Start or restart your Mac, then immediately press and hold the Command + R keys.
b) Release the keys when you see the Apple logo. Mac boots into macOS Recovery mode.
c) From macOS Utilities window, select Reinstall macOS, then click Continue.
d) Erase the Mac storage drive when prompted, then perform the on-screen instructions.
e) After the reinstallation of macOS, restore the backed-up files to your Mac storage drive.
Indeed, the Apple Mac error code 1407 is resolved. For any data loss event, read on.
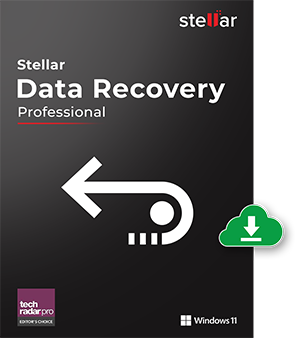
Use a Free Mac File Recovery Software
Suppose you didn’t back up your Mac and lost data during troubleshooting of error 1407, leverage a free Mac file recovery software to recover your lost or deleted data.
Watch the following video for a quick overview:
The complete software steps are as follows:
a) Download & install *Stellar Data Recovery Free Edition for Mac.
b) Launch the software and select the required file types, then click Next.
c) Select the drive location, toggle on Deep Scan, and then click Scan.
d) Preview your files and select the essential ones, then click Recover.
e) Click Browse to specify an external hard drive as recovery location, then click Save.
*Stellar Data Recovery Free Edition for Mac software recovers up to 1 GB of files for free. To recover unlimited data, upgrade the software to the Professional or Premium edition. Also, all Stellar software products have a 30-day money-back guarantee, just in case.
Conclusion
Now you know how to resolve the Apple Mac error code 1407 efficiently. Start the troubleshooting procedure by force quitting Finder, unlocking the locked files, restarting your Mac, running First Aid of Disk Utility, or reinstalling macOS in Recovery mode. And, in case of any unexpected data loss event, consider using Stellar Data Recovery Free Edition for Mac to recover your lost, deleted, or inaccessible data.
About The Author

Santosh
Santosh is a technical writer with 10-year experience in writing. He writes troubleshooting blogs, articles, and other web content on a variety of topics, including data recovery, data security, and data backup. His hobbies include solving puzzles, gardening & painting.
Best Selling Products
Stellar Data Recovery Professional for Windows
Stellar Data Recovery has the right Windows Recovery tool for all your data recovery
Read More
Stellar Data Recovery Professional for Mac
Stellar Data Recovery for Mac program performs safe..
Read More
Stellar Photo Recovery
A comprehensive photo recovery software to restore photos, music & video files
Read More
Stellar Repair for Video
Powerful video repair tool for repairing corrupt or damaged MOV and other video files
Read More
Looks like no one’s replied in a while. To start the conversation again, simply
ask a new question.
I’m encountering this error while deleting any single file on my external harddrive, which is Mac OS Extended (Journaled).
I’ve searched through the net for this error but to no avail.
I need advices and guidance!
pleaseeeee!!
Macbook Pro Unibody Late 2009,
Mac OS X (10.6.5),
Nil
Posted on May 10, 2011 8:06 PM
See if relaunching the Finder will fix it:
http://support.apple.com/kb/TS2942
Regards,
Captfred
Posted on May 10, 2011 8:15 PM
mac error code -1407
Summary:
If you are encountering the error code 1407 on your Mac during any of the file transfer or trying to delete your files, this could be due to problems with the disk or storage drives. The article provides you a few tested and tried troubleshooting methods to fix the error code 1407 on your Mac system.

The Mac Error 1407 is encountered when you try to copy, deleted or transfer files to any external drives like HDD, SSD, USB flash drives or SD card. The error shows up stating:
The operation can’t be completed because an unexpected error occurred. (Error Code -1407).
Reasons for Error code 1407 on Mac
- When Hard disk fails to execute read/write permissions: As HDD always use a mechanical means to read or write data to the disk, any damage caused to these parts eventually lead to the disk failure of the storage device.
- Unsupported drive volume formats: When File is been transferred to other storage device, the formats should be synchronized with both the devices.
- When file is locked by the system: When file is locked by the system, you will not be able to transfer, copy or delete the file from the system. Trying to do so, will lead to Mac error code 1047.
- If the file is being used by another program: When a file is open or used by another program, you will be unable to move the files to other devices. This works similar in Windows as well.
Now, to transfer your files or to delete the files from your Mac all you need to do is resolve the error 1407. Here are the tried methods to fix the Mac 1407 error and help you transfer your files.
How to Resolve the Mac Error Code 1407?
1: Fix the Error 1407 by Repair all Disk Permissions
- Open the Finder icon first → right click the Hard Disk Drive icon.(Click here if Finder is not responding on your macOS)
- Click on the Get Info icon. Now you see the Macintosh HD window on the screen.
- To your left-hand side, users are requested to get a list of hard drives from the menu section and check whether the CD ROM is well connected or not.
- When you see the hard drives list, Select the hard disk type and click the on Repair Disk Permissions button. Follow all the given instructions on your screen.
2: Format the Drive with another drive format to fix the error
- Click the Applications → Utilities → Disk Utility. Now the Window of Disk Utility program icon appears.
- Now, Select the Eraser tab from the various tabs present on it. You can see the options of drives to your left hand side. Select the drive.
- You will be given an option to delete the drive with a different drive/ volume format. Make sure you specify a proper name for the drive.
- Lastly, click the erase button now
Although the above mentioned method erases all the data from the drive, formatting is one of the most used methods to fix any errors on the hard drives. Data once formatted cannot be retrieved back unless an effective recovery method is used to recover data from the Mac.
If you have lost any data from the Mac hard disk, SFWare Mac data recovery tool helps you recover data from the formatted drive in just a few minutes. The software supports all the Mac versions including the macOS Big Sur, Catalina, Mojave, high sierra and others.

3: Force Quit the Finder
If your files are used by Finder Force Quitting Finder helps you fix the issue
- Click on the Apple menu → press the Command + Options + Esc icon at the same time
- Now window with the Force quit option appears
- Select the Finder icon → click the Force Quit icon.
- Now, click the Relaunch button.
4: Use the Terminal
Terminal is a command line interface comes built-in with Mac OS. Terminal helps you fix errors on the drive using the appropriate command. Using terminal commands you can try recovering hidden files from Mac.
- To run Terminal, click the Applications → Utilities → Terminal
- Now, type the command sudo chflags –R nouchg. This is the command to unlock “locked” files on Mac OS.
- Next, press the return icon. Enter the password when prompted to do so and click the Return icon.
5: Remove the Apple Finder PList
PList is an extension used to save the preference of application. These are files in XML format and hold the properties and configuration setting for various programs. Removing the finder plist from the system helps to fix the error 1407.
- Launch the Finder first. Hold down the Options key and navigate to the Go button.
- Click on the Library → Preferences icon next.
- Remove the file written as: apple.finder.plist
- Logout and re-login
With the help of above mentioned methods you can easily resolve the Mac error code 1407.
 Автор |
Тема: внешний диск WD MyBook 2 Tb — не удаляются файлы (код ошибки 1407) (Прочитано 3438 раз) |
|
||||||
|
||||||
|
||||||
|


-
#1
Hello,
I got this message:
«The operation cant be completed because an unexpected error occurred (error code -1407).» each time I try to put a folder inside my external hard drive into the trash, I don’t have this bug for a simple file
Thanks a lot for your help
Thierry
-
#2
Is the external drive formatted as NTFS?
-
#3
Hello
how can I check it ?
Thank
-
#4
Open Disk Utility … select the disk, then look at the bottom of the window where it says Partition Map Scheme.

-
#5
Via Disk Utility* or right clicking on the HDD icon in Finder and selecting GET INFO**.
*

**

-
#6
Make sense
the format is ms-dos (fat32) from Western digital
Thanks
-
#7
Make sense
![;-)]()
the format is ms-dos (fat32) from Western digitalThanks
But Mac OS X is capable of writing to FAT32 formatted volumes.
Is the file bigger than 4GB?
FAT32
- Read/Write FAT32 from both native Windows and native Mac OS X.
- No individual file larger than 4GB.
NTFS
- Read/Write NTFS from native Windows.
- Read only NTFS from native Mac OS X
- To Read/Write NTFS from Leopard: Install MacFUSE and NTFS-3G. You can install both with NTFS-3G for Mac OS X.
- To Read/Write NTFS from Snow Leopard: Guide: Enable native NTFS Read/Write in Snow Leopard
- (Be aware that some are of the opinion that enabling native NTFS in SL is unstable/unreliable, and favor the MacFuse/NTFS-3G method for Snow Leopard)
HFS
- Read/Write HFS from native Mac OS X
- To Read/Write HFS from Windows, Install MacDrive or HFSExplorer
-
#8
it’s 1 tetra USB 2 external hard drive
-
#9
I have copied my files already with no bugs
-
#10
Is the file bigger than 4GB?
If it was … it would have never gotten on the drive to begin with.
OP — have you restarted the machine?
-
#11
If it was … it would have never gotten on the drive to begin with.
OP — have you restarted the machine?
Ah, good to know, I abandoned FAT32 ten years ago (except with those bloody USB memory sticks, and those are often just 4GB ones), thus I have never experienced that.
-
#12
the folder is empty
and I had this bug since yesterday night so I have restarted my mac this morning
Такие проблемы 1407-paths.bin обычно вызваны повреждением файла, связанного с Europa Universalis 3 Complete, или, в некоторых случаях, его случайным или намеренным удалением. Для устранения неполадок, связанных с файлом BIN, большинство профессионалов ПК заменят файл на соответствующую версию. В качестве последней меры мы рекомендуем использовать очиститель реестра для исправления всех недопустимых 1407-paths.bin, расширений файлов BIN и других ссылок на пути к файлам, по причине которых может возникать сообщение об ошибке.
Загрузите новую версию 1407-paths.bin для %%os%% в списке файлов ниже. Также доступны варианты для других версий Windows (при необходимости). В текущем каталоге файлов могут отсутствовать редкие или очень старые версии 1407-paths.bin, но вы можете запросить необходимую версию, нажав на кнопку Request (Запрос) рядом с необходимой версией файла. Если вы не можете найти нужную версию файла в нашей базе данных, вы также можете обратиться за дополнительной помощью к Virtual Programming Ltd..
Несмотря на то, что в большинстве случаев после размещения файла 1407-paths.bin в надлежащем месте на жёстком диске, сообщения об ошибках, связанных с этим файлом, больше не выводятся, следует выполнить быструю проверку, чтобы окончательно в этом убедиться. Вы можете проверить результат, запустив приложение Europa Universalis 3 Complete и проверить, появляется ли проблема.
| 1407-paths.bin Описание файла | |
|---|---|
| Тип: | BIN |
| Тип приложения: | Game |
| Софт: | Europa Universalis 3 Complete |
| Вер: | 2011 |
| Автор: | Virtual Programming Ltd. |
| Имя файла: | 1407-paths.bin |
| Размер (в байтах): | 1152 |
| SHA-1: | 570baa64fb7ecd23ceff1cd4aae065e9089625c4 |
| MD5: | 0663a939e5cd1890d9c84680f8f31351 |
| CRC32: | 1f5eb479 |
Продукт Solvusoft
Загрузка
WinThruster 2023 — Сканировать ваш компьютер на наличие ошибок реестра в 1407-paths.bin
Windows
11/10/8/7/Vista/XP
Установить необязательные продукты — WinThruster (Solvusoft) | Лицензия | Политика защиты личных сведений | Условия | Удаление
BIN
1407-paths.bin
Идентификатор статьи: 511819
1407-paths.bin
| File | Идентификатор файла (контрольная сумма MD5) | Размер | Загрузить | |||||||||||||
|---|---|---|---|---|---|---|---|---|---|---|---|---|---|---|---|---|
| + 1407-paths.bin | 0663a939e5cd1890d9c84680f8f31351 | 1.12 KB | ||||||||||||||
|
Классические проблемы 1407-paths.bin
Наиболее распространенные ошибки 1407-paths.bin, которые могут возникнуть на компьютере под управлением Windows, перечислены ниже:
- «Ошибка в файле 1407-paths.bin.»
- «Отсутствует файл 1407-paths.bin.»
- «Не удалось найти 1407-paths.bin. «
- «Не удалось загрузить модуль для 1407-paths.bin. «
- «Ошибка регистрации: 1407-paths.bin. «
- «Ошибка 1407-paths.bin во время выполнения. «
- «Не удается загрузить 1407-paths.bin. «
Проблемы, связанные с 1407-paths.bin, иногда связанные с Europa Universalis 3 Complete, возникают во время запуска/завершения работы, во время запуска программы, связанной с 1407-paths.bin, или редко во время процесса установки Windows. Ошибки Recording1407-paths.bin, связанные с Europa Universalis 3 Complete, имеют решающее значение для поиска проблем и пересылки Virtual Programming Ltd. для параметров восстановления.
Истоки проблем 1407-paths.bin
Большинство проблем 1407-paths.bin связаны с отсутствующим или поврежденным 1407-paths.bin, вирусной инфекцией или недействительными записями реестра Windows, связанными с Europa Universalis 3 Complete.
Точнее, ошибка 1407-paths.bin, вызванная:
- Недопустимая (поврежденная) запись реестра 1407-paths.bin.
- Вирус или вредоносное ПО, которые повредили файл 1407-paths.bin или связанные с Europa Universalis 3 Complete программные файлы.
- 1407-paths.bin злонамеренно удален (или ошибочно) другим изгоем или действительной программой.
- Другое приложение, конфликтующее с 1407-paths.bin или другими общими ссылками.
- 1407-paths.bin поврежден во время загрузки или установки программного обеспечения.
Finder’s trash can is an amalgam of several different directories:
~/.Trash//.Trashes/<uid>/on each volume (including the startup volume)
e.g./Volumes/Big Media Volume/.Trashes/501/
Most trash operations will move the trashed item to the directory under your home directory. If you trash something on an separate volume, however, Finder will move the item into the volume’s /.Trashes/<uid>/ directory instead (because moving a file to a location on the same volume is very fast, but copying a file from some other volume to your home directory’s trash directory could be quite slow).
Try checking your main trash directory (in a Terminal window):
ls -ld ~/.Trash
If the result does not look like start with drwx------ and show your user’s “short name” twice (the second is actually a group name), then your personal trash directory has probably been fouled. You can move it aside then logout and login again:
cd ~ && mv .Trash .Trash.old
# now logout and re-login
This should create a new ~/.Trash directory for you. You may want to investigate the contents of the .Trash.old file/directory to try to determine its origin.
If the problem is with a per-volume trash directory, you should be able to use the same idea: move it aside, eject it, then remount it (disconnect and reconnect an external disk, reopen a disk image, use Disk Utility to remount an internal volume):
cd '/Volume/whereever' && mv .Trashes .Trashes.old
# then eject and remount
You may need … && sudo mv … if the volume has “Owners Enabled”.
Summary:
Are you encountering error code 1407 on your Mac? The error doesn’t let you delete some of your files or transfer them to an external storage device. If you’re frustrated and don’t know what to do, don’t worry. Read this article to learn how to resolve the Apple Mac error code 1407 quickly. In case you face any unexpected data loss due to this error, download free Mac file recovery software to recover lost data on your macOS Ventura or earlier versions.
Contents
- Force Quit Finder
- Unlock the File
- Restart Mac
- Use First Aid of Disk Utility
- Reinstall macOS
- Use a Free Mac File Recovery Software
- Conclusion
The Apple Mac error code 1407 appears on your Mac when you try to drag and drop a file to Trash or move it to an external SD card, USB flash drive, HDD, or SSD. The error code appears along with a notification, such as “The operation can’t be completed because an unexpected error occurred. (Error Code -1407)”.
Reasons for the Mac Error Code 1407
- The file is locked
- The file is interfered by another program
- Finder is using the file
You need to resolve the error to complete the file deletion or file transfer process. The next sections describe several ways to troubleshoot the error on your Mac.
Force Quit Finder
To do away with the error code 1407, you should try quitting the Finder application forcefully. The steps are as follows:
a) Press the Option + Command + Esc keys simultaneously to open a window named Force Quit.
b) Select Finder from the list of options and click Force Quit. Then, select Relaunch.
Now, try to delete or move your file. If you get the same error, then proceed to the next troubleshooting method.
Unlock the File
Try to unlock the file that you can’t delete or move to an external storage medium due to the error code 1407. The steps are as follows:
a) Select the file you want to delete or move, then go to File > Get Info.
b) Ensure the locked checkbox is unchecked to unlock the file.
Or, you can use Terminal to unlock a file or folder. Steps are explained next:
a) Go to Applications > Utilities > Terminal to launch Terminal.
b) In the Terminal window, type sudo chflags – R nouchg P#, then press Return.
Here, replace P# with the path of the file or folder that you wish to unlock. You can drag and drop the file or folder to the command line to automatically add the path.
c) Enter the password when prompted. The file or the folder with the locked files are unlocked.
Hopefully, you can delete or move your files. If the error persists, go through the next method.
Restart Mac
Try restarting your Mac to resolve the error code 1407. The steps are as follows:
a) Go to Apple menu > Restart.
b) If prompted, click Yes to confirm the restart.
When the Mac starts again, try deleting or moving the files. When the error appears again, read the next troubleshooting method.
Use First Aid of Disk Utility
Try repairing your Mac storage drive to eliminate the error code 1407. Watch the following video for a quick overview on how to repair your Macintosh HD Startup Disk using Disk Utility:
The complete repair steps using Disk Utility are as follows:
a) Start or restart your Mac that throws the error code 1407. Then, immediately press and hold Command + R keys until Apple logo appears. Your Mac boots into macOS Recovery mode.
b) In macOS Utilities window, select Disk Utility, then click Continue to launch Disk Utility.
c) From the sidebar of Disk Utility, select the startup disk, then click First Aid from the top.
d) Click Run to initiate the Mac startup disk repair process. Wait till the repair is complete.
Hopefully, the error code 1407 is fixed. If the above method doesn’t help, proceed to the next troubleshooting procedure.
Reinstall macOS
When the Disk Utility’s repair method fails, you need to reinstall macOS. Steps to reinstall macOS are as follows:
Warning: Reinstalling macOS erases your Mac storage drive; so, back up your startup disk using Time Machine or manually save your files to an external hard drive. After the backup is over, reinstall macOS. The reinstallation steps are as follows:
a) Start or restart your Mac, then immediately press and hold the Command + R keys.
b) Release the keys when you see the Apple logo. Mac boots into macOS Recovery mode.
c) From macOS Utilities window, select Reinstall macOS, then click Continue.
d) Erase the Mac storage drive when prompted, then perform the on-screen instructions.
e) After the reinstallation of macOS, restore the backed-up files to your Mac storage drive.
Indeed, the Apple Mac error code 1407 is resolved. For any data loss event, read on.
Use a Free Mac File Recovery Software
Suppose you didn’t back up your Mac and lost data during troubleshooting of error 1407, leverage a free Mac file recovery software to recover your lost or deleted data.
Watch the following video for a quick overview:
The complete software steps are as follows:
a) Download & install *Stellar Data Recovery Free Edition for Mac.
b) Launch the software and select the required file types, then click Next.
c) Select the drive location, toggle on Deep Scan, and then click Scan.
d) Preview your files and select the essential ones, then click Recover.
e) Click Browse to specify an external hard drive as recovery location, then click Save.
*Stellar Data Recovery Free Edition for Mac software recovers up to 1 GB of files for free. To recover unlimited data, upgrade the software to the Professional or Premium edition. Also, all Stellar software products have a 30-day money-back guarantee, just in case.
Conclusion
Now you know how to resolve the Apple Mac error code 1407 efficiently. Start the troubleshooting procedure by force quitting Finder, unlocking the locked files, restarting your Mac, running First Aid of Disk Utility, or reinstalling macOS in Recovery mode. And, in case of any unexpected data loss event, consider using Stellar Data Recovery Free Edition for Mac to recover your lost, deleted, or inaccessible data.
About The Author
Santosh Kumar Gupta
Santosh is a technical writer with 10-year experience in writing. He writes troubleshooting blogs, articles, and other web content on a variety of topics, including data recovery, data security, and data backup. His hobbies include solving puzzles, gardening & painting.
Summary:
If you are encountering the error code 1407 on your Mac during any of the file transfer or trying to delete your files, this could be due to problems with the disk or storage drives. The article provides you a few tested and tried troubleshooting methods to fix the error code 1407 on your Mac system.
The Mac Error 1407 is encountered when you try to copy, deleted or transfer files to any external drives like HDD, SSD, USB flash drives or SD card. The error shows up stating:
The operation can’t be completed because an unexpected error occurred. (Error Code -1407).
Reasons for Error code 1407 on Mac
- When Hard disk fails to execute read/write permissions: As HDD always use a mechanical means to read or write data to the disk, any damage caused to these parts eventually lead to the disk failure of the storage device.
- Unsupported drive volume formats: When File is been transferred to other storage device, the formats should be synchronized with both the devices.
- When file is locked by the system: When file is locked by the system, you will not be able to transfer, copy or delete the file from the system. Trying to do so, will lead to Mac error code 1047.
- If the file is being used by another program: When a file is open or used by another program, you will be unable to move the files to other devices. This works similar in Windows as well.
Now, to transfer your files or to delete the files from your Mac all you need to do is resolve the error 1407. Here are the tried methods to fix the Mac 1407 error and help you transfer your files.
How to Resolve the Mac Error Code 1407?
1: Fix the Error 1407 by Repair all Disk Permissions
- Open the Finder icon first → right click the Hard Disk Drive icon.(Click here if Finder is not responding on your macOS)
- Click on the Get Info icon. Now you see the Macintosh HD window on the screen.
- To your left-hand side, users are requested to get a list of hard drives from the menu section and check whether the CD ROM is well connected or not.
- When you see the hard drives list, Select the hard disk type and click the on Repair Disk Permissions button. Follow all the given instructions on your screen.
2: Format the Drive with another drive format to fix the error
- Click the Applications → Utilities → Disk Utility. Now the Window of Disk Utility program icon appears.
- Now, Select the Eraser tab from the various tabs present on it. You can see the options of drives to your left hand side. Select the drive.
- You will be given an option to delete the drive with a different drive/ volume format. Make sure you specify a proper name for the drive.
- Lastly, click the erase button now
Although the above mentioned method erases all the data from the drive, formatting is one of the most used methods to fix any errors on the hard drives. Data once formatted cannot be retrieved back unless an effective recovery method is used to recover data from the Mac.
If you have lost any data from the Mac hard disk, SFWare Mac data recovery tool helps you recover data from the formatted drive in just a few minutes. The software supports all the Mac versions including the macOS Big Sur, Catalina, Mojave, high sierra and others.
3: Force Quit the Finder
If your files are used by Finder Force Quitting Finder helps you fix the issue
- Click on the Apple menu → press the Command + Options + Esc icon at the same time
- Now window with the Force quit option appears
- Select the Finder icon → click the Force Quit icon.
- Now, click the Relaunch button.
4: Use the Terminal
Terminal is a command line interface comes built-in with Mac OS. Terminal helps you fix errors on the drive using the appropriate command. Using terminal commands you can try recovering hidden files from Mac.
- To run Terminal, click the Applications → Utilities → Terminal
- Now, type the command sudo chflags –R nouchg. This is the command to unlock “locked” files on Mac OS.
- Next, press the return icon. Enter the password when prompted to do so and click the Return icon.
5: Remove the Apple Finder PList
PList is an extension used to save the preference of application. These are files in XML format and hold the properties and configuration setting for various programs. Removing the finder plist from the system helps to fix the error 1407.
- Launch the Finder first. Hold down the Options key and navigate to the Go button.
- Click on the Library → Preferences icon next.
- Remove the file written as: apple.finder.plist
- Logout and re-login
With the help of above mentioned methods you can easily resolve the Mac error code 1407.
-

-
August 31 2009, 19:11
Прошу помощи у сообщников =)
Перед установкой уже забаяненной сиситемы скопировал контент на разные диски на своем макпро,
в частности на один диск с форматом Macos Extended. Теперь с этого диска мой бекап не удаляется —
выдается ошибка с кодом 1407 при попытке перемещения в корзину. Гуглил, но видимо плохо =(
Что сделать?