
Содержание
- Adjustment program epson l1300 error code 2100012c
- Adjustment program не работает
- Решение проблемы Adjustment program
- Форум по СНПЧ: Help. Помогите найти Adjusment program для L805 — Форум по СНПЧ
- | Сообщение #1 Отправлено 03 января 2017 — 15:36 stamp69
- | Сообщение #2 Отправлено 03 января 2017 — 16:17 sanek943
- | Сообщение #3 Отправлено 03 января 2017 — 16:22 stamp69
- | Сообщение #4 Отправлено 03 января 2017 — 16:43 sanek943
- | Сообщение #5 Отправлено 04 января 2017 — 06:23 stamp69
- | Сообщение #6 Отправлено 06 января 2017 — 13:14 Nikolai67
- | Сообщение #7 Отправлено 06 января 2017 — 13:24 stamp69
- | Сообщение #8 Отправлено 06 января 2017 — 14:19 Роман67
- | Сообщение #9 Отправлено 06 января 2017 — 14:37 stamp69
- | Сообщение #10 Отправлено 07 января 2017 — 12:45 romanM
- | Сообщение #11 Отправлено 07 января 2017 — 13:39 root
- Прикрепленные изображения
- | Сообщение #12 Отправлено 07 января 2017 — 17:40 stamp69
- | Сообщение #13 Отправлено 07 января 2017 — 20:23 romanM
- | Сообщение #14 Отправлено 08 января 2017 — 09:16 stamp69
- | Сообщение #15 Отправлено 13 февраля 2017 — 09:52 Usver2
КОНФЕРЕНЦИЯ СТАРТКОПИ
Принтеры, копировальные аппараты, МФУ, факсы и другая офисная техника:
вопросы ремонта, обслуживания, заправки, выбора
0. 1234567890 24.08.18 09:27
Здравствуйте. Проблема заключается в следующем. При попытке сброса памперса, выдает ошибку 200012c (через программуAdjProg). В статусе показывает Communication error occurred.
Check the I/F cable connection and power of printer.
Не пойму в чем дело. Подскажите пожалуйста как это исправить. Заранее спасибо. Кстати винда 7 Х64.
Прога не видит аппарат. Варианты действий она подсказывает вам сама.
2. 1234567890 24.08.18 09:46
Я конечно извиняюсь, но чето нихр. не подсказывает.
И как может не видеть, если где выбор принтера он есть.
1234567890 (0): Communication error occurred. Check the I/F cable connection and power of printer. — это 1234567890 (2): чето нихр . ))
4. 1234567890 24.08.18 10:00
Я 3 кабела поменял. И тем более принтхелп видит его прекрасно. Как так то? (
1234567890 (4): принтхелп видит его прекрасно
И чего ж не сбросить через него?
6. 1234567890 24.08.18 10:29
(6) И сколько мешков золота просят за это счастье? Наверно, 10 баксов? Или вы всем клиентам сбрасываете памперсы исключительно за спасибо?
8. 1234567890 24.08.18 10:36
(7) Немного меньше. Да и самому интересно разобраться в чем же дело. Раньше не было таких проблем. Через AdjProg всегда все получалось.
9. rapoport 24.08.18 10:38
(8)а аджик у вас для вашего аппарата?
10. 1234567890 24.08.18 10:41
(8) Да для L1300. В инете сколько искал, везде одна и та же.
(8) А, то есть ваша цель — не конечный результат, а сам процесс? Ну удачи тогда в исследованиях. Я таких извратов понимаю, но не принимаю.
12. MichMech 24.08.18 10:57
1234567890 (0): Здравствуйте. Проблема заключается в следующем. При попытке сброса памперса, выдает ошибку
Вы когда запустили программу и выбираете порт, название порта должно содержать номер и модель принтера.
Типа USB 001 — Epson L1300
13. 1234567890 24.08.18 10:59
Так результат конечно необходим. Просто поймите, надо же проблему найти (для опыта, чтобы знать все проблема). Иначе бы я не обращался к Вам за помощью.
Принтнелпом сбросте рекламные 10%. Если сбросит — значит аджипргу чёт не нравится. Тогда качайте какойнить анинсталлер (Revo Uninstaller или др) или ручками удаляйте установленные мильён принтеров с зачисткой хвостов. начните с НР. Освобождайте порты.
15. 1234567890 24.08.18 11:01
(12) Так я выбираю. Там порт с моделью указан.
1234567890 (13): Так результат конечно необходим. Просто поймите, надо же проблему найти (для опыта, чтобы знать все проблема)
Одно диаметрально противоречит второму. Определитесь уже.
17. 1234567890 24.08.18 11:21
(16) Я хочу понять почему AdjProg ошибку бросает. В чем определяться то? Если я не ошибаюсь, этот сайт и создан для того, чтобы помогали друг другу, делились опытом.
18. 1234567890 24.08.18 11:22
(14) Я кстати подключал к другому компу (на котором не было установлено ни одного принтера). Ничего не изменилось.
1234567890 (17): Я хочу понять почему AdjProg ошибку бросает
https://adjprogram.com/contact-html
1234567890 (17): В чем определяться то?
Написано выше.
1234567890 (17): чтобы помогали друг другу, делились опытом
Гадание и опыт — не одно и то же. Скачали с файлопомойки левый (крякнутый) софт, он не хочет работать, а кто-то нагадает, почему он не хочет?
(18)Так я Вам порекомендовал отделить мух от . не мух. Либо аппарат чюдит, либо софт. если второе — то вопрос не сюда, а
Scuzzy (19): (17): Я хочу понять почему AdjProg ошибку бросает
https://adjprogram.com/contact-html Pavel_ (20): Либо аппарат чюдит
С учетом 1234567890 (4): принтхелп видит его прекрасно — это вряд ли.
для начала драйвер удали, он адж програм не нужен
и порт авто выбирай
24. 1234567890 25.08.18 13:48
(23) Именно это программой, которая по ссылке, счетчик считывается, но при нажатии на кнопку initialize, ничего не происходит.
В концовке при долгом поиске решения проблемы нарвался на прогу KelvenBox и с помощью неё все получилось без проблем. Может кому пригодится. Всем большое спасибо.
(24) Ну так она только для чтение счетчика (тестовая, все другие функции выключены)
А с Kelven_ом (китайцем) можно и доиграться, уж больно не хорошие воспоминание у меня остались о нем (горький опыт)
Источник
Adjustment program не работает
Почему не работает Adjustment program? Программа запускается, но не сбрасывает счетчик адсорбера, не выдает отчет. Основная проблема — нет связи с компьютером.
Очень часто специалисты по ремонту принтеров и МФУ Epson оказываются в ситуации, когда работавшие раньше программы Adjustment program перестают работать. Программы запускаются, но при выполнении конкретных действий, связанных с обращением к принтеру, выдают ошибку communication error 20000010.
Номер ошибки может быть разным, но всегда есть сообщение «communication error».
Решение проблемы Adjustment program
Большей частью эта проблема происходит из-за смены Windows. Старые программы Adjustment program не работают в Windows 7,8,10 и совершенно бесполезно искать в интернете другую работающую программу проблема не в программе.
Способы решения этой проблемы:
- теоретически возможно, что проблема может быть из-за плохого качества USB кабеля. Один раз замена на фирменный качественный кабель USB помогла;
- слишком длинный кабель (больше 1.8 м) — программа выдавала в Windows XP ошибку 20000020a с длинным кабелем 4.5 м., при замене кабеля на короткий 1.8 метра программа сработала сразу.
- запуск в режиме совмести с Windows XP из Windows 7,8,10 64 ни разу не помог;
- иногда помогает запуск Adjustment program от имени администратора;
- иногда помогает выбрать порт USB вручную;
- отлично помогает запуск Adjustment program в Windows XP, возможно, что это из-за 32 битной системы.
Выводы: запускать программу Adjustment program в среде Windows XP с хорошим фирменным кабелем.
Читать еще про ремонт струйных Epson принтеров и МФУ.
Источник
Форум по СНПЧ: Help. Помогите найти Adjusment program для L805 — Форум по СНПЧ
| Сообщение #1 Отправлено 03 января 2017 — 15:36 stamp69
| Сообщение #2 Отправлено 03 января 2017 — 16:17 sanek943
| Сообщение #3 Отправлено 03 января 2017 — 16:22 stamp69
| Сообщение #4 Отправлено 03 января 2017 — 16:43 sanek943
 stamp69 сказал:
| Сообщение #5 Отправлено 04 января 2017 — 06:23 stamp69
| Сообщение #6 Отправлено 06 января 2017 — 13:14 Nikolai67
| Сообщение #7 Отправлено 06 января 2017 — 13:24 stamp69
| Сообщение #8 Отправлено 06 января 2017 — 14:19 Роман67
stamp69, В какой ОС пытались работать ?
stamp69 сказал:
Притом запросто , так АР для ТХ650 не работает с РХ660 , так же уходит в ошибку , хотя эти аппараты по функционалу одинаковы .
| Сообщение #9 Отправлено 06 января 2017 — 14:37 stamp69
| Сообщение #10 Отправлено 07 января 2017 — 12:45 romanM
| Сообщение #11 Отправлено 07 января 2017 — 13:39 root
stamp69 сказал:
Прикрепленные изображения
| Сообщение #12 Отправлено 07 января 2017 — 17:40 stamp69
| Сообщение #13 Отправлено 07 января 2017 — 20:23 romanM
| Сообщение #14 Отправлено 08 января 2017 — 09:16 stamp69
| Сообщение #15 Отправлено 13 февраля 2017 — 09:52 Usver2
stamp69 сказал:
Источник
1. Printer doesn’t respond the commands from Adjustment Program
Solution:
After the Adjustment Program window opens, press SELECT, in the PORT section, specify the USB Port printer (don’t use Auto Selection).

2. Show License ID or Hardware ID when open adjustment program
Solution:
Open the KEYGEN file, enter the License ID, then press New Key or Create License Key, to get the Activation Key.

3. Show error “Unknown Exception” when opening the Adjustment Program
Solution:
– Right click Adjprog, run as administrator. If this way fail.
– Disable Antivirus and Windows Defender for a while, then right click Adjprog, run as administrator. After finish using the Adjustment Program, reactivate Antivirus and Windows Defender.

4. Communication error. Error Code : 21000069, 2100012C, 20000010, etc
Solution:
After the Adjustment Program window opens, press SELECT, in the PORT section, specify the USB Port printer (don’t use Auto Selection).

5. This program cannot be used or CRC cheksum error
Solution:
After extract the Epson adjustment program file, then open Adjprog.exe, show error: This program cannot be used or CRC cheksum error.
– Delete the Epson adjustment program folder
– Extract adjprog.rar once again- Open change date and time settings. Change date according to the information contained in the file.
– Delete folder Adjustment Program on drive C. C:Adjustment Program
– Re-open Adjprog.exe
– After finish using the Adjustment Program, normalize the date and time settings

6. A DLL file was not found. Click OK button to terminate this program
Solution:
Right click Adjprog, select Properties, select Compatibility, check box “Run this program in compatibility mode for”, click OK. Open Adjprog.exe once again.

If you have trouble doing it, I suggest asking for help from the nearest printer repair professional.
Решено
Help. Помогите найти Adjusment program для L805
Не могу найти Adjusment program
| Сообщение #1
Отправлено 03 января 2017 — 15:36
Друзья, помогите. Нужна Adjusment program для L805. Требуется тонкая настройка, для L800 не работают.
- Наверх of the page up there ^
-
0
| Сообщение #2
Отправлено 03 января 2017 — 16:17
sanek943
- Наверх of the page up there ^
-
0
| Сообщение #3
Отправлено 03 января 2017 — 16:22
stamp69
Спасибо, но эту пробовал — не работает (выдаёт ошибку)
- Наверх of the page up there ^
-
0
| Сообщение #4
Отправлено 03 января 2017 — 16:43
sanek943
stamp69 сказал:
какую?
- Наверх of the page up there ^
-
0
| Сообщение #5
Отправлено 04 января 2017 — 06:23
stamp69
Вот что пишет
communication error!
error code: 2100012c
- Наверх of the page up there ^
-
0
| Сообщение #6
Отправлено 06 января 2017 — 13:14
Nikolai67
С диска Ц папку с названием принтера удалял?
- Наверх of the page up there ^
-
0
| Сообщение #7
Отправлено 06 января 2017 — 13:24
stamp69
Дрова ставил на только что установленную систему.
- Наверх of the page up there ^
-
0
| Сообщение #8
Отправлено 06 января 2017 — 14:19
Роман67
stamp69, В какой ОС пытались работать ?
stamp69 сказал:
Спасибо, но эту пробовал — не работает (выдаёт ошибку)
Притом запросто , так АР для ТХ650 не работает с РХ660 , так же уходит в ошибку , хотя эти аппараты по функционалу одинаковы .
stamp69, Вам дорога в ИЗВЕСТНЫЙ МАГАЗИН !
Кому суждено быть повешеным,тот не утонет! Если просвистела , то не моя ! То , что вы на свободе — не ваша заслуга , а наша недоработка!
NANO3 , Epson SP1410 , PX660. Чернила : оригинал L800 , WWM EVEREST , Revcol EP390 .
- Наверх of the page up there ^
-
0
| Сообщение #9
Отправлено 06 января 2017 — 14:37
stamp69
Пытался в семёрке и экспишке. А по поводу магазина — насколько можно быть уверенным в том что получишь то что нужно?
- Наверх of the page up there ^
-
0
| Сообщение #10
Отправлено 07 января 2017 — 12:45
romanM
Нет в доступе на л805, купите в магазине 2Manuals, вроде называется, про шару забудьте
Делаю СНПЧ на всё, что в руки попадает, и это работает!
- Наверх of the page up there ^
-
0
| Сообщение #11
Отправлено 07 января 2017 — 13:39
root
stamp69 сказал:
ЧТО конкретно вы хотите настроить?
Проверяли доступные настройки в PrintHelp?
Прикрепленные изображения
- Наверх of the page up there ^
-
0
| Сообщение #12
Отправлено 07 января 2017 — 17:40
stamp69
конкретно нужно
head angular adjustment
Bi-D adjustment
PF/EJ adjustment
PW adjustment
- Наверх of the page up there ^
-
-1
| Сообщение #13
Отправлено 07 января 2017 — 20:23
romanM
Из драйвера сделайте, что не так?
Делаю СНПЧ на всё, что в руки попадает, и это работает!
- Наверх of the page up there ^
-
-1
| Сообщение #14
Отправлено 08 января 2017 — 09:16
stamp69
И где в драйвере такие настройки?
- Наверх of the page up there ^
-
1
| Сообщение #15
Отправлено 13 февраля 2017 — 09:52
Usver2
stamp69 сказал:
Нужна Adjusment program для L805. Требуется тонкая настройка
Тонкую настройку не пробовал но вот памперс сбросила
http://resetters.ru/…=1
- Наверх of the page up there ^
-
2
| Сообщение #16
Отправлено 11 апреля 2017 — 15:24
kofanov49
Есть ли у кого нибудь adjustment program для sx425w
- Наверх of the page up there ^
-
0
| Сообщение #17
Отправлено 11 апреля 2017 — 15:32
Роман67
kofanov49, ДЕРЖИ , правда рабочая или нет , не знаю .
Кому суждено быть повешеным,тот не утонет! Если просвистела , то не моя ! То , что вы на свободе — не ваша заслуга , а наша недоработка!
NANO3 , Epson SP1410 , PX660. Чернила : оригинал L800 , WWM EVEREST , Revcol EP390 .
- Наверх of the page up there ^
-
0
- ← Предыдущая тема
- L100, L200, L800
- Следующая тема →
- Вы не можете создать новую тему
- Вы не можете ответить в тему
1 человек читают эту тему
0 пользователей, 1 гостей, 0 скрытых пользователей
Устранить ошибку 2100012c при обнулении принтеров Epson: возможно, пока вы выполняете процесс обнуления принтера, возникнет ошибка данного кода. Что это означает и как ее поправить
С течением
времени появляется необходимость
обнуления данных принтеров. Обнуление
заключается в том, чтобы дать принтеру
понять, что на самом деле он не распечатал
свой лимит страниц и что ему не нужно
техническое обслуживание. Как правило,
необходимо выполнить обнуление принтера,
когда он уже распечатал около 15000 страниц,
по крайней мере , принтеры марки Epson .
Единственное,
что нужно иметь в виду перед обнулением
принтера, это подключить его перед
выполнением работы. Помните, что никакой
другой принтер может быть подключен к
компьютеру в этот момент, так как это
может изменить программу другого
принтера. Представьте себе программное
обеспечение принтера Epson L200 на Epson TX-
115, именно поэтому может возникнуть
ошибка 2100012c.
Ошибка 2100012c
возникает при сбросе принтера по двум
причинам: вы используете adjustment program,
которая не подходит для этого принтера
или к компьютеру подключен другой
принтер.
Очень редко эта
ошибка возникает, потому что принтер
не подключен непосредственно к принтеру
или потому что мы не указали, через
какрой порт подключен принтер. Что
делать в такой ситуации? Обычно при
обнулении в верхней части диалогового
окна показано, для каких моделей принтеров
подходит данная программа сброса.
Следует посмотреть там.
При
выполнении обнуления этого и любого
другого принтера Epson, нельзя подключать
другой принтер к компьютеру. Необходимо
включить и подключить к компьютеру
только тот принтер, который подлежит
настройкам.
2. Reset the Waste ink counter value
1. Replace the ink pad
There are two solutions that you can use, namely replacing the ink pad with a new one and modifying the waste ink reservoir. Ink pads for the Epson L1300 can be purchased in online stores easily, but if you have trouble replacing the ink pads because you have to disassemble the printer, an alternative solution is to modify the waste ink reservoir. Choose one of the two solutions below.
1.a. Replace the ink pad with a new one
Follow the procedure shown in the image below, how to disassemble the printer and replace the waste ink pad.
Step 1. Removing the Paper Support Assy

Step 2. Removing Stacker Assy

Step 3. Removing the Front Decoration Plate Left/Right

Step 4. Removing the Rear Housing

Step 5. Removing the Panel Unit


Step 6. Removing the Decoration Plate Left/Right


Step 7. Remove the Upper Housing


Step 8. Pull out the Waste Ink Tube from the Joint Tube
Step 9. Remove the screw that secure the Shield Plate Holder, and remove the Shield Plate Holder.
Step 10. Remove the five screws secure the Printer Mechanism.

Step 11. Handling the Printer Mechanism

Step 12. Removing the Waste Ink Pad


1.b. Modification of the waste ink reservoir
For those of you who find it difficult to replace the waste ink pads because they are inexperienced in disassembling the printer, we recommend following the following alternative solution, namely by modifying the waste ink reservoir. The modification is to transfer the waste ink reservoir to a transparent plastic bottle that is placed outside the printer. Here’s how to modify the waste ink reservoir. Please pay attention to the mechanism in the image below.

(1) Remove the ink tank, you will see a door.
(2) Remove the bolt to open the door.
(3) After the door opens, you will see a terminal. This terminal connects two pipes. The waste ink pipe from the pump, and the pipe leading to the waste ink reservoir (see image below).
 |
| Waste ink disposal mechanism in the Epson L1300 |
The modification we will do is divert the waste ink to the ink pad, diverted to a transparent plastic bottle that is placed outside the printer. Here’s how to do it.
— Set the transportation lock to the locked position.

— Remove the ink tank, then remove the screw and open the drain hose terminal cover.

— Remove the drain hose from the pump.

— Drain the ink pad by using a hose and injection device. To drain the ink pad can be done by installing a hose in the drain terminal, then with the injection tool we suck the ink from the ink pad.

— Divert waste ink disposal by installing a new hose.

— Turn on the printer and do the Head Cleaning. Head cleaning is done to check the installation of a new drain hose. If the waste ink has flowed into the storage bottle, the ink pad modification has been successfully carried out.

— Spruce up the ink drain hose installation.

— Set the transportation lock to the unlocked position. Finish.
As shown in Figure 6, before modification is done, we recommend draining the ink pad using a hose and injection device. If necessary, you can close the drain hose that leads to the ink pad.
This modification was made with the aim to divert the waste ink receptacle outside the printer. The length of the hose and the size of the waste ink container, can be replaced with a larger size according to conditions. If you encounter problems during repair, please read the Epson L1300 Service Manual.
After the waste ink pad modification is complete, the next step is to reset the Main pad counter to zero. To reset the Epson L1300, the Epson Adjustment Program tool is used.
2. Reset the Waste ink counter value

Reset the Epson L1300 printer
- Connect the USB cable and turn on the printer.
- Download Adjustment Program Epson L1300
- Extract file
- Open Adjprog.
(2) Port – select USB port Epson L1300 or use Auto selection – OK
(3) Particular Adjustment Mode

(4) Double click Waste Ink Pad Counter
Check the value of the Main pad counter before reset.
(5) Checkbox: Main Pad Counter
(6) Click Check – OK
As shown in the figure below, the Main pad counter value is 11809 point or 100%. Reset is done to reset the Main pad counter to zero.

Note: Wait for the power light to stop flashing, before performing the next command.
(7) Checkbox: Main Pad Counter
(8) Click Initialization
(9) When the OK button is clicked, counter will be initialized – OK
(10) Please turn off the printer. Turn off the printer first, then press OK

Note: Turn on the printer, and wait for the power light to stop blinking, before carrying out the next instruction.
Check the Main pad counter after reset. If the Main pad counter value changes to zero, it means that the reset has been successfully performed.
(11) Checkbox: Main Pad Counter
(12) Click Check – OK

(13) Press the Finish button to end the process.
To repair the Epson L1300 printer for the error «A printer’s ink pad is at the end of its service life» was done in two stages, beginning with draining the ink pad and installing an outer drain tube, followed by resetting the waste ink counter, has been completed. For additional information, also read the paragraph questions and answers below.
Questions and Answers
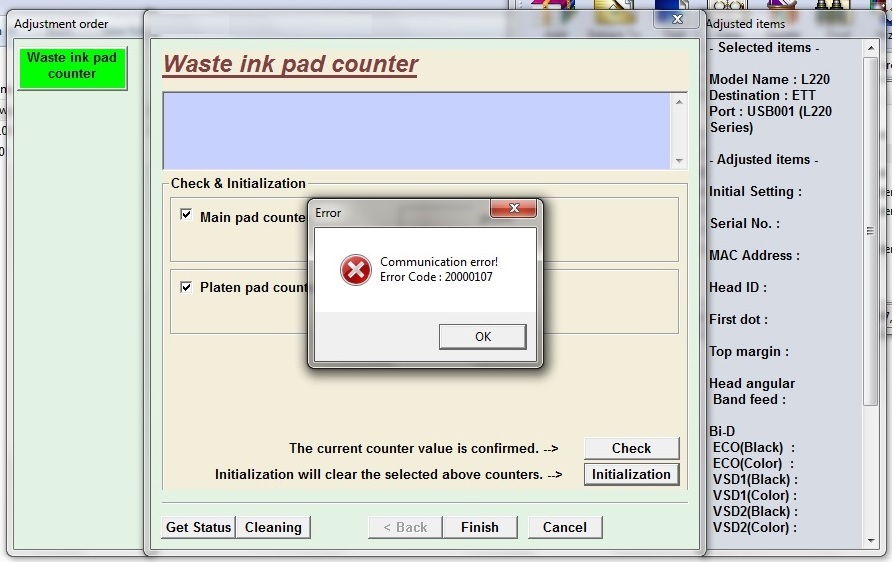
Q: When using the Adjustment Program the message «Communication error! Error Code xxxxxxxx» appears. What to do?
A: Communication error! Error Code: xxxxxxxx occurs because the printer is not ready to accept commands from the Adjustment Program because it is still busy processing the previous command.

So when the printer receives the command example «Main pad counter -> Check», the power light will blink for about 60 seconds. The printer can process the next command example «Main pad counter -> Initialization» after 60 seconds have passed. Communication error! Error Code: xxxxxxxx occurs because the second command «Main pad counter -> Initialization» is done while the printer is still processing the previous command. So wait for the power light to stop flashing, then run the next command.
If you have trouble doing it yourself, we recommend asking for help from the nearest Epson Service Center or the nearest printer repair professional.
This error code appears if you have more than one potentially compatible printer connected to your computer when you try to use the reset utility.
Solutions:
- Make sure you only have the target printer (ie: the one you wish to reset) connected to your computer and turned on.
- Try selecting the specific port that your target printer is connected on rather than “Auto Select” (Via “Settings” button in AdjProg utility)
- This option is a last ditch attempt if all else fails:
- Prepare everything for resetting (ie: input key, etc…)
- Turn printer off, wait 5 seconds and turn printer on
- Wait 2 or 3 seconds then try to reset waste ink counter
This method sometimes works around any power saving or similar issues that stop the printer communicating properly
Advertisement

How to fix AdjProg «Communication Error Code 21000012c», All the necessary steps are given below to fix AdjProg errors on your Epson printer :This error code appears if there are more than one compatible printer are connected to your computer and you are trying to use the reset utility.
Solutions:
- Make sure you only the targeted printer (ie: the one you wish to reset) is connected to your computer and turned on.
- Rather than “Auto Select” (Via “Settings” button in AdjProg utility), try to choose the specific port on which your target printer is connected
- This option is a last ditch attempt if all else fails:
- Prepare everything for resetting (ie: input key, etc…)
- Turn printer off, wait for 5 seconds and turn it on again
- Try to reset waste ink counter after waiting for 2-3 seconds
- This method sometimes works around if there is any power saving or similar issues encounter which stop the printer to communicate properly
Thanks for How to fix AdjProg «Communication Error Code 21000012c»