
Temperature ready LED
Temperature ready LED
Water/steam LED
Water/steam LED
Aroma LED
General alarms LED
General alarms LED
General alarms LED
Coffee grounds drawer
LED
Descaling LED
(60 litres)
Coffee grounds drawer
and descaling LEDs
Temperature ready LED
Descaling LED
General alarms LED
Coffee grounds drawer
LED
(*) Removing and replacing the coffee bean container will reset the «out of coffee» alarm.
Test mode
To open Test Mode, press
rapid flashing of LEDs
is released.
TALEA Section 05
REV00 — August 06
Ideas with Passion
Fixed on.
Slow blinking.
Off
Fixed on.
Fixed on.
Fixed on.
Slow blinking.
Fast blinking.
Fixed on.
Slow blinking.
Blinking alternately.
Light up one after the
other anticlockwise.
and turn the appliance on at the same time (Power On). Entering Test Mode is indicated by the
(lighting up repeatedly ANTICLOCKWISE one after the other), continuing until
Indicates «Coffee ready» or «Steam ready».
The correct temperature has not been reached.
The appliance is in steam mode.
The appliance is in water mode.
To set aroma.
Fill water tank.
Empty drip tray.
Out of coffee (*)
Door open.
Brew group missing.
Drip tray missing.
Coffee container cover missing.
Milk island or carafe missing.
Prime circuit.
Indicates that grounds drawer needs emptying.
Indicates that descaling (manual) is required.
Max. brew group torque exceeded.
Brew group timeout or microswitch error.
Coffee grinder blocked.
OUT OF SERVICE
Indicates that the appliance is running a «rinse
cycle».
8/17
|
Модераторы: morbid, latterus |
| Автор | Добавил | ||
|
saratov64 |
|
||
|
Кофемашина:Gaggia Platinum Vogue Сообщений: 2 |
Добрый день всем! Приобрел замечательную Gaggia Platinum Vogue. Два дня не было проблем — испробовал все дозировки и объемы пригоговления. Претензий по вкусу и качеству пенки нет. Неожиданно загорелся красный воскл.знак. Соответственно, приготовить ничего нельзя. Как пишут в инструкции — либо воды нет, либо отсутствуют каплесборник, емкость под отработанный кофе, либо заварочный механизм. Все очистил, вынимал и вставлял 500 раз при выключенной и включенной машине. Ноль реакции(((((. Зеленая лампочка нагрева воды включается, чувствую, что бойлер греется, а вместе с зеленой и красный воскл.знак горит((((( Помогите, хелп!!!
|
||
|
Наверх |
|||
|
1234567890? |
|
||
|
1234567890?
Кофемашина:Нет Сообщений: 3341 |
Ну как вариант емкость попробуйте для жмыха вынуть на 10 сек при вкл.сост | ||
|
Наверх |
|||
|
saratov64 |
|
||
|
Кофемашина:Gaggia Platinum Vogue Сообщений: 2 |
Спасибо всем! Требовалась промывка системы, всё очистилось, красный воскл.знак потух, теперь наслаждаюсь, | ||
|
Наверх |
|||
|
Yago |
|
||
|
Ростер:Coffee-Tech Engineering Ghibli R-15 Сообщений: 170 |
Да это не промывка системы требовалась, а кофеварка Вам показывала, что нужно выбросить жмых. Вероятнее всего, Вы эту процедуру выполнили при выключенной кофеварке, вот ошибка и не сбрасывалась. Поэтому, Вам все правильно подсказали — во включенном состоянии, даже если физически в бункере жмыха нет, а ошибка переполнения бункера высвечивается, достаньте бункер, не выключая машину, секунд на 10 и вставляйте назад. И в дальнейшем, выбрасывайте жмых (и прочие процедуры) при ВКЛЮЧЕННОЙ кофеварке. RTFM, в конце концов 
Промывку системы кофеварка запланировала сразу после включения, но пока Вы не сбросили ошибку о необходимости опорожнить контейнер для жмыха, сама процедура промывки не начиналась. Как только вставили — кофеварка и выполнила промывку в обычном режиме. [ Редактирование Ср авг 25 2010, 05:58 ] |
||
|
Наверх |
|||
 Чт авг 12 2010, 09:59


Powered by Prokofe.Ru Forum System
- Manuals
- Brands
- Gaggia Manuals
- Coffee Maker
- PLATINUM VOGUE
- Technical & service manual
-
Contents
-
Table of Contents
-
Bookmarks
Quick Links
TECHNICAL SERVICE
MANUAL
Emissione
Luglio 2007
REV.00
Related Manuals for Gaggia PLATINUM VOGUE
Summary of Contents for Gaggia PLATINUM VOGUE
-
Page 1
TECHNICAL SERVICE MANUAL Emissione Luglio 2007 REV.00… -
Page 2
Ideas with Passion PLATINUM TECHNICAL SERVICE MANUAL (Rev 00 Aug.06): CONTENTS Introduction (rev.00) 1.1 Documentation required 1.2 Tools and equipment required 1.3 Safety warnings 1.4 Platinum range Technical data (rev.00) 2.1 Product technical data 2.2 Internal / external machine components Summarised instructions (rev.00) 3.1 Client and programming menu (rev.00) 3.2 Maintenance and cleaning (rev.00) -
Page 3
SECTION 1 INTRODUCTION REV.00 TALEA Section 01 REV00 — August 06… -
Page 4: Documentation Required
Documentation required The following technical documentation is required for repairs: Instruction booklet for specific model. Technical documentation for specific model (diagrams, exploded drawings). Tools and equipment required As well as the standard equipment, the tools listed below are required. 1 special screwdriver with Torx T10 tip. 1 digital thermometer with full 200°C scale.
-
Page 5
Ideas with Passion Platinum range VISION — Touch Screen — S B S — Cup warmer — Motorized tank — Milk adapter — Rapid Steam SWING UP — Pre-ground option — 24×2 display — Ring selector — S B S — Cup warmer — Motorized tank — Milk adapter… -
Page 6
EVENT — S B S — Rapid Steam TALEA — ODEA Cap. 01 REV00 — Luglio 07… -
Page 7: Technical Data
SECTION 2 TECHNICAL DATA REV.00 TALEA Section 02 REV00 — August 06…
-
Page 8
Product technical data Power supply and output: 230 V~, 50/60 Hz, 1300 W. Temperature control: 1 (NTC) variable resistor sensor – transmits the value to the electronic board. Safety system: 2 x 175°C manual reset thermostats. Coffee heat exchanger output: 1300 W –… -
Page 9
Internal components Heater Pump Static eliminator Turbine Card Power board Coffee grinder Solenoid pilot Motorized tank stepper motor on 02 REV00 — August 06… -
Page 10
Ideas with Passion SECTION 3 BRIEF INSTRUCTIONS REV.00 TALEA Section 03 REV00 — August 06… -
Page 11
Ideas with Passion Client and programming menu Platinum Vision Press “go to menu” Main menu Machine Beverage settings settings Maintenance Clock settings Go to Show text Next 8:30 a diagnostics back Machine settings Water Language & settings display Cup warmer Go back to menu back… -
Page 12
Ideas with Passion Platinum Swing Up To open program- ming menu. TALEA Section 03 REV00 — August 06… -
Page 13: Maintenance And Cleaning
Ideas with Passion Maintenance and cleaning STEPS Empty coffee grounds drawer. As instructed. Empty drip tray. As necessary. Clean water tank. Once a week. Clean the coffee granule container. As necessary. Clean casing. As necessary Clean and grease the brew group. Monthly or every 500 coffees.
-
Page 14
Ideas with Passion SECTION 4 DIAGRAMS REV.00 TALEA Section 04 REV00 — August 06… -
Page 15
Ideas with Passion Wiring diagram Platinum Vision TALEA Section 04 REV00 — August 06… -
Page 16
Ideas with Passion Platinum Swing UP TALEA Section 04 REV00 — August 06… -
Page 17
Ideas with Passion Platinum Swing TALEA Section 04 REV00 — August 06… -
Page 18
Platinum Vogue TALEA Section 04 REV00 — August 06… -
Page 19
Ideas with Passion Platinum water circuit TALEA Section 04 REV00 — August 06… -
Page 20: Test Functions
Ideas with Passion Test functions Platinum Vision In the first three seconds after the Next Software version appliance is switched on, you can CPU_V01.04.09 enter test mode by pressing the keys On entering test mode, the screen in the sequence shown on the left. shown in the screenshot opens.
-
Page 21
Ideas with Passion — Milk island present indicates the state of the milk island present microswitch. — Caraffe present indicates the state of the milk carafe present microswitch. — Pressing “valve” once will excite the solenoid valve. — Pressing “water pump” once will start the pump. — Pressing “valve”… -
Page 22
Level T7 – Coffee grounds drawer At this level, you can modify the current value of the number of coffee grounds (maximum of 13). t.7 — Dreg counter Next — max dreg counter — indicates the maximum number of coffee grounds that the drip tray can contain. -
Page 23
Ideas with Passion Platinum Swing e Swing Up TALEA Section 05 4/17 REV00 — August 06… -
Page 24
Ideas with Passion Level M2 Gearmotor function is tested at this level. To move the gearmotor, the coffee grounds drawer and side door microswitches must be excited. The status of the microswitches listed below is shown at the right of the top line on the display: Brew group presence microswitch excited. -
Page 25
Ideas with Passion Level M4 At this level you can check water heater, relative ntc sensor and cup warmer function. — When you press the steam key, the ambient temperature (tt.t) is shown on the second line of the display in degrees centi- grade. -
Page 26
Platinum Vogue Coffee key Press once to select a coffee. Press twice to select a double coffee. Stops coffee from being dispensed when pressed during dispensing. Water/steam key To select either water or steam. Press and hold for 6 seconds to “reset” descaling alarm. -
Page 27
Ideas with Passion Messages/Alarms Temperature ready LED Fixed on. Indicates “Coffee ready” or “Steam ready”. Temperature ready LED Slow blinking. The correct temperature has not been reached. Water/steam LED The appliance is in steam mode. Water/steam LED Fixed on. The appliance is in water mode. Aroma LED Fixed on. -
Page 28
Ideas with Passion POSITION ACTION CHECK POTENTIOMETER Solenoid pilot Press Coffee grinder Press Set aroma. (default: 90-100-110 pulses). Press Valve open. lights up and stays on. Brew group missing microswitch blinks slowly. Drawer missing microswitch blinks slowly. Door open microswitch. blinks slowly. -
Page 29
Ideas with Passion POSITION ACTION CHECK POTENTIOMETER Pump Press Unit up. Press Set aroma. (default: 90-100-110 pulses). Press Unit microswitch up. + Steam key pressed. blinks quickly. Valve open. lights up and stays on. Brew group missing microswitch blinks slowly. Drawer missing microswitch blinks slowly. -
Page 30
Ideas with Passion POSITION ACTION CHECK POTENTIOMETER Steamout procedure. Open valve and While the procedure is underway (for a total of 30 seconds), the following LEDs light up alternately one after the other in a clockwise direction press Press light up and each time the key is pressed, the number of pulses for AVERAGE AROMA is reduced by 5 pulses to a minimum of 60 pulses. -
Page 31
Ideas with Passion DIP SWITCH CONFIGURATION CONFIGURATION PLATINUM VOGUE PLATINUM EVENT AROMA PULSES MILD STRENGTH MEDIUM STRENGTH STRONG STRENGTH DEFAULT DATA TALEA Section 05 12/17 REV00 — August 06… -
Page 32
Ideas with Passion Diagnostics function Platinum Swin up When in diagnostics mode Switch the appliance on (double-pole switch on right side) and wait for the CA to finish initializing; then press and hold the menu key for 2 seconds until the string “Exit” appears on the screen. Press the capaci- tive keypad keys in the order shown on the left within the next two seconds. -
Page 33
Ideas with Passion Level M3 : Error Log 3.1 Errors List The following are shown at this level: The last 20 errors involving the CA The date the error occurred. The error map is shown below: Code Brief description Description COFFEE GRINDER ERRORS Coffee grinder blocked. -
Page 34
Ideas with Passion Level M4 : Products Settings The parameters for each different beverage are shown at this level; these parameters can be modified by opening each item using the coffee key and selecting with the touch-ring. 4.1 Espresso Settings: 4.1.1 Product Qty. -
Page 35
Ideas with Passion Error messages for service personnel PRIMEA Section 05 16/17 REV00 — August 06… -
Page 36
Ideas with Passion Problems, causes, remedies HELP MESSAGES DISPLAYED HOW TO RESET MESSAGE Turn the appliance off and on to solve the problem. Switch off and after 30 sec. turn on the appliance to restore normal operating conditions. Call the Service Center. Problem requiring assistance of Service Center. -
Page 37
SECTION 6 OPERATING LOGIC REV.00 TALEA Section 06 REV00 — August 06… -
Page 38
Reset coffee grounds drawer. The “empty coffee grounds drawer” message is signalled by a “coffee” beverages counter controlled by the appliance electronics. The counter is cleared “empty coffee grounds drawer” reset message: 1. After 13 coffees, if the grounds drawer is removed for more than 5 seconds. 2. -
Page 39
Ideas with Passion Motorized tray The movement of the motorized tray is mechanical by means of a stepper motor (1) in 24V DC, controlled by two capacitive pushbuttons (2) located at the front of the tray. The two microswitches (3) are for the limit switch, and operation can be checked in test mode (see section 5.1). -
Page 40
Ideas with Passion Aqua Prima Operating logic with “AQUA PRIMA” filter. When use of the “aqua prima” filter is selected on the user menu or via the control panel, the system water count logic is as follows: If the “aqua prima” function is enabled the electronics perform a pulse count of the turbine, recording one pulse every 2 revolutions. -
Page 41
Ideas with Passion SBS Valve Beverage dispensing The SBS brewing system valve (see Fig. 2) controllable via the knob, enables variation (increas- ing or decreasing according to the position of the knob) of the water flow rate for brewing. This adjusts the coffee brewing time (extraction time) and consequently the intensity of taste, keeping the cream quality constant. -
Page 42
Ideas with Passion SBS valve operation check To ensure correct operation of the valve SBS a long coffee should be made, and during preparation of the latter, check the difference in dispensing speed between the maximum and minimum positions. The difference in dispensing speed is approx. 2.5 times greater (and therefore VERY obvious!!). -
Page 43
Ideas with Passion Solenoid pilot Turbine Water/steam valve Water drain connector Reinforced silicon hose WATER DRAINED TO TANK Connector with 3 bar relief valve Needle Silicon tube Steam tube MILK ISLAND STEAM Reinforced silicon hose DISPENSE TANK Reinforced silicon hose STEAM/WATER DISPENSE Silicon tube… -
Page 44: Milk Island
Ideas with Passion Milk Island Electrical connec- tion to appliance. Button to Water pipe connected to attach/release appliance for steam inlet. Milk Island from appliance. Steam Anchor pin outfeed between Milk Island and appliance. Carafe present…
-
Page 45
Ideas with Passion SECTION 7 COMPONENT ASSEMBLY AND DISASSEMBLY REV.00 TALEA Section 07 REV00 — August 06… -
Page 46: Component Assembly And Disassembly
Remove the coffee top container , unscrew the three screws pointed out and lift the upper cover. Disconnet the cups warmer ( where included ), the ground wire cable and the coffee top container sensor. In order to dismantle the distributor completely, extract the regulation stick and, following the screws sequence, dismantle the different parts.
-
Page 47
Unscrew the four screws which block the frontal panel, so that it can move. Unnhook the anterior riser, by unblocking firstly the two lower hooks and then the upper ones ( see photo ), paying attention to not break the riser’s hooks. After having removed the riser, it is possible to remove the frontal panel. -
Page 48
Ideas with Passion Right and left side casing To remove the right Loosen the screw as shown. side, loosen the screws as indicated. Split the two sides of the casing (see Fig..1). Press from the bottom (see Fig.2). Release and take it off from the side and at the bottom (see Fig. -
Page 49
Ideas with Passion Electronics CPU card TALEA Section 07 3/11 REV00 — August 06… -
Page 50
Gearmotor TALEA Section 07 4/11 REV00 — August 06… -
Page 51
Ideas with Passion Pump Withdraw the faston connec- tors as indicated. Take the pump out from the rub- ber support guides. Pull out the adapter. TALEA Section 07 5/11 REV00 — August 06… -
Page 52
Ideas with Passion Heater and solenoid pilot unit Loosen the screws as indi- cated. TALEA Section 07 6/11 REV00 — August 06… -
Page 53
Ideas with Passion 7. 7 OETIKER clamp assembly and disassembly Heater clamps HEATER Figure (1) shows the assembly position of the clamp on the heater connector. Solenoid pilot SOLENOID PILOT Figure (2) shows the assembly position of the clamp on the plastic solenoid pilot connectors. Use suitable pliers to tighten the clamp. -
Page 54: Coffee Grinder
Ideas with Passion Coffee grinder Unclamp and remove the con- Loosen the screws on the cover nector inserted in the card. and lift it off, being careful to withdraw damper A. When refitting the motor assem- bly, be careful to reinsert the spring.
-
Page 55
Coffee grinder setting, assembly and disassembly To remove the upper grinder support, use a wrench, turning it clockwise to release the grinder support from the bayonet coupling. To remove the upper burr, rotate On the lower burr, keep the increment pin as anti-clockwise until it detaches from indicated locked in position and proceed as the bayonet coupling. -
Page 56
Ideas with Passion 7.10 Grinder adjustment during servicing To adjust the coffee grinder (in addition to user-permitted adjustments of “C” with the grinding adjustment tool “A”), remove the coffee granule container and turn adjustment insert “B” to widen or tighten grinding. This insert can be repositioned to move interval “C”. Be very careful not to separate the grinders from their supports. -
Page 57
Ideas with Passion 7.11 Motorized drip tray Loosen the screws as indicated. Pull the motorized tray towards you. Disassembling the motorized tank stepper motor To withdraw the stop (A) use pliers to grip the tabs Loosen the two screws to release securing the lifting system to the base and pull out- the electric motor with worm gear wards. -
Page 58
Ideas with Passion SECTION 8 SERVICE SCHEDULE REV.00 TALEA Section 08 REV00 — August 06… -
Page 59
Ideas with Passion Routine maintenance check list S= Replacement R= Service P= Cleaning D= Descaling C= Inspection *= Number of beverages dispensed Parts Task Reason Item Casing, tanks, containers, power Dirty, damaged. See documentation (exp. drawing). cable. Water coffee andè milk lines. GACO DIM 14 seals Wear Water filter…
Коды ошибок кофемашин Gaggia, их причины и рекомендации
По тексту ошибки на дисплее кофемашины Gaggia можно определить вероятную причину неисправности аппарата. Давайте познакомимся с кодами ошибок кофемашин Gaggia и и рекомендациями по их устранению!
| Текст ошибки | Причины неисправности | Рекомендуемые действия |
| BREWUNIT BLOCKED | Вследствие неправильно проведенной декальцинации или засыпки слишком большого объема кофе было заблокировано заварное устройство. | Обратитесь в сервисный центр. |
| BREWUNIT MISSING |
|
Нажмите кнопку «PRESS», извлеките ЗУ и снова вставьте его. |
| CLOSE DOOR |
|
Откройте и закройте сервисную дверцу. Если надпись не исчезает, потребуется ремонт кофемашины. |
| COFFEE BEANS EMPTY |
|
|
| DREGDRAWER FULL | Переполнен лоток для сбора отходов. | При включенном аппарате очистите лоток от отходов и вставьте его на место не ранее чем через 10 секунд. |
| DREGDRAWER MISSING |
|
Установите или переустановите лоток для сбора кофейных отходов. |
| DESCALING | Гидросистема забита накипью. | Выполните процедуру декальцинации. |
| FILL WATERTANK |
|
|
| ENERGY SAVING | Включен режим экономии энергопотребления. | Переведите аппарат рабочий режим. |
| GRINDER BLOCKED | Заблокирована кофемолка. | Необходима разборка и осмотр кофемолки. Обратитесь в сервисный центр. |
| GRINDER BLOCKED | Необходим дренаж системы. |
Налейте полный бак воды и откройте кран подачи горячей воды. После того, как струя воды потечет равномерно, надпись исчезнет. |
Цены на ремонт кофемашин Gaggia
Примерную стоимость ремонта кофемашины можно узнать по тел. +7 (495) 507-7317 или посмотрев в прайс-лист. Точная цена будет известна только после диагностики.
Читайте наши статьи

Эксплуатация кофемашины в зимний период
Что происходит с кофемашиной при длительном нахождении в помещении с низкой температурой? Перевозили кофемашину в багажнике — что теперь от неё ожидать?

Скидка на ремонт кофемашины
Получите 20% скидку на ремонт или обслуживание вашей кофемашины, а также при заказе кофе «Coffee-Everyday» у нас.

Уход за кофемашиной: рекомендации и советы
Как увеличить срок экслуатации вашей кофемашины или кофеварки? Как влияет качество воды на долговечность системы? Как правильно определить момент обсуживания?
Условия для ответа на запрос:
1. «Конкурент» отправляет в Ваш регион.
2. Товар должен быть на складе в наличии и быть готовым к отгрузке/отправке.
Мы можем отказать в продаже товара по сниженной цене если:
1. Запрошенная цена ниже себестоимости товара
2. Товар продается с уценкой (дисконт)
3. Последний товар на складе
4. Товар продается со скидкой (акция)
5. Товар уже зарезервирован за другим Клиентом
Заранее благодарны за Ваше обращение.
Форум о кофемашинах — ремонт, обслуживание, использование кофемашин, выбор кофе и кофемашины

Пожалуйста, войдите или зарегистрируйтесь.
- Документация
- Кофе и кофемашины
- Карта сервисов
- Магазин запчастей
- Инструкции
- Ремонт
-
Начало
-
Помощь
-
Поиск
-
Вход
-
Регистрация
- Форум о кофемашинах — ремонт, обслуживание, использование кофемашин, выбор кофе и кофемашины
рейтинг кофемашин » Gaggia
| Обзор кофемашины | |
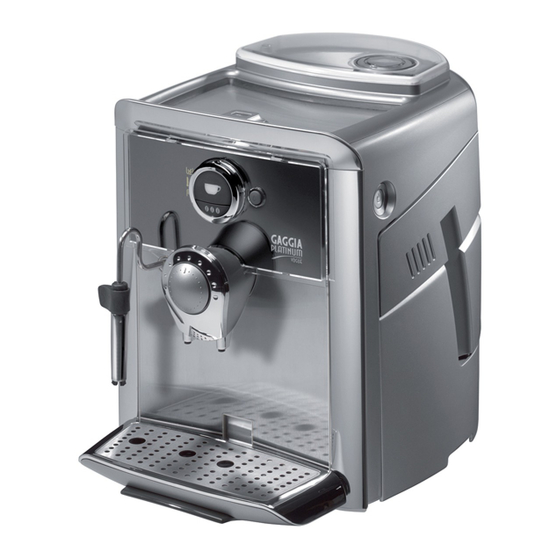
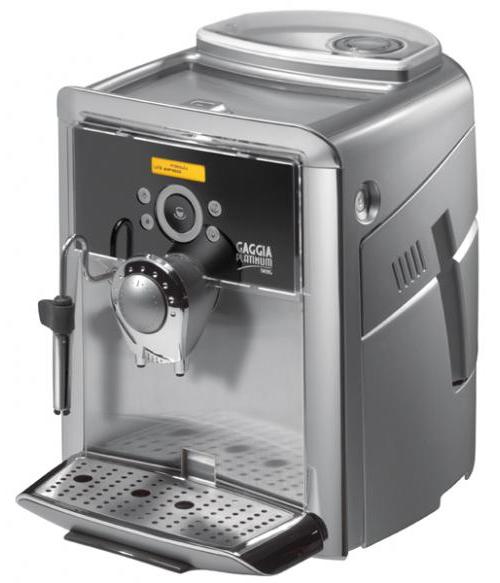
Кофемашина Gaggia Platinum Vogue RI9304/21 Характеристики и функцииНастройкиТехническое обслуживание и уходОсновные компонентыТехнические условияДругоеДизайн и ценаОписание |
|
| Руководство пользователя, инструкция схемы для Кофемашина Gaggia Platinum Vogue RI9304/21 | |||
| Имя файла | Тип файла | Размер файла | |
|
|
Инструкция для кофемашины Gaggia Platinum Vogue (англ.) |
|
1255.0 KB |
|
|
Инструкция для кофемашины Gaggia Platinum Vogue RI9304 21 |
|
1277.2 KB |
|
|
Схема гидросистемы Gaggia Platinum |
|
76.3 KB |
|
|
Электрическая схема Gaggia Platinum Voge |
|
173.2 KB |


| Вопросы для голосования | Пользователи | Специалисты | |
| Качество приготовления кофе |
|
|
Для оценки этой машины, пожалуйста, авторизуйтесь. Впервые на сайте? Зарегистрируйтесь сейчас, бесплатно! |
| Внешний вид, дизайн |
|
|
|
| Сервисное обслуживание и уход |
|
|
|
| Надежность и ремонтопригодность кофемашины |
|
|
|
| Рекомендуете купить? |
|
|
|
| Цена кофемашины |
|
|
| Новый отзыв |

|

|
Gaggia Platinum Vogue

Set-Up & Use

Cleaning & Maintenance

Troubleshooting

Diagrams & Manuals
- Coffee Tastes Bad
- Frothing Difficulty
- Flow Issues
- Leaking Machine
- No Heat or Power
- Alarm Light On
- Alarm Light Slowly Flashing
- Brew Unit Stuck
- Brew Unit Squeaking
- Descale & Grounds Flashing Alternately
- Too Much Steam/Milk Boiling
No Crema or Bad Tasting Shots
Typically, issues with crema or the flavor of the shot do not indicate a malfunction of the machine. Instead, this indicates that an adjustment needs to be made in the brewing process or that different beans need to be used.
The type of bean that is being used is particularly important for super-automatic machines, because the built in burr grinders only accept certain types of beans. Another consideration is the roast of the bean, which greatly influences how much crema can be produced, as well as the flavor of the shot. Super-automatic machines are not compatible with oily, caramelized, or flavored beans. Properly stored and recently roasted beans are best. You can find more information on why bean selection and storage is important for super-automatic machines by watching the video below.
5 Things New Super Automatic Espresso Machine Owners Should Know
Appropriately adjusting the grinder is also important. Poor shots can also be the result of incorrect grind settings.
- If the shot is too bitter:
- The grind is set too fine. Try adjusting the grind to a coarser setting, typically indicated by a large dot symbol or higher number.
- If applicable, the aroma setting is set too high. Lower the aroma setting so that less coffee is ground per shot.
- The beans being used are over-roasted, and a lighter roast is needed.
- If the shot is too sour or weak tasting:
- The grind is set too coarse. Try adjusting the grind to a finer setting, indicated by a lower number. Whenever moving the grind to a finer setting it is important to make minor adjustments, and to only adjust the grinder while in operation.
- If there is little crema:
- The beans are probably stale and fresher beans need to be used.
- The grind setting does not match the drink that is being made. Smaller drinks such as an espresso require finer grind size; larger drinks such as a longo require a coarser grind.
- Oily or dark roasted beans are being used. These beans are not compatible with the unit, and are not suitable for espresso brewing. The oils and chemicals that are needed to produce a rich crema have been roasted out of the bean. Switch to a drier/lighter roast.
- Keep the machine properly cleaned and maintained for good tasting shots. Your grinder may need to be cleaned or calibrated, or you may need to descale your machine to remove any unwanted residues or flavors.
Difficulty Frothing
Pannarello Frothing Issues
As with brewing, frothing is highly dependent on technique. If the machine is producing steam then an adjustment to technique may need to be made. Frothing is very sensitive to technique, so there is a steep learning curve. The video below shows proper frothing technique for pannarello style wands:

How to Froth Milk with a Pannarello Wand
There are also common frothing mistakes which are made that will result in poor or no froth. The video below identifies these mistakes and shows how to correct them:

Quick Tip: Six Common Milk Frothing Mistakes
This machine also utilizes a special nozzle attachment called a pannarello. The pannarello nozzle needs to be regularly cleaned and properly attached to the machine in order to function. This machine uses a 3-piece style of pannarello instead of the normal 6-piece style. The video below describes how to properly clean and maintain this three piece style of wand:
Alternatively you can try frothing on the machine without the pannarello attachment. The naked wand can also produce a tight microfoam, and is preferred by some users. The major disadvantage of frothing with the naked wand is that it reduces the length of the steam wand by several inches.
How to Correct Frothing Problems and Steam Test a Gaggia Brera Espresso Machine
Flow Issues
The first place to start with any flow issue is cleaning the machine. Before going through these steps please make sure the machine is cleaned according to the Cleaning & Maintenance section of this article.
Poor Flow, No Flow, or Alarm Light Flashing Quickly
If you are not able to get water to flow through the machine at all, none of the functions flow well, or the alarm light is on and quickly flashing then there is something blocking the flow of water through the machine. This error typically indicates the machine is not being cleaned on a regular basis. Review the cleaning & maintenance instructions for this machine, and make sure the cleanings are being done at the suggested interval with the recommended product.
- The water tank is not seating properly. Please remove the tank and reinsert it firmly. Make sure there are no beans or debris in the water tank chamber preventing the tank from seating flush with the machine.
- If you are using an Intenza water filter in the machine then it might be blocking the flow of water. Try removing the water filter and using the machine without it. If the machine works without the water filter, then the filter was blocking the flow of water. Keep the filter out of the machine for the remaining steps.
- The machine needs to be descaled. Descaling should be done every 2-3 months with either Gaggia Decalcifier or Durgol Descaler. Scale buildup inside the machine can be very damaging and cause serious flow issues.
- A foreign body, such as coffee grounds, has gotten drawn into the system from the water tank. This kind of debris can get lodged in valves/water circuits and cause flow issues. Try cleaning the brew unit check valve using the instructions here.
- If your machine features an e-plus dial it may be clogged with scale or coffee grinds. Restart the machine. When you hear the pump start vibrating start turning the dial back and forth over and over again. The e-plus dial is the knob located right above the coffee dispensing spout that controls how quickly coffee flows out of the spouts.
No Flow From Steam Wand
Once the flow issue has been resolved the machine should be immediately descaled with the recommended product. Flow issues and blockages are typically due to lack of maintenance or excessive scale buildup.
- First remove any attachments on the wand and set the machine to hot water mode.
- Once the pump is activated turn the steam knob to the steaming position. The pump will start to vibrate and hot water should begin to flow through the wand.
- If hot water does flow through the wand stop the machine from dispensing hot water and switch the wand to steam mode to test for flow. There may have been a piece of debris in the steam wand blocking the flow of water.
- If water does not flow through the wand then there may be a more severe blockage. Proceed to the next step.
- Soak the wand in a mixture of descaler and hot water. Test flow using the hot water function again.
- Use a pipe cleaner to manually clean the inside of the wand. Only use a pipe cleaner with synthetic or plastic bristles; do not use one with metal bristles as it can damage the wand. Test the flow again.
- If none of these cleanings have resolve the behavior then there is an internal blockage, or the steam thermostat has failed. The machine will require a repair.
Reduced Or No Flow During Brewing
- If there is no flow while brewing specifically, then something is blocked along the brew circuit. Begin by running a descale of the machine using the recommended product. Scale buildup is the most common cause of flow issues. Descaling will most likely resolve the issue.
- If the machine is set to a really fine grind, the grinds can block the flow. Set the grind to a coarser setting and see if flow is restored. Leave the grind on the coarse setting for the remainder of flow testing.
- There may be an issue with the brew unit.
- First remove the unit and rinse it off with cold water. Do not use any sort of detergent or soap to rinse it off or necessary lubricant will be removed.
- Wipe down the brew unit chamber with a damp cloth to remove any leftover grounds. A microfiber cloth is best, to prevent any cloth fibers from remaining behind.
- Clean the check-valve. Here are the instructions to follow.
- Reinsert the brew unit and test for flow.
- This machine allows beverage length to be reprogrammed. Make sure it isn’t set to the minimum brew length. If the machine is programmed to the minimum beverage length the machine may not dispense any coffee, or it may only dispense a few drops. Try reprogramming the machine to a longer length drink to see if it resolves the no flow issue.
- Check the brew unit to make sure it is lining up with the spout assembly and connecting with the spout assembly properly.
- If you are noticing a lot of brewed coffee or coffee sprayed inside the brew unit chamber then the brew unit o-ring may be damaged or out of place.
- Remove the brew unit and inspect the large red o-ring attached to the tamping assembly. Make sure it is clean, properly positioned, and not damaged.
- If the o-ring is broken or damaged it should be replaced. A brew unit o-ring can be purchased here.
- Your machine features an e-plus dial which may be blocked. Try brewing a shot and while the pump is activated turn the e-plus dial back and forth. This may clear up the blockage and restore flow.
- The dispensing spout may be blocked. Try very gently cleaning the dispensing spout holes with a toothpick to remove any blockages.
Have Flow But Getting No Flow Error
In some situations, you will be able to get flow through the machine for all functions, but the machine thinks there is no water flowing through. There is a device in the machine called a flow meter, and it tells the machine when water is flowing through or not. The device operates by having small fan-like blades spin when water passes through it. If those blades get stuck from excessive scale buildup or debris, then they will not spin. As a result, even though water is flowing through the machine, you will get a flow error.
If your machine uses a water filter, temporarily remove it from the water tank and add the recommended descaling product to the water tank. The descaler needs to work its way into the system to start dissolving the scale buildup in the flow meter. You may have to keep restarting the machine so that it can keep attempting to prime, which will draw the descaler/water solution into the system. If at any point you are able to clear the flow message then you will want to do an immediate descale of the machine. After you have descaled, run 4-5 tanks of plain water through the hot water function for the wand in order to ensure the system is completely free of debris.
Machine Is Leaking
From The Bottom
- Check the internal drip tray and make sure it is not overfilling. If the drip tray full indicator came on, and the trip tray was removed and reinserted but never emptied, it will reset the machine sensor and possibly result in the tray overflowing.
- The leaking is coming from the water tank chamber.
- If the water tank is not positioned properly it can cause water to continuously drain from the tank, even while the machine is turned off. This happens when the water tank is inserted far enough to open the release valve, but not far enough to seal with the intake line. This water can leak out from the water tank and end up on the bottom of the machine. This particular issue is usually indicated by lots of clear water leaking onto the counter or into the internal drip tray, even though the machine is powered off. Remove the water tank and make sure there isn’t anything, such as coffee beans, which could be blocking the tank from seating properly and then firmly reinsert the tank into the machine and press firmly on it to make sure it creates a good seal with the intake line.
- If the machine only leaks while the water tank is attached, but is properly inserted, then the intake line may be broken or disconnected. This will require a repair.
- If this does not resolve the leaking, then the leaking may be coming from an internal component and the machine should be repaired.
- If you’ve tried all the previous instructions and water is constantly dripping out of the boiler outlet spout, or you consistently find a lot of water puddling under the middle right of the machine the machine will require a repair.
From The Wand
If the steam wand is leaking while the machine is on and/or brewing, the steam valve is open inside the machine. It is likely that scale has built up inside the valve, and the buildup is holding the valve open. Try the following to resolve the leak:
- First begin by descaling the machine using the recommended descaling product.
- After descaling flush 4-5 tanks of plain water through the system using the hot water function for the steam wand. This will ensure any debris or scale buildup the descaling loosened is fully removed.
- If this does not work then the machine should be sent in for repair since the steam valve may need to be replaced.
Machine Not Heating Or Powering On
No Power
- Make sure the machine is plugged into an appropriate power source.
- Do not use the machine on a surge protector. This machine has a high power draw, more than a typical kitchen appliance such as a refrigerator or a microwave. Surge protectors are typically not rated to handle the amperage this machine requires.
- Make sure the power cord is firmly inserted into the power socket on the machine.
- Try using the machine on a different outlet, and make sure the machine is the only appliance plugged into that outlet.
- Try testing another appliance on the same outlet.
- Make sure the power switches are functioning properly and not broken. If the machine isn’t powering on try pressing and holding the power button in the on position to see if the machine turns on. If you are able to power the machine on this way then the power switch needs to be replaced.
- If the machine recently had a leak, had water spilled on it, or any other exposure to moisture then the machine may be shorting out. Try letting the machine sit unplugged for 48 hours to make sure there isn’t a short caused by moisture.
No Or Little Steam
- If you are getting no or little steam then there may just be a blockage in the steam circuit. Do the cleanings suggested in the section of this article which discusses steam wand blockages.
- Check the steam knob to make sure it is correctly positioned. If the knob spins in place and doesn’t reach a stopping point then the knob may be broken, or something is disconnected in the steam valve assembly.
- Make sure to give the machine sufficient time to heat up. Even a machine that uses a rapid steam boiler will still take thirty seconds to a minute to be fully heated.
- Make sure that you are purging the steam line before frothing. Purging is an important process for any machine that has a steam wand. Since the steam leaving the boiler hits the cold room temperature wand it is going to condense back into water. Wait until there is mostly steam coming out of the wand and then close the knob. You are now ready to steam with the machine now that the line has been purged.
- If the cleanings haven’t worked and there is still no steam then the machine may have a bad thermostat and it will require a repair.
Cold Shots
Make sure you are using a preheated cup. Ceramic cups will sap a lot of heat from the shot resulting in a colder shot. Preheating the cups using the machine’s hot water function is suggested, or you can brew into a paper, styrofoam, or other well insulated cup. If your machine utilizes a cup warming function you can use it to preheat the cups. Alternatively you can use the machine’s hot water function to fill the cup with hot water before pulling a shot to preheat it. If the shots are completely cold then the brew thermostat is broken and the machine will require a repair.
Alarm Light On
If the alarm light is on and not flashing the machine is asking for a minor maintenance item to be completed. Make sure the machine is powered on when doing these maintenance items. The various components trip sensors in the unit which tell the machine the maintenance has been done. If the machine is not powered on the sensors won’t reset and the alarm light will remain on.
- The machine is out of beans.
- Check the hopper. If is empty refill it.
- If the hopper is full, or you’ve already refilled it and the light is still not clearing then the grinder may be blocked and need cleaning. This typically happens if beans are being used that are not compatible with the machine. This machine does not accept oily, caramelized, or flavored beans. Use of these beans can cause permanent damage to the machine that is not covered under warranty. These beans can be identified easily. They will be shiny and feel slippery or sticky. Dry beans that are appropriate for the machine will look dull and feel rough.
- Do the cleaning and calibration instructions in this video:
How To Clean and Calibrate a Gaggia Platinum Grinder
-
-
- After reassembling the machine according to these instructions do not add beans in. First make sure the grinder adjustment knob is set to the coarsest setting, which is the largest dot.
- Add beans back into the machine. The beans must be dry, do not add oily beans back into the unit.
- If this clears the alarm light and shots are pulling successfully on this grind setting then you can move the grind back to the original setting. Only move the knob one dot at a time, brewing a shot in between each adjustment.
-
- If none of these steps have cleared the light then the machine may have a broken sensor and will need to be repaired.
Alarm Light Slowly Flashing
If the alarm light is flashing slowly, this indicates that a component of the machine is missing or not inserted properly.
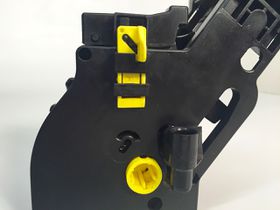
Fin Positioned Incorrectly
-
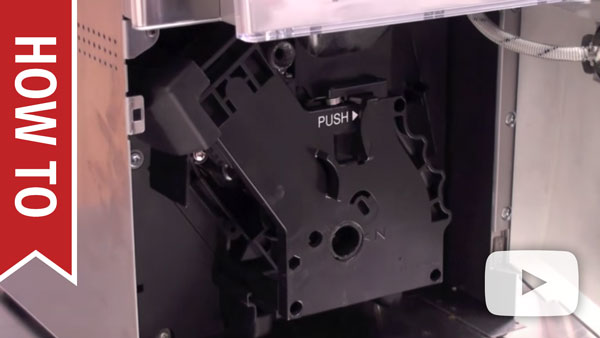
- The brew unit is not inserted properly.
-
- Remove the brew unit from the machine.
- Make sure the brew unit chamber is clean and clear of coffee grounds or other debris. Make sure the tracks for the brew unit are not blocked.
- Firmly reinsert the brew unit into the unit. It should click into place. To test if it is properly reinserted try removing it from the machine without hitting the push/press button. You should not be able to remove it. If you can go to the next step.
- There is a flap on the back of the brew unit, opposite the side that says push/press, that needs to be in a certain position.
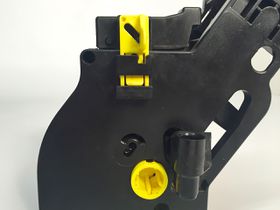
-
-
-
- If the flap is down inside the square notch like the picture below then it needs to be pushed upwards. Please note that on certain units, especially newer Gaggia unites, a yellow plastic is used instead of black plastic to help make this part more easily identified.
- The flap should look like this when it is in the correct position.
- It’s possible that the gear for the brew unit is in the wrong position. This video discusses how to trick the machine into resetting the gear to the correct position:
-
-
If the alarm light is blinking quickly then the machine is sensing that the brew unit motor is working too hard to engage the brew unit. The machine will stop and give these error codes as a protective measure so that the machine does not break itself. This issue is typically resolved through normal maintenance.
-
- First restart the machine to clear the error message and reset the machine back to the home position so that it can be removed.
- Once the machine is restarted wait until the machine is at ready screen.
- When the machine is at the ready screen open the door of the machine.
How to Remove a Stuck Brew Unit
-
-
- Try removing the brew unit. If the brew unit does not readily come out do not force it out. The brew unit is stuck in an engaged position and will need to be properly reset. Forcing it out of the machine can break the brew unit and possible damage other parts. Do the instructions in the following video to get the brew unit properly reset before moving on to the next step. If the brew unit won’t reset to the home position the machine may require a repair.
- If the brew unit is easily removed then rinse it off with cold water and let it dry.
- The brew unit will need to be cleaned and lubricated using the instructions in the cleaning and maintenance section above.
- Reinsert the brew unit into the machine and try brewing a shot.
-
Descale & Grounds Flashing Alternately
This light is a general error signal for the machine. This error signal is used as a catch-all for machine atypical machine errors.
- The brew unit did not engage properly for some reason. If this signal appeared when you heard the brew unit moving, then it likely has something to do with the brew unit or brew unit motor.
- Restart the machine. Sometimes this error simply means the brew unit was blocked or did not engage properly and restarting the machine will resolve the behavior.
- If the error is still occurring refer to the section of this article that discusses brew unit cleaning and lubrication. Make sure the brew unit is cleaned and lubricated according to the instructions.
How To Clean and Calibrate a Gaggia Platinum Grinder
- The grinder may be blocked. If you get this error when the grinder goes to activate in particular, then it likely indicates an issue with the grinder mechanism. This typically happens if beans are being used that are not compatible with the machine. This machine does not accept oily, caramelized, or flavored beans. Use of these beans can cause permanent damage to the machine that is not covered under warranty. These beans can be identified easily. They will be shiny and feel slippery or sticky. Dry beans that are appropriate for the machine will look dull and feel rough.
- Do the cleaning and calibration instructions in this video:
- After reassembling the machine according to these instructions do not add beans in. First make sure the grinder adjustment knob is set to the coarsest setting, which is the largest dot.
- Add beans back into the machine. The beans must be dry, do not add oily beans back into the unit.
- If this clears the alarm light and shots are pulling successfully on this grind setting then you can move the grind back to the original setting. Only move the knob one dot at a time, brewing a shot in between each adjustment.
- If the light still has not cleared then there is an internal issue with the machine which will require a repair.
My Brew Unit is Squeaking While Brewing or Rinsing
If you hear a squeaking sound while brewing or rinsing, your brew unit o-ring likely needs to be lubricated. In some cases, your brew unit o-ring may need to be replaced. You can use Gaggia Food-Safe Lubricant or petroleum gel, such as Vaseline to lubricate the o-ring. Only a little bit of lubricant is needed.
The brew unit brews, as the name suggests, but, just as importantly, it’s also responsible for tamping ground coffee into a consistent puck. Inside the unit are two tracks which should be lubricated every six months or so for best results in the cup. Watch the video on the right to get the low down on food safe lubricant and how to keep the brew unit functioning smoothly.
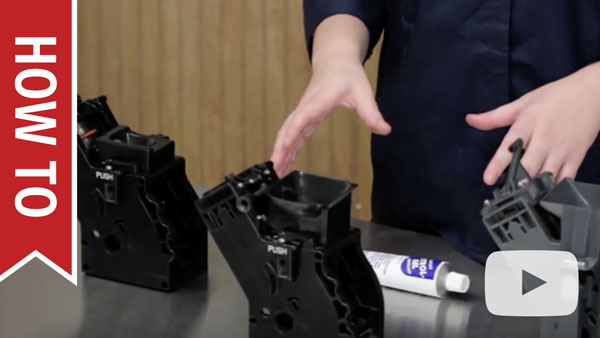
Espresso Machine Maintenance — How To Lubricate A Brew Unit
Brew Unit Stuck
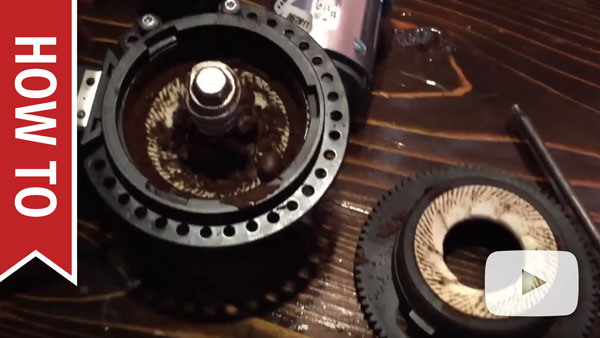
If the brew unit of your machine is stuck in place do not try to force it out of the machine. This will more than likely result in the brew unit breaking or other damage being done to the machine. Forced removal of the brew unit can cause the machine to fail in a way that will only be able to be repaired by professional technician. Follow the instructions in the video below to get the brew unit reset to the proper position.
How to Remove a Stuck Brew Unit
Too Much Steam/Milk Boiling
If you think your wand is producing too much steam, or your milk looks like it is boiling, then you may need to make an adjustment to your frothing technique. Boiling milk, or milk that is getting to hot before frothing is completed is an indication that incorrect frothing technique is being used. Review the section of this article that addresses frothing difficulties for more information.
If you have tried adjusting your technique and the wand still appears to be producing too much steam, then a steam test should be completed. Follow these instructions to perform a steam test.
If the machine is within the specified steam test range, then the machine is producing the correct amount of steam and an adjustment to frothing technique is necessary. Using a carafe that is chilled in a freezer before frothing is helpful for keeping the milk cooler for longer, allowing for more time to froth before the milk begins to scald.