

![]() Юрий Яраскин » Пт сен 10, 2021 9:34 am
Юрий Яраскин » Пт сен 10, 2021 9:34 am


 Просмотров: 2866")
[quote=»Goldwater»]Значит, проблема на плате.[/quote
Вот плата, слева широкий контакт из него 3 и 4 пин это на кнопку закрытия дверцы. Остальные расходятся на другие платы управления. Визуально плата чистенькая. Может есть способ лечения? Или что бы Вы сами сделали в такой ситуации? В парт каталоге нет такой платы. И на просторах инета тоже нет 
-

Юрий Яраскин
- Осматривается
-

- Сайт

![]()
-
-
[SCANNER ERROR] Lamp Error Kyocera FS-1016
мастерчип в форуме Принтеры, МФУ, факсы, копиры формата A4
- 3
- 6641
Усатый Полосатый

Вс окт 28, 2018 11:08 pm
-
[SCANNER ERROR] Lamp Error Kyocera FS-1016
-
-
Kyocera FS-1120d индикатор «Нет бумаги»
vs-dos в форуме Принтеры, МФУ, факсы, копиры формата A4
- 11
- 15138
СТРОНЦИЙ
Вт ноя 02, 2021 2:24 pm
-
Kyocera FS-1120d индикатор «Нет бумаги»
-
-
Kyocera 1035 «бледная» печать
srMax в форуме Принтеры, МФУ, факсы, копиры формата A4
- 2
- 13946
srMax
Пт янв 23, 2015 2:49 pm
-
Kyocera 1035 «бледная» печать
-
-
Kyocera Ecosys M2635dn «поворот» изображения
Искатель в форуме Принтеры, МФУ, факсы, копиры формата A4
- 10
- 6099
MatrixAgent
Ср апр 08, 2020 5:18 am
-
Kyocera Ecosys M2635dn «поворот» изображения
-
-
Стирание вала ведущей шестерни в «печке» Kyocera M2035dn
Грецкий орех в форуме Принтеры, МФУ, факсы, копиры формата A4
- 12
- 3459
СТРОНЦИЙ
Пн дек 13, 2021 3:35 pm
-
Стирание вала ведущей шестерни в «печке» Kyocera M2035dn
Вернуться в Принтеры, МФУ, копиры формата A3
Кто сейчас на форуме
Сейчас этот форум просматривают: нет зарегистрированных пользователей и гости: 25
Японская компания Kyocera производит высококачественные лазерные принтеры и МФУ для офисной печати. Их продукция одна из самых востребованных на сегодняшний день. Ведь печатающие устройства Kyocera характеризуются высокой надежностью, износостойкостью и большим сроком эксплуатации. Однако даже их изделия не являются вечными. Со временем принтеры Kyocera начинают сбоить.
К счастью, оргтехника Kyocera оснащена системой самодиагностики (так же, как и струйные принтеры Canon). Поэтому, в случае возникновения проблемы, устройство самостоятельно выявит уязвимое место и сообщит Вам об этом миганием соответствующего индикатора на панели управления либо кодом ошибки, выведенным на дисплей принтера.
Если Вы не являетесь мастером по обслуживанию принтеров и МФУ Kyocera, то, чтобы понять, о чем сообщает печатающее устройство, Вам потребуется расшифровать указанный им код. Для этого мы добавили в статью таблицу кодов ошибок лазерных принтеров Kyocera серии FS и не только.
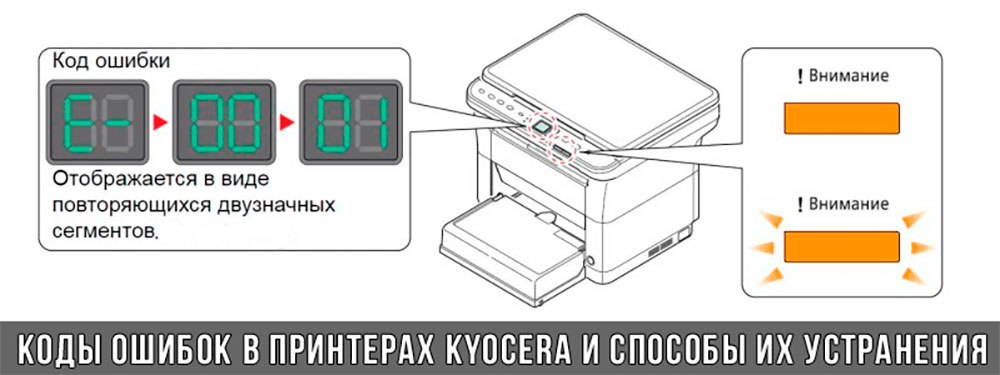
Коды ошибок принтеров и МФУ Kyocera, которые можно исправить самостоятельно
|
Код ошибки |
Значение ошибки |
Решение проблемы |
|
E-0001 (E1) |
Поврежден чип картриджа либо установлен неоригинальный картридж. |
Замените установленный картридж оригинальной версией изделия. Если хотите сэкономить, тогда купите и установите новый чип на картридж или перепрошейте принтер Kyocera. Однако предварительно не помешает попробовать сбросить ошибку соответствующей комбинацией клавиш (как это сделать, читайте в статье «Сброс ошибки установки неоригинального картриджа в принтерах Kyocera»). |
|
E-0002 (E2) |
Регион использования картриджа и принтера не совпадают. |
Замените чип или прошейте принтер Kyocera. |
|
E-0003 (E3) |
Заполнена память принтера или МФУ Kyocera. |
Отпечатайте ранее отсканированные листы или очистите очередь печати нажатием кнопки Стоп/Сброс (ранее отсканированные листы также удалятся из памяти принтера, даже если они еще не были распечатаны). |
|
E-0007 (E7) |
Тонер-картридж Kyocera израсходовал ресурс красящего вещества. |
Замените или заправьте картридж Kyocera (если используете совместимый или перезаправленный расходник, то после установки его в принтер не забудьте сбросить ошибку зажатием на 3-5 секунды кнопок [Ок] и [Сброс/Стоп]). |
|
E-0008 (E8) |
Открыта крышка принтера либо не работает датчик закрытия крышек устройства. |
Откройте и еще раз закройте переднюю и заднюю крышку принтера. Во время закрытия Вы должны услышать характерный щелчок. Если не помогло, то причина в неисправности датчика. |
|
E-0009 (E9) |
Лоток приема бумаги полон. |
Уберите все отпечатанные листы бумаги из выходящего лотка. Чтобы возобновить печать, нажмите кнопку [Старт]. |
|
E-0012 (E12) |
Ошибка памяти принтера Kyocera. |
Попробуйте уменьшить разрешение печати. Скорее всего, формат создаваемого отпечатка не соответствует возможностям принтера. |
|
E-0014 (E14) |
Установлен неверный формат бумаги (неподдерживаемый принтером Kyocera). |
Поменяйте бумагу на поддерживаемую принтером либо смените ее формат в настройках печати. Попробуйте обновить программное обеспечение. Возможно, это расширит поддерживаемые принтером Kyocera форматы. |
|
E-0015 (E15) |
Устройство не подключено к электрической сети либо на компьютере нет (не работает) драйвера принтера Kyocera. |
Проверьте подключение печатающего аппарата к электрической сети, а также целостность кабеля. Если ошибка не исчезает, скачайте драйвер принтера Kyocera и установите его на компьютер. |
|
E-0017 (E17) |
Ошибка передачи данных. |
Проверьте подключение принтера к компьютеру. Кабель не должен быть длиннее 5 метров, а также обязан поддерживать стандарт USB 2.0. Кроме того, переустановите драйвер принтера и утилиту Kyocera Client Tool. |
|
E-0018 (E18) |
Очередь печати заполнена. |
Очистите очередь печати нажатием кнопки [Сброс] либо через драйвер принтера. |
|
E-0019 (E19) |
Неверный формат печати. |
Отмените печать нажатием кнопки [Стоп/Сброс]. Выберите в настройках принтера соответствующий режим печати, а также установите в лоток поддерживаемый принтером формат бумаги. |
|
J-0000 (jam0000) |
Замятие бумаги за задней крышкой. |
Откройте крышку и извлеките бумагу. Проверьте надежность крепления бумаги в лотке, а также принтер на наличие посторонних предметов. Еще причина может быть в пружине выходного флажка. Если она растянулась, то может плохо работать фиксатор. Также проблема может быть из-за печки, сделайте ее ревизию, переборку и смазку. |
|
J-0501 (jam0501) |
Бумага застряла в принтере Kyocera |
Извлеките замятую бумагу. Проверьте надежность установки бумаги во входной лоток. Проверьте целостность роликов протяжки бумаги, а также принтер на наличие посторонних предметов. Если не помогло, стоит внимательно осмотреть ребра на направляющей пластине. На них могут образоваться сколы, трещины и заусенцы. Их можно слегка подчистить наждачной бумагой (нулевкой). |
|
J-0511 (jam0511) |
Принтер Kyocera замял бумагу. |
Извлеките замятую бумагу и повторите печать. Если проблема не исчезла, несите принтер в сервис. Скорее всего, изношен ролик протяжки бумаги. |
|
C7990 |
Бункер драм-картриджа (блока фотобарабана) заполнен отработанным тонером либо неисправен счетчик отработки красящего вещества. Еще проблема может быть в главной плате PWB. |
Осуществите чистку драм-картриджа (блока фотобарабана). Если проблема в датчике или плате, то нужно отнести принтер в СЦ на диагностику. |
|
F248 |
Ошибка обработки отпечатываемого материала. |
Перезагрузите принтер. Уберите неподдерживаемые спецсимволы из отпечатка. Обновите ПО принтера Kyocera. Смените режим работы принтера с PDL на GDI (Пуск -> Принтеры -> Свойства -> Параметры устройства). |
|
PF |
Отсутствует бумага в лотке подачи. |
Загрузите листы бумаги во входной лоток. Если принтер по-прежнему не печатает, значит нужно искать проблему в чем-то другом. |
|
1101 |
Ошибка сканирования через сеть из-за неправильного имени SMTP сервера. |
Пропишите DNS-адреса помимо прочих настроек печати по сети. |
|
1102 |
Некорректная настройка сканера для работы через сеть |
Зайдите в Web-панель управления принтером (нужно в адресную строку браузера ввести iP принтера Kyocera). Далее в зависимости от модели введите логин и пароль (Admin/Admin или просто admin00 без логина). Далее следуйте инструкции:
Логин и пароль нужны обязательно, если их нет, то следует создать. |
|
2101 |
Ошибка передачи данных при сканировании через сеть. |
Правильно настройте параметры (как для ошибки 1102), только предварительно отключите на ПК антивирус и брандмауэр. |
Если Вы испытали все способы, но не смогли убрать ошибку, то следует нести печатающее устройство в сервисный центр. Кроме того, есть ряд ошибок (высвечиваемых на дисплее принтера), которые нельзя устранить в домашних условиях. Соответствующие коды ошибок принтеров Kyocera представляем в очередной таблице.
Коды ошибок принтеров и МФУ Kyocera, которые нужно устранять в сервисном центре
|
Код ошибки |
Значение ошибки |
Решение проблемы |
|
0030 |
Неисправность платы управления факсом принтера. |
Замена платы. |
|
0100 |
Неисправность платы управления или флеш-памяти принтера. |
Замена платы. |
|
0120 |
Ошибка чтения mac-адреса из-за неисправности флеш-памяти принтера. |
Замена платы. |
|
0190 |
Неисправность платы управления или флеш-памяти принтера. |
Замена платы. |
|
0630 |
Неисправность платы управления принтера. |
Замена платы. |
|
1020 |
Неисправность мотора, привода или отсутствие контакта. |
Разборка принтера и замена изношенных частей. Проверка надежности подключений, замена разорванных (прогоревших) кабелей. Ремонт или замена привода мотора. |
|
1040 |
Неисправность мотора, привода или отсутствие контакта. |
Разборка принтера и замена изношенных частей. Проверка надежности подключений, замена разорванных (прогоревших) кабелей. Ремонт или замена привода мотора. |
|
2000 |
Неисправность главной платы управления, соединительного кабеля или привода принтера. |
Проверить ремни, шестерни и ролики привода. Смазать или заменить, если есть дефекты. Заменить привод или главную плату. |
|
3100 (C3100) |
Неисправность главной платы, привода сканера, датчика положения или нарушение целостности соединений. |
Проверить наличие разрывов и отсутствия контакта. Смазать или заменить изношенные элементы привода. Заменить привод, главную плату, датчик или соединительный кабель. Если Вам повезло, то возможно забыли отключить фиксатор блока сканера. |
|
3101 |
Сетевой кабель не подсоединен, или нарушена работа концентратора. Еще может быть из-за наличия вирусов в системе или неправильно заданным параметрам сервера SMTP. |
Проверить соединения, правильно настроить параметры сети. |
|
3300 |
Неисправность главной платы, датчика CIS или соединительного кабеля. |
Проверить контакты, заменить плату или датчик. |
|
3500 |
Неисправность главной платы или нарушение соединения контактов. |
Проверить контакты, заменить плату. |
|
4000 (C4000) |
Неисправность главной платы, привода сканера или нарушение соединений. Однако чаще всего ошибка лазера. |
Проверить контакты, заменить плату или привод блока сканера. Почистить лазер, смазать ось полигон-мотора, либо полностью заменить блок лазера. |
|
4200 |
Неисправность главной платы, блока сканера или датчика BD. |
Отключить питание принтера на 30 минут. Если не помогло, то следует заменить привод сканера или главную плату принтера. |
|
6000 (С6000) |
Неисправность главной платы, термостата, печки или нарушение соединения контактов. |
Проверить и поправить контакты. Заменить фьюзер. Ремонт или замена печки, термодатчика, термопредохранителя и т.д. |
|
6020 |
Сгорание термистора или главной платы. |
Замена термистора или главной платы. |
|
6030 |
Неисправность главной платы, термостата или термистора. Возможно, причина в отсутствии контакта. |
Проверить соединения. Заменить плату, термостат или термистор. |
|
6400 |
Неисправность главной платы, отсутствие питания или контакта. |
Заменить плату или источник питания. |
|
F000 |
Неисправность главной платы или отсутствие контакта. |
Проверить соединение ремня безопасности. Заменить ремень или плату управления. |
|
F020 |
Неисправность элементов памяти принтера. |
Перезагрузить принтер. Если ошибка не устранилась – заменить плату управления. |
|
F040 |
Неисправность главной платы принтера. |
Перезагрузить принтер. Если ошибка не устранилась – заменить плату управления. |
|
F05D |
Неисправность главной платы. Сбой программного оборудования привода. Проблемы с прошивкой принтера Kyocera. |
Перезагрузить принтер. Если ошибка не устранилась – заменить плату управления. Перепрошить принтер Kyocera. |
|
F245 F246 F247 F375 |
Принтер Kyocera заблокирован из-за проблемы, вызванной отказом источника питания. |
Нужно перепрошить принтер специальной сервисной микропрограммой. |
Обратите внимание: Если у печатающего устройства нет дисплея, то определить проблему можно по светодиодным индикаторам, встроенным в панель управления принтером. Например, у Kyocera Ecosys P2135D нужно сосчитать количество миганий индикаторов красного цвета и таким образом определить число, указывающее на ту или иную ошибку. В свою очередь, у модели Kyocera FS-1040 все зависит от темпа мигания светодиода с надписью «Внимание!» («Attention!»):
- Мигает медленно – указывает на отсутствие бумаги в лотке или тонера в картридже.
- Мигает быстро – оповещает о проблеме с памятью устройства, переполненном лотке или замятии бумаги, а также об использовании неоригинальных расходных материалов.
- Горит постоянно – говорит о проблемах с картриджем или фотобарабаном либо указывает на открытые крышки принтера.

Чтобы потребитель мог наверняка определить проблему, рекомендуем использовать утилиту Kyocera Client Tool, которая идет в комплекте с драйверами принтера.
Ваше Имя:
Ваш вопрос:
Внимание: HTML не поддерживается! Используйте обычный текст.
Оценка:
Плохо
Хорошо
Введите код, указанный на картинке:

КОНФЕРЕНЦИЯ СТАРТКОПИ
Принтеры, копировальные аппараты, МФУ, факсы и другая офисная техника:
вопросы ремонта, обслуживания, заправки, выбора
0. pBorisov 08.10.14 17:43
Изначально не брал бумагу в автоподатчике, не поднимался стол. Если снять оптопару на двигатель подъёма, все поднимается без остановки. Но потом появилась ошибка С0980 (нет 24v), и автоподатчик не реагирует на бумагу. При отключении разъёма от аппарата, он(ADF) пропадает с экрана. Вопрос где может быть предохранитель на 24v в автоподатчике или на платах в аппарате?
1. busa 09.10.14 01:23
(0) Для начала, какой ADF? DP-770(реверсивный) или DP-771(однопроходной при дуплексном сканировании). <cite>Ошибка — невозможно использовать автоподатчик оригиналов</cite> сбрасывается командой 906, но возникает заново если есть неисправность. Дальше если честно, ничего не понятно, в каком состояние аппарат?<cite>Но потом появилась ошибка С0980 (нет 24v), и автоподатчик не реагирует на бумагу</cite> .
описание С0980: 24 V power down detect
24V disconnection signal is
detected for 1 s and 12V
disconnection signal is not
detected. (Defective power
source PWB.
Replace the power source PWB and check
for correct operation.)
пы.сы. Поясните, что с аппаратом! Без АДФ работает, а с адф в ошибке С0980 или ошибка — невозможно использовать автоподатчик оригиналов . Дока имеется на тело и адф?
2. pBorisov 09.10.14 10:43
Спасибо за подсказку. Автоподатчик 770, сбросил ошибку, вышел в готовность. Оригинал в автоподатчике виден, при нажатии на пуск начинают вращаться ролики подачи, стол не поднимается , оригинал не уходит дальше, и показывает замин. Доки есть.
3. busa 09.10.14 11:23
Вооот! А теперь дальше. ‘Стол’ не подымается потому, что к/а думает, что у него полно оригиналов. Причиной тому служит хлопонье крышкой адф. На корпусе ролика захвата ломается ‘назовём его Г-образный ограничитель хода корпуса с роликом в крышке адф’. Во как завернул:))). На корпусе ролика есть флажок датчика верхнего положения лифт-мотора(он у вас активен). А вы снимали датчик нижнего положения лифт-мотора, это так к слову. Положите оригинал, приподымите слегонца ролик захвата и нажмите старт. Заработал? Меняем корпус ролика.
4. pBorisov 09.10.14 11:48
Г-образный ограничитель сломан давно. Если приподнять нижний лифт (стол) вручную, при закрытии крышки он опускается в нижнее положение. Ролик захвата крутится при нажатии пуск.
5. busa 09.10.14 12:22
корпус с роликом приподымите и нажмите старт
6. busa 09.10.14 12:37
и потом, если он у сломан давно как он у вас работал? Хотя теоретически, если забить под завязку оригиналами, то будет работать пока бумагу захватывает.
7. pBorisov 09.10.14 16:57
Корпус с роликом приподнимаю, нажимаю пуск. Ролик начинает крутиться, но нижний столик не поднимается. Ролик начинает крутится даже если его не трогать. Если бумагу приподнять к роликам она пройдет на сканер. К сожалению пришлось уехать. Вопрос остался.
8. busa 09.10.14 20:29
(7)Нет, ну конечно всякое может быть с аппаратом, но всё-же, из той инфы, что вы дали я делаю однозначный вывод «Давайте будем грамотными инженерами» у вас есть поломка! Нужно как минимум менять крышку или очумелыми ручками восстановить её геометрию, а потом дальнейшая диагн.
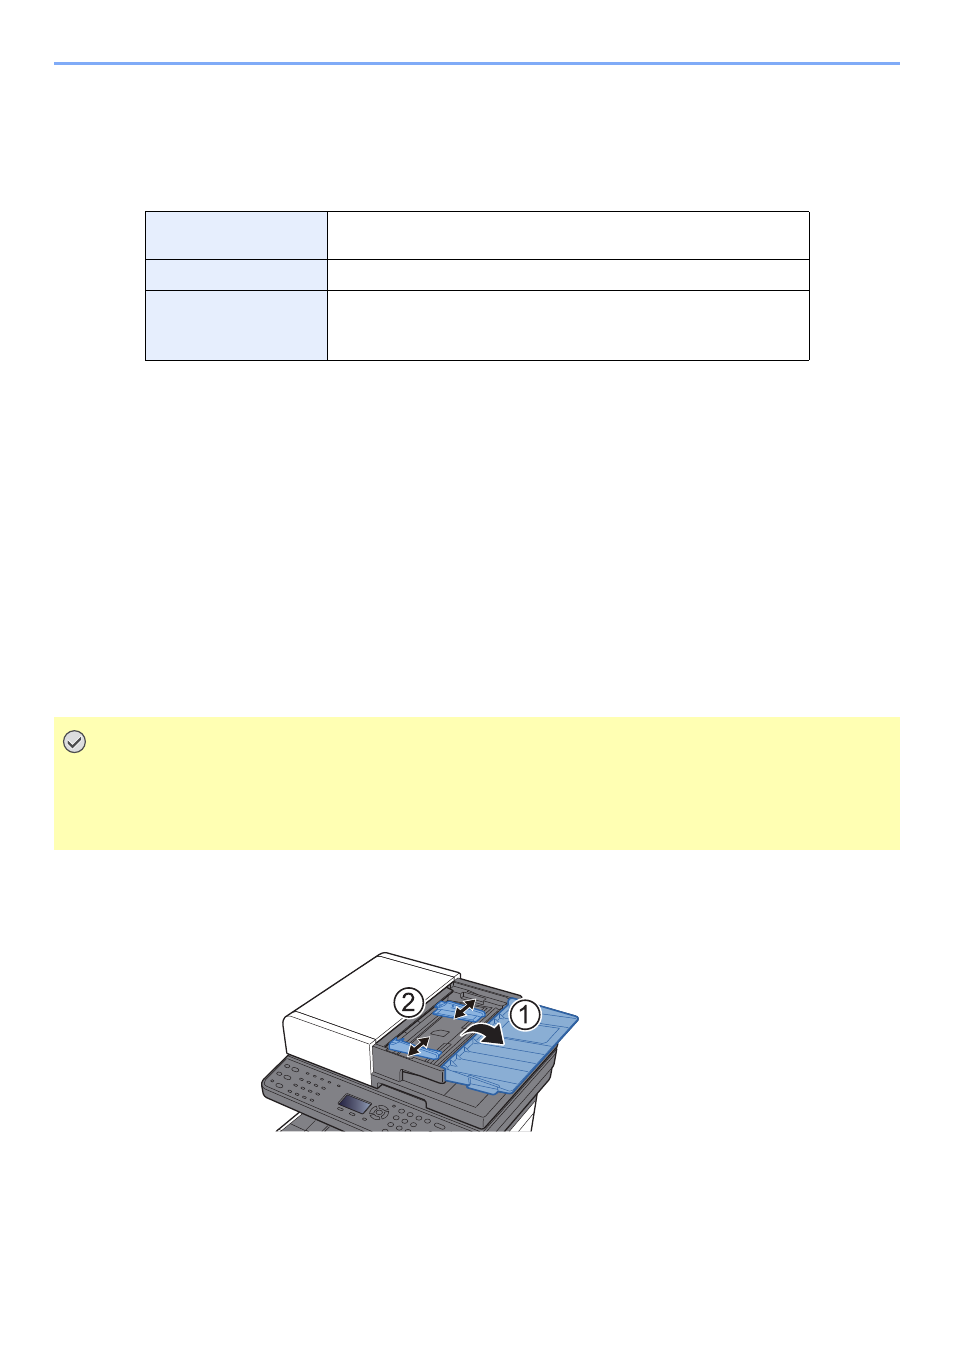
Загрузка оригиналов в автоподатчик оригиналов, Загрузка оригиналов в автоподатчик оригиналов -3, Загрузка оригиналов в автоподатчик – Инструкция по эксплуатации Kyocera Ecosys m2040dn
Автоподатчик оригиналов поддерживает следующие типы оригиналов.
Не используйте с автоподатчиком оригиналы следующих типов. В противном случае возможно замятие
оригиналов или загрязнение автоподатчика оригиналов.
• Края оригиналов со скобами скоросшивателя или скрепками (Перед загрузкой удалите все скрепки или скобы
скоросшивателя, распрямите замятости, складки или загнутые уголки. Несоблюдение этого правила может
привести к застреванию оригиналов).
• Оригиналы со следами клея или с клейкой лентой
• Оригиналы с вырезанными фрагментами
• Оригиналы со складками (разравнивайте складки перед загрузкой. Несоблюдение этого правила может
привести к застреванию оригиналов).
Откройте лоток для оригиналов и отрегулируйте положение
направляющих ширины оригиналов.
От 50 до 160 г/м
(при двустороннем копировании: от 50 до 160 г/м
*1 Только для моделей с функцией двухстороннего сканирования.
Форматы бумаги
Максимальный — Folio (Legal), минимальный — A6 (Statement)
Количество листов
Обычная бумага (80 г/м
): 50 листов (оригиналы разных форматов:
50 листов)
Плотная бумага (120 г/м
• Перед загрузкой оригиналов убедитесь в отсутствии документов в выходном лотке оригиналов. В
противном случае может произойти замятие новых оригиналов.
• Не прикладывайте усилий к верхней крышке автоподатчика оригиналов, например, не следует на ней
выравнивать оригиналы. Это может привести к ошибке автоподатчика оригиналов.
Устранение ошибки C7990 на Kyocera

На дисплее высвечивается: «Сбой аппарата Вызовите сервисный персонал» и в правом нижнем углу, ошибка C7990. Что делать и как быть? Главное не паниковать и не нести аппарат в сервисный центр. Решить самостоятельно данную проблему не составит труда.
Что обозначает ошибка C7990

При печати отработанный тонер с фоторецептора собирается в специальный отсек. Следовательно, в определённый момент, особенно при большом количестве отпечатков, он забивается отработкой. С помощью датчика в бункере, поступает сигнал на главную плату устройства. Вот тут-то и выскакивает ошибка C7990. МФУ блокируется и не позволяет пользователю произвести распечатку того или иного документа.
Устранение ошибки Kyocera C7990

Решение проблемы заключается в очистки отсека с отработанным тонером. Бункер отработки находится в драм-юните. В некоторых аппаратах Kyocera, отработанный тонер собирается в специальную ёмкость. Находится она в небольшой полости корпуса устройства.
Ниже представлен способ решения ошибки C7990 c отсеком для отработанного тонера в драм-юните. Пример устранения проблемы произведу на многофункциональном устройстве Kyocera Ecosys M2035dn.
Устранение ошибки C7990 — Шаг №1
Первое, что необходимо сделать, чтобы ошибка C7990 больше не беспокоила, это выключить печатающее устройство. Затем открыть переднюю крышку. Аккуратно, не торопясь, извлечь блок проявки. Извлекать нужно вместе с тонер-картриджем. Просто потяните его на себя, он выйдет.

Шаг №2
После того как блок проявки извлечён, отложите его в сторону. Второе, что делаем, это извлекаем драм-юнит. Именно по его вине появилась на дисплее устройства ошибка C7990. Вытаскиваем драм также, как и блок проявки, потянув на себя. Тянуть нужно за специально предназначенные для этого зелёные вставки по бокам.

Шаг №3
Третье, на демонтированном драм-юните необходимо отщелкнуть небольшую крышку, закрывающую отверстие для чистки отсека отработки. Чтобы это сделать, поворачиваем драм зелёными вставками назад. По бокам находятся крышки. Отщелкнуть нужно одну из них, без разницы какую. Убрав закрывающую крышку высыпаем отработку.


Шаг №4
Итак, отсек для отработанного тонера после проделанных манипуляций пуст. Причину вызвавшую ошибку C7990 на печатающем устройстве Kyocera устранили. Ставим крышечку на своё место. Вставляем драм-юнит, а затем блок проявки с тонер-картриджем в аппарат. Закрываем переднюю крышку устройства. Включаем МФУ и радуемся устранением проблемы.
Дополнительная информация, касающаяся ошибки C7990
Если вы извлекли драм-юнит и на нём нет крышек закрывающих доступ для очистки отработки, то Вам нужно проделать отверстие самостоятельно. В некоторых моделях печатающих устройств Kyocera, отверстия на драм-юните для очистки отработки отсутствуют. После того как проделали отверстие и высыпали отработанный тонер обязательно заклейте отверстие скотчем! Далее установите драм и блок проявки на своё место, включите устройство. Ошибка C7990 больше Вас не побеспокоит, до следующего переполнения отработанным тонером.

Устранение неполадок
5-6
ИНСТРУКЦИЯ ПО ЭКСПЛУАТАЦИИ
Действия в ответ на сообщения об ошибках
Если на панели управления появилось одно из этих сообщений, выполните соответствующую
процедуру.
Таблица сообщений об ошибках
Сообщение об
ошибке
Контрольные вопросы
Меры по устранению
Страница
для
справки
Верхний лоток
заполнен
бумагой.
Удалите бумагу.
–
Удалите бумагу из верхнего лотка и
нажмите клавишу OK для
возобновления задания.
—
Бумага застр.
–
При замятии бумаги работа
аппарата останавливается и на
дисплее сообщений указывается
месторасположение замятия. Не
отключайте аппарат; устраните
замятие согласно указаниям.
5-11
Добавьте тонер.
–
Замените картридж с тонером.
4-5
Файл не найден.
Задание отменено.
–
Указанный файл не найден. Это
задание отменено. Нажмите
клавишу OK.
—
Загрузите бумагу в
кассету 1.
Не закончилась ли бумага
в указанной кассете?
Загрузите бумагу.
2-19
Загрузите бумагу в
универсальный
лоток.
Загружена ли бумага
указанного формата в
лоток ручной подачи?
Загрузите в лоток ручной подачи
бумагу размера и типа, указанных
на дисплее сообщений.
2-22
Закройте переднюю
крышку.
Открыта ли какая-либо
крышка?
Закройте крышку, указанную на
панели управления.
—
Закройте
автоподатчик
оригиналов.
Открыт ли автоподатчик
оригиналов?
Закройте автоподатчик
оригиналов.
—
Открыта ли верхняя
крышка автоподатчика
оригиналов?
Закройте верхнюю крышку
автоподатчика оригиналов.
2-31
Извлеките оригинал
из автопод. ориг.
Остались ли оригиналы в
автоподатчике
оригиналов?
Извлеките оригиналы из из
автоподатчика оригиналов.
—
Недостаточно
памяти.
Нач. задание невозм.
–
Продолжение сканирования
невозможно из-за нехватки памяти.
Нажмите клавишу OK для печати
отсканированных страниц. Для
отмены задания печати нажмите
клавишу «Стоп«.
—
 Если с аппаратом Kyocera TASKalfa 1800, Kyocera TASKalfa 2200 произошла проблема, откроется следующий экран с уведомлением.
• Индикатор [Внимание] на панели управления горит или мигает.
• На дисплее сообщений панели управления аппарата появилось сообщение об ошибке.
Если индикатор [Внимание] горит или мигает и на дисплее сообщений панели управления аппарата появилось сообщение об ошибке, проверьте KYOCERA Client Tool или Монитор состояния.
ПРИМЕЧАНИЕ Если индикаторы постоянно горят и мигают не так, как описано выше, вероятно, произошла ошибка службы. Выключите питание, отсоедините шнур питания и вставьте его обратно, после чего включите питание. Это может помочь сбросить ошибку. Если ошибка не исчезает, свяжитесь со своим представителем сервисной службы (тел. в Минске +375 17 291-28-24)
Ниже описаны неполадки, которые не могут быть устранены пользователем
|
Дисплей сообщений |
Описание |
Меры устранения |
|
Бункер отраб тонера перепол. или не уст. |
Бункер для отработанного тонера установлен неправильно |
Установите Бункер для отработанного тонера должным образом |
|
Бункер для отработанного тонера заполнен |
Замените бункер отработанного тонера |
|
|
Встряхните картр. с тонером |
Тонер слежался |
Откройте переднюю крышку аппарата и вытяните контейнер с тонером. Сильно встряхните контейнер с тонером и установите его на место |
|
Вызовите сервисный персонал. |
В аппарате произошла ошибка |
Обратите внимание на код ошибки, отображаемый в дисплее сообщений, и свяжитесь с представителем сервисной службы (тел. в Минске +375 17 291-28-24) |
|
Выньте бумагу с внутреннего лотка |
Извлеките бумагу из внутреннего лотка. Нажмите клавишу [OK], чтобы возобновить печать |
|
|
Добавьте тонер |
Закончился тонер |
Замените контейнер с тонером TK-4105 |
|
Загрузите бумагу в кассету # |
↑↓ (отображается попеременно) |
Загрузите бумагу. Нажмите клавишу [OK] и перейдите к следующему шагу. • Для выбора другого устройства подачи выберите [Выберите бумагу]. • Для печати на бумаге, в настоящее время находящейся в устройстве подачи, выберите [Продолж. без изм.] |
|
Загрузите бумагу в универсальный лоток |
↑↓ (отображается попеременно) |
Загрузите бумагу. Нажмите клавишу [OK] и перейдите к следующему шагу. • Для выбора другого устройства подачи выберите [Выберите бумагу]. • Для печати на бумаге, в настоящее время находящейся в устройстве подачи, выберите [Продолж. без изм.] |
|
Закройте автоподатчик оригиналов |
Открыт автоподатчик оригиналов |
Откройте и закройте автоподатчик оригиналов |
|
Закройте крышку автопод. оригиналов |
Открыта верхняя крышка автоподатчика оригиналов |
Откройте и закройте крышку автоподатчика оригинало |
|
Закройте переднюю крышку |
Открыта передняя крышка |
Откройте и закройте переднюю крышку |
|
Закройте правую крышку # |
Открыта какая-либо крышка |
Откройте и закройте крышку, обозначенную на экране |
|
Замятие бумаги. (DP) |
В автоподатчике произошло замятие бумаги. |
См. Устранение замятия бумаги в Руководстве по эксплуатации и извлеките замятую бумагу |
|
Замените МК |
Необходимо производить замену деталей комплекта техобслуживания MK-4105 (ремкомплекта) каждые 150 000 страниц печати. |
Данная операция должна производиться специалистом. Обратитесь к представителю сервисной службы (тел. в Минске +375 17 291-28-24) |
|
Замятие |
Произошло замятие бумаги в кассете или универсальном лотке |
См. Устранение замятия бумаги и извлеките замятую бумагу |
|
Извлеките оригиналы из автоподатчика |
Для продолжения работы необходимо извлечь оригиналы из автоподатчика оригиналов |
Извлеките оригиналы из автоподатчика оригиналов |
|
Кабель USB был отключен |
Кабель USB не подключен |
Нажмите клавишу [OK] и подключите кабель USB |
|
ПК выключен |
Нажмите клавишу [OK] и включите ПК |
|
|
Не удается найти KYOCERA Client Tool |
Нажмите клавишу [OK] и откройте KYOCERA Client Tool на ПК |
|
|
Макс. к-во сканируемых страниц |
Превышен предел сканирования |
Дальнейшее сканирование невозможно. Задание отменено. Нажмите клавишу [OK] |
|
Мало тонера. (Зам., когда законч.) |
Скоро понадобится заменить контейнер с тонером |
Получите новый контейнер с тонером TK-4105. |
|
Не оригинальный тонер |
Установлен контейнер с тонером не марки Kyocera |
Производитель не несет ответственности за повреждения, вызванные использованием неоригинального тонера. Мы рекомендуем использовать исключительно оригинальные контейнеры с тонером TK-4105. . |
|
Неверный ид. уч. зап. Задание отменено |
Указан неверный идентификатор учетной записи при внешней обработке задания. Задание отменено |
Нажмите клавишу [OK] |
|
Невозможна двусторонняя печать на этой бумаге |
Не возможна печать на бумаге выбранного формата или типа |
Нажмите клавишу [OK] и перейдите к следующему шагу: |
|
Недостаточно памяти. Невозможно начать выполнение задания |
Невозможно начать выполнение задания |
Повторите попытку позже |
|
Ограничено алгоритмом учета заданий(Печать) |
Задание отменено, поскольку его выполнение ограничено функцией учета заданий |
Нажмите клавишу [OK] |
|
Ограничено алгоритмом учета заданий(Сканер) |
Задание отменено, поскольку его выполнение ограничено функцией учета заданий |
Нажмите клавишу [OK] |
|
Очистите сканер |
Произошло загрязнение сканера |
Очистите щелевое стекло с помощью чистящей салфетки, поставляемой вместе с автоподатчиком оригиналов. |
|
Ошибка. Выключить |
— |
Отключите и снова включите аппарат с помощью выключателя питания |
|
Память переполнена |
Невозможно продолжить выполнение задания из-за отсутствия свободной памяти |
Измените разрешение печати с Быстр1200 до 600 dpi. См. Printer Driver User Guide |
|
Память сканера переполнена |
Дальнейшее сканирование невозможно из-за нехватки памяти сканера. |
Для отмены задания нажмите [OK] |
|
Перезагрузка печати. Задание отменено |
Предупреждение. Недостаточно памяти принтера. Задание отменено |
Нажмите клавишу [OK] |
|
Превышено ограничение учета заданий |
Превышено число распечаток из-за ограничения алгоритмом учета заданий. Достигнут предел печати |
Это задание отменено. Нажмите клавишу [OK] |
|
Уст.другую кассету |
Выбрано «Сдвиг» |
Для использования сдвига необходимо загрузить в другой лоток бумагу такого же формата, что и в выбранном устройстве подачи, но в другой ориентации |
|
Установите все оригиналы обратно и нажмите клавишу [Старт]. |
Возникает при печати двусторонних документов в режиме ручной двусторонней печати |
Извлеките оригиналы из автоподатчика оригиналов, расположите их в первоначальном порядке и положите обратно. Нажмите клавишу [OK], чтобы возобновить печать. Для отмены задания нажмите [Стоп] |
|
Установлен неизвестный тонер. ПК |
Региональная спецификация контейнера с тонером не соответствует спецификации аппарата |
Установите оригинальный контейнер с тонером Замените контейнер с тонером TK-4105 |
Приветствую. При копировании с автоподатчика лист застревает и пишет ошибку jam 9001 или jam 9110 . Ролики , датчики проверены . Визуальных проблем нет.
-
pvl_test
- Добрался до абсорбера
-
- Персональный альбом
![]()
![]() Lord-Over » Чт авг 16, 2018 10:29 am
Lord-Over » Чт авг 16, 2018 10:29 am
Добрый день
На Kyocera FS-6525MFP мы поменяли автоподатчик DP-470 (так как старый стал ужасно жевать бумагу), сняли с аналогичного нерабочего МФУ FS-6525 в нашем офисе. Теперь автоподатчик работает, но немного приподнят вверх и его нужно рукой прижимать его, иначе выдается ошибка «Проверьте автоподатчик оригиналов. Закройте автоподатчик оригиналов».
Пробовали ставить третий автоподатчик, выпросили в соседней организации для проверки, такой проблемы нет.
Помогите пожалуйста, люди добрые, кто чем может.
-
Lord-Over
- Осматривается
-
![]()
![]() pvl_test » Чт авг 23, 2018 2:13 pm
pvl_test » Чт авг 23, 2018 2:13 pm
Приветствую. Крышка прилегает без перекосов. Замятие возникает раз на 50 листов примерно,
при одностороннем копировании. Датчики и клатчи проверены из сервисного режима . С ними порядок. Проблема на месте. Могут ли быть причиной выходные ролики , т.к лист выходит на 1см в каждый раз при замине с проскальзывающим звуком (будто бы протянуть не может) .
dviz писал(а):Плотно ли прилегает вся крышка с автоподатчиком к столу оригиналов, без перекосов? Проблема постоянная или плавающая? Проблема при подачи одного листа или нескольких подряд? Двухстороннее копирование или одностороннее?
Датчики всякие можно проверить из сервисного меню:
-
pvl_test
- Добрался до абсорбера
-
- Персональный альбом
![]()
![]() Prosto_zapravschik » Пт авг 24, 2018 8:46 am
Prosto_zapravschik » Пт авг 24, 2018 8:46 am
pvl_test писал(а):Ролики , датчики проверены . Визуальных проблем нет.
Интересно, как ролики проверяли? Профилактику им сделать или заменить, и всего делов то… Впрочем, это уже было сказано.
-
Prosto_zapravschik
- Подает надежды
-
![]()
Вернуться в Принтеры, МФУ, копиры формата A3
Кто сейчас на форуме
Сейчас этот форум просматривают: нет зарегистрированных пользователей и гости: 14
10-21
Устранение неисправностей > Устранение неисправностей
Дуплекс. печ. невозм.
на этой бумаге.
↑↓ (отображается
попеременно)
Нажм. ОК для продолж.
используя ун. лоток.
Возможна ли печать на бумаге
выбранного формата/типа?
Выберите [Бумага] для выбора
доступной бумаги. Выберите клавишу
[OK] для печати без использования
функции двусторонней печати.
—
З
Загрузите бумагу в
кассету #.
↑↓ (отображается
попеременно)
Нажм. ОК для продолж.
используя кассету #.
Не закончилась ли бумага в
указанной кассете?
Загрузите бумагу.
Выберите [Бумага] для выбора
другого источника бумаги. Выберите
клавишу [OK] для печати на бумаге из
выбранного на данный момент
источника бумаги.
стр. 3-2
Загрузите бумагу в
универсальный лоток.
↑↓ (отображается
попеременно)
Нажм. ОК для продолж.
используя ун. лоток.
Загружена ли в универсальный
лоток бумага выбранного формата?
Загрузите бумагу.
Выберите [Бумага] для выбора
другого источника бумаги. Выберите
клавишу [OK] для печати на бумаге из
выбранного на данный момент
источника бумаги.
стр. 3-2
Загрузите бумагу в
кассету #.
↑↓ (отображается
попеременно)
Установите выбранный
формат бумаги и
нажмите [OK].
Не закончилась ли бумага в
указанной кассете?
Загрузите бумагу.
Выберите [Бумага] для выбора
другого источника бумаги. Выберите
клавишу [OK] для печати на бумаге из
выбранного на данный момент
источника бумаги.
стр. 3-2
Загрузите бумагу в
универсальный лоток.
↑↓ (отображается
попеременно)
Установите выбранный
формат бумаги и
нажмите [OK].
Загружена ли в универсальный
лоток бумага выбранного формата?
Загрузите бумагу.
Выберите [Бумага] для выбора
другого источника бумаги. Выберите
клавишу [OK] для печати на бумаге из
выбранного на данный момент
источника бумаги.
стр. 3-2
Закройте автоподатчик
оригиналов и его
крышку.
Открыт ли автоподатчик
оригиналов?
Закройте автоподатчик оригиналов.
—
Закройте крышку #.
Открыта ли какая-либо крышка?
Закройте крышку, обозначенную на
экране.
—
Замените МК.
—
Замена деталей в комплекте для
обслуживания необходима через
каждые 100 000 напечатанных
страниц, для этого требуется
профессиональное обслуживание.
Обратитесь к представителю
сервисной службы.
—
Замените тонер.
—
Замените картридж с тонером.
стр. 10-7
Сообщение
Контрольные вопросы
Меры по устранению
Страница
для справки
 12:51
12:51
Обзор МФУ Kyocera ECOSYS M2040dn
 13:56
13:56
Kyocera M2040 печь | Замена термопленки | Ремонт печки
 03:51
03:51
Kyocera M2040DN Первое включение Двухстороннее копирование Добавление бумаги Замена тонера
 10:27
10:27
Настройка сетевого сканирования по протоколу SMB
 03:38
03:38
#89 Заправка картриджа Kyocera TK 1170 | Как и чем заправить Kyocera ECOSYS M2040dn / M2540 / M2640
 16:31
16:31
Kyocera Ecosys M2040dn Functions And Features Explained !
 06:49
06:49
Kyocera Ecosys M2635dn | Обзор, отзывы
 25:47
25:47
Характеристики МФУ Kyocera ECOSYS M2040dn
10-12
Устранение неисправностей > Использование Maintenance Menu
Настроить
качество
печати
Настройка зарядки барабана
При снижении качества печати можно изменить выход основного
наполнителя, чтобы восстановить качество.
Значение
: от 1 до 7
Регулировка высоты над уровнем
моря
Если при использовании аппарата на высоте 1000 м и выше
качество печати снизилось, для его восстановления можно
воспользоваться данной настройкой высоты.
Значение
: Нормальн., 1001—2000 м, 2001—3000 м,
3001—3500 м
Обновление барабана
Если на изображениях появляются белые полоски, запустите
очистку барабана.
Параметр
Описание

Устранение неисправностей, Устранение сбоев в работе, Проблема в работе аппарата
Устранение неисправностей -13, Устранение сбоев в работе -13, Проблема в работе аппарата -13
- Изображение
- Текст
10-13
Устранение неисправностей > Устранение неисправностей
Устранение неисправностей
Устранение сбоев в работе
Ниже в таблице приводятся общие инструкции по устранению неисправностей.
При возникновении какой-либо неполадки аппарата прочитайте контрольные вопросы и выполните процедуры,
которые приводятся на указанных страницах. Если устранить неисправность не удается, обратитесь к
представителю сервисной службы.
Проблема в работе аппарата
Если возникают следующие проблемы в работе аппарата, примените соответствующие процедуры.
ПРИМЕЧАНИЕ
При общении с нами понадобится серийный номер.
Информацию о проверке серийного номера см. в разделе:
Проверка серийного номера оборудования (стр. ii)
Проблема
Контрольные вопросы
Меры по устранению
Страница
для
справки
На экране не происходит
никаких изменений при
включении аппарата с
помощью выключателя
питания.
Проверьте шнур питания.
Надежно и плотно подключите оба
конца шнура питания.
стр. 2-9
При нажатии клавиши
[Старт] копирование не
начинается.
Отображается ли на экране какое-
либо сообщение?
Определите, как следует
отреагировать на сообщение, и
выполните соответствующие
действия.
стр. 10-20
Не включен ли на аппарате режим
ожидания?
Нажмите клавишу
[Энергосбережение]
стр. 2-26
В выходном лотке чистые
листы.
Правильно ли загружены оригиналы?
На стекле оригинал необходимо
размещать по меткам размера,
лицевой стороной вниз.
стр. 5-2
При использовании автоподатчика
оригиналов загружайте оригиналы
стороной для копирования вверх.
стр. 5-3
—
Проверьте настройки прикладного
программного обеспечения.
—
Частое замятие бумаги.
Правильно ли загружена бумага?
Загрузите бумагу надлежащим
образом.
стр. 3-4
—
Разверните загружаемую бумагу на
180 градусов.
стр. 3-4
Относится ли используемая бумага к
поддерживаемым типам? В хорошем
ли она состоянии?
Извлеките бумагу, переверните и
снова загрузите ее в аппарат.
стр. 3-4
Деформирована ли бумага?
Замените бумагу на новую.
стр. 3-4
Нет ли в аппарате обрывков бумаги
или застрявших листов?
Выньте застрявшую бумагу.
стр. 10-31

10-14
Устранение неисправностей > Устранение неисправностей
2 листа или больше
накладываются на выходе.
(подача нескольких
листов)
—
Загрузите бумагу надлежащим
образом.
стр. 3-2
Распечатки сморщены.
Правильно ли загружена бумага?
Загрузите бумагу надлежащим
образом.
стр. 3-2
—
Разверните загружаемую бумагу на
180 градусов.
стр. 3-2
Бумага влажная?
Замените бумагу на новую.
стр. 3-2
Распечатки скручены. —
Переверните бумагу в кассете или
разверните на 180 градусов.
стр. 3-2
Бумага влажная?
Замените бумагу на новую.
стр. 3-2
Мне не удается установить
драйвер принтера.
Вы пытаетесь установить драйвер с
использованием имени хоста при
активированном подключении Wi-Fi
или Wi-Fi Direct?
Укажите IP-адрес вместо имени
хоста.
—
Печать невозможна.
Подключен ли аппарат к электросети? Вставьте вилку шнура питания в
сетевую розетку.
—
Включен ли аппарат?
Включите аппарат с помощью
выключателя питания.
стр. 2-10
Подключены ли кабель USB и
сетевой кабель?
Надежно подсоедините кабель USB и
сетевой кабель.
стр. 2-8
Задание печати приостановлено?
Возобновите печать.
стр. 7-13
Печать с модуля памяти
USB не выполняется.
Модуль памяти USB не
распознается.
Не заблокирован ли хост USB?
Выберите [Разблокировать] в
настройках хоста USB.
стр. 8-20
—
Убедитесь, что модуль памяти USB
надежно вставлен в аппарат.
—
Если для параметра «Auto-
IP» задано значение [Вкл.],
IP-адрес не назначается
автоматически.
Введено ли значение, отличное от
«0.0.0.0», в качестве IP-адреса TCP/
IP(v4)?
Введите «0.0.0.0» в качестве IP-
адреса TCP/IP(v4).
стр. 2-18
Проблема
Контрольные вопросы
Меры по устранению
Страница
для
справки

10-15
Устранение неисправностей > Устранение неисправностей
Невозможно выполнить
отправку по SMB.
Подключен ли сетевой кабель?
Надежно подсоедините подходящий
сетевой кабель.
стр. 2-8
Правильно ли заданы сетевые
настройки для оборудования?
Правильно задайте настройки TCP/IP.
стр. 8-12
Правильно ли заданы настройки
общего доступа к папке?
Проверьте настройки общего доступа
и прав доступа в свойствах папки.
стр. 3-10
Установлено ли [Вкл.] для протокола
SMB?
Установите [Вкл.] для протокола
SMB.
стр. 8-15
Правильно ли задано [Имя хоста]?
*1
Проверьте имя компьютера, на
который передаются данные.
стр. 5-18
Правильно ли задан [Путь]?
Проверьте общее имя для общей
папки.
стр. 5-18
Правильно ли задано [Имя
пользователя при входе]?
*1
*2
Проверьте правильность имени
домена и имени пользователя.
стр. 5-18
Используется ли одинаковое имя
домена для [Имя хоста] и [Имя
пользователя при входе]?
Удалите имя домена и обратную косую
черту («») из [Имя польз. д/вх].
стр. 5-18
Правильно ли введен [Пароль при
входе]?
Проверьте правильность пароля при
входе.
стр. 5-18
Правильно ли выполнена настройка
брандмауэра Windows?
Правильно настройте исключения
брандмауэра Windows.
стр. 3-13
Различаются ли настройки времени
для оборудования, доменного
сервера и компьютера адресата для
передачи данных?
Синхронизируйте настройки времени
на оборудовании, доменном сервере
и компьютере адресата для передачи
данных.
—
На экране отображается «Ошибка
передачи»?
См.
Устранение ошибки передачи
.
стр. 10-28
Не удается передать по
электронной почте.
Не установлен ли предельный размер
исходящих писем на SMTP-сервере
машины?
Проверьте предельное значение
параметра «Предел размера
сообщения эл. почты» меню
[Электронная почта], установленное
в Command Center RX, и измените
при необходимости.
стр. 2-52
Из аппарата в районе
слота выхода бумаги
выходит пар.
Проверьте, не слишком ли низкая
температура в комнате и не
используется ли влажная бумага.
В зависимости от окружающей среды
при печати и состояния бумаги тепло,
образовавшееся в процессе печати,
может привести к испарению влаги,
содержащейся в бумаге, выходящий
из устройства пар может быть похож
на дым. В данном случае нет
проблемы, и вы можете продолжать
печатать. Если пар доставляет вам
неудобство, увеличьте температуру
комнаты или замените бумагу на
более новую и сухую.
—
*1 Можно также ввести полное имя компьютера в качестве имени хоста (например, pc001.abcdnet.com).
*2 Можно также вводить имена пользователей для входа в систему в следующих форматах:
имя домена/имя пользователя (например, abcdnet/james.smith);
имя пользователя@имя домена (например, james.smith@abcdnet).
Проблема
Контрольные вопросы
Меры по устранению
Страница
для
справки

Проблема с распечатанным изображением, Проблема с распечатанным изображением -16
Страница 355
- Изображение
- Текст
10-16
Устранение неисправностей > Устранение неисправностей
Проблема с распечатанным изображением
Если возникает следующая проблема с распечатанным изображением, выполните соответствующие процедуры.
Проблема
Контрольные вопросы
Меры по устранению
Страница
для
справки
Слишком светлые
напечатанные
изображения.
Бумага влажная?
Замените бумагу на новую.
стр. 3-2
Изменили ли вы настройку
плотности?
Выберите соответствующий уровень
плотности.
стр. 6-20
стр. 8-41
Равномерно ли распределен тонер в
контейнере?
Встряхните контейнер с тонером из
стороны в сторону несколько раз.
стр. 10-7
Включен ли режим EcoPrint?
Отключите режим [EcoPrint].
стр. 8-36
Правильно ли установлены узел
проявки и барабанный блок?
Установите узел проявки и
барабанный блок надлежащим
образом.
стр. 10-4
—
Убедитесь, что настройка типа бумаги
соответствует используемой бумаге.
стр. 8-24
—
Нажмите клавишу [Системное меню/
Счетчик] > [Настройка/обслуж] >
[Настр. сервиса] > [Очистка
барабана], а затем выберите [Да].
—
Напечатанные
изображения слишком
темные, хотя фон
отсканированного
оригинала белый.
Изменили ли вы настройку
плотности?
Выберите соответствующий уровень
плотности.
стр. 6-20
стр. 8-41
—
Нажмите клавишу [Системное меню/
Счетчик] > [Настройка/обслуж] >
[Настр. сервиса] > [Очистка
барабана], а затем выберите [Да].
—
—
Нажмите клавишу [Системное меню/
Счетчик] > [Настройка/обслуж] >
[Настр. сервиса] > [MC] и увеличьте
значение регулировки. Увеличивайте
значение регулировки на 1 уровень за
раз относительно текущего значения.
Если не будет улучшения после
увеличения значения на 1 уровень,
увеличьте на 1 уровень снова. Если
не будет улучшения, уменьшите
значение шагов на 1 уровень
относительно изначальной настройки.
Если не будет улучшения после
уменьшения значения на 1 уровень,
уменьшите еще на 1 уровень. Если
все равно нет улучшения,
восстановите исходное значение.
—

10-17
Устранение неисправностей > Устранение неисправностей
На копиях виден муаровый
узор (точки не
распределены
равномерно, а
объединены в группы).
Не использовался ли в качестве
оригинала фотоотпечаток?
При копировании
Установите оригинал изображения
[Фото].
стр. 6-19
—
При копировании
Задайте для параметра [Резкость]
значение от [-1] до [-3].
стр. 6-23
—
При копировании
Нажмите клавишу [Системное меню/
Счетчик] > [Копирование] >
[Считыв. автоп.ор.], а затем
установите [Приоритет кач-ва].
стр. 8-35
Тексты печатаются
нечетко.
Выбрано ли подходящее качество
изображения для оригинала?
Выберите подходящее качество
изображения.
стр. 6-19
—
При копировании
Задайте для параметра [Резкость]
значение от [+1] до [+3].
стр. 6-23
На частях белого фона
изображения появляются
черные точки.
Нет ли грязи на держателе оригинала
или стекле оригинала?
Очистите держатель оригинала или
стекло
оригинала.
стр. 10-2
—
Нажмите клавишу [Системное меню/
Счетчик] > [Настройка/обслуж] >
[Настр. сервиса] > [Очистка
барабана], а затем выберите [Да].
—
—
Нажмите клавишу [Системное меню/
Счетчик] > [Настройка/обслуж] >
[Настр. сервиса] > [MC] и увеличьте
значение регулировки. Увеличивайте
значение регулировки на 1 уровень за
раз относительно текущего значения.
Если не будет улучшения после
увеличения значения на 1 уровень,
увеличьте на 1 уровень снова. Если
все равно нет улучшения,
восстановите исходное значение.
—
Напечатанные
изображения размыты.
Аппарат используется в условиях
высокой влажности или резких
изменений влажности или
температуры?
Используйте в условиях с
надлежащей влажностью.
—
—
Нажмите клавишу [Системное меню/
Счетчик] > [Настройка/обслуж] >
[Настр. сервиса] > [Очистка
барабана], а затем выберите [Да].
—
Проблема
Контрольные вопросы
Меры по устранению
Страница
для
справки

10-18
Устранение неисправностей > Устранение неисправностей
Напечатанные
изображения перекошены.
Правильно ли размещены
оригиналы?
При загрузке оригиналов на стекло
оригиналов выровняйте их по линейкам
размеров.
стр. 5-2
Перед загрузкой оригиналов в
автоподатчик следует тщательно
выровнять направляющие ширины.
стр. 5-3
Правильно ли загружена бумага?
Проверьте положение направляющих
ширины бумаги.
стр. 3-2
На изображении
появляются
беспорядочные
горизонтальные линии.
—
Нажмите клавишу [Системное меню/
Счетчик] > [Настройка/
Обслуживание] > [Настр. сервиса] >
[MC], а затем увеличьте значение
регулировки. Увеличивайте значение
регулировки на 1 уровень за раз
относительно текущего значения.
Если не будет улучшения после
увеличения значения на 1 уровень,
увеличьте на 1 уровень снова. Если
все равно нет улучшения,
восстановите исходное значение.
—
На высоте 1000 м или
выше на изображении
появляются неправильные
горизонтальные белые
линии.
—
Нажмите клавишу [Системное меню/
Счетчик] > [Настройка/
Обслуживание] > [Настр. сервиса] >
[Регулировка высота] и установите
значение высоты на один уровень
выше, чем текущее.
—
На высоте 1000 м или
выше на изображении
появляются точки.
—
Нажмите клавишу [Системное меню/
Счетчик] > [Настройка/
Обслуживание] > [Настр. сервиса] >
[Регулировка высота] и установите
значение высоты на один уровень
выше, чем текущее.
—
На распечатках
вертикальные линии.
Нет ли грязи на щелевом стекле?
Очистите щелевое стекло.
стр. 10-3
—
Очистите наполнитель внутри
аппарата.
стр. 10-4
Проблема
Контрольные вопросы
Меры по устранению
Страница
для
справки

10-19
Устранение неисправностей > Устранение неисправностей
Загрязнение верхнего края
или обратной стороны
бумаги.
Нет ли загрязнений внутренних
деталей аппарата?
Очистите внутренние детали
аппарата.
стр. 10-4
Часть изображения
периодически становится
бледной или с белыми
полосами.
—
Откройте и затем закройте переднюю
крышку.
—
—
Нажмите клавишу [Системное меню/
Счетчик] > [Настройка/обслуж] >
[Настр. сервиса] > [Очистка
барабана], а затем выберите [Да].
—
—
Нажмите клавишу [Системное меню/
Счетчик] > [Настройка/обслуж] >
[Настр. сервиса] > [MC] и уменьшите
значение регулировки. Уменьшайте
значение регулировки на 1 уровень за
раз относительно текущего значения.
Если не будет улучшения после
уменьшения значения на 1 уровень,
уменьшите еще на 1 уровень. Если
все равно нет улучшения,
восстановите исходное значение.
—
Имеется светлый
отпечаток предыдущего
изображения.
—
Убедитесь, что настройка типа бумаги
соответствует используемой бумаге.
стр. 8-23
—
Нажмите клавишу [Системное меню/
Счетчик] > [Настройка/
Обслуживание] > [Настр. сервиса] >
[MC], а затем увеличьте значение
регулировки. Увеличивайте значение
регулировки на 1 уровень за раз
относительно текущего значения.
Если не будет улучшения после
увеличения значения на 1 уровень,
увеличьте на 1 уровень снова. Если
все равно нет улучшения,
восстановите исходное значение.
—
Проблема
Контрольные вопросы
Меры по устранению
Страница
для
справки

Реагирование на сообщения, Реагирование на сообщения -20
Страница 359
- Изображение
- Текст
10-20
Устранение неисправностей > Устранение неисправностей
Реагирование на сообщения
Если на дисплее сообщений или экране компьютера появилось одно из этих сообщений, выполните
соответствующую процедуру.
ПРИМЕЧАНИЕ
При обращении к нам необходимо указать серийный номер.
Информацию о проверке серийного номера см. в разделе:
Проверка серийного номера оборудования (стр. ii)
Сообщение
Контрольные вопросы
Меры по устранению
Страница
для справки
Б
Бумага замята в
обработчике документ.
—
Застрявшая бумага в податчике
документов Оставьте аппарат
включенным и выберите [Справка] на
экране, выполните инструкции по
извлечению застрявшей бумаги.
стр. 10-47
В
Высокая темп.
Отрегулируйте темп в
помещ.
—
Отрегулируйте температуру и
уровень влажности в помещении.
—
Д
Данная ID-карта уже
зарегистрирована.
—
Данная ID-карта уже
зарегистрирована. Используйте
вместо нее другую ID-карту.
—
Данная учетная запись
заблокирована.
Свяжитесь с
администратором
Задание отменено.
—
Свяжитесь с администратором.
Задание отменено. Нажмите клавишу
[OK].
—
Данные смарт-карты не
читаются.
—
В процессе регистрации информация
ID-карты не считывается правильным
образом. Еще раз расположите ID-
карту над деталью считывания ID-
карт.
Если появится то же самое
сообщение, возможно, ID-карта
несовместима с данным устройством.
Используйте вместо нее другую ID-
карту.
—
Дуплекс. печ. невозм.
на этой бумаге.
↑↓ (отображается
попеременно)
Нажм. ОК для продолж.
используя кассету #.
Возможна ли печать на бумаге
выбранного формата/типа?
Выберите [Бумага] для выбора
доступной бумаги. Выберите [OK] для
печати без использования функции
двусторонней печати.
—

10-21
Устранение неисправностей > Устранение неисправностей
Дуплекс. печ. невозм.
на этой бумаге.
↑↓ (отображается
попеременно)
Нажм. ОК для продолж.
используя ун. лоток.
Возможна ли печать на бумаге
выбранного формата/типа?
Выберите [Бумага] для выбора
доступной бумаги. Выберите клавишу
[OK] для печати без использования
функции двусторонней печати.
—
З
Загрузите бумагу в
кассету #.
↑↓ (отображается
попеременно)
Нажм. ОК для продолж.
используя кассету #.
Не закончилась ли бумага в
указанной кассете?
Загрузите бумагу.
Выберите [Бумага] для выбора
другого источника бумаги. Выберите
клавишу [OK] для печати на бумаге из
выбранного на данный момент
источника бумаги.
стр. 3-2
Загрузите бумагу в
универсальный лоток.
↑↓ (отображается
попеременно)
Нажм. ОК для продолж.
используя ун. лоток.
Загружена ли в универсальный
лоток бумага выбранного формата?
Загрузите бумагу.
Выберите [Бумага] для выбора
другого источника бумаги. Выберите
клавишу [OK] для печати на бумаге из
выбранного на данный момент
источника бумаги.
стр. 3-2
Загрузите бумагу в
кассету #.
↑↓ (отображается
попеременно)
Установите выбранный
формат бумаги и
нажмите [OK].
Не закончилась ли бумага в
указанной кассете?
Загрузите бумагу.
Выберите [Бумага] для выбора
другого источника бумаги. Выберите
клавишу [OK] для печати на бумаге из
выбранного на данный момент
источника бумаги.
стр. 3-2
Загрузите бумагу в
универсальный лоток.
↑↓ (отображается
попеременно)
Установите выбранный
формат бумаги и
нажмите [OK].
Загружена ли в универсальный
лоток бумага выбранного формата?
Загрузите бумагу.
Выберите [Бумага] для выбора
другого источника бумаги. Выберите
клавишу [OK] для печати на бумаге из
выбранного на данный момент
источника бумаги.
стр. 3-2
Закройте автоподатчик
оригиналов и его
крышку.
Открыт ли автоподатчик
оригиналов?
Закройте автоподатчик оригиналов.
—
Закройте крышку #.
Открыта ли какая-либо крышка?
Закройте крышку, обозначенную на
экране.
—
Замените МК.
—
Замена деталей в комплекте для
обслуживания необходима через
каждые 100 000 напечатанных
страниц, для этого требуется
профессиональное обслуживание.
Обратитесь к представителю
сервисной службы.
—
Замените тонер.
—
Замените картридж с тонером.
стр. 10-7
Сообщение
Контрольные вопросы
Меры по устранению
Страница
для справки

Комментарии
Быстрая регистрация
После регистрации вы можете задавать вопросы и отвечать на них, зарабатывая деньги. Ознакомьтесь с правилами, будем рады видеть вас в числе наших экспертов!
Создать аккаунт
- Заработок на Vamber
- Интересные факты
- 10% от рефералов
- ТОП авторов
- Работа без опыта
 Пиши ответы и зарабатывай! Вамбер платит до 2.5 руб. за каждый ответ. Всё что нужно — это пройти регистрацию и писать хорошие ответы. Платим каждую неделю на сотовый телефон или yoomoney (Яндекс Деньги). Правила здесь.
Лучшие предложения
- Кредитные карты
- Быстрые займы

Совкомбанк

8 800 200-66-96
sovcombank.ru
Лицензия: №963
39 256 заявок
![]()
МТС Банк

Без процентов
до 111 дней
8 800 250-0-520
mtsbank.ru
Лицензия: №2268
17 943 заявок

Ренессанс Кредит

Без процентов
до 145 дней
8 800 200-09-81
rencredit.ru
Лицензия: №3354
31 949 заявок

ВебЗайм

8-800-700-8706
web-zaim.ru

ВэбБанкир

8 800 775-54-54
webbankir.com

МигКредит

8 800 700 09 08
migcredit.ru
Признание своих ошибок скорее зависит от характера человека, а не от гендера. Да и признавать ошибки можно по-разному. Ошибаются все люди, но ведь признать ошибку это не всегда значит изменить поведение и отношение. Иногда человек вроде бы извиняется, но продолжает вести себя в том же репертуаре … Читать далее
Обычно ошибка 0 появляется на экране когда пропадает сигнал, и тут же увидите это предупреждение. Проверяем уровень сигнала, выясняем причину. Виноват провайдер, или ваше оборудование?
Проверяем работу ресивера, целостность кабелей и коннекторов, ну и конечно надо удостоверится в работоспособности … Читать далее
Если проанализировать самые частые ошибки, которые обыкновенный человек совершает в реальной жизни, то ведь по итогам, так и получается.
Уже случившийся в первый раз поступок, или проступок, ещё можно как-то оправдать, или «скрепя сердце» — простить. Можно сослаться на молодость … Читать далее
Мне кажется, подспудное осознание собственного несовершенства. Если видишь, как другой человек совершает ошибку, невольно возникает неосознанный страх, что и ты можешь её совершить. Или желание показать себя с лучшей стороны. Ведь если другой человек допустил ошибку, а ты её заметил, вроде как … Читать далее
Есть такое высказывание: «На ошибках учатся». Если ошибся в каких-то действиях, что привело к нежелаемому результату, то, естественно, нужно ошибку исправить, иначе желаемое так и не будет достигнуто.
Исправлять ошибки нас учили и учат со школы. Недаром любая школьная работа, контрольная … Читать далее
Вероятность такая мала, но все же существует – реальная 1 к 1000 случаям (примерно). Кто-то действительно ошибется и вдруг вам случайно и реально пошлет свои кровные денежки, вернее зачислит вам их на карту. Пример моей подруги, она старше меня и уже маленько все путает. Выводила деньги с … Читать далее
Часто невозможно исправить то, что связано со здоровьем. Приведу пример — я годами не лечила кариозный зуб и довела его до того, что он насквозь прогнил, и пришлось удалять. Зуб не вернуть, только искусственный ставить. А приди я к зубному, когда кариес только начинался, никакого удаления бы не … Читать далее
Деньги с баланса «Вайлдберриз» сейчас можно вывести, но когда пользователи начинают выводить деньги, возникают проблемы. Появляется ошибка, где говорится, что ФИО в личном кабинете не совпадает с ФИО счета.
Решить проблему можно так:
1. Проверяем ФИО, может, есть ошибка.
2. Может быть, Вы забыли … Читать далее


Обучающие онлайн-курсы
- Разработка
- Маркетинг
- Аналитика
- Дизайн
- Менеджмент
- Code: 0030
- Description: FAX control PWB system error
Processing with the fax software was disabled due to a hardware problem. - Causes: Defective FAX control PWB.
- Remedy: Replace the fax control PWB and check for correct operation.
- Code: 0070
- Description: FAX control PWB incompatible detection error
Abnormal detection of FAX control PWB incompatibility In the initial communication with the FAX control PWB, any normal communication command is not transmitted. - Causes: Defective FAX software.
Defective FAX control PWB. - Remedy: Defective FAX software. Install the fax software.
Defective FAX control PWB. Replace the fax control PWB and check for correct operation.
- Code: 0100
- Description: Backup memory device error
- Causes: Defective flash memory.
Defective main PWB. - Remedy: Defective flash memory. Replace the main PWB and check for correct operation.
Defective main PWB. Replace the main PWB and check for correct operation.
- Code: 0120
- Description: MAC address data error
For data in which the MAC address is invalid. - Causes: Defective flash memory
Defective engine PWB. - Remedy: Defective flash memory. Replace the main PWB and check for correct operation.
Defective engine PWB. Replace the engine PWB and check for correct operation.
- Code: 0150
- Description: Backup memory read/write error (engine PWB)
No response is issued from the device in reading/writing for 5 ms or more and this problem is repeated 5 times successively. Mismatch of reading data from 2 locations occurs 8 times successively. Mismatch between writing data and reading data occurs 8 times successively. - Causes: Improper installation EEPROM.
Device damage of EEPROM. - Remedy: Improper installation EEPROM. Check the installation of the EEPROM and remedy if necessary.
Defective engine PWB. Replace the engine PWB and check for correct operation.
Device damage of EEPROM. Contact the Service Administrative Division.
- Code: 0160
- Description: Backup memory data error (engine PWB)
Reading data from EEPROM is abnormal. - Causes: Data damage of EEPROM.
- Remedy: Contact the Service Administrative Division.
- Code: 0170
- Description: Billing counting error
A checksum error is detected in the main and engine backup memories for the billing counters. - Causes: Data damage of EEPROM.
Defective PWB. - Remedy: Data damage of EEPROM. Contact the Service Administrative Division.
Defective PWB. Replace the main PWB or the engine PWB and check for correct operation.
- Code: 0180
- Description: Machine number mismatch
Machine number of main and engine does not match. - Causes: Data damage of EEPROM.
- Remedy: Contact the Service Administrative Division.
- Code: 0620
- Description: FAX image DIMM error
DIMM is not installed correctly. DIMM cannot be accessed. - Causes: DIMM installed incorrectly.
Defective main PWB. - Remedy: DIMM installed incorrectly. Check if the DIMM is inserted into the socket on the main PWB correctly.
Defective main PWB. Replace the main PWB and check for correct operation.
- Code: 0630
- Description: DMA error
DMA transmission of image data does not complete within the specified period of time. - Causes: Poor contact in the connector terminals.
Defective main PWB. - Remedy: Poor contact in the connector terminals. Check the connection the signal cable for CIS and the main PWB, and the continuity across the connector terminals. Repair or replace if necessary.
Defective main PWB. Replace the main PWB and check for correct operation.
- Code: 0640
- Description: Hard disk error
The hard disk cannot be accessed. - Causes: Defective hard disk.
Defective main PWB. - Remedy: Defective hard disk. Replace the hard disk and check for correct operation.
Defective main PWB. Replace the main PWB and check for correct operation.
- Code: 0650
- Description: FAX image DIMM check error
Improper DIMM is installed. - Causes: DIMM installed incorrectly.
Defective main PWB. - Remedy: DIMM installed incorrectly. Check if the DIMM is inserted into the socket on the main PWB correctly.
Defective main PWB. Replace the main PWB and check for correct operation.
- Code: 0800
- Description: Image processing error
JAM010X is detected twice. - Causes: Defective main PWB.
- Remedy: Replace the main PWB and check for correct operation.
- Code: 0830
- Description: FAX control PWB flash program area checksum error
A checksum error occurred with the program of the FAX control PWB. - Causes: Defective FAX software.
Defective FAX control PWB. - Remedy: Defective FAX software. Install the fax software.
Defective FAX control PWB. Replace the fax control PWB and check for correct operation.
- Code: 0840
- Description: Faults of RTC
The time is judged to go back based on the comparison of the RTC time and the current time or five years or more have passed. - Causes: The battery is disconnected from the main PWB
Defective main PWB. - Remedy: The battery is disconnected from the main PWB. Check visually and remedy if necessary
Defective main PWB. Replace the main PWB and check for correct operation.
- Code: 0870
- Description: FAX control PWB to main PWB high capacity data transfer error
High-capacity data transfer between the FAX control PWB and the main PWB of the machine was not normally performed even if the data transfer was retried the specified times - Causes: Improper installation FAX control PWB.
Defective FAX control PWB or main PWB. - Remedy: Improper installation FAX control PWB. Reinstall the FAX control PWB.
Defective FAX control PWB or main PWB. Replace the FAX control PWB or main PWB and check for correct operation.
- Code: 0900
- Description: FAX software incompatible detection error
Incompatible FAX control PWB is installed. - Causes: Defective FAX software.
Defective FAX control PWB. - Remedy: Defective FAX software. Install the fax software.
Defective FAX control PWB. Replace the fax control PWB and check for correct operation.
- Code: 0920
- Description: Fax file system error
The backup data is not retained for file system abnormality of flash memory of the FAX control PWB. - Causes: Defective FAX control PWB.
- Remedy: Replace the fax control PWB and check for correct operation.
- Code: 0970
- Description: 12 V power down detect Power is disconnected during sleeping.
- Causes: Defective power source PWB.
- Remedy: Replace the power source PWB and check for correct operation.
- Code: 0980
- Description: 24 V power down detect 24V disconnection signal is detected for 1 s and 12V disconnection signal is not detected.
- Causes: Defective power source PWB.
- Remedy: Replace the power source PWB and check for correct operation.
- Code: 1000
- Description: MP lift motor error
After the MP lift motor is driven, the ON status of MP lift sensors 1 and 2 cannot be detected for 1.5 s. - Causes: Defective MP plate elevation mechanism.
Defective connector cable or poor contact in the connector.
Defective drive transmission system of motor.
Defective MP lift motor.
Defective engine PWB. - Remedy: Defective MP plate elevation mechanism. Check to see if the MP plate can move smoothly and repair it if any problem is found.
Defective connector cable or poor contact in the connector. Reinsert the connector. Also check for continuity within the connector cable. If none, replace the cable. MP lift motor and relay PWB (YC3) Relay PWB (YC12) and feed PWB 1 (YC17) Feed PWB 1 (YC1) and engine PWB (YC6)
Defective drive transmission system of motor. Check if the gears rotate smoothly. If not, grease the bushes and gears. Check for broken gears and replace if any.
Defective MP lift motor. Replace the MP lift motor.
Defective engine PWB. Replace the engine PWB and check for correct operation.
- Code: 1010
- Description: Lift motor 1 error After cassette 1 is inserted, lift sensor 1 does not turn on within 12 s.
This error is detected 4 times successively. The lock signal of the motor is detected continuously for 1 s. - Causes: Defective bottom plate elevation mechanism in the cassette.
Defective connector cable or poor contact in the connector.
Defective drive transmission system of motor.
Defective lift motor 1.
Defective engine PWB. - Remedy: Defective bottom plate elevation mechanism in the cassette. Check to see if the bottom plate can move smoothly and repair it if any problem is found.
Defective connector cable or poor contact in the connector. Reinsert the connector. Also check for continuity within the connector cable. If none, replace the cable. Lift motor 1 and feed PWB 2 (YC3) Feed PWB 2 (YC1) and engine PWB (YC4)
Defective drive transmission system of motor. Check if the gears rotate smoothly. If not, grease the bushes and gears. Check for broken gears and replace if any.
Defective lift motor 1. Replace the lift motor 1.
Defective engine PWB. Replace the engine PWB and check for correct operation.
- Code: 1020
- Description: Lift motor 2 error
After cassette 2 is inserted, lift sensor 2 does not turn on within 12 s. This error is detected 4 times successively. The lock signal of the motor is detected continuously for 1 s. - Causes: Defective bottom plate elevation mechanism in the cassette.
Defective connector cable or poor contact in the connector.
Defective drive transmission system of motor.
Defective lift motor 2.
Defective engine PWB. - Remedy: Defective bottom plate elevation mechanism in the cassette. Check to see if the bottom plate can move smoothly and repair it if any problem is found.
Defective connector cable or poor contact in the connector. Reinsert the connector. Also check for continuity within the connector cable. If none, replace the cable. Lift motor 2 and feed PWB 2 (YC3) Feed PWB 2 (YC1) and engine PWB (YC4)
Defective drive transmission system of motor. Check if the gears rotate smoothly. If not, grease the bushes and gears. Check for broken gears and replace if any.
Defective lift motor 2. Replace the lift motor 2.
Defective engine PWB. Replace the engine PWB and check for correct operation.
- Code: 1030
- Description: PF lift motor 1 error (paper feeder)
After cassette 3 is inserted, PF lift sensor 1 does not turn on within 12 s. This error is detected 5 times successively. During driving the motor, the lift overcurrent protective monitor signal is detected for 1 s or more 5 times successively. However, the first 1 s after motor is turned on is excluded from detection. - Causes: Defective bottom plate elevation mechanism in the cassette.
Defective connector cable or poor contact in the connector.
Defective drive transmission system of motor.
Defective PF lift motor 1.
Defective PF main PWB. - Remedy: Defective bottom plate elevation mechanism in the cassette. Check to see if the bottom plate can move smoothly and repair it if any problem is found.
Defective connector cable or poor contact in the connector. Reinsert the connector. Also check for continuity within the connector cable. If none, replace the cable. PF lift motor 1 and PF main PWB (YC7)
Defective drive transmission system of motor. Check if the gears rotate smoothly. If not, grease the bushes and gears. Check for broken gears and replace if any.
Defective PF lift motor 1. Replace the PF lift motor 1.
Defective PF main PWB. Replace the PF main PWB (Refer to the service manual for the paper feeder).
- Code: 1040
- Description: PF lift motor 2 error (paper feeder)
After cassette 4 is inserted, PF lift sensor 2 does not turn on within 12 s. This error is detected 5 times successively. During driving the motor, the lift overcurrent protective monitor signal is detected for 1 s or more 5 times successively. However, the first 1 s after motor is turned on is excluded from detection. - Causes: Defective bottom plate elevation mechanism in the cassette.
Defective connector cable or poor contact in the connector.
Defective drive transmission system of motor.
Defective PF lift motor 2.
Defective PF main PWB. - Remedy: Defective bottom plate elevation mechanism in the cassette. Check to see if the bottom plate can move smoothly and repair it if any problem is found.
Defective connector cable or poor contact in the connector. Reinsert the connector. Also check for continuity within the connector cable. If none, replace the cable. PF lift motor 2 and PF main PWB (YC7)
Defective drive transmission system of motor. Check if the gears rotate smoothly. If not, grease the bushes and gears. Check for broken gears and replace if any.
Defective PF lift motor 2. Replace the PF lift motor 2.
Defective PF main PWB. Replace the PF main PWB (Refer to the service manual for the paper feeder).
- Code: 1100
- Description: PF lift motor 1 error (large capacity feeder)
After cassette 3 is inserted, PF lift sensor 1 does not turn on within 12 s. This error is detected 2 times successively. During driving the motor, the lift overcurrent protective monitor signal is detected for 500 ms or more 2 times successively. However, the first 1 s after PF lift motor 1 is turned on is excluded from detection. - Causes: Defective connector cable or poor contact in the connector.
Defective drive transmission system of motor.
Defective PF lift motor 1.
Defective PF main PWB. - Remedy: Defective connector cable or poor contact in the connector. Reinsert the connector. Also check for continuity within the connector cable. If none, replace the cable. PF lift motor 1 and PF main PWB (YC7)
Defective drive transmission system of motor. Check if the gears rotate smoothly. If not, grease the bushes and gears. Check for broken gears and replace if any.
Defective PF lift motor 1. Replace the PF lift motor 1.
Defective PF main PWB. Replace the PF main PWB (Refer to the service manual for the paper feeder).
- Code: 1110
- Description: PF lift motor 2 error (large capacity feeder)
After cassette 4 is inserted, PF lift sensor 2 does not turn on within 12 s. This error is detected 2 times successively. During driving the motor, the lift overcurrent protective monitor signal is detected for 500 ms or more 2 times successively. However, the first 1 s after PF lift motor 2 is turned on is excluded from detection. - Causes: Defective connector cable or poor contact in the connector.
Defective drive transmission system of motor.
Defective PF lift motor 2.
Defective PF main PWB. - Remedy: Defective connector cable or poor contact in the connector. Reinsert the connector. Also check for continuity within the connector cable. If none, replace the cable. PF lift motor 2 and PF main PWB (YC7)
Defective drive transmission system of motor. Check if the gears rotate smoothly. If not, grease the bushes and gears. Check for broken gears and replace if any.
Defective PF lift motor 2. Replace the PF lift motor 2.
Defective PF main PWB. Replace the PF main PWB (Refer to the service manual for the paper feeder).
- Code: 1140
- Description: SD lift motor error (side deck)
After cassette 5 is inserted, SD lift sensor does not turn on within 30 s. The lock signal of the motor is detected continuously for 200 ms. - Causes: Defective connector cable or poor contact in the connector.
Defective drive transmission system of motor.
Defective SD lift motor.
Defective SD main PWB. - Remedy: Defective connector cable or poor contact in the connector. Reinsert the connector. Also check for continuity within the connector cable. If none, replace the cable. SD lift motor and SD main PWB (YC8)
Defective drive transmission system of motor. Check if the gears rotate smoothly. If not, grease the bushes and gears. Check for broken gears and replace if any.
Defective SD lift motor. Replace the SD lift motor.
Defective SD main PWB. Replace the SD main PWB (Refer to the service manual for the paper feeder).
- Code: 1720
- Description: Paper feeder incompatible detection error
The paper feeder has been installed with a device to which it is incompatible. - Causes: The paper feeder is installed with a device to which it is incompatible.
- Remedy: The paper feeder must be installed with the devices to which it is compatible.
- Code: 1800
- Description: Paper feeder communication error
A communication error from paper feeder is detected 10 times in succession. - Causes: Improper installation paper feeder.
Defective connector cable or poor contact in the connector.
Defective engine PWB.
Defective PF main PWB. - Remedy: Improper installation paper feeder. Follow installation instruction carefully again.
Defective connector cable or poor contact in the connector. Reinsert the connector. Also check for continuity within the connector cable. If none, replace the cable. PF main PWB (YC13) and engine PWB (YC19)
Defective engine PWB. Replace the engine PWB an1-5-43d check for correct operation.
Defective PF main PWB. Replace the PF main PWB (Refer to the service manual for the paper feeder).
- Code: 1900
- Description: Paper feeder EEPROM error
When writing the data, read and write data does not match 3 times in succession. - Causes: Defective PF main PWB.
Device damage of EEPROM. - Remedy: Defective PF main PWB. Replace the PF main PWB (Refer to the service manual for the paper feeder).
Device damage of EEPROM. Contact the Service Administrative Division.
- Code: 2101
- Description: Developer motor error
After developer motor is driven, the ready signal does not turn to L within 5 s. After developer motor is stabilized, the ready signal is at the H level for 5 s continuously. - Causes: Defective connector cable or poor contact in the connector.
Defective drive transmission system of motor.
Defective developer motor.
Defective engine PWB. - Remedy: Defective connector cable or poor contact in the connector. Reinsert the connector. Also check for continuity within the connector cable. If none, replace the cable. Developer motor and feed PWB 1 (YC8) Feed PWB 1 (YC2) and engine PWB (YC5)
Defective drive transmission system of motor. Check if the gears rotate smoothly. If not, grease the bushes and gears. Check for broken gears and replace if any.
Defective developer motor. Replace the developer motor.
Defective engine PWB. Replace the engine PWB and check for correct operation.
- Code: 2201
- Description: Drum motor steady-state error
After drum motor is stabilized, the ready signal is at the H level for 5 s continuously. - Causes: Defective connector cable or poor contact in the connector.
Defective drive transmission system of motor.
Defective drum motor.
Defective engine PWB. - Remedy: Defective connector cable or poor contact in the connector. Reinsert the connector. Also check for continuity within the connector cable. If none, replace the cable. Drum motor and feed PWB 1 (YC9) Feed PWB 1 (YC2) and engine PWB (YC5)
Defective drive transmission system of motor. Check if the gears rotate smoothly. If not, grease the bushes and gears. Check for broken gears and replace if any.
Defective drum motor. Replace the drum motor.
Defective engine PWB. Replace the engine PWB and check for correct operation.
- Code: 2300
- Description: Fuser motor error
After fuser motor is driven, the ready signal does not turn to L within 2 s. After fuser motor is stabilized, the ready signal is at the H level for 1 s continuously. - Causes: Defective connector cable or poor contact in the connector.
Defective drive transmission system of motor.
Defective fuser motor.
Defective engine PWB. - Remedy: Defective connector cable or poor contact in the connector. Reinsert the connector. Also check for continuity within the connector cable. If none, replace the cable. Fuser motor and feed PWB 1 (YC18) Feed PWB 1 (YC1) and engine PWB (YC6)
Defective drive transmission system of motor. Check if the gears rotate smoothly. If not, grease the bushes and gears. Check for broken gears and replace if any.
Defective fuser motor. Replace the fuser motor.
Defective engine PWB. Replace the engine PWB and check for correct operation.
- Code: 2500
- Description: Transfer motor error
After transfer motor is driven, the ready signal does not turn to L within 2 s. After transfer motor is stabilized, the ready signal is at the H level for 1 s continuously - Causes: Defective connector cable or poor contact in the connector.
Defective drive transmission system of motor.
Defective fuser motor.
Defective engine PWB. - Remedy: Defective connector cable or poor contact in the connector. Reinsert the connector. Also check for continuity within the connector cable. If none, replace the cable. Transfer motor and relay PWB (YC6) Relay PWB (YC5) and feed PWB 1 (YC13) Feed PWB 1 (YC1) and engine PWB (YC6)
Defective drive transmission system of motor. Check if the gears rotate smoothly. If not, grease the bushes and gears. Check for broken gears and replace if any.
Defective fuser motor. Replace the fuser motor.
Defective engine PWB. Replace the engine PWB and check for correct operation.
- Code: 2550
- Description: Paper feed motor error
After paper feed motor is driven, the ready signal does not turn to L within 2 s. After paper feed motor is stabilized, the ready signal is at the H level for 1 s continuously. - Causes: Defective connector cable or poor contact in the connector.
Defective drive transmission system of motor.
Defective paper feed motor.
Defective engine PWB. - Remedy: Defective connector cable or poor contact in the connector. Reinsert the connector. Also check for continuity within the connector cable. If none, replace the cable. Paper feed motor and feed PWB 2 (YC2) Feed PWB 2 (YC1) and engine PWB (YC4)
Defective drive transmission system of motor. Check if the gears rotate smoothly. If not, grease the bushes and gears. Check for broken gears and replace if any.
Defective paper feed motor. Replace the paper feed motor.
Defective engine PWB. Replace the engine PWB and check for correct operation.
- Code: 2600
- Description: PF paper feed motor error (large capacity feeder)
After PF paper feed motor is driven, the ready signal does not turn to L within 2 s. - Causes: Defective connector cable or poor contact in the connector.
Defective drive transmission system of motor.
Defective PF paper feed motor.
Defective PF main PWB. - Remedy: Defective connector cable or poor contact in the connector. Reinsert the connector. Also check for continuity within the connector cable. If none, replace the cable. PF paper feed motor and PF main PWB (YC16)
Defective drive transmission system of motor. Check if the gears rotate smoothly. If not, grease the bushes and gears. Check for broken gears and replace if any.
Defective PF paper feed motor. Replace the PF paper feed motor.
Defective PF main PWB. Replace the PF main PWB (Refer to the service manual for the paper feeder).
- Code: 2610
- Description: PF paper feed motor error (paper feeder)
After PF paper feed motor is driven, the ready signal does not turn to L within 2 s. - Causes: Defective connector cable or poor contact in the connector.
Defective drive transmission system of motor.
Defective PF paper feed motor.
Defective PF main PWB. - Remedy: Defective connector cable or poor contact in the connector. Reinsert the connector. Also check for continuity within the connector cable. If none, replace the cable. PF paper feed motor and PF main PWB (YC16)
Defective drive transmission system of motor. Check if the gears rotate smoothly. If not, grease the bushes and gears. Check for broken gears and replace if any.
Defective PF paper feed motor. Replace the PF paper feed motor.
Defective PF main PWB. Replace the PF main PWB (Refer to the service manual for the paper feeder).
- Code: 2640
- Description: SD paper feed motor error (side deck)
After SD paper feed motor is driven, the ready signal does not turn to L within 2 s. - Causes: Defective connector cable or poor contact in the connector.
Defective drive transmission system of motor.
Defective SD paper feed motor.
Defective SD main PWB. - Remedy: Defective connector cable or poor contact in the connector. Reinsert the connector. Also check for continuity within the connector cable. If none, replace the cable. SD paper feed motor and SD main PWB (YC16)
Defective drive transmission system of motor. Check if the gears rotate smoothly. If not, grease the bushes and gears. Check for broken gears and replace if any.
Defective SD paper feed motor. Replace the SD paper feed motor.
Defective SD main PWB. Replace the SD main PWB (Refer to the service manual for the paper feeder).
- Code: 2810
- Description: Inner motor error Initialized when an error is constantly observed for 2 seconds after the inner motor is activated. An error is constantly observed for 2.5 seconds after rebooting.
- Causes: Defective connector cable or poor contact in the connector.
Defective drive transmission system of motor.
Defective inner motor.
Defective engine PWB. - Remedy: Defective connector cable or poor contact in the connector. Reinsert the connector. Also check for continuity within the connector cable. If none, replace the cable. Inner motor and front PWB (YC13) Front PWB (YC3) and engine PWB (YC7)
Defective drive transmission system of motor. Check if the gears rotate smoothly. If not, grease the bushes and gears. Check for broken gears and replace if any.
Defective inner motor. Replace the inner motor.
Defective engine PWB. Replace the engine PWB and check for correct operation.
- Code: 3100
- Description: Scanner carriage error
The home position is not correct when the power is turned on or at the start of copying using the table. - Causes: Defective connector cable or poor contact in the connector.
Defective home position sensor.
Defective scanner motor.
Defective ISC PWB.
Defective main PWB. - Remedy: Defective connector cable or poor contact in the connector. Reinsert the connector. Also check for continuity within the connector cable. If none, replace the cable. Home position sensor and ISC PWB (YC8) Scanner motor and ISC PWB (YC5) ISC PWB (YC3) and main PWB (YC11)
Defective home position sensor. Replace the home position sensor.
Defective scanner motor. Replace the scanner motor.
Defective ISC PWB. Replace the ISC PWB and check for correct operation.
Defective main PWB. Replace the main PWB and check for correct operation.
- Code: 3200
- Description: Exposure lamp error
When input value at the time of LED lamp PWB illumination does not exceed the threshold value between 5 s. - Causes: Defective connector cable or poor contact in the connector.
Defective LED lamp PWB.
Defective ISC PWB.
Defective main PWB. - Remedy: Defective connector cable or poor contact in the connector. Reinsert the connector. Also check for continuity within the connector cable. If none, replace the cable. LED lamp PWB and ISC PWB (YC6) ISC PWB (YC3) and main PWB (YC11)
Defective LED lamp PWB. Replace the LED lamp PWB and check for correct operation.
Defective ISC PWB. Replace the ISC PWB and check for correct operation.
Defective main PWB. Replace the main PWB and check for correct operation.
- Code: 3210
- Description: CIS lamp error
When input value at the time of CIS illumination does not exceed the threshold value between 5 s. - Causes: Defective connector cable or poor contact in the connector.
Defective CIS.
Defective DPSHD PWB.
Defective DP relay PWB. - Remedy: Defective connector cable or poor contact in the connector. Reinsert the connector. Also check for continuity within the connector cable. If none, replace the cable. CIS and DPSHD PWB (YC2) DPSHD PWB (YC3) and DP relay PWB (YC2)
Defective CIS. Replace the CIS and check for correct operation.
Defective DPSHD PWB. Replace the DPSHD PWB and check for correct operation.
Defective DP relay PWB. Replace the DP relay PWB and check for correct operation.
- Code: 3300
- Description: Optical system (AGC) error
After AGC, correct input is not obtained at CCD. - Causes: Defective connector cable or poor contact in the connector.
Defective exposure lamp
Defective CCD PWB.
Defective ISC PWB.
Defective main PWB. - Remedy: Defective connector cable or poor contact in the connector. Reinsert the connector. Also check for continuity within the connector cable. If none, replace the cable. CCD PWB (YC2) and ISC PWB (YC9) ISC PWB (YC3) and main PWB (YC11)
Defective exposure lamp. Replace the LED lamp PWB and check for correct operation.
Defective CCD PWB. Replace the CCD PWB and check for correct operation.
Defective ISC PWB. Replace the ISC PWB and check for correct operation.
Defective main PWB. Replace the main PWB and check for correct operation.
- Code: 3310
- Description: CIS AGC error After AGC, correct input is not obtained at CIS.
- Causes: Defective CIS.
Defective DPSHD PWB.
Defective DP relay PWB. - Remedy: Defective CIS. Replace the CIS and check for correct operation.
Defective DPSHD PWB. Replace the DPSHD PWB and check for correct operation.
Defective DP relay PWB. Replace the DP relay PWB and check for correct operation.
- Code: 3500
- Description: Communication error between scanner and ASIC
An error code is detected. - Causes: Defective connector cable or poor contact in the connector.
Defective ISC PWB.
Defective main PWB. - Remedy: Defective connector cable or poor contact in the connector. Reinsert the connector. Also check for continuity within the connector cable. If none, replace the cable. ISC PWB (YC3) and main PWB (YC11)
Defective ISC PWB. Replace the ISC PWB and check for correct operation.
Defective main PWB. Replace the main PWB and check for correct operation.
- Code: 3600
- Description: Scanner sequence error
- Causes: Defective ISC PWB.
- Remedy: Replace the ISC PWB and check for correct operation.
- Code: 3700
- Description: Scanner device error
- Causes: CCD connector inserted incorrectly.
- Remedy: Reinsert the image scanner unit connector if necessary.
- Code: 3800
- Description: AFE error
When writing the data, read and write data does not match 3 times in succession. - Causes: Defective ISC PWB.
- Remedy: Replace the ISC PWB and check for correct operation.
- Code: 3900
- Description: Backup memory read/write error (ISC PWB)
Read and write data does not match. - Causes: Defective backup memory or PWB.
- Remedy: Replace the ISC PWB and check for correct operation.
- Code: 4001
- Description: Polygon motor synchronization error
After polygon motor is driven, the ready signal does not turn to L within 30 s. - Causes: Defective connector cable or poor contact in the connector.
Defective polygon motor.
Defective engine PWB. - Remedy: Defective connector cable or poor contact in the connector. Reinsert the connector. Also check for continuity within the connector cable. If none, replace the cable. Polygon motor and engine PWB (YC15)
Defective polygon motor. Replace the laser scanner unit.
Defective engine PWB. Replace the engine PWB and check for correct operation.
- Code: 4011
- Description: Polygon motor steady-state error
After polygon motor is stabilized, the ready signal is at the H level for 15 s continuously. - Causes: Defective connector cable or poor contact in the connector.
Defective polygon motor.
Defective engine PWB. - Remedy: Defective connector cable or poor contact in the connector. Reinsert the connector. Also check for continuity within the connector cable. If none, replace the cable. Polygon motor and engine PWB (YC15)
Defective polygon motor. Replace the laser scanner unit.
Defective engine PWB. Replace the engine PWB and check for correct operation.
- Code: 4101
- Description: BD initialization error
After polygon motor is driven, ASIC detects a BD error for 1 s. - Causes: Defective connector cable or poor contact in the connector.
Defective PD PWB.
Defective engine PWB. - Remedy: Defective connector cable or poor contact in the connector. Reinsert the connector. Also check for continuity within the connector cable. If none, replace the cable. Laser scanner unit and LSU relay PWB (YC3) LSU relay PWB (YC2) and engine PWB (YC11)
Defective PD PWB. Replace the laser scanner unit.
Defective engine PWB. Replace the engine PWB and check for correct operation.
- Code: 4201
- Description: BD steady-state error
The BD signal is not detected. - Causes: Defective connector cable or poor contact in the connector.
Defective PD PWB.
Defective engine PWB. - Remedy: Defective connector cable or poor contact in the connector. Reinsert the connector. Also check for continuity within the connector cable. If none, replace the cable. Laser scanner unit and LSU relay PWB (YC3) LSU relay PWB (YC2) and engine PWB (YC11)
Defective PD PWB. Replace the laser scanner unit.
Defective engine PWB. Replace the engine PWB and check for correct operation.
- Code: 5101
- Description: Main high-voltage error
Abnormality of charger roller is detected when Vpp adjustment. - Causes: Defective connector cable or poor contact in the connector.
Defective high voltage PWB
Defective engine PWB. - Remedy: Defective connector cable or poor contact in the connector. Reinsert the connector. Also check for continuity within the connector cable. If none, replace the cable. High voltage PWB (YC2) and engine PWB (YC16)
Defective high voltage PWB. Replace the high voltage PWB and check for correct operation.
Defective engine PWB. Replace the engine PWB and check for correct operation.
- Code: 6000
- Description: Broken fuser heater wire
Fuser thermistor 1 does not reach 100° C/212 °F even after 30 s during warming up. The detected temperature of fuser thermistor 1 does not reach the specified temperature (ready indication temperature) for 30 s in warming up after reached to 100° C/212 °F. A temperature of less than 80°C/176 °F was observed at the fuser thermistor when the temperature at the fuser thermistor 1 reached 100°C/ 212 °F after warming up. - Causes: Defective connector cable or poor contact in the connector.
Deformed connector pin.
Defective triac.
Fuser thermostat triggered.
Defective fuser heater.
Defective engine PWB. - Remedy: Defective connector cable or poor contact in the connector. Reinsert the connector. Also check for continuity within the connector cable. If none, replace the cable. Power source PWB (YC3) and fuser heater PWB (YC3) Fuser heater PWB (YC2) and feed PWB 1 (YC27) Feed PWB 1 (YC1) and engine PWB (YC6)
Fuser thermostat triggered. Replace the fuser unit.
Defective fuser heater. Replace the fuser unit.
Defective engine PWB. Replace the engine PWB and check for correct operation.
- Code: 6020
- Description: Abnormally high fuser thermistor 1 temperature
Fuser thermistor 1 detects a temperature higher than 240°C/464°F for 1 s. - Causes: Deformed connector pin.
Defective triac.
Shorted fuser thermistor 1.
Defective engine PWB. - Remedy: Shorted fuser thermistor 1. Replace the fuser unit.
Defective engine PWB. Replace the engine PWB and check for correct operation.
- Code: 6030
- Description: Broken fuser thermistor 2 wire A temperature of less than 30°C/86°F was observed at the fuser thermistor 2 when the temperature at the fuser thermistor 1 is greater than 70°C/158°F during warming up.
- Causes: Defective connector cable or poor contact in the connector.
Deformed connector pin.
Defective triac.
Broken fuser thermistor 1 wire.
Fuser thermostat triggered.
Defective fuser heater.
Defective engine PWB. - Remedy: Defective connector cable or poor contact in the connector. Reinsert the connector. Also check for continuity within the connector cable. If none, replace the cable. Fuser unit and engine PWB (YC26)
Broken fuser thermistor 1 wire. Replace the fuser unit.
Fuser thermostat triggered. Replace the fuser unit.
Defective fuser heater. Replace the fuser unit.
Defective engine PWB. Replace the engine PWB and check for correct operation.
- Code: 6040
- Description: Fuser heater error
Input from fuser thermistor 1 is abnormal value continuously for 1 s. - Causes: Defective connector cable or poor contact in the connector.
Deformed connector pin.
Defective triac.
Broken fuser thermistor 1 wire.
Defective fuser heater.
Defective engine PWB. - Remedy: Defective connector cable or poor contact in the connector. Reinsert the connector. Also check for continuity within the connector cable. If none, replace the cable. Fuser unit and engine PWB (YC26)
Broken fuser thermistor 1 wire. Replace the fuser unit.
Defective fuser heater. Replace the fuser unit.
Defective engine PWB. Replace the engine PWB and check for correct operation.
- Code: 6050
- Description: Abnormally low fuser thermistor 1 temperature
Fuser thermistor 1 detects a temperature lower than 100°C/212°F for 1 s after warming up. - Causes: Deformed connector pin.
Defective triac.
Defective fuser thermistor 1.
Defective fuser heater.
Defective engine PWB. - Remedy: Defective fuser thermistor 1. Replace the fuser unit.
Defective fuser heater. Replace the fuser unit.
Defective engine PWB. Replace the engine PWB and check for correct operation.
- Code: 6200
- Description: Broken fuser edge heater wire
A temperature of less than 90°C/194 °F was observed at the fuser thermistor when the temperature at the fuser thermistor 1 reached 160°C/ 320 °F after warming up. - Causes: Defective connector cable or poor contact in the connector.
Deformed connector pin.
Defective triac.
Fuser thermostat triggered.
Defective fuser heater.
Defective engine PWB. - Remedy: Defective connector cable or poor contact in the connector. Reinsert the connector. Also check for continuity within the connector cable. If none, replace the cable. Power source PWB (YC3) and fuser IH PWB (YC1) Fuser IH PWB (YC4) and engine PWB (YC26)
Fuser thermostat triggered. Replace the fuser unit.
Defective fuser heater. Replace the fuser unit.
Defective engine PWB. Replace the engine PWB and check for correct operation.
- Code: 6220
- Description: Abnormally high fuser thermistor 2 temperature
Fuser thermistor 2 detects a temperature higher than 250°C/482°F for 1 s. - Causes: Deformed connector pin.
Defective triac.
Shorted fuser thermistor 2.
Defective engine PWB. - Remedy: Shorted fuser thermistor 2. Replace the fuser unit.
Defective engine PWB. Replace the engine PWB and check for correct operation.
- Code: 6230
- Description: Broken fuser thermistor 2 wire
Input from fuser thermistor 2 is 992 or more (A/D value) continuously for 1 s. - Causes: Defective connector cable or poor contact in the connector.
Deformed connector pin.
Defective triac.
Broken fuser thermistor 2 wire.
Fuser thermostat triggered.
Defective fuser heater.
Defective engine PWB. - Remedy: Defective connector cable or poor contact in the connector. Reinsert the connector. Also check for continuity within the connector cable. If none, replace the cable. Fuser unit and engine PWB (YC26)
Broken fuser thermistor 2 wire. Replace the fuser unit.
Fuser thermostat triggered. Replace the fuser unit.
Defective fuser heater. Replace the fuser unit.
Defective engine PWB. Replace the engine PWB and check for correct operation.
- Code: 6250
- Description: Abnormally low fuser thermistor 2 temperature
Fuser thermistor 2 detects a temperature lower than 50°C/ 122°F for 1 s after warming up. - Causes: Deformed connector pin.
Defective triac.
Defective fuser thermistor 2.
Defective fuser heater.
Defective engine PWB. - Remedy: Defective fuser thermistor 2. Replace the fuser unit.
Defective fuser heater. Replace the fuser unit.
Defective engine PWB. Replace the engine PWB and check for correct operation.
- Code: 6400
- Description: Zero-cross signal error
While fuser heater ON/OFF control is performed, the zero-cross signal is not input within 3 s. - Causes: Defective connector cable or poor contact in the connector.
Defective fuser heater PWB. - Remedy: Defective connector cable or poor contact in the connector. Reinsert the connector. Also check for continuity within the connector cable. If none, replace the cable. Fuser heater PWB (YC29) and feed PWB 1 (YC27)
Defective fuser heater PWB. Replace the fuser heater PWB and check for correct operation.
- Code: 6900
- Description: Fuser front fan motor error
When the fuser front fan motor is driven, alarm signal is detected for 5 s continuously. - Causes: Defective connector cable or poor contact in the connector.
Defective fuser front fan motor.
Defective engine PWB. - Remedy: Defective connector cable or poor contact in the connector. Reinsert the connector. Also check for continuity within the connector cable. If none, replace the cable. Fuser front fan motor and front PWB (YC11) Front PWB (YC2) and engine PWB (YC8)
Defective fuser front fan motor. Replace the fuser front fan motor.
Defective engine PWB. Replace the engine PWB and check for correct operation.
- Code: 6910
- Description: Fuser rear fan motor error
When the fuser rear fan motor is driven, alarm signal is detected for 5 s continuously. - Causes: Defective connector cable or poor contact in the connector.
Defective fuser rear fan motor.
Defective engine PWB. - Remedy: Defective connector cable or poor contact in the connector. Reinsert the connector. Also check for continuity within the connector cable. If none, replace the cable. Fuser rear fan motor and engine PWB (YC26)
Defective fuser rear fan motor. Replace the fuser rear fan motor.
Defective engine PWB. Replace the engine PWB and check for correct operation.
- Code: 7001
- Description: Toner motor error
A state in which the lock signal is detected for 20 times has been detected 3 times during the toner motor is activated. - Causes: Defective connector cable or poor contact in the connector.
Defective toner motor.
Defective engine PWB. - Remedy: Defective connector cable or poor contact in the connector. Reinsert the connector. Also check for continuity within the connector cable. If none, replace the cable. Toner motor and engine PWB (YC27)
Defective toner motor. Replace the toner motor.
Defective engine PWB. Replace the engine PWB and check for correct operation.
- Code: 7101
- Description: Toner sensor error
Sensor output value of 60 or less or 944 or more continued for 3 s. - Causes: Defective connector cable or poor contact in the connector.
Defective engine PWB. - Remedy: Defective connector cable or poor contact in the connector. Reinsert the connector. Also check for continuity within the connector cable. If none, replace the cable. Toner sensor and front PWB (YC7) Front PWB (YC2) and engine PWB (YC8)
Defective engine PWB. Replace the engine PWB and check for correct operation.
- Code: 7200
- Description: Broken outer temperature sensor wire
The sensor input sampling is greater than 230. - Causes: Defective connector cable or poor contact in the connector.
Defective outer temperature sensor.
Defective engine PWB. - Remedy: Defective connector cable or poor contact in the connector. Reinsert the connector. Also check for continuity within the connector cable. If none, replace the cable. Outer temperature sensor and front PWB (YC8) Front PWB (YC2) and engine PWB (YC8)
Defective outer temperature sensor. Replace outer temperature sensor.
Defective engine PWB. Replace the engine PWB and check for correct operation.
- Code: 7210
- Description: Short-circuited outer temperature sensor
The sensor input sampling is less than 69. - Causes: Defective connector cable or poor contact in the connector.
Defective outer temperature sensor.
Defective engine PWB. - Remedy: Defective connector cable or poor contact in the connector. Reinsert the connector. Also check for continuity within the connector cable. If none, replace the cable. Outer temperature sensor 2 and front PWB (YC8) Front PWB (YC2) and engine PWB (YC8)
Defective outer temperature sensor. Replace outer temperature sensor.
Defective engine PWB. Replace the engine PWB and check for correct operation.
- Code: 7221
- Description: Broken LSU thermistor wire
The sensor input sampling is greater than 230. - Causes: Defective connector cable or poor contact in the connector.
Defective LSU thermistor.
Defective engine PWB. - Remedy: Defective connector cable or poor contact in the connector. Reinsert the connector. Also check for continuity within the connector cable. If none, replace the cable. Laser scanner unit and LSU relay PWB (YC3) LSU relay PWB (YC2) and engine PWB (YC11)
Defective LSU thermistor. Replace the laser scanner unit.
Defective engine PWB. Replace the engine PWB and check for correct operation.
- Code: 7231
- Description: Short-circuited LSU thermistor
The sensor input sampling is less than 69. - Causes: Defective connector cable or poor contact in the connector.
Defective LSU thermistor.
Defective engine PWB. - Remedy: Defective connector cable or poor contact in the connector. Reinsert the connector. Also check for continuity within the connector cable. If none, replace the cable. Laser scanner unit and LSU relay PWB (YC3) LSU relay PWB (YC2) and engine PWB (YC11)
Defective LSU thermistor. Replace the laser scanner unit.
Defective engine PWB. Replace the engine PWB and check for correct operation.
- Code: 7241
- Description: Broken developer thermistor wire
The sensor input sampling is greater than 230. - Causes: Defective connector cable or poor contact in the connector.
Defective developer thermistor.
Defective engine PWB. - Remedy: Defective connector cable or poor contact in the connector. Reinsert the connector. Also check for continuity within the connector cable. If none, replace the cable. Developer unit and front PWB (YC7) Front PWB (YC2) and engine PWB (YC8)
Defective developer thermistor. Replace developer unit.
Defective engine PWB. Replace the engine PWB and check for correct operation.
- Code: 7251
- Description: Short-circuited developer thermistor
The sensor input sampling is less than 69. - Causes: Defective connector cable or poor contact in the connector.
Defective developer thermistor.
Defective engine PWB. - Remedy: Defective connector cable or poor contact in the connector. Reinsert the connector. Also check for continuity within the connector cable. If none, replace the cable. Developer unit and front PWB (YC7) Front PWB (YC2) and engine PWB (YC8)
Defective developer thermistor. Replace developer unit.
Defective engine PWB. Replace the engine PWB and check for correct operation.
- Code: 7301
- Description: Toner hopper motor error
When the toner hopper motor is driven, toner hopper sensor does not turn on within 200 ms. This error is detected 15 times successively. - Causes: Defective connector cable or poor contact in the connector.
Defective drive transmission system of motor.
Defective toner hopper sensor.
Defective toner hopper motor.
Defective engine PWB. - Remedy: Defective connector cable or poor contact in the connector. Reinsert the connector. Also check for continuity within the connector cable. If none, replace the cable. Toner hopper motor and front PWB (YC5) Front PWB (YC3) and engine PWB (YC7)
Defective drive transmission system of motor. Check if the gears rotate smoothly. If not, grease the bushes and gears. Check for broken gears and replace if any.
Defective toner hopper sensor. Replace the toner hopper sensor.
Defective toner hopper motor. Replace the toner hopper motor.
Defective engine PWB. Replace the engine PWB and check for correct operation.
- Code: 7401
- Description: Developer unit type mismatch error
Absence of the developer unit is detected. - Causes: Defective connector cable or poor contact in the connector.
Different type of the developer unit is installed. - Remedy: Defective connector cable or poor contact in the connector. Reinsert the connector. Also check for continuity within the connector cable. If none, replace the cable. Developer unit and front PWB (YC7) Front PWB (YC2) and engine PWB (YC8)
Different type of the developer unit is installed. Install the correct developer unit.
- Code: 7411
- Description: Drum unit type mismatch error
Absence of the drum unit is detected. - Causes: Defective connector cable or poor contact in the connector.
Different type of the drum unit is installed. - Remedy: Defective connector cable or poor contact in the connector. Reinsert the connector. Also check for continuity within the connector cable. If none, replace the cable. Drum unit and front PWB (YC6) Front PWB (YC2) and engine PWB (YC8)
Different type of the drum unit is installed. Install the correct drum unit.
- Code: 7460
- Description: Developer shutter error
Power is turned on while the developer shutter is locked. - Causes: The developer shutter has been locked.
Defective connector cable or poor contact in the connector. - Remedy: The developer shutter has been locked. Release the developer shutter.
Defective connector cable or poor contact in the connector. Reinsert the connector. Also check for continuity within the connector cable. If none, replace the cable. Developer shutter sensor and front PWB (YC4) Front PWB (YC3) and engine PWB (YC7)
- Code: 7601
- Description: ID sensor error
An abnormal value is detected in the input data to ID sensor. - Causes: Defective connector cable or poor contact in the connector.
Defective engine PWB. - Remedy: Defective connector cable or poor contact in the connector. Reinsert the connector. Also check for continuity within the connector cable. If none, replace the cable. ID sensor and relay PWB (YC10) Relay PWB (YC1) and feed PWB 1 (YC14) Feed PWB 1 (YC2) and engine PWB (YC5)
Defective engine PWB. Replace the engine PWB and check for correct operation.
- Code: 7602
- Description: ID sensor error
An abnormal value is detected in the input data to ID sensor. - Causes: Defective connector cable or poor contact in the connector.
Defective engine PWB. - Remedy: Defective connector cable or poor contact in the connector. Reinsert the connector. Also check for continuity within the connector cable. If none, replace the cable. ID sensor and relay PWB (YC10) Relay PWB (YC1) and feed PWB 1 (YC14) Feed PWB 1 (YC2) and engine PWB (YC5)
Defective engine PWB. Replace the engine PWB and check for correct operation.
- Code: 7800
- Description: Broken outer temperature sensor wire
The sensor input sampling is greater than 255. - Causes: Defective connector cable or poor contact in the connector.
Defective outer temperature sensor.
Defective engine PWB. - Remedy: Defective connector cable or poor contact in the connector. Reinsert the connector. Also check for continuity within the connector cable. If none, replace the cable. Outer temperature sensor and front PWB (YC8) Front PWB (YC2) and engine PWB (YC8)
Defective outer temperature sensor. Replace outer temperature sensor.
Defective engine PWB. Replace the engine PWB and check for correct operation.
- Code: 7810
- Description: Short-circuited outer temperature sensor
The sensor input sampling is less than 0. - Causes: Defective connector cable or poor contact in the connector.
Defective outer temperature sensor.
Defective engine PWB. - Remedy: Defective connector cable or poor contact in the connector. Reinsert the connector. Also check for continuity within the connector cable. If none, replace the cable. Outer temperature sensor and front PWB (YC8) Front PWB (YC2) and engine PWB (YC8)
Defective outer temperature sensor. Replace outer temperature sensor.
Defective engine PWB. Replace the engine PWB and check for correct operation.
- Code: 7901
- Description: Drum EEPROM error
No response is issued from the device in reading/writing for 5 ms or more and this problem is repeated five times successively. Mismatch of reading data from two locations occurs 8 times successively. Mismatch between writing data and reading data occurs 8 times successively. - Causes: Defective connector cable or poor contact in the connector.
Defective drum PWB. - Remedy: Defective connector cable or poor contact in the connector. Reinsert the connector. Also check for continuity within the connector cable. If none, replace the cable. Drum PWB and front PWB (YC6) Front PWB (YC2) and engine PWB (YC8)
Defective drum PWB. Replace the drum unit.
- Code: 7911
- Description: Developer unit EEPROM error
No response is issued from the device in reading/writing for 5 ms or more and this problem is repeated five times successively. Mismatch of reading data from two locations occurs 8 times successively. Mismatch between writing data and reading data occurs 8 times successively. - Causes: Defective connector cable or poor contact in the connector.
Defective developer unit. - Remedy: Defective connector cable or poor contact in the connector. Reinsert the connector. Also check for continuity within the connector cable. If none, replace the cable. Developer unit and front PWB (YC7) Front PWB (YC2) and engine PWB (YC8)
Defective developer unit. Replace the developer unit.
- Code: 7941
- Description: Laser scanner unit EEPROM error
Mismatch of reading data from two locations occurs 8 times successively. Mismatch between writing data and reading data occurs 8 times successively. - Causes: Defective connector cable or poor contact in the connector.
Defective APC PWB. - Remedy: Defective connector cable or poor contact in the connector. Reinsert the connector. Also check for continuity within the connector cable. If none, replace the cable. APC PWB and LSU relay PWB (YC3) LSU relay PWB (YC2) and engine PWB (YC11)
Defective APC PWB. Replace the laser scanner unit.
- Code: 8010
- Description: Punch motor error 1
When the punch motor is driven, punch home position sensor does not turn on within 200 ms. - Causes: Defective connector cable or poor contact in the connector (4000-sheet finisher).
Defective connector cable or poor contact in the connector (1000-sheet finisher).
Defective punch home position sensor.
Defective punch motor.
Defective PWB. - Remedy: Defective connector cable or poor contact in the connector (4000-sheet finisher). Reinsert the connector. Also check for continuity within the connector cable. If none, replace the cable. Punch motor and punch PWB (YC4) Punch home position sensor and punch PWB (YC8) Punch PWB (YC1) and DF main PWB (YC7)
Defective connector cable or poor contact in the connector (1000-sheet finisher). Reinsert the connector. Also check for continuity within the connector cable. If none, replace the cable. Punch motor and punch PWB (YC4) Punch home position sensor and punch PWB (YC8) Punch PWB (YC1) and DF main PWB (YC8)
Defective punch home position sensor. Replace the punch home position sensor.
Defective punch motor. Replace the punch motor.
Defective PWB. Replace the punch PWB or DF main PWB and check for correct operation.
- Code: 8020
- Description: Punch motor error 2
Home position is not obtained in 3 seconds after home position is initialized or in standby. - Causes: Defective connector cable or poor contact in the connector (4000-sheet finisher).
Defective connector cable or poor contact in the connector (1000-sheet finisher).
Defective punch motor.
Defective PWB. - Remedy: Defective connector cable or poor contact in the connector (4000-sheet finisher). Reinsert the connector. Also check for continuity within the connector cable. If none, replace the cable. Punch motor and punch PWB (YC4) Punch PWB (YC1) and DF main PWB (YC7)
Defective connector cable or poor contact in the connector (1000-sheet finisher). Reinsert the connector. Also check for continuity within the connector cable. If none, replace the cable. Punch motor and punch PWB (YC4) Punch PWB (YC1) and DF main PWB (YC8)
Defective punch motor. Replace the punch motor.
Defective PWB. Replace the punch PWB or DF main PWB and check for correct operation.
- Code: 8030
- Description: Punch motor error 3
Home position does not turn from On to Off in 50 ms after home position has been initialized. - Causes: Defective connector cable or poor contact in the connector (4000-sheet finisher).
Defective connector cable or poor contact in the connector (1000-sheet finisher).
Defective punch motor.
Defective PWB. - Remedy: Defective connector cable or poor contact in the connector (4000-sheet finisher). Reinsert the connector. Also check for continuity within the connector cable. If none, replace the cable. Punch motor and punch PWB (YC4) Punch PWB (YC1) and DF main PWB (YC7)
Defective connector cable or poor contact in the connector (1000-sheet finisher). Reinsert the connector. Also check for continuity within the connector cable. If none, replace the cable. Punch motor and punch PWB (YC4) Punch PWB (YC1) and DF main PWB (YC8)
Defective punch motor. Replace the punch motor.
Defective PWB. Replace the punch PWB or DF main PWB and check for correct operation.
- Code: 8090
- Description: DF paddle motor error
When the DF paddle motor is driven, DF paddle sensor does not turn on within 1 s. - Causes: Defective connector cable or poor contact in the connector (4000-sheet finisher).
Defective connector cable or poor contact in the connector (1000-sheet finisher).
Defective DF paddle sensor.
Defective DF paddle motor.
Defective DF main PWB. - Remedy: Defective connector cable or poor contact in the connector (4000-sheet finisher). Reinsert the connector. Also check for continuity within the connector cable. If none, replace the cable. DF paddle motor and DF main PWB (YC15) DF paddle sensor and DF main PWB (YC22)
Defective connector cable or poor contact in the connector (1000-sheet finisher). Reinsert the connector. Also check for continuity within the connector cable. If none, replace the cable. DF paddle motor and DF main PWB (YC11) DF paddle sensor and DF main PWB (YC20)
Defective DF paddle sensor. Replace the DF paddle sensor.
Defective DF paddle motor. Replace the DF paddle motor.
Defective DF main PWB. Replace the DF main PWB and check for correct operation.
- Code: 8100
- Description: DF eject release motor error
When the DF eject release motor is driven, DF bundle discharge sensor does not turn on within 1 s. - Causes: Defective connector cable or poor contact in the connector (4000-sheet finisher).
Defective connector cable or poor contact in the connector (1000-sheet finisher).
Defective DF bundle discharge sensor.
Defective DF eject release motor.
Defective DF main PWB. - Remedy: Defective connector cable or poor contact in the connector (4000-sheet finisher). Reinsert the connector. Also check for continuity within the connector cable. If none, replace the cable. DF eject release motor and DF main PWB (YC12) DF bundle discharge sensor and DF main PWB (YC22)
Defective connector cable or poor contact in the connector (1000-sheet finisher). Reinsert the connector. Also check for continuity within the connector cable. If none, replace the cable. DF eject release motor and DF main PWB (YC10) DF bundle discharge sensor and DF main PWB (YC20)
Defective DF bundle discharge sensor. Replace the DF bundle discharge sensor.
Defective DF eject release motor. Replace the DF eject release motor.
Defective DF main PWB. Replace the DF main PWB and check for correct operation.
- Code: 8110
- Description: DF shift motor 1 error
When the DF shift motor 1 is driven, DF shift sensor 1 does not turn on within 160 ms. - Causes: Defective connector cable or poor contact in the connector.
Defective DF shift sensor 1.
Defective DF shift motor 1
Defective DF main PWB. - Remedy: Defective connector cable or poor contact in the connector. Reinsert the connector. Also check for continuity within the connector cable. If none, replace the cable. DF shift motor 1 and DF main PWB (YC14) DF shift sensor 1 and DF main PWB (YC23)
Defective DF shift sensor 1. Replace the DF shift sensor 1.
Defective DF shift motor 1. Replace the DF shift motor 1.
Defective DF main PWB. Replace the DF main PWB and check for correct operation.
- Code: 8120
- Description: DF shift motor 2 error
When the DF shift motor 2 is driven, DF shift sensor 2 does not turn on within 160 ms. - Causes: Defective connector cable or poor contact in the connector.
Defective DF shift sensor 2.
Defective DF shift motor 2.
Defective DF main PWB. - Remedy: Defective connector cable or poor contact in the connector. Reinsert the connector. Also check for continuity within the connector cable. If none, replace the cable. DF shift motor 2 and DF main PWB (YC14) DF shift sensor 2 and DF main PWB (YC23)
Defective DF shift sensor 2. Replace the DF shift sensor 2.
Defective DF shift motor 2. Replace the DF shift motor 2.
Defective DF main PWB. Replace the DF main PWB and check for correct operation.
- Code: 8130
- Description: DF shift release motor error
When the DF shift release motor is driven, DF shift release sensor does not turn on within 1 s. - Causes: Defective connector cable or poor contact in the connector.
Defective DF shift release sensor.
Defective DF shift release motor
Defective DF main PWB. - Remedy: Defective connector cable or poor contact in the connector. Reinsert the connector. Also check for continuity within the connector cable. If none, replace the cable. DF shift release motor and DF main PWB (YC14) DF shift release sensor and DF main PWB (YC23)
Defective DF shift release sensor. Replace the DF shift release sensor.
Defective DF shift release motor. Replace the DF shift release motor.
Defective DF main PWB. Replace the DF main PWB and check for correct operation.
- Code: 8140
- Description: DF tray motor error 1
When the main tray has started ascending, DF tray sensor 1 or DF tray upper surface sensor does not turn on within 20 s. - Causes: Defective connector cable or poor contact in the connector (4000-sheet finisher).
Defective connector cable or poor contact in the connector (1000-sheet finisher).
Defective sensor.
Defective DF tray motor.
Defective DF main PWB. - Remedy: Defective connector cable or poor contact in the connector (4000-sheet finisher). Reinsert the connector. Also check for continuity within the connector cable. If none, replace the cable. DF tray motor and DF main PWB (YC16) DF tray sensor 1 and DF main PWB (YC22) DF tray upper surface sensor and DF main PWB (YC21, YC13)
Defective connector cable or poor contact in the connector (1000-sheet finisher). Reinsert the connector. Also check for continuity within the connector cable. If none, replace the cable. DF tray motor and DF main PWB (YC14) DF tray sensor 1 and DF main PWB (YC20) DF tray upper surface sensor and DF main PWB (YC18)
Defective sensor. Replace DF tray sensor 1 or DF tray upper surface sensor.
Defective DF tray motor. Replace the DF tray motor.
Defective DF main PWB. Replace the DF main PWB and check for correct operation.
- Code: 8150
- Description: DF tray motor error 2
When the main tray has descended, DF tray sensor 1 or DF tray upper surface sensor does not turn off within 5s. - Causes: Defective connector cable or poor contact in the connector (4000-sheet finisher).
Defective connector cable or poor contact in the connector (1000-sheet finisher).
Defective sensor.
Defective DF tray motor.
Defective DF main PWB. - Remedy: Defective connector cable or poor contact in the connector (4000-sheet finisher). Reinsert the connector. Also check for continuity within the connector cable. If none, replace the cable. DF tray motor and DF main PWB (YC16) DF tray sensor 1 and DF main PWB (YC22) DF tray upper surface sensor and DF main PWB (YC21, YC13)
Defective connector cable or poor contact in the connector (1000-sheet finisher). Reinsert the connector. Also check for continuity within the connector cable. If none, replace the cable. DF tray motor and DF main PWB (YC14) DF tray sensor 1 and DF main PWB (YC20) DF tray upper surface sensor and DF main PWB (YC18)
Defective sensor. Replace DF tray sensor 1 or DF tray upper surface sensor.
Defective DF tray motor. Replace the DF tray motor.
Defective DF main PWB. Replace the DF main PWB and check for correct operation.
- Code: 8160
- Description: DF tray motor error 3
When the main tray has descended, DF tray sensor 3 does not turn on within 20 s. - Causes: Defective connector cable or poor contact in the connector (4000-sheet finisher).
Defective connector cable or poor contact in the connector (1000-sheet finisher).
Defective DF tray sensor 3.
Defective DF tray motor.
Defective DF main PWB. - Remedy: Defective connector cable or poor contact in the connector (4000-sheet finisher). Reinsert the connector. Also check for continuity within the connector cable. If none, replace the cable. DF tray motor and DF main PWB (YC16) DF tray sensor 3 and DF main PWB (YC23)
Defective connector cable or poor contact in the connector (1000-sheet finisher). Reinsert the connector. Also check for continuity within the connector cable. If none, replace the cable. DF tray motor and DF main PWB (YC14) DF tray sensor 3 and DF main PWB (YC20)
Defective DF tray sensor 3. Replace DF tray sensor 3.
Defective DF tray motor. Replace the DF tray motor.
Defective DF main PWB. Replace the DF main PWB and check for correct operation.
- Code: 8170
- Description: DF side registration motor 1 error 1
When initial operation, DF side registration sensor 1 does not turn on within 3 s. - Causes: Defective connector cable or poor contact in the connector (4000-sheet finisher).
Defective connector cable or poor contact in the connector (1000-sheet finisher).
Defective DF side registration sensor 1.
Defective DF side registration motor 1.
Defective DF main PWB. - Remedy: Defective connector cable or poor contact in the connector (4000-sheet finisher). Reinsert the connector. Also check for continuity within the connector cable. If none, replace the cable. DF side registration motor 1 and DF main PWB (YC15) DF side registration sensor 1 and DF main PWB (YC22)
Defective connector cable or poor contact in the connector (1000-sheet finisher). Reinsert the connector. Also check for continuity within the connector cable. If none, replace the cable. DF side registration motor 1 and DF main PWB (YC11) DF side registration sensor 1 and DF main PWB (YC20)
Defective DF side registration sensor 1. Replace DF side registration sensor 1.
Defective DF side registration motor 1. Replace DF side registration motor 1.
Defective DF main PWB. Replace the DF main PWB and check for correct operation.
- Code: 8180
- Description: DF side registration motor 1 error 2
JAM6810 is detected twice. - Causes: Defective connector cable or poor contact in the connector (4000-sheet finisher).
Defective connector cable or poor contact in the connector (1000-sheet finisher)
Defective DF side registration sensor 1.
Defective DF side registration motor 1.
Defective DF main PWB. - Remedy: Defective connector cable or poor contact in the connector (4000-sheet finisher). Reinsert the connector. Also check for continuity within the connector cable. If none, replace the cable. DF side registration motor 1 and DF main PWB (YC15) DF side registration sensor 1 and DF main PWB (YC22)
Defective connector cable or poor contact in the connector (1000-sheet finisher). Reinsert the connector. Also check for continuity within the connector cable. If none, replace the cable. DF side registration motor 1 and DF main PWB (YC11) DF side registration sensor 1 and DF main PWB (YC20)
Defective DF side registration sensor 1. Replace DF side registration sensor 1.
Defective DF side registration motor 1. Replace DF side registration motor 1.
Defective DF main PWB. Replace the DF main PWB and check for correct operation.
- Code: 8190
- Description: DF side registration motor 2 error 1
When initial operation, DF side registration sensor 2 does not turn on within 3 s. - Causes: Defective connector cable or poor contact in the connector (4000-sheet finisher).
Defective connector cable or poor contact in the connector (1000-sheet finisher).
Defective DF side registration sensor 2.
Defective DF side registration motor 2.
Defective DF main PWB. - Remedy: Defective connector cable or poor contact in the connector (4000-sheet finisher). Reinsert the connector. Also check for continuity within the connector cable. If none, replace the cable. DF side registration motor 2 and DF main PWB (YC15) DF side registration sensor 2 and DF main PWB (YC22)
Defective connector cable or poor contact in the connector (1000-sheet finisher). Reinsert the connector. Also check for continuity within the connector cable. If none, replace the cable. DF side registration motor 2 and DF main PWB (YC11) DF side registration sensor 2 and DF main PWB (YC20)
Defective DF side registration sensor 2. Replace DF side registration sensor 2.
Defective DF side registration motor 2. Replace DF side registration motor 2.
Defective DF main PWB. Replace the DF main PWB and check for correct operation.
- Code: 8200
- Description: DF side registration motor 2 error 2
JAM6910 is detected twice. - Causes: Defective connector cable or poor contact in the connector (4000-sheet finisher).
Defective connector cable or poor contact in the connector (1000-sheet finisher).
Defective DF side registration sensor 2.
Defective DF side registration motor 2.
Defective DF main PWB. - Remedy: Defective connector cable or poor contact in the connector (4000-sheet finisher). Reinsert the connector. Also check for continuity within the connector cable. If none, replace the cable. DF side registration motor 2 and DF main PWB (YC15) DF side registration sensor 2 and DF main PWB (YC22)
Defective connector cable or poor contact in the connector (1000-sheet finisher). Reinsert the connector. Also check for continuity within the connector cable. If none, replace the cable. DF side registration motor 2 and DF main PWB (YC11) DF side registration sensor 2 and DF main PWB (YC20)
Defective DF side registration sensor 2. Replace DF side registration sensor 2.
Defective DF side registration motor 2. Replace DF side registration motor 2.
Defective DF main PWB. Replace the DF main PWB and check for correct operation.
- Code: 8210
- Description: DF slide motor error
When initial operation, DF staple sensor does not turn on within 3 s. - Causes: Defective connector cable or poor contact in the connector (4000-sheet finisher).
Defective connector cable or poor contact in the connector (1000-sheet finisher).
Defective DF staple sensor.
Defective DF slide motor.
Defective DF main PWB. - Remedy: Defective connector cable or poor contact in the connector (4000-sheet finisher). Reinsert the connector. Also check for continuity within the connector cable. If none, replace the cable. DF slide motor and DF main PWB (YC12) DF staple sensor and DF main PWB (YC22)
Defective connector cable or poor contact in the connector (1000-sheet finisher). Reinsert the connector. Also check for continuity within the connector cable. If none, replace the cable. DF slide motor and DF main PWB (YC10) DF staple sensor and DF main PWB (YC20)
Defective DF staple sensor. Replace the DF staple sensor.
Defective DF slide motor. Replace the DF slide motor.
Defective DF main PWB. Replace the DF main PWB and check for correct operation.
- Code: 8230
- Description: DF staple motor error 1
JAM7000 is detected twice. - Causes: Defective connector cable or poor contact in the connector (4000-sheet finisher).
Defective connector cable or poor contact in the connector (1000-sheet finisher).
Defective DF staple sensor
Defective DF staple motor.
Defective DF main PWB. - Remedy: Defective connector cable or poor contact in the connector (4000-sheet finisher). Reinsert the connector. Also check for continuity within the connector cable. If none, replace the cable. Staple unit and DF main PWB (YC17)
Defective connector cable or poor contact in the connector (1000-sheet finisher). Reinsert the connector. Also check for continuity within the connector cable. If none, replace the cable. Staple unit and DF main PWB (YC11)
Defective DF staple sensor. Defective DF staple motor. Replace the staple unit.
Defective DF main PWB. Replace the DF main PWB and check for correct operation.
- Code: 8240
- Description: DF staple motor error 2
The lock signal of the motor is detected continuously for 500 ms. - Causes: Defective connector cable or poor contact in the connector (4000-sheet finisher).
Defective connector cable or poor contact in the connector (1000-sheet finisher).
Defective DF staple motor
Defective DF main PWB. - Remedy: Defective connector cable or poor contact in the connector (4000-sheet finisher). Reinsert the connector. Also check for continuity within the connector cable. If none, replace the cable. Staple unit and DF main PWB (YC17)
Defective connector cable or poor contact in the connector (1000-sheet finisher). Reinsert the connector. Also check for continuity within the connector cable. If none, replace the cable. Staple unit and DF main PWB (YC11)
Defective DF staple motor. Replace the staple unit.
Defective DF main PWB. Replace the DF main PWB and check for correct operation.
- Code: 8250
- Description: DF tray motor error 4
The lock signal of the motor is detected continuously for 500 ms. - Causes: Defective connector cable or poor contact in the connector (4000-sheet finisher).
Defective connector cable or poor contact in the connector (1000-sheet finisher).
Defective DF tray motor.
Defective DF main PWB. - Remedy: Defective connector cable or poor contact in the connector (4000-sheet finisher). Reinsert the connector. Also check for continuity within the connector cable. If none, replace the cable. DF tray motor and DF main PWB (YC16) DF tray sensor 3 and DF main PWB (YC23)
Defective connector cable or poor contact in the connector (1000-sheet finisher). Reinsert the connector. Also check for continuity within the connector cable. If none, replace the cable. DF tray motor and DF main PWB (YC14) DF tray sensor 3 and DF main PWB (YC20)
Defective DF tray motor. Replace the DF tray motor.
Defective DF main PWB. Replace the DF main PWB and check for correct operation.
- Code: 8300
- Description: Center-folding unit communication error
Communication with the center-folding unit is not possible. - Causes: Defective connector cable or poor contact in the connector.
Defective CF set sensor.
Defective PWB. - Remedy: Defective connector cable or poor contact in the connector. Reinsert the connector. Also check for continuity within the connector cable. If none, replace the cable. CF main PWB (YC7) and DF main PWB (YC9)
Defective CF set sensor. Replace the CF set sensor.
Defective PWB. Replace the CF main PWB or the DF main PWB and check for correct operation.
- Code: 8310
- Description: CF side registration motor 2 error
When initial operation, CF side registration sensor 2 does not turn on within 1 s. - Causes: Defective connector cable or poor contact in the connector.
Defective CF side registration sensor 2.
Defective CF side registration motor 2.
Defective CF main PWB. - Remedy: Defective connector cable or poor contact in the connector. Reinsert the connector. Also check for continuity within the connector cable. If none, replace the cable. CF side registration motor 2 and CF main PWB (YC10) CF side registration sensor 2 and CF main PWB (YC20)
Defective CF side registration sensor 2. Replace CF side registration sensor 2.
Defective CF side registration motor 2. Replace CF side registration motor 2.
Defective CF main PWB. Replace the CF main PWB and check for correct operation.
- Code: 8320
- Description: CF adjustment motor error
When initial operation, CF adjustment sensor does not turn on within 2.5 s. - Causes: Defective connector cable or poor contact in the connector.
Defective CF adjustment sensor 1, 2.
Defective CF adjustment motor 1, 2.
Defective CF main PWB. - Remedy: Defective connector cable or poor contact in the connector. Reinsert the connector. Also check for continuity within the connector cable. If none, replace the cable. CF adjustment motor 1, 2 and CF main PWB (YC10) CF adjustment sensor 1, 2 and CF main PWB (YC20)
Defective CF adjustment sensor 1, 2. Replace CF adjustment sensor 1, 2.
Defective CF adjustment motor 1, 2. Replace CF adjustment motor 1, 2.
Defective CF main PWB. Replace the CF main PWB and check for correct operation.
- Code: 8330
- Description: CF blade motor error
When initial operation, CF blade sensor does not turn on within 1.5 s. - Causes: Defective connector cable or poor contact in the connector.
Defective CF blade sensor.
Defective CF blade motor.
Defective CF main PWB. - Remedy: Defective connector cable or poor contact in the connector. Reinsert the connector. Also check for continuity within the connector cable. If none, replace the cable. CF blade motor and CF main PWB (YC15) CF blade sensor and CF main PWB (YC20)
Defective CF blade sensor. Replace the CF blade sensor.
Defective CF blade motor. Replace the CF blade motor.
Defective CF main PWB. Replace the CF main PWB and check for correct operation.
- Code: 8340
- Description: CF staple motor error 1
JAM7600 is detected twice. - Causes: Defective connector cable or poor contact in the connector.
Defective CF staple sensor.
Defective CF staple motor.
Defective CF main PWB. - Remedy: Defective connector cable or poor contact in the connector. Reinsert the connector. Also check for continuity within the connector cable. If none, replace the cable. CF staple unit and CF main PWB (YC13)
Defective CF staple sensor. Defective CF staple motor. Replace the CF staple unit.
Defective CF main PWB. Replace the CF main PWB and check for correct operation.
- Code: 8350
- Description: CF side registration motor 1 error
When initial operation, CF side registration sensor 1 does not turn on within 1 s - Causes: Defective connector cable or poor contact in the connector.
Defective CF side registration sensor 1.
Defective CF side registration motor 1.
Defective CF main PWB. - Remedy: Defective connector cable or poor contact in the connector. Reinsert the connector. Also check for continuity within the connector cable. If none, replace the cable. CF side registration motor 1 and CF main PWB (YC10) CF side registration sensor 1 and CF main PWB (YC20)
Defective CF side registration sensor 1. Replace CF side registration sensor 1.
Defective CF side registration motor 1. Replace CF side registration motor 1.
Defective CF main PWB. Replace the CF main PWB and check for correct operation.
- Code: 8360
- Description: CF main motor error
During driving the motor, lock signal is detected for 1 s continuously. - Causes: Defective connector cable or poor contact in the connector.
Defective CF main motor.
Defective CF main PWB. - Remedy: Defective connector cable or poor contact in the connector. Reinsert the connector. Also check for continuity within the connector cable. If none, replace the cable. CF main motor and CF main PWB (YC16)
Defective CF main motor. Replace the CF main motor.
Defective CF main PWB. Replace the CF main PWB and check for correct operation.
- Code: 8370
- Description: CF staple motor error 2
The lock signal of the motor is detected continuously for 500 ms. - Causes: Defective connector cable or poor contact in the connector
Defective CF staple motor.
Defective CF main PWB - Remedy: Defective connector cable or poor contact in the connector. Reinsert the connector. Also check for continuity within the connector cable. If none, replace the cable. CF staple unit and CF main PWB (YC13)
Defective CF staple motor. Replace the CF staple unit.
Defective CF main PWB. Replace the CF main PWB and check for correct operation.
- Code: 8410
- Description: Punch slide motor error 1
The punch slide sensor won’t turn On when home position has been moved by 30 mm. - Causes: Defective connector cable or poor contact in the connector (4000-sheet finisher).
Defective connector cable or poor contact in the connector (1000-sheet finisher).
Defective slide sensor.
Defective punch slide motor
Defective PWB. - Remedy: Defective connector cable or poor contact in the connector (4000-sheet finisher). Reinsert the connector. Also check for continuity within the connector cable. If none, replace the cable. Punch slide motor and punch PWB (YC3) Punch slide sensor and punch PWB (YC6) Punch PWB (YC1) and DF main PWB (YC7)
Defective connector cable or poor contact in the connector (1000-sheet finisher). Reinsert the connector. Also check for continuity within the connector cable. If none, replace the cable. Punch slide motor and punch PWB (YC3) Punch slide sensor and punch PWB (YC6) Punch PWB (YC1) and DF main PWB (YC8)
Defective slide sensor. Replace the punch slide sensor.
Defective punch slide motor. Replace the punch slide motor.
Defective PWB. Replace the punch PWB or DF main PWB and check for correct operation.
- Code: 8420
- Description: Punch slide motor error 2
In detection of paper edges, the paper edge cannot be detected in 30 mm move. - Causes: Defective connector cable or poor contact in the connector (4000-sheet finisher).
Defective connector cable or poor contact in the connector (1000-sheet finisher).
Defective punch slide motor.
Defective PWB. - Remedy: Defective connector cable or poor contact in the connector (4000-sheet finisher). Reinsert the connector. Also check for continuity within the connector cable. If none, replace the cable. Punch slide motor and punch PWB (YC3) Punch PWB (YC1) and DF main PWB (YC7)
Defective connector cable or poor contact in the connector (1000-sheet finisher). Reinsert the connector. Also check for continuity within the connector cable. If none, replace the cable. Punch slide motor and punch PWB (YC3) Punch PWB (YC1) and DF main PWB (YC8)
Defective punch slide motor. Replace the punch slide motor.
Defective PWB. Replace the punch PWB or DF main PWB and check for correct operation.
- Code: 8430
- Description: Punch unit communication error
Communication with the punch unit is not possible. - Causes: Defective connector cable or poor contact in the connector (4000-sheet finisher).
Defective connector cable or poor contact in the connector (1000-sheet finisher).
Defective PWB. - Remedy: Defective connector cable or poor contact in the connector (4000-sheet finisher). Reinsert the connector. Also check for continuity within the connector cable. If none, replace the cable. Punch PWB (YC1) and DF main PWB (YC7)
Defective connector cable or poor contact in the connector (1000-sheet finisher). Reinsert the connector. Also check for continuity within the connector cable. If none, replace the cable. Punch PWB (YC1) and DF main PWB (YC8)
Defective PWB. Replace the punch PWB or the DF main PWB and check for correct operation.
- Code: 8500
- Description: Mailbox communication error
Communication with the mailbox is not possible. - Causes: Defective connector cable or poor contact in the connector.
Defective PWB. - Remedy: Defective connector cable or poor contact in the connector. Reinsert the connector. Also check for continuity within the connector cable. If none, replace the cable. MB main PWB (YC3) and DF main PWB (YC6)
Defective PWB. Replace the MB main PWB or the DF main PWB and check for correct operation.
- Code: 8510
- Description: MB conveying motor error 1
When initial operation, MB home position sensor does not turn on within 5 s. - Causes: Defective connector cable or poor contact in the connector.
Defective MB home position sensor
Defective MB conveying motor.
Defective MB main PWB. - Remedy: Defective connector cable or poor contact in the connector. Reinsert the connector. Also check for continuity within the connector cable. If none, replace the cable. MB conveying motor and MB main PWB (YC5) MB home position sensor and MB main PWB (YC2)
Defective MB home position sensor. Replace the MB home position sensor.
Defective MB conveying motor. Replace the MB conveying motor.
Defective MB main PWB. Replace the MB main PWB and check for correct operation.
- Code: 8520
- Description: MB conveying motor error 2
When standby operation, MB home position sensor does not turn off within 1 s. - Causes: Defective connector cable or poor contact in the connector.
Defective MB home position sensor.
Defective MB conveying motor.
Defective MB main PWB. - Remedy: Defective connector cable or poor contact in the connector. Reinsert the connector. Also check for continuity within the connector cable. If none, replace the cable. MB conveying motor and MB main PWB (YC5) MB home position sensor and MB main PWB (YC2)
Defective MB home position sensor. Replace the MB home position sensor.
Defective MB conveying motor. Replace the MB conveying motor.
Defective MB main PWB. Replace the MB main PWB and check for correct operation.
- Code: 8800
- Description: Document finisher communication error
Communication with the document finisher is not possible. - Causes: Defective connector cable or poor contact in the connector (4000-sheet finisher).
Defective connector cable or poor contact in the connector (1000-sheet finisher).
Defective PWB. - Remedy: Defective connector cable or poor contact in the connector (4000-sheet finisher). Reinsert the connector. Also check for continuity within the connector cable. If none, replace the cable. DF main PWB (YC4) and engine PWB (YC18)
Defective connector cable or poor contact in the connector (1000-sheet finisher). Reinsert the connector. Also check for continuity within the connector cable. If none, replace the cable. DF main PWB (YC7) and engine PWB (YC18)
Defective PWB. Replace the DF main PWB or the engine PWB and check for correct operation.
- Code: 8900
- Description: Document finisher backup error
Read and write data does not match 3 times in succession. - Causes: Defective connector cable or poor contact in the connector (4000-sheet finisher).
Defective connector cable or poor contact in the connector (1000-sheet finisher).
Improper installation EEPROM.
Defective DF main PWB. - Remedy: Defective connector cable or poor contact in the connector (4000-sheet finisher). Reinsert the connector. Also check for continuity within the connector cable. If none, replace the cable. DF main PWB (YC4) and engine PWB (YC18)
Defective connector cable or poor contact in the connector (1000-sheet finisher). Reinsert the connector. Also check for continuity within the connector cable. If none, replace the cable. DF main PWB (YC7) and engine PWB (YC18)
Improper installation EEPROM. Check the installation of the EEPROM and remedy if necessary.
Defective DF main PWB. Replace the DF main PWB and check for correct operation.
- Code: 8930
- Description: Center-folding unit backup error
Read and write data does not match 3 times in succession. - Causes: Defective connector cable or poor contact in the connector.
Improper installation EEPROM.
Defective CF main PWB. - Remedy: Defective connector cable or poor contact in the connector. Reinsert the connector. Also check for continuity within the connector cable. If none, replace the cable. CF main PWB (YC7) and DF main PWB (YC9)
Improper installation EEPROM. Check the installation of the EEPROM and remedy if necessary.
Defective CF main PWB. Replace the CF main PWB and check for correct operation.
Defective connector cable or poor contact in the connector. Reinsert the connector. Also check for continuity within the connector cable. If none, replace the cable. DP main PWB (YC1) and ISC PWB (YC12) ISC PWB (YC3) and main PWB (YC11)
Defective PWB. Replace the DP main PWB or the ISC PWB and check for correct operation.
- Code: 9000
- Description: Document processor communication error
Communication with the document processor is not possible. - Causes: Defective connector cable or poor contact in the connector
Defective PWB. - Remedy: Defective connector cable or poor contact in the connector. Reinsert the connector. Also check for continuity within the connector cable. If none, replace the cable. DP main PWB (YC1) and ISC PWB (YC12) ISC PWB (YC3) and main PWB (YC11)
Defective PWB. Replace the DP main PWB or the ISC PWB and check for correct operation.
- Code: 9010
- Description: Coin vender communication error
A communication error from coin vender is detected 10 times in succession. - Causes: Defective connector cable or poor contact in the connector.
Data setup failure.
Defective coin vender control PWB.
Defective PWB. - Remedy: Defective connector cable or poor contact in the connector. Reinsert the connector. Also check for continuity within the connector cable. If none, replace the cable.
Data setup failure. Set maintenance mode U206 to off when a coin vender is not installed.
Defective coin vender control PWB. Replace the coin vender control PWB.
Defective PWB. Replace the main PWB and check for correct operation.
- Code: 9040
- Description: DP lift motor going up error
When the DP lift motor is driven, DP lift sensor 1 does not turn on within 2 s. - Causes: Defective connector cable or poor contact in the connector.
Defective DP lift sensor 1.
Defective DP lift motor.
Defective DP main PWB. - Remedy: Defective connector cable or poor contact in the connector. Reinsert the connector. Also check for continuity within the connector cable. If none, replace the cable. DP lift motor and DP main PWB (YC5) DP lift sensor 1 and DP main PWB (YC4)
Defective DP lift sensor 1. Replace the DP lift sensor 1.
Defective DP lift motor. Replace the DP lift motor.
Defective DP main PWB. Replace the DP main PWB and check for correct operation.
- Code: 9050
- Description: DP lift motor going down error
When the DP lift motor is driven, DP lift sensor 2 does not turn on within 2 s. - Causes: Defective connector cable or poor contact in the connector.
Defective DP lift sensor 2.
Defective DP lift motor.
Defective DP main PWB. - Remedy: Defective connector cable or poor contact in the connector. Reinsert the connector. Also check for continuity within the connector cable. If none, replace the cable. DP lift motor and DP main PWB (YC5) DP lift sensor 2 and DP main PWB (YC2)
Defective DP lift sensor 2. Replace the DP lift sensor 2.
Defective DP lift motor. Replace the DP lift motor.
Defective DP main PWB. Replace the DP main PWB and check for correct operation.
- Code: 9060
- Description: DP EEPROM error
Mismatch of reading data from two locations occurs 3 times successively. Mismatch between writing data and reading data occurs 3 times successively. - Causes: Defective DP main PWB.
Device damage of EEPROM. - Remedy: Defective DP main PWB. Replace the DP main PWB and check for correct operation.
Device damage of EEPROM. Contact the Service Administrative Division.
- Code: 9070
- Description: Communication error between DP and SHD
A communication error is detected. - Causes: Defective connector cable or poor contact in the connector.
Defective DPSHD PWB. - Remedy: Defective connector cable or poor contact in the connector. Reinsert the connector. Also check for continuity within the connector cable. If none, replace the cable. DPSHD PWB (YC1) and DP main PWB (YC10)
Defective DPSHD PWB. Replace the DPSHD PWB and check for correct operation.
- Code: 9080
- Description: LED fault detection
When the power supply is turned on, the peak value of LED is 80hex or less. - Causes: Defective connector cable or poor contact in the connector.
Defective CIS
Defective DPSHD PWB. - Remedy: Defective connector cable or poor contact in the connector. Reinsert the connector. Also check for continuity within the connector cable. If none, replace the cable. CIS and DPSHD PWB (YC1) DPSHD PWB (YC1) and DP main PWB (YC10)
Defective CIS. Replace CIS and check for correct operation.
Defective DPSHD PWB. Replace the DPSHD PWB and check for correct operation.
- Code: 9100
- Description: Coin vender control PWB error
Communication error has been detected at the coin mec of the coin vender control PWB. - Causes: Defective coin vender control PWB.
- Remedy: Replace the coin mec.
- Code: 9110
- Description: Coin vender error
Communication error has been detected in connection with the coin mec and the rejector. - Causes: Rejector installed incorrectly.
Defective rejector. - Remedy: Rejector installed incorrectly. Check the rejector is properly installed and, if not, perform the corrective action.
Defective rejector. Replace the rejector.
- Code: 9120
- Description: Sensor error in coin vender change (Yen 10)
Change is empty despite change is enough. - Causes: Coin jam in the change tube
Poor contact in the connector.
Defective change empty sensor.
Defective coin vender control PWB. - Remedy: Coin jam in the change tube Check visually and remedy.
Poor contact in the connector. Check if the change empty sensor is intact.
Defective change empty sensor. Replace the coin mec.
Defective coin vender control PWB. Replace the coin mec.
- Code: 9130
- Description: Sensor error in coin vender change (Yen 50)
Change is empty despite change is enough. - Causes: Coin jam in the change tube
Poor contact in the connector.
Defective change empty sensor.
Defective coin vender control PWB. - Remedy: Coin jam in the change tube Check visually and remedy.
Poor contact in the connector. Check if the change empty sensor is intact.
Defective change empty sensor. Replace the coin mec.
Defective coin vender control PWB. Replace the coin mec.
- Code: 9140
- Description: Sensor error in coin vender change (Yen 100)
Change is empty despite change is enough. - Causes: Coin jam in the change tube
Poor contact in the connector.
Defective change empty sensor.
Defective coin vender control PWB. - Remedy: Coin jam in the change tube Check visually and remedy.
Poor contact in the connector. Check if the change empty sensor is intact.
Defective change empty sensor. Replace the coin mec.
Defective coin vender control PWB. Replace the coin mec.
- Code: 9150
- Description: Sensor error in coin vender change (Yen 500)
Change is empty despite change is enough. - Causes: Coin jam in the change tube
Poor contact in the connector.
Defective change empty sensor.
Defective coin vender control PWB. - Remedy: Coin jam in the change tube Check visually and remedy.
Poor contact in the connector. Check if the change empty sensor is intact.
Defective change empty sensor. Replace the coin mec.
Defective coin vender control PWB. Replace the coin mec.
- Code: 9160
- Description: Coin vender pay-out error
Coin is paid out despite the pay-out motor is determined not active. - Causes: Defective pay-out motor.
- Remedy: Replace the coin mec.
- Code: 9170
- Description: Coin vender pay-out sensor error
Coin is paid out despite the pay-out motor is determined not active. - Causes: Change jam at the pay-out.
Defective pay-out motor.
Defective pay-out sensor. - Remedy: Change jam at the pay-out. Check visually and remedy.
Defective pay-out motor. Replace the coin mec.
Defective pay-out sensor. Replace the coin mec.
- Code: 9500 … 9550
- Description: Contact the Service Administrative Division.
- Causes:
- Remedy: Contact the Service Administrative Division.
- Code: F000
- Description: Communication error between main PWB and operation PWB
- Causes: Defective main PWB.
Defective operation PWB. - Remedy: Defective main PWB. Turn the main power switch off/on to restart the machine. If the error is not resolved, replace main PWB.
Defective operation PWB. Replace the operation PWB and check for correct operation.
- Code: F010
- Description: Main PWB checksum error
- Causes: Defective main PWB.
- Remedy: Turn the main power switch off/on to restart the machine. If the error is not resolved, replace main PWB.
- Code: F040
- Description: Communication error between main PWB and print engine
- Causes: Defective main PWB.
Defective engine PWB. - Remedy: Defective main PWB. Turn the main power switch off/on to restart the machine. If the error is not resolved, replace main PWB.
Defective engine PWB. Replace the engine PWB and check for correct operation.
- Code: F041
- Description: Communication error between main PWB and scanner engine
- Causes: Defective main PWB.
Defective ISC PWB. - Remedy: Defective main PWB. Turn the main power switch off/on to restart the machine. If the error is not resolved, replace main PWB.
Defective ISC PWB. Replace the ISC PWB and check for correct operation.
- Code: F050
- Description: Print engine ROM checksum error
- Causes: Defective engine PWB.
- Remedy: Turn the main power switch off/on to restart the machine. If the error is not resolved, replace engine PWB.
- Code: F051
- Description: Scanner engine ROM checksum error
- Causes: Defective ISC PWB.
- Remedy: Turn the main power switch off/on to restart the machine. If the error is not resolved, replace ISC PWB.
- Code: F278
- Description: Power supply in drive system error
- Causes: Main power switch was turned off without using the power key, or a power failure has occurred.
- Remedy: Turn on power. (To switch off power, first press the power key until the main power indicator goes off, then turn the main power switch off.)
КОНФЕРЕНЦИЯ СТАРТКОПИ
Принтеры, копировальные аппараты, МФУ, факсы и другая офисная техника:
вопросы ремонта, обслуживания, заправки, выбора
0. pBorisov 08.10.14 17:43
Изначально не брал бумагу в автоподатчике, не поднимался стол. Если снять оптопару на двигатель подъёма, все поднимается без остановки. Но потом появилась ошибка С0980 (нет 24v), и автоподатчик не реагирует на бумагу. При отключении разъёма от аппарата, он(ADF) пропадает с экрана. Вопрос где может быть предохранитель на 24v в автоподатчике или на платах в аппарате?
1. busa 09.10.14 01:23
(0) Для начала, какой ADF? DP-770(реверсивный) или DP-771(однопроходной при дуплексном сканировании). <cite>Ошибка — невозможно использовать автоподатчик оригиналов</cite> сбрасывается командой 906, но возникает заново если есть неисправность. Дальше если честно, ничего не понятно, в каком состояние аппарат?<cite>Но потом появилась ошибка С0980 (нет 24v), и автоподатчик не реагирует на бумагу</cite> .
описание С0980: 24 V power down detect
24V disconnection signal is
detected for 1 s and 12V
disconnection signal is not
detected. (Defective power
source PWB.
Replace the power source PWB and check
for correct operation.)
пы.сы. Поясните, что с аппаратом! Без АДФ работает, а с адф в ошибке С0980 или ошибка — невозможно использовать автоподатчик оригиналов . Дока имеется на тело и адф?
2. pBorisov 09.10.14 10:43
Спасибо за подсказку. Автоподатчик 770, сбросил ошибку, вышел в готовность. Оригинал в автоподатчике виден, при нажатии на пуск начинают вращаться ролики подачи, стол не поднимается , оригинал не уходит дальше, и показывает замин. Доки есть.
3. busa 09.10.14 11:23
Вооот! А теперь дальше. ‘Стол’ не подымается потому, что к/а думает, что у него полно оригиналов. Причиной тому служит хлопонье крышкой адф. На корпусе ролика захвата ломается ‘назовём его Г-образный ограничитель хода корпуса с роликом в крышке адф’. Во как завернул:))). На корпусе ролика есть флажок датчика верхнего положения лифт-мотора(он у вас активен). А вы снимали датчик нижнего положения лифт-мотора, это так к слову. Положите оригинал, приподымите слегонца ролик захвата и нажмите старт. Заработал? Меняем корпус ролика.
4. pBorisov 09.10.14 11:48
Г-образный ограничитель сломан давно. Если приподнять нижний лифт (стол) вручную, при закрытии крышки он опускается в нижнее положение. Ролик захвата крутится при нажатии пуск.
5. busa 09.10.14 12:22
корпус с роликом приподымите и нажмите старт
6. busa 09.10.14 12:37
и потом, если он у сломан давно как он у вас работал? Хотя теоретически, если забить под завязку оригиналами, то будет работать пока бумагу захватывает.
7. pBorisov 09.10.14 16:57
Корпус с роликом приподнимаю, нажимаю пуск. Ролик начинает крутиться, но нижний столик не поднимается. Ролик начинает крутится даже если его не трогать. Если бумагу приподнять к роликам она пройдет на сканер. К сожалению пришлось уехать. Вопрос остался.
8. busa 09.10.14 20:29
(7)Нет, ну конечно всякое может быть с аппаратом, но всё-же, из той инфы, что вы дали я делаю однозначный вывод «Давайте будем грамотными инженерами» у вас есть поломка! Нужно как минимум менять крышку или очумелыми ручками восстановить её геометрию, а потом дальнейшая диагн.
Загрузка оригиналов в автоподатчик оригиналов, Загрузка оригиналов в автоподатчик оригиналов -3, Загрузка оригиналов в автоподатчик – Инструкция по эксплуатации Kyocera Ecosys m2040dn
Автоподатчик оригиналов поддерживает следующие типы оригиналов.
Не используйте с автоподатчиком оригиналы следующих типов. В противном случае возможно замятие
оригиналов или загрязнение автоподатчика оригиналов.
• Края оригиналов со скобами скоросшивателя или скрепками (Перед загрузкой удалите все скрепки или скобы
скоросшивателя, распрямите замятости, складки или загнутые уголки. Несоблюдение этого правила может
привести к застреванию оригиналов).
• Оригиналы со следами клея или с клейкой лентой
• Оригиналы с вырезанными фрагментами
• Оригиналы со складками (разравнивайте складки перед загрузкой. Несоблюдение этого правила может
привести к застреванию оригиналов).
Откройте лоток для оригиналов и отрегулируйте положение
направляющих ширины оригиналов.
От 50 до 160 г/м
(при двустороннем копировании: от 50 до 160 г/м
*1 Только для моделей с функцией двухстороннего сканирования.
Форматы бумаги
Максимальный — Folio (Legal), минимальный — A6 (Statement)
Количество листов
Обычная бумага (80 г/м
): 50 листов (оригиналы разных форматов:
50 листов)
Плотная бумага (120 г/м
• Перед загрузкой оригиналов убедитесь в отсутствии документов в выходном лотке оригиналов. В
противном случае может произойти замятие новых оригиналов.
• Не прикладывайте усилий к верхней крышке автоподатчика оригиналов, например, не следует на ней
выравнивать оригиналы. Это может привести к ошибке автоподатчика оригиналов.
Устранение ошибки C7990 на Kyocera
На дисплее высвечивается: «Сбой аппарата Вызовите сервисный персонал» и в правом нижнем углу, ошибка C7990. Что делать и как быть? Главное не паниковать и не нести аппарат в сервисный центр. Решить самостоятельно данную проблему не составит труда.
Что обозначает ошибка C7990
При печати отработанный тонер с фоторецептора собирается в специальный отсек. Следовательно, в определённый момент, особенно при большом количестве отпечатков, он забивается отработкой. С помощью датчика в бункере, поступает сигнал на главную плату устройства. Вот тут-то и выскакивает ошибка C7990. МФУ блокируется и не позволяет пользователю произвести распечатку того или иного документа.
Устранение ошибки Kyocera C7990
Решение проблемы заключается в очистки отсека с отработанным тонером. Бункер отработки находится в драм-юните. В некоторых аппаратах Kyocera, отработанный тонер собирается в специальную ёмкость. Находится она в небольшой полости корпуса устройства.
Ниже представлен способ решения ошибки C7990 c отсеком для отработанного тонера в драм-юните. Пример устранения проблемы произведу на многофункциональном устройстве Kyocera Ecosys M2035dn.
Устранение ошибки C7990 — Шаг №1
Первое, что необходимо сделать, чтобы ошибка C7990 больше не беспокоила, это выключить печатающее устройство. Затем открыть переднюю крышку. Аккуратно, не торопясь, извлечь блок проявки. Извлекать нужно вместе с тонер-картриджем. Просто потяните его на себя, он выйдет.
Шаг №2
После того как блок проявки извлечён, отложите его в сторону. Второе, что делаем, это извлекаем драм-юнит. Именно по его вине появилась на дисплее устройства ошибка C7990. Вытаскиваем драм также, как и блок проявки, потянув на себя. Тянуть нужно за специально предназначенные для этого зелёные вставки по бокам.
Шаг №3
Третье, на демонтированном драм-юните необходимо отщелкнуть небольшую крышку, закрывающую отверстие для чистки отсека отработки. Чтобы это сделать, поворачиваем драм зелёными вставками назад. По бокам находятся крышки. Отщелкнуть нужно одну из них, без разницы какую. Убрав закрывающую крышку высыпаем отработку.
Шаг №4
Итак, отсек для отработанного тонера после проделанных манипуляций пуст. Причину вызвавшую ошибку C7990 на печатающем устройстве Kyocera устранили. Ставим крышечку на своё место. Вставляем драм-юнит, а затем блок проявки с тонер-картриджем в аппарат. Закрываем переднюю крышку устройства. Включаем МФУ и радуемся устранением проблемы.
Дополнительная информация, касающаяся ошибки C7990
Если вы извлекли драм-юнит и на нём нет крышек закрывающих доступ для очистки отработки, то Вам нужно проделать отверстие самостоятельно. В некоторых моделях печатающих устройств Kyocera, отверстия на драм-юните для очистки отработки отсутствуют. После того как проделали отверстие и высыпали отработанный тонер обязательно заклейте отверстие скотчем! Далее установите драм и блок проявки на своё место, включите устройство. Ошибка C7990 больше Вас не побеспокоит, до следующего переполнения отработанным тонером.