
Skip to Content
Information Center
- Информационный центр
- Информация о принтере
- Последовательность индикаторов на панели управления
Поиск по Информационному центру
Последовательность индикаторов на панели управления
| Горит | Мигает | Медленно мигает |
|---|---|---|
|
|
|
|
|
|
|
|
|
|
|
|
|
|
|
|
|
|
|
|
|
|
|
|


| Последовательность индикации: | Сообщения об ошибках или состояние принтера | |||||
|
|
|
|
|
|
|
|
|---|---|---|---|---|---|---|
|
|
Закройте переднюю дверцу |
|||||
|
|
|
|
Замените блок копи-картриджа |
|||
|
|
|
|
|
Замените неподдерживаемый тонер-картридж |
||
|
|
|
|
|
Замените неподдерживаемый блок копи-картриджа |
||
|
|
|
Несоответствие тонер-картриджа и блока копи-картриджа |
||||
|
|
|
|
|
|
|
Отмена задания на печать |
|
|
|
Сброс буфера |
||||
|
|
|
Разрешение понижено |
||||
|
Индикаторы мигают по одному, слева направо, с интервалами. |
||||||
|
Тип расходного материала не Lexmark |
||||||
|
|
|
|
|
Необходимо перезапустить принтер |
||
|
|
|
|
Очень низкий ресурс тонер-картриджа |
|||
|
|
|
|
Очень низкий ресурс копи-картриджа |
|||
|
|
|
|
Ресурс тонер-картриджа приближается к низкому уровню |
|||
|
|
|
|
Ресурс копи-картриджа приближается к низкому уровню |
|||
|
|
|
|
|
|
|
Ошибка. Требуется техническое обслуживание принтера. |
|
|
|
Загрузите бумагу |
||||
|
|
Удалите бумагу из стандартного выходного лотка |
|||||
|
|
|
Ресурс тонер-картриджа на низком уровне |
||||
|
|
|
Ресурс копи-картриджа на низком уровне |
||||
|
|
Готов |
|||||
|
|
|
Ожидание |
||||
|
|
Занят |
|||||
|
|
Не готов |


Если последовательность индикаторов совпадает с последовательностью в колонке «Основная последовательность индикаторов» следующей таблицы, дважды нажмите  . Найдите совпадающие последовательности индикаторов в колонке дополнительных последовательностей индикаторов, затем см. соответствующее сообщение об ошибке или состояние принтера.
| Основная последовательность индикаторов | Дополнительные последовательности индикаторов | Сообщения об ошибках или состояние принтера | ||||||||||
|
|
|
|
|
|
|
|
|
|
|
|
|
|
|---|---|---|---|---|---|---|---|---|---|---|---|---|
|
|
|
|
|
|
Тонер-картридж отсутствует или не реагирует |
|||||||
|
|
|
|
|
|
Замените тонер-картридж |
|||||||
|
|
|
|
|
|
Несоответствие региона тонер-картриджа, принтера |
|||||||
|
|
|
|
|
|
Копи-картридж отсутствует или не реагирует |
|||||||
|
|
|
|
|
|
Ошибка стандартного сетевого программного обеспечения |
|||||||
|
|
|
|
|
|
Ошибка программного обеспечения сети [x] |
|||||||
|
|
|
|
|
|
Недостаточно памяти для разбора задания по копиям |
|||||||
|
|
|
|
|
|
Ошибка шрифта PPDS |
|||||||
|
|
|
|
|
|
Сложная страница |
|||||||
|
|
|
|
|
|
Недостаточно памяти для поддержки функции сохранения ресурсов |
|||||||
|
|
|
|
|
|
|
Стандартный параллельный порт отключен |
||||||
|
|
|
|
|
|
|
Заданий порт USB отключен |
||||||
|
|
|
|
|
|
|
Присоединено слишком много лотков |
||||||
|
|
|
|
|
|
|
Неверный формат бумаги |
||||||
|
|
|
|
|
|
|
Переполнение памяти |
||||||
|
|
|
|
|
|
Замятие бумаги, очистите стандартный выходной лоток. |
|||||||
|
|
|
|
|
|
Замятие бумаги, удалите стандартный лоток для очистки устройства двусторонней печати |
|||||||
|
|
|
|
|
|
Замятие бумаги, откройте заднюю дверцу |
|||||||
|
Замятие бумаги, удалите стандартный лоток для очистки устройства двусторонней печати |
||||||||||||
|
|
|
|
|
|
Замятие бумаги, откройте переднюю дверцу |
|||||||
|
|
|
|
|
|
|
Замятие бумаги, удалите стандартный лоток |
||||||
|
|
|
|
|
|
|
Замятие бумаги, удалите стандартный лоток |
||||||
|
|
|
|
|
|
|
Замятие бумаги, устройство ручной подачи |
Помогла ли вам эта статья?
Top
Action
Step 8
Check the cartridge gearbox cable for damage.
Is it free of damage?
171 errors
171 error messages
Error code Description
171.03
Fuser fan error.
171.04
Fuser fan error.
171.05
Fuser fan error.
171.06
Fuser fan error.
171.07
Fuser fan error.
Cooling fan service check
Action
Step 1
a
Make sure that the cable JFAN1 is properly connected to the
controller board.
b
Check if the cooling fan is rotating properly.
Is it rotating properly?
Step 2
a
Turn off the printer, and disconnect JFAN1 from the controller
board.
b
Turn on the printer, and measure the voltage across JFAN1.
Is the voltage approximately 24 V?
Step 3
Is the fan idle?
Action
Go to
page
Diagnostics and troubleshooting
162
Yes
No
Replace the
Replace the
controller board. See
cartridge gearbox.
«Controller board
See
removal» on
gearbox removal»
page
299.
on page
«Cooling fan service check» on
162.
Yes
No
Go to step 2.
Replace the cooling
fan. See
fan removal» on
page
Go to step 3.
Replace the
controller board. See
«Controller board
removal» on
page
Replace the cooling
The problem is
fan. See
«Cooling
solved.
fan removal» on
page
298.
7015
«Cartridge
291.
«Cooling
298.
299.
- Manuals
- Brands
- Lexmark Manuals
- All in One Printer
- MX310dn
Manuals and User Guides for Lexmark MX310dn. We have 17 Lexmark MX310dn manuals available for free PDF download: Service Manual, User Manual, Compatibility Manual, Manual, Technical Reference, Driver Manual, Quick Reference, Tech Note, Specifications, Product Specifications
Lexmark MX310dn Service Manual (421 pages)
Lexmark Machine Type 7015-270, -470, -6xx Printers Service Manual
Brand: Lexmark
|
Category: Printer
|
Size: 30.69 MB
Table of Contents
-
Table of Contents
3
-
Service Manual
1
-
Product Information
2
-
Edition Notice
2
-
November
2
-
Table of Contents
3
-
-
Notices and Safety Information
15
-
Laser Notices
15
-
Safety
18
-
-
Preface
23
-
Service Manual Conventions
23
-
-
General Information
25
-
Media Guidelines
25
-
Paper Guidelines
25
-
Moisture Content
26
-
-
Unacceptable Paper
26
-
Selecting Paper
27
-
Selecting Preprinted Forms and Letterhead
27
-
Storing Paper
27
-
Using Recycled Paper and Other Office Papers
28
-
Using Specialty Media
28
-
Supported Paper Sizes, Types, and Weights
30
-
Supported Paper Types and Weights
32
-
-
Data Security Notice
33
-
Tools Required for Service
34
-
-
Diagnostic Information
35
-
Troubleshooting Overview
35
-
Performing the Initial Troubleshooting Check
35
-
Power-On Reset (POR) Sequence
36
-
Using Safe Mode
36
-
-
Fixing Print Quality Issues
37
-
Initial Print Quality Check
37
-
Gray Background or Toner Fog on Prints
38
-
Repeating Defects
39
-
Printer Is Printing Blank Pages
39
-
Printer Is Printing Solid Black Pages
40
-
Shadow Images Appear on Prints
40
-
Skewed Print
41
-
Streaked Horizontal or Vertical Lines Appear on Prints
43
-
Toner Rubs off
44
-
Toner Specks Appear on Prints
45
-
-
Paper Jams
45
-
Avoiding Jams
46
-
Understanding Jam Messages and Locations
47
-
200 Paper Jams
48
-
Main Drive Motor Control Jam Service Check
55
-
202 Paper Jams
56
-
X]‑Page Jam, Clear Standard Bin. [20Y.XX
57
-
23Y Paper Jams
60
-
24Y Paper Jams
62
-
X]‑Page Jam, Open Tray [X]. [24Y.XX
62
-
25Y Paper Jams
71
-
X]‑Page Jam, Clear Manual Feeder. [25Y.XX
71
-
Mpf Service Check
73
-
-
28Y Paper Jams
74
-
29Y.XX Paper Jams
75
-
-
Understanding Printer Messages
76
-
Cartridge Low [88.Xy]
76
-
Cartridge Nearly Low [88.Xy]
76
-
Cartridge very Low, [X] Estimated Pages Remain [88.Xy]
76
-
Change [Paper Source] to [Custom String] Load [Paper Orientation]
76
-
Change [Paper Source] to [Custom Type Name] Load [Orientation]
76
-
Change [Paper Source] to [Paper Size] Load [Orientation]
77
-
Change [Paper Source] to [Paper Type] [Paper Size] Load [Orientation]
77
-
Close Flatbed Cover and Load Originals if Restarting Job [2Yy.XX]
77
-
Close Door
77
-
Configuration Change, some Held Jobs Were Not Restored [57]
77
-
Complex Page, some Data May Not Have Printed [39]
78
-
Defective Flash Detected [51]
78
-
Disk Must be Formatted for Use in this Device
78
-
Error Reading USB Drive. Remove USB
78
-
Error Reading USB Hub. Remove Hub
78
-
Fax Partition Inoperative. Contact System Administrator
78
-
Fax Server ‘To Format’ Not Set Up. Contact System Administrator
79
-
Fax Station Name Not Set Up. Contact System Administrator
79
-
Fax Station Number Not Set Up. Contact System Administrator
79
-
Imaging Unit Low [84.Xy]
79
-
Imaging Unit Nearly Low [84.Xy]
79
-
Imaging Unit very Low, [X] Estimated Pages Remain [84.Xy]
79
-
Incorrect Paper Size, Open [Paper Source] [34]
80
-
Insufficient Memory, some Held Jobs Were Deleted [37]
80
-
Insufficient Memory, some Held Jobs will Not be Restored [37]
80
-
Insufficient Memory for Flash Memory Defragment Operation [37]
80
-
Insufficient Memory to Collate Job [37]
80
-
Insufficient Memory to Support Resource Save Feature [35]
81
-
Load Manual Feeder with [Custom String] [Paper Orientation]
81
-
Load Manual Feeder with [Custom Type Name] [Paper Orientation]
81
-
Load Manual Feeder with [Paper Size] [Paper Orientation]
81
-
Load Manual Feeder with [Paper Type] [Paper Size] [Paper Orientation]
82
-
Load [Paper Source] with [Custom String] [Paper Orientation]
82
-
Load [Paper Source] with [Custom Type Name] [Paper Orientation]
82
-
Load [Paper Source] with [Paper Size] [Paper Orientation]
82
-
Load [Paper Source] with [Paper Type] [Paper Size] [Paper Orientation]
83
-
Maintenance Kit Low [80.Xy]
83
-
Maintenance Kit Nearly Low [80.Xy]
83
-
Maintenance Kit very Low, [X] Estimated Pages Remain [80.Xy]
83
-
Memory Full [38]
83
-
Memory Full, Cannot Print Faxes
83
-
Memory Full, Cannot Send Faxes
84
-
Network [X] Software Error [54]
84
-
No Analog Phone Line Connected to Modem, Fax Is Disabled
84
-
Non-Lexmark [Supply Type], See User’s Guide [33.Xy]
84
-
Not Enough Free Space in Flash Memory for Resources [52]
85
-
Printer Had to Restart. Last Job May be Incomplete
85
-
Reinstall Defective or Unresponsive Cartridge [31.Xy]
85
-
Reinstall Missing or Unresponsive Cartridge [31.Xy]
85
-
Remove Paper from Standard Output bin
85
-
Replace All Originals if Restarting Job
85
-
Replace Cartridge, 0 Estimated Pages Remain [88.Xy]
86
-
Replace Cartridge, Printer Region Mismatch [42.Xy]
86
-
Replace Defective Imaging Unit [31.Xy]
86
-
Replace Jammed Originals if Restarting Job
87
-
Replace Imaging Unit, 0 Estimated Pages Remain [84.Xy]
87
-
Replace Maintenance Kit, 0 Estimated Pages Remain [80.Xy]
87
-
Reinstall Missing or Unresponsive Imaging Unit [31.Xy]
87
-
Replace Unsupported Cartridge [32.Xy]
87
-
Replace Unsupported Imaging Unit [32.Xy]
88
-
Restore Held Jobs
88
-
Scanner Automatic Feeder Cover Open
88
-
Scanner Disabled by Admin [840.01]
88
-
Scanner Disabled. Contact System Administrator if Problem Persists. [840.02]
88
-
Scanner Jam, Remove All Originals from the Scanner [2Yy.XX]
88
-
Scanner Jam, Remove Jammed Originals from the Scanner [2Yy.XX]
88
-
Serial Option [X] Error [54]
89
-
SMTP Server Not Set Up. Contact System Administrator
89
-
Some Held Jobs Were Not Restored
89
-
Standard Network Software Error [54]
89
-
Standard USB Port Disabled [56]
89
-
Supply Needed to Complete Job
90
-
Too Many Flash Options Installed [58]
90
-
Too Many Trays Attached [58]
90
-
Unformatted Flash Detected [53]
90
-
Weblink Server Not Set Up. Contact System Administrator
90
-
-
User Attendance Messages (0-99.99)
91
-
Toner Cartridge Smart Chip Contact Service Check
93
-
Imaging Unit Smart Chip Contact Service Check
93
-
Media Size Mismatch Service Check
94
-
Printer/Cartridge Mismatch Service Check
95
-
Insufficient Memory Service Check
95
-
-
Printer Hardware Errors
95
-
Printer Hardware Errors
96
-
1Xx Error Messages
97
-
111.XX LSU Service Check
100
-
Fuser Service Check
100
-
LVPS Service Check
101
-
Toner Density Sensor Service Check
101
-
CTLS Service Check
102
-
Main Drive Gearbox Service Check
102
-
ACM Service Check
103
-
Cartridge Gearbox Service Check
103
-
171.XX Cooling Fan Service Check
104
-
Tray 1 Pick/Lift Motor Gearbox Service Check
104
-
9Xx Error Messages
105
-
System Software Error Service Check
105
-
System Software Error Service Check
108
-
NVRAM Mismatch Failure Service Check
112
-
Base Printer Symptoms
114
-
Control Panel Service Check
114
-
Dead Machine Service Check
114
-
Controller Board Service Check
115
-
Control Panel Service Check
116
-
Control Panel Button Service Check
117
-
USB Print Service Check
118
-
Front Door Not Closed Service Check
119
-
Network Service Check
120
-
-
Input Option Hardware Errors
122
-
3Xx Error Messages
122
-
Option Tray Pick/Lift Motor Service Check
122
-
Option Tray Separator/Passthrough Motor Service Check
122
-
Option Tray ACM Motor Service
123
-
-
Option Tray Pick/Lift Motor Service Check
124
-
Option Tray Separator/Passthrough Motor Service Check
124
-
Option Tray ACM Motor Service Check
125
-
Option Tray Controller Card Service Check
125
-
-
Adf/Scanner Hardware Errors
126
-
8Xx Service Error Messages
126
-
Scanner Disabled Error Service Check
127
-
ADF Service Check
128
-
Scan/Fax/Copy Symptoms
129
-
Black or Blank Page Copy Service Check
130
-
CCD Service Check
131
-
Flatbed Motor Service Check
131
-
Flatbed Home Position Service Check
132
-
Flatbed Legal Scan Service Check
132
-
ADF Cover Open Service Check
133
-
ADF Streak Service Check
134
-
ADF Paper Jam Service Check
134
-
ADF Feed Errors Service Check
136
-
ADF Duplex Service Check
137
-
Modem/Fax Card Service Check
138
-
Fax Reception Service Check
139
-
Fax Transmission Service Check
141
-
Fax Error Log Codes
143
-
Escalating a Fax Issue to Second-Level Support
147
-
-
-
Service Menus
149
-
Understanding the Control Panel and Menus (Mx310Dn)
149
-
Using the Printer Control Panel
149
-
Understanding the Colors of the Indicator and Sleep Button Lights
150
-
-
Understanding the Control Panel and Menus (MX410, MX510, and MX511)
150
-
Using the Printer Control Panel
150
-
Understanding the Colors of the Indicator and Sleep Button Lights
151
-
Understanding the Home Screen
151
-
Using the Touch-Screen Buttons
153
-
-
Menus List
154
-
Diagnostics Menu
155
-
Entering the Diagnostics Menu
155
-
Registration
155
-
Scanner Calibration
155
-
Registration
156
-
Scanner Calibration
156
-
-
Print Tests
156
-
Print Quality Pages
156
-
Hardware Tests
157
-
Panel Test
157
-
-
Button Test
157
-
Dram Test
157
-
Serial Wrap Test
158
-
Duplex Tests
159
-
-
Quick Test
159
-
Duplex Tests
160
-
Top Margin
160
-
Left Margin
160
-
Input Tray Tests
161
-
Output bin Tests
162
-
Base Sensor Test
163
-
Device Tests
163
-
Printer Setup
164
-
-
Disk Test/Clean
164
-
Flash Test
164
-
Printed Page Count
165
-
Permanent Page Count
165
-
Ep Setup
166
-
-
Ep Defaults
166
-
Transfer Adjust
166
-
Print Contrast
166
-
Ep Setup
167
-
Gap Adjust
167
-
Reports
168
-
Event Log
168
-
Event Log
169
-
Scanner Tests
169
-
Asic Test
169
-
Scanner Tests
170
-
-
Feed Test
170
-
Sensor Tests
170
-
Scanner Tests
171
-
Exit Diags
173
-
Scanner Tests
173
-
-
Configuration Menu
174
-
Entering the Configuration Menu
174
-
Reset ADF Maintenance Kit Counter
174
-
Maintenance Counter Value
174
-
Reset Maintenance Counter
174
-
Print Quality Pages
175
-
Reports
175
-
Panel Menus
175
-
PPDS Emulation
176
-
Download Emuls
176
-
Safe Mode
176
-
Factory Defaults
176
-
Energy Conserve
176
-
Fax Low Power Support
177
-
Min Copy Memory
177
-
Num Pad Job Assist
177
-
Format Fax Storage
177
-
ADF Edge Erase
178
-
Flatbed Edge Erase
178
-
Scanner Manual Registration
178
-
Disable Scanner
179
-
Paper Prompts
180
-
Envelope Prompts
180
-
Action for Prompts
180
-
Jobs on Disk
181
-
Disk Encryption
181
-
Erase All Information on Disk
182
-
Wipe All Settings
182
-
Font Density
182
-
Font Sharpening
182
-
Reduced Curl
182
-
Require Standby
182
-
A5 Loading
183
-
UI Automation
183
-
LES Applications
183
-
Key Repeat Initial Delay
184
-
Key Repeat Rate
184
-
Clear Supply Usage History
184
-
Clear Custom Status
184
-
USB Speed
185
-
Automatically Display Error Screens
185
-
USB Pnp
185
-
-
Entering Invalid Engine Mode
185
-
Entering Recovery Mode
186
-
Accessing the Network SE Menu
186
-
Service Engineer Menu
186
-
Accessing the Service Engineer (SE) Menu
186
-
Service Engineer (SE) Menu
186
-
Fax Service Engineer (SE) Menu
187
-
-
-
Repair Information
189
-
Removal Precautions
189
-
Data Security Notice
189
-
Handling ESD-Sensitive Parts
190
-
Controller Board/Control Panel Replacement
190
-
Esf Solutions Backup
191
-
Ribbon Cable Connectors
192
-
Zero Insertion Force (ZIF) Connectors
192
-
Horizontal Top Contact Connector
193
-
Horizontal Bottom Contact Connector
196
-
Vertical Mount Contact Connector
199
-
Horizontal Sliding Contact Connector
202
-
Low Insertion Force (LIF) Connector
205
-
-
Printhead Assembly Adjustments
206
-
-
Removal Procedures
209
-
Left Side Removals
209
-
Left Cover Removal
209
-
Main Drive Gearbox Removal
211
-
MPF Solenoid Removal
213
-
MPF Gearbox Removal
215
-
Reverse Solenoid Removal
218
-
ACM Clutch Removal (MX310, MX410)
219
-
Cartridge Gearbox Removal
224
-
Duplex Gear Assembly Removal
224
-
-
Right Side Removals
226
-
Right Cover Removal
226
-
Memory Access Door Removal
229
-
Tray Present Sensor Removal
229
-
Cooling Fan Removal
230
-
Controller Board Removal
231
-
Controller Board Shield Removal
234
-
Upper Shield Removal
236
-
Toner Cartridge Smart Chip Contact Removal
236
-
Modem Removal
238
-
-
Front Removals
240
-
Left Front Mount Removal
240
-
Right Front Mount Removal
241
-
Transfer Roll Removal
243
-
Cartridge Plunger Removal
244
-
Name Plate Cover Removal
246
-
Front bin Cover Removal
248
-
Control Panel Assembly Removal
249
-
UICC Removal
252
-
UICC (MX310) Removal
252
-
UICC Shield Removal
253
-
USB Cable Bracket Removal
254
-
Speaker Removal
254
-
Control Panel Cover Removal
255
-
Display Removal (MX410, Mx51X)
256
-
Display (MX310) Removal
258
-
Light Tube Removal
258
-
Keypad Assembly Removal
260
-
MPF Tray Removal
260
-
MPF Pick Roller Cover Removal
263
-
MPF Pick Roller Removal
263
-
Bail Removal
264
-
Jam Access Cover Removal
264
-
Front Access Cover Removal
265
-
Front Door Sensor Removal
267
-
Front Input Guide Removal
267
-
Separator Pad Removal
269
-
-
Bottom Removals
272
-
Power Supply Removal
272
-
Power Supply Shield Removal
273
-
Duplex Removal
274
-
Duplex Sensor and Input Sensor Removal
275
-
Duplex Sensor and Input Sensor (MX310, MX410) Removal
278
-
Index Sensor Removal
279
-
Media Present Sensor Removal
280
-
Toner Density Sensor Removal
282
-
Trailing Edge Sensor Removal
282
-
Trailing Edge Sensor (MX310, MX410) Removal
283
-
ACM Assembly Removal
288
-
ACM Assembly (MX310, MX410) Removal
294
-
Pick/Lift Motor Gearbox Removal
297
-
Tray Guide Removal
298
-
-
Rear Side Removals
300
-
Dust Cover Removal
300
-
Rear Exit Door Removal
301
-
Rear Cover Removal
302
-
Narrow Media/Bin Full Sensor Removal
302
-
Redrive Assembly Removal
304
-
Fuser Removal
305
-
-
Top Side Removals
307
-
Top Cover Assembly Removal
307
-
Bin Extender Removal
308
-
Laser Scanning Unit (LSU) Removal
309
-
Removal Procedure
310
-
-
Adf/Scanner Removals
311
-
ADF Separator Pad Removal
311
-
ADF Separator Roll Removal
312
-
Flatbed Cushion Removal
314
-
Scanner Front Cover Removal
315
-
Scanner Rear Cover Removal
315
-
ADF Input Tray Removal
316
-
ADF Unit Removal
316
-
Scanner Assembly Removal
319
-
ADF Top Cover Assembly
323
-
ADF Unit Removal
325
-
ADF Cable Removal
325
-
USB Cable Removal
325
-
USB Wireless Cable Removal
326
-
Scanner Front Cover Removal
326
-
ADF Hinge Removal
328
-
Flatbed Assembly Removal
328
-
Control Panel Ribbon Cable Removal
328
-
Speaker Cable Removal
329
-
Cave Light Cable Removal
331
-
Restraint Pad Removal
332
-
-
250/550-Sheet Option Tray Removals
333
-
Pick Roller Removal
333
-
Separator Roll Assembly Removal
333
-
ACM Assembly Removal
335
-
-
-
Component Locations
339
-
Exterior Locations
339
-
Front View
339
-
Rear View
340
-
-
Connectors
341
-
Controller Board
341
-
Power Supply
347
-
-
-
Maintenance
349
-
Inspection Guide
349
-
Scheduled Maintenance
350
-
Maintenance Kits
350
-
Resetting the Maintenance Counter
351
-
-
Lubrication Specification
351
-
Cleaning the Printer
351
-
Cleaning the Scanner Glass
352
-
-
Parts Catalog
354
-
Legend
354
-
Assembly 1: Covers
355
-
Assembly 2: Imaging
357
-
Assembly 3: Control Panel (Mx41X, Mx51X)
361
-
Assembly 4: Control Panel (Mx31X)
363
-
Assembly 5: Electronics 1
365
-
Assembly 5: Electronics
366
-
Assembly 6: Electronics 2
367
-
Assembly 7: Frame
369
-
Assembly 8: Option Trays
371
-
Assembly 9: Maintenance Kits
373
-
Assembly 10: Power Cords
375
-
Assembly 11: Miscellaneous
377
-
-
Appendix A: Printer Specifications
379
-
Electrical Specifications
379
-
Operating Clearances
379
-
Acoustics
379
-
Operating Environment
380
-
Scanner Specifications
381
-
Fax Specifications
382
-
-
Appendix B: Options and Features
383
-
Available Internal Options
383
-
Media Handling Options
383
-
-
Appendix C: Theory of Operation
385
-
POR Sequence
385
-
Printer Control
385
-
Paper Path Information
385
-
Input Tray
385
-
Multipurpose Feeder (MPF)
386
-
Simplex Printing
386
-
Duplex Printing
387
-
-
Media Handling Components
387
-
Main Drive Gearbox
387
-
Autocompensator Mechanism (ACM)
388
-
-
Key Components
388
-
Sensors
388
-
Trailing Edge Sensor
388
-
Media Present Sensor
388
-
-
Other Key Components
389
-
-
Tray Present Sensor
389
-
Toner Density Sensor
389
-
Electrophotographic Process (EP Process)
390
-
ADF Theory
394
-
ADF Theory of Operation
394
-
-
-
Appendix D: Acronyms
397
-
Acronyms
397
-
-
Index
399
-
Advertisement
Lexmark MX310dn User Manual (269 pages)
Brand: Lexmark
|
Category: All in One Printer
|
Size: 8.68 MB
Table of Contents
-
Table of Contents
2
-
Safety Information
6
-
Learning about the Printer
8
-
Finding Information about the Printer
8
-
Selecting a Location for the Printer
9
-
Printer Configurations
10
-
Understanding the Basic Functions of the Scanner
11
-
Using the ADF and Scanner Glass
12
-
Using the Printer Control Panel
13
-
Understanding the Colors of the Sleep Button and Indicator Lights
13
-
-
Additional Printer Setup
15
-
Installing Internal Options
15
-
Installing an Optional Card
17
-
Installing Hardware Options
18
-
Installing Optional Trays
19
-
Attaching Cables
22
-
Setting up the Printer Software
23
-
Updating Available Options in the Printer Driver
24
-
Networking
25
-
Preparing to Set up the Printer on a Wireless Network
27
-
Connecting the Printer Using the Wireless Setup Wizard
28
-
Connecting the Printer to a Wireless Network Using the Embedded Web Server
29
-
-
Verifying Printer Setup
30
-
-
Loading Paper and Specialty Media
31
-
Setting the Paper Size and Type
31
-
Configuring Universal Paper Settings
31
-
Loading Trays
31
-
Loading the Multipurpose Feeder
36
-
Linking and Unlinking Trays
40
-
Creating a Custom Name for a Paper Type
41
-
Assigning a Custom Paper Type Name
41
-
Assigning a Custom Paper Type
42
-
-
-
Paper and Specialty Media Guide
43
-
Paper Guidelines
43
-
Grain Direction
44
-
Fiber Content
44
-
Unacceptable Paper
44
-
Selecting Paper
44
-
Selecting Preprinted Forms and Letterhead
44
-
Using Recycled Paper and Other Office Papers
45
-
-
Supported Paper Sizes, Types, and Weights
46
-
Supported Paper Types and Weights
48
-
Using Specialty Media
49
-
Tips on Using Envelopes
50
-
Tips on Using Labels
50
-
-
Storing Paper
51
-
-
Printing
52
-
Printing a Document
52
-
Printing from a Mobile Device
53
-
Printing Confidential and Other Held Jobs
53
-
Modifying Confidential Print Settings
54
-
Printing Information Pages
55
-
Canceling a Print Job
55
-
For Macintosh Users
56
-
-
Copying
57
-
Making Copies
57
-
Copying Photos
58
-
Copying on Specialty Media
58
-
Copying on Letterhead
59
-
Customizing Copy Settings
60
-
Reducing or Enlarging Copies
61
-
Making a Copy Lighter or Darker
62
-
Adjusting Copy Quality
62
-
Collating Copies
63
-
Placing Separator Sheets between Copies
64
-
Copying Multiple Pages Onto a Single Sheet
64
-
-
Placing Information on Copies
65
-
Canceling a Copy Job
66
-
Understanding the Copy Options
66
-
Separator Sheets
68
-
-
E-Mailing
69
-
Setting up the Printer to E-Mail
69
-
Creating an E-Mail Shortcut
70
-
E-Mailing a Document
70
-
Canceling an E-Mail
71
-
-
Faxing
72
-
Setting up the Printer to Fax
72
-
Initial Fax Setup
73
-
Choosing a Fax Connection
74
-
Connecting to a Distinctive Ring Service
85
-
Setting the Outgoing Fax or Station Name and Number
85
-
-
Sending a Fax
86
-
Sending a Fax Using the Computer
87
-
Creating a Fax Destination Shortcut Using the Embedded Web Server
88
-
Customizing Fax Settings
89
-
Canceling an Outgoing Fax
90
-
Holding and Forwarding Faxes
91
-
Understanding the Fax Options
92
-
-
Scanning
94
-
Scanning to an FTP Address
94
-
Scanning to a Computer
96
-
-
Understanding the Printer Menus
98
-
Menus List
98
-
Paper Menu
99
-
Configure Mp Menu
102
-
Substitute Size Menu
102
-
Paper Texture Menu
102
-
Paper Weight Menu
104
-
Paper Loading Menu
105
-
Custom Types Menu
106
-
Custom Scan Sizes Menu
107
-
Universal Setup Menu
107
-
-
Reports Menu
108
-
Network/Ports Menu
109
-
Network Card Menu
110
-
Tcp/Ip Menu
111
-
Ipv6 Menu
112
-
Wireless Menu
113
-
Appletalk Menu
114
-
Smtp Setup Menu
114
-
-
Security Menu
115
-
Security Audit Log Menu
115
-
Set Date and Time Menu
116
-
-
Settings Menu
117
-
Copy Settings Menu
122
-
Fax Settings Menu
125
-
E‑Mail Settings Menu
132
-
Ftp Settings Menu
136
-
Print Settings
139
-
Setup Menu
139
-
Finishing Menu
140
-
Quality Menu
141
-
Utilities Menu
142
-
Xps Menu
143
-
Pdf Menu
143
-
Pcl Emul Menu
143
-
Html Menu
146
-
-
Help Menu
147
-
Lexmark MX310dn User Manual (260 pages)
Brand: Lexmark
|
Category: All in One Printer
|
Size: 3.48 MB
Table of Contents
-
Table of Contents
2
-
Safety Information
6
-
Conventions
6
-
-
Learning about the Printer
9
-
Finding Information about the Printer
9
-
Selecting a Location for the Printer
10
-
Printer Configurations
11
-
Understanding the Basic Functions of the Scanner
12
-
Using the ADF and Scanner Glass
13
-
Using the Printer Control Panel
13
-
Understanding the Colors of the Sleep Button and Indicator Lights
14
-
-
Additional Printer Setup
16
-
Installing Internal Options
16
-
Installing an Optional Card
18
-
Installing Hardware Options
19
-
Installing Optional Trays
20
-
Attaching Cables
23
-
Setting up the Printer Software
24
-
Networking
25
-
Connecting the Printer Using the Wireless Setup Wizard
26
-
Verifying Printer Setup
28
-
Printing a Network Setup Page
29
-
-
Loading Paper and Specialty Media
30
-
Setting the Paper Size and Type
30
-
Configuring Universal Paper Settings
30
-
Loading Trays
30
-
Loading the Multipurpose Feeder
35
-
Linking and Unlinking Trays
39
-
Creating a Custom Name for a Paper Type
40
-
Assigning a Custom Paper Type
40
-
-
-
Paper and Specialty Media Guide
42
-
Using Specialty Media
42
-
Tips on Using Labels
43
-
Paper Guidelines
44
-
Selecting Paper
45
-
Selecting Preprinted Forms and Letterhead
45
-
Using Recycled Paper and Other Office Papers
46
-
Storing Paper
47
-
-
Supported Paper Sizes, Types, and Weights
48
-
Supported Paper Types and Weights
50
-
-
Printing
51
-
Printing a Document
51
-
Printing from a Mobile Device
51
-
Printing Confidential and Other Held Jobs
53
-
Printing Information Pages
54
-
Canceling a Print Job
54
-
-
Copying
56
-
Making Copies
56
-
Copying Photos
57
-
Copying on Specialty Media
57
-
Copying on Letterhead
58
-
Customizing Copy Settings
59
-
Reducing or Enlarging Copies
60
-
Making a Copy Lighter or Darker
60
-
Adjusting Copy Quality
61
-
Collating Copies
62
-
Placing Separator Sheets between Copies
62
-
-
Placing Information on Copies
63
-
Canceling a Copy Job
64
-
Understanding the Copy Options
64
-
-
E-Mailing
67
-
Setting up the Printer to E-Mail
67
-
Creating an E-Mail Shortcut
68
-
E-Mailing a Document
68
-
Canceling an E-Mail
68
-
-
Faxing
69
-
Setting up the Printer to Fax
69
-
Initial Fax Setup
70
-
Choosing a Fax Connection
70
-
Connecting to a Distinctive Ring Service
81
-
Setting the Outgoing Fax or Station Name and Number
82
-
Setting the Date and Time
82
-
-
Sending a Fax
83
-
Creating a Fax Destination Shortcut Using the Embedded Web Server
84
-
Customizing Fax Settings
85
-
Canceling an Outgoing Fax
86
-
Holding and Forwarding Faxes
87
-
Understanding the Fax Options
88
-
-
Scanning
90
-
Scanning to an FTP Address
90
-
Scanning to a Computer
91
-
-
Understanding the Printer Menus
93
-
Menus List
93
-
Paper Menu
94
-
Substitute Size Menu
97
-
Paper Texture Menu
97
-
Paper Weight Menu
99
-
Paper Loading Menu
100
-
Custom Types Menu
101
-
Custom Scan Sizes Menu
102
-
Universal Setup Menu
102
-
-
Reports Menu
103
-
Network/Ports Menu
104
-
Network Card Menu
106
-
Ipv6 Menu
107
-
Wireless Menu
108
-
Appletalk Menu
109
-
Smtp Setup Menu
109
-
-
Security Menu
110
-
Set Date and Time Menu
111
-
Settings Menu
112
-
Copy Settings Menu
116
-
Fax Settings Menu
120
-
Ftp Settings Menu
130
-
Print Settings
134
-
Setup Menu
134
-
Finishing Menu
135
-
Quality Menu
136
-
Utilities Menu
138
-
Xps Menu
138
-
Pdf Menu
138
-
Postscript Menu
139
-
Pcl Emul Menu
139
-
Ppds Menu
141
-
Html Menu
143
-
Image Menu
144
-
-
Help Menu
145
-
Advertisement
Lexmark MX310dn Compatibility Manual (179 pages)
Card Stock & Label Guide
Brand: Lexmark
|
Category: Printer
|
Size: 3.23 MB
Table of Contents
-
Edition Notice
2
-
Table of Contents
3
-
-
Overview
7
-
Introduction
7
-
-
General Information
8
-
Paper and Label Industry
8
-
Printing Volumes
8
-
Testing Print Material
8
-
Design Factors
9
-
Pick Roller Technology
11
-
Maintenance Procedures
14
-
Troubleshooting
14
-
-
Card Stock
16
-
Weight
16
-
Grain Orientation
17
-
Coatings
18
-
Offset Powders
19
-
-
Labels
20
-
Label Characteristics
20
-
Printing on Labels
20
-
Duplexing Paper Labels
20
-
Primary Rib Pattern Design Guidelines for Reference Edge Alignment
22
-
Label Components
23
-
Label Design Guidelines
25
-
-
Printer Specifications
32
-
Lexmark C500N
32
-
Lexmark C510
33
-
Lexmark C520, C522, and C524
34
-
Lexmark C530, C532, and C534
36
-
Lexmark C540, C543, C544, and C546Dtn
38
-
Lexmark C720
40
-
Lexmark C734 and C736
42
-
Lexmark C746 and C748
44
-
Lexmark C750
46
-
Lexmark C752
48
-
Lexmark C760 and C762
51
-
Lexmark C770, C772, C780, and C782
53
-
Lexmark C792E, C792De, C792Dte, and C792Dhe
54
-
Lexmark C910
56
-
Lexmark C912
58
-
Lexmark C920
59
-
Lexmark C925
61
-
Lexmark C935
62
-
Lexmark C950
64
-
Lexmark Cs310N, Cs310Dn, Cs410N, Cs410Dn, and Cs510De
65
-
Lexmark Cx310N, Cx310Dn, Cx410E, Cx410De, Cx410Dte, Cx510De, Cx510Dhe, and Cx510Dthe
67
-
Lexmark E120
69
-
Lexmark E220
70
-
Lexmark E230, E232, E234(N), E330, and E332N
71
-
Lexmark E238, E240, E240N, E340, and E342N
72
-
Lexmark E250, E350, and E450N
73
-
Lexmark E260, E260D, E260Dn, E360D, E360Dn, E460Dn, E460Dw, and E462Dtn
74
-
Lexmark E320, E322
75
-
Lexmark E321, E323
76
-
Lexmark Ms310D, Ms310Dn, Ms410D, Ms410Dn, Ms510Dn, Ms610Dn, and Ms610De
77
-
Lexmark MS710 and MS711
79
-
Lexmark MS810, MS811, and MS812
82
-
Lexmark Mx310Dn, Mx410De, Mx510De, Mx511De, Mx511Dhe, Mx610De, Mx611De, and Mx611Dhe
84
-
Lexmark MX710, MX711, MX810, MX811, and MX812
86
-
Lexmark T420
89
-
Lexmark T430
91
-
Lexmark T520, T522
93
-
Lexmark T620, T622
96
-
Lexmark T630, T632, T634
99
-
Lexmark T640, T642, T644
102
-
Lexmark T650, T652, T654, and T656Dne
104
-
Lexmark W812
107
-
Lexmark W820
108
-
Lexmark W840
109
-
Lexmark W850
111
-
Lexmark X203N and X204N
113
-
Lexmark X215
114
-
Lexmark X264Dn, X363Dn, X364Dn, and X364Dw
116
-
Lexmark X422
118
-
Lexmark X463De, X464De, X466Dte, and X466Dtwe
119
-
Lexmark X500 and X502N
121
-
Lexmark X543, X544, and X546Dtn
122
-
Lexmark X548
124
-
Lexmark X560
125
-
Lexmark X642E
127
-
Lexmark X644E, X646E
129
-
Lexmark X651De, X652De, X654De, X656De, and X658De
132
-
Lexmark X734, X736, and X738
135
-
Lexmark X746 and X748
137
-
Lexmark X782
139
-
Lexmark X792De, X792Dte, X792Dtfe, X792Dtpe, X792Dtme, and X792Dtse
141
-
Lexmark X850, X852E, and X854E
143
-
Lexmark X860E, X862E, and X864E
145
-
Lexmark X925
147
-
Lexmark X940 and X945
149
-
Lexmark X950
150
-
Optra Plus, 4039, 4029, 4019, Winwriter 600 Printers
151
-
Optra C
155
-
Optra C710
155
-
Optra Color 1200
157
-
Optra E, Ep
158
-
Optra E310, E312
159
-
Optra es Special Media Printer
160
-
Optra K 1220
161
-
Optra M410, M412
162
-
Optra N
164
-
Optra S
165
-
Optra SC 1275
168
-
Optra T
169
-
Lexmark MX310dn Manual (170 pages)
Card Stock & Label Guide
Brand: Lexmark
|
Category: Printer
|
Size: 3.21 MB
Table of Contents
-
Edition Notice
2
-
Table of Contents
3
-
-
Overview
7
-
Introduction
7
-
-
General Information
8
-
Paper and Label Industry
8
-
Printing Volumes
8
-
Testing Print Material
8
-
Design Factors
9
-
Pick Roller Technology
11
-
Maintenance Procedures
14
-
Troubleshooting
14
-
-
Card Stock
16
-
Weight
16
-
Grain Orientation
17
-
Coatings
18
-
Offset Powders
19
-
-
Labels
20
-
Label Characteristics
20
-
Printing on Labels
20
-
Duplexing Paper Labels
20
-
Primary Rib Pattern Design Guidelines for Reference Edge Alignment
22
-
Label Components
23
-
Label Design Guidelines
25
-
-
Printer Specifications
32
-
Lexmark C500N
32
-
Lexmark C510
33
-
Lexmark C520, C522, and C524
34
-
Unacceptable Labels
35
-
Lexmark C530, C532, and C534
36
-
Lexmark C540, C543, C544, and C546Dtn
38
-
Lexmark C720
39
-
Lexmark C734 and C736
41
-
Lexmark C746 and C748
43
-
Lexmark C750
45
-
Lexmark C752
47
-
Lexmark C760 and C762
49
-
Lexmark C770, C772, C780, and C782
51
-
Lexmark C792E, C792De, C792Dte, and C792Dhe
53
-
Lexmark C910
54
-
Lexmark C912
56
-
Lexmark C920
57
-
Lexmark C925
59
-
Lexmark C935
60
-
Lexmark C950
62
-
Lexmark Cs310N, Cs310Dn, Cs410N, Cs410Dn, and Cs510De
63
-
Lexmark Cx310N, Cx310Dn, Cx410E, Cx410De, Cx410Dte, Cx510De, Cx510Dhe, and Cx510Dthe
65
-
Lexmark E120
66
-
Lexmark E220
67
-
Lexmark E230, E232, E234(N), E330, and E332N
68
-
Lexmark E238, E240, E240N, E340, and E342N
69
-
Lexmark E250, E350, and E450N
70
-
Lexmark E260, E260D, E260Dn, E360D, E360Dn, E460Dn, E460Dw, and E462Dtn
71
-
Lexmark E320, E322
72
-
Lexmark E321, E323
73
-
Lexmark Ms310D, Ms310Dn, Ms410D, Ms410Dn, Ms510Dn, Ms610Dn, and Ms610De
74
-
Lexmark MS710 and MS711
76
-
Lexmark MS810, MS811, and MS812
78
-
Lexmark Mx310Dn, Mx410De, Mx510De, Mx511De, Mx511Dhe, Mx610De, Mx611De, and Mx611Dhe
80
-
Lexmark MX710, MX711, MX810, MX811, and MX812
82
-
Lexmark T420
85
-
Lexmark T430
87
-
Lexmark T520, T522
89
-
Lexmark T620, T622
91
-
Lexmark T630, T632, T634
94
-
Lexmark T640, T642, T644
97
-
Lexmark T650, T652, T654, and T656Dne
99
-
Lexmark W812
102
-
Lexmark W820
103
-
Lexmark W840
104
-
Lexmark W850
106
-
Lexmark X203N and X204N
107
-
Lexmark X215
109
-
Lexmark X264Dn, X363Dn, X364Dn, and X364Dw
111
-
Lexmark X422
112
-
Lexmark X463De, X464De, X466Dte, and X466Dtwe
114
-
Lexmark X500 and X502N
115
-
Lexmark X543, X544, and X546Dtn
116
-
Lexmark X548
118
-
Lexmark X560
119
-
Lexmark X642E
120
-
Lexmark X644E, X646E
123
-
Lexmark X651De, X652De, X654De, X656De, and X658De
125
-
Lexmark X734, X736, and X738
128
-
Lexmark X746 and X748
130
-
Lexmark X782
132
-
Lexmark X792De, X792Dte, X792Dtfe, X792Dtpe, X792Dtme, and X792Dtse
134
-
Lexmark X850, X852E, and X854E
136
-
Lexmark X860E, X862E, and X864E
138
-
Lexmark X925
140
-
Lexmark X940 and X945
142
-
Lexmark X950
143
-
Optra Plus, 4039, 4029, 4019, Winwriter 600 Printers
144
-
General Maintenance
146
-
Optra C
147
-
Optra C710
148
-
Optra Color 1200
149
-
Optra E, Ep
150
-
Optra E310, E312
151
-
Optra es Special Media Printer
152
-
Optra K 1220
153
-
Optra M410, M412
154
-
Optra N
156
-
Optra S
157
-
Optra SC 1275
159
-
Optra T
160
-
Optra W810
163
-
Lexmark MX310dn Manual (110 pages)
Product Study Guide
Brand: Lexmark
|
Category: All in One Printer
|
Size: 4.52 MB
Table of Contents
-
Table of Contents
5
-
Laser Printer Naming Convention
9
-
Product Lineup
10
-
Lexmark Ms31 X /Ms41
10
-
-
Technical Information
11
-
Printer Specifications: MS310/312/315/410/415/510/610
11
-
Print Speed : Ms31 X /Ms41 X /Ms510/Ms610 Series
14
-
Time to First Print (Ttfp): Ms31
14
-
Lexmark Mx310/Mx410/Mx510/Mx610 Series
15
-
Media Options: Ms31X/Ms41X/Ms510/Ms610 Series
15
-
-
Technical Information
16
-
Specifications: MX310/MX410/MX510/MX610
16
-
Duty Cycle: Mx310/Mx410/Mx51X/Mx61X
17
-
Print Speed: Mx310/Mx410/Mx51X/Mx61X
17
-
Time to First Print (TTFP): Mx310/Mx410/Mx51X/Mx61X
17
-
Scanner and Fax Specifications: Mx310/Mx410/Mx51X/Mx61X
18
-
ADF Scan Speed: Mx310/Mx410/Mx51X/Mx61X
19
-
Time to First Copy (TTFC): Mx310/Mx410/Mx51X/Mx61X
19
-
Media Options: MX310/MX410/MX510/MX610
20
-
-
Theory of Operation
21
-
Electrophotographic Process
21
-
EP Process Components Cross-Sectional
22
-
-
Paper Transport System and Enhancements
23
-
Base Engine Features and Updates
23
-
Paper Transport System Key Components: MS310/MS312/MS315/MS410/MS415
25
-
Paper Transport System Key Components: MS510/MS610 and Mx310/Mx410/Mx51X/Mx61X
26
-
Print Engine Paper Path: MS510/MS610 and MX510/MX610 Series
28
-
Paper Jam Locations: MS310/MS312/MS315/MS410/MS415
29
-
Paper Jam Locations: MS510/MS610 Series
30
-
Paper Jam Locations: Mx310/Mx410/Mx51X
31
-
Paper Jam Locations: Mx61X
32
-
-
Scanner System: MX310/MX410/MX510/MX610
33
-
ADF Theory of Operation
33
-
ADF Key Components: MX310
35
-
ADF Paper Path: MX310
36
-
ADF Key Components: Mx410/Mx51X/Mx61X
37
-
ADF Paper Path: Mx410/Mx51X/Mx61X
38
-
Flatbed Key Components: Mx310/Mx410/Mx51X/Mx61X
39
-
-
-
Control Panel and Menus
40
-
Ms310D/Dn Control Panel
40
-
Buttons and Functions
40
-
Administrative Menu: Ms310D/Dn
41
-
Service Menus: MS310
42
-
-
Ms312Dn and Ms410D/Dn Control Panel
44
-
Buttons and Functions
44
-
Administrative Menu: Ms312Dn and Ms410D/Dn
45
-
Service Menus: MS410 and MS412
46
-
-
Ms315Dn/Ms415Dn/Ms510Dn Control Panel
48
-
Ms610Dn Control Panel
48
-
Buttons and Functions: Ms315Dn/Ms415Dn/Ms510Dn and Ms610Dn
49
-
Administrative Menu: Ms315Dn/Ms415Dn/Ms510Dn and Ms610Dn
50
-
Service Menus: Ms315Dn/Ms415Dn/Ms510Dn and Ms610Dn
51
-
-
Ms610De Control Panel
54
-
Buttons and Functions
54
-
Administrative Menu: Ms610De
55
-
Service Menus: Ms610De
56
-
-
Mx310Dn Control Panel
59
-
Mx410De/Mx510De/Mx511De Control Panel
59
-
Mx610De/Mx611De/Mx611Dhe Control Panel
59
-
Buttons and Functions: Mx310/Mx410/Mx51X/Mx61X
60
-
Mx310/Mx410/Mx51X Home Screen Menus
61
-
Mx61X Home Screen Menus
62
-
Administrative Menu: Mx310/Mx410/Mx51X/Mx61X
63
-
Service Menus: Mx310/Mx410/Mx51X/Mx61X
64
-
-
Lexmark MX310dn Technical Reference (111 pages)
Brand: Lexmark
|
Category: All in One Printer
|
Size: 3.88 MB
Table of Contents
-
Edition Notice
2
-
Table of Contents
3
-
-
Introduction
5
-
Understanding Letters after Model Numbers
5
-
-
Learning about the Printer
6
-
Finding Information about the Printer
6
-
-
Printer Control Language (PCL) Page Formatting
7
-
Printable Areas
7
-
Supported Paper and Envelope Dimensions
7
-
-
Printer Job Language (PJL)
9
-
PJL Commands Information
9
-
-
Postscript (PS) Emulation
10
-
Supported Paper Sizes
10
-
Postscript Paper Tray Support
11
-
Postscript Envelope Size Support
12
-
Postscript Envelope Tray Support
13
-
-
Printer Specifications
15
-
Airflow Requirement
15
-
Noise Emission Levels
15
-
Electrical Specifications
16
-
Power Requirements
16
-
Physical Specifications
17
-
Clearance Requirements
18
-
Environmental Conditions
19
-
Altitude and Atmospheric Pressure Specifications
20
-
-
Appendix A: PCL Support
21
-
PCL Emulation Commands
21
-
GL/2 Commands
27
-
-
Appendix B: PJL Support
30
-
Common Variables for both Printer Languages
30
-
Lexmark-Unique PJL Variables for both Printer Languages
32
-
Common Variables for PCL Emulation
42
-
Lexmark-Unique Variables for PCL Emulation
42
-
Common Variables for Postscript Emulation
43
-
Lexmark-Unique Variables for Postscript Emulation
43
-
Lexmark-Unique LRESOURCE Variables
43
-
Status Readback Commands
44
-
USTATUS Unsolicited Status Variables
44
-
PJL Messages for Auto-Continuable Conditions
45
-
PJL Messages for Attendance Conditions
53
-
PJL Messages for Paper Handling
74
-
PJL Messages for Paper Jams
78
-
Service Errors
84
-
Device Attendance Messages
84
-
Lexmark-Unique PJL Commands
84
-
-
Appendix C: Postscript Support
87
-
Supplemental Operators
87
-
Page Device Parameters
90
-
User Interpreter Parameters
94
-
System Interpreter Parameters
95
-
Devices Supported
98
-
Device Parameters
100
-
Postscript Message Keys Commands
109
-
-
Index
110
Lexmark MX310dn Technical Reference (108 pages)
Brand: Lexmark
|
Category: All in One Printer
|
Size: 3.88 MB
Table of Contents
-
Edition Notice
2
-
Table of Contents
3
-
-
Introduction
5
-
Understanding Letters after Model Numbers
5
-
-
Learning about the Printer
6
-
Finding Information about the Printer
6
-
-
Printer Control Language (PCL) Page Formatting
8
-
Printable Areas
8
-
Supported Paper and Envelope Dimensions
8
-
-
Printer Job Language (PJL)
10
-
PJL Commands Information
10
-
-
Postscript (PS) Emulation
11
-
Supported Paper Sizes
11
-
Postscript Paper Tray Support
12
-
Postscript Envelope Size Support
13
-
Postscript Envelope Tray Support
14
-
-
Printer Specifications
16
-
Airflow Requirement
16
-
Noise Emission Levels
16
-
Electrical Specifications
17
-
Power Requirements
17
-
Physical Specifications
18
-
Clearance Requirements
19
-
Environmental Conditions
19
-
Altitude and Atmospheric Pressure Specifications
20
-
-
Appendix A: PCL Support
21
-
PCL Emulation Commands
21
-
GL/2 Commands
26
-
-
Appendix B: PJL Support
30
-
Common Variables for both Printer Languages
30
-
Lexmark-Unique PJL Variables for both Printer Languages
32
-
Common Variables for PCL Emulation
41
-
Lexmark-Unique Variables for PCL Emulation
42
-
Common Variables for Postscript Emulation
42
-
Lexmark-Unique Variables for Postscript Emulation
43
-
Lexmark-Unique LRESOURCE Variables
43
-
Status Readback Commands
43
-
USTATUS Unsolicited Status Variables
43
-
PJL Messages for Auto-Continuable Conditions
44
-
PJL Messages for Attendance Conditions
52
-
PJL Messages for Paper Handling
73
-
PJL Messages for Paper Jams
77
-
Service Errors
82
-
Device Attendance Messages
82
-
Lexmark-Unique PJL Commands
83
-
-
Appendix C: Postscript Support
85
-
Supplemental Operators
85
-
Page Device Parameters
88
-
User Interpreter Parameters
92
-
System Interpreter Parameters
93
-
Devices Supported
95
-
Device Parameters
98
-
Postscript Message Keys Commands
106
-
-
Index
107

Lexmark MX310dn Manual (49 pages)
Print Drivers for UNIX and LINUX Systems
Brand: Lexmark
|
Category: Printer
|
Size: 0.34 MB
Table of Contents
-
Table of Contents
3
-
Learning about the Printer Drivers
7
-
Using the Printer Drivers with UNIX and Linux
7
-
-
Installing the Printer Drivers
8
-
Before Installing the Printer Drivers
8
-
Supported Operating Systems
8
-
System Requirements
9
-
Installing on HP-UX
9
-
Installing on IBM AIX
10
-
Installing on Red Hat, Red Flag, Linpus, or SUSE Linux
11
-
Installing on Linspire, Debian, or Ubuntu Linux
11
-
Installing on Sun Solaris SPARC
11
-
Installing on Sun Solaris X86
12
-
Finding Space to Install the Printer Drivers Package
13
-
Removing the Printer Drivers Package
13
-
Removing Remaining Directories
14
-
-
Performing Tasks
15
-
Opening the Printer Driver
15
-
Print Drivers Setup
15
-
Administrative Group
15
-
Web Browser
15
-
Paper Size
15
-
Desktop Integration
16
-
Asian Drivers
16
-
Cups
16
-
-
Changing an Administrative Group Name
16
-
Adding or Removing a User from the Administrative Group
17
-
Creating Virtual Devices
17
-
Before Creating Virtual Devices
17
-
Creating Virtual Devices Using the Device Manager
17
-
Creating Virtual Devices from the Command Line
18
-
-
Creating a Print Queue
19
-
Creating Print Queues Using the Add Print Queue Wizard
19
-
Creating Print Queues from the Command Line
19
-
-
Changing the Print Queue Status
20
-
Changing the Print Queue Properties
21
-
Working with Printer Aliases
22
-
Introduction to Printer Aliases
22
-
Creating a Print Queue with an Alias
22
-
Displaying the Alias of a Print Queue
22
-
-
Working with Printer Classes
22
-
Introduction to Printer Classes
22
-
Creating a Class
23
-
Adding to a Class
23
-
Removing a Queue from a Class
23
-
-
Managing Printer Groups
23
-
Creating a Printer Group
23
-
Adding a Print Queue to My Printers or Another Printer Group
23
-
Removing a Printer Group
24
-
-
Printing from the Command Line
24
-
Printing a File
25
-
Printing a Test Page
25
-
Printing a Duplex Job
26
-
Printing Multiple Pages on One Sheet
26
-
Printing Multiple Copies of a Document
26
-
Changing the Orientation of a Print Job
27
-
Changing the Lines Per Page Setting
27
-
Defining the Printable Area When Printing Text Files
27
-
Using the Print and Hold Setting
28
-
Creating Custom Banner Pages
29
-
Writing a Banner Program
29
-
Using a Banner Program
29
-
-
Changing a Virtual Device
29
-
Removing a Virtual Device
30
-
Changing a Print Queue to Print to a Different Printer
30
-
Removing a Print Queue
30
-
Plugin Manager Utility (Software Updates)
31
-
Using the Plugin Manager Utility
31
-
Installing Plugins from the Printer Driver
31
-
Removing Plugins from the Printer Driver
31
-
Using the Plugin Manager Utility from the Command Line
31
-
-
Lexmark MX310dn Manual (45 pages)
Printer, Option, and Stand Compatibility Guide
Brand: Lexmark
|
Category: Printer
|
Size: 4.2 MB
Table of Contents
-
Edition Notice
2
-
Table of Contents
3
-
-
Introduction
5
-
Understanding this Guide
5
-
Lexmark C546Dtn and X546Dtn with Desktop or Swivel Cabinet
6
-
Lexmark C73X
7
-
Lexmark C74X
8
-
Lexmark C792
9
-
Lexmark C925
11
-
Lexmark C950
12
-
Lexmark T65X with Caster Base 39V3588
16
-
Lexmark X74X
18
-
Lexmark X792
19
-
Lexmark X925
21
-
Lexmark X95X
23
-
Lexmark X65X
27
-
Lexmark X651E, X652E, X654E, and X656E with Caster Base 16M1216
27
-
Lexmark X651, X652, X654, and X656 Mfps with Desktop and Swivel Cabinet
28
-
Lexmark X658E
29
-
-
Lexmark X73X
30
-
Lexmark X73X with Caster Base 16M1210
30
-
Lexmark X73X with Desktop and Swivel Cabinet
31
-
-
Caster Base 10G0080
32
-
Caster Base 10G0080 with Scanner
32
-
Caster Base 10G0080 Without Scanner
33
-
-
Caster Base 22G0544
34
-
Caster Base 22G0544 for Mfps
34
-
Caster Base 22G0544 with Scanner
35
-
Caster Base 22G0544 with Scanner and Shelf 21J0050
36
-
Caster Base 22G0544 Without Scanner
36
-
-
Desktop
37
-
Furniture Stand 16C0389
38
-
Furniture Stand 16C0369 and 16C0379
39
-
Printer Stand 16N1708
41
-
Printer Stand 16N1708 with or Without Scanner Shelf 10B1755
41
-
Printer Stand 16N1708 with or Without Scanner Shelf 21J0055
41
-
-
Scanner Shelf
42
-
Swivel Cabinet 3052765
43
-
-
Index
45
Lexmark MX310dn Manual (42 pages)
Printer, Option, and Stand Compatibility Guide
Brand: Lexmark
|
Category: All in One Printer
|
Size: 2.31 MB
Table of Contents
-
Table of Contents
2
-
Lexmark CS310, CS410, and CS510 Series
3
-
Lexmark CX310, CX410, and CX510 Series
4
-
Lexmark MS310, MS410, MS510, and MS610 Series
5
-
Lexmark MS710 and MS810 Series
6
-
Output Options
7
-
Lexmark MX310, MX410, and MX510 Series
10
-
Lexmark MX610 Series
11
-
Lexmark MX710 Series
12
-
Lexmark MX810 Series
14
-
Lexmark C546Dtn and X546Dtn
15
-
Lexmark C730 Series
16
-
Lexmark C740 Series
17
-
Lexmark C792
18
-
Lexmark C925
20
-
Lexmark C950 Series
22
-
Lexmark T650 Series
25
-
Lexmark X650 Series
27
-
Lexmark X658E
28
-
Lexmark X730 Series
29
-
Lexmark X740 Series
30
-
Lexmark X792
31
-
Lexmark X925
32
-
Lexmark X950 Series
34
-
Caster Base 22G0544
37
-
Caster Base 22G0544 for Mfps
37
-
Caster Base 22G0544 with Scanner and Shelf 21J0050
38
-
-
Printer Stand 16N1708
39
-
Printer Stand 16N1708 with or Without Scanner Shelf 10B1755
39
-
Printer Stand 16N1708 with or Without Scanner Shelf 21J0055
39
-
-
Notices
41
-
Edition Notice
41
-
-
Index
42

Lexmark MX310dn Driver Manual (27 pages)
Universal Print Driver Version 2.0 White Paper
Brand: Lexmark
|
Category: All in One Printer
|
Size: 8.1 MB
Table of Contents
-
Table of Contents
2
-
Introduction
3
-
What Are the Universal Print Drivers
3
-
Benefits
3
-
New Features
4
-
-
Before You Begin
6
-
Operating System Support
6
-
Device Compatibility
6
-
Connectivity
9
-
Travel Print
9
-
Supported Paper Sizes and Types
10
-
Paper Sizes Supported by the Universal Print Driver
10
-
Paper Types and Weights Supported by the Printer
10
-
-
Language Support
11
-
-
Installing the Universal Print Driver
13
-
Updating Previous Versions of the Universal Print Driver
13
-
Downloading the Universal Print Driver
13
-
Updating Installed Options
13
-
Using Travel Print
13
-
Enabling the Travel Print Feature
14
-
-
Understanding the Universal Print Driver
15
-
Using the Layout Tab
15
-
Using the Paper/Finishing Tab
16
-
Using the Quality Tab
17
-
Using the Fax Preferences Tab
19
-
Using the Watermark Tab
20
-
Using the Overlays Tab
20
-
Using the Print and Hold Tab
21
-
Using the Other Options Tab
22
-
-
Frequently Asked Questions
24
-
Index
27
Lexmark MX310dn User Manual (21 pages)
Network Scan Drivers
Brand: Lexmark
|
Category: Printer
|
Size: 0.21 MB
Table of Contents
-
Edition Notice
2
-
Table of Contents
3
-
-
Introduction to the Network Scan Driver
5
-
Installing the Network Scan Driver
5
-
System Requirements
5
-
Supported Operating Systems
5
-
Installing on Fedora, Linpus Linux, SUSE Linux, Linux Opensuse, Red hat Enterprise Linux, or Red Flag Linux
5
-
Installing on Debian Gnu/Linux or Ubuntu Linux
6
-
-
Checking if the Network Scan Driver Is Installed
6
-
Scanning Using a Network Printer
6
-
Removing the Network Scan Driver
6
-
-
Scanning
7
-
Scanning Using Applications
7
-
Scanning Using Xsane
7
-
Scanning Using Openoffice.org
7
-
Scanning Using GIMP
8
-
Scanning Using a Terminal Window
8
-
-
Scanning Multiple Pages
8
-
Scanning both Sides of a Page
10
-
Canceling a Scan
11
-
Adjusting Scan Settings
12
-
Adjusting Scan Settings Using Xsane or Openoffice.org
12
-
Adjusting Scan Settings Using Scanimage
13
-
Setting Default Scan Options
17
-
-
-
Troubleshooting
18
-
Printer Scans the Page, but Image Is Not Displayed on the Computer
18
-
Printer Stops Scanning or Prints a «Profile Scan Failed» Page
18
-
Disable any Firewall Application
18
-
Open the Required Scanning Ports (Tcp: 9751-9760)
18
-
Accept the Device Certificate
18
-
Enter a Valid Scan Job Login
18
-
-
Only One Page Is Displayed on the Computer
19
-
Printer Not Compatible
19
-
SANE Does Not Recognize the Network Scan Driver
19
-
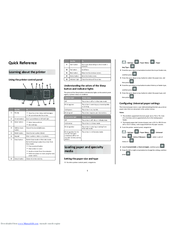
Lexmark MX310dn Quick Reference (16 pages)
Brand: Lexmark
|
Category: All in One Printer
|
Size: 3.11 MB
Table of Contents
-
Loading Trays
2
-
Loading the Multipurpose Feeder
3
-
Linking and Unlinking Trays
5
-
Printing a Document
6
-
Adjusting Toner Darkness
6
-
Canceling a Print Job
6
-
Making Copies
7
-
Copying Photos
7
-
Canceling a Copy Job from the Printer Control Panel
7
-
Setting up the Printer to E-Mail
7
-
Canceling an E-Mail
8
-
Sending a Fax
8
-
Creating a Fax Destination Shortcut Using the Embedded Web Server
9
-
Canceling an Outgoing Fax
9
-
Clearing Jams
9
-
Avoiding Jams
9
-
Understanding Jam Messages and Locations
10
-
X]-Page Jam, Remove Tray 1 to Clear Duplex. [23Y.XX]
13
-
X]-Page Jam, Clear Manual Feeder. [25Y.XX]
14
-
X]-Page Jam, Open Automatic Feeder Top Cover. [28Y.XX]
14
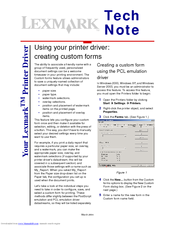
Lexmark MX310dn Tech Note (3 pages)
Tech Notes
Brand: Lexmark
|
Category: Software
|
Size: 0.07 MB

Lexmark MX310dn Specifications (2 pages)
Monochrome Laser Multifunction Product
Brand: Lexmark
|
Category: All in One Printer
|
Size: 0.41 MB

Lexmark MX310dn Product Specifications (2 pages)
Monochrome Laser Multifunction Printer
Brand: Lexmark
|
Category: Printer
|
Size: 0.81 MB
Advertisement
Related Products
-
Lexmark MX317
-
Lexmark MX321
-
Lexmark MX331
-
Lexmark MX331adn
-
Lexmark MX331dn
-
Lexmark MX321adn
-
Lexmark MX321adw
-
Lexmark MX722
-
Lexmark MX432
-
Lexmark MX912de
Lexmark Categories
![]()
Printer
![]()
All in One Printer
Printer Accessories
Software
Print Server
More Lexmark Manuals
All life indicators are designed to function with Lexmark supplies and parts, and may deliver unpredictable results if
third-party supplies or parts are used. Imaging component usage beyond the intended life may damage your Lexmark
printer or associated components.
To accept any and all of these risks and to proceed with the use of non-genuine supplies or parts in your printer,
press
and
simultaneously for at least three seconds to clear the light sequence.
Note: For the list of supported supplies, see the “Ordering supplies” section of the User’s Guide or visit
.
Replace cartridge, 0 estimated pages remain [88.xy]
‑ On
‑ On
Troubleshooting
113
| Error |
|---|