
@JeffDIsr,
Welcome to the HP Forums  I would like to take a moment and thank you for using this forum, it is a great place to find answers. For you to have the best experience on the HP forum, you could also visit our HP Forums Guide for First Time Here? Learn How to Post and More. I understand you are having issues related to printer. No worries, I’ll be glad to help you.
To provide you with an accurate solution, I’ll need a few more details:
Have you recently made any changes on the printer before the issue started?
Have you tried to check the print settings?
Have you tried to update the printer firmware?
Let’s start off by updating the printer firmware. If your printer connected wirelessly, make sure to temporary connect the device with USB and then follow the link to install the latest firmware update on your printer from our HP support website. Click here to download the firmware update for your printer. Once done, restart the printer.
For more details on how to update, please use this link: HP LaserJet — Update the firmware
If the issue persists, I would suggest here is to do a hard reset on the printer and make sure that the printer is connected directly to the wall outlet and not to the surge protector.
With the printer turned on, disconnect the power cord from the rear of the printer and also unplug the power cord from the wall outlet.
Remove USB cable, if present.
Wait for 2-3 minutes, press and hold the power button on your printer for about 30 seconds to remove any additional charge.
Now plug back the power cable straight to a wall outlet without any surge protector or an extension cord and then plug back the power cord to the printer.
Turn on the printer and wait till warm-up period finishes and the printer is idle.
Change the paper size and type from the program you are printing from.
-
In the program you are trying to print from, click File, and then click Print.
The Print window opens.
-
Open the Properties dialog box.
Depending on the software program, the button might be Properties, Options, Printer Setup, Printer, or Preferences.
-
Click the Paper Quality tab, and then select the paper type from the Media drop-down menu.
-
Click Advanced, select a paper size from the drop-down menu, and then click OK.
-
Click OK to apply the settings, and then click Print.
Print a cleaning page to clean the paper feed and pick rollers
-
Search Windows for your printer model, and then click the printer name in the list of results.
HP Printer Assistant opens.
-
Click Print, and then click HP Device Toolbox.
-
Click the System tab, and then select the Service page.
-
In the Cleaning Mode area, click Start to begin the cleaning process.
For more details, please follow this link: HP Color LaserJet Pro M252, M274, M277 Printers — ‘Out of Paper’ Error, Printer Does Not Pick Paper
Please let me know if this resolves the issue, or if you require further assistance!
Eagerly waiting for your response!
that said, If the information I’ve provided was helpful,
give us some reinforcement by clicking the solution and kudos buttons,
that’ll help us and others see that we’ve got the answers!
Good Luck.
Jeet_Singh
I am an HP Employee
We get numerous calls on this HP laser printer issue, and if you know how to decipher and trouble-shoot the differences between these two error messages, it’s usually fairly simple. Usually, this is a setting miscommunication, rather than a laser printer hardware failure.

Decoding HP Laser Printer Manual Load Paper and Tray 1 Load Paper Messages
What is the difference and what do you do when your printer tells you to either manually load tray 1 or load tray 1 with a specific size and type of paper?
With manually load tray 1 the printer is asking you to single-sheet feed each page, while the load tray 1 with a specific size and type message occurs because the machine does not see that specific paper in any of the other trays.
Manually load paper tray 1 can be caused by two things; either a setting in the print driver on the computer prompting the message, or because the printer menu’s manual feed option is turned on.
Print a configuration page
One way to distinguish them is to run a configuration page from the panel of the laser printer. If the display says manually load tray, then it is turned on in the menus of the printer.
For most HP printers, simply go into the Configure Device Menu, choose the Printing Menu, then scroll through and find where it says Manual Feed and select Off. If the printer asks you to load tray 1 with a specific size and type, it is not finding what it’s seeking in any other trays.
This could be a setting discrepancy between the driver and print job settings and the way the printer is set up. Run a configuration page from the machine. Does it ask to load tray 1 or does it print from your cassette trays?
If it is asking for tray 1 put paper into tray 1 to print out the configuration page. On the configuration page, look under paper trays and option to find out how it recognizes the trays’ set up. You will also have to look at this if this only happens when sending print jobs to compare your driver settings with that of the machine.
If the configuration page is not saying what you think you should have in the tray, then check the tray and make sure your paper guides are in the correct positions. Depending on the model of machine it could have a bad paper size sensing board.
For example: If the printer is telling you to load tray 1 plain letter and this only happens when sending a print job with internal tests working fine with no issues, then check the print drivers on the computer and see how you have the trays set up.
Another example: The machine says load tray 1 plain letter and it does this even when it is trying to print a configuration page.
Open up the menus and go into the Paper Handling menu. Check the type of paper the tray is set up to handle, and make sure it is plain. The problem could be caused by something as simple as someone changing it to bond by accident.
If that is OK and it is set to plain, then check the guides in the tray, and check on the configuration page to make sure it sees it as letter. If it shows that it sees the setting as legal and the tray is set correct, then you have a bad size sensing board for the tray.
What do you do if it is seeing it as plain and letter and it is still asking for plain letter in tray 1 even running a configuration page? Try a cold reset, sometimes this is needed to kick start the machine. This is usually not the case, but every now and then you will get a stubborn printer.
Other Helpful Laser Printer Service Resources
-
Paper Jam Solutions For Laserjet Printers
-
Printer Service And Parts Glossary
-
Printer Service Error Codes
-
Developing a Critical HP Printer Parts Stocking Strategy

Metrofuser is a leading global innovator, manufacturer of printer parts, equipment, diagnostics, repair information and systems solutions for professional users performing critical tasks. Products and services include hp printer parts, printers and printer repair training. Parts include hp printer parts such as printer fusers, printer maintenance kits and other hp printer replacement parts. The company’s, customers include office equipment dealerships, online retailers, repair centers and MPS service providers nationwide. Metrofuser has been named to Inc. Magazine’s fastest growing companies five consecutive years.
hi all, an offsite user has a printer that is a HP Laserjet 5100.
They have been unable to print to anything other than the bypass tray.
They want tray 2 [letter] to be default.
i tried manually setting tray 2 as default , and it still asks ‘tray 1 load plain paper’
I googled this and came up with the following:
If the HP LaserJet 4000, 4050, 4100, 5000 or 5100 series printer displays the message «Tray 1 Load Plain Letter » or if the paper is being pulled from an unexpected paper tray, try the following steps:
Follow these steps to check that the paper guides in the trays are correctly configured.
1. Remove the tray in question from the printer, take out all of the paper, and verify that the rear paper guide and the side paper guides are aligned with the «Letter » guide slot and not the «A4» guide slot.
2. On some paper trays, there is a dial on the right of the tray, along the outside area, where the paper is loaded toward the front. Follow these steps if the tray has the dial:
a. Pull the tray out of the printer.
b. Look at the blue paper-size-adjustment-dial and verify that the correct paper size is selected.
3. Other trays have an adjustment in the left, upper area in front of where the paper is loaded. As soon as the tray is being removed, look down on top of it toward the front left side. For trays with this adjustment, follow these steps:
a. Pull the tray out of the printer.
b. Rotate the inset blue dial in the tray so that the printer will read the correct size of paper. The toggle switch accesses more sizes.
|
NOTE: |
Setting the dial adjusts the printer’s sensors, but not the paper guide. |
I asked the person on site to confirm everything is set to «Letter» and it is.
this still does not work.
I also uninstalled and reinstalled the drivers the terminal server they work from uses to print to this printer.
any ideas?
HP Printers are one of the best and cost-effective printers available in the market. Printing has become very easy and reasonable with HP printers. Printers like any other machinery can falter at any point of time leaving you in a fix. That’s exactly where our role comes in. We are a group of Professional HP Printer technicians who strive to resolve your HP Printer errors very promptly and are the best possible manner. In this article, we will try to resolve HP Printer Load Tray 1 Error.
Causes Load Tray 1 Error HP Printer Machine
Before resolving the error, let us first try to understand what it means by the error HP Printer Load Tray 1 Error. This error occurs due to a mismatch in the Printer settings and the actual loading of paper. There are two trays in a printer.
The Tray 1 is the small tray in the front for the manual feeding of paper. While the Tray 2 is the paper cassette that slides out and holds the paper. Load Tray 1 Error is displayed when the printer settings say take the paper from tray 1 while you must have put paper in the cassette below that is the tray 2. For resolving this error any of the traditional steps such as simple RESET of the printer, stopping the printer spool and restarting it etc. will not help. Then How to solve the error Load Tray 1 Error?
Troubleshooting HP Printer Error Load Tray 1
How to Fix the HP Printer Load Tray 1 Error?
Follow the following steps to resolve the HP Printer Error – Load Tray 1 Error:
Step 1: Checking for the access control for Tray Settings
- Click on the security tab.
- Select the access control from the panel on the left.
- Under the sign in and permissions policy expand the tray options.
- In that select the ability to modify tray size and type settings.
- Scroll down and select apply.
Step 2: Set the Use Requested Tray Setting
- Click on the Copy/Print Tab
- Select the manage trays from the left panel.
- Under the use requested tray, select exclusively or tray 2.
- Click Apply.
Step 3: Restricting the access to Tray settings.
- Click on the security tab.
- Select the access control from the panel on the left.
- Under the sign in and permissions policy, expand the tray options.
- In the Device Guest column click on the checkbox Ability to modify tray type and size settings and lock it for guest users. It will turn yellow and will have a lock icon next to it.
- Scroll down and select apply.
Performing this step will resolve the error. If however the error still appears or you find any difficulty in performing any of the aforesaid steps then feel free to contact us at HP Toll-Free Number  . We are a pool of Technical professionals always ready to help you solve your errors.
Our Scope of Services:
- 24X7 availability Printer Technical Support
- 365 days working
- Prompt service
- Guaranteed solution
- 100% effective and efficient response
June 12, 2018April 11, 2021
15.11.2010
Вопрос:
Панель управления заблокирована паролем, ничего нельзя изменить.
Как сбросить пароль или настройки до заводских?
Ответ:
Аппарат сообщает о том, что нужно загрузить в лоток 1 бумагу нужного для печати формата (А4 или Plain).
Задайте свой вопрос
Чтобы задать вопрос, Вам необходимо авторизоваться
hp-concentra-wrapper-portlet
![]()
Actions
Issue
An ‘Out of paper‘ message displays on the control panel, and the printer does not pick up or feed paper. The printer might make noises as though it is printing, but no paper moves through it.
Experiencing frequent or recurring paper feed issues?
Follow these guidelines to help prevent paper feed issues:
-
Make sure to push the paper tray into the product until it stops.
-
Load at least 10 sheets of paper into the tray, but do not overload the tray.
-
Do not push the paper too far into the tray.
-
Load only one type of paper at a time into the tray.
-
Use only clean unused paper in the tray.
-
Store paper in a cool dry place.
-
Reload paper that has been in the tray for a while. Avoid printing on paper that is dusty.
-
Wait for the product to complete a print job or to display an ‘Out of paper‘ message before reloading the tray.
Causes
Any of the following issues can cause paper feed issues:
-
The paper tray is not pushed into the product until it stops.
-
The paper tray is overloaded.
-
The paper is curled.
-
The print side or shiny side of the paper is not loaded face down in the tray.
-
The paper width guides are too tight against the paper stack.
-
The paper feed rollers are coated with dust.
-
Debris such a as paper clips or bits of paper might have fallen into the paper path.
 Important: You must follow these solutions in the order presented to resolve the issue.
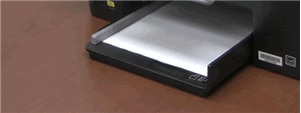
Main tray
Solution one: Reset the All-in-One
Sometimes, resetting the printer can clear a paper feed issue. Follow these steps to perform a reset, and then print a Printer Status Report.
Step one: Perform a power reset
Follow these steps to perform a power reset.
-
With the printer turned on, disconnect the power cord from the rear of the printer.
-
Unplug the power cord from the wall outlet.
-
Wait at least 15 seconds.
-
Plug the power cord back into the wall outlet.
-
Reconnect the power cord to the printer.
-
Turn the printer on.
Step two: Print a Printer Status Report
Follow these steps to print a test page.
-
Load plain white U.S. letter or A4 size paper in the tray, if it is not already loaded.
-
On the product control panel, touch the Settings icon (
), and then touch Tools. -
Touch Printer Status Report. The product prints the test page.
 ), and then touch
 -
If these steps resolved the issue, you do not need to continue troubleshooting.
-
If the issue persists, continue to the next solution.
Solution two: Check the paper, and then reload it
Paper feed issues might result from using ripped, dusty, curled, wrinkled, or bent paper. The quality of the paper can also make a difference. Use these guidelines to help avoid the issue.
-
Use only good quality paper that meets printer specifications.
-
Store all paper in a dry, cool place. Paper feed issues occur more often in humid environments.
-
Do not print on paper that is already printed. The dampness of the ink can cause the paper to stick together.
-
Wait for the printer to complete a job or for an Out of paper or Load Paper message to display before you reload the paper.
Step one: Check the condition of the paper
Follow these steps to check the condition of the paper.
-
Remove the stack of paper from the tray.
-
Check for obstructions inside the tray. Use a flashlight to view the mechanism inside the tray to make sure that nothing blocks the paper from engaging with the rollers. Even small pieces of paper can cause paper feed issues.
note:
If you find obstructions in the paper path, skip to the section on cleaning the rollers.
-
Examine the condition of the paper, and then replace any ripped, dusty, curled, wrinkled, or bent paper.
-
Make sure that all the paper in the stack is the same size and type. Never load mixed types of paper in the tray. The product can only process one type of paper at a time.
-
Tap the stack of paper on a flat surface to align the edges.
-
Make sure that the stack of paper contains no fewer than 10 sheets and no more than 25 sheets of paper.
note:
You need to use 10 to 25 sheets of paper only for purposes of these troubleshooting steps. When the issue is resolved, you can resume loading paper according to the paper tray capacity specifications for your product.
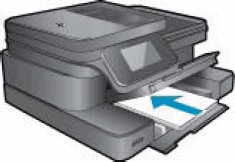
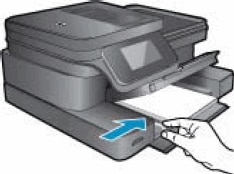
Step two: Reload the paper
Follow these steps to load U.S. letter or A4 size paper in the printer.
-
Raise the photo tray.
-
Slide the paper width guides to their outermost positions.
Figure : Slide paper width guides to their outermost positions
-
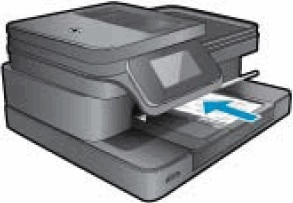
Load a stack of plain paper into the tray with the short edge facing toward the product and the print side down (if the paper has a print side). Push the stack into the tray until it stops.
Figure : Load paper into the tray
-
Slide the paper width guides until they rest against the edges of the paper.
Figure : Slide the paper width guides against the edges of the paper
-
Close the photo tray and the paper tray, pull the tray extender toward you, and then extend the paper catch until it is fully extended.

Step three: Print a Printer Status Report
Print a test page to make sure the hardware functions correctly.
How to print a Printer Status Report
Follow these steps to print a test page.
-
Load plain white U.S. letter or A4 size paper in the tray, if it is not already loaded.
-
On the product control panel, touch the Settings icon (
), and then touch Tools. -
Touch Printer Status Report. The product prints the test page.
If the issue is not resolved, try loading different brands of paper and different types of paper, one type at a time. Then try printing the test page again.
-
If these steps resolved the issue, you do not need to continue troubleshooting.
-
If the issue persists, continue to the next solution.
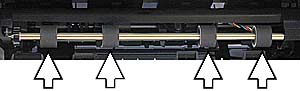
Solution three: Clean the paper feed rollers
Dust, paper fiber, and other debris might accumulate on the paper feed rollers and cause paper feed issues. Follow these steps to clean the paper feed rollers.
Step one: Clean the paper feed rollers
Follow these steps to clean the paper feed rollers.
-
Gather the following materials:
-
A clean, lint-free cloth, or any cloth that does not come apart or leave fibers
-
Distilled, filtered, or bottled water (tap water might damage the printer)
-
-
Disconnect the USB cable from the rear of the printer if your printer is connected with a USB cable.
-
Press the Power button (
) to turn off the printer. -
Disconnect the power cord from the rear of the printer.
-
Remove the two-sided printing accessory (duplexer) from the rear of the printer. Push the right side of the duplexer to the left, and then pull out the duplexer to remove it. Set the duplexer aside.
-
Push the duplexer to the left
-
Pull out the duplexer
Figure : Remove the duplexer
-
-
Lightly dampen a clean, lint-free cloth with bottled or distilled water, and then squeeze any excess liquid from the cloth.
-
Press the cloth against the rollers, and then rotate the rollers upward with your fingers. Apply a moderate amount of pressure to remove any dust or dirt buildup.
Figure : Clean the rollers in the rear of the printer
-
Allow the rollers to dry for 10 or 15 minutes.
-
Check the rollers on the duplexer. Make sure that the rollers are not missing, that they turn easily, and that they are springy when you press them. If the rollers are damaged, replace the duplexer.
Figure : Check the rollers on the duplexer
-
Reattach the duplexer to the rear of the printer. Insert the two pegs on the left side of the duplexer into the left side of the printer, and then gently push the duplexer into place. Make sure that the duplexer is firmly attached.
Figure : Reattach the duplexer
-
Reconnect the power cord to the rear of the printer.
-
If the printer does not turn on automatically, press the Power button (
) to turn it on.
 ) to turn off the printer.
Step two: Print a Printer Status Report
Print a test page to make sure that the hardware functions correctly.
How to print a Printer Status Report
Follow these steps to print a test page.
-
Load plain white U.S. letter or A4 size paper in the tray, if it is not already loaded.
-
On the product control panel, touch the Settings icon (
), and then touch Tools. -
Touch Printer Status Report. The product prints the test page.
-
If the test page prints, try printing the original document again. If the issue is resolved, there is no need to continue troubleshooting.
-
If the test page prints, but the original document does not, continue with the next solution.
-
If the test page does not print, try printing the report again. Listen for the rubber paper rollers; you should be able to hear them rotating. Then try to slowly push the paper farther into the tray until the rollers pick up the paper. Be careful not to push the paper in too far, which can cause a paper jam.
-
If the test page prints when you slowly push the paper farther in, try printing the original document again. The paper might not have been loaded far enough into the printer. If the issue is resolved, there is no need to continue troubleshooting.
-
If the test page does not print when you slowly push the paper farther in, repeat the previous steps to clean the rollers again. If the issue continues after repeated cleaning, continue with next solution.
-
If the paper feeds through the printer only when you slowly push it farther in, repeat the previous steps to clean the rollers again. If the issue continues after repeated cleaning, continue with the next solution.
-
Solution four: Adjust the paper settings in the print driver
The printer might not pick up paper if the paper size and type in the paper tray do not match the size and type settings in the print driver.
-
Reload the paper you were using when the issue occurred.
-
Return to the document you were trying to print when the issue occurred.
-
Click File or click the Microsoft Office Button (
), and then click Print. The Print dialog box opens. -
Select your printer, and then click Properties or Preferences. The Properties or Preferences dialog box opens.
-
Click the Paper/Quality tab.
-
From the Paper Size drop-down, make sure that the selected option matches your paper size. For example, if you have legal paper loaded in your printer, select Legal.
-
From the Media drop-down, select the paper type that matches the paper you have loaded in the printer.
-
Click OK to apply the settings.
-
Click OK from the Print dialog box to start the print job.
-
If the document prints, the issue is resolved, and there is no need to continue troubleshooting.
-
If the document prints on plain white paper, but not a special paper type, there is no need to continue troubleshooting. The problem is probably related to the paper that you tried to print on, or possibly a connectivity problem. Review the ‘Cause’ and ‘Experiencing frequent or recurring paper feed issues?’ sections at the beginning of this document to check other possibilities.
-
If the document does not print, continue to the solution to service the printer.
-
 ), and then click
 Photo Tray
Solution one: Reset the All-in-One
Sometimes, resetting the printer can clear a paper feed issue. Follow these steps to perform a reset, and then try printing the photo again.
Step one: Perform a power reset
Follow these steps to perform a power reset.
-
With the printer turned on, disconnect the power cord from the rear of the printer.
-
Unplug the power cord from the wall outlet.
-
Wait at least 15 seconds.
-
Plug the power cord back into the wall outlet.
-
Reconnect the power cord to the printer.
-
Turn the printer on.
Step two: Print the photo again
Try printing the photo again.
-
If these steps resolved the issue, you do not need to continue troubleshooting.
-
If the issue persists, continue to the next solution.
Solution two: Check the condition of the paper, check the photo tray, and then reload the paper
Paper feed issues might result from dusty, torn, wrinkled, wet, or folded paper in the photo tray. The quality of the paper can also make a difference. Use only good quality paper that meets product specifications. Follow these steps to check the condition of the paper.
Step one: Check the condition of the photo paper
Follow these steps to check the condition of the photo paper.
-
Remove the photo paper from the photo tray.
-
Check for obstructions inside the tray. Use a flashlight to view the mechanism inside the tray to make sure that nothing blocks the photo paper from engaging with the rollers. Even small pieces of photo paper can cause paper feed issues.
note:
If you find obstructions in the paper path, skip to the section on cleaning the paper rollers.
-
Examine the condition of the photo paper, and then replace any ripped, dusty, curled, wrinkled, or bent photo paper.
-
Make sure that all the photo paper in the stack is the same size and type. Never load mixed types of photo paper in the photo tray. The printer can process only one type of photo paper at a time.
-
Tap the stack of photo paper on a flat surface to align the edges.
-
Make sure that the stack of photo paper contains 5 or more sheets of photo paper.
note:
You need to use 5 sheets or more of photo paper only for purposes of these troubleshooting steps. When the issue is resolved, you can resume loading photo paper according to the paper tray capacity specifications for your printer.
Step two: Check the photo tray
Follow these steps to make sure that the photo tray fits in the printer correctly.
-
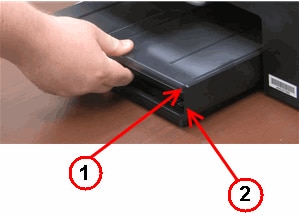
Grasp the photo tray, tilt it upward, and then pull it away from the printer to remove it.
Figure : Grasp the photo tray
Figure : Tilt the tray upward and pull it away from the printer
Figure : The main tray with the photo tray removed
-
Slide the photo tray back into place at a slight upward angle until it stops, and then press the photo tray down and in to seat it correctly.
Figure : Reinsert the photo tray
-
Make sure that the front of the photo tray aligns with the end of the main tray. If the front of the photo tray does not line up with the end of the main tray, lift the photo tray at a slight upward angle, and then press the photo tray all the way into the printer.
-
Front of the photo tray
-
End of the main tray
Figure : Align the front of the photo tray with the end of the main tray
-

Step three: Reload the paper
Follow these steps to load photo paper into the printer’s photo tray.
-
Open the photo tray, and then slide the paper width guides to their outermost positions.
-
Load a stack of photo paper into the tray, with the short edge facing toward the product and the print side down. Push the stack into the tray until it stops.
Figure : Load photo paper into the tray
-
Slide the paper width guides in until they rest against the edges of the paper.
Figure : Slide the paper width guides until they rest against the edges of the paper
-
Close the photo tray.

Step three: Print the photo again
Try printing the photo again.
-
If these steps resolved the issue, you do not need to continue troubleshooting.
-
If the issue persists, continue to the next solution.
Solution three: Clean the paper feed rollers
Dust, paper fiber, and other debris might accumulate on the paper feed rollers and cause paper feed issues. Follow these steps to clean the paper feed rollers.
Step one: Clean the paper feed rollers
Follow these steps to clean the paper feed rollers.
-
Gather the following materials:
-
A clean, lint-free cloth, or any cloth that does not come apart or leave fibers
-
Distilled, filtered, or bottled water (tap water might damage the printer)
-
-
Disconnect the USB cable from the rear of the printer if your printer is connected with a USB cable.
-
Press the Power button (
) to turn off the printer. -
Disconnect the power cord from the rear of the printer.
-
Remove the two-sided printing accessory (duplexer) from the rear of the printer. Push the right side of the duplexer to the left, and then pull out the duplexer to remove it. Set the duplexer aside.
-
Push the duplexer to the left
-
Pull out the duplexer
Figure : Remove the duplexer
-
-
Lightly dampen a clean, lint-free cloth with bottled or distilled water, and then squeeze any excess liquid from the cloth.
-
Press the cloth against the rollers, and then rotate the rollers upward with your fingers. Apply a moderate amount of pressure to remove any dust or dirt buildup.
Figure : Clean the rollers in the rear of the printer
-
Allow the rollers to dry for 10 or 15 minutes.
-
Check the rollers on the duplexer. Make sure that the rollers are not missing, that they turn easily, and that they are springy when you press them. If the rollers are damaged, replace the duplexer.
Figure : Check the rollers on the duplexer
-
Reattach the duplexer to the rear of the printer. Insert the two pegs on the left side of the duplexer into the left side of the printer, and then gently push the duplexer into place. Make sure that the duplexer is firmly attached.
Figure : Reattach the duplexer
-
Reconnect the power cord to the rear of the printer.
-
If the printer does not turn on automatically, press the Power button (
) to turn it on.
Step two: Print the photo again
Try printing the photo again.
-
If these steps resolved he issue, you do not need to continue troubleshooting.
-
If the issue persists, continue to the next solution.
Solution four: Adjust the paper settings in the print driver
The printer might not pick up paper if the paper size and type in the paper tray do not match the size and type settings in the print driver.
-
Return to the photo you were trying to print when the issue occurred.
-
Click File or click the Microsoft Office Button (
), and then click Print. The Print dialog box opens. -
Select your printer, and then click Properties or Preferences. The Properties or Preferences dialog box opens.
-
Click the Paper/Quality tab.
-
From the Paper Size drop-down, make sure that the selected option matches the size of the photo paper in the photo tray.
note:
The photo tray supports up to 101.6 x 152.4 mm (4 x 6 in.) photo paper. Do not select a size larger than 101.6 x 152.4 mm (4 x 6 in.).
-
From the Paper Source drop-down list, select Photo Tray if it is not already selected.
note:
If the photo tray is not available in the Paper Source drop-down list, the paper size selected is likely too large for the photo tray. Select a paper size no larger than 101.6 x 152.4 mm (4 x 6 in.) to use the photo tray.
-
From the Media drop-down, select the paper type that matches the paper you have loaded in the printer.
-
Click OK to apply the settings.
-
Click OK from the Print dialog box to start the print job.
-
If the photo prints, the issue is resolved, and there is no need to continue troubleshooting.
-
If the photo does not print, continue to the next solution.
-
Solution five: Try to print a photo from the main tray
You can print photos from the main tray if the photo tray does not feed photo paper. Follow these steps to print photos from the main tray.
Step one: Load photo paper in the main tray
Follow these steps to load photo paper in the main tray.
-
Raise the photo tray lid.
-
Slide the photo paper width guide to its outermost position.
-
Remove the photo paper from the photo tray, and then lower the photo tray lid.
-
Lift the output tray, and then slide the paper width guide to its outermost position.
Figure : Slide the paper width guide to its outermost position
-
Gather 5 sheets of photo paper, and then tap the edges of the stack of photo paper on a flat surface to make sure that all the edges are even.
-
Load the photo paper into the tray with the short edge forward and the glossy side down. Slide the stack forward until it stops.
note:
Make sure that all the photo paper in the stack is the same size and type and is free from rips, dust, wrinkles, and curled or bent edges.
-
Slide the paper width guide inward until it stops at the edge of the photo paper. Do not push the guide in so tightly that it binds against the photo paper.
Figure : Slide the paper width guide inward until it stops at the edge of the photo paper
-
Lower the output tray.
Step two: Change the print settings
Follow these steps to change the print settings.
-
Return to the photo you were trying to print when the issue occurred.
-
Click File or click the Microsoft Office Button (
), and then click Print. The Print dialog box opens. -
Select your printer, and then click Properties or Preferences. The Properties or Preferences dialog box opens.
-
Click the Paper/Quality tab.
-
From the Paper Size drop-down, make sure that the selected option matches the size of the photo paper in the photo tray.
note:
The photo tray supports up to 101.6 x 152.4 mm (4 x 6 in.) photo paper. Do not select a size larger than 101.6 x 152.4 mm (4 x 6 in.).
-
From the Paper Source drop-down list, select Photo Tray if it is not already selected.
note:
If the photo tray is not available in the Paper Source drop-down list, the paper size selected is likely too large for the photo tray. Select a paper size no larger than 101.6 x 152.4 mm (4 x 6 in.) to use the photo tray.
-
From the Media drop-down, select the paper type that matches the paper you have loaded in the printer.
-
Click OK to apply the settings.
-
Click OK from the Print dialog box to start the print job.
-
If the photo prints, the issue is resolved, and there is no need to continue troubleshooting.
-
If the photo does not print, continue to the solution to service the printer.
-
Service the All-in-One
 Important: Service the printer only if you have tried all of the previous solutions and the printer will not print a test page or photo.
Service or replace your HP product if the issue persists after completing all the preceding steps.
Go to Contact HP Customer Support to schedule a product repair or replacement. If you are in Asia Pacific, you will be directed to a local service center in your area.
To confirm your warranty status, go to HP Product Warranty Check. Repair fees might apply for out-of-warranty products.
Interpret control-panel messages, status-alert messages and event code errors
The control-panel messages and event code errors indicate the current product status or situations that might require action.
NOTE: Event log errors do not appear on the control-panel display. Access the event log to view or print the event log errors.
Control-panel messages appear temporarily and might require that you acknowledge the message by pressing the OK button to resume printing or by pressing the Stop button to cancel the job. With certain messages, the job might not finish printing or the print quality might be affected. If the message is related to printing and the auto-continue feature is on, the product will attempt to resume printing after the message has appeared for 10 seconds without acknowledgement.
For some messages, restarting the product might fix the problem. If a critical error persists, the product might require service.
___________________________________________________________________________
10.00.33
Description A used supply is in use (end of life).
Recommended action No action necessary.
10.00.35
Description An incompatible supply is in use.
Recommended action Install the correct HP print cartridge for this product (CE390A or CE390X).
NOTE: The CE390X cartridge is not compatible with the HP LaserJet Enterprise 600 M601.
10.00.60
Description The black cartridge is low.
Recommended action If print quality is no longer acceptable, replace the print cartridge.
TIP: Advise the customer that HP recommends that they have replacement supplies available to install when the print quality is no longer acceptable.
10.00.69
Description The black cartridge is very low.
Recommended action If print quality is no longer acceptable, replace the print cartridge.
TIP: Advise the customer that HP recommends that they have replacement supplies available to install when the print quality is no longer acceptable.
10.00.91
Description Cartridge motor stall.
Recommended action Replace the print cartridge.
10.0X.Y0 Supply memory error
Description The product cannot read or write to at least one print cartridge memory tag or a memory tag is missing from the print cartridge.
Memory error (Y = 0)
10.00.00 (event code) Black print cartridge
Memory tag missing (Y = 1)
10.00.10 (event code) Black print cartridge
Recommended action
Remove, and then reinstall the indicated print cartridge.
- If the error reappears, turn the power off, and then on.
- Check the cartridge memory tag. If it is damaged, replace the cartridge.
- If the error persists, replace the indicated print cartridge.
10.23.35
Description An incompatible fuser is in use.
Recommended action Replace the fuser.
TIP: Advise the customer that HP recommends that they have replacement supplies available to install when the print quality is no longer acceptable.
10.23.50
Description The fuser kit life was reset above the order threshold.
Recommended action No action necessary.
10.23.51
Description The fuser kit life was reset above the replace threshold.
Recommended action No action necessary.
10.23.52
Description The fuser kit life was reset above the reset threshold.
Recommended action No action necessary.
10.23.60
Description The product indicates when fuser kit is very low. The actual remaining fuse kit life might vary. You do not need to replace the fuser kit at this time unless print quality is no longer acceptable.
NOTE: After an HP supply has reached the very low threshold, the HP premium protection warranty ends.
Recommended action If print quality is no longer acceptable, replace the fuser kit. See the parts chapter in the service manual for the fuser kit part number.
TIP: Advise the customer that HP recommends that they have replacement supplies available to install when the print quality is no longer acceptable.
10.23.70 Printing Past Very Low
Description The product indicates when the fuser kit is very low. The actual remaining fuse kit life might vary. You do not need to replace the fuser kit at this time unless print quality is no longer acceptable.
NOTE: After an HP supply has reached the very low threshold, the HP premium protection warranty ends.
Recommended action If print quality is no longer acceptable, replace the fuser kit. See the parts chapter in the service manual for the fuser kit part number.
TIP: Advise the customer that HP recommends that they have replacement supplies available to install when the print quality is no longer acceptable.
10.26.15
Description The product indicates when the maintenance might need to be replaced.
Recommended action If print quality is no longer acceptable, replace the maintenance kit. See the parts chapter in the service manual for the maintenance kit part number.
TIP: Advise the customer that HP recommends that they have replacement supplies available to install when the print quality is no longer acceptable.
10.26.50
Description The maintenance kit was reset.
Recommended action No action required.
10.26.60
Description The product indicates when the maintenance kit is very low. The actual remaining maintenance kit life might vary. You do not need to replace the maintenance kit at this time unless print quality is no longer acceptable.
NOTE: After an HP supply has reached the very low threshold, the HP premium protection warranty ends.
Recommended action
If print quality is no longer acceptable, replace the maintenance kit. See the parts chapter in the service manual for the maintenance kit part number.
TIP: Advise the customer that HP recommends that they have replacement supplies available to install when the print quality is no longer acceptable.
10.XX.34 Used Supply In Use
Description The print cartridge is used.
10.00.34 (event code) Black print cartridge
Recommended action If you believe this is a genuine HP supply, go to http://www.hp.com/go/anticounterfeit.
NOTE: Removing a cartridge from one product and then installing it in a different product (for testing functionality) will cause this event code.
10.XX.40 Genuine HP Supplies Installed
Description A genuine HP print cartridge has been installed.
10.00.40 (event code) Black print cartridge
Recommended action No action necessary.
10.XX.41 Unsupported Supply In Use
Description The installed print cartridge is for a different product.
10.00.41 (event code) Black print cartridge
Recommended action Remove the print cartridge, and then install the correct cartridge for this product.
TIP: See the parts chapter in the service manual for the correct cartridge part number.
10.XX.70 Printing past very low
Description The product indicates when a supply level is very low. The actual remaining print cartridge life might vary. You do not need to replace the print cartridge at this time unless print quality is no longer acceptable.
NOTE: After an HP supply has reached the very low threshold, the HP premium protection warranty ends.
10.00.70 (event code) Black print cartridge
Recommended action If print quality is no longer acceptable, replace the print cartridge. See the parts chapter in the service manual for the correct cartridge part number.
TIP: Advise the customer that HP recommends that they have replacement supplies available to install when the print quality is no longer acceptable.
10.YY.15 Install <supply>
Description The indicated supply has been removed or installed incorrectly.
10.00.15 (event code) Black print cartridge
10.23.15 Fuser kit
Recommended action Replace or install the indicated supply. See the parts chapter in the service manual for the correct supply or kit part number.
10.YY.35 Incompatible <supply>
Description The indicated supply is not compatible with this product.
10.00.35 (event code) Black print cartridge
10.23.35 (event code) Fuser
Recommended action CAUTION: The fuser might be hot. Be careful when removing the fuser. Install a supply that is designed for this product. See the parts chapter in the service manual for the correct supply part number.
11.00.YY Internal clock error
Description The product real time clock has experienced an error.
◦ 01=dead clock
◦ 02=dead real time clock
Recommended action Whenever the product is turned off and then turned on again, set the time and date at the control panel. If the error persists, you might need to replace the formatter.
13.00.00
Description Generic jam event code.
Recommended action Check the product for a jam. See the clear jams section in the service manual.
13.00.EE
Description Unknown door open
Recommended action make sure that all of the doors and covers are closed.
13.A3.FF
Description Power on jam at the Tray 3 feed sensor.
Recommended action Check the product for a jam. See the clear jams section in the service manual.
13.D3.DZ
Description Late to duplex re-feed jam
◦ 13.D3.D1 (event code)
◦ 13.D3.D2 (event code)
◦ 13.D3.D3 (event code)
◦ 13.D3.D4 (event code)
◦ 13.D3.D5 (event code)
◦ 13.D3.D6 (event code)
◦ 13.D3.DD (event code)
◦ 13.D3.DE (event code)
Recommended action Check the product for a jam. See the clear jams section in the service manual.
13.E5.FF
Description A power on jam has occurred.
Recommended action Check the product for a jam. See the clear jams section in the service manual.
13.EA.EE
Description A door jam has occurred.
Recommended action Check the product for a jam. See the clear jams section in the service manual. Use the component test to isolate a faulty door switch or sensor.
13.EE.FF
Description A power on jam has occurred.
Recommended action Check the product for a jam. See the clear jams section in the service manual.
13.FF.EE
Description A door jam has occurred.
Recommended action Check the product for a jam. See the clear jams section in the service manual. Use the Manual sensors test or Tray/Bin manual sensors test to isolate a faulty door switch or sensor.
13.FF.FF
Description A power on residual paper jam has occurred (sensor).
Recommended action Check the product for a jam. See the clear jams section in the service manual. Use the Manual sensors test or Tray/Bin manual sensors test to isolate a faulty door switch or sensor.
13.WX.EE
Description This jam occurs when a door is opened during printing.
Recommended action Make sure that the doors are fully closed.
13.WX.FF
Description Power on residual paper jam This jam occurs when the paper exists at any of the paper path jam sensors at power on or door close. Due to the current FW timing requirements, the displayed jam code is always 13.FF.FF, only the event log will have 13.WX.FF
Recommended action Clear the jam. See the clear jams section in the service manual.
13.WX.YZ Fuser Area Jam
Description A jam in the fuser area has occurred.
Recommended action Clear the jam. See the clear jams section in the service manual. Make sure media is within specifications, check for obstructions in the fuser, check that the T2 roller is installed properly.
13.WX.YZ Fuser wrap jam
Description Recommended action Clear the jam. See the clear jams section in the service manual.
13.WX.YZ Jam below control panel
Description
13.B2.9Z (event code)
Page at duplex switchback jam.
Z = the source tray number
Recommended action Check the product for a jam. See the clear jams section in the service manual.
13.WX.YZ Jam in Tray 1
Description
13.B2.D1 (event code)
Late to registration jam, from Tray 1
This jam occurs when the paper does not reach the TOP sensor in designated amount of time from the start of paper pickup at printing from Tray 1 and duplex printing.
Recommended action Clear the jam. See the clear jams section in the service manual.
13.B2.D2 Late to registration jam, Tray 2
13.B2.D3 Late to registration jam, Tray 3
Note: Same as above.
13.WX.YZ Jam in Tray <X>
Description A misfeed jam has occurred.
Recommended action Clear the jam. See the clear jams section in the service manual.
13.WX.YZ Jam inside envelope feeder
Description A jam exists inside the envelope feeder.
Recommended action Clear the jam. See the clear jams section in the service manual.
13.WX.YZ Jam inside top cover
Description A jam exists inside the top cover.
Recommended action Clear the jam. See the clear jams section in the service manual.
14.00.XX
Description A feed roller error has occurred.
◦ 14.00.01 (event code)
◦ 14.00.02 (event code)
◦ 14.00.03 (event code)
◦ 14.00.04 (event code)
◦ 14.00.05 (event code)
◦ 14.00.06 (event code)
Recommended action Check the product and accessories feed rollers for dirt or damage. Clean or replace the rollers as necessary.
20.00.00 Insufficient memory: <Device> To continue, touch “OK”
Description The product has experienced a memory error. You might have tried to transfer too many fonts or macros.
Recommended action Touch the OK button to print the transferred data (some data might be lost), and then simplify the print job or install additional memory.
21.00.00 Page Too Complex
Description The page decompression process was too slow for the printer.
Recommended action Touch the OK button to continue printing (some data might be lost).
32.08.AX
Description
◦ 32.08.A1 (event code)
Shutdown event
◦ 32.08.A2 (event code)
Boot from normal shutdown event
◦ 32.08.A3 (event code)
Boot from abnormal shutdown event
Recommended action No action necessary.
32.1C.XX
Description
◦ 32.1C.01 (event code)
NVRAM backup/restore service backup started
◦ 32.1C.02 (event code)
NVRAM backup/restore service restore started
◦ 32.1C.03 (event code)
NVRAM backup/restore administrator backup started
◦ 32.1C.04 (event code)
NVRAM backup/restore administrator restore started
◦ 32.1C.05 (event code)
Backup/restore complete
◦ 32.1C.06 (event code)
Data model failed to clone job ticket
◦ 32.1C.07 (event code)
Backup restore permissions error
◦ 32.1C.08 (event code)
Not enough disk space to perform backup/restore or network share issue
◦ 32.1C.09 (event code)
Tried to restore a backup file that was not valid for this product
◦ 32.1C.0A (event code)
Backup file is invalid
◦ 32.1C.0B (event code)
Backup is from newer version of FW than what is currently on the product
◦ 32.1C.0C (event code)
Backup cancelled from the HP Embedded Web Server
◦ 32.1C.0D (event code)
Backup/restore failed, auto-reboot failed, or the product might be busy
◦ 32.1C.0E (event code)
Backup/restore timeout while communicating with the formatter
◦ 32.1C.0F (event code)
Backup/restore timeout while communicating with the finisher firmware
◦ 32.1C.10 (event code)
Backup/restore timeout while communicating with the scanner firmware
◦ 32.1C.11 (event code)
Backup/restore timeout while communicating with the engine
◦ 32.1C.12 (event code)
Backup/restore timeout while communicating with the disk
◦ 32.1C.13 (event code)
Scheduled backup failure
◦ 32.1C.14 (event code)
NVRAM restore timeout while communicating with the formatter
◦ 32.1C.15 (event code)
NVRAM restore timeout while communicating with the finisher firmware
◦ 32.1C.16 (event code)
NVRAM restore timeout while communicating with the scanner firmware
◦ 32.1C.17 (event code)
NVRAM restore timeout while communicating with the engine
◦ 32.1C.18 (event code)
Backup of copy subsystem failed
◦ 32.1C.19 (event code)
Backup of fax subsystem failed
◦ 32.1C.1A (event code)
Backup of digital send subsystem failed
◦ 32.1C.1B (event code)
Backup of print subsystem failed
◦ 32.1C.1C (event code)
Backup of networking subsystem failed
◦ 32.1C.1D (event code)
Backup of finishing subsystem failed
◦ 32.1C.1E (event code)
Restore of copy subsystem failed
◦ 32.1C.1F (event code)
Restore of fax subsystem failed
◦ 32.1C.20 (event code)
Restore of digital send subsystem failed
◦ 32.1C.21 (event code)
Restore of print subsystem failed
◦ 32.1C.22 (event code)
Restore of networking subsystem failed
◦ 32.1C.24 (event code)
NVRAM backup/restore successful
◦ 32.1C.25 (event code)
Reset of copy subsystem failed
◦ 32.1C.26 (event code)
Reset of fax subsystem failed
◦ 32.1C.27 (event code)
Reset of digital send subsystem failed
◦ 32.1C.28 (event code)
Reset of print subsystem failed
◦ 32.1C.29 (event code)
Reset of networking subsystem failed
◦ 32.1C.2A (event code)
Reset of finishing subsystem failed
◦ 32.1C.2B (event code)
Reset formatter timeout
◦ 32.1C.2C (event code)
Reset finisher timeout
◦ 32.1C.2D (event code)
Reset scanner timeout
◦ 32.1C.2E (event code)
Reset engine timeout
◦ 32.1C.2F (event code)
Reset failure
Recommended action
◦ 32.1C.01 (event code)
No action necessary
◦ 32.1C.02 (event code)
No action necessary
◦ 32.1C.03 (event code)
No action necessary
◦ 32.1C.04 (event code)
No action necessary
◦ 32.1C.05 (event code)
No action necessary
◦ 32.1C.06 (event code)
Retry
◦ 32.1C.07 (event code)
Retry
◦ 32.1C.08 (event code)
Remove stored jobs and retry
Use larger capacity storage device
Check network share
◦ 32.1C.09 (event code)
Use a valid backup file
◦ 32.1C.0A (event code)
Use a valid backup file
Reboot and observe state of product
Do a partition clean using the Preboot menu.
◦ 32.1C.0B (event code)
Use a valid backup file or put correct firmware version on the product.
◦ 32.1C.0C (event code)
No action necessary
◦ 32.1C.0D (event code)
Reboot and then retry the backup/restore
◦ 32.1C.0E (event code)
Turn the product off then on and retry
◦ 32.1C.0F (event code)
Turn the product off then on and retry
◦ 32.1C.10 (event code)
Turn the product off then on and retry
◦ 32.1C.11 (event code)
Turn the product off then on and retry
◦ 32.1C.12 (event code)
Turn the product off then on and retry
◦ 32.1C.13 (event code)
Turn the product off then on and retry
◦ 32.1C.14 (event code)
Turn the product off then on and retry
◦ 32.1C.15 (event code)
Turn the product off then on and retry
◦ 32.1C.16 (event code)
Turn the product off then on and retry
◦ 32.1C.17 (event code)
Turn the product off then on and retry
◦ 32.1C.18 (event code)
Turn the product off then on and retry
◦ 32.1C.19 (event code)
Turn the product off then on and retry
◦ 32.1C.1A (event code)
Turn the product off then on and retry
◦ 32.1C.1B (event code)
Turn the product off then on and retry
◦ 32.1C.1C (event code)
Turn the product off then on and retry
◦ 32.1C.1D (event code)
Turn the product off then on and retry
◦ 32.1C.1E (event code)
Turn the product off then on and retry
If the error persists, clear the firmware image from the active partition by using the Partial Clean item in the Preboot menu.
◦ 32.1C.1F (event code)
Turn the product off then on and retry
If the error persists, clear the firmware image from the active partition by using the Partial Clean item in the Preboot menu.
◦ 32.1C.20 (event code)
Turn the product off then on and retry
If the error persists, clear the firmware image from the active partition by using the Partial Clean item in the Preboot menu.
◦ 32.1C.21 (event code)
Turn the product off then on and retry
If the error persists, clear the firmware image from the active partition by using the Partial Clean item in the Preboot menu.
◦ 32.1C.22 (event code)
Turn the product off then on and retry
If the error persists, clear the firmware image from the active partition by using the Partial Clean item in the Preboot menu.
◦ 32.1C.24 (event code)
Turn the product off then on and retry.
◦ 32.1C.25 (event code)
Turn the product off then on and retry.
◦ 32.1C.26 (event code)
Turn the product off then on and retry.
◦ 32.1C.27 (event code)
Turn the product off then on and retry.
◦ 32.1C.28 (event code)
Turn the product off then on and retry.
◦ 32.1C.29 (event code)
Turn the product off then on and retry.
◦ 32.1C.2A (event code)
Turn the product off then on and retry.
◦ 32.1C.2B (event code)
Turn the product off then on and retry.
◦ 32.1C.2C (event code)
Turn the product off then on and retry.
◦ 32.1C.2D (event code)
Turn the product off then on and retry.
◦ 32.1C.2E (event code)
Turn the product off then on and retry.
◦ 32.1C.2f (event code)
Turn the product off then on and retry.
32.21.00
Description Corrupt firmware in external accessory
Recommended action Turn the product off, then on, and retry.
If the error persists, clear the firmware image from the active partition by using the Partial Clean item in the Preboot menu
33.01.XX
Description
◦ 33.01.01 (event code)
A restore process has occurred.
◦ 33.01.02 (event code)
A save process has occurred.
Recommended action No action necessary.
33.XX.YY Used board/disk
Description An encrypted board or disk with existing data previously locked to a different product has replaced the original. If you continue, data is permanently lost.
Recommended action To save the data on the board or disk, turn the product off. Replace the board or disk with another board or disk.
To delete the data on the board or disk and continue, touch the OK button.
40.00.01 USB I/O buffer overflow To continue, touch “OK”
Description The USB buffer has overflowed.
Recommended action Touch the OK button to print the transferred data (some data might be lost). Check the host configuration.
40.00.02 Embedded I/O buffer overflow To continue, touch “OK”
Description The product has experienced a JetDirect buffer overflow.
Recommended action Touch the OK button to print the transferred data (some data might be lost). Check the host configuration.
40.00.05 Embedded I/O bad transmission To continue, touch “OK”
Description The USB device has been removed.
Recommended action Touch the OK button to clear the error message. (Data will be lost.) Install the USB device.
41.02.00 Error
Description A beam detected misprint error.
Recommended action Turn the product off, and then on. If the error persists, replace the laser/scanner assembly.
41.03.YZ Unexpected size in envelope feeder To use another tray, touch “Options”
Description The product detected a different paper size than expected.
◦ Y = 0
Size mismatch. Detected media is longer or shorter than expected.
◦ Y = A
Size mismatch. Detected media too long.
◦ Y = B
Size mismatch. Detected media too short.
◦ Y = C
Size mismatch. Inter-page gap error.
◦ Z = D
Source is duplexer
◦ Z = E
Source is envelope feeder
◦ Z = 2
◦ Z = 3
Source is Tray 3
◦ Z = 4
Source is Tray 4
◦ Z = 5
Source is Tray 5
Recommended action Make sure that the feeder is loaded with the correct paper size and that the sliding paper guides are correctly adjusted. Use the Tray/Bin manual sensor test to verify that the envelope feeder paper sensor (PS1802) is correctly functioning.
If the error persists, replace the envelope feeder.
41.03.YZ Unexpected size in tray <X>
Description The product detected a different paper size than expected.
◦ Y = 0
Size mismatch. Detected media is longer or shorter than expected.
◦ Y = A
Size mismatch. Detected media too long.
◦ Y = B
Size mismatch. Detected media too short.
◦ Y = C
Size mismatch. Inter-page gap error.
◦ Z = D
Source is duplexer
◦ Z = E
Source is envelope feeder
◦ Z = 1
Source is Tray 1
Z = 2
Source is Tray 2
◦ Z = 3
Source is Tray 3
◦ Z = 4
Source is Tray 4
◦ Z = 5
Source is Tray 5
Recommended action Make sure that the tray is loaded with the correct paper size and that the sliding paper guides are correctly adjusted. Use the Tray/Bin manual sensor test to verify that the cassette media switch is correctly functioning. If the error persists, replace the lifter assembly.
41.05.YZ Unexpected type in tray <X>
Description The product detected a different paper type than expected.
◦ Y = 0 (expected type)
Unknown
◦ Y = 1 (expected type)
Normal media
◦ Y = 3 (expected type)
LBP OHT
◦ Y = 6 (expected type)
Non-assured OHT
◦ Y = 7 (expected type)
Heavy media
◦ Y = 8 (expected type)
Light media
◦ Y = 9 (expected type)
Rough media
◦ Y = C (expected type)
Heavy media 3
◦ Y = D (expected type)
Heavy media 2
◦ Z = 1 (detected type)
Normal media
◦ Z = 3 (detected type)
LBP OHT
◦ Z = 6 (detected type)
Non-assured OHT
◦ Z = 7 (detected type)
Heavy media
◦ Z = 8 (detected type)
Light media
◦ Z = 9 (detected type)
Rough media
◦ Z = B (detected type)
Heavy glossy media (glossy media 2)
◦ Z = C (detected type)
Heavy media 3
◦ Z = D (detected type)
Heavy media 2
Recommended action Load the tray with the size and type of paper indicated, or use another tray if available. If this message appears and the tray is loaded with the correct paper type, check the print driver settings to make sure they match the tray type settings.
Clean the Media Sensor. If the error persists, replace the paper pickup assembly.
41.XX.YZ Error To continue, touch “OK”
Description A product error has occurred.
◦ XX = error type
◦ Y = fuser mode
◦ Z = input tray
◦ XX = 02
Beam detect misprint
◦ XX = 09
Sub thermistor abnormally high
◦ XX = 18
Scan line inclination adjustment
◦ XX = 20
Image drum HV
◦ Y = 2
Normal typed (not AutoSense)
◦ Y = 3)
Light media 1, 2, 3: typed or AutoSense
◦ Y = 4
Heavy media 1: typed or AutoSense
◦ Z = 0
Envelope feeder
◦ Z = 1
Tray 1
◦ Z = 2
Tray 2
◦ Z = 3
Tray 3
◦ Z = 4
Tray 4
◦ Z = 5
Tray 5
◦ Z = 6
Tray 6
◦ Z = D
Duplexer
Recommended action Turn the product off, and then on.
If the error persists, replace the DC controller PCA.
42.XX.YY
Description Internal system failure
Recommended action Turn the product of,f then on, and retry.
If the error persists, clear the firmware image from the active partition by using the Partial Clean item in the Preboot menu.
47.00.XX
Description Back channel internal error
Recommended action Turn the product off, and then on again. Resend the print job. If the error persists, execute the Partial Clean item in the Preboot menu.
47.01.XX
Description Image transformer internal error
Recommended action Turn the product off, and then on again. Resend the print job. If the error persists, execute the Partial Clean item in the Preboot menu.
47.02.XX
Description Job parser internal error
Recommended action Turn the product off, and then on again. Resend the print job. If the error persists, execute the Partial Clean item in the Preboot menu.
47.03.XX
Description Print job internal error
Recommended action Turn the product off, and then on again. Resend the print job. If the error persists, execute the Partial Clean item in the Preboot menu.
47.04.XX
Description Print spooler 9100 internal error
Recommended action Turn the product off, and then on again. Resend the print job. If the error persists, execute the Partial Clean item in the Preboot menu.
47.05.00
Description Print spooler framework internal error
Recommended action Turn the product off, and then on again. Resend the print job. If the error persists, execute the Partial Clean item in the Preboot menu.
47.06.XX
Description Print App internal error
Recommended action Turn the product off, and then on again. Resend the print job. If the error persists, execute the Partial Clean item in the Preboot menu.
47.WX.YZ Printer Calibration Failed To continue, touch “OK”
Description The device is unable to access or implement one of the image patterns files.
Y = calibration type, Z = event
◦ 47.FC.20 (event code)
Error Diffusion Image not found at system initialization
◦ 47.FC.21 (event code)
Error Diffusion Store image failure
◦ 47.FC.22 (event code)
Error Diffusion Image not found
◦ 47.FC.23
Error Diffusion Print engine execution failure
◦ 47.FC.300 (event code)
Drum Speed Adjustment Image not found at system initialization
◦ 47.FC.31 (event code)Drum Speed Adjustment Store image failure
◦ 47.FC.32 (event code)
Drum Speed Adjustment Image not found
◦ 47.FC.33 (event code)
Drum Speed Adjustment Print engine execution failure
◦ 47.FC.40 (event code)
Pulse Width Modulation Image not found at system initializatione
◦ 47.FC.41 (event code)
Pulse Width Modulation Store image failure
◦ 47.FC.42 (event code)
Pulse Width Modulation Image not found
◦ 47.FC.43 (event code)
Pulse Width Modulation Print engine execution failure
Recommended action Turn the product off, and then on. If the error persists, reload the firmware.
49.XX.YY To continue turn off then on
Description A firmware error has occurred.
Recommended action
- Turn the product off, and then on.
- If the error returns, check the following:
- The error might be caused by a network connectivity problem.
- Damaged interface cable
- Damaged USB port
- Invalid network configuration setting
- The error might be caused by the print job.
- Invalid printer driver
- Problem with the software application
- Problem with the file
- If the error persists, perform a firmware upgrade.
50.WX.YZ Fuser error To continue turn off then on
Description
The fuser has experienced an error.
W = fuser error code, X = fuser mode, Y = previous printer sleep state, Z = next printer sleep state
Recommended action
W = 2
Fuser warm up failure
- Reconnect the connector (J128) between the fuser and the DC controller PCA.
- Turn the product off. Remove the fuser and then reinstall it. If the error persist, replace the fuser.
- If the error persists, replace the low-voltage power supply.
W = 3
Low temperature thermistor 1
- Reinstall the fuser. Check the connector (J128) between the fuser and the product. If it is damaged, replace the fuser.
- Reconnect the connector (J82) on the DC controller PCA.
- Replace the fuser.
- W = 2: Reconnect the connector (J62) on the low-voltage power supply PCA.
- If the error persists, replace the low-voltage power supply.
W = 4
High temperature thermistor 1
- Reinstall the fuser. Check the connector (J128) between the fuser and the product. If it is damaged,
replace the fuser.
- Reconnect the connector (J82) on the DC controller PCA.
- Replace the fuser.
- If the error persists, replace the low-voltage power supply.
W = 6
Drive circuit fault
- Check the power source. Make sure the power source meets product requirements.
NOTE: If the power source does not meet the power frequency requirement of 40 to 70Hz, the
fuser temperature control does not work properly and causes this error.
- Reconnect connectors J51, J52, J53, and J162 and DC controller PCA connectors J85, J95, and J96.
- If the error persists, replace the low-voltage power supply.
W = 10
Low temperature thermistor 2
- Reinstall the fuser. Check the connector (J128) between the fuser and the product. If it is damaged,
replace the fuser.
- Reconnect the connector (J62) on the low-voltage power supply PCA.
- If the error persists, replace the low-voltage power supply.
W = 11
High temperature thermistor 2
- Reinstall the fuser. Check the connector (J128) between the fuser and the product. If it is damaged,
replace the fuser.
- Reconnect the connector (J62) on the low-voltage power supply PCA.
- If the error persists, replace the low-voltage power supply.
W = 12
Fuser pressure release mechanism failure
- Reconnect the fuser connector (J128) and the DC controller PCA connector (J62).
- Check the fuser pressure release sensor flag. If the flag is damaged or not properly working, replace the fuser.
- Reconnect the fuser motor connector (J221) and the DC controller PCA connector (J89).
- Use the Component Test item in the Troubleshooting menu to test the fuser motor. If the motor fails the test, replace the fuser motor.
- If the error persists replace the fuser.
50.22.xx See This article for troubleshooting steps
51.00.YY Error
Description Laser/scanner error
◦ YY = 20
Black laser/scanner error
Recommended action
- Reconnect connector (J145) on the laser/scanner.
- Reconnect connectors (J86 and J93) on the DC controller.
- If the error persists, replace the laser/scanner.
52.XX.00 Error To continue turn off then on
Description Laser/scanner error
◦ XX = 00
laser/scanner motor startup error
◦ XX = 20
Laser/scanner rotation error
Recommended action
- Reconnect connector (J145) on the laser/scanner.
- Reconnect connectors (J86 and J93) on the DC controller.
- Use the scanner motor (M108) drive test in the component test to verify that the scanner motor is properly functioning. If it is not, replace the laser/scanner.
NOTE: Listen for a high pitched whine from the motor.
- If the error persists, replace the laser/scanner.
54.XX.YY Error
Description
A sensor error has occurred.
Recommended action
54.00.03
Environmental sensor (TH3) failure
- Turn the product off, and then reconnect the connector (J63) on the DC controller PCA. Turn the
product on.
- If the environment sensor has been removed or replaced, check the connector (J199) on the
environment sensor and the connector (J63) on the DC controller PCA.
- If the error persists, replace the environment sensor assembly.
54.06.21
Primary laser/scanner beam detect abnormality
- Turn the product off, and then on.
- If the product has had parts removed or replace, check the connector (J93) on the DC controller PCA.
- If the error persists, replace the laser/scanner assembly.
55.00.YY DC controller error To continue turn off then on
Description DC controller PCA error
◦ 55.00.01 (event code)
DC controller memory error
◦ 55.00.03 (event code
DC controller no engine response
◦ 55.00.04 (event code
DC controller communications timeout
Recommended action Turn the product off, and then on. If the error persists, replace the DC controller PCA.
55.0X.YY DC controller error To continue turn off then on
Description DC controller PCA error
◦ 55.01.06 (event code)
NVRAM memory data error warning
◦ 55.02.06 (event code)
NVRAM memory access error warning
Recommended action Turn the product off, and then on.
If the error persists, replace the DC controller PCA.
56.00.YY Error To continue turn off then on
Description Optional paper trays communication error
Recommended action Turn the product off, and then on. If the error persists, reseat the optional paper trays (1 x 500-sheet feeder and/or 3 x 500-sheet feeder). Check the input connectors for damage. If a connector is damaged, replace the connector.
57.00.0Y Error To continue turn off then on
Description Fan error
Recommended action
57.00.03
Main fan (FN101) failure
- Turn the product off, and then on. Listen for fan noise at the back corner of the product. If no noise is heard, replace the power supply fan (FN101).
- If the fan has been removed or replaced, check the connector (J64) on the DC controller PCA.
- If the error persists, replace the main fan (FN101).
57.00.04
Laser/scanner fan (FN102) failure
- If this part has been removed or replace, check the connector (J75) on the DC controller PCA.
- If the error persists, replace the laser/scanner fan (FN102).
57.00.06
Cartridge fan (FN301) failure
- If this part has been removed or replace, check the connector (J95) on the DC controller PCA.
- If the fan has been removed or replaced, check the connector (J66) on the DC controller PCA.
- If the error persists, replace the cartridge fan (FN301).
57.00.05
Cartridge front-side fan (FN103) failure
- Turn the product off, and then on. Listen for fan noise at the middle back of the product. If no noise
is heard, replace the cartridge front-side fan (FN103).
- If the fan has been removed or replaced, check the connector (J79) on the DC controller PCA.
- If the error persists, replace the cartridge front-side fan (FN103).
57.00.07
Duplex fan (FN107) failure
- Turn the product off, and then on. Listen for fan noise at the left side of the product. If no noise is
heard, replace the duplex fan (FN107).
- If the fan has been removed or replaced, check the connector (J64) on the DC controller PCA.
- If the error persists, replace the duplexer.
58.00.0Y Error To continue turn off then on
Description A sensor error has occurred.
Recommended action
58.00.05
Environmental sensor (TH3) failure
- Turn the product off.
- If this part has been removed or replace, check the connector (J63) on the DC controller PCA.
- If the error persists, replace the environmental sensor (TH3).
58.00.03
DC controller CPU failure
- Turn the product off.
- Check all of the connectors on the DC controller PCA.
- If the error persists, replace the DC controller PCA.
58.00.04
LVPS failure
- Turn the product off.
- If this part has been removed or replace, check the connector (J50) on the LVPS, and then check
the connector (J85 and J95) on the DC controller PCA.
- If the error persists, replace the LVPS.
59.00.YY error To continue turn off then on
Description A motor error has occurred.
◦ YY = 00
Paper path malfunction
Recommended action
59.00.20 or 59.00.30
Feed motor (M101) failure (start-up or rotational)
- Reconnect the connector (J191) on the feed motor and the connector (J91) on the DC controller PCA.
- Use the feed motor (M101) drive test in the Component test to verify that the motor is properly functioning. If is not, replace the feed motor (M101).
59.00.40 or 59.00.50
Fuser motor (M299) failure (start-up or rotational)
- Reconnect the connector (J221) on the feed motor and the connector (J89) on the DC controller PCA.
- Use the fuser motor (M299) drive test in the Component test to verify that the motor is properly functioning. If it is not, replace the fuser motor (M299).
59.00.60 or 59.00.70
Drum motor (M102) failure (start-up or rotational)
- Reconnect the connector (J187) on the drum motor and the connector (J87) on the DC controller PCA.
- Use the drum motor (M102) drive test in the Component test to verify that the motor is properly functioning. If it is not, replace the drum motor (M102).
59.A2.0x Error
Description A product error has occurred.
Recommended action
59.A2.02 or 59.A2.11
Lifter driver assembly Tray 2 failure
- Use the Tray/Bin manual sensor test to verify that the Tray 2 paper (PS107 and PS907) surface sensors are properly functioning.
- If this part has been removed or replace, check the connector (J73 and J94) on the on the DC controller PCA.
- Check the media stack surface sensor lever and place it in the correct position to move smoothly. Replace the media stack surface sensor lever if it is damaged.
- If the error persists, replace the lifter drive assembly (Tray 2).
59.A2.12 to 59.A2.15
Lifter driver assembly Tray 3 to 6 motor failure
- Reconnect the connectors (J1605 and J1608) on the paper feeder drive PCA.
- Reconnect the connectors (J1703 and J1707) on the paper cassette drive PCA.
- Replace the sheet feeder media stack surface sensor.
- If the error persists, replace the lifter motor for the specific sheet feeder.
60.00.0Y Tray <Y> lifting error
Description A tray lift motor error has occurred.
Recommended action
60.00.02
Lifter driver assembly Tray 2 failure
- Use the Tray/Bin manual sensor test to verify that the Tray 2 paper (PS107 and PS907) surface sensors are properly functioning.
- If this part has been removed or replace, check the connector (J73 and J94) on the on the DC controller PCA.
- Check the media stack surface sensor level and place it in the correct position to move smoothly.
Replace the sensor lever if it is damaged.
- Replace the media stack surface sensor.
- If the error persists, replace the lifter drive assembly (Tray 2).
60.00.12 to 60.00.15
Lifter driver assembly Tray 3 failure
- Use the Tray/Bin manual sensor test to verify that the Tray 3 paper (SR1 and SR2) surface sensors
are properly functioning.
- If this part has been removed or replace, check the connector (1605 and 1608) on the on the
paper feeder controller PCA.
- Reconnect the connectors (J1703 and J1707) on the sheet feeder PCA.
- Replace the sheet feeder media stack surface sensor.
- If the error persists, replace the lifter drive assembly (Tray 3-6).
62.00.00 No system To continue turn off then on
Description Internal system failure
Recommended action Turn the product off, and then on.
If the error persists, reload the firmware. If the error still persists, perform a firmware upgrade.
If the firmware upgrade does not resolve the problem, replace the hard disk.
65.X0.A1 Output accessory disconnected
Description
An external paper handling accessory connection has been interrupted.
Recommended action
- Turn the product off.
- Make sure that all packing materials have been removed from the paper handling accessory.
- Check the paper path for obstructions, or jammed paper.
- Check the accessory cable connection.
- Turn the product on. If the error persists, replace the accessory.
66.80.YY Stapler/Stacker failure
Description An external paper handling accessory error has occurred.
◦ 66.80.01 (event code)
Y-align malfunction
◦ 66.80.02 (event code)
Jogger malfunction
◦ 66.80.03 (event code)
Stapler malfunction
◦ 66.80.21 (event code)
Lift up malfunction
◦ 66.80.22 (event code)
Lift down malfunction
◦ 66.80.23 (event code)
Lift sensor malfunction
◦ 66.80.33 (event code)
Output roller malfunction
◦ 66.80.35 (event code)
Self priming malfunction
◦ 66.80.51 (event code)
System error (FW error)
◦ 66.80.55 (event code)
System error 5 (FW error)
◦ 66.80.56 (event code)
System error 6 (FW error)
◦ 66.80.57 (event code)
System error 7 (FW error)
◦ 66.80.58 (event code)
System error 8 (FW error)
◦ 66.80.59 (event code)
System error 9 (FW error)
◦ 66.80.60 (event code)
System error 10 (inter-page delay mismatch)
◦ 66.80.61 (event code)
System error 11 (lifter task trouble)
◦ 66.80.62 (event code)
System error 12 (inter-page delay mismatch)
◦ 66.80.63 (event code)
System error 13 (FW error)
◦ 66.80.64 (event code)
System error 14 (FW error)
◦ 66.80.65 (event code)
System error 15 (FW error)
◦ 66.80.70 (event code)
Page-info in flush
◦ 66.80.71 (event code)
Flush request in PDLV
◦ 66.80.72 (event code)
Delivery notice error
◦ 66.80.73 (event code)
Flush request in checking paper path
◦ 66.80.74 (event code)
Checking paper path start in PDLV
◦ 66.80.75 (event code)
Flush request in flush
◦ 66.80.76 (event code)
Non-flush complete
Recommended action
Turn the product off, and then on.
If the error persists, replace the paper handling device.
69.11.YY Error To continue turn off then on
Description Duplexer error
Recommended action
Turn the product off, and then on.
If the error persists, replace the duplexer.
70.00.00 Error To continue turn off then on
Description DC controller failure
Recommended action Turn the product off, and then on. If the error persists, replace the DC controller.
79.XX.YY Error To continue turn off then on
Description
This error can be caused by corrupted print jobs, software application issues, non-product specific
printer drivers, poor-quality USB or network cables, bad network connections or incorrect network
configurations, invalid firmware operations, or unsupported accessories.
Recommended action
- Turn the product off, and then on.
- If the error persists, check the following:
- The error might be caused by a network connectivity problem, such as a bad interface cable,
a bad USB port, or an invalid network configuration setting.
- The error might be caused by the print job, an invalid print driver, a problem with the
software application, or a problem with the file you are printing.
Make sure you are using the correct printer driver. Try printing using a different software
application. Try printing a different file or print job.
- Upgrading the product firmware might resolve the problem.
80.0X.YY Embedded JetDirect error
Description Embedded HP JetDirect print server critical error
◦ 80.01.80 (event code)
No heartbeat
◦ 80.01.81 (event code)
Reclaim timeout
◦ 80.01.82 (event code)
Invalid data length
◦ 80.01.8B (event code)
Invalid max outstanding packet header field
◦ 80.01.8C (event code)
Invalid channel mapping response
◦ 80.03.01 (event code)
No PGP buffers
◦ 80.03.02 (event code)
Channel table full
◦ 80.03.03 (event code)
Producer index not reset
◦ 80.03.04 (event code)
Consumer index not reset
◦ 80.03.05 (event code)
Queue position size too small
◦ 80.03.06 (event code)
Transport overflow
◦ 80.03.07 (event code)
No overflow packets
◦ 80.03.08 (event code)
Invalid identify response
◦ 80.03.09 (event code)
Invalid channel map return status
◦ 80.03.1080.03.10 (event code)
Invalid reclaim return status
◦ 80.03.12 (event code)
Datagram invalid buffer
◦ 80.03.13 (event code)
Max stream channels
◦ 80.03.14 (event code)
Max datagram channels
◦ 80.03.15 (event code)
Card reset failed
◦ 80.03.16 (event code)
Self test failure
◦ 80.03.17 (event code)
Unknown PGP packet
◦ 80.03.18 (event code)
Duplicate I/O channel.
Recommended action
Turn the product off, and then on.
If the error persists, replace the formatter.
81.YY.ZZ EIO-1 Card Failure
Description An EIO error has occurred.
◦ 81.01.80 (event code)
No heartbeat
◦ 81.01.81 (event code)
Reclaim timeout
◦ 81.01.82 (event code)
Invalid data length
◦ 81.01.8B (event code)
Invalid max outstanding
◦ 81.01.8C (event code)
Invalid channel mapping
◦ 81.03.01 (event code)
No PGP buffers
◦ 81.03.02 (event code)
Channel table full
◦ 81.03.03 (event code)
Producer index not reset
◦ 81.03.04 (event code)
Consumer index not reset
◦ 81.03.05 (event code)
Queue position size
◦ 81.03.06 (event code)
Transport overflow
◦ 81.03.07 (event code)
No overflow packets
◦ 81.03.08 (event code)
Invalid identify response
◦ 81.03.09 (event code)
Invalid channel map return
◦ 81.03.10 (event code)
Invalid reclaim return status
◦ 81.03.12 (event code)
Datagram invalid buffer
◦ 81.03.13 (event code)
Max stream channels
◦ 81.03.14 (event code)
Max datagram channels
◦ 81.03.15 (event code)
Card reset failed
◦ 81.03.16 (event code)
Self test failure
◦ 81.03.17 (event code)
Unknown PGP packet
◦ 81.03.18 (event code)
Duplicate I/O channel
Recommended action
Turn the product off, and then on.
If the error persists, replace the EIO device..
82.73.46 OR 82.73.47
Description A hard disk or compact flash disk cleaning failed. Usually caused by a failure of the disk hardware.
Recommended action
- Turn the product off, and then on.
- Use the Clean Disk item in the Preboot menu.
- Reload the firmware.
98.00.01 Corrupt data in firmware volume
Description
Data corruption has occurred in the firmware volume
Recommended action
Turn the product off, and then on.
Use the Clean Disk item in the Preboot menu.
Reload the firmware.
98.00.02 Corrupt data in solutions volume
Description Data corruption has occurred in the solutions volume
Recommended action Turn the product off, and then on. Use the Clean Disk item in the Preboot menu. Reload the firmware.
98.00.03 Corrupt data in configuration volume
Description
Data corruption has occurred in the configuration volume
Recommended action Turn the product off, and then on.
Use the Clean Disk item in the Preboot menu.
Reload the firmware.
98.00.04 Corrupt data in job data volume
Description Data corruption has occurred in the job data volume
Recommended action Turn the product off, and then on. Rerun the file erase function.
99.00.01 Upgrade not performed file is corrupt
Description A remote firmware upgrade (RFU) was not performed. CRC error in the firmware image (bad image).
Recommended action Download the RFU file and attempt the upgrade again.
99.00.02 Upgrade not performed timeout during receive
Description A remote firmware upgrade (RFU) was not performed. I/O timeout when reading header number and size. Indicates a problem with the network environment, not the device.
Recommended action The most common cause is an issue with the network environment. Make sure that there is a good connection to the device and attempt the upgrade again, or upgrade using the USB walk-up port.
99.00.03 Upgrade not performed error writing to disk
Description A remote firmware upgrade (RFU) was not performed.
Disk error. May indicate a problem or a hard disk failure. It might be necessary to check the connection to the hard disk or replace the hard disk.
Recommended action
- Download the RFU file and attempt the upgrade again.
- If the error persists, perform the Clean Disk process. You will then need to download firmware
from the Preboot menu.
- If the error persists, replace the hard disk.
99.00.04 Upgrade not performed timeout during receive
Description A remote firmware upgrade (RFU) was not performed. I/O timeout when reading rest of header.
Recommended action The most common cause is an issue with the network environment. Make sure that there is a good connection to the device and attempt the upgrade again, or upgrade using the USB walk-up port.
99.00.05 Upgrade not performed timeout during receive
Description A remote firmware upgrade (RFU) was not performed.
I/O timeout when reading image data.
Recommended action The most common cause is an issue with the network environment. Make sure that there is a good connection to the device and attempt the upgrade again, or upgrade using the USB walk-up port.
99.00.06 Upgrade not performed error reading upgrade
Description A remote firmware upgrade (RFU) was not performed.
Unexpected read error when reading header number and size.
Recommended action Download the RFU file and attempt the upgrade again.
- If the error persists, replace the hard disk.
99.00.07 Upgrade not performed error reading upgrade
Description A remote firmware upgrade (RFU) was not performed. Unexpected read error when reading rest of header.
Recommended action
- Download the RFU file and attempt the upgrade again.
- If the error persists, replace the hard disk.
99.00.08 Upgrade not performed error reading upgrade
Description A remote firmware upgrade (RFU) was not performed. Unexpected read error when reading image data.
Recommended action
- Download the RFU file and attempt the upgrade again.
- If the error persists, replace the hard disk.
99.00.09 Upgrade canceled by user
Description A remote firmware upgrade (RFU) was not performed. The RFU was canceled by the user.
Recommended action Resend the RFU.
99.00.10 Upgrade canceled by user
Description A remote firmware upgrade (RFU) was not performed. Job canceled when reading header number and size.
Recommended action Resend the RFU.
99.00.11 Upgrade canceled by user
Description A remote firmware upgrade (RFU) was not performed. Job canceled when reading rest of header.
Recommended action Resend the RFU.
99.00.12 Upgrade not performed the file is invalid
Description A remote firmware upgrade (RFU) was not performed. Header number is 1 but header size doesn’t match version 1 size.
Recommended action Download the RFU file again. Make sure that you download the file for the correct product model. Resend the RFU.
99.00.13 Upgrade not performed the file is invalid
Description A remote firmware upgrade (RFU) was not performed.
Header number is 2 but header size doesn’t match version 2 size.
Recommended action Download the RFU file again. Make sure that you download the file for the correct product model. Resend the RFU.
99.00.14 Upgrade not performed the file is invalid
Description A remote firmware upgrade (RFU) was not performed. The file is invalid.
Recommended action Download the RFU file again. Make sure that you download the file for the correct product model. Resend the RFU.
99.00.2X
Description
◦ 99.00.20 (event log)
The bundle is not for this product
◦ 99.00.21 (event log)
The bundle is not signed with the correct signature, or the signature is invalid
◦ 99.00.22 (event log)
The bundle header version is not supported by this firmware
◦ 99.00.23 (event log)
The package header version is not supported by this firmware
◦ 99.00.24 (event log)
◦ The format of the bundle is invalid
◦ 99.00.25 (event log)
The format of the package is invalid
◦ 99.00.26 (event log)
A CRC32 check did not pass
◦ 99.00.27 (event log)
An I/O error occurred while downloading the bundle
Recommended action Download the correct firmware file from http://www.hp.com/go/lj600Series_firmware, and then resend the firmware upgrade.
99.00.27 only: Turn the product off, and then on again. Resend the firware upgrade. If the error persists, try the sending the upgrade by another method (USB or Embedded Web Server).
99.09.60 Unsupported disk
Description Preboot menu error.
The hard disk currently installed is not recognized or supported by the product.
Recommended action Install the correct hard disk for this product.
99.09.61 Unsupported disk
Description Preboot menu error.
The installed disk is installed in a product configured for a encrypted hard disk.
Recommended action Access the Preboot menu and then select Lock Disk to lock the disk.
99.09.62 Unknown disk
Description Preboot menu error. The installed disk was previously locked in another product.
Recommended action Install a new disk or use the Preboot menu to unlock this disk. If the disk is to be reused in a different product, execute the Clean Disk procedure from the Preboot menu, then reload firmware and lock the disk.
99.09.63 Incorrect disk
Description A new or blank disk has been installed in a device which previously had an encrypted disk.
Recommended action Follow the procedure to load firmware on a new hard disk and then lock it to this product.
99.09.64 Disk malfunction
Description A fatal hard disk failure has occurred.
Recommended action Replace the hard disk drive.
99.09.65 Disk data error
Description Disk data corruption has occurred.
Recommended action Execute the Clean Disk procedure from the Preboot menu, and then resend the RFU.
99.09.66 No disk installed
Description A disk drive is not installed in the product.
Recommended action Install a compatible hard disk drive.
99.09.67 Disk is not bootable please download firmware
Description The product has a non-secure disk (solid state disk) installed as the boot disk, and it has been replaced with a new service part. A new firmware image needs to be downloaded to the device.
Recommended action
- Press any key to continue to the main Preboot menu.
- Press the Help button to see the help text for the error.
- Select the Administrator menu.
NOTE: If there is a password assigned to the Administrator, a prompt to enter the password displays.
- Select the Download item.
- The user can now download a new firmware bundle to the product.
99.XX.YY
Description Firmware installation error
Recommended action Reload the firmware.
<binname> full Remove all paper from bin
Description The specified output bin is full.
Recommended action Empty the bin to continue printing.
Error Message List
Wait a moment. Network initializing .
The network is being initialized.
Wait for a while until the machine connects to the network.
Checking File System
File system in the hard disk is being checked. Wait for a while.
Inspection is required. PU Flash Error
Turn the machine off, and then back on. If the same error occurs, contact your dealer.
Inspection is required. PU Communication Error
Turn the machine off, and then back on. If the same error occurs, contact your dealer.
Offline Mode
The machine is offline. Press the Online button to set it to [Online].
Data present.
Data remains unprinted.
Deleting data.
The job was cancelled or user is unauthorized.
Warming up.
The machine is adjusting the temperature of the fuser unit. Wait for a while.
Preparing .
Color registration and density are being adjusted. Wait for a while.
Updating firmware. Do not turn OFF the power.
The programs on the machine are being updated.
Do not turn the machine off until the update completes.
The machine automatically restarts after the update completes.
Toner Low.
The toner indicated on the screen is low. Have a new toner cartridge ready.
Waste Toner Full Replace with new Toner Cartridge.
Waste toner is full. Replace the toner cartridge with a new one.
C: Cyan (blue), M: Magenta (red)
C Non Recommended Toner.
An optimum C (Cyan, blue) toner cartridge is not installed.
Use a toner cartridge that matches your machine.
M Non Recommended Toner.
An optimum M (Magenta, red) toner cartridge is not installed.
Use a toner cartridge that matches your machine.
Y Non Recommended Toner.
An optimum Y (Yellow) toner cartridge is not installed.
Use a toner cartridge that matches your machine.
K Non Recommended Toner.
An optimum K (Black) toner cartridge is not installed.
Use a toner cartridge that matches your machine.
Error Postscript
A postscript error has occurred.
Image Drum Near Life.
The image drum indicated on the screen is near life. Have a new image drum ready.
C: Cyan (blue), M: Magenta (red), Y: Yellow, K: Black
Fuser Near Life.
The fuser unit is near life. Have a new fuser unit ready.
Belt Unit Near Life.
The belt unit is near life. Have a new belt unit ready.
Fuser Unit Life. Install New Fuser Unit.
The fuser unit reaches its lifetime.
Replace the fuser unit with a new one.
Belt Unit Life. Install New Belt Unit.
The belt unit reaches its lifetime.
Replace the belt unit with a new one.
Toner empty. Replace with new Toner Cartridge.
The toner indicated on the screen is empty. Replace the empty toner cartridge with a new one.
C: Cyan (blue), M: Magenta (red), Y: Yellow, K: Black
Toner cartridge not installed.
A color toner cartridge indicated on the screen is not installed.
Install the toner cartridge.
C: Cyan (blue), M: Magenta (red), Y: Yellow, K: Black
Image Drum Life. Please install new Image Drum Unit.
The image drum indicated on the screen reaches its lifetime.
Replace the image drum with a new one.
C: Cyan (blue), M: Magenta (red), Y: Yellow, K: Black
TRAY is empty.
No paper is loaded in the tray. Load paper.
File System is full.
Memory in the file system is full.
Delete unnecessary files.
The File System is write-protected.
The file you are trying to write is write-protected.
Check the file name.
Insufficient page memory to collate.
Insufficient memory error has occurred during collate printing.
Reduce the number of pages to print.
Insufficient memory. Error: 014
Memory full error has occurred during PC Fax reception. Press [Close].
Unauthorized user, job cancelled.
Unauthorized job was sent or unauthorized user attempted to print or send a fax. Data was deleted. Contact your administrator to use this machine.
File erasing .
Files stored for authentication print are being deleted.
Wait for a while.
Deleting encrypted authentication print data.
Files stored for encrypted authentication print are being deleted. Wait for a while.
Erased Data Full
Files supposed to be deleted are full. Erase the files.
Secure job storage period exceeded.
Files whose authentication print data storage period expired were automatically deleted.
Disk Read/Write Error
An error has occurred in the file system. Press [Close].
Flash Error
An error has occurred when firmware was being updated.
Contact the administrator.
Invalid print data received.
Invalid print data or PC fax data was received. To erase the message, press [Close].
If you performed authentication printing, the data was deleted because it was incomplete. Print again.
Received data has been discarded because Job Type is restricted.
Data whose job type is not defined in the acceptable job type settings was received. The data was discarded without being processed.
Select a job type defined in the acceptable job type settings for [Job Type] of the printer driver and print again.
Manual Request. Error : 500
Print on paper fed manually. Load paper in the MP tray.
Please change [MEDIA_SIZE] [MEDIA_TYPE] in [TRAY]. Error: 461, 462, 463, 464
The size and type of fed paper do not match those indicated on the screen. Use the same size and type of paper selected on the application.
Please change [MEDIA_SIZE] [MEDIA_TYPE] in MP Tray Error: 460
The size and type of paper loaded in the MP tray do not match those indicated on the screen. Make sure that the size and type of paper loaded in the MP tray match those selected on the application.
Wait a moment. Message Data processing .
Messages to be displayed on the machine are being updated. Wait for a while.
Wait a moment. Message Data writing .
Messages to be displayed on the machine are being updated. Wait for a while.
Restart the machine. Writing message data has been complete.
Messages to be displayed on the machine are now updated.
Turn the machine off, and then back on.
Wait for a while.
Please check data. Message Data Write Error
Updating messages to be displayed on the machine failed.
Make sure that you use right data for this machine.
Wait a moment. Network Configuration writing .
Network settings for this machine is changed. The new settings are being stored. Wait for a while.
Wait a moment. Network initializing .
Network settings for this machine are initializing.
Paper [TRAY] is empty Set [MEDIA_SIZE] Error: 490, 491, 492, 493, 494
No paper is loaded in the indicated tray. Load paper of the displayed size.
[TRAY] cassette is missing. Open and Close the indicated cassette. Error: 440, 441, 442, 430, 431, 432, 433
The tray is not installed. Install the cassette. If the cassette is already inserted, pull it out, and then insert it again.
Insufficient memory. Error: 420
Data is too complicated. Memory full error has occurred during processing. Reduce the volume of the print data.
Waste Toner Full Replace with new Toner Cartridge. Error: 414, 415, 416, 417
Waste toner of the toner cartridge is full. Opening and closing the front cover can resume printing for a while, but it may damage the image drum. Replace the toner cartridge with a new one as soon as possible.
C: Cyan (blue), M: Magenta (red)
Toner empty. Replace with new Toner Cartridge. Error: 410, 411, 412, 413
The indicated cartridge ran out of toner.
Opening and closing the front cover can resume printing for a while, but it may damage the image drum. Replace the toner cartridge with a new one as soon as possible.
C: Cyan (blue), M: Magenta (red), Y: Yellow, K: Black
Incompatible C Toner. Error: 552, 556, 616, 622
The installed C (Cyan, blue) toner cartridge is not optimum.
We recommend using an optimum toner cartridge.
Incompatible M Toner. Error: 551, 555, 615, 621
The installed M (Magenta, red) toner cartridge is not optimum.
We recommend using an optimum toner cartridge.
Incompatible Y Toner. Error: 550, 554, 614, 620
The installed Y (Yellow) toner cartridge is not optimum.
We recommend using an optimum toner cartridge.
Incompatible K Toner. Error: 553, 557, 617, 623
The installed K (Black) toner cartridge is not optimum.
We recommend using an optimum toner cartridge.
Toner Not Installed. Error: 610, 611, 612, 613
A color toner cartridge indicated on the screen is not installed.
Install the toner cartridge.
C: Cyan (blue), M: Magenta (red), Y: Yellow, K: Black
Image Drum Sensor Error Check Image Drum. Error: 540, 541, 542, 543
The sensor error has occurred in the image drum indicated on the screen.
Uninstall the image drum, and then install it again.
If the message persists, uninstall the toner cartridge and install it again.
If the toner cartridge is not installed, install it.
C: Cyan (blue), M: Magenta (red), Y: Yellow, K: Black
Multiple sheets of paper have been fed. Reset Paper in [TRAY]. Error: 401
The indicated tray fed multiple sheets of paper at a time.
Remove the cassette from the tray, and then load paper again.
Paper Size Error. Reset Paper in [TRAY]. Error: 400
Paper size error has occurred in the indicated tray. Make sure that the size made by paper loaded in the tray matches the setting made by the paper size dial in the paper cassette. Load paper according to the paper size and direction set for the paper size dial.
If the setting made by the paper size dial is wrong, cancel printing first, set the paper size dial, and then print again.
Make sure that the cassette does not feed multiple sheets of paper at a time after starting printing. If it happens, remove paper, and then load paper correctly.
Paper jam has occurred. Open the front cover and remove the paper. Error: 390
Paper jammed via the paper feed path from the MP tray.
If the edge of the jammed paper is not visible, open the front cover and remove the paper.
Paper jam has occurred. Pull out the [TRAY] cassette and then remove the paper. Error: 391, 392, 393, 394
A paper jammed via the paper feed path from the indicated tray.
Pull out the cassette, and then remove paper. If multiple sheets of paper are fed at a time, remove paper and reload paper.
Make sure that the paper stoppers are set in the right position.
Paper jam has occurred. Open the front cover and remove the paper. Error: 372, 380
Paper jammed in the paper feed path of the machine. Open the front cover and remove the jammed paper.
A paper jam has occurred under the image drum or around the fuser unit. Please remove paper. Error: 381, 382, 383, 348, 389
A paper jam has occurred inside the machine.
Open the cover and remove jammed paper.
A Paper Jam has occurred and paper remains near the Duplex Unit. Please remove paper. Error: 370, 371, 373
Paper jammed near the duplex printing unit.
Pull out the duplex unit on the back of the machine, and then remove jammed paper.
The 2-Sided Printing unit is not set correctly. Error: 360
The duplex unit is not properly installed. Install the duplex unit.
Image Drum Life. Please install new Image Drum Unit. Error: 350, 351, 352, 353
The image drum indicated on the screen reaches its lifetime.
Replace the image drum with a new one.
Opening and closing the cover can resume printing for a while. Replace with a new one as soon as possible, however.
C: Cyan (blue), M: Magenta (red), Y: Yellow, K: Black
Image Drum Life. Please install new Image Drum Unit. Error: 560, 561, 562, 563, 564, 565, 566, 567
The image drum indicated on the screen reaches its lifetime.
Replace the image drum with a new one.
C: Cyan (blue), M: Magenta (red), Y: Yellow, K: Black
Image Drum Life. Please install new Image Drum Unit. Error: 680, 681, 682, 683
Printing has stopped because the image drum indicated on the screen reached its lifetime. Replace with a new image drum to print.
C: Cyan (blue), M: Magenta (red), Y: Yellow, K: Black
Fuser Unit Life. Install New Fuser Unit. Error: 354
The fuser unit reaches its lifetime.
Replace the fuser unit with a new one.
Opening and closing the cover can resume printing for a while. Replace with a new one as soon as possible for maintaining the print quality.
Belt Unit Life. Install New Belt Unit. Error: 355
The belt unit reaches its lifetime.
Replace the belt unit with a new one.
Opening and closing the cover can resume printing for a while. Replace with a new one as soon as possible for maintaining the print quality.
The Fuser Unit is not installed correctly. Reset Fuser Unit. Error: 348
The fuser unit is not properly installed. Remove and re-install the fuser unit. If the error persists after re-installing, replace the fuser unit with a new one.
Waste Toner Full. Install New Belt Unit. Error: 356
Waste toner of the belt unit is full. Replace the belt unit with a new one. Opening and closing the cover can resume printing. Printing stops after 500 sheets are printed.
Toner cartridge not properly installed. Error: 544, 545, 546, 547
A color toner cartridge indicated on the screen is not installed.
Make sure that the lever on the toner cartridge is fully turned and the protective tape is removed.
C: Cyan (blue), M: Magenta (red), Y: Yellow, K: Black
Image Drum not properly installed. Check Image Drum. Error: 340, 341,342, 343
The indicated image drum is not installed correctly.
Remove and re-install the image drum.
C: Cyan (blue), M: Magenta (red), Y: Yellow, K: Black
The Fuser Unit is not installed correctly. Reset Fuser Unit. Error: 320
The fuser unit is not properly installed. Remove and re-install the fuser unit.
Belt Unit not installed correctly. Re-set the Belt Unit. Error: 330
The belt unit is not properly installed. Remove and re-install the belt unit.
[COVER] Open. Error: 310, 311, 587
Indicated cover is open. Close the cover.
Error: 310 The output tray, 311 The front cover, 587 The upper output tray
Please check data. Program Data Write Error
An error occurred when firmware was being updated.
Use a correct update file.
Power OFF/ON
Turn the machine off, and then back on.
If the same error occurs, contact your dealer.
Inspection is required.
Turn the machine off, and then back on.
If the same error occurs, contact your dealer.
Cancelling .
The cancel button was pressed while copying. The copy job is being cancelled. Wait for a while.
Automatic document feeder (ADF) cover is open.
The ADF cover of the scanner is open. Close the cover.
Document jam has occurred. Open the automatic document feeder (ADF) cover on the scanner to check.
Paper jammed in the ADF of the scanner.
Open the ADF cover and remove jammed paper.
Multiple sheets of document have been fed. Open the automatic document feeder (ADF) cover on the scanner to check.
Multiple sheets of document have been fed. Fan a stack of the paper well and place them on the automatic document feeder (ADF). Use the document glass if a tag or label is affixed to the document.
Scanner lamp error check the lamp.
Light volume of the scanner is low. Contact your dealer.
Power OFF/ON Carriage Error
An error has occurred on the carriage of the scanner. Turn the machine off, and then back on.
If the same error occurs, contact your dealer.
USB Memory Full
Scan To USB Memory was cancelled because the USB Memory is full.
Check the free space in the USB Memory.
Writing to USB memory failed.
The USB Memory is write-protected. Unlock the protection.
USB Memory disconnected.
The USB Memory was removed while performing Scan To USB Memory.
Connect to PC failed.
No destination computer was found for Scan to Computer. Make sure that your computer is turned on and recordable.
To erase the message, press [Close].
Insufficient memory occurred during Rx.
Memory full error has occurred during fax reception. Ensure available memory.
Communication Error
An error has occurred during fax transmission or fax reception.
Telephone
The external phone is in use.
File Transmission Error
An error such as a malfunction of the server or disconnection of a network cable has occurred while performing Scan To shared folder.
Check the network connection.
To erase the message, press [Close].
E-mail Transmission Error
An error such as a malfunction of the server or disconnection of a network cable has occurred while performing Scan To E-mail. Check the network connection.
To erase the message, press [Close].
Please check SMTP settings.
Cannot connect to the SMTP server. Check the network settings.
Please check POP3 settings.
Cannot connect to the POP3 server. Check the network settings.
SMTP Login failed.
An attempt to log into the SMTP server ended up an authentication error.
Check the network settings.
SMTP Auth. Unsupported
The SMTP server does not support the authentication system.
Check the network settings.
POP3 Login failed.
An attempt to log into the POP3 server ended up an authentication error.
Check the network settings.
Getting target IP failed. Please Check DHCP settings.
The DHCP server cannot be detected. Check the network connection.
Please check DNS settings.
Cannot connect to the DNS server. Check the network connection.
Please check Server settings.
Cannot connect to the file server. Check the network settings.
Server Login failed.
Logging into the file server failed. Check the server settings.
Entering directory failed.
Connecting to the directory of the FTP server failed. Check the server settings.
Changing data Transfer Type failed.
File transmission failed because the file transfer type was not accepted by the FTP server. Change the FTP transfer type to «binary».
File writing failed.
Files sent using Scan To shared folder could not be written. Check the access rights for the shared folder.
FTP destination Full.
Memory in the FTP server is low. Delete unnecessary files and ensure the free space.
Please change File Name.
The specified file name is not acceptable. Check the FTP server settings and change the file name.
Device communication protocol not supported.
The server does not support CIFS or FTP. Check the server settings.
Please check Network Share Name.
The name of the network shared folder is not correct. Check the folder name.
Please check data. Program Data Write Error
An error has occurred when program was being updated.
Please insert USB Memory.
Scan To USB Memory or print from USB Memory with USB Memory not inserted was attempted.
Insert USB Memory.
[TRAY] cassette missing.
The cassette in the indicated tray is pulled out.
Install the cassette.
Access Limitation Error Monochrome printing was performed due to the color printing limitation.
A color print job was converted to a mono print job due to an unauthorized user. Contact your administrator for color printing.
Access Limitation Error Data was deleted due to the color printing limitation.
A color print job was deleted due to an unauthorized user. Contact your administrator for color printing.
Restricted access error Data deleted due to printing restrictions.
A print job was deleted due to an unauthorized user. Contact your administrator for printing.
Incompatible USB device connected. Remove the connected USB device.
An unsupported USB device is connected. Remove the USB device.
Please remove the connected USB device. USB device has not been recognized.
The connected USB device was not recognized. Remove the USB device.
Please remove the USB Hub. USB Hub is connected.
A USB hub is connected. Remove the USB hub. This machine does not support USB hub.
Inspection is required. SIP Error
Turn the machine off, and then back on. If the same error occurs, contact your dealer.
Please call service. Scanner unit failed to detect printer unit.
Turn the machine off, and then back on. If the same error occurs, contact your dealer.
HDD Error 0
While initializing this machine, a hard disk which needs formatting was detected.
HDD Error 250
While initializing this machine, a damaged file for encrypted authentication printing was found. Format the hard disk again.
Accounting Log buffer is near full.
The accounting log buffer is almost full.
Acquire the log and free the buffer.
Accounting Log Writing Error
An accounting log writing error has occurred.
To erase the message, press [Close].
Job Log Database Error
A data base access error has occurred while writing or reading the job log. Turning the machine off and on may resolve the problem.
To erase the message, press [Close].
Accounting Log Buffer Full (Delete old logs)
Old logs were deleted, because accounting log buffer was full. Acquire the log and free the buffer.
Power OFF/ON
Turn the machine off, and then back on. If the same error occurs, contact your dealer.
A decoding error occurred. Check the image data.
An error has occurred in the image data sent to this machine. Check the image data.
Process has been canceled as there is no space on the device. Please free up enough memory space by reducing usage and try again.
Processing data was cancelled due to memory full.
Reduce the usage on the device to ensure available memory, and then retry.
Process has been canceled by a device error. After maintenance or change of the device, please try again.
Processing data was cancelled because an error occurred on the device.
Repair or replace the device, and then retry.
Access denied to PC. Please check PC.
Connecting to a computer failed when performing Scan to Computer. Check the settings on the computer.
Deleting data.
This machine ran out of color toner. Color print data is being deleted.
Error PDF
The PDF file is damaged.
This PDF file is password protected.
This PDF file is password protected. Enter a password to print.
Valid password required to print document.
This PDF needs authentication. Enter a password to print.
No communication with the SNTP server.
Obtaining current time from the SNTP server failed. Check the server.
USB Memory disconnected.
The USB Memory was removed while printing from USB Memory. Do not remove USB Memory while printing is in progress.
Cannot open the file.
The specified file could not be Opened. Check the file.
Cannot read the file.
Files could not be read. Check the device where the files are stored.
File loading from USB.
Data is being read from USB Memory.
Press the Stop button to cancel reading.
An error occurred. Scanning is pending.
Printing has stopped due to an error.
Image Drum Sensor Error.
The toner sensor error has occurred in the image drum indicated on the screen.
Printing was stopped. Rear Output Tray was opened during printing. Open the Output Tray. Error code: 409
The rear output tray was moved while printing.
Place the rear output tray in the correct position, and then open and close the output tray.
Toner empty. Replace with new Toner Cartridge.
The indicated cartridge ran out of toner.
Replace the empty toner cartridge with a new one.
Wait Timeout in menu is disabled. Printing is disabled except by USB. Clear page buffer and enable time out in menu.
Wait Timeout is disabled.
Insufficient memory occurred during Fax Tx reservation.
Insufficient memory error has occurred during Scan To fax.
Insufficient memory.
Insufficient memory error has occurred during fax reception.
E-mail receiving has been cancelled.
E-mail reception was cancelled.
Check the file format and size of the attached file.
Wireless settings are incomplete.
Wrong values are set or items remain unset in the wireless LAN settings. Check the wireless settings.
Not connected to wireless access point.
No wireless LAN access points are found.
Make sure that the access point is turned on.
Disconnect and re-connect to wireless LAN.
Wireless startup failed.
Restart the machine. If the error persists, contact your dealer.
Firmware Update Error Please try again. If network doesn’t work, please try firmware update over USB.
Updating the firmware failed. Update again.
Registering with Google Cloud Print. Don’t turn off the power until registration is complete.
This machine is being registered to the Google Cloud Print service. Wait for a while.
Deleting from Google Cloud Print.
This machine is being removed from the Google Cloud Print service. Wait for a while.
Caution, unknown Consumable detected Go to User Manual «Trouble Shooting» to restore operation Error 709
You can use any consumables in your product, but you must accept the risks of using non-genuine consumables.
If the use of non-genuine consumables causes damage to the product or results in your product not functioning to its full specification, then such damage or effect on the product is not covered by warranty.
To accept these risks and to restore function;
Turn off the machine.
Holding the [CLEAR] button, turn on the machine.
Release the [CLEAR] button when «RAM CHECK 100%» is displayed.
This operation log is recorded in the product.
If you have any questions, contact your dealer.
Replace the image drum. [PAGES] Pages Left.
The image drum indicated on the screen reaches its lifetime.
Replace the image drum with a new one.
C: Cyan (blue), M: Magenta (red), Y: Yellow, K: Black
Replace the image drum. Print Quality Not Guaranteed.
The image drum indicated on the screen reaches its lifetime.
Replace the image drum with a new one.
C: Cyan (blue), M: Magenta (red), Y: Yellow, K: Black
Receiving data timeout.
Data could not received within a certain period of time.
IPv4 address is conflicted. Please change IPv4 address.
The IP address assigned to this machine is duplicated with that of another device.
Check the IP addresses, and then assign another IP address.
Incompatible [COLOR] Image Drum. Error: 984, 685, 686, 687, 690, 691, 692, 693, 700, 701, 702, 703, 704, 705, 706, 707
Non-optimum image drum is installed.
C: Cyan (blue), M: Magenta (red), Y: Yellow, K: Black
C Image Drum Not Installed. Error: 696
Cyan (blue) image drum is not installed.
Install the image drum.
M Image Drum Not Installed. Error: 695
Magenta (red) image drum is not installed.
Install the image drum.
Y Image Drum Not Installed. Error: 694
Yellow image drum is not installed.
Install the image drum.
K Image Drum Not Installed. Error: 697
Black image drum is not installed.
Install the image drum.
Blank pages were detected on all pages. Please check how the document was set.
Scanned pages are all blank. Turn over the document.
In order to set paper that cannot be output to the Upper Output Tray, the paper was output from Output Tray. To turn off this display, press the [Close] button.
Check the type of the specified paper.
Simplex printing was performed as the paper setting did not allow duplex printing.
Duplex printing is not available on the specified paper.
Check the size and thickness of paper.
Multi-purpose tray has not been set to be used as the tray, so multiple copies have been printed. Please verify multi-purpose tray settings. Press [Close] button to remove this dialog
MP tray setting is set to [Do Not Use]. Change the MP tray setting.
Output Paper Full. Remove the paper on [TRAY]. Error: 480, 485
Paper in the output tray is full.
Remove the handout.
Changing Language. Panel operation is disabled.
Display language is being changed.
Wait for a while.
Language Change Failed. Error num: %CODE%
Switching display languages failed. Press the power button to turn the machine off, and then back on.
Detected an abnormality of internal database. The data must be deleted. After pressing [Format], the data will be deleted, and then reboot.
Data base is beyond restoration.
To delete the data base, press [Format].
Cannot print because your Summary Account balance is 0. User name for Printing: [USERNAME] Summary Account Name for Insufficient Balance: [ACCOUNTNAME] To continue the print job, increase the balance and select [Start]. To increase the balance, please contact the device administr. To cancel the print job, select [Cancel].
The number of print jobs excesses the limit. No more print jobs are authorized. Contact your administrator.
Copyright © 2015 Oki Electric Industry Co., Ltd. All rights reserved.
Источник
- Sign up
- Sign in
- HP Community
- Printers
- LaserJet Printing
- Load tray 1 Plain letter or Press ok to use available media
Options
- Mark Topic as New
- Mark Topic as Read
- Float this Topic for Current User
- Printer Friendly Page
![]()

Create an account on the HP Community to personalize your profile and ask a question
Your account also allows you to connect with HP support faster, access a personal dashboard to manage all of your devices in one place, view warranty information, case status and more.


vlong
1
0
0
25,181
New member
05-12-2016
06:32 PM

HP Recommended
- Mark as New
- Permalink
Product: HP 200 Laserjet Pro
Operating System: Microsoft Windows 7 (64-bit)
Every time I try to print I get the error, «Load tray 1 Plain letter or Press ok to use available media.» I’ve tried resetting the settings, and have also changed the settings before I print. Nothing is working. Any help would be greatly appreciated!
2 REPLIES 2
05-12-2016
08:30 PM
HP Recommended
- Mark as New
- Permalink
What happens if you press ok. Does it print from the paper tray. Most times when this happens there is a mismatch between what the printer thinks it has in the paper tray and what the job is asking for. Most times if you set tray 2 for the correct size and then choose type as any it will solve the issue. The tray may be set for bond or something else.
09-11-2017
07:50 PM
HP Recommended
- Mark as New
- Permalink
I have encountered this error. You must remove the paper in tray 1. The screen will then display the message. There are 2 options. «ok» or «modify». You choose «Modify» then you select paper type «any size». click ok is delicious
![]()
Be alert for scammers posting fake support phone numbers and/or email addresses on the community.
If you think you have received a fake HP Support message, please report it to us by clicking on «Flag Post».
† The opinions expressed above are the personal opinions of the authors, not of HP. By using this site, you accept the Terms of Use and Rules of Participation.

-
English
Open Menu

† The opinions expressed above are the personal opinions of the authors, not of HP. By using this site, you accept the <a href=»https://www8.hp.com/us/en/terms-of-use.html» class=»udrlinesmall»>Terms of Use</a> and <a href=»/t5/custom/page/page-id/hp.rulespage» class=»udrlinesmall»> Rules of Participation</a>.
Windows 10: HP laser pro 129 not working. It keeps asking to Load tray 1 Plain A4 or press ok to…
Discus and support HP laser pro 129 not working. It keeps asking to Load tray 1 Plain A4 or press ok to… in Windows 10 Gaming to solve the problem; Split from this thread.my printer hp laser pro 129 will not work properly with windows 11. It keeps asking to Load tray 1Plain A4or press ok to…
Discussion in ‘Windows 10 Gaming’ started by TheresaElsworth, Mar 23, 2022.
-
HP laser pro 129 not working. It keeps asking to Load tray 1 Plain A4 or press ok to…
Split from this thread.my printer hp laser pro 129 will not work properly with windows 11. It keeps asking to Load tray 1Plain A4or press ok to continue.This causes time that when busy don’t have and is annoying
-
HP Color LaserJet Pro M452DN keeps wanting to print to Tray 1 on Outlook
Greetings,
We are having issues printing on Outlook with the HP Color LaserJet Pro M452DN. It keeps wanting print to Tray 1 and not the main tray ->Tray 2.
It prints perfectly on Word, Excel, PDF applications but on Outlook 2016, it keeps wanting to print to Tray 1.
I’ve scoured the Microsoft forums going way back to Office 2007 that had this issue before with printing from Outlook, from selecting Tray 2 only, disabling Tray 1, checking if it’s on Memo, checking for paper type to as many things as possible.
Again, the problem is only with printing with Outlook 2016 to the HP LaserJet Pro M452DN, no problems with Word, Excel or PDF applications. We had no problems with any other HP LaserJet at our locations, just this new printer.
Fortunately, they can print if they hit the button to continue printing and then hitting the button again for tray 2 and then it will print that way. But it’s a frustration that our staff is not used to dealing with. So, not sure if this limitation is
with the new color laserjet printer from HP or this is more Outlook related.Thank you in advance.
-
How to print alignment page on a Canon Pixma MG3022
- Make sure that the power is turned on
- Load a sheet of A4 or Letter-sized plain paper in the rear tray
- Pull out the paper output tray and the output tray extension
- Hold down the Stop button until the Alarm lamp flashes four times, then release it immediately
-
HP laser pro 129 not working. It keeps asking to Load tray 1 Plain A4 or press ok to…
hp Laser 200 color nor printing.
hp Laser 200 color nor printing. On my network and all summaries indicate all is OK. Appears in my device/printer screen but doesn’t make it to the printer. Thanks for any suggestions,
Mark L.

HP laser pro 129 not working. It keeps asking to Load tray 1 Plain A4 or press ok to…
-
HP laser pro 129 not working. It keeps asking to Load tray 1 Plain A4 or press ok to… — Similar Threads — laser pro 129
-
HP laser pro 129 not working. It keeps asking to Load tray 1 Plain A4 or press ok to…
in Windows 10 Software and Apps
HP laser pro 129 not working. It keeps asking to Load tray 1 Plain A4 or press ok to…: Split from this thread.my printer hp laser pro 129 will not work properly with windows 11. It keeps asking to Load tray 1Plain A4or press ok to continue.This causes time that when busy don’t have and is annoying… -
Printing issue Win 10 pro x64 and HP laser Jet Pro MFP M125nw
in Windows 10 Drivers and Hardware
Printing issue Win 10 pro x64 and HP laser Jet Pro MFP M125nw: Hello,I have Windows 10 pro x64 — version 1909 with upto date fixes. In this version I have issue to print. The printer can print what I want, just one document cant be printed. When I want to print this specific document from Word 2016, it is going to the queue only, but…
-
HP Color Laser Jet 1600
in Windows 10 Installation and Upgrade
HP Color Laser Jet 1600: HP Color Laser Jet 1600 is USB 2.0, Windows 10 Does not find it.https://answers.microsoft.com/en-us/windows/forum/all/hp-color-laser-jet-1600/32bc9256-142c-4bad-a2a2-9ae7da511dff
-
Laser Jet Pro CM1415fnw color MFP doesn’t work
in Windows 10 Drivers and Hardware
Laser Jet Pro CM1415fnw color MFP doesn’t work: Laser Jet Pro CM1415fnw color MFP doesn’t work. Can’t find it in my list of available printershttps://answers.microsoft.com/en-us/windows/forum/all/laser-jet-pro-cm1415fnw-color-mfp-doesnt-work/afd89f02-4ddf-48ab-98e7-cf53c257844e
-
HP LASER JET 3015 PRINTER PROBLEM
in Windows 10 Drivers and Hardware
HP LASER JET 3015 PRINTER PROBLEM: Hello — after an update of Windows 10, my HP Laser Jet 3015 failed to be recognised. Have tried re-installing the driver from the HP driver disc. However after many attempts I still can not get it to work. Is this a known issue, if so is there a fix?… -
Downloading HP Laser Jet 1018
in Windows 10 Drivers and Hardware
Downloading HP Laser Jet 1018: Why does HP Laser Jet 1018 not appear as an option to download on my PC?I had it once before and deleted it, and wonder if that is the problem.
Do I need a driver first?…
-
HP Laser Jet verified drivers
in Windows 10 Installation and Upgrade
HP Laser Jet verified drivers: I have a Windows 10 S laptop, and am trying to install the HP LaserJet 1020 driver on it, but the driver is not a verified app. The HP site doesn’t seem to have a verified app available for download. Are there any other alternatives for me? I suspect I will run into the… -
HP laser jet 1018 will not print
in Windows 10 Drivers and Hardware
HP laser jet 1018 will not print: I was in idle status, removed hardware and now back at square 1. New desktop today, worked fine on old machinehttps://answers.microsoft.com/en-us/windows/forum/all/hp-laser-jet-1018-will-not-print/7d161a25-7c0b-426b-b552-763cddc02ac5
-
HP Laser Jet 1020 / 10.0.10240
in Windows 10 Drivers and Hardware
HP Laser Jet 1020 / 10.0.10240: The drivers of my printer were correctly install when I turn it ON yesterday. It’s the first time since 10074 that automatic installation occurs.8904