
Такая ошибка может возникать при стирании данных и разбиении на разделы. Это происходит, потому что ОС пытается использовать том «Зарезервировано Microsoft» емкостью 134,2 МБ для тома EFI, минимальный размер которого — 200 МБ. Технические подробности см. в документации Apple.
Эту проблему можно решить разными способами, но проще всего отформатировать накопитель с использованием схемы разделов GUID. Тогда Дисковая утилита сможет создать на нем собственные тома. Если этот вариант недоступен, включите режим просмотра Показывать все устройства вверху слева (см. начало этой статьи).
Если накопитель будет использоваться и с macOS, и с Windows, сделайте резервную копию всех важных данных с него и отформатируйте его в exFAT под macOS. Как отформатировать накопитель в exFAT…
Если вы планируете использовать накопитель только в macOS, отформатируйте его в Mac OS Extended (журналируемая). Этот формат оптимизирован специально для устройств Apple. По-другому он называется HFS+. Как отформатировать накопитель в HFS+…
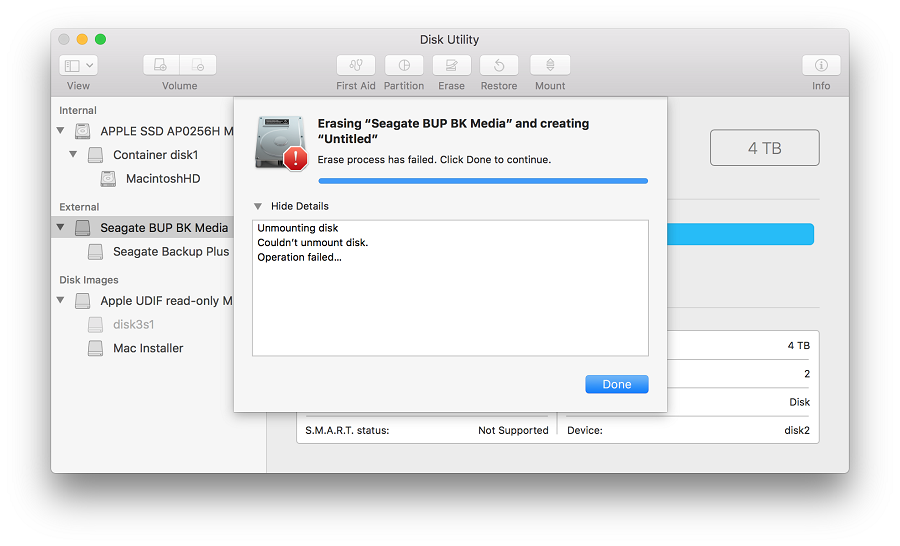
Такая ошибка может возникать по ряду причин. Это происходит, если накопитель занят — например, когда на нем открыт образ диска. В таком случае извлеките образ и еще раз попробуйте отформатировать диск.
Если вы считаете, что диск не занят никаким процессом, просто запустите форматирование еще раз. Если это не поможет, выделите том и нажмите «Отключить». После этого мешающий процесс должен завершиться.
Если и это не поможет, выключите компьютер, отключите накопитель и перезагрузите компьютер. Когда ОС загрузится, подключите накопитель и вновь попробуйте его отформатировать.
Ошибка: ошибка com.apple.DiskManagement.disenter 49223
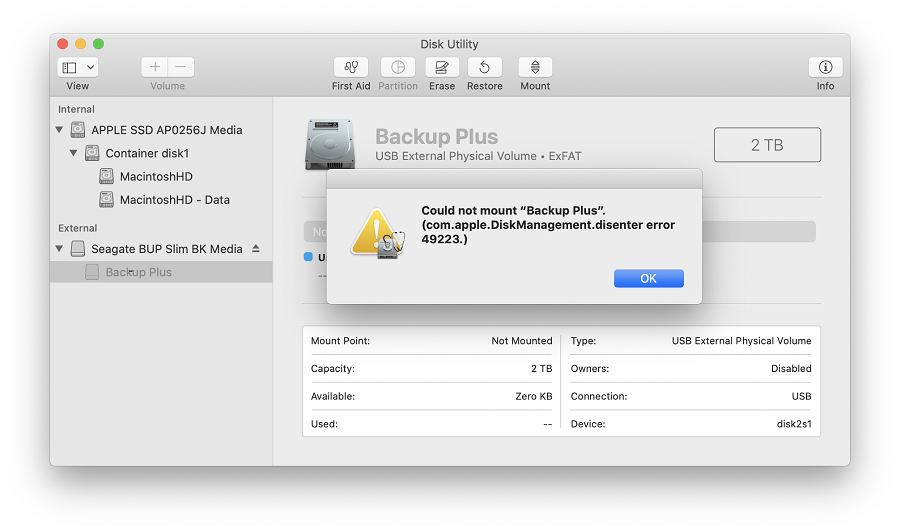
Такая ошибка случается с накопителями, отформатированными в exFAT. Если накопитель используется и с macOS, и с ОС Windows, его нужно форматировать только на компьютере с macOS. Дело в том, что она не поддерживает некоторые размеры кластеров (блоков), создаваемые при форматировании в ОС Windows. Из-за этого накопитель может не подключаться. Это сообщение об ошибке выводится, если попытаться вручную подключить накопитель в Дисковой утилите.
Если накопитель будет использоваться и с macOS, и с Windows, сделайте резервную копию всех важных данных с него и отформатируйте его в exFAT под macOS. Как отформатировать накопитель в exFAT…
Если вы планируете использовать накопитель только в macOS, отформатируйте его в Mac OS Extended (журналируемая). Этот формат оптимизирован специально для устройств Apple. По-другому он называется HFS+. Как отформатировать накопитель в HFS+…
Ошибка: ошибка com.apple.DiskManagement.disenter 49153
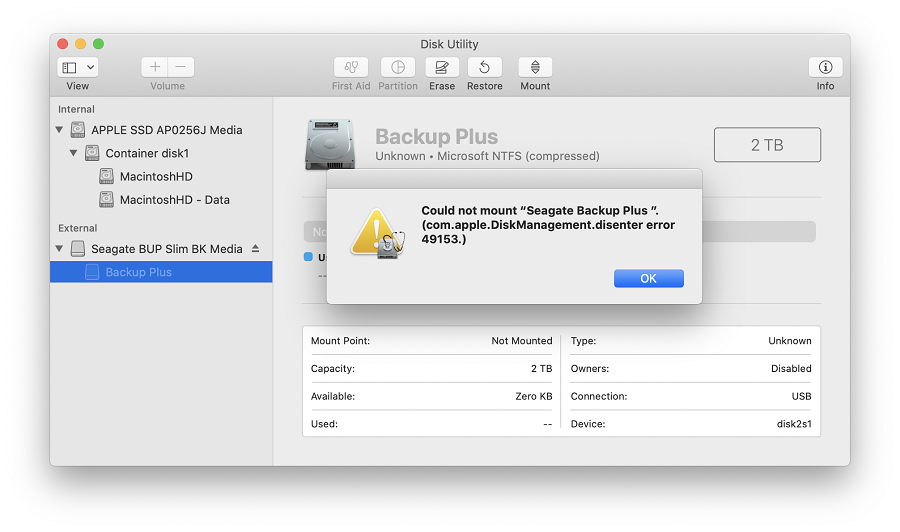
Такая ошибка характерна для внешних жестких дисков и некоторых других накопителей. Она возникает, если диск отформатирован в NTFS и для него используется драйвер Paragon. Обычно причина проблемы заключается именно в драйвере.
Чтобы решить проблему, удалите и заново установите драйвер Paragon. Как удалить драйвер Paragon… Если у вас macOS 10.13 (High Sierra) или более поздней версии, при установке обязательно выберите для расширения ядра опцию «Разрешить». Если кнопка «Разрешить» отсутствует, попробуйте смонтировать накопитель с помощью программного обеспечения Paragon и проверить, не выдается ли сообщение об ошибке. После этого кнопка «Разрешить» может появиться на панели «Защита и безопасность».
ПРИМЕЧАНИЕ. Версия Paragon для дисков Seagate несовместима с накопителями LaCie. Если вы используете полную версию Paragon, удалите и вновь установите ее, следуя инструкциям в Paragon.
Что делать, если решить проблему не удалось?
Если у вас есть доступ к другому компьютеру Mac, попробуйте подключить накопитель к нему и вновь запустить стирание данных.
Если у вас есть возможность воспользоваться другим компьютером с ОС Windows, подключите накопитель к этому компьютеру и отформатируйте его с помощью утилиты diskpart. Как пользоваться diskpart… Затем вновь подключите накопитель к компьютеру Mac и попробуйте стереть данные.
Источник
Вы можете получить сообщение «Диск, который вы вставили, не был доступен для чтения на этом компьютере. » на Mac в разных ситуациях. Это означает, что подключенный внешний жесткий диск не распознается Mac.
Что ж, ваши файлы, хранящиеся на диске, не будут потеряны, хотя в настоящее время вы не можете читать и записывать этот диск.
В этой статье анализируются некоторые распространенные причины и решения о нечитаемых дисках на Mac. Вы можете прочитать и выполнить следующие шаги, чтобы выяснить реальную причину. Даже если ваш внешний жесткий диск отключен, вы также должны как можно скорее восстановить важные данные.

1. Вставьте другой диск в компьютер Mac
Собственно, вам нужно определить, какое устройство повреждено, подключенный диск или ваш Mac? Если значок жесткого диска появляется в Finder, проблема связана с неисправным жестким диском.
Вы также можете подключить к компьютеру другие съемные устройства, например USB-накопитель, iPhone, Android и другие. Если вы не можете открыть диск и получить «Диск, который вы вставили, не был доступен для чтения на этом компьютере. » сообщение об ошибке на Mac, значит, с вашим Mac определенно что-то не так.
2. Запустите Дисковую Утилиту, чтобы Устранить неполадки нечитаемого диска на Mac
Иногда сообщение «Вставленный диск не был доступен для чтения на этом компьютере”Появляется, как только вы вставляете диск в Mac. В течение этого времени вы можете восстановить нечитаемый диск с помощью Дисковой утилиты.
Шаг 1 Нажмите Игнорировать когда вы видите сообщение об ошибке вставленного диска не читается Mac.
Шаг 2 Откройте Launchpad, Тип Disk Utility в строке поиска вверху, чтобы получить этот инструмент.
Шаг 3 Выберите свой нечитаемый диск в Disk Utility окно.
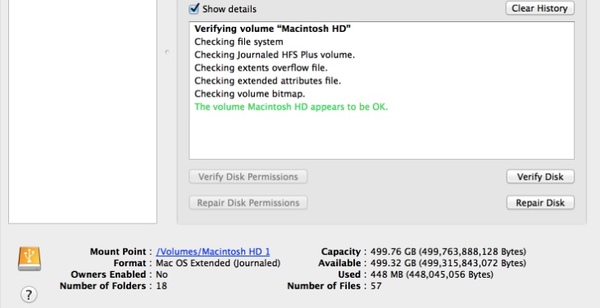
Шаг 4 Нажмите Первая помощь на верхней панели инструментов.
Шаг 5 Подождите некоторое время, чтобы завершить процесс. Позже перезагрузите Mac и проверьте, доступен ли диск для чтения.
Примечание. Если вы получили другое сообщение с надписью «Процесс оказания первой помощи не удался”, Вам необходимо исправить ошибку нечитаемой информации с диска другими мерами.
3. Переформатировать нечитаемый диск в FAT32
Если ваш внешний диск NTFS-отформатированных, то определенно не может быть распознан Mac. Вам необходимо изменить формат внешнего жесткого диска на FAT32, чтобы исправить «Вставленный диск не был доступен для чтения на этом компьютере. » на Mac.
Шаг 1 Нажмите Finder > Приложения > Утилиты > Disk Utility.
Шаг 2 Выберите диск, который показывает нечитаемое сообщение об ошибке на левой панели.
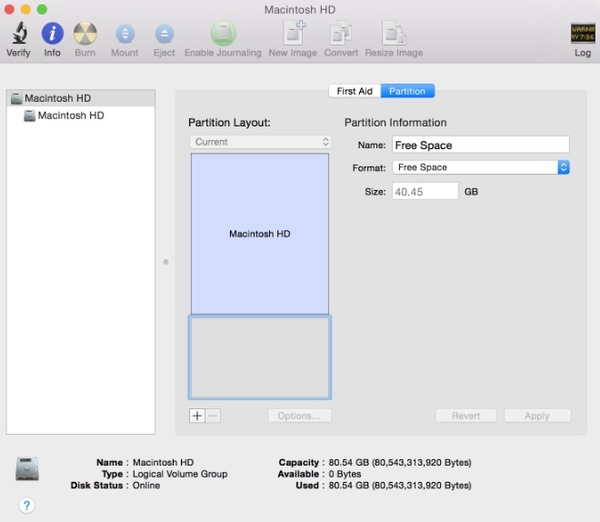
Шаг 3 Нажмите Раздел на верхней панели ленты.
Шаг 4 Выберите количество разделов под Объемная схема из его выпадающего меню.
Шаг 5 Нажмите Формат под Информация о томе последующей MS-DOS (FAT).
Шаг 6 Выберите Применить и Раздел подтвердить и начать исправление нечитаемого диска.
4. Инициализировать нечитаемый диск и восстановить все потерянные данные
Если ваш жесткий диск все еще не читается, вы должны выбрать инициализировать когда «Вставленный диск не был доступен для чтения на этом компьютере. » ошибка появляется на Mac. В результате ваш поврежденный диск будет переустановлен с правильной файловой системой. Хотя по умолчанию все ваши предыдущие файлы стираются.
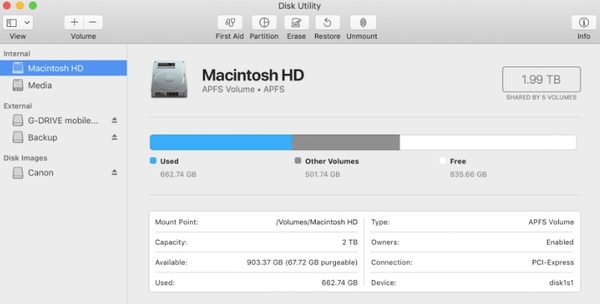
Шаг 1 Выберите Вид в верхней строке меню Дисковая утилита, Затем выберите Показать все устройства из его списка.
Шаг 2 Выберите подключенное устройство в разделе Внешний в левой панели.
Шаг 3 Нажмите Первая помощь на верхней панели ленты.
Шаг 4 Выберите Ремонт диска полностью восстановить нечитаемый диск на Mac.
5. Восстановите все утерянные данные с помощью FoneLab Data Retriever
К счастью, вы можете запустить FoneLab Data Retriever восстановить любые данные после форматирования на Mac. Mac для восстановления данных программного обеспечения может помочь вам восстановить фотографии, видео, музыку, документы и многие другие файлы с поврежденного внешнего жесткого диска. Поддерживаются большинство марок внешних жестких дисков, такие как Seagate, SanDisk, Кингстон, Western Digital, И т.д.
Одним словом, вы можете восстановить данные с диска с Data Retriever без особых усилий.
- Восстановите удаленные или потерянные данные с вашего Windows / Mac, карты памяти, флэш-накопителя, видеокамеры цифровой камеры, жесткого диска и других съемных дисков.
- Широкая поддержка восстанавливаемых типов данных и форматов.
- Найти потерянные данные с Быстрое сканирование и Глубокий анализ Режим.
- Верните потерянные файлы без изменений или перезаписи.
FoneLab Data Retriever — восстанавливайте потерянные / удаленные данные с компьютера, жесткого диска, флэш-накопителя, карты памяти, цифровой камеры и многого другого.
- Восстановление фотографий, видео, документов и других данных с легкостью.
- Предварительный просмотр данных перед восстановлением.
Теперь вы можете безопасно и легко исправить вставленный диск, который не читался этим компьютером на Mac. Если вы не можете найти определенный файл, не забудьте запустить Ретривер данных восстановить данные на Mac немедленно.
В противном случае удаленные файлы могут быть заменены вновь сохраненными файлами навсегда.
Источник
Looks like no one’s replied in a while. To start the conversation again, simply
ask a new question.
After updating my imac to macOS Catalina it will not show my external hard drive. The drive is recognized on the disk utility but when I try to mount it I got the following message «Could not mount “TOSHIBA EXT”. (com.apple.DiskManagement.disenter error 49244.)». How can I fix this issue?
Posted on Oct 11, 2019 3:23 PM
6 replies
Question marked as
★
Helpful
Oct 16, 2019 5:51 AM in response to luisr1031
I solved the problem by install the trial 15 days tuxera license
Question marked as
★
Helpful
Oct 18, 2019 6:44 PM in response to claus237
Hi,
In utilities, the hard drive was greyed out. I can’t mount my new hard drive. I just keep getting the error.
I’ll take it back to the store and see what they can do.
Question marked as
★
Helpful
Oct 16, 2019 6:20 AM in response to maminyana
I’ve reinstalled Tuxera, and the problem is been solved!
Question marked as
★
Helpful
Oct 16, 2019 9:23 AM in response to yeison208
And what will happen when your free trial expires?
Question marked as
★
Helpful
Oct 15, 2019 1:20 PM in response to luisr1031
My Macbook pro also got this problem when I insert my WD Mobile Hard disk.
There are so many important files
Question marked as
★
Helpful
Nov 14, 2019 9:30 AM in response to luisr1031
Après la mise à jour de mon imac vers macOS Catalina, mon disque dur externe ne s’affiche pas. Le lecteur est reconnu sur l’utilitaire de disque, mais lorsque j’essaie de le monter, le message suivant «Impossible de monter» Backup». (Erreur 49244 de com.apple.DiskManagement.disenter). Comment puis-je résoudre ce problème?
35 replies
Oct 22, 2019 12:13 AM in response to rogerh@mac.com
tout fonctionne depuis la mise à jour de tuxera,
since the update of Tuxera it’s OK for me
Oct 25, 2019 3:19 AM in response to yeison208
Tuxera Works perfectly so far. Had bought the previous version in 2015. Bought a new license key just now.
Oct 25, 2019 7:13 AM in response to luisr1031
Same issue is happening on my MacBook Air Mid-2015. But it is not mounting anything, not even update nor any other download image (DMG file). External disks nor Time Machine either.
Does any one got any answer for that? Tuxera didn’t worked as well.
Workaround I am using is downloading in other machine, extract file do disk and copy using AirDrop, but is it not a solution.
Thanks.
Oct 30, 2019 2:27 PM in response to NickZaven
I am having major issues with spinning external hard drives after installing Catalina. I’ve had 2 hard drives die and a 3rd is now failing to mount.
Oct 30, 2019 3:10 PM in response to maminyana
You need special software to be able got access and use an NTFS volume. A system upgrade will remove that software so you’ll need to reinstall it.

Nov 2, 2019 10:20 AM in response to luisr1031
(com.apple.DiskManagement.disenter error 0.) In my case.
Is there a way to make my WD Mybook work again also on Catalina MBPro 2019? Strangest thing is that i have same model Mybook at office and it works fine with Catalina on Imac (27 late 2013) Both hdd’s are xFat and was working perfect before catalina update.
Nov 11, 2019 6:24 AM in response to luisr1031
Have similar error after updating macOS Catalonia. What should I do to rectify it. Have 4Tb of files in my external hard disk and it is not mounting.
Nov 13, 2019 6:40 PM in response to luisr1031
UPDATED YOUR TUXERA DISK MANAGER
I had the same error today. When I upgraded to the new macOS Catalina, Tuxera Disk Manager was outdated and needed to be manually updated (it doesn’t happen automatically like most other apps). Once I updated Tuxera, I was able to mount all my external hard drives.
Question marked as
★
Helpful
Nov 14, 2019 9:30 AM in response to luisr1031
Après la mise à jour de mon imac vers macOS Catalina, mon disque dur externe ne s’affiche pas. Le lecteur est reconnu sur l’utilitaire de disque, mais lorsque j’essaie de le monter, le message suivant «Impossible de monter» Backup». (Erreur 49244 de com.apple.DiskManagement.disenter). Comment puis-je résoudre ce problème?
Dec 10, 2019 11:03 PM in response to luisr1031
I have the exact same issue… except its with my Macbook’s internal SSD… yeah.
Happened sometime roughly after I upgraded my mac to MacOS Catalina. One day, I decide to restart my mac, and then next thing you know it can’t find it’s boot drive. Question mark icon on a blinking folder when I try to boot up.
I would really like to just be able to mount my internal SSD again so I can access my data normally, but for now I am stuck booting off of an external drive with MacOS Catalina installed, using 3rd party data recovery software to try and save some of my data before I will probably inevitably have to format the SSD and start over again.
Any known fixes to mount my internal APFS drive? Its not even recognized as a boot drive when in recovery mode… Thinking this is more serious than I’m making it out to be!
Dec 20, 2019 5:24 PM in response to luisr1031
I got same issue while i was copying boot image suddenly remove usb from mac. thereafter mac doesn’t recognise my usb even i format usb using windows machine. so I clearly read error message so then I realised partition table has issue. to fix that I used below resolution
- plug usb and open terminal with diskutil list ( in my case it was dev/disk2
- re-partition whole disk with «diskutil eraseDisk JHFS+ UntitledUFS diskN» (diskN is your disk number my case it was disk2)
mac Os Catalina and mac book pro 2018 version
Thanks
Damith
Jan 6, 2020 10:38 AM in response to luisr1031
After updating my imac to macOS Catalina it will not show my external hard drive. The drive is recognized on the disk utility but when I try to mount it I got the following message «Could not mount “TOSHIBA EXT”. (com.apple.DiskManagement.disenter error 49244.)». How can I fix this issue?
Jan 17, 2020 11:37 AM in response to maminyana
How did you reinstall this? Did you buy the Tuxera software?
Disk Management disenter error 49244
I have a fairly new LaCie d2 4TB hard drive (roughly one year old). Some days ago it wouldn’t show up anymore and now I looked into the issue.
In disk utility the disk is unmounted. When hitting «mount» I get this error:
(com.apple.DiskManagement.disenter-error 49244.)
When trying to repair the disk I get the exit code 8 and
Invalid node structure (8, 0) Invalid B-tree node size (8, 0)
I also have Bootcamp installed and Windows can see the drive; it seems normal to me there. But it is formatted as Mac OS Extended so Windows can’t do anything with it. Do you have any idea what I can do other than reformat?
I read the in a different post that you can try the repair process in the terminal or boot into windows and eject the drive properly (yet, Windows isn’t even mounting a Mac OS Extended journaled drive, so how should I unmount it. Also a normal shutdown should do this job, too, and I have done that multiple times in both macOS and Windows). I have tried the terminal commands from the mentioned post, the only interesting part is, when using the sudo fsck_hfs -r -d /dev/disk5s2 command I get this error, where it also shows error 7.
** /dev/rdisk5s2
    Using cacheBlockSize=32K cacheTotalBlock=65536 cacheSize=2097152K.
   Executing fsck_hfs (version hfs-522.100.5).
** Checking Journaled HFS Plus volume.
   The volume name is X-d2
hfs_swap_BTNode: offsets 1 and 0 out of order (0x0000, 0x0000)
   Invalid node structure
(8, 0)
   Invalid B-tree node size
(8, 0)
** The volume X-d2 could not be verified completely.
    volume check failed with error 7
    volume type is pure HFS+
    primary MDB is at block 0 0x00
    alternate MDB is at block 0 0x00
    primary VHB is at block 2 0x02
    alternate VHB is at block 7813365342 0x1d1b67e5e
    sector size = 512 0x200
    VolumeObject flags = 0x07
    total sectors for volume = 7813365344 0x1d1b67e60
    total sectors for embedded volume = 0 0x00
    CheckHFS returned -1317, fsmodified = 0
(The files are backed up, so it would be ok to reformat, but I would prefer being able to repair it)
I would be very happy for any answers. Thank you!
What Is Error 49244?
Many users have reported Error 49244 to appear each time when they connect an external SSD drive to their Mac, running the latest version. The main problem with this error is that it holds the process of the connection and stops it completely from happening.
Read this post to learn more about what is this error and what it does on your Mac and what you can do to fix it for free.

On this page:
What Is Error 49244?Error 49244 DetailsError 49244 – What Are Its SymptomsIs Error 49244 Dangerous?Error 49244 – How to Fix It?Alternative Fixes
Error 49244 Details
| Name | Error 49244, also known as com.apple.DiskManagement.disenter error 49244 |
| Type | Runtime / Compatibility Error |
| Short Description | The error says that an external drive has incompatible partition, which cannot be read. |
| Symptoms | A pop-up stating the error and its number – “Disk Management disenter error 49244“. |
| Program | MacOS |
| Fix Tool |
Try this fix to repair your Mac from errors and optimise system performance:
Download SpyHunter |
Error 49244 – What Are Its Symptoms
Error 49244 is a typical compatibility runtime error and belongs to the same type of errors as the Error -1426, Error Code 1309 and Error Code 101.
Victims have posted on Apple’s Community Forums noticing this error with the following complaints:
error 49244
I tried to connect a SSD external hard drive, it is recognized by Mac OS Monterey but impossible to activate and thus format or partition. ???error message disenter error 49244
Other side effects of seeing the Disk Management disenter error 49244 on your Mac may also be:
- Internet speed starts slowing down.
- Your device may behave erratically.
- Some of your other apps or external drives connected may stop functioning.
This is a runtime error that most likely is related to the compatibility of your Mac with external drives. Seeing it does not necessarily mean that your Mac has a virus. However, it is recommended to do a checkup using a professional anti-malware software, due to the possibility of some malware modifying your compatibility permissions and partitions.
Is Error 49244 Dangerous?
This error belongs to the category of runtime / compatibility errors, and as such, it doesn’t seem to be related to a more severe issue.
Error 49244 – How to Fix It?
Below we have quoted several different methods, which are possible fixes according to support. Be advised to backup all your files on your external drive from a safe device before applying those steps.
According to the experts on forums, the most upvoted solutions that are reportedly working to fix the com.apple.DiskManagement.disenter error 49244 are the following:
Error 49244 Fix #1:
- Open Disk Utility tool and click on Show All Devices.
- Select your external drive and then check if are able to erase and re-format the drive using GUID / APFS partition map.
- Erase or reformat the drive.
Error 49244 Fix #2
- Plug in your device.
- Open your Terminal after which navigate to dev/{your disk number or name}
- Type “diskutil eraseDisk JHFS+ UntitledUFS disk(Your disk number)” to repartition the whole disk.
Alternative Fixes
If these fixes do not work, you can try the general fixes that are designed to help you deal with most runtime errors for macOS, located below:
Step 1: Close any apps or programs that may be in conflict.
When you get errors, like this one, often conflicting apps may be the case. Below, you can find the solutions for closing conflicting apps for Windows and macOS:
Go to Activity Monitor, mark any processes you believe are suspicious and close them by clicking the “X” button on top left above them.
After you have done this fix, you should observe if this error will show up again if you start and stop a specific process.
Step 2: Update and Re-install Any Software You Believe is Problematic.
Go to Applications and drag the icon of your program to Bin to uninstall it. For macOS, you can go to your AppStore and click on the “Updates” tab to check if any applications are out of date.
Step 3: Install the latest updates of your OS.
Go to System Preferences – Software Update and check for a newer macOS version. You will see a button to install it and Upgrade if its available.
Step 4: Scan your Mac for errors and optimise it automatically.
If you have tried most of the fixes, but you keep getting error messages, then the best advice to go for is to make sure and check your computer for:
- Viruses.
- Tracking cookies and other pesky and harmful objects.
- Problematic files.
- Unwanted software.
- Adware.
- Browser Hijackers.
- Other errors that may be slowing it down.
You can do all of this by running an automatic scan of your computer using a professional anti-malware software. Such an advanced tool is created by cybersecurity and tech experts and is guaranteed to help detect and delete any malicious files and whatever may be causing errors and optimise your computer to make it fast again:
Spy Hunter scanner will only detect the problem. If you want the issue to be automatically removed, you need to purchase the full version of the anti-malware tool.Find Out More About SpyHunter Anti-Malware Tool / How to Uninstall SpyHunter
Mac Errors – Frequently Asked Questions
What are Mac Errors?
Mac errors are faulty problems of macOS. They are different types, affecting various programs running on your Mac.
Since macOS is frequently updated, it is easier to fix such errors, due to the way this operating system is constructed.
What Do Mac Error Codes Mean?
Error Codes on Mac are how your macOS explains the different types of problems that can occur on it. The number of the Mac Error code pops up on your screen, and it shows you the error with some explanatory text to help you fix it.
These error codes exist for both small and bigger problems, and in some cases, they can mean that there is a significant issue with your device.
Why Do I See Errors On My Mac?
The reasons may vary. These can be due to a badly written code, faulty software, external app modifying your app, incompatibility, problems with the resources required to run the app, and even a Mac malware infection.
What Types of Mac Errors Exist?
Just like with Windows devices, there are some general error types with Mac as well, including:
- Runtime Errors – when you execute a program and it fails due to badly written code, incompatibility with the program and web servers or other problems, like malware.
- Logic Errors – something in the logic makes the program fail to return results.
- Arithmetic Errors – a type of logic error, which involves miscalculation due to an erroneous configuration or code that does not fit the same logic as the system reads it.
- Resource Errors – when your device does not meet the resources required to run a program or if the program is coded faulty, so it requires more resources than necessary.
- Interface Errors – when there is a difference between what an app is meant to do and what it actually does.
- Compilation Errors – when the compiler of a software fails to turn complicated code into a simple language, understandable by your Mac.
Which are The Most Common Mac Errors?
According to different sources and online forums, the most commonly encountered errors on Mac carry the following codes:
- Error Code 36 – when Finder fails to read or write a file on your Mac.
- Error Code 41 – caused by malware, outdated software or corrupted files and directories.
- Error Code 50 – when you fail to copy and paste a file onto another drive, like USB or an external SSD or HDD.
- Error Code 2003F – it shows up when you try reinstalling your macOS in Recovery Mode. Possible causes include bad sectors in the hard disk, malware, etc.
What to Do If I See a Mac Error?
If you see an error on your Mac, your first job is to check the meaning of it. Then, you can see reputable forums, like Apple Discussions or SensorsTechForum in order to find different types of fixes for the problem.
How to Stop Getting Mac Errors?
You cannot. As long as there are people writing the code, there will always be the human error factor. However, there are several measures that you can take in order to significantly reduce the chance of getting a Mac Error:
- Check and update your Mac and your Apps (if possible) to the latest version on a daily basis.
- Install a relevant and reputable anti-malware for Mac.
- Install an optimizer for your Mac, which will keep all your apps updated, remove junk software, and improve your Mac’s health.
- Only install apps from trusted sources.

Ventsislav Krastev
Ventsislav is a cybersecurity expert at SensorsTechForum since 2015. He has been researching, covering, helping victims with the latest malware infections plus testing and reviewing software and the newest tech developments. Having graduated Marketing as well, Ventsislav also has passion for learning new shifts and innovations in cybersecurity that become game changers. After studying Value Chain Management, Network Administration and Computer Administration of System Applications, he found his true calling within the cybersecrurity industry and is a strong believer in the education of every user towards online safety and security.
More Posts — Website
Follow Me:
-
#1
I have a MacBook Air M1 2020. MacOS Ventura 13.0.1 When I try to make a clone of a system disk to external drive, I always get error 49244 regardless a tool I’m using — «asr» in terminal or Disk Utility. How to fix it?
-
#2
Have you tried using either SuperDuper or CarbonCopyCloner ??
Both are free to download and try out for 30 days.
SuperDuper will do a «full clone» (clones everything, not «incremental») forever without having to register.
-
#3
Have you tried using either SuperDuper or CarbonCopyCloner ??
Both are free to download and try out for 30 days.
SuperDuper will do a «full clone» (clones everything, not «incremental») forever without having to register.
No, I’ve not tried these. And I’m not interested in using of 3rd part utilities. I need to use only built-in ones
-
#4
«And I’m not interested in using of 3rd part utilities. I need to use only built-in ones»
Have it your way.
CCC and SD are utilities that are designed SPECIFICALLY for «cloning» drives.
They use the «asr» routine, but with a graphical user interface.
-
#5
«And I’m not interested in using of 3rd part utilities. I need to use only built-in ones»
Have it your way.
CCC and SD are utilities that are designed SPECIFICALLY for «cloning» drives.
They use the «asr» routine, but with a graphical user interface.
CCC & SD both are 3rd party software
-
#6
macOS Big Sur and later uses a Signed System Volume to protect most system content. This is implemented as a sealed snapshot on the system volume. In order for the clone to boot successfully, this snapshot must be copied over exactly as is. I am not sure wether Disk Utility actually allows for access to the sealed snapshot (name and UUID)?.
The good news: ASR can do it.
Make sure to have…
- sufficient space on the destination disk.
- you have full disk access permissions for Terminal. This is required for ASR to successfully clone the running macOS system, at least in macOS Ventura and later.
- identified correctly your source and target using diskutil — importantly the startup snapshot and UUID.
- your destination is a Apple File System (APFS) Container that will hold your new clone on the external SSD. You can clone your source system to the same drive that holds it, but you’ll likely need macOS Recovery’s Terminal for that.
- assembled in the Terminal the specific ASR command that you’ll use. Something along the lines of:
sudo asr restore --source /dev/sysvol --target /dev/yourTarget --toSnapshot sysSnap --no-personalization --erase.
— Replace sysvol with the source system volume’s disk ID
— Replace yourTarget with the disk ID for the target volume or container.
— Replace sysSnap with the UUID or name of the source system snapshot.
You can do this from macOS Recovery too — then the “sudo” from the start of the command sequence above isn’t needed.
Or… you simply use e.g. CCC or SD — which offer a GUI wrapper to AST — recommended and pointed out by @Fishrrman 😎
Last edited: Dec 5, 2022
-
#7
slart observed:
«Or… you simply use e.g. CCC or SD — which offer a GUI wrapper to AST — recommended and pointed out by @Fishrrman»
The guy seems to have some beef with using 3rd party applications.
He could download SuperDuper and have the job done in five minutes — FOR FREE.
-
#10
slart observed:
«Or… you simply use e.g. CCC or SD — which offer a GUI wrapper to AST — recommended and pointed out by @Fishrrman»The guy seems to have some beef with using 3rd party applications.
He could download SuperDuper and have the job done in five minutes — FOR FREE.
For free? Yeaahh, of course. «Smart update, copy newer, copy different modes are only available in the registered version»
-
#11
Yes, SuperDuper IS free, if you wish to clone THE ENTIRE DRIVE.
It will do this over and over again, and you don’t have to register.
However…
If you wish to do «incremental» backups, then you have to register.
Why don’t you just give it a try?
CCC (on the other hand) is fully functional for 30 days.
Then you have to register.
-
#12
Yes, SuperDuper IS free, if you wish to clone THE ENTIRE DRIVE.
It will do this over and over again, and you don’t have to register.
However…
If you wish to do «incremental» backups, then you have to register.Why don’t you just give it a try?
CCC (on the other hand) is fully functional for 30 days.
Then you have to register.
SuperDuper you said? Okey man

Error 49244
-
#13
I’m using — «asr» in terminal
Can you post the result of diskutil list ?
I’ve successfully cloned Monterey from a VM to an external SSD with
Code:
sudo asr restore --source /dev/disk1s3 --target /dev/disk3s1 –erasewhere /dev/disk1s3 was the system volume (Macintosh HD) and /dev/disk3s1 was the APFS formatted volume on the external disk.
In your case, from the last image, it probably should look like this
Code:
sudo asr restore --source /dev/disk1s3 --target /dev/disk5s1 –erasebut make sure /dev/disk5s1 is still the desired destination, as it will be erased.
-
#14
Can you post the result of diskutil list ?
I’ve successfully cloned Monterey from a VM to an external SSD withCode:
sudo asr restore --source /dev/disk1s3 --target /dev/disk3s1 –erasewhere /dev/disk1s3 was the system volume (Macintosh HD) and /dev/disk3s1 was the APFS formatted volume on the external disk.
In your case, from the last image, it probably should look like thisCode:
sudo asr restore --source /dev/disk1s3 --target /dev/disk5s1 –erasebut make sure /dev/disk5s1 is still the desired destination, as it will be erased.
diskutil list

asr error 49244

my cat )))

-
#15
Did you give Terminal full disk access? As mentioned by Slartibart above.
-
#16
Did you give Terminal full disk access? As mentioned by Slartibart above.
Of course I did
-
#17
Kind of curious as to why you’re doing screen shots with an external tool rather than the built-in screen capture commands.
-
#18
I think I had SIP disabled too, but that should not be required in order to work.
-
#19
I’ve just tried on MBA M1 with Monterey 12.6.1 (SIP disabled) and it worked like this:
Code:
sudo asr restore --no-personalization --source / --target /dev/disk7 --erasewhere /dev/disk7 was a whole partition on the external disk.

-
#20
Kind of curious as to why you’re doing screen shots with an external tool rather than the built-in screen capture commands.
It’s hard to explain now. Just as is. I know I can use internal tool but it’s about enterprise policies.
-
#21
I’ve just tried on MBA M1 with Monterey 12.6.1 (SIP disabled) and it worked like this:
Code:
sudo asr restore --no-personalization --source / --target /dev/disk7 --erasewhere /dev/disk7 was a whole partition on the external disk.
View attachment 2124816
The same

-
#23
Have you run First Aid on the external disk?
Apple: «Repair volumes, then containers, then disks»
https://support.apple.com/HT210898
EN https://support.apple.com/en-us/HT210898
Dude, I’ve already checked several different external disks. I’m always getting the same error as I said in my first post.
And I never got this error when I did imaging on Intel Macbook. So this error has connection with CPU type as I think.
-
#24
You have Tuxera’s NTFS support (or Fuse) installed on your system?
-
#25
You have Tuxera’s NTFS support (or Fuse) installed on your system?
No, I don’t