
Функция сжатия оперативной памяти в Windows 10 и 11 используется для оптимизации использования RAM за счет хранения части страниц в оперативной памяти в сжатом виде (компрессия). Благодаря использованию сжатия памяти процессов вы можете размещать больше процессов в физической оперативной памяти без складывания их в своп файла на диске. Нужные данные извлекаются из более быстрой оперативной памяти быстрее, даже с учетом того, что на их сжатие/декомпрессию тратятся дополнительные ресурсы процессора. При использовании сжатия памяти уменьшается использование RAM, снижается нагрузка на жесткий диск за счет меньшего количества операций ввода/вывода к файлу подкачки и сохраняется ресурс SSD.
Впервые Microsoft добавила поддержку сжатия памяти процессом Memory Manager (MM) в Windows 10 и Windows Server 2016. В этой статье мы рассмотрим, как посмотреть статистику по использованию сжатой памяти в Windows, как включить или отключить сжатие RAM (если ваш компьютер работает медленно из-за высокой загрузки процессом Memory Compression).
Содержание:
- Получить информацию о сжатой памяти в Windows 10
- Процесс «Система и сжатая память» сильно грузит компьютер
- Как отключить сжатую память в Windows 10 и 11?
- Как включить сжатие памяти в Windows Server 2016/2019/2022 или Windows 10/11?
Если диспетчер памяти Windows обнаруживает нехватку памяти, он пытается сжать неиспользуемые страницы памяти вместо записи их в файл подкачки на диске и за счет этого освободить ресурсы RAM для других процессов.
Изначально поток, отвечающий за работу подсистемы сжатой памяти, находилась внутри процесса System, что было не очень удобно с точки зрения диагностики.
В современных билдах Windows (Win 10 20H2 и Windows 11) этот функционал выделен в отдельный процесс Сжатая память (Memory Compression), который не доступен в диалоговом окне диспетчера задач. Получить информацию об этом процессе можно с помощью PowerShell командлета Get-Process:
Get-Process -Name "Memory Compression"
Handles NPM(K) PM(K) WS(K) CPU(s) Id SI ProcessName
------- ------ ----- ----- ------ -- -- -----------
0 0 2184 53104 1 810,95 2388 0 Memory Compression

В диспетчере задач Windows можно просмотреть только текущий уровень использования компрессии памяти.
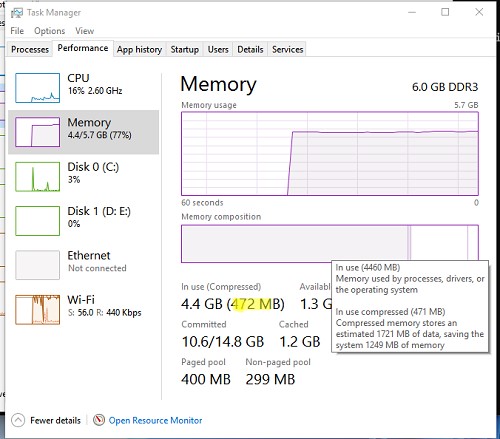
Перейдите на вкладку Производительность (Performance), выберите раздел Память (Memory). Текущее значение использования сжатой памяти отображается в значении параметра Использование (сжатая)/ In Use (Compression). В моем примере Windows использует 4.4 Гб памяти, из которой в сжатом виде хранится 472 Мб. Чтобы понять, какой объем данных получилось сжать, нужно навести мышкой на график Структура памяти (Memory composition):
Используется сжатой памяти (471 Мб). В сжатой памяти хранится примерно 1721 Мб данных, освобождая для системы 1249 Мб памяти.
Как вы видите, уровень компрессии памяти достигает почти 400%, так что экономия RAM довольно большая.
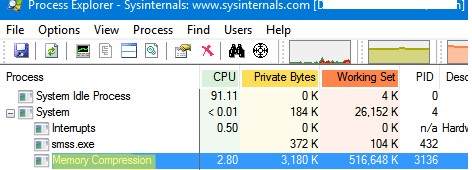
Вы можете найти более подробную информацию о нагрузке на CPU процессом Memory Compression и его размер в памяти Windows 10/11 с помощью утилиты Process Explorer.
Запустите Process Explorer и найдите процесс Memory Compression в дереве процесса System.
Процесс сжатия памяти обслуживаются службой SysMain (ранее – SuperFetch). SysMain обеспечивает сокращение объёма записи на диск путём сжатия и объединения страниц памяти. Если эта служба остановлена, то в Windows не используется сжатие RAM.
Вы можете проверить состояние службы SysMain с помощью PowerShell:
get-service sysmain

В большинстве случаев, если Windows работает нормально и на нем установлен достаточный объём оперативной памяти, процесс «Сжатой памяти» работает отлично и не требует никакого вмешательства.
Процесс «Система и сжатая память» сильно грузит компьютер
Служба SysMain и процесс Memory Compression в подавляющем большинстве случаем улучшают производительность компьютера. Но иногда случается, когда процесс «Система и сжатая память» начинает сильно грузить процессор или жесткий диск компьютера (вплоть до 100%, это видно в диспетчере задач), или же занимать в памяти слишком много места. Компьютер, при этом, естественно, начинает сильно тормозить и подвисать.
Что делать в этом случае?
Я приведу 2 совета, которые должны помочь исправить проблему с высокой загрузкой системы процессом «Сжатая память».
- Отключите файл подкачки системы (опция Без файла подкачки), перезагрузите компьютер, включите файл подкачки (опция Автоматически выбирать размер файла подкачки) и еще раз перезагрузитесь.
- Если проблема высокой загрузки процессом «Сжатая память» возникает только при выходе из режима сна или гибернации (а после перезагрузки пропадает), попробуйте скачать и установить с сайта производителя последние версии драйверов для ваших дисковых контроллеров (ACPI/AHCI/RAI SCSI), дисков и видеокарты. После чего желательно отключить автоматическое обновление драйверов.

Если указанные манипуляции не помогли, можно попробовать полностью запретить Windows использовать сжатую память.
Как отключить сжатую память в Windows 10 и 11?
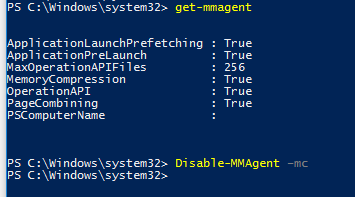
Если вы хотите проверить стабильность работы Windows без использования функции «сжатой памяти», можно временно отключать эту функцию. Для этого, откройте консоль PowerShell с правами администратора. Проверьте, включена ли сейчас опция компрессии памяти:
Get-mmagent
ApplicationLaunchPrefetching : True
ApplicationPreLaunch         : True
MaxOperationAPIFiles         : 512
MemoryCompression            : True
OperationAPI                 : True
PageCombining                : True
Строка MemoryCompression : True указывает на то, что сжатие памяти включено.
Чтобы отключить сжатую память, выполните:
Disable-MMAgent –MemoryCompression
И перезагрузите компьютер
Restart-Computer
Проверьте, изменилась ли общая производительность системы после отключения сжатой памяти.
В некоторых случаях пользователям для исправления проблемы со сжатой памятью рекомендуют:
- Отключить службу SysMain или SuperFetch (
services.msc
-> SysMain-> тип запуска Отключена). Это отключит в Windows 10/11 современные процессы оптимизации памяти; - Отключит задание обслуживания системы в планировщике RunFullMemoryDiagnosticEntry (Task Scheduler -> Библиотека планировщика -> Microsoft -> Windows -> MemoryDiagnostic -> RunFullMemoryDiagnosticEntry ->Отключить);
- Попробуйте отключить драйвер мониторинга сетевой активности (Network Data Usage — NDU (описано статье про невыгружаемый пул памяти Windows);
- Отключите проверку в реальном времени в вашем антивирусе. Возможно он некорректно работает со сжатой памятью;
- Проверьте целостность системных файлов образа Windows с помощью DISM и SFC.
Эти советы могут помочь избавится от чрезмерной нагрузки на компьютер со стороны процесса «Сжатая память». Но при этом отключаются базовые подсистемы оптимизации производительности Windows, что может негативно сказаться на общей производительности компьютера.
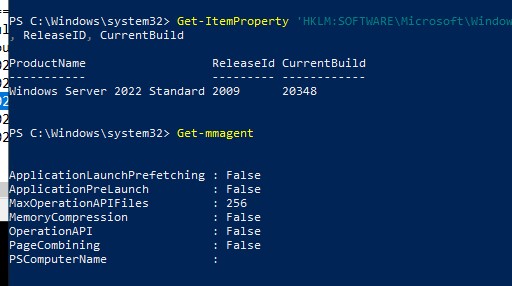
Как включить сжатие памяти в Windows Server 2016/2019/2022 или Windows 10/11?
Во всех версиях Windows Server сжатие памяти по-умолчанию отключено.
Выполните команду
Get-mmagent
, чтобы проверить что сжатие памяти отключено. На скриншоте ниже мы показали, что в Windows Server 2022 значение Memory Comression = False.
Чтобы Windows могла использовать сжатие памяти, должны быть выполнены следующие условия:
- Включен файл подкачки (хотя бы минимального размера – 16 МБ);
- Служба SysMain должна быть запущена;
- Используется Windows 10/11 или Windows Server 2016+ (можно узнать версию Windows с помощью команды winver или с помощью PowerShell).
Чтобы включить сжатие памяти, выполните команду:
Enable-MMAgent -MemoryCompression
Перезагрузите компьютер.
При включении сжатия памяти автоматически включается еще одна функция SysMain — page combining. Эта функция диспетчера памяти используется для объединения страниц памяти с одинаковым содержимым (своеобразная дедупликация в RAM).
Технология «Сжатой памяти» в Windows 10 и 11, как правило работает довольно эффективно и не требует никаких вмешательств. Если сжатие памяти вызывает проблемы на вашем компьютере, скорее всего у вас имеются проблемы с настройками Windows, оборудованием или драйверами. В случае необходимости, функцию сжатия памяти можно совсем отключить.
Приветствую всех, разбираемся с такой штукой как Memory Compression в Windows 10.. что это такое? Да, по названию могу предположить, что связано с оптимизацией памяти.. но нужно разобраться точно.
Значит покопался в интернете, вот что выяснил — переводится как сжатая память, это название вы можете увидеть в другом названии — Система и сжатая память. Может использовать много оперативной памяти.
Еще узнал, что процесс Система и сжатые файлы (System and compressed memory) — один из компонентов и.. вроде бы это какое новшество. Этот процесс уменьшает обращение к файлу подкачки, он помещает данные вместо этого в память в сжатом виде. Да, это как бы должно ускорить работу. Но вот… сжатие памяти и ее обратный процесс — не может обходиться без ресурсов процессора, поэтому на практике спокойно могут быть тормоза.
Жесткий диск — память, где хранятся файлы. Она медленная. SSD — уже намного быстрее, но все равно, по сравнению с оперативной памятью — очень медленный. Именно оперативная память — очень быстрая, поэтому хранение данных в ней всегда улучшает быстродействие компа.
Если вы используете проги, которые могут требовать много оперативки.. ну или в Хроме открыли кучу вкладок.. то процесс Система и сжатые файлы может использовать много оперативки. Это как бы нормально, но вот глюки при этом, разумеется должны отсутствовать.
Вот собственно сам процесс:

И как видите, даже здесь он много кушает оперы.. больше чем полгига..
Как отключить Система и сжатые файлы?
Если попробовать этот процесс завершить — могут быть проблемы.. об этом Windows вас предупредит таким сообщением:

Думаю вы понимаете, что это связано с тем, что вы получается завершите работу процесс.. в памяти которого содержатся данные, которые проги используют в данный момент.
Но можно ли отключить вообще? В интернете есть способы, например отключение службы SuperFetch. Теоритически — похоже что эта служба и отключает работу Система и сжатые файлы.. но насколько я знаю, SuperFetch отвечает за кэширование файла. То есть немного другое. Поэтому.. я на всякий случай напишу как отключать SuperFetch, после отключения ничего страшного не будет, но потребление памяти и правда может уменьшиться. В общем отключить можно так:
- Зажмите Win + R, появится окошко Выполнить.
- Напишите туда команду services.msc, нажмите ОК.
- Появится окно служб, найдите здесь SuperFetch, нажмите два раза.
- В окошке свойств выберите в менюшке Тип запуска — отключено, и потом еще нажмите кнопку Отключена. При возможности перезагрузите ПК.
Второй способ отключения, скорее всего более корректный
Но способ, более логичный — при помощи командой строки PowerShell, запущенной от администратора, для этого можно зажать Win + X и потом в менюшке выбрать этот пункт:

Либо просто откройте меню Пуск, найдите там Windows PowerShell, откройте папку, нажмите правой кнопкой по PowerShell и выберите пункт запуска от администратора:

Далее нужно указать команду для отключения:
Disable-MMAgent –mc

Команду нужно вставить и нажать энтер. А после — выполнить перезагрузку. Потом, после перезагрузки советую проверить.. нужно снова запустить PowerShell и вставить команду:
Get-mmagent
Она покажет — включено сжатие памяти или нет. Нужно посмотреть в графу MemoryCompression, если там указано True значит включено:

Хм, если отключено.. то наверно будет написано обратное True, то есть False.
Ребята, на этом все. Надеюсь вам эта информация пригодилась. Если что не так, то сори. Удачи и добра, до новых встреч господа!
На главную!
22.07.2019
Сжатие памяти в Windows 10/11: какие варианты?
Одна из главных задач любой операционной системы — эффективно распределять ресурсы компьютера. Особое внимание уделяется именно оперативной памяти. В Windows 10 появилась возможность управлять одним из типов памяти при помощи функции MM (она же Memory Management) с целью сжатия страниц с редким к ним обращением. Это призвано изменить объём операций записи/чтения на/с диска (речь сейчас идёт за пресловутый pagefile.sys), теоретически давая возможность пользователю поиграть с производительностью вцелом. Сжимая память мы сокращаем общий её объём, используемый на обслуживание каждого конкретного процесса. Тем самым (продолжая логическую цепочку) давая всё большему количеству приложений работать именно с RAM до обращения к pagefile на диске, чья скорость ниже, чем у планок оперативной памяти. Даже сейчас, когда HDD заменяются на гораздо более быстрые SSD.
Когда Менеджер памяти заставляет вносить запись в pagefile, данные, записываемые на диск или с него читаемые, уже сжаты в среднем на 40% по сравнению с оригинальным своим размером. Сжатие таким образом призвано улучшить производительность остальных процессов за счёт снятия (или хотя бы снижения) воздействия или влияния на общий объём данных при вводе/выводе информации уже на экране. В итоге пользователь должен заметить более быстрые запуск и ответ от приложений. Но как всегда здесь есть одно НО: производительность в части высвобождения памяти в этом случае ложится на плечи центрального процессора. Сжатие памяти ускоряет производительность системы за счёт уменьшения числа обращений к pagefile.sys, то бишь к диску (который — файл — конечно, никуда не удаляется). Но процессор при этом «немного поднагрузится». При этом следует учесть, что под улучшением производительности не стоит понимать именно УСКОРЕНИЕ системы. Если вы видите большой объём памяти в части сжатой в Диспетчере задач, и в этом вы вините именно нехватку памяти, есть смысл прибегнуть к:
- установке дополнительных планок оперативной памяти (увеличение физической памяти компьютера);
- или отключению сжатия памяти, перенося нагрузку на процессор.
Включено ли сжатие памяти сейчас?
- запускаем консоль Powershell от имени администратора

- вводим команду
Get-MMAgent
- проверяем вывод консоли. В части выводимых данных в строке MemoryCompression вы увидите либо False (Не Включено) либо True (Включено):

Как включить или выключить сжатие в Windows 10/11?
- Сжатие включается из той же консоли Powershell командой
Enable-MMAgent -mc
Результаты включения сжатия проявят себя при определённых обстоятельствах, то есть при серьёзной нагрузке на систему.
- Выключаем так:
Disable-MMAgent -mc
Обе операции подразумевают перезагрузку Windows.
ВНИМАНИЕ. При отключении сжатия Windows после перезагрузки может на некоторое время зависнуть.
Нужно ли включать сжатие памяти в Windows?
Вопрос, как вы поняли по предыдущим абзацам, скользкий. По идее система выбирает эту «настройку» самостоятельно. Однако мне лично известен случай, когда на компьютере со следующими характеристиками:
- Windows 10 Профессиональная
- Intel® Core™ i5 2,8 ГГц 6200U
- 16 ГБ RAM
пользователь начал замечать серьёзные лаги в части производительности при загрузке процессора в границах 80% и выше. Короче, играл напропалую. При этом владка Диспетчера с памятью не диагностировала подъём потребления выше 60%, а сжатие памяти было включено. В качестве пробы было принято решение ОТКЛЮЧИТЬ сжатие, после чего системные прерывания перестали перегружать процессор. Беспричинные задержки в работе Windows также прекратились. Не рассматривайте описанное как призыв к действию, просто бросьте в копилку знаний.
Успехов.
Содержание
- Процесс Vmmem — что это?
- Описание
- Разбираемся
- Заключение
- Добавить комментарий Отменить ответ
- Процесс «Система и сжатая память» в Windows 10
- Особенности технологии «Сжатой памяти» в Windows 10
- Процесс «Система и сжатая память» сильно грузит компьютер
- Как отключить сжатую память в Windows 10
- Заключение
- Memory Compression в Windows 10 — что это такое?
- Как отключить Система и сжатые файлы?
- Второй способ отключения, скорее всего более корректный
- Добавить комментарий Отменить ответ
Процесс Vmmem — что это?
Приветствую друзья!  Сегодня мы поговорим про один процесс, который вы можете заметить в диспетчере задач… название его — Vmmem. Постараемся выяснить — зачем он нужен? Это может быть процесс вполне легальной программы, но это может быть и вирус.. поэтому давайте разбираться))
Описание
Процесс Vmmem — это оперативная память, которая выделена для использования виртуальной машиной (Hyper-V).
Простыми словами — виртуальная машина, это в некотором смысле виртуальный компьютер, который имеет свой процессор, свою оперативку. Сколько виртуальная машина (или несколько) потребляет памяти — столько примерно и будет кушать оперативы процесс Vmmem.
Разбираемся
Чтобы отключить процесс Vmmem, попробуйте следующее:
Можно также ограничить ресурсы Vmmem путем создания файла %UserProfile%.wslconfig, внутри которого прописать:
[wsl2]
memory=6GB # Ограничиваем память для WSL2 VM.
processors=5 # Ограничиваем количество процессов для WSL2 VM.
Вот пример сколько процесс может потреблять оперативки (это еще далеко немного):

Картина может быть и такой, здесь уже намного больше используется:

Заключение
Удачи и добра, до новых встреч друзья! 
Добавить комментарий Отменить ответ
Этот сайт использует Akismet для борьбы со спамом. Узнайте как обрабатываются ваши данные комментариев.
Источник
Процесс «Система и сжатая память» в Windows 10
Функция сжатия оперативной памяти в Windows 10 предназначена для ускорения работы (отзывчивости) системы за счет хранения части страниц в оперативной памяти в сжатом виде. Тем самым достигается уменьшение количества обращений на чтение и запись страниц памяти из медленного (по сравнению с RAM) файла подкачки на жестком диске. Нужные данные извлекаются из более быстрой оперативной памяти быстрее, даже с учетом того, что на их сжатие/декомпрессию тратятся дополнительные ресурсы процессора.
Особенности технологии «Сжатой памяти» в Windows 10
Изначально поток, отвечающий за работу подсистемы сжатой памяти, находилась внутри процесса System, что не очень удобно с точки зрения диагностики. В Windows 10 1511 этот функционал был выделен в отдельный процесс — Система и сжатая память (System and compressed memory).
В Windows 10 Anniversary edition (1607) появился отдельный процесс Сжатая память (Memory Compression), скрытый от диспетчера задач. Получить информацию об этом процессе можно с помощью PowerShell командлета Get-Process:
Также информацию об использовании сжатой памяти системой можно получить с помощью диспетчера задач. Перейдите на вкладку Производительность (Performance), выберите раздел Память (Memory). Текущее значение использования сжатой памяти отображается в значении параметра Использование (сжатая). В моем примере используется 3 Гб памяти, из которой в сжатом виде хранится 230 Мб. Чтобы понять, какой объем данных получилось упаковать в сжатый блок, нужно навести мышкой на график Структура памяти:
Используется сжатой памяти (230 Мб). В сжатой памяти хранится примерно 1012 Мб данных, освобождая для системы 782 Мб памяти.
Как вы видите, уровень компрессии достигает почти 400%, так что экономия довольно большая.

В большинстве случаев, если компьютер работает нормально и на нем установлен достаточный объём оперативной памяти, процесс «Сжатой памяти» работает отлично и не требует никакого вмешательства.
Процесс «Система и сжатая память» сильно грузит компьютер
Но иногда случается, когда процесс «Система и сжатая память» начинает довольно сильно грузить процессор или жесткий диск компьютера (вплоть до 100%, это видно в диспетчере задач), или же занимаеть в памяти слишком много места. Компьютер, при этом, естественно, начинает сильно тормозить и подвисать.
Что делать в этом случае?
Я приведу 2 совета, которые должны помочь исправить проблему с высокой загрузкой системы процессом «Сжатая память».
Если указанные манипуляции не помогли, можно попробовать отключить сжатую память.
Как отключить сжатую память в Windows 10
Если вы хотите проверить стабильность работы Windows 10 без использования функции «сжатой памяти», можно временно отключать эту функцию. Для этого, откройте консоль PowerShell с правами администратора. Проверим, включена ли сейчас опция «Сжатой памяти»:
Строка MemoryCompression : True указывает на то, что сжатая память включена.
Отключим сжатую память:
И перезагрузим компьютер
После загрузки проверьте, как ведет себя система. Если производительность улучшилась, можно оставить ОС в режиме с отключенным режимом сжатой памяти.
Чтобы включить MemoryCompression, выполните команду:
Заключение
Технология «Сжатой памяти» в Windows 10, как правило работает довольно эффективно и не требует никаких вмешательств. В том случае, если она вызывает проблемы на вашем компьютере, скорее всего у вас имеются некоторые проблемы с настройками системы, оборудованием или драйверами. В случае необходимости, функцию сжатия памяти можно совсем отключить.
В некоторых случаях пользователям для исправления проблемы со сжатой памятью рекомендуют:

В некоторых случаях эти советы помогают избавится от чрезмерной нагрузки на компьютер со стороны процесса «Сжатая память», но при этом отключаются базовые подсистемы оптимизации производительности Windows, что может негативно сказаться на других аспектах производительности системы.
Источник
Memory Compression в Windows 10 — что это такое?
Приветствую всех, разбираемся с такой штукой как Memory Compression в Windows 10.. что это такое? Да, по названию могу предположить, что связано с оптимизацией памяти.. но нужно разобраться точно.
Значит покопался в интернете, вот что выяснил — переводится как сжатая память, это название вы можете увидеть в другом названии — Система и сжатая память. Может использовать много оперативной памяти.
Еще узнал, что процесс Система и сжатые файлы (System and compressed memory) — один из компонентов и.. вроде бы это какое новшество. Этот процесс уменьшает обращение к файлу подкачки, он помещает данные вместо этого в память в сжатом виде. Да, это как бы должно ускорить работу. Но вот… сжатие памяти и ее обратный процесс — не может обходиться без ресурсов процессора, поэтому на практике спокойно могут быть тормоза.
Жесткий диск — память, где хранятся файлы. Она медленная. SSD — уже намного быстрее, но все равно, по сравнению с оперативной памятью — очень медленный. Именно оперативная память — очень быстрая, поэтому хранение данных в ней всегда улучшает быстродействие компа.
Если вы используете проги, которые могут требовать много оперативки.. ну или в Хроме открыли кучу вкладок.. то процесс Система и сжатые файлы может использовать много оперативки. Это как бы нормально, но вот глюки при этом, разумеется должны отсутствовать.
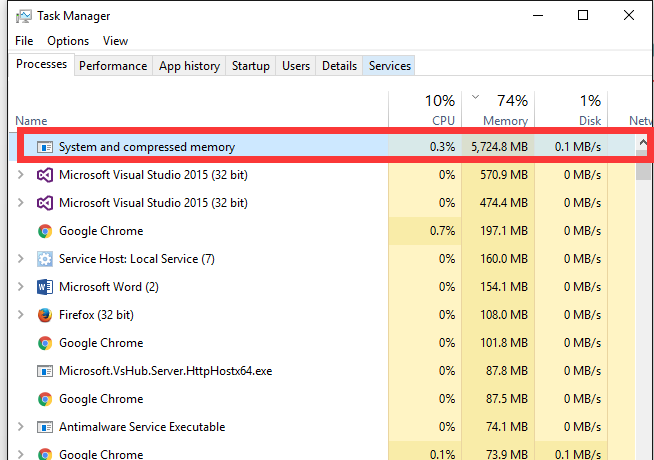
Вот собственно сам процесс:
И как видите, даже здесь он много кушает оперы.. больше чем полгига..
Как отключить Система и сжатые файлы?
Если попробовать этот процесс завершить — могут быть проблемы.. об этом Windows вас предупредит таким сообщением:
Думаю вы понимаете, что это связано с тем, что вы получается завершите работу процесс.. в памяти которого содержатся данные, которые проги используют в данный момент.
Но можно ли отключить вообще? В интернете есть способы, например отключение службы SuperFetch. Теоритически — похоже что эта служба и отключает работу Система и сжатые файлы.. но насколько я знаю, SuperFetch отвечает за кэширование файла. То есть немного другое. Поэтому.. я на всякий случай напишу как отключать SuperFetch, после отключения ничего страшного не будет, но потребление памяти и правда может уменьшиться. В общем отключить можно так:
Второй способ отключения, скорее всего более корректный
Но способ, более логичный — при помощи командой строки PowerShell, запущенной от администратора, для этого можно зажать Win + X и потом в менюшке выбрать этот пункт:
Либо просто откройте меню Пуск, найдите там Windows PowerShell, откройте папку, нажмите правой кнопкой по PowerShell и выберите пункт запуска от администратора:
Далее нужно указать команду для отключения:
Команду нужно вставить и нажать энтер. А после — выполнить перезагрузку. Потом, после перезагрузки советую проверить.. нужно снова запустить PowerShell и вставить команду:
Она покажет — включено сжатие памяти или нет. Нужно посмотреть в графу MemoryCompression, если там указано True значит включено:
Хм, если отключено.. то наверно будет написано обратное True, то есть False.
Ребята, на этом все. Надеюсь вам эта информация пригодилась. Если что не так, то сори. Удачи и добра, до новых встреч господа!
Добавить комментарий Отменить ответ
Этот сайт использует Akismet для борьбы со спамом. Узнайте как обрабатываются ваши данные комментариев.
Источник
When your system begins to slow down, some people first turn to the Task Manager to see what is causing the problem. In recent years, one of the issues people are seeing is the System and Compressed Memory taking up all their computer disk, memory, or CPU power.
Automatically Repair Windows Errors
Recommended: To easily install drivers automatically, use the tool below.
This process should generally only use a minor amount of memory, CPU, and disk. Still, if you notice it has become a processing power dominator, this article can help you resolve the issue.
Keep in mind that the System and Compressed Memory app will use a lot of memory when the system is idle.
What Causes System and Compressed Memory Processing Errors?
There are a few underlying causes for this system error:
- You were fiddling around with the settings for virtual memory and changed the paging file size to a set value instead of the “Automatic” default.
- There is a corruption in one of the memory files.
- Third-party software is interfering with the System and Compressed Memory operation.
The System and Compressed Memory are responsible for managing your PC’s memory. When it works correctly, it improves performance by compressing unused pages instead of just writing them to the disk. This should reduce the amount of memory needed and allow you to have more applications running simultaneously.
It also allows your computer to improve its response time. Because of how it works, it can use a lot of memory if you have several apps open and are not using them. However, once you begin using an app, the System and Compressed Memory are supposed to stop using so many resources.
How Can I Tell if It’s an Issue?
In updated Windows 10, Microsoft has hidden this operation in the Task Manager. To see if Memory Compression is causing the problem, you need to open the Task Manager and click on the “Performance” tab.
At the bottom of the window, you will see the option to “Open the Resource Monitor.” In the Resource Monitor window that opens, go to the “Disk” tab. Now, scroll the list to see if Memory Compression uses the most memory.
Resolve the System and Compressed Memory Processing Error
Update Your Antivirus and Scan Your Computer
Viruses cause many memory consumption issues. First, you should update your antivirus software to ensure that a virus isn’t contributing to the Compressed Memory processing issue.
All antivirus software is different, but if you use the built-in Windows Defender, you type “Windows Defender” into the Start menu, select it, and click “Check for Updates Now” when it opens.
When your antivirus is up-to-date, you must run a full system scan. (If you don’t have an Antivirus program, check out our updated list of the best antivirus for Windows.)
Once the scan is complete, have the antivirus remove any viruses it found and restart your computer.
If you are using a third-party antivirus, you should do the steps above and make sure that Windows Defender is disabled. Windows 10 should have automatically done that, but you can find out more about disabling it here.
Run the Windows 10 System Maintenance Troubleshooter
The troubleshooter will clean up any shortcuts and files that may interfere with the System and Compressed Memory.
Step #1
Press the [R] key and the [Windows] key simultaneously. Then type or cut and paste “msdt.exe -id MaintenanceDiagnostic” into the ‘Run’ box that appears without quotation marks.

Step #2
Click “Advanced.”

Step #3
Make sure “Apply repairs automatically” has a checkmark next to it, and click “Run as administrator.” Then click “Next.”

The troubleshooter will run and automatically clean up files that need to be fixed. If it gives you instructions, follow them to deal with the problems it finds.
When finished, see if the Memory Compression no longer uses so much CPU power.
Return the Page File Size to the Automatic Setting
Windows 10 is designed to work with the computer managing the paging file size. Although users can access this option and set it to a fixed value, doing so will interfere with how Windows apps, such as the System and Compressed Memory app, work.
This method tells you how to restore the setting to automatic.
Step #1
Open the Start menu and click on the Settings icon.

Step #2
Type “performance” into the Settings window search bar. Click the option to “Adjust the appearance and performance of Windows.”

Step #3
Choose the “Advanced” tab in the Performance Options pop-up window.

Step #4
Make sure the box next to “Automatically manage paging file size for all drives” has a checkmark and click “OK.”

Step #5
Now, you should be back on the Performance Options pop-up window. Click “Apply” and then “OK.” Choose to restart your computer so the changes can take effect.

Continue with the following method if you still notice the System and Compressed Memory are monopolizing your CPU.
See Also: How to Set Your CPU Priority, So It Prefers Foreground Apps
Optimize Visual Effects to Repair Compressed Memory High CPU Issues
Sometimes optimizing the visual effects performance resolves this issue. Here is how to do this method:
Step #1
As in the previous method, open the Start menu and click on the Settings icon.
Type “performance” into the Settings search bar. Click to “Adjust the appearance and performance of Windows.”
Step #2
This time, when the Performance Options window appears, stay on the “Visual Effects” tab and make sure the circle next to “Adjust for best performance” is selected.

Step #3
Now choose “Apply” and then “OK.”

Step #4
Close any programs or windows you have open. Then click the Power icon in the Start menu and choose to Restart your computer.

Disable Hibernate and Fast Startup and Enable Maximum Power Savings
The hibernate and fast startup options allow your computer to sleep and restart quickly after a shutdown. System and compressed memory are involved in this feature, so disabling them can lower the memory used.
Step #1
Type “control panel” into the Start menu and choose that option from the list that populates.
Step #2
Type “Power options” into the Control Panel search bar and choose “Choose what power buttons do” from the available options.

Step #3
Click on “Change settings that are currently unavailable.”

Step #4
Now scroll down to the Shutdown settings. make sure there is not a checkmark next to “Turn on fast startup (recommended)” and “Hibernate.” Then click “Save changes.”

Step #5
You should see the “Choose or customize a power plan” window when the previous window closes after saving. Now choose “Change plan settings” for the plan you currently have active.

Step #6
Now click “Change advanced power settings.”

Step #7
Scroll down and open the “Sleep” option. Open “Sleep after” and make sure the option(s) is set to “Never.” Now set the option(s) under “Hibernate after” to “Never” as well. Click “Apply.”

Step #8
Now scroll down to “PCI Express” and expand it. Open “Link StatePowerManagement” and make sure its option(s) is set to “Maximum power savings.” Click “Apply” again and then click “OK.”

Step #9
Open the Start menu and click the Power icon. Choose “Restart” and allow your computer to restart.
Check to see if the memory usage has returned to normal.
Recommended: Fortect System Repair Tool – Fix Errors & Speed Up Windows Automatically
Turn off Windows Tips Notifications
Windows Tips are another app that operates in the background and can cause problems with CPU usage, and shutting them off can resolve your issue.
Step #1
Click the Settings icon in the Start menu.
Step #2
Click “System” in the Settings window.

Step #3

On the left-side menu, choose “Notifications & actions.” Then make sure the option to “Get tips, tricks, and suggestions” is set to “Off.”
Uninstall Unused Apps
In addition to closing any open windows you aren’t using, you can help resolve the issue by uninstalling any unused apps.
The more apps you have on your computer, the more likely they will run in the background and perform updates or maintenance tasks that can interfere with the Compressed Memory app.
Make sure you back up your computer before performing this method in case you accidentally remove a program you need. You can learn how to create a system restore point here.
Step #1
Type “control panel” into the Start menu again and choose that option from the list that populates.

Step #2
Click on the option to “Uninstall a program.”

Step #3
Scroll through the list of programs. Uninstall those you do not need or use by clicking on the program and the “Uninstall” button at the top of the list.

You will need to restart your computer and check the Task Manager to see if the problem is resolved.
Run Disk Cleanup
This Windows 10 built-in app is designed to clean up shortcuts and files that may interfere with the System and Compressed Memory high CPU problems.
Step #1
Open the Start menu and type in “Disk Cleanup.” Then click to open that app.

Step #2
Select the drive you want to clean. This is usually the C: drive. If unsure, repeat this method until you have cleaned all the drives.

Step #3

Make sure a checkmark is next to all the files you wish to delete. Then click “Clean up system files.”
Step #4
You should return to the select a drive window in Step #2. If you want to clean another drive, select it. Otherwise, close the window and click on the Power icon on the Start menu to restart your computer.
Run a System File Check and Repair the Windows Image
The system file check is designed to repair and fix corrupt files on your computer automatically. You can access this app through PowerShell.
Step #1
Press the [X] and the [Windows] keys on your keyboard simultaneously. Choose “Windows PowerShell (Admin)” on the menu that appears, and choose “Yes” if the system asks if you want to allow that app to make changes.

Step #2
In the PowerShell window that opens, type “sfc /scannow” (without quotation marks) into it and press [Enter]. Wait until the process is done. It may take some time to complete.

Step #3
When the scan is complete, and you see a new prompt, type “Repair-WindowsImage -RestoreHealth” (without quotation marks) into it or copy and paste the command. Press [Enter] when you are done.
Again, it may take some time for the repair to finish.

Step #4
When the scan finishes, you must restart your computer. Open the Start menu, click the Power icon, and choose “Restart.”
If you still see the System and Compressed Memory slowing your computer performance, continue with the following method.
Test Your Physical RAM
RAM can develop memory problems, and RAM problems affect how memory is used. The following method allows you to check your RAM usage issues.
Step #1
Close any open programs and save your work. Type “mdsched” into the Start menu and select “Windows Memory Diagnostic” from the list.

Step #2
In the pop-up window, choose “Restart now and check for problems.”

Step #3
Your computer will run a memory check and restart. The check can take a while, but it is essential not to interrupt it.
When the computer finishes the check and is completely rebooted, type “event” into the Start menu and select “Event Viewer.”

Step #4
On the left side of the window that opens, open the “Windows Logs” menu and click on “System” once.

Step #5
Now, you need to click “System” again, but this time use a right-click, which will bring up another menu.
Choose “Filter current log.” You would be unable to select this option if you did not left-click “System” first.

Step #6
In the Filter Log window, click on the drop-down menu next to “Event sources.” Scroll down (the menu is quite long) until you find “MemoryDiagnostics-Results.” Place a checkmark in the box next to that and click “OK.”

Step #7
This will return you to the Event Viewer, where you should have about two “Events” listed in the filtered log.
Click each event and look at the information provided. If no errors are detected, go on to the following method.
You do not have issues with your RAM hardware. If you see an error, you must continue to Step #8.

Step #8
If you have a problem with your RAM, the only way to fix it is to replace your RAM sticks. If you prefer, you can test each one by shutting down your computer and removing all the sticks except the one you are testing.
Then you can reboot your computer and rerun steps #1-7. Repeat this with all the sticks.
Replace any that had errors with factory-recommended RAM sticks. When you have replaced all the faulty RAM sticks, check to see if the System and Compressed Memory have returned to normal CPU usage.
Upgrade Your RAM
Memory problems may occur because you need more RAM. If you have available slots or can upgrade the RAM sticks, you have to ones with more memory; this is an easy way to resolve the problem.
Run Check Disk in the Command Prompt
Corrupt files are the key reason behind many incidences where the Compressed Memory task uses too much CPU power in Windows 10. You can check your computer disk drives for errors by following these steps:
Step #1
Type “Command Prompt” into the Start menu. Right-click the “Command Prompt” option and choose “Run as administrator” from the drop-down menu. Click “Yes” to allow the program to make changes and continue to the Command Prompt.

Step #2
Enter “chkdsk c: /r” at the prompt without quotation marks. Keep in mind that C: is the name of the drive you wish to check,
Now press “Enter.”

Step #3
The system will prompt you to restart the system. Choose “Y” to restart now and press “Enter.”
This process can take some time, especially if it is the first time you have done it. However, Windows should automatically repair any errors it finds.
Update Drivers to fix compressed memory high CPU issues
Updating drivers can take time. For this reason, you should first update any drivers for graphics, video, and the processor. Be sure to check if these resolve the issue before continuing to update the rest of your drivers.
Step #1
Press the [X] key and the [Windows] key on your keyboard. This opens the Quick Link menu, where you must choose “Device Manager.”

Step #2
Click the first type of device to expand it. Now, right-click on the name of the first device listed and click “Properties.”

Step #3
In the driver tab, choose “Update Driver.”

Step #4

When you click Update Driver, you will see an option to have the computer automatically search for driver software. Choose this option.
Alternatively, you can note the current driver version and check on the manufacturer’s website for the latest version. You can download the newest version and install it manually from the manufacturer’s website if you do not have the latest version.
Step #5
The computer should perform an automatic search. If your driver is up-to-date, you will see a message stating you already have the best driver installed for that device.
Otherwise, the computer should automatically update the driver. Close the pop-up window once the search (and correct it if needed) is finished.
Return to the device manager window (and Step #2) and follow the instructions for the next device until you have checked for driver updates on all the types of devices and device drivers listed.

Step #6
Once you have checked for updates for every driver on the list, restart your computer.
Again, check your CPU usage. Continue reading if you still haven’t resolved the error.
Don’t Run the System and Compressed Memory Task With the Highest Privileges
Usually, this process is set to run with the highest privileges, and simply changing this can resolve the problem. Before doing this method, you want to create a System Restore point or backup drive.
Step #1
Type “task scheduler” into the Start menu and choose that option from the list that populates.

Step #2
Click on the “Task Scheduler Library” in the left-side menu. This will expand it. Then choose “Microsoft” and then “Windows.”

Step #3
Now, click “MemoryDiagnostic.”

Step #4
In the center box, you should see the option “RunFullMemoryDiagnostic.” Click it. Then, on the right side of the window, you will see another menu. Under “Selected Item,” choose “Properties.”

Step #5

In the pop-up properties window, ensure the box next to “Run with highest privileges” is not checked, and click “OK.”
Step #6
Restart your computer to allow the changes to occur.
Reassign the System and Compressed Memory Process to Run Under Your User Account
In Windows 10, Administrator User accounts managed by the computer are created. Microsoft tasks run under these accounts. This method shows you how to reassign the task to run under your account.
You must have a User Account with Administrative privileges to use this method. Before doing this method, you want to create a System Restore point or backup drive.
Step #1
Type “task scheduler” into the Start menu again, and open it.
Step #2
Click on the “Task Scheduler Library” in the left-side menu to expand it. Then choose “Microsoft” and then “Windows.” Finally, click “MemoryDiagnostic.”
Step #3
Click “RunFullMemoryDiagnostic” in the center. Then, choose “Properties” on the right side.

Step #4
In the pop-up properties window, click “Change User or Group.”

Step #5
Another pop-up window will appear; click “Advanced.”

Step #6
In the Advanced pop-up, click “Object Types,” and without making any changes, click “OK.” Then click “Find Now” and select your User Account. Then click “OK.” Click “OK” again to save the changes.
Then close the window and restart your computer.

This method has worked for many users especially if they had upgraded to Windows 10 instead of using a clean install. If you still have problems, continue to the following method to disable the process altogether.
Disable the MemoryDiagnostic Task
If you have tried everything else already suggested, you can try disabling tasks directly related to the System and Compressed Memory. Make sure you back up your system before continuing with this method.
Step #1
As before, type “task scheduler” into the Start menu and open it. Click on “Task Scheduler Library” in the left-side menu. Then choose “Microsoft,” “Windows,” and “MemoryDiagnostic.”
Step #2
Now, in the center menu, click “RunFullMemoryDiagnostic.” Then, on the right-side menu, select “Disable.”

Step #3
Like in many other methods, you must close the Task Scheduler window and restart your computer before checking to see if you have resolved the problem.
If you still have trouble with the System and Compressed Memory using too much memory, continue with the following method.
Disable the Speech Runtime Executable Process
In some cases, the Speech Runtime Executable process, which is associated with Windows 10 speech recognition and Cortana, is causing the System and Compressed Memory overload. You can remove Cortana if you don’t use that feature too.
If you follow this method, you need to back up your computer or create a system restore point before you do it.
If you disable Speech Runtime Executable, Windows 10 will no longer have speech recognition. Also, as a Microsoft system process, it will reactivate.
Step #1
Right-click on the Task Bar. Choose “Task Manager” from the options that appear.

Step #2
In the “Processes” tab of the Task Manager, find “Speech Runtime Executable” and click on it. Then click “End Task.”
Disable SuperFetch
Superfetch is a part of the memory caching developed by Microsoft. Although it was designed to speed up the performance of your computer, in many cases, it starts to take over the CPU and can cause the Compressed Memory to balloon out of control.
If you use an SSD or M.2 drive, chances are good. You won’t notice any performance issues at all after you disable SuperFetch. In other cases, you may disable it and find you want to enable it again.
Step #1
Press the [R] key and the [Windows] key simultaneously. Type “services.msc” into the Run window prompt that appears without using quotation marks. Then click “OK.”

Step #2
Scroll down the list until you find “Superfetch,” Double-click on it to open its properties window.

Step #3
In the properties box, click “Stop.” Then adjust the “Startup type” to “Disabled.” Finally, click “Apply” and then “OK.”

At this point, you first need to determine if this fixed the Memory Compression CPU usage issue. Then, you need to find out if this caused slower performance problems. If you need to, this step is easily reversible, and you can move on to the following method if you still haven’t resolved your issue.
Do a Clean Boot
If third-party apps are interfering with the Memory Compression, restarting the computer without these running should fix the issue. When you do a clean boot, it reboots the computer with only the necessary Microsoft apps running.
Step #1
Log in as an administrator. Then, press the [R] and the [Windows] keys together. Type “msconfig” in the Run box without quotation marks, and click “OK.”

Step #2
In the System Configuration window, click the “Services” tab. Make sure that “Hide all Microsoft services” has a checkmark next to it.
Click the button to “Disable all.”

Step #3
Now, click the “Startup” tab in the System Configuration window. Then click “Open Task Manager.”

Step #4
When the Task Manager opens, click the “Startup” tab if it isn’t already open.
Select each item you find and click the button to “Disable” it if it isn’t already disabled. When you are finished, close the Task Manager.

Step #5
You should be back in the System Configuration window that is still open; click the “Apply” button and then “OK.”

Step #6
Now you need to restart your computer. Click on the Power icon on the Start menu and choose “Restart.”
Step #7
Once the computer restarts, check the Task Manager to see if the problem is resolved. If the issue is resolved, slowly add in other apps one at a time to see which one is causing the problem.
Since more than one may be interfering, you will need to disable or uninstall any that do.
If you have tried all the methods above and still have problems, you can check out the blog post on fixing 100% disk use errors on Windows 10 for more ideas.
Windows Automatic Repair Tool

System Information
-
Your machine is currently running Windows 10 -
Restoro is compatible with your operating system.
Recommended: To repair Windows Errors, use this software package; Fortect System Repair. This repair tool has been proven to identify and fix these errors and other Windows problems with very high efficiency.

-
100% safe as confirmed by Norton. -
Only your system and hardware are evaluated.
Frequently Asked Questions
What is the system and compressed memory process?
The system and compressed memory process is a process that is used to compress data to save space. This process is often used when data is being transferred from one location to another or when data is being stored on a storage device. The compression process can be lossless, which means that no data is lost during the compression process, or lossy, which means that some data may be lost during the compression process.
How to reduce the process of system and compressed memory?
There are a few ways to reduce the process of system and compressed memory. One way is to use a utility program that helps manage and free up memory. Another way is to optimize your computer’s settings so that less memory is used. Finally, you can try to avoid using memory-intensive programs.
What happens if I kill system and compressed memory process?
If you kill the system and compressed memory process, your computer will likely crash. This is because these processes are responsible for managing your computer’s memory. Without them, your computer will not be able to manage its resources, leading to a crash effectively.
How to turn off memory compression in windows 10?
To disable memory compression in Windows 10, follow these steps:
Open the Start menu and type ‘Control Panel.’
Select ‘System and Security.’
Select ‘Performance.’
Select ‘Settings.’
Under the ‘Visual Effects’ tab, uncheck the box next to ‘Memory Compression.’
Click ‘Apply’ and then ‘OK.’
How to limit memory compression disk usage?
One way to limit memory compression disk usage is to use a technique called “data de-duplication.” This involves identifying and removing duplicate data from a dataset, which can help to reduce the overall size of the data set and minimize the amount of disk space required to store it. Additionally, you can compress data to reduce its size further. Data compression can be lossless, meaning that no data is lost in the compression process, or lossy, meaning that some data is lost.
How to enable memory compression Windows 10?
Windows 10 uses a compression algorithm to compress data in memory, which improves performance by reducing the amount of data that needs to be read from and written to the disk. To enable memory compression, open the Performance Options dialog box (press Windows+R, type sysdm.cpl, and press Enter), click the Advanced tab, and then click Settings under Performance. In the Performance Options dialog box, click the Advanced tab, and then under Virtual memory, click Change.
What is the recommended size of the paging file under normal circumstances?
The recommended size of the paging file under normal circumstances is typically 1.5 times the amount of physical memory in the system. However, it is important to note that the actual size of the paging file will vary based on several factors, including the amount of physical memory in the system, the number of processes running, and the specific workloads being run.
Why is system and compressed memory high CPU utilization?
System and compressed memory high CPU utilization can be caused by several factors, including but not limited to: the system’s process for managing memory, the amount of available memory, and the type of data being stored in memory. When troubleshooting this issue, it is important to consider all of these potential causes to determine the root cause of the problem.