
Have a Laserjet Pro M404n printer that worked fine for a period of a few months but now all it shows during power up is MFG MODE on the display. The funny thing is when I connect the printer to ethernet it grabs an IP and I can navagate the embedded web of the device, but anytime I try to send it a reboot command or reset to defaults, it returns a «Printer busy, Try again later» message. So the printer is somewhat working.
Is there any keys I can hold down to get this printer out of MFG MODE. The firmware is the latest build.
- Sign up
- Sign in
- HP Community
- Printers
- Printing Errors or Lights & Stuck Print Jobs
- HP LaserJet Pro M404dn stuck in MGF MODE
![]()

Create an account on the HP Community to personalize your profile and ask a question
Your account also allows you to connect with HP support faster, access a personal dashboard to manage all of your devices in one place, view warranty information, case status and more.

11-22-2020
05:31 AM

HP Recommended
- Mark as New
- Bookmark
- Subscribe
- Permalink
- Flag Post
Product: HP LaserJet Pro M404dn
Operating System: Microsoft Windows 10 (64-bit)
Hi,
My printer stuck in MGF Mode, the message is show up just after the HP logo.
i tired the solution below but the problem still exist.
- While the Printer is ON, unplug the Power cord from back of the printer.
- wait for 30 seconds.
- Plug in the Power Cord to the printer.
also i tried to update the firmware but with no result.
1 ACCEPTED SOLUTION

HuolSam
Author
12
0
1
3,248
Level 2
11-22-2020
09:40 AM
— edited
11-22-2020
09:40 AM
HP Recommended
- Mark as New
- Bookmark
- Subscribe
- Permalink
- Flag Post
Hi,
i fixed the problem by doing a cold reset even it’s hard to get the control menu because of the MGF MODE message.
so i clicked to shutdown button ( just click one time on shutdown button) and at same time i kept clicking on right arrow to get the ready and control menu.
just go to troubleshooting menu and chose cold reset.
Was this reply helpful?
Yes
No
1 REPLY 1
HuolSam
Author
12
0
1
3,249
Level 2
11-22-2020
09:40 AM
— edited
11-22-2020
09:40 AM
HP Recommended
- Mark as New
- Bookmark
- Subscribe
- Permalink
- Flag Post
Hi,
i fixed the problem by doing a cold reset even it’s hard to get the control menu because of the MGF MODE message.
so i clicked to shutdown button ( just click one time on shutdown button) and at same time i kept clicking on right arrow to get the ready and control menu.
just go to troubleshooting menu and chose cold reset.
Was this reply helpful?
Yes
No
![]()
Be alert for scammers posting fake support phone numbers and/or email addresses on the community.
If you think you have received a fake HP Support message, please report it to us by clicking on «Flag Post».
† The opinions expressed above are the personal opinions of the authors, not of HP. By using this site, you accept the Terms of Use and Rules of Participation.

-
English
Open Menu

† The opinions expressed above are the personal opinions of the authors, not of HP. By using this site, you accept the <a href=»https://www8.hp.com/us/en/terms-of-use.html» class=»udrlinesmall»>Terms of Use</a> and <a href=»/t5/custom/page/page-id/hp.rulespage» class=»udrlinesmall»> Rules of Participation</a>.
Обновлено: 03.06.2023
Enter Special Key Combo
Вводим — нажимаем и держим клавишу навигации влево (<) и затем 2-раза нажимаем клавишу «ОК» , попадаем в меню с заголовком:
uiaux:
2). Reports menu -> OK:
a). print-mech tap tests -> OK ->
Code =0 -> OK -> ничего не происходит ->
отмена
> — (клавиша навигации вправо)
b). tap test list -> OK -> Executing -> ничего не происходит ->
отмена
> — (клавиша навигации вправо)
3). FP/FW info menu -> OK ->
a). Display FP ID -> OK ->
Project ID:17
SW Version:0
IFC Version:0
>
b). Display PCA Revision -> OK ->
ID:12582
MFG:3
FAM:9
NUM:6
>
c). Display FW Revision -> OK ->
FW Revision:
SherpaBuilt: Mon Jun 13, 2005 10:38 AM
-> отмена
>
4). product usage menu -> OK ->page counters -> OK ->
Total: 998
Copy: 105
Fax: 0
Scan: 2830 ->
отмена
>
5). special test menu -> OK -> run benchrun -> OK -> ничего не происходит ->
отмен
>
6). Display PID/VID -> OK ->
VID/PID:
0x03f0114e
7). Scanner info menu -> OK ->
a). display notch and origin -> OK ->
LeftSqr: (0,4257)
RightSqr: (0,4257)
DocOffset: (10,42047)
Notch: (0,0)
b). display mag error -> OK ->
Mag error % = 0,0 % ->
отмена
>
8). usb info menu -> OK -> display usb status ->
usb disconnect ->
отмена
>
9). NVM/firms menu -> OK -> clear firms
>
clear NVM ->
отмена
>
10). boot code menu -> OK -> set mfg mode -> mode set mfg -> OK:
mode set->
отмена
>
a). set user mode -> OK -> mode set:
user ->
отмена
>
b).display boot mode OK->
init: user
nvm: user
Меню 2 — нажимаем одновременно клавишу навигации влево (<) и клавишу «OK» , затем нажимаем только клавишу навигации влево (<) — один раз, затем появляется
заголовок меню:
uiaux
1). Service
:R0036
2). System conficguration -> OK ->
a). enter serial number — > OK ->
Serial Number:
MY69P2105604DY
(Здесь можно курсором подвигать влево вправво , стрелками вверх вниз изменяется буква или цифра)
b). enter service ID -> OK ->
Service ID:
17133
(Здесь можно курсором подвигать влево вправво , стрелками вверх вниз изменяется буква или цифра)
c). enter MAC adress -> OK ->
MAC: пусто — никаких значении нет
(Здесь можно курсором подвигать влево вправво , стрелками вверх вниз изменяется цифра)
d) r/w parametrs -> OK -> parametr 0
(стрелками вверх вниз можно задать значение в диапазоне от 0 до 1198)
3). Special Reports -> OK ->
a). selftest -> OK -> ничего не происходит
b). extended selftest -> OK -> ничего не происходит
c). config report -> OK -> ничего не происходит
d). fax trace -> OK -> ничего не происходит
e). counter -> oK -> ничего не происходит
Меню 3 — нажимаем одновременно клавишу «копирование» и клавишу «OK», затем появляется заголовок меню:
uiaux
1). INFO MENu:
R0036
2). Model Number -> OK ->
Photosmart 2570 Series
Service ID: 17133
3). Serial Number -> OK -> см.выше п.2
4). Region Language -> OK ->
german
russian
5). Counters -> OK ->
Pages: 998
Cycles: 50
6). Last 5 Events -> OK -> Event 1-6996 , Event 2-69551 Event 3-69551, Event 4-69961, Event 5-69556
7). Firm Version -> OK ->
FWR0036
8). NHIO ->
NHIO 0
9). IEO -> OK->
IEO 0
10).Ink Status 1 ->
Black: OK
если нажать кнопку навигации «влево» (<) то экранчик синеет , и выскакивает ошибка:
Error: 0xf02fcd74
57349: sys_div_by_zero_c (возможно cab)
11). Last 5 Accerts -> OK ->
ERROR 1: 0xf02fcd74
12). Region Of Printer -> OK ->
Printer Region: 0
В программе управления принтерами компании HP присутствует специальная опция «Защита картриджей HP», позволяющая владельцу блокировать возможность использования установленных картриджей на других устройствах. То есть, если эта функция включена, после установки чернильниц чипы «привязываются» к конкретному принтеру и переставлять куда-то ещё их уже бесполезно. Данное средство защиты срабатывает и на неоригинальных чипах. Чтобы избежать проблем, связанных с блокировкой работы картриджей на совместимых устройствах, мы рекомендуем заранее отключить эту опцию.
Внимание: на некоторых принтерах опция отключения защиты картриджей отсутствует (например, на HP T120, T520, T125, T525, 8210, 8710, 7740, 7720, 7730, 8720, 8730, 8725, 8218, 8715, 8740), но принтер не блокирует работу неоригинальных картриджей, а только предупреждает о них.
Отключение защиты картриджей HP
1. В меню «Пуск» найдите папку «HP» и выберете устройство, на котором собираетесь отключить защиту. Появится «Помощник по принтеру HP». 2. В случае, если вы ещё не установили официальные драйвера для устройства, вместо полноценного меню появится предложение «Подключить новый принтер». Выберете пункт и следуя инструкциям программы-установщика подключите устройство.
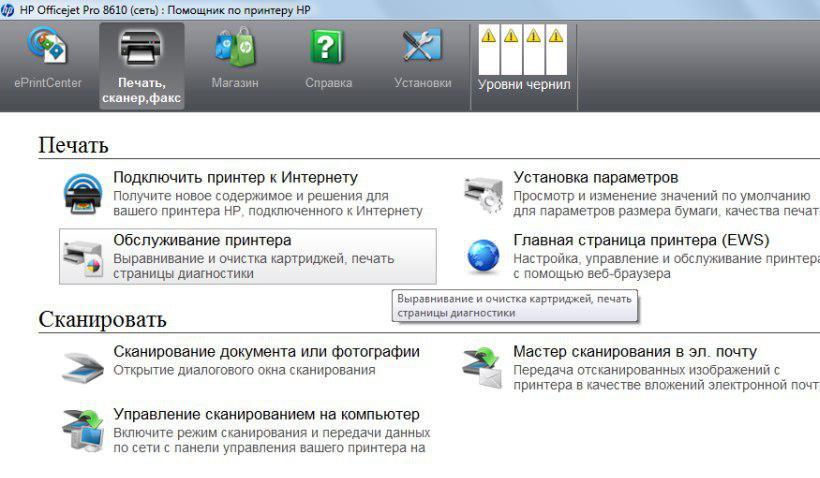
3. Оказавшись в меню «Помощника по принтеру», выберете вкладку «Печать, сканер, факс». В данном окне следует выбрать пункт «Обслуживание принтера» из блока Печати. 4. Зайдя в панель инструментов, следует выбрать вкладку «Защита картриджей HP», поставить галочку напротив пункта «Отключить защиту картриджей HP» и нажать кнопку «Сохранить параметры».

Альтернативный способ отключения
Отключить защиту можно также через веб-интерфейс управления принтером. Для этого следует:
Не так давно компания HP порадовала пользователей очередным детищем. Это линейка принтеров, использующих картриджи CF259A емкостью 3000 страниц и CF259X емкостью 10000 страниц. В линейку входят аппараты HP LaserJet Pro M304, M305, M404, M405.
Эти аппараты являются развитием предыдущей модели HP LaserJet Pro M402 с картриджами CF226A и CF226X. Картридж на первый взгляд тот же самый, но отличия все же есть. Направляющие расположены в других местах — картриджи не взаимозаменяемые. И самое главное отличие — это чип. Как и на предыдущих аппаратах без чипа принтер печатать не будет. Чип на картридже должен быть, хотя бы закончившийся.
Неужели теперь с «пустым» чипом принтер работать не будет? Не стоит пугаться. Принтеры печатают с закончившимся чипом, как и прежде. Просто производитель по умолчанию включил опцию прекращения печати по окончании тонера. Ее просто нужно выключить. Для этого нужно установить полные драйверы для Вашего аппарата.
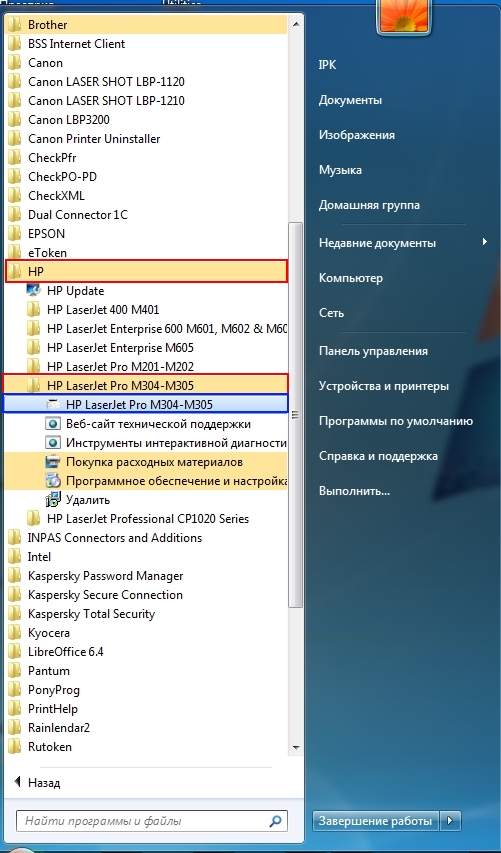
Открываем меню «Пуск» -> «Все программы», листаем список в поисках папки «HP» и вибираем модель. В нашем случае это «HP LaserJet Pro M304-M305». Нажимаем на одноименный пункт в папке.
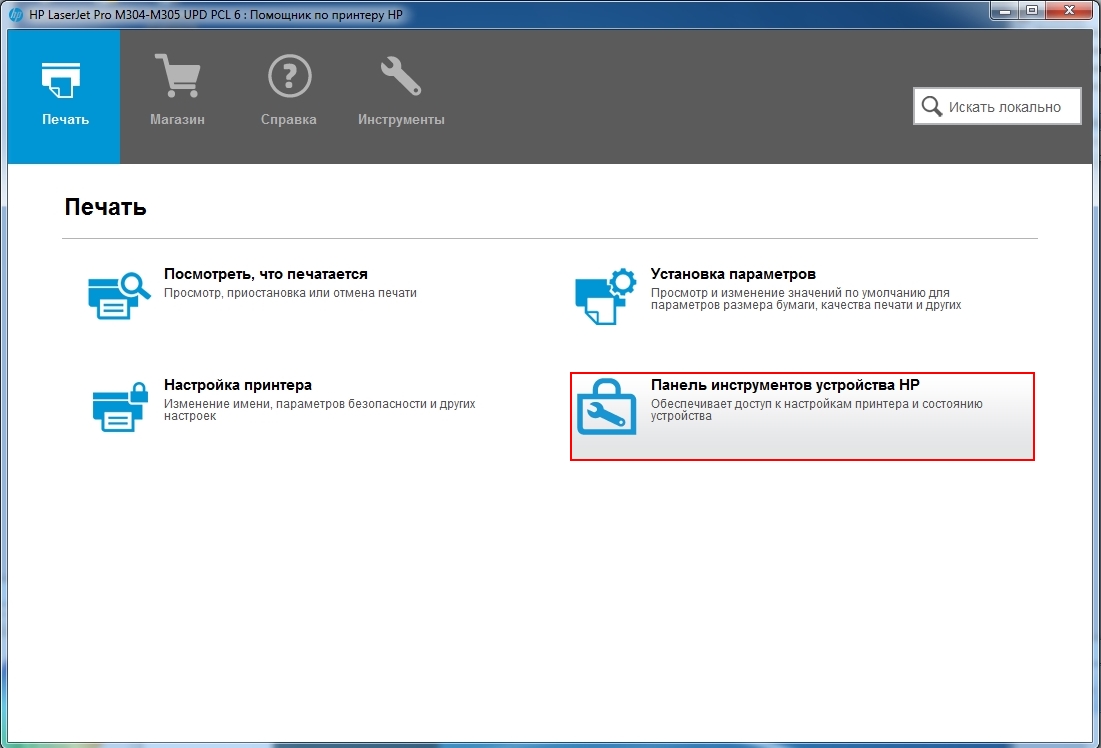
Откроется «Помощник по принтеру HP». Выбираем «Панель инструментов устройства HP».
В открывшемся окне переходим на вкладку «Параметры».
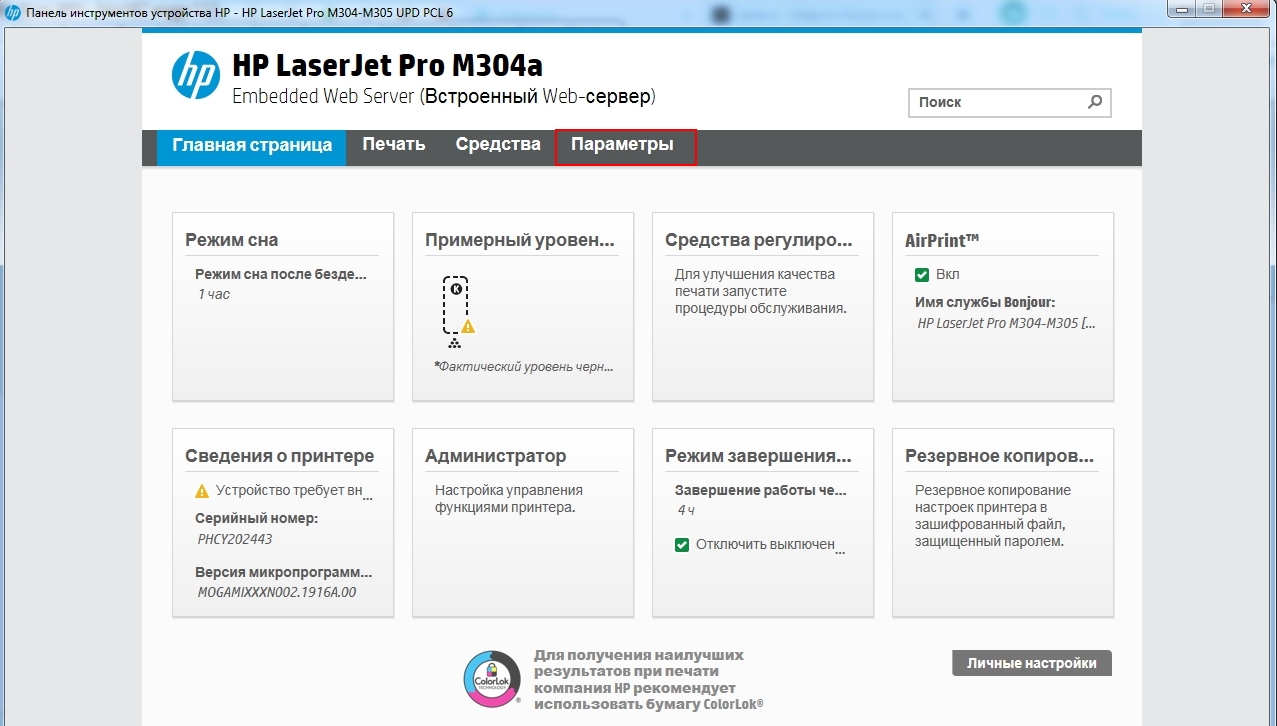
В левой панели раскрываем список «+Расходные материалы» и выбираем «Параметры расходных материалов». В открывшихся параметрах находим «Защита картриджей» выбираем пункт «Продолжить» и нажимаем кнопку «Применить».
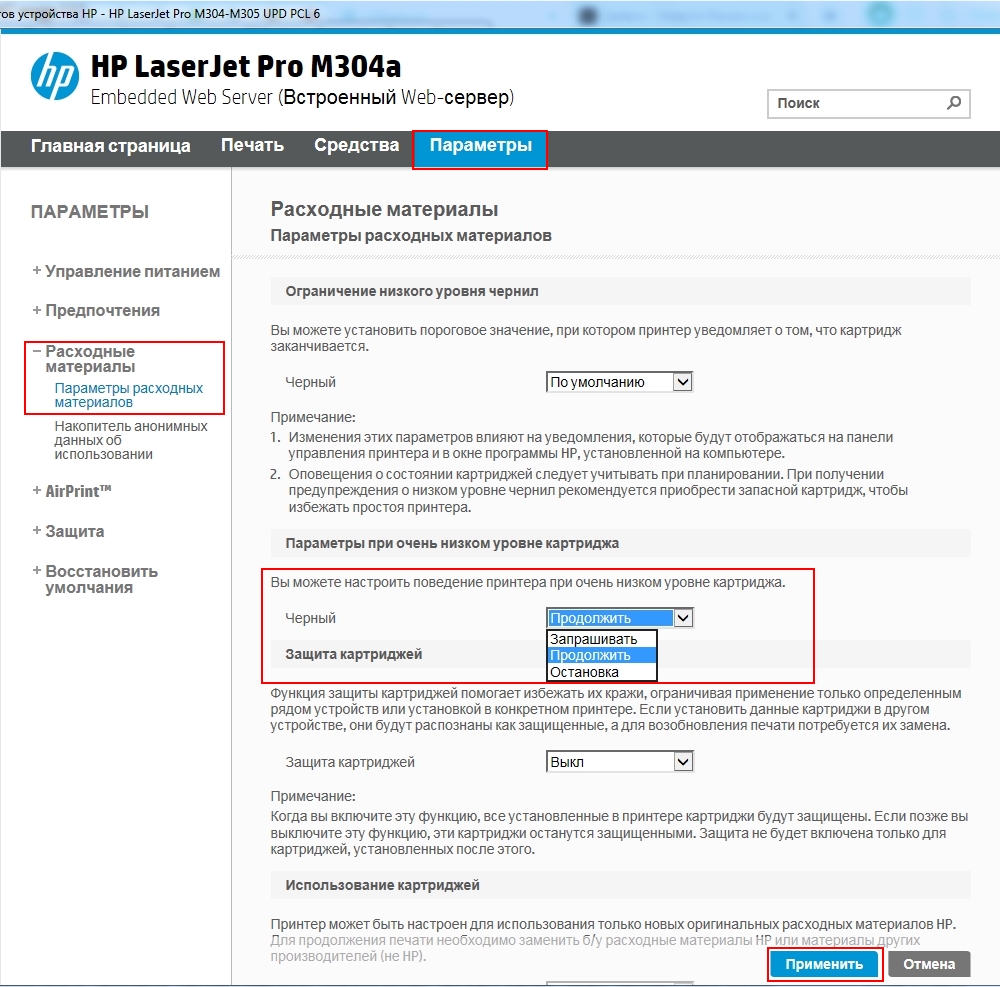
Все готово! Теперь можно печатать с «пустым» чипом. Главное, чтобы чип просто был установлен на картридже.

Обладатели печатной продукции от компании HP иногда сталкиваются с тем, что на экране появляется уведомление «Ошибка печати». Причин возникновения этой неполадки может быть несколько и каждая из них решается по-разному. Сегодня мы подготовили для вас разбор основных способов исправления рассматриваемой проблемы.
Исправляем ошибку печати на принтере HP
Каждый приведенный ниже метод имеет разную эффективность и будет наиболее подходящим в определенной ситуации. Мы по порядку рассмотрим все варианты, начиная от самого простого и действенного, а вы, следуя инструкциям, решите поставленную задачу. Однако сначала мы рекомендуем обратить внимание на эти советы:
- Перезапустите компьютер и переподключите устройство печати. Желательно, чтобы перед следующим подключением принтер находится в выключенном состоянии не менее одной минуты.
- Проверьте картридж. Иногда ошибка появляется в тех случаях, когда в чернильнице закончилась краска. О том, как заменить картридж вы можете прочитать в статье по ссылке ниже.
Если приведенные советы ничем не помогли, переходите к осуществлению следующих методов решения «Ошибка печати» при использовании периферии компании HP.
Способ 1: Проверка принтера
В первую очередь советуем проверить отображение и конфигурацию оборудования в меню «Устройства и принтеры». От вас потребуется произвести всего несколько действий:
-
Через меню «Панель управления» и переместитесь в «Устройства и принтеры».


По окончании процесса рекомендуется перезагрузить ПК и переподключить оборудование, чтобы все изменения точно стали активными.
Способ 2: Разблокирование процедуры печати
Иногда происходят скачки напряжения или различные системные сбои, вследствие чего периферия и ПК перестают нормально выполнять определенные функции. По таким причинам и может возникать ошибка печати. В таком случае вам следует проделать следующие манипуляции:
-
Снова перейдите в «Устройства и принтеры», где правым кликом мыши на активном оборудовании выберите пункт «Просмотр очереди печати».


Осталось только выключить продукт компании HP, отключить его от питания, дать так постоять примерно минуту. После этого перезагрузите ПК, соедините оборудование и повторите процесс печати.
Способ 3: Отключение брандмауэра Windows
Иногда защитник Windows блокирует отправленные данных с компьютера на устройство. Связано это может быть с некорректной работой брандмауэра или различными системными сбоями. Мы советуем на время отключить защитник Виндовс и повторить попытку печати. Детальнее о деактивации этого инструмента читайте в другом нашем материале по следующим ссылкам:
Подробнее: Отключение брандмауэра в Windows XP, Windows 7, Windows 8
Способ 4: Переключение учетной записи пользователя
Рассматриваемая проблема порой возникает тогда, когда попытка отправки в печать производится не с той учетной записи пользователя Windows, с которой происходило добавление периферии. Дело в том, что каждый профиль имеет свои привилегии и ограничения, что приводит к появлению подобного рода неполадок. В таком случае нужно попробовать сменить запись юзера, если у вас их конечно добавлено больше, чем одна. Развернуто о том, как это сделать в разных версиях Виндовс читайте в статьях ниже.
Подробнее: Как сменить учетную запись пользователя в Windows 7, Windows 8, Windows 10
Способ 5: Восстановление Windows
Часто случается, что ошибки печати связаны с определенными изменениями в операционной системе. Самостоятельно обнаружить их достаточно сложно, однако состояние ОС можно вернуть, откатив все изменения. Осуществляется данная процедура с помощью встроенного компонента Виндовс, а детальное руководство по этой теме вы найдете в другом материале от нашего автора.

Способ 6: Переустановка драйвера
Мы поставили этот способ последним, поскольку он требует от пользователя выполнения большого количества различных манипуляций, а также является достаточно сложным для новичков. Если никакие приведенные выше инструкции вам не помогли, значит остается только переустановить драйвер устройства. Для начала следует избавиться от старого. О том, как это сделать, читайте далее:
По завершении процедуры удаления задействуйте один из методов инсталляции программного обеспечения для периферии. Всего существует пять доступных способов. Развернуто с каждыми из них знакомьтесь в другой нашей статье.

Как видите, методов исправления ошибки печати принтера HP существует достаточно большое количество, и каждый из них будет полезен в разных ситуациях. Надеемся, приведенные выше инструкции помогли вам без труда решить возникшую проблему, а продукт компании снова функционирует корректно.

Мы рады, что смогли помочь Вам в решении проблемы.
Отблагодарите автора, поделитесь статьей в социальных сетях.
Опишите, что у вас не получилось. Наши специалисты постараются ответить максимально быстро.
Читайте также:
- Huawei y6 prime 2018 сброс до заводских настроек
- Hp laserjet pro 400 какой картридж
- Плита dexp мигает h
- Как сделать скриншот на honor 8 lite
- Какие сервисы есть у apple
My husband and I have owned an HP Printer for over 8 years and for the most part it has been incredibly reliable. It’s no wonder they are consistently among the top selling printers globally!
Having said that, we have encountered a few issues over the years while working from home. One such issue is a strange error that results in our device getting stuck in what is known as “MFG Mode”.
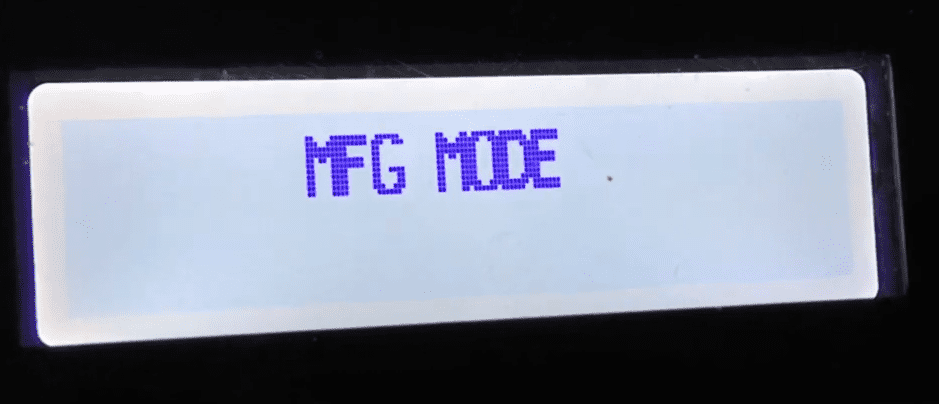
MFG Mode is short for Manufacturing Mode. Many of the HP Printer models have a well know malfunction where the printer will either boot directly into this mode or switch from User Mode to Manufacturing Mode.
This happens involuntary without user interaction and results in the control panel becoming unresponsive or unavailable.
If you are stuck in HP Printer MFG Mode, first turn the printer on and wait until it is idle and silent before continuing. With the printer turned on, disconnect the power cord. Wait 60 seconds. Plug the power cord back in. Turn the printer on. It should be fixed!
Read on for further step-by-step instructions and additional troubleshooting steps you can take to get your printer unstuck today!
Step 1: Perform Hard Reset
In most cases, performing a “hard reset” will be sufficient to solve the problem.
To perform a hard reset, first disconnect the power cord from BOTH the printer and the power source while the printer is ON.
Allow 60 seconds to pass. Then, reconnect the power cord to the back of the printer and the power outlet. Your printer should reset and turn back on automatically.
If your printer does not power up automatically following the hard reset, manually turn the printer back on. It’s really that simple! This should solve the issue for most users.
Step 2: Power Drain Printer
Sometimes performing a power drain is required. First, unplug any USB or cable from the printer. Then, pull the power cord out of the printer and wait 60 seconds or so.
Next, hold down the power button for 10 seconds to drain any remaining power from the system.
Finally, plug the power cord back in and attempt to restart the printer. Do not put any USB or other cables into the printer at this time.
Step 3: Perform Cold Reset
If the hard reset and power drain processes do not work, you can also attempt to “cold reset” your printer.
A cold reset forces the printer to return to its factory default settings. Often times if the printer’s configuration has been corrupted, a cold reset will do the trick.
The cold reset procedure differs depending on the printer model.
Older HP Printer models (including HP4000, 4100, 8000, 8100, 8150):
- Turn off the printer.
- While holding down the Go or Online button, turn the printer on.
- Release the buttons when the printer displays “Cold Reset” or “Resetting”.
Newer HP Printer models (including HP3800DN, 4200, 4250, 4300, 4350, 9000, 4600, 5500, 4700):
- Turn on the printer.
- On the control panel the memory will start counting. When it does, press and hold the Select button.
- Continue holding the Select button until all three Control Panel LED’s are illuminated and on solid, then release Select button.
- The control panel should now say “Select Language”.
- Use the down arrow on the control panel display to locate “Cold Reset” and press Select.
- The printer should now perform a cold reset and then continue its power-on sequence.
HP LaserJet (including 2200, 2200dn, and 2200dtn):
- Press and hold down the Go button.
- While holding down the Go button, turn the printer on. Continue holding Go.
- When the Attention light turns on, release the Go button.
If your model does not have a display panel, the cold reset procedure typically requires using a combination of the Go and Power buttons. Use your model number to look up your printer manual for the exact procedure.
Step 4: Set Printer To “User Mode”
Ok, so the hard reset, power drain and cold reset didn’t do the trick.
Another troubleshooting step to consider is setting your printer to User Mode.
To clear the MFG message and return to User mode, do the following:
- Turn the printer off and wait 10 seconds before turning the printer back on. Allow the the printer to boot up and display MFG Mode.
- Tap the power button. The display should now say Ready. If Ready does not appear, keep pressing the power button until you see the home screen.
- Navigate to the Engineering Menu / Underware Menu. Hit the OK button.
- The Boot code menu should now appear. Hit OK again.
- Use the Right Arrow button to locate the Set to user mode option. Hit OK again.
- Now use the Power button to shut the printer off an wait 10 seconds before turning the printer back on.
- When the printer reboots, the display should say Ready which means you are now in user mode.
If you are having trouble finding the User Mode on your printer, this may be due to your model following a slightly different procedure. Once again, use your model number to look up your device’s manual for the exact procedure.
Step 5: Update Firmware
To get the most out of your printer, you need to update your firmware regularly. HP frequently releases new firmware versions for printer enhancements that often include issue fixes.
Notably, updating your firmware may help prevent this MFG issue, Initializing errors, and others from happening in the future.
Update Firmware Directly From Printer
- First, connect the printer via a Wi-Fi or Ethernet connection.
- Use the control panel to open the Setup, Service, or Settings menu.
- Then, select Preferences, Printer Maintenance, or Tools.
- From there select Web Services, Printer Update, or LaserJet Update.
- If prompted, use the instructions that are displayed to turn on Web Services.
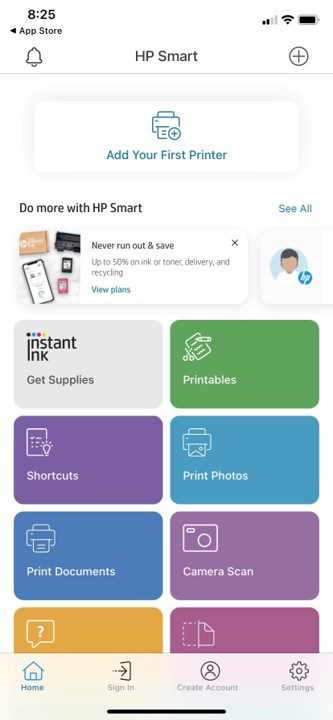
Update Firmware Through HP Smart App
- First, create an HP Smart App account or sign in if you already have an existing account.
- Then, on the home screen of the application, select your printer model.
- Next, navigate to Advanced, and select Advanced Settings or Printer Home Page (EWS).
- Select Tools or Web Services.
- Finally, select Printer Updates or Product Update, and click Check Now. Any available firmware updates will be automatically downloaded and installed onto your printer.
ATTENTION: Do not turn off the printer during the firmware update as this can cause permanent damage to your printer, and lead to your device not printing at all.
Final Word
If you encounter your HP Printer stuck in MFG Mode, follow these five troubleshooting steps in order:
- Perform a hard reset
- Power drain the printer
- Cold reset to factory default settings
- Set printer to User Mode
- Update firmware
As a final measure, you can try contacting HP customer support by using your printer model number. Once you’ve exhausted all of your options, be sure to check your warranty terms and conditions before making any purchases.

Chelsea Ashbrook is a Senior Manager of Corporate Digital Experience at Genentech. Chelsea received her B.A. from the University of Connecticut and has spent the last 11 years working in the technology field.
HP M404 Printer INVOLUNTARY BOOT UP TO MANUFACTURING (MFG) MODE W1A52A
The INVOLUNTARY BOOT UP TO MANUFACTURING (MFG) MOD error message is common on the following HP printers.
-
M404n
-
M404dn
-
M404dw

HP M404 Printer W1A52A INVOLUNTARY BOOT UP TO MANUFACTURING (MFG) MODE
In some cases, without any user interaction, a LaserJet M404 printer will switch from the typically used user mode to manufacturing mode and will display “MFG MODE’ on the control panel. When in manufacturing mode, the control panel and menus will be unresponsive/unavailable.
To clear this message and return to user mode, do the following:
Turn the power off, wait ten seconds and turn the power back on. Wait for the printer to boot up and display ‘MFG MODE’.
Hit the ‘X’ button, then hit the Back arrow twice, then hit the ‘X’ button, then hit the Back arrow twice.
Hit the power button. The display should now show ‘READY’.
Hit the ‘X’ button, then hit the Back arrow twice, then hit the ‘X’ button, then hit the Back arrow twice.
The display should now show ‘Engineering Menu / Underware Menu’. Hit the ‘OK’ button.
The display should now show ‘boot code menu’. Hit the ‘OK’ button.
Hit the ‘Right Arrow’ button so that ‘set to user mode’ is displayed. Hit the ‘OK’ button.
Hit the power button to shut the printer off.
Wait ten seconds and turn the printer back on. It should now boot to ‘READY’; you are now in user mode.
More HP LaserJet Printer Maintenance Resources
-
HP Laser Printer Technician Basics
-
Introduction To HP Laser Printer Repair and Troubleshooting
-
Onboarding-Making the Most of Printer Technical Phone Support and Avoiding The Top 5 Profit-Time Wasters
-
How The Laser Printer Works
-
HP Paper Jams and Paper Path Troubleshooting Problems
-
How To Troubleshoot Laser Printing Communication & Connection Problems
About Metrofuser NVRAM Reset Advisors
Metrofuser is a leading global innovator, manufacturer, and marketer of printer parts, equipment, diagnostics, repair information and systems solutions for professional users performing critical tasks. Products and services include remanufactured laser printer parts, remanufactured printers and service training for HP, Lexmark and Canon brands. The company’s customers include office equipment dealerships, online retailers, repair centers and MPS service providers nationwide. Metrofuser has been named to Inc. Magazine’s fastest-growing companies five consecutive years. For more information, visit http://www.metrofuser.com.