
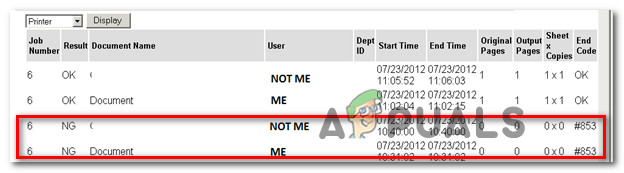
Пользователи Windows, использующие принтеры Canon, могли столкнуться с конечным кодом # 853 или кодом ошибки # 853 в очереди печати. Этот код ошибки появляется, когда пользователь пытается печатать обычным способом. Важно отметить, что эта ошибка обычно не возникает, когда выдается тестовое задание на печать.

Возможные причины этой ошибки:
- Postscript (.ps)-это формат файла, который содержит инструкции, а также необходимое содержимое для печати. Если драйвер принтера не поддерживает формат Postscript, можно увидеть эту ошибку. По умолчанию системы Windows 10 настроены на использование драйвера класса IPP от Microsoft. В большинстве случаев этот драйвер не поддерживает формат PS и обнаруженную ошибку.
- Драйвер принтера не обновлен.
- Прошивка принтера устарела.
Исправления, которые могут помочь вам решить эту ошибку, перечислены ниже.
Исправление 1. Установите драйвер UFR 2
Шаг 1. Откройте Страница поддержки Canon
Шаг 2. В разделе Драйверы и загрузка в раскрывающемся списке Операционная система выберите ОС.
Для 64-битной машины выберите Windows 10 (x64)
Для 32-разрядной машины выберите Windows 10
Шаг 3. Необходимые драйверы будут перечислены в разделе”Рекомендуемые драйверы”.
Шаг 4. Нажмите кнопку ВЫБРАТЬ
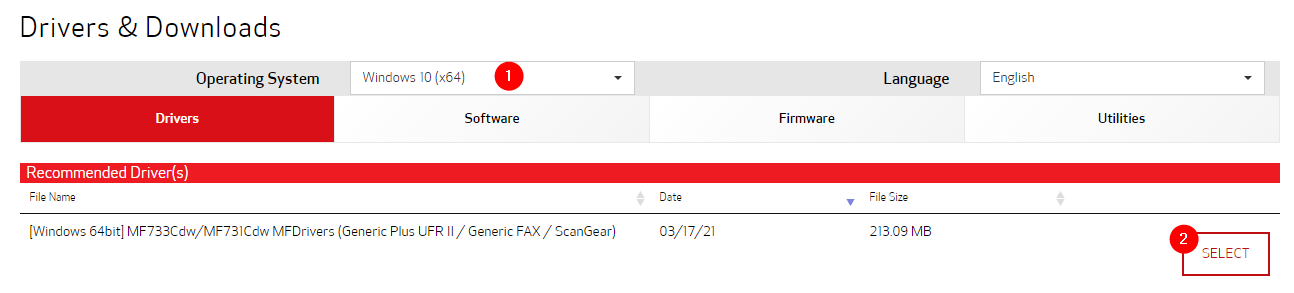
Шаг 5. Нажмите кнопку СКАЧАТЬ

Шаг 6. Дважды щелкните загруженный файл, чтобы запустить его. Завершите установку, следуя инструкциям на экране.
Шаг 7. Перезагрузите систему
Проверьте, помогает ли это, если ошибка все еще появляется, попробуйте следующее исправление.
Исправление 2. Убедитесь, что принтер использует драйвер UFR 2
По умолчанию Windows 10 настраивает драйвер класса Microsoft IPP в качестве драйвера принтера, даже если в вашей системе установлен драйвер UFR 2. Поэтому важно убедиться, что принтер использует драйвер UFR 2. Для этого выполните следующие действия:
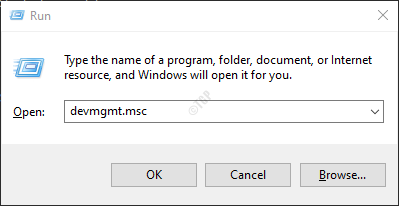
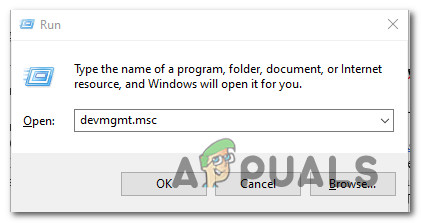
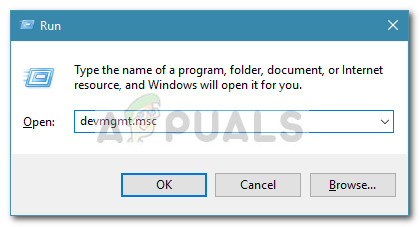
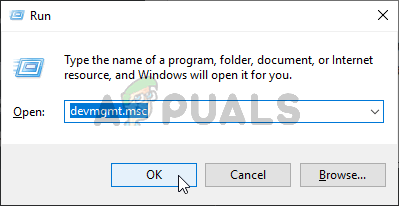
Шаг 1. Откройте диалоговое окно”Выполнить”с помощью клавиш клавиатуры Windows и R
.
Шаг 2. Введите devmgmt.msc и нажмите Enter
.
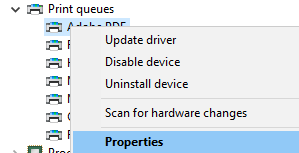
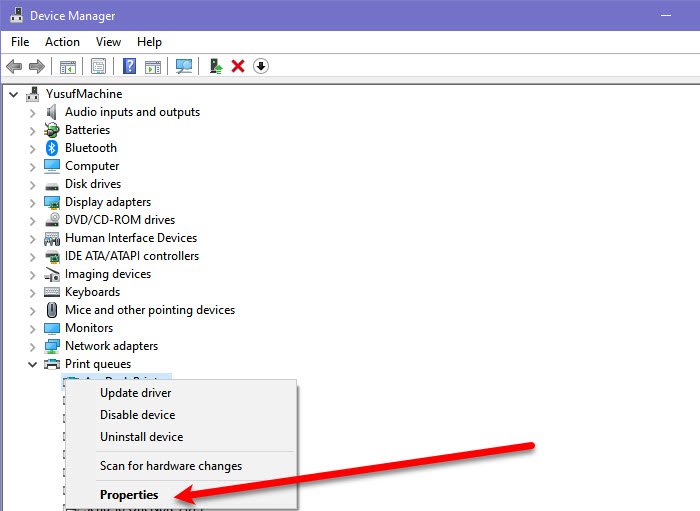
Шаг 3. Откроется окно диспетчера устройств. Прокрутите вниз и дважды щелкните Очереди печати
.
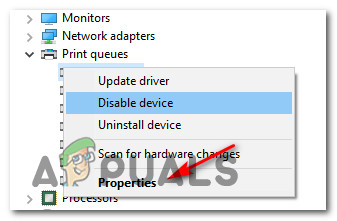
Шаг 4. В списке доступных принтеров щелкните правой кнопкой мыши на своем принтере Canon и выберите Свойства
.
Шаг 5. В открывшемся окне”Свойства”перейдите на вкладку Драйвер
.
Шаг 6. В раскрывающемся меню выберите Canon Generic Plus UFR II
.
Шаг 7. Наконец, нажмите Применить , а затем-OK
.
Шаг 8. Перезагрузите систему.
Исправление 3. Запустите средство устранения неполадок принтера
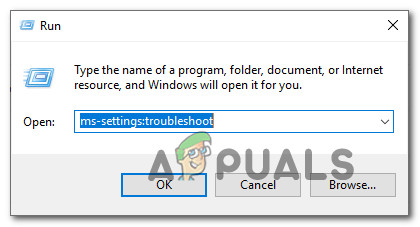
Шаг 1. Откройте диалоговое окно”Выполнить”в своей системе, это можно сделать, удерживая кнопку Windows+r
Шаг 2. В появившемся окне введите команду ms-settings: Troubleshoot и нажмите OK

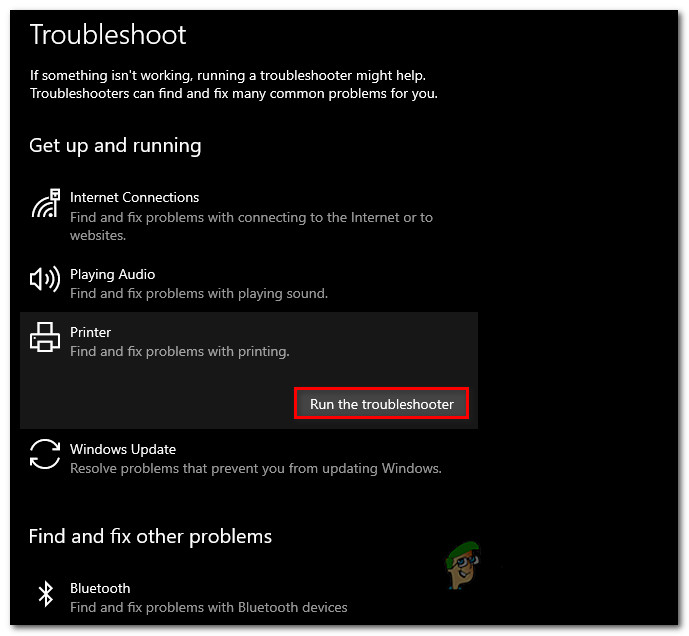
Шаг 3. В открывшемся окне”Настройки> Обновление и безопасность> Устранение неполадок”нажмите Дополнительные средства устранения неполадок
.
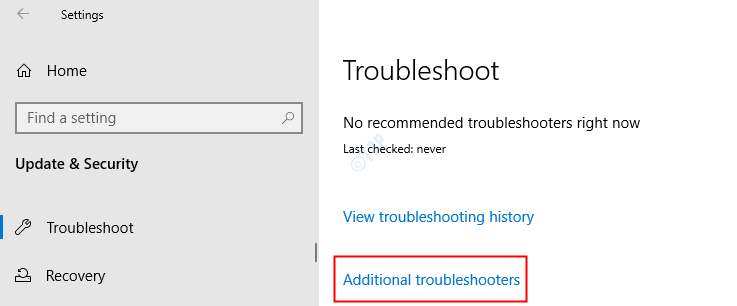
Шаг 4. В открывшемся окне”Дополнительные средства устранения неполадок”нажмите Принтеры
.

Шаг 5. Теперь нажмите кнопку Запустить средство устранения неполадок
.
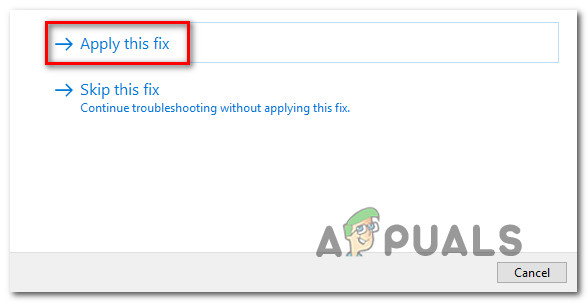
Шаг 6. Теперь система начнет поиск проблем. Вы получите уведомление, как только проблема будет обнаружена. Следуйте инструкциям на экране, чтобы устранить проблему.
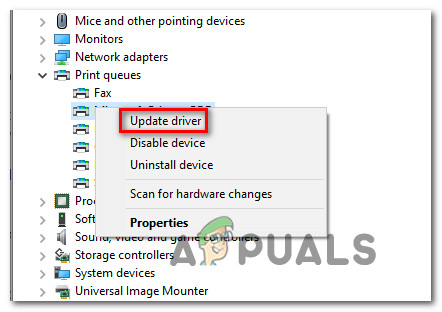
Исправление 4. Обновите драйвер принтера из диспетчера устройств
Шаг 1. Откройте диспетчер устройств. См. Шаги 1,2 из Исправления 1
Шаг 2. Прокрутите вниз и дважды щелкните Очереди печати
.
Шаг 3. Щелкните правой кнопкой мыши на принтере Canon и выберите Обновить драйвер
.
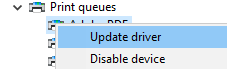
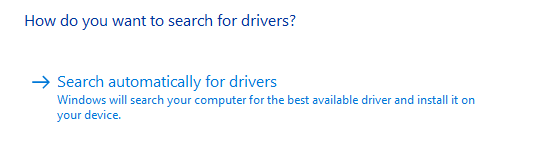
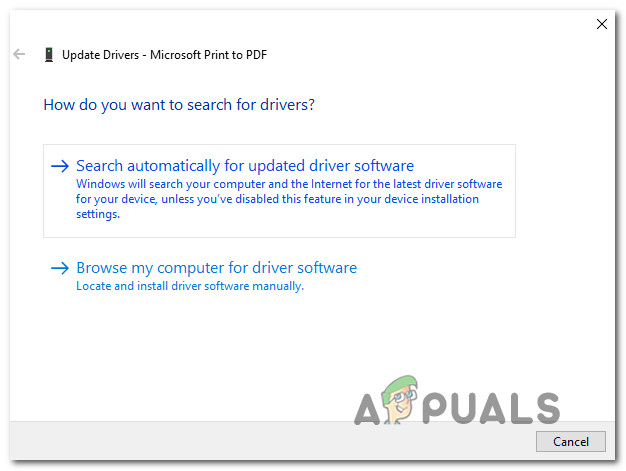
Шаг 4. В появившемся окне нажмите Автоматический поиск драйверов
.
Шаг 5. Вы получите уведомление, если будет найдена обновленная версия драйвера. Следуйте инструкциям на экране, чтобы обновить драйвер.
Шаг 6. Перезагрузите систему после завершения обновления.
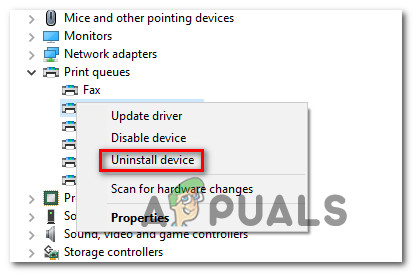
Исправление 5. Обновите драйвер принтера вручную
Шаг 1. Откройте диспетчер устройств. См. шаги 1,2 из Исправления 1
Шаг 2. Прокрутите вниз и дважды щелкните Очереди печати
.
Шаг 3. Щелкните правой кнопкой мыши на принтере Canon и выберите Удалить драйвер
.
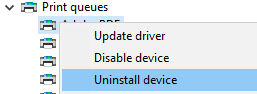
Шаг 4. Следуйте инструкциям на экране и полностью удалите принтер.
Чтобы переустановить драйвер, выполните следующие действия:
Шаг 5. Посетите Страница поддержки Canon
Шаг 6. Введите сведения о принтере
Шаг 7. Вам будет показан список необходимых драйверов.
Шаг 8. Следуйте инструкциям на экране и загрузите драйверы.
Шаг 9. Дважды щелкните загруженный файл, чтобы запустить его. Завершите установку, следуя инструкциям на экране.
Шаг 10. Перезагрузите систему
Исправление 6. Обновление прошивки принтера
Если вы попробовали все перечисленные выше исправления, но ошибка не исчезла, это может означать, что микропрограмму принтера необходимо обновить. Для этого внимательно следуйте приведенным ниже инструкциям.
Шаг 1. Убедитесь, что принтер подключен к сети
Шаг 2. На экране принтера откройте вкладку Меню
Шаг 3. Выберите Настройки управления системой
.
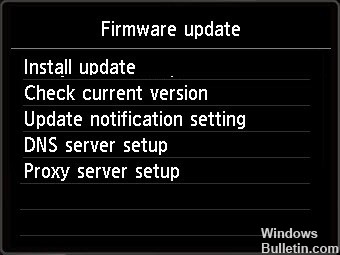
Шаг 4. Выберите Обновить прошивку
.
Шаг 5. Выберите Через Интернет
.
Шаг 6. Обновление микропрограммы займет некоторое время. Пожалуйста, подождите терпеливо.
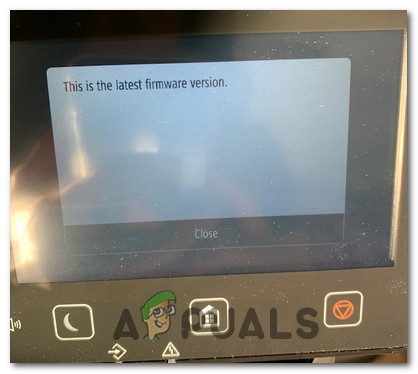
Шаг 7. Перезагрузите принтер. На экране отображается сообщение Это последняя версия микропрограммы . Это означает, что микропрограмма была успешно обновлена.
Это все
Надеемся, эта статья была информативной. Спасибо за чтение.
Мы будем рады, если вы оставите комментарий и сообщите нам об исправлении, которое помогло вам устранить ошибку.
Some Windows users using Canon printers are reporting that they end up seeing the error code #853 inside the Print Queue whenever they attempt to print something conventionally. Most affected users are reporting that printing out a test page doesn’t return the same error code.
After investigating this particular error code thoroughly, it turns out that several different underlying causes might be causing this error. Here’s a list of potential culprits that might be causing this problem:
- Postscript printing issue – In most cases, you can expect to see this error popping up if your Canon printer is attempting to execute a printing job through a driver that doesn’t support the Postscript printer’s language. In this case, you can get the issue resolved by installing the UFR2 driver to grant the printer’s the required dependencies.
- IPP Class Driver is used instead of the UFRII driver – As it turns out, you can also expect to see this error in those situations where your Windows 10 computer is configured by default to use the Microsoft IPP Class driver instead of the one that supports Postscript (UFR2 driver). If this scenario is applicable, you can resolve the issue by using Device Manager to modify the default behavior and make the UFR2 driver the default choice.
- Common printer inconsistency – According to some affected users, you can also expect to see this error code due to a common printer inconsistency if you’re seeing this error on Windows 10. In this case, you should run the Windows Printer Troubleshooter and apply the recommended fix to resolve the issue.
- Outdated printer version – Under certain circumstances, you can expect to see this error code due to an outdated printer driver that is affecting the connection between the host computer and the Canon printer that’s triggering this printing queue error. In this case, you should update your printer driver version manually or via Windows Update.
- Outdated printer firmware – If you’re seeing this error with Canon model MF733Cdw or similar models with smart functionality, chances are you’re dealing with an outdated firmware version. To resolve this issue, connect your printer to the internet and update the firmware version to the latest via the in-game menus of Canon.
Now that you are aware of every potential fix that might be responsible for this particular issue, here’s a list of verified methods that other affected users have successfully used to resolve the #853 error code:
Method 1: Installing the UFR2 driver (if applicable)
Since the 853 error code is an internal processing error at heart, you need to start this investigation by ensuring that the problem is not occurring due to a Postscript issue.
Most commonly, you can expect to see this error code when your Canon printer is attempting to execute a printing job because it attempts to use a Postscript driver even though the printer model does NOT support the Postscript printer language.
Note: This is a fairly common occurrence with printers that are using the Canon PS v4.x driver.
If this scenario applies to your particular situation, you should be able to fix the problem by installing and using the UFR2 driver instead.
If you’re looking for specific instructions on how to download & install the UFR2 driver on the computer that acts as the host for your printer, follow the instructions below:
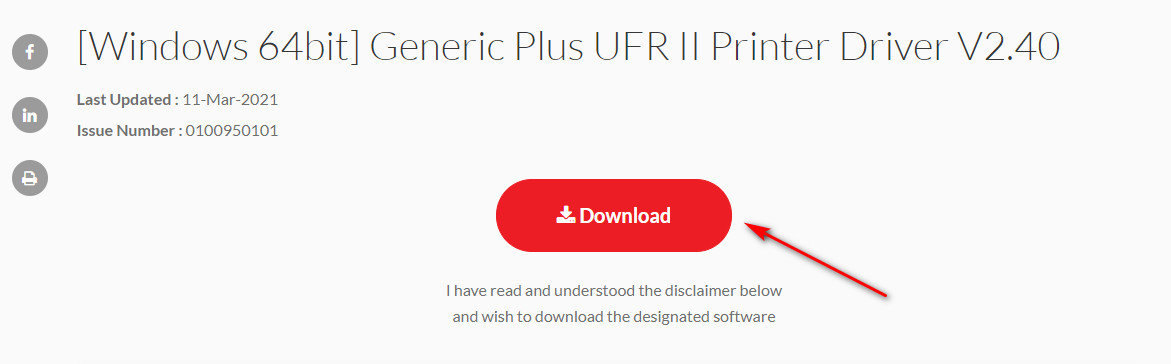
- Open your default browser and navigate to the download page of the generic version of the UFR2 printer driver.
- Once you’re inside the correct page, click on the Download button to initiate the download.

Downloading the UFR driver Note: This driver version is compatible with every recent Windows version including Windows 7, Windows 8.1, and Windows 10.
- Once the download is complete, double-click on the executable that you’ve just downloaded and click Yes at the UAC (User Account Control) to grant admin access.
- Next, follow the on-screen instructions to complete the installation of the UFR2 driver before restarting your computer.
- After your computer boots back up, the new printer driver will automatically replace the old one you previously used.
- Repeat the action that was previously causing the #853 error code and see if the problem is now fixed.
In case the same problem is still occurring, move down to the next potential fix below.
Method 2: Forcing the correct driver (UFR II)
Even if you have previously installed the UFR II driver, that doesn’t guarantee that your computer is configured to use it in your particular situation.
In fact, Windows 10 is configured to use the Microsoft IPP Class driver by default, so chances are the UFRII driver is still not in use even if you followed the instructions above to install the correct driver.
Several affected users who found themselves in a similar situation have reported that they could fix the issue by modifying the driver priority via Device Manager, forcing the printer to use the Canon Generic Plus UFR II instead of the Microsoft IPP Class driver.
Follow the instructions below to ensure that your Canon printer is using the correct driver before printing a file again to check if the 853 error has been fixed:
- Press Windows key + R to open up a Run dialog box. Next, type ‘devmgmt.msc’ inside the text box and press Enter to open up Device Manager. When you see the UAC (User Account Control), click Yes to grant admin access.

Opening Device Manager - Inside Device Manager, scroll down through the different device types and expand the drop-down menu associated with Print Queues.
- Next, right-click on your printer from the list of available options inside and choose Properties from the context menu that just appeared.

Accessing the Properties menu - Once you’re inside the Properties screen of your printer, click on the Driver tab at the top, then use the drop-down menu inside to select Canon Generic Plus UFR II instead of Microsoft IPP Class Driver (or whatever the default choice currently is).
- After the modification is complete, click on Apply to save the changes, then restart your computer and see if the problem is finally fixed.
In case the same 853 error is still occurring even after you’ve ensured that you are indeed using the Canon Generic Plus UFR II driver, move down to the next potential fix below.
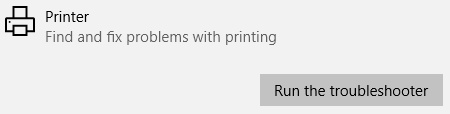
Method 3: Running the Windows Printer Troubleshooter
If the first two methods were not effective in your case, you should also consider the possibility that you might be dealing with a generic printer driver inconsistency.
If you’re using Windows 10, you have a built-in utility at your disposal that should be capable of resolving the issue automatically if the error is covered by one of the many automated repair strategies covered by the Printer Troubleshooter.
When you start the Printer Troubleshooter, the utility will analyze your current situation and determine if any of the predetermined repair strategies are applicable in this situation. If one is a match, you will be prompted to apply the fix. If everything goes well, this will end up resolving the issue with minimal hassle.
Follow the instructions below to run the Printer Troubleshooter:
- Press Windows key + R to open up a Run dialog box. Then, type” ms-settings:troubleshoot” and press Enter to open up the Troubleshoot tab of the Settings app.

Accessing the Activation troubleshooter - Once you’re inside the Troubleshooting tab, move to the Get up and running tab and click on Printer. Then, from the list of available options, and click on the Run the troubleshooter button.

Running the printer troubleshooter - After the scanning period is complete, then click on Apply this fix if a repair strategy is recommended.

Applying the recommended fix - Once the operation is complete, close the troubleshooting window and see if you’re still encountering the same error message when trying to print something from your default printer.
If the same issue is still persisting, move down to the next method below.
Method 4: Updating your printer’s driver version
As it turns out, you can also expect to encounter the 853 error code due to some kind of outdated printer driver that is affecting the connection between the host computer and the Canon printer that is triggering the error.
In this case, you have two available options for mitigating the outdated driver issue:
- Updating your printer driver version via Windows Update
- Updating your printer driver version manually
We’ve covered both potential approaches with a series of sub guides that will walk you through every step. Follow the guide that is applicable to your preferred way of doing things under Windows.
A. Updating your printer driver via Windows Update
- Start by pressing Windows key + R to open up a Run dialog box. Then, type “devmgmt.msc” and press Enter to open up Device Manager. If prompted by the UAC (User Account Control), click Yes to grant administrative privileges.
Opening Device Manager - Once you’re inside Device Manager, scroll through the list of devices and expand the Printers (Print queues) drop-down menu.
- Right-click on the printer that you’re having issues with and choose Update driver.

Updating your printer driver - Once you get to the next screen, click on Search automatically for updated driver software to let Windows Update scan and download the newer driver version for your printer.

Updating the driver version - If a new version of the printer version is available, follow the on-screen prompts to complete the installation of the newer driver version.
- At the end of this operation, restart your computer and see if the problem is now fixed.
B. Updating your printer driver manually
- Start by pressing Windows key + R to open up a Run dialog box. Then, type “devmgmt.msc” and press Enter to open up Device Manager. If you are prompted by the UAC (User Account Control), click Yes to grant admin access.

Opening Device Manager - Next, go ahead and expand the drop-down menu associated with Printers (or Print Queues). Next, right-click on the printer that you’re having issues with and choose Uninstall device – You’ll need to confirm once again before the driver is uninstalled.

Uninstalling the Printer Driver Note: Keep in mind that you need to avoid restarting your computer during this time. Doing this will trigger Windows Update to search and install a generic version of the driver at the next startup, which will likely end up producing the same error.
- After you manage to remove your printer’s driver open your browser and search online for your manufacturer’s website.
Note: The latest printer driver versions are often available in the support section. - After you finally locate and download the latest driver version, open it and follow the on-screen prompts to install it on your system. Almost all printer drivers are self-installing – meaning that they only require you to double-click them and accept the UAC prompt for them to install.
- Once the newer printer driver is installed, reboot your computer and see if the issue is resolved once the next startup is complete.
In case you’ve already ensured that you are using the latest printer drivers and you’re still seeing the 853 error while attempting to initiate a printing job, move down to the next method below.
Method 5: Updating the Canon printer’s firmware (if applicable)
If none of the methods above have proven to be effective in your case, you should also take into consideration that an outdated printer firmware can be responsible for the inability to take on printing jobs from the home/work network.
Several Canon users that were dealing with the same problem have reported that they finally managed to fix the issue by updating the firmware over the Internet after ensuring that the printer is connected to the internet.
Follow the instructions below to update your Canon firmware to the latest version:
Note: The instructions below were tested on a MF733Cdw Canon printer model. The steps should work on similar Canon models using the same OS with Wireless / Wired Capabilities.
- On your printer, access the Menu option using your printer’s screen.
- Inside the options available inside the Menu tab, access the System Management Settings.
- Make sure your printer is connected to the internet (via wireless or wired cable).
- Next, choose Update Firmware, then select Via Internet when asked to select your preferred approach of updating.
- Wait until the operation is complete, then restart your printer conventionally and return to the Update Firmware screen once again.
- If the same screen now returns the message ‘This is the latest firmware version‘, it means you have successfully updated your Canon printer versions to the latest version available.

Updating the latest firmware version on Canon printer
РЕКОМЕНДУЕМЫЕ: Загрузите этот инструмент, который поможет вам безопасно исправить распространенные ошибки Windows и автоматически оптимизировать производительность системы.
Покупка нового принтера заставит вас ожидать, что все в порядке. Большинство принтеров после тестирования работают нормально и без проблем прослужат месяцы или даже годы. Но есть одно исключение для Принтер Canon пользователей. Многие из них сталкиваются с Код ошибки задания печати Canon # 853 после распечатки тестовой страницы. Когда дело доходит до реальной печати, ничего не выходит. Принтер просто не работает.
Это случается со многими людьми, но есть способы решить и исправить проблему печати Canon 853 на ПК с Windows 10 или 11. Вы можете принести его обратно в магазин, где вы его купили, чтобы технический специалист проверил его и отремонтировал. Но, хотя это займет некоторое время, вы можете попробовать некоторые из советов по устранению неполадок, которые мы перечислили ниже.

Канон это нарицательное имя бренд для принтеров и другое компьютерное оборудование. Однако независимо от того, насколько надежен и известен бренд, время от времени мы не можем избавиться от сбоев и проблем. Вы можете попытаться устранить проблему и исправить сообщение об ошибке принтера Canon 853 самостоятельно, выполнив следующие действия. Это руководство работает на ПК с Windows 10 или Windows 11.
РЕКОМЕНДУЕМЫЕ: Amazon предлагает большие скидки и потрясающую экономию на новейших принтерах Canon прямо сейчас!
Метод №1 — Запустите средство устранения неполадок Windows.
- Щелкните кнопку «Пуск».
- Перейдите в Настройки.
- Выберите Обновление и безопасность.
- Выберите Устранение неполадок.
- Найдите раздел «Принтер».
- Щелкните Запустить средство устранения неполадок.
- После завершения сканирования выберите рекомендованную стратегию исправления ошибки и нажмите Применить это исправление.
- После этого проверьте, устраняет ли он ошибку принтера Canon 853.
Метод № 2 — Загрузите и установите драйвер UFR II от Canon
 Снимок экрана: Windows Dispatch
- В вашем браузере перейдите в эта страница.
- Выберите версию ОС для вашего компьютера.
- Нажмите кнопку «Загрузить».
- После загрузки перейдите в папку с файлом и дважды щелкните его.
- Нажмите Да, если вас попросят предоставить доступ администратора.
- Теперь завершите процесс установки драйвера UFR II.
- После установки драйвера перезагрузите компьютер.
Метод № 3 — Измените настройки свойств драйвера принтера
- Запустите Диспетчер устройств вашего компьютера из меню настроек.
- Прокрутите вниз и найдите очереди печати.
- Щелкните стрелку раскрывающегося списка, чтобы раскрыть меню.
- Выберите «Свойства».
- Перейдите на вкладку Драйверы.
- Щелкните раскрывающееся меню.
- Выберите Canon Generic Plus UFR II.
- Нажмите кнопку Применить.
Метод №4 — Обновите драйвер принтера
- Откройте меню настроек и перейдите в диспетчер устройств.
- Перейдите к Очередям печати и разверните раскрывающееся меню.
- Найдите свой принтер и щелкните его правой кнопкой мыши.
- Выберите Обновить драйвер.
- Щелкните Автоматический поиск обновленного программного обеспечения драйвера.
- Теперь завершите установку.
- Перезагрузите компьютер.
Метод № 5 — Обратитесь в службу поддержки Canon
Вы также можете попытаться связаться со службой поддержки клиентов Canon, перейдя в эта страница в вашем браузере.
Сработал ли какой-либо из вышеперечисленных методов для исправления кода ошибки принтера Canon # 853? Какой из них сделал? Вы можете сообщить нам об этом, написав нам комментарий ниже.
НУЖЕН НОВЫЙ ПРИНТЕР? Ознакомьтесь с этими эксклюзивными предложениями на новые принтеры в официальном интернет-магазине Canon!
Обновлено май 2023: перестаньте получать сообщения об ошибках и замедлите работу вашей системы с помощью нашего инструмента оптимизации. Получить сейчас в эту ссылку
- Скачайте и установите инструмент для ремонта здесь.
- Пусть он просканирует ваш компьютер.
- Затем инструмент почини свой компьютер.

Если вы столкнулись с «Ошибка задания печати Canon 853» или «Ошибка печати Canon № 853» в очереди печати вашего компьютера с Windows 10/8/7, подключенного к Canon принтер при попытке распечатать документ вы попали в нужное место, чтобы найти решение. Вот несколько простых шагов / методов для решения проблемы. Начнем обсуждение.
Это распространенная проблема в Windows, которая считается ошибкой принтера или очереди печати. Эта ошибка обычно возникает в принтерах Canon на компьютерах с Windows 10/8/7 при попытке распечатать что-либо обычным способом. Несколько пользователей сообщили об этой проблеме и объяснили, что печать тестовой страницы не вернула тот же код ошибки.
- Устаревшая версия принтера
- Устаревшая прошивка принтера
- Проблема с печатью PostScript
- Общая несогласованность принтера
- Вместо драйвера UFRII используется драйвер класса IPP.
Как устранить ошибку 853 задания на печать?
Обновление за май 2023 года:
Теперь вы можете предотвратить проблемы с ПК с помощью этого инструмента, например, защитить вас от потери файлов и вредоносных программ. Кроме того, это отличный способ оптимизировать ваш компьютер для достижения максимальной производительности. Программа с легкостью исправляет типичные ошибки, которые могут возникнуть в системах Windows — нет необходимости часами искать и устранять неполадки, если у вас под рукой есть идеальное решение:
- Шаг 1: Скачать PC Repair & Optimizer Tool (Windows 10, 8, 7, XP, Vista — Microsoft Gold Certified).
- Шаг 2: Нажмите «Начать сканирование”, Чтобы найти проблемы реестра Windows, которые могут вызывать проблемы с ПК.
- Шаг 3: Нажмите «Починить все», Чтобы исправить все проблемы.

Применить обновление прошивки
- Если ваш принтер может подключаться к Интернету, вы можете попробовать этот метод.
- Откройте меню и щелкните вкладку «Управление системой».
- Перейдите в раздел «Обновление прошивки» и выберите «Через Интернет», чтобы принтер мог подключиться к Интернету и загрузить прошивку.
- Если вы уже скачали прошивку, вы также можете установить ее через USB-форму. Это может быть полезно, если по какой-то причине ваш принтер не может подключиться к Интернету.
Обновление драйвера принтера
- Откройте меню настроек и перейдите в диспетчер устройств.
- Перейдите в раздел «Очереди печати» и разверните раскрывающееся меню.
- Найдите свой принтер и щелкните его правой кнопкой мыши.
- Выберите Обновить драйвер.
- Щелкните Автоматически проверять наличие обновленных драйверов.
- Теперь завершите установку.
- Перезагрузите компьютер.
Изменение свойств драйвера принтера
- Запустите диспетчер устройств вашего компьютера через меню настроек.
- Прокрутите вниз и найдите очереди печати.
- Щелкните стрелку раскрывающегося списка, чтобы раскрыть меню.
- Выберите пункт Свойства.
- Нажмите вкладку Драйверы.
- Щелкните раскрывающееся меню.
- Выберите Canon Generic Plus UFR II.
- Нажмите кнопку Применить.
Запуск средства устранения неполадок Windows
- Нажмите кнопку «Пуск».
- Перейдите в настройки.
- Выберите Обновление и безопасность.
- Выберите Устранение неполадок.
- Найдите раздел «Принтеры».
- Щелкните Выполнить устранение неполадок.
- Когда сканирование будет завершено, выберите рекомендованную политику для исправления ошибки, а затем нажмите Применить это исправление.
Совет экспертов: Этот инструмент восстановления сканирует репозитории и заменяет поврежденные или отсутствующие файлы, если ни один из этих методов не сработал. Это хорошо работает в большинстве случаев, когда проблема связана с повреждением системы. Этот инструмент также оптимизирует вашу систему, чтобы максимизировать производительность. Его можно скачать по Щелчок Здесь
Часто задаваемые вопросы
Откройте диспетчер устройств, используя Win + X -> Диспетчер устройств. Разверните очередь печати, щелкните правой кнопкой мыши драйвер принтера и выберите «Свойства». Теперь перейдите на вкладку «Драйвер» и в раскрывающемся меню выберите Canon Generic Plus UFR II. Наконец, нажмите Применить и перезагрузите систему, чтобы увидеть, решена ли проблема.
- Откройте средство устранения неполадок принтера. Введите «устранение неполадок» в текстовое поле, чтобы найти варианты устранения неполадок.
- Удалите папку пула печати. Пользователи также сообщили, что они исправили ошибку печати, удалив папку диспетчера очереди печати.
- Проверьте настройки подключения принтера.
- Включите принтер.
- Удерживайте кнопку Stop / Reset.
- Нажмите и удерживайте кнопку, которую вы используете, чтобы сделать цветную копию.
- Подождите 5 секунд.
- Принтер перезапустится и настроится.
Сообщение Просмотров: 494
Download PC Repair Tool to quickly find & fix Windows errors automatically
Many Canon users are facing Error 853 while using the Canon Printer to print something. There are multiple reasons for the issue, but more often than not, an incorrect driver is responsible for the error. However, in this article, we are going to see all the possible solutions to fix Canon Printer Error 853 on Windows 10.

These are the things you need to do to fix Canon Printer Error 853 on Windows 10.
- Install UFR2 driver
- Alter Driver’s Properties
- Run Printer Troubleshooter
- Reinstall Driver
Let us talk about them in detail.
1] Install UFR2 driver
If the error appears when you try to initiate the printing job then the chances are you are facing a postscripting issue. To fix this issue, you need to install a UFR2 driver. You can download the driver from canon.com
Install this driver and see if it fixes the issue.
2] Alter Driver’s Properties
If installing a UFR2 driver doesn’t work then you have to select UFR II from the Device Manager and see if it fixes the error code. You can follow the given steps to do the same.
- Open Device Manager by Win + X > Device Manager.
- Expand Print queues, right-click on your printer’s driver, and select Properties.
- Now go to the Drivers tab and use the drop-down menu to select Canon Generic Plus UFR II.
- Finally, click Apply and restart your system to see if the issue is fixed.
3] Run Printer Troubleshooter
Windows has a built-in troubleshooter to fix any printer-related issue. So, you can entrust it, usually, to fix the Canon Printer error.
To do that, you can follow the given steps.
- Launch Settings by Win + I.
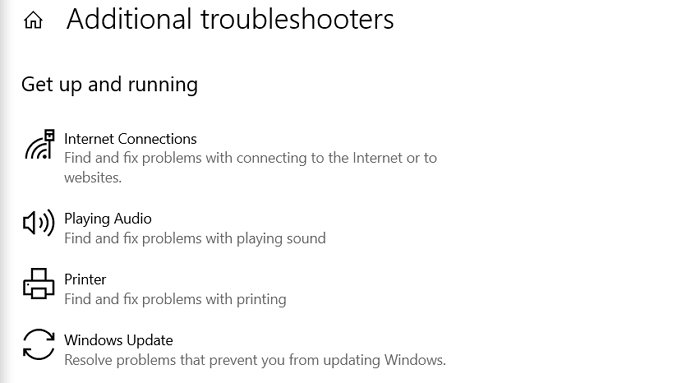
- Click Update & Security > Troubleshoot > Additional troubleshooter.
- Click Windows Update > Run the troubleshooter.
Now, follow the on-screen instructions to fix the Canon Printer error.
4] Reinstall Driver
If nothing works, you should try to uninstall the driver and then reinstall it from canon.com to see if it fixes the error.
Hopefully, this will fix the Canon driver error for you.
Read Next: B200: Printer error has occurred.

Yusuf is an Engineering graduate from Delhi. He has written over 1000 technical articles and has knowledge of programming languages including Java, and C++, and technologies such as Oracle 12C and MsSQL. Troubleshooting Windows is his favorite past-time.