
Вопрос
Проблема: как исправить BSOD несоответствия версии микрокода в Windows?
Привет. В течение последних нескольких недель моя Windows продолжает вылетать из-за ошибки синего экрана Несоответствие версии микрокода. Я думал, что проблема исчезнет сама по себе, но я ошибался, поскольку проблемы продолжаются. Я был бы признателен за несколько советов, как решить эту проблему. Спасибо.
Решенный ответ
Синий экран смерти[1] Ошибка может быть чем-то, с чем большинство пользователей Windows сталкивается в разное время, когда компьютер находится в рабочем состоянии. Он заставляет компьютер автоматически выключаться и перезагружаться без какого-либо предупреждения, немедленно прерывая всю работу или любые другие действия, предпринимаемые пользователями. По меньшей мере, BSOD может варьироваться от слегка раздражающего до откровенно катастрофического.
Как бы мы ни ненавидели эти прерывания, они выполняют важную функцию — без них не было бы возможности узнать, когда что-то пойдет не так с наша система так быстро — что может привести к более потенциально опасным последствиям, чем просто временная потеря данных или время, потраченное на ожидание, пока она загрузится снова.
Большинство ошибок синего экрана исчезают, как только компьютер перезагружается — ему удается немедленно восстановиться, и пользователи могут продолжить то, что они делали раньше, забыв, что это когда-либо происходило. Однако повторяющиеся ошибки BSOD, такие как Microcode_Revision_Mismatch (проверка ошибок 0x0000017E), могут указывать на то, что что-то не так.
Фактически, некоторые пользователи, у которых возник сбой с этим кодом ошибки, сказали, что они застряли в цикле перезагрузки и не могут получить доступ к Windows в обычном режиме. Вместо этого они продолжали видеть то же стандартное сообщение об ошибке «Синий экран смерти», предоставленное Microsoft — «Ваш компьютер столкнулся с проблемой и требует перезагрузки».
Причина, по которой несоответствие версии микрокода отображается на вашем экране, связана с неправильно загруженным кодом одним из ядер вашего микропроцессора. Хотя это может показаться запутанным, все, что вам нужно знать, это то, что эту ошибку можно исправить. Ниже вы найдете несколько методов, которые помогут вам в этом.

Прежде чем приступить к устранению неполадок вручную, мы настоятельно рекомендуем вам попробовать использовать инструмент для ремонта ПК. ReimageСтиральная машина Mac X9. Приложение специализируется на поиске поврежденных или битых секторов системы Windows и их автоматическом ремонте, исправлении BSOD, реестра.[2] ошибки и многое другое. Кроме того, он также может помочь вам с удалением вредоносных программ и регулярным обслуживанием, таким как автоматическое удаление ненужных файлов и очистка браузера.
BSOD несоответствия версии микрокода: если вы не можете получить доступ к Windows
Исправить это сейчас!Исправить это сейчас!
Для восстановления поврежденной системы необходимо приобрести лицензионную версию Reimage Reimage.
Многие пользователи сообщили, что не смогли получить доступ к Windows и застряли в цикле перезагрузки. Это не уникальное поведение, как и многие другие ошибки BSOD (DRIVER_INVALID_STACK_ACCESS, ERROR_BROKEN_PIPE, VIDEO_TDR_FAILURE, amdkmdag.sys) демонстрируют такое же поведение.
Если это так, не волнуйтесь. Некоторые методы должны помочь вам получить беспрепятственный доступ к устройству. Во-первых, давайте попробуем получить доступ к безопасному режиму (примечание: перед продолжением убедитесь, что все внешние устройства, такие как USB-накопитель, принтер или камера, отключены).
Доступ к безопасному режиму
- Начать сначала Окна
- Как только система начнет загружаться, прервите процесс загрузки, нажав и удерживая кнопку питания — сделайте это еще два раза
- Windows автоматически войдет Расширенный запуск Режим

- Выбирать Устранение неполадок> Дополнительные параметры> Параметры запуска и Начать сначала
- После перезагрузки системы выберите 4 / F4 или 5 / F5 получить доступ Безопасный режим.


После загрузки в безопасном режиме обои должны быть заменены черным экраном, а «Безопасный режим» отображается вверху и внизу экрана. Чтобы выйти из этой среды, все, что вам нужно сделать, это перезагрузить устройство (хотя не делайте этого, пока не примените исправления ниже или запустите инструмент автоматического восстановления ПК).
Изменить настройки BIOS
Если вы не можете войти в безопасный режим, попробуйте изменить настройки в BIOS:
- Во время загрузки вашего ПК нажмите Esc, Del, F8, F10, или другой ключ, который его запускает (более подробные инструкции см. на веб-сайте производителя ноутбука или материнской платы)
- После доступа к BIOS перейдите в Выход вкладка
- Выбирать Загрузите оптимальные настройки по умолчанию и начать сначала ваша система.

Теперь, когда вы вошли в Windows, выполните следующие действия по устранению неполадок.
1. Запустите SFC и DISM
Исправить это сейчас!Исправить это сейчас!
Для восстановления поврежденной системы необходимо приобрести лицензионную версию Reimage Reimage.
Поврежденные системные файлы могут быть одной из основных причин BSOD. Запустите SFC и DISM, чтобы убедиться, что целостность системных файлов не нарушена:
- Тип cmd в поиске Windows
- Щелкните правой кнопкой мыши на Командная строка и выберите Запустить от имени администратора
- Скопировать и вставить sfc / scannow команда и нажмите Входить
- Подождите, пока Windows выполнит проверку и перезагружать ваше устройство, если ошибки были исправлены
- Если SFC не удалось восстановить поврежденные файлы, выполните набор следующих команд:
Dism / Online / Cleanup-Image / CheckHealth
Dism / Online / Cleanup-Image / ScanHealth
Dism / Online / Cleanup-Image / RestoreHealth

2. Обновите драйверы
Исправить это сейчас!Исправить это сейчас!
Для восстановления поврежденной системы необходимо приобрести лицензионную версию Reimage Reimage.
Драйверы устройств[3] являются неотъемлемой частью любой операционной системы Windows. Многие проблемы могут возникнуть из-за несовместимых или поврежденных драйверов. Чтобы избежать всех этих неприятностей, мы настоятельно рекомендуем использовать DriverFix, автоматическое средство обновления драйверов, которое также может автоматически создавать резервные копии и восстанавливать систему, если что-то пойдет не так.
Как вариант, вы можете попробовать самостоятельно найти проблемные драйверы:
- Щелкните правой кнопкой мыши на Начинать и выбрать Диспетчер устройств
- Здесь откройте каждый из разделов и найдите желтые восклицательные знаки
- Как только такой драйвер будет найден, щелкните правой кнопкой мыши и выберите Обновить драйвер
- Выбирать Автоматический поиск драйверов и ждем пока они установятся
- Начать сначала твое устройство.

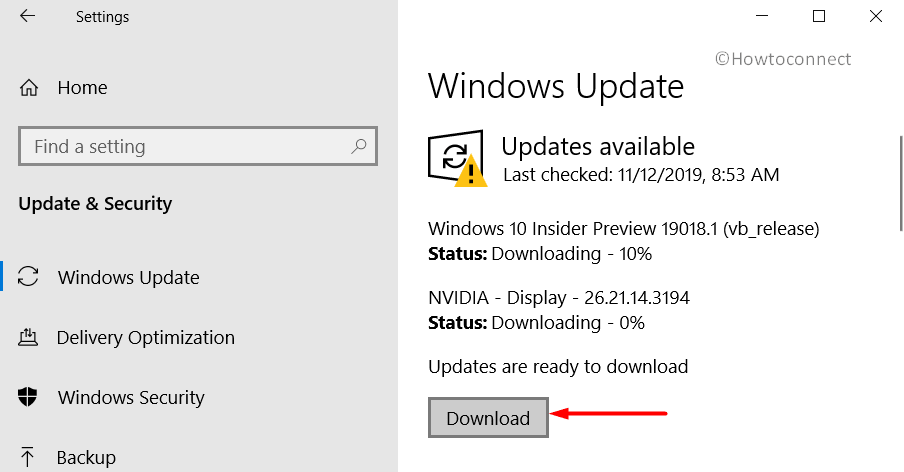
3. Установите все ожидающие обновления
Исправить это сейчас!Исправить это сейчас!
Для восстановления поврежденной системы необходимо приобрести лицензионную версию Reimage Reimage.
- Тип Обновления в поиске Windows и нажмите Входить
- Выбирать Проверить обновления и пусть Windows загрузит необходимые файлы
- Если вы заметили Ожидает установки записи, щелкните Загрузить и установить
- Начать сначала ваш компьютер.

Если этот метод не помог и BSOD произошел после того, как вы применили обновления Windows, перейдите к решению, приведенному ниже.
4. Удалите самые последние обновления Windows.
Исправить это сейчас!Исправить это сейчас!
Для восстановления поврежденной системы необходимо приобрести лицензионную версию Reimage Reimage.
Если обновления Windows не были установлены правильно, они могут вызвать серьезные проблемы. Самый простой способ справиться с этим — удалить самое последнее обновление, а затем установить его заново. Выполняйте этот шаг только в том случае, если проблемы начались после последнего обновления Windows.
- Тип Панель управления в поиске Windows и нажмите Входить
- Выбирать Программы> Удалить программу
- Нажмите на Просмотр установленных обновлений в левой части окна
- Сортировать все обновления по дате
- Щелкните правой кнопкой мыши самое последнее обновление и выберите Удалить
- Следуйте инструкциям на экране.

5. Проверьте свою систему на наличие вредоносных программ
Исправить это сейчас!Исправить это сейчас!
Для восстановления поврежденной системы необходимо приобрести лицензионную версию Reimage Reimage.
Вредоносное ПО также может вызывать различные проблемы с Windows. Чтобы проверить, так ли это (или нет), вам следует выполнить полное сканирование системы с помощью программного обеспечения для защиты от вредоносных программ. Хотя существует множество сторонних опций, глубокого сканирования с помощью Защитника Windows должно быть достаточно:
- Тип Безопасность Windows в поиске Windows и нажмите Входить
- Выбирать Защита от вирусов и угроз и выбрать Параметры сканирования
- Выбирать Автономное сканирование Microsoft Defender и нажмите Сканировать сейчас
- Ваш компьютер немедленно перезагружать и начните глубокое сканирование.

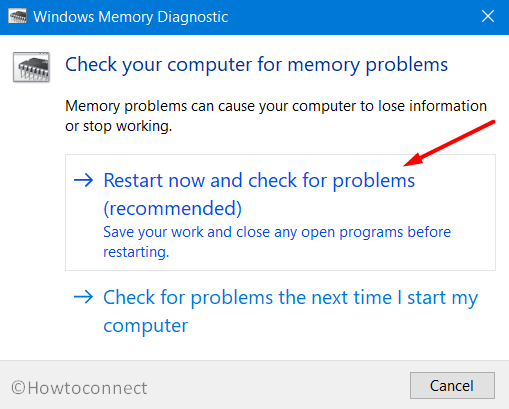
6. Запустите средство диагностики памяти Windows
Исправить это сейчас!Исправить это сейчас!
Для восстановления поврежденной системы необходимо приобрести лицензионную версию Reimage Reimage.
- Введите Диагностика памяти Windows в поиске Windows и нажмите Входить
- Здесь выберите Перезагрузите сейчас и проверьте наличие проблем (рекомендуется) вариант
- Ваш компьютер будет перезагружать и проверка памяти выполнена
- Результаты должны отображаться после перезапуска.

7. Сбросить Windows
Исправить это сейчас!Исправить это сейчас!
Для восстановления поврежденной системы необходимо приобрести лицензионную версию Reimage Reimage.
Если ни один из способов не помог, попробуйте сбросить Windows.
- Щелкните правой кнопкой мыши на Начинать и выбрать Настройки
- Перейти к Обновление и безопасность раздел и выберите Восстановление
- Под Сбросить этот компьютер, нажмите на Начать
- Выбирать Храните мои файлы и Загрузка в облако
- Дождитесь загрузки всех необходимых файлов и переустановки системы.

Исправляйте ошибки автоматически
Команда ugetfix.com делает все возможное, чтобы помочь пользователям найти лучшие решения для устранения их ошибок. Если вы не хотите бороться с методами ручного ремонта, используйте автоматическое программное обеспечение. Все рекомендованные продукты были протестированы и одобрены нашими профессионалами. Инструменты, которые можно использовать для исправления ошибки, перечислены ниже:
Предложение
сделай это сейчас!
Скачать Fix
Счастье
Гарантия
сделай это сейчас!
Скачать Fix
Счастье
Гарантия
Совместим с Майкрософт ВиндоусСовместим с OS X По-прежнему возникают проблемы?
Если вам не удалось исправить ошибку с помощью Reimage, обратитесь за помощью в нашу службу поддержки. Сообщите нам все подробности, которые, по вашему мнению, нам следует знать о вашей проблеме.
Reimage — запатентованная специализированная программа восстановления Windows. Он диагностирует ваш поврежденный компьютер. Он просканирует все системные файлы, библиотеки DLL и ключи реестра, которые были повреждены угрозами безопасности.Reimage — запатентованная специализированная программа восстановления Mac OS X. Он диагностирует ваш поврежденный компьютер. Он просканирует все системные файлы и ключи реестра, которые были повреждены угрозами безопасности.
Этот запатентованный процесс восстановления использует базу данных из 25 миллионов компонентов, которые могут заменить любой поврежденный или отсутствующий файл на компьютере пользователя.
Для восстановления поврежденной системы необходимо приобрести лицензионную версию Reimage инструмент для удаления вредоносных программ.

Нажмите
Условия использования Reimage | Политика конфиденциальности Reimage | Политика возврата денег за товар | Нажмите
VPN имеет решающее значение, когда дело доходит до конфиденциальность пользователя. Онлайн-трекеры, такие как файлы cookie, могут использоваться не только платформами социальных сетей и другими веб-сайтами, но также вашим интернет-провайдером и правительством. Даже если вы примените самые безопасные настройки через веб-браузер, вас все равно можно будет отслеживать через приложения, подключенные к Интернету. Кроме того, браузеры, ориентированные на конфиденциальность, такие как Tor, не являются оптимальным выбором из-за пониженной скорости соединения. Лучшее решение для вашей максимальной конфиденциальности — это Частный доступ в Интернет — быть анонимным и безопасным в сети.
Программное обеспечение для восстановления данных — один из вариантов, который может вам помочь восстановить ваши файлы. После удаления файла он не исчезает в воздухе — он остается в вашей системе до тех пор, пока поверх него не записываются новые данные. Восстановление данных Pro это программа для восстановления, которая ищет рабочие копии удаленных файлов на вашем жестком диске. Используя этот инструмент, вы можете предотвратить потерю ценных документов, школьных заданий, личных фотографий и других важных файлов.
Today, in this article, we will discuss another interesting Blue Screen issue and its possible solutions. Loaded with a wide number of reasons, the BSODs are unpredictable until it hits your PC. One such annoying error message is MICROCODE REVISION MISMATCH that accompanies a stop code 0x0000017E in Windows 10. It is a little complicated thing for a normal user to interpret this error and code. However, this indicates that one or more than 1 processor in the multiprocessor configuration has inconsistent microcode loaded. Before an affected user can understand what’s happening with his system, the device goes for an auto-reboot with an intention to save the PC from further loss. The common reasons are the outdated drivers and operating system, missing system files, bad areas in hard disk and more. So, go through the below list to try them out and see which one works for your system.
Here is how to Fix MICROCODE REVISION MISMATCH Error 0x0000017E in Windows 10 –
1] Ensure to Keep the Drivers up to Date
Drivers always play an integral role in the functioning of an operating system. In this regard, Windows 10 is no exception and if any drivers are not functioning with their latest versions, people may face issues like MICROCODE REVISION MISMATCH. So, you need to ensure that all the drivers are up to date and running with the latest versions. Here is how to find and update them –
- Press the key combination Win + X and choose Device Manager from the list.
- Once the console opens up, locate the devices that display a yellow warning sign next to them.
- When you find them, expand and right-click on their respective devices one by one. Choose Update driver.
- Select Search automatically for drivers from the wizard that shows up.
- After the installation gets over, restart the device and see for the BSOD.
2] Repair Corrupted System Files
When you begin to encounter MICROCODE REVISION MISMATCH Error, there is a good chance that one or more system files have gone corrupted or missing. Though Windows 10 is designed to protect the system files sometimes it happens that due to reasons like sudden power failure, mismatched versions, update errors, etc the files become faulty. To deal with such conditions, Microsoft provides a tiny, powerful command-line tool called System File Checker. It will scan all the integral components including DLL files and if detects any problematic file, it will instantly replace it. So, let us head forward and see how to deploy this solution –
- Insert the command cmd.exe in the taskbar search box. When Command Prompt shows as the result, click Run as administrator option on the extended search pane.
- Click Yes if User Account Control pops up for permission.
- In the black window, insert the below-given command and hit Enter to start the process.
sfc /scannow
- Wait for the scan to complete 100% and it will take a good amount of time for it. Upon completion, it will display the result.
- For better results, reboot the device and then see for the error.
3] Conduct a Full PC Scan
Virus or malware attack is quite common among Windows 10 users. They can harm the integral components of the system by hiding deep inside the system files. A computer gets affected by such attacks through several means and one such common is the Internet. Visiting any malicious site, or clicking on suspicious links are always the doorway for malware. They damage the integral elements, files, settings of the system. So, once you perform a full scan, it will diagnose all the files, running programs, boot record to remove viruses and security threats. This is how you can do this task using Windows Security –
- Go to the system tray and click the Show hidden icons arrow. Once all the icons are visible, click the shield one.
- This will immediately launch the Windows Security app on the PC screen.
- Select the Virus & threat protection category.
- Click the Scan options link.
- Choose the Full Scan radio button on the following page. Hit the Scan now button to initiate the detection.

- The entire scan will take a lot of time as it will get deep into the system to find out the threats. In the end, click the Clean Threats button to start the removing process.
- Select Remove followed by a hit on the Start action button to get rid of the malware.
- Once the system is threat-free, you will not encounter MICROCODE REVISION MISMATCH Error.
4] Fix MICROCODE REVISION MISMATCH by Repairing Defective Windows Image Files
In situations when replacement files inside Windows 10 image get corrupted or damaged in any way, you are likely to encounter unexpected errors. This particular issue needs a DISM command-line tool that would scan and repair the “install.wim” image. Go through the below directions on how to deploy this workaround –
- Do a right-click on Start and choose the Run option from the Win+X menu.
- Type cmd and press Ctrl + Shift + Enter keys altogether to Open Command Prompt as Admin From Run Dialog.
- Click Yes on the UAC prompt and insert the below command line in the black window that shows up.
DISM.exe/online/cleanup-image/Restorehealth
- Press Enter and the DISM tool will connect to the Windows Update servers. Depending upon the severity, it will download and replace the damaged files in the local image for Windows 10.
5] Install Pending Updates
One of the major reasons for the occurrence of any BSOD including MICROCODE REVISION MISMATCH error is the outdated operating system. Microsoft releases a wide range of Tuesday patches, cumulative updates, preview builds, and more regularly. These packages are important to install as they contain new features, a lot of fixes for bugs and issues, etc. So, the devices that don’t install the updates periodically are likely to face a number of problems. Hence, go through the below steps and ensure to install all the pending patches right away –
- First, press “Win + I” key to open Windows Settings, the built-in component of the operating system.
- Once into it, click Update & security.
- Click Check for updates button that is available on the right pane. Windows will start scanning for the updates that your device needs to install.
- The same page will eventually list out all the updates, select the Download button to grab them.
- You can view the downloading progress and when it gets over, reboot the device. However, the update(s) will guide you for installation.
6] Run Blue Screen Troubleshooter
The giant software provides all the necessary security options to make Windows 10 healthy. In order to deal with the BSOD error, a dedicated Blue Screen troubleshooter is there in the Settings app. This tool would scan, detect, and fix all the possible causes that create such issues. No internet connection is required to run the troubleshooter and here is the process –
- Press the Windows key and click the cog icon to access Settings.
- Head to the Update & security category.
- Select the Troubleshooter subsection and choose the Blue Screen option. Click Run the troubleshooter button.
- The tool will take requisite action depending on the result it gets while scanning. For better results, simply restart the device and then check for MICROCODE REVISION MISMATCH.
7] Perform a Memory Test
One of the common causes of a BSOD is a failing of memory. When the system suspects memory issues it will throw an unexpected error. The dedicated tool to deal with RAM issues is Windows Memory Diagnostic. Unfortunately, the utility cannot run within Windows and hence the computer reboots to make it function. Let us see how to carry out this solution –
- On the taskbar search box, type memory, and select “Windows Memory Diagnostic“.
- The tool will show up with two options, select Restart now and check for problems (recommended).
- The system would warn you to close down all the running programs and will begin the shutdown process. The computer would restart with the tool diagnosing the issues.
- Upon startup, you can view the result on the system tray. If it finds any errors in the diagnosis, it will report you the same with the necessary course of action to take.
8] Update BIOS to Fix MICROCODE REVISION MISMATCH
The BIOS needs to be updated to avoid the occurrence of any BSOD. There is a number of components that operate as a subordinate of BIOS. Hence, this makes it necessary to always have the latest version.
- Open Run dialog by jointly hitting “Win + R” hotkeys. Insert the command msinfo32 and click OK.
- This would immediately open System Information.
- Locate and see the Value next to the item BIOS version/date. Then, launch any web browser and navigate to the BIOS manufacturer website.
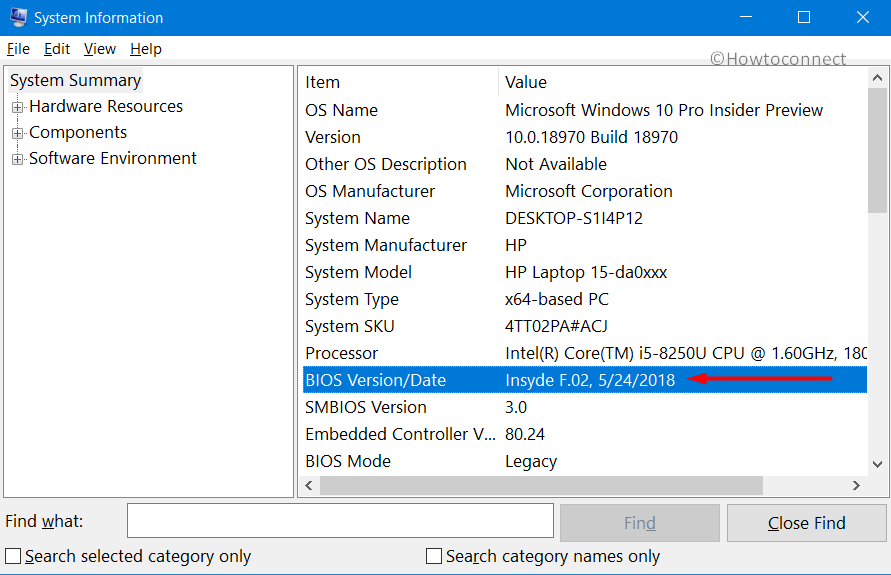
- Search for your BIOS model and download its latest version. Go through the instructions manual to install the updated file. Updating the BIOS would eventually bypass the MICROCODE REVISION MISMATCH error.
9] Remove External Hardware
Sometimes, your device’s external hardware can also be the possible reason for BSOD like MICROCODE REVISION MISMATCH. So, just unplug the external storage drives and devices. You need to plug out all the hardware devices that don’t require the basic functioning of the device. Restart Windows 10 PC and if you don’t experience any issues, the external device(s) might be the root cause of the problem.
For further support, you need to contact the manufacturer of the problematic device.
10] Uninstall 3rd Party Antivirus to Fix MICROCODE REVISION MISMATCH
The installation of the 3rd party free antivirus often changes the integral settings of the system such as some Registry entries. As a result, these modifications create conflicts that lead to several problems including BSODs. Therefore, another workaround that you can try is to remove such antimalware solutions from the device. While uninstalling, you need to ensure that all its settings are also removed to make PC healthy and safe. This is how you will do this –
- Perform a right-click on the Start icon and choose Apps and Features from the menu.
- From the list of installed applications, find and select the third-party antivirus program.
- Click the Uninstall button.
- Go through the direction of the app to complete its removal from the device. Reboot the PC and hopefully, you will not get MICROCODE REVISION MISMATCH again.
11] Rectify Bad Areas in the Hard Disk
Bad areas in the hard disk are also the possible reason behind the occurrence of any BSOD. This happens when the disk is in use for a long time. You cannot control this behavior but can definitely deal with the situation. All you need is to run a command-line tool that would repair the bad areas.
- Get access to the Run dialog and type cmd in the box. Press Ctrl + Shift + Enter keys to launch an elevated Command Prompt.
- Insert the given command and press Enter to execute it.
Chkdsk c: /f /r/x
- The disk checking utility will detect and rectify the bad areas. Once the scan gets over, restart the device and then see for the error and the stop code.
12] Uninstall Faulty Update Files
Though Windows 10 is designed to get the updates automatically but sometimes due to several reasons, the installation process does not complete as expected. Complications like low disk space, network connection problems, system failure, etc can corrupt the update files. So, in such situations, you need to remove the last installed patch from the system and see if this works.
- Launch the Settings app by using the shortcut keys “Win + I”.
- Select Update & security.
- Do a click on View update history.
- From the following page, click the link saying Uninstall updates.
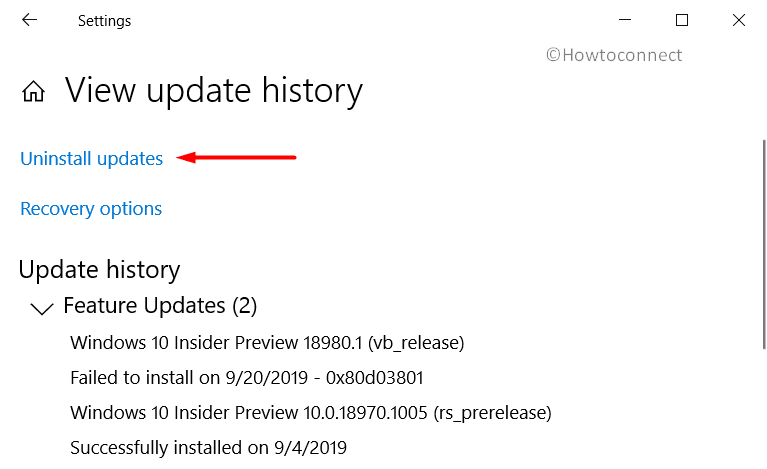
- Choose the latest installed patch from the list of downloads and click the Uninstall button at the top.
- Confirm the removal process and delete the entire package from the system. To see if this resolves the MICROCODE REVISION MISMATCH error, reboot the device.
13] Fix MICROCODE REVISION MISMATCH – Keep Disk Drive Clean
The continuous accumulation of junk items, temporary files, internet browser cache, and more things consume the valuable space of the disk drive. When the system starts running out of space, it will create several issues and BSOD is one of them. Sufficient area in the disk drive is always important and wipe out the junk, you need to use Disk Cleanup utility.
- On the taskbar search box, insert the command cleanmgr and press Enter.
- Choose the disk drive letter from the dropdown of the tool.
- Disk Cleanup will start detecting the areas that you can free up. Click the Cleanup system files button.
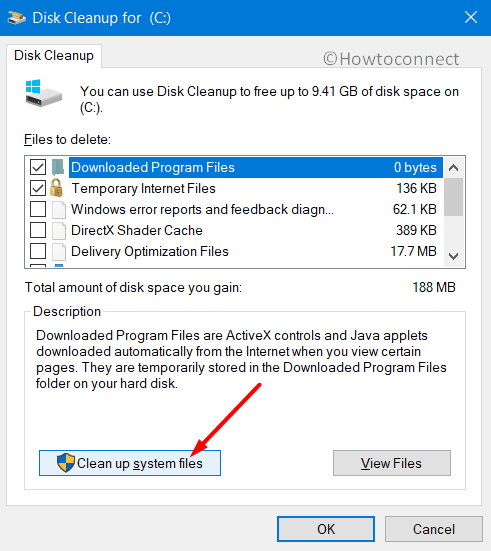
- Again choose the same disk drive letter and click OK.
- After scanning the system, the tool will display the files you need to clean. Select all the checkboxes and click OK to start the removal process. If you have any important files stored in any of the listed folders, save them to a secure location to avoid loss.
- Once the cleaning is done, restart the computer and see if the error persists or not.
14] Conduct a System Restore
One of the last solutions that you can try to get rid of MICROCODE REVISION MISMATCH is performing a System Restore. This procedure will take back your device to the time when everything was working normally. However, to make this workaround work, you should have already created a restore point earlier. In its absence, you cannot carry out this task. But if you have one, this is how you can get back to the working condition –
- Fire up the Run dialog and input the command rstrui. Press Enter to see System restore wizard on the screen.
- Click Next.
- Select the box namely Show more restore points.
- Choose the latest one and click Next.
- Click the Finish button on the wizard to start the restoring process.
Hopefully, by now, you are able to bypass this annoying MICROCODE REVISION MISMATCH error. If you have more interesting tips to resolve this BSOD, do share them with us in the comments section below.
Methods:
1] Ensure to Keep the Drivers up to Date
2] Repair Corrupted System Files
3] Conduct a Full PC Scan
4] Repair Defective Windows Image Files
5] Install Pending Updates
6] Run Blue Screen Troubleshooter
7] Perform a Memory Test
8] Update BIOS
9] Remove External Hardware
10] Uninstall 3rd Party Antivirus
11] Rectify Bad Areas in the Hard Disk
12] Uninstall Faulty Update Files
13] Keep Disk Drive Clean
14] Conduct a System Restore
That’s all!!
Repair any Windows problems such as Blue/Black Screen, DLL, Exe, application, Regisrty error and quickly recover system from issues using Reimage.
-
#1
My laptop (Lenovo G70-70, 240GB Seagate SSD) exhibited this issue a few days ago, with no way to revive the Win10 installation. It ran error free for almost 3 years.
The hardware is OK, RAM and SSD are fine, I can access the disk partitions and read files just fine with some tools, but Windows refuses to boot, even from Recovery CDs. It was willing to restore a former restore point, but that did not fix things either. It was not willing to do ‘repairs’, or let me see the Startup options menus.
I heard and read about this Neosmart EasyRE tool. The available ‘test’ version does not even accept my Win10 revision (too new), a great start…
Before I shell out money and waste even more time: did anyone see THIS obscure and rare BSOD loop error of Win10?
Did anyone successfully revive the existing Win10 installation (mainly all my programs, settings etc) with EasyRE in such a heavy error case?
Thanks for any useful advice or encouragement!
m

-
#2
All questions associated with Easy Recovery Essentials for Windows and the NeoSmart-created Windows recovery CDs should be submitted via email to EasyRE@NeoSmart.net
For those of you having trouble getting responses for help. Support advise me that ALL requests are answered.
Please check your Junk &/or Spam folders plus your web-mail folders.
Usually an auto-response is sent within a few hours and a full response may take 1 or more days.
If you are using Gmail and haven’t received a response at all then try using a different ‘From’ email address if possible.
Again:
Check your email Junk/Spam folders and if you are using Gmail log into it on the website at gmail.com and check the same folders there. If you are using an ISP email check their online folders in the same manner.
-
#3
As I am NOT YET a customer I didnot want to go through the email channel.
Also chose this forum to leave a public trail for any interested user or victim of BSOD issues in Win10.
But will go the suggested mail path instead now , thanks!
m
-
#4
It’s best to email anything for that application only. That’s what we Moderators have been told. It’s doubtful anyone will post here.
-
#5
Thanks! I do not quite understand your role as a ‘volunteer moderator’ and simultaneous ‘staff member’ — do you represent the company NeoSmart formally?
Per your suggestion I sent this question to their support mail address. I did receive a promise that ‘one of the agents’ will get back to me soon. We’ll see..
As this is a NEOSMART forum where their software is discussed in public I do not quite understand this ‘undercover’ handling of valid questions around their products? After all OTHER USERS may have a legitimate answer, may know/wonder if the repair tool really does (or not) work in this specific fatal case.
I hate to dispute a purchase if the product is failing to deliver what it promises so boldly. None of all other tools I tried has solved this f.ing MS issue so far.
And if it really works I will praise this EasyRE whereever I can — even here — helping to promote it that way.
Acting behind curtains is not really helping anyone, or?
-
#6
Clearing out spam mostly and moving some posts to another spot when posted incorrectly. We answer basic questions for the free products. This product’s support is via email only as per the sticky 1st post in this section.

Terry60
Telephone Sanitizer (2nd Class)
-
#7
«staff member» is an affectation of the forum software. It’s a description it attaches to Mods.
We have no connection to Neosmart other than as end-users.
-
#8
I was not aware that this NeoSmart forum has no affiliation with the company NeoSmart and their services.
A little odd..
Anyways: since their ‘support’ did only confirm the reception of my original question, promising a speedy reply without doing so I bit the bullet:
with no other tools and error related infos left on the internet I purchased the new Win10 version of their EasyER tool and gave it a try on my ‘microcode’ macroshit Windows corpse.
What can I say? IT WORKED! It fixed what none of the official MS tools, official Win10 CDs and touted repair/recover/restore point strategies suggested and tried. It worked where all of the other 3rd party ‘Windows Repair’ toolkits failed utterly. And it took a mere 30sec (after a 10min CD boot/install time).
I rarely praise tools, but this one is a gemstone I will frame on my office wall.
For anyone who will run into this same nightmare Windows boot error: YES, the darn EasyER will clean up Bill’s mess.
Thanks!
m
-
#9
We never said the forum has no affiliation with NeoSmart. Quite the opposite is true. The owner only visits occasionally. We try to sort out the forum stuff, while the owner works behind the scenes. A family member of the owner answers emails as soon as possible after receipt.
Glad you achieved success.
Terry60
Telephone Sanitizer (2nd Class)
-
#10
Sorry for the confusion.
The «We» in my post referred to the Mods not to the forum.
| title | description | keywords | ms.date | topic_type | ms.topic | api_name | api_type | ||
|---|---|---|---|---|---|---|---|---|---|
|
Bug Check 0x17E MICROCODE_REVISION_MISMATCH |
The MICROCODE_REVISION_MISMATCH bug check has a value of 0x0000017E. It indicates that that one or more processors in the multiprocessor configuration have inconsistent microcode loaded. |
|
01/14/2019 |
apiref |
reference |
MICROCODE_REVISION_MISMATCH |
NA |
Bug Check 0x17E: MICROCODE_REVISION_MISMATCH
The MICROCODE_REVISION_MISMATCH bug check has a value of 0x0000017E. It indicates that one or more processors in the multiprocessor configuration have inconsistent microcode loaded.
[!IMPORTANT]
This topic is for programmers. If you are a customer who has received a blue screen error code while using your computer, see Troubleshoot blue screen errors.
MICROCODE_REVISION_MISMATCH Parameters
| Parameter | Description |
|---|---|
| 1 | The processor CPUID signature value of the processor that mismatched. |
| 2 | The expected microcode revision for the processor. |
| 3 | The actual, reported microcode revision for the processor. |
| 4 | The processor index of the mismatching processor. |
Cause
One or more processors in the multiprocessor configuration have inconsistent microcode loaded.
This bugcheck indicates that faulty system firmware has mistakenly applied a microcode update to only a subset of processors in the host configuration. System firmware must apply microcode updates to all processors in a uniform fashion.
See Also
Bug Check Code Reference
Question
Issue: How to fix Microcode Revision Mismatch BSOD in Windows?
Hello. For the past few weeks, my Windows keeps crashing with Blue Screen error Microcode Revision Mismatch. I thought that the problem would go away by itself, but I was wrong as issues continue. I would appreciate some tips on how to resolve this. Thanks.
Solved Answer
A Blue Screen of Death[1] error might be something that most Windows users came across during various times when a computer is operational. It forces the PC to shut down and restart automatically without any warning whatsoever, immediately interrupting all the work or any other activities undertaken by the users. To say the least, BSOD can range from mildly annoying to straight out catastrophic.
As much as we hate these interruptions, they serve an important function – without them, there would be no way of knowing when something goes wrong with our system so quickly – which could lead to more potentially damaging consequences than just temporarily losing data or time spent waiting until it loads again.
Most of the Blue Screen errors go away as soon as the PC is restarted – it manages to recover immediately, and users can continue whatever they were doing before, forgetting it ever happened. However, repeated BSOD errors such as Microcode_Revision_Mismatch (bug check 0x0000017E) might indicate that something is very wrong.
In fact, some users who experience the crash with this error code said they were stuck in a reboot loop and were unable to access Windows as normal. Instead, they kept seeing the same standard Blue Screen of Death error message provided by Microsoft – “Your PC ran into a problem and needs to restart.”
The reason why Microcode Revision Mismatch shows up on your screen is due to an incorrectly loaded code by one of your microprocessor’s cores. While this might sound confusing, all you have to know is that this error can be fixed. Below you will find several methods that should help you with that.

Before proceeding with manual troubleshooting steps, we highly recommend you try using a PC repair tool RestoroMac Washing Machine X9. The app specializes in finding damaged or broken sectors of a Windows system and repairs them automatically, fixing BSODs, registry[2] errors, and much more. Besides, it can also help you with malware removal and regular maintenance activities such as automatic junk file deletion and browser cleaning.
Microcode Revision Mismatch BSOD: if you can’t access Windows
Fix it now!
Fix it now!
To repair damaged system, you have to purchase the licensed version of Restoro Mac Washing Machine X9.
Many users reported that they were unable to access Windows and were stuck in a reboot loop. This is not a unique behavior, like many other BSOD errors (DRIVER_INVALID_STACK_ACCESS, ERROR_BROKEN_PIPE, VIDEO_TDR_FAILURE, amdkmdag.sys) exhibit the same behavior.
If that is the case for you, do not worry. Some methods should help you access the device unhindered. First, let’s try accessing Safe Mode (note: make sure all the external devices such as USB flash stick, printer, or camera are disconnected before proceeding).
Access Safe Mode
- Restart Windows
- Once the system starts booting, interrupt the loading process by pressing and holding Power button – do this two more times
- Windows will automatically enter Advanced Startup mode
- Select Troubleshoot > Advanced options > Startup Settings and Restart
- After a system reboot, select 4/F4 or 5/F5 to access Safe Mode.


Once you boot into Safe Mode, your wallpaper should be replaced by a black screen, and “Safe Mode” is indicated at the top and bottom of your screen. To exit this environment, all you have to do is restart your device (although don’t do that before you apply the fixes below or run an automatic PC repair tool).
Change BIOS settings
If you can’t enter Safe Mode, try changing settings in BIOS:
- During the loading sequence of your PC, press Esc, Del, F8, F10, or other key that triggers it (refer to your laptop or motherboard manufacturer website for more detailed instructions)
- After accessing BIOS, go to the Exit tab
- Pick Load Optimized Defaults and restart your system.

Now that you have accessed Windows, proceed with the below troubleshooting steps.
1. Run SFC and DISM
Fix it now!
Fix it now!
To repair damaged system, you have to purchase the licensed version of Restoro Mac Washing Machine X9.
Corrupted system files might be one of the main reasons for a BSOD. Run SFC and DISM to ensure that system file integrity is intact:
- Type cmd in Windows search
- Right-click on Command Prompt and select Run as administrator
- Copy and paste sfc /scannow command and press Enter
- Wait till Windows runs a check and reboot your device if errors were fixed
- If SFC was unable to repair damaged files, run the set of following commands:
Dism /Online /Cleanup-Image /CheckHealth
Dism /Online /Cleanup-Image /ScanHealth
Dism /Online /Cleanup-Image /RestoreHealth

2. Update drivers
Fix it now!
Fix it now!
To repair damaged system, you have to purchase the licensed version of Restoro Mac Washing Machine X9.
Device drivers[3] are an integral part of any Windows operating system. Many issues can come out of incompatible or corrupt drivers. To avoid all these troubles, we highly recommend using DriverFix, an automatic driver updater that can also prepare backups automatically and recover the system if something goes wrong.
Alternatively, you can try looking for problematic drivers yourself:
- Right-click on Start and pick Device Manager
- Here, access each of the sections and look for yellow exclamation marks
- Once such driver is found, right-click and select Update driver
- Pick Search automatically for drivers and wait till they are installed
- Restart your device.

3. Install all the pending updates
Fix it now!
Fix it now!
To repair damaged system, you have to purchase the licensed version of Restoro Mac Washing Machine X9.
- Type Updates in Windows search and hit Enter
- Select Check for Updates and let Windows download the necessary files
- If you notice Pending install entries, click Download and install
- Restart your PC.

If this method did not help and the BSOD occurred after you applied Windows updates, proceed with the solution below.
4. Uninstall the most recent Windows updates
Fix it now!
Fix it now!
To repair damaged system, you have to purchase the licensed version of Restoro Mac Washing Machine X9.
If Windows updates were not installed correctly, they might cause serious issues. The easiest way to deal with this is to uninstall the most recent update and then install it anew. Proceed with this step only if your troubles started after the most recent Windows update.
- Type Control Panel in Windows search and press Enter
- Select Programs > Uninstall a program
- Click on View installed updates on the left side of the window
- Sort all the updates by date
- Right-click on the most recent update and select Uninstall
- Proceed with on-screen instructions.

5. Check your system for malware
Fix it now!
Fix it now!
To repair damaged system, you have to purchase the licensed version of Restoro Mac Washing Machine X9.
Malware can also cause various Windows issues to arise. In order to check whether that’s the case (or isn’t), you should run a full system scan with anti-malware software. While there are many third-party options, a deep scan with Windows Defender should suffice:
- Type Windows Security in Windows search and press Enter
- Select Virus & threat protection and pick Scan options
- Choose Microsoft Defender Offline scan and click Scan now
- Your computer will immediately reboot and begin a deep scan.

6. Run Windows Memory Diagnostic tool
Fix it now!
Fix it now!
To repair damaged system, you have to purchase the licensed version of Restoro Mac Washing Machine X9.
- Type in Windows Memory Diagnostic in Windows search and press Enter
- Here, select the Restart now and check for problems (recommended) option
- Your PC will reboot and memory check performed
- The results should be displayed after a restart.

7. Reset Windows
Fix it now!
Fix it now!
To repair damaged system, you have to purchase the licensed version of Restoro Mac Washing Machine X9.
If none of the methods helped, try resetting Windows.
- Right-click on Start and pick Settings
- Go to Update & Security section and select Recovery
- Under Reset this PC, click on Get Started
- Select Keep my files and Cloud download
- Wait till all the necessary files are downloaded and system reinstalled

Repair your Errors automatically
ugetfix.com team is trying to do its best to help users find the best solutions for eliminating their errors. If you don’t want to struggle with manual repair techniques, please use the automatic software. All recommended products have been tested and approved by our professionals. Tools that you can use to fix your error are listed bellow:
do it now!
Download Fix
Happiness
Guarantee
do it now!
Download Fix
Happiness
Guarantee
Compatible with Microsoft Windows
Compatible with OS X
Still having problems?
If you failed to fix your error using RestoroMac Washing Machine X9, reach our support team for help. Please, let us know all details that you think we should know about your problem.
Restoro — a patented specialized Windows repair program. It will diagnose your damaged PC. It will scan all System Files, DLLs and Registry Keys that have been damaged by security threats.Mac Washing Machine X9 — a patented specialized Mac OS X repair program. It will diagnose your damaged computer. It will scan all System Files and Registry Keys that have been damaged by security threats.
This patented repair process uses a database of 25 million components that can replace any damaged or missing file on user’s computer.
To repair damaged system, you have to purchase the licensed version of Restoro malware removal tool.To repair damaged system, you have to purchase the licensed version of Mac Washing Machine X9 malware removal tool.
A VPN is crucial when it comes to user privacy. Online trackers such as cookies can not only be used by social media platforms and other websites but also your Internet Service Provider and the government. Even if you apply the most secure settings via your web browser, you can still be tracked via apps that are connected to the internet. Besides, privacy-focused browsers like Tor is are not an optimal choice due to diminished connection speeds. The best solution for your ultimate privacy is Private Internet Access – be anonymous and secure online.
Data recovery software is one of the options that could help you recover your files. Once you delete a file, it does not vanish into thin air – it remains on your system as long as no new data is written on top of it. Data Recovery Pro is recovery software that searchers for working copies of deleted files within your hard drive. By using the tool, you can prevent loss of valuable documents, school work, personal pictures, and other crucial files.