
Error Troubleshooting
Applicable Error
Initial Actions
2-96
Paper jam was detected at the Main or Bypass Tray.
•
075-100: Misfeed Jam
•
Check the media path for obstructions or debris.
•
Check condition of the Feed Roller and Separator Pad.
•
Cycle printer power.
•
If the problem persists, use the following procedure.
Troubleshooting Reference Table
Applicable Parts
Feed Solenoid, PL2.3.21
■
Registration Sensor, PL2.3.10
■
Main Drive Motor, PL6.1.1
■
MCU Board, PL7.1.3
■
Troubleshooting Procedure Table
Step
Actions and Questions
1
Test the Registration Sensor.
Does the Registration Sensor
function correctly?
2
Test the Main Drive Motor.
Does the motor function correctly?
3
Test the Feed Solenoid.
Does the Feed Solenoid function
correctly?
4
Replace the MCU Board (page 4-43).
Does the error persist?
Xerox Internal Use Only
Wiring and Plug/Jack Map References
«Map 2» on page 7-4
■
«Drive» on page 7-14
■
Yes
Go to Step 2.
Go to Step 3.
Go to Step 4.
Contact your
designated
field support for
assistance.
Phaser 3010/3040/WorkCentre 3045 Service
No
Replace the
Registration
Sensor
(page 4-30).
Replace the
Main Drive
Motor
(page 4-41)..
Replace the
Feed Solenoid
(page 4-32).
Complete.
hp-concentra-wrapper-portlet
![]()
Actions
Issue
During printing, the paper becomes stuck in the product and the error message ‘Paper jam or misfeed’ displays on the control panel.
 Experiencing frequent or recurring paper jams?
If you are looking for information on preventing a paper jam from recurring, you can skip to the prevention and cause sections in this document.
How to use the solutions in this document
To resolve the issue, try each solution in this document, and then use the steps in this section to print a self-test report. This step determines if the product hardware functions correctly. When you have resolved the issue, and the product successfully prints a self-test report, there is no need to continue troubleshooting.
Print a self-test report
Use the following steps to print a self-test report.
-
Load plain white paper in the input tray.
-
Press the Power button (
 ) to turn on the product.
 -
Press the Setup button (
). -
Press the down arrow (
) to select Print Report, and then press OK. -
Press the down arrow (
) to select Self-Test Report, and then press OK. The self-test report prints.
 ) to turn on the product.
  ).
). ) to select
  IMPORTANT! Try to print a self-test report after every solution even if the solution resolves the issue.
note:
Paper jams can be real or false. The product might report a paper jam even when there is no jammed paper. The following solutions apply to both real and false paper jams.
Solution one: Clear the jam from the product
Follow these steps to check for and clear a paper jam from the product.
Step one: Remove any loose paper
Remove any loose sheets of paper from the input tray and the output tray.
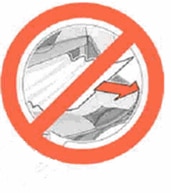
caution:Do not remove jammed paper at this stage. Trying to clear jammed paper from the front of the product can damage theprint mechanism.
|
Remove any loose paper |
Do not pull jammed paper |
|
|
|

Step two: Clear the jam from the rear of the product
caution:Never pull jammed paper from the front of the product. If you can pull it from the rear of the product or the tray, always try the rear first. Pulling paper from inside the front cover can cause mechanical damage to the product.
Video of clearing the jam from the rear of the product
Click here to view a demonstration of clearing the paper jam from the rear of the product.
-
Disconnect the USB cable from the rear of the product.
-
Press the Power button (
) to turn off the product. -
Press in the buttons on the sides of the two-sided printing accessory (duplexer), and then remove the duplexer by pulling it away from the product.
note:
Your product might not look exactly like the one in the figure, but the steps are the same.
-
Press the buttons on the sides of the duplexer
-
Pull the duplexer out of the product
Figure : Remove the duplexer
-
-
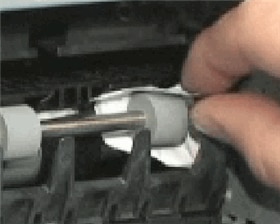
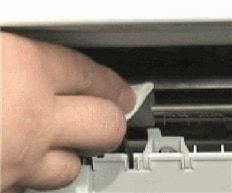
Gently remove any jammed paper or bits of torn paper from the rollers inside the product. Use both hands to pull out any whole sheets of paper to avoid tearing them.
Figure : Remove the jammed paper
caution:Use a flashlight to thoroughly check the rollers and wheels for torn pieces of paper that might remain inside the product. If any torn pieces of paper remain inside the product, more jams are likely to occur.
Figure : Remove scraps of paper
-
Remove any paper from the top zone of the paper path.
Figure : Paper path top zone
-
Press in the buttons on the latch on the back of the duplexer, and then lower the cover.
-
Latch on the back of the duplexer
-
Duplexer cover
Figure : Open the duplexer
-
-
Gently pull any jammed paper out of the duplexer.
-
Close the door of the duplexer.
-
Gently push the duplexer into the product until it snaps firmly into place. Do not press the buttons on the end of the accessory while you are reattaching it.


Step three: Clear the jam from the front of the product
-
Without opening the cartridge access door, check the output tray for jammed paper.
-
If you see jammed paper, gently pull it out.
caution:Carefully remove paper from the front of the product. Pulling too hard on jammed paper can damage the print mechanism.
-
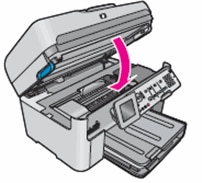
Open the cartridge access door.
Figure : Open the cartridge access door
note:
The carriage might try to move into the access area. If it does, allow it to move to that position.
-
Check for any jammed paper inside the product.
caution:Remove paper from the front of the product as carefully as possible. If any torn pieces of paper remain inside the product, more paper jams are likely to occur, and this could damage the print mechanism. Use a flashlight to make sure that you find all traces of paper.
-
Close the cartridge access door.
Figure : Close the cartridge access door
-
Reconnect the power cord to the rear of the product.
-
Press the Power button (
) to turn on the product.

Step four: Print a self-test report
Print a self-test report. See the section on how to use these solutions at the beginning of this document.
-
If these steps resolved the issue, and the test page prints, there is no need to continue troubleshooting.
-
If the issue persists, continue with the next solution.
-
If the test page does not print, continue with the next solution.
Solution two: Make sure that the carriage moves freely
Use the following steps to make sure that the carriage moves freely.
Step one: Check the paper path
-
If the product is not turned on, press the Power button (
) to turn it on. -
Open the cartridge access door.
Figure : Open the cartridge access door
note:
The carriage might try to move into the access area. If it does, allow it to move to that position.
-
With the product turned on, disconnect the power cord from the rear of the product.
-
Unplug the power cord from the power source or electrical outlet.
warning:You must unplug the power cord to move the carriage by hand and reset the paper feed mechanism without the risk of electrical shock.
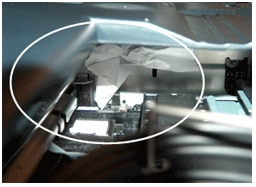
-
Check for any paper or objects that might be restricting the carriage.
Figure : Example of paper that might restrict the carriage
-
Remove any paper or objects you find.
note:
If the paper tears when you remove it from the rollers, check the rollers and wheels for torn pieces of paper that might remain inside the product. If pieces of paper remain in the product, more paper jams might occur.
-
Reach inside the product through the cartridge access door, and then manually move the carriage.
-
If the carriage is stuck on the right side, move the carriage to the left side of the product.
-
If the carriage is stuck on the left side, move the carriage to the right side of the product.
-
If the carriage is stuck in the middle, move the carriage to the right.
-
-
Make sure that the carriage can move freely across the width of the product by gently pushing the carriage to the left, and then to the right.
-
Close the cartridge access door.
Figure : Close the cartridge access door
-
Reconnect the power cord to the rear of the product.
-
Plug the power cord back into the power source or electrical outlet.
-
Press the Power button (
) to turn on the product.
Step two: Print a self-test report
Print a self-test report. See the section on how to use these solutions at the beginning of this document.
-
If these steps resolved the issue, and the test page prints, there is no need to continue troubleshooting.
-
If the issue persists, continue with the next solution.
-
If the test page does not print, continue with the next solution.
Solution three: Clean the rollers
Dust, paper fiber, and other debris might accumulate on the paper feed rollers and cause paper jams and paper feed issues. Follow these steps to clean the paper feed rollers.
Step one: Clean the rollers in the rear access area
-
Gather the following materials:
-
A clean, lint-free cloth, or any cloth that will not come apart or leave fibers
-
Distilled, filtered, or bottled water (tap water might damage the product)
-
-
Press the Power button (
) to turn off the product. -
Disconnect the power cord from the rear of the product.
-
Press in the buttons on the sides of the two-sided printing accessory (duplexer), and then remove the duplexer by pulling it away from the product.
note:
Your product might not look exactly like the one in the figure, but the steps are the same.
-
Press the buttons on the sides of the duplexer
-
Pull the duplexer out of product
Figure : Remove the duplexer
-
-
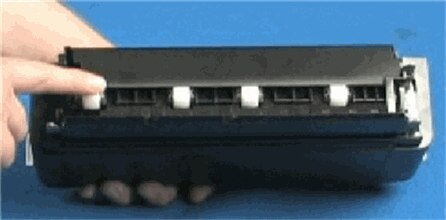
Lightly dampen a clean, lint-free cloth with bottled or distilled water, and then squeeze any excess liquid from the cloth.
-
Press the cloth against the rollers in the product, and then rotate them upwards with your fingers. Apply a moderate amount of pressure to remove any dust or dirt buildup.
Figure : Clean the rollers in the product
-
Allow the rollers to dry for 10 or 15 minutes.
Step two: Check the rollers in the duplexer
-
Press in the buttons on the latch on the back of the duplexer, and then lower the cover.
-
Latch on the back of the duplexer
-
Duplexer cover
Figure : Open the duplexer
-
-
Check the paper feed rollers on the duplexer to make sure that they are clean, free of paper bits, and rotate freely.
Figure : Check the rollers on the duplexer
-
Clean the surface and the rollers of the duplexer the same way you cleaned the large rollers inside the product.
-
Allow the rollers of the duplexer to dry for 10 or 15 minutes.
-
Gently push the duplexer into the product until it snaps firmly into place.
-
Reconnect the power cord to the rear of the product.
-
Press the Power button (
) to turn on the product.
Step three: Print a self-test report
Print a self-test report. See the section on how to use these solutions at the beginning of this document.
-
If these steps resolved the issue, and the test page prints, there is no need to continue troubleshooting.
-
If the issue persists, continue with the next solution.
-
If the test page does not print, continue with the next solution.
Solution four: Reset the product
Follow these steps to reset the product.
Step one: Perform a power reset
-
Press the Power button (
) to turn on the product. -
With the product turned on, disconnect the power cord from the rear of the product.
-
Unplug the power cord from the wall outlet.
-
Wait at least 15 seconds.
-
Plug the power cord back into the wall outlet.
-
Reconnect the power cord to the rear of the product.
-
If the product does not turn on by itself, press the Power button (
) to turn it on.
Step two: Print a self-test report
Print a self-test report. See the section on how to use these solutions at the beginning of this document.
-
If these steps resolved the issue, and the self-test report prints, there is no need to continue troubleshooting. Connect the USB cable to continue the print job.
-
If the issue persists, continue to the next step.
-
If the self-test report does not print, skip to the next solution.
Step three: Search for more information
If you are still experiencing issues, see the HP Product Support Home Page, and then search for another document that relates to the symptoms you are experiencing.
note:
If the page displays in the wrong country/region or language, click the Region — Language link in the upper right corner of your browser. Then you can select the correct country/region and language.
Solution five: Service the product
Service or replace your HP product if the issue persists after completing all the preceding steps.
Go to Contact HP Customer Support to schedule a product repair or replacement. If you are in Asia Pacific, you will be directed to a local service center in your area.
To confirm your warranty status, go to HP Product Warranty Check. Repair fees might apply for out-of-warranty products.
Preventing paper jams
Use the following suggestions to prevent paper jams.
The following recommendations can help prevent recurring paper jams in your HP product.
-
Before loading paper in the tray, hold the stack of paper, and then tap the bottom edge on a flat surface so that the stack is even on all sides.
-
Make sure that the length and width adjusters on the tray are correctly positioned, and then push the stack of paper forward until it stops in the tray.
caution:Do not force the paper to move too far forward in the tray.
-
Do not overload the tray with paper.
-
Only add paper to the tray when the product is not printing.
-
Make sure the HP product supports the paper type. See the documentation that came with the HP product for more information.
-
Do not print on paper with paper clips or staples attached.
-
Do not use paper that is bent, torn, dusty, damp, wrinkled, curled, or paper that does not lie flat.
-
Use only one type of paper at a time. Do not mix different types, weights, or sizes of paper.
-
Do not use paper that is too thin, too thick, or too glossy for the product.
Causes
The following factors can cause paper jams:
-
Paper loaded incorrectly in the paper tray.
-
Damaged or dirty paper rollers.
-
Torn, wrinkled, or damp paper loaded in the paper tray.
-
The rear access door or two-sided printing accessory (duplexer) might not be closed or is not locked into place.
-
Paper was added to a stack already in the tray while the HP product was printing.
-
The tray contains more than one type of paper.
-
The paper is jammed inside the HP product where you cannot see it.
-
An obstruction is blocking the paper path.
-
Torn pieces of paper from a previous jam are stuck in the product.
-
The tray is too full.
-
If printing on an envelope, the edges of the envelope are bent.
- Sign up
- Sign in
- HP Community
- Printers
- Printer Paper Jams & Feed Issues
- Strange misfeed / jam errors
Options
- Mark Topic as New
- Mark Topic as Read
- Float this Topic for Current User
- Bookmark
- Subscribe
- Mute
- Printer Friendly Page
![]()

Create an account on the HP Community to personalize your profile and ask a question
Your account also allows you to connect with HP support faster, access a personal dashboard to manage all of your devices in one place, view warranty information, case status and more.

07-26-2022
06:04 AM

HP Recommended
- Mark as New
- Bookmark
- Subscribe
- Permalink
- Flag Post
Is it at all possible that a WiFi access point placed directly behind the printer could cause random paper jams / misfeeds when there is no other obvious reason?
![]()
Be alert for scammers posting fake support phone numbers and/or email addresses on the community.
If you think you have received a fake HP Support message, please report it to us by clicking on «Flag Post».
† The opinions expressed above are the personal opinions of the authors, not of HP. By using this site, you accept the Terms of Use and Rules of Participation.

-
English
Open Menu

† The opinions expressed above are the personal opinions of the authors, not of HP. By using this site, you accept the <a href=»https://www8.hp.com/us/en/terms-of-use.html» class=»udrlinesmall»>Terms of Use</a> and <a href=»/t5/custom/page/page-id/hp.rulespage» class=»udrlinesmall»> Rules of Participation</a>.
- Home
- || Dell Printer
- ||
How to Fix Paper Misfeed Errors in Dell Printers Device? - Ask a Question
My Dell 1350cnw printer is refusing to print saying paper jam error code 075~100. I am 100% sure that there are no bits of paper caught inside the printer then why my Dell printer is insisting it has a jam issue or paper misfeed error. Please help me to resolve paper misfeed error in Dell Printer! Thanks!
-
Noel
-
1
Ans
-
Dell Printer
-
2 years ago
-
Ans by :
-
Steven Miller
Fix Paper Misfeed Errors in Dell Printer:
Fix Misfeed Jam (075~100 error) on Dell 1350cnw printer —
To Clear Misfeed Jam from the Dell Printer, You Need to Follow These Points —
- First of all, pull PSI in the outside direction and remove the jammed paper from the front of the printer ( if there exists).
- Next, you have to reinstall PSI in your Dell printer.
- In the next step, you have to remove communication cable, no matter it is a USB cable or network cable.
- Also, delete the previous printing jobs from the Print Queue by clicking on «Cancel All Document»s button (located on Operator Panel).
- Now, turn Dell printer power off. After turning off the printer, load the paper from the front side and verify that paper guides are touching the paper’s edges.
- Turn on Dell 1350cnw printer and print a settings page. To print a settings page, follow these points —
- First a click of the Menu button.
- After this, press down the arrow key until Report is highlighted.
- Again press down arrow key until System Settings is highlighted.
- If your Dell printer prints the Settings page properly then you should understand that your printer is working as designed.
- Now, reconnect the communication cable that you have unplugged earlier. After connecting communication cable, print a Windows Test Page.
- After printing, Windows Test page, re-try sending the original print job. If the print job is still failing then check the print properties.
I hope these steps will help you to resolve misfeed jam (075~100 error) on Dell 1350cnw printer. If you have any doubt or query, please don’t hesitate to ask, I will definitely help you.
Tags
- resolve paper misfeed
- paper misfeed error
- fix dell printer issue
- paper jam issue
- dell 1350cnw printer
- dell printer
- printer is refusing
- dell
- misfeed errors
- dell printer technical support
- fix paper problem
How to Fix Paper Misfeed Errors in Dell Printers Device?
Top Related Question
- How to Troubleshoot Dell Laser Printers?
- How to Fix Dell Printer Error Code 2000-0511?
- Dell C1765 Black Cartridge Printing Light Gray?
- How to Fix Dell Printer Error Code 009-654?
- How to Fix Dell Support Assist Not Working or Reponding?