
If you move your project or media folder or rename it, you will get an error message from Premiere Pro, saying Missing media for these clips. Here is how to show Premiere Pro where to find it:
Show Premiere Pro How to Resolve Error Message Missing Media For These Clips

- At the bottom of the Link Media Box, uncheck Use Media Browser to locate files.
- Click the Locate button, which opens a file browser.
- Look at the top of the screen, where Premiere is showing the previous location of the folder, and the name of the file.

- Click on the folder in the browser and then find the file name.
- Click on the file name.
- Click on Confirm.
Premiere Pro will automatically reconnect all the missing files and resolve the Missing media for these clips message.
Now continue editing.
Saved my project, come back two weeks later and all the original media files are «missing.» The locator can not see the files even though in the Mac Finder the files are there, in the same location, with the same name. Is there another way to link the file to the media clip?
Not sure why the Premiere file locator cannot find the file even though it is in the same place with the same name and I have not touched any of the files. They just do not show up on the file browser, though other files in the same folder do appear.
Restarted the Mac, still happening, restarted Premiere didn’t help.
Is there an issue with the cache that is an easy fix? Please help I needed to add the finishing touches to this project tonight and this is messing up the timeline for this project big time.
Have you ever jumped back into some editing, and to your horror, your media files have vanished? I’m guessing you have – it happens pretty often. But how do you relink this missing media in Premiere Pro?
Don’t worry at all; Premiere Pro has enabled us to fix the missing media link in minutes with a few simple steps. So that horrible Red screen displaying missing media will be soon gone.
In today’s article, we will look at the possible situations in which you can lose the link between your video files and Premiere Pro and how you can solve it in minutes.
Let’s check it out below!
Why am I getting a missing media notification in Premiere Pro?
Firstly, why are you getting a notification in Premiere Pro stating you have missing media.
When you import video footage into the project panel within Premiere Pro, the file has not moved from its actual location. Premiere Pro creates a map of where the files are stored and directly points to where your video footage is stored.
An example of this would be if you were editing using an external hard drive and it was a video of your kitten names “Kittens 1st day at home”.
The file setup will be the External Hard Drive > Folder Name > File Name.
This is where Premiere Pro looks to find the footage at any point and will follow this path when you open up your project within Premiere Pro.
But, if you’ve moved the file anywhere else or renamed the video files name, the map Premiere Pro follows to locate the file becomes muddied.
Premiere Pro will not locate the file, therefore triggering the error message that the media files link is missing.
If you ever look to move a file or rename it, ensure you redirect Premiere Pro to the new location, as if you don’t, it will not be able to display the media and show it as unlinked.
That’s how you get the missing media notification in Premiere Pro, but don’t worry; the next part of the article is how you can solve it in a few simple steps.
You may also be interested in: 6 ways to optimise Premiere Pro’s performance
Now it’s time to relink the missing media. But first of all, have a think of why this media may be missing in the first place and why Premiere Pro is flagging it as “Offline Media”.
Have you moved the file or the folder? Have you renamed the file or the folder? Have you unplugged your hard drive or disconnected it?
Why does Premiere Pro say media offline?
If you have renamed the file
Here’s how to relink your media if you have renamed your file or changed the folder’s name.
When you open your project up, you’ll find that you have a strange red screen where the media should display, showing you the “Unlinked Media” image.
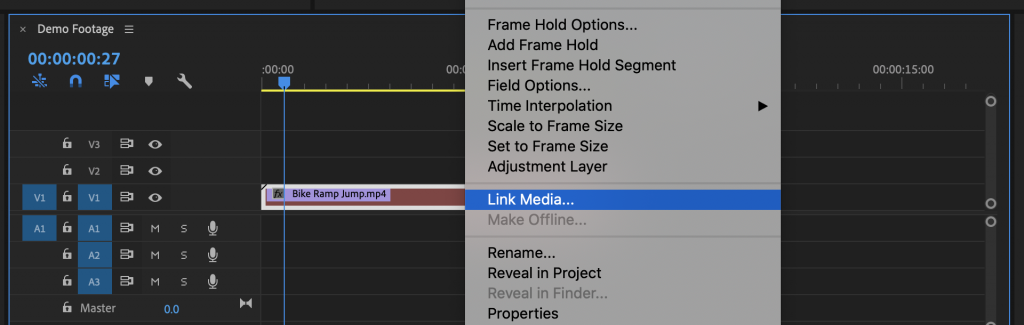
To start fixing the process, you need to right-click on your clip that has the missing media, select Link Media.
Once this happens, a file box will pop up, and you need to make a couple of adjustments.
Firstly deselect the File Name default option under the Match File Properties title.

Then you must deselect the second option for File Extension if you have converted a file from one format to another. I.e .MP4 to .MOV.
Now you can select Locate; this will then allow you to find the file’s new location. Select the file and click OK. This will reconnect your footage, and you’ll be raring to go!
If you have moved the file location or folder location
The number of times I do this in haste and forget I’ve moved the file, meaning I’ll fire up the Mac to edit and see the red screen of doom. Only to remember, I’ve moved the file location.
Don’t worry; we are here to help! It’s as simple as the solution above.
Here’s how to relink missing media in Premiere Pro caused by a file/folder being relocated.
Firstly, when this image pops up:

This lets you know that you have missing media (or offline media) and need to relink your media. If you don’t see it, you will see the image below in red. The media offline, red screen of doom.

Simply right-click on your file and select “Link Media”. When the dialogue box pops up, you will want to leave all settings as they are and leave them on default.

Now select the clip name and click on the Locate button.

In this window, Premiere Pro will show you where the last place it was able to locate the file, including the names. On the left-hand side, you can use this window to navigate the new location of your footage in which you want to relink missing media in Premiere Pro.
If you find the missing media through this, you can simply click on it and click OK. This will relink the media to the new file location.
However, there is a chance that you will not be able to locate the media immediately, but fear not! Here’s another solution to solve this.
Click on the Search button. There you can search the old file name, and you will find the new location. Therefore selecting the clip and relinking your media in Premiere Pro.
The final chapter
We hope this article on “How to Relink Missing Media in Premiere Pro” was helpful to you. Check out at the top Philip’s video tutorial if you’re a visual learner!
Let us know if you want to see more video-based articles in the comments below. Or, if you’re going to finesse your Premiere Pro skills further, simply scroll a little further and read more of our exceptional Premiere Pro guides.
Happy editing!
In today’s post, I’ll walk you through exactly how easy it is to reconnect missing media files in Premiere Pro.
The dreaded missing media ‘red screen’ happens to the best of us, so don’t sweat it. Lucky for us, Premiere Pro has made it fairly quick and simple to reconnect multiple files at once so you can get back to editing in no time.
Understanding How Premiere Pro Works
Here’s a brief explanation for why you are getting the missing media notification in your project.
When you drag or import footage and other media files into your project panel within Premiere Pro, you need to know that the actual file itself hasn’t moved from its original location.
Premiere Pro simply creates a blueprint or a map of where that file lives and points back to the source of the file any time you use that file in your project.
For example, let’s say you’ve dragged in a file named ‘sunset’ from an external hard drive named ‘vacation videos’ that is located in a folder named ‘footage’.
The breakdown might look something like this:
Vacation Videos (External Hard Drive) -> Footage (Folder Name) -> Sunset (File Name)
This is where Premiere Pro will go to find this file anytime that you open your project.
However, if you move the file to a different folder OR if you rename and part of that equation (the hard drive, the folder, or the file itself) then Premiere Pro is going to be confused.
You changed the blueprint without letting Premiere Pro know.
This is why you’ll get the missing media link in your project.
If ever you move or rename a file, you have to redirect Premiere Pro to the new location of your file or files.
How to Relink Missing Media Files
First, think through what may have caused the broken link.
Did you move a folder or a file to a new location?
Did your hard drive get disconnected?
Did you rename any folders or files associated with your project?
If your hard drive was disconnected, you need to make sure that it is correctly connected before moving on to the next step.
Scenario 1: If you moved a folder or file to a new location.
Let’s walk through step by step the most common scenario – you moved a folder or file to a new location.

When you first open your project, you’ll see this ‘link media’ window pop open, letting you know exactly which files are missing.
If you don’t see this window, simply right click on a clip that is unlinked and choose ‘Link Media’.
For this scenario, you can leave all the default settings at the bottom as is.

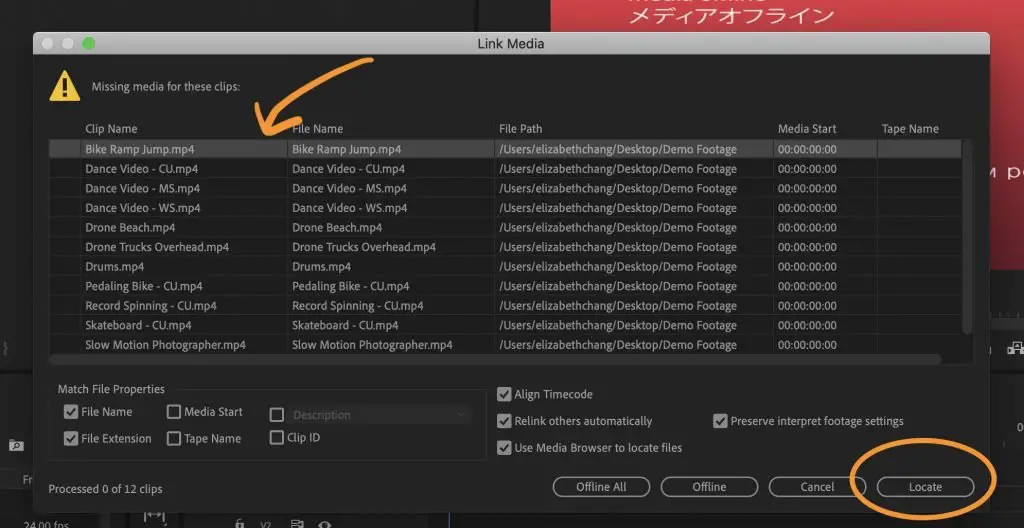
Select the top clip name and then hit the ‘Locate’ button in the bottom right corner.
In this next window, you’ll see at the very top, the last place that Premiere Pro was able to locate your file, as well as the name of the file you are looking to connect.
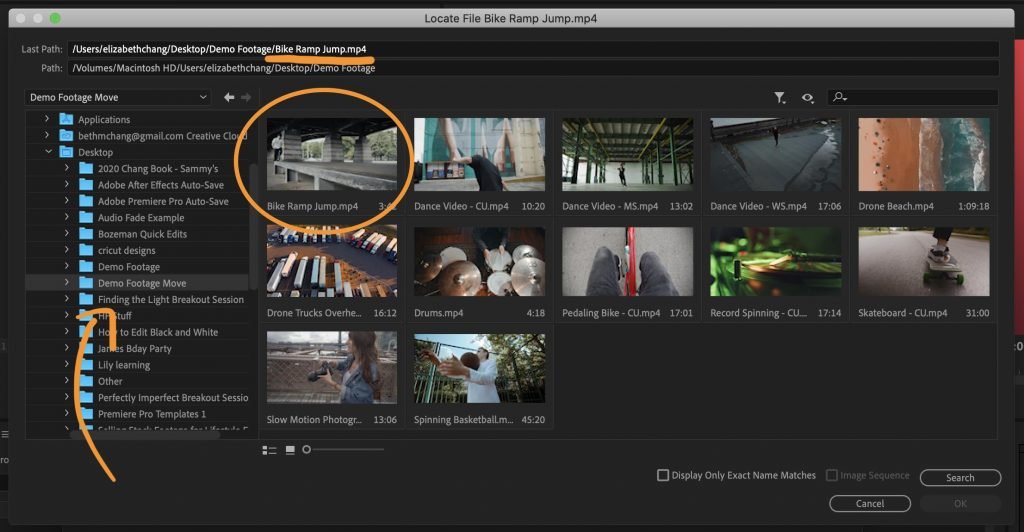
On the left side, you will use this window to navigate to the new location of your footage. When you select a folder, it’s contents will appear in the main portion of the window.
If you find your clip right away, then you can select that single clip and hit ‘OK’ in the lower right hand corner.
If you can’t find your clip and aren’t sure where it is on your computer, then you can hit the ‘search’ button.
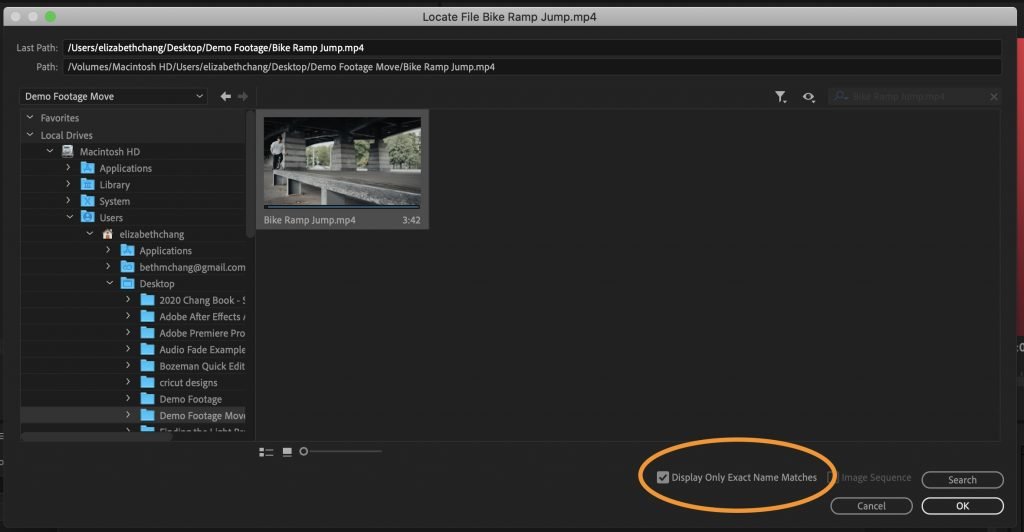
Lastly, if your clip is hard to find but you know you’re in the right folder (say the file has a long numerical name or you have tons of clips to sort through), you can click the option ‘Display Only Exact Name Matches’ to help narrow down your search.
Note: this only works if you haven’t changed the name or extension of your file.
Hit ‘OK’ and Premiere Pro will now reconnect and relink your media automatically.
Assuming you haven’t moved individual files into all different folders, Premiere Pro will be able to locate multiple files all at once.
For example, if you’ve moved an entire project folder from one drive to another, but haven’t changed the inner structure of that folder, Premiere Pro will be able to locate all the files at once.
Scenario 2: If you renamed a file or converted to a different extension.
If you have changed the name of a folder or a file within your project then you will follow most of the same steps above, but first you need to make sure you uncheck the ‘File Name’ default option under ‘Match File Properties’.
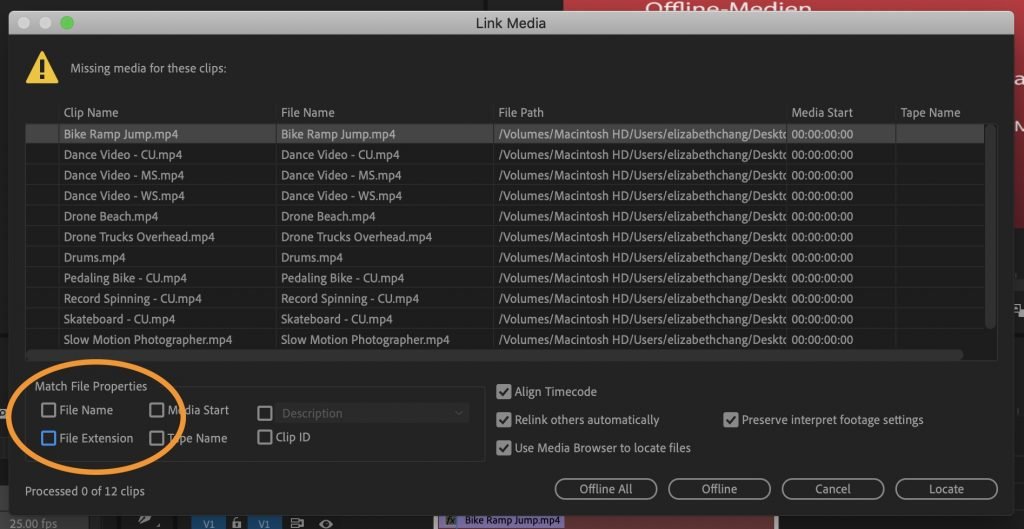
You also need to uncheck the second option for ‘File Extension’ if you’ve converted a file (from .MOV to .MP4, for example) from one format to another.
Now when you hit ‘Locate’, you’ll navigate to the newly named file, select it and hit ‘OK’ to reconnect your footage.
The Importance of File Organization
Now that you know why this error may have happened to you, you’ll understand much better why it’s so critical to be organized with your project from the start.
Any time that you make a single change to your folder structure or the files within them, you’ll have to reconnect those files again.
I have a specific folder structure that I use for all my video projects, which makes it very easy anytime I start a new project.
It looks like this:

As you can see, I have a separate folder for the most common types of files that I’ll have within my video projects.
I simply copy and paste this structure each and every time that I start a new project.
Feel free to copy my layout or create your own in a way that makes sense for you.
The point is to have a structure in place that allows you to keep your files organized from the start so you never end up moving them halfway through your edit.
Concluding Thoughts
That about wraps it up, guys.
Let me know if this helped solved your problem. Any further questions? Leave them for me in the comment box below.
Thanks!
-Beth