

9.4
<Устранение неисправностей>
Действия при возникновении
неисправностей
При неправильной работе принтера руководствуйтесь следующим
перечнем операций. Если при выполнении какой-либо операции
возникает ошибка, следуйте соответствующим рекомендациям.
Операция
Способы устранения
Убедитесь, что
находящийся
на панели
управления
индикатор
Подключен горит
зеленым светом.
• Если индикатор Подключен не горит,
проверьте подключение шнура питания.
Проверьте исправность выключателя.
Проверьте исправность источника
питания, подключив шнур питания
к другой розетке.
Напечатайте
тестовую страницу,
чтобы проверить
подачу бумаги в
принтер. См. с. 2.1.
• Если тестовая страница не печатается,
проверьте наличие бумаги в лотке.
• В случае замятия бумаги см. с. 9.1.
Убедитесь, что
тестовая страница
распечатана
правильно.
При возникновении проблем с качеством
печати см. с. 9.7.
Распечатайте
документ из
приложения, чтобы
убедиться, что
принтер подключен к
компьютеру и обмен
данными происходит
корректно.
• Если страница не печатается, проверьте
подключение кабелей к компьютеру
и принтеру.
• Просмотрите очередь печати и проверьте
состояние диспетчера очереди печати,
чтобы убедиться, что работа принтера
не была приостановлена.
• Убедитесь, что используются надлежащий
драйвер принтера и порт связи. Если
печать страницы прерывается, см. с. 9.5.
Если после
выполнения этих
действий проблемы
в работе принтера
не будут устранены,
прочтите следующие
разделы
руководства.
• «Индикаторы» на с. 9.4.
• «Устранение основных проблем,
возникающих при печати» на с. 9.5.
• «Типичные проблемы при
использовании Windows» на с. 9.9.
• «Типичные проблемы при
использовании PostScript» на с. 9.9.
• «Типичные проблемы при
использовании Linux» на с. 9.10.
• «Типичные проблемы при
использовании Macintosh» на с. 9.10.
Индикаторы
Индикатор
Состояние
Описание
Ошибка
Красный Вкл.
• Возникло замятие бумаги.
Для устранения неисправности
см. с. 9.1.
• Открыта крышка.
Закройте крышку.
• В лотке отсутствует бумага.
Загрузите бумагу в лоток.
• Принтер прекратил печать
из-за серьезной ошибки.
• Не установлен картридж с
тонером. Установите картридж.
• Возникла системная ошибка.
Если возникла эта проблема,
обратитесь в службу технической
поддержки.
Мигает • Произошла незначительная
ошибка, и принтер ожидает ее
устранения. После устранения
ошибки принтер продолжит
печать.
• Заканчивается тонер. Закажите
новый картридж. Качество
печати можно временно
улучшить, перераспределив
тонер. См. с. 8.3.
• Тонер в картридже полностью
закончился. Замените картридж.
См. с. 8.4.
• Срок службы картриджа
с тонером подходит к концу.
Подключен Зеленый Вкл.
• Принтер находится в режиме
энергосбережения.
• Принтер включен и может
получать данные с компьютера.
Мигает • Если индикатор мигает медленно,
это означает, что принтер
получает данные с компьютера.
• Если индикатор мигает часто,
это означает, что выполняется
печать.
Troubleshooting
6.3.6 Cover Open
• Description
The ERROR lamp is on even when the print cover is closed.
Check and Cause
1. The Hook Lever in the top cover may be defective.
2. Check the connector (Engine B’d↔HVPS) and circuit of
the cover switch department in the Main Control board.
Perform DCU mode : If Error state ’64’ occurs, Check the
related codes of the Cover Open Error.
6.3.7 No lamp on when the cover is open
• Description
The ERROR lamp does not come on even when the printer cover is open
Check and Cause
1. Check the connector and circuit of the cover switch
department in the Main Control board. Perform DCU
mode : If Error state ’64’ occurs, Check the related codes
of the Cover Open Error
Service Manual
6-10
Solution
1. Replace the hook lever, if defective.
2. Check the insertion of the Cover Open S/W
Connect.
3. Replace the Main Control board or Cover Open
S/W.
Solution
1. Check the insertion of the Cover Open S/W
Connect.
2. Replace the Main Control board or Cover Open
S/W.
Samsung Electronics
Действия при возникновении неисправностей
При неправильной работе принтера руководствуйтесь следующим перечнем операций Если при выполнении какой-либо операции возникает ошибка следуйте соответствующим рекомендациям.
Операция
Способы устранения
Убедитесь что находящийся на панели управления индикатор Подключен горит зеленым светом.
• Если индикатор Подключен не горит проверьте подключение шнура питания Проверьте исправность выключателя Проверьте исправность источника питания подключив шнур питания к другой розетке.
Напечатайте тестовую страницу чтобы проверить подачу бумаги в принтер См с 2.1.
• Если тестовая страница не печатается проверьте наличие бумаги в лотке.
• В случае замятия бумаги см с 9.1.
Убедитесь что тестовая страница распечатана правильно.
При возникновении проблем с качеством печати см с 9.7.
Распечатайте документ из приложения чтобы убедиться что принтер подключен к компьютеру и обмен данными происходит корректно.
• Если страница не печатается проверьте подключение кабелей к компьютеру и принтеру
• Просмотрите очередь печати и проверьте состояние диспетчера очереди печати чтобы убедиться что работа принтера не была приостановлена.
• Убедитесь что используются надлежащий драйвер принтера и порт связи Если печать страницы прерывается см с 9.5.
Если после выполнения этих действий проблемы в работе принтера не будут устранены прочтите следующие разделы руководства.
• «Индикаторы» на с 9.4.
— «Устранение основных проблем возникающих при печати» на с 9.5.
• «Типичные проблемы при использовании Windows» на с 9.9.
• «Типичные проблемы при использовании PostScript» на с 9.9.
• «Типичные проблемы при использовании Linux» на с 9.10.
• «Типичные проблемы при использовании Macintosh» на с 9.10.
Индикаторы
Индикатор
Состояние
Описание
Ошибка
Красный Вкл.
• Возникло замятие бумаги
Для устранения неисправности см с 9.1.
• Открыта крышка
Закройте крышку.
• В лотке отсутствует бумага
Загрузите бумагу в лоток.
• Принтер прекратил печать из-за серьезной ошибки.
• Не установлен картридж с тонером Установите картридж.
• Возникла системная ошибка
Если возникла эта проблема обратитесь в службу технической поддержки
Мигает • Произошла незначительная ошибка и принтер ожидает ее устранения После устранения ошибки принтер продолжит печать
• Заканчивается тонер Закажите новый картридж Качество печати можно временно улучшить перераспределив тонер См с 8.3.
• Тонер в картридже полностью закончился Замените картридж См с 8.4.
• Срок службы картриджа с тонером подходит к концу.
Подключен Зеленый Вкл.
• Принтер находится в режиме энергосбережения.
• Принтер включен и может получать данные с компьютера.
Мигает • Если индикатор мигает медленно это означает что принтер получает данные с компьютера.
• Если индикатор мигает часто это означает что выполняется печать.
Модератор: vetal

Последний раз редактировалось AlexOuch Ср июл 17, 2013 12:21 pm, всего редактировалось 1 раз.
-

AlexOuch
- Осматривается
-
![]()
![]() Andreyak777 » Ср июл 17, 2013 12:09 pm
Andreyak777 » Ср июл 17, 2013 12:09 pm
То, что другие люди говорят обо мне, никак не характеризует меня. Зато отлично характеризует их.
-

Andreyak777
- Избран тонером
-

![]()
![]() AlexOuch » Ср июл 17, 2013 12:20 pm
AlexOuch » Ср июл 17, 2013 12:20 pm


kvg писал(а):А статус-монитор что пишет? Или компьютером не определяется?
Что за статус монитор? прогуглил, кроме фишинговых сайтов ниче не нашел
Andreyak777 писал(а):С донора подкидывали рабочую печку и думаете что печка все равно виновата?
очепятка, имелл ввиду БП
avalon писал(а):Врят ли БП, датчики бумаги смотри
Датчиков бумаги там два, на наличие и на замятие, оба проверены и исправны. Если не бп, почему в таком случае он на лампу напругу не дает?
-
AlexOuch
- Осматривается
-
![]()
![]() AlexOuch » Ср июл 17, 2013 12:31 pm
AlexOuch » Ср июл 17, 2013 12:31 pm
dviz писал(а):Компом определяется?
никаких нареканий по этому поводу нету
-
AlexOuch
- Осматривается
-
![]()
![]() Andreyak777 » Ср июл 17, 2013 12:31 pm
Andreyak777 » Ср июл 17, 2013 12:31 pm
То, что другие люди говорят обо мне, никак не характеризует меня. Зато отлично характеризует их.
-
Andreyak777
- Избран тонером
-
![]()
![]() AlexOuch » Ср июл 17, 2013 12:39 pm
AlexOuch » Ср июл 17, 2013 12:39 pm
Andreyak777 писал(а):А БП на донора если подкинуть?
AlexOuch писал(а):Были подкинуты HPVS, печка и форматтер с донора
Обратно не снимал, поэтому не вижу смысла собирать все на другой пластмассе
upd: Народ, с 99% вероятностью проблема в бп. Так как в них не силен, обратился к вам
-
AlexOuch
- Осматривается
-
![]()
![]() AlexOuch » Ср июл 17, 2013 2:05 pm
AlexOuch » Ср июл 17, 2013 2:05 pm
Ошибка в состоянии принтера — открыта крышка, даже впаял перемычку вместо кнопки, сейчас еще проверю шлейф до форматера, и по совету прозвоню до симистора
upd: Шлейфы звонятся, в цепи до симистора пробоев не обнаружено. фак 
-
AlexOuch
- Осматривается
-
![]()
![]() Александр78 » Ср июл 17, 2013 2:39 pm
Александр78 » Ср июл 17, 2013 2:39 pm
Две кнопки,одна спереди справа,другая сзади сверху(обе замыкал?)
Добавлено спустя 4 минуты 31 секунду:
На задней кнопке пред стоит,тоже глянь.
-

Александр78
- Засыпщик
-

![]()
![]() AlexOuch » Ср июл 17, 2013 2:54 pm
AlexOuch » Ср июл 17, 2013 2:54 pm
Александр78 писал(а):Две кнопки,одна спереди справа,другая сзади сверху(обе замыкал?)
Добавлено спустя 4 минуты 31 секунду:
На задней кнопке пред стоит,тоже глянь.
AlexOuch писал(а):впаял перемычку вместо кнопки
Какой предохранитель? на питалове?
-
AlexOuch
- Осматривается
-
![]()
![]() Александр78 » Ср июл 17, 2013 3:06 pm
Александр78 » Ср июл 17, 2013 3:06 pm
Сзади под кнопкой бочонок коричневый,слева от неё семикондуктор белый,на включенном принтере посмотри на кнопке хоть какое-нибудь напряжение есть? Один контакт на землю,другой на кнопку.
Добавлено спустя 2 минуты 36 секунд:
Через кнопку на бп которая должно проходить 20 вольт постоянного тока.
Добавлено спустя 6 минут 17 секунд:
На шлейфе питания на форматер сверху вниз,контакт 3 и 4 при нажатой кнопке на бп долно быть 18-20 вольт.
-
Александр78
- Засыпщик
-
![]()
Вернуться в Принтеры, МФУ, факсы, копиры формата A4
Кто сейчас на форуме
Сейчас этот форум просматривают: нет зарегистрированных пользователей и гости: 76
 04:47
04:47
как самому заправить картридж принтера
 06:03
06:03
Разборка и ремонт лазерного принтера Samsung ML-2510
 01:00
01:00
Samsung ML-2510 Printer
 04:40
04:40
How To Fix a Paper Jam
 01:26
01:26
Samsung ML-2571N Laser Printer
 09:02
09:02
Samsung ML-2571N Toner Dolumu Nasıl Yapılır
 01:01
01:01
Samsung ML-2571N review
 01:27
01:27
How to install Samsung ML 1610 toner cartridge for Samsung ML 2571N printer By 123Ink ca
9.10
<Устранение неисправностей>
Типичные проблемы при
использовании Linux
Операция
Способы устранения
Принтер
не печатает.
• Проверьте, установлен ли в системе драйвер
принтера. Запустите программу Unified Driver
Configurator и в окне Printers Configuration на
вкладке Printers проверьте список доступных
принтеров. Используемый принтер должен быть
в этом списке. Если это не так, добавьте его с
помощью мастера добавления нового принтера.
• Проверьте, запущен ли принтер. В окне Printers
Configuration выберите устройство в списке
принтеров. Просмотрите описание устройства
в области данных выбранного принтера. Если
строка состояния содержит строку (stopped),
нажмите кнопку Start. После этого принтер
должен возобновить нормальную работу.
Состояние остановки stopped активизируется
в случае возникновения некоторых неполадок
при печати.
При печати
документа
появляется
сообщение
об ошибке
«Unable to
open mfp port
device file!»
Во время печати не следует изменять параметры
выполняемого задания печати (например,
с помощью графического интерфейса LPR).
Существующие версии сервера CUPS прерывают
задание печати в случае изменения его параметров
и затем пытаются повторно запустить прерванное
задание с самого начала. Поскольку драйвер Unified
Linux Driver блокирует порт многофункционального
устройства во время печати, после внезапного
прекращения работы драйвера порт остается
заблокированным и недоступным для последующих
заданий печати. В этом случае следует освободить
порт многофункционального устройства.
Типичные проблемы при
использовании Macintosh
Операция
Способы устранения
Не печатаются
документы из
приложения
Acrobat Reader.
При печати из приложения Acrobat
Reader для параметра Print Method
необходимо установить значение
Print as Image.
После завершения
печати документа
задание печати не
исчезает из очереди
печати (в операционной
системе Mac OS 10.3.2).
Обновите операционную систему
Mac OS до версии OS 10.3.3 или
более поздней.
Документы из
приложения Adobe
Illustrator не печатаются
по протоколу IPP.
Установите для параметра Data type
из меню печати приложения Adobe
Illustrator значение Binary.
Можно также использовать печать
по протоколу Appletalk.

Технические характеристики, Технические характеристики принтера
Страница 42
- Изображение
- Текст
10.1
<Технические характеристики>
10
Технические характеристики
Технические характеристики принтера
Тип данных
Характеристики и описание
Скорость
печати
a
До 24 стр./мин. для формата A4
(25 стр./мин. для формата Letter)
Разрешение
ML-2510
Фактическое разрешение —
до 1200 x 600 тчк/дюйм
ML-2570,
ML-2571N
Фактическое разрешение —
до 1200 x 1200 тчк/дюйм
Время разогрева Менее 15 секунд
Начальное
время вывода на
печать
9 секунд (из состояния «Готов»)
В спящем режиме: 25 секунд
Диапазон
напряжения
110–127 В, 50/60 Гц, 5,5 A
220–240 В, 50/60 Гц, 3 A
Потребляемая
мощность
Средняя: 390 Вт (ML-2510),
400 Вт (ML-2570, ML-2571N)
В режиме энергосбережения: менее 6,5 Вт
(ML-2510), 8,5 Вт (ML-2570, ML-2571N)
Уровень шума
b
В режиме ожидания: менее 35 дБ
При печати: менее 53 дБ
Ресурс
картриджа
с тонером
c
3000 страниц при 5 % заполнении страницы
согласно ISO 19752
(устройство поставляется с картриджем
на 1000 страниц)
Максимальная
нагрузка
Ежемесячно: до 10 000 страниц
Вес
8,9 кг (включая расходные материалы)
Масса упаковки
Бумажная: 1,6 кг; пластиковая: 0,3 кг
Наружные
размеры
(Ш х Г х В)
354 X 297 X 246 мм
Условия
окружающей
среды
Температура: от 10 до 32 °C
Относительная влажность: от 20 до 80 %
Язык принтера
ML-2510
SPL
ML-2570,
ML-2571N
SPL, PostScript 3, PCL6
d

10.2
<Технические характеристики>
Память
ML-2510
8 МБ (без возможности
расширения)
ML-2570,
ML-2571N
32 МБ (без возможности
расширения)
Шрифты
Шрифты ОС Windows
Интерфейс
• Стандартный параллельный
двунаправленный интерфейс IEEE 1284
— Поддерживаемые режимы: совместимый,
полубайтовый, байтовый, ECP
• Стандарт интерфейса USB
— USB 1.1: cовместим с USB 2.0
(только для модели ML-2510)
— USB 2.0: высокоскоростной интерфейс
USB 2.0 (только для моделей ML-2570
и ML-2571N)
— 1 порт 480 мбит/с
• Сетевой интерфейс
— Ethernet 10/100 Base TX для проводной сети
(может использоваться с моделями ML-2510
и ML-2570)
Совместимость
с операционным
и системами
• Windows 98/Me/NT 4.0/2000/XP(32/64 bit)/2003
• Различные версии ОС Linux
• Mac 10.3 (ML-2510) или 8.6–9.2/10.1–10.4
(ML-2570, ML-2571N)
Драйверы
принтера
e
• SPL: Windows, Linux
• CUPS: ОС Macintosh 10.3 (ML-2510)
• Драйвер печати PCL6 (только для моделей
ML-2570 и ML-2571N): Windows 98/Me/
NT 4.0/2000/XP(32/64 bit)/2003
• Драйвер PostScript (только для моделей
ML-2570 и ML-2571N): Windows 98/Me/
NT 4.0/2000/XP(32/64 bit)/2003,
ОС Macintosh 8.6–9.2/10.1–10.4
Функции
Сервер с сетевым интерфейсом
Ethernet 10/100 Base TX
(только для моделей ML-2510 и ML-2570)
a. Скорость печати зависит от операционной системы, быстродействия
компьютера, используемых приложений, способа подключения,
типа и размеров материала для печати и сложности задания печати.
b. Уровень звукового давления, ISO 7779.
c. Количество страниц зависит от условий эксплуатации, интервала печати,
а также типа и размера материала для печати.
d. Совместим с PCL6 версии 2.1.
e. Чтобы загрузить последнюю версию программного обеспечения,
посетите веб-сайт
www.samsungprinter.com
.
Тип данных
Характеристики и описание

1
А
ЛФАВИТНЫЙ
УКАЗАТЕЛЬ
В
выходной лоток 5.6
Д
дополнительные компоненты,
информация для заказа 7.1
З
загрузка бумаги
лоток ручной подачи 5.5
стандартный лоток 5.4
замена, картридж с тонером 8.4
замятие бумаги, устранение
в области выхода бумаги 9.3
в области картриджа 9.2
лоток ручной подачи 9.2
стандартный лоток 9.1
замятие, устранение 9.1
И
изнашивающиеся компоненты 8.5
индикатор, значение 9.4
К
картридж с тонером
замена 8.4
обслуживание 8.3
перераспределение тонера 8.3
Л
лоток ручной подачи, использование 5.5
П
панель управления
индикаторы 9.4
обзор 1.3
перераспределение тонера, картридж с
тонером 8.3
печать
проблемы 9.5
страница конфигурации 8.5
тестовая страница 2.1
проблема, решение
замятия бумаги 9.1
проблема, устранение
Linux 9.10
Macintosh 9.10
Windows 9.9
качество печати 9.7
ошибки PS 9.9
перечень операций 9.4
печать 9.5
проблемы качества 9.7
проблемы при использовании Linux 9.10
проблемы при использовании Macintosh
9.10
проблемы при использовании PostScript
9.9
проблемы при использовании Windows
9.9
проблемы с качеством печати,
устранение 9.7
Р
размер бумаги, характеристики 5.2
расположение компонентов 1.2
расходные материалы, информация для
заказа 7.1
режим ручной подачи, использование 5.5
режим экономии тонера, использование
2.1
рекомендации по работе с бумагой 5.3
С
сервер с сетевым интерфейсом,
установка 4.2
сетевые операционные системы 4.1
специальные материалы для печати,
рекомендации 5.3
страница конфигурации, печать 8.5
Т
тестовая страница, печать 2.1
тип бумаги, характеристики 5.2
требования к системе
Linux 3.3
Macintosh 3.3
Windows 3.2
У
устранение неисправностей 9.1
Х
характеристики, принтер 10.1
Ч
чистка
внутри 8.1
снаружи 8.1

Принтер Samsung
Программное обеспечение


Д ОПОЛНИТЕЛЬНЫЕ НАСТРОЙКИ ПЕЧАТИ Печать нескольких страниц…
Страница 47
- Изображение
- Текст

Р АБОТА С ПРИНТЕРОМ В ОПЕРАЦИОННОЙ СИСТЕМЕ L INUX Приступа…
Страница 48
- Изображение
- Текст

Установка программного обеспечения для принтера, Глава 1, Становка
Программного, Обеспечения, Принтера, Indows
- Изображение
- Текст
Установка программного обеспечения принтера в Windows
4
1
Установка программного
обеспечения принтера
в Windows
Данная глава содержит следующие разделы.
•
Установка программного обеспечения для принтера
•
Переустановка программного обеспечения принтера
•
Удаление программного обеспечения принтера
Установка программного
обеспечения для принтера
Можно установить программное обеспечение для печати на
локальном принтере или на сетевом принтере. Для установки
программного обеспечения печати на компьютер следуйте
инструкциям по установке для используемого принтера.
Драйвер принтера — это программа, позволяющая компьютеру
взаимодействовать с принтером. Процедура установки драйверов
может отличаться в зависимости от используемой операционной
системы.
Перед началом установки закройте все приложения.
Установка программного обеспечения
для печати на локальном принтере
Локальным называется принтер, подключенный к компьютеру с помощью
кабеля из комплекта поставки принтера, например кабеля USB или
параллельного кабеля. Если принтер подключен к локальной сети,
пропустите этот шаг и перейдите к разделу «Установка программного
обеспечения для печати на сетевом принтере» на стр. 7.
Для программного обеспечения печати можно выбрать обычную
или выборочную установку.
П
РИМЕЧАНИЕ
.
Если во время установки откроется окно мастера
установки нового оборудования, щелкните значок
в правом
верхнем углу окна или нажмите кнопку Отмена, чтобы закрыть его.
Обычная установка
Этот режим установки рекомендуется для большинства пользователей.
Будут установлены все компоненты, необходимые для работы с
принтером.
1
Убедитесь, что принтер подключен к компьютеру и включен.
2
Вставьте компакт-диск, входящий в комплект поставки,
в дисковод для компакт-дисков.
Должен произойти автоматический запуск компакт-диска
с открытием окна установки.
Если окно установки не открылось, нажмите кнопку Пуск,
а затем выберите Выполнить. Введите строку X:Setup.exe,
где «X» — имя дисковода, и нажмите ОК.
3
Нажмите кнопку Далее.
•
При необходимости выберите язык в раскрывающемся списке.
•
Просмотр руководства пользователя: позволяет
просмотреть руководство пользователя. Если на компьютере не
установлена программа Adobe Acrobat, выберите этот пункт, и
программа Adobe Acrobat Reader будет установлена
автоматически.
4
Выберите Обычная установка для локального принтера.
Нажмите кнопку Далее.

Установка программного обеспечения принтера в Windows…
Страница 50
- Изображение
- Текст
Установка программного обеспечения принтера в Windows
5
П
РИМЕЧАНИЕ
. Если принтер не подключен к компьютеру, откроется
следующее окно.
• Подключите принтер и нажмите кнопку Далее.
• Если вы планируете подключить принтер позднее, нажмите
кнопку Далее, а в следующем окне — кнопку Нет. Начнется
установка программного обеспечения. После завершения
установки тестовая страница печататься не будет.
•
В зависимости от принтера и используемого интерфейса
окно установки может отличаться от описанного в данном
руководстве.
5
После завершения установки появится окно с запросом
на печать тестовой страницы. Чтобы напечатать тестовую
страницу, установите флажок и нажмите кнопку Далее.
В противном случае нажмите кнопку Далее и перейдите к шагу 7.
6
Если тестовая страница напечатана правильно, нажмите
кнопку Да.
В противном случае нажмите кнопку Нет для повторной печати.
7
Чтобы зарегистрироваться в качестве пользователя принтера
Samsung и получать сообщения от компании Samsung, установите
флажок и нажмите кнопку Готово. Откроется веб-сайт
компании Samsung.
Если вы не хотите регистрироваться, нажмите кнопку Готово.
П
РИМЕЧАНИЕ
. Если по завершении установки драйвер принтера будет
работать неправильно, переустановите его. См. «Переустановка
программного обеспечения принтера» на стр. 10.
Выборочная установка
В этом режиме можно выбрать устанавливаемые компоненты.
1
Убедитесь, что принтер подключен к компьютеру и включен.
2
Вставьте компакт-диск, входящий в комплект поставки,
в дисковод для компакт-дисков.
Должен произойти автоматический запуск компакт-диска
с открытием окна установки.
Если окно установки не открылось, нажмите кнопку Пуск,
а затем выберите Выполнить. Введите строку X:Setup.exe,
где «X» — имя дисковода, и нажмите ОК.

Комментарии
![]()
LASER PRINTER
ML-2500 Series
ML-2510/XAA
Basic Model : ML-2571N
SERVICE Manual 
|
LASER PRINTER |
The keynote of Product |
|
— Speed : 25ppm (Ltr) / 24ppm(A4), 600dpi |
|
|
— Paper Path : MPF Type Cassette |
|
|
— Emulation : SPL (ML-2510) |
|
|
PCL (ML-2570/ML-2571N) |
|
|
— Processor : 150MHz Jupiter4e CPU |
|
|
400MHz SPGP V3 CPU |
|
|
— Memory : ML-2510(SDRAM, 8MB), |
|
|
ML-2570/2571N(SDRAM, 32MB) |
|
|
— MP Cassette : 250 pages / Face Down |
|
|
(100 pages) |
|
|
— Fuser Design : Lamp Type |
|
|
— I/O : ML-2510(USB1.1+IEEE 1284), |
|
|
ML-2570/2571N(USB2.0+IEEE 1284) |
|
|
ML-2571N |
— Machine Life : 50K(pages) |
1. Precautions
The cautions below are items needed to keep in mind when maintaining and servicing.
Please read carefully and keep the contents in mind to prevent accidents while servicing and to prevent the machine from getting damaged.
1.1 Safety Warning
(1) Request service by qualified service person.
Service for this machine must be performed by a Qualified service person. It is dangerous if unqualified service personnel or users try to fix the machine.
(2) Do not rebuild.
Do not attach or change parts discretionary. Do not dissemble, fix of rebuilt it. If so, printer will abnormally work and electric shock or fire may occur.
(3) Laser Safety Statement
The Printer is certified in the U.S. to conform to the requirements of DHHS 21 CFR, chapter 1 Subchapter J for Class 1(1) laser products, and elsewhere, is certified as a Class I laser product conforming to the requirements of IEC 825.
Class I laser products are not considered to be hazardous. The laser system and printer are designed so there is never any human access to laser radiation above a Class I level during normal operation, user maintenance, or prescribed service condition.
Warning >> Never operate or service the printer with the protective cover removed from Laser/Scanner assembly. The reflected beam, although invisible, can damage your eyes. When using this product, these basic safety precautions should always be followed to reduce risk of fire, electric shock, and injury to persons.
|
Samsung Electronics |
Service Manual |
1-1 |

Precautions
1.2 Safety Caution
1.2.1 Noxious Material Precaution
The toner in a printer cartridge contains a chemical material, which may harm human body if it is swallowed. Please keep children out of reach of the toner cartridge.
1.2.2 Electric Shock or fire Precaution
It is possible to get electric shock or burn by fire if you don’t fallow the instructions of the manual.
(1)Use exact voltage. Please use an exact voltage and wall socket. If not, a fire or an electric leakage can be caused.
(2)Use authorized power cord. Do use the power cord supplied with PRINTER. A fire can happen when over current flows in the power cord.
(3)Do not insert many cords in an outlet. A fire can be occurred due to flow over current in an outlet.
(4)Do not put water or extraneous matter in the PRINTER. Please do not put water, other liquid, pin, clip, etc. It can cause a fire, electric shock, or malfunction. If this occurs, turn off the power and remove the power plug from outlet immediately.
(5)Do not touch the power plug with wet hand. When servicing, remove the power plug from outlet. Do not insert or take off it with wet hand. Electric shock can be occurr.
(6)Caution when inserting or taking off the power plug. The power plug has to be inserted completely. If not, a fire can be caused due to poor contact. When taking off the power plug, grip the plug and take it off. If grip the line and pull over, it could be damaged. A fire or electric shock could happen.
(7)Management of power cord. Do not bend, twist, or bind it and place other materials on it. Do not fix with staples. If the power cord gets damaged, a fire or electric shock can happen. A damaged power cord must be replaced immediately. Do not repair the damaged part and reuse it. A repaired part with plastic tape can be cause a fire or electric shock. Do not spread chemicals on the power cord. Do not spread insecticide on the power cord. A fire or electric shock can be happen due to thinner(weak) cover of the power cord.
(8)Check whether the power outlet and the power plug are damaged, pressed, chopped, or blazing fire or not. When such inferiorities are found, repair it immediately. Do not make it pressed or chopped when moving the machine.
(9)Caution when there is thundering or lightning, and being flash of lightening. It causes a fire or electric shock. Take the power plug off there is thunder. Do not touch cable and device when thundering and flash of lightening.
(10)Avoid the place where is moisture or has dust. Do not install the printer where lots of dust or around humidifier. A fire can occurred. A plug part need to clean well with dried fabric to remove dust. If water drops are dripped on the place covered with dust, a fire can occurred.
(11)Avoid direct sunlight. Do not install the printer near window where direct contacts to the sunlight. If the machine contacts sunlight long time, the machine cannot work properly because inner temperature of the machine is getting hotter. A fire can occur.
(12)Turn off the power and take off the plug when smoke, strange smell, or sound from the machine. If you keep using it, a fire can be occurred.
(13)Do not insert steel or metal piece inside/outside of the machine. Do not put steel or metal piece into a ventilator. An electric shock could happened.
1-2 Service Manual
Samsung Electronics

Precautions
1.2.3 Handling Precautions
If you ignore this information, you could harm machine and could be damaged.
(1)Do not install it on different levels, or slanted floor.
Please confirm whether it is balanced or not after installation. If it is unbalanced, an accident can be happened due to the machine falling over.
(2)Be careful not to insert a finger or hair in the rotating unit.
Be careful not to insert a finger of hair in the rotating unit (motor, fan, paper feeding part, etc) while the machine is operating. Once it happens, you could be harmed.
(3)Do not place a pot containing water/chemical or small metals. If they got caught into the inner side of machine, a fire or electric shock can be occurred.
(4)Do not install it where lots of moisture or dust exists or where raindrop reaches. A fire or electric shock can be caused.
(5)Do not place a candlelight, burning cigarette, and etc. on the machine. Do not install it near to heater. A fire can be occurred.
1.2.4 Assembly/Disassembly precaution
When replacing parts, do it very carefully. Memorize the location of each cable before replace parts for reconnecting it afterwards. Memorize. Please perform the steps below before replace or disassembly the parts.
(1)Check the contents stored in the memory. All the information will be erased after replacing main board. The information needed to keep has to be written down.
(2)Before servicing or replacing electric parts, take off plug.
(3)Take off printer cables and power cord connected to printer.
(4)Use formal parts and same standardized goods when replacing parts.Must check the product name, part cord, rated voltage, rated current, operating temperature, etc.
(5)Do not over-force when release or tighten up the plastic parts.
(6)Be careful not to drop small parts such as screws in the printer.
(7)Be careful not to change the location of small parts such as screws when assembling and disassembling.
(8)Remove dust or foreign matters completely to prevent fire of tracking, short, or etc.
(9)After finished repair, check the assembling state whether it is same as before the repair or not.
|
Samsung Electronics |
Service Manual |
1-3 |

Precautions
1.3 ESD Precautions
Certain semiconductor devices can be easily damaged by static electricity. Such components are commonly called “Electrostatically Sensitive (ES) Devices”, or ESDs. Examples of typical ESDs are: integrated circuits, some field effect transistors, and semiconductor “chip” components.
The techniques outlined below should be followed to help reduce the incidence of component damage caused by static electricity.
Caution >>Be sure no power is applied to the chassis or circuit, and observe all other safety precautions.
1.Immediately before handling a semiconductor component or semiconductor-equipped assembly, drain off any electrostatic charge on your body by touching a known earth ground. Alternatively, employ a commercially available wrist strap device, which should be removed for your personal safety reasons prior to applying power to the unit under test.
2.After removing an electrical assembly equipped with ESDs, place the assembly on a conductive surface, such as aluminum or copper foil, or conductive foam, to prevent electrostatic charge buildup in the vicinity of the assembly.
3.Use only a grounded tip soldering iron to solder or desolder ESDs.
4.Use only an “anti-static” solder removal device. Some solder removal devices not classified as “anti-static” can generate electrical charges sufficient to damage ESDs.
5.Do not use Freon-propelled chemicals. When sprayed, these can generate electrical charges sufficient to damage ESDs.
6.Do not remove a replacement ESD from its protective packaging until immediately before installing it. Most replacement ESDs are packaged with all leads shorted together by conductive foam, aluminum foil, or a comparable conductive material.
7.Immediately before removing the protective shorting material from the leads of a replacement ESD, touch the protective material to the chassis or circuit assembly into which the device will be installed.
8.Maintain continuous electrical contact between the ESD and the assembly into which it will be installed, until completely plugged or soldered into the circuit.
9.Minimize bodily motions when handling unpackaged replacement ESDs. Normal motions, such as the brushing together of clothing fabric and lifting one’s foot from a carpeted floor, can generate static electricity sufficient to damage an ESD.
1-4 Service Manual
Samsung Electronics

|
Product Specifications |
|||||||
|
2. Product Specifications |
|||||||
|
2.1 Product Overview |
|||||||
|
Item |
Descriptions |
Remark |
|||||
|
2 |
|||||||
|
Basic Model |
ML-2571N |
||||||
|
Series Model |
ML-2510, ML-2570 |
||||||
|
Market of Sailes |
Persnal user Laser printer.(Low Price for small work Group.) |
||||||
|
Specification |
24ppm(Ltr. 25ppm), Jupiter 4e 150MHz, 8Mbytes SDRAM, |
||||||
|
SPGP V3 400MHz, 32Mbytes SDRAM |
|||||||
|
1K(initial), 3K(sailes) |
|||||||
|
USB 1.1 (Compatible with USB 2.0) + IEEE 1284 Parallel : ML-2510 |
|||||||
|
USB 2.0 + IEEE 1284 Parallel : ML-2570, ML-2571N |
|||||||
|
250pages feeding, 100pages Face Down |
|||||||
2.2 Specifications
 Product Specifications are subject to change without notice. See below for product specifications.
2.2.1 General Specifications
|
Item |
Descriptions |
|
Print Method |
Electro-photographic Printing |
|
Developing system |
Non-Magnetic, Mono-Component Developing System |
|
Print Speed |
24 PPM : A4 size |
|
25 PPM (Letter size) |
|
|
Resolution |
True 1200 X 600 DPI, 1200 X 1200(ML-2570/2571N) |
|
Source of Light |
Laser diode (LSU : Laser Scanning Unit) |
|
Warm-Up Time |
Cold Warm-up : 15sec, Sleep mode : 15sec |
|
First Print Time |
Less than 9 seconds (Ready to 1st page out) |
|
Feed Method |
Cassette & Manual |
|
Media Size |
76 X 128mm (3 x 5”) to 216 X 356mm (8.5 X 14”) |
|
Paper thickness |
Cassette : 16 ~28 lb , Manual Feeder : 16 ~ 43 lb |
|
Size(W X D X H) |
352 X 298 X 243 mm |
|
Weight |
Net : 5.6Kg with out toner cartridge(W/O) |
|
Gross : 8.7Kg(41Ib) |
|
|
Acoustic Noise |
Stand by : Less than 35 dB |
|
Printing : Less than 53 dB |
|
|
Power save mode |
Yes |
|
Toner save mode |
Yes |
|
Machine Life |
50,000pages |
|
Samsung Electronics |
Service Manual |
2-1 |

Product Specifications
|
Item |
Descriptions |
||
|
Periodic Replacing Parts |
Pick Up Roller : 50,000 Pages |
||
|
Same with Machine Life |
Transfer Roller : 50,000 Pages |
||
|
Fuser Assembly : 50,000 Pages |
|||
|
Toner Sensor |
No |
||
|
Toner Type |
Non-Magnetic Contact System |
||
|
Toner Initial |
1,000 sheets@ISO 19752 Standard coverage |
||
|
Toner sale |
3,000 sheets@ISO 19752 Standard coverage |
||
|
Cassette |
— Paper capacity : 250sheets |
||
|
— Paper weight : 60 ~ 163 g/ |
/ 16 ~ 43 lbs |
||
2.2.2 Controller
|
Item |
Descriptions |
|
Processor(CPU) |
Jupiter 4e 150MHz/SPGP V3 400MHz |
|
Memory |
Standard/Max. : 8MB(Max. 8MB) — ML-2510/32MB(Max. 32MB) — ML-2570/2571N |
|
Type : SDRAM |
|
|
Expand Memory Slot, Type : NO |
|
|
Compression Technology : MET(Memory Enhancement Technology) |
|
|
(Emulation) |
Standard : SPL/PCL |
|
Auto Emulation Sensing : YES |
|
|
(Interface) |
USB 1.1 (Compatible with USB 2.0)+IEEE 1284 for ML-2510, |
|
USB 2.0+IEEE 1284 for ML-2570/2571N |
|
|
Option : NO |
|
|
Auto Interface Sensing : YES |
|
|
Font |
Type : Windows Fonts |
|
Number : NO |
|
|
Test Print |
Demo Mode : Press the Demo Key for 2 Seconds |
|
Configration Mode : Press the Demo Key for 4 Seconds |
|
|
Cleaning Mode : Not Support |
|
|
Service Mode : Press the Demo Key when Power on(F/W Download) |
|
 ML-2510 model : I/O Support(USB 1.1 + IEEE 1284 Parallel port)
ML-2570/2571N model : I/O Support(USB 2.0 + IEEE 1284 Parallel port)
2-2 Service Manual
Samsung Electronics
![]()
Product Specifications
2.2.3 Electrical Specification
|
Item |
Descriptions |
Remark |
||
|
Input Voltage |
Nominal input voltage |
220~240 VAC |
||
|
Input voltage range |
198~255 VAC |
|||
|
Nominal frequency |
50/60 MHz |
|||
|
Frequency tolerance |
+3Hz |
|||
|
Power Consumption |
Printing : 390W Ave(Max. 400W) — 2510 Model |
|||
|
400W Ave(Max. 420W) — 2570/2571N Model |
||||
|
Idling : 65W Ave or less-ML-2510 Model |
||||
|
70W Ave or less-ML-2570/2571N Model |
||||
|
Power Save : 6.5W Ave or less-ML-2510 Model |
||||
|
8.5W Ave or less-ML-2570/2571N Model |
||||
2.2.4 Environmental Range
|
Item |
Operating |
Storage |
|
Temperature |
10~30 oC(50-90 oF) |
-20~40 oC (-4~104 oF) |
|
Humidity |
20~80%RH |
10~80%RH |
2.2.5 Toner Cartridge
|
Item |
Descriptions |
Remark |
|
Life span |
Starter: 1,000 Pages(initial) |
A4 Size, ISO 19752 Pattern |
|
Running : 3,000 Pages(sailes) |
Standard Coverage SIMPLEX |
|
|
Developing Method |
Non-magnetic Contact Developing |
|
|
Charging Method |
Conductive Roller Charging |
|
|
Toner Empty sensor |
No |
|
|
Ozone |
0.1PPM or less |
|
|
Cartridge Style |
Single cartridge |
|
|
Samsung Electronics |
Service Manual |
2-3 |

Product Specifications
2.2.6 Paper Handling Specifications
Please refer to Paper Secifications on user Guide.
2.2.6.1 Input Paper Size
|
Paper |
paper size |
Cassette |
|
|
A4 |
210 X 297 mm |
O |
|
|
Letter |
216 X 279(8.5 X 11″) |
O |
|
|
US Folio(Legal13″) |
216 X 330(8.5 X 13″) |
O |
|
|
Legal(Legal14″) |
216 X 356(8.5 X14″) |
O |
|
|
Executive |
184 X 267((7.25 X10.5″) |
O |
|
|
Statement |
140 X 216(5.5 x8.5″) |
O |
|
|
ISO B5 |
176 X 250 |
O |
|
|
JIS B5 |
182 X257 |
O |
|
|
A5 |
148 X 210 |
O |
|
|
A6 |
105 X148 |
O( |
) |
|
No.10 Env. |
105 X 241(4.15 X 9.5″) |
O( |
) |
|
Monarch Env. |
98 X191(3.87 X 7.5″) |
O( |
) |
|
DL Env. |
110 X 220(4.33 X 8.66″) |
O( |
) |
|
C5 Env. |
162 X 229(6.38 X 9.01″) |
O( |
) |
|
C6 Env. |
114 X 162(4.49 X 6.38″) |
O( |
) |
|
Transparency(OHP) |
A4 or Letter |
O( |
) |
|
Label paper |
A4 or Letter |
O( |
) |
2.2.6.2 Input capacity
|
Item |
Descriptions |
|
Cassette |
250 sheets |
2.2.6.3 Output capacity
2-4 Service Manual
Samsung Electronics

Product Specifications
2.3 Model Comparison Table
|
Model Name |
ML-2510 |
ML-2570 |
ML-2571N |
||||
|
Company |
Samsung |
Samsung |
Samsung |
||||
|
Printing Process |
|||||||
|
Print Method: |
Electrophotographic Laser |
Electrophotographic Laser |
Electrophotographic laser |
||||
|
Print Speed |
Up to 24ppm in A4, Up to 25ppm in letter |
Up to 24ppm in A4, Up to 25ppm in letter |
Up to 24ppm(A4) |
||||
|
FPOT |
9sec |
9sec |
9sec |
||||
|
Resolusion |
1200×600 |
1200×1200 |
1200×1200 |
||||
|
Duty Cycle, Monthly |
up to 5000 prints per month |
up to 5000 prints per month |
up to 15,000 prints per month |
||||
|
Hardware Software |
|||||||
|
Processor Type |
Samsung Jupiter 4e 150MHz |
Samsung SPGP V3 400MHz |
Samsung SPGP V3 400MHz |
||||
|
Memory |
8MB(8MB) |
32MB SDRAM(32MB) |
32MB SDRAM(32MB) |
||||
|
OS |
Win9X/ME/2000/XP/Linux7/NT4.0/Mac OS8.6 |
Win9X/ME/2000/XP/Linux7/NT4.0/Mac OS8.6 |
Win9X/ME/2000/XP/Linux7/NT4.0/Mac OS8.6 |
||||
|
Standard Emulations |
SPL |
PCL |
PCL |
||||
|
Interface Support |
|||||||
|
Standard Interfaces |
USB 1.1(Compatible with USB 2.0)+ |
USB 2.0 |
USB 2.0 |
||||
|
IEEE 1284 Parallel |
IEEE 1284 Parallel |
IEEE 1284 Parallel |
|||||
|
Cable Not Supply(KOR,CHINA is Supply) |
|||||||
|
Optional Interfaces |
N/A |
N/A |
N/A |
||||
|
Paper Handling |
|||||||
|
Standard Paper Input |
250 Sheets Multi-purpose Tray |
250 Sheets Multi-purpose Tray |
250 Sheets Multi-purpose Tray |
||||
|
Paper Output |
Face down : 100 Sheet(TBD) |
Face down : 100 Sheet(TBD) |
100 Sheet Face Down Tray |
||||
|
Duplexing |
Manual |
Manual |
Manual |
||||
|
Paper Weight : |
|||||||
|
— Plain paper |
16 to 24 lb. Bond(60 to 90g/m2) |
16 to 24 lb. Bond(60 to 90g/m2) |
16 to 24 lb. Bond(60 to 90g/m2) |
||||
|
— Thick stock |
24 — 90 lb. Index(163g/m2) |
24 — 90 lb. Index(163g/m2) |
24 — 90 lb. Index(163g/m2) |
||||
|
Physical |
|||||||
|
Type |
Laser Printer with Internal Controller |
Laser Printer with Internal Controller |
Laser Printer with Internal Controller |
||||
|
Dimensions w/output |
352mm x 298mm x 243mm |
352mm x 298mm x 243mm |
352mm x 298mm x 243mm |
||||
|
tray extended(WxDxH) |
|||||||
|
Weight(without cartridge) |
5.6kg |
5.6kg |
5.6kg |
||||
|
Carton Dimensions |
455mm x 415mm x 325mm |
455mm x 415mm x 325mm |
508mm x 425mm x 265mm |
||||
|
(WxDxH) |
|||||||
|
Weight(as shipped) |
8.7kg |
8.7kg |
8.7kg |
||||
|
Electical |
|||||||
|
Power Requirements |
|||||||
|
Power Consumption |
Power Consumption |
Power Consumption |
Power Consumption |
||||
|
390W printing, 6.5W Down Sleep Mode |
400W printing, 8.5W Down Sleep Mode |
400W printing, 8.5W Down Sleep Mode |
|||||
|
Energy Star* Compliant |
Yes |
Yes |
Yes |
||||
|
Environmental |
|||||||
|
Temprature : |
|||||||
|
— Operating |
10 |
to 32 |
10 |
to 32 |
10 |
to 32 |
|
|
— Non-Operating |
0 |
to 40 |
0 |
to 40 |
0 |
to 40 |
|
|
Humidity : |
|||||||
|
— Operating |
: 20% to 80% RH |
: 20% to 80% RH |
: 20% to 80% RH |
||||
|
— Non-Operating |
: 20% to 80% RH |
: 20% to 80% RH |
: 20% to 80% RH |
||||
|
Noise Level : |
|||||||
|
Operating |
Operating : <53dB(A), Standby : <35dB(A) |
Operating : <53dB(A), Standby : <35dB(A) |
Operating : <53dB(A), Standby : <35dB(A) |
||||
|
Consumables |
|||||||
|
Starter |
up to 1,000 pages(A4/Letter) at ISO 5% coverage |
up to 1,000 pages(A4/Letter) at ISO 5% coverage |
up to 1,000 pages(A4/Letter) at ISO 5% coverage |
||||
|
continuous printing. |
continuous printing. |
continuous printing. |
|||||
|
Replacement |
up to 3,000 pages(A4/Letter) at ISO 5% coverage |
up to 3,000 pages(A4/Letter) at ISO 5% coverage |
up to 3,000 pages(A4/Letter) at ISO 5% coverage |
||||
|
Samsung Electronics |
Service Manual |
2-5 |
Product Specifications
*. These model are as yet undeveloped.
|
Acessory |
Code |
Quantity |
|
INA-ACCESSORY |
JC99-01993J |
— |
|
S/W APPLICATION-CD |
JC46-00287A |
1 |
|
COVER-M_PAPER (PAPER COVER) |
JC63-01119A |
1 |
|
MANUAL-(CARD)WARRANTY CARD |
JC68-00690A |
1 |
|
Acessory |
Code |
Quantity |
|
INA-ACCESSORY |
JC99-01986C |
— |
|
S/W APPLICATION-CD |
JC46-00291A |
1 |
|
COVER-M_PAPER (PAPER COVER) |
JC63-01119A |
1 |
|
MANUAL-(CARD)WARRANTY CARD |
JC68-00690A |
1 |
2-6 Service Manual
Samsung Electronics
System Overview
33. System Overview
3.1 System Outline
 Paper Path Layout
14
12
13
BIN PATH
12 MAIN PBA
|
Samsung Electronics |
Service Manual |
3-1 |
System Overview
 Unit Layout
LSU
Panel
HVPS
Motor
SMPS
Main PBA
3-2 Service Manual
Samsung Electronics

System Overview
3.1.1 Feeding
There are the C-path type, which loads papers, and the manual feeder, which supplies paper one by one.The cassette has the function pad which separates paper one by one, and it has the sensor function to check the existence of the loading paper.
1)Feeding Type : MPF Type
2)Feeding Standard : Center Loading
3)Feeding Qty : Cassette 250 sheets (75g/ , 20lb paper standard)
4)Manual 1 sheet (Paper, OHP, Envelope etc.)
5)Separating Type : Cassette — Friction Pad Type
6)Manual : None
7)Driver Type : Driving by Gearing from Main Motor
 Pick_up Roller Driver : Solenoid
9)Paper detecting Sensor : Photo Sensor
10)Paper Size Sensor : None
11)Paper Exit Type : Face Down
3.1.2 Transfer Ass’y
The transfer roller delivers the toner of the OPC drum to the paper.
— The life span : Print over 50,000 sheets (in 16 ~30 )
)
3.1.3Driver Ass’y
It is a power delivery unit by gearing. By driving the motor, it supplies the power to the feeding unit, the fusing unit, and the distributing unit.(Motor drive IC : A3977)
— It is a power delivery unit by gearing : Feeder/Developer  Motor
Motor  Fuser/Exit
3.1.4FUSER
The fuser is consisted of the Heat Lamp,Heat Roller,Pressure Roller,Thermister and Thermostat. It adheres the toner on the paper with pressure and heat to complete the printing job.
— Life Cycle : 50K(pages)
|
Samsung Electronics |
Service Manual |
3-3 |

System Overview
1) Heat Lamp
. Heat Lamp Terminal Shape : Terminal Single Type
. Voltage 120 V : 115 + /- 5 %
220 V : 230 + /- 5 %
. Capacity : 750 Watt + /- 30 W
. Life : 3000 Hr
2) Thermostat
. Thermostat Type : Non-Contact type THERMOSTAT
. Control Temperature : 150
 5
5
3) Thermistor
. Thermistor Type : FS-50004 (SEMITEC 364Fs Type)
. Temperature Resistance : 7 (180
(180 )
)
. SYSTEM Temperature SETTING
—Stand by : 160 + /- 5
—Printing : 180 + /- 5 (before 30pages) 75
 + /- 5
 (after 30pages)
—Overshoot : 200 or less
—Overheat : 210 or less
4)Heat roller
. Length : 254 mm
. Valid length : 222 mm
. GND Type : H/R Bearing Grounding type By SECC Fuser frame
5)Pressure roller
. Shaft
—Length : 239.5 mm
. Rubber
—Length : 222 mm
6)Paper separation method
Teflon Coating with mold Claw System
7)Safety Relevant Facts
. Protecting device when overheating
—1st protecting device : H/W cuts off when detecting an overheating
—2st protecting device : S/W cuts off when detecting overheating
—3st protecting device : Thermostat cuts off the power
. Safety device
—The power of Fuser is cut-off after front cover is open.
—The overheating safety device for customer
—The surface temperature of the Fuser Cover is under 80
3-4 Service Manual
Samsung Electronics
System Overview
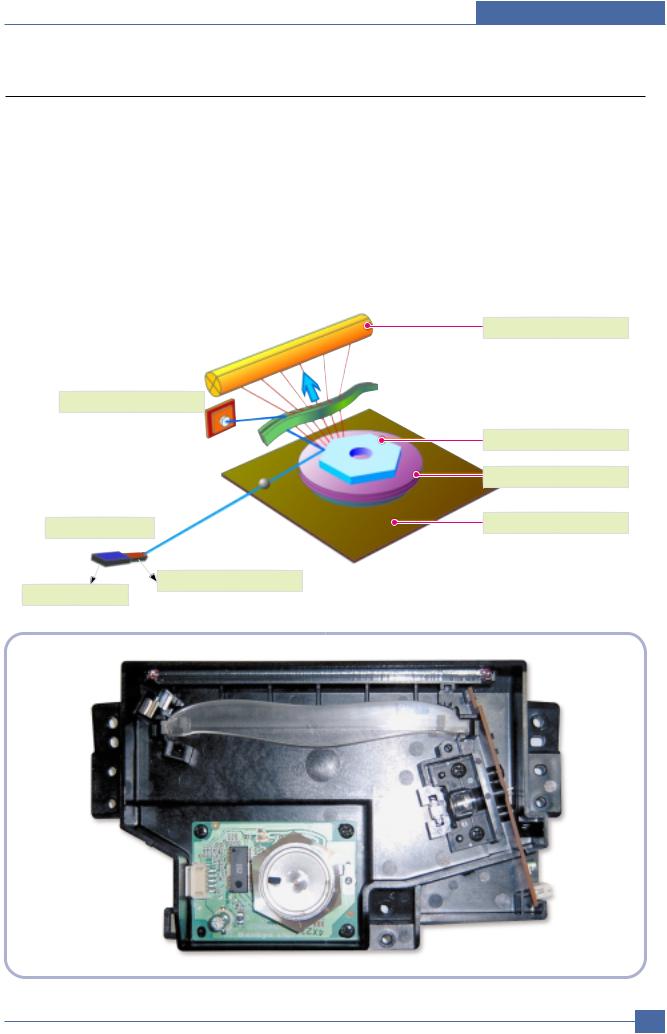
3.1.5 LSU (Laser Scanner Unit)
The LSU unit is controlled by video controller. It scans the video data received from video controller with laser beam by using the rotation principle of the polygon mirror to create the latent image on the OPC drum. It is the core part of LBP.
The OPC drum rotates as the same speed as the paper feeding speed. It creates the /HSYNC signal and sends it to the engine when the laser beam of the LSU reaches the end of the polygon mirror, and the engine detects the /HSYNC signal to arrange the vertical line of the image on the paper. After detecting the /HSYNC signal, the image data is sent to the LSU to arrange the its margin on the paper. The one side of the polygon mirror is one line for scanning..
OPC Drum
Photo Diode
Polygon Mirror
Polygon Motor
|
LD Driver circit |
Motor Driver |
LD(Laser Diode)
Protector panel
|
Samsung Electronics |
Service Manual |
3-5 |

System Overview
3.1.6 Toner Cartridge
By using the electronic photo process, it creates a visual image. In the toner cartridge, the OPC unit and the developer unit are in a body. The OPC unit has OPC drum and charging roller, and the developer unit has toner, toner cartridge, supply roller, developing roller, and blade (Doctor blade)
—Developing Method: Non magnetic 1 element contacting method
—Toner: Non magnetic 1 element shatter type toner
—The life span of toner: 3,000 sheets (ISO 19752 Pattern/A4 standard)
—Toner Cartridge : Initial(1,000), Sales(2,000)
—Toner remaining amount detecting sensor: None
—OPC Cleaning: Collect the toner by using electric static + FILM OPC
—Management of disusable toner: Collect the toner by using electric static (Clenerless TypeNo disusable toner)
—OPC Drum protecting Shutter: None
—Classifying device for toner cartridge: ID is classified by interruption of the frame channel.
3-6 Service Manual
Samsung Electronics
![]()
System Overview
3.2 H/W Structure and Descriptions
3.2.1 H/W Overview
ML-2510/2570/2571N is roughly made up Main Control part and SMPS/HVPS part.
Main Controller uses Jupiter4E for ML-2510 and SPGP V3 for ML-2570/2571N, which is on chip micro controller and developed for Low-end Laser Beam Printer.
Jupter4E and SPGP V3 provide provides the integrated printing functions such as Printer video controller, Laser Scan Unit controller, PWM controller and Bi-polar Stepper Motor Controller and has USB and IEEE 1284 Parallel Interface capacity.
SMPS
OPE B’D
(Build-in HVPS)
HVPS
Main Controller
|
Jupiter IV ASIC for 2510 |
V1.1 |
USB for 2510 |
|
|
SPGP V3 for 2570/2571N |
V2.0 |
USB for 2570/2571N |
DRAM 8M Byte for 2510
32MByte for 2570/2571N
Printer Engine B’D
Flash Memory for 2510 8MByte for 2570/2571N
3.2.1.1.Main Control
ML-2510/2570/2571N of Main Control are composed of CPU and Print and operate follows function by CPU
—Bus Control, I/o
—Handling, each Driver and PC Interface
Main Control operate its full function on the Main B’d and CPU control Controller ASIC.
3.2.1.2 CPU
ML-2510 Use 32Bit RISC Processor of Jupiter4e, which is built in Memory, while ML-2570/2571N sue SPGP V3, They control system by operating operation block of the system.
|
Samsung Electronics |
Service Manual |
3-7 |

System Overview
— Main Function Block:  Completely Integrated System for Embedded Applications,
 32 Bit Risc Architecture for ML-2510 and ARM10 CPU for ML-2570/2571N ARM9 CPU
 LSU Interface Module for Interfacing PVC with LSU
 2 Channel General Purpose DMA Controller for High Speed I/O
  Dual Memory Bus Architecture
—Operation Frequency : 150MHz for ML-2510/400MHz for ML-2570/2571N
—Operation Voltage : 3.3V
—POWER ON RESET TIME : 6.6ms below
3.2.1.3Flash Memory
Store System Program and can be down load System Program through PC Interface
—Capacity : 8M Byte for ML-2570/2571N, ML-2510 uses 0.5M Byte ASIC built flash memory
—Access Time : 70 nsec
3.2.1.4DRAM
When Printing, use Band Buffer, System Working Memory Area .
—8M capa : 8M Byte basic for ML-2510
8M :Printing System Working Memory Area
—32M capa : 32M Byte basic for ML-2570/2571N 32M :Printing System Working Memory Area
—Access Time : 60 nsec
3.2.1.5ENGINE
This recording method is electrophography method using LSU, which toner is composed of 1 component and non magnetic.
1)Recording Method : LSU(Laser Scanning Unit)
2)Printing Speed :24ppm
(In continuing printing base A4, printing pages from 2nd to last during 1min)
3)Recording Density : 1200 x 600dpi
4)Cassette Capa. : Cassette : 250sheets(75g  Base),
Manual : N/A((DRIVE Selection : Paper, OHP, Envelop — 1 sheet)
5)Paper Size : Cassette ,Manual; Width = 76 ~ 216mm, Length = 125mm ~ 356mm
6)Effective recording size
—A4 : 202 x 291 mm
—Letter : 208 x 273 mm
—Legal : 208 x 350 mm
—Folio : 208 x 325 mm
—Top Margin : 4.23 ° 3 mm
3 mm
—Left, Right Margin : 4.23 ° 3 mm
3 mm
7)CRU(Toner Cartridge)Life : 3,000pages Printing(A4, 5% Pattern Printing)
First Print Out Time : within 9sec( Standby )
9)Warming up time : within 15sec (Ambient : 25° )
)
3-8 Service Manual
Samsung Electronics
System Overview
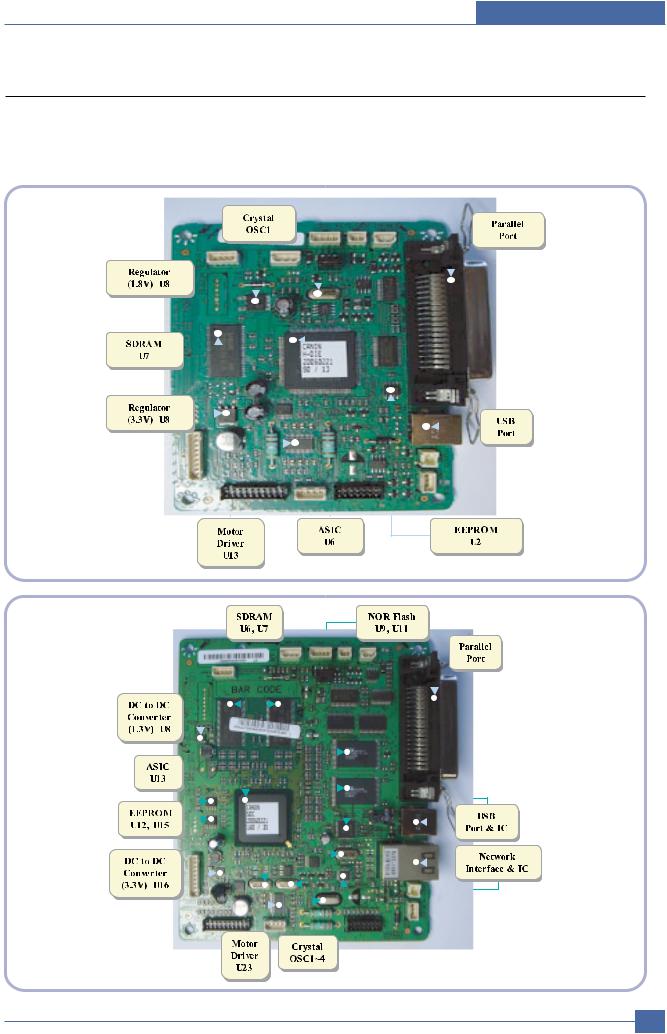
3.2.2 Main Board
Main Board are composed of Engine and Controller on the one-Board.
Main Board control to send Current Imagedml Video Data to LSU to print and have motor Driving and Circuit for the current driving and also include Paper Exit Sensor, Cover Open s/w, panel s/w.
< ML-2510 >
< ML-2570/2571N >
|
Samsung Electronics |
Service Manual |
3-9 |

System Overview
 U6(Jupiter 4E for ML-2510 and SPGP V3 for ML-2570/2571N)
—ML-2510 use Jupiter4E which has a CPU core CLK with over 150MHz and a System bus 80MHz.
—It use 3.3V for operation voltage and I/O, It uses 80MHz for system bus CLK, Built in Flash Memory.
—ML-2570/2571N use SPGP V3 which has a CPU core CLK with over 400MHz and a System bus 100MHz.
 SDRAM
SDRAM
— Main memory. SDCLK is 75Mhz for ML-2510, SDCLIC is 100Mhz for ML-2570/2571N.
 A3977
A3977
— It is an Main motor driver IC and controls the motion of main motor.
 Regulator
— It Supplies the core voltage to CPU by converting 3.3V to 1.8V for ML-2510
 EEPROM(U8 : 93C66 for ML-2510, 24C32 for ML-2570/2571N. — It is an EEPROM with 12C method.
 SMPS connector(CN8)
—It connects SMPS, supplies the power, and delivers the high voltage contol signal, etc. If a harness is not normally connected to this connector, power cannot be supplied.
 LSU connector(CN12) — It connects a LSU.
 DC Motor connector(CN11)
— It connects an main motor and drive a DC motor.
 HVPS connector(CN10) — It connects a HVPS.
 DCU connector(CN1)
— It interface a DCU-JIG
 USB connector(CN6)
— It interface the computer.
 Network Connector(ML-2571N only) — It interface the network
 IEEE 1284 Parallel Connector
— It interface the computer.
 DC To DC Converter
—It supplies the core sltage to CPU
by Converting 3.3V to 1.3V for ML-2570/2571N
3-10 Service Manual
Samsung Electronics

System Overview
3.2.3 Asic(Jupiter 4E) Specification
3.2.3.1 Introduction
Jupiter4E is One-Chip micro-Controller for Low cust Laser beam Printer.
1.One Chip Laser Beam Printer Controller
—GDI only
—AMBA AHB used for high speed bus transactions between masters and slaves
—AMBA APB used for low speed bus transactions between ARM core and peripherals
—3 PLLs ( 2 Dithered PLL and 1 General PLL)
first for CPU(150MHz), AHB(75MHz), APB(75MHz), second for USB(48MHz)
third for PVC(59MHz)
—75MHz system operation
—1.8V power operation
—3.3V tolerant input and bi-directional I/Os
—SDRAM and IO Address / Data signals multiplexing
2.Integrated ARM940T 32-bit RISC embedded processor core
—75MHz core frequency operation
—Harvard Architecture Cache : 4KByte Instruction cache, 4KByte Data cache
—Single memory bus architecture
3.Built in Flash Memory
—4MBits (128Kx32bits)
—Serial programming mode using flash programmer tool
—Internally flash memory read / write operation support
—Programmable access timing control
4.32MB Special function Register Area
5.Directly connected to 3 external IO banks (IOC)
—32 MB size in each IO bank
—Programmable setup, access, hold timing
—Programmable recovery time for slow devices
—Allows to access peripheral devices such as GPIO control logic
6.Directly connected to 1 external ROM bank (ROMC)
—32 MB size for one ROM bank
—One external flash memory attachable.
7.Directly connected to two SDRAM banks (SDRAMC)
—Extensible architecture
—Two external SDRAM attachable.
—SDRAM controller supports PC-100 and PC-133 SDRAM running at 75MHz
—Up to 32MB per bank.
—Support for SDRAM configurations including programmable column address
—Programmable refresh interval
8.Interrupt Controller (INTC)
—FIQ or IRQ mode operation selectable
—Programmable Interrupt Enable/Disable
|
Service Manual |
3 |
-11 |
|
|
Samsung Electronics |
|||

System Overview
9.USB interface
—Version 1.1
—Four 128×8 FIFOs for Data transmission.
—Interrupt based input / output interface, no DMA based interface support
—USB wrapper for AHB interface
—AHB Bus interface
10.Serial port interface (UART)
—Programmable Baud Rate
—2 channel Independent Full Duplex UART
—Polling, Interrupt based operation support
—Max 16 byte FIFO to handle SIR Bit Rate Speed
11.Printer video controller for LBP engines (PVC)
—20MHz video rate (Hummingbird 2 : letter — 21 ppm, A4 : 20ppm)
—video data transmitted through LSU Controller
12.Laser Scan Unit (LSU) Controller
—Laser Scan Unit (LSU) Interface for Laser Diode turn on/off timing control
—Sample & hold period generation.
—Auto Power Control for Laser Diode with PID control method using internal 10 bits DAC.
—LSU clock generation
—Brushless DC motor control clock generation
13.ADC Interface
—4 channels ADC interface for analog devices such as temperature sensor.
—Programmable ADC Clock Cycle.
—Automatic or Manual AD Conversion support.
—4 Special Function Registers for monitoring the ADC results for 4 channels.
14.PWM Controller
—4 PWM output ports — THV, BIAS, FAN control and AC ELECTRIFICATION
15.Bi-polar Stepper Motor controller (MOTORC)
—Phase generation for the purpose of paper feeding
—fixed hardware phase and current table
—programmable phase and interval time
—Interrupt based phase change operation
16.Timer
—3 Independent Programmable Timers
—Watch Dog Timer for S/W Trap
17.Miscellaneous
—Mux controlled 24 GPI, 28 GPO & 5 GPIO ports .
—Mutual exclusive GPO/GPIO ports control by the port control enable register
—Programmable Bus Master Priority.
—Project code added.
3-12 Service Manual
Samsung Electronics
System Overview
3.2.3.2 Jupiter4E Internal Block Diagram
TMS
TCK
TDI
TDO
nTRST
PPD[7:0]
nSTROBE,
nINIT,
nSLCTIN, nAUTOFD
PDE,
BUSY,
nACK,
SELECT,
PERROR, nFAULT
RXD1-0
TXD1-0
D+
D-
Dpullup
VBUS
GPIO4-0
GPO27-0
TEST
OM2-0
nRESET
XI
XO
CAP2-0
SCLK
EXTCLK
ARM CORE
( ARM940T
I / C 4 KB
D/ C 4 KB )
TIC
PVC
PPI
UART
USB CORE
( USB1.1 )
INTC
TCU
MISC
PLL
( pll 2096x, pll 2073x)
CLOCK & RESET
AHBC
( ARB, DEC, MUX)
A
H
B
A
H
B
A
PAPB
BBRI DGE
SCL
SDA
FLASH CORE
PROGRAM
( mfl130_128Kx32 )
ENEXHV
EXHV
DC2-0
|
nSRAS |
|||
|
nSCAS |
|||
|
SDRAMC |
nSCS |
||
|
( EXT |
: 2 CH) |
DQM1-0 |
|
|
BA1-0 |
|||
|
SCKE |
|||
|
ADDR/DATA |
ADDR18-0 |
||
|
DATA15-0 |
|||
|
BUS |
MUX |
||
|
nSWE/nWE |
|||
|
nIOCS1-0 |
|||
|
IOC |
( 3 CH) |
nIOCS2_WE |
|
|
nIOCS2_OE |
|||
|
/ ROMC (1 CH) |
nIOCS_ALL |
|
nROMCS |
|
|
nOE |
nLREADY nHSYNC VDO
LSUC LSUCLK ( dac1264x_1455) SHPERIOD
nLDON DACOUT BLDC_CLK
|
ADC INTERFACE |
ADCIN3-0 |
|
( adc1275x_pc) |
|
|
PWM |
PWM3-0 |
|
MOTORC |
MOTPAT5-0 |
|
Service Manual |
3 |
-13 |
|
|
Samsung Electronics |
|||

System Overview
3.2.3.3 Asic(SPGPv3)
 CPU Core : ARM1020E
— 32KB instruction cache and 32KB data cache
Operating Frequency
—CPU Core : over 300MHz
—System Bus : 100MHz
SDRAMC
—32Bits Only, 100MHz
—5 Banks (Up to 128MB per Bank)
 ROMC
ROMC
— 4 Banks (Up to 16MB per Bank)  IOC
IOC
— 6 Banks (Up to 16MB per Bank  DMAC
DMAC
— 4 Channels HPVC
—Dual/Single Beam
—LVDS Pad(VDO, HSYNC)
 UART
UART
— 5 Channels (1 Channels Supports DMA Operation)
PCI Controller
—32Bits, 33/66MHz
—PCI Local Bus Specification rev2.2 Complaint
—Host / Agent Mode (Support 4 Devices in Host Mode)
NAND Flash Controller
—8/16Bits, H/W EEC Generation
—Auto Boot Mode (Using Internal SRAM, 4KB)
MAC
—10M/100Mbps
—Full IEEE 802.3 Compatibility
Engine Controller
—LSU Interface Unit
—Step Motor : 2 Channels
—PWM : 8 Channels
—ADC : 6 Channels
 I2C Controller
— I2C(S-BUS) Slave Device Support(I2C Version 2.1)
 RTC
RTC
— RTC Core Voltage : 3V
 PLL
PLL
— 3 PLL : MAIN, PCI, PVC
3.2.3.4 Memory
Flash Memory : It stores System Program and downloads the System Program through PC Interface, and in case of model for export it compresses the PCL font, then stores it.
—Capacity : 8M Byte (Nor Flash)
—Random Access Time : 10 us (Max)
—Serial Page Access Time : 50ns (Min)
 DRAM : It is used as Swath Buffer, System Working Memory Area, etc. when printing.
It stores Font List, compressed into Flash memory, on DRAM and uses it as PCL font in case of model for export.
—Capacity : 32M Byte(STD/MAX)
—Type : SDRAM 100MHz/133MHz, 16bit
3-14 Service Manual
Samsung Electronics

System Overview
3.2.3.5 SPGPv3 Internal Block Diagram
|
Service Manual |
3 |
-15 |
|
|
Samsung Electronics |
|||

System Overview
3.2.3.6 Flash Memory
It stores the system program and downloads system program through the PC Interface.
 Capacity : 8M Byte (NOR Flash)
 Random Access Time : 10 us (Max)
  Serial Page Access Time : 50ns (Min)
3.2.3.7 SDRAM
It is used as swath buffer, system working memory area, etc. while Printing.
 Capacity : The 32M Byte is for this model (32M :Printing System Working Memory Area )
3-16 Service Manual
Samsung Electronics
![]()
System Overview
3.2.4 Sensor Controller
3.2.4.1Paper Feeding/Width
When a paper passes an actuator of a feed sensor unit after feeding a paper into a set,it detects a signal of the photo interrupter and informs the paper feeding status to CPU. After sensing the signal and certain time later, it strews an image data.(Related in Paper Front Edge Adjustment)
If it could not detect the feed sensor within 1 second after feeding a paper, a paper jam0 (CPU#_) occurs. ML-1610 differs from other general printers because it doesn’t have a paper empty sensor. It recognizes the paper existing status by using a firmware. If a paper is not fed, it recognizes the state as no paper (Red and Yellow lights turn on among other LEDs). With the same principle, it senses the OPC unit. After OPC unit is mounted,the actuator operates. When it passes the actuator of sensor unit, it detects the signal of the photo interrupter, informs the existing OPC unit to CPU, and then stays at the status.
3.2.4.2Paper Empty Sensing
The paper empty is detected by the empty sensor mounted to an engine board and the actuator mounted to a frame. Paper senses the on/off time of the empty sensor by using CPU and informs the normal operation status and the jam occurrence status to CPU.
3.2.4.3Jam Cover/Cover Open Sensing
ML-1610 uses two M/S:one senses the cover open and the other senses the jam cover open.
The cover open sensor is located on the left bottom of HVPS.When the front cover is open, +24V supplied to each unit (DC fan,Solenoid,Main Motor,Polygon Motor Unit of LSU in Fusing Unit,and HVPS)is interrupted.
The jam cover open sensor is located on the left bottom of SMPS. When the jam cover is open, +24V supplied to each unit (DC fan, Solenoid, Main Motor, Polygon Motor Unit of LSU in Fusing Unit, and HVPS) is interrupted.
D0 bit of CPU detects the jam cover open/cover open, and D7 bit of CPU detects the existence of OPC. In this case, it informs the status to user by turning on the red LED among OP panel LEDs.
3.2.4.4Solenoid Driving Circuit
The solenoid consists of two used for paper pick-up and MP signal. D4 bit of CPU turns it on/off, and its driving time is 300ms. The diode protects the drive TR from the pulse (noise)generated by de-energizing operation of solenoid.
|
Service Manual |
3 |
-17 |
|
|
Samsung Electronics |
|||

System Overview
3.2.5 SMPS board (Switching Module Power Supply)
The SMPS supplies DC Power to the System.
It takes 110V/220V and outputs the +5V, +24V to supply the power to the main board and other board. It is consisted of the AMPS part, which supplies the DC power for driving the system, and the AC heater control part, which supplies the power to fuser. SMPS has two output channels. Which are 5V and +24V
Pin Signal
|
<CON2> |
Pin No |
Pin Name |
|
1 |
+24VS2 |
|
|
2 |
+24V |
|
|
3 |
+24VS1 |
|
|
4 |
+24VS1 |
|
|
5 |
+5V |
|
|
6 |
DGND |
|
|
7 |
DGND |
|
|
8 |
P_REGI |
|
|
9 |
FUSER ON |
|
3-18 Service Manual
Samsung Electronics

System Overview
1)SMPS Specification
—AC Input
 Input Rated Voltage : AC 220V ~ 240V AC 120V / AC 220V(EXP version)
 Input Voltage fluctuating range : AC 90V ~ 135V / AC 180V ~ 270V(EXP version)
 Rated Frequency : 50/60 Hz
 Frequency Fluctuating range : 47 ~ 63 Hz
 Input Current : Under 4.0Arms / 2.5Arms
(But, the status when lamp is off or rated voltage is inputted/outputted )
— Rated Output Power
|
No |
Items |
CH1 |
CH2 |
Remarks |
|
1 |
Channel |
+5V |
+24.0V |
|
|
2 |
Connector pin |
CON 3 |
CON 3 |
|
|
5V PIN : 11, 12 |
24V PIN : 2, 3, 4 |
|||
|
GND PIN : 8, 9 |
GND PIN : 6, 7 |
|||
|
3 |
Rated Output |
+5V 5% |
+24V 5% |
|
|
(4.75 ~ 5.25V) |
(20.4 ~ 27.6V) |
|||
|
4 |
Max. Output current |
0.8A |
2.5A |
|
|
5 |
Peak Loading current |
1.0A |
2.7A |
1ms |
|
6 |
RIPPLE NOISE Voltage |
100mVp-p or less |
500mVp-p or less |
|
|
7 |
Maximum output |
4W |
60W |
|
|
8 |
Peak output |
5W |
65W |
1ms |
9Protecttion for loading shorage and overflowing current
—Consumption Power
|
No |
Items |
CH1(+5V) |
CH2(+24V) |
System |
|
1 |
Stand-by |
1.0 A |
0.4 A |
AVG : 55 Wh |
|
2 |
PRINTING |
1.0 A |
2.5 A |
AVG : 350 Wh |
|
3 |
Sleep-Mode |
0.8 A |
0.4 A |
AVG : 10 Wh |
—Power Cord Length : 1830°  50mm
50mm
—Power Cord Switch : Use
—Feature
. Insulating Resistance : 100 or more (at DC 500V)
. Insulating revisiting pressure : Must be no problem within 1 min. (at 1000Vac,10mA)
. Leaking Current : under 3.5mA
. Running Current : under 40A PEAK (AT 25 , COLD START) under 50A PEAK (In other conditions)
. Rising Time : within 2Sec
. Falling Time : over 20ms
. Surge : Ring Wave 6KV-500A (Normal, Common)
|
Service Manual |
3 |
-19 |
|
|
Samsung Electronics |
|||

System Overview
|
— Environment Condition |
|
|
. Operating temperature range : 0 |
40 |
|
. Maintaining temperature range : -20 |
40 |
. Preserving Humidity Condition : 10% ~ 90% RH
. Operating atmospheric pressure range : 1atm
—EMI Requirement : CISPR ,FCC, CE, MIC,
—Safty Requrement : IEC950 UL1950, CSA950, C-UL,Semko, EK,CB,
CCC(CCIB),GOST, EPA, Power Save
3.2.6 HVPS board (High Voltage Power Supply)
The HVPS board creates the high voltage of THV/MHV/Supply/Dev and supplies it to the developer part for making best condition to display the image. The HVPS part takes the 24V and outputs the high voltage for THV/MHV/BIAS, and the outputted high voltage is supplied to the toner, OPC cartridge, and transfer roller.
1)Transfer High Voltage (THV+)
—Input Voltage : 24 V DC ° 15%
15%
—Out Voltage : Max. +1.3KV ° 15% (Cleaning,200
  )
)
—Out Voltage Trigger : 6.5 
—Input Voltage Variation :  5 % below(Variation 21.6V°≠ 26.4V) Load Variation :
  % below
—Out Voltage Rising Time : 100 ms Max
—Out Voltage Falling Time : 100 ms Max
—Transfer Variation Voltage on Environment Variation : +650 V(Duty 10%) ~ 5KV (Duty 90%)
—Control Method on environment : THV-PWM ACTIVE,transfer Active signal, of environment sensing voltage is input and get feed back current, and recalculate it to resistence .
—Control method on transfer output voltage : It is controlled by changing its duty of THVPWM Signal as follows. 10% Duty : +650V, 90% Duty : +5KV  5%
5%
2)Charge Voltage (MHV)
—Input Voltage : 24 V DC  15%
15%
—Out Voltage : -1.3KV ~  3.2%
3.2%
—Out Voltage Rising Time : 50 ms Max
—Out Voltage Falling Time : 50 ms Max
—Out Voltage Range : 30  ~ 1000
—Output Control Signal(MHV-PWM) : CPU is HV output when PWM is Low
3)Developing Voltage (DEV)
—IInput Voltage : 24 V DC  15%
15%
—Output Voltage: -350V  4.6%
4.6%
—Output Voltage Fluctuation range: PWM Control
—Input contrast of the output stability degree :  5 % or less
—Loading contrast :  5 % or less
—Output Voltage Rising Time : 50 ms Max
3-20 Service Manual
Samsung Electronics

System Overview
— Output Voltage Falling Time : 50 ms Max
— Output Loading range : 10Mߟ ~ 1000
—Output Control Signal (BIAS-PWM) : the CPU output is HV output when PWM is low.
4)Supply
—Output Voltage : -550 V  8.6%(ZENER using, DEV )
—Input contrast of the output stability degree : under  5 %
5 %
— Loading contrast :  5 % or less
—Output Voltage Rising Time : 50 ms Max
—Output Voltage Falling Time : 50 ms Max
—Output Loading range : 10  ~ 1000
—Output Control Signal (BIAS-PWM) : the CPU is HV output when PWM is low.
Input
|
Service Manual |
3 |
-21 |
|
|
Samsung Electronics |
|||

System Overview
3.2.7 FUSER AC POWER CONTROL
Fuser(HEAT LAMP) gets heat from AC power. The AV power controls the switch with the Triac, a semiconductor switch. The ‘ON/OFF control’ is operated when the gate of the Triac is turned on/off by Phototriac (insulting part). In other words, the AC control part is passive circuit, so it turns the heater on/off with taking signal from engine control part.
When the ‘HEATER ON’ signal is turned on at engine, the LED of PC1 (Photo Triac) takes the voltage and flashes. From the flashing light, the Triac part (light receiving part) takes the voltage, and the voltage is supplied to the gate of Triac and flows into the Triac. As a result, the AC current flows in the heat lamp, and heat is occurred.
On the other hand, when the signal is off, the PC1 is off, the voltage is cut off at the gate of Triac, the Triac becomes off, and then the heat lamp is turned off.
1)Triac (THY1) feature :16A, 600V SWITCHING
2)Phototriac Coupler (PC3)
. Turn On If Current : 16mA
. High Repetive Peak Off State Voltage : Min 600V
3-22 Service Manual
Samsung Electronics

System Overview
3.3 S/W Structure and Descriptions
The purpose of this document is to describe the design specification of the Engine Control F/W for the ML-1610.
3.3.1 Introduction
This Engine Control Firmware is a program that controls LBP Engine of the ML-1610.
This firmware is executed every 10msec as an interrupt routine of the main system. At stand-by state, this firmware monitors the enable print command from the main system. If the enable print command is detected, this firmware controls the Engine Mechanism according to the printing process and paper feeding state. And with the Sleep command or Wake-Up command, this firmware controls the Engine state.
3.3.2 Engine Control F/W Overview
Engine Control F/W is executed every 10msec by timer interrupt of main system. And it consists of 3 control modules.
— Engine Main Control, Interface Control and Sensing & Unit Control Module.
Major operations of the Engine Control F/W are following.
—Control the Pick-Up, Feeding and Discharging of Paper
—Control the LSU
—Control the HVPS for the Developer Process
—Control the Temperature of Fixing unit
Controlling selection to here is added.
— Second Cassette Feeder(SCF) : N/A
|
Service Manual |
3 |
-23 |
|
|
Samsung Electronics |
|||

System Overview
— Architecture of Engine Control F/W
Main F/W of the printer controller
Engine F/W
Interface Control Module
Engine Main Control Module
Sensing & Unit Control Module
Hardware Devices
& Mechanical Device
Power On
Initial
Device Units
Fixing Unit
LSU
HVPS
Fan Unit
Motors
Solenold &
Clutch
3-24 Service Manual
Samsung Electronics

System Overview
3.3.3F/W Architecture of Engine Control Firmware
—The Engine Control Module is executed every 10msec as interrupt job of main system. There are three control modules, i.e., Engine Main Control Module, Engine Interface Module and Sensing & Unit Control Module.
—Probably from usual state it will be able to rehabilitated a prior to entry error state in error condition it is to confirm. When the if rehabilitation is possible then after rehabilitating it goes back in usual state, else with an error condition it goes in error state. Currently the rehabilitation function of the low heat error , the over heat error and the LSU error is embodied.
—Low Heat Error
When the error occurrs, it does not indicate an error. It stores the present temperature and supplies the heat to the fixing unit during the scheduled time. If the temperature goes up after scheduled time, it goes back to a normal state. However, if not, it is formed that an error occurrs.
—Over Heat Error
When the error occurs, it informs an error first. It stores the present temperature as well and waits a scheduled time. If the temperature goes down after scheduled time, then it goes back to a normal state. However, if not, it is formed that an error occurrs.
—Lsu Error
When the error occurrs, it does not indicate an error. It accomplishes printing only again. If even time when it judges an error, it informs an error. Concretely speaking, if the LReady or Hsync error happens, the paper exits out beforehand. And then the engine mode is changed to recovery mode and the engine informs the main system of the engine mode. And the engine checks the LSU error in itself. If the error doesn’t happen, the printing job will be proceeding.
3.3.4Engine Interface Module Design
Engine Interface Module communicates with the main system in order to receive the command from main system and to transmit the present engine status for the requested status. There are two sub functions. One is a function to receive the command from the main system. The other is a function that informs the main system of the current engine status for the requested item.
3.3.5 Engine Sensing & Unit Control Module Design
Engine Sensing & Unit Control Module consists of 4 sub-functions. The first function is an ADC function that reads the ADC values of the temperature of the fixing unit. The second one is a fixing unit control function. This function regulates the temperature of the fixing unit within a fixed range to be set by the paper type and the number of pages to print out. The third one is a fan control function that controls the fan unit. And the last one sets the flag that describes the present status of each sensor.
|
Service Manual |
3 |
-25 |
|
|
Samsung Electronics |
|||
 Loading…