
Ответ мастера
Сергей, доброе утро.
BEKO RFNK290E23S — отдельно стоящий морозильник-шкаф с электронным управлением, с одним компрессором и Ноу Фрост. Этот индикатор (!) загорается при отказе питания, высокой температуре и предупреждениях об ошибке. Мигающая цифра указывает на неисправность. Ошибка 3 — Неисправность нагревателя: Тены не работают, неисправен датчик температуры. Причина ошибки: Не функционирует нагреватель или работает не в полную мощь, возможно, необходима замена или ремонт датчика холодильного аппарата.
Ответить
Холодильная техника «Беко» оснащена системой самодиагностики. Она позволяет пользователю быстро определить причину поломки. Как это работает? На дисплее холодильника Beko высвечивается код ошибки: изменяются данные показателя температур. Если вы заметили подобные значения на экране, нужно посмотреть расшифровку в инструкции либо в нашей таблице.
Неисправности холодильника Веко
При появлении значков на дисплее выполните перезагрузку техники — возможно, это системный сбой. Для этого:
- Отключите агрегат от сети.
- Подождите 10-15 минут.
- Повторите подключение.
Если ошибка снова показалась, тогда нужно приступать к диагностике и ремонту. Значение неисправностей смотрите в таблице ниже.
| Мигает показатель температур | Значение кода | Причины появления | Как устранить неполадку |
| +2 | Возникли проблемы с охлаждением. |
|
Ваши действия:
|
| +3 | Вышел из строя нагревательный элемент. | Почему это произошло:
|
Вы должны провести проверку элементов и заменить, если они неисправны. |
| +4 | Нет контакта с датчиком. | Причины:
|
Что нужно сделать:
|
| +5 | Замкнуло датчик. | Почему:
|
Ваши действия:
|
| +6 | Клавиша на панели управления приведена в действие. | Залипла или запала кнопка. Возможно, элемент износился, либо на панель попала жидкость. | Нужно разобрать панель и починить или сменить сломанную клавишу. |
| +7 | Возникли проблемы с компрессором. | Что могло послужить причиной:
|
Как исправить ситуацию:
|
| -12 | Не срабатывает переключатель. | Плохое соединение проводов между главным модулем и переключателем. |
Ваша задача: проверка проводки, подтяжка контактов. Замена подгоревших деталей. |
Могут быть и другие проблемы, при которых температура на дисплее колеблется.
- Дверца отделения часто открывается.
- Поврежден уплотнитель, что приводит к проникновению теплого воздуха в камеру. Нужно почистить его при засоре либо установить новый.
- Загружено много теплых продуктов. В результате температура в камере повышается, что приводит к срабатыванию датчика. Запустите режим «Суперохлаждения», если он предусмотрен в модели. Либо подождите 20-30 минут, пока климат нормализуется.
Некоторые неисправности холодильника «Беко» можно устранить самостоятельно. Но случаются такие поломки, которые требуют вмешательства опытного мастера и наличия специального оборудования. Если вы не уверены, что справитесь с проблемой, обратитесь в сервисный центр.

|
|
В нормальном рабочем состоянии на индикаторной панели все значки и цифры будут гореть постоянным светом, но в случае
ошибки начинает мигать индикатор 12 сигнализации вместе с кодом ошибки, который появляется вместо
текущей температуры холодильного отделения. Пиктограмма сигнализации автоматически выключится после устранения проблемы
или при запуске процедуры самотестирования.
Постоянного горящий индикатор ION говорит о наличии у вашей модели ионизатора. Это электронное устройство, очищающее
воздух от бактерий в холодильном отделении. Ионизатор работает с перерывами по специальному алгоритму. При открытии
двери отделения для свежих продуктов он выключается.
Далее предлагаем вашему вниманию код ошибок холодильников BEKO (Беко) и рекомендации по устранению их причин.
Коды ошибок E0-E9 свидетельствуют о поломке одного из узлов холодильника, для ремонта которой лучше обратиться в службу
ремонта.
| Код | Описание | Способ устранения |
|---|---|---|
| +2 |
Возникла проблема в системе охлаждения:
|
|
| +3 |
Не работает нагреватель (ТЭН) системы оттайки или работает не на полную мощность:
|
|
| +4 |
Нет сигнала от одного из датчиков:
|
|
| +5 |
Проблемы с датчиком NTC (скорее всего, короткое замыкание):
|
|
| +6 |
Одна из клавиш на панели управления находится в нажатом положении (запала, залипла):
|
|
| +7 |
Увы, что случилось с компрессором:
|
|
| -12 |
Переключатель на работает, скорее всего, из-за нарушения в его цепи:
|
|
| Системные коды ошибок при неисправностях узлов холодильника | ||
| E0 | Компрессор работает без остановки из-за неисправности датчика FRZ (датчик воздуха) | Обратиться в сервисный центр за профессиональной помощью. |
| E1 | Проблемы с датчиком испарителя (NTC) | |
| E3 | Неисправен датчик воздуха (NTC) | |
| E4 | Не работает ТЭН оттайки | |
| E5 | Плохо работает воздушная заслона холодильного отделения | |
| E6 | Нестабильно или вообще не работает вентилятор в моделях с системой No-Frost | |
| E7 | Проблемы с одним из внутренних датчиков | |
| E8 | Сломан внутренний соленоидный датчик | |
| E9 | Сломан внешний соленоидный датчик |
Предлагаем вашему вниманию расшифровку, причину и устранение ошибок BEKO.
Мы расскажем про холодильники BEKO всё
Профессиональный сервис
Для нашего удобства все современные холодильник включают в себя систему диагностики и снабжены многочисленными функциями, среди которых и сообщение прибора о неисправностях. Электронный модуль постоянно контролирует все критические ситуации и сообщает о них на дисплей в виде кода ошибки. Но надо не забывать, что код ошибки далеко не всегда совпадает с первопричиной проблемы: чтобы её установить, необходимо специальное диагностическое оборудование – если сразу не удалось разобраться в проблеме, звоните в сервис.

Рекомендация для всех холодильников
- Если панель индикации не светиться, то это не обязательно неисправность. Это может быть связанно напряжением в сети. Например не рабочая розетка и холодильника Beko не включается.
- Когда моргают или засветились одновременно лампочки, тогда нужно начать проверку с блока управления (модуля), а уже затем проверять всю остальную периферию стиральной машины.
- Бывает, что ошибка может появится только один раз и для сброса будет достаточно просто перегрузить машинку. Но если код не исчез, тогда придётся его устранить.
-
Мы работаем каждый день с 09:00 до 22:00 и поэтому вы всегда можете вызвать нашего мастеря для ремонта вашей техники.
Если вам нужен ремонт холодильника, и вы бы хотели ознакомиться с нашими ценами и узнать как мы работаем, тогда вам нужно перейти по этой ссылке “Ремонт холодильников в Самаре“.
+1 – Нарушена функция быстрого охлаждения.
Требуется выполнить диагностику и найти причину.

Причины:
- Проверка герметичности дверки,
- Замена термодатчика
- Диагностика и ремонт.
Как устранить:
- Заменить уплотнители.
- Приобрести и установить новый термодатчик.
+2 – Возникли проблемы в системе охлаждением.
Проблем в системе охлаждения (выход из строя компрессора, вентиляторов охлаждения, термодатчиков)

Причины:
- Поврежден контур, происходит утечка газа-фреона.
- Сломался компрессор. Не функционирует вентилятор в камере.
- Вышел из строя терморегулятор. Неплотно закрыта дверца.
Как устранить:
- Осмотр контура, выявление места повреждения.
- Ремонт и дозаправка системы хладагентом.
- Диагностика и замена мотора.
- Проверка контактов и мотора вентилятора.
- Замена неисправных деталей.
- Установка нового регулятора температур в отделении.
- Замена уплотнителя дверцы, подтяжка креплений.
- Проверка герметичности дверки, замена термодатчика, диагностика и ремонт.
+3 – Неисправность ТЭНа системы оттайки.
Тэн необходим для предотвращения нарастания льда на испарителе для избежание нарушения циркуляции воздуха в системе.

Причины:
- Диагностика системы оттайки, замена или ремонт поврежденного элемента.
- Нагреватели работают не в полную мощность, не работают совсем, произвести ремонт датчиков холодильника.
Как устранить:
- Заменить ТЭН.
- Восстановить контакты.
- Заменить проводку.
- Починить блок управления.
+4 – Отсутствие сигнала одного из датчиков.
Проверка и закрепление контактов, прозвонка проводки с заменой поврежденных участков, замена датчиков.

Причины:
- Отошли контакты датчика.
- Перегорела проводка.
- Неправильное подключение.
Как устранить:
- Восстановить контакты.
- Проверить шлейф и установить новые провода на место подгоревших.
- Проверить подключение.
- Проблема в модуле управления.
+5 – Неисправность датчика NTC.
Вышел из строя температурный датчик. Требуется

Причины:
- Проблема в контактах между датчиком и электронным блоком.
- Датчик неисправен.
Как устранить:
- Восстановить контакты.
- Заменить датчик NTC.
+6 – Одна из клавиш на панели управления нажата (запала, залипла).
Клавиша на панели управления приведена в действие.

Причины:
- Залипла кнопка или вышла из строя.
Как устранить:
- Разобрать модуль индикации (управления) и прочистить кнопку.
- Заменить кнопку.
- Заменить блок целиком.
+7 – Неисправность компрессора.
Вышел из строя мотор. Нужно заменить.

Причины:
- Произошел засор в системе. Хладагент не может нормально циркулировать.
- Поврежден контур.
- Газ вытекает наружу. Неисправен мотор-компрессор.
Как устранить:
- Профессиональная диагностика, ремонт или замена поврежденного элемента.
- Компрессор не работает, произошла утечка хладагента, закупорка системы циркуляции.
+8 – Нарушен режим экономии электроэнергии
Клавиша на панели управления приведена в действие.

Причины:
- Короткое замыкание.
- Проблема в контактах.
Как устранить:
- Проверка датчиков, их замена.
+9 – Проблемы в функции блокировки управления.
Требуется компьютерная диагностика и возможно потребуется ремонт модуля управления или замена целиком.

-12 – Ошибка в цепи переключателя.
Переключатель на работает, скорее всего, из-за нарушения в его цепи.

Причина:
- нарушена соединение между переключателем и модулем управления;
- плохой контакт на переключателе или в разъеме на плате управления, высокое напряжение в проводке.
Как устранить:
- Прозвон цепи с заменой поврежденных участков, подтягивание контактов.
- Обнаружен плохой контакт в переключателях, в местах соединения проводов с управляющей платой или переключателем, возможно из-за высокого сопротивления проводов.
Системные коды ошибок asko
Для всех ошибок ниже вам потребуется провести профессиональную диагностику и найти причину неполадки. Так же всегда можно вызвать мастера по ремонту холодильника Беко.
E0 – Компрессор работает без остановки из-за неисправности датчика FRZ (датчик воздуха).

Причины:
- Постоянная работа компрессора из-за неисправности датчика воздуха.
- Неисправность датчика воздуха, компрессор работает без остановки.
E1 – Проблемы с датчиком испарителя (NTC).
Требуется заменить датчик испарителя, для нормальной работы холодильника Beko.

E1, E3 – Проблемы с датчиком испарителя (NTC).
Требуется заменить датчик испарителя, для нормальной работы холодильника Beko.
E4 – Неисправен ТЭН оттайки.
Требуется заменить тэн оттайки, для нормальной работы холодильника Beko.

E5 – Ошибка воздушной заслонки.
Некорректная работа воздушной заслонки холодильного отделения. Требуется заменить.

E6 – Не работает вентилятор.
В моделях с системой No Frost некорректно или полностью не работает вентилятор

E7 – Неисправность одного из внутренних датчиков.
Некорректная работа воздушной заслонки холодильного отделения. Требуется заменить.

E8 – Поломка внутреннего соленоидного датчика.
Некорректная работа соленоидного датчика. Требуется заменить.

E9 – Поломка внешний соленоидного датчика.
Некорректная работа соленоидного датчика. Требуется заменить.

! – повышенная температура внутри камеры.
Загружен большой объём теплых продуктов, неплотно закрыта дверца или поврежден уплотнитель, случайный сбой модуля управления.


МастериЯ — советы мастеров по ремонту бытовой техники и авто
Узнайте советы мастеров. Задайте вопрос мастеру, поделитесь своим опытом и знаниями в ремонте
Последнее
Теги
Пользователи
Показать ответы (0)
-

andy
-

- Beko морозильная камера
- 24.09.2018

E0 — Отказ термистора морозильной камеры
E1 — Неисправность датчика оттаивания
E3 — Сбой термистора или отказ датчика
E4 — Сбой нагревателя оттаивания
E8 — Неисправность датчика ледогенератора или ледяного термистора
E9 — Неисправность ледогенератора
Другие неполадки с морозильной камерой Beko
• Морозильник не замерзает
• Морозильник не работает и щелкает
• Морозильник работает все время
• Из морозильной камеры протекает вода
• Заморожен дренаж морозильной камеры
• Катушки морозильника замороженны
• Не горит индикатор морозильной камеры
• Коды ошибок морозильной камеры Beko
• Видео советы мастеров по ремонту морозильной камеры Beko
- Ремонт морозильника Beko своими руками
- Неполадки морозильника Beko
- Морозильник Beko
- Коды ошибок морозильника Beko
- Запчасти морозильника Beko
- Beko
Комментарий
Никаких комментариев пока не создано.
Ответы (0)
-
Нравится
-
Наибольшее число голосов
-
Новые
-
Старые первыми
На это сообщение еще не было ни одного ответа.
Однако, Вы не можете отвечать на это сообщение.
Чтобы оставить ответ, необходимо зарегистрироваться
Вы должны быть зарегистрированы, чтобы иметь возможность оставить ответ. Водите, используя форму входа или зарегистрируйтесь, если вы впервые на сайте. Зарегистрируйтесь здесь »
Забыли пароль?
Powered by EasyDiscuss for Joomla!
7
Поиск и устранение неисправностей
Прежде чем обращаться в сервисный центр, ознакомьтесь с данным разделом. Это
поможет вам сэкономить ваше время и деньги. В этом списке описаны наиболее частые
жалобы, не относящиеся к браку производства или материалов. Некоторые упомянутые
ниже функции могут быть не применимы к вашей модели.
Морозильник не работает.
• Вилка недостаточно прочно зафиксирована в розетке. >>> Воткните ее так, чтобы она
полностью вошла в розетку.
• Перегорел предохранитель, соединяющийся с питающей продукт розеткой или основной
предохранитель. >>> Проверьте предохранители.
Образование конденсата на боковой стенке морозильной камеры (MULTI ZONE, COOL, CONTROL и
FLEXI ZONE).
• Дверца открывается слишком часто >>> Старайтесь не открывать дверцу устройства
слишком часто.
• Слишком влажно. >>> Не устанавливайте устройство в среде с высокой влажностью.
• Пищевые продукты, содержащие жидкости, хранятся в незакрытых упаковках. >>> Храните
содержащие жидкости продукты в закрытых упаковках.
• Дверца устройства оставлена открытой. >>> Не оставляйте дверцу устройства открытой
надолго.
• Термостат установлен на слишком низкую температуру. >>> Установите термостат на
надлежащую температуру.
Не работает компрессор.
• В случае внезапного отключения электропитания или вытаскивания, а затем
включения вилки обратно в розетку давление газа в морозильной системе устройства
разбалансируется, это вызывает включение теплового предохранителя компрессора.
Устройство перезапустится примерно через 6 минут. Если устройство не перезапустилось по
истечении этого времени, обратитесь в сервисную службу.
• Включена разморозка. >>> Это стандартная установка для полностью автоматического
размораживающего устройства. Разморозка проводится периодически.
• Вилка устройства не включена в розетку. >>> Убедитесь, что шнур электропитания
включен в розетку.
• Неверная установка температуры. >>> Выберите подходящие настройки температуры.
• Отключено электропитание. >>> Устройство заработает в стандартном режиме, как
только будет возобновлено электропитание.
Звук работающего морозильника в ходе работы становится громче.
• Рабочие характеристики устройства могут меняться в зависимости от изменений
температуры окружающей среды. Это нормально и не является поломкой.
Морозильник/Руководство по эксплуатации
43 / RU
Морозильник
Инструкция по эксплуатации
EN / RU
Document Number: 4579963121_B
RFNK290E23W
RFNK290E23S
RFNK290E23X
RFNK290T21W
RFNK290T21S
Freezer
User manual

3 / EN
Freezer/User Manual
Please read this manual before using the product!
Dear Customer,
We’d like you to make the best use of our product, which has been manufactured in
modern facilities with care and meticulous quality controls.
Thus, we advice you to read the entire user manual before you use the product. In
case the product changes hands, do not forget to hand the guide to its new owner
along with the product.
This guide will help you use the product quickly and safely.
• Please read the user guide carefully before installing and operating the product.
• Always observe the applicable safety instructions.
• Keep the user guide within easy reach for future use.
• Please read any other documents provided with the product.
Keep in mind that this user guide may apply to several product models. The guide
clearly indicates any variations of different models.
C
Important nformaton and useful tps.
A
Rsk of lfe and property.
B
Rsk of electrc shock.
The product’s packagng s made of recyclable materals, n
accordance wth the Natonal Envronment Legslaton.
4 / EN
Freezer/User Manual
1 Safety and environment
instructions 5
1.1 General safety ……………………………………………5
1.1.1 HC warning ……………………………………………. 6
1.2 Intended use ……………………………………………..7
1.3 Child safety ………………………………………………..7
1.4 Compliance with WEEE Directive and
Disposing of the Waste Product ………………….7
1.5 Compliance with RoHS Directive …………..7
1.6 Package information ………………………………..7
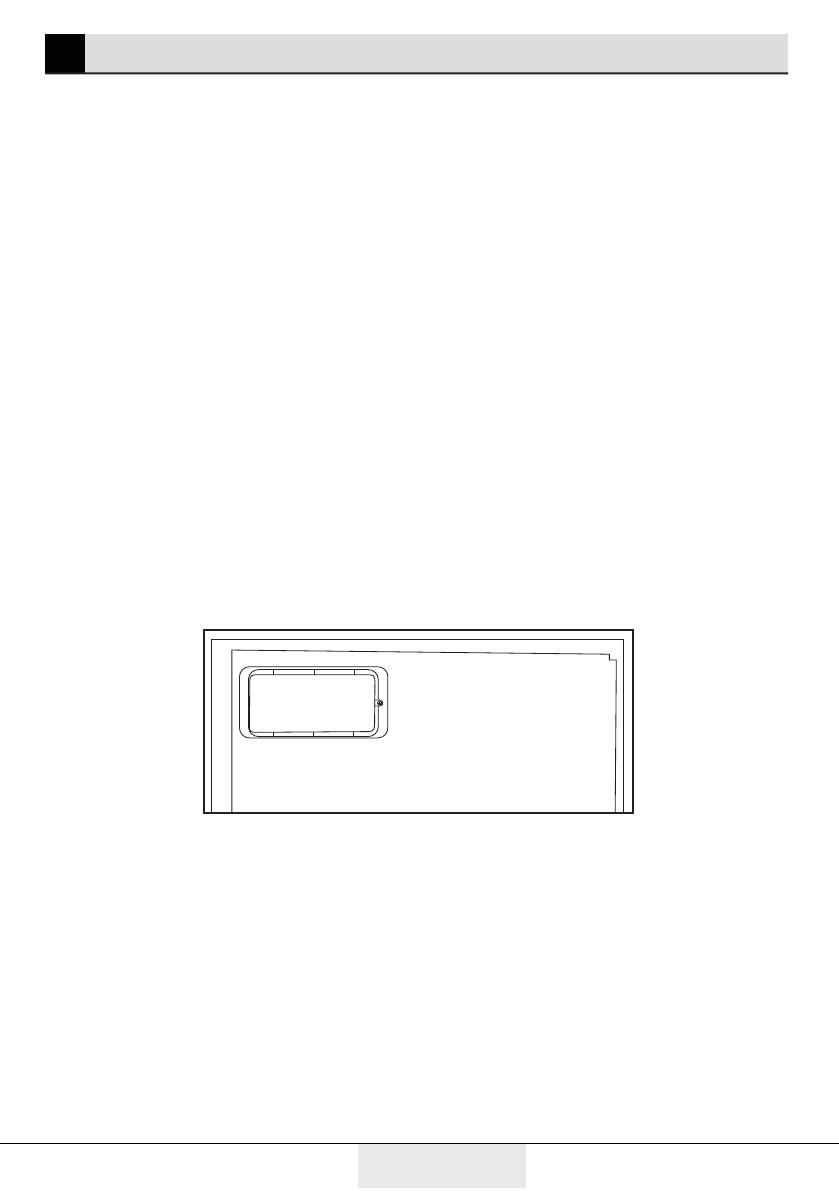
2 Your Freezer 8
3 Installation 9
3.1 Appropriate installation location …………. 9
3.2 Installing the plastic wedges ……………….. 9
3.3 Adjusting the feet………………………………….10
3.4 Electrical connection …………………………….10
4 Preparation 11
5 Operating the product 12
5.1 Freezing fresh food ………………………………. 15
5.2 Recommendations for preserving the
frozen food ……………………………………………………. 15
5.3 Deep-freeze information …………………….. 15
5.4 Placing the food …………………………………….16
5.5 Door open warning ……………………………….16
5.6 Changing the door opening direction . 16
5.7 Ice Pack …………………………………………………… 16
6 Maintenance and cleaning 17
6.1 Avoiding bad odours …………………………….. 17
6.2 Protecting the plastic surfaces …………. 17
7 Troubleshooting 18
8 Techncal specfcatons 22
1 Указания по технике
безопасности и защите
окружающей среды 26
1.1 Общие правила техники
безопасности …………………………….. 26
1.1.1 Предупреждение об опасности
для жизни …………………………………. 28
1.1.2 Для моделей с фонтанчиком
для питья ………………………………….. 28
1.2 Использование по назначению 28
1.3 Безопасность детей ……………… 29
1.4 Соответствие Директиве по
утилизации отходов электрического и
электронного оборудования (WEEE) и
утилизация морозильника ………….. 29
1.5 Соответствие Директиве ЕС по
ограничению использования вредных
веществ (RoHS) ………………………… 29
1.6 Информация об упаковке……… 29
2 Описание морозильник 30
3 Установка 31
3.1 Правила транспортировки
морозильника ……………………………. 31
3.2 Подготовка к эксплуатации …… 31
3.3 Утилизация упаковки ……………. 33
3.4 Утилизация старого
морозильника ……………………………. 33
3.5 Размещение и установка………. 33
4 Подготовка 34
5 Эксплуатация
морозильника 35
5.1 Панель индикаторов …………….. 35
5.2 Замораживание свежих
продуктов …………………………………. 38
5.3 Рекомендации для хранения
замороженных продуктов …………… 39
5.4 Детальное описание глубокой
заморозки …………………………………. 39
5.5 Размещение продуктов ………… 39
5.6 Сигнал открытой двери ……….. 39
5.7 Внутреннее освещение ………… 40
6 Обслуживание и очистка 41
6.1 Предотвращение неприятных
запахов ……………………………………. 41
6.2 Защита пластиковых
поверхностей ……………………………. 42
7 Поиск и устранение
неисправностей 43
8 Технические
характеристики 47
5 / EN
Freezer/User Manual
This section provides the safety instructions necessary to prevent the risk
of injury and material damage. Failure to observe these instructions will
invalidate all types of product warranty.
1.1. General safety
• This product should not be used by persons with physical, sensory and
mental disabilities, without sufficient knowledge and experience or by
children. The device can only be used by such persons under supervision
and instruction of a person responsible for their safety. Children should
not be allowed to play with this device.
• In case of malfunction, unplug the device.
• After unplugging, wait at least 5 minutes before plugging in again.
• Unplug the product when not in use.
• Do not touch the plug with wet hands! Do not pull the cable to plug off,
always hold the plug.
• Wipe the power plug’s tip with a dry cloth before plugging in.
• Do not plug in the refrigerator if the socket is loose.
• Unplug the product during installation, maintenance, cleaning and repair.
• If the product will not be used for a while, unplug the product and remove
any food inside.
• Do not use the product when the compartment with circuit cards located
on the upper back part of the product (electrical card box cover) (1) is
open.
1
• Do not use steam or steamed cleaning materials for cleaning the
refrigerator and melting the ice inside. Steam may contact the electrified
areas and cause short circuit or electric shock!
• Do not wash the product by spraying or pouring water on it! Danger of
electric shock!
• In case of malfunction, do not use the product, as it may cause electric
shock. Contact the authorized service before doing anything.
• Plug the product into an earthed socket. Earthing must be done by a
qualified electrician.
• If the product has LED type lighting, contact the authorized service for
replacing or in case of any problem.
• Do not touch frozen food with wet hands! It may adhere to your hands!
1 Safety and environment instructions
6 / EN
Freezer/User Manual
Safety and environment instructions
• Do not place liquids in bottles and cans into the freezer compartment.
They may burst out!
• Place liquids in upright position after tightly closing the lid.
• Do not spray flammable substances near the product, as it may burn or
explode.
• Do not keep flammable materials and products with flammable gas
(sprays, etc.) in the refrigerator.
• Do not place containers holding liquids on top of the product. Splashing
water on an electrified part may cause electric shock and risk of fire.
• Exposing the product to rain, snow, sunlight and wind will cause
electrical danger. When relocating the product, do not pull by holding
the door handle. The handle may come off.
• Take care to avoid trapping any part of your hands or body in any of the
moving parts inside the product.
• Do not step or lean on the door, drawers and similar parts of the
refrigerator. This will cause the product to fall down and cause damage
to the parts.
• Take care not to trap the power cable.
1.1.1 HC warning
If the product comprises a cooling system using R600a gas, take care to
avoid damaging the cooling system and its pipe while using and moving
the product. This gas is flammable. If the cooling system is damaged, keep
the product away from sources of fire and ventilate the room immediately.
C
The label on the inner left side indicates the type of gas used
in the product.
1.1.2 For models with water fountain
• In order for the water system inside the refrigerator to operate
properly, pressure in the water mains must be between 1-8 bars. A
pressure regulator must be used if the pressure in the water mains is
higher than 5 bars. If the pressure in the mains is higher than 8 bars,
the refrigerator must not be connected to the mains. If you are not sure
about how to measure the water pressure, ask for professional help.
7 / EN
Freezer/User Manual
Safety and environment instructions
• Use drinking water only.
1.2. Intended use
• This product is designed for home use. It is not intended for commercial
use.
• The product should be used to store food and beverages only.
• Do not keep sensitive products requiring controlled temperatures
(vaccines, heat sensitive medication, medical supplies, etc.) in the
refrigerator.
• The manufacturer assumes no responsibility for any damage due to
misuse or mishandling.
1.3. Child safety
• Keep packaging materials out of children’s reach.
• Do not allow the children to play with the product.
• If the product’s door comprises a lock, keep the key out of children’s
reach.
1.4. Compliance with WEEE Directive and
Disposing of the Waste Product
This product complies with EU WEEE Directive (2012/19/EU). This
product bears a classification symbol for waste electrical and electronic
equipment (WEEE).
This product has been manufactured with high quality parts
and materials which can be reused and are suitable for
recycling. Do not dispose of the waste product with normal
domestic and other wastes at the end of its service life. Take
it to the collection center for the recycling of electrical and
electronic equipment. Please consult your local authorities to
learn about these collection centers.
1.5. Compliance with RoHS Directive
• This product complies with EU WEEE Directive (2011/65/EU). It does
not contain harmful and prohibited materials specified in the Directive.
1.6. Package information
• Packaging materials of the product are manufactured from recyclable
materials in accordance with our National Environment Regulations.
Do not dispose of the packaging materials together with the domestic
or other wastes. Take them to the packaging material collection points
designated by the local authorities.
8 / EN
Freezer/User Manual
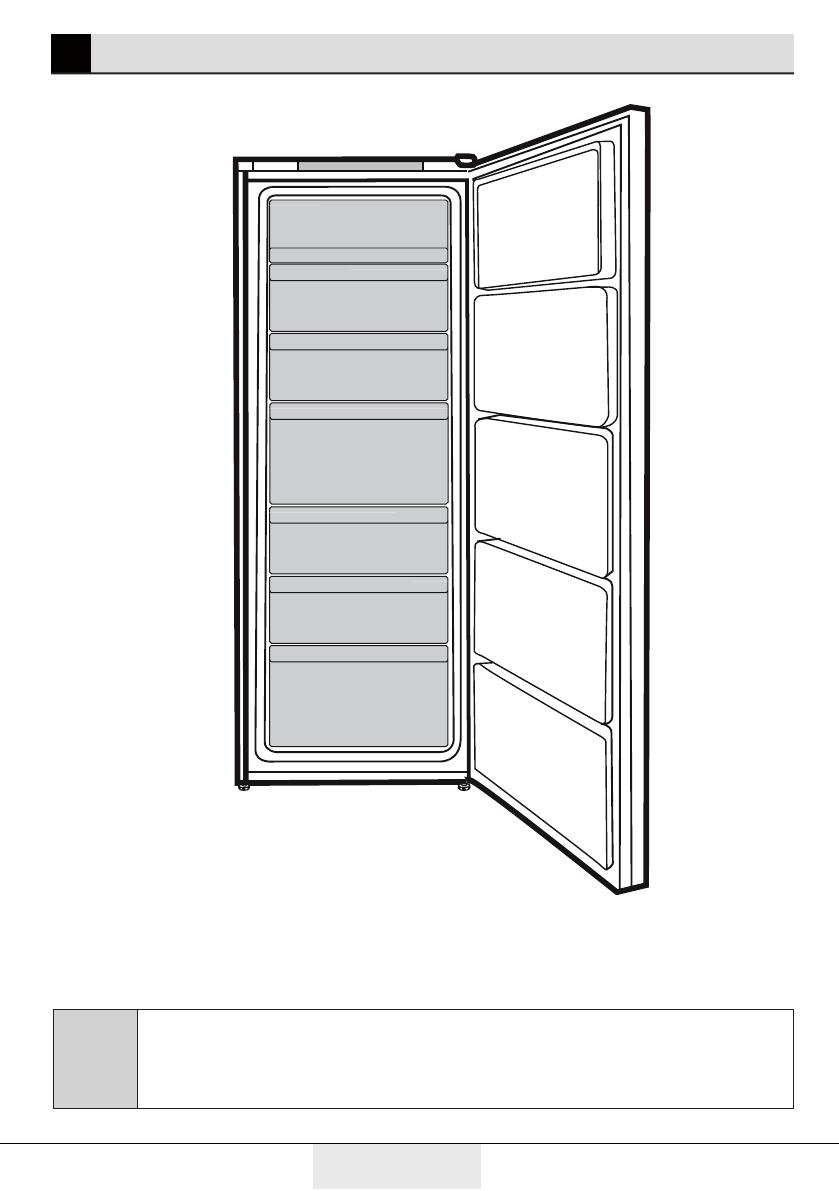
2 Your Freezer
1. Control Panel
2. Flap
3. Drawers
4. Adjustable front feet
C
Figures that take place in this instruction manual are schematic and
may not correspond exactly with your product. If the subject parts are
not included in the product you have purchased, then it is valid for other
models.
*1
2
3
44
*
*1
9 / EN
Freezer/User Manual
3 Installation
3.1. Appropriate
installation location
Contact an Authorized Service
for the installation of the product.
In order to prepare the product
for use, refer the information in
the user manual and ensure that
electrical installation and water
installation are appropriate. If
not, call a qualified electrician and
technician to have any necessary
arrangements carried out.
B
WARNING: Manufacturer
shall not be held liable for
damages that may arise from
procedures carried out by
unauthorized persons.
B
WARNING: Product must
not be plugged in during
installation. Otherwise, there
is the risk of death or serious
injury!
A
WARNING:
If the door clearance of the
room where the product shall
be place is so tight to prevent
passing of the product,
remove the door of the
room and pass the product
through the door by turning
it to its side; if this does not
work, contact the authorized
service.
• Place the product on an even
floor surface to prevent jolts.
• Install the product at least 30 cm
away from heat sources such as
hobs, heater cores and stoves
and at least 5 cm away from
electrical ovens.
• Product must not be subjected
to direct sun light and kept in
humid places.
• Appropriate air ventilation must
be provided around your product
in order to achieve an efficient
operation. If the product is to
be placed in a recess in the wall,
pay attention to leave at least 5
cm distance with the ceiling and
side walls.
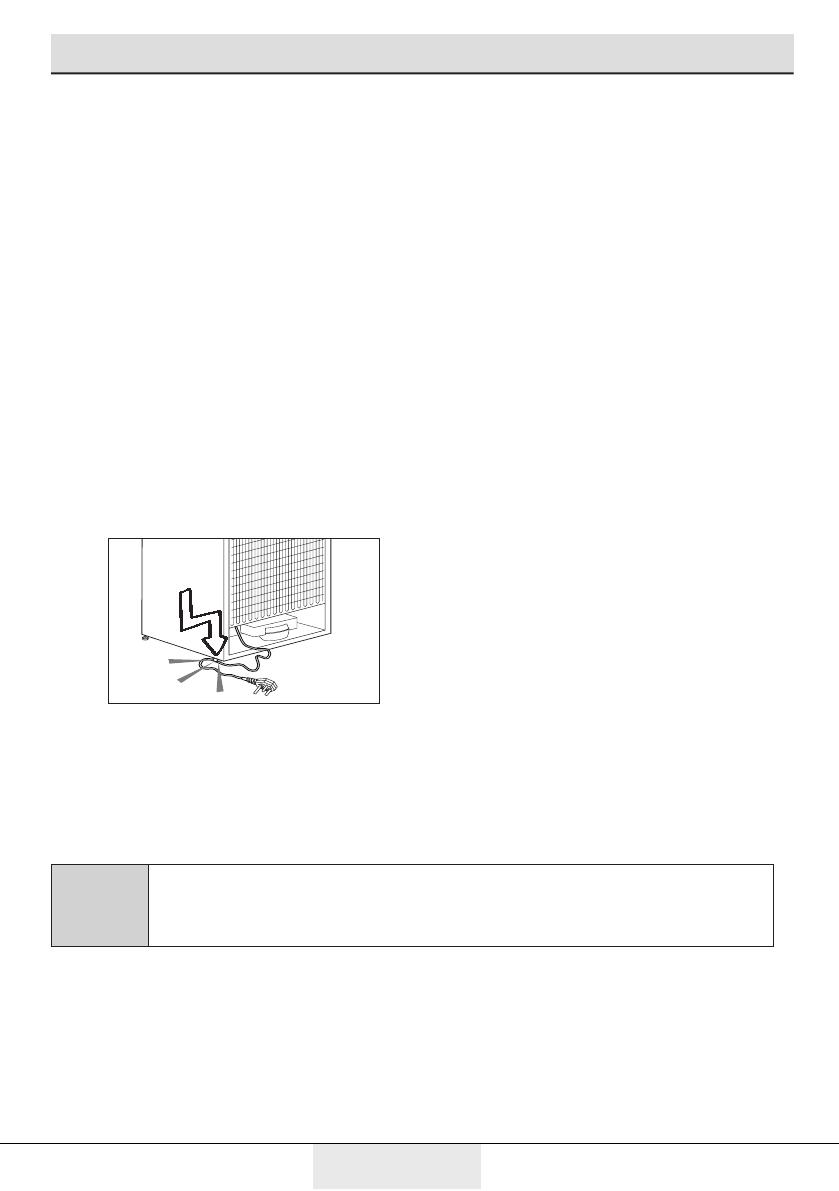
3.2. Installing the
plastic wedges
Plastic wedges supplied with the
product are used to create the
distance for the air circulation
between the product and the rear
wall.
1. To install the wedges, remove the
screws on the product and use the
screws supplied together with the
wedges.
2. Insert the 2 plastic wedges onto
the rear ventilation cover as
illustrated in the figure.
10 / EN
Freezer/User Manual
Installation
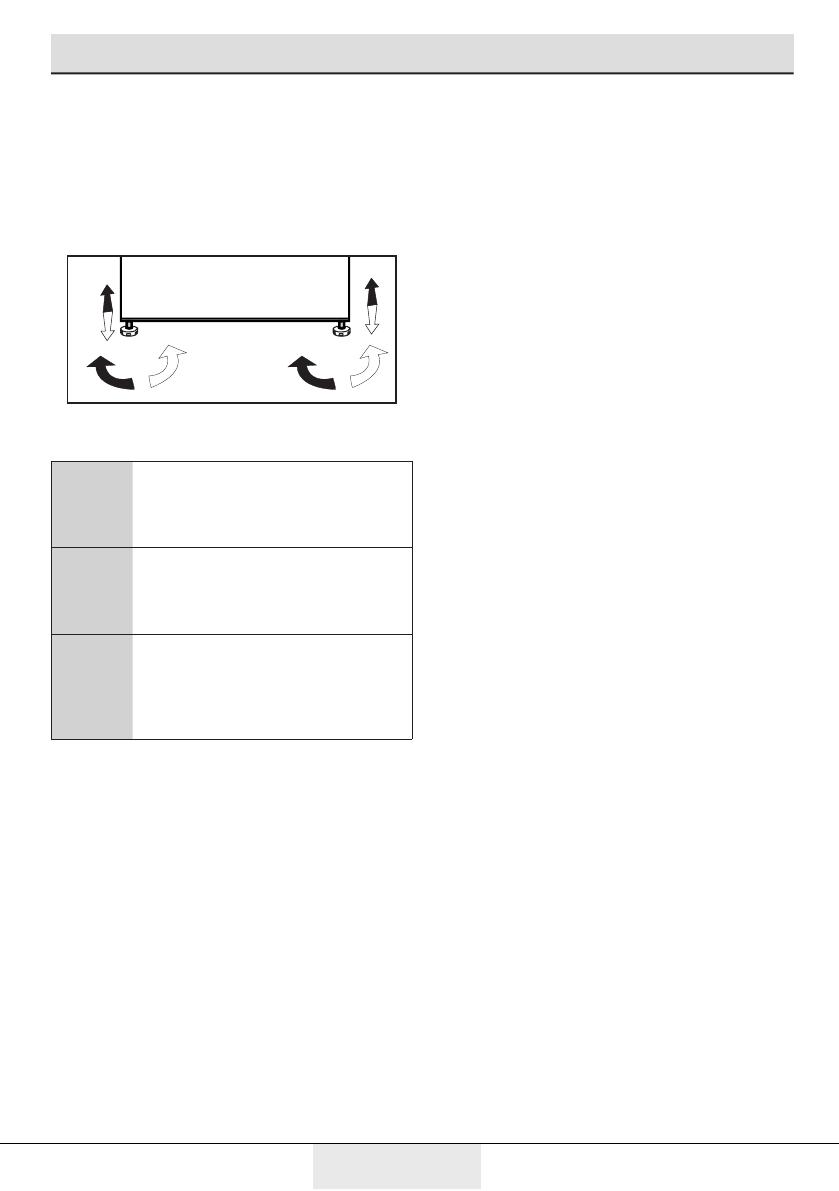
3.3. Adjusting the feet
If the product stands unbalanced
after installation, adjust the feet on
the front by rotating them to the
right or left.
3.4. Electrical connection
A
WARNING: Do not make
connections via extension
cables or multi-plugs.
B
WARNING: Damaged power
cable must be replaced by the
Authorized Service Agent.
C
If two coolers are to be
installed side by side, there
should be at least 4 cm
distance between them.
• Our company shall not be liable
for any damages that will arise
when the product is used
without grounding and electrical
connection in accordance with
the national regulations.
• Power cable plug must be within
easy reach after installation.
• Connect your refrigerator to
a grounded outlet rated for a
voltage value of 220-240V /50
Hz. Outlet shall have 10 to 16A
fuse.
• Do not extension cords or
cordless multiple outlets
between your product and the
wall outlet.
11 / EN
Freezer/User Manual
4 Preparation
• Your refrigerator should be
installed at least 30 cm away from
heat sources such as hobs, ovens,
central heater and stoves and at
least 5 cm away from electrical
ovens and should not be located
under direct sunlight.
• The ambient temperature of
the room where you install your
refrigerator should at least be
-15°C. Operating your refrigerator
under cooler conditions is not
recommended with regard to its
efficiency.
• Please make sure that the interior
of your refrigerator is cleaned
thoroughly.
• If two refrigerators are to be
installed side by side, there should
be at least 2 cm distance between
them.
• When you operate your
refrigerator for the first time,
please observe the following
instructions during the initial six
hours.
• The door should not be opened
frequently.
• It must be operated empty without
any food in it.
• Do not unplug your refrigerator. If
a power failure occurs out of your
control, please see the warnings in
the “Recommended solutions for
the problems” section.
• Original packaging and foam
materials should be kept for future
transportations or moving.
• The baskets/drawers that
are provided with the chill
compartment must always be in
use for low energy consumption
and for better storage conditions.
• Food contact with the
temperature sensor in the freezer
compartment may increase energy
consumption of the appliance.
Thus any contact with the
sensor(s) must be avoided.
• In some models, the instrument
panel automatically turns off 5
minutes after the door has closed.
It will be reactivated when the
door has opened or pressed on any
key.
• Due to temperature change as
a result of opening/closing the
product door during operation,
condensation on the door/body
shelves and the glass containers is
normal
12 / EN
Freezer/User Manual
C
Figures in this user manual are schematic and may not match the
product exactly. If the subject parts are not included in the product you
have purchased, then those parts are valid for other models.
5 Operating the product
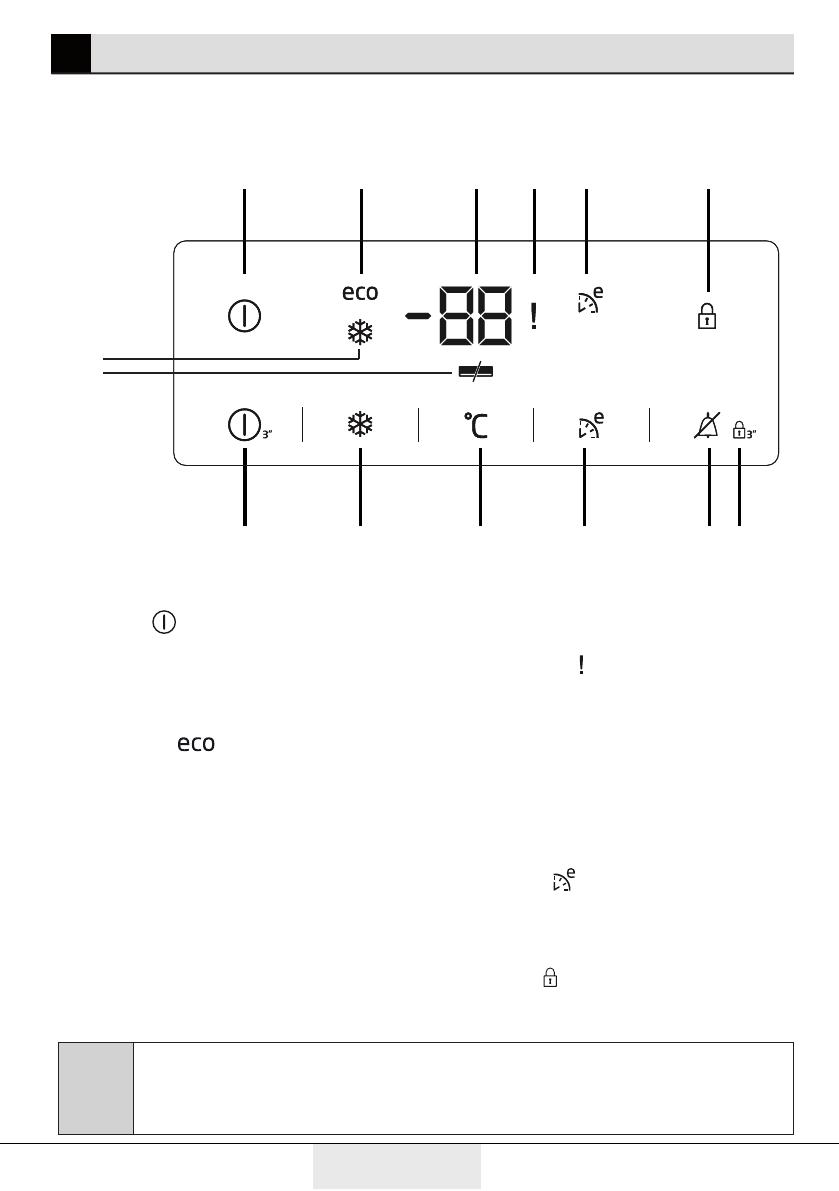
Indicator panel
Select ndcaton panel, whch match wth your freezer.
1
7812 1011 9
14
2 3
54 6
13
1.On/O Indicator:
This icon ( ) come on when the
freezer is turned off. All the other
icons turn off.
2.Economic Usage Indicator:
This icon ( ) (comes on when
the Freezer Compartment is set to
-18°C which is the most economical
set value. Economic Usage Indicator
turns off when the Quick Fridge or
Quick Freeze function is selected.
3.Freezer Compartment
Temperature Setting
Indicator:
Indicates the temperature set for
the Freezer Compartment.
4.Power failure/High
temperature / error warning
indicator :
This light () illuminates during
power failure, high temperature
failures and error warnings. During
sustained power failures, the
highest temperature that the
freezer compartment reaches will
flash on the digital display.
5.Eco Extra Indicator:
This icon ( ) lights up when this
Function is active.
6.Key Lock Indicator:
This icon ( ) lights up when the Key
Lock mode is activated.
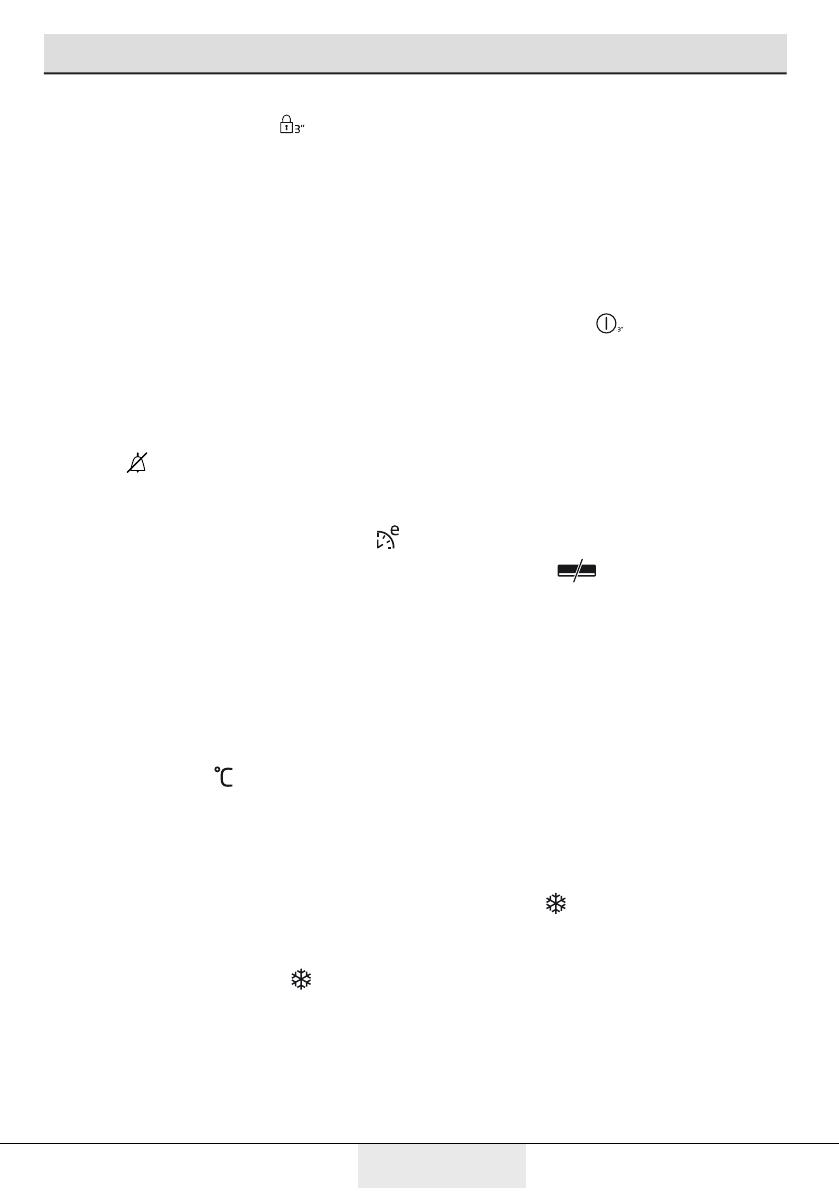
13 / EN
Freezer/User Manual
Operating the product
7.Key Lock Mode:
Press Key Lock ( ) button
continuously for 3 seconds. Key
lock icon will light up and key lock
mode will be activated. Buttons will
not function if the Key Lock mode
is active. Press Key Lock button
continuously for 3 seconds again.
Key lock icon will turn off and the
key lock mode will be exite.
8- Alarm off warning:
In case of power failure/high
temperature alarm, after checking
the food located in the freezer
compartment press the alarm off
button ( ) to clear the warning.
9.Eco Extra Function:
Press the Eco Extra button ( )
for 3 seconds to activate Eco Extra
Function when going on holday
for instance. Freezer will start
operating in the most economic
mode at around 6 hours later and
the economic usage indicator will
turn on when the function is active.
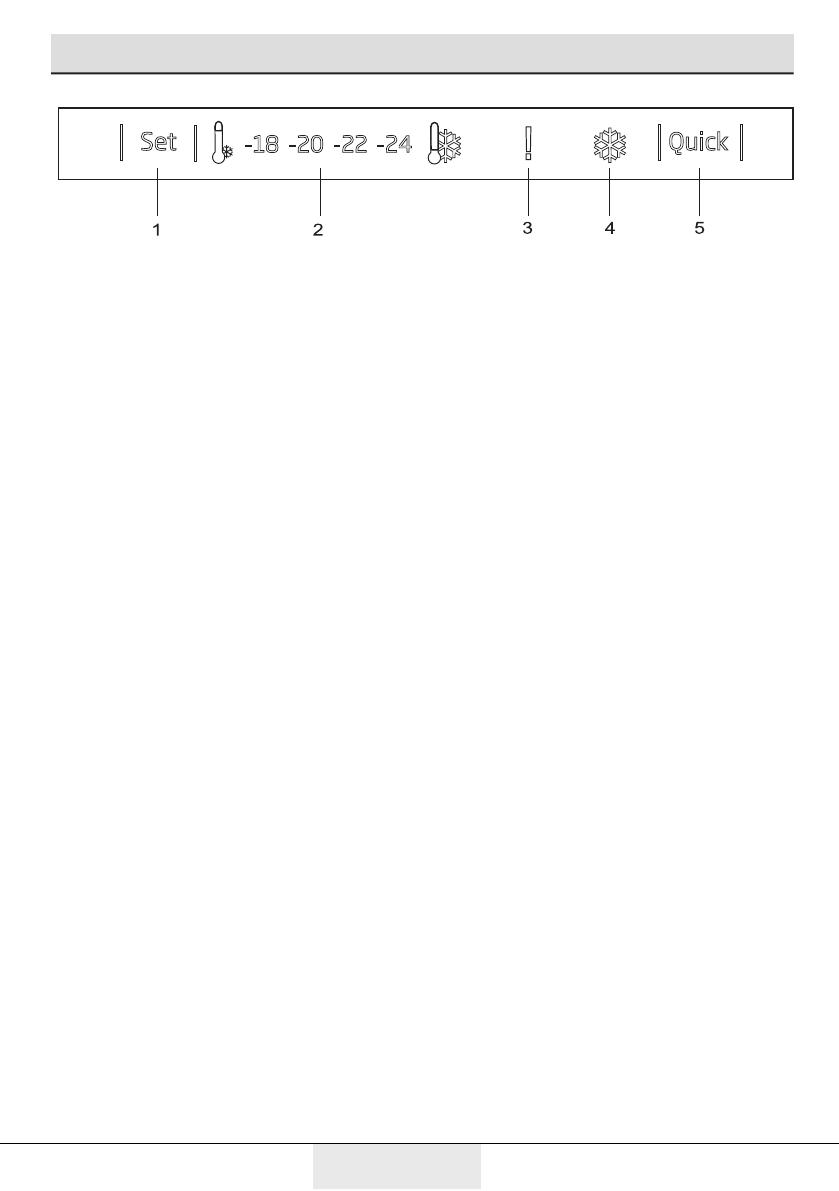
10.Freezer Set Function:
This function ( ) allows you to
change the Freezer compartment
temperature setting. Press this
button to set the temperature of
the freezer compartment to -18,
-19, -20, -21, -22, -23 and -24,
respectively.
11.Quick Freeze Function:
Quick Freeze indicator ( ) turns on
when the Quick Freeze function is
on. Press Quick Freeze button again
to cancel this function. Quick Freeze
indicator will turn off and normal
settings will be resumed.
Quick Freeze function will be
cancelled automatically 3-4 hours
later if you do not cancel it manually.
If you want to freeze plenty amount
food, press Quick Freeze button
before you place the food into the
freezer compartment.
12.On/Off Function:
This function ( ) allows you to
make the Fridge turn off when
pressed for 3 seconds.The fridge
could be turned on by pressing On/
Off button for 3 seconds again .
13.Energy Saving Indicator :
If the product doors are kept
closed for a long time energy saving
function is automatically activated
and energy saving symbol is
illuminated. ( )
When energy saving function is
activated, all symbols on the display
other than energy saving symbol will
turn off. When the Energy Saving
function is activated, if any button
is pressed or the door is opened,
energy saving function will be
canceled and the symbols on display
will return to normal.
Energy saving function is activated
during delivery from factory and
cannot be canceled.
14.Quick Freeze Indicator :
This icon ( ) comes on when the
Quick Freeze function is on.
14 / EN
Freezer/User Manual
Operating the product
1. Temperature control
button:
By using this button you can change
temperature settings inside freezer.
You can set up -18, -20, -22 or -24°C
temperature by pressing this button
repeatedly.
2. Temperature settng
ndcator:
It shows the temperature settngs
nsde freezer.
3. Hgh temperature
ndcator/warnng:
Lghts when temperature nsde
freezer becomes hgh or shows an
error.
4. Fast freezng ndcator:
Lights when fast freezing function
is switch on.
5. Fast freezng button:
Fast freezing indicator is lights,
when fast freezing function is
active. For cancelling Fast freezing
function press this button again.
Indicator will turn off and previous
functions will restored.
Fast freezing function will be
turned off after 4 hours if you don’t
turn off it manually. For freezing
large amount of food, press Fast
freezing button before putting food
into the freezer.
15 / EN
Freezer/User Manual
Operating the product
5.1. Freezing fresh food
• In order to preserve the quality
of the food, it shall be frozen
as quickly as possible when
it is placed in the freezer
compartment, use the fast
freezing feature for this purpose.
• You may store the food longer in
freezer compartment when you
freeze them while they are fresh.
• Pack the food to be frozen and
close the packing so that it would
not allow entrance of air.
• Ensure that you pack your food
before putting them in the
freezer. Use freezer containers,
foils and moisture-proof papers,
plastic bags and other packing
materials instead of traditional
packing papers.
Freezer
Compartment
Settng
Remarks
-18°C This is the normal recommended setting.
-20,-22 or -24°C
These settings are recommended when the ambient
temperature exceeds 30°C.
Quick Freeze
Use when you wish to freeze your food in a short time. Your
product will return to its previous mode when the process is
over.
-18°C or colder
Use these settings if you think that your fridge
compartment is not cold enough because of the hot ambient
conditions or frequent opening and closing of the door.
5.2. Recommendations for
preserving the frozen food
Compartment shall be set to -18°C at
least.
1. Put packages in the freezer as
quickly as possible after purchase
without allowing the to thaw.
2. Check whether the «Use By»
and «Best Before» dates on the
packaging are expired or not before
• Label each pack of food by adding
the date before freezing. You
may distinguish the freshness of
each food pack in this way when
you open your freezer each time.
Store the food frozen before in
the front side of compartment to
ensure that they are used first.
C
The freezer compartment
defrosts automatically.
• Frozen food must be used
immediately after they are
thawed and they should not be
re-frozen.
• Do not freeze too large
quantities of food at one time.
freezing it.
3. Ensure that the package of
the food is not damaged.
5.3. Deep-freeze
information
According to IEC 62552 standards,
the product shall freeze at least
4.5 kg of food at 32°C ambient
temperature to -18°C or lower
16 / EN
Freezer/User Manual
Operating the product
within 24 hours for every 100-litres
of freezer volume.
It is possible to preserve the food
for a long time only at -18°C or
lower temperatures.
You can keep the freshness of food
for many months (at -18°C or lower
temperatures in the deep freeze).
Foods to be frozen should not be
allowed to come in contact with the
previously frozen items to prevent
them from getting thawed partially.
Boil the vegetables and drain their
water in order to store vegetables
for a longer time as frozen. After
draining their water, put them
in air-proof packages and place
them inside the freezer. Food such
as bananas, tomatoes, lettuce,
celery, boiled eggs, potatoes are
not suitable for freezing. When
these foods are frozen, only their
nutritional value and taste shall
be affected negatively. They shall
not be spoiled so that they would
create a risk for human health.
5.4. Placing the food
Freezer
compartment
shelves
Various frozen
food such as meat,
fish, ice cream,
vegetables and etc.
Freezer
compartment
shelves
Food in pans,
covered plates and
closed containers,
eggs (in closed
container)
5.5. Door open warning
(This feature is optional)
An audio warning signal will be
given when the door of your product
is left open for at least 1 minute. This
warning will be muted when the
door is closed or any of the display
buttons (if any) are pressed.
Door open warning is given to user
both visually and acoustically. If the
warning continues for 10 minutes,
interior lights will be turned off.
5.6. Changing the door
opening direction
Door opening direction of your ref—
rigerator can be changed according
to the place you are using it.If this is
necessary, please call your nearest
Authorized Service.
Above description is a general exp—
ression.For information on changing
the opening direction of the door,
you must refer to the warning label
located on the inner side of the door.
5.7. Ice Pack
Ice subsitute pack decelerates
thawing of stored frozen food in
case of blackout or malfunction.
Placing the pack directly on top of
the food will enable the longest
storing period.
Ice substitute pack can also be
used to keep food temporarily cold,
e.g. in a cooler bag.
17 / EN
Freezer/User Manual
6 Maintenance and cleaning
Cleaning your fridge at regular
intervals will extend the service life
of the product.
B
WARNING: Unplug the product
before cleaning it.
• Never use gasoline, benzene or
similar substances for cleaning
purposes.
• Never use any sharp and abrasive
tools, soap, household cleaners,
detergent and wax polish for
cleaning.
• Dissolve one teaspoon of bi-
carbonate in half litre of water.
Soak a cloth with the solution
and wrung it thoroughly. Wipe
the interior of the refrigerator
with this cloth and the dry
thoroughly.
• Make sure that no water enters
the lamp housing and other
electrical items.
• If you will not use the
refrigerator for a long period of
time, unplug it, remove all food
inside, clean it and leave the door
ajar.
• Check regularly that the door
gaskets are clean. If not, clean
them.
• To remove door and body
shelves, remove all of its
contents.
• Remove the door shelves by
pulling them up. After cleaning,
slide them from top to bottom to
install.
• Never use cleaning agents or
water that contain chlorine
to clean the outer surfaces
and chromium coated parts of
the product. Chlorine causes
corrosion on such metal surfaces.
6.1. Avoiding bad odours
Materials that may cause odour
are not used in the production of
our refrigerators. However, due
to inappropriate food preserving
conditions and not cleaning the
inner surface of the refrigerator
as required can bring forth the
problem of odour. Pay attention to
following to avoid this problem:
• Keeping the refrigerator clean is
important. Food residuals, stains,
etc. can cause odour. Therefore,
clean the refrigerator with bi-
carbonate dissolved in water
every few months. Never use
detergents or soap.
• Keep the food in closed
containers. Microorganisms
spreading out from uncovered
containers can cause unpleasant
odours.
• Never keep the food that have
passed best before dates and
spoiled in the refrigerator.
6.2. Protecting the
plastic surfaces
Do not put liquid oils or oil-cooked
meals in your refrigerator in
unsealed containers as they
damage the plastic surfaces of
the refrigerator. If oil is spilled or
smeared onto the plastic surfaces,
clean and rinse the relevant part
of the surface at once with warm
water.
18 / EN
Freezer/User Manual
7 Troubleshooting
Check this list before contacting the service. Doing so will save you time and money.
This list includes frequent complaints that are not related to faulty workmanship or
materials. Certain features mentioned herein may not apply to your product.
The freezer is not working.
• The power plug s not fully settled. >>> Plug t n to settle completely nto the
socket.
• The fuse connected to the socket powerng the product or the man fuse s
blown. >>> Check the fuses.
Condensation on the side wall of the cooler compartment (MULTI ZONE,
COOL, CONTROL and FLEXI ZONE).
• The door s opened too frequently >>> Take care not to open the product’s
door too frequently.
• The envronment s too humd. >>> Do not nstall the product n humd
envronments.
• Foods contanng lquds are kept n unsealed holders. >>> Keep the foods
contanng lquds n sealed holders.
• The product’s door s left open. >>> Do not keep the product’s door open for
long perods.
• The thermostat s set to too low temperature. >>> Set the thermostat to
approprate temperature.
Compressor is not working.
• In case of sudden power falure or pullng the power plug off and puttng back
on, the gas pressure n the product’s coolng system s not balanced, whch
trggers the compressor thermc safeguard. The product wll restart after
approxmately 6 mnutes. If the product does not restart after ths perod,
contact the servce.
• Defrostng s actve. >>> Ths s normal for a fully-automatc defrostng
product. The defrostng s carred out perodcally.
• The product s not plugged n. >>> Make sure the power cord s plugged n.
• The temperature settng s ncorrect. >>> Select the approprate temperature
settng.
• The power s out. >>> The product wll contnue to operate normally once the
power s restored.
The freezer’s operating noise is increasing while in use.
• The product’s operatng performance may vary dependng on the ambent
temperature varatons. Ths s normal and not a malfuncton.
19 / EN
Freezer/User Manual
Troubleshooting
The freezer runs too often or for too long.
• The new product may be larger than the prevous one. Larger products wll run
for longer perods.
• The room temperature may be hgh. >>> The product wll normally run for long
perods n hgher room temperature.
• The product may have been recently plugged n or a new food tem s placed
nsde. >>> The product wll take longer to reach the set temperature when
recently plugged n or a new food tem s placed nsde. Ths s normal
• Large quanttes of hot food may have been recently placed nto the product.
>>> Do not place hot food nto the product.
• The doors were opened frequently or kept open for long perods. >>> The
warm ar movng nsde wll cause the product to run longer. Do not open the
doors too frequently.
• The freezer or cooler door may be ajar. >>> Check that the doors are fully
closed.
• The product may be set to temperature too low. >>> Set the temperature to a
hgher degree and wat for the product to reach the adjusted temperature.
• The cooler or freezer door washer may be drty, worn out, broken or not
properly settled. >>> Clean or replace the washer. Damaged / torn door
washer wll cause the product to run for longer perods to preserve the current
temperature.
The freezer temperature is very low, but the cooler temperature is adequate.
• The freezer compartment temperature s set to a very low degree. >>> Set the
freezer compartment temperature to a hgher degree and check agan.
The cooler temperature is very low, but the freezer temperature is adequate.
• The cooler compartment temperature s set to a very low degree. >>> Set the
freezer compartment temperature to a hgher degree and check agan.
The food items kept in cooler compartment drawers are frozen.
• The cooler compartment temperature s set to a very low degree. >>> Set the
freezer compartment temperature to a hgher degree and check agan.
20 / EN
Freezer/User Manual
Troubleshooting
The temperature in the cooler or the freezer is too high.
• The cooler compartment temperature s set to a very hgh degree. >>> Cooler
compartment temperature settng has an effect on the freezer compartment
temperature. Change the temperature of the cooler or freezer compartment
and wat untl the temperature of the related compartments come to the
adequate level.
• The doors were opened frequently or kept open for long perods. >>> Do not
open the doors too frequently.
• The door may be ajar. >>> Fully close the door.
• The product may have been recently plugged n or a new food tem s placed
nsde. >>> Ths s normal. The product wll take longer to reach the set
temperature when recently plugged n or a new food tem s placed nsde.
• Large quanttes of hot food may have been recently placed nto the product.
>>> Do not place hot food nto the product.
Shaking or noise.
• The ground s not level or durable. >>> If the product s shakng when moved
slowly, adjust the stands to balance the product. Also make sure the ground s
suffcently durable to bear the product.
• Any tems placed on the product may cause nose. >>> Remove any tems
placed on the product.
The product is making noise of liquid flowing, spraying etc.
• The product’s operatng prncples nvolve lqud and gas flows. >>> Ths s
normal and not a malfuncton.
There is sound of wind blowing coming from the product.
• The product uses a fan for the coolng process. Ths s normal and not a
malfuncton.
There is condensation on the product’s internal walls.
• Hot or humd weather wll ncrease cng and condensaton. Ths s normal and
not a malfuncton.
• The doors were opened frequently or kept open for long perods. >>> Do not
open the doors too frequently; f open, close the door.
• The door may be ajar. >>> Fully close the door.
There is condensation on the product’s exterior or between the doors.
• The ambent weather may be humd, ths s qute normal n humd weather. >>>
The condensaton wll dsspate when the humdty s reduced.
Холодильная техника «Беко» оснащена системой самодиагностики. Она позволяет пользователю быстро определить причину поломки. Как это работает? На дисплее холодильника Beko высвечивается код ошибки: изменяются данные показателя температур. Если вы заметили подобные значения на экране, нужно посмотреть расшифровку в инструкции либо в нашей таблице.
Неисправности холодильника Веко
При появлении значков на дисплее выполните перезагрузку техники — возможно, это системный сбой. Для этого:
- Отключите агрегат от сети.
- Подождите 10-15 минут.
- Повторите подключение.
Если ошибка снова показалась, тогда нужно приступать к диагностике и ремонту. Значение неисправностей смотрите в таблице ниже.
| Мигает показатель температур | Значение кода | Причины появления | Как устранить неполадку |
| +2 | Возникли проблемы с охлаждением. |
|
Ваши действия:
|
| +3 | Вышел из строя нагревательный элемент. | Почему это произошло:
|
Вы должны провести проверку элементов и заменить, если они неисправны. |
| +4 | Нет контакта с датчиком. | Причины:
|
Что нужно сделать:
|
| +5 | Замкнуло датчик. | Почему:
|
Ваши действия:
|
| +6 | Клавиша на панели управления приведена в действие. | Залипла или запала кнопка. Возможно, элемент износился, либо на панель попала жидкость. | Нужно разобрать панель и починить или сменить сломанную клавишу. |
| +7 | Возникли проблемы с компрессором. | Что могло послужить причиной:
|
Как исправить ситуацию:
|
| -12 | Не срабатывает переключатель. | Плохое соединение проводов между главным модулем и переключателем. |
Ваша задача: проверка проводки, подтяжка контактов. Замена подгоревших деталей. |
Могут быть и другие проблемы, при которых температура на дисплее колеблется.
- Дверца отделения часто открывается.
- Поврежден уплотнитель, что приводит к проникновению теплого воздуха в камеру. Нужно почистить его при засоре либо установить новый.
- Загружено много теплых продуктов. В результате температура в камере повышается, что приводит к срабатыванию датчика. Запустите режим «Суперохлаждения», если он предусмотрен в модели. Либо подождите 20-30 минут, пока климат нормализуется.
Некоторые неисправности холодильника «Беко» можно устранить самостоятельно. Но случаются такие поломки, которые требуют вмешательства опытного мастера и наличия специального оборудования. Если вы не уверены, что справитесь с проблемой, обратитесь в сервисный центр.