
MySQL — система управления базами данных (СУБД) с открытым исходным кодом от компании Oracle. Она была разработана и оптимизирована специально для работы веб-приложений. MySQL является неотъемлемой частью таких веб-сервисов, как Facebook, Twitter, Wikipedia, YouTube и многих других.
Эта статья расскажет, как определять, с чем связаны частые ошибки на сервере MySQL, и устранять их.
Не удаётся подключиться к локальному серверу
Одной из распространённых ошибок подключения клиента к серверу является «ERROR 2002 (HY000): Can’t connect to local MySQL server through socket ‘/var/run/mysqld/mysqld.sock’ (2)».

Эта ошибка означает, что на хосте не запущен сервер MySQL (mysqld) или вы указали неправильное имя файла сокета Unix или порт TCP/IP при попытке подключения.
Убедитесь, что сервер работает. Проверьте процесс с именем mysqld на хосте сервера, используя команды ps или grep, как показано ниже.
$ ps xa | grep mysqld | grep -v mysqldЕсли эти команды не показывают выходных данных, то сервер БД не работает. Поэтому клиент не может подключиться к нему. Чтобы запустить сервер, выполните команду systemctl.
$ sudo systemctl start mysql        #Debian/Ubuntu
$ sudo systemctl start mysqld       #RHEL/CentOS/Fedora
Чтобы проверить состояние службы MySQL, используйте следующую команду:
$ sudo systemctl status mysql       #Debian/Ubuntu
$ sudo systemctl status mysqld      #RHEL/CentOS/Fedora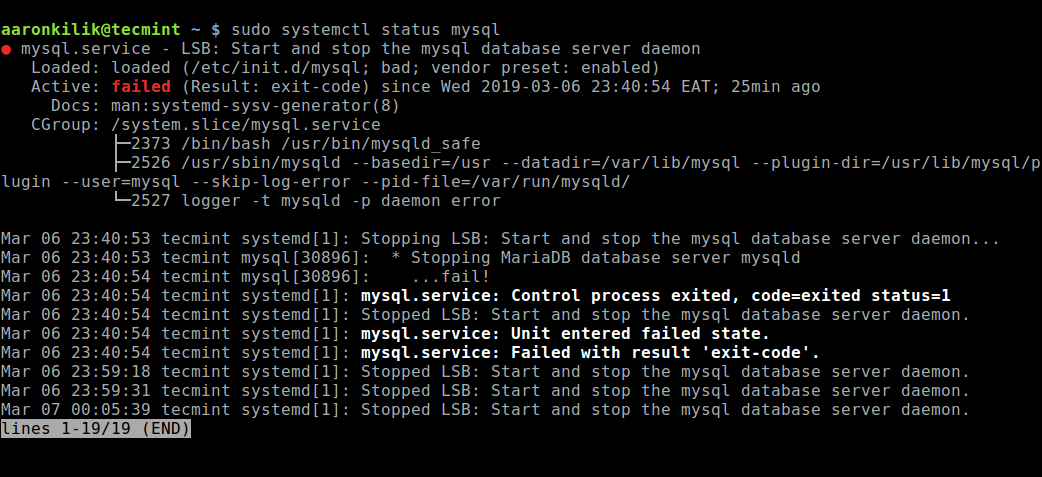
Если в результате выполнения команды произошла ошибка службы MySQL, вы можете попробовать перезапустить службу и ещё раз проверить её состояние.
$ sudo systemctl restart mysql
$ sudo systemctl status mysql
Если сервер работает (как показано) и вы по-прежнему видите эту ошибку, вам следует проверить, не заблокирован ли порт TCP/IP брандмауэром или любой другой службой блокировки портов.
Для поиска порта, который прослушивается сервером, используйте команду netstat.
$ sudo netstat -tlpn | grep "mysql"Ещё одна похожая и часто встречающаяся ошибка подключения — «(2003) Can’t connect to MySQL server on ‘server’ (10061)». Это означает, что в сетевом соединении было отказано.
Следует проверить, работает ли в системе сервер MySQL (смотрите выше) и на тот ли порт вы подключаетесь (как найти порт, можно посмотреть выше).
Похожие частые ошибки, с которыми вы можете столкнуться при попытке подключиться к серверу MySQL:
ERROR 2003: Cannot connect to MySQL server on 'host_name' (111)
ERROR 2002: Cannot connect to local MySQL server through socket '/tmp/mysql.sock' (111)
Ошибки запрета доступа в MySQL
В MySQL учётная запись (УЗ) определяется именем пользователя и клиентским хостом, с которого пользователь может подключиться. УЗ может также иметь данные для аутентификации (например, пароль).
Причин для запрета доступа может быть много. Одна из них связана с учётными записями MySQL, которые сервер разрешает использовать клиентским программам при подключении. Это означает, что имя пользователя, указанное в соединении, может не иметь прав доступа к базе данных.
В MySQL есть возможность создавать учётные записи, позволяющие пользователям клиентских программ подключаться к серверу и получать доступ к данным. Поэтому при ошибке доступа проверьте разрешение УЗ на подключение к серверу через клиентскую программу.
Увидеть разрешённые привилегии учётной записи можно, выполнив в консоли команду SHOW GRANTS
Входим в консоль (пример для Unix, для Windows консоль можно найти в стартовом меню):
В консоли вводим команду:
> SHOW GRANTS FOR 'tecmint'@'localhost';Дать привилегии конкретному пользователю в БД по IP-адресу можно, используя следующие команды:
> grant all privileges on *.test_db to 'tecmint'@'192.168.0.100';
> flush privileges;
Ошибки запрещённого доступа могут также возникнуть из-за проблем с подключением к MySQL (см. выше).
Потеря соединения с сервером MySQL
С этой ошибкой можно столкнуться по одной из следующих причин:
- плохое сетевое соединение;
- истекло время ожидания соединения;
- размер BLOB больше, чем
max_allowed_packet.
В первом случае убедитесь, что у вас стабильное сетевое подключение (особенно, если подключаетесь удалённо).
Если проблема с тайм-аутом соединения (особенно при первоначальном соединении MySQL с сервером), увеличьте значение параметра connect_timeout.
В случае с размером BLOB нужно установить более высокое значение для max_allowed_packet в файле конфигурации /etc/my.cnf в разделах [mysqld] или [client] как показано ниже.
[mysqld]
connect_timeout=100
max_allowed_packet=500M
Если файл конфигурации недоступен, это значение можно установить с помощью следующей команды.
> SET GLOBAL connect_timeout=100;
> SET GLOBAL max_allowed_packet=524288000;
Слишком много подключений
Эта ошибка означает, что все доступные соединения используются клиентскими программами. Количество соединений (по умолчанию 151) контролируется системной переменной max_connections. Устранить проблему можно, увеличив значение переменной в файле конфигурации /etc/my.cnf.
[mysqld]
max_connections=1000
Недостаточно памяти
Если такая ошибка возникла, это может означать, что в MySQL недостаточно памяти для хранения всего результата запроса.
Сначала нужно убедиться, что запрос правильный. Если это так, то нужно выполнить одно из следующих действий:
- если клиент MySQL используется напрямую, запустите его с ключом
--quick switch, чтобы отключить кешированные результаты; - если вы используете драйвер MyODBC, пользовательский интерфейс (UI) имеет расширенную вкладку с опциями. Отметьте галочкой «Do not cache result» (не кешировать результат).
Также может помочь MySQL Tuner. Это полезный скрипт, который подключается к работающему серверу MySQL и даёт рекомендации по настройке для более высокой производительности.
$ sudo apt-get install mysqltuner     #Debian/Ubuntu
$ sudo yum install mysqltuner         #RHEL/CentOS/Fedora
$ mysqltuner
MySQL продолжает «падать»
Если такая проблема возникает, необходимо выяснить, заключается она в сервере или в клиенте. Обратите внимание, что многие сбои сервера вызваны повреждёнными файлами данных или индексными файлами.
Вы можете проверить состояние сервера, чтобы определить, как долго он работал.
$ sudo systemctl status mysql       #Debian/Ubuntu
$ sudo systemctl status mysqld      #RHEL/CentOS/Fedora
Чтобы узнать время безотказной работы сервера, запустите команду mysqladmin.
$ sudo mysqladmin version -p 
Кроме того, можно остановить сервер, сделать отладку MySQL и снова запустить службу. Для отображения статистики процессов MySQL во время выполнения других процессов откройте окно командной строки и введите следующее:
$ sudo mysqladmin -i 5 statusИли
$ sudo mysqladmin -i 5 -r statusЗаключение
Самое важное при диагностике — понять, что именно вызвало ошибку. Следующие шаги помогут вам в этом:
- Первый и самый важный шаг — просмотреть журналы MySQL, которые хранятся в каталоге
/var/log/mysql/. Вы можете использовать утилиты командной строки вродеtailдля чтения файлов журнала. - Если служба MySQL не запускается, проверьте её состояние с помощью
systemctl. Или используйте командуjournalctl(с флагом-xe) в systemd. - Вы также можете проверить файл системного журнала (например,
/var/log/messages) на предмет обнаружения ошибок. - Попробуйте использовать такие инструменты, как Mytop, glances, top, ps или htop, чтобы проверить, какая программа использует весь ресурс процессора или блокирует машину. Они также помогут определить нехватку памяти, дискового пространства, файловых дескрипторов или какого-либо другого важного ресурса.
- Если проблема в каком-либо процессе, можно попытаться его принудительно остановить, а затем запустить (при необходимости).
- Если вы уверены, что проблемы именно на стороне сервера, можете выполнить команды:
mysqladmin -u root pingилиmysqladmin -u root processlist, чтобы получить от него ответ. - Если при подключении проблема не связана с сервером, проверьте, нормально ли работает клиент. Попробуйте получить какие-либо его выходные данные для устранения неполадок.
Перевод статьи «Useful Tips to Troubleshoot Common Errors in MySQL»
In my case, It seems like I wasnt really able to kill the mysql process, when I run
sudo service mysql stop
ps -ef | grep mysql
The mysql process was always there, it looks like it was blocking the socket file and new mysql process wasnt able to create it itself.
so this helped
cd /var/run
sudo cp mysqld/ mysqld.bc -rf
sudo chown mysql:mysql mysqld.bc/
sudo service mysql stop
sudo cp mysqld.bc/ mysqld -rf
sudo chown mysql:mysql mysqld -R
sudo /usr/sbin/mysqld --skip-grant-tables --skip-networking &
Now Im able to log in database using
mysql -u root
Then to update root password:
UPDATE user SET authentication_string=password('YOURPASSWORDHERE') WHERE user='root';
FLUSH PRIVILEGES;
PS: I had trouble updating root passwod, seems like problem with «auth_socket» plugin, so I had to create new user with full privileges
insert into user set `Host` = "localhost", `User` = "super", `plugin` = "mysql_native_password", `authentication_string` = NULL, `password_expired` = "N", `password_lifetime` = NULL, `account_locked` = "N", `Select_priv` = "Y",
`Insert_priv` = "Y", `Update_priv` = "Y", `Delete_priv` = "Y", `Create_priv` = "Y", `Drop_priv` = "Y", `Reload_priv` = "Y", `Shutdown_priv` = "Y", `Process_priv` = "Y", `File_priv` = "Y",
`Grant_priv` = "Y",  `References_priv` = "Y", `Index_priv` = "Y", `Alter_priv` = "Y", `Show_db_priv` = "Y", `Super_priv` = "Y", `Create_tmp_table_priv` = "Y", `Lock_tables_priv` = "Y",
`Execute_priv` = "Y", `Repl_slave_priv` = "Y",  `Repl_client_priv` = "Y",  `Create_view_priv` = "Y", `Show_view_priv` = "Y", `Create_routine_priv` = "Y", `Alter_routine_priv` = "Y",
`Create_user_priv` = "Y",  `Event_priv` = "Y", `Trigger_priv` = "Y", `Create_tablespace_priv` = "Y";
This creates user «super» with no password and then you can connect with mysql -u super
The SQLSTATE[HY000] [2002] error is a common issue faced by developers when attempting to connect to a MySQL database. This error usually indicates that the connection to the MySQL server could not be established, often due to incorrect settings or server-related issues. In this guide, we’ll discuss the possible causes and provide step-by-step solutions to fix the «No Connection Could Be Made» issue.
Table of Contents
- Possible Causes
- Solutions
- Check MySQL Server Status
- Verify Connection Parameters
- Check MySQL Configuration File
- Check Firewall Settings
- FAQs
Possible Causes
There could be various reasons for this error, such as:
- MySQL server is not running or has crashed
- Incorrect connection parameters, like host, port, or socket
- Incorrect settings in the MySQL configuration file (my.cnf or my.ini)
- Firewall or security settings blocking the connection
Solutions
Check MySQL Server Status
The first step is to ensure that the MySQL server is running. You can check the server’s status by running the following command:
sudo service mysql status
If the server is not running or has crashed, start or restart the MySQL service:
sudo service mysql start
or
sudo service mysql restart
If you still encounter the error, move on to the next solution.
Verify Connection Parameters
Ensure that you’re using the correct connection parameters, such as host, port, and socket. The default host is ‘localhost’, the default port is 3306, and the default socket is ‘/var/run/mysqld/mysqld.sock’ (for Linux) or ‘/tmp/mysql.sock’ (for macOS).
In your application code, verify the connection parameters. For example, in PHP:
$host = 'localhost';
$port = 3306;
$user = 'your_username';
$password = 'your_password';
$dbname = 'your_database_name';

$dsn = "mysql:host=$host;port=$port;dbname=$dbname";

try {
    $conn = new PDO($dsn, $user, $password);
} catch (PDOException $e) {
    echo 'Connection failed: ' . $e->getMessage();
}
If the connection parameters are correct but you still face the issue, proceed to the next solution.
Check MySQL Configuration File
The MySQL configuration file (my.cnf or my.ini) contains settings that can affect the connection. Open the configuration file and look for the following settings:
- bind-address: Ensure that it’s set to the correct IP address or ‘0.0.0.0’ to allow connections from any IP address.
- port: Ensure that it’s set to the correct port number (usually 3306).
- socket: Ensure that it’s set to the correct socket path.
If you make any changes to the configuration file, restart the MySQL server:
sudo service mysql restart
If the issue persists, move on to the next solution.
Check Firewall Settings
Firewall settings may block the connection to the MySQL server. To allow connections through the firewall, run the following command:
sudo ufw allow mysql
This command allows connections on the default MySQL port (3306).
After making the necessary changes, restart your server and try connecting again.
FAQs
Q: How do I find the MySQL configuration file?
Use the following command to locate the my.cnf or my.ini file:
sudo find / -name my.cnf
or
sudo find / -name my.ini
Q: How do I check the MySQL server logs for errors?
MySQL server logs can be found in the following location:
/var/log/mysql/error.log
You can use the tail command to view the latest server logs:
sudo tail -f /var/log/mysql/error.log
Q: Can I use a different port for MySQL?
Yes, you can change the default port (3306) to another available port number in the MySQL configuration file (my.cnf or my.ini). After making the change, restart the MySQL server.
Q: Can I use a hostname instead of an IP address to connect to the MySQL server?
Yes, you can use a hostname, such as ‘localhost’, instead of an IP address when connecting to the MySQL server. Make sure the hostname resolves to the correct IP address.
Q: How do I check the MySQL server version?
Run the following command to check the MySQL server version:
mysql --version
or
mysql -V
Related Links:
- MySQL Official Documentation
- PHP Data Objects (PDO) Documentation
- Ubuntu Firewall (UFW) Documentation
If you run into this error message while trying to connect to a local MySQL Server:
ERROR 2002 (HY000): Can't connect to local MySQL server through socket '/var/lib/mysql/mysql.sock'
It means either the MySQL server is not installed/running, or the file mysql.sock doesn’t exist in /var/lib/mysql/.
There are a couple of solutions for this error.
1. First, check to see whether mysqld service is running or not. If not, start it:
Then try to connect again.
2. Try to connect to 127.0.0.1 instead of localhost
If you connect to localhost, it will use the socket connector, but if you connect to 127.0.0.1 the TCP/IP connector will be used. So when the socket connector is not working, try connecting to 127.0.0.1 instead.
3. Edit file my.cnf
Find the file my.cnf (usually in /etc/) to edit and add these following line:
[mysqld]

socket=/var/lib/mysql/mysql.sock

[client]

socket=/var/lib/mysql/mysql.sock
Restart mysql and connect again.
4. Symlink
In some cases, you mysql.sock might be located in another folder. You have to find and symlink it. You might find it in /tmp/mysql.sock or /data/mysql_datadir/mysql.sock
For example, your file is located as in /tmp/mysql.sock
Then symlink it:
ln -s /var/lib/mysql/mysql.sock /tmp/mysql.sock
Restart mysql and connect again.
Need a good GUI Tool for MySQL? TablePlus is a modern, native tool with an elegant UI that allows you to simultaneously manage multiple databases such as MySQL, PostgreSQL, SQLite, Microsoft SQL Server and more.
Download TablePlus for Mac.
Not on Mac? Download TablePlus for Windows.
On Linux? Download TablePlus for Linux
Need a quick edit on the go? Download TablePlus for iOS.

When you try to connect to your MySQL server through the command line, you might encounter a MySQL ERROR 2002 as follows:
mysql -uroot -proot
ERROR 2002 (HY000): Can't connect to local MySQL server
through socket '/tmp/mysql.sock' (2)
The ERROR 2002 above happens when the mysql.sock socket file can’t be found in your filesystem.
This file is created when MySQL server is started and removed when you stop the server.
To fix this error, you need to see if MySQL server is already installed and running on your computer.
If you’re using Linux, you may need to install mysql-server in addition to the mysql package:
apt-get install mysql-server mysql
Once you have the server installed, run the server with the following command:
sudo service mysql start
# or
sudo /etc/init.d/mysql start
That should start the server and generate the mysql.sock file. You can try to connect to your MySQL server again now.
For macOS
If you’re using macOS and installed MySQL using Homebrew, then you need to make sure that the server is started using the following command:
brew services start mysql
Once MySQL is running, you can try to connect using the mysql command again.
For Windows
For Windows OS, you need to make sure that MySQL service is running in the Services panel.
Open the Windows Start menu and search for the Services panel to see the result below:
Then, scroll through the services list until you reach the services that start with "M" to look for MySQL services.
Usually, you have the MySQL version number attached to the service name.
The MySQL version installed on my computer is MySQL 8.0.26 so I have MySQL80 service listed as shown below:
If you have MySQL version 7, then you may have MySQL70 listed on the Services panel.
As you can see from the picture above, the status of MySQL80 service is empty, meaning that it’s not currently running.
If you see the same status, you can run the service by clicking the Start the service link on the left pane.
Now you can try to connect again to your MySQL server from the Command Line.
To conclude, the ERROR 2002 happens when your computer can’t connect to MySQL server because the socket file is missing.
The socket file is generated when MySQL server is started, so you probably need to start the server to make it work.
Depending on your operating system, there are different ways to start your MySQL server.
Good luck fixing the error! 👍