
Why Encounter ‘File System Verify or Repair Failed. : (-69845)’
A utility program called Mac Disk Utility is made to assist users in identifying and fixing directory system faults on their personal computers. It is a vital tool that may assist users in locating and resolving file system difficulties, including damaged data, missing files, and other difficulties.
When users are repairing hard drives with Disk Utility, they may encounter file system verify or repair failed. : (-69845). Are you worried about the reasons for this error to happen? The primary reasons are listed below:
- It occurs when conducting First Aid to fix an external disk, including an ExFAT disk or a Time Machine backup.
- This error can happen on the eternal or internal hard drive, SD card, and USB flash drive on a Mac operating any macOS version. It can usually be discovered in the file system corruption on the drive. If any sudden power failure, invalid volume header, ransom attacks, and catalog file corruption occurs, it will give rise to file system verify or repair failed. : (-69845) error.
- This error might also be attended by details, including «error: Unable to conduct postponed repairs without complete space verification.»
Thinking about how to fix error ‘file system verify or repair failed. : (-69845)’? This article has listed different fixing methods for your ease. So, let’s get started!
Recover Lost Files When Encounter ‘File System Verify or Repair Failed. : (-69845)’
Data loss is expected if you encounter file system verify or repair failed. : (-69845). But with the help of professional data retrieval software, you can recover every type of file in a jiffy. Are you thinking of which tool we’re talking about? It’s none other than EaseUS Data Recovery Wizard for Mac! This tool can help you retrieve lost data when you encounter unexpected disk errors.
Moreover, with the aid of EaseUS Data Recovery Wizard for Mac, difficult data loss situations can be resolved:
- 🛠️Recover data from corrupted hard drives. When you encounter hard drive corruption, this recovery tool can help you recover data before repairing corrupted hard drives on Mac.
- ❌Recover data from formatted Mac hard drive. You have an additional chance to recover data from your formatted Mac hard drive with the EaseUS recovery tool.
- 🔖Recover lost files after macOS Ventura update. This powerful tool can be very helpful when you lose essential data after a macOS upgrade.
- 🗑️Support Mac Trash recovery. If you accidentally deleted important data and emptied the Trash, you will need EaseUS Data Recovery Wizard for Mac.
Now, you can follow the leads to recover lost files:
Step 1. Search for lost files
Select the disk location to search for lost files (it can be an internal HDD/SSD or a removable storage device) on macOS Sierra, High Sierra, Mojave, Catalina, Big Sur, Monterey and the latest Ventura. Click the «Search for lost files» button.

Step 2. Go through the scanning results
EaseUS Data Recovery Wizard for Mac will immediately scan your selected disk volume and display the scanning results.

Step 3. Select the file(s) and recover
In the scan results, select the file(s) to preview and click the «Recover» button to have them back.

How to Fix ‘File System Verify or Repair Failed. : (-69845)’ on Internal Drive
You can resolve the File System Verify or Repair Failed. : (-69845)’ error with plenty of tools developed into Mac. But specific solutions, for example, reformatting drives, will erase your data. Follow the steps below to fix this error:
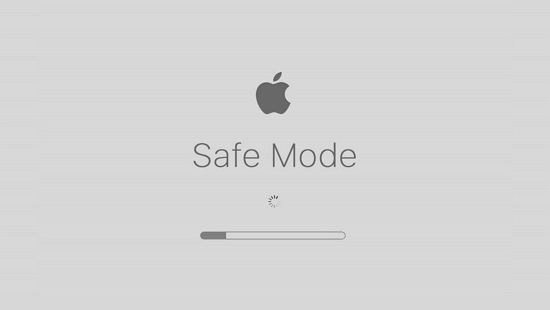
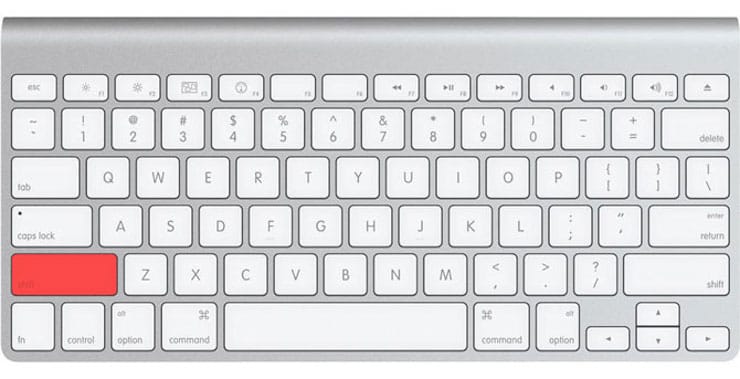
1. Troubleshoot the Error by Booting Mac into Safe Mode
In case you’re operating macOS Catalina 10.15, follow the steps below to boot your Mac in Safe Mode:
Step 1. Shut down your Mac by pressing the Power button or hitting the Apple menu.
Step 2. Keep it shut down for approximately 10 seconds.
Step 3. Hold the power button.
Step 4. Once it starts, quickly press & hold the Shift key.
Step 5. Release the Shift key after watching the grey Apple logo and the progress indicator on its screen.
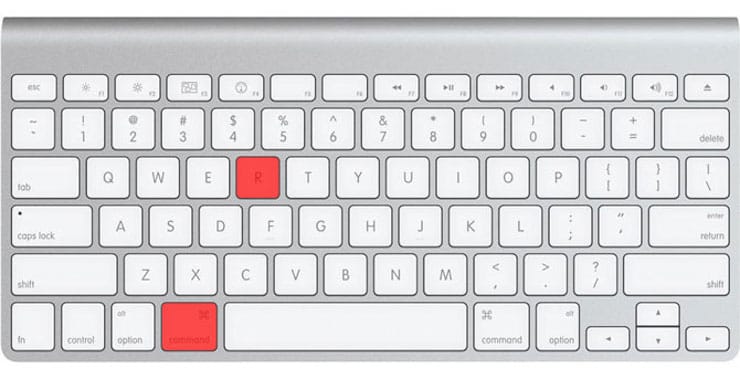
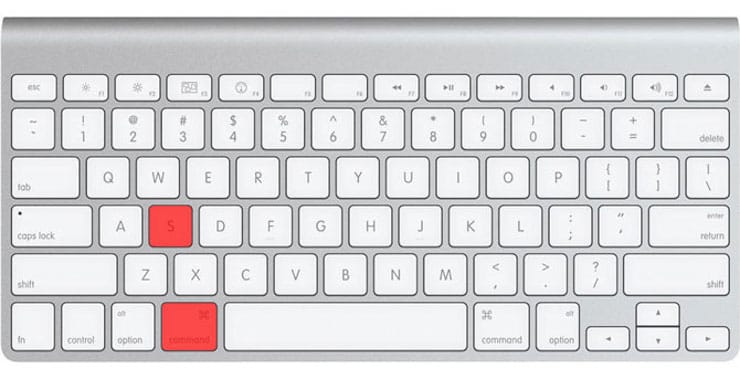
2. Run FSCK to Fix ‘File System Verify or Repair Failed. : (-69845)’
File system consistency check, or FSCK, is a beneficial program for detecting and fixing drive errors. It’s necessary to boot into macOS single-user mode to conduct FSCK. Follow the steps below:
Step 1. Switch off your Mac.
Step 2. Switch it on, and hit the Command + S keys to get that boot sound.
Step 3. Enter the /sbin/fsck -fy command in single-user mode, and hit the Enter button.
Step 4. At this stage, two messages can be seen: The volume [name] appears OK — everything is perfect. File system modifications were made; problems were found and resolved.
Step 5. In case you see the second text, do enter the /sbin/fsck -fy command again until you notice the message «The volume [name] appears to be OK».
Step 6. Restart your MacBook.
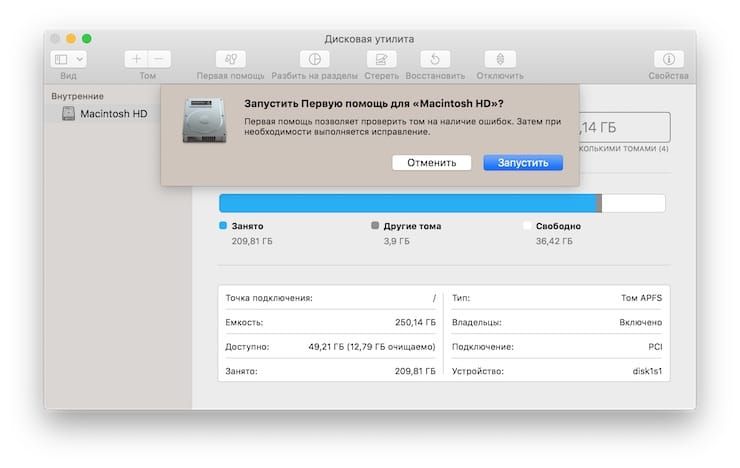
3. Run First-Aid in macOS Disk Utility to Fix the Issue
You can diagnose your partitions and disks fastest with the First Aid application. It can rummage and resolve disk formatting and directory structure errors. Initially, you must open Disk Utility in Recovery mode. Follow the steps below to run first-aid in the macOS disk utility to fix the issue:
For M1-based Mac:
Step 1. Restart your MacBook.
Step 2. Until the Loading Startup options pop up, keep holding the power button.

Step 3. Opt for the Gear symbol.
Step 4. Open the Disk Utility.
For Intel-based Mac:
Step 1. Restart your MacBook.
Step 2. Hold down the Command + R keys.

Step 3. When the macOS utility window opens, launch the Disk Utility.
The disc that displays the «File system verify or repair failed» error should then be repaired using First Aid:
Step 1. Select View on the menu bar in the Disk Utility.
Step 2. Opt for Show All Devices.
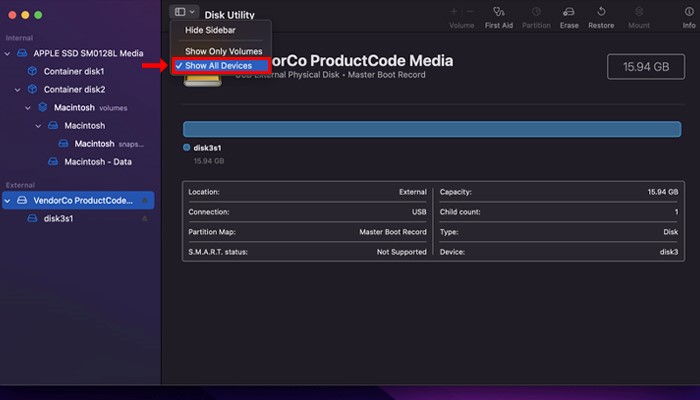
Step 3. Opt for the required partition or disk > select the First Aid button > Select Run.
Step 4. Restart your MacBook to finish the error fix.
If you have fixed this «file system verification or repair failed. : (-69845)» error, don’t forget to share the methods with more users!
4. Factory Reset and Reinstall macOS on Mac
If nothing works, it’s time to factory reset MacBook Air/Mac and reinstall macOS on Mac/MacBook. Follow the steps below to factory reset macOS on Mac:
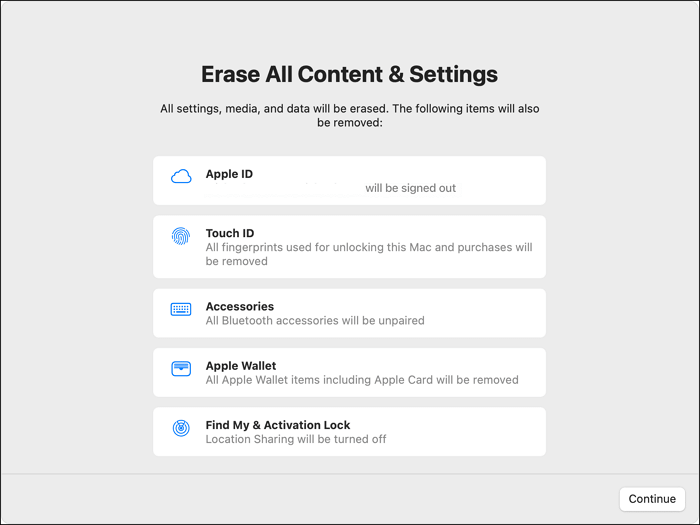
Step 1. Open System Preferences. Hit the Apple logo and opt for System Preferences from the drop-down menu.
Step 2. Open erase assistant. Open «Erase All Contents and Settings» from system preferences.
Step 3. Go through the Erase Assistant prompts. You can follow Erase Assistant’s instructions to perform a factory reset, but you must log out of iCloud before it’s finished.
You may use a bootable USB installer to reinstall macOS. Follow the steps below:
Step 1. Download macOS Ventura or other versions.
Step 2. Build a bootable USB using the Terminal.
Step 3. Employ a Bootable Installer.
For Intel-based Mac
- You need to plug in the installer and check the compatibility and connectivity.
- Long-pressing the Option key will bring a list of volumes on the screen.
- Opt for the volume with a bootable installer, and hit the Return key.
For Apple Silicon
- If you want to reinstall macOS, plug in the bootable USB.
- Crosscheck its internet connectivity and its compatibility with the installed macOS version.
- Long-press the power button until the Utility window pops up.
- Opt for the volume containing the OS, and select Continue.
How to Fix ‘File System Verify or Repair Failed. : (-69845)’ on External Drive
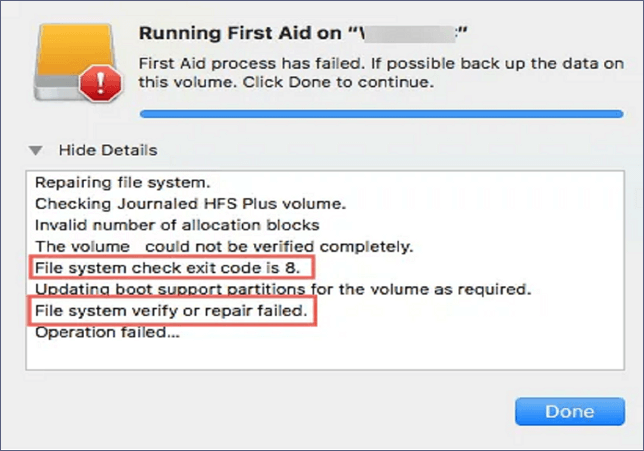
After verifying your data is protected, you may proceed with File System Verify or Repair Failed. : (-69845) on external drives without the hassles of losing data. If Disc Utility reports exit codes like «File system check exit code is 1,» «File system check exit code is 65,» «File system check exit code is 8,» etc., it is recommended to continue with the following simple fixes.
1. Reboot Mac to Fix ‘File System Verify or Repair Failed. : (-69845)’
A straightforward reboot can help solve several issues on Mac, including File System Verify or Repair Failed. : (-69845). So, follow the steps below to reboot your Mac:
Step 1. Hold the Power button of your Mac to turn it off.
Step 2. Wait 10 seconds, and turn it on again to operate First Aid. In case it still shows this error, check the next solution.
2. Reformat the External Drive with Mac Disk Utility
Reformatting is one of the flexible ways to resolve disk errors while facing File System Verify or Repair Failed. : (-69845) on an external drive. To make it work again, you can reformat the hard drives. These are the significant steps to follow:
Step 1. Head over to Disk Utility.
Step 2. Select the drive from the left sidebar that is experiencing problem 69845.
Step 3. Hit the Erase button located on the top of the Window.
Step 4. Hit the Erase again after providing a name and format. The whole deletion process will take some time.
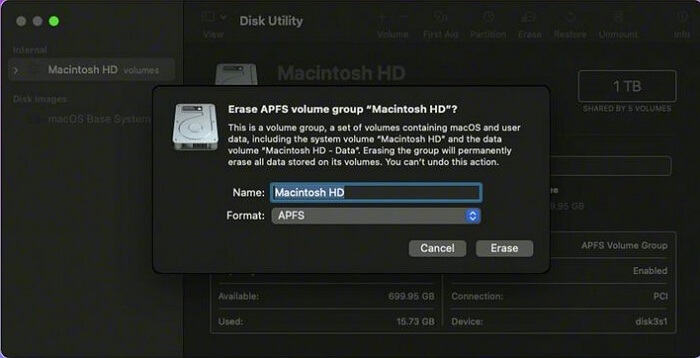
Step 5. Select Done when it’s over.
3. Send Your Damaged External Hard Drive for Repairing
Sadly, if none of the aforementioned fixes can fix the «File system verify or repair failed.: (-69845)» issue, the drive is probably physically destroyed. It must be swapped out for an alternate one or taken to a nearby drive repair facility.
Ideally, you have resolved the issue causing external discs to display the error message «File system verify or repair failed.: (-69845)». If so, kindly show the steps above to assist more individuals.
Conclusion
It is awful to see this error notification, such as «File system verify, or repair failed. : (-69845)», You can find helpful techniques in this article to repair Mac’s internal or external hard disc that has been damaged. However, please use EaseUS Data Recovery Wizard for Mac to retrieve lost data from damaged drives first to ensure the confidentiality of your data.
File System Verify or Repair Failed. : (-69845) FAQs
Go through the FAQs below to understand the topic better:
1. How to fix corrupted hard drives on Mac?
You can fix a corrupted hard drive on Mac by initiating the FSCK command or by repairing the corrupted hard drive using the disk utility. If you encounter data loss because of corruption on Mac hard drives, you can download EaseUS Data Recovery Wizard for Mac to retrieve lost data.
2. Why my Mac says ‘file system verify or repair failed. : (-69845)’?
Any macOS version functioning on a computer can experience ‘File system verify or repair failed.: (-69845)’ on an internal or external hard disc, USB flash drive, or SD card. It likely originates in the file system instability on the disc, which abrupt power outages, damaged catalog files, erroneous volume headers, malware attacks, etc., can bring on.
3. How to fix ‘file system verify or repair failed. : (-69845)’ in Disk Utility?
You can reformat the external drive in Disk Utility to fix the ‘file system verify or repair failed. : (-69845).’ Consider the steps below to fix the error:
- 1. Activate Disc Utility.
- 2. From the left sidebar, select the drive that is experiencing problem 69845.
- 3. On the screen, click Erase.
- 4. Give a Name and Format, and then hit Erase. The erasing process will take some time to complete.
- 5. When it’s finished, click Done.
4. How do I fix code 8 on my Mac?
Follow the steps below to fix code 8 on your Mac:
- 1. Make a backup of the stored Mac data.
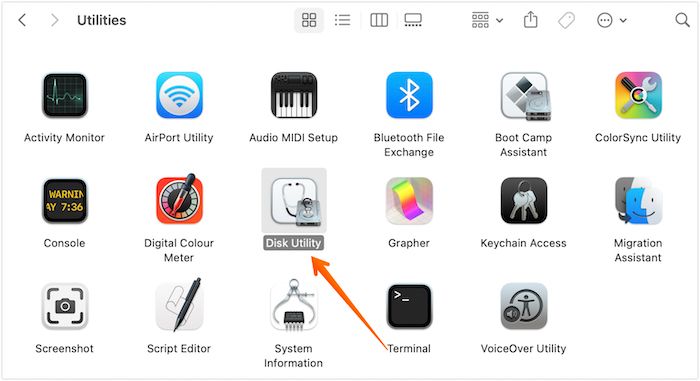
- 2. Head over to Applications > Utilities > Disk Utility.
- 3. Opt for the corrupted drive, and hit First Aid on the menu bar located at the top.
- 4. Hit Done, and restart your MacBook.
Looks like no one’s replied in a while. To start the conversation again, simply
ask a new question.
Error: -69845: File system verify or repair failed Underlying error: 8: POSIX reports: Exec format error
When trying to check my disks I receive this message on Onyx… what or how can I solve the issue?
Message:
Error: -69845: File system verify or repair failed
Underlying error: 8: POSIX reports: Exec format error
MacBook Pro (15-inch Mid 2012),
OS X Mavericks (10.9.4)
Posted on Aug 4, 2014 2:38 AM
Error: -69845: File system verify or repair failed Underlying error: 8: POSIX reports: Exec format error
Содержание
- Mac OS: Восстановление файловой системы
- Question: Q: Error: -69845: File system verify or repair failed Underlying error: 8: POSIX reports: Exec format error
- Helpful answers
- Как проверить и исправить ошибки жесткого диска (HDD, SDD) на Mac
- Загрузка в Безопасном режиме (Safe Mode) на Mac
- 2. Режим восстановления и Первая помощь на Mac
- Проверка fsck
- Apple Diagnostics
- Восстановление файлов с поврежденного диска
- Как я могу восстановить диск, который Дисковая утилита не может восстановить?
Mac OS: Восстановление файловой системы
Бывают случаи когда после сбоя питания, падения о пол или попадания Луны в Юпитер Mac OS перестаёт корректно загружаться. Вероятнее всего проблема кроется в повреждении жесткого диска, и как следствие этого повреждении файловой системы. Есть несколько способов восстановить файловую систему.
Сперва нужно загрузиться либо с установочного диска Mac OS или с раздела восстановления. Для этого нажимаем кнопку Alt в момент загрузки и выбираем с чего грузиться.
Способ 1. Восстановление с помощью дисковой утилиты.
Запускаем дисковую утилиту, выбираем нужный диск, нажимаем кнопку «Проверить диск». Если в ходе проверки были обнаружены ошибки, нажимаем кнопку «Исправить диск». Если исправление прошло успешно, то перезагружаемся в нормальном режиме. Если же при исправлении возникли ошибки типа «Invalid Node Structure», переходим ко второму способу.
Способ 2. Восстановление с помощью консоли.
Вспоминаем что Mac OS X официально сертифицированная unix-система и пробуем восстановить через терминал. Запускаем терминал: Утилиты -> Терминал.
С помощью команды df узнаем ID нужного раздела. В столбце «Mounted on» должно быть написано Macintosh HD, ID указан после /dev/, например disk0s3.
Размонтируем нужный раздел:
Запускаем утилиту восстановления:
После того как fsck_hfs успешно отработала нужно запустить проверку дисковой утилитой (способ 1). Если
fsck_hfs выдает ошибку «Disk full error» значит на диске недостаточно свободного места для восстановления, требуется удалить ненужные файлы и запустить утилиту снова.
Способ 3. Восстановление с помощью сторонних программ.
Если первые 2 способа не помогают можно попробовать восстановить файловую систему с помощью стороннего софта. Такая возможность есть в программах MacDrivePro и Alsoft Diskwarrior. Так как лично я опыта восстановления файловой системы данными программами не имею, рассказывать ничего не буду, если появится опыт постараюсь дополнить эту статью.
Источник
Question: Q: Error: -69845: File system verify or repair failed Underlying error: 8: POSIX reports: Exec format error
When trying to check my disks I receive this message on Onyx. what or how can I solve the issue?
Error: -69845: File system verify or repair failed
Underlying error: 8: POSIX reports: Exec format error
MacBook Pro (15-inch Mid 2012), OS X Mavericks (10.9.4)
Posted on Aug 4, 2014 2:38 AM
Helpful answers
Well, I have solved running a «fsck -fy» from single user mode.
Apr 2, 2015 2:15 PM
I’ve received the same message.
I’ve just installed a new Crucial SSD MX100 to my old MacBook Pro 3,1 (2007) with latest version of Yosemite. All seems ok, system works very well and very fast, but after install Onyx I’ve received the same message:
Error: -69845: File system verify or repair failed
Underlying error: 8: POSIX reports: Exec format error
Is there something bad with my new SSD or just Onyx is not good cheking SSD drives?
Apr 2, 2015 1:40 PM
There’s more to the conversation
Loading page content
Page content loaded
I’ve received the same message.
I’ve just installed a new Crucial SSD MX100 to my old MacBook Pro 3,1 (2007) with latest version of Yosemite. All seems ok, system works very well and very fast, but after install Onyx I’ve received the same message:
Error: -69845: File system verify or repair failed
Underlying error: 8: POSIX reports: Exec format error
Is there something bad with my new SSD or just Onyx is not good cheking SSD drives?
Apr 2, 2015 1:40 PM
Well, I have solved running a «fsck -fy» from single user mode.
Apr 2, 2015 2:15 PM
Hi, I too am having this issue with an external drive after installing a new internal drive. The external drive can be identified using the diskutil list command from terminal but when I try to verify or repair the volume both in Disk Utility and from terminal I get the following message:
The volume could not be verified completely
File system check exit code is 8
Updating boot support partitions for the volume as required
Error: -69845: File system verify or repair failed
Underlying error: 8: POSIX reports: Exec format error
I am unable to fix the disk from single user mode since it is an external drive and not a bootable disk. Is there any other way that this disk can be repaired?
Источник
Как проверить и исправить ошибки жесткого диска (HDD, SDD) на Mac
Ваш Mac не включается? Без паники! Не спешите бросать всё и нести любимый компьютер в ближайший сервис. Вполне возможно, что для «реанимации» хватит и встроенных средств macOS, воспользоваться которыми может каждый желающий.
Загрузка в Безопасном режиме (Safe Mode) на Mac
При активации Safe Mode macOS просканирует жесткий диск и исправит все ошибки, которые найдет.
«Безопасная» загрузка запускает только жизненно необходимые компоненты (т.е. только то, что необходимо для запуска компьютера). В результате не будут запущены сторонние расширения, элементы входа в систему (логины-пароли), а также будет очищен кэш в определенных разделах.
Чтобы запустить Mac в режиме Safe Mode, выключите его, затем включите и одновременно со стартовым звуком зажмите на клавиатуре клавишу ⇧Shift. Если ваш Mac завис при включении, сначала выключите его (для этого удерживайте физическую кнопку питания на корпусе или клавиатуре в течение 10 секунд).
Если Mac загрузил систему, перезагрузите его и включайте уже как обычно. Если же компьютер вновь завис, переведите его в Verbose Mode — для этого необходимо выключить Mac, включить его и после стартового сигнала одновременно нажать и удерживать ⌘Cmd + V. Так вы сможете узнать, какой именно системный компонент приводит к проблеме. Когда источник будет выявлен, можно перезагрузиться в Safe Mode (с зажатой клавишей ⇧Shift) и удалить проблемное расширение, после чего попробовать уже обычную перезагрузку.
2. Режим восстановления и Первая помощь на Mac
Если безопасный режим не решил вашу проблему, переходим к следующей опции под названием Режим восстановления (Recovery Mode). Он «живёт» в отдельной части загрузочного диска и позволяет восстанавливать систему, получать доступ к Терминалу и возможность переустановить операционную систему вашего Mac — macOS.
Для перехода в Режим восстановления:
1. Выключите компьютер;
3. Сразу же после стартового сигнала нажмите и удерживайте сочетание клавиш ⌘Cmd + R.
Если перейти в Recovery Mode не удается (при проблемах с диском такое бывает), можно запустить режим восстановления через интернет. Сочетание клавиш будет уже несколько другим — ⌘Cmd + ⌥Option (Alt) + R. Этот способ требует интернет-подключения и займет гораздо больше времени, т.к. macOS будет загружать из Сети образ системы весом в несколько гигабайт.
Если загрузка в Режим восстановления прошла успешно, вы увидите несколько вариантов действий. Запустите Дисковую утилиту и найдите загрузочный диск, который является источником проблем — скорее всего, он называется Macintosh HD. Выберите его в окне слева, а затем нажмите Первая помощь → Запустить.
Проверка fsck
File system consistency check (fsck, «проверка целостности файловой системы») — старый добрый Unix-инструмент для проверки и решения проблем с дисками.
В зависимости от объема жесткого диска, его типа и серьезности проблемы fsck-проверка может занять довольно много времени. Просто наберитесь терпения.
Для запуска fsck необходим переход в однопользовательский режим (Single User Mode). Он позволяет вносить изменения в общие пользовательские ресурсы на компьютере. Single User Mode не запускает macOS; он просто дает доступ к командной строке Unix.
Для перехода в Single User Mode:
1. Выключите Mac;
3. Сразу после стартового сигнала нажмите и удерживайте сочетание клавиш ⌘Cmd + S.
Вскоре вы увидите командную строку. Наберите в ней fsck -fy для запуска процедуры fsck.
Примечание: если ваш диск зашифрован, выберите подходящий пользовательский аккаунт и введите пароль для дешифровки. Если у вас установлен пароль на прошивку Mac, запустить Single User Mode не получится.
Важно дождаться окончания fsck-проверки — если процесс будет прерван, возможна потеря данных. После окончания проверки вы увидите одно из следующих сообщений:
** The volume Macintosh HD could not be repaired.
*****The volume was modified *****
Система сообщает, что восстановить жесткий диск не удалось. Ничего страшного — просто запустите fsck еще раз. Команда та же: fsck -fy
** The volume Macintosh HD was repaired successfully.
*****The volume was modified *****
Уже намного лучше… но расслабляться рано. Опять-таки, запустите проверку еще раз.
** The volume Macintosh HD appears to be OK.
А вот это — то, что нам нужно. fsck проверила весь диск и не нашла ничего, что требовало бы исправлений.
Теперь из Single User Mode можно выходить. Команда для выхода: exit.
Apple Diagnostics
Если описанные выше способы вам не помогли, то проблема почти наверняка очень серьезная. А это значит, что пришло время воспользоваться Apple Diagnostics!
Это специальный тест для компьютеров Mac от компании-производителя. По его итогам вы получите код ошибки и сможете понять, что именно не так с вашим Mac.
Для запуска теста Apple Diagnostics:
1. Выключите ваш Mac;
2. Отключите от него все подключенные устройства, за исключение клавиатуры, мышки, монитора, Ethernet-кабеля (если есть) и кабеля питания. Иными словами, отключите флешки, внешние жесткие диски, принтеры, сканеры и т.п.
4. Сразу же после стартового сигнала нажмите и удерживайте на клавиатуре D.
5. Выберите свой язык
Как уже упоминалось выше, после прохождения теста вы получите в свое распоряжение код ошибки. Расшифровка кодов:
- ADP001: Ошибок не найдено.
- NDD001: Проблема с USB-устройствами. Убедитесь, что вся ненужная USB-техника отключена;
- NNN001: Не найден серийный номер. Вы пользуетесь Hackintosh? За вами уже выехали! (шутка);
- PFR001: Проблема с программным обеспечением;
- PPM001-015: Проблема с памятью компьютера;
- PPR001: Проблема с процессором;
- PPT001: Аккумулятор не найден;
- VFD006: Проблема с видеокартой;
- VFF001: Проблема со звуковой картой.
Как видим, проблемы делятся на две категории — те, которые легко устранит и рядовой пользователь (например, ошибки, связанные с USB), и те, с которыми надо сразу идти в сервис (к примеру, неполадки с видео- и аудиокартами, процессором, памятью и т.д.).
Восстановление файлов с поврежденного диска
Повреждение жесткого диска среди прочего означает и возможную потерю данных (или их части). Для того, чтобы избежать этого, попробуйте создать образ «сломавшегося» диска. Для этого потребуется внешний жесткий диск как минимум того же объема.
1. Подключите его к Mac, перезагрузите компьютер,
2. Войдите в Recovery Mode (⌘Cmd + R),
3. Запустите Дисковую утилиту,
4. В строке меню вверху выберите Файл → Новый образ → Образ «Macintosh HD» и запустите процесс. На создание образа уйдет какое-то время, но в конце вы получите копию старого диска в формате DMG и сможете его смонтировать уже в новой системе.
Если же создание образа по каким-то причинам не получится, файлы можно скопировать и вручную. Для этого вернитесь в режим восстановления (⌘Cmd + R) и запустите приложение Терминал. Для запуска копирования ваших файлов на внешний носитель используйте команду cp -r. Пример:
cp -r /Volumes/Macintosh HD/Users/[username]/Documents/Volumes/Backup/
Не забудьте сменить [username] на свое имя пользователя в системе.
Давайте разберем команду: cp — это команда на копирование, —r означает, что эта команда выполняется рекурсивно, т.е. сначала копируются директории внутри указанной вами директории, а затем директории, которые входят в их состав, и так далее.
Первый путь — это указание на местонахождение файлов, которые вы хотите скопировать. Второй путь указывает местоположение внешнего накопителя, он всегда будет в /Volumes/, какое бы название вы ему ни дали.
Единственная сложность этого способа — вы должны вспомнить, где именно находились ваши файлы, и соответствующим образом прописать путь. Также вам остается только надеяться на то, что файлы не находятся на поврежденной части диска.
Когда копирование данных будет завершено, вы можете с чистой совестью отдать Mac в ремонт или переустановить macOS.
… Именно в такие моменты люди начинают понимать важность резервного копирования данных. И действительно — при настроенном копировании Time Machine проблемы с потерей данных не страшны. Настройте копирование данных прямо сейчас — и сэкономьте себе много времени, нервов и денег в будущем!
Источник
Как я могу восстановить диск, который Дисковая утилита не может восстановить?
У меня есть внешний жесткий диск с одним разделом Mac OS Extended. Этот диск перестал работать пару дней назад. Я попытался восстановить раздел с помощью утилиты диска, но не повезло. Сообщение об ошибке следующее:
Ошибка: Дисковая утилита не может восстановить этот диск. Создайте резервные копии максимально возможного количества файлов, отформатируйте диск и восстановите резервные копии файлов.
Любые идеи или инструменты, которые я могу попытаться восстановить мой диск?
Существует возможность исправить это с помощью командной строки (в терминале) с помощью утилиты терминала, как описано в документации по поддержке Apple , показанной ниже:
Используйте командную строку и fsck_hfs -l команду.
Загрузите компьютер и войдите в систему как администратор.
Откройте Терминал (/ Приложения / Утилиты).
В командной строке введите следующую команду и нажмите клавишу «Return», чтобы определить свой идентификатор файловой системы:
Посмотрите на некоторые строки текста, которые выглядят так:
Запишите имя «диска» внешнего диска, которое появляется после / dev /, например, «/ dev / disk0s3». Это идентификатор вашей файловой системы для вашего внешнего тома.
В командной строке введите следующую команду и нажмите клавишу «Return»:
Затем введите следующую команду, где «disk1» — это идентификатор вашей файловой системы, который вы отметили на шаге 4, затем нажмите «Return»:
При появлении запроса введите пароль администратора, затем нажмите «Return», чтобы начать проверку.
Вы должны увидеть такие сообщения во время проверки диска:
Когда вы подключаете поврежденный диск Apple_HFS к Mavericks / Yosemite, он запускается fsck_hfs самостоятельно.
Вы можете увидеть вывод (в терминале):
Подождите, пока он закончится, прежде чем приступать к ремонту самостоятельно.
Также ремонт должен быть запущен повторно, чтобы исправить некоторые ошибки. Недавно мне нужно было запустить его 7 раз, но в итоге он успешно восстановил диск. Вы можете использовать либо fsck_hfs Дисковую утилиту, либо.
Одна из попыток, которая, возможно, является крайней, состоит в том, чтобы поместить диск в несколько слоев морозильных пакетов и охладить его в морозильной камере , а затем попытаться установить его и скопировать все данные, которые вы можете, до тех пор, пока он снова не выйдет из строя, а затем повторите этот процесс. Это абсурдно, но это сработало для меня, и есть много необоснованных свидетельств того, что это может помочь восстановить данные, независимо от мифологических рассылок, которые начали появляться в Интернете, как только идея была подхвачена крупными новостными выпусками технологий.
Мне повезло с fsck командной строкой, использующей слегка отличающиеся опции сверху.
Используется df -hl для определения пути к дисковому устройству, как указано выше (в моем случае мой первый внешний USB-накопитель /dev/disk1s1 )
Опция -r перестраивает B-дерево каталога. Не уверен, почему дисковая утилита не делает это автоматически. Опция -d показывает дополнительную информацию об отладке. Подробности смотрите в разделе Восстановление диска из однопользовательского режима (сбой fsck) и справочная страница fsck_hfs .
Вам может не понадобиться восстанавливать диск!
Это внешний диск, которым вы делитесь между Mac и ПК с Windows? У меня была эта проблема несколько раз с отформатированным диском FAT32. Если вы не размонтируете свой диск должным образом при удалении его с ПК с Windows, весь том будет помечен как «занят», и вам будет предложено восстановить том, если вы посмотрите на него в Дисковой утилите Apple. Однако Дисковая утилита не сможет восстановить том и сообщит:
Не удается открыть (Ресурс занят).
Код завершения проверки файловой системы — 8.
Исправить это просто, просто подключите этот диск обратно к ПК с Windows и размонтируйте его правильно, прежде чем подключать к компьютеру Mac.
Отключение USB-накопителя не редкость, просто выдернув кабель, и обычно это не вызывает никаких проблем, и целостность проверяется, когда вы подключаете его снова. В идеале, компьютеры Mac распознают эту распространенную проблему и обходят ее, но кажется, что они только доверяют Microsoft, чтобы проверить, что файловая система в порядке.
У меня была эта проблема с внешним диском в ExFAT, ничего не получалось. Я только собирался использовать программное обеспечение для восстановления, но загрузился в Windows, Windows прочитала это хорошо. Загрузился обратно в OS X и теперь все так, как должно быть. Weird.
Честно говоря, Apple довольно консервативна в отношении сообщений об ошибках. Иногда (некоторые люди скажут) по вине. Поэтому, когда они указывают на такую проблему, как эта. Это МОЖЕТ быть исправлено с помощью сторонней программы, но, честно говоря, первое, что вы должны сделать, это сделать резервную копию ваших данных. Поскольку вполне вероятно, что даже если диск не является тостом, существует явная вероятность потери данных.
В редких случаях загрузка с внешнего носителя или раздела для восстановления (COMMAND-R) и запуска Дисковой утилиты с его помощью может привести к ее восстановлению. Стоит попробовать, так как это будет стоить вам немного времени.
Лично я использую DiskWarrior и восстановил диски, которые Дисковая утилита не может коснуться, включая это точное сообщение об ошибке. Нет гарантии, что это сработает, но дешевле, чем новый HD.
Если у вас нет другого коммерческого программного обеспечения, это то, что вам нужно. И держите его в курсе и на загрузочном носителе, который работает на всех ваших текущих Mac. Я делаю.
У меня была похожая проблема с моим внешним Toshiba HD — мой macbook не распознавал HD, пока не отключил его, а затем запросил пароль (который не применялся в течение нескольких месяцев). Я испробовал все возможности предыдущего пароля, получил то же сообщение об ошибке в утилите диска при попытке восстановить HD и, наконец, смог исправить эту ошибку, используя бесплатное обновление ОС до Yosemite. Надеюсь, это поможет!!
Сначала необходимо определить, связана ли проблема с дисковым оборудованием или файловой системой. Чтобы узнать, работает ли аппаратное обеспечение, вы можете использовать утилиту, которая будет оценивать данные SMART. Дисковая утилита Apple делает это в ограниченной форме, но она не так надежна, как специальный инструмент. Я использую SMART Utility — бесплатная пробная версия предоставит всю информацию, необходимую для одноразовой диагностики.
Если оборудование плохое, вы не должны пытаться восстановить файловую систему. Вы находитесь в ситуации восстановления данных.
Если в соответствии с программой SMART Utility диск исправен, попробуйте восстановить файловую систему с помощью Alsoft DiskWarrior . DiskWarrior разработан командой с глубоким знанием файловой системы HFS, и он способен решать проблемы, которые Дисковая утилита не может .
Если Дисковая утилита не может восстановить том, это означает, что ее структура каталогов повреждена до такой степени, что она больше не может найти все каталогизированные файлы.
Хотя теперь вы можете попробовать скопировать все файлы на другой диск, это может привести к большому количеству ошибок, а также, возможно, вы не получите все файлы, которые теоретически восстанавливаемы.
Поэтому я рекомендую вам использовать продукт Data Rescue для этого задания восстановления. Он сканирует весь диск (занимает некоторое время), ищет «потерянные фрагменты» каталога, стараясь изо всех сил восстановить как можно больше.
Если диск помечен как не подлежащий ремонту, вы не должны пытаться продолжать запись на него (на самом деле его следует делать доступным только для чтения, что, к сожалению, уже не так просто, как раньше), потому что любые дальнейшие записи может перезаписать действительные данные из-за поврежденного каталога.
Итак, достаньте достаточно большой второй диск и начните спасать. Не пытайтесь исправить этот объем, если вы не заботитесь о дополнительных потерях.
У меня был хороший опыт исправления томов (даже если дисковая утилита говорит, что не может это исправить) с помощью Diskwarrior и / или TechTool Pro . Оба они условно-бесплатны, могут быть бесплатные альтернативы, но у меня нет опыта работы с ними.
Короткая история: Используйте DiskWarrior
Мой компьютер вышел из строя и повредил файлы каталога на моем внешнем жестком диске. Так что он не будет монтироваться, но я мог видеть его в Дисковой утилите (хотя он не будет восстанавливать). Заплатил 120 долларов за дискваррианта, прошел через все, и это было хорошо. Дает вам предварительный просмотр, чтобы захватить файлы, прежде чем они войдут и исправят ошибку. Стоит денег.
Прочитайте где-нибудь о попытке нажать несколько раз, пока она не заработала. Прошло какое-то время, пока он не занял его, и я смог восстановить диск, создать его резервную копию и отформатировать.
Для меня Дисковая утилита на Snow Leopard работает над восстановлением разрешений для дисков, но не для Mavericks. Странный.
Источник
-
#1
I keep getting fail errors when I run disk utility on «data» (see attached screenshot).
File System verify or repair failed. : (-69845)
I’ve tried in normal mode, safe mode and recovery mode. Any clue how to fix this without wiping my operating system? Apple doesn’t seem to recognize this error and they’re kind of giving me a hard time about passing this error code onto the developers so that they can tell me what this code relates to. I’m running disk utility because when I ran it a few days ago, it solved some permissions issues that werent allowing me to open Adobe After Effects. Now when I open Adobe Acrobat DC and try to embed a document with a password, the password box wont pop open (on my desktop computer) but it will on my laptop so it makes me think theres lingering permissions issue on the desktop computer. So I’m trying to repair the permissions with no luck when it comes to the «data» column in disk utility. Any help would be appreciated.
When I couldnt get into After Effects, Adobe remoted in and tried for hours to fix it, and couldnt figure it out themselves. So I’m not confident they are gonna be able to fix this one. I would like to leave them out of this if possible, because they started doing all this wild stuff to my computer to experiment with it to fix the issue, like they tried wiping all my fonts. I dont want to involve them because they always resort to the most wild things that end up being a big setback for me.

-
#2
I’ve tried in normal mode, safe mode and recovery mode.
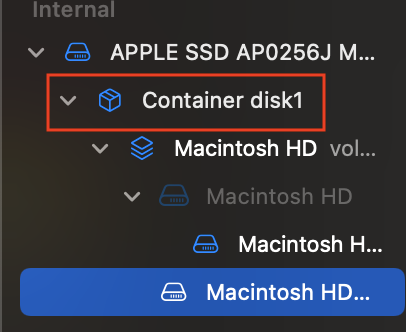
Have to ask: did you try repair in recovery on the full APFS container like suggested in the error message (ie. Disk Utility > View > Show All Devices)?
-

du.png
48 KB · Views: 117
-
#3
Have to ask: did you try repair in recovery on the full APFS container like suggested in the error message (ie. Disk Utility > View > Show All Devices)?
I dont remember if there was a container, but in recovery mode, i made sure to run «first aid» on all 3 instances where it listed «Macintosh» and data was the only one to fail.
-
#4
I dont remember if there was a container, but in recovery mode, i made sure to run «first aid» on all 3 instances where it listed «Macintosh» and data was the only one to fail.
If it’s formatted as APFS then there is definitely a container. Just click the View button in the toolbar and show everything. Then repair the container above.
-
#5
If it’s formatted as APFS then there is definitely a container. Just click the View button in the toolbar and show everything. Then repair the container above.
and if theres not a container? i’ve repaired everything above and gotten the green check mark. but data is still failing. and im still having this adobe acrobat issue.
-
#6
and if theres not a container? i’ve repaired everything above and gotten the green check mark. but data is still failing. and im still having this adobe acrobat issue.
As I said if it’s formatted as APFS then there IS a container. Have you pressed the View button and shown everything?
-
#7
As I said if it’s formatted as APFS then there IS a container. Have you pressed the View button and shown everything?
I’m in recovery mode , I clicked view mode, show only volumes, there is definitely no APFS
-
#8
I’m in recovery mode , I clicked view mode, show only volumes, there is definitely no APFS
You’re misunderstanding what we’re saying. If you click the View button in the toolbar and choose «SHOW ALL DEVICES» you will see a «Container» item in the left-hand side. Look in your first picture in this thread; your disk is formatted as APFS:
-
#9
As I said if it’s formatted as APFS then there IS a container. Have you pressed the View button and shown everything?
OK I’m running disc utility through recovery mode. I have highlighted the container. It’s scary that the bar shows red, i’ve never seen that before. Anyway I ran disk utility on the container and it gave me the green checkmark saying it passed. After it passed and I pressed OK, the word container is no longer there on the left side of the screen
-
#10
OK I’m running disc utility through recovery mode. I have highlighted the container. It’s scary that the bar shows red, i’ve never seen that before. Anyway I ran disk utility on the container and it gave me the green checkmark saying it passed. After it passed and I pressed OK, the word container is no longer there on the left side of the screen
But I think you solved it because this time when I ran disk utility on data after doing the container run, it didn’t fail this time
-
#11
Let’s hope this fixes your issue.
(I don’t know what you mean when you say «the bar shows red»? Also, the container will only show if you are showing all devices. It’s possible that you need to click the View button again and show them. Not sure why Disk Utility would change the view after performing a repair.)
-
#12
I love it when the internet is more knowledgeable then calling apple. When I called apple today they told me there were only really 2 options for fixing this issue. one of which was wiping my operating system. That seemed a little extreme to me. shows apple doesnt know what they’re talking about because the solution you posed wasnt extreme at all and solved the issue. thank you soooo much
-
#13
With APFS the OS is stored in the «Macintosh HD» volume — the one that’s immediately above «Macintosh HD — Data» (not the one at the top) and is greyed out.
Your user data (user accounts etc.) is stored in «Macintosh HD — Data».
The highest-level «Macintosh HD» item at the top has a container in it which contains «Macintosh HD» (the OS) and «Macintosh HD — Data» (your data).
When you boot into macOS your desktop shows just the one drive: «Macintosh HD». macOS intelligently keeps the OS separate from your user data so that if you need to reinstall the OS it only affects that particular part of the drive. It also means it’s more secure as apps shouldn’t be able to break your OS files.
It’s all a bit technical, and I doubt the first-line support you’d get on the phone to Apple would go into the detail required to get you working again. I would only ever use Apple Support as a last resort if I couldn’t fix my problem from forums like these.
Last edited: Apr 7, 2022
-
#14
I love it when the internet is more knowledgeable then calling apple. When I called apple today they told me there were only really 2 options for fixing this issue. one of which was wiping my operating system. That seemed a little extreme to me. shows apple doesnt know what they’re talking about because the solution you posed wasnt extreme at all and solved the issue. thank you soooo much
Correction Apple Support knows nothing. Apple’s Software Engineer and Hardware Engineers are where Apple’s smarts are.
Apple Support follows a script.
-
#15
With APFS the OS is stored in the «Macintosh HD» volume — the one that’s immediately above «Macintosh HD — Data» (not the one at the top) and is greyed out.
Your user data (user accounts etc.) is stored in «Macintosh HD — Data».
The highest-level «Macintosh HD» item at the top has a container in it which contains B and C.
When you boot into macOS your desktop shows just the one drive: «Macintosh HD». macOS intelligently keeps the OS separate from your user data so that if you need to reinstall the OS it only affects that particular part of the drive. It also means it’s more secure as apps shouldn’t be able to break your OS files.
It’s all a bit technical, and I doubt the first-line support you’d get on the phone to Apple would go into the detail required to get you working again. I would only ever use Apple Support as a last resort if I couldn’t fix my problem from forums like these.
What bothered me was, this was supposedly a «senior» technician on the phone with me. they should know more then the first script-reader that you get on the phone with apple.
-
#16
Fantastic!
I had the same errors on TWO m1’s. Appeared at the same time. Contacted Apple support they guided me through Disk Utils, shared my screen etc — all the stuff I had already done. I also formatted the disc and reinstalled, errors came back after a few days. Apple support said not to use time machine as it might be copying something over. So I formatted again and manually restored. Fine for a few days but the errors gradually came back.
Pulling my hair. out at this point. New mac studio with errors! Found this and ran disk utils on the container disk (Why apple support don’t know about this is ridiculous) fixed the disk!
If you experience these kind of errors it looks like they are on the snapshots but the problem is the disk itself. Use the magic view menu first and show your snapshots. Delete them and then check the disk in recovery mode. If you keep the snapshots then when you check the disk later the errors get shown in the snapshots even though the disk is fixed as the snap shots are of the unfixed disc. This could lead to confusion over whether the disc is fixed or not
-
#17
Not so fantastic. This error comes back. I am fixing the disk daily…. Looks like I will have to return the Studio unless anybody has any ideas?
-
#18
Does anybody know what exactly is an ‘error: doc-id tree: record exists for doc-id 8487, file-id 3279950 but no inode references this doc-id’?
Be good to know how serious this issue is
-
#19
I have the same exact issue with my M1 Max MacBook Pro. It is causing a ton of Finder errors, I can’t Airdrop anything at all, and the machine runs slower than my Intel MacBook on Lightroom, especially when running multiple displays. It can’t sidecar to my iPad any longer, it just hangs, and I get the spinning beach ball more and more. I’ve run all the first aid on every level of the disk there is and still come up with errors.
I am totally fine with resetting the system if needed, but I have a bad feeling that it will just continue. I did restore this machine from my old MacBook, could that be part of the issue?
-
#20
Have to ask: did you try repair in recovery on the full APFS container like suggested in the error message (ie. Disk Utility > View > Show All Devices)?
Can’t thank you enough. Got me to an exit code 0 after getting an exit code 8. Whew!
-
#21
I am still having to repair the disc at least once a week. My m1 laptop about once a month… With both having the same issue I can’t help but think it’s a software issue. Anybody reading this who has an M1 — check your discs. Be interesting to see if there is a common issue. If it keeps going I will have to get Apple to look at it. Maybe the new OS will sort it … Don’t seem to have side effects from the errors …
-
#22
Thanks a lot — I had the very same issue on M1 MacBook macOS Ventura.
Only DELETING the snapshots and then re-doing first aid would help and actually correct the errors.
I had to do this in Recory mode as one snapshot was showing as «resource busy». So I rebooted in to Recovery Mode, started Disk Utility, set «Show all devices» and «Show Snapshots» under «View» menu and then delete the snapshots both on the System disk level as well as on the Data partition.
Then re-do the First-Aid on Container disk level and data disk level. All with 0 errors.
-
#23
Thanks a lot — I had the very same issue on M1 MacBook macOS Ventura.
Only DELETING the snapshots and then re-doing first aid would help and actually correct the errors.I had to do this in Recory mode as one snapshot was showing as «resource busy». So I rebooted in to Recovery Mode, started Disk Utility, set «Show all devices» and «Show Snapshots» under «View» menu and then delete the snapshots both on the System disk level as well as on the Data partition.
Then re-do the First-Aid on Container disk level and data disk level. All with 0 errors.
so we need recovery mode first because of memory ( 8GB ) not enought right ? because i get disk utility is not responding , i use mbp m1
Apple MacBook is idiot-proof. I proved this myself.
The incident happened on my unlucky Friday morning, 29 January 2016, where there were some updates available for my six-year-old MacBook Pro. I was supposed to upgrade from OS X Yosemite 10.10.5 to the new OS X El Capitan 10.11.3.
I clicked “upgrade” from the App Store and waited for the laptop to restart. I walked away for some drinks and came back. Everything seemed normal until this point where my stupidity changed the course of the event. When I saw the laptop was shut down (it was actually in the process of rebooting), I pressed the start button to turn the laptop on.
That was when the trouble began. The MacBook Pro was not able to boot correctly. It stuck at the boot screen with (approximately) 50 % in progress forever. I waited 6 hours before I tried to reboot after reading from the internet that Apple MacBook is smart enough to resume the update or upgrade anywhere it left off. So I tried again in the evening (by pressing the start button twice, first long press to shut down, then to boot) and let the laptop booting for the whole night.
The next morning, it was still stuck at 50 % in the startup process (after more than 12 hours of booting). I realized that my situation was different from the others who had the “same” problem. Mine was definitely a different case where something was corrupted (I suspected) because I pressed the start button exactly when the laptop was about to restart.
Recovery Mode
I searched online and found some useful short-cuts to get into different modes while booting a MacBook.
Note: From my experience, in order to enter the different modes successfully, you need to press and hold the key combinations after the white backlight lights up on the screen and you can release them after you see the Apple logo appears during the startup process.
I tried Command-Option-P-R to reset NVRAM: It did reset the NVRAM because I observed that something restarted after I pressed those keys. However, the booting process still hung at 50 %.
I tried Shift ⇧ to enter Safe Mode: I was not able to enter safe mode at all even after waiting for a long time.
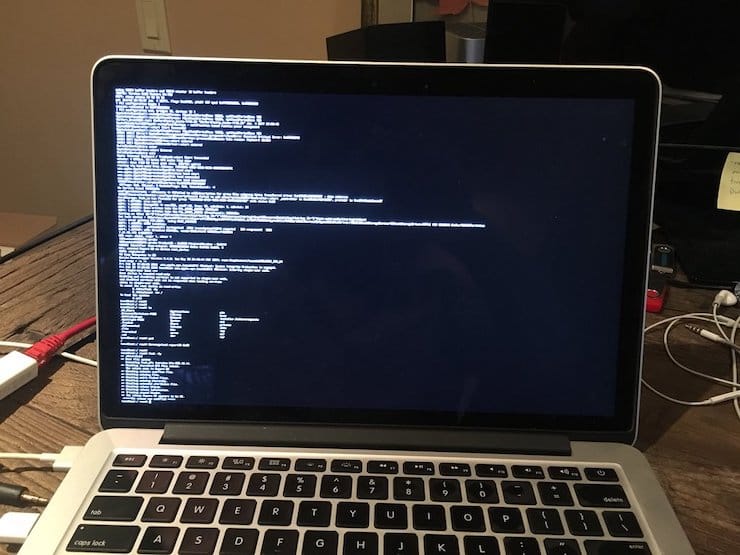
I tried Command-S to enter single-user mode: I could enter this mode (with a bunch of texts on the screen), however, it stuck at the place where it needed access to “Macintosh HD”. So I never successfully try anything in this mode.
I tried Command (⌘)-R to enter OS X Recovery mode: After successfully entered this mode, I was offered several options.
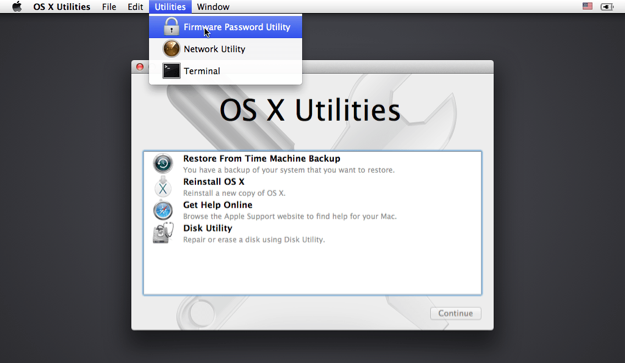
Mac Recovery Mode
In recovery mode, you have the following options:
- Restore From Time Machine Backup
- Reinstall OS X
- Get Help Online
- Disk Utility
The first option “Restore From Time Machine Backup” was not useful because I didn’t have any backups from Time Machine.
The last option “Disk Utility” was where I spent the most of my time trying to rescue my old laptop.
Disk Utility
From the Disk Utility interface, I saw that the “Macintosh HD” was greyed out.
I tried almost all the combinations I could think off with the options offered by the Disk Utility to rescue “Macintosh HD”. At first, I thought to myself I needed to perserve my existing data. After trying many different combinations of “solutions” (mount “Macintosh HD” disk, verify and repair “Macintosh HD” disk, restore “Macintosh HD” disk to external drive, etc). All failed.
At some point, I came across this interesting article which states that by keep on repairing the disk N times (with N large enough), it could work. But it didn’t work for me.
I even tried with bash script: “for ((c=0;c<25;c++)) do diskutil repairVolume /dev/disk0s2; done;»
Note: disk0s2 is the identifier for “Macintosh HD” drive. Run “diskutil list” on terminal to find out.
All the time I was getting:
“Error: -69845: File system verify or repair failed
Underlying error: 8: POSIX reports: Exec format error”
I was convinced that “Macintosh HD” was corrupted and dead.
Reinstall OS X
Since I was having no success trying to backup my data, I gave up doing it. The idea then was to reinstall OS X on “Macintosh HD” drive, hence potentially overwriting all my files. I was ready to erase and repartition “Macintosh HD”. This failed too. The disk was in really bad shape I thought to myself.
By consequence, the disk didn’t show up as an option when I tried to reinstall OS X. The whole day passed with no progress.
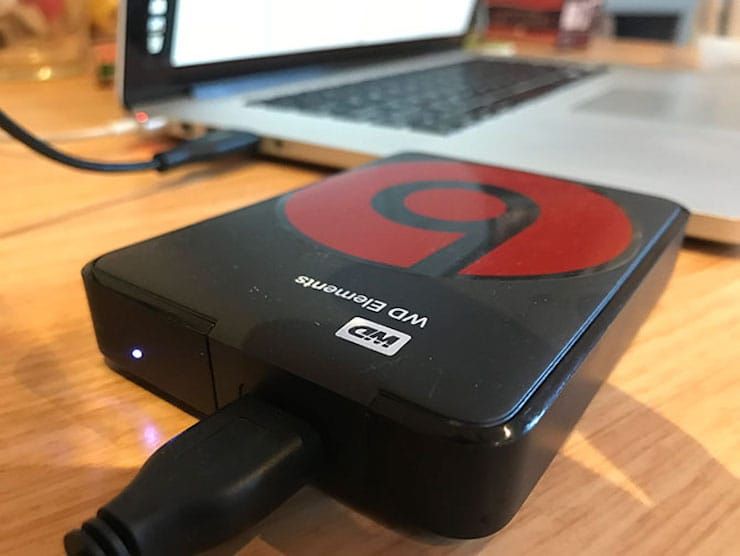
USB Drive to the rescue
The next day, I had no choice but to install the OS on external drive. I choose the cheapest option: USB drive (at least 15 GB of storage else OS X won’t install).
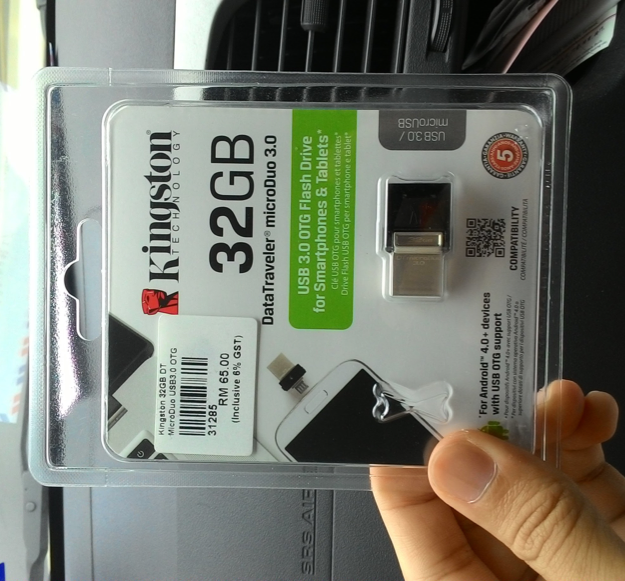
USB Drive 32 GB
It took at least 6 hours to download the OS and install to the USB drive. At first boot, everything was so slow. The runtime experience was really bad. But I notice one thing when I opened System Preference > Startup Disk, I saw the following:
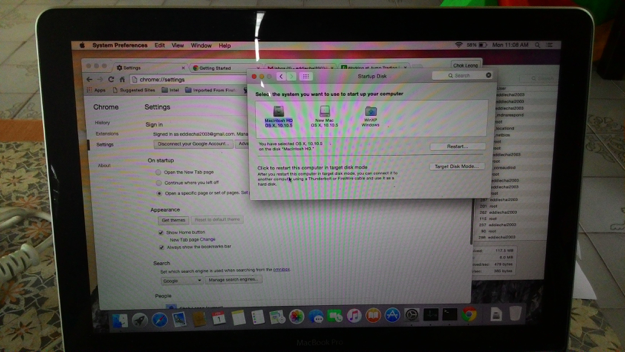
Macintosh HD is alive
I saw something unbelievable: the “Macintosh HD” that I thought was dead is now available as a start up disk. Sure enough, after I selected it as the startup disk and rebooted, everything is working as normal again! My data is not lost.
Unbelievable.
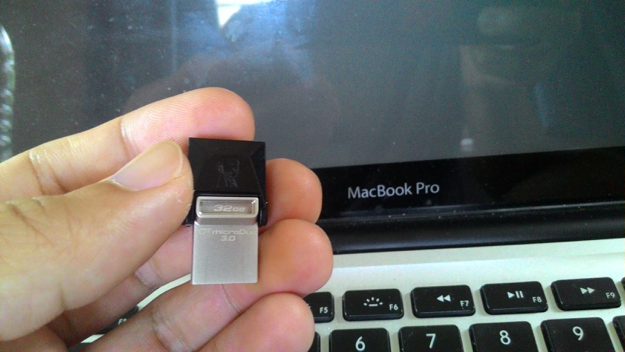
USB drive that saved my MacBook
Final thought
When Disk Utility can’t repair your disk, reinstall OS X on an external drive and see if your data is accessible again.